
Очень обидно, когда долго ждешь чего-то, а оно все откладывается. Особенно, если уже заплатил немалые деньги.
Мы очень хорошо понимаем и чувствуем это разочарование наших пользователей. И делаем максимум, чтобы решить проблему работы некоторых онлайн-сервисов Embarcadero в самые сжатые сроки. А пока…. сбой, произошедший вне нашей зоны ответственности, вывел из рабочего состояния сервера, необходимые для штатного режима скачивания дистрибутивов новых продуктов и их установки. На сегодня, сбоем затронуты сервера Code Central, Quality Portal, Support и GetIt.
Несмотря на то, что мы рассчитываем на решение этой проблемы в течение кратчайшего времени, наши инженеры предоставили временный канал получения дистрибутива и дополнительных пакетов GetIt.
Полный дистрибутив RAD Studio 10.3.2 (в виде ISO образа DVD) временно находится здесь:
http://altd.embarcadero.com/download/radstudio/10.3/delphicbuilder10_3_2_496593b.iso
Этот оффлайн-установщик может быть использован для установки любого продукта из состава RAD Studio и любой редакции, включая Trial, Professional, Enterprise или Architect. Однако, он не годится для установки редакции Community Edition.
Последовательность действий по обновлению предыдущего релиза версии 10.3:
- Запустите отдельную программу Migration Tool, выберите режим сохранения текущих настроек релиза 10.3.x из регистри в файл на жестком диске (укажите имя и расположение этого файла)
http://docwiki.embarcadero.com/RADStudio/Rio/en/Settings_Migration_Tool - Деинсталлируйте текущую версию RAD Studio / Delphi /C++Builder из обычной контрольной панели Windows. Это особенно важно, если ваша текущая версия была установлена из online-инсталлятора
- Смонтируйте образ ISO дистрибутива 10.3.2 и запустите Setup.exe
- Запустите еще раз Migration Tool и восстановите настройки из файла, куда вы их записали на первом шаге
http://docwiki.embarcadero.com/RADStudio/Rio/en/Restoring_Settings_from_Backup - Новым пользователям или при установке пробной версии Trial может потребоваться создать новую учетную запись EDN. Это делается на сайте https://members.embarcadero.com обычным образом
Для установки расширений и дополнительных пакетов 10.3.2 через менеджер пакетов GetIt после установки необходимо перенастроить IDE для работы с временным сервисом GetIt. Необходимо указать адрес доступа к временному серверу GetIt https://getit-1032.embarcadero.com в паре ключей системного регистри Windows. Как это сделать подробно написано в блоге Sarina DuPont — продукт менеджера RAD Studio. https://community.idera.com/developer-tools/b/blog/posts/temporary-10-3-2-getit-server-for-installing-10-3-2-add-on-packages
После этого вы сможете пользоваться меню Tools > GetIt Package Manager как обычно, и вам будут доступны для установки:
- RAD Server installers для Linux и Windows
- FMX Linux
- примеры
- Boost Library
- FMX и VCL Styles
- Konopka Controls
- Radiant Shapes
- IP*Works
- FastReport VCL
- некоторые другие third party components

Содержание
- ИТ-записки Чорнага кашака
- 30 мая 2020
- Ошибка установки патча RAD Studio 10.4 через GetIt Package Manager
- Временное решение проблемы с загрузкой и установкой RAD Studio 10.3.2
- RAD Studio Installer FAQ
- RAD Studio Installer FAQ
- Is it possible to do an unattended installation?
- What do I do if there is a «sources not found» error during install?
- Why does the installer leave a bunch of files in Documents and SettingsAll UsersApplication Data?
- How do I upgrade my installation?
- Where do I find my serial number?
- I am an Electronic Software Delivery customer. I want to backup my install when it is downloaded so I don’t have to download it again. How do I do that?
- Once I have stored off the downloaded files, how can I use them to install again?
- I bought Delphi 2007 and want to install C++Builder 2007. How does this impact Delphi 2007?
- I want to install updates, but do not have access to the web. What can I do?
- I have Delphi 2007 Professional Installed, and want to use the C++Builder 2007 Trial. Can I?
- I have Delphi 2007 Trial Installed and want to install C++Builder Enterprise. What happens?
- Marco Tech Blog
- Enabling GetIt Install Logs for RAD Studio Installation
- Installation
- Contents
- Installing RAD Studio
- Before You Install RAD Studio
- Choosing an Installer
- Running the Chosen Installer
- After You Install RAD Studio
- Importing Settings from Previous Version
- Installing the New Platform Assistant
- Updating Template Files
- Adding or Removing Features After the Installation
- Removing RAD Studio
- Removing RAD Studio Instances that Use Network Licenses
- Removing Configuration Files
- Upgrading RAD Studio Sydney
ИТ-записки Чорнага кашака
Язык программирования самого высокого уровня содержит всего несколько команд для управления программистами
30 мая 2020
Ошибка установки патча RAD Studio 10.4 через GetIt Package Manager
RAD Studio 10.4 получила новую улучшенную версию менеджера установки дополнительных пакетов GetIt Package Manager. Одна из его новых функций – это возможность установки патчей. В день релиза RAD Studio 10.4 Sydney компания Embarcadero предоставила своим пользователям возможность протестировать работу этого механизма выпустив первое обновление RAD Studio 10.4 Sydney, в которое включила файлы, которые разработчики забыли положить в инсталлятор. Многие пользователи, которые воспользовались механизмом установки обновлений RAD Studio через GetIt Package Manager, столкнулись с ошибкой на подобии этой:
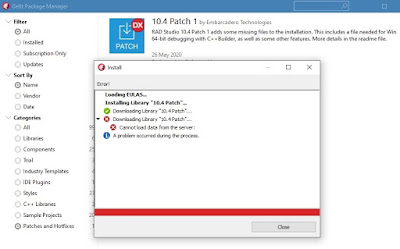
Оказалось, что это не баг в GetIt Package Manager. Подобные ошибки возникли у пользователей, которые установили RAD Studio 10.4 Sydney используя offline-инсталлятор с ISO-образа. В «RAD Studio 10.4 Sydney Release Notes» есть абзац, который объясняет причину ошибки. Оказывается, что если вы воспользовались новым offline-инсталлятором RAD Studio, то не сможете получить доступ через GetIt Package Manager пока не переключите его в «online-режим». Но подобной настройки в GetIt Package Manager вы не найдете. Это можно сделать только с помощью консольной утилиты GetItCmd.exe, запустив ее с параметром «-c=useonline» или «—config=useonline»:
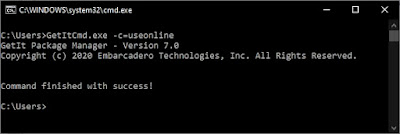
После ее выполнения вы можете использовать GetIt Package Manager для установки обновлений RAD Studio:

У меня сложилось впечатление, что выполнение «GetItCmd.exe -c=useonline» просто меняет в реестре значение ключа
с «Offline» на «Online».
Я не понимаю, что помешало разработчикам добавить смену этого параметра прямо в GetIt Package Manager? Для пользователей так было бы проще и понятнее, и, что самое важное, это позволило бы избежать лишних вопросов.
Источник
Временное решение проблемы с загрузкой и установкой RAD Studio 10.3.2


Очень обидно, когда долго ждешь чего-то, а оно все откладывается. Особенно, если уже заплатил немалые деньги.
Мы очень хорошо понимаем и чувствуем это разочарование наших пользователей. И делаем максимум, чтобы решить проблему работы некоторых онлайн-сервисов Embarcadero в самые сжатые сроки. А пока…. сбой, произошедший вне нашей зоны ответственности, вывел из рабочего состояния сервера, необходимые для штатного режима скачивания дистрибутивов новых продуктов и их установки. На сегодня, сбоем затронуты сервера Code Central, Quality Portal, Support и GetIt.
Несмотря на то, что мы рассчитываем на решение этой проблемы в течение кратчайшего времени, наши инженеры предоставили временный канал получения дистрибутива и дополнительных пакетов GetIt.
Полный дистрибутив RAD Studio 10.3.2 (в виде ISO образа DVD) временно находится здесь:
Этот оффлайн-установщик может быть использован для установки любого продукта из состава RAD Studio и любой редакции, включая Trial, Professional, Enterprise или Architect. Однако, он не годится для установки редакции Community Edition.
Последовательность действий по обновлению предыдущего релиза версии 10.3:
- Запустите отдельную программу Migration Tool, выберите режим сохранения текущих настроек релиза 10.3.x из регистри в файл на жестком диске (укажите имя и расположение этого файла)
http://docwiki.embarcadero.com/RADStudio/Rio/en/Settings_Migration_Tool - Деинсталлируйте текущую версию RAD Studio / Delphi /C++Builder из обычной контрольной панели Windows. Это особенно важно, если ваша текущая версия была установлена из online-инсталлятора
- Смонтируйте образ ISO дистрибутива 10.3.2 и запустите Setup.exe
- Запустите еще раз Migration Tool и восстановите настройки из файла, куда вы их записали на первом шаге
http://docwiki.embarcadero.com/RADStudio/Rio/en/Restoring_Settings_from_Backup - Новым пользователям или при установке пробной версии Trial может потребоваться создать новую учетную запись EDN. Это делается на сайте https://members.embarcadero.com обычным образом
Для установки расширений и дополнительных пакетов 10.3.2 через менеджер пакетов GetIt после установки необходимо перенастроить IDE для работы с временным сервисом GetIt. Необходимо указать адрес доступа к временному серверу GetIt https://getit-1032.embarcadero.com в паре ключей системного регистри Windows. Как это сделать подробно написано в блоге Sarina DuPont — продукт менеджера RAD Studio. https://community.idera.com/developer-tools/b/blog/posts/temporary-10-3-2-getit-server-for-installing-10-3-2-add-on-packages
После этого вы сможете пользоваться меню Tools > GetIt Package Manager как обычно, и вам будут доступны для установки:
- RAD Server installers для Linux и Windows
- FMX Linux
- примеры
- Boost Library
- FMX и VCL Styles
- Konopka Controls
- Radiant Shapes
- IP*Works
- FastReport VCL
- некоторые другие third party components
Reduce development time and get to market faster with RAD Studio, Delphi, or C++Builder.
Design. Code. Compile. Deploy.
Start Free Trial Upgrade Today
Источник
RAD Studio Installer FAQ
Written by Embarcadero USA on Tuesday, 5 June 2007 Posted in PROGRAMMING
RAD Studio Installer FAQ
Is it possible to do an unattended installation?
You can use the silent install mechanism to do an unattended installation:
The install will execute silently without a user interface and without user intervention. When user input is required in a dialog, the default values will be used.
For example, to silently install C++Builder 2007 in German into the path «D:Program FilesCodeGearRAD Studio5.0» while creating a logfile into %TEMP%install.log use the following command line:
To silently uninstall while creating a logfile into %TEMP%uninstall.log , use the following command line:
What do I do if there is a «sources not found» error during install?
If you are having trouble installing Delphi 2007 Update 2 because your cache is not present, see Solution Report for the RAD Studio Update 2 “Sources Not Found” Error.
Why does the installer leave a bunch of files in Documents and SettingsAll UsersApplication Data?
This is data that the installer uses to remember information about your existing install for times when you want to upgrade, modify, or repair your install. If these files are not present, then you would have to have a DVD or do another download to properly repair, modify or upgrade your product.
How do I upgrade my installation?
You can select the Start|CodeGear RAD Studio|Check for New Updates. This will query our server and see if there is an update available. You can also tell the IDE to check for new updates each time the IDE starts.
See the special information regarding Update 3 for Delphi 2007 for Win32 and C++ Builder 2007 at Important RAD Studio Update Information before doing that update.
Where do I find my serial number?
The location of your serial number depends on how your CodeGear product was delivered.
- Physical products — your serial number will be on a License Certificate Card in the box or attached to the inside of the DVD case
- Electronic delivery — your serial number will be in your order confirmation email
- Networked licenses — your company receives a license file and instruction on how to use that file in place of serial numbers
- Trial license — the serial number is sent by email
You see which products you have registered on your computer by running the License Manager, usually available as a shortcut from the Start menu in the group with your CodeGear product. Delphi/C++Builder/RAD Studio 2007 and later use a different license manager than older versions so the license manager may not show all licenses.
You can see all the CodeGear products you have registered by going to http://members.codegear.com, logging in, and clicking the «My Registered Products» button.
You can also see which CodeGear Serial Numbers have been registered by looking in the cglm.ini file. This file is in the bin directory where you installed the RAD Studio product. By default this is installed to C:Program FilesCodeGearRAD Studio5.0bin .
I am an Electronic Software Delivery customer. I want to backup my install when it is downloaded so I don’t have to download it again. How do I do that?
With the new installer that is part of C++Builder and Delphi 2007 Update 1, the installer will ask you specifically where you want to store these files for later use. You can place them anywhere on your computer or network that you like.
Once I have stored off the downloaded files, how can I use them to install again?
You can simply place the SETUP.EXE file in the same directory as the archived files and run it from there.
I bought Delphi 2007 and want to install C++Builder 2007. How does this impact Delphi 2007?
Using the setup.exe for C++Builder 2007 will allow you to register additional serial numbers for additional RAD Studio personalties or products. Select the Upgrade option to add a new key. Then you will be prompted for what personalities to install, and what features of these personalities.
Note that A Trial of any personality will be disabled once a retail key is registered. This will not affect the retail product.
Example: Delphi 2007 Professional adding C++Builder 2007 Professional:
- Run setup.exe for C++Builder 2007 Professional
- Select Upgrade option
- Enter your serial number for C++Builder 2007
- Select both personalities
- Select features you want installed
- Complete the install
- Start the IDE
- Register your Serial Number for C++Builder 2007 Professional
- End result : Both Delphi 2007 and C++Builder 2007 Professional
I want to install updates, but do not have access to the web. What can I do?
A separate download pack will be made available on the registered users site. Please visit the registered users site for more information and review the documentation present there for latest updates and changes.
I have Delphi 2007 Professional Installed, and want to use the C++Builder 2007 Trial. Can I?
No, you cannot use the C++Builder Trial with the Delphi 2007 Enterprise or Professional installed as they share many similar files. The personality associated with the trial will not have the files installed.
I have Delphi 2007 Trial Installed and want to install C++Builder Enterprise. What happens?
The D2007 Trial will be uninstalled, and C++Builder Enterprise will be installed.
Article originally contributed by Dee Elling
Источник
Marco Tech Blog 

Enabling GetIt Install Logs for RAD Studio Installation
At times, RAD Studio GetIt-based web installer stops with some fairly vague error message. Here are some steps you can use to enable the creation of a log file with more information, which can be attached to Quality Portal reports.
At times, RAD Studio GetIt-based web installer stops with some fairly vague error message. These can be due to connectivity issues, odd file system configurations, lack of disk space, an existing partial install, and other causes. But some of the error messages like «operation error» don’t explain the cause of the problem. For the future, we are making sure to surface more specific errors, like «Could not create folder xyz», «Could not copy file foo.dcu to folder bar», or similar.
For the time being, and in general as a way to better report errors on Quality Portal, there is an undocumented registry setting you can use to enable the generation of a log file with the installer progress (notice, the same log file is used only for installation and manage platform dialog, not when you are installing regular, additional GetIt packages).
After you have started the installation (up to the point of a failure or after a successfull operation) — the configuration setting is read when you restart the process — you can open the RegEdit Windows tool and navigate to a key like:
where xx.0 is the internal version of RAD Studio, like 19.0 for the most recent version. Under that key add a DWORD value with the name «Debug» and the value 1.
As you restart an installation or restart the IDe to add new features, the system should create a detailed log file at a location like:
This helps getting more detailed information in case of error, but also have a full log of a successful installation. The same log file is used over time with more data added to the end. When you are calling support or reporting installer issues, adding this log file can help us identify the core issue.
Источник
Installation
This topic describes how to install, upgrade or remove RAD Studio.
Contents
Installing RAD Studio
Before You Install RAD Studio
The Installation Notes page describes the RAD Studio system requirements and other information that you must know before you decide to install RAD Studio.
You can install RAD Studio Sydney on a system where previous versions of RAD Studio are installed. Note, however, that each version of RAD Studio extends your PATH environment variable, which cannot be longer than 1830 characters before you install RAD Studio Sydney.
Choosing an Installer
To install RAD Studio, you can either use the Installer or use the Offline Installer.
The Installer is the best choice for most use cases, as it provides:
- A much lower installation time, as well as a much lower time to modify installed features after the initial installation.
- A higher flexibility to choose features:
- You can choose specific combinations of target platforms and programming languages, instead of choosing programming languages and target platforms separately.
- You can remove support for any programming language after the installation.
- A much lower installer size: 0.2 GB. Anything else is downloaded on demand based on the features that you choose to install. Also, you do not need to keep the Installer around after the initial installation, you can use the IDE to modify installed features.
- A better user experience. The installation steps are more straightforward.
- The machine where you want to install RAD Studio does not have a working internet connection.
- The drive where you want to install RAD Studio does not have enough space if cache files are installed on the same drive. The Offline Installer allows you to customize the temporary storage folder.
set BDS=C:Program Files (x86)EmbarcaderoStudio21.0
%BDS%binrsvars.bat command file.
Running the Chosen Installer
If you chose the Installer, follow the instructions in Using the Installer.
If you chose the Offline Installer, follow the instructions in Using the Offline Installer.
After You Install RAD Studio
The following sections describe some steps that you may need to take after you install RAD Studio Sydney.
Importing Settings from Previous Version
If you have a previous version of RAD Studio installed in your system, use the Settings Migration Tool to migrate your old settings to your RAD Studio Sydney installation.
Installing the New Platform Assistant
If you plan to deploy applications for macOS or iOS, or if you plan to deploy applications for 64-bit Windows using a remote system, you must install on your Mac or on your remote 64-bit Windows system the Platform Assistant provided with RAD Studio Sydney. You cannot reuse the Platform Assistant from a previous version of RAD Studio.
Updating Template Files
Projects for macOS, iOS, or Android include template files that allow you to customize certain aspects of your application for those platforms. When you migrate a project from a previous version of RAD Studio to RAD Studio Sydney, you must:
- Create a backup of any customized template file, so that you can check your custom changes later.
- Remove all template files from your project folder.
- Build (Android) or deploy (macOS, iOS) your application for each target platform so that RAD Studio Sydney automatically generates an up-to-date version of each template file.
- Edit the new template files to apply your custom changes, if any.
For more information, see:
Adding or Removing Features After the Installation
During the installation of RAD Studio, you can enable or disable several features: support for programming languages, support for target platforms, language packs, and so on. You can add or remove any of these features after the installation.
If you installed RAD Studio using the Installer, follow the instructions in Adding or Removing Features Using the Feature Manager.
If you installed RAD Studio using the Offline Installer, follow the instructions in Adding or Removing Features Using the Offline Installer.
Removing RAD Studio
The user with Administrator privileges who initially installed RAD Studio can remove RAD Studio following the steps described in Repair or remove programs in Windows 10.
Removing RAD Studio Instances that Use Network Licenses
After you remove RAD Studio, each user who is not the Administrator must remove user-specific data from the Windows registry:
- Log in to the user account.
- Make a backup of the registry.
- Launch Regedit or another registry editing tool.
- Delete the following registry key: HKEY_CURRENT_USERSoftwareEmbarcaderoBDS21.0
Removing Configuration Files
After you remove RAD Studio, user-specific data such as default project settings might remain in configuration files. You should manually remove these folders:
- All UsersApplication DataEmbarcaderoBDS21.0
- All UsersShared DocumentsEmbarcaderoBDS21.0
Upgrading RAD Studio Sydney
To replace RAD Studio Sydney with a better edition or an update of RAD Studio Sydney, you must remove RAD Studio Sydney from your system and install your upgraded edition or update of RAD Studio Sydney.
Источник
Install Error Messages
On this page, we have bundled the most frequently encountered issues with installing 3rd party components in general in Delphi or C++Builder. This applies to TMS components as well as to any 3rd party VCL component. The issues typically originate from an incorrect IDE setup. We hope this will be valuable information to quickly trace & solve the most common issues & mistakes with installing components.
General error messages
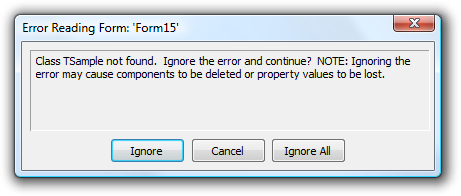
1. Error: Class…not found (when opening a project)
Please make sure ALL packages that are used for the component for which the error appears are installed & active. See menu Component, Install Packages in the IDE.
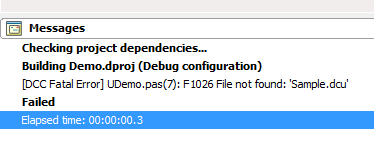
2. Error: File not found xxxx.dcu
Please make sure to set your Delphi library path correct that it includes the folder
where these DCU files are located. The library path can be configured under menu Tools, Options, Library — Win32
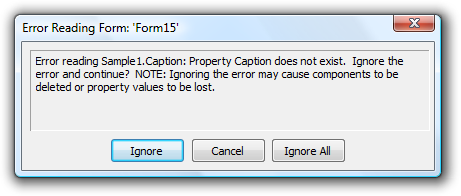
3. Error: Property … does not exist
Before installing component updates, make sure that ALL old version files (DCU, BPL, BPI, LIB, DCP, HPP, OBJ .. files) are removed from your Delphi or C++Builder library path. After installing new component versions and compiling applications that have been build with previous component versions, property errors can be raised upon running the applications. This is a common Delphi or C++Builder phenomenon. Solve this by first opening ALL forms in the application that use the updated component, ignore ALL property errors upon opening the forms, save the form files and after this, rebuild the application. The problem will be solved.
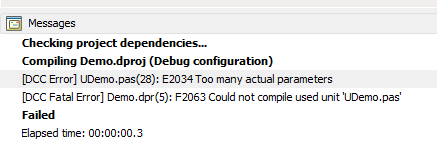
4. Error: Could not compile used unit ‘xxxx.pas’
Before installing component updates, make sure that ALL old version files (DCU, BPL, BPI, LIB, DCP, HPP, OBJ .. files) are removed from your Delphi or C++Builder library path.
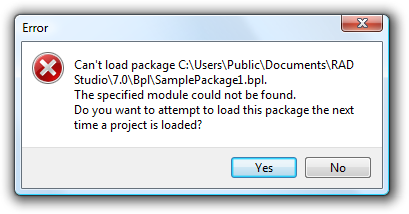
5. Error: Can’t load package … .bpl
Add the folder where the package .BPL files are located to your system path.
See Control Panel, System, Advanced Settings, Environment for editing the system path.
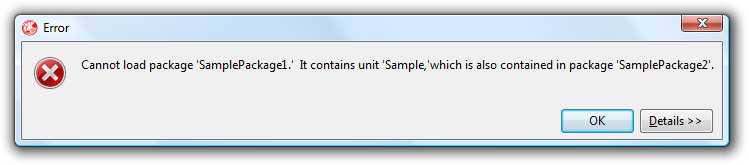
6. Error: Cannot load package ‘x’. It contains unit ‘y’, which is also contained in package ‘z’.
In Delphi & C++Builder, a unit can be used in one package only. This error happens when you try to install two or more packages that use the same unit.
To solve this, remove the unit(s) that is/are used in multiple packages from the package files (choose Remove from Project Manager). Then, from the IDE create a new package and add the unit(s) to this new package and compile this package. Then, in the packages where the unit was used, add a reference in the Requires list of the package to this new compiled package (.DCP file in Delphi / .BPI file in C++Builder) that contains the unit(s).
More information about installing TMS Components with shared units can also be found here:
https://www.tmssoftware.com/site/instcommon.asp
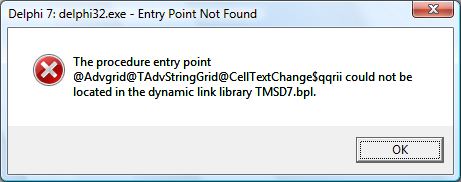
7. Error: procedure entry point could not be found
When errors are raised upon running the applications such as «procedure @… or the procedure entry point @… could not be located», make sure to scan your hard disk for ALL old versions of package .BPL, package .DCP (package .LIB in C++Builder) files and delete ALL old versions. This error can appear when a project is built with a different version .DCP or .LIB file than the version that is loaded at runtime.
8. Error: Ambiguity between ‘xxxx’ and ‘unit::xxxx
In Delphi or C++Builder, constants with the same name but declared in different units can be used simultaneously. For example, the constant psOffice2003Blue is declared in both AdvPanel.pas & AdvOfficePagerStylers.pas. To use these constants in an application that uses both units, prefix the constant with its namespace, ie:
For a TAdvPanel style, use AdvPanel.psOffice2003Blue and for a TAdvOfficePager style use AdvOfficePagerStylers.psOffice2003Blue
9. Error: Activation file has been created ….TMSPCKLIC.act. Please exit setup and activate your software
When errors are raised upon entering your registration email and code in the setup.exe such as «Activation file has been created ….TMSPCKLIC.act Please exit setup and activate your software», make sure that an internet connection is available on your machine and that no firewall or antivirus software is blocking internet access for SETUP.EXE.
When this issue ensured, delete the .ACT file and restart the SETUP.
10. Error: [DCC Fatal Error] advgrid.pas(488): F1026 File not found: «Windows.dcu»
When errors are raised upon installing the package tmsDXE2.bpl such as: [DCC Fatal Error] advgrid.pas(488): F1026 File not found: «Windows.dcu»,
make sure that your unit scope names are setup correct in your IDE, project & packages. See: http://docwiki.embarcadero.com/RADStudio/en/Unit_Scope_Names
For VCL UI Pack, unit scope names should be:
Data.Win;Datasnap.Win;Web.Win;Soap.Win;Xml.Win;Bde;Vcl;Vcl.Imaging;Vcl.Touch;Vcl.Samples;Vcl.Shell;System;Xml;Data;Datasnap;Web;Soap;Winapi;System.Win
11. Error: Unknown Parent namespace:embarcadero.rs_XXXX Insufficient permissions to complete action
When installing TMS help files and following error appears: «Unknown Parent namespace:embarcadero.rs_XXXX Insufficient permissions to complete action» or
«Unknown Parent namespace:embarcadero.rs_XXXX Parent NameSpace: embarcadero.rs_XXXX not registered»
This indicates that the default help system in RAD Studio can’t be found.
Can you make sure that:
1) The default help system in your IDE is installed & working
2) You execute the command RegHelp2.exe with the same user account as the user account with which
you installed Delphi or execute it with admin privileges.
12. Error: function HTMLDrawEx(Canvas:TCanvas; s:string; fr:TRect; FImages: TCustomImageList;
[Error] HTMLENGO.PAS(406): Undeclared identifier: «TCustomImageList»
If you use our HTML engine outside our components, you should add the unit ImgList to the uses list where this was used.
Error messages in C++Builder
1. Error: [BCC32 Error] Uxtheme.hpp(37) E2257, expected
When errors are raised upon installing the package tmsc2010.bpl such as «[BCC32 Error] Uxtheme.hpp(37): E2257, expected», make sure to delete the uxtheme.h file in the TMS VCL UI Pack source folder and recompile. This file is required for older C++Builder versions but not anymore in C++Builder 2010. The same goes for dwmapi.hpp.
2. Error: [Linker fatal error] Unable to open file «xxxx.LIB»
When errors are raised upon compiling such as «Error: [Linker fatal error] Unable to open file ‘xxxx.LIB'», make sure that xxxx.LIB is linked, you can force this with adding in the project source:
#pragma link «xxxx.lib»
Errors during installation with the automatic installer
If there is an issue on your machine during installation with the automatic installer, set Logging = true and send the install.log file that should have been generated under «My documents» for investigation.
1. Error: tmsdXXXX.dpk(165) Fatal: E2202 Required package ‘vcl’ not found OR tmsdXXXX.dpk(165) Fatal: E2202 Required package ‘rtl’ not found
This means that your Delphi library path is not properly setup.
Please make sure that the folder is included in your library path where vcl.dcp
is located, this normally is $(BDS)lib
For multi-platform supported Delphi versions, please have a look at http://codeverge.com/embarcadero.delphi.ide/delphi-xe4-library-path-delete-invalid/1062669
2. Error: E2038 Illegal character in input file:
asgreg.pas(2) Error: E2038 Illegal character in input file: ‘`’ (#$60)
asgreg.pas(2) Error: E2038 Illegal character in input file: » (#$5C)
This means that there was an issue with the activation of the software.
Please make sure that when you run the installer, that there is no software such as firewall / antivirus / proxy interfering with the internet connection via HTTP port 80 to http://www.tmssoftware.biz/ that the installer needs.
Please turn-off any such software and retry the install.
3. Error: C:Program FilesEmbarcaderoRAD Studio8.0bindcc32.exe cannot be found.
Normally, for a properly installed & non trial version of RAD Studio XE, the command line compiler DCC32.EXE should be available.
If you have a trial version of RAD Studio XE, it is a known limitation of RAD Studio XE trial itself that the automatic installer will not work. To install for the RAD Studio XE trial , please do this manually from the IDE following the steps in INSTALL.TXT.
4. Error: xlsadaptertmsXlsMessages.pas(8) Fatal: Could not compile used unit ‘xlsadaptertmsUFlxMessages.pas’.
This means that you have not installed all Delphi 6 update packs, including the last RTL update.
Please make sure to first install all Delphi 6 update packs and then install TMS VCL UI Pack.
5. When installing the package TMS Scripter and following error appears: ascriptproXXXX.dpk(32) Fatal: E2202 Required package ‘tmsdXXXX’ not found.
This means that TMS VCL UI Pack is not properly installed in your Delphi. The TMS Scripter Installer has detected the package registered in your Delphi, but could not find «tmsdXXXX» package file, required to compile Scripter Studio.
6. Error: tmsdXXXX.dpk(607) Fatal: F2039 Could not create output file ‘tmsdXXXX.drf’
This means that the user account executing the installer has no write permissions for the folder where the components are installed. Please verify this and choose a folder with no write limitations.
7. Error: This version of the product does not support command line compiling
This means you’re using a trial version of Delphi and it is a limitation of the Delphi trial version that it doesn’t support command line compiling.
Please install this on the full version of Delphi or do a manual install following the instructions in INSTALL.TXT
8. Error: E2161 Error: RLINK32: Unsupported 16bit resource in file «…tmssoftwareTMS VCL UI Packxxxx.res»
This would hint at a failed activation of the software.
Please retry to install, make sure there is no antivirus, firewall, other security tools that interfere with the internet connection our installer needs to activate the software.
9. C:Windows>CALL MSBuild /target:Build /p:config=Debug /p:platform=Win32 /p:DCC_DcuOutput=»\MacHomeDocumentstmssoftware…
MSBUILD : error MSB1009: Project file does not exist.
Installing from a network folder isn’t supported. This is a shortcoming in MSBUILD. Please run the installer at least from a network drive.