Представьте, вы купили платье. Несколько раз надели и видите, что ткань разошлась возле самого шва. Если бы по шву — неприятно, но зашить просто. А как зашить ткань которая расползается?
Недавно мне задали вот такой вопрос. Попросили рассказать и показать, как укрепить материал, чтобы он не рвался.

Какая ткань может расползтись
Чаще всего такой проблеме подвержены скользкие, рыхлые материи как синтетические, так и натуральные, например, шелк. Если не укрепить швы, через время, в местах большего натяжения структура материала нарушается, появляется дырка.
Как исправить
Давайте рассмотрим, на примере конкретного платья.
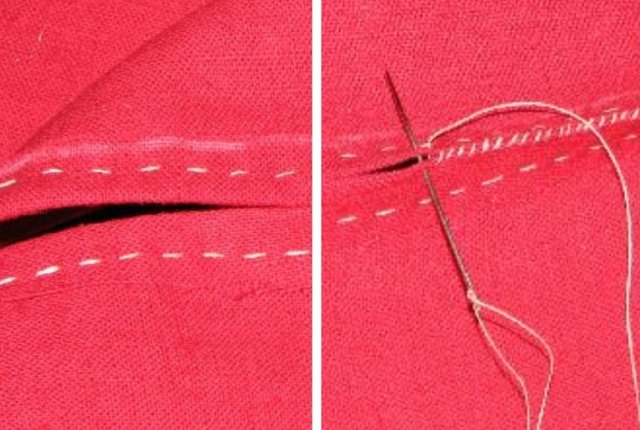
Перед нами изделие из синтетической ткани, которое в двух местах побоку разошлось возле самой строчки, фото 1.
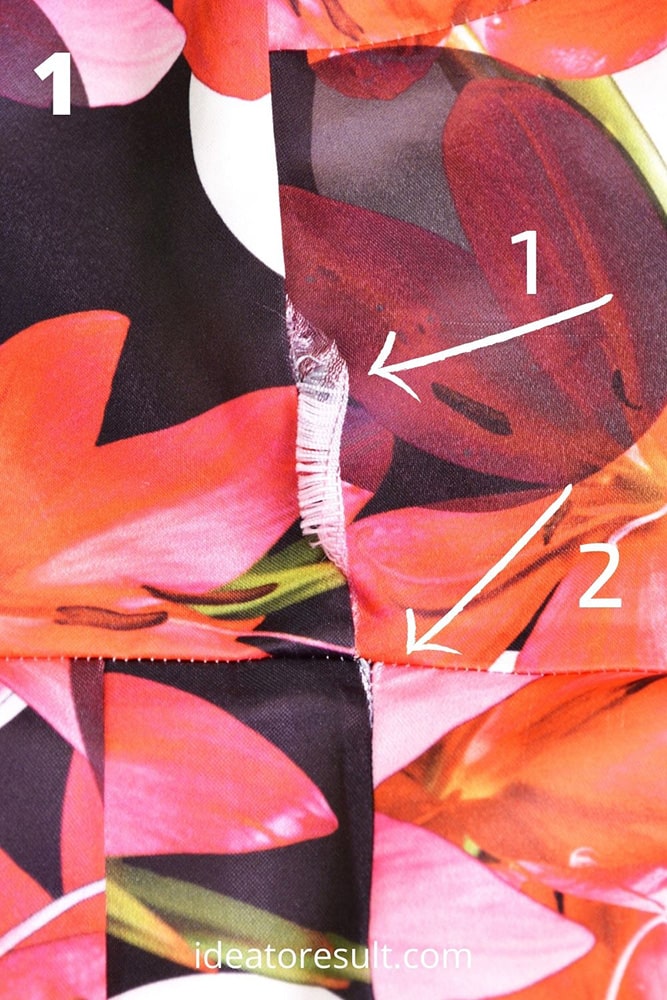
В верхней части я пометила его цифрой – 1, материя разорвалась около 2 см.
Чуть ниже, пометила цифрой — 2, около 1 см.
Вывернем наизнанку
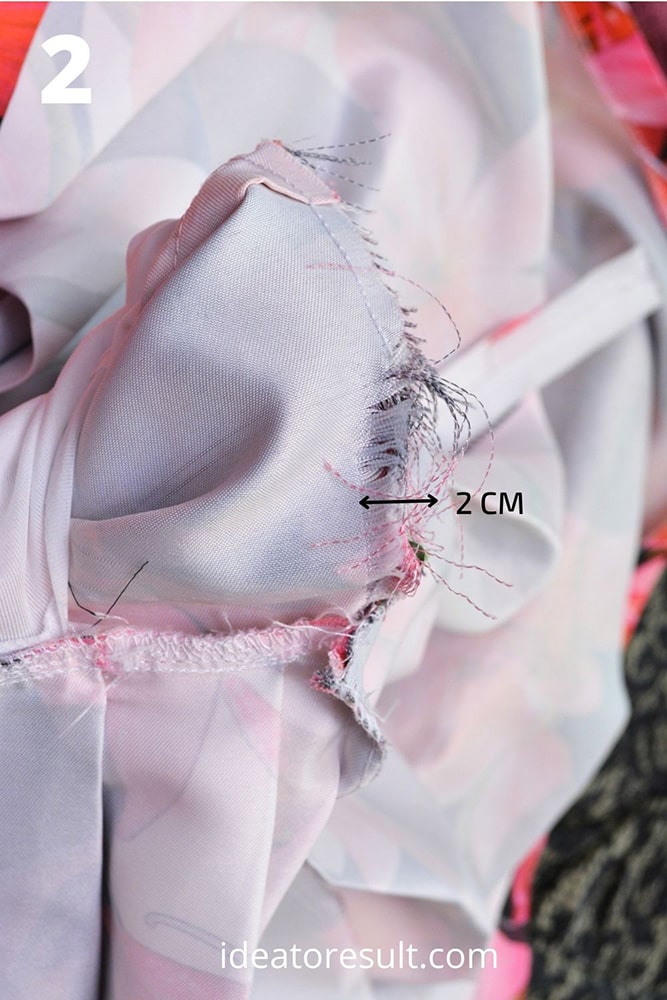
Фото 2. Очень хорошо видно, как материал распушился только с одной стороны. Получилась дырка равная 2 см + 0,5 см мы возьмём на шов (в этом месте) получим 2,5 см.
Читайте также
КОГДА НЕ СТОИТ РЕМОНТИРОВАТЬ ДЖИНСЫ
Надо учесть
Если мы сложим оба припуска вместе, как обычно, прострочим, то платье на уровне груди уменьшится на 5 см. Это очень много.
Что делать?
Предлагаю забрать только со стороны дырки. Тогда изделие уменьшится на 2,5 см. Если вас это не смущает и оно вам достаточно свободно, приступаем к работе.
Да, шов не будет идеальным, но зато можно будет двигаться. Так как это бок, погрешность не будет заметна.
Наши действия
- Укрепить ткань;
- Зашить швы.
Ход работы
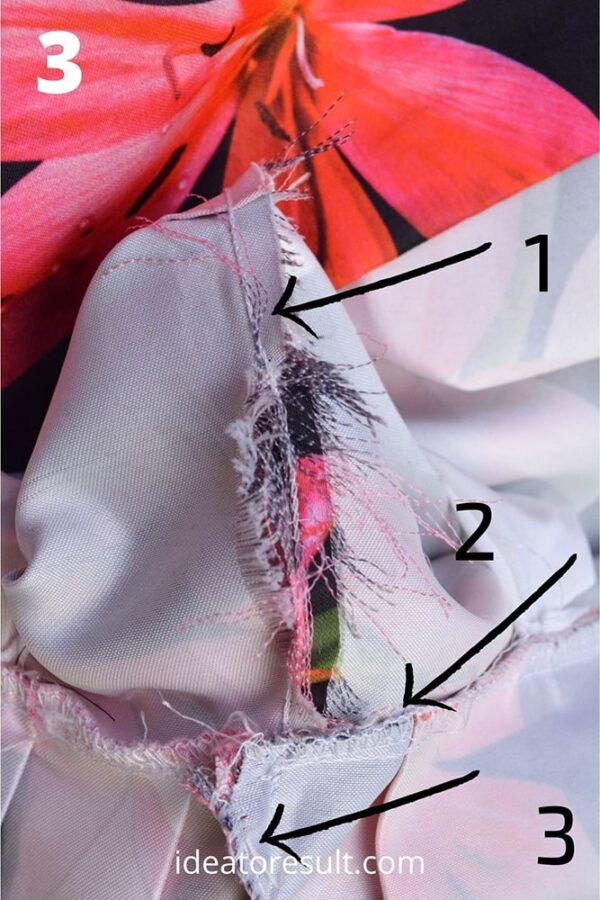
- Вначале распарываем все три строчки, снимок 3.
- Обрезаем припуск только с одной стороны, со стороны дырки.
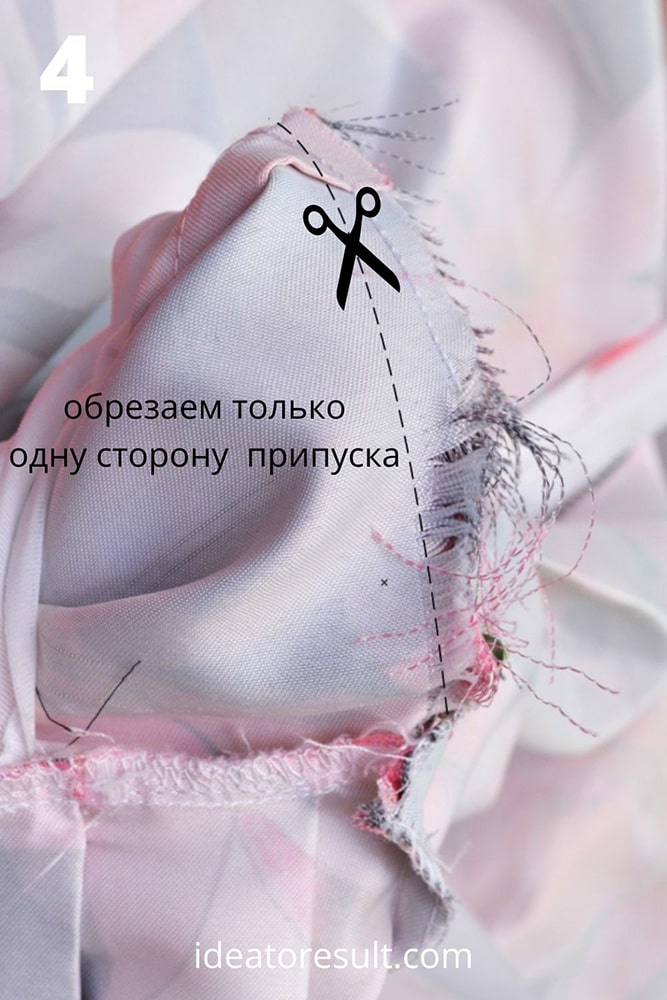
Отрезаем так, как идёт пунктирная линия, снимок 4 – плавно наискосок. У проймы пунктирная линия мягко входит в край припуска (на снимке этого не видно). Получается, что по линии проймы объём останется прежним, рукав корректировать не нужно.
- Обрезали всё лишнее. Теперь, надо укрепить ткань. Для этого используем флизелин.
- Из флизелина вырезаем две полоски шириной 1,5-2 см, длинной: в верхней части бока по длине шва, а в нижней 5 см.
- Я взяла тонкую клеевую, для наглядности чёрного цвета. Вы в таком случае берёте белый флизелин.
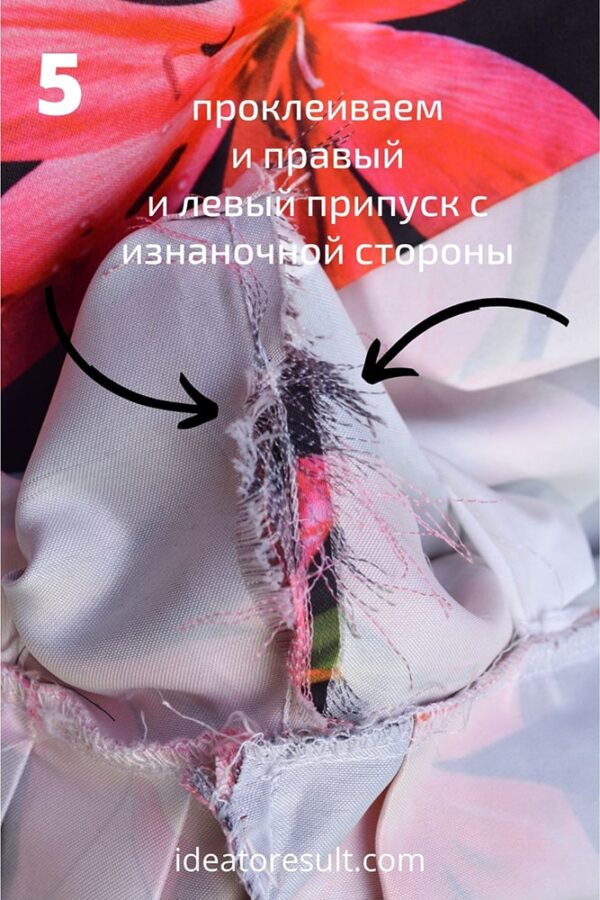
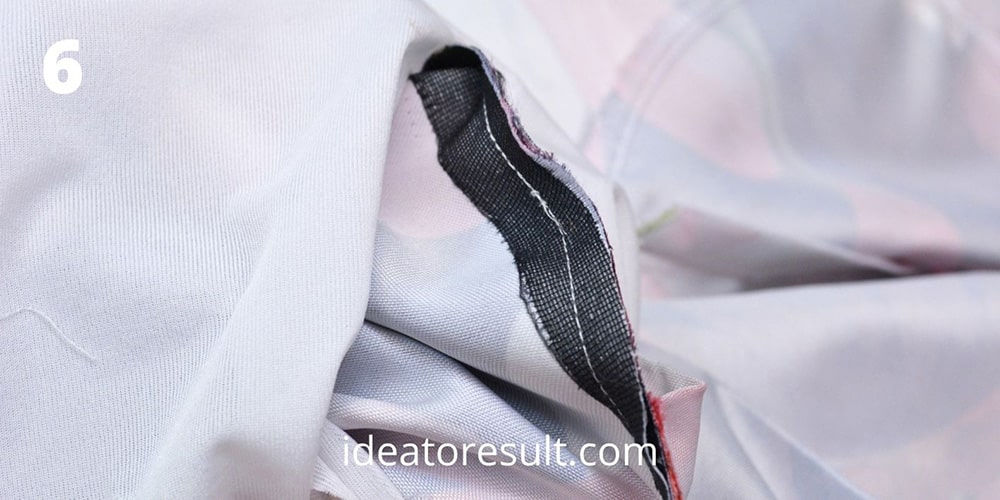
- Приклеиваем полоски с изнаночной стороны. Вначале на один, затем на второй припуск, фото 5 – 6.
- Складываем припуски лицевая с лицевой. Прошиваем на швейной машине, соединяя все детали этого бока. Обмётываем. Снимок 6-7.
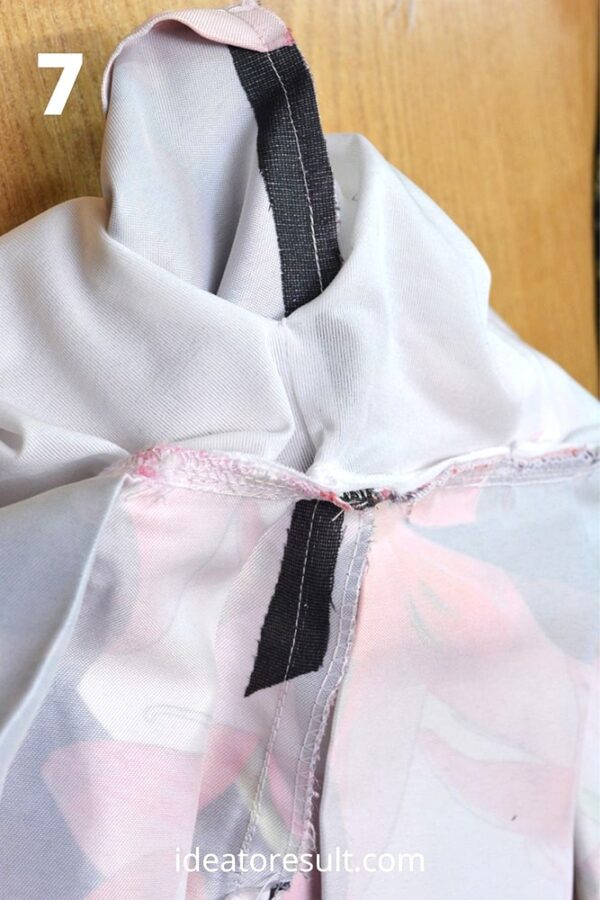
- Выворачиваем вещь на лицевую сторону и отглаживаем все линии, снимок 8.

Посмотрите, как красиво получилось. Я отметила стрелками проблемные места. Эти места точно не порвутся. Другие, не знаю. Сами видите, швы там слабоватые.
Совет
При шитье или покупке новой вещи из скользких, рыхлых тканей всегда проклеивайте швы (с двух сторон) тонкой полоской флизелина. Носить будете очень долго. Проверено))
А что делать, если платье вам и так впритык. Зашив 2,5 см, вы не сможете двигаться. Что делать в таком случае?
Если этот вопрос возникает, пишите в комментариях, я расскажу о вариантах решения и такой проблемы.

Оставляйте статью в закладках, делитесь с друзьями.
Желаю вам творческого настроения и красивых работ.
Ваша

Контакт | Pinterest
Консультации | Мастер-классы
ЧИТАЙТЕ:
Нитка с иголкой – это палочка-выручалочка, которая должна быть всегда под рукой. Ведь она может потребоваться в самых неожиданных местах, как, например, у Золушки на балу. Достаточно владеть основными ручными стежками, и подобная ситуация не страшна.
Существуют различные техники ручного шва, которые позволяют быстро отремонтировать порванную вещь, применяются при сметке деталей швейных изделий и их декорировании. Что уж говорить о рукоделии, в котором без швов не обойтись. Расскажем, об основных стежках, которые вам обязательно пригодятся.
Виды ручных швов
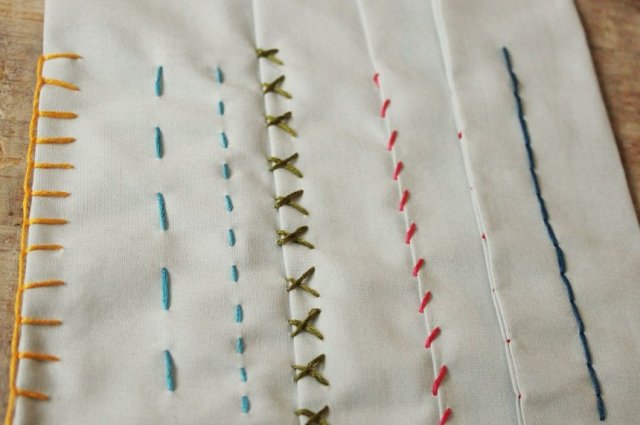

У ручных швов довольно обширная классификация, их подразделяют по расположению стежков на ткани и по назначению. Так, стежки бывают прямые, косые, крестообразные, петельные, специальные и петлеобразные. А применяться они могут для сметывания, подшивания, обметывания, отделки, образования сборок и т.д.
В зависимости от назначения, швы выполняются одной или несколькими строчками, которые в свою очередь состоят из стежков. Качественно выполненные швы должны быть ровными, с одинаковыми стежками и расстоянием между ними, с равномерно затянутыми нитями.
Конечно, с первого раза получить идеальную строчку едва ли удастся, но опыт приходит с практикой. У некоторых мастериц ручной шов не отличить от машинного. И такое качество высоко ценится, ведь неслучайно самая дорогая одежда «от кутюр» пошита вручную.
Мы, конечно, на такие высоты не претендуем, поэтому рассмотрим ручные швы, которые применяются в повседневной жизни.
Основные ручные швы
Ручными швами можно не только отремонтировать место, где разошлась машинная строчка, но и подшить низ брюк или юбки, приметать оторвавшуюся подкладку или обработать край осыпающейся ткани. Для каждой этой операции используется конкретный шов.
Наметочный шов
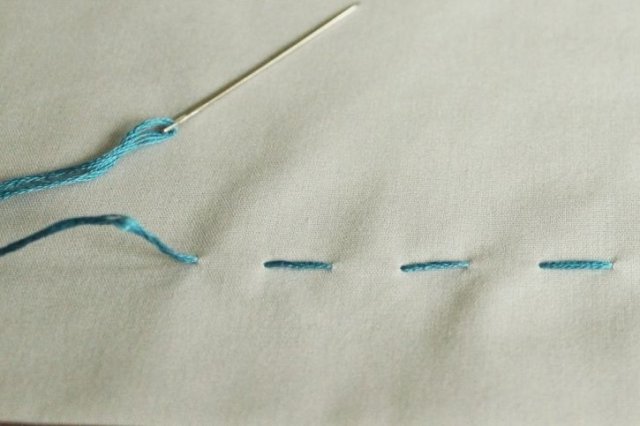

Самый простой из всех швов – наметочный. Но без него не обойтись, если у вас даже имеется швейная машинка, т.к. он соединяет детали для примерки. Его чаще всего и используют портные. Также при помощи этого шва стягивают ткань, делают защипы и штопают дырки.
Делается такая строчка просто: равномерно вводите в ткань и выводите из нее иголку до того, как протянете нить. Такой шов легко шьется и также легко вытягивается. Им можно сделать и потайную строчку, если разошелся машинный шов.
Шов «назад иголку»

Шов «назад иголку» напоминает машинную строчку. Он считается одним из самых прочных из ручных швов, особенно если шить в две нити. Его еще называют стачным и применяют в труднодоступных местах, где невозможно прошить на швейной машине, а также для закрепления строчек. Подходит он и при замене застежки-молнии.
Техника выполнения шва «назад иголку» довольно проста, но требует опыта, чтобы получить одинаковые стежки и ровную строчку.
Проткните ткань с изнаночной стороны в месте, в котором необходимо сделать строчку (не забудьте на конце нити завязать узелок). Затем сделайте небольшой стежок назад на 2-3 мм и выведите иглу на лицевую сторону на те же 2-3 мм, но уже перед стежком. Продолжая вводить иглу в конец последнего стежка и выводя спереди него, проделайте строчку необходимой длины.
С изнанки стежки будут в два раза длиннее, чем на лицевой стороне.
Шов «козлик»

Шов «козлик» применяется в основном для закрепления подгиба низа изделий, рукавов и подкладки, а также используется для отделки одежды. Выполняется он слева направо.
Отступите немного от края и сделайте в ткани подгиба небольшой горизонтальный стежок. Затем выполните вправо по диагонали стежок на ткани, к которой пришиваете подгиб. Следующий стежок делайте так же по диагонали, но на подгибе.
При выполнении шва «козлик» не затягивайте сильно нить, чтобы на лицевой стороне изделия маленькие стежки были незаметны.
Обметочный, или петельный, шов


Обметочный шов используется для предотвращения осыпания ткани на краях изделия. Существует несколько его видов: косой, крестообразный и петельный. Косой и крестообразный выполняются практически одинаково: стежки делаются через край слева направо. В крестообразном шве затем выполняется еще одна строчка уже в обратном направлении.
Петельным же швом обметывают срезы на сыпучих тканях, а также обрабатывают отверстия и петли. Подходит он и для декорирования изделий из фетра и флиса.
Закрепите иглу на краю изделия. Стежки делайте по направлению к себе, набрасывая нить на выходящую под тканью иглу. Расстояние от края и длина стежка зависят от вашей задумки. Для обработки петель выполняйте 6-10 стежков на 1 см шириной в 2-3 см.
Елизаветинский шов

Для скрепления деталей из шерсти, драпа и других плотных тканей стык в стык применяется штуковочный шов. Раньше он носил название елизаветинский. Им шили верхнюю одежду.
Чтобы получить крепкий шов, нитки нужно смазать пчелиным воском. Разложите каждую деталь отдельно и загните их края. Этот загиб прошейте обычной наметочной строчкой. Старайтесь делать стежки аккуратно и как можно меньше, чтобы ткань прилегала плотно.
Когда обе детали будут подшиты, положите их рядом и соедините края штуковочной строчкой, делая на каждый сантиметр по 6-10 стежков. Затем раздвиньте детали в разные стороны, чтобы шов стал плоским.
Такой шов не только прочный, но и смотрится оригинально.
Ручных швов, конечно, значительно больше, но они в какой-то мере повторяют вышеназванные. Они пригодятся как для ремонта вещей, так и в рукоделии.
![]()
Download Article
![]()
Download Article
Torn seams are among the most common problems plaguing sewn goods, and can happen with just about any type of fabric, from low-end to high-end. Although a torn seam can be a frustrating obstacle to encounter, fixing a torn seam is typically a simple and easy process, and will have your damaged item back to good as new in a hurry. To mend a torn seam, you must located and identify the tear, identify the type of fabric you are working with, choose the correct hand stitch to repair the seam with, or repair the garment with a machine.
-

1
Gather a needle and thread. Choose a needle and thread according to the item you are trying to repair. If you are working with a delicate fabric such as chiffon, lace, or silk, choose a thin needle and correspondingly thin thread.[1]
If you are working with a heavier fabric, such as denim or canvas, you will need a thick needle and thick thread. If the seam will be visible, be sure to choose a color corresponding to the surrounding fabric.[2]
-
2
Thread the needle. Loop the thread through the eye of your needle. If the edge of the thread is frayed or otherwise impaired, trim back until the thread is smooth with a blunt end. If necessary, wet the end of the thread before passing through the head of the needle.[3]
- You can either loop a single piece of thread through the eye of the needle, or two ends of the thread to create a thicker sewing tool. As can be expected, a thicker gathering of thread will be better for heavy-duty fabrics.
Advertisement
-
3
Cut the thread, leaving several inches of extra space. When measuring the amount of thread to use, double the length of the seam, and add another inch or two. While you may wind up with too much thread, it is far better to have too much thread than to have too little, as you may be able to see where your stitch starts and stops in the middle of the torn area.[4]
-
4
Choose your stitch. Different stitches work well for different fabrics and problems. A simple whip stitch is wonderful for delicate fabric, while a running stitch will do well with a sturdy fabric. If you are dealing with an exposed seam, a backstitch will provide a discreet means of repair.[5]
- If you are a beginner, a running stitch is likely to be the easiest option, as it involves going in a single, straight line.
- A backstitch is another good beginner option. To backstitch, push your needle through the fabric, pull your thread all the way through, and push your needle up through the bottom of the fabric ¼ an inch (.635 cm), before placing your needle at your starting point and pulling the thread all the way through again. Continue this process to create a clean backstitch.
-
5
Repair your seam. Once you’ve chosen your stitch, begin to repair your seam, holding the fabric taut to prevent wrinkling or snagging. Try to keep your stitches as even and uniform as possible, favoring a tighter stitch rather than a loose one. While a loose stitch will be faster and easier, you run the risk of the repaired seam weakening and reopening quickly.[6]
-
6
Finish with a firm knot. Once you have reached the edge of the torn seam, tie a firm knot to prevent further fraying and damage. If your knot is too loose, your newly-repaired seam may begin to unravel, while a tight knot may cause snagging. Smooth the fabric to make sure there are no wrinkles or problems, then tie a knot to lie flush against the fabric.
- Tying the knot will be easier if you keep the needle intact and pull the needle through the loop you’ve made for your knot. This is especially true if you have only an inch or so of extra thread.
-
7
Test the result. Turning the fabric right-side-out, gently pull apart the area you’ve mended, making sure there are no ripples, remaining holes, or snags. If you do find a snag, use a seam-ripper to remove your thread, and start again.
- While you do want to check to make sure your seam is solid, avoid yanking on the seam, as this can damage even the most well-constructed item of clothing.


Advertisement
-
1
Wind your bobbin with the appropriate color. Choose the color that best suits your seam, whether it is visible or not. Although the color may not seem important initially, if the fabric in question is even a tiny bit sheer, a dark or light thread will be immediately visible. Choose a color as close to the fabric or existing thread as possible.
-
2
Choose your sewing machine’s settings. New and old sewing machines come with a wide array of settings, ranging from the length of a stitch to the type of stitch being used. Consult your machine’s manufacturer’s booklet or instruction manual to determine how to choose a setting, and which setting is the optimal setting for your fabric.[7]
-
3
Place the fabric beneath the machine’s foot. Place the fabric in need of repair below the foot, beginning ¼-½ inch in front of the torn seam. If possible, line the existing thread up with the machine’s needle to keep the appearance of the seam uniform.
-
4
Slowly feed your fabric through the machine. Gently press down on the machine’s pedal, feeding your fabric through the machine carefully and slowly. Again, though you may think it is best to get the job done quickly, the needle could snag even a thick fabric if it is passed through too quickly. Take your time.
- Remove your pins as you go, making sure they do not pass beneath the machine’s needle. Although it could skip over the pin, you run the risk of breaking the needle when it hits the pin.
-
5
Run back over the final ½ inch (1.27 cm) of the fabric. Once you have reached the end of the tear, go back over your fabric to close the thread loop. Once you have done that, lift the foot, and remove the fabric from beneath the foot.[8]
- ½ an inch (1.27 cm) is more than enough space. Going over any more of the fabric may result in accidentally ripping up your repaired stitches.
-
6
Remove excess thread. Snip the thread from the bobbin and needle, and trim any excess fabric or thread from the newly-mended area. If there are frayed edged, be sure to trim those too, as leaving a frayed edge behind could result in additional fraying.[9]
- Be sure to remove your fabric from the machine slowly; you must cut the thread from the bobbin and needle before trimming up any leftover thread.


Advertisement
Add New Question
-
Question
How do you sew French seams?

Kpoene Kofi-Bruce is a tailor, couture wedding gown designer, and the Creative Director of Mignonette Bridal and Ette the Wedding Tailor in Chicago, Illinois. With nearly two decades of experience as a wedding gown designer, small business owner, and vintage sewing enthusiast, Kpoene specializes in wedding gown design and the social history of wedding dresses. She received a BA in Creative Writing from Middlebury College and studied the business of fashion at the Fashion Institute of Technology. She is also a graduate of the Goldman Sachs 10KSB program and the Chicago Fashion Incubator and has written about wedding fashion for Jezebel, Catalyst, the Sun Times, and XO Jane.
Couture Bridal Designer
Expert Answer
You will need the following items iron, a pair of small very sharp scissors, pins, and a cutting surface. The first step would be to place your fabric with the wrong sides facing each other you are sewing your first seam on the outside of the garment. Sew your seams together as usual. Then take your scissors and cut away the seam allowance, leaving about ⅛” of the material left. Next, fold your fabric together at the seam so that what you just sewed is sandwiched between the two layers of fabric. (your right sides should be together now). Press with the iron along that seam line. Pin if needed to keep the seam nice and straight. Next, sew along that seam line again, using your normal seam allowance. When you are done, press along the seam with the iron. This is a difficult process, therefore I recommend practicing before you cut your actual fabric.
-
Question
What should I do if I don’t have any thread and needle? Can I use hot glue?
Heather Kenyon-Haff
Top Answerer
Hot glue may or may not work, depending on the hot glue and fabric. It may discolor the fabric. It will leave a glue residue that may be hard, sharp or uncomfortable against the skin. It also may be a temporary fix.
-
Question
How do I repair a large hole?
Repairing a large hole requires the same process as a small one, but may require more finesse. Instead of hand-stitching, use a sewing machine to repair a large hole, as the stitches on a sewing machine will be easier to keep uniform and small. To use a machine, turn your fabric inside-out, align the torn area, and run your sewing needle over the hole. Finish up by going back over the final 1/2 inch (1.27 cm) of the mend to close the stitch.

See more answers
Ask a Question
200 characters left
Include your email address to get a message when this question is answered.
Submit
Advertisement
Video
-
If you are unfamiliar with a sewing machine, try a few practice rounds on a scrap piece of fabric before diving into a seam repair.
-
For novices, a hand stitch may be the faster, easier route to take when considering a repair.
-
As you repair, try to determine the root cause of the tear; for instance, if the tear was caused by being pulled too tight, you can let the seam out a little bit as you repair to prevent a recurrence.
Advertisement
-
If at all possible, avoid quick fixes such as staples and loose stitches. Both can cause damage to the fabric.
-
Make sure to read your instruction manual before using a larger or smaller needle with your sewing machine; some machines require certain brands and installation techniques.
-
If the seam is torn and thoroughly shredded, you may need to visit a seamstress for a patch or repair.
Advertisement
References
About This Article
Article SummaryX
To repair a torn seam, try using a needle and thread. First, put some thread that’s about twice as long as the seam onto the needle to make sure you’ve got enough for the stitches. Then, sew the seam closed, making the stitches as small as possible for a professional look. For a faster approach, use a sewing machine. Start by winding thread around your bobbin that’s as close to the color of your garment as possible. this will ensure that your repair is less visible when it’s done. Then, slowly feed your fabric through the machine as it sews the seam closed. For tips on how to set your sewing machine to repair a seam, keep reading!
Did this summary help you?
Thanks to all authors for creating a page that has been read 413,094 times.
Reader Success Stories
-

Tiffany Norris
Jan 30, 2017
«Removing the loose strings of the chiffon and just sewing it up is good, even though the seam won’t be in the exact…» more
Did this article help you?
![]()
Download Article
![]()
Download Article
Torn seams are among the most common problems plaguing sewn goods, and can happen with just about any type of fabric, from low-end to high-end. Although a torn seam can be a frustrating obstacle to encounter, fixing a torn seam is typically a simple and easy process, and will have your damaged item back to good as new in a hurry. To mend a torn seam, you must located and identify the tear, identify the type of fabric you are working with, choose the correct hand stitch to repair the seam with, or repair the garment with a machine.
-
1
Gather a needle and thread. Choose a needle and thread according to the item you are trying to repair. If you are working with a delicate fabric such as chiffon, lace, or silk, choose a thin needle and correspondingly thin thread.[1]
If you are working with a heavier fabric, such as denim or canvas, you will need a thick needle and thick thread. If the seam will be visible, be sure to choose a color corresponding to the surrounding fabric.[2]
-
2
Thread the needle. Loop the thread through the eye of your needle. If the edge of the thread is frayed or otherwise impaired, trim back until the thread is smooth with a blunt end. If necessary, wet the end of the thread before passing through the head of the needle.[3]
- You can either loop a single piece of thread through the eye of the needle, or two ends of the thread to create a thicker sewing tool. As can be expected, a thicker gathering of thread will be better for heavy-duty fabrics.
Advertisement
-
3
Cut the thread, leaving several inches of extra space. When measuring the amount of thread to use, double the length of the seam, and add another inch or two. While you may wind up with too much thread, it is far better to have too much thread than to have too little, as you may be able to see where your stitch starts and stops in the middle of the torn area.[4]
-
4
Choose your stitch. Different stitches work well for different fabrics and problems. A simple whip stitch is wonderful for delicate fabric, while a running stitch will do well with a sturdy fabric. If you are dealing with an exposed seam, a backstitch will provide a discreet means of repair.[5]
- If you are a beginner, a running stitch is likely to be the easiest option, as it involves going in a single, straight line.
- A backstitch is another good beginner option. To backstitch, push your needle through the fabric, pull your thread all the way through, and push your needle up through the bottom of the fabric ¼ an inch (.635 cm), before placing your needle at your starting point and pulling the thread all the way through again. Continue this process to create a clean backstitch.
-
5
Repair your seam. Once you’ve chosen your stitch, begin to repair your seam, holding the fabric taut to prevent wrinkling or snagging. Try to keep your stitches as even and uniform as possible, favoring a tighter stitch rather than a loose one. While a loose stitch will be faster and easier, you run the risk of the repaired seam weakening and reopening quickly.[6]
-
6
Finish with a firm knot. Once you have reached the edge of the torn seam, tie a firm knot to prevent further fraying and damage. If your knot is too loose, your newly-repaired seam may begin to unravel, while a tight knot may cause snagging. Smooth the fabric to make sure there are no wrinkles or problems, then tie a knot to lie flush against the fabric.
- Tying the knot will be easier if you keep the needle intact and pull the needle through the loop you’ve made for your knot. This is especially true if you have only an inch or so of extra thread.
-
7
Test the result. Turning the fabric right-side-out, gently pull apart the area you’ve mended, making sure there are no ripples, remaining holes, or snags. If you do find a snag, use a seam-ripper to remove your thread, and start again.
- While you do want to check to make sure your seam is solid, avoid yanking on the seam, as this can damage even the most well-constructed item of clothing.
Advertisement
-
1
Wind your bobbin with the appropriate color. Choose the color that best suits your seam, whether it is visible or not. Although the color may not seem important initially, if the fabric in question is even a tiny bit sheer, a dark or light thread will be immediately visible. Choose a color as close to the fabric or existing thread as possible.
-
2
Choose your sewing machine’s settings. New and old sewing machines come with a wide array of settings, ranging from the length of a stitch to the type of stitch being used. Consult your machine’s manufacturer’s booklet or instruction manual to determine how to choose a setting, and which setting is the optimal setting for your fabric.[7]
-
3
Place the fabric beneath the machine’s foot. Place the fabric in need of repair below the foot, beginning ¼-½ inch in front of the torn seam. If possible, line the existing thread up with the machine’s needle to keep the appearance of the seam uniform.
-
4
Slowly feed your fabric through the machine. Gently press down on the machine’s pedal, feeding your fabric through the machine carefully and slowly. Again, though you may think it is best to get the job done quickly, the needle could snag even a thick fabric if it is passed through too quickly. Take your time.
- Remove your pins as you go, making sure they do not pass beneath the machine’s needle. Although it could skip over the pin, you run the risk of breaking the needle when it hits the pin.
-
5
Run back over the final ½ inch (1.27 cm) of the fabric. Once you have reached the end of the tear, go back over your fabric to close the thread loop. Once you have done that, lift the foot, and remove the fabric from beneath the foot.[8]
- ½ an inch (1.27 cm) is more than enough space. Going over any more of the fabric may result in accidentally ripping up your repaired stitches.
-
6
Remove excess thread. Snip the thread from the bobbin and needle, and trim any excess fabric or thread from the newly-mended area. If there are frayed edged, be sure to trim those too, as leaving a frayed edge behind could result in additional fraying.[9]
- Be sure to remove your fabric from the machine slowly; you must cut the thread from the bobbin and needle before trimming up any leftover thread.
Advertisement
Add New Question
-
Question
How do you sew French seams?
Kpoene Kofi-Bruce is a tailor, couture wedding gown designer, and the Creative Director of Mignonette Bridal and Ette the Wedding Tailor in Chicago, Illinois. With nearly two decades of experience as a wedding gown designer, small business owner, and vintage sewing enthusiast, Kpoene specializes in wedding gown design and the social history of wedding dresses. She received a BA in Creative Writing from Middlebury College and studied the business of fashion at the Fashion Institute of Technology. She is also a graduate of the Goldman Sachs 10KSB program and the Chicago Fashion Incubator and has written about wedding fashion for Jezebel, Catalyst, the Sun Times, and XO Jane.
Couture Bridal Designer
Expert Answer
You will need the following items iron, a pair of small very sharp scissors, pins, and a cutting surface. The first step would be to place your fabric with the wrong sides facing each other you are sewing your first seam on the outside of the garment. Sew your seams together as usual. Then take your scissors and cut away the seam allowance, leaving about ⅛” of the material left. Next, fold your fabric together at the seam so that what you just sewed is sandwiched between the two layers of fabric. (your right sides should be together now). Press with the iron along that seam line. Pin if needed to keep the seam nice and straight. Next, sew along that seam line again, using your normal seam allowance. When you are done, press along the seam with the iron. This is a difficult process, therefore I recommend practicing before you cut your actual fabric.
-
Question
What should I do if I don’t have any thread and needle? Can I use hot glue?
Heather Kenyon-Haff
Top Answerer
Hot glue may or may not work, depending on the hot glue and fabric. It may discolor the fabric. It will leave a glue residue that may be hard, sharp or uncomfortable against the skin. It also may be a temporary fix.
-
Question
How do I repair a large hole?
Repairing a large hole requires the same process as a small one, but may require more finesse. Instead of hand-stitching, use a sewing machine to repair a large hole, as the stitches on a sewing machine will be easier to keep uniform and small. To use a machine, turn your fabric inside-out, align the torn area, and run your sewing needle over the hole. Finish up by going back over the final 1/2 inch (1.27 cm) of the mend to close the stitch.
See more answers
Ask a Question
200 characters left
Include your email address to get a message when this question is answered.
Submit
Advertisement
Video
-
If you are unfamiliar with a sewing machine, try a few practice rounds on a scrap piece of fabric before diving into a seam repair.
-
For novices, a hand stitch may be the faster, easier route to take when considering a repair.
-
As you repair, try to determine the root cause of the tear; for instance, if the tear was caused by being pulled too tight, you can let the seam out a little bit as you repair to prevent a recurrence.
Advertisement
-
If at all possible, avoid quick fixes such as staples and loose stitches. Both can cause damage to the fabric.
-
Make sure to read your instruction manual before using a larger or smaller needle with your sewing machine; some machines require certain brands and installation techniques.
-
If the seam is torn and thoroughly shredded, you may need to visit a seamstress for a patch or repair.
Advertisement
References
About This Article
Article SummaryX
To repair a torn seam, try using a needle and thread. First, put some thread that’s about twice as long as the seam onto the needle to make sure you’ve got enough for the stitches. Then, sew the seam closed, making the stitches as small as possible for a professional look. For a faster approach, use a sewing machine. Start by winding thread around your bobbin that’s as close to the color of your garment as possible. this will ensure that your repair is less visible when it’s done. Then, slowly feed your fabric through the machine as it sews the seam closed. For tips on how to set your sewing machine to repair a seam, keep reading!
Did this summary help you?
Thanks to all authors for creating a page that has been read 413,094 times.
Reader Success Stories
-
Tiffany Norris
Jan 30, 2017
«Removing the loose strings of the chiffon and just sewing it up is good, even though the seam won’t be in the exact…» more
Did this article help you?
Шаги
-
1
Найдите место, где разошелся шов. Выверните изделие наизнанку и осторожно потяните по линии шва, пока не найдете дыру.
-
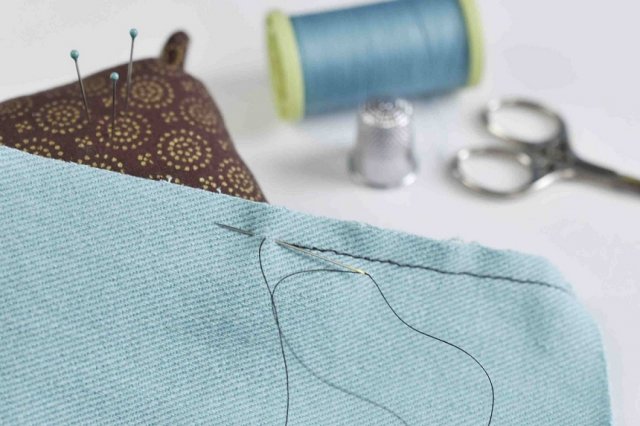
2
Вденьте нитку в иглу. Используйте иглу среднего размера и нитки, подходящие по цвету к ткани. Обрежьте нитку длиной в руку. Смочите один ее конец и проденьте его в ушко иглы. Завяжите узелок на конце нити. Если вы сшиваете плотную ткань, например деним, используйте наперсток, чтобы не поранить пальцы.
-
3
Сшейте шов. Проденьте иголку в шов чуть ниже дыры.
- Проденьте ее сквозь шов и обратно.
- Продевайте нитку сквозь ткань, создавая сметочный стежок.
- Продолжайте шить сметочными стежками во всю длину разрыва.
-
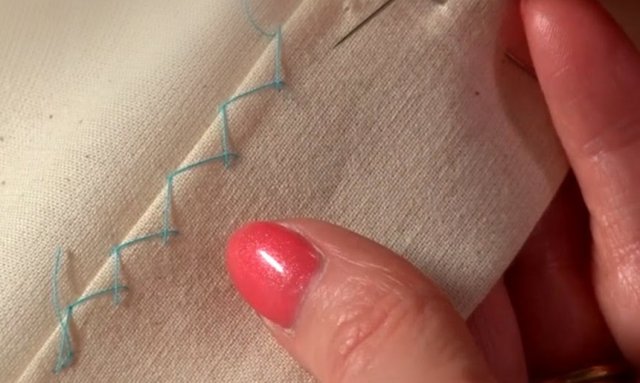
4
Обметайте. Начиная от места, где вы закончили делать сметочные стежки, вставьте иголку с ниткой по одну сторону шва, затем протяните ее через верх шва по другую его сторону. Проденьте иглу в ткань.
- Продолжайте вдоль заштопанного шва. Это не даст ткани обтрепаться и укрепит штопку.
-
5
Закончите работу. Завяжите 2 или 3 узелка на конце.
- Чтобы закрепить нитку, сделайте несколько маленьких стежков.
- Подергайте за нитку и обрежьте ее как можно ближе к ткани.
-
6
Выверните изделие на лицевую сторону. Посмотрите на свою работу. Одежда как новая!
Реклама


Советы
- Обрежьте торчащие из ткани нитки перед работой.
- Если не можете подобрать цвет ниток идеально к ткани, подберите наиболее похожий оттенок. В шве их почти не будет видно.
- Если вы никогда не делали этого раньше, знайте, что это легко! Вы очень скоро научитесь этому простому стилю шитья, а подумайте о разнице между выброшенной вещью и той, которую можно сохранить на долгие годы!
- Очень важно подобрать правильную иголку. Чем плотнее ткань, тем толще должна быть иголка и наоборот.
Реклама
Предупреждения
- Не делайте сметочные стежки слишком близко друг к другу и слишком туго.
Реклама
Что вам понадобится
- Нитки, подходящие по цвету к ткани
- Игла среднего размера
- Ножницы
- Наперсток
Об этой статье
Эту страницу просматривали 17 905 раз.
Была ли эта статья полезной?
Olga_Olelukoe
Рег.
07.04.2010
Сообщ.
46
|
лучше сзади делать шов |
На платье сзади шва не будет, может у волана шов сместить к левой бретеле?
А если на волане будет два шва?
НатВад
Рег.
02.01.2008
Сообщ.
6125
Награды: 7
|
Дорогие Осиночки, может вы и мне подскажите-поможете. |
Если у вас льняная ткань редкого переплетения, а изделие прилегающего силуэта, то сколько бы вы не укрепляли швы, они будут расползаться вновь.
Как правило, ткань расползается на швах в сильно прилегающих изделиях, поэтому совет может быть один — перед раскроем ткани нужно проверить ткань на растяжимость. Для чего, нужно встать лицом к окну, взять двумя руками ткань за край и потянуть ее между пальцами изо всех сил. Если при этом нити ткани развинуться или расползутся, то из нее нельзя шить изделия сильно прилегающие по фигуре.
НатВад
Рег.
02.01.2008
Сообщ.
6125
Награды: 7
На платье сзади шва не будет, может у волана шов сместить к левой бретеле? |
Вполне допустимо на таком волане сделать два шва над плечами.
Olga_Olelukoe
Рег.
07.04.2010
Сообщ.
46
Спасибо, Коша.
Спасибо, Наталья Вадимовна!
Arisha 1
Рег.
14.04.2009
Сообщ.
749
|
Дорогие Осиночки, может вы и мне подскажите-поможете. |
Можно проклеять припуск флизелиновой полоской скроенной по утка(он по изгибам улаживается хорошо и не разлазится) или тонким дублирином ,ваша строчка должна пройти по этой полосочке.Я вообще в сыпучих и рыхлых тканях все срезы проклеиваю флизелином(надо не лениться и нарезать самим,тот что в магазинах не подходит,он для придупреждения растяжения)чтоб прям под оверлог пошол,срез укрепляет .
fleur-de-the
Рег.
22.10.2009
Сообщ.
134
Уважаемые мастерицы!
Помогите пожалуйста советом! ![]() Хочу попробовать сшить своей пожилой родственнице костюм. Юбку и кофту из трикотажа. Уже купила тыжелый плотный вискозный трикотаж. Шью я хоть уже и очень давно, но только по готовым выкройкам, а в данном случае таких выкроек не найти, т.к очень большой размер: ОБ 144 и ОГ 140. Вот думаю, что делать…
Хочу попробовать сшить своей пожилой родственнице костюм. Юбку и кофту из трикотажа. Уже купила тыжелый плотный вискозный трикотаж. Шью я хоть уже и очень давно, но только по готовым выкройкам, а в данном случае таких выкроек не найти, т.к очень большой размер: ОБ 144 и ОГ 140. Вот думаю, что делать… ![]() Юбку я, допустим, сошью просто из двух прямоугольников и посажу на резинку, т.к. бедра шире талии всего на 15 см, но что с делать с верхом не знаю… как вариант, взять выкройку бурды, например, что-то вроде вот этой модели http://www.osinka.ru/Zhurnaly/2008/burda/burda_plus_02/slides/04.html и увеличить ее в ширину… (в высоту, видимо, не потребуется, т.к. рост ок. 165см). Как вы думаете, сработает? Ворот и рукава подработаем по ходу
Юбку я, допустим, сошью просто из двух прямоугольников и посажу на резинку, т.к. бедра шире талии всего на 15 см, но что с делать с верхом не знаю… как вариант, взять выкройку бурды, например, что-то вроде вот этой модели http://www.osinka.ru/Zhurnaly/2008/burda/burda_plus_02/slides/04.html и увеличить ее в ширину… (в высоту, видимо, не потребуется, т.к. рост ок. 165см). Как вы думаете, сработает? Ворот и рукава подработаем по ходу ![]()
Yves
Рег.
10.03.2009
Сообщ.
81
НатВад, подскажите пожалуйста, при пошиве жакетов, пальто, плащей обязательно ли делать выкраивать обтачку горловины спинки из основной ткани, к которой потом пришивается подклад? Или все таки можно обойтись без нее? Например, как на этой фотографии ( скопировала у одной мастерицы)

на фотохостинг →
Или может выкраивать обтачку несколько другой формы? Как правильно?
А то ли у меня руки не оттуда растут, то и в Бурде такие выкройки, но она никогда ровно не лежит, как на покупных вещах.
И еще вопросик, как правильно утюжить сгибы лацканов, чтобы был равномерные переход в воротник?
Извиняюсь, за то что такими словами объясняю ![]() ) не знаю как по другому, более правильно
) не знаю как по другому, более правильно ![]() )
)
РусланаS
Рег.
27.01.2008
Сообщ.
1026
Осиночки, подскажите пожалуйста, пытаюсь пошить платье из батиста, но у меня не получается сделать красиво прямую строчку — сам шов такой как проволка получается и стягивает ткань. Что надо сделать? Чем помочь?Шв. машинка Бразер NX 400, иголку взяла № 70 универсальная
НатВад
Рег.
02.01.2008
Сообщ.
6125
Награды: 7
|
НатВад, подскажите пожалуйста, при пошиве жакетов, пальто, плащей обязательно ли делать выкраивать обтачку горловины спинки из основной ткани, к которой потом пришивается подклад? Или все таки можно обойтись без нее? |
Можно обтачку горловины спинки не делать, как на фото.
Или может выкраивать обтачку несколько другой формы?
А какой формы обтаку вы выкраиваете обычно?
Чтобы обтачка ровно выкладывалась по горловине спинки, ее нужно выкраивать точно по форме верхней части спинки и обтачка должна быть обязательно продублирована.
И еще вопросик, как правильно утюжить сгибы лацканов, чтобы был равномерные переход в воротник?
Для этого нужно очень точно построить линию лацкана, которая при правильном построении должна плавно переходить в линию перегиба стойки воротника и затем перенести ее на пол-ку.
При пошиве верхней одежды по линии перегиба лацкана нужно обязательно приклеить узкую клеевую кромку с небольшим натяжением, чтобы линия лацкана лучше прилегала в этом месте.
При окончательной утюжке линию перегиба лацкана слегка приутюживают, выкладывая ее по нити, проложенной по линии перегиба лацкана, так же слегка приутюживается и линия перегиба стойки. Некрасиво и не современно смотрится жестко приутюженная линия перегиба лацкана и стойки воротника, она должна выглядеть округло.
При соблюдении всех правил построения и пошива этого узла изделия, воротник и лацканы должны лежать на изделии ровно, не поднимаясь вверх своими краями.
НатВад
Рег.
02.01.2008
Сообщ.
6125
Награды: 7
|
Осиночки, подскажите пожалуйста, пытаюсь пошить платье из батиста, но у меня не получается сделать красиво прямую строчку — сам шов такой как проволка получается и стягивает ткань. Что надо сделать? Чем помочь?Шв. машинка Бразер NX 400, иголку взяла № 70 универсальная |
Батист очень тонкая ткань, поэтому для ее пошива нужна не только тонкая игла, но и более тонкие нитки, не более №50. Имеет также значение наладка верхней и нижней нити.
Правильно налаженное натяжение нити проверяется очень просто. Перед стачиванием шва, нужно потянуть одновременно за концы обеих нитей и сразу станет ясно, какая из них тянется туже. Вот ее и нужно наладить послабее и проверить сторочку на кусочке ткани.
Yves
Рег.
10.03.2009
Сообщ.
81
НатВад, спасибо большое за подробное описание. Шью я всегда из Бурды, т.к сама не умею строить выкройки, а там, обтачка — как обрезанная сверху спинка, округлой формы, и она вся такая волнистая получается в готовом виде. Вот такая:

на фотохостинг →
А если пришивать подклад без обтачки, нужно ли закладывать складку на свободное облегание?
НатВад
Рег.
02.01.2008
Сообщ.
6125
Награды: 7
|
НатВад, спасибо большое за подробное описание. Шью я всегда из Бурды, т.к сама не умею строить выкройки, а там, обтачка — как обрезанная сверху спинка, округлой формы, и она вся такая волнистая получается в готовом виде. А если пришивать подклад без обтачки, нужно ли закладывать складку на свободное облегание? |
Если пришиваете подкладку без обтачки, то все равно на ней нужно закладывать складку у горловины, как и при обработке с обтачкой. Это делается для опеспечивания свободы по ширине спинки на подкладке.
Странно, что обтачка получается такая волнистая и не лежит ровно. Если она повторяет линию горловины и части плечевых швов спинки, то по идее, она должна лежать ровно, особенно если ее прикрепить ручныи стежками к среднему шву верха, то она не будет выворачивться.
Yves
Рег.
10.03.2009
Сообщ.
81
НатВад, большое Вам спасибо за подробные ответы. Я попробую сделать обтачку на основе выкройки спинки, а не как самостоятельную часть в Бурда моден, либо остановлюсь на варианте без обтачки.
Зайна
Рег.
13.07.2008
Сообщ.
340
Прошу модераторов не удалять сообщение. ![]() Я уже спрашиваю не о фасоне, а о технологии шитья
Я уже спрашиваю не о фасоне, а о технологии шитья ![]()
Из такой ткани

на фотохостинг →

на фотохостинг →
намечается платье. Платье трапеция, с незначительным расклещением от бедра.
Можно обойтись вытачкой из проймы заканчивающейся на груди? Вот такими

на фотохостинг →
Будут и боковые вытачки. А на полочке и спинке не хотелось бы…
Мерки девушки, которая будет носить платье
Ог 96
Под грудью 82
От 77
Об 98
Дтп 41
Дтс 38
Впк 44
Шг 36
Шс 42
Вг 28
Шп 13 (расстояние между точками плеча 40,5см)
Края ткани узорные, и на низе платья, на низе рукава и на низе брючек к платью будет этот самаый готовый узор. А как мне горловину оформить, обтачкой? Что сливался с общим видом…
Какое расклещение нужно дать к низу платья чтоб не узко было при ходьбе и не слишком широко было? И каким должен быть вырез горловины с учетом мерок и структуры ткани? (Ткань не растягивается)
На что мне нужно обратить внимание при раскрое и шитье? Буду очень благодарна за отклики
Манон
Рег.
26.08.2009
Сообщ.
314
Уважаемые мастера . Подскажите, пожалуйста, как определить расход ткани на плиссированную юбку . Хочу пошить дочке в школу сарафан с плиссированной юбкой. Но перед опрецией «Плиссе» нужно кусок ткани подшить, а сколько этой ткани брать — не знаю.