This post aims to discuss all the common reasons why a Remote Desktop Protocol (RDP) connection can’t connect to a remote computer. I will explain how to identify the cause and then show you how to fix your failing Remote Desktop Connection.
Contents
- Verify the network connectivity
- Verify user permissions
- Allow Remote Desktop Connection
- Verify the status of the RDP services
- Identify whether Group Policy is blocking RDP
- Check the RDP listener port on the remote computer
- Checking RDP connectivity with PowerShell
- Conclusion
- Author
- Recent Posts
Krishna is working as a Senior System Administrator for a managed IT Service provider. He has 10 years of IT experience in the insurance and healthcare industries. Krishna focuses on Windows and Active Directory administration and works with various other technologies such as VMware, Azure, Hyper-V, and PowerShell.
There are many reasons why an RDP connection to a remote machine might fail. The screen below shows a typical error for a failed RDP connection.
«Remote Desktop can’t connect to the remote computer for one of these reasons:»
RDP connection failed
Verify the network connectivity
Every admin should be familiar with this RDP error. The most common cause of a failing RDP connection concerns network connectivity issues, for instance, if a firewall is blocking access.
You can use ping, a Telnet client, and PsPing from your local machine to check the connectivity to the remote computer. Keep in mind ping won’t work if ICMP is blocked on your network. The main advantage of Telnet and PsPing is that you can connect via TCP, and you can check whether the RDP port 3389 is open.
The Telnet client isn’t enabled by default. Use this command to enable Telnet from a command prompt:
dism /online /Enable-Feature /FeatureName:TelnetClient
And use this one from a PowerShell console:
Install-WindowsFeature -name Telnet-Client
Use PsPing if you have problems enabling the Telnet client. PsPing also lets you test the connectivity to a specific TCP port. It is portable, so no installation is required.
First, try to ping the remote computer’s hostname or IP address.
The remote machine connection timed out with PsPing
As you can see in the screenshot above, I was unable to ping the remote machine, and the port was not reachable as well.
If this works, and you are unable to ping the machine using the FQDN name, check whether DNS resolution is working properly. Sometimes the hostname is pointing to another machine on DNS that is either offline or not in use.
If you can’t connect at all, a local firewall (Windows Firewall or third-party security software) or a network firewall might be blocking the port. The PowerShell command below lets you display the Windows Firewall state on the remote machine.
Invoke-Command -ComputerName [ComputerName] -ScriptBlock {netsh advfirewall show allprofiles}
Remote computer firewall status
For testing purposes, you can disable Windows Firewall on the remote computer with this command:
Invoke-Command -ComputerName Win7 -ScriptBlock {netsh advfirewall set allprofiles state off}
Note that you should enable PSRemoting on the remote computer to execute the above command. If not, you can use PsExec to enable PowerShell remoting with the command below:
psexec \RemoteComputer -u administrator -p PASSWORD netsh advfirewall set allprofiles state off
Verify user permissions
If your user account has no administrator privileges, you should be a member of the local Remote Desktop Users group to access the remote machine via RDP. By default, no members are in this group, and only members of the Administrators group can connect via RDP.
Read this 4sysops article to learn how to add users remotely to a user group.
Allow Remote Desktop Connection
Ensure Remote Desktop is enabled on the remote computer. The RDP listener could be inactive. You can enable the Remote Desktop Connection either from System Properties or from the registry.
Option 1: Select Start > Run, type sysdm.cpl, and select the Remote tab.
Remote computer RDP settings
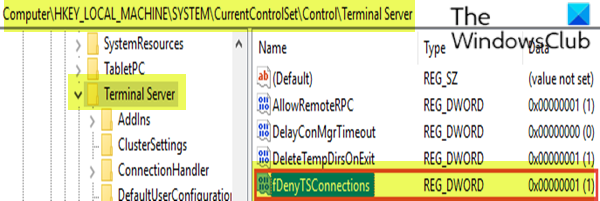
Option 2: Select Start > Run, type regedit, navigate to HKEY_LOCAL_MACHINE > SYSTEM > CurrentControlSet > Control > Terminal Server, and set the value for the key fDenyTSConnections to 0 (0 = Enable; 1 = Disable).
Remote computer RDP settings in the Registry
You can use this PowerShell command to enable RDP remotely:
(Get-WmiObject Win32_TerminalServiceSetting -Computername [ComputerName] ‑Namespace rootcimv2TerminalServices).SetAllowTsConnections(1,1)
And from the command prompt, you can use the next command if the Remote Registry service is running on the remote computer:
REG ADD "\[RemoteComputer] HKLMSYSTEMCurrentControlSetControlTerminal Server" /v fDenyTSConnections /d 0 /f /t REG_DWORD
Verify the status of the RDP services
On both the local (client) computer and the remote (target) computer, the following services should be running:
- Remote Desktop Services (TermService)
- Remote Desktop Services UserMode Port Redirector (UmRdpService)
The UmRdpService is an RDP port redirector service, which helps redirect drives, printers, and ports from the local to the remote machine. For example, if you want to map all of your local drivers to the remote computer, this service will do the job.
If the UmRdpService service was set to disabled through a central Group Policy, RDP connections to this machine will fail. Note that sometimes restarting the service won’t fix the issue, and you have to reboot the machine after reconfiguring the Startup Type to Automatic.
Remote computer RDP services status
The PowerShell command below starts both of these services remotely if they are in a stopped state. Note that this only works if the service Startup Type is set to either Automatic or Manual.
"TermService","UmRdpService" | ForEach-Object{ (Get-WmiObject Win32_service -ComputerName [RemoteComputer] -Filter "Name = '$_' ").StartService() }
The output of the command should be either 0 (started) or 10 (already running). Check out this article to learn more about return codes and their descriptions.
Identify whether Group Policy is blocking RDP
You can enable or disable Remote Desktop centrally through Group Policy settings. To check those settings, go to Start > Run, type gpedit.msc, navigate to Computer Configuration > Administrative Templates > Windows Components > Remote Desktop Services > Remote Desktop Session Host > Connections, and find the Allow users to connect remotely by using Remote Desktop Services setting. If the setting is Disabled, you should change it to Enabled or Not Configured.
RDP settings in Group Policy
Use GPResult (gpresult /h C:output.htm) from a console on the remote machine to verify whether Group Policy has been applied properly. Also you can use rsop.msc to get the applied Group Policy settings on a particular machine.
Check the RDP listener port on the remote computer
By default, the RDP client verifies that the Remote Desktop service on the remote computer is listening on port 3389. If not, another application could be occupying the same port.
To check whether any remote session (RDP-TCP) already exists on that computer, use qwinsta, which gives you a list of local as well as remote sessions.
Using qwinsta to list sessions
The screenshot above shows that the rdp-tcp session with session ID 65536 already exists.
To verify that the Remote Desktop service is using the correct port, use the Registry Editor. Go to Start > Run, type regedit, navigate to HKEY_LOCAL_MACHINE > SYSTEM > CurrentControlSet > Control > Terminal Server > WinStations > RDP-Tcp, and review the PortNumber setting.
RDP port setting from the registry
Alternatively, you can use the command below:
REG QUERY "\[Remote Computer]HKLMSYSTEMCurrentControlSetControlTerminal ServerWinStationsRDP-Tcp" /F "PortNumber"
If the output of the RDP port value is 0x00000d3d (hex), your RDP port is configured with a default port, which is 3389. In the screenshot above, the default RDP port was changed to 3388. In this case, either you have to change the RDP port to the default one, or you access the remote machine via the new port 3388.
In the Remote Desktop client, you have to specify the custom RDP port in the computer address space as shown in below:
RDP access with a different port
If another application is using the RDP port, you have to find that application on the remote machine and then reconfigure it to use a port other than 3389. Use the netstat command to find the application PID listening on port 3389. And with the tasklist command, you can identify the name of the application running with this PID as shown below:
Check whether another process is using the RDP port
Checking RDP connectivity with PowerShell
Checking all those possible connectivity issues manually is a time-consuming task. I wrote a little PowerShell script that automates this task.
My Get-RDPStatus.Ps1 script checks connectivity of the remote computer via ping, FQDN, RDP ports, and RDP services, and the RDP status with NLA (Network Level Authentication). The script uses WMI cmdlets that work over RPC and therefore does not require PSRemoting. The screenshots below shows the output of the script.
The latest version is available for download from the Github.
Subscribe to 4sysops newsletter!
Sample Script output 2
Sample Script output 1
Conclusion
Many articles discuss Remote Desktop connection problems. I wrote this one mainly to compile all possible causes of failed RDP connections. If you know of another possible cause, please post a comment below.
Let’s try to figure out how to fix an RDP connection error This computer can’t connect to the remote computer. It occurs when you try to connect to a remote Windows computer or Windows Server host running Remote Desktop Services (RDS) role using the built-in Windows RDP client (mstsc.exe).
The problem looks like this: when you try to connect to a remote Windows server/desktop via RDP, the mstsc.exe client freezes for a minute, and a window with the following RDP error appears:
Remote Desktop Connection
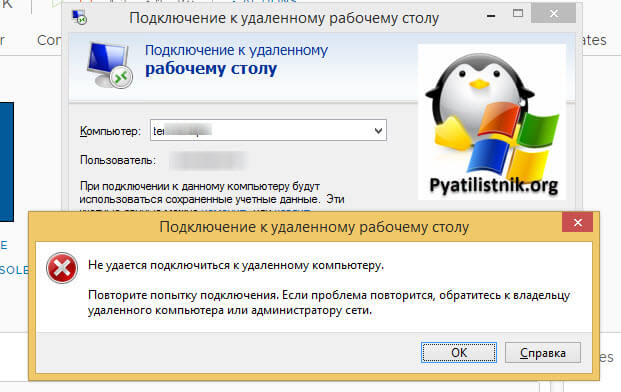
This computer can’t connect to the remote computer.
Try connecting again. If the problem continues, contact the owner of the remote computer or your network administrator.
Check the RDP Network Connectivity
First of all, check if the remote computer is accessible from your device over the network, and the default Remote Desktop port (TCP 3389) is responding (and not blocked by firewalls).
Make sure the DNS address of the remote RDP host is correctly resolved from your computer. Use the following commands:
nslookup rdp_server_name1

ping rdp_server_name1
If the DNS name is not resolved properly, check your DNS settings or try connecting to a remote host using its IP address.
Hint. Be sure to check the contents of the local hosts file. It should not contain static entries for the name or IP address of your remote server. Remove extra entries from the hosts file. You can list the contents of the hosts file using PowerShell:
Get-Content $env:SystemRootSystem32Driversetchosts
You can check the RDP port availability on a remote server from a client workstation using:
The Telnet client:
telnet rdp_server_name1 3389
PowerShell 4.0 and higher:
Test-NetConnection rdp_server_name1 -Port 3389 -InformationLevel Quiet
Note. If this command returned True, then the RDP port responds on the server and it’s not blocked.
PowerShell all versions:
New-Object System.Net.Sockets.TcpClient).Connect(‘rdp_server_name1’, 3389)
If port 3389 is unavailable, you should check if the Remote Connection is enabled on the remote server (right-click on Start button > Settings > System > Remote Desktop > Enable Remote Desktop).
You can enable RDP remotely on a Windows computer by changing the fDenyTSConnections registry.
Check the RDP Service Settings on the Remote Computer
If Remote Desktop is enabled, next you should check the setting, which determines the maximum number of simultaneous users’ connections to a Remote Desktop. Open tsadmin.msc mmc snap-in (Administrative tools > Remote Desktop Services > Remote desktop Session Host Configuration). Click on RDP-TCP properties, and check the value of the Maximum connections property in Network Adapter tab.
The tsadmin.msc is missing in modern Windows versions (like Windows 10 or Windows Server 2016), so you should set the RDP service settings using Group Policies.
- Open the local GPO editor on the remote host: Win + R > gpedit.msc;
- Navigate to the following GPO section: Computer Configuration > Policies > Administrative Templates > Windows Components > Remote Desktop Services > Remote Desktop Session Host > Connections;
- Enable the policy parameter named Allow users to connect remotely using Remote Desktop Services (if this policy is disabled, the remote user will not be able to connect to this computer using Remote Desktop Services);
- Also, check if the Remote Desktop Services do not limit the number of simultaneous connections to the server. A maximum number of RDP connections can be specified in the section Connections using the policy Limit number of connections. Set unlimited connections by specifying 999999 in the option RD Maximum Connections allowed;
Use the netstat command to verify if TCP port 3389 is in the Listening state. Open a command prompt as administrator, and execute the command:
netstat -a -o|find "LIST"
As you can see, in our example, port 3389 is listening.
TCP 0.0.0.0:3389 DESKTOP-JOPF9:0 LISTENING 1096
Try to restart the Remote Desktop Services service. You can perform this action using the services.msc console or with the following command in the elevated PowerShell prompt:
get-service TermService| Restart-Service -force -Verbose
Check RDP Port and Windows Firewall Settings
In some cases, the administrator can change the RDP port number from default 3389 to something else (although Microsoft does not recommend this). To check the current port on which the Remote Desktop service is listening on the computer, open the registry editor (regedit.exe), and go to the registry key:
HKEY_LOCAL_MACHINESYSTEMCurrentControlSetControlTerminal ServerWinStationsRDP-Tcp
Note the value of the PortNumber REG_DWORD parameter. It indicates the current TCP port assigned to the RDP service. In our example, this is 3389 (d3d hexadecimal value). If you have a different port, you can change it to 3389 (in decimal), and restart the computer.
You can check the current Remote Desktop listening port number using PowerShell:
Get-ItemProperty -Path 'HKLM:SYSTEMCurrentControlSetControlTerminal ServerWinStationsRDP-Tcp' -name "PortNumber"
In order to check the RDP port on a remote computer, use the Invoke-Command command:
Invoke-Command -ComputerName computername1 {Get-ItemProperty -Path HKLM:SYSTEMCurrentControlSetControlTerminal ServerWinStationsRDP-Tcp -Name PortNumber | select PortNumber}
If a non-standard port is configured for Remote Desktop on a remote computer, you must specify the port number separated by a colon when connecting to the computer through the Remote Desktop Connection client. For example, rdp_server_name1:3320.
Also, check that the rule which allows incoming RDP connections is enabled in the Windows Defender Firewall settings.
- To do this, go to the Control Panel > System and Security > Windows Defender Firewall;
- Press the “Allow an app or feature through Windows Defender Firewall” > Change Settings;
- Find the Remote Desktop rule, and make sure it is enabled for Private and Public networks.
Hint. You can enable the built-in firewall rule for the Remote Desktop Service running on port TCP/3389 using PowerShell:
Enable-NetFirewallRule -DisplayGroup "Remote Desktop"
If this built-in firewall rule is missing, you can create a new one:
New-NetFirewallRule -DisplayName "AllowRDP_connection" -Direction Inbound -Protocol TCP –LocalPort 3389 -Action Allow
Check your network connection profile. You may encounter various RDP connection errors if a Public profile is configured for your network location. Try changing it to Private.
You can change the network location using the Control Panel (Network and Internet > Status > Connection Properties), or with PowerShell.
Get current network profile:
Get-NetConnectionProfile
Change network connection profile to Private:
Set-NetConnectionProfile -InterfaceIndex 14 -NetworkCategory Private
If you use a third-party firewall or antivirus, make sure it does not block incoming RDP connections. You can temporarily disable your antivirus software.
Next, check your network connection properties. Verify if the network connection status is set to Public. Change it from Private to Public if needed (Settings > Network & Internet > Status > Network status > Change connection properties).
In some cases, you need to try resetting the winsock and IP stack settings for the network adapter on the remote computer. Open a command prompt with administrator rights and run the commands:
netsh winsock reset

netsh int ip reset

ipconfig /release

ipconfig /renew

ipconfig /flushdns
In Windows 10, there is a special option to reset network settings in Settings > Network and Internet > Status > Network reset.
After resetting the network settings, you need to reboot Windows.
RDP This computer can’t connect to the remote computer: a possible cause
Another possible cause of the RDP error may be a high level of security, which is not supported by older versions of the RDP client.
In this case, open the General tab on the RDP-Tcp properties window, and change the Security layer from default Negotiate to less secure RDP Security Layer.
Tip. Snap-in tsadmin.msc and RDP-Tcp Properties dialog boxes are missing in Windows Server 2019/2016 and 2012 R2. But you can configure the Remote Desktop setting using the local Group Policy Editor (gpedit.msc). The necessary policies are located in the following GPO section: Local Computer Policy > Computer Configuration > Administrative Templates > Windows Components > Remote Desktop Services > Remote Desktop Session Host > Security.
RDP security level can be specified using the policy named Require user of specific security layer for remote (RDP) connections. Enable this policy, and in the dropdown menu select the RDP Security level. This will change the Remote Desktop security layer from the default Negotiate to the less secure RDP.
Save the changes, update local GPO settings using the “gpupdate /force” command, and restart the Remote Desktop Service:
net stop TermService && net start TermService
RemoteApp Disconnected: Can’t Connect to the Remote Computer
In some cases, when connecting with Windows 10 to a remote desktop on Remote Desktop Gateway on Windows 2012 R2, an error occurs:
RemoteApp Disconnected
Your computer can’t connect to the remote computer because an error occurred on the remote computer that you want to connect to. Contact your network administrator for assistance.
To fix this problem, you need to perform the following steps on the RDP client:
- Open the Registry Editor (regedit.exe);
- Go to the registry key HKEY_CURRENT_USERSoftwareMicrosoftTerminal Server Client;
- Create a DWORD parameter with the name RDGClientTransport and the value 1;
- Restart the computer.
The RDGClientTransport parameter forces the clients to use the RPC/HTTP connections instead of HTTP/UDP to connect to the server.
If the above solution didn’t fix the RDP connection error, try to change the collection settings on the RDSH server side. Open properties of your problematic application collection, go to the Security tab, and uncheck the option “Allow connections only from computers running Remote Desktop with Network Level Authentication”.
If the RemoteApp Disconnected error occurs on only a single not-domain joined computer, it is possible, that the different LAN Manager/NTLM policy settings are used on the RDSH host and the desktop computer. Often, this can cause authentication problems.
Check current Network Security: LAN Manager authentication level policy settings on RSDH using the command gpresult /r c:tmpgpreport.html (inspect html file) or using rsop.msc (this policy is located in the section Computer Configuration > Windows Settings > Security Settings > Local Policies > Security Options). If LM and NTLMv1 protocols are disabled on your RDSH server (Send NTLMv2 Response only policy value), you must change the appropriate policy settings on the client side.
- To do this, open the local GPO editor (gpedit.msc);
- Go to the GPO section above;
- Enable the policy “Network Security: LAN Manager authentication level”, and set its value to Send NTLMv2 Response only;
- Update the policies on the client with the gpupdate command;
- Check your RemoteApp connection.
Fix: Can’t Connect to the Remote Desktop Gateway Server
There is another error related to Remote Desktop Gateway which is used to deliver RemoteApps to users:
RemoteApp Disconnected.
Your computer can’t connect to the remote computer because the Remote Desktop Gateway server address is unreachable or incorrect. Type a valid Remote Desktop Gateway server address.
This error looks like this:
Your computer can’t connect to the remote computer because the Remote Desktop Gateway server is temporarily unavailable. Try reconnecting later or contact your network administrator for assistance.
If you are facing one of the errors above, then, most likely, the problem is that your computer can’t resolve the public FQDN name of your Remote Desktop Gateway server. In some cases, the public RDGW name can’t match the hostname.
To fix this problem:
- Open the Internet Information Services (IIS) Manager on the Remote Desktop Gateway server;
- Go to the IIS section Sites > Default Website > RDWeb > Pages > Application Settings;
- For the DefaultTSGateway value, enter the server’s FQDN public name of your RD Gateway server, and then restart the web services with the command:
iisreset
Also, check your RDGW certificate. Your certificate must not be expired.
You can find your SSL certificate info by going to Server Manager > Remote Desktop Services > Collections > Your_Collection > Tasks > Edit Deployment Properties > Certificates > RD Gateway > View Details. Check the certificate expiration date.
Go back to your client’s PC, and try to start a new RDP session. The connection should be established successfully.
Remote Desktop Connection: Error Code 0x904, Extended Error Code: 0x7
In modern versions of Windows 10/11 and Windows Server 2016/2019/2022, you may encounter another common RDP connection error:
Remote Desktop Connection
This computer can’t connect to the remote computer.
Try connecting again.
Error Code: 0x904
Extended Error Code: 0x7
Most often, when connecting to RDP, an error 0x904 appears on an unstable network connection (not enough bandwidth, packages lost, mismatch encryption cyphers, etc.), or when your VPN connection to a corporate network is too slow. Try to reconnect to your VPN workspace or change your ISP.
- About
- Latest Posts
I enjoy technology and developing websites. Since 2012 I’m running a few of my own websites, and share useful content on gadgets, PC administration and website promotion.
А бывает ли у вас такое, что не работает RDP? Ну, то есть, может и работает, на подключиться к виртуалке не получается. Скорее всего, для многих это не будет никакой проблемой, и у каждого прямо с сейчас с ходу найдётся пара советов, куда зайти и что проверить. Но вдруг, кто-то о чём-то всё же не знает. Здесь собрали несколько рецептов решения, начиная с самых банальных. Ну, на всякий случай…
Начнём с того, что иногда люди сами себе отрубают RDP, после чего обращаются в техподдержку, надеясь, что проблема не на стороне клиента. В таких случаях специалисты техподдержки только и могут, что предложить переустановку.
Но помимо этого, сложность может быть заключена немного глубже. Для человека, пытающегося подключиться к своему серверу, это может выглядеть как “бесконечный коннект”, не заканчивающийся ни чем. А может появиться сообщение вида “Произошла внутренняя ошибка”. Во многих подобного рода случаях могут помочь лежащие на поверхности решения.
Во-первых, необходимо убедиться, что на виртуальном сервере достаточное для штатного функционирования службы RDP количество оперативной памяти. Возможна, например, ситуация, когда на виртуалке нагружено большое количество торговых ботов и сервер под такой нагрузкой не может толком раскрутить даже RDP.
Во-вторых, пользователь мог сам закрыть порт 3389 на сервере, который и используется по умолчанию службой RDP. Правила для входящих подключений по этому порту так и называются – “Удаленный рабочий стол – пользовательский режим”. Ну, вот, всякое же бывает. Допустим, неудачно настроил брандмауэр. Ну, или, скажем, скачал “супер безопасный софт для супер безопасного интернета”.
Иногда что-то может пойти не так с самой рабочей станции, с которой производится подключение. Тогда имеет смысл очистить историю RDP-подключений. Делается это следующим образом:
- откройте редактор реестра
regedit.exeи перейдите в веткуHKEY_CURRENT_USERSoftwareMicrosoftTerminal Server Client; - разверните ветку реестра
HKEY_CURRENT_USERSoftwareMicrosoftTerminal Server ClientDefault, и чтобы очистить историю последних RDP-соединений, выделите все ключи с именамиMRU0-MRU9, щелкните правой клавишей и выберите пунктDeleteилиУдалить.

Чтобы очистить историю всех RDP-подключений и сохранённых имён пользователей, нужно очистить содержимое ветки реестра Servers. Так как выделять все вложенные ветки не очень удобно, проще всего удалить ветку Servers целиком, а затем пересоздать ее вручную.

Те же операции можно сделать и через Powershell. Для получения информации о правилах брандмауэра приложение должен быть запущен с правами администратора.

Далее, необходимо проверить, запущена ли служба:
Get-Service TermServiceИз полученного результата следует убедиться, что поле Status установлено в значение Running:

Также, это можно посмотреть в диспетчере задач на вкладке Services (Службы) или в оснастке services.msc:
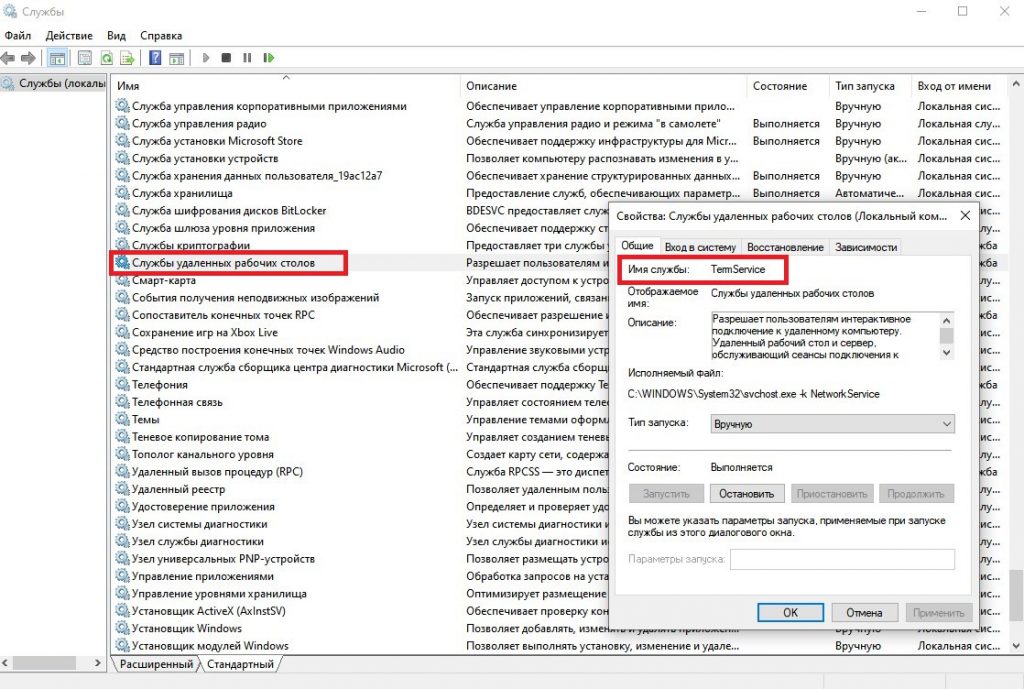
Ещё необходимо проверить, слушается ли порт 3389 на стороне сервера. Сделать это можно так же через Powershell:
Get-NetTCPConnection -State Listen | Where-Object LocalPort -EQ 3389Порт должен быть в выведенном списке. Поле State должно иметь значение Listen.

На виртуальном сервере проверить порт 3389 можно и через монитор ресурсов (resmon.exe). Активность порта видна на вкладке Network (Сеть) в разделе TCP Connections (TCP-подключения):

Туда же можно попасть через Диспетчер задач, перейдя на вкладку Performance (Производительность) и далее на Open Resource Monitor (Открыть монитор ресурсов):

Также, данный функционал доступен через Панель управления → Администрирование → Монитор ресурсов:
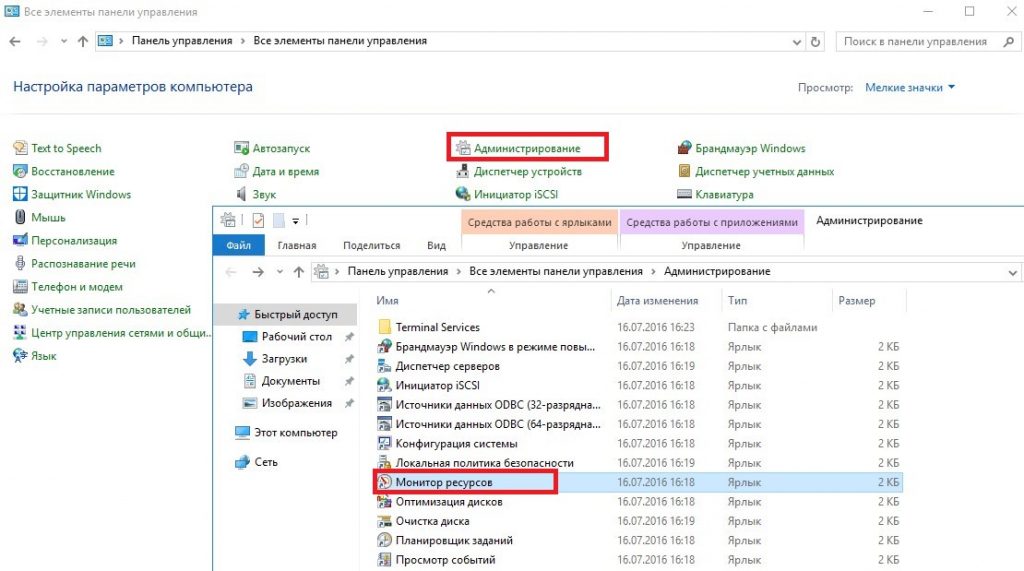
Ещё одно важное замечание. По умолчанию Windows блокирует все входящие подключения, поэтому у вас должно быть разрешающее правило. Рассмотрим случай, когда вы не используете сторонний межсетевой экран. Если вы всё же пользуетесь таким файрволом, обратитесь к его документации.
Итак, для брандмауэра Windows проверьте, существует ли правило, разрешающее входящие подключения RDP:
Get-NetFirewallPortFilter | Where-Object LocalPort -EQ 3389 | Get-NetFirewallRuleПоле Enabled должно иметь значение True, поле Action – значение Allow.

Также, эти данные доступны в оснастке wf.msc:

Перейти к настройкам брандмауэра можно также через Windows Administrative Tools в меню Пуск.
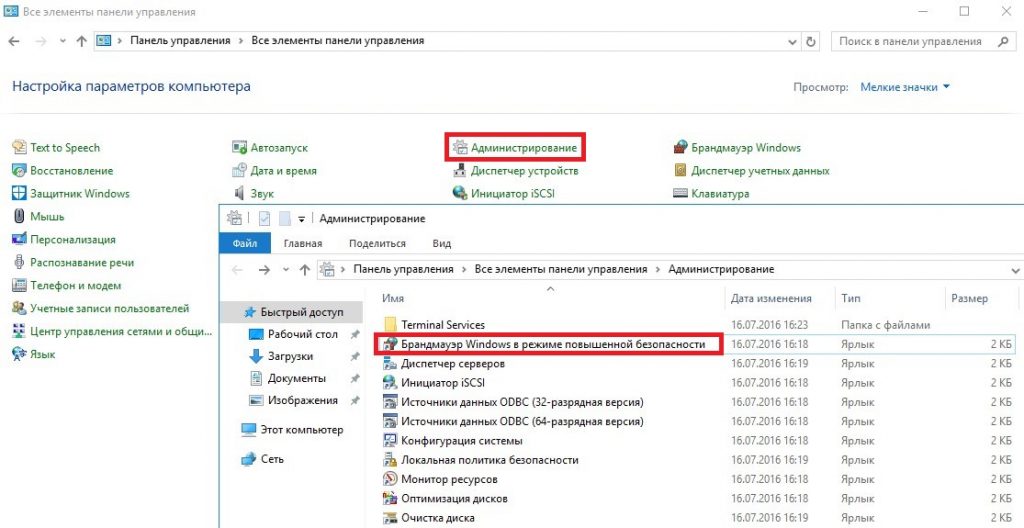
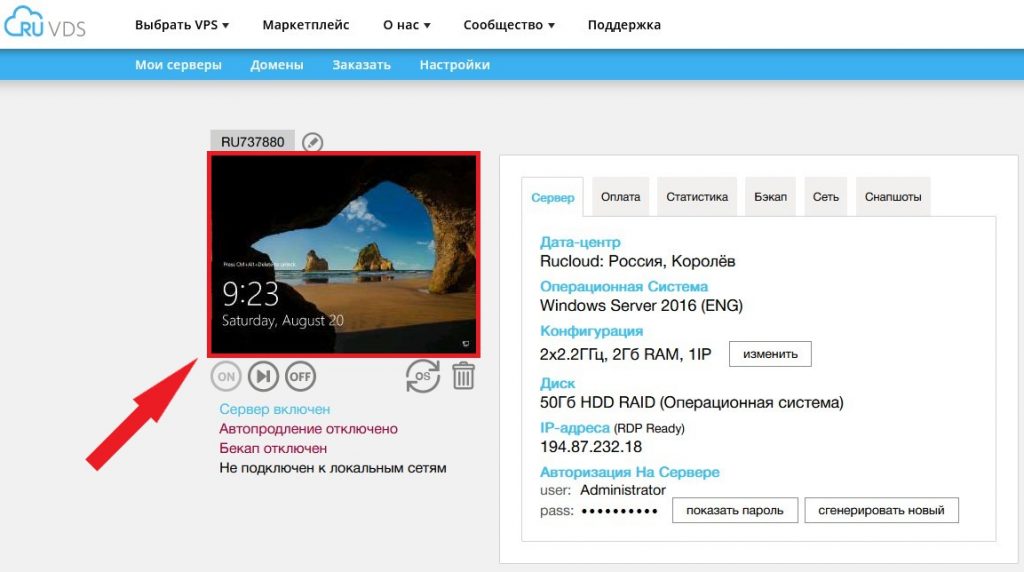
Для подключения к своей виртуалке вы также можете использовать аварийный режим в случае, если доступ по RDP осуществить не получается. Данная опция присутствует в личном кабинете. Для того, чтобы воспользоваться аварийным режимом, просто кликните на картинку с рабочим столом вашего сервера.
Ну, и наконец в крайнем случае, если на сервере нет важных данных, можно переустановить систему или написать в техническую поддержку.
Обновлено 08.12.2022

Описание проблемы
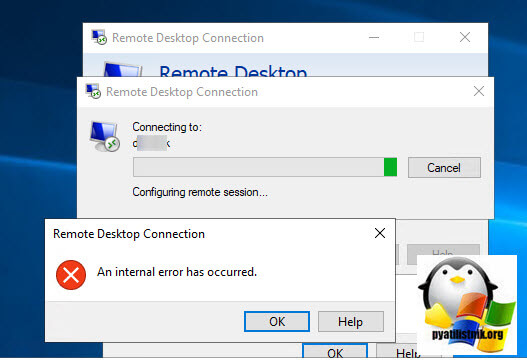
Есть сервер с операционной системой Windows Server 2012 R2, сотрудник пытается к нему подключиться, через классическую утилиту «Подключение к удаленному рабочему столу», в момент авторизации, выскакивает окно с ошибкой «Произошла внутренняя ошибка».
В английском варианте ошибка звучит вот так:
An internal error has occurred
После этого у вас разрывается соединение. Когда мы видели моргающий экран по RDP, там хотя бы вы попадали на сервер и могли открыть диспетчер устройств, тут сразу все обрубается на корню. Давайте смотреть, что можно сделать.
🆘 Что есть в логах?
Если посмотреть журналы событий на удаленном сервере, куда вы пытаетесь подключиться, то там порядок событий будет такой:
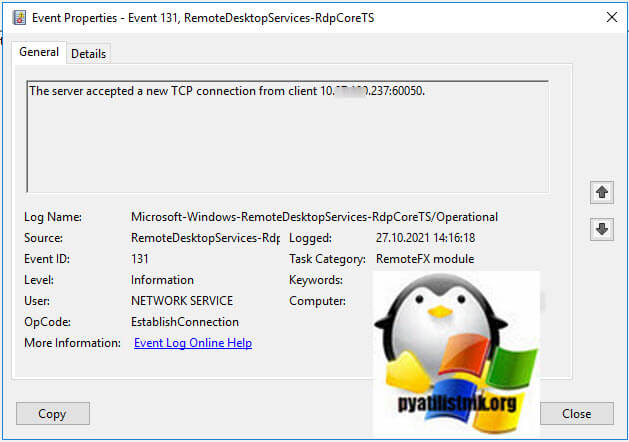
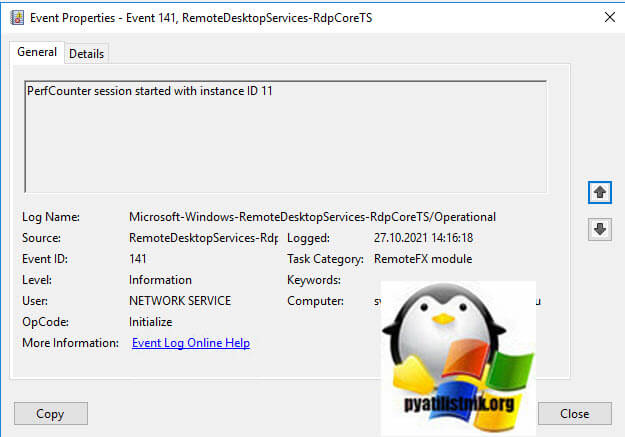
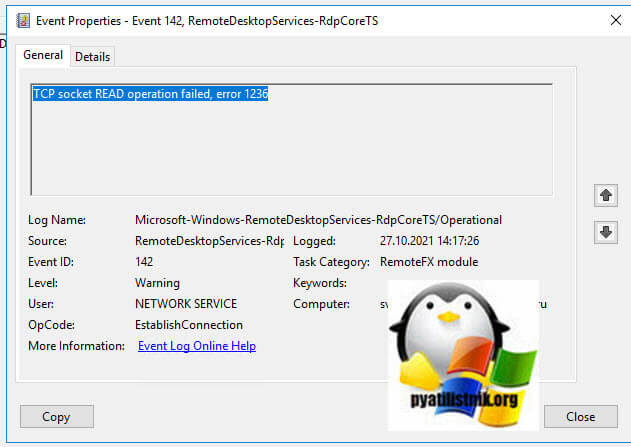
События нужно искать в журнале Microsoft-Windows-RemoteDesktopServices-RdpCoreTS/Operational
- 1️⃣ Первым будет идти событие ID 131 «The server accepted a new TCP connection from client IP-адрес:60050.». Тут вы увидите IP-адрес с которого идет попытка входа.
- 2️⃣ Далее событие ID 65 «Connection RDP-Tcp#11 created «.
- 3️⃣ Затем событие 141 «PerfCounter session started with instance ID 11». Тут сессии будет назначен ID.
- 4️⃣ За ним будет идти ID 142 «TCP socket READ operation failed, error 1236».
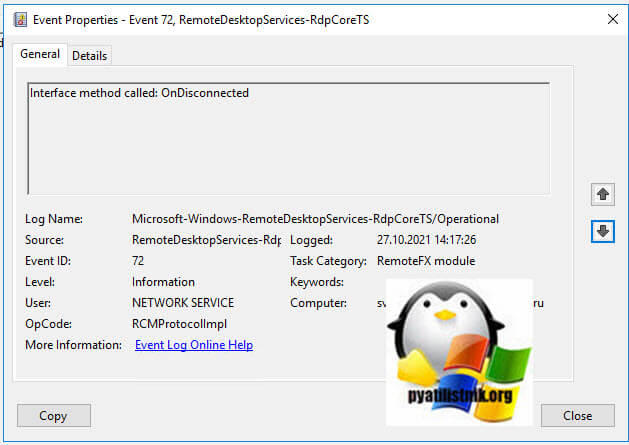
- 5️⃣ Потом вы увидите ID 72 «Interface method called: OnDisconnected»
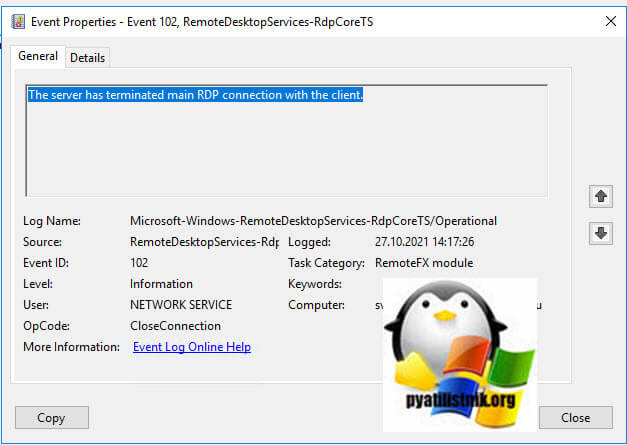
- 6️⃣ И же после этого вам покажут, что сервер разорвал подключение: «ID 102 The server has terminated main RDP connection with the client.»
- 7️⃣ В событии ID 145 так же появляются подробности «During this connection, server has not sent data or graphics update for 0 seconds (Idle1: 0, Idle2: 0).».
- 8️⃣ Могут быть события с ID 148 «Channel rdpinpt has been closed between the server and the client on transport tunnel: 0.» или «Channel rdpcmd has been closed between the server and the client on transport tunnel: 0.» или «Channel rdplic has been closed between the server and the client on transport tunnel: 0.»
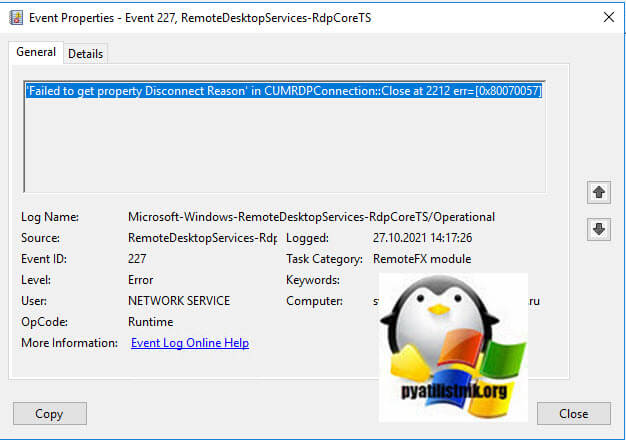
- 9️⃣ Ну и вишенка на торте, ошибка ID 227 «‘Failed to get property Disconnect Reason’ in CUMRDPConnection::Close at 2212 err=[0x80070057]»
Исправляем ошибку «Произошла внутренняя ошибка»
Так как по RDP подключиться не получается, то первым делом нужно проверить отвечает ли порт, по умолчанию это 3389. О том, как проверить порт на удаленном сервере я вам описывал, там все сводилось к выполнению команды Telnet, ознакомьтесь. Если порт отвечает, то делаем следующее.
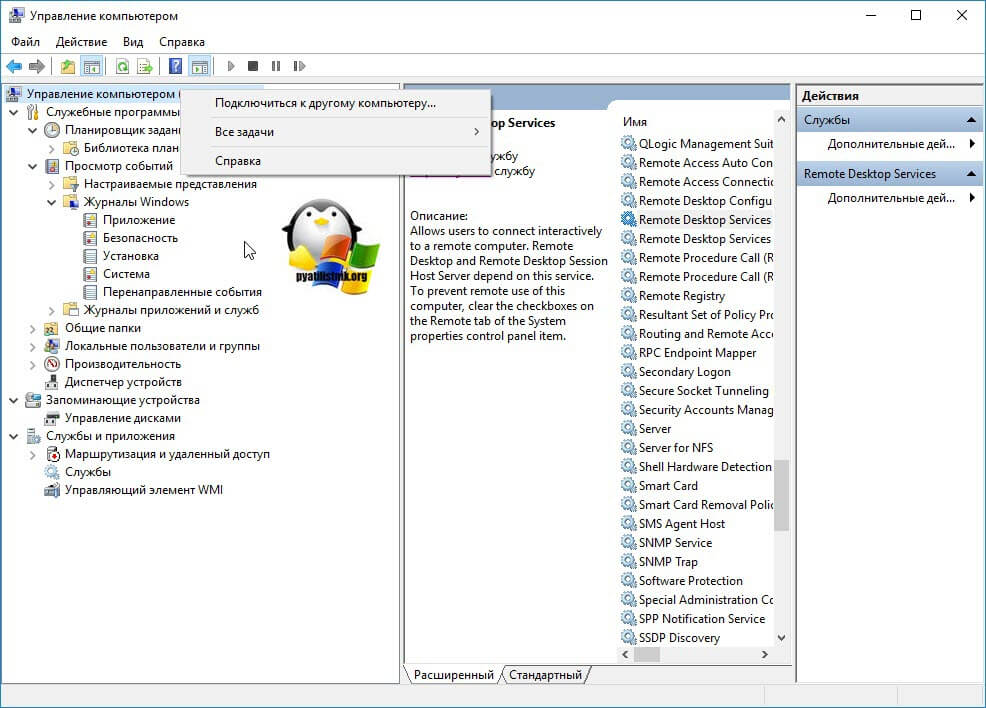
Нужно удаленно перезапустить службу на этом сервере, чтобы сам сервер не перезагружать, так как в этот момент, он может выполнять важные задачи, можно использовать утилиту «Управление компьютером». Открыть ее можно через команду вызова оснастки, вызываем окно «Выполнить», через одновременное нажатие клавиш WIN и R, в котором пишем:
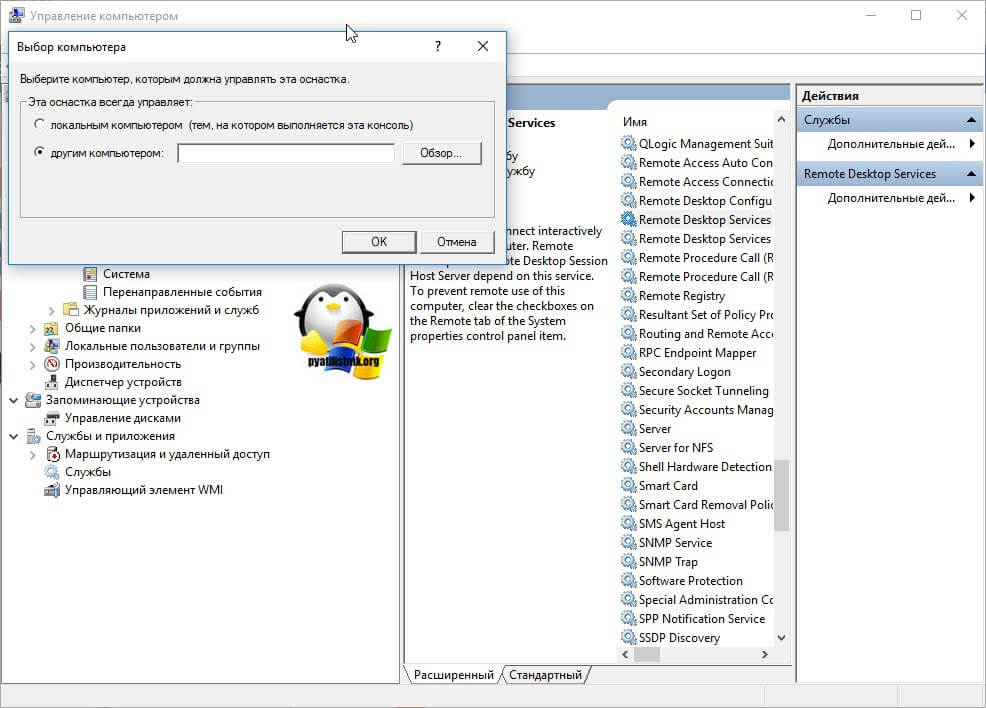
В открывшейся оснастке, щелкните в самом верху по пункту «Управление компьютером» правым кликом мыши, и выберите пункт «Подключиться к удаленному компьютеру».
Выберите пункт «Другим компьютером» и укажите его DNS имя, или найдите его через кнопку обзор.
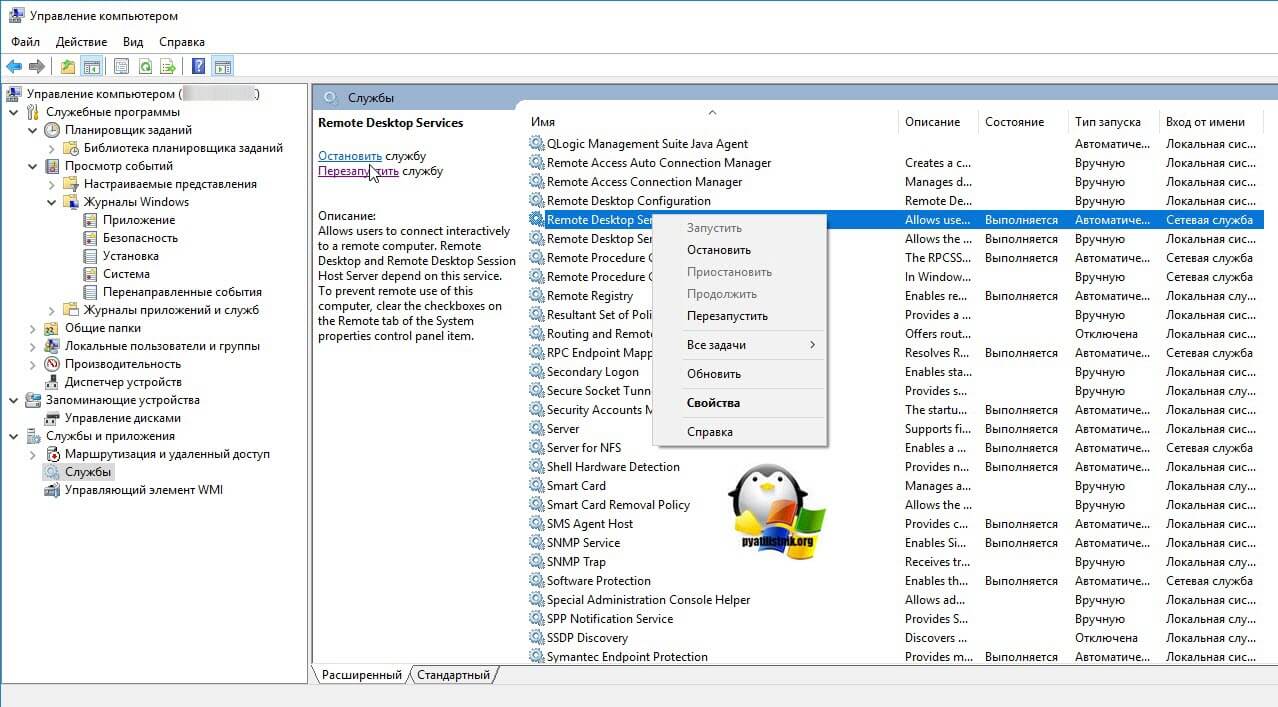
Когда вы подключитесь к нужному серверу, перейдите в пункт «Службы и приложения — Службы», в списке сервисов найдите службу удаленных рабочих столов (Remote Desktop Services), и перезапускаем ее. После этого ошибка подключения по RDP «Произошла внутренняя ошибка», у вас должна пропасть.
Так же вы можете использовать оболочку PowerShell запущенную от имени пользователя, у которого есть права на удаленный сервер, где будет перезапускаться служба RDP. Выполните:
Get-Service TermService -ComputerName Имя сервера | Restart-Service –force –verbose
Дополнительные методы решения
Если вам не помог первый метод, перезапускающий службу удаленных рабочих столов, то можно попробовать выполнить правку реестра. Открываете редактор реестра Windows, если у вас физического доступа к серверу нет или он далеко и вам лень до него идти, то можно попробовать подключиться к реестру удаленного сервера.
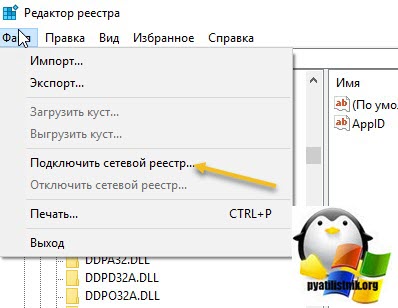
Для этого в окне «Редактор реестра» пункт меню «Файл — Подключить сетевой реестр».
В открывшемся окне «Выбор компьютера» указываем его DNS-имя или ip-адрес и нажимаем ок. У вас будет установлено подключение к удаленному реестру сервера, что испытывает проблемы.
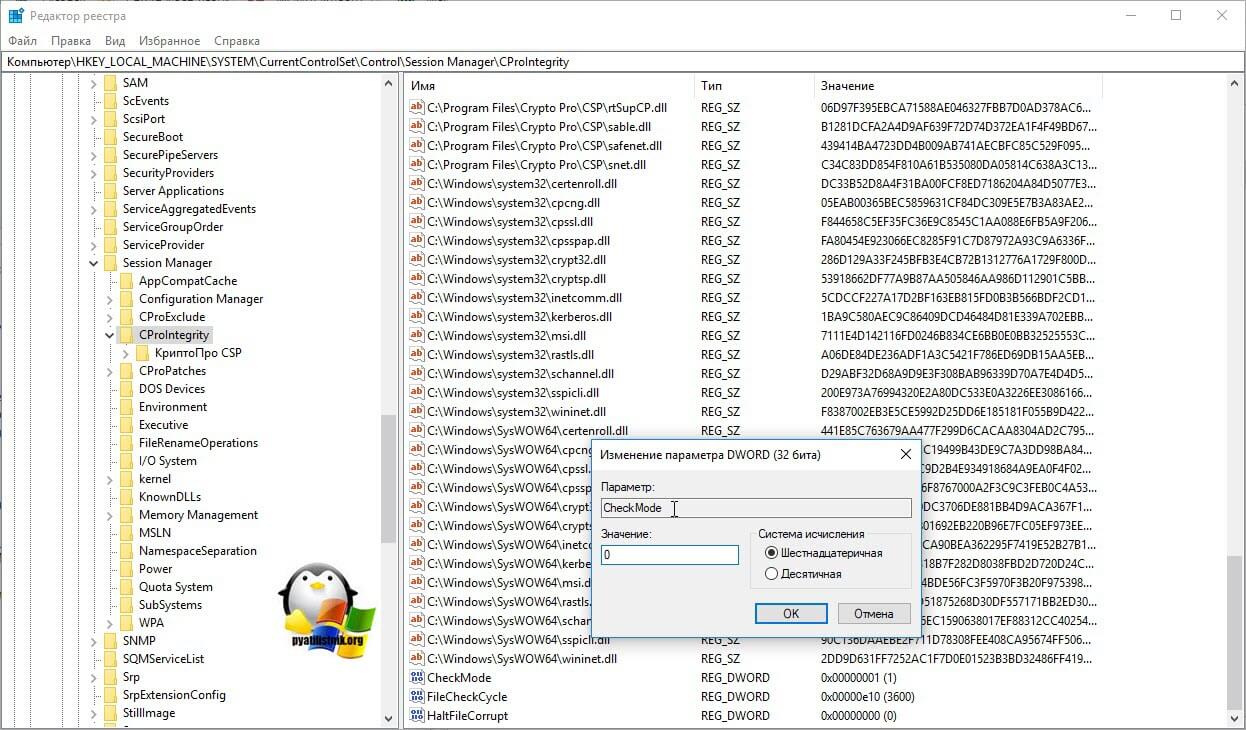
Находим ключ CheckMode по пути
HKEY_LOCAL_MACHINESYSTEMCurrentControlSetControl Session ManagerCProIntegrityCheckMode
Перед любыми правками реестра, обязательно сделайте выгрузку нужной ветки, чтобы можно было восстановить все в оперативном режиме
Выставляем ему значение о, чтобы отключить у программы КриптоПРО CSP проверку контрольных сумм. Еще один важный момент, если у вас старая версия КриптоПРО, то это так же может быть источником, проблем, недавний пример, это ошибка «Windows installer service could not be accessed». Для этого удаляем правильно КриптоПРО CSP и ставим последнюю доступную версию.
Еще можно попробовать изменить значение вот такого ключа реестра:
HKEY_LOCAL_MACHINESYSTEMCurrentControlSetControl Session ManagerMemory ManagementSessionImageSize
Найдите ключ SessionImageSize и задайте ему значение 0x00000020.
Дополнительные настройки RDP клиента
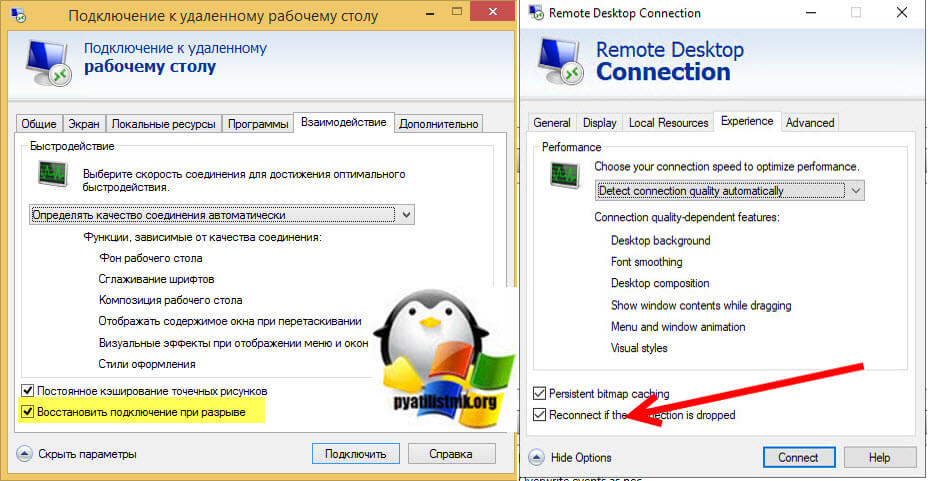
Например ошибка «An internal error has occurred» у меня встретилась на Windows Server 2022 и там мне помогло в настройках клиента RDP отключение некой опции. Перейдите в дополнительные настройки клиента для удаленного подключения, где н вкладке «Experiens (Взаимодействие)» вам нужно убрать галку с опции «Восстановить подключение при разрыве (Reconnect if the connection is droped)«
На каких-то сайтах предлагалось именно активировать данный пункт.
Удаление кэша подключений
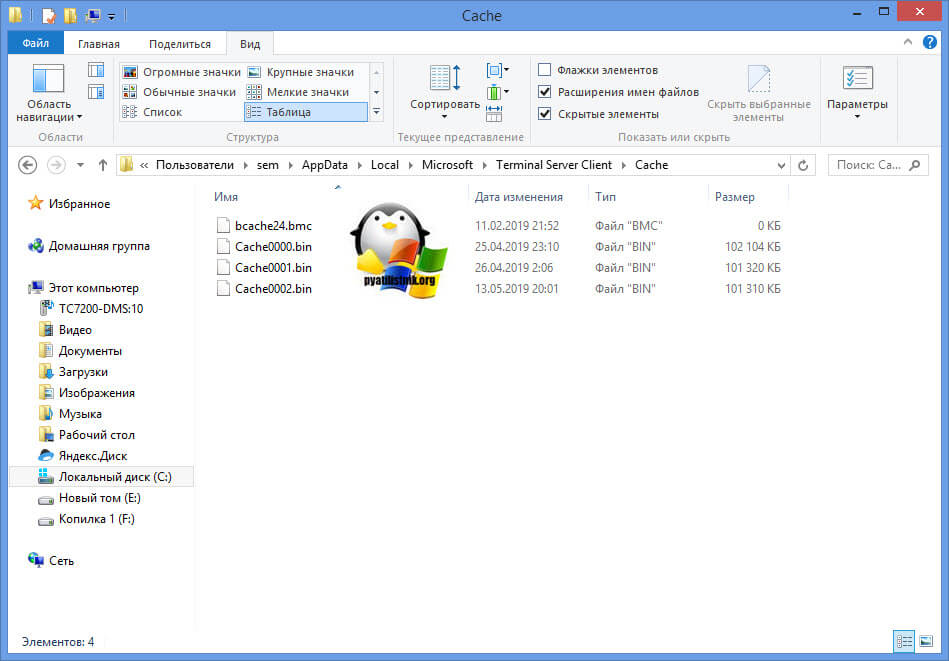
Еще одним методом решения внутренней ошибки подключения по RDP может выступать поврежденный кэш, который хранится на локальном компьютере пользователя. Для его отображения вам необходимо включить отображение скрытых папок и удалить содержимое папки:
C:Usersимя пользователяAppDataLocalMicrosoftTerminal Server Client
Обновление 07.12.2022
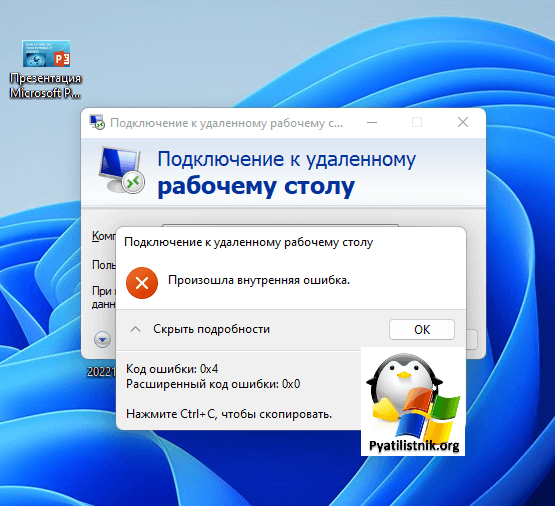
В декабре я вновь столкнулся с внутренней ошибкой, она еще стала проявлять себя вот так:
Не удается подключиться к удаленному компьютеру
Произошла внутренняя ошибка. Код ошибки: 0x4. Расширенный код ошибки: 0x0
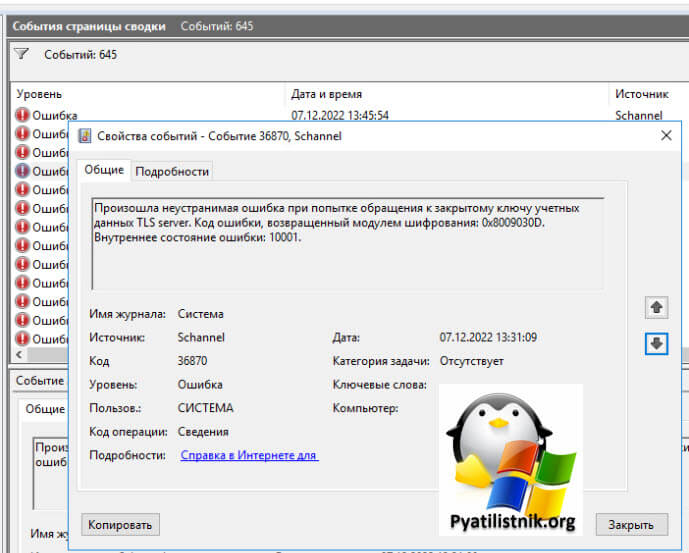
В логах сервера очень много ошибок:
Она возникает, при каждой попытке войти на рабочий стол, это и есть проблема в моем конкретном случае. Устраните ее, и ошибка с подключекнием уйдет. Перезагрузка не нужна.
Данная ошибка говорит, что на тот сертификат, что использует удаленный сервер, нет прав у самого сервера, подробности выше по ссылке
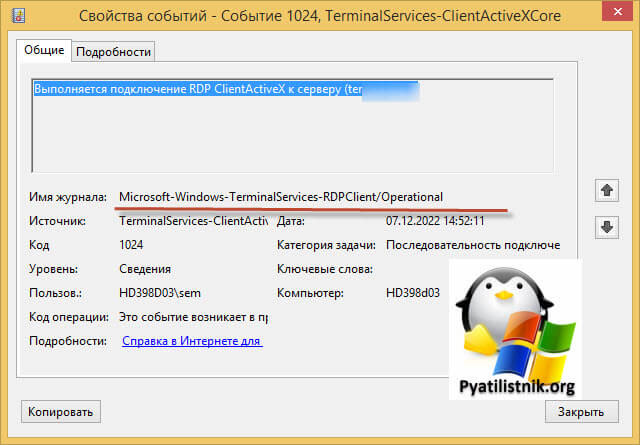
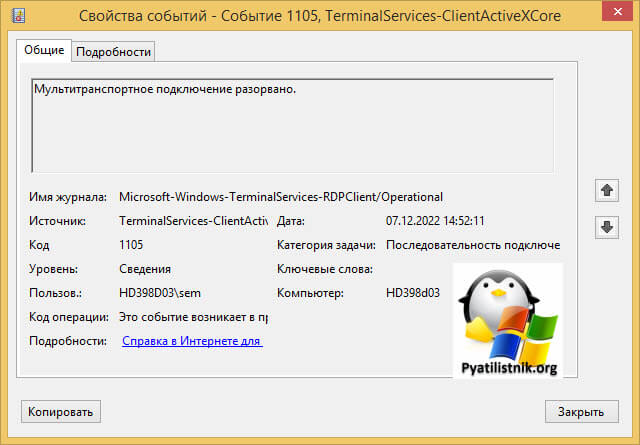
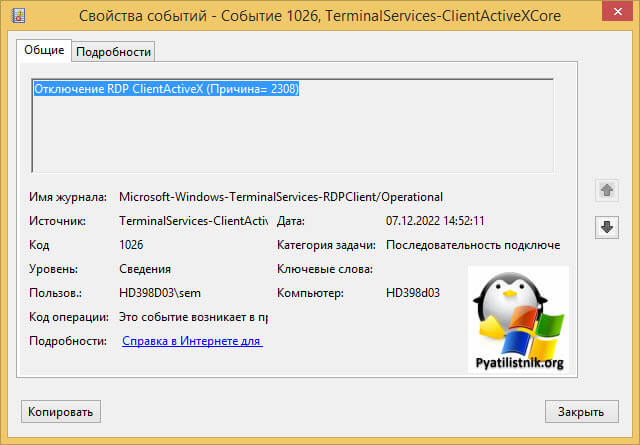
На клиентской машине откуда я пытался произвести подключение было три события:
ID 1024: Выполняется подключение RDP ClientActiveX к серверу (ter104)
ID 1105: Мультитранспортное подключение разорвано.
ID 1028: Отключение RDP ClientActiveX (Причина= 2308)
Код 2808 — Ваш сеанс служб удаленных рабочих столов завершен. Соединение с удаленным компьютером было потеряно, возможно, из-за проблем с сетевым подключением. Попробуйте снова подключиться к удаленному компьютеру. Если проблема не исчезнет, обратитесь к сетевому администратору или в службу технической поддержки.
Так как у меня это была виртуальная машина, то я смог легко подключиться через консоль. В случае с ошибкой «Отключение RDP ClientActiveX (Причина= 2308)«, я отключил на сервере и клиенте autotuninglevel:
netsh interface tcp set global autotuninglevel=disabled
Не забываем перезагрузиться.
Это не помогло, далее я выполнил еще несколько рекомендаций. Я установил на сервер валидный SSL сертификат для RDP сессии. В ошибке 0x907, RDP соединение разрывалось, так как клиентская система не доверяла самоподписному сертификату удаленного сервера. Это нужно поправить, ссылку я указал, обязательно проверьте, кто сейчас выступает в роли активного:
Get-WmiObject «Win32_TSGeneralSetting» -Namespace rootcimv2terminalservices -Filter «TerminalName=’RDP-tcp'»
Еще я создал параметр реестра MaxOutstandingConnections. В Windows по умолчанию есть ограничения на количество сетевых подключений, так например в серверной версии, это параметр равен 3000, в десктопной 100. Из-за нестабильной сети, они могут быстро забиваться. Одно из решений проблемы с внутренней ошибкой подключения, является увеличение этого значения. В командной строке в режиме администратора выполните:
REG ADD «HKLMSYSTEMCurrentControlSetControlTerminal Server» /v MaxOutstandingConnections /t REG_DWORD /d 65536
New-ItemProperty -Path «HKLM:SYSTEMCurrentControlSetControlTerminal Server»
-Name MaxOutstandingConnections -Value 10000 -PropertyType DWORD -Force
После этого нужно перезагрузиться.
Временное решение
Пока вы не уберете ошибку «Код ошибки, возвращенный модулем шифрования: ошибка 0x8009030D», описанную выше, вы можете понизить уровень безопасности вот такими манипуляциями, это устранит «An internal error has occurred».
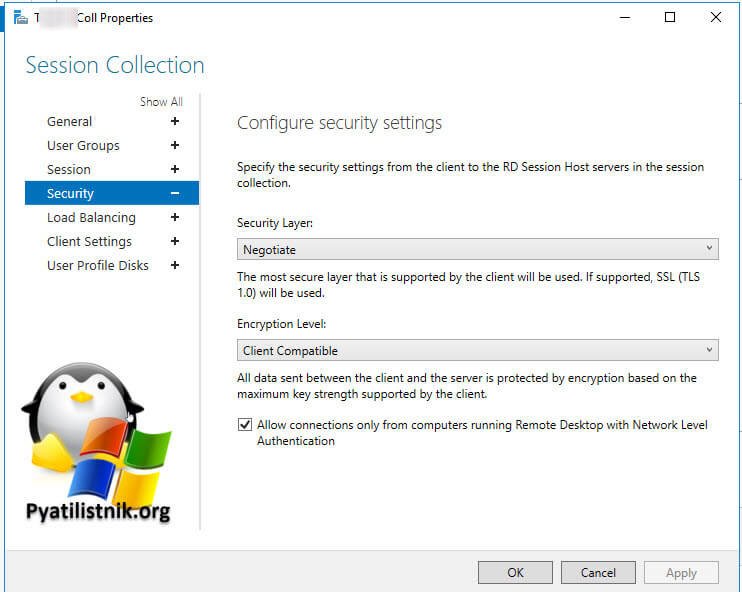
На обычном сервере все это помогло, а вот на ноде RDSH ошибка оставалась. Тут я решил проверить догадку с уровнем безопасности «Configure security settings». На моей ферме был уровень «Согласования (Negotiate)«
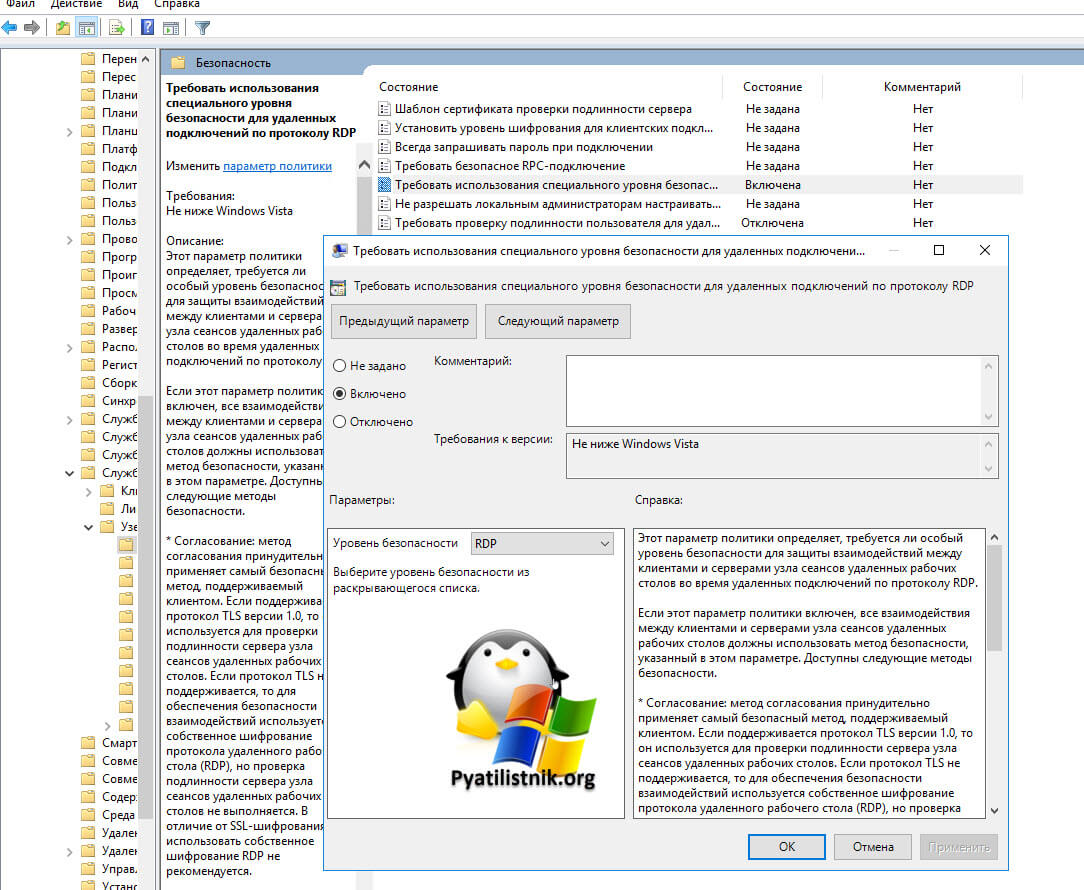
Я пошел на сервер, где были проблемы подключения и решил проверить один параметр локальной политики gpedit.msc.
Конфигурация компьютера — Административные шаблоны- Компоненты Windows — Службы удаленных рабочих столов — Узел сеансов удаленных рабочих столов — Безопасность — Требовать использование специального уровня безопасности для удаленных подключений по протоколу RDP
Тут попробуйте выставить уровень RDP. В результате у меня после этих настроек все заработало. Теперь нужно понять, что изменилось. В настройках RDS фермы указано, что мы используем уровень согласование:
* Согласование: метод согласования принудительно применяет самый безопасный метод, поддерживаемый клиентом. Если поддерживается протокол TLS версии 1.0, то он используется для проверки подлинности сервера узла сеансов удаленных рабочих столов. Если протокол TLS не поддерживается, то для обеспечения безопасности взаимодействий используется собственное шифрование протокола удаленного рабочего стола (RDP), но проверка подлинности сервера узла сеансов удаленных рабочих столов не выполняется. В отличие от SSL-шифрования, использовать собственное шифрование RDP не рекомендуется.
Если и это вам не помогло, то нужно смотреть вариант в сторону обновления или переустановки драйверов на сетевую карту, тут вы определяете модель вашей карты или материнской платы, если в нее все интегрировано и обновляете. С вами был Иван Семин, автор и создатель IT портала Pyatilistnik.org.
Дополнительные ссылки
- https://serverfault.com/questions/934026/windows-10-pro-rdp-server-an-internal-error-has-occurred
- https://social.technet.microsoft.com/Forums/en-US/e1d60cc0-0096-4859-a0e7-eb7f11905737/remote-desktop-v10-error-0x4-from-mac?forum=winRDc
- https://learn.microsoft.com/en-us/answers/questions/108219/can-not-rdp-to-2012-r2-standard-server-after-septe.html
- https://serverfault.com/questions/541364/how-to-fix-rdp-on-windows-server-2012
Remote Desktop Protocol (RDP) is a proprietary protocol developed by Microsoft which provides a user with a graphical interface to connect to another computer over a network connection. The user employs RDP client software for this purpose, while the other computer must run RDP server software. In this post, we will explore how to troubleshoot general Remote Desktop connection issues on Windows 11/10.
Try the outlined troubleshooting steps below when a Remote Desktop client is not working or cannot connect to a remote desktop but doesn’t provide messages or other symptoms that would help identify the cause.
1] Check the status of the RDP protocol on a local computer
You’ll need to enable Remote Desktop to check and change the status of the RDP protocol on a local computer. You can also enable Remote Desktop using Command Prompt or PowerShell.
2] Check the status of the RDP protocol on a remote computer
To check and change the status of the RDP protocol on a remote computer, use a network registry connection.
Since this is a registry operation, it is recommended that you back up the registry or create a system restore point as necessary precautionary measures. Once done, you can proceed as follows:
- Press Windows key + R to invoke the Run dialog.
- In the Run dialog box, type
regeditand hit Enter to open Registry Editor. - In the Registry Editor, select File, then select Connect Network Registry.
- In the Select Computer dialog box, enter the name of the remote computer.
- Select Check Names.
- Select OK.
- Next, navigate or jump to the registry key path below:
HKEY_LOCAL_MACHINESYSTEMCurrentControlSetControlTerminal Server
- At the location, on the right pane, double-click the fDenyTSConnections key to edit its properties.
- To enable RDP, set the Value data of fDenyTSConnections from 1 to 0.
The value of 0 indicates RDP is enabled, while the value of 1 indicates RDP is disabled.
Related: Remote Desktop option is greyed out on Windows 11/10,
3] Check whether a Group Policy Object (GPO) is blocking RDP on a local computer
A GPO may be overriding the computer-level settings, if you can’t turn on RDP in the user interface or the value of fDenyTSConnections reverts to 1 after you’ve changed it
To check the group policy configuration on a local computer, do the following:
- Press Windows key + R to invoke the Run dialog.
- In the Run dialog box, type
cmdand then press CTRL + SHIFT + ENTER to open Command Prompt in admin/elevated mode. - In the command prompt window, type the command below and hit Enter.
gpresult /H c:gpresult.html
- Once the command executes, open gpresult.html.
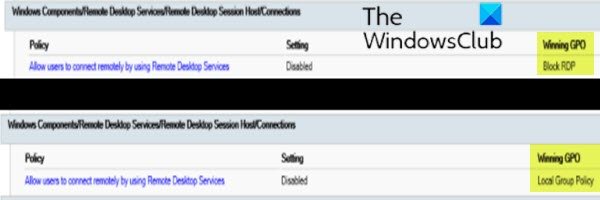
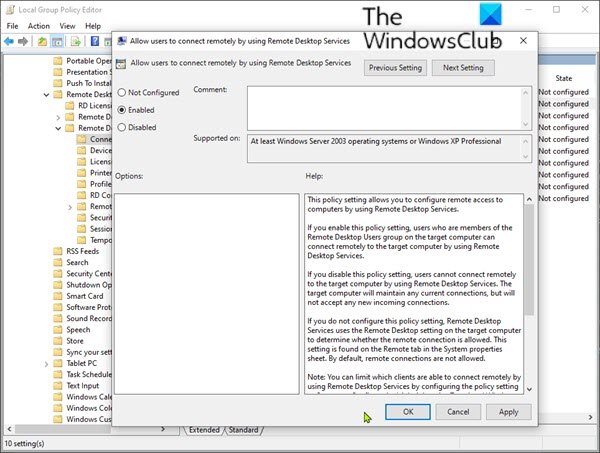
- In Computer ConfigurationAdministrative TemplatesWindows ComponentsRemote Desktop ServicesRemote Desktop Session HostConnections, find the Allow users to connect remotely by using Remote Desktop Services policy.
If the setting for this policy is Enabled, Group Policy is not blocking RDP connections. If the setting for this policy is Disabled, check Winning GPO. This is the GPO that is blocking RDP connections.
4] Check whether a GPO is blocking RDP on a remote computer
To check the Group Policy configuration on a remote computer, run the command below in elevated CMD prompt:
gpresult /S <computer name> /H c:gpresult-<computer name>.html
The file that this command produces (gpresult-<computer name>.html) uses the same information format as the local computer version (gpresult.html) uses.
Fix: Your computer can’t connect to the remote computer
5] Modify a blocking GPO
You can modify these settings in the Group Policy Object Editor (GPE) and Group Policy Management Console (GPMC).
To modify the blocking policy, use one of the following methods:
Using GPE, do the following:
- Press Windows key + R to invoke the Run dialog.
- In the Run dialog box type
gpedit.mscand press Enter to open Group Policy Editor. - Inside the Local Group Policy Editor, use the left pane to navigate to the path below:
Computer Configuration > Administrative Templates > Windows Components > Remote Desktop Services > Remote Desktop Session Host > Connections
- At the location, on the right pane, double click the Allow users to connect remotely by using Remote Desktop Services.to edit its properties.
- Set the policy to either Enabled or Not configured.
- Click Apply > OK and exit.
- On the affected computers, open a command prompt window as an administrator, and run the command below:
gpupdate /force
Using GPMC, navigate to the organizational unit (OU) in which the blocking policy is applied to the affected computers and delete the policy from the OU.
6] Check the status of the RDP services
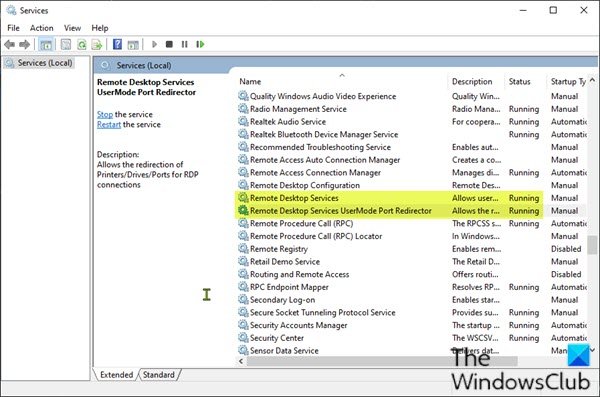
On both the local (client) computer and the remote (target) computer, the following services should be running:
- Remote Desktop Services (TermService)
- Remote Desktop Services UserMode Port Redirector (UmRdpService)
On either computer, if one or both services are not running, start them.
Do the following:
- Press Windows key + R to invoke the Run dialog.
- In the Run dialog box, type
services.mscand hit Enter to open Services. - In the Services window, scroll and locate both aforementioned service.
- Double-click on the entry to edit its properties.
- In the properties window, click the Start button.
- Click OK.
You can also use PowerShell to manage the services locally or remotely (if the remote computer is configured to accept remote PowerShell cmdlets).
7] Check the status of the RDP listener
This procedure uses PowerShell because the same cmdlets work both locally and remotely. For a local computer, you can also use a command prompt that has administrative permissions.
To connect to a remote computer, do the following:
- Press Windows key + X to open Power User Menu.
- Tap A on the keyboard to launch PowerShell in admin/elevated mode.
- In the PowerShell console, type in the command below and hit Enter:
Enter-PSSession -ComputerName <computer name>
- Enter
qwinsta.
If the list includes rdp-tcp with a status of Listen, as shown in the image above, the RDP listener is working. Jump to the Troubleshooting step 10] below. Otherwise, you’ll need to export the RDP listener configuration from a working computer.
Do the following:
- Sign in to a computer that has the same operating system version as the affected computer has, and access that computer’s registry.
- Navigate or jump to the following registry entry:
HKEY_LOCAL_MACHINESYSTEMCurrentControlSetControlTerminal ServerWinStationsRDP-Tcp
- Export the entry to a .reg file.
- Copy the exported .reg file to the affected computer.
- To import the RDP listener configuration, open a PowerShell window that has administrative permissions on the affected computer (or open the PowerShell window and connect to the affected computer remotely).
To back up the existing registry entry, enter the following cmdlet:
cmd /c 'reg export "HKLMSYSTEMCurrentControlSetControlTerminal ServerWinStationsRDP-tcp" C:Rdp-tcp-backup.reg'
To remove the existing registry entry, enter the following cmdlets:
Remove-Item -path 'HKLM:SYSTEMCurrentControlSetControlTerminal ServerWinStationsRDP-tcp' -Recurse -Force
To import the new registry entry and then restart the service, run the cmdlets below. Replace the <filename> placeholder with the name of the exported .reg file.
cmd /c 'regedit /s c:<filename>.reg'
Restart-Service TermService -Force
Once done executing the cmdlets, you can test the configuration by trying the remote desktop connection again. If you still can’t connect, restart the affected computer.
If you still can’t connect, proceed with the next troubleshooting step which is to check the status of the RDP self-signed certificate.
8] Check the status of the RDP self-signed certificate
If you still can’t connect, do the following:
- Press the Windows key + R to invoke the Run dialog.
- In the Run dialog box, type
mmcand hit Enter to open Microsoft Management Console. - Click the File menu.
- Select Add/Remove Snap-in.
- Select Certificates from the list of snap-ins.
- Click Add.
- When you are prompted to select the certificate store to manage, select Computer account.
- Click Next.
- Select the affected computer.
- Click the Finish button.
- Click OK.
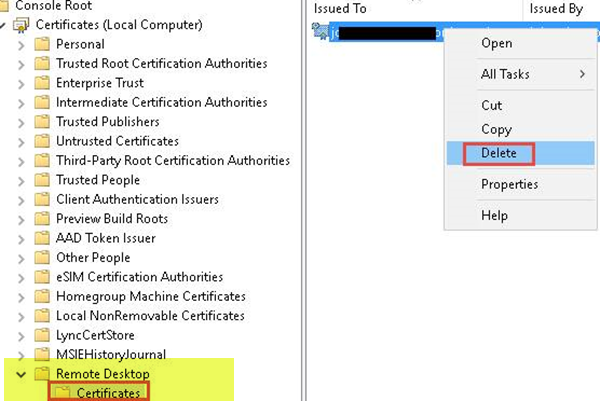
- Now, in the Certificates folder under Remote Desktop, delete the RDP self-signed certificate.
- On the affected computer, restart the Remote Desktop Services service.
- Refresh the Certificates snap-in.
- If the RDP self-signed certificate has not been recreated, check the permissions of the MachineKeys folder.
9] Check the permissions of the MachineKeys folder
On the affected computer, do the following:
- Press Windows key + E to open File Explorer.
- Navigate to the directory path below:
C:ProgramDataMicrosoftCryptoRSA
- At the location, right-click MachineKeys, select Properties, select Security, and then select Advanced.
Make sure that the following permissions are configured:
- BuiltinAdministrators: Full control
- Everyone: Read, Write
10] Check the RDP listener port
On both the local (client) computer and the remote (target) computer, the RDP listener should be listening on port 3389. No other applications should be using this port.
To check or change the RDP port, use the Registry Editor. As a precautionary measure back up the registry or create a system restore point, then continue as follows:
- Open Registry Editor, select File, then select Connect Network Registry.
- In the Select Computer dialog box, enter the name of the remote computer.
- Select Check Names.
- Select OK.
- Next, navigate or jump to the registry key path below:
HKEY_LOCAL_MACHINESYSTEMCurrentControlSetControlTerminal ServerWinStationsRDP-Tcp
- At the location, on the right pane, double-click the PortNumber entry to edit its properties.
- In the properties window, if the Value data field has a value other than 3389, change it to 3389.
- Click OK to save changes.
- Restart the Remote Desktop Services service.
11] Check that another application isn’t using the same port
Do the following:
- Open a PowerShell in elevated mode.
- To connect to a remote computer, run the command below:
Enter-PSSession -ComputerName <computer name>
Next, run the following command:
cmd /c 'netstat -ano | find "3389"'
- Look for an entry for TCP port 3389 (or the assigned RDP port) with a status of Listening.
Note: The process identifier (PID) for the process or service using that port appears under the PID column.
- To determine which application is using port 3389 (or the assigned RDP port), enter the following command:
cmd /c 'tasklist /svc | find "<pid listening on 3389>"'
- Look for an entry for the PID number that is associated with the port (from the
netstatoutput). The services or processes that are associated with that PID appear on the right column. - If an application or service other than Remote Desktop Services (TermServ.exe) is using the port, you can resolve the conflict by using one of the following methods:
Configure the other application or service to use a different port (recommended).
Uninstall the other application or service.
Configure RDP to use a different port, and then restart the Remote Desktop Services service (not recommended).
12] Check whether a firewall is blocking the RDP port
You can use the psping tool to test whether you can reach the affected computer by using port 3389.
Do the following:
- Go to a different computer that isn’t affected and download psping.
- Open a command prompt window as an administrator, change to the directory in which you installed psping, and then enter the following command:
psping -accepteula <computer IP>:3389
- Check the output of the psping command for results such as the following:
Connecting to <computer IP>: The remote computer is reachable.
(0% loss): All attempts to connect succeeded.
The remote computer refused the network connection: The remote computer is not reachable.
(100% loss): All attempts to connect failed.
- Run psping on multiple computers to test their ability to connect to the affected computer.
- Note whether the affected computer blocks connections from all other computers, some other computers, or only one other computer.
Additional steps you can take includes;
- Engage your network administrators to verify that the network allows RDP traffic to the affected computer.
- Investigate the configurations of any firewalls between the source computers and the affected computer (including Windows Firewall on the affected computer) to determine whether a firewall is blocking the RDP port.
Hope this post can help you successfully troubleshoot RDP connection issues you might be having!
Подключение к удаленному рабочему столу позволяет подключаться к компьютерам с удаленным рабочим столом для устранения неполадок и других целей. Однако при попытке установить или установить соединение вы можете столкнуться с ошибкой «Удаленному рабочему столу не удается подключиться к удаленному компьютеру».
Эта ошибка может возникнуть по нескольким причинам, в основном из-за неправильной конфигурации и проблем с сетью. В этой статье мы рассмотрим причины и некоторые советы по устранению неполадок, которые помогут вам снова заставить RDC работать.
Причины, по которым удаленный рабочий стол не может подключиться к удаленному компьютеру?
Эта ошибка может возникнуть по нескольким причинам:
-
На главном компьютере должен быть включен удаленный рабочий стол. Эта функция доступна только в Windows 10 Pro и более поздних версиях.
-
На исходящие и входящие соединения может влиять наличие антивируса на вашем компьютере. Убедитесь, что ваш брандмауэр не блокирует RDP-соединение, и при необходимости добавьте его в белый список.
-
Убедитесь, что у вашей учетной записи достаточно прав для запуска подключения с исходного компьютера.
-
У вас неправильная конфигурация прослушивающих портов, поврежденные учетные данные RDC или некоторые проблемы, связанные с сетью.
Теперь, когда вы знаете потенциальные причины, давайте рассмотрим несколько исправлений, которые вы можете использовать, чтобы устранить эту ошибку на своем компьютере.
1. Включите удаленный рабочий стол на вашем компьютере.
Прежде чем пытаться исправить что-либо в этой статье, убедитесь, что на вашем компьютере включен удаленный рабочий стол.
Чтобы включить удаленный рабочий стол в Windows 10:
-
Перейдите в Пуск> Настройки> Система> Удаленный рабочий стол.
-
Переключите переключатель в разделе «Включить удаленный рабочий стол», чтобы включить службу.
Следуйте нашему руководству по включению и настройке подключения к удаленному рабочему столу в Window 10 для получения дальнейших инструкций.
Если удаленный рабочий стол уже включен, выключите его и перезагрузите компьютер. После перезагрузки компьютера снова включите удаленный рабочий стол и проверьте наличие улучшений.
2. Проверьте правила брандмауэра.
В зависимости от того, как вы настроили политику своего брандмауэра, он может блокировать некоторые входящие и исходящие сообщения. Проверьте настройки брандмауэра Защитника Windows, чтобы узнать, не заблокировано ли подключение к удаленному рабочему столу. Если да, добавьте приложение в список разрешенных.
Чтобы разблокировать удаленный рабочий стол в брандмауэре Защитника Windows:
-
Введите Защитник Windows в строке поиска Windows и нажмите Брандмауэр Защитника Windows.
-
В появившемся окне нажмите Разрешить приложение или функцию через брандмауэр Защитника Windows.
-
Нажмите «Изменить настройки», чтобы добавить или изменить разрешения приложений. Он покажет список приложений и функций, которые разрешены для входящих и исходящих подключений.
-
Прокрутите вниз и установите флажок Удаленный рабочий стол для столбцов Private и Public.
-
Щелкните ОК, чтобы применить изменения.
3. Измените свой сетевой профиль.
В Windows 10 вы можете сделать свой сетевой профиль общедоступным или частным. В общедоступной сети Windows отключает функцию сетевого обнаружения, чтобы скрыть ваш компьютер от других компьютеров.
Попробуйте изменить свою сеть на частную, чтобы проверить, сможете ли вы установить соединение с включенной функцией сетевого обнаружения. Вот как это сделать.
-
Нажмите Win + I, чтобы открыть Настройки.
-
Зайдите в Сеть и Интернет. На вкладке «Статус» проверьте статус своей сети.
-
Чтобы изменить статус, нажмите кнопку «Свойства», а затем установите для своего сетевого профиля значение «Частный». Если он уже установлен на частный, измените его на общедоступный и проверьте наличие улучшений.
4. Сбросьте учетные данные для подключения к удаленному рабочему столу.
Когда вы впервые устанавливаете новое подключение к удаленному рабочему столу, клиент сохраняет учетные данные для быстрого входа в систему. Однако поврежденные или измененные учетные данные часто могут приводить к невозможности подключения удаленного рабочего стола к удаленному компьютеру.
Эту ошибку может решить быстрый сброс сохраненных учетных данных. Вот как это сделать.
-
Введите «Подключение к удаленному рабочему столу» в строке поиска Windows и откройте клиент.
-
Щелкните раскрывающийся список Компьютер и выберите свой удаленный компьютер.
-
Щелкните ссылку «Удалить» в разделе «Имя пользователя» и нажмите «Да», чтобы подтвердить действие.
-
После сброса учетных данных перезапустите клиент подключения к удаленному рабочему столу и попробуйте подключиться снова.
5. Добавьте адрес удаленного компьютера в файл Hosts.
Другой способ устранить ошибку «Удаленный рабочий стол не может подключиться к удаленному компьютеру» — это добавить удаленный IP-адрес в файл hosts на вашем ПК. Файл Hosts Windows содержит информацию для сопоставления связи между IP-адресом и доменным именем.
Добавление адреса удаленного ПК в файл hosts вручную может помочь вам решить любые проблемы, которые могут возникнуть из-за разрешения доменного имени. Вот как это сделать.
-
Нажмите Win + I, чтобы открыть проводник, и перейдите в следующее место: C: Windows System32 drivers etc.
-
В папке etc щелкните правой кнопкой мыши файл hosts, выберите «Открыть с помощью» и выберите «Блокнот» из списка приложений.
-
Вы можете увидеть несколько закомментированных записей в файле hosts. Все, что вам нужно сделать, это добавить IP-адрес удаленного компьютера, к которому вы хотите подключиться, и сохранить файл (Ctrl + S).
6. Включите протокол RDP на удаленном компьютере с помощью редактора реестра.
Для работы подключения к удаленному рабочему столу в реестре должен быть включен протокол RDP. Проверьте запись реестра, связанную с протоколом RDP, чтобы убедиться, что он включен в вашей системе. Вот как это сделать.
-
Нажмите Win + R, чтобы открыть Выполнить.
-
Введите regedit и нажмите ОК, чтобы открыть редактор реестра.
-
Затем перейдите по следующему пути. Вы также можете скопировать и вставить то же самое для быстрой навигации: HKEY_LOCAL_MACHINE SYSTEM CurrentControlSet Control Terminal Server.
-
Щелкните правой кнопкой мыши значение fDenyTSConnection и выберите «Изменить».
-
В появившемся всплывающем окне введите 1 в поле «Значение».
-
Щелкните ОК, чтобы сохранить изменения.
Закройте редактор реестра, а затем запустите подключение к удаленному рабочему столу, чтобы проверить, устранена ли ошибка. Если проблема не исчезнет, проверьте конфигурацию порта прослушивания RDP в редакторе реестра.
Связано: Что такое реестр Windows и как его редактировать?
7. Проверьте и настройте порт прослушивания RDP.
RDP использует 3389 как порт прослушивания по умолчанию. Подобно статусу RDP, вы также можете настроить порт прослушивания с помощью редактора реестра. Вот как это сделать.
-
Откройте редактор реестра и перейдите в следующее расположение: Computer HKEY_LOCAL_MACHINE SYSTEM CurrentControlSet Control Terminal Server WinStations RDP-Tcp
-
Выберите ключ RDP-Tcp. Затем на правой панели щелкните правой кнопкой мыши PortNumber и выберите Edit.
-
Установите значение 3389 и нажмите ОК.
8. Включите службы удаленных рабочих столов в редакторе групповой политики.
Если проблема не исчезнет, возможно, объект групповой политики блокирует соединение с вашим локальным компьютером. Здесь вам нужно будет вручную включить службу с помощью редактора групповой политики. Вот как это сделать.
-
Нажмите Win + R, чтобы открыть Выполнить. Введите gpedit.msc и нажмите ОК. Откроется редактор групповой политики. В Windows 10 Home Edition вам нужно будет включить GPE вручную, прежде чем вы сможете получить доступ к инструменту.
-
В редакторе групповой политики перейдите в следующее расположение: Конфигурация компьютера Административные шаблоны Компоненты Windows Службы удаленного рабочего стола Узел сеанса удаленного рабочего стола Подключения.
-
В разделе «Параметры» найдите и дважды щелкните «Разрешить пользователям подключаться удаленно с помощью служб удаленных рабочих столов».
-
Выберите «Включено», нажмите «Применить» и «ОК», чтобы сохранить изменения.
Закройте редактор групповой политики и откройте командную строку от имени администратора. Для этого введите cmd в строке поиска Windows, щелкните правой кнопкой мыши командную строку и выберите «Запуск от имени администратора».
В командной строке введите gpupdate force и нажмите Enter. Это приведет к недавним изменениям, внесенным в GPO.
9. Проверьте статус ваших служб RDP.
Службы в ОС Windows — это программные приложения без пользовательского интерфейса, которые работают в фоновом режиме и обычно запускаются автоматически по расписанию. Чтобы удаленный рабочий стол работал, службы, связанные с RDP, должны работать как в удаленной, так и в клиентской системе.
Чтобы перезапустить службы RDP:
-
Нажмите Win + R, чтобы открыть Выполнить. Затем введите services и нажмите OK.
-
В окне «Службы» найдите и щелкните правой кнопкой мыши службу «Службы удаленных рабочих столов» (TermService) и выберите «Свойства».
-
В окне «Свойства» установите для параметра «Тип запуска» значение «Автоматический» и нажмите «Применить».
-
Снова щелкните службу правой кнопкой мыши и выберите «Перезагрузить».
-
Повторите шаги для службы перенаправителя портов пользовательского режима служб удаленных рабочих столов.
10. Добавьте ключ RDGClientTransport в реестр.
Еще один способ решения проблем, связанных с подключением к удаленному рабочему столу, — настроить редактор реестра для добавления ключа RDGClientTransport. Это заставит протокол удаленного рабочего стола использовать соединение RPC / HTTP вместо HTTP / UDP.
Чтобы добавить ключ RDGClientTransport:
-
Нажмите Win + R, чтобы открыть Выполнить. Введите regedit и нажмите ОК, чтобы открыть редактор реестра.
-
В редакторе реестра перейдите в следующее место. Компьютер HKEY_CURRENT_USER SOFTWARE Microsoft Клиент терминального сервера
-
Щелкните правой кнопкой мыши ключ клиента сервера терминалов и выберите «Создать»> «Значение DWORD (32-разрядное)».
-
Переименуйте значение как RDGClientTransport.
-
Затем дважды щелкните вновь созданные значения и введите 1 в поле «Значение данных». Щелкните ОК, чтобы сохранить изменения.
Теперь вы можете подключиться к удаленному рабочему столу без ошибок
Удаленный рабочий стол — удобный инструмент, доступный в Pro-версии Windows 10. Однако иногда вы можете столкнуться с проблемами, связанными с подключением, по разным причинам, включая отключенный удаленный рабочий стол, автономный хост-компьютер и проблемы с сетью. В зависимости от состояния вашего компьютера вам может потребоваться выполнить один или несколько шагов по устранению неполадок, чтобы устранить эту ошибку.


