Время прочтения
8 мин
Просмотры 13K
Как сделать падение мягким?

Я не нашел исчерпывающего руководства по обработке ошибок в React приложениях, поэтому решил поделиться полученным опытом в этой статье. Статья рассчитана на начинающих разработчиков и может стать некоторой отправной точкой к систематизации обработки ошибок в приложении.
Проблематика и постановка целей
Понедельник утро, вы спокойненько попиваете кофе и хвастаетесь, что пофиксили больше багов, чем на прошлой неделе и тут прибегает менеджер и машет руками — “у нас прод свалился, все очень печально, мы теряем деньги”. Вы бежите и открываете свой Mac, заходите на продакшн версию вашего SPA, делаете пару кликов для воспроизведения бага, видите белый экран и только всевышний знает, что там произошло, лезем в консоль, начинаем копать, внутри компонента t есть компонент с говорящим именем b, в котором произошла ошибка cannot read property getId of undefined. N часов исследований и вы с победоносным кличем несетесь катить hotfix. Такие набеги происходят с некоторой периодичностью и стали уже нормой, но что, если я скажу, что все может быть по-другому? Как сократить время на отладку ошибок и построить процесс таким образом, чтобы клиент практически не заметил просчетов при разработке, которые неизбежны?
Рассмотрим по порядку проблемы, с которыми мы столкнулись:
- Даже если ошибка незначительна или локализирована в пределах модуля, в любом случае неработоспособным становится все приложение
До 16 версии React у разработчиков не было единого стандартного механизма перехвата ошибок и случались ситуации, когда повреждение данных приводило к падению рендеринга только на следующих шагах или странному поведению приложения. Каждый разработчик обрабатывал ошибки, так как он привык, а императивная модель с try/catch в целом плохо ложилась на декларативные принципы React. В 16 версии появился инструмент Error Boundaries, который попытался решить эти проблемы, мы рассмотрим как его применить. - Ошибка воспроизводится только в продакшн среде или не воспроизводится без дополнительных данных
В идеальном мире среда разработки совпадает с продакшн и мы можем воспроизвести любой баг локально, но мы живем в реальном мире. На боевой системе отсутствуют инструменты для отладки. Раскапывать такие инциденты сложно и не продуктивно, в основном приходиться биться с обфусцированным кодом и отсутствием информации об ошибке, а не с сутью проблемы. Мы не будем рассматривать вопрос, как приблизить условия среды разработки к условиям продакшена, однако рассмотрим инструменты, которые позволяют получить подробную информацию о случившихся инцидентах.
Все это снижает скорость разработки и лояльность пользователей к программному продукту, поэтому я поставил для себя 3 самые важные цели:
- Повысить удобство работы пользователя с приложением в случаях возникновения ошибок;
- Сократить время между попаданием ошибки в продакшн и ее обнаружением;
- Ускорить процесс поиска и отладки проблем в приложении для разработчика.
Какие задачи необходимо решить?
- Обрабатывать критические ошибки при помощи Error Boundary
Для повышения удобства работы пользователя с приложением мы должны перехватывать критические ошибки UI и обработать их. В случае, когда приложение состоит из независимых компонентов, такая стратегия позволит пользователю работать с остальной частью системы. Так же мы можем попробовать предпринять шаги для восстановления приложения после сбоя, если это возможно. - Сохранять расширенную информацию об ошибках
При возникновении ошибки посылать отладочную информацию на сервер мониторинга, который будет фильтровать, хранить и показывать информацию об инцидентах. Это поможет нам быстро обнаруживать и легко отлаживать ошибки после деплоя.
Обработка критических ошибок
Начиная с 16 версии React изменил стандартное поведение обработки ошибок. Теперь исключения, которые не были пойманы при помощи Error Boundary будут приводить к размонтированию всего React дерева и, как следствие к неработоспособности всего приложения. Это решение аргументированно тем, что лучше не показывать ничего, чем дать пользователю возможность получить непредсказуемый результат. Более подробно можно почитать в официальной документации React.
Так же многих сбивает с толку заметка о том, что Error Boundary не отлавливает ошибки из обработчиков событий и асинхронного кода, однако если задуматься, то любой обработчик в конечном счете может поменять стейт, на основе которого будет вызван новый цикл рендера, который, в конечном счете может привести к ошибке в коде UI. В противном случае, это не является критической ошибкой для UI и она может быть обработана специфическим образом внутри обработчика.
С нашей точки зрения критическая ошибка — это исключение, которое произошло внутри кода UI и если его не обработать, то произойдет размонтирование всего React дерева. Остальные ошибки не являются критическими и могут быть обработаны согласно логике приложения, например, при помощи нотификаций.
В данной статье мы сосредоточимся на обработке критических ошибок, несмотря на то, что некритичные ошибки тоже могут приводить к неработоспособности интерфейса в худшем случае. Их обработку сложно выделить в общий блок и каждый отдельный случай требует принятия решения в зависимости от логики приложения.
В целом некритичные ошибки могут быть очень даже критичными (такой вот каламбурчик), поэтому информация о них должна логироваться точно также, как и для критичных.
Сейчас мы спроектируем Error Boundary для нашего простого приложения, оно будет состоять из навигационной панели, хэдера и основной рабочей области. Оно достаточно простое, чтобы сосредоточиться только на обработке ошибок, но при этом имеет типовую структуру для многих приложений.

У нас есть навигационная панель из 3 ссылок, каждая из которых ведет к независимым друг от друга компонентам, таким образом мы хотим добиться такого поведения, чтобы даже если один из компонентов не работает, то мы можем продолжить работу с остальными.
В следствии чего у нас будет по ErrorBoundary на каждый компонент в который можно перейти через навигационное меню и общий ErrorBoundary, информирующий о падении всего приложения, в том случае, когда ошибка произошла в компоненте header, nav panel или внутри ErrorBoundary, но мы решили ее не обрабатывать и выкинуть дальше.
Рассмотрим листинг всего приложения, которое завернуто в ErrorBoundary
const AppWithBoundary = () => (
  <ErrorBoundary errorMessage="Application has crashed">
    <App/>
  </ErrorBoundary>
)
function App() {
return (
<Router>
<Layout>
<Sider width={200}>
<SideNavigation />
</Sider>
<Layout>
<Header>
<ActionPanel />
</Header>
<Content>
<Switch>
<Route path="/link1">
<Page1
title="Link 1 content page"
errorMessage="Page for link 1 crashed"
/>
</Route>
<Route path="/link2">
<Page2
title="Link 2 content page"
errorMessage="Page for link 2 crashed"
/>
</Route>
<Route path="/link3">
<Page3
title="Link 3 content page"
errorMessage="Page for link 3 crashed"
/>
</Route>
<Route path="/">
<MainPage
title="Main page"
errorMessage="Only main page crashed"
/>
</Route>
</Switch>
</Content>
</Layout>
</Layout>
</Router>
);
}Никакой магии в ErrorBoundary нет, это всего лишь классовый компонент, в котором определен метод componentDidCatch, то есть любой компонент можно сделать ErrorBoundary, в случае если в нем определить данный метод.
class ErrorBoundary extends React.Component {
  state = {
    hasError: false,
  }

  componentDidCatch(error) {
    // Здесь можно отправлять данные в сервис сбора ошибок
    this.setState({ hasError: true });
  }

  render() {
    if (this.state.hasError) {
      return (
        <Result
          status="warning"
          title={this.props.errorMessage}
          extra={
            <Button type="primary" key="console">
              Some action to recover
            </Button>
          }
  />
      );
    }
    return this.props.children;
  }
};
Вот так выглядит ErrorBoundary для компоненты Page, которая будет рендериться в блок Content:
const PageBody = ({ title }) => (
  <Content title={title}>
    <Empty className="content-empty" />
  </Content>
);

const MainPage = ({ errorMessage, title }) => (
  <ErrorBoundary errorMessage={errorMessage}>
    <PageBody title={title} />
  </ErrorBoundary>
Так как ErrorBoundary является обычным React компонентом, то мы можем использовать один и тот же компонент ErrorBoundary для оборачивания каждой из страниц в свой обработчик, просто передавая в ErrorBoundary разные параметры, так как это разные экземпляры класса, то их стейт не будет зависеть друг от друга.
ВАЖНО: ErrorBoundary умеет ловить ошибки только в компонентах, которые находятся ниже него в дереве.
В листинге ниже ошибка не будет перехвачена локальным ErrorBoundary, а будет выкинута и перехвачена обработчиком выше по дереву:
const Page = ({ errorMessage }) => (
  <ErrorBoundary errorMessage={errorMessage}>
    {null.toString()}
  </ErrorBoundary>
);
А здесь ошибка перехватиться локальным ErrorBoundary:
const ErrorProneComponent = () => null.toString();

const Page = ({ errorMessage }) => (
  <ErrorBoundary errorMessage={errorMessage}>
    <ErrorProneComponent />
  </ErrorBoundary>
);
Завернув каждый отдельный компонент в свой ErrorBoundary мы добились необходимого поведения, положим заведомо ошибочный код в компоненту по ссылке link3 и посмотрим что произойдет. Намеренно забудем передать параметр steps:
const PageBody = ({ title, steps }) => (
  <Content title={title}>
    <Steps current={2} direction="vertical">
      {steps.map(({ title, description }) => (<Step title={title} description={description} />))}
    </Steps>
  </Content>
);

const Page = ({ errorMessage, title }) => (
  <ErrorBoundary errorMessage={errorMessage}>
    <PageBody title={title} />
  </ErrorBoundary>
);
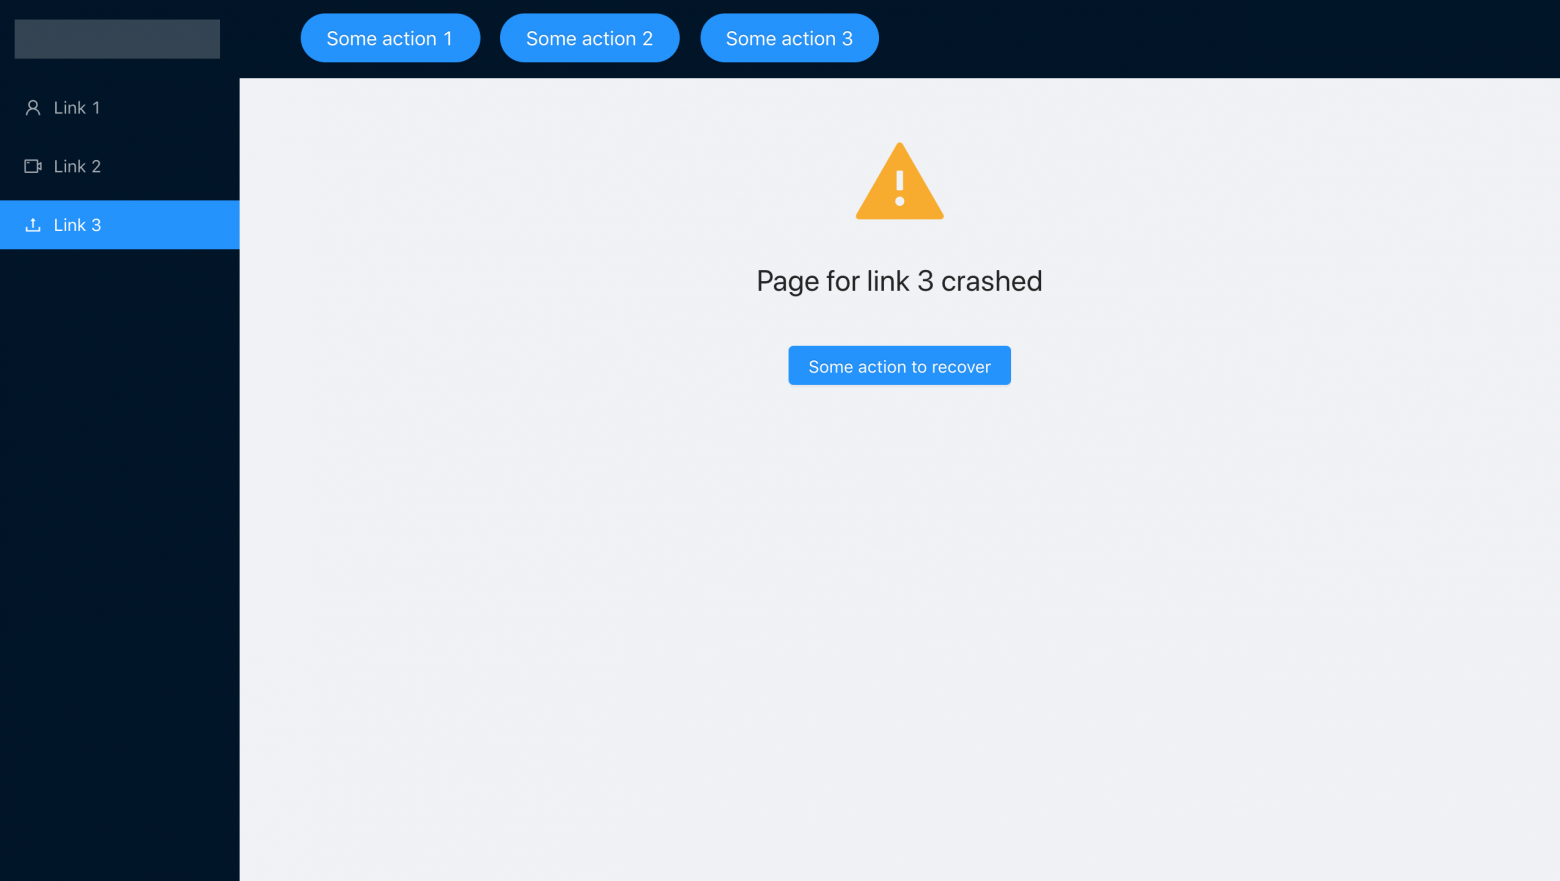
Приложение сообщит нам, что произошла ошибка, однако полностью не упадет, мы можем перемещаться по навигационному меню и работать с другими разделами.

Такая нехитрая конфигурация позволяет нам легко достичь поставленной цели, однако на практике мало кто уделяет много внимания обработки ошибок, планируя только штатное исполнение приложение.
Сохранение информации об ошибках
Теперь, когда мы разместили достаточно ErrorBoundary в нашем приложении, необходимо сохранять информацию об ошибках, чтобы как можно быстрее их обнаружить и поправить. Самый простой способ — это использовать SaaS сервисы, например, такие как Sentry или Rollbar. Они обладают очень схожим функционалом, так что можно использовать любой сервис мониторинга ошибок.
Я покажу базовый пример на Sentry, так как всего за минуту можно получить минимальную функциональность. При этом Sentry сам перехватывает исключения и даже модифицирует console.log, получая всю информацию об ошибках. После чего все ошибки, которые будут происходить в приложении будут отправляться и храниться на сервере. В Sentry есть механизмы фильтрации событий, обфускации персональных данных, привязки к релизу и многое другое. Мы рассмотрим только базовый сценарий интеграции.
Для подключения необходимо зарегистрироваться на их официальном сайте и пройти quick start guide, который сразу направит вас после регистрации.
В нашем приложении добавляем всего пару строк и все взлетает.
import * as Sentry from '@sentry/browser';
Sentry.init({dsn: “https://12345f@sentry.io/12345”});
Снова переходим по ссылке /link3 в нашем приложении и получаем экран ошибки, после чего переходим в интерфейс sentry, видимо, что произошло событие и проваливаемся внутрь.
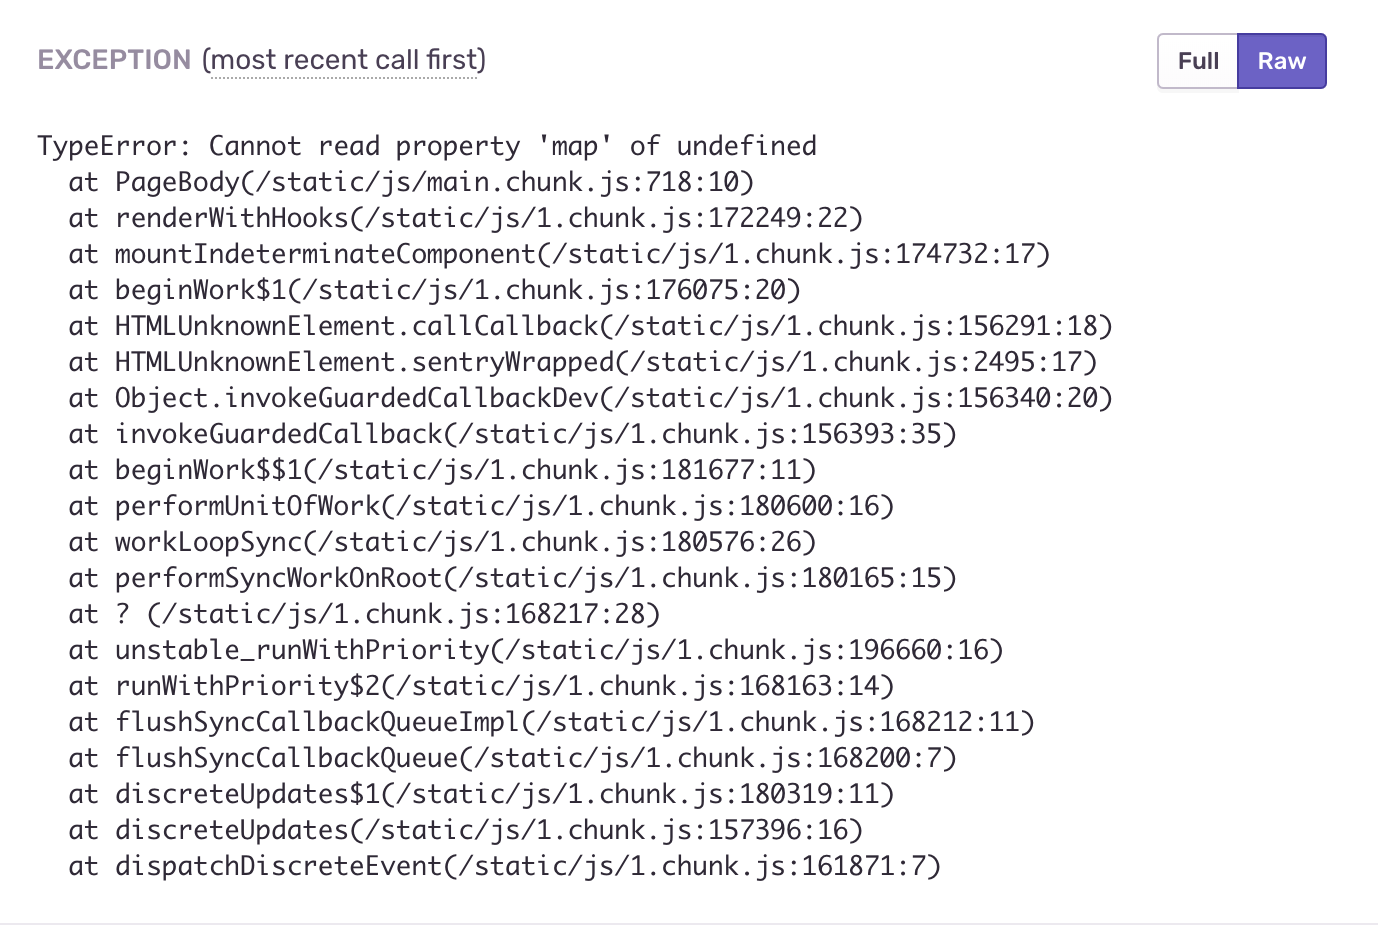
Ошибки автоматически группируются по типам, частоте и времени появления, можно применять различные фильтры. У нас одно событие — мы проваливаемся в него и на следующем экране видим кучу полезной информации, например stack trace
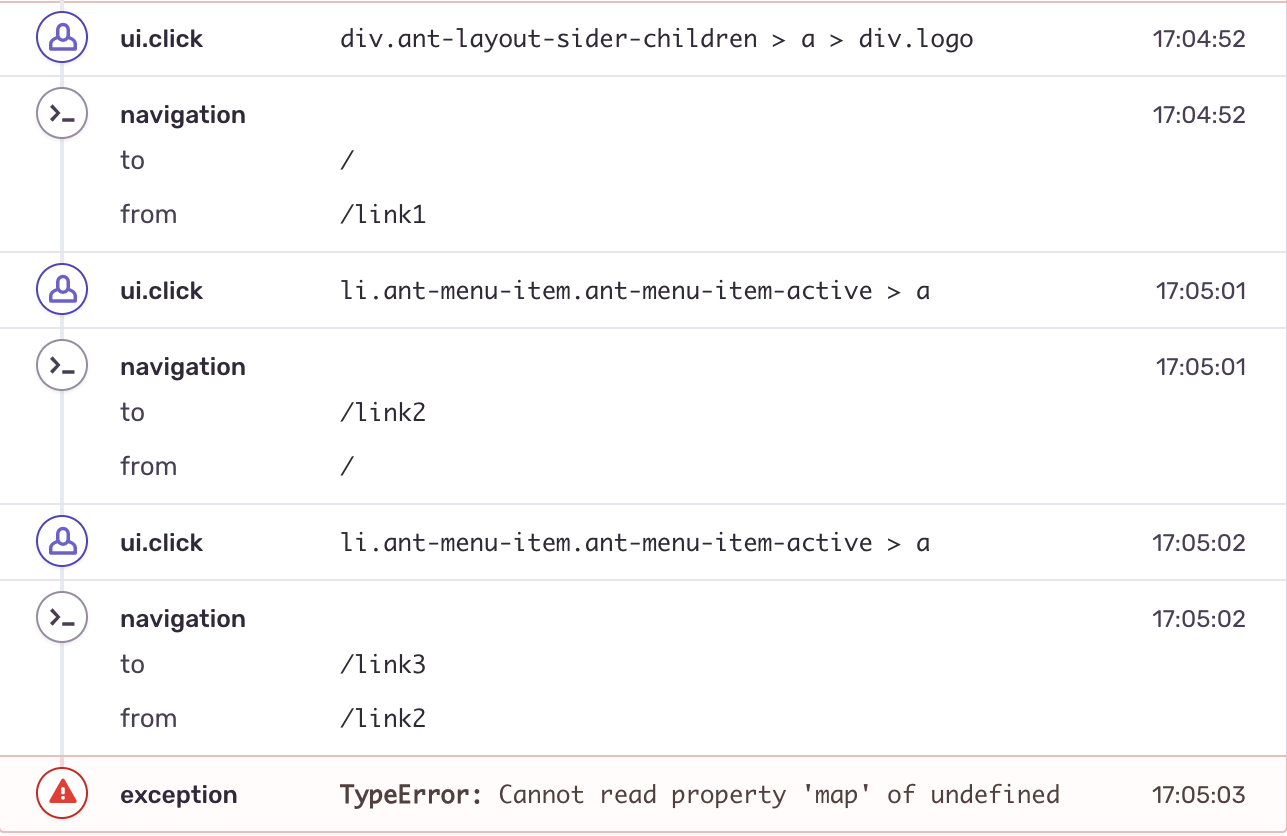
и последние действия пользователя перед ошибкой (breadcrumbs).
Даже при такой простой конфигурации мы можем накапливать и анализировать информацию об ошибках и использовать ее при дальнейшей отладке. В данном примере ошибка посылается от клиента в development mode, поэтому мы можем наблюдать полную информацию о компоненте и ошибках. Для того, чтобы получать аналогичную информацию из production mode необходимо дополнительно настроить синхронизацию данных о релизе с Sentry, которая будет хранить в себе sourcemap, таким образом позволяя сохранить достаточно информации, без увеличения размера bundle. Мы не будем рассматривать такую конфигурации в рамках этой статьи, но я постараюсь рассказать о подводных камнях такого решения в отдельной статье после его внедрения.
Итог:
Обработка ошибок при помощи ErrorBoundary позволяет нам сгладить углы при частичном падении приложения, тем самым повысив удобство работы пользователей системы, а использование специализированных систем мониторинга ошибок — сократить время обнаружения и отладки проблем.
Тщательно продумывайте стратегию обработки и мониторинга ошибок вашего приложения, в дальнейшем это сэкономит вам кучу времени и сил. Продуманная стратегия в первую очередь улучшит процесс работы с инцидентами, а уже потом будет влиять на структуру кода.
P.S. Вы можете попробовать различные варианты конфигурации ErrorBoundary или подключить Sentry в приложение самостоятельно в ветке feature_sentry, заменив ключи на полученные при регистрации на сайте.
Демо-приложение на git-hub
Официальная документация React по Error Boundary
Let’s face it. Nobody wants to see a broken, empty page while surfing the web. It leaves you stranded and confused. You don’t know what happened or what caused it, leaving you with a bad impression of the website.
It is often better to communicate the error and let the user continue to use the app. The user will get less of a bad impression and can continue to use its features.
In today’s post, we’ll go through different ways to handle errors in React applications.
The Classic ‘Try and Catch’ Method in React
If you’ve used JavaScript, you’ve probably had to write a ‘try and catch’ statement. To make sure we’re on board with what it is, here’s one:
try {
  somethingBadMightHappen();
} catch (error) {
  console.error("Something bad happened");
  console.error(error);
}
It is a great tool to catch misbehaving code and ensure our app doesn’t blow up into smithereens. To be more realistic and close to the React world as possible, let’s see an example of how you’d use this in your app:
const fetchData = async () => {
  try {
    return await fetch("https://some-url-that-might-fail.com");
  } catch (error) {
    console.error(error); // You might send an exception to your error tracker like AppSignal
    return error;
  }
};
When doing network calls in React, you’d usually use the try...catch statement. But why? Unfortunately, try...catch only works on imperative code. It does not work on declarative code like the JSX we are writing in our components. So that is why you don’t see a massive try...catch wrapping our whole app. It just won’t work.
So, what do we do? Glad you asked. In React 16, a new concept got introduced — React Error Boundaries. Let’s dig into what they are.
React Error Boundaries
Before we get into error boundaries, let us first see why they are necessary. Imagine you had a component like this:
const CrashableComponent = (props) => {
  return <span>{props.iDontExist.prop}</span>;
};

export default CrashableComponent;
If you try to render this component somewhere, you’ll get an error like this one:
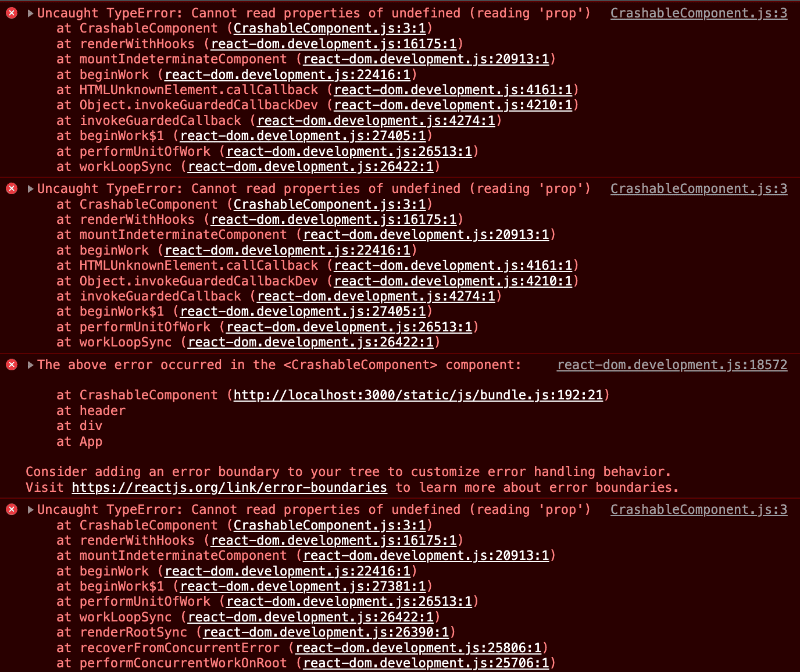
Not only that, the whole page will be blank, and the user won’t be able to do or see anything. But what happened? We tried to access a property iDontExist.prop, which doesn’t exist (we don’t pass it to the component). This is a banal example, but it shows that we cannot catch these errors with the try...catch statement.
This whole experiment brings us to error boundaries. Error boundaries are React components that catch JavaScript errors anywhere in their child component tree. Then, they log those caught errors and display a fallback UI instead of the component tree that crashed. Error boundaries catch errors during rendering, in lifecycle methods, and in constructors of the whole tree below them.
An error boundary is a class component that defines either (or both) of the lifecycle methods static getDerivedStateFromError() or componentDidCatch().
static getDerivedStateFromError() renders a fallback UI after an error has been thrown.
componentDidCatch() can log error information to your service provider (like AppSignal) or to a browser console.
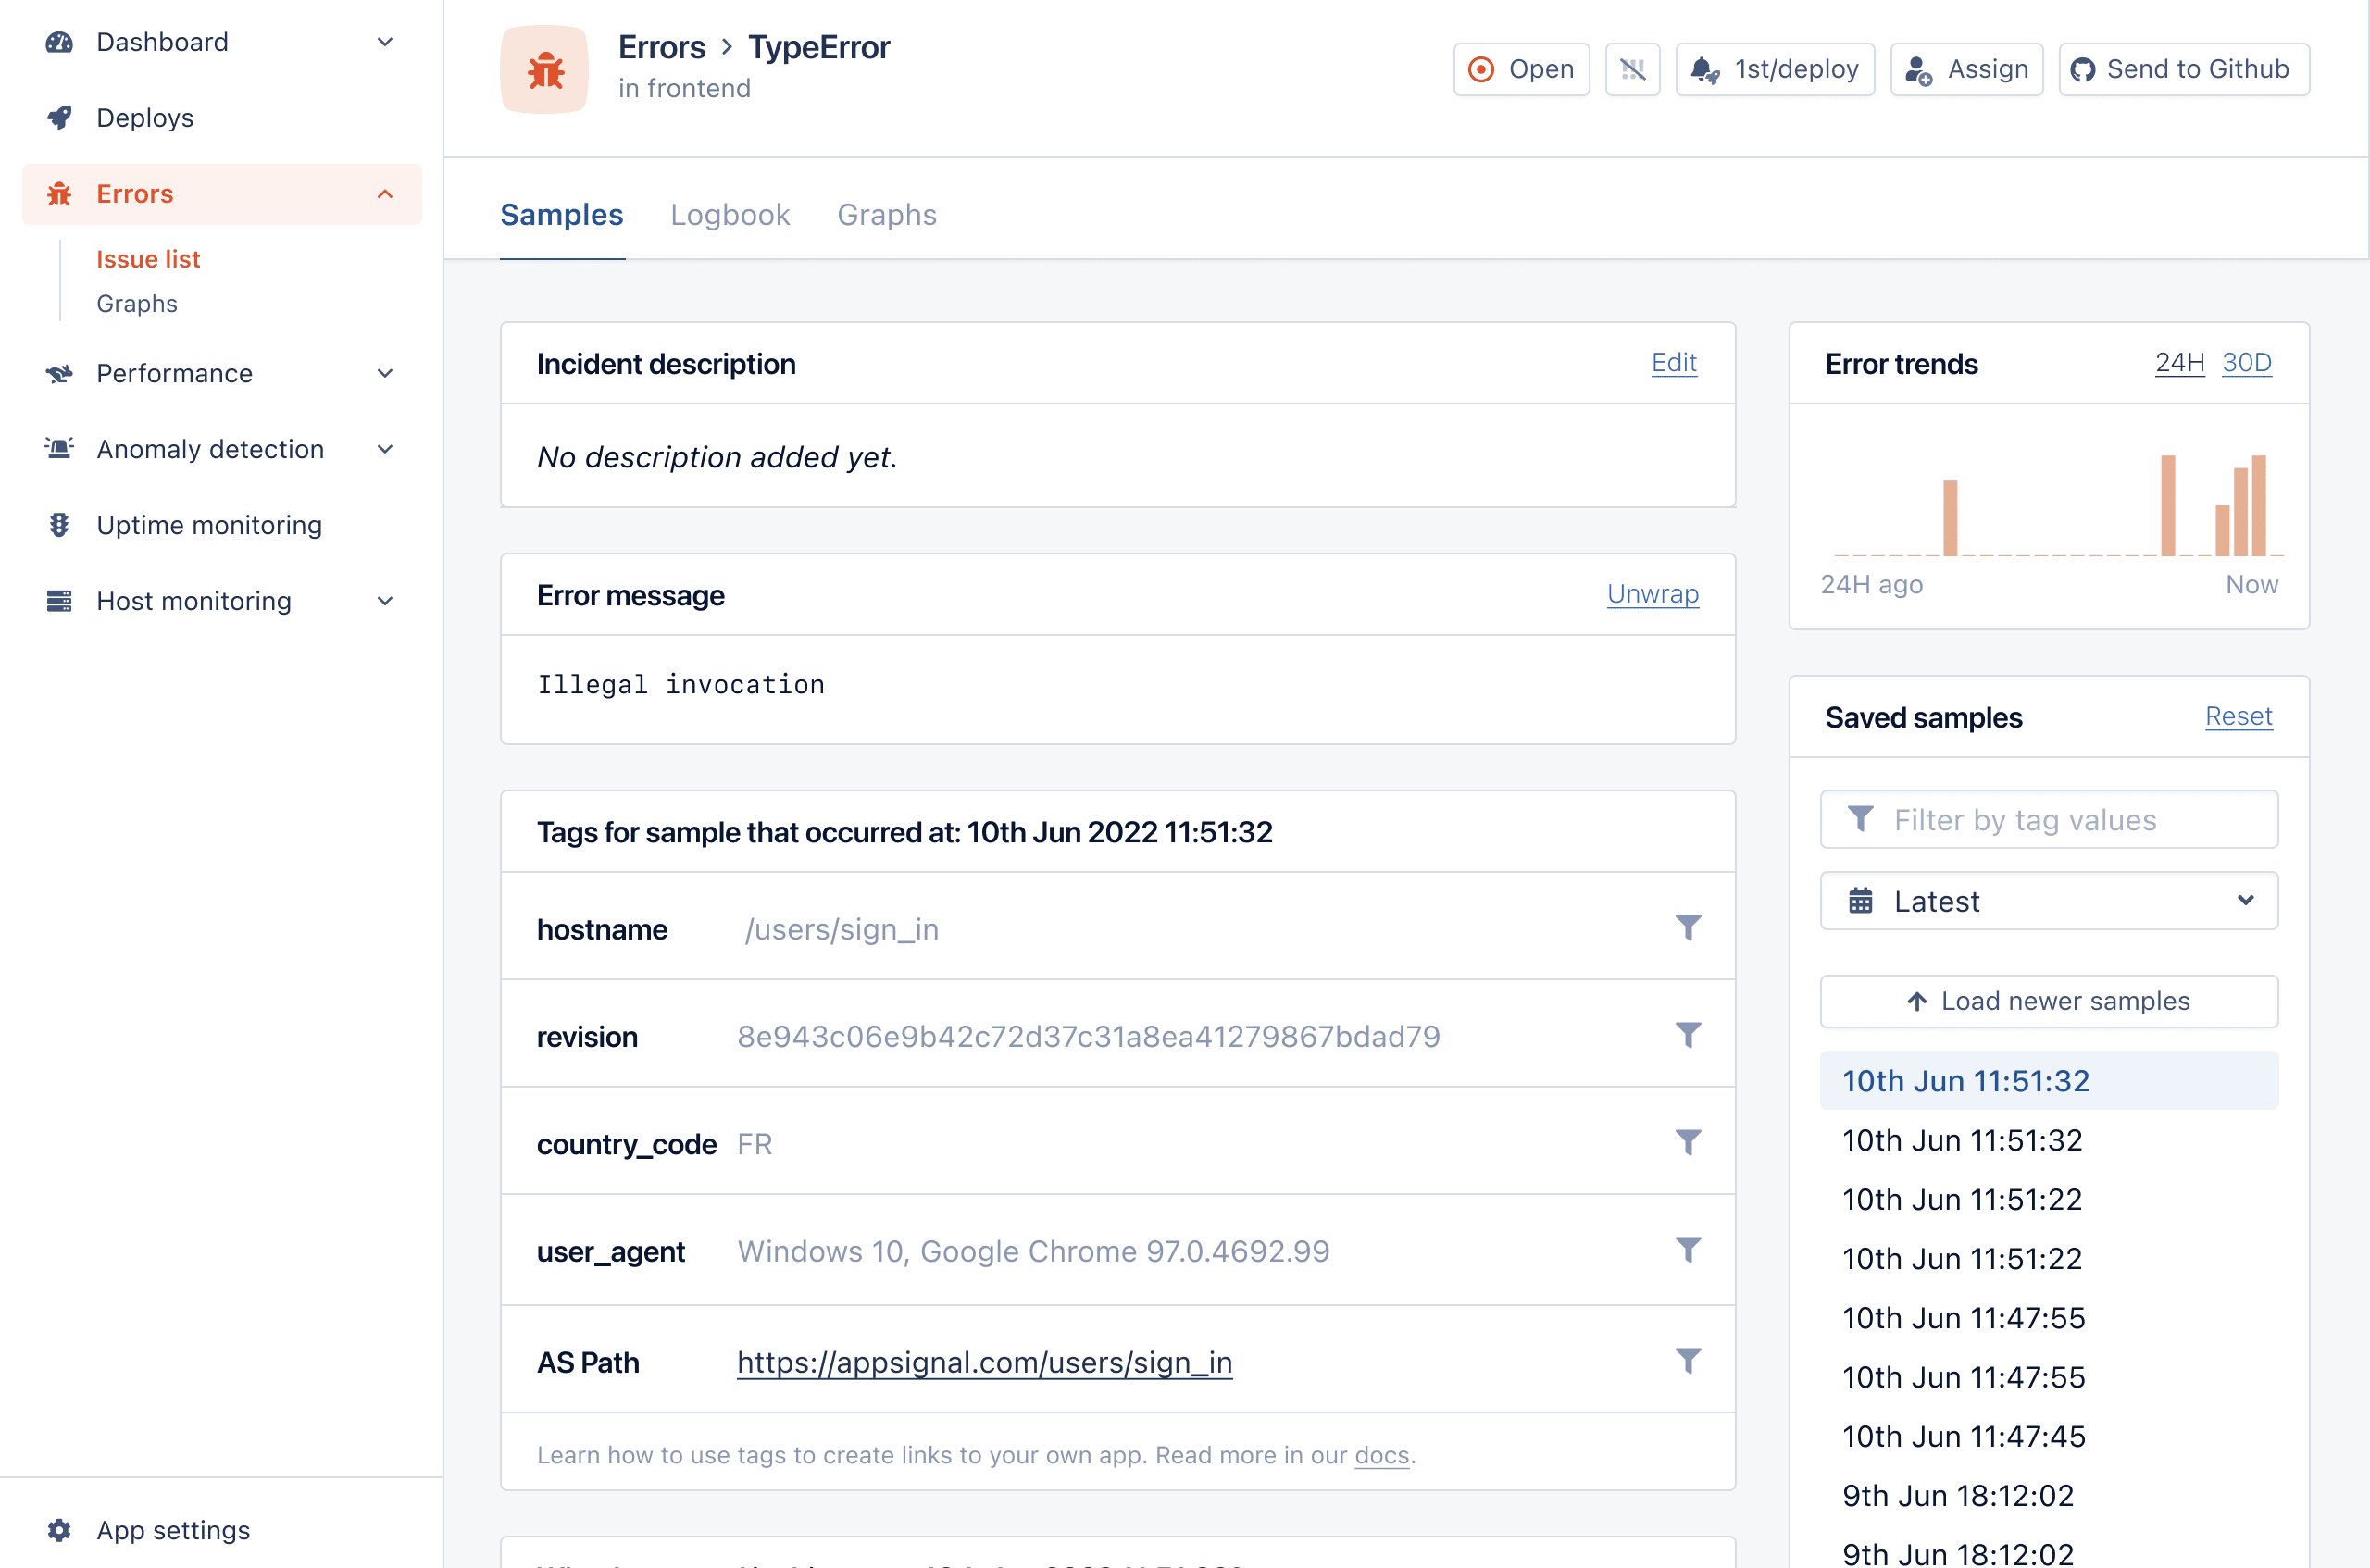
Here’s an example of how information about a React error looks in AppSignal’s ‘issue list’:
Let’s see a typical error boundary component:
import { Component } from "react";

class ErrorBoundary extends Component {
  constructor(props) {
    super(props);
    this.state = { hasError: false };
  }

  static getDerivedStateFromError(error) {
    // Update state so the next render will show the fallback UI.
    return {
      hasError: true,
      error,
    };
  }

  componentDidCatch(error, errorInfo) {
    // You can also log the error to an error reporting service like AppSignal
    // logErrorToMyService(error, errorInfo);
  }

  render() {
    const { hasError, error } = this.state;

    if (hasError) {
      // You can render any custom fallback UI
      return (
        <div>
          <p>Something went wrong 😭</p>

          {error.message && <span>Here's the error: {error.message}</span>}
        </div>
      );
    }

    return this.props.children;
  }
}

export default ErrorBoundary;
We can use ErrorBoundary like so:
<ErrorBoundary>
  <CrashableComponent />
</ErrorBoundary>
Now, when we open our app, we will get a working app with the following:

That is precisely what we want. We want our app to remain functional when an error occurs. But we also want to inform the user (and our error tracking service) about the error.
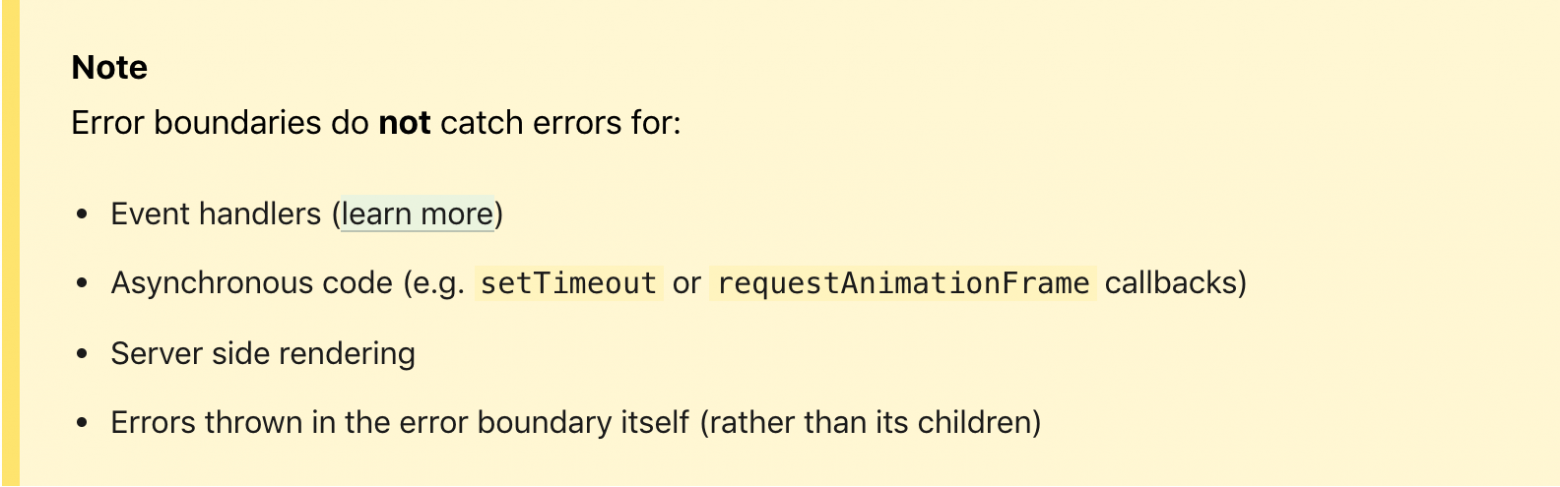
Beware that using an error boundary is not a silver bullet. Error boundaries do not catch errors for:
- Event handlers
- Asynchronous code (e.g.
setTimeoutorrequestAnimationFramecallbacks) - Server-side rendering
- Errors that are thrown in the error boundary itself (rather than its children)
You still need to use the try...catch statement for these fellas. So, let’s go ahead and show how you can do that.
Error Catching in Event Handlers
As mentioned before, error boundaries can’t help us when an error is thrown inside an event handler. Let’s see how we can handle those. Below is a small button component that throws an error when you click it:
import { useState } from "react";

const CrashableButton = () => {
  const [error, setError] = useState(null);

  const handleClick = () => {
    try {
      throw Error("Oh no :(");
    } catch (error) {
      setError(error);
    }
  };

  if (error) {
    return <span>Caught an error.</span>;
  }

  return <button onClick={handleClick}>Click Me To Throw Error</button>;
};

export default CrashableButton;
Notice that we have a try and catch block inside handleClick that ensures our error is caught. If you render the component and try to click it, this happens:

We have to do the same in other cases, like in setTimeout calls.
Error Catching in setTimeout Calls
Imagine we have a similar button component, but this one calls setTimeout when clicked. Here’s how it looks:
import { useState } from "react";

const SetTimeoutButton = () => {
  const [error, setError] = useState(null);

  const handleClick = () => {
    setTimeout(() => {
      try {
        throw Error("Oh no, an error :(");
      } catch (error) {
        setError(error);
      }
    }, 1000);
  };

  if (error) {
    return <span>Caught a delayed error.</span>;
  }

  return (
    <button onClick={handleClick}>Click Me To Throw a Delayed Error</button>
  );
};

export default SetTimeoutButton;
After 1,000 milliseconds, the setTimeout callback will throw an error. Luckily, we wrap that callback logic in try...catch, and setError in the component. That way, no stack trace is shown in the browser console. Also, we communicate the error to the user. Here’s how it looks in the app:

That is all well and good, as we got our app’s pages up and running despite errors popping all over the place in the background. But is there an easier way to handle errors without writing custom error boundaries? You bet there is, and of course, it comes in the form of a JavaScript package. Let me introduce you to the react-error-boundary.
JavaScript’s react-error-boundary Package
You can pop that library inside your package.json faster than ever with:
npm install --save react-error-boundaryNow, you’re ready to use it. Remember the ErrorBoundary component we made? You can forget about it because this package exports its own. Here’s how to use it:
import { ErrorBoundary } from "react-error-boundary";
import CrashableComponent from "./CrashableComponent";

const FancyDependencyErrorHandling = () => {
  return (
    <ErrorBoundary
      FallbackComponent={ErrorFallback}
      onError={(error) => {
        // You can also log the error to an error reporting service like AppSignal
        // logErrorToMyService(error, errorInfo);
        console.error(error);
      }}
    >
      <CrashableComponent />
    </ErrorBoundary>
  );
};

const ErrorFallback = ({ error }) => (
  <div>
    <p>Something went wrong 😭</p>

    {error.message && <span>Here's the error: {error.message}</span>}
  </div>
);

export default FancyDependencyErrorHandling;
In the example above, we render the same CrashableComponent, but this time, we use the ErrorBoundary component from the react-error-boundary library. It does the same thing as our custom one, except that it receives the FallbackComponent prop plus the onError function handler. The result is the same as we had with our custom ErrorBoundary component, except you don’t have to worry about maintaining it since you’re using an external package.
One great thing about this package is that you can easily wrap your function components into a withErrorBoundary making it a higher-order component (HOC). Here’s how that looks:
import { withErrorBoundary } from "react-error-boundary";

const CrashableComponent = (props) => {
  return <span>{props.iDontExist.prop}</span>;
};

export default withErrorBoundary(CrashableComponent, {
  FallbackComponent: () => <span>Oh no :(</span>,
});
Nice, you’re good to go now to capture all those errors bugging you.
But maybe you don’t want another dependency in your project. Can you achieve it yourself? Of course you can. Let’s see how it can be done.
Using Your Own React Boundaries
You can achieve a similar, if not the same, effect you get from react-error-boundary. We already showed a custom ErrorBoundary component, but let’s improve it.
import { Component } from "react";

export default class ErrorBoundary extends Component {
  constructor(props) {
    super(props);
    this.state = { hasError: false };
  }

  static getDerivedStateFromError(error) {
    // Update state so the next render will show the fallback UI.
    return {
      hasError: true,
      error,
    };
  }

  componentDidCatch(error, errorInfo) {
    // You can also log the error to an error reporting service like AppSignal
    // logErrorToMyService(error, errorInfo);
  }

  render() {
    const { hasError, error } = this.state;

    if (hasError) {
      // You can render any custom fallback UI
      return <ErrorFallback error={error} />;
    }

    return this.props.children;
  }
}

const ErrorFallback = ({ error }) => (
  <div>
    <p>Something went wrong 😭</p>

    {error.message && <span>Here's the error: {error.message}</span>}
  </div>
);

const errorBoundary = (WrappedComponent) => {
  return class extends ErrorBoundary {
    render() {
      const { hasError, error } = this.state;

      if (hasError) {
        // You can render any custom fallback UI
        return <ErrorFallback error={error} />;
      }

      return <WrappedComponent {...this.props} />;
    }
  };
};

export { errorBoundary };
Now you get the ErrorBoundary and the HOC errorBoundary that you can use across your app. Extend and play around with it as much as you want. You can make them receive custom fallback components to customize how you recover from each error. You can also make them receive an onError prop and later call it inside componentDidCatch. The possibilities are endless.
But one thing is for sure — you didn’t need that dependency after all. I bet writing your own error boundary will bring a sense of achievement, and you’ll get to understand it better. Also, who knows what ideas you might get when you’re trying to customize it.
Summing Up: Get Started with React Error Handling
Thanks for reading this blog post about handling errors in React. I hope you had as much fun reading and trying things out as I did writing it. You can find all the code, with examples, in the GitHub repo I created.
A quick rundown of the things we went through:
- React Error boundaries are great for catching errors in declarative code (e.g., inside their child component tree).
- For other cases, you need to use a
try...catchstatement (e.g., async calls likesetTimeout, event handlers, server-side rendering, and errors thrown in the error boundary itself). - A library like
react-error-boundarycan help you write less code. - You can also run your own error boundary and customize it as much as you want.
That is all, folks. Thanks for tuning in, and catch you in the next one!
P.S. If you liked this post, subscribe to our JavaScript Sorcery list for a monthly deep dive into more magical JavaScript tips and tricks.
P.P.S. If you need an APM for your Node.js app, go and check out the AppSignal APM for Node.js.
Subscription
![]()
Thanks for submitting the form.
What is Error Handling?
The response and recovery methods from erroneous situations contained in a software application are error handling. It’s the process of anticipating, identifying, and addressing application, programming, and communication difficulties, to put it another way. Error management aids in the continuation of the program’s usual flow. When it comes to error-handling solutions, many applications confront several design issues.
An asynchronous programming model where the developer process the stream of coming data to propagate the changes in code. Click to explore about, Reactive Programming Solutions
Errors are divided into three categories
Errors in logic
Errors that occur during compilation
Errors during execution
Rigorous proofreading is one of the error-handling approaches for development errors. The most common error-handling strategies for logic errors or faults are diligent application debugging or troubleshooting. Depending on the circumstances, error-handling apps can correct runtime issues or reduce their impact by implementing suitable counter measures. Most hardware applications provide an error-handling mechanism that allows them to recover from unforeseen faults gracefully.
Error handling is critical for application designers, and developers, independent of the application built or programming languages utilized because errors can be disastrous. In the worst-case situation, the application’s error handling procedures force the user to log out and the system to shut down.
Test React components without depending on their implementation details. Click to explore about, ReactJs Testing of Components with Various Methods
What are the Error Boundaries?
React 16 presented a new concept of an “error boundary” to solve a problem when a part in the UI contains a JavaScript error. It shouldn’t damage the whole application. Error Boundaries are React components used to manage JavaScript errors in their child component tree, and they give some form of boundaries or checks on errors.
React components that log and display a fallback user interface in the event of a JavaScript failure anywhere in their child component tree. It looks for problems in rendering, lifecycle methods, and other areas. Errors which Error Boundaries won’t catch in:
- Event handlers use a try/catch in event handlers.
- Server-side Rendering
- Error Boundary Component having Error.
The componentDidCatch() method operates similarly to a catch block in JavaScript, but for components. You’ll most likely want to declare an error boundary component once and utilize it across your project. Error boundaries can only be class components.
An error boundary can’t catch errors that occur within it. Error boundaries only notice errors in the components in the tree below them. If an error boundary fails to show an error message, the error will spread to the error boundary immediately above it. This, too, is analogous to how JavaScript’s catch block works.
Reason To Use
If a JavaScript error occurs within a component, it might cause React’s internal state to be corrupted, resulting in cryptic errors. Error boundaries assist in removing these mistakes and the display of a Fallback UI in their place (Which means a display of an error that something broke in the code).
Working Principle
In JavaScript, Error Boundary is quite similar to catch. If an error occurs, it attempts to locate the nearest Error Boundaries Tag as soon as a broken JavaScript component in Rendering or Lifecycle Methods is discovered.
Unlike react components, the test doesn’t run on the browser and needs any test runner. Click to explore about, Unit Testing in React using Jest and Enzyme
New Behavior for Uncaught Errors
In React 16, any errors that were not caught by any Error Boundary will result in unmounting the whole React Component Tree.
Leaving the malfunctioning UI exposed in software like Messenger, for example, may result in someone sending a message to the wrong person. Similarly, a payments app displaying an incorrect amount is worse than rendering nothing.
Because of this change, migrating to React 16 will certainly reveal previously undiscovered crashes in your application. When anything goes wrong, adding error boundaries improves the user experience.
We also recommend that you use JS error reporting services (or create your own) to learn about and repair unhandled exceptions as they occur in production.
Component Stack Traces
When an error occurs during program execution, the JVM automatically displays a stack trace. During the execution of a program, the stack trace is used to track the active stack frames at any one time.
Even if the application consumes them, React 16 prints all errors during rendering to the console during development. It also offers component stack traces in addition to the error message and the JavaScript stack. Now you can see precisely where the failure occurred in the component tree:
In component stack trace, you can see the line numbers and filenames, and it works by default in Create React App projects:
If you don’t want to utilize the Create React App, you can manually add this plugin to your Babel settings. It should be noted that it is just for development purposes and must be disabled in production.
React applications boost performance, the virtual DOM and React ecosystem is vast and powerful. Click to explore about, Optimizing React Application Performance
Why not use Try/Catch?
One question that may cross your mind is why should you learn this new concept when Error Boundaries works like Catch? Try/catch is used with imperative code, while React is declarative by nature, and Error Boundaries help preserve that declarative nature.
Error bounds maintain React’s declarative nature and operate as you’d expect. Even if a setState someplace deep in the tree causes an error in a componentDidUpdate method, the issue will correctly propagate to the closest error boundary means that no matter how deep in the tree error has occurred error boundary will still detect the issue but try/catch will not catch all the errors in React.js code.Try/catch will detect errors in an imperative code, whereas React is declarative.
Behavior in React 15 and Earlier
In the past, several Javascript errors were used to corrupt React’s internal state and caused cryptic errors on the next renders. React couldn’t handle these errors gracefully as an earlier error caused these errors in the application code. As a result, React could not recover from them.
Naming Changes from React 15
In React 15, error boundaries had extremely limited support under a distinct method name.
Unstable handle: This function does not work with the first React 16 beta version and must be replaced with componentDidCatch in code.
Error Handling Best Practices
Using Error Boundaries to Handle Errors -For Class Components :
- The easiest and effective way to handle problems within your React components is to use error boundaries. If you use a class component, you may construct an error boundary component by inserting the life cycle method componentDidCatch(error, info). This function should be used to log error data to your selected error logging service.
- Try-Catch Error Handling: Catching Errors Beyond Boundaries:
Because they don’t catch exceptions cascaded from child components, try-catch blocks aren’t the best solution to manage component-level exceptions.
On the other hand, try-catch blocks are used to handle mistakes that aren’t caught by error boundaries. - Using react-error-boundary Library: The react-error-boundary package makes error handling in React easier, and it’s the most effective way to get over the constraints of the basic error boundaries. It allows you to show a fallback component, log errors similarly to simple error boundaries, and reset the application’s state to prevent recurring issues.

Conclusion
React developers can use react-error-boundary to reduce the amount of code they have to write and increase the capabilities of their error borders to catch various types of problems that conventional error boundaries wouldn’t catch. Remember that anything in your Error Boundary’s child component tree is affected if it throws an error. So be cautious when creating one to avoid making mistakes.
- Discover more about Data Visualization with React and GraphQL
- Read more about React Server Components Working
Давайте признаем, что тот, кто ищет что-то в интернете, не хочет наткнуться на нерабочую пустую страницу. Это, как минимум, путает, сбивает с толку. Сидишь и не понимаешь, что произошло и почему, это оставляет плохое впечатление о сайте. Часто лучше сообщить об ошибке и дать пользователю продолжить пользоваться приложением или сайтом. В таком случае он получит меньше негативных эмоций и не закроет это приложение.
В этой статье мы пройдёмся по различным способам справиться с ошибками в приложениях на React.

Классический метод «Try and Catch» в React
Если вы использовали JavaScript, вам, вероятно, приходилось писать инструкцию «try and catch». Чтобы убедиться в этом, посмотрите:
try {
  somethingBadMightHappen();
} catch (error) {
  console.error("Something bad happened");
  console.error(error);
Это отличный инструмент для выявления неправильного кода и обеспечения того, чтобы наше приложение не сломалось. Чтобы быть более реалистичным и максимально приближенным к миру React, давайте посмотрим пример того, как вы будете использовать это в своем приложении:
const fetchData = async () => {
  try {
    return await fetch("https://some-url-that-might-fail.com");
  } catch (error) {
    console.error(error); // You might send an exception to your error tracker like AppSignal
    return error;
  }
При выполнении сетевых вызовов в React обычно используют инструкцию try...catch. Но почему? К сожалению, try...catch работает только с императивным кодом, но не работает с декларативным, таким как JSX, который пишут в компонентах. Вот почему вы не видите массивной упаковки try...catch всего нашего приложения. Это просто не сработает.
Итак, что делать? В React 16 появилась новая концепция — границы ошибок React. Давайте разберемся, что это такое.
Границы ошибок React
Прежде чем мы перейдем к границам ошибок, давайте сначала посмотрим, почему они необходимы. Представьте, что у вас есть такой компонент:
const CrashableComponent = (props) => {
  return <span>{props.iDontExist.prop}</span>;
};

export default CrashableComponent
Если вы попытаетесь отобразить этот компонент где-нибудь, вы получите ошибку, подобную этой:

Мало того, вся страница будет пустой, и пользователь не сможет ничего делать или видеть. Но что произошло? Мы попытались получить доступ к свойству iDontExist.prop, которого не существует (мы не передаем его компоненту). Это банальный пример, но он показывает, что мы не можем поймать эти ошибки try...catch с помощью инструкции.
Весь этот эксперимент подводит нас к границам ошибок. Границы ошибок — это компоненты React, которые улавливают ошибки JavaScript в любом месте своего дочернего дерева компонентов. Затем они регистрируют эти обнаруженные ошибки и отображают резервный пользовательский интерфейс вместо дерева компонентов, которое разбилось. Границы ошибок улавливают ошибки во время рендеринга, в методах жизненного цикла и в конструкторах всего дерева под ними.
Граница ошибки — это классовый компонент, который определяет один (или оба) из методов жизненного цикла static getDerivedStateFromError() или componentDidCatch(). static getDerivedStateFromError() отображает резервный пользовательский интерфейс после возникновения ошибки. componentDidCatch() можно передавать информацию об ошибках вашему поставщику услуг (например, AppSignal) или в консоль браузера.
Вот пример того, как информация об ошибке React выглядит в «списке проблем» AppSignal:

Давайте посмотрим на типичный компонент границы ошибки:
import { Component } from "react";

class ErrorBoundary extends Component {
  constructor(props) {
    super(props);
    this.state = { hasError: false };
  }

  static getDerivedStateFromError(error) {
    // Update state so the next render will show the fallback UI.
    return {
      hasError: true,
      error,
    };
  }

  componentDidCatch(error, errorInfo) {
    // You can also log the error to an error reporting service like AppSignal
    // logErrorToMyService(error, errorInfo);
  }

  render() {
    const { hasError, error } = this.state;

    if (hasError) {
      // You can render any custom fallback UI
      return (
        <div>
          <p>Something went wrong ????</p>

          {error.message && <span>Here's the error: {error.message}</span>}
        </div>
      );
    }

    return this.props.children;
  }
}

export default ErrorBoundary
Мы можем использовать ErrorBoundary примерно так:
<ErrorBoundary>
  <CrashableComponent />
</ErrorBoundary
Теперь, когда мы открываем наше приложение, мы получим рабочее приложение с текстом:

Это именно то, чего мы хотим. Мы хотим, чтобы наше приложение оставалось функциональным при возникновении ошибки. Но также хотим информировать пользователя (и нашу службу отслеживания ошибок) об ошибке.
Помните, что использование границ ошибок не панацея. Границы ошибок не распознают ошибки для:
-
Обработчики событий.
-
Асинхронный код (например,
setTimeout, илиrequestAnimationFrameCallbacks). -
Server-side rendering.
-
Ошибки, которые возникают в самой границе ошибки (а не в ее дочерних элементах).
В этих случаях всё равно нужно использовать try...catch. И так, давайте продолжим и покажем, как вы можете это сделать.
Перехват ошибок в обработчиках событий
Как упоминалось ранее, границы ошибок не могут нам помочь, когда ошибка выдается внутри обработчика событий. Давайте посмотрим, как можно с ними справиться. Ниже приведен небольшой компонент кнопки, который выдает ошибку при нажатии на него:
import { useState } from "react";

const CrashableButton = () => {
  const [error, setError] = useState(null);

  const handleClick = () => {
    try {
      throw Error("Oh no :(");
    } catch (error) {
      setError(error);
    }
  };

  if (error) {
    return <span>Caught an error.</span>;
  }

  return <button onClick={handleClick}>Click Me To Throw Error</button>;
};

export default CrashableButton
Обратите внимание, что у нас есть блок try and catch внутри handleClick, который гарантирует, что наша ошибка будет обнаружена. Если вы отобразите компонент и попытаетесь щелкнуть по нему, это произойдет:

Нужно делать то же самое в других случаях, например, в вызовах setTimeout
Перехват ошибок в вызовах setTimeout
Представьте, что у нас есть аналогичный компонент button, но он вызывает setTimeout при нажатии. Вот как это выглядит:
import { useState } from "react";

const SetTimeoutButton = () => {
  const [error, setError] = useState(null);

  const handleClick = () => {
    setTimeout(() => {
      try {
        throw Error("Oh no, an error :(");
      } catch (error) {
        setError(error);
      }
    }, 1000);
  };

  if (error) {
    return <span>Caught a delayed error.</span>;
  }

  return (
    <button onClick={handleClick}>Click Me To Throw a Delayed Error</button>
  );
};

export default SetTimeoutButton
Через 1000 миллисекунд callback setTimeout выдаст ошибку. К счастью, мы включаем эту логику обратного вызова в try...catch и в компонент setError. Таким образом, трассировка стека не отображается в консоли браузера. Кроме того, мы сообщаем об ошибке пользователю. Вот как это выглядит в приложении:

Таким образом, мы запустили страницы приложения, несмотря на то, что ошибки появляются повсюду в фоновом режиме. Но есть ли более простой способ обработки ошибок без написания пользовательских границ ошибок? Вы можете поспорить, что есть, и, конечно же, он поставляется в виде пакета JavaScript. Позвольте мне познакомить вас с react-error-boundary.
react-error-boundary пакет JavaScript
Вы можете вставить эту библиотеку в свой package.json быстрее, чем когда-либо, с:
npm install --save react-error-boundaryТеперь вы готовы использовать его. Помните компонент ErrorBoundary, который мы создали? Вы можете забыть об этом, потому что этот пакет экспортирует свои собственные. Вот как это использовать:
import { ErrorBoundary } from "react-error-boundary";
import CrashableComponent from "./CrashableComponent";

const FancyDependencyErrorHandling = () => {
  return (
    <ErrorBoundary
      FallbackComponent={ErrorFallback}
      onError={(error) => {
        // You can also log the error to an error reporting service like AppSignal
        // logErrorToMyService(error, errorInfo);
        console.error(error);
      }}
    >
      <CrashableComponent />
    </ErrorBoundary>
  );
};

const ErrorFallback = ({ error }) => (
  <div>
    <p>Something went wrong ????</p>

    {error.message && <span>Here's the error: {error.message}</span>}
  </div>
);

export default FancyDependencyErrorHandling
В этом примере визуализируем то же CrashableComponent, но на этот раз мы используем компонент ErrorBoundary из библиотеки react-error-boundary. Он делает то же самое, что и наш пользовательский, за исключением того, что он получает FallbackComponent и обработчик функции onError. Результат тот же, что и с нашим пользовательским компонентом ErrorBoundary, за исключением того, что вам не нужно беспокоиться о его обслуживании, поскольку вы используете внешний пакет.
Одна из замечательных особенностей этого пакета заключается в том, что вы можете легко обернуть свои функциональные компоненты в компонент withErrorBoundary более высокого порядка (HOC). Вот как это выглядит:
import { withErrorBoundary } from "react-error-boundary";

const CrashableComponent = (props) => {
  return <span>{props.iDontExist.prop}</span>;
};

export default withErrorBoundary(CrashableComponent, {
  FallbackComponent: () => <span>Oh no :(</span>,
});
Хорошо, теперь вы можете записывать все те ошибки, которые вас беспокоят.
Но, возможно, вы не хотите, чтобы в вашем проекте была другая зависимость. Давайте посмотрим, как это можно сделать самостоятельно.
Используя свои собственные границы React
Похожего, если не точно такого же эффекта можно достичь с помощью react-error-boundary. Мы уже разбирали кастомный ErrorBoundary компонент, но предлагаю его улучшить.
import { Component } from "react";

export default class ErrorBoundary extends Component {
  constructor(props) {
    super(props);
    this.state = { hasError: false };
  }

  static getDerivedStateFromError(error) {
    // Update state so the next render will show the fallback UI.
    return {
      hasError: true,
      error,
    };
  }

  componentDidCatch(error, errorInfo) {
    // You can also log the error to an error reporting service like AppSignal
    // logErrorToMyService(error, errorInfo);
  }

  render() {
    const { hasError, error } = this.state;

    if (hasError) {
      // You can render any custom fallback UI
      return <ErrorFallback error={error} />;
    }

    return this.props.children;
  }
}

const ErrorFallback = ({ error }) => (
  <div>
    <p>Something went wrong ????</p>

    {error.message && <span>Here's the error: {error.message}</span>}
  </div>
);

const errorBoundary = (WrappedComponent) => {
  return class extends ErrorBoundary {
    render() {
      const { hasError, error } = this.state;

      if (hasError) {
        // You can render any custom fallback UI
        return <ErrorFallback error={error} />;
      }

      return <WrappedComponent {...this.props} />;
    }
  };
};

export { errorBoundary };
У вас получились ErrorBoundary и HOC errorBoundary, которые вы можете использовать во всем приложении. Их можно масштабировать и видоизменять. Вы можете сделать так, чтобы они получали индивидуальные fallback компоненты для кастомизации способов восстановления после каждой ошибки. Ещё можно настроить получение onError, и потом вызывать его внутриcomponentDidCatch. Возможности не ограничены.
Одно могу сказать точно — эти взаимосвязи не нужны в конце концов. Уверен, написание собственного error boundary даст ощущение успеха, сможете лучше их понимать. Ну и кто знает, может, придут какие-то интересные идеи в голову, пока вы экспериментируете с кастомизацией.
Резюмируем:
-
Границы ошибок React отлично подходят для обнаружения ошибок в декларативном коде (например, внутри дерева дочерних компонентов).
-
Для других случаев необходимо использовать инструкцию
try...catch(например, асинхронные вызовы, такие какsetTimeoutобработчики событий, рендеринг на стороне сервера и ошибки, возникающие в самой границе ошибки). -
Подобная библиотека
react-error-boundaryпомогает писать меньше кода. -
Вы также можете запустить свою собственную границу ошибок и настроить ее так, как хотите.