Предохранители
Ранее ошибки JavaScript внутри компонентов портили внутреннее состояние React и заставляли его выдавать таинственные сообщения об ошибках во время следующего рендера. Эти сообщения всегда вызывались ошибками, расположенными где-то выше в коде приложения, но React не предоставлял способа адекватно обрабатывать их в компонентах и не мог обработать их самостоятельно.
Представляем предохранители (компоненты Error Boundary)
Ошибка JavaScript где-то в коде UI не должна прерывать работу всего приложения. Чтобы исправить эту проблему для React-пользователей, React 16 вводит концепцию «предохранителя» (error boundary).
Предохранители это компоненты React, которые отлавливают ошибки JavaScript в любом месте деревьев их дочерних компонентов, сохраняют их в журнале ошибок и выводят запасной UI вместо рухнувшего дерева компонентов. Предохранители отлавливают ошибки при рендеринге, в методах жизненного цикла и конструкторах деревьев компонентов, расположенных под ними.
Примечание
Предохранители не поймают ошибки в:
- обработчиках событий (подробнее);
- асинхронном коде (например колбэках из
setTimeoutилиrequestAnimationFrame);- серверном рендеринге (Server-side rendering);
- самом предохранителе (а не в его дочерних компонентах).
Классовый компонент является предохранителем, если он включает хотя бы один из следующих методов жизненного цикла: static getDerivedStateFromError() или componentDidCatch(). Используйте static getDerivedStateFromError() при рендеринге запасного UI в случае отлова ошибки. Используйте componentDidCatch() при написании кода для журналирования информации об отловленной ошибке.
class ErrorBoundary extends React.Component {
  constructor(props) {
    super(props)
    this.state = { hasError: false }
  }

  static getDerivedStateFromError(error) {
    // Обновить состояние с тем, чтобы следующий рендер показал запасной UI.
    return { hasError: true }
  }

  componentDidCatch(error, info) {
    // Можно также сохранить информацию об ошибке в соответствующую службу журнала ошибок
    logErrorToMyService(error, info)
  }

  render() {
    if (this.state.hasError) {
      // Можно отрендерить запасной UI произвольного вида
      return <h1>Что-то пошло не так.</h1>
    }

    return this.props.children
  }
}
И можно дальше им пользоваться, как обыкновенным компонентом:
<ErrorBoundary>
  <MyWidget />
</ErrorBoundary>
Предохранители работают как JavaScript-блоки catch {}, но только для компонентов. Только классовые компоненты могут выступать в роли предохранителей. На практике чаще всего целесообразным будет один раз описать предохранитель и дальше использовать его по всему приложению.
Обратите внимание, что предохранители отлавливают ошибки исключительно в своих дочерних компонентах. Предохранитель не сможет отловить ошибку внутри самого себя. Если предохранителю не удаётся отрендерить сообщение об ошибке, то ошибка всплывает до ближайшего предохранителя, расположенного над ним в дереве компонентов. Этот аспект их поведения тоже напоминает работу блоков catch {} в JavaScript.
Живой пример
Посмотрите пример объявления и использования предохранителя в React 16.
Где размещать предохранители
Степень охвата кода предохранителями остаётся на ваше усмотрение. Например, вы можете защитить им навигационные (route) компоненты верхнего уровня, чтобы выводить пользователю сообщение «Что-то пошло не так», как это часто делают при обработке ошибок серверные фреймворки. Или вы можете охватить индивидуальными предохранителями отдельные виджеты, чтобы помешать им уронить всё приложение.
Новое поведение при обработке неотловленных ошибок
Это изменение влечёт за собой существенное последствие. Начиная с React 16, ошибки, не отловленные ни одним из предохранителей, будут приводить к размонтированию всего дерева компонентов React.
Хотя принятие этого решения и вызвало споры, судя нашему опыту, бо́льшим злом будет вывести некорректный UI, чем удалить его целиком. К примеру, в приложении типа Messenger, вывод поломанного UI может привести к тому, что пользователь отправит сообщение не тому адресату. Аналогично, будет хуже, если приложение для проведения платежей выведет пользователю неправильную сумму платежа, чем если оно не выведет вообще ничего.
Это изменение означает, что при миграции на React 16 вы с большой вероятностью натолкнётесь на незамеченные ранее ошибки в вашем приложении. Добавляя в ваше приложение предохранители, вы обеспечиваете лучший опыт взаимодействия с приложением при возникновении ошибок.
Например, Facebook Messenger охватывает содержимое боковой и информационной панелей, журнала и поля ввода сообщений отдельными предохранителями. Если один из этих компонентов UI упадёт, то остальные сохранят интерактивность.
Также мы призываем пользоваться сервисами обработки ошибок JavaScript (или написать собственный аналогичный сервис), чтобы вы знали и могли устранять необработанные исключения в продакшен-режиме.
Стек вызовов компонентов
В режиме разработки React 16 выводит на консоль сообщения обо всех ошибках, возникших при рендеринге, даже если они никак не сказались на работе приложения. Помимо сообщения об ошибке и стека JavaScript, React 16 также выводит и стек вызовов компонентов. Теперь вы в точности можете видеть в каком именно месте дерева компонентов случилось страшное:

Кроме этого, в стеке вызовов компонентов выводятся имена файлов и номера строк. Такое поведение по умолчанию настроено в проектах, созданных при помощи Create React App:

Если вы не пользуетесь Create React App, вы можете вручную добавить к вашей конфигурации Babel вот этот плагин. Обратите внимание, что он предназначен исключительно для режима разработки и должен быть отключён в продакшен.
Примечание
Имена компонентов, выводимые в их стеке вызовов, определяются свойством
Function.name. Если ваше приложение поддерживает более старые браузеры и устройства, которые могут ещё не предоставлять его нативно (например, IE 11), рассмотрите возможность включения полифиллаFunction.nameв бандл вашего приложения, напримерfunction.name-polyfill. В качестве альтернативы, вы можете явным образом задать пропdisplayNameв каждом из ваших компонентов.
А как насчёт try/catch?
try / catch — отличная конструкция, но она работает исключительно в императивном коде:
try {
  showButton()
} catch (error) {
  // ...
}
В то время, как компоненты React являются декларативными, указывая что должно быть отрендерено:
Предохранители сохраняют декларативную природу React и ведут себя так, как вы уже привыкли ожидать от компонентов React. Например, если ошибка, произошедшая в методе componentDidUpdate, будет вызвана setState где-то в глубине дерева компонентов, она всё равно корректно всплывёт к ближайшему предохранителю.
А что насчёт обработчиков событий?
Предохранители не отлавливают ошибки, произошедшие в обработчиках событий.
React не нуждается в предохранителях, чтобы корректно обработать ошибки в обработчиках событий. В отличие от метода render и методов жизненного цикла, обработчики событий не выполняются во время рендеринга. Таким образом, даже если они сгенерируют ошибку, React всё равно знает, что нужно выводить на экран.
Чтобы отловить ошибку в обработчике событий, пользуйтесь обычной JavaScript-конструкцией try / catch:
class MyComponent extends React.Component {
  constructor(props) {
    super(props)
    this.state = { error: null }
    this.handleClick = this.handleClick.bind(this)
  }

  handleClick() {
    try {
      // Делаем что-то, что сгенерирует ошибку
    } catch (error) {
      this.setState({ error })
    }
  }

  render() {
    if (this.state.error) {
      return <h1>Отловил ошибку.</h1>
    }
    return (
      <div onClick={this.handleClick}>Нажми на меня</div>
    )
  }
}
Обратите внимание, что приведённый выше пример демонстрирует стандартное поведение JavaScript и не использует предохранителей.
Изменение названия метода по сравнению с React 15
React 15 включал очень ограниченную поддержку предохранителей с другим названием метода: unstable_handleError. Этот метод больше не работает и вам будет нужно заменить его в вашем коде на componentDidCatch начиная с первого бета-релиза React 16.
Для обработки этого изменения мы написали codemod, обеспечивающий автоматическую миграцию вашего кода.
![]()
Rolando
Posted on Nov 7, 2020
• Updated on Aug 7, 2021
One thing React does well ( among other things ) is to show console error and warning messages, they point out meaningful stuff: bad practices, bugs ( or potential bugs), and recommendations. If we don’t pay attention to them, they will somehow follow us to soon or later make their point, however, during my career, I have work in several React apps where opening the console means looking at a long list of yellow and red messages left by previous tasks.
One error message I confess had not paid the necessary attention to, it is the one bellow saying:
Consider adding an error boundary to your tree to customize error handling behavior. Visit https://reactjs.org/link/error-boundaries to learn more about error boundaries

This error can appear at different, hard to predict circumstances like data fetch error, bad rerender of a component, a throw newError exception coming from somewhere, among others. We sometimes don’t know how our app is going to behave when unexpected events like this happen, that’s why React offers this type of messages with even a link included that can guide us to offer a better UI experience for our users.
Let’s see the following code
I have this simple component called Title that throws an error exception if the props argument has not been included.

I’m planning to now pass it inside another component as a child:
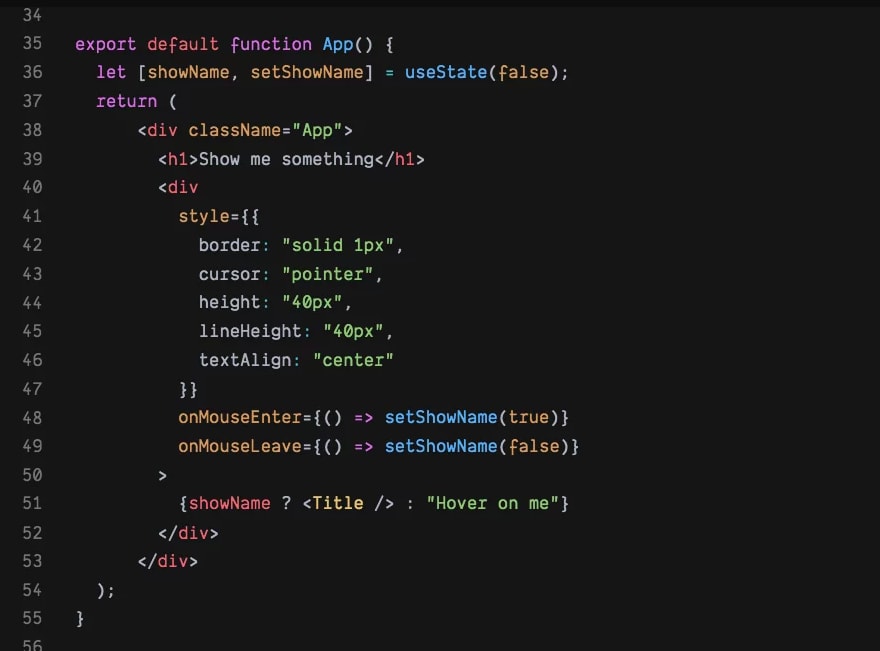
As we can see, the title prop was not passed over to the Title component which is going to make our app break as soon we hover on the element, but the worst part is the user experience, the user won’t see anything on the screen, like literally.

To communicate this much better, we are going to grab the error boundaries example component from the React Js documentation which works perfectly for this problem.

It is a simple wrapper class component that updates a state error depending on if something doesn’t work as expected by making an error state change from false to true, if indeed something has gone wrong, we can then display something to the screen like a text message for example. We can also console some error details which will help us tackle the issue better thanks to the componentDidCatch lifecycle method
Note: There is no version of hooks for this one because the getDerivedStateFromError and componentDidCatch «old school» lifecycle do not have an equivalent effect yet, more info here
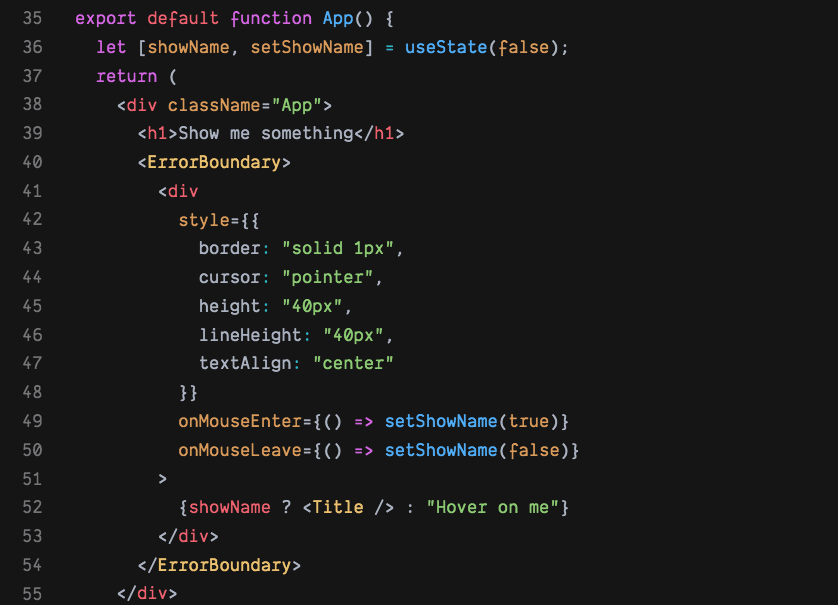
We will wrap it on top of our App component.

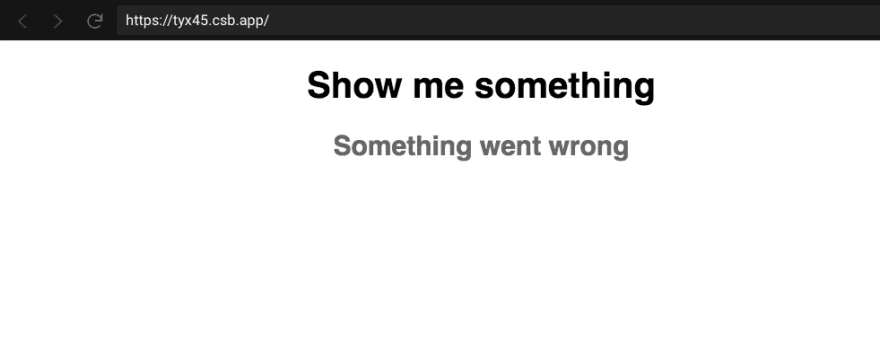
Now when the user hovers, we can show something to the screen instead of leaving them blank.

But this could be even better, notice the Title component is the one that can potentially bring issues, we do not need to wrap the whole App component with the error boundary, we can move it closer down like:
We now have a part of the app displaying content while the other it’s not, which might be better than showing one big error.
Full code example here
Conclusion
When building software, some unexpected things could happen in our apps, it is our responsibility to give users the best experience by providing minimal information about these events, an error boundary component could help us achieve this with not a lot of effort. Be also mindful of other React errors and warning displaying in the console, as they usually point at problems or potential ones.
Follow me on Twitter for more content

От автора: эта статья познакомит вас с концепцией error boundaries в React. Мы рассмотрим, какие задачи они пытаются решить, как их реализовать и какие у них есть недостатки. Наконец, мы рассмотрим небольшой слой абстракции, который делает error boundaries еще лучше!
Даже в самых безупречных приложениях время от времени возникают ошибки выполнения. Сеть может выйти из строя, какая-то внутренняя служба может выйти из строя, или пользователи могут предоставить вам некоторую вводную информацию, которая просто не вычисляется. Или — ну знаете — баги. Но как лучше всего обрабатывать ошибки, чтобы ваше приложение оставалось безотказным, продолжало реагировать и обеспечивать максимально удобное взаимодействие с пользователем?
Что такое error boundaries?
Error boundaries — это способ React обрабатывать ошибки в приложении. Они позволяют вам реагировать и восстанавливаться после ошибок времени выполнения, а также предоставляют резервный пользовательский интерфейс, если это применимо.
Идея, лежащая в основе error boundaries, заключается в том, что вы можете заключить любую часть вашего приложения в специальный компонент — так называемую границу ошибки (error boundary)- и если в этой части приложения возникнет неперехваченная ошибка, она будет содержаться в этом компоненте. Затем вы можете показать ошибку, сообщить об этом в службу отчетов об ошибках и попытаться ее исправить, если это возможно.
Error boundaries были введены в React 16 и были одной из первых функций, появившихся в результате усилий команды React по переписыванию Fiber. Это единственный компонент, который вам все еще нужно написать как компонент класса (так что пока никаких хуков!), Но он определенно должен быть частью любого современного приложения React.

Хотите узнать, что необходимо для создания сайта?
Посмотрите видео и узнайте пошаговый план по созданию сайта с нуля!
Смотреть видео
Обратите внимание, что даже несмотря на то, что вы можете создать несколько error boundaries в своем приложении, как правило, выбирают только одну на корневом уровне. При желании вы можете использовать супер-грануляцию, но мой опыт подсказывает, что часто бывает достаточно корневого уровня.
Моя первая error boundary
Error boundary — это обычный компонент класса, который реализует один (или оба) из следующих методов:
static getDerivedStateFromError(error)
Этот метод возвращает новое состояние на основе обнаруженной ошибки. Обычно вы меняете флаг состояния, который сообщает error boundary, следует ли предоставлять резервный пользовательский интерфейс.
componentDidCatch(error, errorInfo)
Этот метод вызывается всякий раз, когда возникает ошибка. Вы можете зарегистрировать ошибку (и любую дополнительную информацию) в службе отчетов об ошибках, попытаться исправить ошибку и сделать все, что вам нужно.
Чтобы показать, как это реализовано, давайте сделаем несколько шагов. Во-первых, давайте создадим компонент обычного класса.
|
class ErrorBoundary extends React.Component { render() { return this.props.children; } } |
Этот компонент почти ничего не делает — он просто отображает своих дочерних элементов. Зарегистрируем ошибку в сервисе ошибок!
|
class ErrorBoundary extends React.Component { componentDidCatch(error, errorInfo) { errorService.log({ error, errorInfo }); } render() { return this.props.children; } } |
Теперь, когда у пользователей возникает ошибка, мы получаем уведомление через службу отчетов об ошибках. Мы получим саму ошибку, а также полный стек компонентов, в которых произошла ошибка. Это значительно упростит работу по исправлению ошибок в дальнейшем!
Однако мы все еще нарушаем работу приложения! Это плохо. Давайте предоставим резервный пользовательский интерфейс. Для этого нам нужно отслеживать, находимся ли мы в ошибочном состоянии — и именно здесь на помощь приходит статический метод getDerivedStateFromError!
|
class ErrorBoundary extends React.Component { state = { hasError: false }; static getDerivedStateFromError(error) { return { hasError: true }; } componentDidCatch(error, errorInfo) { errorService.log({ error, errorInfo }); } render() { if (this.state.hasError) { return <h1>Oops, we done goofed up</h1>; } return this.props.children; } } |
И теперь у нас есть базовая, но функциональная Error boundary!
Начнем использовать Error boundary
Теперь приступим к ее использованию. Просто оберните компонент корневого приложения в новый компонент ErrorBoundary!
|
ReactDOM.render( <ErrorBoundary> <App /> </ErrorBoundary>, document.getElementById(‘root’) ) |
Обратите внимание, что вы можете использовать error boundaries так, чтобы они также отображали базовый макет (верхний колонтитул, нижний колонтитул и т. Д.).
Добавим функцию reset!
Иногда подобные ошибки случаются, когда пользовательский интерфейс переходит в нестабильное состояние. Всякий раз, когда возникает ошибка, все поддерево error boundary размонтируется, что, в свою очередь, сбрасывает любое внутреннее состояние.
Предоставление пользователю кнопки «Хочу повторить попытку», которая будет пытаться перемонтировать поддерево с новым состоянием, иногда может быть хорошей идеей! Давайте сделаем это.
|
1 2 3 4 5 6 7 8 9 10 11 12 13 14 15 16 17 18 19 20 21 22 |
class ErrorBoundary extends React.Component { state = { hasError: false }; static getDerivedStateFromError(error) { return { hasError: true }; } componentDidCatch(error, errorInfo) { errorService.log({ error, errorInfo }); } render() { if (this.state.hasError) { return ( <div> <h1>Oops, we done goofed up</h1> <button type=«button» onClick={() => this.setState({ hasError: false })}> Try again? </button> </div> ); } return this.props.children; } } |
Конечно, это может быть не очень хорошей идеей для приложения. При реализации подобных функций учитывайте свои потребности и потребности пользователей.
Инструмент воспроизведения сеанса с открытым исходным кодом
Отладка веб-приложения в производственной среде может быть сложной задачей и потребовать много времени. OpenReplay — это альтернатива с открытым исходным кодом для FullStory, LogRocket и Hotjar. Он позволяет отслеживать и воспроизводить все, что делают ваши пользователи, и показывает, как ваше приложение ведет себя при каждой проблеме. Это похоже на то, как если бы инспектор вашего браузера был открыт, когда вы смотрите через плечо пользователя. OpenReplay — единственная доступная альтернатива с открытым исходным кодом.
Ограничения
Error boundaries отлично подходят для того, что они делают — вылавливают ошибки времени выполнения, которых вы не ожидали во время рендеринга. Однако есть несколько типов ошибок, которые не обнаруживаются, и с которыми нужно справляться другим способом. К ним относятся:
Хотите узнать, что необходимо для создания сайта?
Посмотрите видео и узнайте пошаговый план по созданию сайта с нуля!
Смотреть видео
ошибки в обработчиках событий (например, при нажатии кнопки)
ошибки в асинхронных обратных вызовах (например, setTimeout)
ошибки, которые происходят в самом компоненте error boundary
ошибки, возникающие при рендеринге на стороне сервера
Эти ограничения могут показаться серьезными, но в большинстве случаев их можно обойти, используя try-catch и hasError.
|
function SignUpButton(props) { const [hasError, setError] = React.useState(false); const handleClick = async () => { try { await api.signUp(); } catch(error) { errorService.log({ error }) setError(true); } } if (hasError) { return <p>Sign up failed!</p>; } return <button onClick={handleClick}>Sign up</button>; } |
Это работает достаточно хорошо, даже если вам нужно продублировать несколько строк кода.
Создание лучшей Error boundary
Error boundaries хороши по умолчанию, но было бы неплохо повторно использовать их логику обработки ошибок в обработчиках событий и асинхронных местах. Это достаточно просто реализовать через контекстный API! Давайте реализуем функцию для запуска ошибок вручную.
|
1 2 3 4 5 6 7 8 9 10 11 12 13 14 15 16 17 18 19 20 |
class ErrorBoundary extends React.Component { state = { hasError: false }; static getDerivedStateFromError(error) { return { hasError: true }; } componentDidCatch(error, errorInfo) { errorService.log({ error, errorInfo }); } triggerError = ({ error, errorInfo }) => { errorService.log({ error, errorInfo }); this.setState({ hasError: true }); } resetError = () => this.setState({ hasError: false }); render() { if (this.state.hasError) { return <h1>Oops, we done goofed up</h1>; } return this.props.children; } } |
Затем давайте создадим контекст и передадим в него нашу новую функцию:
|
const ErrorBoundaryContext = React.createContext(() => {}); |
Затем мы можем создать пользовательский хук для извлечения функции запуска ошибки из любого дочернего компонента:
|
const useErrorHandling = () => { return React.useContext(ErrorBoundaryContext) } |
Затем давайте обернем нашу error boundary в контексте:
|
1 2 3 4 5 6 7 8 9 10 11 12 13 14 15 16 17 18 19 20 21 22 23 24 |
class ErrorBoundary extends React.Component { state = { hasError: false }; static getDerivedStateFromError(error) { return { hasError: true }; } componentDidCatch(error, errorInfo) { errorService.log({ error, errorInfo }); } triggerError = ({ error, errorInfo }) => { errorService.log({ error, errorInfo }); this.setState({ hasError: true }); } resetError = () => this.setState({ hasError: false }); render() { return ( <ErrorBoundaryContext.Provider value={this.triggerError}> {this.state.hasError ? <h1>Oops, we done goofed up</h1> : this.props.children } </ErrorBoundaryContext.Provider> ); } } |
Теперь мы можем запускать ошибки и из наших обработчиков событий!
|
function SignUpButton(props) { const { triggerError } = useErrorHandling(); const handleClick = async () => { try { await api.signUp(); } catch(error) { triggerError(error); } } return <button onClick={handleClick}>Sign up</button>; } |
Теперь нам не нужно думать об отчетах об ошибках или создании резервного пользовательского интерфейса для каждого реализованного нами обработчика кликов — все это находится в компоненте error boundary.
Использование react-error-boundary
Написание собственной логики error boundary, как мы делали выше, — это нормально, и вам подойдет большинство вариантов использования. Однако это решенная проблема. Член команды React Core Брайан Вон (а позже очень талантливый преподаватель React Кент С. Доддс) потратил немного времени на создание [react-error-boundary] (https://www.npmjs.com/package/react-error-boundary) пакета npm, который дает вам почти то же самое, что и выше.
API немного отличается, поэтому вы можете передавать пользовательские резервные компоненты и логику reset вместо написания своей собственной, но он используется очень похожим образом. Вот пример:
|
ReactDOM.render( <ErrorBoundary FallbackComponent={MyFallbackComponent} onError={(error, errorInfo) => errorService.log({ error, errorInfo })} > <App /> </ErrorBoundary>, document.getElementById(‘root’) ) |
Вы также можете посмотреть, как это реализовано — он использует другой подход к запуску ошибок из хуков, но в остальном все работает примерно так же.
Заключение
Обработка ошибок и неожиданных событий имеет решающее значение для любого качественного приложения. Чрезвычайно важно обеспечить удобство работы пользователей, даже если все идет не так, как планировалось.
Error boundaries — отличный способ заставить ваше приложение упасть изящно и даже содержать ошибки, которые привели к падению, в то время как остальная часть приложения продолжит работать! Напишите свой собственный или воспользуйтесь библиотекой react-error-boundary, которая сделает все за вас. Независимо от того, что вы выберете, пользователи будут вам благодарны!
Автор: Kristofer Selbekk
Источник: blog.openreplay.com
Редакция: Команда webformyself.
Читайте нас в Telegram, VK, Яндекс.Дзен
Хотите узнать, что необходимо для создания сайта?
Посмотрите видео и узнайте пошаговый план по созданию сайта с нуля!
Смотреть видео

ReactJS: основы
Изучите основы ReactJS и создайте ваше первое приложение на ReactJS
Смотреть
Editor’s note: This article was updated on 13 April 2022 to reflect the most recent information for react-error-boundary, including use of the withErrorBoundary function as a higher order component.
Errors are bound to happen in our applications, whether they’re server-related errors, edge cases, or others. As such, many methods have been developed to prevent these errors from interfering with user and developer experience. In React, one such method is the use of error boundaries.
In this article, we’ll examine React error handling using react-error-boundary. We’ll cover the following:
- Error boundaries in React
- react-error-boundary
ErrorBoundarycomponent- Resetting error boundaries
useErrorHandlerHookwithErrorBoundaryfunction as HOC
Error boundaries in React
Error boundaries were introduced in React 16 as a way to catch and handle JavaScript errors that occur in the UI parts of our component. So error boundaries only catch errors that occur in a lifecycle method, render method, and inside Hooks like useEffect. According to the React documentation, error boundaries do not handle errors in:
- Event handlers
- Asynchronous code (e.g.,
setTimeoutorrequestAnimationFramecallbacks) - Server-side rendering
- Errors thrown in the error boundary itself (rather than its children)
So basically, error boundaries only handle errors in the parts of our code that involve React.
To create an error boundary, we simply have to create a class component and define a state variable for determining whether the error boundary has caught an error. Our class component should also have at least three methods:
- A static method called
getDerivedStateFromError, which is used to update the error boundary’s state - A
componentDidCatchlifecycle method for performing operations when our error boundaries catch an error, such as logging to an error logging service - A
rendermethod for rendering our error boundary’s child or the fallback UI in case of an error
Here’s an example (taken from the React docs) of what our simple error boundary should look like:
class ErrorBoundary extends React.Component {
  constructor(props) {
    super(props);
    this.state = { hasError: false };
  }

  static getDerivedStateFromError(error) {
    // Update state so the next render will show the fallback UI.
    return { hasError: true };
  }

  componentDidCatch(error, errorInfo) {
    // You can also log the error to an error reporting service
    logErrorToMyService(error, errorInfo);
  }

  render() {
    if (this.state.hasError) {
      // You can render any custom fallback UI
      return <h1>Something went wrong.</h1>;
    }

    return this.props.children;
  }
}
react-error-boundary
react-error-boundary is a wrapper around React’s error boundary that allows developers to implement error boundaries in code without building them from scratch. With react-error-boundary, we can simply wrap components where we expect errors with the provided ErrorBoundary component and pass in some extra props to customize our error boundary’s behavior.
In this article, I will work through using react-error-boundary to deal with errors in a React application. Let’s take a look at what the library offers.
ErrorBoundary component
The ErrorBoundary component is the main component available in react-error-boundary. It allows us to implement the typical React error boundary with less code.
Here’s a very basic use case of ErrorBoundary:
function App(){
  ...
  return (
    <ErrorBoundary
          FallbackComponent={OurFallbackComponent}
        >
          <ComponentThatMightThrowAnError/>
    </ErrorBoundary>
  );
}

const OurFallbackComponent = ({ error, componentStack, resetErrorBoundary }) => {
  return (
    <div>
      <h1>An error occurred: {error.message}</h1>
      <button onClick={resetErrorBoundary}>Try again</button>
    </div>
  );
};
In the above component, we simply wrap our component with the ErrorBoundary component and pass in our fallback component to the FallbackComponent prop so that if there’s an error (that can be caught and handled by react-error-boundary), our fallback component will be rendered; otherwise, our component will be rendered.
We also have the fallbackRender prop, which is a render prop-based API for specifying our fallback component in an inline manner. Here’s the above code block using the fallbackRender prop:
function App(){
  ...
  return (
    <ErrorBoundary
      fallbackRender =  {({error, resetErrorBoundary, componentStack}) => (
          <div>
          <h1>An error occurred: {error.message}</h1>
          <button onClick={resetErrorBoundary}>Try again</button>
        </div>
      )}
    >
      <ComponentThatMightThrowAnError/>
    </ErrorBoundary>
  );
}
The ErrorBoundary also has an onError prop, which acts as a listener that is triggered when our error boundary catches and handles an error in its child components. It is from this place that we might choose to log such errors to whatever error logging service we might be using.
function App(){
  ...

  return (
    <ErrorBoundary
      onError = {(error, componentStack) => {
        logToErrorLoggingService(error, componentStack);
      }}
      ...
    >
      <ComponentThatMightThrowAnError/>
    </ErrorBoundary>
  );
}
Resetting error boundaries
react-error-boundary also provides a way for our code to recover from errors caught by our error boundaries. This is done using the reset keys and the resetErrorBoundary function passed to the fallback component.
The best way to explain how this works is to use an example code block taken directly from the React documentation:
function ErrorFallback({error, componentStack, resetErrorBoundary}) {
  return (
    <div role="alert">
      <p>Something went wrong:</p>
      <pre>{error.message}</pre>
      <pre>{componentStack}</pre>
      <button onClick={resetErrorBoundary}>Try again</button>
    </div>
  )
}

function Bomb() {
  throw new Error('💥 KABOOM 💥')
}

function App() {
  const [explode, setExplode] = React.useState(false)
  return (
    <div>
      <button onClick={() => setExplode(e => !e)}>toggle explode</button>
      <ErrorBoundary
        FallbackComponent={ErrorFallback}
        onReset={() => setExplode(false)}
        resetKeys={[explode]}
      >
        {explode ? <Bomb /> : null}
      </ErrorBoundary>
    </div>
  )
}
As we can see from the code above, a state Hook was created and used to determine whether the App component renders a Bomb component that throws an error or an error-safe component. Reset keys were also passed to the error boundary component. These reset keys determine whether the error boundary’s internal state will be reset. If one of the reset keys change during renders, the error boundary’s internal state will be reset.
On the other hand, calling the resetComponent function triggers the onResethandler of our ErrorBoundary component, where we set our explode state value to false. This causes our App component to render an error-safe component.
We also have the onResetKeysChange handler, which is triggered when the value of the reset keys change, causing a reset of the error boundary’s internal state.
useErrorHandler Hook
Another great feature of the react-error-boundary library is that it allows developers to use error boundaries to catch errors that wouldn’t otherwise be caught by traditional React error boundaries. This means we can now use error boundaries to catch errors during API requests, event handlers, and other parts of code where errors could occur.
There are two ways to use the useErrorHandler Hook:
const handleError = useErrorHandler(): then we can call thehandleError(error)and pass in the error object, just like in the example belowuseErrorHandler(error): this is useful when we’re handling the error state ourselves or when we’re getting it from another Hook
This is how we would catch errors in an API request using the first method:
 const App = () => {
  return (
    <ErrorBoundary
      FallbackComponent={CharacterFallback}
    >
      <ComponentWhereErrorMightOccur/>
    </ErrorBoundary>
  );
};


const ComponentWhereErrorMightOccur = () => {
  const handleError = useErrorHandler();
  const callAPI = () => {
    const result = fetch(apiURL)
    .then(
      (response) => response.json(),
      (error) => handleError(error))
    .then((data) => {
      return data["results"];
    });
    return result;
  };
  useEffect(() => {
    (async function () {
      await callAPI();
    })();
  }, []);
  return (
    ...
  );
};
As you can see, all we need to do is pass the error object returned from fetching data from our API to our handleError function, which was returned by the useErrorHandle Hook. This way, our error boundaries are more useful.
withErrorBoundary function as HOC
React-error-boundary allows us to utilize the withErrorBoundary function as a higher order component (HOC) to manage problems within components. This way we can focus on developing components while leaving error handling to the function. Furthermore, this method decreases the amount of code required to implement the component and its tests.
Here’s an example from the react-error-boundary docs for how to use this:
import {withErrorBoundary} from 'react-error-boundary'

const ComponentWithErrorBoundary = withErrorBoundary(ComponentThatMayError, {
  FallbackComponent: ErrorBoundaryFallbackComponent,
  onError(error, info) {
    // Do something with the error
    // E.g. log to an error logging client here
  },
})

const ui = <ComponentWithErrorBoundary />
Conclusion
react-error-boundary enables React developers to reduce the amount of code that must be written and expand their error boundary capabilities to catch other forms of errors that wouldn’t otherwise be identified by regular error boundaries. Learn more about react-error-boundary on GitHub.
LogRocket: Full visibility into your production React apps
Debugging React applications can be difficult, especially when users experience issues that are hard to reproduce. If you’re interested in monitoring and tracking Redux state, automatically surfacing JavaScript errors, and tracking slow network requests and component load time,
try LogRocket.


LogRocket
combines session replay, product analytics, and error tracking – empowering software teams to create the ideal web and mobile product experience. What does that mean for you?
Instead of guessing why errors happen, or asking users for screenshots and log dumps, LogRocket lets you replay problems as if they happened in your own browser to quickly understand what went wrong.
No more noisy alerting. Smart error tracking lets you triage and categorize issues, then learns from this. Get notified of impactful user issues, not false positives. Less alerts, way more useful signal.
The LogRocket Redux middleware package adds an extra layer of visibility into your user sessions. LogRocket logs all actions and state from your Redux stores.
Modernize how you debug your React apps —
start monitoring for free.
While catching errors before they hit production is ideal, some of them, such as network errors, might slip through testing and impact your users.
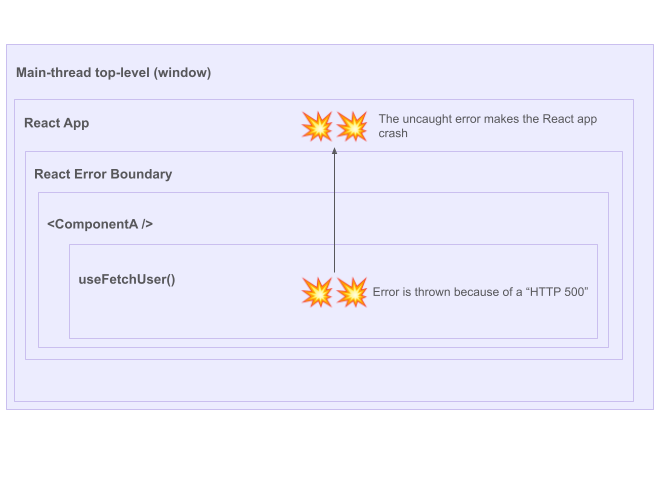
If your React components are not properly catching errors thrown by third-party libraries or React hooks, such errors either end-up crashing the React lifecycle or reaching the top-level of the main execution thread, resulting in the “white screen” scenario:
As of React 16, errors that were not caught […] will result in unmounting of the whole React component tree
It is crucial that your application gracefully handle such errors by providing proper visual feedback and potential actions (ex: retry mechanisms).
Fortunately, implementing such UX patterns can be achieved with little work with the React API and, for the most advanced UX, with the help of lightweight React libraries.
Using JavaScript’s try-catch around React hooks calls won’t work due to the asynchronous nature of their execution. However, React API offers the Error boundaries mechanism to catch all types of errors that might “bubble out” from a component.
For example, if the <ComponentA /> is wrapped in a React Error boundary, the error propagation will stop at the Error Boundary level, preventing the React App from crashing:

This article will cover how to implement Error Boundaries in your application, from simple error catching to displaying visual feedback and providing retry mechanisms.
Simple Error Boundaries: Catching and Reporting Errors
Behind its sophisticated name, an Error Boundary is just a plain class React component implementing the componentDidCatch(error) method:
class ErrorBoundarySimple extends React.Component {

   componentDidCatch(error) {
      // report the error to your favorite Error Tracking tool (ex: Sentry, Bugsnag)
   }


   render() {
      return  this.props.children;
   }

}
Note: React is not yet offering a hook-based alternative to implement error boundaries.
As showcased in this CodeSandbox, the componentDidCatch() class method will be called as soon as an error reaches our MyErrorBoundary component, allowing us to prevent the React app from crashing and forwarding the error to our error reporting tool. (The CodeSandbox might display a development error overlay that only shows in development, you can dismiss it to see the rendering result).
Let’s make our <ErrorBoundarySimple> more friendly by adding simple visual feedback when errors are raised. For this, we add some state to ErrorBoundarySimple and use the getDerivedStateFromError() method, as follows:
class ErrorBoundarySimple extends React.Component {
  state = { hasError: false };

  componentDidCatch(error: unknown) {
    // report the error to your favorite Error Tracking tool (ex: Sentry, Bugsnag)
    console.error(error);
  }

  static getDerivedStateFromError(error: unknown) {
    // Update state so the next render will show the fallback UI.
    return { hasError: true };
  }

  render() {
    if (this.state.hasError) {
      return <p>Failed to fetch users.</p>;
    }

    return this.props.children;
  }
}
React expects the detDerivedStateFromError() method to return the state value to apply to out <ErrorBoundarySimple> when an error occurs.
As we can see on our live CodeSandbox, our UI is now providing visual feedback!
Error boundaries can also be nested to provide more contextualized feedback. For example, in this React app tree, we might want to provide different feedback based on what is crashing. For instance, we may want to provide different feedback when the Chat is crashing and when the TodoList is crashing, yet still handle any kind of crash at the application level. We can introduce multiple Boundaries to achieve this:

With the above setup, any error in the <Chat> component (or its descendant) would be caught in the Error Boundary wrapping the <Chat> component (not the “App” Error Boundary), allowing us to give a contextualized visual feedback. However, any error coming from all <App> descendants (excluding <Chat> and <TodoList>) will be caught by the “App” Error Boundary.
With a few lines of code, we just greatly improved our user experience by gracefully handling errors in our application.
However, such simple Error Boundaries implementations do have limitations. First, according to the React documentation, Error boundaries do not catch errors for:
- Event handlers
- Asynchronous code (e.g. setTimeout or requestAnimationFrame callbacks)
- Server-side rendering
- Errors thrown in the error boundary itself (rather than its children)
And, the previously showcased Error Boundaries do not provide any action to the user to recover from the error, for example, with a retry mechanism. In the next section, we will see how to leverage the react-error-boundary library to handle all these edge cases.
Advanced Error Boundaries: Catching all Errors and Retry Mechanisms
Let’s now provide a superior error handling user experience by catching all kinds of errors and exposing recovery actions to the users. For this, we will use the react-error-boundary library which can be installed as follows:
npm install --save react-error-boundary

yarn add react-error-boundary
Provide a Retry Mechanism
Our new CodeSandbox defines a <Users> component that will fail to load users 50% of the time. (The CodeSandbox might display a development error overlay that only shows in development, you can dismiss it to see the rendering result).
Let’s use react-error-boundary to properly catch errors and provide a retry mechanism:
import { ErrorBoundary, FallbackProps } from "react-error-boundary";
import { Users } from "./Users";

function ErrorFallback({ error, resetErrorBoundary }: FallbackProps) {
  return (
    <div role="alert">
      <p>Failed to load users:</p>
      <pre>{error.message}</pre>
      <button onClick={resetErrorBoundary}>Try again</button>
    </div>
  );
}

export default function App(): JSX.Element {
  return (
    <div className="App">
      <h1>Hello CodeSandbox</h1>
      <h2>Start editing to see some magic happen!</h2>
      <ErrorBoundary FallbackComponent={ErrorFallback}>
        {/* Users will fail to load 50% of the time */}
        <Users />
      </ErrorBoundary>
    </div>
  );
}
<ErrorBoundary> takes one mandatory FallbackComponent= prop that should be the react component or JSX that will be rendered in case of error. In the case of a component, this FallbackComponent= function will receive FallbackProps:
errorcan be used to display the error.resetErrorBoundaryis a callback to reset the error state and re-render the children’s components.
An ononError prop can also be provided to forward the error to your favorite error reporting tool (ex: Sentry). The react-error-boundary documentation showcases how to leverage other props (ex: onReset=) to handle more advanced scenarios.
Catching all Errors
As aforementioned, Error boundaries do not catch errors for:
- Event handlers (learn more)
- Asynchronous code (e.g. setTimeout or requestAnimationFrame callbacks)
Because such errors happen outside of the React rendering lifecycle, Error boundaries won’t be invoked. Again, react-error-boundary has us covered by providing a handleError() hook that helps with catching event-related and asynchronous errors.
import { useErrorHandler } from 'react-error-boundary'

function Greeting() {
  const [greeting, setGreeting] = React.useState(null)
  const handleError = useErrorHandler()

  function handleSubmit(event) {
    event.preventDefault()
    const name = event.target.elements.name.value
    fetchGreeting(name).then(
      newGreeting => setGreeting(newGreeting),
      error => handleError(error),
    )
  }

  return greeting ? (
    <div>{greeting}</div>
  ) : (
    <form onSubmit={handleSubmit}>
      <label>Name</label>
      <input id="name" />
      <button type="submit">get a greeting</button>
    </form>
  )
}
Errors happening inside of handleSubmit() function won’t be caught by React rendering lifecycle. For this reason, we use the handleError function provided by react-error-boundary ’s useErrorHandler() to rethrow the error in the React lifecycle so that the nearest ErrorBoundary can catch it.
Conclusion
Behind its sophisticated name, a React Error Boundary is a straightforward way to gracefully handle any kind of error in a React application.
Good products should prevent errors from reaching production but also should use error boundaries to provide contextual feedback and recovery actions to their users in case of unexpected errors.
Meticulous
Meticulous is a tool for software engineers to catch visual regressions in web applications without writing or maintaining UI tests.
Inject the Meticulous snippet onto production or staging and dev environments. This snippet records user sessions by collecting clickstream and network data. When you post a pull request, Meticulous selects a subset of recorded sessions which are relevant and simulates these against the frontend of your application. Meticulous takes screenshots at key points and detects any visual differences. It posts those diffs in a comment for you to inspect in a few seconds. Meticulous automatically updates the baseline images after you merge your PR. This eliminates the setup and maintenance burden of UI testing.
Meticulous isolates the frontend code by mocking out all network calls, using the previously recorded network responses. This means Meticulous never causes side effects and you don’t need a staging environment.
Learn more here.
Authored by Charly Poly