While catching errors before they hit production is ideal, some of them, such as network errors, might slip through testing and impact your users.
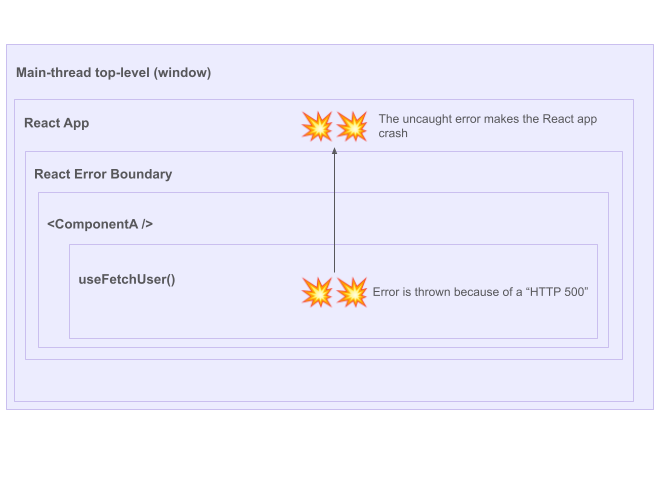
If your React components are not properly catching errors thrown by third-party libraries or React hooks, such errors either end-up crashing the React lifecycle or reaching the top-level of the main execution thread, resulting in the “white screen” scenario:
As of React 16, errors that were not caught […] will result in unmounting of the whole React component tree
It is crucial that your application gracefully handle such errors by providing proper visual feedback and potential actions (ex: retry mechanisms).
Fortunately, implementing such UX patterns can be achieved with little work with the React API and, for the most advanced UX, with the help of lightweight React libraries.
Using JavaScript’s try-catch around React hooks calls won’t work due to the asynchronous nature of their execution. However, React API offers the Error boundaries mechanism to catch all types of errors that might “bubble out” from a component.
For example, if the <ComponentA /> is wrapped in a React Error boundary, the error propagation will stop at the Error Boundary level, preventing the React App from crashing:

This article will cover how to implement Error Boundaries in your application, from simple error catching to displaying visual feedback and providing retry mechanisms.
Simple Error Boundaries: Catching and Reporting Errors
Behind its sophisticated name, an Error Boundary is just a plain class React component implementing the componentDidCatch(error) method:
class ErrorBoundarySimple extends React.Component {

   componentDidCatch(error) {
      // report the error to your favorite Error Tracking tool (ex: Sentry, Bugsnag)
   }


   render() {
      return  this.props.children;
   }

}
Note: React is not yet offering a hook-based alternative to implement error boundaries.
As showcased in this CodeSandbox, the componentDidCatch() class method will be called as soon as an error reaches our MyErrorBoundary component, allowing us to prevent the React app from crashing and forwarding the error to our error reporting tool. (The CodeSandbox might display a development error overlay that only shows in development, you can dismiss it to see the rendering result).
Let’s make our <ErrorBoundarySimple> more friendly by adding simple visual feedback when errors are raised. For this, we add some state to ErrorBoundarySimple and use the getDerivedStateFromError() method, as follows:
class ErrorBoundarySimple extends React.Component {
  state = { hasError: false };

  componentDidCatch(error: unknown) {
    // report the error to your favorite Error Tracking tool (ex: Sentry, Bugsnag)
    console.error(error);
  }

  static getDerivedStateFromError(error: unknown) {
    // Update state so the next render will show the fallback UI.
    return { hasError: true };
  }

  render() {
    if (this.state.hasError) {
      return <p>Failed to fetch users.</p>;
    }

    return this.props.children;
  }
}
React expects the detDerivedStateFromError() method to return the state value to apply to out <ErrorBoundarySimple> when an error occurs.
As we can see on our live CodeSandbox, our UI is now providing visual feedback!
Error boundaries can also be nested to provide more contextualized feedback. For example, in this React app tree, we might want to provide different feedback based on what is crashing. For instance, we may want to provide different feedback when the Chat is crashing and when the TodoList is crashing, yet still handle any kind of crash at the application level. We can introduce multiple Boundaries to achieve this:

With the above setup, any error in the <Chat> component (or its descendant) would be caught in the Error Boundary wrapping the <Chat> component (not the “App” Error Boundary), allowing us to give a contextualized visual feedback. However, any error coming from all <App> descendants (excluding <Chat> and <TodoList>) will be caught by the “App” Error Boundary.
With a few lines of code, we just greatly improved our user experience by gracefully handling errors in our application.
However, such simple Error Boundaries implementations do have limitations. First, according to the React documentation, Error boundaries do not catch errors for:
- Event handlers
- Asynchronous code (e.g. setTimeout or requestAnimationFrame callbacks)
- Server-side rendering
- Errors thrown in the error boundary itself (rather than its children)
And, the previously showcased Error Boundaries do not provide any action to the user to recover from the error, for example, with a retry mechanism. In the next section, we will see how to leverage the react-error-boundary library to handle all these edge cases.
Advanced Error Boundaries: Catching all Errors and Retry Mechanisms
Let’s now provide a superior error handling user experience by catching all kinds of errors and exposing recovery actions to the users. For this, we will use the react-error-boundary library which can be installed as follows:
npm install --save react-error-boundary

yarn add react-error-boundary
Provide a Retry Mechanism
Our new CodeSandbox defines a <Users> component that will fail to load users 50% of the time. (The CodeSandbox might display a development error overlay that only shows in development, you can dismiss it to see the rendering result).
Let’s use react-error-boundary to properly catch errors and provide a retry mechanism:
import { ErrorBoundary, FallbackProps } from "react-error-boundary";
import { Users } from "./Users";

function ErrorFallback({ error, resetErrorBoundary }: FallbackProps) {
  return (
    <div role="alert">
      <p>Failed to load users:</p>
      <pre>{error.message}</pre>
      <button onClick={resetErrorBoundary}>Try again</button>
    </div>
  );
}

export default function App(): JSX.Element {
  return (
    <div className="App">
      <h1>Hello CodeSandbox</h1>
      <h2>Start editing to see some magic happen!</h2>
      <ErrorBoundary FallbackComponent={ErrorFallback}>
        {/* Users will fail to load 50% of the time */}
        <Users />
      </ErrorBoundary>
    </div>
  );
}
<ErrorBoundary> takes one mandatory FallbackComponent= prop that should be the react component or JSX that will be rendered in case of error. In the case of a component, this FallbackComponent= function will receive FallbackProps:
errorcan be used to display the error.resetErrorBoundaryis a callback to reset the error state and re-render the children’s components.
An ononError prop can also be provided to forward the error to your favorite error reporting tool (ex: Sentry). The react-error-boundary documentation showcases how to leverage other props (ex: onReset=) to handle more advanced scenarios.
Catching all Errors
As aforementioned, Error boundaries do not catch errors for:
- Event handlers (learn more)
- Asynchronous code (e.g. setTimeout or requestAnimationFrame callbacks)
Because such errors happen outside of the React rendering lifecycle, Error boundaries won’t be invoked. Again, react-error-boundary has us covered by providing a handleError() hook that helps with catching event-related and asynchronous errors.
import { useErrorHandler } from 'react-error-boundary'

function Greeting() {
  const [greeting, setGreeting] = React.useState(null)
  const handleError = useErrorHandler()

  function handleSubmit(event) {
    event.preventDefault()
    const name = event.target.elements.name.value
    fetchGreeting(name).then(
      newGreeting => setGreeting(newGreeting),
      error => handleError(error),
    )
  }

  return greeting ? (
    <div>{greeting}</div>
  ) : (
    <form onSubmit={handleSubmit}>
      <label>Name</label>
      <input id="name" />
      <button type="submit">get a greeting</button>
    </form>
  )
}
Errors happening inside of handleSubmit() function won’t be caught by React rendering lifecycle. For this reason, we use the handleError function provided by react-error-boundary ’s useErrorHandler() to rethrow the error in the React lifecycle so that the nearest ErrorBoundary can catch it.
Conclusion
Behind its sophisticated name, a React Error Boundary is a straightforward way to gracefully handle any kind of error in a React application.
Good products should prevent errors from reaching production but also should use error boundaries to provide contextual feedback and recovery actions to their users in case of unexpected errors.
Meticulous
Meticulous is a tool for software engineers to catch visual regressions in web applications without writing or maintaining UI tests.
Inject the Meticulous snippet onto production or staging and dev environments. This snippet records user sessions by collecting clickstream and network data. When you post a pull request, Meticulous selects a subset of recorded sessions which are relevant and simulates these against the frontend of your application. Meticulous takes screenshots at key points and detects any visual differences. It posts those diffs in a comment for you to inspect in a few seconds. Meticulous automatically updates the baseline images after you merge your PR. This eliminates the setup and maintenance burden of UI testing.
Meticulous isolates the frontend code by mocking out all network calls, using the previously recorded network responses. This means Meticulous never causes side effects and you don’t need a staging environment.
Learn more here.
Authored by Charly Poly
Backend engineers have all the tools. Nice error handling. Reporting. Metrics. What about us frontend devs? Sure, we can catch errors in our functions, but what about errors in our presentational code? Take React for example. Write some bad code in your function component and the whole app crashes.
Fortunately, frontend devs are getting more and more tools to help them with error handling. In fact, with the release of React 16, a new tool was added to the toolbox designed to specifically handle errors in components. Error Boundaries allow developers to catch and handle errors in the presentational layer of React applications. From the React team’s announcement:
In the past, JavaScript errors inside components used to corrupt React’s internal state and cause it to emit cryptic errors on next renders. These errors were always caused by an earlier error in the application code, but React did not provide a way to handle them gracefully in components, and could not recover from them.
That all changed with React 16. However, if you wanted to recover from a presentational layer error AND report it, there wasn’t anything out of the box to help you. This is where Exceptionless (an open-source error handling and monitoring tool) and React work really well together.
Let’s run through a quick tutorial that creates a React app that does the following:
Creates an Error Boundary
Forces an error in a function component
Recovers from that error
Reports it to our monitoring service (Exceptionless)
Getting Started
For this tutorial, you will need to have the following installed:
- Node.js v12 or greater
- NPM
- Text editor
- Free account on Exceptionless
With those things in place, let’s generate our React app. From the command line, run the following:
npx create-react-app error-boundary-example
When your app is created, change into the directory and install the Exceptionless React package:
cd error-boundary-example && npm i @exceptionless/react
This should get you set up with an app and the required package. Now, let’s write a bit of code to show off the functionality. We’ll walk through setting up an Error Boundary first.
Creating an Error Boundary in React
The first thing we need to do is create an Error Boundary file. This will act as a wrapper component for the rest of our application. In src folder of your React application, create a new file called ErrorBoundary.js. This will allow us to render a fallback when we hit an error in our component. We’ll use Exceptionless’s built-in Error Boundary to actually handle reporting the error. You’ll see that soon, but let’s focus on rendering the fallback for now.
Inside your new file, add the following:
import React from "react";

class ErrorBoundary extends React.Component {
  constructor(props) {
    super(props);
    this.state = { hasError: false };
  }

  static getDerivedStateFromError(error) {
    return { hasError: true };
  }

  render() {
    if (this.state.hasError) {
      return (
        <div>
          <h1>Uh oh!</h1>
          <p>
            This wasn't supposed to happen. If you continue to see this message,
            please reach out to support.
          </p>
        </div>
      );
    }

    return this.props.children;
  }
}

export default ErrorBoundary;
Enter fullscreen mode
Exit fullscreen mode
This file will, again, wrap our main application code. So it will work throughout all of our components. If there’s an error in a component, rather than totally crashing the application, it will render what we have in our render method here. You can change this to include whatever styling and information you’d like. I kept mine pretty simple.
Now, we need to connect this to our application components.
Wrapping The App Component
You may have many providers in your application that all wrap your main App component. That’s OK. This new Error Boundary component will simply wrap everything at the top level. Go to your index.js and update your file to look like this:
import React from 'react';
import ReactDOM from 'react-dom';
import './index.css';
import App from './App';
import reportWebVitals from './reportWebVitals';
import ErrorBoundary from './ErrorBoundary';

ReactDOM.render(
  <React.StrictMode>
    <ErrorBoundary>
      <App />
    </ErrorBoundary>
  </React.StrictMode>,
  document.getElementById('root')
);

reportWebVitals();
Enter fullscreen mode
Exit fullscreen mode
Now, before we handle reporting the error to Exceptionless, let’s make sure this code works. Start up your application with npm start. We need to force an error. So, go into your App.js file and add an undefined variable into your component body:
import logo from './logo.svg';
import './App.css';

function App() {
  return (
    <div className="App">
      <header className="App-header">
        <p>{undefinedVariable}</p>
        <img src={logo} className="App-logo" alt="logo" />
        <p>
          Edit <code>src/App.js</code> and save to reload.
        </p>
        <a
          className="App-link"
          href="https://reactjs.org"
          target="_blank"
          rel="noopener noreferrer"
        >
          Learn React
        </a>
      </header>
    </div>
  );
}
Enter fullscreen mode
Exit fullscreen mode
export default App;
You can see I’ve added undefinedVariable into the component. Because that variable is, well, undefined, the component will break. Save your code and check out the app. You’ll see…
…an error message still. What gives?
Well, in development mode, React is going to try to help you out by rendering the error on screen. If you refresh the page, you should see your fallback component render for a split-second before the error appears on screen. When this code is deployed to a production environment, the error won’t be displayed on screen. You know this because you’ve seen your production React apps crash. We all have. It shows a white screen. That’s it. Now, though, your app will show the fallback screen.
Pretty cool!
Now, we need to make sure the error is reported back to our monitoring system. We will surely get emails from customers about this, but having the details handy might help us solve the problem before our support team can even get to those emails.
Capturing Errors
Now that we can display a message, Let’s work on capturing the error and sending it to our reporting system—Exceptionless.
The Exceptionless React package includes an Error Boundary helper called ExceptionlessErrorBoundary. All we need to do is import this into our index.js and wrap our App component with it. You’ll need to grab yourself an API key from your Exceptionless account for this. You can follow this guide to do so.
Let’s take a look at what the code looks like. This is what you should update your index.js file to look like:
import React from 'react';
import ReactDOM from 'react-dom';
import './index.css';
import App from './App';
import reportWebVitals from './reportWebVitals';
import {
  Exceptionless,
  ExceptionlessErrorBoundary
} from "@exceptionless/react";
import ErrorBoundary from './ErrorBoundary';

const startExceptionless = async () => {
  await Exceptionless.startup((c) => {
    c.apiKey = "YOUR API KEY";
    c.useDebugLogger();

    c.defaultTags.push("Example", "React");
  });
};

startExceptionless();

ReactDOM.render(
  <React.StrictMode>
    <ErrorBoundary>
      <ExceptionlessErrorBoundary>
        <App />
      </ExceptionlessErrorBoundary>
    </ErrorBoundary>
  </React.StrictMode>,
  document.getElementById('root')
);

reportWebVitals();
Enter fullscreen mode
Exit fullscreen mode
Now go back to your React app and re-load. You won’t necessarily see it there, but the error event was sent to Exceptionless. Open up your Exceptionless dashboard and take a look at the Exceptions events:
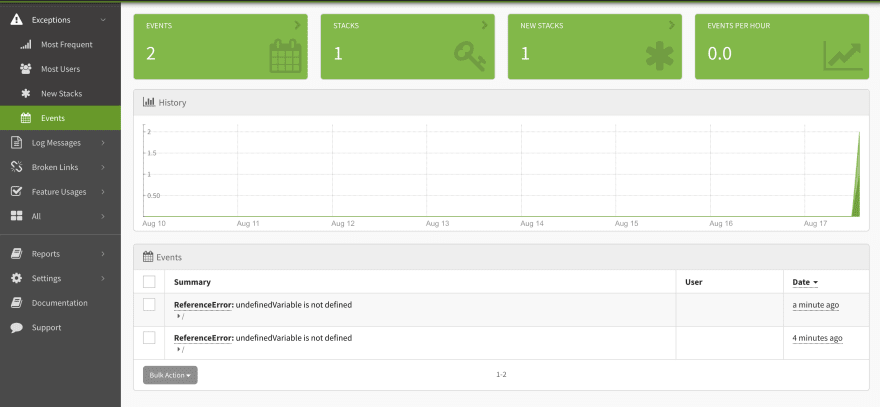
You can click into your exceptions to get more details. In this case, we will see what the variable was and the full stack trace for our React app.
Wrapping Up
Error Boundaries in React are powerful tools in helping you debug and quickly fix your applications. You can see how quickly we set this up to not only render a fallback UI and to report to an error monitoring service. You could write even less code and only report the error if you wanted to, but I’ll leave that up to you.
There are plenty of error monitoring services out there that you can plug this into, but if you’re interested in an open-source solution, get started with Exceptionless today.
Let’s face it. Nobody wants to see a broken, empty page while surfing the web. It leaves you stranded and confused. You don’t know what happened or what caused it, leaving you with a bad impression of the website.
It is often better to communicate the error and let the user continue to use the app. The user will get less of a bad impression and can continue to use its features.
In today’s post, we’ll go through different ways to handle errors in React applications.
The Classic ‘Try and Catch’ Method in React
If you’ve used JavaScript, you’ve probably had to write a ‘try and catch’ statement. To make sure we’re on board with what it is, here’s one:
try {
  somethingBadMightHappen();
} catch (error) {
  console.error("Something bad happened");
  console.error(error);
}
It is a great tool to catch misbehaving code and ensure our app doesn’t blow up into smithereens. To be more realistic and close to the React world as possible, let’s see an example of how you’d use this in your app:
const fetchData = async () => {
  try {
    return await fetch("https://some-url-that-might-fail.com");
  } catch (error) {
    console.error(error); // You might send an exception to your error tracker like AppSignal
    return error;
  }
};
When doing network calls in React, you’d usually use the try...catch statement. But why? Unfortunately, try...catch only works on imperative code. It does not work on declarative code like the JSX we are writing in our components. So that is why you don’t see a massive try...catch wrapping our whole app. It just won’t work.
So, what do we do? Glad you asked. In React 16, a new concept got introduced — React Error Boundaries. Let’s dig into what they are.
React Error Boundaries
Before we get into error boundaries, let us first see why they are necessary. Imagine you had a component like this:
const CrashableComponent = (props) => {
  return <span>{props.iDontExist.prop}</span>;
};

export default CrashableComponent;
If you try to render this component somewhere, you’ll get an error like this one:
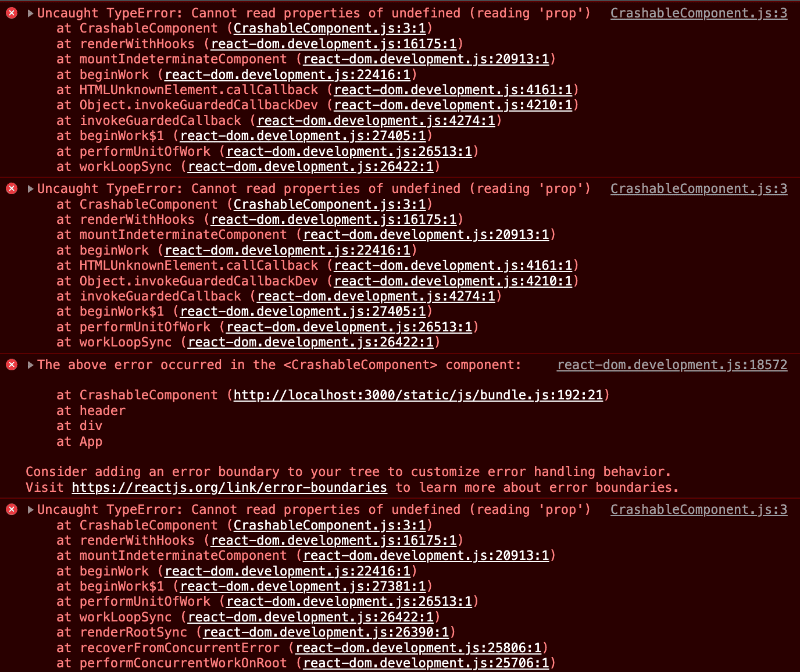
Not only that, the whole page will be blank, and the user won’t be able to do or see anything. But what happened? We tried to access a property iDontExist.prop, which doesn’t exist (we don’t pass it to the component). This is a banal example, but it shows that we cannot catch these errors with the try...catch statement.
This whole experiment brings us to error boundaries. Error boundaries are React components that catch JavaScript errors anywhere in their child component tree. Then, they log those caught errors and display a fallback UI instead of the component tree that crashed. Error boundaries catch errors during rendering, in lifecycle methods, and in constructors of the whole tree below them.
An error boundary is a class component that defines either (or both) of the lifecycle methods static getDerivedStateFromError() or componentDidCatch().
static getDerivedStateFromError() renders a fallback UI after an error has been thrown.
componentDidCatch() can log error information to your service provider (like AppSignal) or to a browser console.
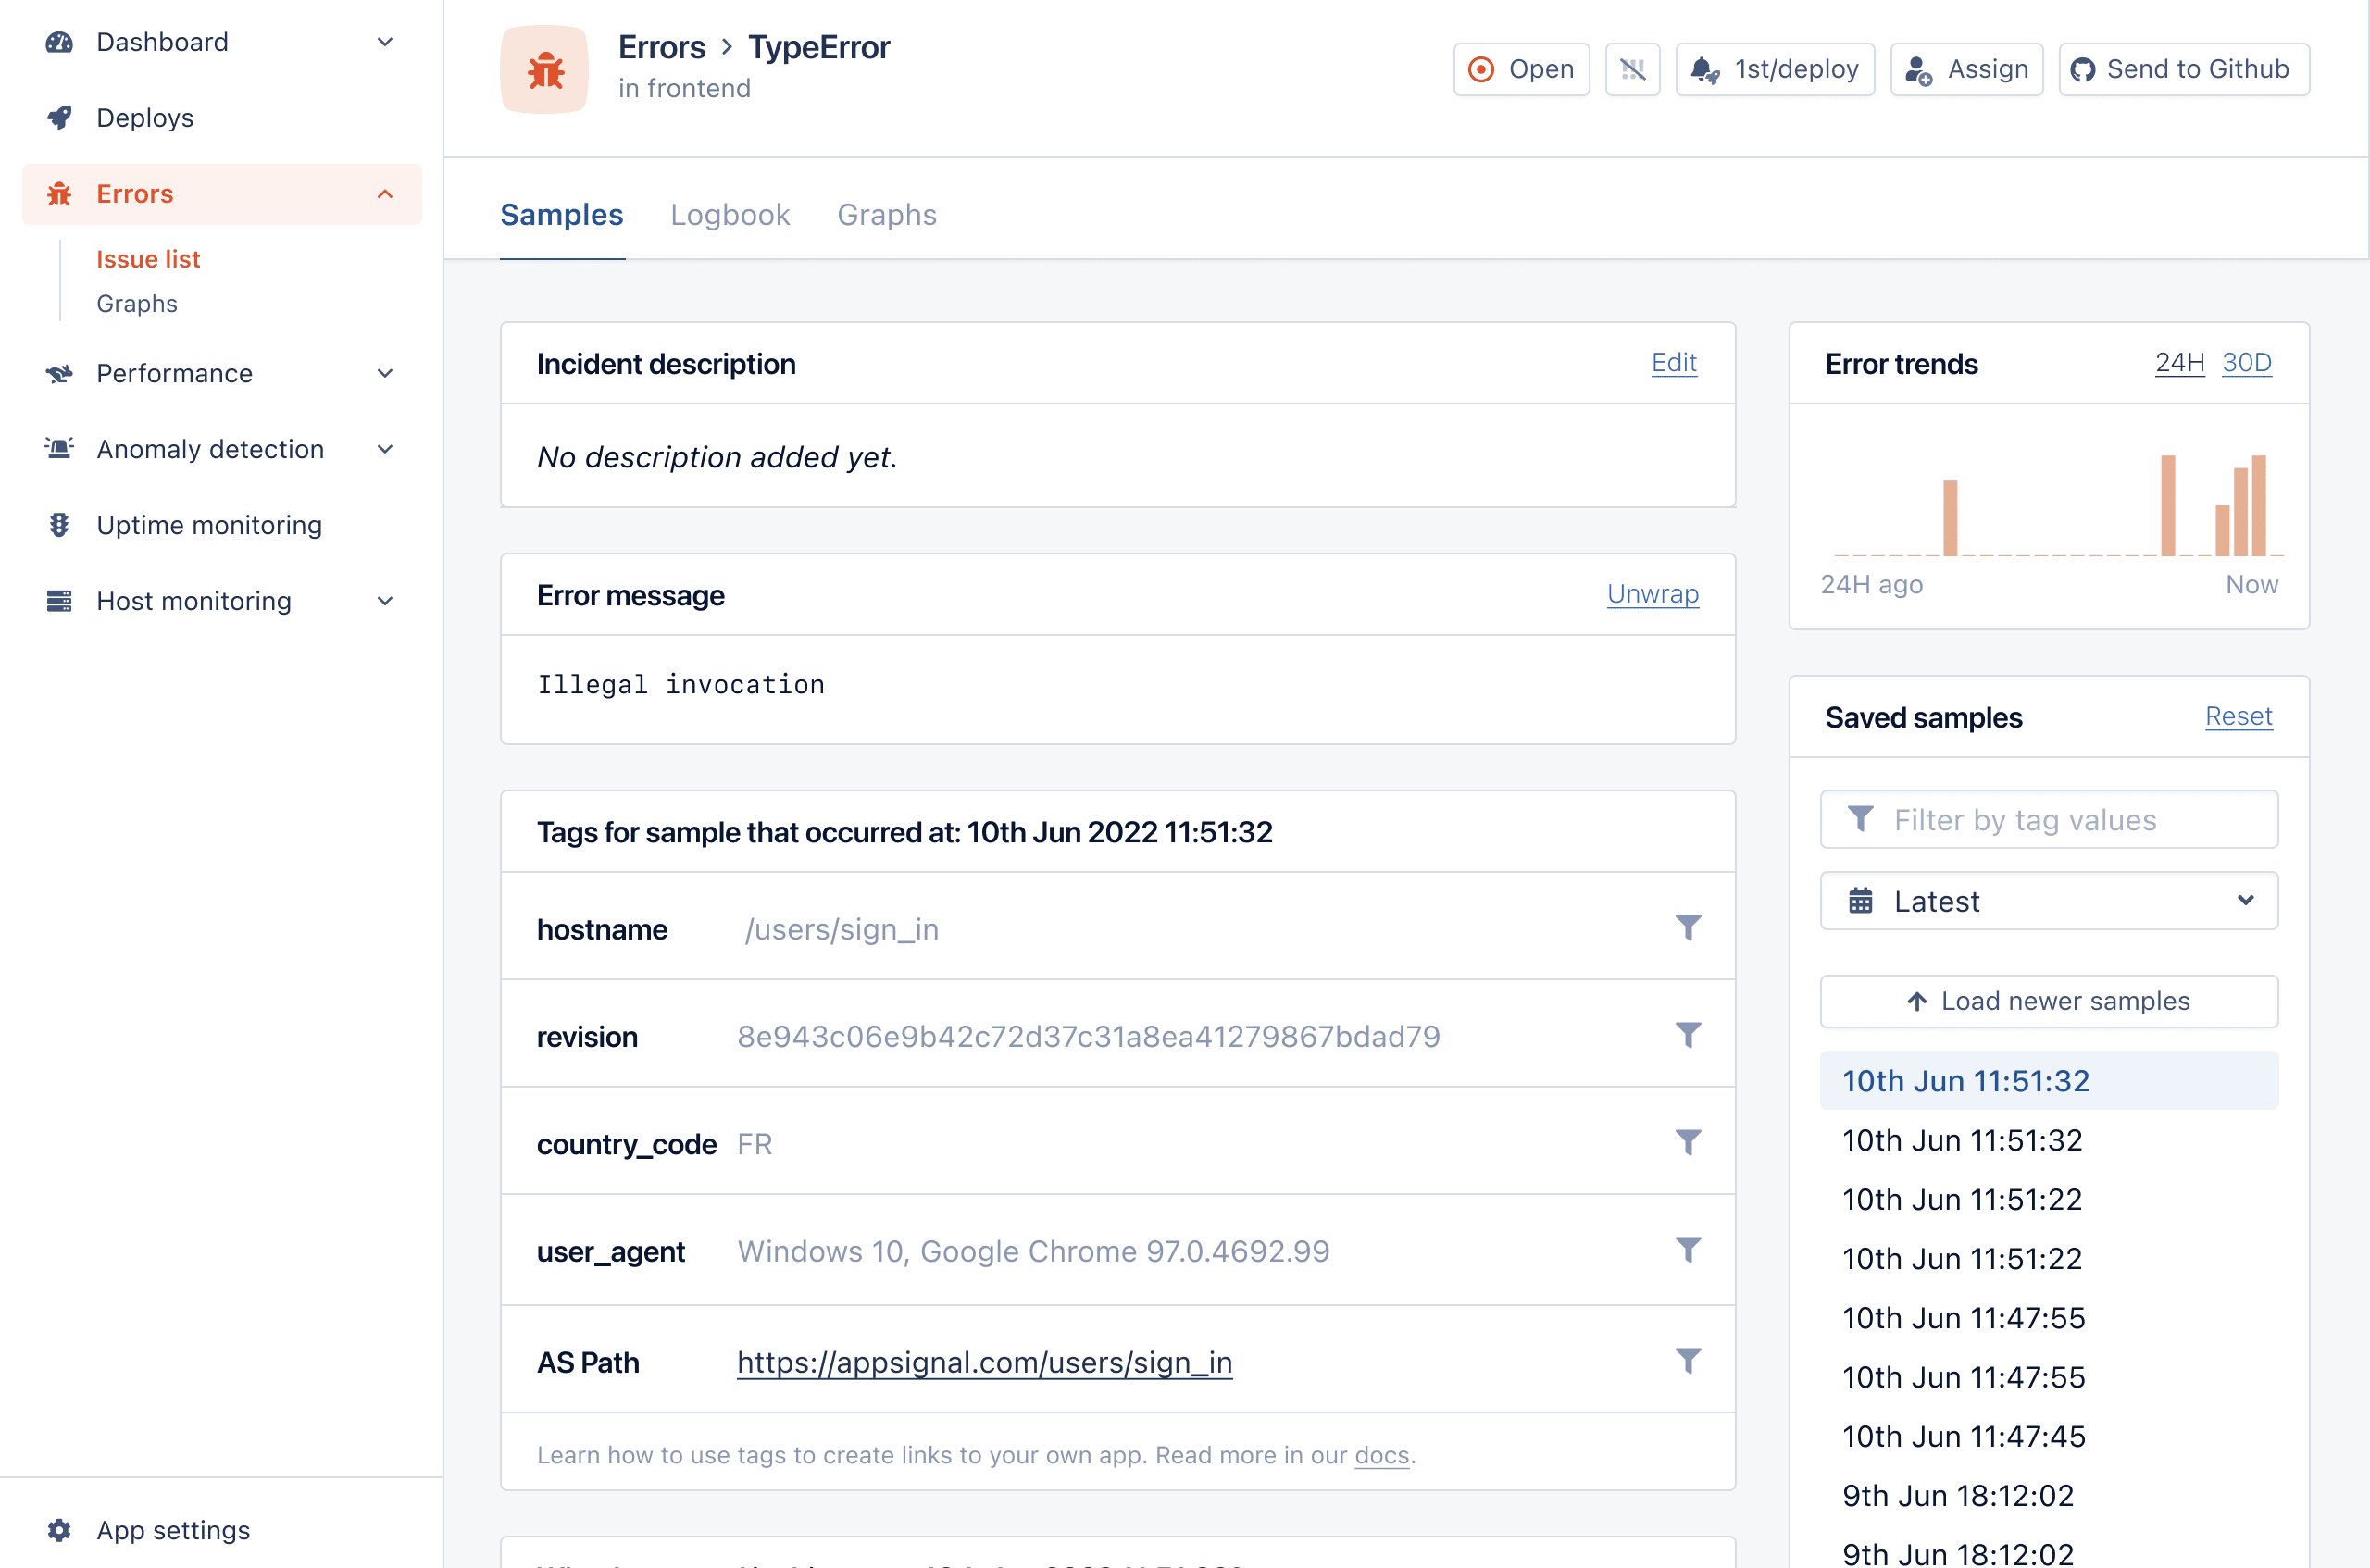
Here’s an example of how information about a React error looks in AppSignal’s ‘issue list’:
Let’s see a typical error boundary component:
import { Component } from "react";

class ErrorBoundary extends Component {
  constructor(props) {
    super(props);
    this.state = { hasError: false };
  }

  static getDerivedStateFromError(error) {
    // Update state so the next render will show the fallback UI.
    return {
      hasError: true,
      error,
    };
  }

  componentDidCatch(error, errorInfo) {
    // You can also log the error to an error reporting service like AppSignal
    // logErrorToMyService(error, errorInfo);
  }

  render() {
    const { hasError, error } = this.state;

    if (hasError) {
      // You can render any custom fallback UI
      return (
        <div>
          <p>Something went wrong 😭</p>

          {error.message && <span>Here's the error: {error.message}</span>}
        </div>
      );
    }

    return this.props.children;
  }
}

export default ErrorBoundary;
We can use ErrorBoundary like so:
<ErrorBoundary>
  <CrashableComponent />
</ErrorBoundary>
Now, when we open our app, we will get a working app with the following:

That is precisely what we want. We want our app to remain functional when an error occurs. But we also want to inform the user (and our error tracking service) about the error.
Beware that using an error boundary is not a silver bullet. Error boundaries do not catch errors for:
- Event handlers
- Asynchronous code (e.g.
setTimeoutorrequestAnimationFramecallbacks) - Server-side rendering
- Errors that are thrown in the error boundary itself (rather than its children)
You still need to use the try...catch statement for these fellas. So, let’s go ahead and show how you can do that.
Error Catching in Event Handlers
As mentioned before, error boundaries can’t help us when an error is thrown inside an event handler. Let’s see how we can handle those. Below is a small button component that throws an error when you click it:
import { useState } from "react";

const CrashableButton = () => {
  const [error, setError] = useState(null);

  const handleClick = () => {
    try {
      throw Error("Oh no :(");
    } catch (error) {
      setError(error);
    }
  };

  if (error) {
    return <span>Caught an error.</span>;
  }

  return <button onClick={handleClick}>Click Me To Throw Error</button>;
};

export default CrashableButton;
Notice that we have a try and catch block inside handleClick that ensures our error is caught. If you render the component and try to click it, this happens:

We have to do the same in other cases, like in setTimeout calls.
Error Catching in setTimeout Calls
Imagine we have a similar button component, but this one calls setTimeout when clicked. Here’s how it looks:
import { useState } from "react";

const SetTimeoutButton = () => {
  const [error, setError] = useState(null);

  const handleClick = () => {
    setTimeout(() => {
      try {
        throw Error("Oh no, an error :(");
      } catch (error) {
        setError(error);
      }
    }, 1000);
  };

  if (error) {
    return <span>Caught a delayed error.</span>;
  }

  return (
    <button onClick={handleClick}>Click Me To Throw a Delayed Error</button>
  );
};

export default SetTimeoutButton;
After 1,000 milliseconds, the setTimeout callback will throw an error. Luckily, we wrap that callback logic in try...catch, and setError in the component. That way, no stack trace is shown in the browser console. Also, we communicate the error to the user. Here’s how it looks in the app:

That is all well and good, as we got our app’s pages up and running despite errors popping all over the place in the background. But is there an easier way to handle errors without writing custom error boundaries? You bet there is, and of course, it comes in the form of a JavaScript package. Let me introduce you to the react-error-boundary.
JavaScript’s react-error-boundary Package
You can pop that library inside your package.json faster than ever with:
npm install --save react-error-boundaryNow, you’re ready to use it. Remember the ErrorBoundary component we made? You can forget about it because this package exports its own. Here’s how to use it:
import { ErrorBoundary } from "react-error-boundary";
import CrashableComponent from "./CrashableComponent";

const FancyDependencyErrorHandling = () => {
  return (
    <ErrorBoundary
      FallbackComponent={ErrorFallback}
      onError={(error) => {
        // You can also log the error to an error reporting service like AppSignal
        // logErrorToMyService(error, errorInfo);
        console.error(error);
      }}
    >
      <CrashableComponent />
    </ErrorBoundary>
  );
};

const ErrorFallback = ({ error }) => (
  <div>
    <p>Something went wrong 😭</p>

    {error.message && <span>Here's the error: {error.message}</span>}
  </div>
);

export default FancyDependencyErrorHandling;
In the example above, we render the same CrashableComponent, but this time, we use the ErrorBoundary component from the react-error-boundary library. It does the same thing as our custom one, except that it receives the FallbackComponent prop plus the onError function handler. The result is the same as we had with our custom ErrorBoundary component, except you don’t have to worry about maintaining it since you’re using an external package.
One great thing about this package is that you can easily wrap your function components into a withErrorBoundary making it a higher-order component (HOC). Here’s how that looks:
import { withErrorBoundary } from "react-error-boundary";

const CrashableComponent = (props) => {
  return <span>{props.iDontExist.prop}</span>;
};

export default withErrorBoundary(CrashableComponent, {
  FallbackComponent: () => <span>Oh no :(</span>,
});
Nice, you’re good to go now to capture all those errors bugging you.
But maybe you don’t want another dependency in your project. Can you achieve it yourself? Of course you can. Let’s see how it can be done.
Using Your Own React Boundaries
You can achieve a similar, if not the same, effect you get from react-error-boundary. We already showed a custom ErrorBoundary component, but let’s improve it.
import { Component } from "react";

export default class ErrorBoundary extends Component {
  constructor(props) {
    super(props);
    this.state = { hasError: false };
  }

  static getDerivedStateFromError(error) {
    // Update state so the next render will show the fallback UI.
    return {
      hasError: true,
      error,
    };
  }

  componentDidCatch(error, errorInfo) {
    // You can also log the error to an error reporting service like AppSignal
    // logErrorToMyService(error, errorInfo);
  }

  render() {
    const { hasError, error } = this.state;

    if (hasError) {
      // You can render any custom fallback UI
      return <ErrorFallback error={error} />;
    }

    return this.props.children;
  }
}

const ErrorFallback = ({ error }) => (
  <div>
    <p>Something went wrong 😭</p>

    {error.message && <span>Here's the error: {error.message}</span>}
  </div>
);

const errorBoundary = (WrappedComponent) => {
  return class extends ErrorBoundary {
    render() {
      const { hasError, error } = this.state;

      if (hasError) {
        // You can render any custom fallback UI
        return <ErrorFallback error={error} />;
      }

      return <WrappedComponent {...this.props} />;
    }
  };
};

export { errorBoundary };
Now you get the ErrorBoundary and the HOC errorBoundary that you can use across your app. Extend and play around with it as much as you want. You can make them receive custom fallback components to customize how you recover from each error. You can also make them receive an onError prop and later call it inside componentDidCatch. The possibilities are endless.
But one thing is for sure — you didn’t need that dependency after all. I bet writing your own error boundary will bring a sense of achievement, and you’ll get to understand it better. Also, who knows what ideas you might get when you’re trying to customize it.
Summing Up: Get Started with React Error Handling
Thanks for reading this blog post about handling errors in React. I hope you had as much fun reading and trying things out as I did writing it. You can find all the code, with examples, in the GitHub repo I created.
A quick rundown of the things we went through:
- React Error boundaries are great for catching errors in declarative code (e.g., inside their child component tree).
- For other cases, you need to use a
try...catchstatement (e.g., async calls likesetTimeout, event handlers, server-side rendering, and errors thrown in the error boundary itself). - A library like
react-error-boundarycan help you write less code. - You can also run your own error boundary and customize it as much as you want.
That is all, folks. Thanks for tuning in, and catch you in the next one!
P.S. If you liked this post, subscribe to our JavaScript Sorcery list for a monthly deep dive into more magical JavaScript tips and tricks.
P.P.S. If you need an APM for your Node.js app, go and check out the AppSignal APM for Node.js.
Weekly Downloads (2,444,930)
- GitHub Stars
-
4.63K
- Forks
-
168
- Contributors
-
30
Direct Usage Popularity
The npm package react-error-boundary receives a total of
2,444,930 downloads a week. As such, we scored
react-error-boundary popularity level to be Key ecosystem project.
Based on project statistics from the GitHub repository for the
npm package react-error-boundary, we found that it has been
starred 4,626 times.
Downloads are calculated as moving averages for a period of the last 12
months, excluding weekends and known missing data points.
Commit Frequency
- Open Issues
- 19
- Open PR
- 5
- Last Release
-
1 year ago
- Last Commit
-
1 year ago
Further analysis of the maintenance status of react-error-boundary based on
released npm versions cadence, the repository activity,
and other data points determined that its maintenance is
Sustainable.
An important project maintenance signal to consider for react-error-boundary is
that it
hasn’t seen any new versions released to npm in the
past 12 months, and could be considered as a discontinued project, or that which
receives low attention from its maintainers.
As a healthy sign for on-going project maintenance, we found that the
GitHub repository had at least 1 pull request or issue interacted with
by the community.
- Node.js Compatibility
-
>=10
- Age
-
6 years
- Dependencies
-
1 Direct
- Versions
-
34
- Install Size
-
56.4 kB
- Dist-tags
-
1
- # of Files
-
15
- Maintainers
-
2
- TS Typings
-
Yes
react-error-boundary has more than a single and default latest tag published for
the npm package. This means, there may be other tags available for this
package, such as next to indicate future releases, or stable to indicate
stable releases.