Let’s face it. Nobody wants to see a broken, empty page while surfing the web. It leaves you stranded and confused. You don’t know what happened or what caused it, leaving you with a bad impression of the website.
It is often better to communicate the error and let the user continue to use the app. The user will get less of a bad impression and can continue to use its features.
In today’s post, we’ll go through different ways to handle errors in React applications.
The Classic ‘Try and Catch’ Method in React
If you’ve used JavaScript, you’ve probably had to write a ‘try and catch’ statement. To make sure we’re on board with what it is, here’s one:
try {
  somethingBadMightHappen();
} catch (error) {
  console.error("Something bad happened");
  console.error(error);
}
It is a great tool to catch misbehaving code and ensure our app doesn’t blow up into smithereens. To be more realistic and close to the React world as possible, let’s see an example of how you’d use this in your app:
const fetchData = async () => {
  try {
    return await fetch("https://some-url-that-might-fail.com");
  } catch (error) {
    console.error(error); // You might send an exception to your error tracker like AppSignal
    return error;
  }
};
When doing network calls in React, you’d usually use the try...catch statement. But why? Unfortunately, try...catch only works on imperative code. It does not work on declarative code like the JSX we are writing in our components. So that is why you don’t see a massive try...catch wrapping our whole app. It just won’t work.
So, what do we do? Glad you asked. In React 16, a new concept got introduced — React Error Boundaries. Let’s dig into what they are.
React Error Boundaries
Before we get into error boundaries, let us first see why they are necessary. Imagine you had a component like this:
const CrashableComponent = (props) => {
  return <span>{props.iDontExist.prop}</span>;
};

export default CrashableComponent;
If you try to render this component somewhere, you’ll get an error like this one:
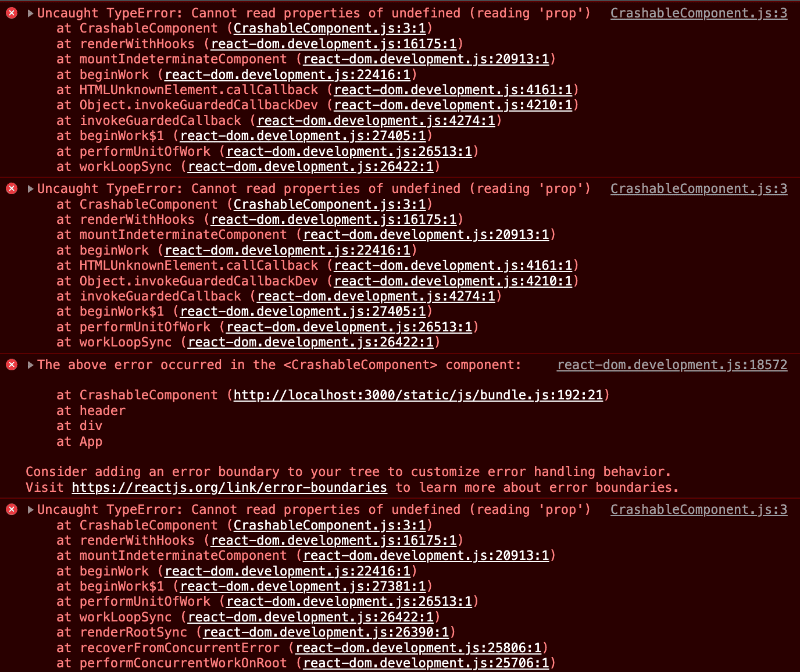
Not only that, the whole page will be blank, and the user won’t be able to do or see anything. But what happened? We tried to access a property iDontExist.prop, which doesn’t exist (we don’t pass it to the component). This is a banal example, but it shows that we cannot catch these errors with the try...catch statement.
This whole experiment brings us to error boundaries. Error boundaries are React components that catch JavaScript errors anywhere in their child component tree. Then, they log those caught errors and display a fallback UI instead of the component tree that crashed. Error boundaries catch errors during rendering, in lifecycle methods, and in constructors of the whole tree below them.
An error boundary is a class component that defines either (or both) of the lifecycle methods static getDerivedStateFromError() or componentDidCatch().
static getDerivedStateFromError() renders a fallback UI after an error has been thrown.
componentDidCatch() can log error information to your service provider (like AppSignal) or to a browser console.
Here’s an example of how information about a React error looks in AppSignal’s ‘issue list’:

Let’s see a typical error boundary component:
import { Component } from "react";

class ErrorBoundary extends Component {
  constructor(props) {
    super(props);
    this.state = { hasError: false };
  }

  static getDerivedStateFromError(error) {
    // Update state so the next render will show the fallback UI.
    return {
      hasError: true,
      error,
    };
  }

  componentDidCatch(error, errorInfo) {
    // You can also log the error to an error reporting service like AppSignal
    // logErrorToMyService(error, errorInfo);
  }

  render() {
    const { hasError, error } = this.state;

    if (hasError) {
      // You can render any custom fallback UI
      return (
        <div>
          <p>Something went wrong 😭</p>

          {error.message && <span>Here's the error: {error.message}</span>}
        </div>
      );
    }

    return this.props.children;
  }
}

export default ErrorBoundary;
We can use ErrorBoundary like so:
<ErrorBoundary>
  <CrashableComponent />
</ErrorBoundary>
Now, when we open our app, we will get a working app with the following:

That is precisely what we want. We want our app to remain functional when an error occurs. But we also want to inform the user (and our error tracking service) about the error.
Beware that using an error boundary is not a silver bullet. Error boundaries do not catch errors for:
- Event handlers
- Asynchronous code (e.g.
setTimeoutorrequestAnimationFramecallbacks) - Server-side rendering
- Errors that are thrown in the error boundary itself (rather than its children)
You still need to use the try...catch statement for these fellas. So, let’s go ahead and show how you can do that.
Error Catching in Event Handlers
As mentioned before, error boundaries can’t help us when an error is thrown inside an event handler. Let’s see how we can handle those. Below is a small button component that throws an error when you click it:
import { useState } from "react";

const CrashableButton = () => {
  const [error, setError] = useState(null);

  const handleClick = () => {
    try {
      throw Error("Oh no :(");
    } catch (error) {
      setError(error);
    }
  };

  if (error) {
    return <span>Caught an error.</span>;
  }

  return <button onClick={handleClick}>Click Me To Throw Error</button>;
};

export default CrashableButton;
Notice that we have a try and catch block inside handleClick that ensures our error is caught. If you render the component and try to click it, this happens:

We have to do the same in other cases, like in setTimeout calls.
Error Catching in setTimeout Calls
Imagine we have a similar button component, but this one calls setTimeout when clicked. Here’s how it looks:
import { useState } from "react";

const SetTimeoutButton = () => {
  const [error, setError] = useState(null);

  const handleClick = () => {
    setTimeout(() => {
      try {
        throw Error("Oh no, an error :(");
      } catch (error) {
        setError(error);
      }
    }, 1000);
  };

  if (error) {
    return <span>Caught a delayed error.</span>;
  }

  return (
    <button onClick={handleClick}>Click Me To Throw a Delayed Error</button>
  );
};

export default SetTimeoutButton;
After 1,000 milliseconds, the setTimeout callback will throw an error. Luckily, we wrap that callback logic in try...catch, and setError in the component. That way, no stack trace is shown in the browser console. Also, we communicate the error to the user. Here’s how it looks in the app:

That is all well and good, as we got our app’s pages up and running despite errors popping all over the place in the background. But is there an easier way to handle errors without writing custom error boundaries? You bet there is, and of course, it comes in the form of a JavaScript package. Let me introduce you to the react-error-boundary.
JavaScript’s react-error-boundary Package
You can pop that library inside your package.json faster than ever with:
npm install --save react-error-boundaryNow, you’re ready to use it. Remember the ErrorBoundary component we made? You can forget about it because this package exports its own. Here’s how to use it:
import { ErrorBoundary } from "react-error-boundary";
import CrashableComponent from "./CrashableComponent";

const FancyDependencyErrorHandling = () => {
  return (
    <ErrorBoundary
      FallbackComponent={ErrorFallback}
      onError={(error) => {
        // You can also log the error to an error reporting service like AppSignal
        // logErrorToMyService(error, errorInfo);
        console.error(error);
      }}
    >
      <CrashableComponent />
    </ErrorBoundary>
  );
};

const ErrorFallback = ({ error }) => (
  <div>
    <p>Something went wrong 😭</p>

    {error.message && <span>Here's the error: {error.message}</span>}
  </div>
);

export default FancyDependencyErrorHandling;
In the example above, we render the same CrashableComponent, but this time, we use the ErrorBoundary component from the react-error-boundary library. It does the same thing as our custom one, except that it receives the FallbackComponent prop plus the onError function handler. The result is the same as we had with our custom ErrorBoundary component, except you don’t have to worry about maintaining it since you’re using an external package.
One great thing about this package is that you can easily wrap your function components into a withErrorBoundary making it a higher-order component (HOC). Here’s how that looks:
import { withErrorBoundary } from "react-error-boundary";

const CrashableComponent = (props) => {
  return <span>{props.iDontExist.prop}</span>;
};

export default withErrorBoundary(CrashableComponent, {
  FallbackComponent: () => <span>Oh no :(</span>,
});
Nice, you’re good to go now to capture all those errors bugging you.
But maybe you don’t want another dependency in your project. Can you achieve it yourself? Of course you can. Let’s see how it can be done.
Using Your Own React Boundaries
You can achieve a similar, if not the same, effect you get from react-error-boundary. We already showed a custom ErrorBoundary component, but let’s improve it.
import { Component } from "react";

export default class ErrorBoundary extends Component {
  constructor(props) {
    super(props);
    this.state = { hasError: false };
  }

  static getDerivedStateFromError(error) {
    // Update state so the next render will show the fallback UI.
    return {
      hasError: true,
      error,
    };
  }

  componentDidCatch(error, errorInfo) {
    // You can also log the error to an error reporting service like AppSignal
    // logErrorToMyService(error, errorInfo);
  }

  render() {
    const { hasError, error } = this.state;

    if (hasError) {
      // You can render any custom fallback UI
      return <ErrorFallback error={error} />;
    }

    return this.props.children;
  }
}

const ErrorFallback = ({ error }) => (
  <div>
    <p>Something went wrong 😭</p>

    {error.message && <span>Here's the error: {error.message}</span>}
  </div>
);

const errorBoundary = (WrappedComponent) => {
  return class extends ErrorBoundary {
    render() {
      const { hasError, error } = this.state;

      if (hasError) {
        // You can render any custom fallback UI
        return <ErrorFallback error={error} />;
      }

      return <WrappedComponent {...this.props} />;
    }
  };
};

export { errorBoundary };
Now you get the ErrorBoundary and the HOC errorBoundary that you can use across your app. Extend and play around with it as much as you want. You can make them receive custom fallback components to customize how you recover from each error. You can also make them receive an onError prop and later call it inside componentDidCatch. The possibilities are endless.
But one thing is for sure — you didn’t need that dependency after all. I bet writing your own error boundary will bring a sense of achievement, and you’ll get to understand it better. Also, who knows what ideas you might get when you’re trying to customize it.
Summing Up: Get Started with React Error Handling
Thanks for reading this blog post about handling errors in React. I hope you had as much fun reading and trying things out as I did writing it. You can find all the code, with examples, in the GitHub repo I created.
A quick rundown of the things we went through:
- React Error boundaries are great for catching errors in declarative code (e.g., inside their child component tree).
- For other cases, you need to use a
try...catchstatement (e.g., async calls likesetTimeout, event handlers, server-side rendering, and errors thrown in the error boundary itself). - A library like
react-error-boundarycan help you write less code. - You can also run your own error boundary and customize it as much as you want.
That is all, folks. Thanks for tuning in, and catch you in the next one!
P.S. If you liked this post, subscribe to our JavaScript Sorcery list for a monthly deep dive into more magical JavaScript tips and tricks.
P.P.S. If you need an APM for your Node.js app, go and check out the AppSignal APM for Node.js.
This is a quick example of how to handle both network errors and HTTP errors (4xx or 5xx) for Fetch API (fetch()) requests in a single catch() block.
GET request with error handling
This sends an HTTP GET request to an invalid URL on the Reqres api which is a fake online REST api used for testing, then writes the error message to the parent of the #get-request-error-handling .total element and logs the error to the console.
Error Handling
The fetch() function will automatically throw an error for network errors but not for HTTP errors such as 4xx or 5xx responses. For HTTP errors we can check the response.ok property to see if the request failed and reject the promise ourselves by calling return Promise.reject(error);. This approach means that both types of failed requests — network errors and http errors — can be handled by a single catch() block instead of needing two separate pieces of error handling code.
JSON Check
The fetch .then() callback is passed the HTTP response object when the request is completed, the function checks if the response type is JSON before parsing the response body with the response.json() method, because calling response.json() will cause an error if the response doesn’t contain JSON data.
// Fetch GET request with error handling
const element = document.querySelector('#get-request .result');
fetch('https://reqres.in/invalid-url')
    .then(async response => {
        const isJson = response.headers.get('content-type')?.includes('application/json');
        const data = isJson ? await response.json() : null;

        // check for error response
        if (!response.ok) {
            // get error message from body or default to response status
            const error = (data && data.message) || response.status;
            return Promise.reject(error);
        }

        element.innerHTML = JSON.stringify(data, null, 4);
    })
    .catch(error => {
        element.parentElement.innerHTML = `Error: ${error}`;
        console.error('There was an error!', error);
    });
Run the example Fetch GET request on StackBlitz at https://stackblitz.com/edit/fetch-error-handling-http-and-network-errors
Subscribe or Follow Me For Updates
Subscribe to my YouTube channel or follow me on Twitter, Facebook or GitHub to be notified when I post new content.
- Subscribe on YouTube at https://www.youtube.com/JasonWatmore
- Follow me on Twitter at https://twitter.com/jason_watmore
- Follow me on Facebook at https://www.facebook.com/JasonWatmoreBlog
- Follow me on GitHub at https://github.com/cornflourblue
-
Feed formats available:
RSS,
Atom,
JSON
Other than coding…
I’m currently attempting to travel around Australia by motorcycle with my wife Tina on a pair of Royal Enfield Himalayans. You can follow our adventures on YouTube, Instagram and Facebook.

- Subscribe on YouTube at https://www.youtube.com/TinaAndJason
- Follow us on Instagram at https://www.instagram.com/tinaandjason
- Follow us on Facebook at https://www.facebook.com/TinaAndJasonVlog
- Visit our website at https://tinaandjason.com.au
Need Some Fetch Help?
Search fiverr to find help quickly from experienced Fetch developers.
The Fetch API provides a JavaScript interface for accessing and manipulating parts of the protocol, such as requests and responses. It also provides a global fetch() method that provides an easy, logical way to fetch resources asynchronously across the network.
This kind of functionality was previously achieved using XMLHttpRequest. Fetch provides a better alternative that can be easily used by other technologies such as Service Workers. Fetch also provides a single logical place to define other HTTP-related concepts such as CORS and extensions to HTTP.
The fetch specification differs from jQuery.ajax() in the following significant ways:
- The Promise returned from
fetch()won’t reject on HTTP error status even if the response is an HTTP 404 or 500. Instead, as soon as the server responds with headers, the Promise will resolve normally (with theokproperty of the response set to false if the response isn’t in the range 200–299), and it will only reject on network failure or if anything prevented the request from completing. - Unless
fetch()is called with thecredentialsoption set toinclude,fetch():- won’t send cookies in cross-origin requests
- won’t set any cookies sent back in cross-origin responses
- As of August 2018, the default credentials policy changed to same-origin. Firefox was also modified in version 61.0b13)
A basic fetch request is really simple to set up. Have a look at the following code:
fetch('http://example.com/movies.json')
  .then((response) => response.json())
  .then((data) => console.log(data));
Here we are fetching a JSON file across the network and printing it to the console. The simplest use of fetch() takes one argument — the path to the resource you want to fetch — and does not directly return the JSON response body but instead returns a promise that resolves with a Response object.
The Response object, in turn, does not directly contain the actual JSON response body but is instead a representation of the entire HTTP response. So, to extract the JSON body content from the Response object, we use the json() method, which returns a second promise that resolves with the result of parsing the response body text as JSON.
Note: See the Body section for similar methods to extract other types of body content.
Fetch requests are controlled by the connect-src directive of Content Security Policy rather than the directive of the resources it’s retrieving.
Supplying request options
The fetch() method can optionally accept a second parameter, an init object that allows you to control a number of different settings:
See fetch() for the full options available, and more details.
// Example POST method implementation:
async function postData(url = '', data = {}) {
  // Default options are marked with *
  const response = await fetch(url, {
    method: 'POST', // *GET, POST, PUT, DELETE, etc.
    mode: 'cors', // no-cors, *cors, same-origin
    cache: 'no-cache', // *default, no-cache, reload, force-cache, only-if-cached
    credentials: 'same-origin', // include, *same-origin, omit
    headers: {
      'Content-Type': 'application/json'
      // 'Content-Type': 'application/x-www-form-urlencoded',
    },
    redirect: 'follow', // manual, *follow, error
    referrerPolicy: 'no-referrer', // no-referrer, *no-referrer-when-downgrade, origin, origin-when-cross-origin, same-origin, strict-origin, strict-origin-when-cross-origin, unsafe-url
    body: JSON.stringify(data) // body data type must match "Content-Type" header
  });
  return response.json(); // parses JSON response into native JavaScript objects
}

postData('https://example.com/answer', { answer: 42 })
  .then((data) => {
    console.log(data); // JSON data parsed by `data.json()` call
  });
Note that mode: "no-cors" only allows a limited set of headers in the request:
AcceptAccept-LanguageContent-LanguageContent-Typewith a value ofapplication/x-www-form-urlencoded,multipart/form-data, ortext/plain
Sending a request with credentials included
To cause browsers to send a request with credentials included on both same-origin and cross-origin calls, add credentials: 'include' to the init object you pass to the fetch() method.
fetch('https://example.com', {
  credentials: 'include'
});
Note: Access-Control-Allow-Origin is prohibited from using a wildcard for requests with credentials: 'include'. In such cases, the exact origin must be provided; even if you are using a CORS unblocker extension, the requests will still fail.
Note: Browsers should not send credentials in preflight requests irrespective of this setting. For more information see: CORS > Requests with credentials.
If you only want to send credentials if the request URL is on the same origin as the calling script, add credentials: 'same-origin'.
// The calling script is on the origin 'https://example.com'

fetch('https://example.com', {
  credentials: 'same-origin'
});
To instead ensure browsers don’t include credentials in the request, use credentials: 'omit'.
fetch('https://example.com', {
  credentials: 'omit'
})
Uploading JSON data
Use fetch() to POST JSON-encoded data.
const data = { username: 'example' };

fetch('https://example.com/profile', {
  method: 'POST', // or 'PUT'
  headers: {
    'Content-Type': 'application/json',
  },
  body: JSON.stringify(data),
})
  .then((response) => response.json())
  .then((data) => {
    console.log('Success:', data);
  })
  .catch((error) => {
    console.error('Error:', error);
  });
Uploading a file
Files can be uploaded using an HTML <input type="file" /> input element, FormData() and fetch().
const formData = new FormData();
const fileField = document.querySelector('input[type="file"]');

formData.append('username', 'abc123');
formData.append('avatar', fileField.files[0]);

fetch('https://example.com/profile/avatar', {
  method: 'PUT',
  body: formData
})
  .then((response) => response.json())
  .then((result) => {
    console.log('Success:', result);
  })
  .catch((error) => {
    console.error('Error:', error);
  });
Uploading multiple files
Files can be uploaded using an HTML <input type="file" multiple /> input element, FormData() and fetch().
const formData = new FormData();
const photos = document.querySelector('input[type="file"][multiple]');

formData.append('title', 'My Vegas Vacation');
let i = 0;
for (const photo of photos.files) {
  formData.append(`photos_${i}`, photo);
  i++;
}

fetch('https://example.com/posts', {
  method: 'POST',
  body: formData,
})
  .then((response) => response.json())
  .then((result) => {
    console.log('Success:', result);
  })
  .catch((error) => {
    console.error('Error:', error);
  });
Processing a text file line by line
The chunks that are read from a response are not broken neatly at line boundaries and are Uint8Arrays, not strings. If you want to fetch a text file and process it line by line, it is up to you to handle these complications. The following example shows one way to do this by creating a line iterator (for simplicity, it assumes the text is UTF-8, and doesn’t handle fetch errors).
async function* makeTextFileLineIterator(fileURL) {
  const utf8Decoder = new TextDecoder('utf-8');
  const response = await fetch(fileURL);
  const reader = response.body.getReader();
  let { value: chunk, done: readerDone } = await reader.read();
  chunk = chunk ? utf8Decoder.decode(chunk) : '';

  const re = /n|r|rn/gm;
  let startIndex = 0;
  let result;

  while (true) {
    let result = re.exec(chunk);
    if (!result) {
      if (readerDone) break;
      let remainder = chunk.substr(startIndex);
      ({ value: chunk, done: readerDone } = await reader.read());
      chunk = remainder + (chunk ? utf8Decoder.decode(chunk) : '');
      startIndex = re.lastIndex = 0;
      continue;
    }
    yield chunk.substring(startIndex, result.index);
    startIndex = re.lastIndex;
  }

  if (startIndex < chunk.length) {
    // Last line didn't end in a newline char
    yield chunk.substr(startIndex);
  }
}

async function run() {
  for await (const line of makeTextFileLineIterator(urlOfFile)) {
    processLine(line);
  }
}

run();
Checking that the fetch was successful
A fetch() promise will reject with a TypeError when a network error is encountered or CORS is misconfigured on the server-side, although this usually means permission issues or similar — a 404 does not constitute a network error, for example. An accurate check for a successful fetch() would include checking that the promise resolved, then checking that the Response.ok property has a value of true. The code would look something like this:
fetch('flowers.jpg')
  .then((response) => {
    if (!response.ok) {
      throw new Error('Network response was not OK');
    }
    return response.blob();
  })
  .then((myBlob) => {
    myImage.src = URL.createObjectURL(myBlob);
  })
  .catch((error) => {
    console.error('There has been a problem with your fetch operation:', error);
  });
Supplying your own request object
Instead of passing a path to the resource you want to request into the fetch() call, you can create a request object using the Request() constructor, and pass that in as a fetch() method argument:
const myHeaders = new Headers();

const myRequest = new Request('flowers.jpg', {
  method: 'GET',
  headers: myHeaders,
  mode: 'cors',
  cache: 'default',
});

fetch(myRequest)
  .then((response) => response.blob())
  .then((myBlob) => {
    myImage.src = URL.createObjectURL(myBlob);
  });
Request() accepts exactly the same parameters as the fetch() method. You can even pass in an existing request object to create a copy of it:
const anotherRequest = new Request(myRequest, myInit);
This is pretty useful, as request and response bodies can only be used once.
Making a copy like this allows you to effectively use the request/response again while varying the init options if desired.
The copy must be made before the body is read.
Note: There is also a clone() method that creates a copy. Both methods of creating a copy will fail if the body of the original request or response has already been read, but reading the body of a cloned response or request will not cause it to be marked as read in the original.
The Headers interface allows you to create your own headers object via the Headers() constructor. A headers object is a simple multi-map of names to values:
const content = 'Hello World';
const myHeaders = new Headers();
myHeaders.append('Content-Type', 'text/plain');
myHeaders.append('Content-Length', content.length.toString());
myHeaders.append('X-Custom-Header', 'ProcessThisImmediately');
The same can be achieved by passing an array of arrays or an object literal to the constructor:
const myHeaders = new Headers({
  'Content-Type': 'text/plain',
  'Content-Length': content.length.toString(),
  'X-Custom-Header': 'ProcessThisImmediately'
});
The contents can be queried and retrieved:
console.log(myHeaders.has('Content-Type')); // true
console.log(myHeaders.has('Set-Cookie')); // false
myHeaders.set('Content-Type', 'text/html');
myHeaders.append('X-Custom-Header', 'AnotherValue');

console.log(myHeaders.get('Content-Length')); // 11
console.log(myHeaders.get('X-Custom-Header')); // ['ProcessThisImmediately', 'AnotherValue']

myHeaders.delete('X-Custom-Header');
console.log(myHeaders.get('X-Custom-Header')); // null
Some of these operations are only useful in ServiceWorkers, but they provide a much nicer API for manipulating headers.
All of the Headers methods throw a TypeError if a header name is used that is not a valid HTTP Header name. The mutation operations will throw a TypeError if there is an immutable guard (see below). Otherwise, they fail silently. For example:
const myResponse = Response.error();
try {
  myResponse.headers.set('Origin', 'http://mybank.com');
} catch (e) {
  console.log('Cannot pretend to be a bank!');
}
A good use case for headers is checking whether the content type is correct before you process it further. For example:
fetch(myRequest)
  .then((response) => {
     const contentType = response.headers.get('content-type');
     if (!contentType || !contentType.includes('application/json')) {
       throw new TypeError("Oops, we haven't got JSON!");
     }
     return response.json();
  })
  .then((data) => {
      /* process your data further */
  })
  .catch((error) => console.error(error));
Guard
Since headers can be sent in requests and received in responses, and have various limitations about what information can and should be mutable, headers’ objects have a guard property. This is not exposed to the Web, but it affects which mutation operations are allowed on the headers object.
Possible guard values are:
none: default.request: guard for a headers object obtained from a request (Request.headers).request-no-cors: guard for a headers object obtained from a request created withRequest.modeno-cors.response: guard for a headers object obtained from a response (Response.headers).immutable: guard that renders a headers object read-only; mostly used for ServiceWorkers.
Note: You may not append or set the Content-Length header on a guarded headers object for a response. Similarly, inserting Set-Cookie into a response header is not allowed: ServiceWorkers are not allowed to set cookies via synthesized responses.
Response objects
As you have seen above, Response instances are returned when fetch() promises are resolved.
The most common response properties you’ll use are:
Response.status— An integer (default value 200) containing the response status code.Response.statusText— A string (default value «»), which corresponds to the HTTP status code message. Note that HTTP/2 does not support status messages.Response.ok— seen in use above, this is a shorthand for checking that status is in the range 200-299 inclusive. This returns a boolean value.
They can also be created programmatically via JavaScript, but this is only really useful in ServiceWorkers, when you are providing a custom response to a received request using a respondWith() method:
const myBody = new Blob();

addEventListener('fetch', (event) => {
  // ServiceWorker intercepting a fetch
  event.respondWith(
    new Response(myBody, {
      headers: { 'Content-Type': 'text/plain' }
    })
  );
});
The Response() constructor takes two optional arguments — a body for the response, and an init object (similar to the one that Request() accepts.)
Note: The static method error() returns an error response. Similarly, redirect() returns a response resulting in a redirect to a specified URL. These are also only relevant to Service Workers.
Body
Both requests and responses may contain body data. A body is an instance of any of the following types:
ArrayBufferTypedArray(Uint8Array and friends)DataViewBlobFileString, or a string literalURLSearchParamsFormData
The Request and Response interfaces share the following methods to extract a body. These all return a promise that is eventually resolved with the actual content.
Request.arrayBuffer()/Response.arrayBuffer()Request.blob()/Response.blob()Request.formData()/Response.formData()Request.json()/Response.json()Request.text()/Response.text()
This makes usage of non-textual data much easier than it was with XHR.
Request bodies can be set by passing body parameters:
const form = new FormData(document.getElementById('login-form'));
fetch('/login', {
  method: 'POST',
  body: form
});
Both request and response (and by extension the fetch() function), will try to intelligently determine the content type. A request will also automatically set a Content-Type header if none is set in the dictionary.
Feature detection
Fetch API support can be detected by checking for the existence of Headers, Request, Response or fetch() on the Window or Worker scope. For example:
if (window.fetch) {
  // run my fetch request here
} else {
  // do something with XMLHttpRequest?
}
Specifications
| Specification |
|---|
| Fetch Standard # fetch-method |
Browser compatibility
BCD tables only load in the browser
See also
How to use Fetch API with async – await, try – catch & then – catch in useEffect hook in React Application
How to use Fetch API with async – await, try – catch & then – catch in useEffect hook in React Application
Before the Fetch API most of the React JS developers used to depend on the Axios to get the data from the server. Now, with the Fetch API being supported by the most of the browsers, many developers wants to use this instead of Axios as the Fetch API is native to the browsers and there will be no need to depend on third party library.
One of the common requirement in many applications is to send a request to the server to get data when the application is started. The most common place in React JS application to do this task is inside an useEffect hook with an empty array as its dependency which basically makes the hook run only during the initial run of the application.
Using Fetch API with then & catch in useState hook in React Application
The traditional way of getting the data or error from the promise is by using then and catch.
Code:
import React, { useState, useEffect } from 'react'

function FetchAPI() {

    const [users, setUsers] = useState([])
    const [isError, setIsError] = useState(false);

    useEffect(() => {
        fetch('https://jsonplaceholder.typicode.com/users').then((response) => {
            if (response.ok) {
                return response.json();
            } else {
                throw 'Error getting users list'
            }
        }).then((data) => {
            setUsers(data);
        }).catch((error) => {
            setIsError(true)
        })
    }, [])

    return (
        <div>
            {isError ? <h3> Error! Please try again later</h3> :
                <ul>
                    {users.map((user) => <li key={user.id} > {user.name} </li>)}
                </ul>
            }
        </div>
    )
}

export default FetchAPI
Notice how we returned the data or an error message, based on the response in the first then callback function. One important thing to note about fetch API is, if there is an error like 404, the then callback function gets executed and the callback function inside catch do not get executed. So, based on the response from the server, we need to either get the data from the response or throw an error message which goes to the catch block.
In the above example, we checked the ok property of the response. Instead of this, you can check the response status ( for example 200, 404 or 500 etc.,) and take appropriate action.
How to use Fetch API async – await with try – catch in useEffect hook in React Application
Another commonly used way with fetch API is to use with async and await. In order to handle the errors, we can use this with try-catch in our application.
example:
import React, { useState, useEffect } from 'react'

function FetchAPI() {

    const [users, setUsers] = useState([])
    const [isError, setIsError] = useState(false);

    useEffect(() => {

        const fetchData = async () => {
            try {
                let response = await fetch('https://jsonplaceholder.typicode.com/users');
                if (response.status === 200) {
                    let data = await response.json();
                    setUsers(data);
                } else {
                    throw 'Error fetching users list'
                }
            } catch (error) {
                setIsError(true)
            }
        }
        fetchData();

    }, [])

    return (
        <div>
            {isError ? <h3> Error! Please try again later</h3> :
                <ul>
                    {users.map((user) => <li key={user.id} > {user.name} </li>)}
                </ul>
            }
        </div>
    )
}

export default FetchAPI
in the example above, we have checked for the status code of the response instead of ok property as we did in the first example. Here we checked only against 200 status, in a real time application, you may have to check it against several other status codes also such as 201, 404 or 500 etc.,
Share This Article

Related Posts

![]()
The fetch() method in JavaScript is a global, asynchronous method that allows us to interface with API’s for requests and responses. While this is a powerful and commonly-used tool, its error handling process may seem a bit elusive at start.
Why Error Handling?
When errors are encountered during a fetch() call, it is often necessary to halt the compiler from reading the next few lines of code. To do so, the method call should throw an error upon encountering one. The thrown error can be «caught» later on for an alternate behavior to take place. Although one might think that the fetch() call would automatically throw an error upon encountering one, that is not the case for JavaScript.
According to the fetch() MDN, the Promise object returned by the fetch() call is rejected (throws an error) only when «a network error is encountered.» This means that fetch() Promises do resolve despite encountering client-side HTTP errors such as 404 and do not throw errors during the fetch. Therefore, the code shown below would log «Success» instead of «Error» when run, which may seem unexpected.
fetch(url) // encounters a 404 error
   .then(res => res.json()) // no error is thrown
   .then(() => console.log("Success")) //
   .catch(() => console.log("Error")) // fails to catch error
Enter fullscreen mode
Exit fullscreen mode
Luckily, you can fix this quite simply by using proper error handling.
Handling fetch() Errors
fetch() calls can be made using either Promise chains or Async/Await. Fortunately, the error handling process is similar for both.
Using Promises
The fetch API provides an ok property to the Promise response which indicates whether the HTTP status is within the range 200-299 (inclusive). This can be used to check whether any error is encountered during fetch.
const handleError = response => {
   if (!response.ok) {
      throw Error(response.statusText);
   } else {
      return response.json();
   }
}; //handler function that throws any encountered error

fetch(url)
   .then(handleError) // skips to .catch if error is thrown
   .then(data => console.log("Does something with data"))
   .catch(console.log); // catches the error and logs it
Enter fullscreen mode
Exit fullscreen mode
The error-handler function should be called before the Promise response is parsed by
.json(). Otherwise, the.json()method would strip out the response properties necessary for error handling (such asok,status, andstatusText).
Using Async/Await
Error handling using Async/Await uses a slightly different syntax, but it also revolves around the idea of using the ok property to check whether any error is encountered or not.
const response = await fetch(url);
if (!response.ok) {
   console.log(response.status, response.statusText);
} else {
   const data = await response.json();
   console.log(data);
}
Enter fullscreen mode
Exit fullscreen mode
The
statusresponse property provides the status code (e.g. «404») while thestatusTextresponse property provides the status description (e.g. «Is Not Found»).
Conclusion
Although the error handling for fetch() may not seem intuitive at first, it will later make more sense since it provides the user with more control over unique situations.
Overall, error-handling for fetch() calls is a simple and user-friendly tool that will definitely aid you in the long-term.
Resources
- Handling Failed HTTP Responses With fetch()
- Error handling while using native fetch API in JavaScript
- Using Fetch MDN