Содержание
- How to solve CORS error in Node.js and React applications
- Table of Contents
- Project Setup
- What is CORS (Cross-Origin Resource Sharing)?
- Why CORS (Cross-Origin Resource Sharing)?
- React & REST API: How to overcome CORS errors
- Make REST API calls to xkcd
- What is xkcd?
- xkcd has an API?
- What are we going to do?
- Let’s try calling it!
- Set up Express
- What is Express?
- How will we use Express?
- Set up Express
- Avoiding CORS Issues in React/Next.js
- Andrew Israel
- Why are cross origin requests an issue?
- Practical example
- Fix 1: Fixing the server
- Fix 2: Adding a proxy
- Fixing Common Problems with CORS and JavaScript
- Prerequisites to Building a Go Application
- How to Build a Simple Web Front End
- How to Build a Simple REST API in Go
- How to Solve a Simple CORS Issue
- Allowing Access from Any Origin Domain
- CORS in Flight
- What Else Does CORS Block?
- Restrictions on Response Headers
- Credentials Are a Special Case
- Control CORS Cache Configuration
- How to Prevent CORS Issues with Okta
- How CORS Prevents Security Issues
How to solve CORS error in Node.js and React applications

Table of Contents
In the previous article, I have explained how to deploy a Node.js application to Heroku. In this tutorial, we will be making use of the endpoint created there and see if we can use it in our React project.
Project Setup
Let’s create a React project using the following command:
Now update the App.js with the following code:
Here we have a local state called message , which we show to the user. If the message is empty, then we display them with a loading text. When the component is mounted (useEffect), we make a call to the API endpoint and fetch the message.
Now let’s run this and see if it works:
You will see that only «Loading..» text is displayed and the message never loads. If we inspect the page and see the console, we will see the following error:
Access to fetch at ‘https://nodejs-using-github.herokuapp.com/’ from origin ‘http://localhost:3000’ has been blocked by CORS policy: No ‘Access-Control-Allow-Origin’ header is present on the requested resource. If an opaque response serves your needs, set the request’s mode to ‘no-cors’ to fetch the resource with CORS disabled.
In the next sections, we will see what is CORS and how to fix this error.
What is CORS (Cross-Origin Resource Sharing)?
CORS stands for Cross-Origin Resource Sharing, which is an HTTP header based mechanism that helps the server to tell the browser, from which all domain requests can be made (except the same domain).
That is, in our case, the Node.js server hosted at https://nodejs-using-github.herokuapp.com/ , does not tell the browser that request can be made from http://localhost:3000 .
When this happens, your browser will throw an error as seen earlier.
Why CORS (Cross-Origin Resource Sharing)?
The next question that would come to your mind is why do we really need this mechanism. Imagine you are logged into your bank account or any social media website, then you visit a malicious website. This malicious website could run some scripts in the background to make API calls to your banking or social media to get your personal details.
To prevent this, your browser checks if the request to the banking or social media server can be made from the malicious website and throws the CORS error.
So CORS exists to share certain resources between trusted third-parties (across different origins/domains), hence the name Cross-Origin Resource Sharing.
Источник
React & REST API: How to overcome CORS errors
In Part 2 of this series, we’ll be making a REST API call from our React project to a service that has some CORS policies implemented. In this particular example, we’ll make REST API calls to xkcd’s API.
Make REST API calls to xkcd
What is xkcd?
xkcd is a webcomic series created by American author Randall Munroe. You can find the awesome comics here.
xkcd has an API?
Yes, it does indeed have an API.
You can find the great and concise API docs here.
What are we going to do?
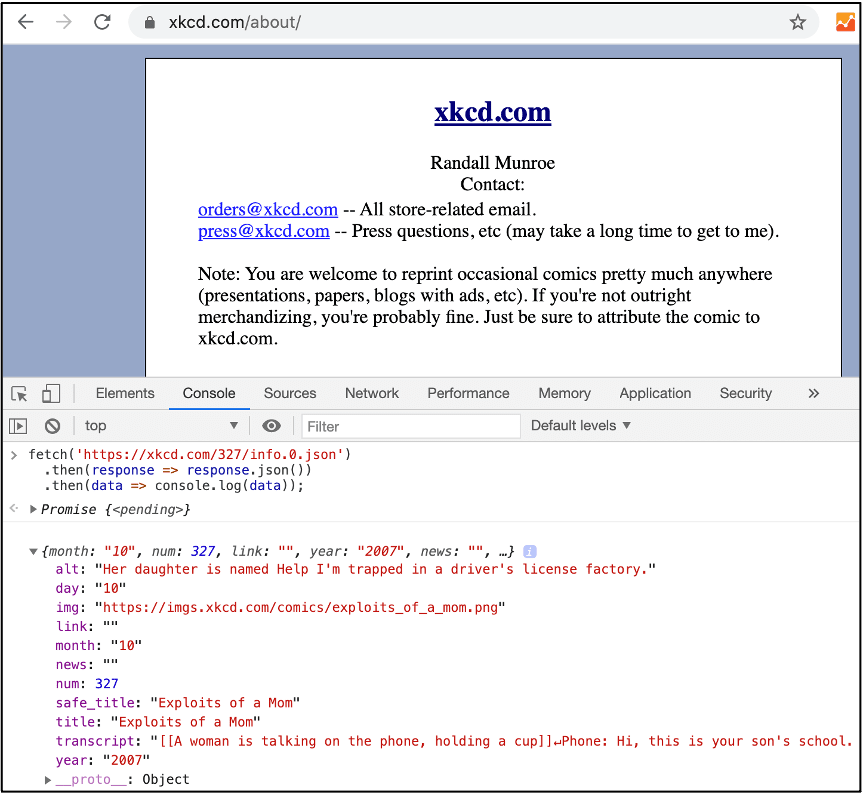
We’ll make REST API calls to one of my favorite comic strips that has an ID of 327, i.e. our endpoint will be https://xkcd.com/327/info.0.json . This will return JSON data about that particular comic strip.
Let’s try calling it!
OK, so the implementation should be fairly simple. We made our REST API call to the Random User Generator API in our previous article — we just have to switch around the endpoint URL, right?
Exit fullscreen mode
OK that was super easy! Now let’s refresh our React page.

. Access to fetch at blah blah from origin bleh bleh has been blocked by CORS policy . say what now.
Well, it looks like the response didn’t render. And there seems to be a whole lot of red text in the console. _(┐「ε:)_
That error we see in the console is well known as the CORS Error. Basically, resources that lie on xkcd’s domain cannot be requested from another domain (i.e. our front-end React App).

There are several ways we can overcome this issue:
- Make REST API calls from the same domain as xkcd
- Edit the CORS settings of xkcd’s server
- Make REST API calls from our own backend server
We can quickly experience method 1 if we navigate to any page on xkcd, and run the following code in the console.
Exit fullscreen mode
The REST API request is being made on the same domain, so we don’t run into any CORS errors. But it’s highly unlikely that xkcd will host our React App on their site for us, so this isn’t a realistic approach.
Method 2 again is unrealistic, since we don’t have permission to access the settings of xkcd’s server ¯(ツ)/¯
Method 3 is achievable by either setting up your own server and making requests from it, or using a services such as Zapier or Power Automate to make the requests for us.
In this article, we’ll proceed with Method 3 by setting up a backend server using Express, which will act as a proxy to make REST API calls to xkcd.
Set up Express
What is Express?
Express is a back-end web application framework for Node.
How will we use Express?
In this article, we’ll treat Express as a tool for creating custom endpoints that our front-end React App can make calls to. When we make requests to these custom endpoints, the Express server will make REST API calls to our desired 3rd party service endpoint, receive the response, and then route the response back to our React App.
If that was a bit hard to grasp, think of it like ordering food at a nice restaurant. If we (front-end App) go directly to the kitchen and order food directly to the chef (3rd party service), we’ll be scolded for bad manners (CORS errors). What we need to do is order food to the server (Express App). The server (Express App) will take our order, walk to the kitchen, and request for the food to the chef (3rd party service). After some time, the chef (3rd party service) will respond by giving the server (Express App) back a plate of food. The server (Express App) then carries the plate back to the table so that we (front-end App) can consume it.
Set up Express
OK, so let’s go ahead to set up Express. This is basically a new node project with the Express dependencies installed. We’ll want this project to be in a separate location from our React App, so let’s navigate back up to our myproject directory, create a new directory called backend, and navigate into it. Since the terminal we were using is running the React app, go ahead to use the commands in a new terminal window.
Exit fullscreen mode
From here we’ll follow the Express installation tutorial to make our Express project.
Источник
Avoiding CORS Issues in React/Next.js

Andrew Israel

If you’ve written any frontend code, you’ve likely encountered a CORS error before, like this:
Access to _ has been blocked by CORS policy
Cross-Origin Resource Sharing (CORS) is a protocol that defines how web requests should be handled when they are across different URLs.
Why are cross origin requests an issue?
Your browser holds a lot of state about you for every website you visit. Let’s say you are logged in to mybank.com and you have a cookie set with mybank.com indicating that you are logged in.
While you are browsing, you accidentally visit malicious.site, which makes a request to mybank.com that looks like this:
If this request was allowed and your cookie was included, the owner of malicious.site would be able to make requests on your behalf and read your account details.
With CORS, the server is allowed to specify which cross-origin requests it will accept vs reject. It can reject requests that need cookies. It can reject requests from untrusted.mybank.com but accept requests from app.mybank.com. It can reject all POST requests but allow GETs and PUTs.
The important thing to note about CORS is that the configuration/settings are done on the server and enforced by both the server and your browser. Most server frameworks have a library for configuring your CORS headers, but if you want to see the underlying headers themselves, here’s a good resource.
Practical example
Let’s say we have a React application with an Express backend. Our frontend is running on port 3000 — a common default for React.
Since our backend cannot also run on port 3000 locally, we’ll setup Express to run on port 4000.
If our React application made a fetch request to our backend like this:
we should expect a CORS error. Just like our earlier example, 127.0.0.1:3000 and 127.0.0.1:4000 are treated as two separate domains, so you cannot make requests across them yet. Let’s look at a few ways to fix this.
Fix 1: Fixing the server
One approach is to fix our server. We can do this by installing a CORS library (https://www.npmjs.com/package/cors) and telling the server to expect requests from 127.0.0.1:3000
Our requests will now succeed. This approach is pretty straightforward and is generally good practice. We can use this same approach in production in case our frontend and backend are hosted on two different subdomains.
Fix 2: Adding a proxy
In production, in some cases, you’ll host your frontend and backend from the same origin. In these cases, you usually want to write fetch code that looks like this:
Источник
Fixing Common Problems with CORS and JavaScript

Many websites have JavaScript functions that make network requests to a server, such as a REST API. The web pages and APIs are often in different domains. This introduces security issues in that any website can request data from an API. Cross-Origin Resource Sharing (CORS) provides a solution to these issues. It became a W3C recommendation in 2014. It makes it the responsibility of the web browser to prevent unauthorized access to APIs. All modern web browsers enforce CORS. They prevent JavaScript from obtaining data from a server in a domain different than the domain the website was loaded from, unless the REST API server gives permission.
From a developer’s perspective, CORS is often a cause of much grief when it blocks network requests. CORS provides a number of different mechanisms for limiting JavaScript access to APIs. It is often not obvious which mechanism is blocking the request. We are going to build a simple web application that makes REST calls to a server in a different domain. We will deliberately make requests that the browser will block because of CORS policies and then show how to fix the issues. Let’s get started!
NOTE: The code for this project can be found on GitHub.
Table of Contents
Prerequisites to Building a Go Application
First things first, if you don’t already have Go installed on your computer you will need to download and install the Go Programming Language.
Now, create a directory where all of our future code will live.
Finally, we will make our directory a Go module and install the Gin package (a Go web framework) to implement a web server.
A file called go.mod will get created containing the dependencies.
How to Build a Simple Web Front End
We are going to build a simple HTML and JavaScript front end and serve it from a web server written using Gin.
First of all, create a directory called frontend and create a file called frontend/index.html with the following content:
The web page has a text area to display messages and a simple form with two buttons. When a button is clicked it calls the JavaScript function onGet() passing it a version number. The idea being that v1 requests will always fail due to CORS issues, and v2 will fix the issue.
Next, create a file called frontend/control.js containing the following JavaScript:
The onGet() function inserts the version number into the URL and then makes a fetch request to the API server. A successful request will return a list of messages. The messages are displayed in the text area.
Finally, create a file called frontend/.go containing the following Go code:
This code simply serves the contents of the frontend directory on requests on port 8080. Note that JavaScript makes a call to port http://localhost:8000 which is a separate service.
Start the server and point a web browser at http://localhost:8080 to see the static content.
How to Build a Simple REST API in Go
Create a directory called rest to contain the code for a basic REST API.
NOTE: A separate directory is required as Go doesn’t allow two program entry points in the same directory.
Create a file called rest/server.go containing the following Go code:
A list called messages is created to hold message objects.
The function GetMessages() is called whenever a GET request is made to the specified URL. It returns a JSON string containing the messages. The URL contains a path parameter which will be v1 or v2 . The server listens on port 8000.
The server can be run using:
How to Solve a Simple CORS Issue
We now have two servers—the front-end one on http://localhost:8080 , and the REST API server on http://localhost:8000 . Even though the two servers have the same hostname, the fact that they are listening on different port numbers puts them in different domains from the CORS perspective. The domain of the web content is referred to as the origin. If the JavaScript fetch request specifies cors a request header will be added identifying the origin.
Make sure both the frontend and REST servers are running.
Next, point a web browser at http://localhost:8080 to display the web page. We are going to get JavaScript errors, so open your browser’s developer console so that we can see what is going on. In Chrome it is *View** > Developer > Developer Tools.
Next, click on the Send v1 button. You will get a JavaScript error displayed in the console:
Access to fetch at ‘http://localhost:8000/api/v1/messages’ from origin ‘http://localhost:8080’ has been blocked by CORS policy: No ‘Access-Control-Allow-Origin’ header is present on the requested resource. If an opaque response serves your needs, set the request’s mode to ‘no-cors’ to fetch the resource with CORS disabled.
The message says that the browser has blocked the request because of a CORS policy. It suggests two solutions. The second suggestion is to change the mode from cors to no-cors in the JavaScript fetch request. This is not an option as the browser always deletes the response data when in no-cors mode to prevent data from being read by an unauthorized client.
The solution to the issue is for the server to set a response header that allows the browser to make cross-domain requests to it.
This tells the web browser that the cross-origin requests are to be allowed for the specified domain. If the domain specified in the response header matches the domain of the web page, specified in the Origin request header, then the browser will not block the response being received by JavaScript.
We are going to set the header when the URL contains v2 . Change the GetMessages() function in cors/server.go to the following:
This sets a header to allow cross-origin requests for the v2 URI.
Restart the server and go to the web page. If you click on Get v1 you will get blocked by CORS. If you click on Get v2 , the request will be allowed.
A response can only have at most one Access-Control-Allow-Origin header. The header can only specify only one domain. If the server needs to allow requests from multiple origin domains, it needs to generate an Access-Control-Allow-Origin response header with the same value as the Origin request header.
Allowing Access from Any Origin Domain
There is an option to prevent CORS from blocking any domain. This is very popular with developers!
Be careful when using this option. It will get flagged in a security audit. It may also be in violation of an information security policy, which could have serious consequences!
CORS in Flight
Although we have fixed the main CORS issue, there are some limitations. One of the limitations is that only the HTTP GET, and OPTIONS methods are allowed. The GET and OPTIONS methods are read-only and are considered safe as they don’t modify existing content. The POST, PUT, and DELETE methods can add or change existing content. These are considered unsafe. Let’s see what happens when we make a PUT request.
First of all, add a new form to client/index.html :
This form has a text input and the two send buttons as before that call a new JavaScript function.
Next, add the JavaScript funtion to client/control.js :
This makes a PUT request sending the form parameters in the request body. Note that the URI ends in /0 . This means that the request is to create or change the message with the identifier 0 .
Next, define a PUT handler in the main() function of rest/server.go :
The message identifier is extracted as a path parameter.
Finally, add the request handler function to rest/server.go :
This updates the message from the form data and sends the new list of messages. The function also always sets the allow origin header, as we know that it is required.
Now, restart the servers and load the web page. Make sure that the developer console is open. Add some text to the text input and hit the Send v1 button.
You will see a slightly different CORS error in the console:
Access to fetch at ‘http://localhost:8000/api/v1/messages/0’ from origin ‘http://localhost:8080’ has been blocked by CORS policy: Response to preflight request doesn’t pass access control check: No ‘Access-Control-Allow-Origin’ header is present on the requested resource. If an opaque response serves your needs, set the request’s mode to ‘no-cors’ to fetch the resource with CORS disabled.
This is saying that a preflight check was made, and that it didn’t set the Access-Control-Allow-Origin header.
Now, look at the console output from the API server:
So, what is happening here? JavaScript is trying to make a PUT request. This is not allowed by CORS policy. In the GET example, the browser made the request and blocked the response. In this case, the browser refuses to make the PUT request. Instead, it sent an OPTIONS request to the same URI. It will only send the PUT if the OPTIONS request returns the correct CORS header. This is called a preflight request. As the server doesn’t know what method the OPTIONS preflight request is for, it specifies the method in a request header:
Let’s fix this by adding a handler for the OPTIONS request that sets the allow origin header in cors/server.go :
Notice that the OPTIONS handler is only set for the v2 URI as we don’t want to fix v1 .
Now, restart the server and send a message using the Put v2 button. We get yet another CORS error!
Access to fetch at ‘http://localhost:8000/api/v2/messages/0’ from origin ‘http://localhost:8080’ has been blocked by CORS policy: Method PUT is not allowed by Access-Control-Allow-Methods in preflight response.
This is saying that the preflight check needs another header to stop the PUT request from being blocked.
Add the response header to cors/server.go :
Restart the server and resend the message. The CORS issues are resolved.
What Else Does CORS Block?
CORS has a very restrictive policy regarding which HTTP request headers are allowed. It only allows safe listed request headers. These are Accept , Accept-Language , Content-Language , and Content-Type . They can only contain printable characters and some punctuation characters are not allowed. Header values can’t have more than 128 characters.
There are further restrictions on the Content-Type header. It can only be one of application/x-www-form-urlencoded , multipart/form-data , and text/plain . It is interesting to note that application/json is not allowed.
Let’s see what happens if we send a custom request header. Modify the onPut() function in frontend/control.js to set a header:
Now, make sure that the servers are running and load or reload the web page. Type in a message and click the Put v1 button. You will see a CORS error in the developer console.
Access to fetch at ‘http://localhost:8000/api/v2/messages/0’ from origin ‘http://localhost:8080’ has been blocked by CORS policy: Request header field x-token is not allowed by Access-Control-Allow-Headers in preflight response.
Any header which is not CORS safe-listed causes a preflight request. This also contains a request header that specifies the header that needs to be allowed:
Note that the header name x-token is specified in lowercase.
The preflight response can allow non-safe-listed headers and can remove restrictions on safe listed headers:
Next, change the function in cors/server.go to allow the custom header:
Restart the server and resend the message by clicking the Put v2 button. The request should now be successful.
CORS also places restrictions on response headers. There are seven whitelisted response headers: Cache-Control , Content-Language , Content-Length , Content-Type , Expires , Last-Modified , and Pragma . These are the only response headers that can be accessed from JavaScript. Let’s see this in action.
First of all, add a text area to frontend/index.html to display the headers:
Next, replace the first then block in the onPut function in frontend/control.js to display the response headers:
Finally, set a custom header in rest/server.go :
Now, restart the server and reload the web page. Type in a message and hit Put v2 . You should see some headers displayed, but not the custom header. CORS has blocked it.
This can be fixed by setting another response header to expose the custom header in server/server.go :
Restart the server and reload the web page. Type in a message and hit Put v2 . You should see some headers displayed, including the custom header. CORS has now allowed it.
Credentials Are a Special Case
There is yet another CORS blocking scenario. JavaScript has a credentials request mode. This determines how user credentials, such as cookies are handled. The options are:
- omit : Never send or receive cookies.
- same-origin : This is the default, that allows user credentials to be sent to the same origin.
- include : Send user credentials even if cross-origin.
Let’s see what happens.
Modify the fetch call in the onPut() function in frontend/Control.js :
Now, make sure that the client and server are running and reload the web page. Send a message as before. You will get another CORS error in the developer console:
Access to fetch at ‘http://localhost:8000/api/v2/messages/0’ from origin ‘http://localhost:8080’ has been blocked by CORS policy: Response to preflight request doesn’t pass access control check: The value of the ‘Access-Control-Allow-Credentials’ header in the response is ‘’ which must be ‘true’ when the request’s credentials mode is ‘include’.
The fix for this is to add another header to both the OptionMessage() , and PutMessage() functions in cors/server.go as the header needs to be present in both the preflight request and the actual request:
The request should now work correctly.
The credentials issue can also be resolved on the client by setting the credentials mode to omit and sending credentials as request parameters, instead of using cookies.
Control CORS Cache Configuration
The is one more CORS header that hasn’t yet been discussed. The browser can cache the preflight request results. The Access-Control-Max-Age header specifies the maximum time, in seconds, the results can be cached. It should be added to the preflight response headers as it controls how long the Access-Control-Allow-Methods and Access-Control-Allow-Headers results can be cached.
Browsers typically have a cap on the maximum time. Setting the time to -1 prevents caching and forces a preflight check on all calls that require it.
How to Prevent CORS Issues with Okta
Authentication providers, such as Okta, need to handle cross-domain requests to their authentication servers and API servers. This is done by providing a list of trusted origins. See Okta Enable CORS for more information.
How CORS Prevents Security Issues
CORS is an important security feature that is designed to prevent JavaScript clients from accessing data from other domains without authorization.
Modern web browsers implement CORS to block cross-domain JavaScript requests by default. The server needs to authorize cross-domain requests by setting the correct response headers.
CORS has several layers. Simply allowing an origin domain only works for a subset of request methods and request headers. Some request methods and headers force a preflight request as a further means of protecting data. The actual request is only allowed if the preflight response headers permit it.
CORS is a major pain point for developers. If a request is blocked, it is not easy to understand why, and how to fix it. An understanding of the nature of the blocked request, and of the CORS mechanisms, can easily overcome such issues.
If you enjoyed this post, you might like related ones on this blog:
Follow us for more great content and updates from our team! You can find us on Twitter, Facebook, subscribe to our YouTube Channel or start the conversation below.
Источник
In Part 2 of this series, we’ll be making a REST API call from our React project to a service that has some CORS policies implemented. In this particular example, we’ll make REST API calls to xkcd’s API.
Make REST API calls to xkcd
What is xkcd?
xkcd is a webcomic series created by American author Randall Munroe. You can find the awesome comics here.
xkcd has an API?
Yes, it does indeed have an API.
You can find the great and concise API docs here.
What are we going to do?
We’ll make REST API calls to one of my favorite comic strips that has an ID of 327, i.e. our endpoint will be https://xkcd.com/327/info.0.json. This will return JSON data about that particular comic strip.
Let’s try calling it!
OK, so the implementation should be fairly simple. We made our REST API call to the Random User Generator API in our previous article — we just have to switch around the endpoint URL, right?
//const restEndpoint = "https://randomuser.me/api/";
const restEndpoint = "https://xkcd.com/327/info.0.json";
Enter fullscreen mode
Exit fullscreen mode
OK that was super easy! Now let’s refresh our React page.
…? Access to fetch at blah blah from origin bleh bleh has been blocked by CORS policy …. say what now???
Well, it looks like the response didn’t render. And there seems to be a whole lot of red text in the console…_(┐「ε:)_
That error we see in the console is well known as the CORS Error. Basically, resources that lie on xkcd’s domain cannot be requested from another domain (i.e. our front-end React App).
There are several ways we can overcome this issue:
- Make REST API calls from the same domain as xkcd
- Edit the CORS settings of xkcd’s server
- Make REST API calls from our own backend server
We can quickly experience method 1 if we navigate to any page on xkcd, and run the following code in the console.
fetch('https://xkcd.com/327/info.0.json')
  .then(response => response.json())
  .then(data => console.log(data));
Enter fullscreen mode
Exit fullscreen mode
The REST API request is being made on the same domain, so we don’t run into any CORS errors. But it’s highly unlikely that xkcd will host our React App on their site for us, so this isn’t a realistic approach.
Method 2 again is unrealistic, since we don’t have permission to access the settings of xkcd’s server ¯(ツ)/¯
Method 3 is achievable by either setting up your own server and making requests from it, or using a services such as Zapier or Power Automate to make the requests for us.
In this article, we’ll proceed with Method 3 by setting up a backend server using Express, which will act as a proxy to make REST API calls to xkcd.
Set up Express
What is Express?
Express is a back-end web application framework for Node.
How will we use Express?
In this article, we’ll treat Express as a tool for creating custom endpoints that our front-end React App can make calls to. When we make requests to these custom endpoints, the Express server will make REST API calls to our desired 3rd party service endpoint, receive the response, and then route the response back to our React App.
If that was a bit hard to grasp, think of it like ordering food at a nice restaurant. If we (front-end App) go directly to the kitchen and order food directly to the chef (3rd party service), we’ll be scolded for bad manners (CORS errors). What we need to do is order food to the server (Express App). The server (Express App) will take our order, walk to the kitchen, and request for the food to the chef (3rd party service). After some time, the chef (3rd party service) will respond by giving the server (Express App) back a plate of food. The server (Express App) then carries the plate back to the table so that we (front-end App) can consume it.
Set up Express
OK, so let’s go ahead to set up Express. This is basically a new node project with the Express dependencies installed. We’ll want this project to be in a separate location from our React App, so let’s navigate back up to our myproject directory, create a new directory called backend, and navigate into it. Since the terminal we were using is running the React app, go ahead to use the commands in a new terminal window.
mkdir backend
cd backend
Enter fullscreen mode
Exit fullscreen mode
From here we’ll follow the Express installation tutorial to make our Express project.
npm init
Enter fullscreen mode
Exit fullscreen mode
You’ll be asked a number of questions but you can skip through them by hitting enter until it’s finished.
Continue to install some dependencies.
npm install express node-fetch cors
Enter fullscreen mode
Exit fullscreen mode
Finally, create a JavaScript file to work on — we’ll call ours server.js.
touch server.js
Enter fullscreen mode
Exit fullscreen mode

Set up the Express code
We’ll use this code for server.js
const express = require('express');
const cors = require('cors');
const fetch = require('node-fetch');

const PORT = 5000;
const app = express();

app.use(cors());
const corsOptions = {
    origin: "http://localhost:3000"
};

const requestEndpoint = "https://xkcd.com/327/info.0.json";

// This function runs if the http://localhost:5000/getData endpoint
// is requested with a GET request
app.get('/getData', cors(corsOptions), async (req, res) => {
    const fetchOptions = {
        method: 'GET'
    }
    const response = await fetch(requestEndpoint, fetchOptions);
    const jsonResponse = await response.json();
    res.json(jsonResponse);
});

app.listen(PORT, () => {
    console.log(`Example app listening at http://localhost:${PORT}`);
});
Enter fullscreen mode
Exit fullscreen mode
So, let’s go through the code.
We first set our port to 5000, as we need it to be separate from the port we use on our front-end React App, which was defaulted to port 3000.
const PORT = 5000;
Enter fullscreen mode
Exit fullscreen mode
Express commonly uses routing that defines how the server’s endpoints will respond to our front-end React App’s requests. In this case, we’ve defined how the server will react when the endpoint http://localhost:5000/getData is accessed with a GET request.
app.get('/getData', cors(corsOptions), async (req, res) => {
  //...
});
Enter fullscreen mode
Exit fullscreen mode
But by default, our Express server will return CORS errors if accessed from our front-end React App that lies on a different domain (port). By setting up some CORS options, we allow requests from port 3000 to access our resources that lie on http://localhost:5000/getData.
app.use(cors());
const corsOptions = {
    origin: "http://localhost:3000"
};

app.get('/getData', cors(corsOptions), async (req, res) => {
  //...
});
Enter fullscreen mode
Exit fullscreen mode
If we were to access http://localhost:5000/getData with a GET request from our React App, Express will run the related function, which in this case would be a fetch request to the xkcd REST API endpoint. As this request is made from the server side, it does not run in to any CORS errors. The response from xkcd is obtained, and returned back to our React App through the res.json() method.
const fetchOptions = {
    method: 'GET'
}
const response = await fetch(requestEndpoint, fetchOptions);
const jsonResponse = await response.json();
res.json(jsonResponse);
Enter fullscreen mode
Exit fullscreen mode
OK, now that’s ready, let’s start running the express server!
node server.js
Enter fullscreen mode
Exit fullscreen mode
We can quickly see if it’s running successfully by accessing http://localhost:5000/getData through the browser. We should see the JSON response being displayed.

OK, so it looks like the Express App is making successful REST API calls to https://xkcd.com/327/info.0.json. Note that if we want to make any changes to server.js, we should restart the App to see the changes take place.
Let’s leave the Express server running, and return back to our React code so that it points to the Express App rather than directly to the xkcd server.
Update the React code
There isn’t much to do here, except for updating our REST endpoint to our Express server instead of the xkcd endpoint.
// const restEndpoint = "https://xkcd.com/327/info.0.json";
const restEndpoint = "http://localhost:5000/getData";
Enter fullscreen mode
Exit fullscreen mode
Refresh the browser, and let’s see if we’ve managed to bypass the CORS error.
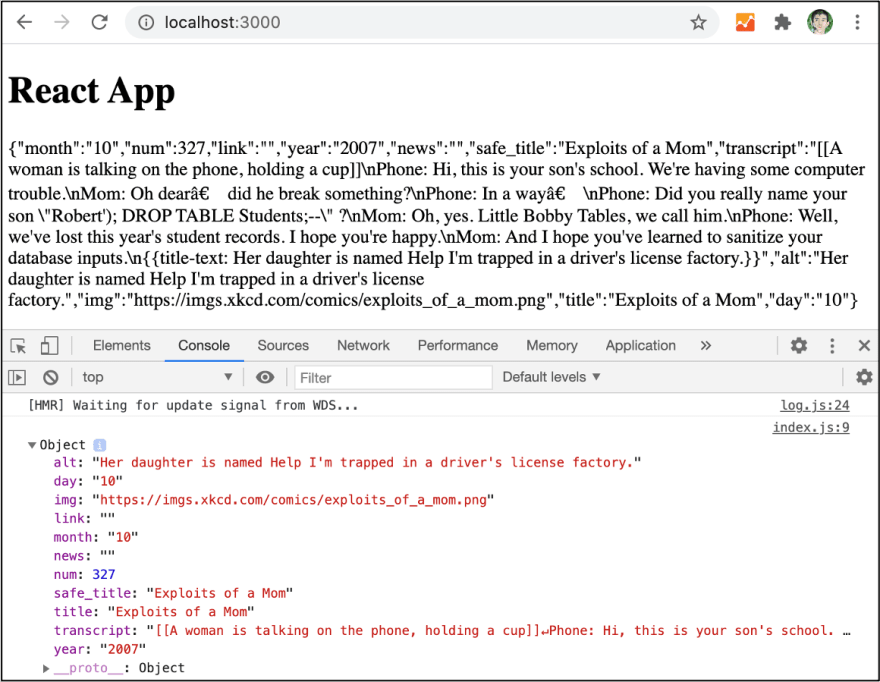
Great! The REST API response has successfully rendered onto our HTML, and there are no CORS errors in our console.
And with that, we’ve managed to successfully avoid CORS errors to make REST API calls to xkcd by using our Express server as a proxy!
Next steps
In the next part of the series, we’ll make a REST API call to a Web Database service, Kintone, which will challenge us to our next issue.
                   _人人人人人人人人人_
                   > AUTHENTICATION <
                    ̄Y^Y^Y^Y^Y^Y^Y^Y ̄
                   (__/)
                   (•ㅅ•)
                   /つ つ
Enter fullscreen mode
Exit fullscreen mode
На чтение 3 мин Обновлено 16.01.2023
How to solve CORS error in Node.js and React applications
Table of Contents
In the previous article, I have explained how to deploy a Node.js application to Heroku. In this tutorial, we will be making use of the endpoint created there and see if we can use it in our React project.
Project Setup
Let’s create a React project using the following command:
Now update the App.js with the following code:
Here we have a local state called message , which we show to the user. If the message is empty, then we display them with a loading text. When the component is mounted (useEffect), we make a call to the API endpoint and fetch the message.
Now let’s run this and see if it works:
You will see that only «Loading..» text is displayed and the message never loads. If we inspect the page and see the console, we will see the following error:
Access to fetch at ‘https://nodejs-using-github.herokuapp.com/’ from origin ‘http://localhost:3000’ has been blocked by CORS policy: No ‘Access-Control-Allow-Origin’ header is present on the requested resource. If an opaque response serves your needs, set the request’s mode to ‘no-cors’ to fetch the resource with CORS disabled.
In the next sections, we will see what is CORS and how to fix this error.
What is CORS (Cross-Origin Resource Sharing)?
CORS stands for Cross-Origin Resource Sharing, which is an HTTP header based mechanism that helps the server to tell the browser, from which all domain requests can be made (except the same domain).
That is, in our case, the Node.js server hosted at https://nodejs-using-github.herokuapp.com/ , does not tell the browser that request can be made from http://localhost:3000 .
When this happens, your browser will throw an error as seen earlier.
Why CORS (Cross-Origin Resource Sharing)?
The next question that would come to your mind is why do we really need this mechanism. Imagine you are logged into your bank account or any social media website, then you visit a malicious website. This malicious website could run some scripts in the background to make API calls to your banking or social media to get your personal details.
To prevent this, your browser checks if the request to the banking or social media server can be made from the malicious website and throws the CORS error.
So CORS exists to share certain resources between trusted third-parties (across different origins/domains), hence the name Cross-Origin Resource Sharing.
Источник
Table of Contents
In the previous article, I have explained how to deploy a Node.js application to Heroku.
In this tutorial, we will be making use of the endpoint created there and see if we can use it in our React project.
Project Setup
Let’s create a React project using the following command:
1npx create-react-app react-cors
Now update the App.js with the following code:
App.js
1import { useEffect, useState } from "react"
2import "./App.css"
3
4function App() {
5 const [message, setMessage] = useState("")
6 useEffect(() => {
7 fetch("https://nodejs-using-github.herokuapp.com/")
8 .then(response => response.json())
9 .then(data => {
10 setMessage(data.message)
11 })
12 .catch(err => console.log(err))
13 }, [])
14 return <div className="App">{message ? message : "Loading.."}</div>
15}
16
17export default App
Here we have a local state called message, which we show to the user.
If the message is empty, then we display them with a loading text.
When the component is mounted (useEffect), we make a call to the API endpoint and fetch the message.
Now let’s run this and see if it works:
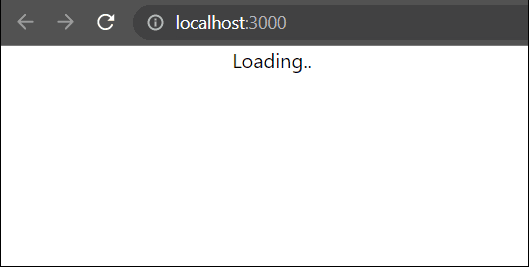
You will see that only «Loading..» text is displayed and the message never loads.
If we inspect the page and see the console, we will see the following error:
Access to fetch at 'https://nodejs-using-github.herokuapp.com/' from origin 'http://localhost:3000' has been blocked by CORS policy: No 'Access-Control-Allow-Origin' header is present on the requested resource. If an opaque response serves your needs, set the request's mode to 'no-cors' to fetch the resource with CORS disabled.

In the next sections, we will see what is CORS and how to fix this error.
What is CORS (Cross-Origin Resource Sharing)?
CORS stands for Cross-Origin Resource Sharing,
which is an HTTP header based mechanism that helps the server to tell the browser,
from which all domain requests can be made (except the same domain).
That is, in our case, the Node.js server hosted at https://nodejs-using-github.herokuapp.com/,
does not tell the browser that request can be made from http://localhost:3000.
When this happens, your browser will throw an error as seen earlier.
Why CORS (Cross-Origin Resource Sharing)?
The next question that would come to your mind is why do we really need this mechanism.
Imagine you are logged into your bank account or any social media website, then you visit a malicious website.
This malicious website could run some scripts in the background to make API calls to your banking or social media to get your personal details.
To prevent this, your browser checks if the request to the banking or social media server can be made from the malicious website and throws the CORS error.
So CORS exists to share certain resources between trusted third-parties (across different origins/domains), hence the name Cross-Origin Resource Sharing.
How to configure CORS in Node.js
Since we are clear about what and why is CORS required, let’s see how to enable CORS in the Node.js application.
You may clone the Node.js code from this repo.
Once the project is cloned, open it in your code editor and install cors package.
Now open index.js and update it with the following code:
index.js
1const express = require("express")
2const cors = require("cors")
3const app = express()
4const port = process.env.PORT || 3000
5
6const whitelist = ["http://localhost:3000"]
7const corsOptions = {
8 origin: function (origin, callback) {
9 if (!origin || whitelist.indexOf(origin) !== -1) {
10 callback(null, true)
11 } else {
12 callback(new Error("Not allowed by CORS"))
13 }
14 },
15 credentials: true,
16}
17app.use(cors(corsOptions))
18
19app.get("/", (req, res) => {
20 res.send({ message: "Hello World!" })
21})
22
23app.listen(port, () => {
24 console.log(`Example app listening at Port: ${port}`)
25})
Here we check if the origin (client’s domain) is in the whitelist, then we tell the clients that requests can be made.
If it is not in the list then we throw an error saying the client is not allowed to make CORS requests to this server.
The domain should not have any trailing slashes (/)
We can deploy the changes to Heroku and see if this works.
Now if you reload your page, you should be able to see the message.
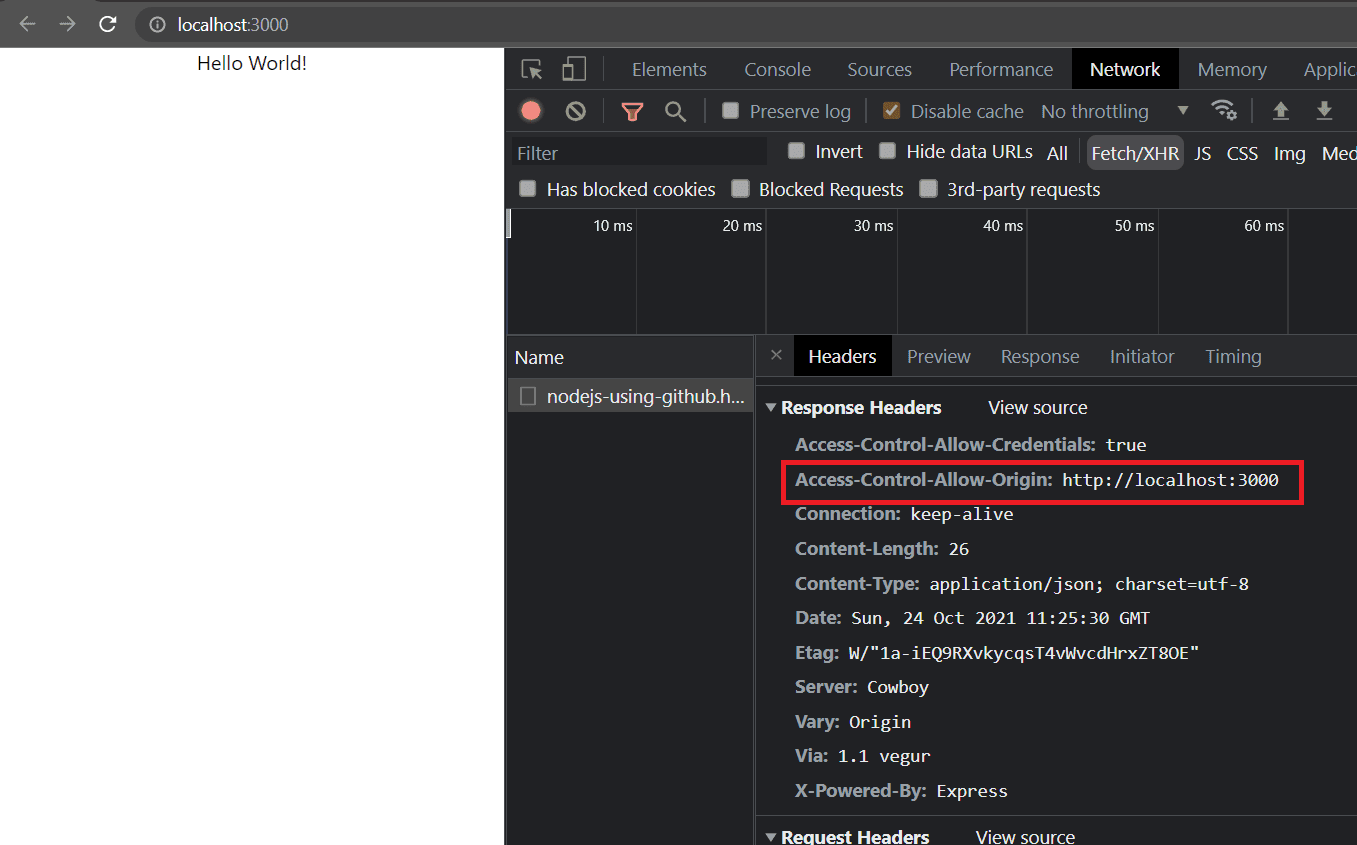
You will also see that a response header called Access-Control-Allow-Origin has been added with the value http://localhost:3000.
Making CORS domains configurable
If you have multiple client origins to be connected to you, and you want them to be configurable, you can do so by using environment variables:
index.js
1const express = require("express")
2const cors = require("cors")
3const app = express()
4const port = process.env.PORT || 3000
5
6const domainsFromEnv = process.env.CORS_DOMAINS || ""
7
8const whitelist = domainsFromEnv.split(",").map(item => item.trim())
9
10const corsOptions = {
11 origin: function (origin, callback) {
12 if (!origin || whitelist.indexOf(origin) !== -1) {
13 callback(null, true)
14 } else {
15 callback(new Error("Not allowed by CORS"))
16 }
17 },
18 credentials: true,
19}
20app.use(cors(corsOptions))
21
22app.get("/", (req, res) => {
23 res.send({ message: "Hello World!" })
24})
25
26app.listen(port, () => {
27 console.log(`Example app listening at Port: ${port}`)
28})
Testing environment variables locally
To test environment variables locally, you can install the package called dotenv:
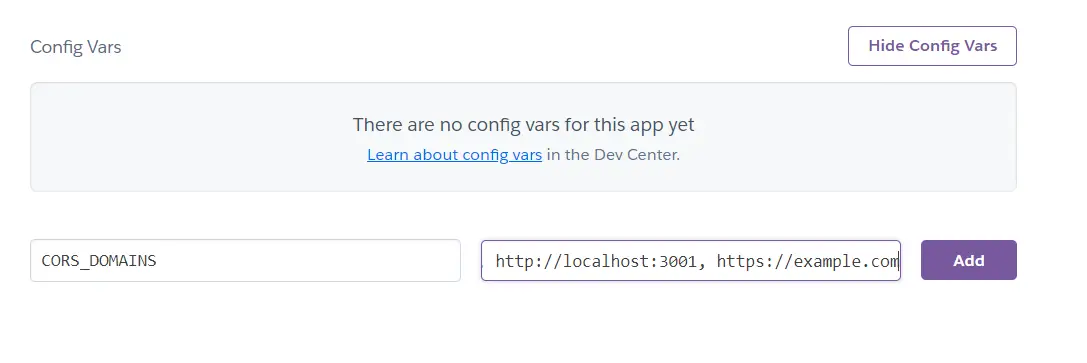
Now create a file called .env in the root directory of your project with the domains:
1CORS_DOMAINS = http://localhost:3000, http://localhost:3001, https://example.com
Update index.js to use the dotenv package:
index.js
1const express = require("express")
2const cors = require("cors")
3const app = express()
4const port = process.env.PORT || 3000
5
6if (process.env.NODE_ENV !== "production") {
7 require("dotenv").config()
8}
9
10const domainsFromEnv = process.env.CORS_DOMAINS || ""
11
12const whitelist = domainsFromEnv.split(",").map(item => item.trim())
13
14const corsOptions = {
15 origin: function (origin, callback) {
16 if (!origin || whitelist.indexOf(origin) !== -1) {
17 callback(null, true)
18 } else {
19 callback(new Error("Not allowed by CORS"))
20 }
21 },
22 credentials: true,
23}
24app.use(cors(corsOptions))
25
26app.get("/", (req, res) => {
27 res.send({ message: "Hello World!" })
28})
29
30app.listen(port, () => {
31 console.log(`Example app listening at Port: ${port}`)
32})
Here we made sure that .env files are loaded only in non-production environments.
It is recommended to store the configurations in the server host rather than in .env files for production.
Remember to add
.env*to the.gitignorefile so that you don’t accidentally push them to the repo.
Configuring environment files in heroku
With our latest code, we can configure environment files in the heroku settings:
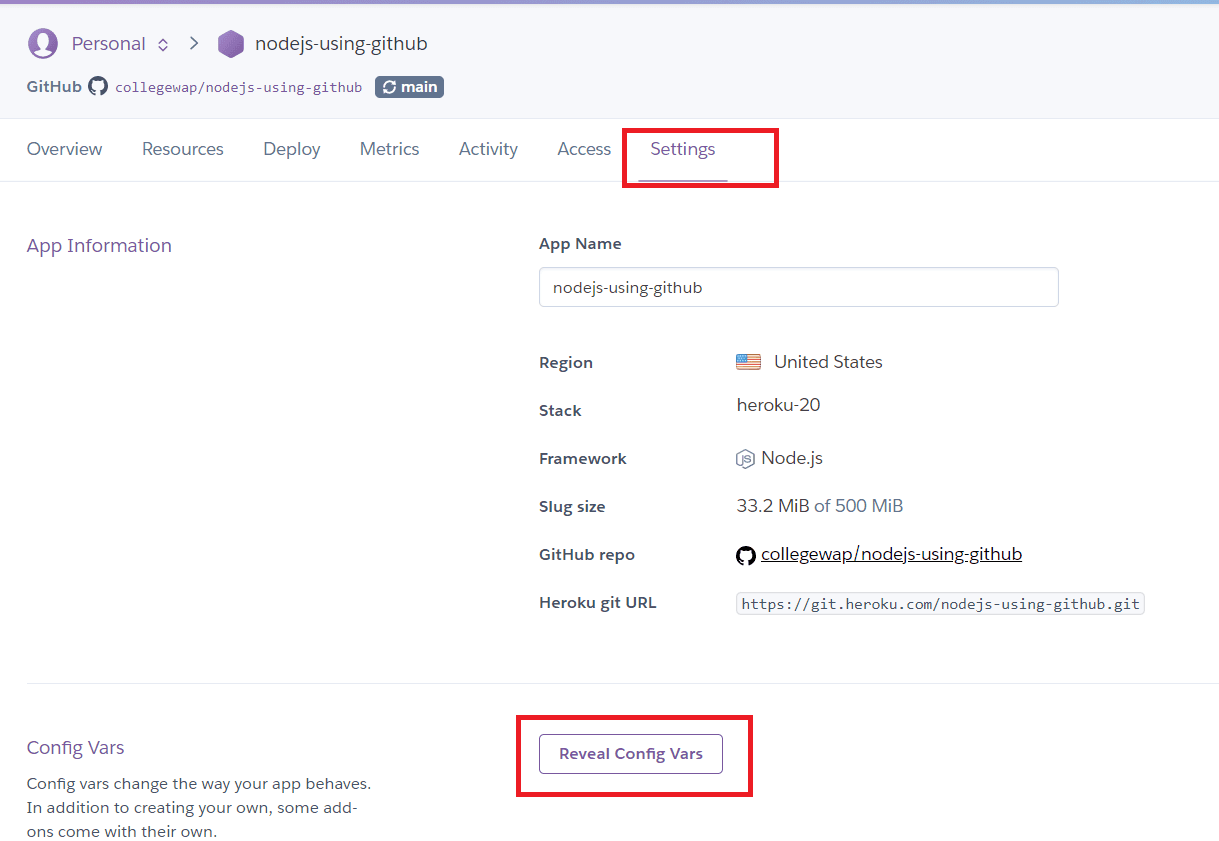
Go to your project settings and click on «Reveal Config Vars». Now you can provide the key and values here and click on «Add»
Once added, you can push your changes and see if the changes work.
If you have liked article, stay in touch with me by following me on twitter.
Many websites have JavaScript functions that make network requests to a server, such as a REST API. The web pages and APIs are often in different domains. This introduces security issues in that any website can request data from an API. Cross-Origin Resource Sharing (CORS) provides a solution to these issues. It became a W3C recommendation in 2014. It makes it the responsibility of the web browser to prevent unauthorized access to APIs. All modern web browsers enforce CORS. They prevent JavaScript from obtaining data from a server in a domain different than the domain the website was loaded from, unless the REST API server gives permission.
From a developer’s perspective, CORS is often a cause of much grief when it blocks network requests. CORS provides a number of different mechanisms for limiting JavaScript access to APIs. It is often not obvious which mechanism is blocking the request. We are going to build a simple web application that makes REST calls to a server in a different domain. We will deliberately make requests that the browser will block because of CORS policies and then show how to fix the issues. Let’s get started!
NOTE: The code for this project can be found on GitHub.
Table of Contents
- Prerequisites to Building a Go Application
- How to Build a Simple Web Front End
- How to Build a Simple REST API in Go
- How to Solve a Simple CORS Issue
- Allowing Access from Any Origin Domain
- CORS in Flight
- What Else Does CORS Block?
- Restrictions on Response Headers
- Credentials Are a Special Case
- Control CORS Cache Configuration
- How to Prevent CORS Issues with Okta
- How CORS Prevents Security Issues
Prerequisites to Building a Go Application
First things first, if you don’t already have Go installed on your computer you will need to download and install the Go Programming Language.
Now, create a directory where all of our future code will live.
Finally, we will make our directory a Go module and install the Gin package (a Go web framework) to implement a web server.
go mod init cors
go get github.com/gin-gonic/gin
go get github.com/gin-contrib/static
A file called go.mod will get created containing the dependencies.
How to Build a Simple Web Front End
We are going to build a simple HTML and JavaScript front end and serve it from a web server written using Gin.
First of all, create a directory called frontend and create a file called frontend/index.html with the following content:
<html>
    <head>
        <meta charset="UTF-8" />
        <title>Fixing Common Issues with CORS</title>
    </head>
    <body>
        <h1>Fixing Common Issues with CORS</h1>
        <div>
            <textarea id="messages" name="messages" rows="10" cols="50">Messages</textarea><br/>
            <form id="form1">
                <input type="button" value="Get v1" onclick="onGet('v1')"/>
                <input type="button" value="Get v2" onclick="onGet('v2')"/>
            </form>
        </div>
    </body>
</html>
The web page has a text area to display messages and a simple form with two buttons. When a button is clicked it calls the JavaScript function onGet() passing it a version number. The idea being that v1 requests will always fail due to CORS issues, and v2 will fix the issue.
Next, create a file called frontend/control.js containing the following JavaScript:
function onGet(version) {
    const url = "http://localhost:8000/api/" + version + "/messages";
    var headers = {}

    fetch(url, {
        method : "GET",
        mode: 'cors',
        headers: headers
    })
    .then((response) => {
        if (!response.ok) {
            throw new Error(response.error)
        }
        return response.json();
    })
    .then(data => {
        document.getElementById('messages').value = data.messages;
    })
    .catch(function(error) {
        document.getElementById('messages').value = error;
    });
}
The onGet() function inserts the version number into the URL and then makes a fetch request to the API server. A successful request will return a list of messages. The messages are displayed in the text area.
Finally, create a file called frontend/.go containing the following Go code:
package main

import (
	"github.com/gin-contrib/static"
	"github.com/gin-gonic/gin"
)

func main() {
	r := gin.Default()
	r.Use(static.Serve("/", static.LocalFile("./frontend", false)))
	r.Run(":8080")
}
This code simply serves the contents of the frontend directory on requests on port 8080. Note that JavaScript makes a call to port http://localhost:8000 which is a separate service.
Start the server and point a web browser at http://localhost:8080 to see the static content.
How to Build a Simple REST API in Go
Create a directory called rest to contain the code for a basic REST API.
NOTE: A separate directory is required as Go doesn’t allow two program entry points in the same directory.
Create a file called rest/server.go containing the following Go code:
package main

import (
	"fmt"
	"strconv"
	"net/http"

	"github.com/gin-gonic/gin"
)

var messages []string

func GetMessages(c *gin.Context) {
	version := c.Param("version")
	fmt.Println("Version", version)
	c.JSON(http.StatusOK, gin.H{"messages": messages})
}

func main() {
	messages = append(messages, "Hello CORS!")
	r := gin.Default()
	r.GET("/api/:version/messages", GetMessages)
	r.Run(":8000")
}
A list called messages is created to hold message objects.
The function GetMessages() is called whenever a GET request is made to the specified URL. It returns a JSON string containing the messages. The URL contains a path parameter which will be v1 or v2. The server listens on port 8000.
The server can be run using:
How to Solve a Simple CORS Issue
We now have two servers—the front-end one on http://localhost:8080, and the REST API server on http://localhost:8000. Even though the two servers have the same hostname, the fact that they are listening on different port numbers puts them in different domains from the CORS perspective. The domain of the web content is referred to as the origin. If the JavaScript fetch request specifies cors a request header will be added identifying the origin.
Origin: http://localhost:8080
Make sure both the frontend and REST servers are running.
Next, point a web browser at http://localhost:8080 to display the web page. We are going to get JavaScript errors, so open your browser’s developer console so that we can see what is going on. In Chrome it is *View** > Developer > Developer Tools.
Next, click on the Send v1 button. You will get a JavaScript error displayed in the console:
Access to fetch at ‘http://localhost:8000/api/v1/messages’ from origin ‘http://localhost:8080’ has been blocked by CORS policy: No ‘Access-Control-Allow-Origin’ header is present on the requested resource. If an opaque response serves your needs, set the request’s mode to ‘no-cors’ to fetch the resource with CORS disabled.
The message says that the browser has blocked the request because of a CORS policy. It suggests two solutions. The second suggestion is to change the mode from cors to no-cors in the JavaScript fetch request. This is not an option as the browser always deletes the response data when in no-cors mode to prevent data from being read by an unauthorized client.
The solution to the issue is for the server to set a response header that allows the browser to make cross-domain requests to it.
Access-Control-Allow-Origin: http://localhost:8080
This tells the web browser that the cross-origin requests are to be allowed for the specified domain. If the domain specified in the response header matches the domain of the web page, specified in the Origin request header, then the browser will not block the response being received by JavaScript.
We are going to set the header when the URL contains v2. Change the GetMessages() function in cors/server.go to the following:
func GetMessages(c *gin.Context) {
	version := c.Param("version")
	fmt.Println("Version", version)
	if version == "v2" {
		c.Header("Access-Control-Allow-Origin", "http://localhost:8080")
	}
	c.JSON(http.StatusOK, gin.H{"messages": messages})
}
This sets a header to allow cross-origin requests for the v2 URI.
Restart the server and go to the web page. If you click on Get v1 you will get blocked by CORS. If you click on Get v2, the request will be allowed.
A response can only have at most one Access-Control-Allow-Origin header. The header can only specify only one domain. If the server needs to allow requests from multiple origin domains, it needs to generate an Access-Control-Allow-Origin response header with the same value as the Origin request header.
Allowing Access from Any Origin Domain
There is an option to prevent CORS from blocking any domain. This is very popular with developers!
Access-Control-Allow-Origin: *
Be careful when using this option. It will get flagged in a security audit. It may also be in violation of an information security policy, which could have serious consequences!
CORS in Flight
Although we have fixed the main CORS issue, there are some limitations. One of the limitations is that only the HTTP GET, and OPTIONS methods are allowed. The GET and OPTIONS methods are read-only and are considered safe as they don’t modify existing content. The POST, PUT, and DELETE methods can add or change existing content. These are considered unsafe. Let’s see what happens when we make a PUT request.
First of all, add a new form to client/index.html:
<form id="form2">
    <input type="text" id="puttext" name="puttext"/>
    <input type="button" value="Put v1" onclick="onPut('v1')"/>
    <input type="button" value="Put v2" onclick="onPut('v2')"/>
</form>
This form has a text input and the two send buttons as before that call a new JavaScript function.
Next, add the JavaScript funtion to client/control.js:
function onPut(version) {
    const url = "http://localhost:8000/api/" + version + "/messages/0";
    var headers = {}

    fetch(url, {
        method : "PUT",
        mode: 'cors',
        headers: headers,
        body: new URLSearchParams(new FormData(document.getElementById("form2"))),
    })
    .then((response) => {
        if (!response.ok) {
            throw new Error(response.error)
        }
        return response.json();
    })
    .then(data => {
        document.getElementById('messages').value = data.messages;
    })
    .catch(function(error) {
        document.getElementById('messages').value = error;
    });
}
This makes a PUT request sending the form parameters in the request body. Note that the URI ends in /0. This means that the request is to create or change the message with the identifier 0.
Next, define a PUT handler in the main() function of rest/server.go:
r.PUT("/api/:version/messages/:id", PutMessage)
The message identifier is extracted as a path parameter.
Finally, add the request handler function to rest/server.go:
func PutMessage(c *gin.Context) {
	version := c.Param("version")
	id, _ := strconv.Atoi(c.Param("id"))
	text := c.PostForm("puttext")
	messages[id] = text
	if version == "v2" {
	    c.Header("Access-Control-Allow-Origin", "http://localhost:8080")
	}
	c.JSON(http.StatusOK, gin.H{"messages": messages})
}
This updates the message from the form data and sends the new list of messages. The function also always sets the allow origin header, as we know that it is required.
Now, restart the servers and load the web page. Make sure that the developer console is open. Add some text to the text input and hit the Send v1 button.
You will see a slightly different CORS error in the console:
Access to fetch at ‘http://localhost:8000/api/v1/messages/0’ from origin ‘http://localhost:8080’ has been blocked by CORS policy: Response to preflight request doesn’t pass access control check: No ‘Access-Control-Allow-Origin’ header is present on the requested resource. If an opaque response serves your needs, set the request’s mode to ‘no-cors’ to fetch the resource with CORS disabled.
This is saying that a preflight check was made, and that it didn’t set the Access-Control-Allow-Origin header.
Now, look at the console output from the API server:
[GIN] 2020/12/01 - 11:10:09 | 404 | 447ns | ::1 | OPTIONS "/api/v1/messages/0"
So, what is happening here? JavaScript is trying to make a PUT request. This is not allowed by CORS policy. In the GET example, the browser made the request and blocked the response. In this case, the browser refuses to make the PUT request. Instead, it sent an OPTIONS request to the same URI. It will only send the PUT if the OPTIONS request returns the correct CORS header. This is called a preflight request. As the server doesn’t know what method the OPTIONS preflight request is for, it specifies the method in a request header:
Access-Control-Request-Method: PUT
Let’s fix this by adding a handler for the OPTIONS request that sets the allow origin header in cors/server.go:
func OptionMessage(c *gin.Context) {
	c.Header("Access-Control-Allow-Origin", "http://localhost:8080")
}

func main() {
	messages = append(messages, "Hello CORS!")
	r := gin.Default()
	r.GET("/api/:version/messages", GetMessages)
	r.PUT("/api/:version/messages/:id", PutMessage)
	r.OPTIONS("/api/v2/messages/:id", OptionMessage)
	r.Run(":8000")
}
Notice that the OPTIONS handler is only set for the v2 URI as we don’t want to fix v1.
Now, restart the server and send a message using the Put v2 button. We get yet another CORS error!
Access to fetch at ‘http://localhost:8000/api/v2/messages/0’ from origin ‘http://localhost:8080’ has been blocked by CORS policy: Method PUT is not allowed by Access-Control-Allow-Methods in preflight response.
This is saying that the preflight check needs another header to stop the PUT request from being blocked.
Add the response header to cors/server.go:
func OptionMessage(c *gin.Context) {
	c.Header("Access-Control-Allow-Origin", "http://localhost:8080")
	c.Header("Access-Control-Allow-Methods", "GET, OPTIONS, POST, PUT")
}
Restart the server and resend the message. The CORS issues are resolved.
What Else Does CORS Block?
CORS has a very restrictive policy regarding which HTTP request headers are allowed. It only allows safe listed request headers. These are Accept, Accept-Language, Content-Language, and Content-Type. They can only contain printable characters and some punctuation characters are not allowed. Header values can’t have more than 128 characters.
There are further restrictions on the Content-Type header. It can only be one of application/x-www-form-urlencoded, multipart/form-data, and text/plain. It is interesting to note that application/json is not allowed.
Let’s see what happens if we send a custom request header. Modify the onPut() function in frontend/control.jsto set a header:
var headers = { "X-Token": "abcd1234" }
Now, make sure that the servers are running and load or reload the web page. Type in a message and click the Put v1 button. You will see a CORS error in the developer console.
Access to fetch at ‘http://localhost:8000/api/v2/messages/0’ from origin ‘http://localhost:8080’ has been blocked by CORS policy: Request header field x-token is not allowed by Access-Control-Allow-Headers in preflight response.
Any header which is not CORS safe-listed causes a preflight request. This also contains a request header that specifies the header that needs to be allowed:
Access-Control-Request-Headers: x-token
Note that the header name x-token is specified in lowercase.
The preflight response can allow non-safe-listed headers and can remove restrictions on safe listed headers:
Access-Control-Allow-Headers: X_Token, Content-Type
Next, change the function in cors/server.go to allow the custom header:
func OptionMessage(c *gin.Context) {
	c.Header("Access-Control-Allow-Origin", "http://localhost:8080")
	c.Header("Access-Control-Allow-Methods", "GET, POST, OPTIONS, PUT")
	c.Header("Access-Control-Allow-Headers", "X-Token")
}
Restart the server and resend the message by clicking the Put v2 button. The request should now be successful.
CORS also places restrictions on response headers. There are seven whitelisted response headers: Cache-Control, Content-Language, Content-Length, Content-Type, Expires, Last-Modified, and Pragma. These are the only response headers that can be accessed from JavaScript. Let’s see this in action.
First of all, add a text area to frontend/index.html to display the headers:
<textarea id="headers" name="headers" rows="10" cols="50">Headers</textarea><br/>
Next, replace the first then block in the onPut function in frontend/control.js to display the response headers:
.then((response) => {
    if (!response.ok) {
        throw new Error(response.error)
    }
    response.headers.forEach(function(val, key) {
        document.getElementById('headers').value += 'n' + key + ': ' + val;
    });
    return response.json();
})
Finally, set a custom header in rest/server.go:
func PutMessage(c *gin.Context) {
	version := c.Param("version")
	id, _ := strconv.Atoi(c.Param("id"))
	text := c.PostForm("puttext")
	messages[id] = text
	if version == "v2" {
	    c.Header("Access-Control-Allow-Origin", "http://localhost:8080")
	}
	c.Header("X-Custom", "123456789")
	c.JSON(http.StatusOK, gin.H{"messages": messages})
}
Now, restart the server and reload the web page. Type in a message and hit Put v2. You should see some headers displayed, but not the custom header. CORS has blocked it.
This can be fixed by setting another response header to expose the custom header in server/server.go:
func PutMessage(c *gin.Context) {
	version := c.Param("version")
	id, _ := strconv.Atoi(c.Param("id"))
	text := c.PostForm("puttext")
	messages[id] = text
	if version == "v2" {
        c.Header("Access-Control-Expose-Headers", "X-Custom")
	    c.Header("Access-Control-Allow-Origin", "http://localhost:8080")
	}
	c.Header("X-Custom", "123456789")
	c.JSON(http.StatusOK, gin.H{"messages": messages})
}
Restart the server and reload the web page. Type in a message and hit Put v2. You should see some headers displayed, including the custom header. CORS has now allowed it.
Credentials Are a Special Case
There is yet another CORS blocking scenario. JavaScript has a credentials request mode. This determines how user credentials, such as cookies are handled. The options are:
omit: Never send or receive cookies.same-origin: This is the default, that allows user credentials to be sent to the same origin.include: Send user credentials even if cross-origin.
Let’s see what happens.
Modify the fetch call in the onPut() function in frontend/Control.js:
fetch(url, {
    method : "PUT",
    mode: 'cors',
    credentials: 'include',
    headers: headers,
    body: new URLSearchParams(new FormData(document.getElementById("form2"))),
})
Now, make sure that the client and server are running and reload the web page. Send a message as before. You will get another CORS error in the developer console:
Access to fetch at ‘http://localhost:8000/api/v2/messages/0’ from origin ‘http://localhost:8080’ has been blocked by CORS policy: Response to preflight request doesn’t pass access control check: The value of the ‘Access-Control-Allow-Credentials’ header in the response is ‘’ which must be ‘true’ when the request’s credentials mode is ‘include’.
The fix for this is to add another header to both the OptionMessage(), and PutMessage() functions in cors/server.go as the header needs to be present in both the preflight request and the actual request:
c.Header("Access-Control-Allow-Credentials", "true")
The request should now work correctly.
The credentials issue can also be resolved on the client by setting the credentials mode to omit and sending credentials as request parameters, instead of using cookies.
Control CORS Cache Configuration
The is one more CORS header that hasn’t yet been discussed. The browser can cache the preflight request results. The Access-Control-Max-Age header specifies the maximum time, in seconds, the results can be cached. It should be added to the preflight response headers as it controls how long the Access-Control-Allow-Methods and Access-Control-Allow-Headers results can be cached.
Access-Control-Max-Age: 600
Browsers typically have a cap on the maximum time. Setting the time to -1 prevents caching and forces a preflight check on all calls that require it.
How to Prevent CORS Issues with Okta
Authentication providers, such as Okta, need to handle cross-domain requests to their authentication servers and API servers. This is done by providing a list of trusted origins. See Okta Enable CORS for more information.
How CORS Prevents Security Issues
CORS is an important security feature that is designed to prevent JavaScript clients from accessing data from other domains without authorization.
Modern web browsers implement CORS to block cross-domain JavaScript requests by default. The server needs to authorize cross-domain requests by setting the correct response headers.
CORS has several layers. Simply allowing an origin domain only works for a subset of request methods and request headers. Some request methods and headers force a preflight request as a further means of protecting data. The actual request is only allowed if the preflight response headers permit it.
CORS is a major pain point for developers. If a request is blocked, it is not easy to understand why, and how to fix it. An understanding of the nature of the blocked request, and of the CORS mechanisms, can easily overcome such issues.
If you enjoyed this post, you might like related ones on this blog:
- What is the OAuth 2.0 Implicit Grant Type?
- Combat Side-Channel Attacks with Cross-Origin Read Blocking
Follow us for more great content and updates from our team! You can find us on Twitter, Facebook, subscribe to our YouTube Channel or start the conversation below.
In ReactJS, Cross-Origin Resource Sharing (CORS) refers to the method that allows you to make requests to the server deployed at a different domain. As a reference, if the frontend and backend are at two different domains, we need CORS there.
Method to setup CORS requests in react app at front-end level:
- In axios: Axios always use base URL to start the request and the browser confirms that in the beginning HTTP OPTIONS requests by itself. Many times we need to pass tokens for authentication and the token which we are using is identified by Bearer. Now, the main part we need to pass some additional headers for CORS named as Access-Control-Allow-Credentials. This one is required because the browser needs to confirm the server if that is allowed to access resources.
- In fetch: To use CORS in fetch we need to use the mode option and set it to cors.
const response = await fetch("https://api.request.com/api_resource", {
    method: "GET",
    mode: "cors",
    headers: {
        Authorization: `Bearer: ${token}`,
        "Content-Type": "application/json",
    },
    body: JSON.stringify(data),
});

console.log(response.json());
Let’s create an application in react to demonstrate the above concepts:
Creating React Application
Step 1: Create a React application using the following command:
npx create-react-app example
Step 2: After creating your project folder i.e. example, move to it using the following command:
cd example
Step 3: Here we are using the Axios library for fetching API data, we need to install that by using the command from the root directory.
npm install axios
Project structure: It will look like this.
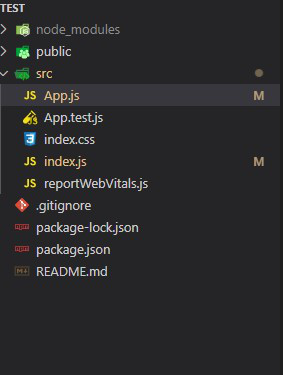
Project structure
Example: Demonstrating the CORS options in ReactJS. Write down the following code in index.js and App.js file.
index.js
import React from "react";
import ReactDOM from "react-dom";
import "./index.css";
import App from "./App";
import reportWebVitals from "./reportWebVitals";
ReactDOM.render(
<React.StrictMode>
<App />
</React.StrictMode>,
document.getElementById("root")
);
reportWebVitals();
App.js
import React, { useEffect, useState } from "react";
import axios from "axios";
function App() {
const [isLoading, setLoading] = useState(true);
const [pokemon, setPokemon] = useState();
useEffect(() => {
axios.get(`${baseurl}api/v2/pokemon/5`).then((response) => {
setPokemon(response.data);
setLoading(false);
});
}, []);
if (isLoading) {
return (
<div
style={{
display: "flex",
flexDirection: "column",
alignItems: "center",
justifyContent: "center",
height: "100vh",
backgroundColor: "grey",
}}
>
Loading...
</div>
);
}
return (
<div
style={{
display: "flex",
flexDirection: "column",
alignItems: "center",
justifyContent: "center",
height: "100vh",
backgroundColor: "grey",
}}
>
<div>{pokemon.name}</div>
<img alt={pokemon.name} src={pokemon.sprites.front_default} />
</div>
);
}
export default App;
Step to run the application: Open the terminal and type the following command.
npm start
Output: We will see the following output on the browser screen.

output
We can see in the console that there is no CORS error. Therefore, we successfully handled the CORS in react.