This is a quick example of how to handle both network errors and HTTP errors (4xx or 5xx) for Fetch API (fetch()) requests in a single catch() block.
GET request with error handling
This sends an HTTP GET request to an invalid URL on the Reqres api which is a fake online REST api used for testing, then writes the error message to the parent of the #get-request-error-handling .total element and logs the error to the console.
Error Handling
The fetch() function will automatically throw an error for network errors but not for HTTP errors such as 4xx or 5xx responses. For HTTP errors we can check the response.ok property to see if the request failed and reject the promise ourselves by calling return Promise.reject(error);. This approach means that both types of failed requests — network errors and http errors — can be handled by a single catch() block instead of needing two separate pieces of error handling code.
JSON Check
The fetch .then() callback is passed the HTTP response object when the request is completed, the function checks if the response type is JSON before parsing the response body with the response.json() method, because calling response.json() will cause an error if the response doesn’t contain JSON data.
// Fetch GET request with error handling
const element = document.querySelector('#get-request .result');
fetch('https://reqres.in/invalid-url')
    .then(async response => {
        const isJson = response.headers.get('content-type')?.includes('application/json');
        const data = isJson ? await response.json() : null;

        // check for error response
        if (!response.ok) {
            // get error message from body or default to response status
            const error = (data && data.message) || response.status;
            return Promise.reject(error);
        }

        element.innerHTML = JSON.stringify(data, null, 4);
    })
    .catch(error => {
        element.parentElement.innerHTML = `Error: ${error}`;
        console.error('There was an error!', error);
    });
Run the example Fetch GET request on StackBlitz at https://stackblitz.com/edit/fetch-error-handling-http-and-network-errors
Subscribe or Follow Me For Updates
Subscribe to my YouTube channel or follow me on Twitter, Facebook or GitHub to be notified when I post new content.
- Subscribe on YouTube at https://www.youtube.com/JasonWatmore
- Follow me on Twitter at https://twitter.com/jason_watmore
- Follow me on Facebook at https://www.facebook.com/JasonWatmoreBlog
- Follow me on GitHub at https://github.com/cornflourblue
-
Feed formats available:
RSS,
Atom,
JSON
Other than coding…
I’m currently attempting to travel around Australia by motorcycle with my wife Tina on a pair of Royal Enfield Himalayans. You can follow our adventures on YouTube, Instagram and Facebook.

- Subscribe on YouTube at https://www.youtube.com/TinaAndJason
- Follow us on Instagram at https://www.instagram.com/tinaandjason
- Follow us on Facebook at https://www.facebook.com/TinaAndJasonVlog
- Visit our website at https://tinaandjason.com.au
Need Some Fetch Help?
Search fiverr to find help quickly from experienced Fetch developers.

![]()
The fetch() method in JavaScript is a global, asynchronous method that allows us to interface with API’s for requests and responses. While this is a powerful and commonly-used tool, its error handling process may seem a bit elusive at start.
Why Error Handling?
When errors are encountered during a fetch() call, it is often necessary to halt the compiler from reading the next few lines of code. To do so, the method call should throw an error upon encountering one. The thrown error can be «caught» later on for an alternate behavior to take place. Although one might think that the fetch() call would automatically throw an error upon encountering one, that is not the case for JavaScript.
According to the fetch() MDN, the Promise object returned by the fetch() call is rejected (throws an error) only when «a network error is encountered.» This means that fetch() Promises do resolve despite encountering client-side HTTP errors such as 404 and do not throw errors during the fetch. Therefore, the code shown below would log «Success» instead of «Error» when run, which may seem unexpected.
fetch(url) // encounters a 404 error
   .then(res => res.json()) // no error is thrown
   .then(() => console.log("Success")) //
   .catch(() => console.log("Error")) // fails to catch error
Enter fullscreen mode
Exit fullscreen mode
Luckily, you can fix this quite simply by using proper error handling.
Handling fetch() Errors
fetch() calls can be made using either Promise chains or Async/Await. Fortunately, the error handling process is similar for both.
Using Promises
The fetch API provides an ok property to the Promise response which indicates whether the HTTP status is within the range 200-299 (inclusive). This can be used to check whether any error is encountered during fetch.
const handleError = response => {
   if (!response.ok) {
      throw Error(response.statusText);
   } else {
      return response.json();
   }
}; //handler function that throws any encountered error

fetch(url)
   .then(handleError) // skips to .catch if error is thrown
   .then(data => console.log("Does something with data"))
   .catch(console.log); // catches the error and logs it
Enter fullscreen mode
Exit fullscreen mode
The error-handler function should be called before the Promise response is parsed by
.json(). Otherwise, the.json()method would strip out the response properties necessary for error handling (such asok,status, andstatusText).
Using Async/Await
Error handling using Async/Await uses a slightly different syntax, but it also revolves around the idea of using the ok property to check whether any error is encountered or not.
const response = await fetch(url);
if (!response.ok) {
   console.log(response.status, response.statusText);
} else {
   const data = await response.json();
   console.log(data);
}
Enter fullscreen mode
Exit fullscreen mode
The
statusresponse property provides the status code (e.g. «404») while thestatusTextresponse property provides the status description (e.g. «Is Not Found»).
Conclusion
Although the error handling for fetch() may not seem intuitive at first, it will later make more sense since it provides the user with more control over unique situations.
Overall, error-handling for fetch() calls is a simple and user-friendly tool that will definitely aid you in the long-term.
Resources
- Handling Failed HTTP Responses With fetch()
- Error handling while using native fetch API in JavaScript
- Using Fetch MDN
Table of Contents
When you develop an application, you will often need to fetch data from a backend or a third-party API.
In this article, we will learn different ways to fetch and display data from API in React.
Fetching data using inbuilt fetch API.
All modern browsers come with an inbuilt fetch Web API,
which can be used to fetch data from APIs.
In this tutorial, we will be fetching data from the JSON Server APIs.
1import React, { useEffect, useState } from "react"
2
3const UsingFetch = () => {
4 const [users, setUsers] = useState([])
5
6 const fetchData = () => {
7 fetch("https://jsonplaceholder.typicode.com/users")
8 .then(response => {
9 return response.json()
10 })
11 .then(data => {
12 setUsers(data)
13 })
14 }
15
16 useEffect(() => {
17 fetchData()
18 }, [])
19
20 return (
21 <div>
22 {users.length > 0 && (
23 <ul>
24 {users.map(user => (
25 <li key={user.id}>{user.name}</li>
26 ))}
27 </ul>
28 )}
29 </div>
30 )
31}
32
33export default UsingFetch
In the above code,
- We have are using a
useEffecthook, which will be executed once the component is mounted (alternative of componentDidMount in class-based components).
Inside theuseEffecthook, we are callingfetchDatafunction. - In the
fetchDatafunction, we are making the API call to fetch users and set the users to a local state. - If users exist, then we are looping through them and displaying their names as a list.
You can learn more about how useEffect works
and how to loop through an array in React from my previous articles.
Since the API calls are asynchronous,
fetch API returns a Promise.
Hence, we chain the then method with a callback, which will be called when we receive the response from the server/backend.
Since we need the response to be resolved to a JSON, we call .json() method with the returned response.
Again .json() return a promise, therefore we need to chain another then method to resolve the second promise.
Since the then callbacks have only one line, we can use implicit returns to shorten the fetchData method as follows:
1const fetchData = () =>
2 fetch("https://jsonplaceholder.typicode.com/users")
3 .then(response => response.json())
4 .then(data => setUsers(data))
Fetching data in React using async-await
In case you like to use async-await syntax instead of then callbacks, you can write the same example as follows:
1import React, { useEffect, useState } from "react"
2
3const AsyncAwait = () => {
4 const [users, setUsers] = useState([])
5
6 const fetchData = async () => {
7 const response = await fetch("https://jsonplaceholder.typicode.com/users")
8 const data = await response.json()
9 setUsers(data)
10 }
11
12 useEffect(() => {
13 fetchData()
14 }, [])
15
16 return (
17 <div>
18 {users.length > 0 && (
19 <ul>
20 {users.map(user => (
21 <li key={user.id}>{user.name}</li>
22 ))}
23 </ul>
24 )}
25 </div>
26 )
27}
28
29export default AsyncAwait
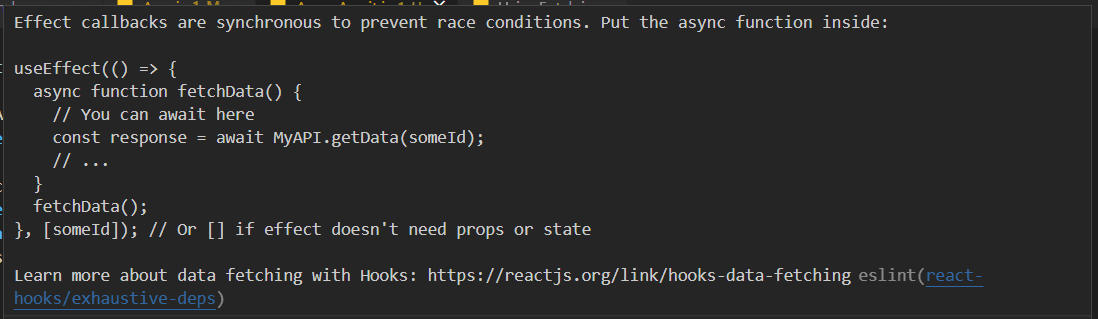
Make sure that you do not use async-await inside the useEffect hook.
If you convert the useEffect hook itself to an async function, then React will show the following warning:
Effect callbacks are synchronous to prevent race conditions. Put the async function inside
Fetching Data in React when a button is clicked
If you want to fetch data conditionally, say when a button is clicked, you can do that as shown below:
1import React, { useState } from "react"
2
3const ButtonClick = () => {
4 const [users, setUsers] = useState([])
5
6 const fetchData = () => {
7 fetch("https://jsonplaceholder.typicode.com/users")
8 .then(response => {
9 return response.json()
10 })
11 .then(data => {
12 setUsers(data)
13 })
14 }
15
16 return (
17 <div>
18 <button onClick={fetchData}>Fetch Users</button>
19 {users.length > 0 && (
20 <ul>
21 {users.map(user => (
22 <li key={user.id}>{user.name}</li>
23 ))}
24 </ul>
25 )}
26 </div>
27 )
28}
29
30export default ButtonClick
Here instead of calling fetchData inside the useEffect hook,
we are passing it to the onClick handler of the button.
Passing a parameter while fetching data
If you want to fetch data based on some parameter, say the id of the user, then you can do by adding it to the URL as shown below.
The backtick («) syntax is known as template literals or
string interpolation in JavaScript.
1import React, { useEffect, useState } from "react"
2
3const PassParam = () => {
4 const [user, setUser] = useState([])
5 const id = 1
6
7 const fetchData = () => {
8 fetch(`https://jsonplaceholder.typicode.com/users?id=${id}`)
9 .then(response => {
10 return response.json()
11 })
12 .then(data => {
13 setUser(data[0].name)
14 })
15 }
16
17 useEffect(() => {
18 fetchData()
19 }, [])
20
21 return <div>Name: {user}</div>
22}
23
24export default PassParam
Fetching data in React based on user input (onChange)
If you want to fetch data based on user input, say user searching for a name, then you achieve it with the following code:
1import React, { useState } from "react"
2
3const SearchUser = () => {
4 const [users, setUsers] = useState([])
5
6 const fetchData = e => {
7 const query = e.target.value
8 fetch(`https://jsonplaceholder.typicode.com/users?q=${query}`)
9 .then(response => {
10 return response.json()
11 })
12 .then(data => {
13 setUsers(data)
14 })
15 }
16
17 return (
18 <div>
19 <input onChange={fetchData} label="Search User" />
20 {users.length > 0 && (
21 <ul>
22 {users.map(user => (
23 <li key={user.id}>{user.name}</li>
24 ))}
25 </ul>
26 )}
27 </div>
28 )
29}
30
31export default SearchUser
In the above code, we have modified the previous example to take user input by binding an onChange handler.
The above example will search for all the data belonging to the user, not just the name.
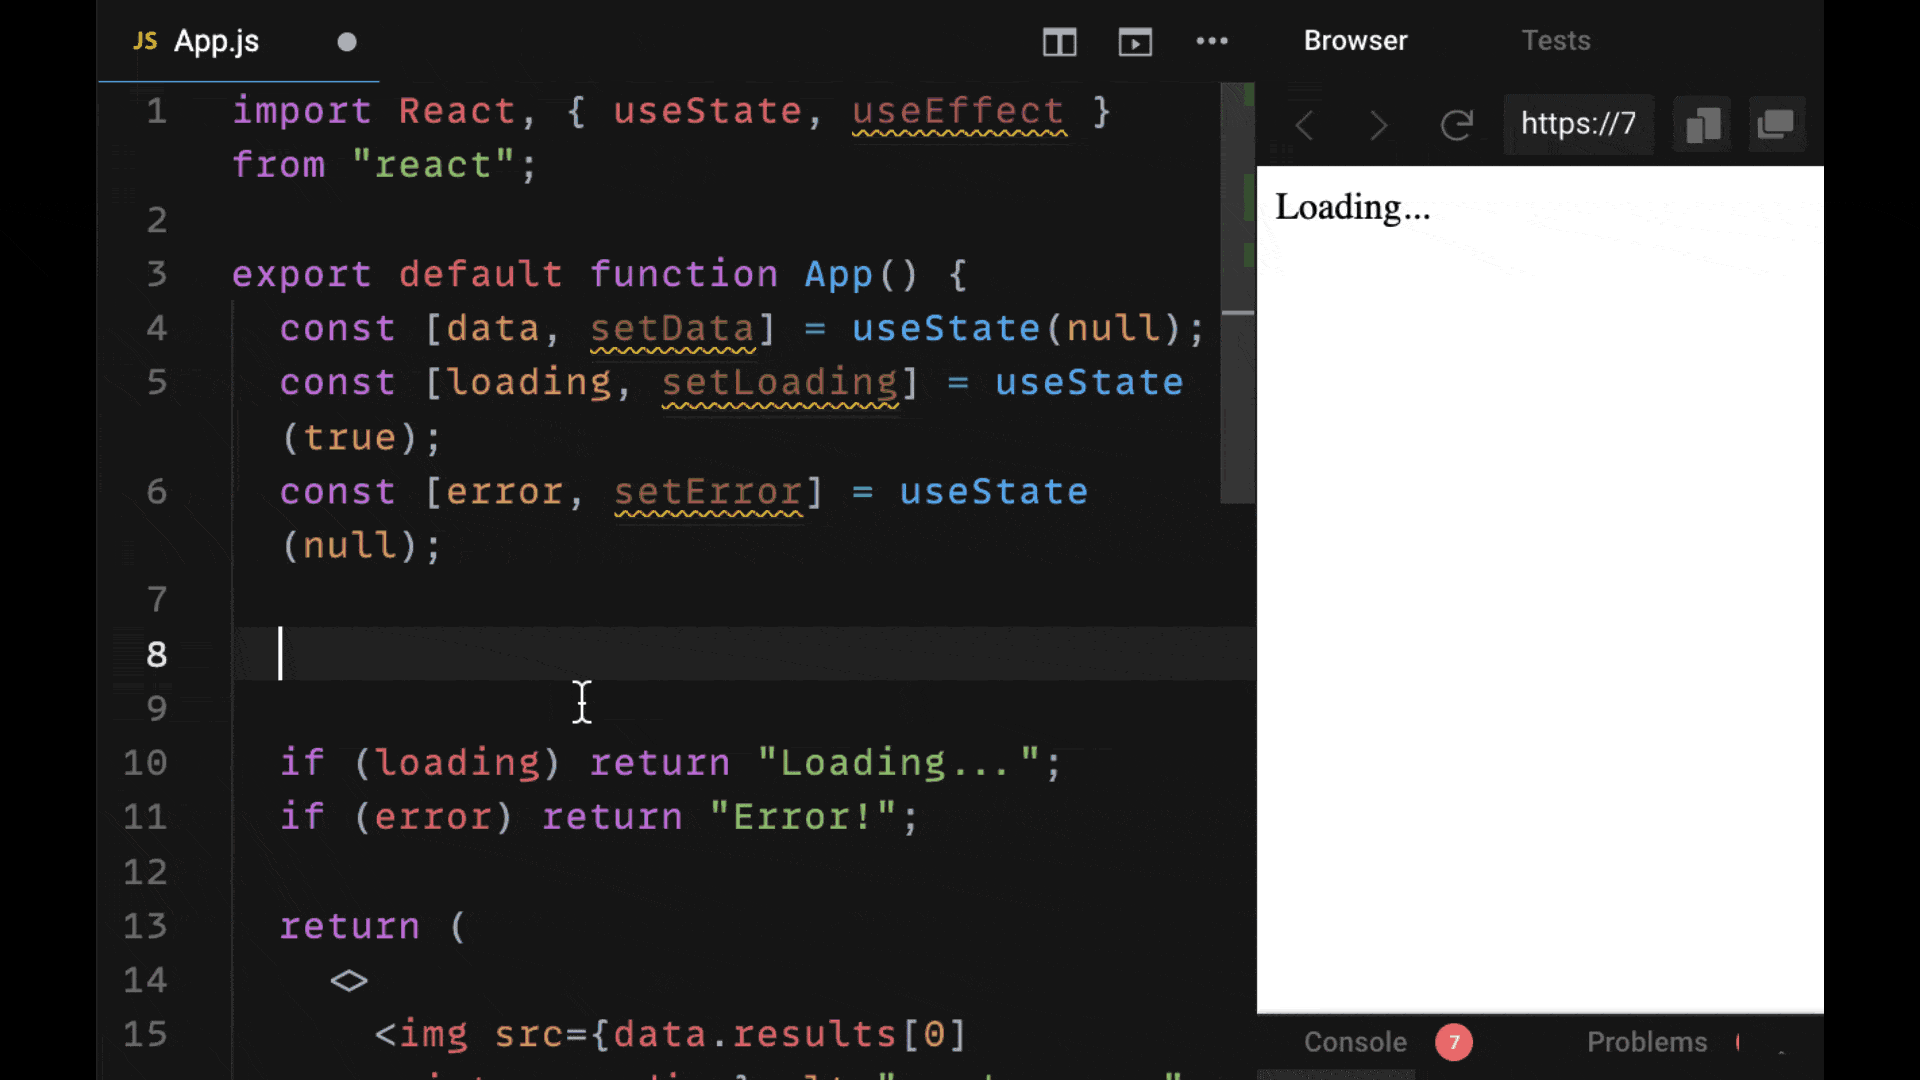
Displaying Loading state when fetching data from API in React
It is always a good practice to display an indicator (a loader) to the user while fetching data
so that the user wouldn’t wonder what is happening after seeing a blank screen while the data is being loaded.
We can display a loading message (or a spinner) by making use of a local state.
1import React, { useEffect, useState } from "react"
2
3const LoadingText = () => {
4 const [users, setUsers] = useState([])
5 const [isLoading, setIsLoading] = useState(false)
6
7 const fetchData = () => {
8 setIsLoading(true)
9 fetch("https://jsonplaceholder.typicode.com/users")
10 .then(response => {
11 return response.json()
12 })
13 .then(data => {
14 setIsLoading(false)
15 setUsers(data)
16 })
17 }
18
19 useEffect(() => {
20 fetchData()
21 }, [])
22
23 return (
24 <div>
25 {isLoading && <p>Loading...</p>}
26 {users.length > 0 && (
27 <ul>
28 {users.map(user => (
29 <li key={user.id}>{user.name}</li>
30 ))}
31 </ul>
32 )}
33 </div>
34 )
35}
36
37export default LoadingText
Here we have used the && short circuit operator to display the loading text to conditionally render it.
In my previous article,
I have explained different ways to render react components conditionally.
Error handling while fetching data
While relying on external data, we should always have error handling in place.
An API might fail because of any issues in the server or due to incorrect information passed from the client-side.
We will see how to handle errors in both then syntax as well as async-await syntax.
Error handling in then() callback
We will update our endpoint to a non existent URL, so that it returns a HTTP 404 error.
1import React, { useEffect, useState } from "react"
2
3const ErrorThen = () => {
4 const [users, setUsers] = useState([])
5
6 const fetchData = () => {
7 fetch("https://jsonplaceholder.typicode.com/404")
8 .then(response => {
9 return response.json()
10 })
11 .then(data => {
12 setUsers(data)
13 })
14 }
15
16 useEffect(() => {
17 fetchData()
18 }, [])
19
20 return (
21 <div>
22 {users.length > 0 && (
23 <ul>
24 {users.map(user => (
25 <li key={user.id}>{user.name}</li>
26 ))}
27 </ul>
28 )}
29 </div>
30 )
31}
32
33export default ErrorThen
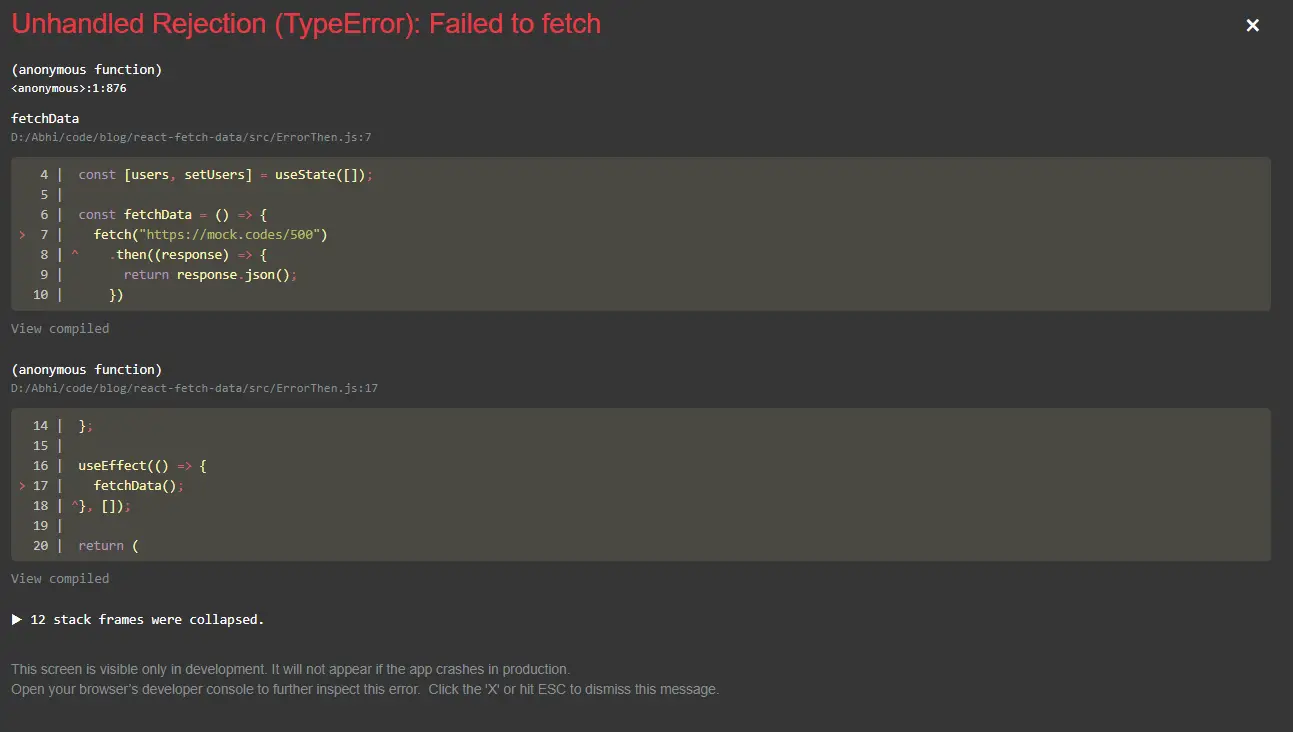
Now if you run the code, you will get an error: Unhandled Rejection (TypeError): Failed to fetch
We can fix this by checking if the response has a HTTP 2XX response code or not
and if the server responds with anything other than 2XX, then we will throw an error and handle it in the catch method callback:
1import React, { useEffect, useState } from "react"
2
3const ErrorThen = () => {
4 const [users, setUsers] = useState([])
5 const [error, setError] = useState("")
6
7 const fetchData = () => {
8 setError("")
9 fetch("https://jsonplaceholder.typicode.com/404")
10 .then(response => {
11
12 if (response.ok) {
13 return response.json()
14 } else {
15
16
17 throw new Error("Sorry something went wrong")
18 }
19 })
20 .then(data => {
21 setUsers(data)
22 })
23 .catch(error => {
24
25
26
27 setError(error.message)
28 })
29 }
30
31 useEffect(() => {
32 fetchData()
33 }, [])
34
35 return (
36 <div>
37 {error && <p>{error}</p>}
38 {users.length > 0 && (
39 <ul>
40 {users.map(user => (
41 <li key={user.id}>{user.name}</li>
42 ))}
43 </ul>
44 )}
45 </div>
46 )
47}
48
49export default ErrorThen
Also, note that if any error other than 4xx or 5xx error, such as network error happens,
then it will directly go to catch callback without going to the first then callback.
Error handling in async-await
To handle errors while using async-await syntax, we can go for the traditional try-catch blocks:
1import React, { useEffect, useState } from "react"
2
3const ErrorAsyncAwait = () => {
4 const [users, setUsers] = useState([])
5 const [error, setError] = useState("")
6
7 const fetchData = async () => {
8 setError("")
9 try {
10 const response = await fetch("https://jsonplaceholder.typicode.com/404")
11 if (!response.ok) {
12
13
14 throw new Error("Sorry something went wrong")
15 }
16 const data = await response.json()
17 setUsers(data)
18 } catch (error) {
19
20
21
22 setError(error.message)
23 }
24 }
25
26 useEffect(() => {
27 fetchData()
28 }, [])
29
30 return (
31 <div>
32 {error && <p>{error}</p>}
33 {users.length > 0 && (
34 <ul>
35 {users.map(user => (
36 <li key={user.id}>{user.name}</li>
37 ))}
38 </ul>
39 )}
40 </div>
41 )
42}
43
44export default ErrorAsyncAwait
Fetching data in React using Axios
We can make use of libraries like axios as well for fetching data.
The advantage of using axios is, it has additional features compared to fetch like canceling previous requests.
First, let’s install axios in our project by running the following command:
You can use
npm i axiosif you are using npm instead of yarn (if you have apackage-lock.jsonfile instead ofyarn.lock).
Now we can use axios to fetch data as follows:
1import axios from "axios"
2import React, { useEffect, useState } from "react"
3
4const UsingAxios = () => {
5 const [users, setUsers] = useState([])
6
7 const fetchData = () => {
8 axios.get("https://jsonplaceholder.typicode.com/users").then(response => {
9 setUsers(response.data)
10 })
11 }
12
13 useEffect(() => {
14 fetchData()
15 }, [])
16
17 return (
18 <div>
19 {users.length > 0 && (
20 <ul>
21 {users.map(user => (
22 <li key={user.id}>{user.name}</li>
23 ))}
24 </ul>
25 )}
26 </div>
27 )
28}
29
30export default UsingAxios
Note that we do not need 2 then blocks here since axios will handle converting response to JSON for us.
The response data can be accessed via response.data.
Also, we do not have to check for response.ok as in the case of fetch since all the errors will come to the catch method callback:
1const fetchData = () => {
2 axios
3 .get("https://jsonplaceholder.typicode.com/users")
4 .then(response => {
5 setUsers(response.data)
6 })
7 .catch(error => {
8 console.log({ error })
9
10 })
11}
There are many other features in axios, which you can read here.
Data fetching using Higher-Order Components (HOC)
If you want to separate code and data fetching into 2 different components, you can do so by extracting data fetching into an HOC:
withFetching.js
1import axios from "axios"
2import React, { useEffect, useState } from "react"
3
4const withFetching = url => Component => {
5 return () => {
6 const [users, setUsers] = useState([])
7 const [error, setError] = useState("")
8 const [isLoading, setIsLoading] = useState(false)
9
10 const fetchData = () => {
11 setIsLoading(true)
12 axios
13 .get(url)
14 .then(response => {
15 setUsers(response.data)
16 setIsLoading(false)
17 })
18 .catch(error => {
19 setError("Sorry, something went wrong")
20 setIsLoading(false)
21 })
22 }
23
24 useEffect(() => {
25 fetchData()
26 }, [])
27
28 return <Component users={users} error={error} isLoading={isLoading} />
29 }
30}
31
32export default withFetching
Now use the HOC created above while exporting the component:
1import React from "react"
2import withFetching from "./withFetching"
3const url = "https://jsonplaceholder.typicode.com/users"
4
5const UsingHoc = ({ isLoading, error, users }) => {
6 if (isLoading) {
7 return <div>Loading..</div>
8 }
9 if (error) {
10 return <div>{error}</div>
11 }
12 return (
13 <div>
14 {users.length > 0 && (
15 <ul>
16 {users.map(user => (
17 <li key={user.id}>{user.name}</li>
18 ))}
19 </ul>
20 )}
21 </div>
22 )
23}
24
25export default withFetching(url)(UsingHoc)
Fetching data using custom hook
Fetching data using a custom hook is very similar to that of Higher-Order Component.
Let’s first create a custom hook called useFetch hook:
1import axios from "axios"
2import { useEffect, useState } from "react"
3
4const useFetch = url => {
5 const [users, setUsers] = useState([])
6 const [error, setError] = useState("")
7 const [isLoading, setIsLoading] = useState(false)
8
9 useEffect(() => {
10 setIsLoading(true)
11 axios
12 .get(url)
13 .then(response => {
14 setUsers(response.data)
15 setIsLoading(false)
16 })
17 .catch(error => {
18 setError("Sorry, something went wrong")
19 setIsLoading(false)
20 })
21 }, [url])
22
23 return { users, error, isLoading }
24}
25
26export default useFetch
We can use this hook like how we use other hooks:
1import React from "react"
2import useFetch from "./useFetch"
3const url = "https://jsonplaceholder.typicode.com/users"
4
5const UsingCustomHook = () => {
6 const { users, error, isLoading } = useFetch(url)
7
8 if (isLoading) {
9 return <div>Loading..</div>
10 }
11 if (error) {
12 return <div>{error}</div>
13 }
14 return (
15 <div>
16 {users.length > 0 && (
17 <ul>
18 {users.map(user => (
19 <li key={user.id}>{user.name}</li>
20 ))}
21 </ul>
22 )}
23 </div>
24 )
25}
26
27export default UsingCustomHook
Fetching data using render props
One more alternative way for HOC is to use render props:
Fetcher.js
1import axios from "axios"
2import { useEffect, useState } from "react"
3
4const Fetcher = ({ url, children }) => {
5 const [users, setUsers] = useState([])
6 const [error, setError] = useState("")
7 const [isLoading, setIsLoading] = useState(false)
8
9 useEffect(() => {
10 setIsLoading(true)
11 axios
12 .get(url)
13 .then(response => {
14 setUsers(response.data)
15 setIsLoading(false)
16 })
17 .catch(error => {
18 setError("Sorry, something went wrong")
19 setIsLoading(false)
20 })
21 }, [url])
22
23 return children({ users, error, isLoading })
24}
25
26export default Fetcher
In the above render prop function, we pass the local states to the children component and
we wrap our component with the Fetcher component as shown below:
1import React from "react"
2import Fetcher from "./Fetcher"
3const url = "https://jsonplaceholder.typicode.com/users"
4
5const UsingRenderProps = () => {
6 return (
7 <Fetcher url={url}>
8 {({ isLoading, error, users }) => {
9 if (isLoading) {
10 return <div>Loading..</div>
11 }
12 if (error) {
13 return <div>{error}</div>
14 }
15 return (
16 <div>
17 {users.length > 0 && (
18 <ul>
19 {users.map(user => (
20 <li key={user.id}>{user.name}</li>
21 ))}
22 </ul>
23 )}
24 </div>
25 )
26 }}
27 </Fetcher>
28 )
29}
30
31export default UsingRenderProps
Source code and Demo
You can view the complete source code here and a demo here.
If you have liked article, stay in touch with me by following me on twitter.
May 23, 2022

- Anticipate potential network errors
- Examples of user errors
- Examples of environmental changes
- Examples of errors with the video-sharing website
- Handle errors with the Fetch API
- When the Fetch API throws errors
- When the network status code represents an error
- When there is an error parsing the network response
- When the network request must be canceled before it completes
- Conclusion
This article demonstrates some error handling approaches when working with the Fetch API. The Fetch API lets you make a request to a remote network resource. When you make a remote network call, your web page becomes subject to a variety of potential network errors.
The following sections describe potential errors and describe how to write code that provides a sensible level of functionality that is resilient to errors and unexpected network conditions. Resilient code keeps your users happy and maintains a standard level of service for your website.
Anticipate potential network errors #
This section describes a scenario in which the user creates a new video named "My Travels.mp4" and then attempts to upload the video to a video-sharing website.
When working with Fetch, it’s easy to consider the happy path where the user successfully uploads the video. However, there are other paths that are not as smooth, but for which web developers must plan. Such (unhappy) paths can happen due to user error, through unexpected environmental conditions, or because of a bug on the video-sharing website.
Examples of user errors #
- The user uploads an image file (such as JPEG) instead of a video file.
- The user begins uploading the wrong video file. Then, part way through the upload, the user specifies the correct video file for upload.
- The user accidentally clicks «Cancel upload» while the video is uploading.
Examples of environmental changes #
- The internet connection goes offline while the video is uploading.
- The browser restarts while the video is uploading.
- The servers for the video-sharing website restart while the video is uploading.
Examples of errors with the video-sharing website #
- The video-sharing website cannot handle a filename with a space. Instead of
"My Travels.mp4", it expects a name such as"My_Travels.mp4"or"MyTravels.mp4". - The video-sharing website cannot upload a video that exceeds the maximum acceptable file size.
- The video-sharing website does not support the video codec in the uploaded video.
These examples can and do happen in the real world. You may have encountered such examples in the past! Let’s pick one example from each of the previous categories, and discuss the following points:
- What is the default behavior if the video-sharing service cannot handle the given example?
- What does the user expect to happen in the example?
- How can we improve the process?
| Action | The user begins uploading the wrong video file. Then, part way through the upload, the user specifies the correct video file for upload. |
|---|---|
| What happens by default | The original file continues to upload in the background while the new file uploads at the same time. |
| What the user expects | The user expects the original upload to stop so that no extra internet bandwidth is wasted. |
| What can be improved | JavaScript cancels the Fetch request for the original file before the new file begins to upload. |
| Action | The user loses their internet connection part way through uploading the video. |
|---|---|
| What happens by default | The upload progress bar appears to be stuck on 50%. Eventually, the Fetch API experiences a timeout and the uploaded data is discarded. When internet connectivity returns, the user has to reupload their file. |
| What the user expects | The user expects to be notified when their file cannot be uploaded, and they expect their upload to automatically resume at 50% when they are back online. |
| What can be improved | The upload page informs the user of internet connectivity issues, and reassures the user that the upload will resume when internet connectivity has resumed. |
| Action | The video-sharing website cannot handle a filename with a space. Instead of «My Travels.mp4», it expects names such as «My_Travels.mp4» or «MyTravels.mp4». |
|---|---|
| What happens by default | The user must wait for the upload to completely finish. Once the file is uploaded, and the progress bar reads «100%», the progress bar displays the message: «Please try again.» |
| What the user expects | The user expects to be told of filename limitations before upload begins, or at least within the first second of uploading. |
| What can be improved | Ideally, the video-sharing service supports filenames with spaces. Alternative options are to notify the user of filename limitations before uploading begins. Or, the video-sharing service should reject the upload with a detailed error message. |
Handle errors with the Fetch API #
Note that the following code examples use top-level await (browser support) because this feature can simplify your code.
When the Fetch API throws errors #
This example uses a try/catch block statement to catch any errors thrown within the try block. For example, if the Fetch API cannot fetch the specified resource, then an error is thrown. Within a catch block like this, take care to provide a meaningful user experience. If a spinner, a common user interface that represents some sort of progress, is shown to the user, then you could take the following actions within a catch block:
- Remove the spinner from the page.
- Provide helpful messaging that explains what went wrong, and what options the user can take.
- Based on the available options, present a «Try again» button to the user.
- Behind the scenes, send the details of the error to your error-tracking service, or to the back-end. This action logs the error so it can be diagnosed at a later stage.
try {
  const response = await fetch('https://website');
} catch (error) {
  // TypeError: Failed to fetch
  console.log('There was an error', error);
}
At a later stage, while you diagnose the error that you logged, you can write a test case to catch such an error before your users are aware something is wrong. Depending on the error, the test could be a unit, integration, or acceptance test.
When the network status code represents an error #
This code example makes a request to an HTTP testing service that always responds with the HTTP status code 429 Too Many Requests. Interestingly, the response does not reach the catch block. A 404 status, amongst certain other status codes, does return a network error but instead resolves normally.
To check that the HTTP status code was successful, you can use any of the following options:
- Use the
Response.okproperty to determine whether the status code was in the range from200to299. - Use the
Response.statusproperty to determine whether the response was successful. - Use any other metadata, such as
Response.headers, to assess whether the response was successful.
let response;try {
response = await fetch('https://httpbin.org/status/429');
} catch (error) {
console.log('There was an error', error);
}
// Uses the 'optional chaining' operator
if (response?.ok) {
console.log('Use the response here!');
} else {
console.log(`HTTP Response Code: ${response?.status}`)
}
The best practice is to work with people in your organization and team to understand potential HTTP response status codes. Backend developers, developer operations, and service engineers can sometimes provide unique insight into possible edge cases that you might not anticipate.
When there is an error parsing the network response #
This code example demonstrates another type of error that can arise with parsing a response body. The Response interface offers convenient methods to parse different types of data, such as text or JSON. In the following code, a network request is made to an HTTP testing service that returns an HTML string as the response body. However, an attempt is made to parse the response body as JSON, throwing an error.
let json;try {
const response = await fetch('https://httpbin.org/html');
json = await response.json();
} catch (error) {
if (error instanceof SyntaxError) {
// Unexpected token < in JSON
console.log('There was a SyntaxError', error);
} else {
console.log('There was an error', error);
}
}
if (json) {
console.log('Use the JSON here!', json);
}
You must prepare your code to take in a variety of response formats, and verify that an unexpected response doesn’t break the web page for the user.
Consider the following scenario: You have a remote resource that returns a valid JSON response, and it is parsed successfully with the Response.json() method. It may happen that the service goes down. Once down, a 500 Internal Server Error is returned. If appropriate error-handling techniques are not used during the parsing of JSON, this could break the page for the user because an unhandled error is thrown.
When the network request must be canceled before it completes #
This code example uses an AbortController to cancel an in-flight request. An in-flight request is a network request that has started but has not completed.
The scenarios where you may need to cancel an in-flight request can vary, but it ultimately depends on your use case and environment. The following code demonstrates how to pass an AbortSignal to the Fetch API. The AbortSignal is attached to an AbortController, and the AbortController includes an abort() method, which signifies to the browser that the network request should be canceled.
const controller = new AbortController();
const signal = controller.signal;// Cancel the fetch request in 500ms
setTimeout(() => controller.abort(), 500);
try {
const url = 'https://httpbin.org/delay/1';
const response = await fetch(url, { signal });
console.log(response);
} catch (error) {
// DOMException: The user aborted a request.
console.log('Error: ', error)
}
Conclusion #
One important aspect of handling errors is to define the various parts that can go wrong. For each scenario, make sure you have an appropriate fallback in place for the user. With regards to a fetch request, ask yourself questions such as:
- What happens if the target server goes down?
- What happens if Fetch receives an unexpected response?
- What happens if the user’s internet connection fails?
Depending on the complexity of your web page, you can also sketch out a flowchart which describes the functionality and user interface for different scenarios.
Return to all articles

There are many ways to fetch data from an external API in React. But which one should you be using for your applications in 2021?
In this tutorial, we will be reviewing five of the most commonly used patterns to fetch data with React by making an HTTP request to a REST API.
We will not only cover how to fetch data, but how to best handle loading and error state upon fetching our data.
Let’s get started!
For all of these examples, we will be using an endpoint from the popular JSON Placeholder API, but you can use your own API that you have created (such as a Node API with Express) or any other public API.
Want Your Own Copy?
Click here to download the cheatsheet in PDF format (it takes 5 seconds).
It includes all of the essential information here as a convenient PDF guide.
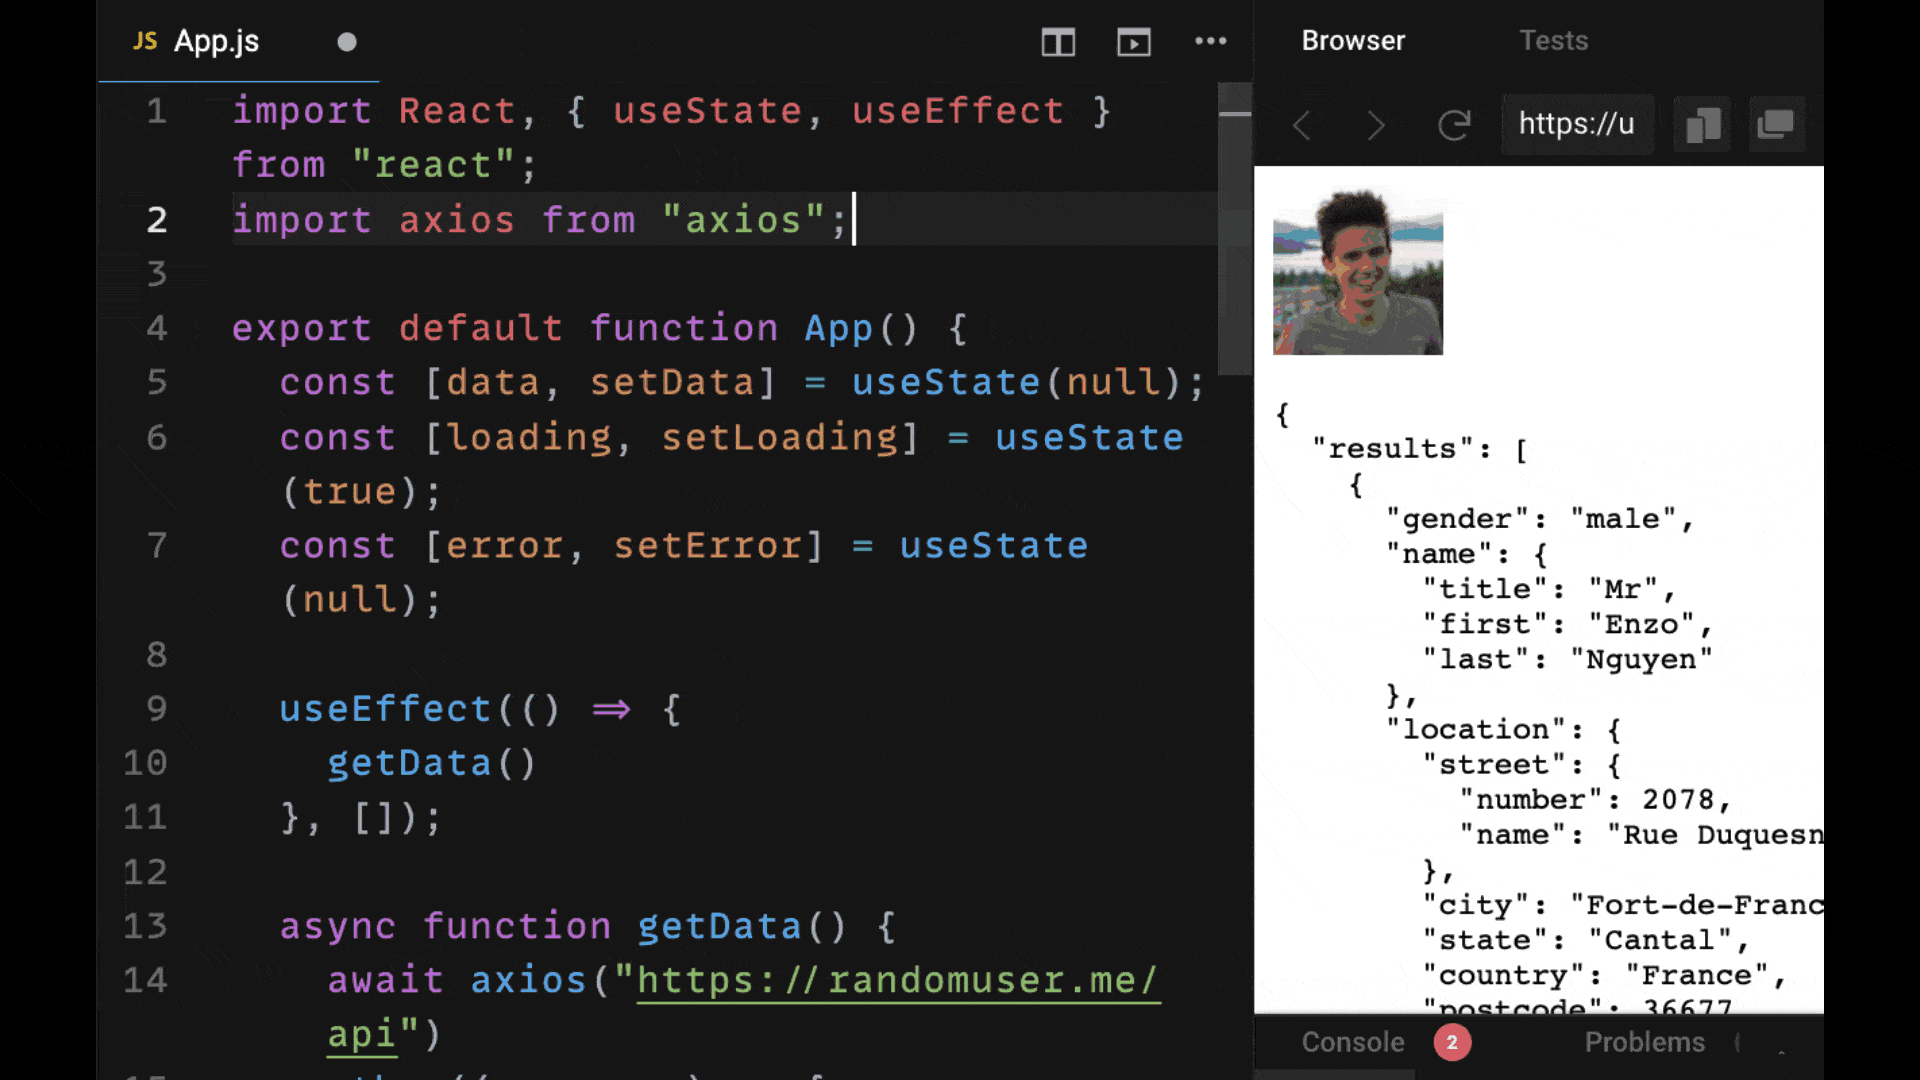
1. How to Fetch Data in React Using the Fetch API
The most accessible way to fetch data with React is using the Fetch API.
The Fetch API is a tool that’s built into most modern browsers on the window object (window.fetch) and enables us to make HTTP requests very easily using JavaScript promises.
To make a simple GET request with fetch we just need to include the URL endpoint to which we want to make our request. We want to make this request once our React component has mounted.
To do so, we make our request within the useEffect hook, and we make sure to provide an empty dependencies array as the second argument, so that our request is only made once (assuming it’s not dependent on any other data in our component).
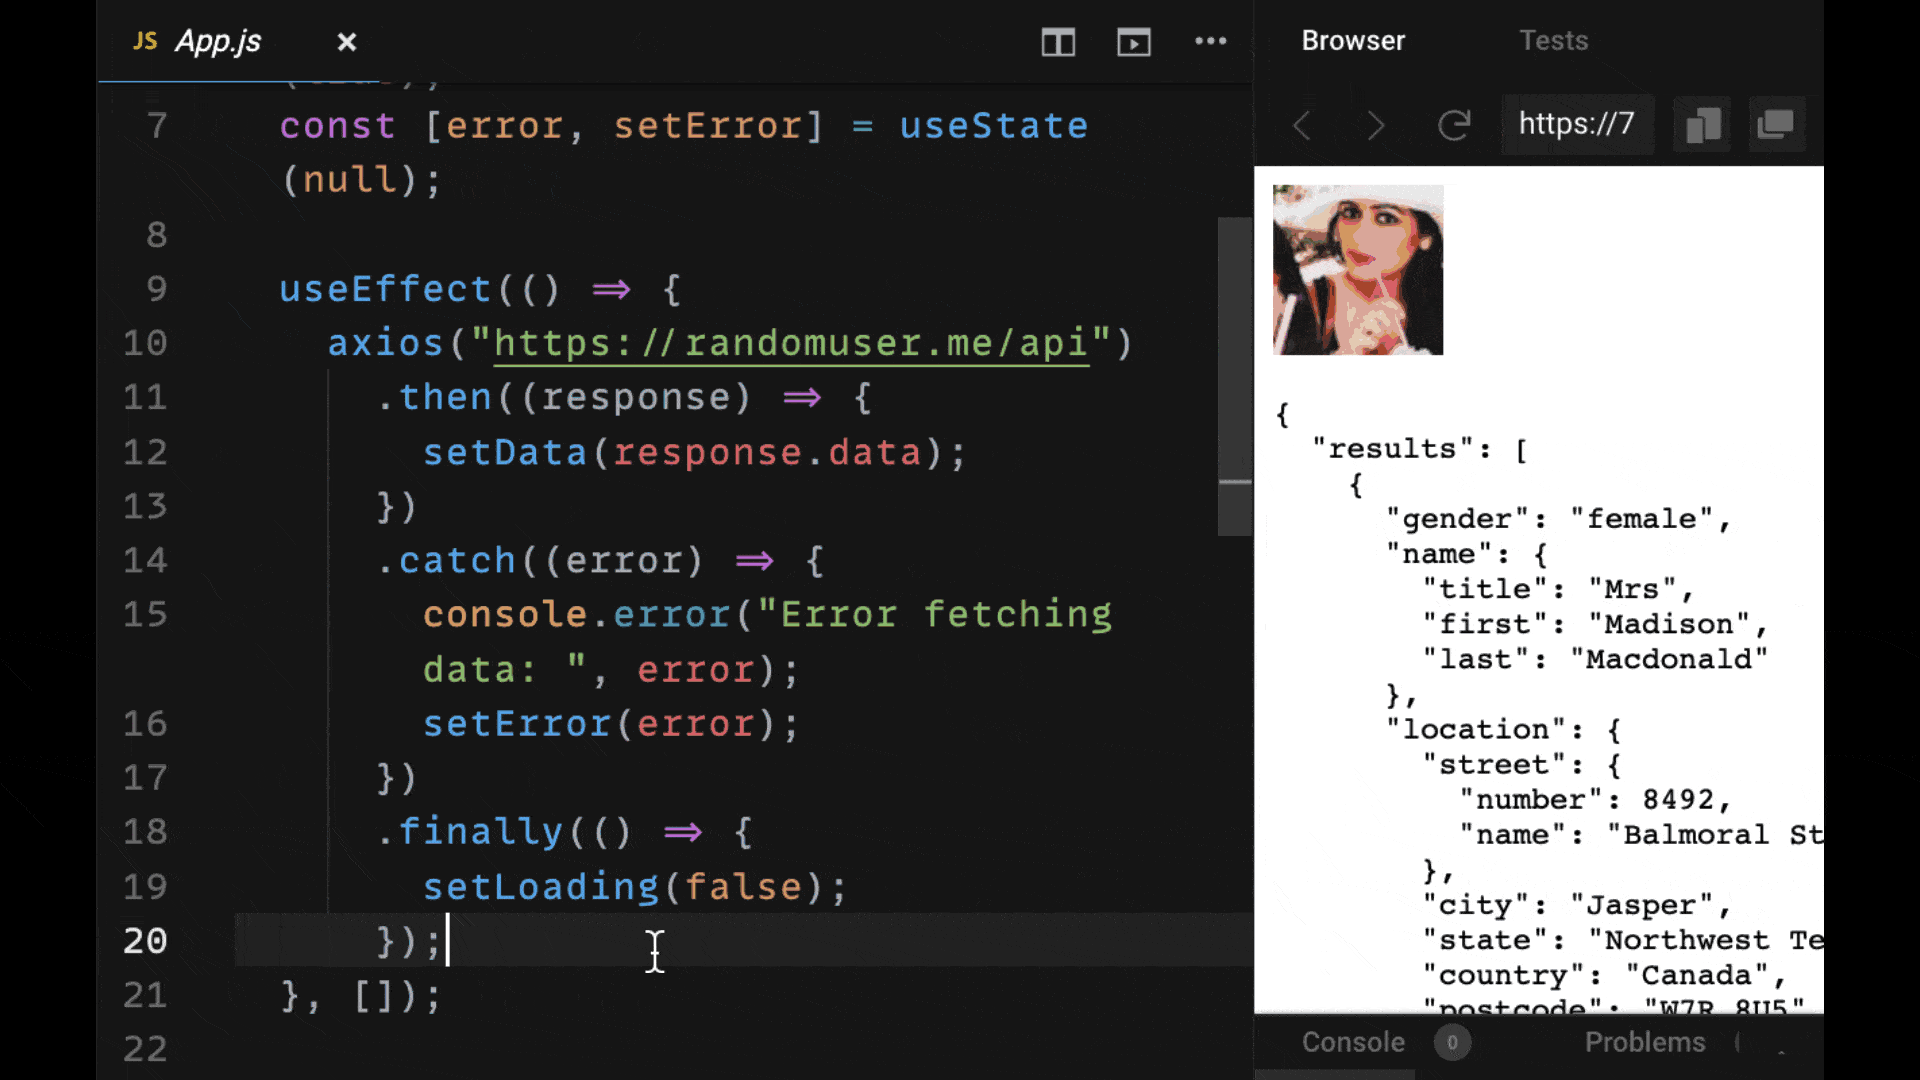
Within the first .then() callback, we check to see if the response was okay (response.ok). If so, we return our response to pass to the next, then call back as JSON data, since that’s the data we’ll get back from our random user API.
If it’s not an okay response, we assume there was an error making the request. Using fetch, we need to handle the errors ourselves, so we throw response as an error for it to handled by our catch callback.
Here in our example we are putting our error data in state with setError. If there’s an error we return the text «Error!».
Note that you can also display an error message from the error object we put in state by using
error.message.
We use the .finally() callback as function that is called when our promise has resolved successfully or not. In it, we set loading to false, so that we no longer see our loading text.
Instead we see either our data on the page if the request was made successfully, or that there was an error in making the request if not.
2. How to Fetch Data in React Using Axios
The second approach to making requests with React is to use the library axios.
In this example, we will simply revise our Fetch example by first installing axios using npm:
npm install axiosThen we will import it at the top of our component file.
What axios enables us to do is to use the exact same promise syntax as fetch – but instead of using our first then callback to manually determine whether the response is okay and throw an error, axios takes care of that for us.
Additionally, it enables us in that first callback to get the JSON data from response.data.
What’s convenient about using axios is that it has a much shorter syntax that allows us to cut down on our code and it includes a lot of tools and features which Fetch does not have in its API.
All of these reasons are why it has become the go-to HTTP library for React developers.

3. How to Fetch Data in React Using async / await syntax
In ES7, it became possible to resolve promises using the async / await syntax.
The benefit of this is that it enables us to remove our .then(), .catch(), and .finally() callbacks and simply get back our asynchronously resolved data as if we were writing synchronous code without promises altogether.
In other words, we do not have to rely on callbacks when we use async / await with React.
We have to be aware of the fact that when we use useEffect, the effect function (the first argument) cannot be made an async function.
If we take a look at the linting error that React gives us if we were using Create React App to build our project, we will be told that this function cannot be asynchronous to prevent race conditions.
As a result, instead of making that function async, we can simply create a separate async function in our component, which we can call synchronously. That is, without the await keyword before it.
In this example, we create an async function called getData. By calling it synchronously within useEffect, we can fetch our data like we would expect.
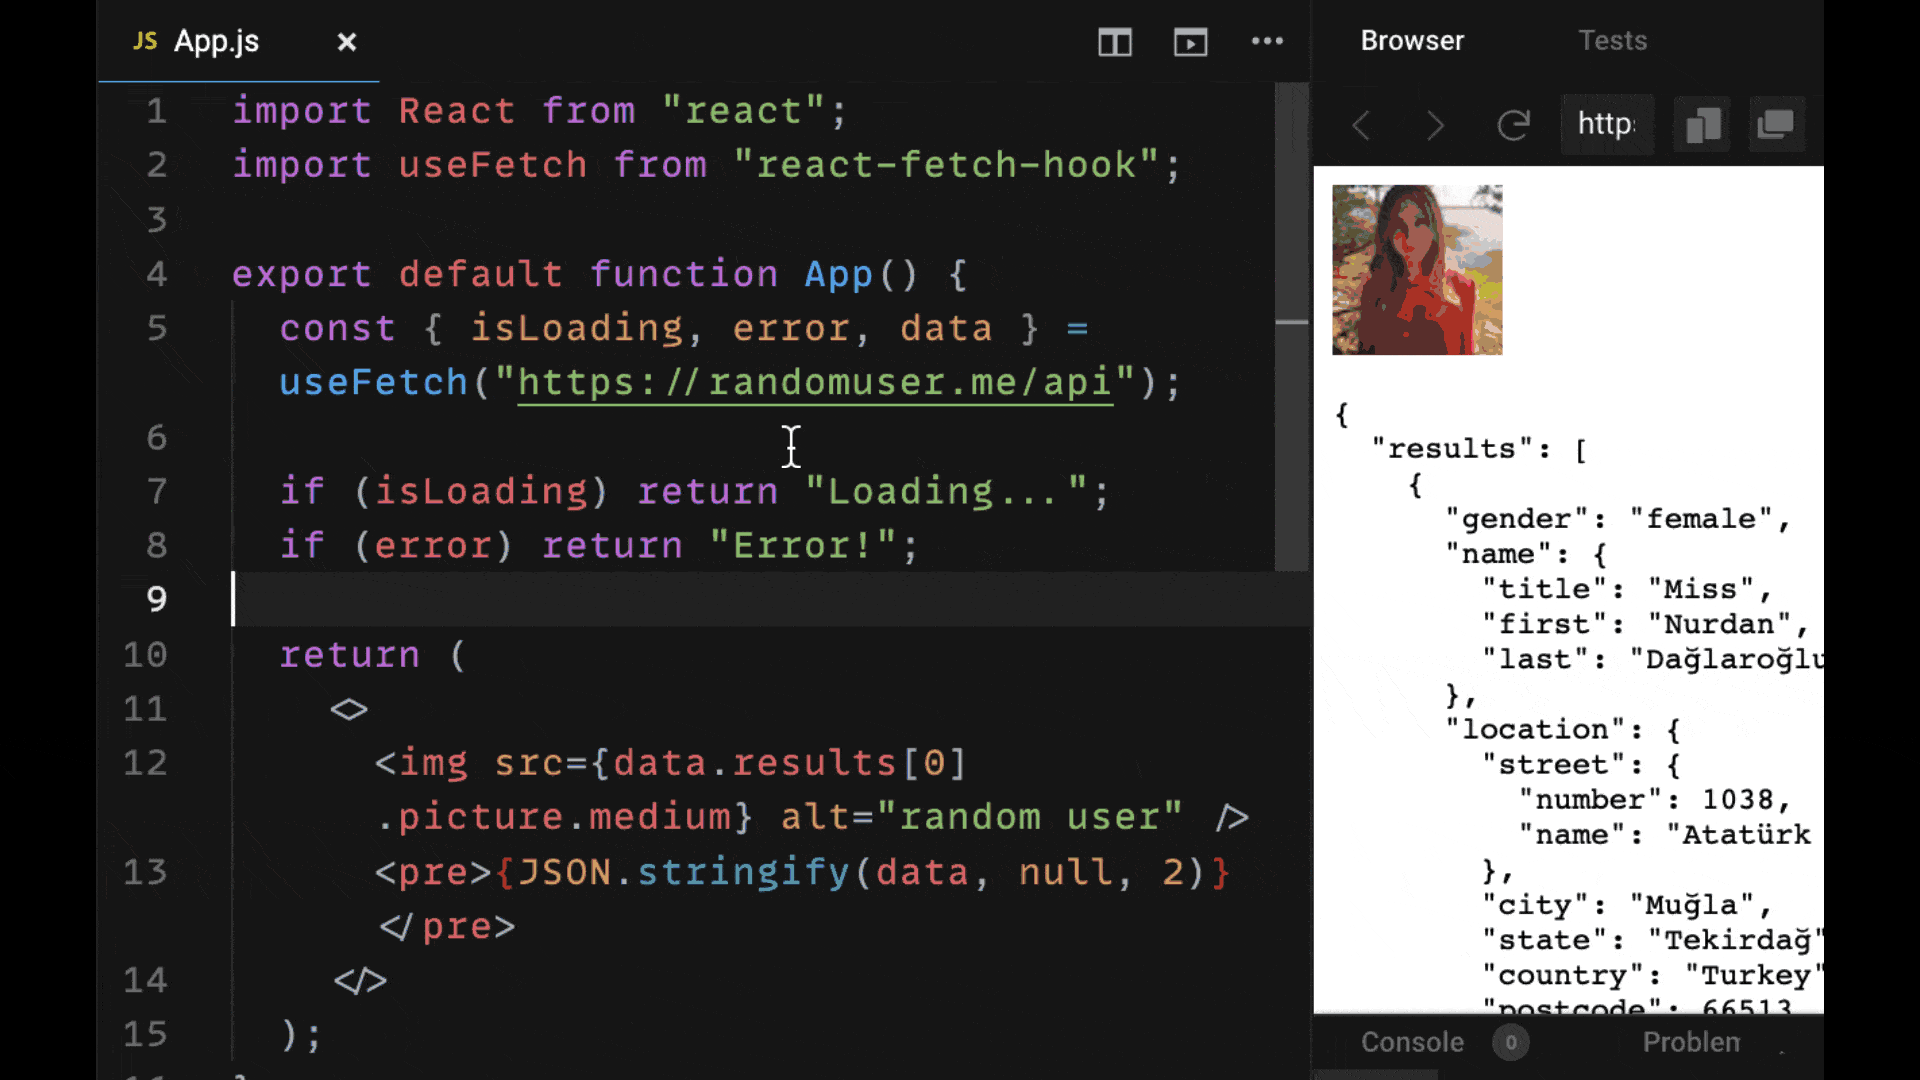
4. How to Fetch Data in React Using a Custom React Hook (useFetch)
Over time, you may realize that it gets a bit tedious and time-consuming to keep writing the useEffect hook with all of its boilerplate within every component in which you want to fetch data.
To cut down on our reused code, we can use a custom hook as a special abstraction, which we can write ourselves from a third party library (like we are here, using the library react-fetch-hook).
A custom hook that makes our HTTP request allows us to make our components much more concise. All we have to do is call our hook at the top of our component.
In this case, we get back all the data, loading, and error state that we need to be able to use the same structure for our component as before, but without having to useEffect. Plus, we no longer need to imperatively write how to resolve our promise from our GET request every time we want to make a request.
5. How to Fetch Data in React Using the React Query Library
Using custom hooks is a great approach to writing much more concise HTTP requests to get our data and all of its related state. But a library that really takes data fetching with hooks to the next level is React Query.
React Query not only allows us to use custom hooks that we can reuse across our components in a concise way, but it also gives us a great deal of state management tools to be able to control when, how, and how often our data is fetched.
In particular, React query gives us a cache, which you can see below through the React Query Devtools. This enables us to easily manage the requests that we have made according to key value that we specify for each request.
For the requests below, our query for our random user data is identified by the string ‘random-user’ (provided as the first argument to useQuery).
By referencing that key, we can do powerful things such as refetch, validate or reset our various queries.
If we rely on our custom hook solution or useEffect, we will refetch our data every single time our component is mounted. To do this is in most cases unnecessary. If our external state hasn’t changed, we should ideally not have to show loading state every time we display our component.
React Query improves our user experience greatly by trying to serve our data from its cache first and then update the data in the background to display changes if our API state has changed.
It also gives us an arsenal of powerful tools to better manage our requests according to how our data changes through our request.
For example, if our application allowed us to add a different user, we might want to refetch that query, once the user was added. If we knew the query was being changed very frequently, we might want to specify that it should be refreshed every minute or so. Or to be refreshed whenever the user focuses their window tab.
In short, React Query is the go-to solution for not only making requests in a concise manner, but also efficiently and effectively managing the data that is returned for our HTTP requests across our app’s components.
Want to keep this guide for future reference?
Click here to download the cheatsheet as a helpful PDF.
Here are 3 quick wins you get when you grab the downloadable version:
- You’ll get tons of copyable code snippets for easy reuse in your own projects.
- It is a great reference guide to strengthen your skills as a React developer and for job interviews.
- You can take, use, print, read, and re-read this guide literally anywhere that you like.
Learn to code for free. freeCodeCamp’s open source curriculum has helped more than 40,000 people get jobs as developers. Get started