You are not logged in. Please login or register.
Active topics Unanswered topics
Pages 1
You must login or register to post a reply
1 2020-06-08 16:27:30
- kartikpkr
- New member
- Offline
- Registered: 2020-06-08
- Posts: 3
Topic: Read timeout error
I face this issue while connecting the HC-05 module with my phone.
— Start connection
— Connecting to bluetooth device
— Bluetooth device connected
— Recieving GUI configuration
— Read timeout error
— Recieving GUI configuration, try 2
— Read timeout error
— Recieving GUI configuration, try 3
— Read timeout error
— Recieving GUI configuration, try 4
— Read timeout error
— Disconnect
After which a window pops up saying «Board Not Reply»
2 Reply by remotexy 2020-06-09 19:21:19

- remotexy
- Administrator
- Offline

- Registered: 2016-10-27
- Posts: 817
Re: Read timeout error
If you receive this specific error, check yourself on the list, going to the next point only after checking the previous one:
-your Arduino is not on;
-the required sketch has not been loaded into the Arduino;
-the RemoteXY library did not update, using old version of library;
-power is not supplied to the Bluetooth module, the power contacts may be reversed;
-RX and TX contacts of the Bluetooth module, or one of them are not connected to the controller, a bad contact;
-the RX and TX contacts of the Bluetooth module are not connected correctly, they may be interchanged, check the scheme (step 4);
-incorrect configuration settings or connection settings had been chosen before generating the source code;
-the data baud rate of HC-05 (06) module does not match which selected into the RemoteXY configuration (default 9600);
-the Bluetooth module is defective.
3 Reply by kartikpkr 2020-06-10 06:35:21
- kartikpkr
- New member
- Offline
- Registered: 2020-06-08
- Posts: 3
Re: Read timeout error
remotexy wrote:
If you receive this specific error, check yourself on the list, going to the next point only after checking the previous one:
-your Arduino is not on;
-the required sketch has not been loaded into the Arduino;
-the RemoteXY library did not update, using old version of library;
-power is not supplied to the Bluetooth module, the power contacts may be reversed;
-RX and TX contacts of the Bluetooth module, or one of them are not connected to the controller, a bad contact;
-the RX and TX contacts of the Bluetooth module are not connected correctly, they may be interchanged, check the scheme (step 4);
-incorrect configuration settings or connection settings had been chosen before generating the source code;
-the data baud rate of HC-05 (06) module does not match which selected into the RemoteXY configuration (default 9600);
-the Bluetooth module is defective.
From the above points all of them except the last one (Bluetooth module may be defective) was checked and still the problem persists.
To check the bluetooth module. I connected the module to a power source and shorted the RX and TX pin on the module Then i connected the module to my phone and using a terminal app I sent a single character and I got the return value as the same character, which is what I suppose should happen when the data is sent and recieved properly by the module.
I am just a beginner and new to this field, so the problem can be something really basic.
Thanks for the reply
Posts: 3
Pages 1
You must login or register to post a reply
Содержание
- unstable work: Read timeout error Board not reply
- Posts: 9
- 1 Topic by Karens4 2021-04-09 21:13:15
- Topic: unstable work: Read timeout error Board not reply
- 2 Reply by salsedine 2021-04-11 15:09:41
- Re: unstable work: Read timeout error Board not reply
- 3 Reply by Karens4 2021-04-11 16:38:37
- Re: unstable work: Read timeout error Board not reply
- 4 Reply by remotexy 2021-04-12 04:47:11
- Re: unstable work: Read timeout error Board not reply
- 5 Reply by salsedine 2021-04-12 08:53:49 (edited by salsedine 2021-04-12 11:25:13)
- Re: unstable work: Read timeout error Board not reply
- 6 Reply by remotexy 2021-04-13 06:58:23
- Re: unstable work: Read timeout error Board not reply
- 7 Reply by salsedine 2021-04-13 18:22:33
- Re: unstable work: Read timeout error Board not reply
- 8 Reply by Karens4 2021-04-14 20:41:23
- Re: unstable work: Read timeout error Board not reply
- 9 Reply by remotexy 2021-04-15 03:47:12
- Re: unstable work: Read timeout error Board not reply
- Posts: 9
- Read timeout error
- Posts: 3
- 1 Topic by kartikpkr 2020-06-08 16:27:30
- Topic: Read timeout error
- 2 Reply by remotexy 2020-06-09 19:21:19
- Re: Read timeout error
- 3 Reply by kartikpkr 2020-06-10 06:35:21
- Re: Read timeout error
- Read timeout error
- Posts: 3
- 1 Topic by Frjlmkam56! 2022-03-28 20:15:09
- Topic: Read timeout error
- 2 Reply by Frjlmkam56! 2022-03-31 21:54:23
- Re: Read timeout error
unstable work: Read timeout error Board not reply
RemoteXY community → Software and RemoteXY library → unstable work: Read timeout error Board not reply
You must login or register to post a reply
Posts: 9
1 Topic by Karens4 2021-04-09 21:13:15
- Karens4
- New member
- Offline
- Registered: 2020-12-17
- Posts: 3
Topic: unstable work: Read timeout error Board not reply


ru:
обнаружена нестабильная работа приложения, а именно после запуска esp, разных вариацый и через точку и через клиент локальной сети, через 2 — 7 мин происходит отключение приложения от esp.
так же esp перестает быть доступной в сети ,
но скетч работет на esp а RemoteXY pro(куплена на google play) ver.4.7.12 не может работать. ide FLProg 7.3.3 как мне быть ? помогите советом пожалуйста.
en:
unstable operation of the application was detected, namely after launching esp, different variants both through the point and through the client of the local network, after 2 — 7 minutes the application is disconnected from esp.
also esp is no longer available on the network,
but the sketch works on esp and RemoteXY pro (bought on google play) ver.4.7.12 cannot work. ide FLProg 7.3.3 what should I do? help with advice please.
2 Reply by salsedine 2021-04-11 15:09:41

- salsedine
- Member
- Offline

- Registered: 2020-04-19
- Posts: 29
Re: unstable work: Read timeout error Board not reply
It is similar to my issue.
Yesterday i opened my garage using the app 4.7.14 + library 3.1.5 and Arduino UNO+esp8266-01, for the first time (on wednesday i turned off and on my platform and i never connected until yesterday). I tried 2 ways:
The first, after enabling the Wifi and the geolocalization, i let the app to connect to my AP but it failed after 4 attempts.
The second way worked, i connect to the AP and after i opened the app and it connected for 2 minutes (time needed to open my garage door).
Today my AP is disappeared, but my Arduino runs (as i posted in another topic).
I cannot understand why my AP is off. I know that the AP is setted up with AT commands and there i should find an answer (esp will reply to my AT commands??). Another test i will perform is to disconnect from the AP instead of turn off Wifi and geoloc..
3 Reply by Karens4 2021-04-11 16:38:37
- Karens4
- New member
- Offline
- Registered: 2020-12-17
- Posts: 3
Re: unstable work: Read timeout error Board not reply
And the most offensive thing is that esp continues to work but the anamaalia with WiFi and the client and the point remain, I too like you gathered on the point but also the point disappeared. I’m stumped by this and decided to share the problem. By the way, the replacement of esp does not help, and with the food drawdowns no.
4 Reply by remotexy 2021-04-12 04:47:11
- remotexy
- Administrator
- Offline
- Registered: 2016-10-27
- Posts: 808
Re: unstable work: Read timeout error Board not reply
1. Use the last library 3.x.x https://remotexy.com/en/library/
2. Enable debug mode in the library on Serial. Add the following code to the beginning of the program.
What do you see in the terminal?
5 Reply by salsedine 2021-04-12 08:53:49 (edited by salsedine 2021-04-12 11:25:13)
- salsedine
- Member
- Offline
- Registered: 2020-04-19
- Posts: 29
Re: unstable work: Read timeout error Board not reply
1. Use the last library 3.x.x https://remotexy.com/en/library/
2. Enable debug mode in the library on Serial. Add the following code to the beginning of the program.
What do you see in the terminal?
Thanks for your reply, i’m just searching how enable the debug. On the UNO it is tricky to debug because the only serial port is used by my esp. i should enable a sw serial port. Anyway i’ll investigate
6 Reply by remotexy 2021-04-13 06:58:23
- remotexy
- Administrator
- Offline
- Registered: 2016-10-27
- Posts: 808
Re: unstable work: Read timeout error Board not reply
Try setting the default baud rate of ESP to 19200 using AT commands (AT+UART_DEF). Connect it to the soft serial. And you get a free hard serial for debug
7 Reply by salsedine 2021-04-13 18:22:33
- salsedine
- Member
- Offline
- Registered: 2020-04-19
- Posts: 29
Re: unstable work: Read timeout error Board not reply
Try setting the default baud rate of ESP to 19200 using AT commands (AT+UART_DEF). Connect it to the soft serial. And you get a free hard serial for debug
Yesterday and today i did 2 connections about 3 minutes and the AP is alive, no freeze no disconnections (not setted a debug yet) then tomorrow i’ll test again.
The only problem to debug is keeping a PC always connected to the UNO until something could happen after X days, i haven’t enough pins to connect a SD and save on it datas, https://i.postimg.cc/63ZZq42x/photo5884 … 061887.jpg, i’ll think something.
The only care i used is to disconnect from the AP before turn off wifi and geoloc. of the phone, i think it is not the definitive solution, the issue will pop up.
8 Reply by Karens4 2021-04-14 20:41:23
- Karens4
- New member
- Offline
- Registered: 2020-12-17
- Posts: 3
Re: unstable work: Read timeout error Board not reply
1. Use the last library 3.x.x https://remotexy.com/en/library/
2. Enable debug mode in the library on Serial. Add the following code to the beginning of the program.
What do you see in the terminal?
Верисю библиотеки обновлял. Но проблему решило удаление библиотеки neopixel.
Ещё вопрос . а в будущем можно будет к задатчику задавать приделы не 0-100 а например 0-255?
9 Reply by remotexy 2021-04-15 03:47:12
- remotexy
- Administrator
- Offline
- Registered: 2016-10-27
- Posts: 808
Re: unstable work: Read timeout error Board not reply
Ещё вопрос . а в будущем можно будет к задатчику задавать приделы не 0-100 а например 0-255?
Это планируется вместе с другими глобальными изменениями.
Однако я совсем не вижу в этом проблемы. Вы же можете просто умножить значение на 2.55 и получите от 0 до 255. Правда немного пострадает точность, но не думаю что бегунком можно так точно регулировать.
Posts: 9
You must login or register to post a reply
RemoteXY community → Software and RemoteXY library → unstable work: Read timeout error Board not reply
Источник
Read timeout error
You must login or register to post a reply
Posts: 3
1 Topic by kartikpkr 2020-06-08 16:27:30
- kartikpkr
- New member
- Offline
- Registered: 2020-06-08
- Posts: 3
Topic: Read timeout error
I face this issue while connecting the HC-05 module with my phone.
— Start connection
— Connecting to bluetooth device
— Bluetooth device connected
— Recieving GUI configuration
— Read timeout error
— Recieving GUI configuration, try 2
— Read timeout error
— Recieving GUI configuration, try 3
— Read timeout error
— Recieving GUI configuration, try 4
— Read timeout error
— Disconnect
After which a window pops up saying «Board Not Reply»
2 Reply by remotexy 2020-06-09 19:21:19
- remotexy
- Administrator
- Offline
- Registered: 2016-10-27
- Posts: 808
Re: Read timeout error
If you receive this specific error, check yourself on the list, going to the next point only after checking the previous one:
-your Arduino is not on;
-the required sketch has not been loaded into the Arduino;
-the RemoteXY library did not update, using old version of library;
-power is not supplied to the Bluetooth module, the power contacts may be reversed;
-RX and TX contacts of the Bluetooth module, or one of them are not connected to the controller, a bad contact;
-the RX and TX contacts of the Bluetooth module are not connected correctly, they may be interchanged, check the scheme (step 4);
-incorrect configuration settings or connection settings had been chosen before generating the source code;
-the data baud rate of HC-05 (06) module does not match which selected into the RemoteXY configuration (default 9600);
-the Bluetooth module is defective.
3 Reply by kartikpkr 2020-06-10 06:35:21
- kartikpkr
- New member
- Offline
- Registered: 2020-06-08
- Posts: 3
Re: Read timeout error
If you receive this specific error, check yourself on the list, going to the next point only after checking the previous one:
-your Arduino is not on;
-the required sketch has not been loaded into the Arduino;
-the RemoteXY library did not update, using old version of library;
-power is not supplied to the Bluetooth module, the power contacts may be reversed;
-RX and TX contacts of the Bluetooth module, or one of them are not connected to the controller, a bad contact;
-the RX and TX contacts of the Bluetooth module are not connected correctly, they may be interchanged, check the scheme (step 4);
-incorrect configuration settings or connection settings had been chosen before generating the source code;
-the data baud rate of HC-05 (06) module does not match which selected into the RemoteXY configuration (default 9600);
-the Bluetooth module is defective.
From the above points all of them except the last one (Bluetooth module may be defective) was checked and still the problem persists.
To check the bluetooth module. I connected the module to a power source and shorted the RX and TX pin on the module Then i connected the module to my phone and using a terminal app I sent a single character and I got the return value as the same character, which is what I suppose should happen when the data is sent and recieved properly by the module.
I am just a beginner and new to this field, so the problem can be something really basic.
Источник
Read timeout error
You must login or register to post a reply
Posts: 3
1 Topic by Frjlmkam56! 2022-03-28 20:15:09
- Frjlmkam56!
- New member
- Offline
- From: USA
- Registered: 2022-01-26
- Posts: 4
Topic: Read timeout error
I am working on a stepper motor control program with RemoteXY using Visuino. If I use on (2) buttons I can connect to Bluetooth BLE on a ESP32 developer board. If I use (3) buttons I can still connect to my smartphone app. If I use (4) buttons I receive a Read timeout error when trying to connect Bluetooth BLE. My stepper program is written in Visuino, and was working. Just recently it has stopped working since the last Remotexy library update. Any help would be appreciated.
// RemoteXY select connection mode and include library
#define REMOTEXY_MODE__ESP32CORE_BLE
#include
// RemoteXY connection settings
#define REMOTEXY_BLUETOOTH_NAME «RemoteXY»
// RemoteXY configurate
#pragma pack(push, 1)
uint8_t RemoteXY_CONF[] = // 58 bytes
< 255,4,0,0,0,51,0,16,24,1,1,0,23,57,19,19,26,10,68,87,
78,0,1,0,3,34,19,19,26,10,76,70,84,0,1,0,23,13,19,19,
26,10,85,80,0,1,0,42,34,19,19,26,10,82,71,72,84,0 >;
// this structure defines all the variables and events of your control interface
struct <
// input variables
uint8_t UP_1; // =1 if button pressed, else =0
uint8_t LFT_1; // =1 if button pressed, else =0
uint8_t UP_1; // =1 if button pressed, else =0
uint8_t UP_1; // =1 if button pressed, else =0
// other variable
uint8_t connect_flag; // =1 if wire connected, else =0
void setup()
<
RemoteXY_Init ();
2 Reply by Frjlmkam56! 2022-03-31 21:54:23
- Frjlmkam56!
- New member
- Offline
- From: USA
- Registered: 2022-01-26
- Posts: 4
Re: Read timeout error
// Shared Component Member Variables
namespace ComponentVariables
<
class
<
public:
bool Value1 : 1;
bool Value2 : 1;
uint32_t Value3 : 4;
bool Value4 : 1;
bool Value5 : 1;
bool Value6 : 1;
bool Value7 : 1;
bool Value8 : 1;
bool Value9 : 1;
bool Value10 : 1;
bool Value11 : 1;
bool Value12 : 1;
bool Value13 : 1;
bool Value14 : 1;
bool Value15 : 1;
bool Value16 : 1;
bool Value17 : 1;
bool Value18 : 1;
uint32_t Value19 : 4;
int32_t Value20 : 1;
bool Value21 : 1;
bool Value22 : 1;
bool Value23 : 1;
bool Value24 : 1;
bool Value25 : 1;
bool Value26 : 1;
bool Value27 : 1;
bool Value28 : 1;
class Variable1
<
public:
inline static bool GetValue() < return BitFields.Value1; >
inline static void SetValue( bool AValue )
class Variable2
<
public:
inline static bool GetValue() < return BitFields.Value2; >
inline static void SetValue( bool AValue )
class Variable3
<
public:
inline static uint32_t GetValue() < return BitFields.Value3; >
inline static void SetValue( uint32_t AValue )
class Variable4
<
public:
inline static bool GetValue() < return BitFields.Value4; >
inline static void SetValue( bool AValue )
class Variable5
<
public:
inline static bool GetValue() < return BitFields.Value5; >
inline static void SetValue( bool AValue )
class Variable6
<
public:
inline static bool GetValue() < return BitFields.Value6; >
inline static void SetValue( bool AValue )
class Variable7
<
public:
inline static bool GetValue() < return BitFields.Value7; >
inline static void SetValue( bool AValue )
class Variable8
<
public:
inline static bool GetValue() < return BitFields.Value8; >
inline static void SetValue( bool AValue )
class Variable9
<
public:
inline static bool GetValue() < return BitFields.Value9; >
inline static void SetValue( bool AValue )
class Variable10
<
public:
inline static bool GetValue() < return BitFields.Value10; >
inline static void SetValue( bool AValue )
class Variable11
<
public:
inline static bool GetValue() < return BitFields.Value11; >
inline static void SetValue( bool AValue )
class Variable12
<
public:
inline static bool GetValue() < return BitFields.Value12; >
inline static void SetValue( bool AValue )
class Variable13
<
public:
inline static bool GetValue() < return BitFields.Value13; >
inline static void SetValue( bool AValue )
class Variable14
<
public:
inline static bool GetValue() < return BitFields.Value14; >
inline static void SetValue( bool AValue )
class Variable15
<
public:
inline static bool GetValue() < return BitFields.Value15; >
inline static void SetValue( bool AValue )
class Variable16
<
public:
inline static bool GetValue() < return BitFields.Value16; >
inline static void SetValue( bool AValue )
class Variable17
<
public:
inline static bool GetValue() < return BitFields.Value17; >
inline static void SetValue( bool AValue )
class Variable18
<
public:
inline static bool GetValue() < return BitFields.Value18; >
inline static void SetValue( bool AValue )
class Variable19
<
public:
inline static uint32_t GetValue() < return BitFields.Value19; >
inline static void SetValue( uint32_t AValue )
class Variable20
<
public:
inline static int32_t GetValue() < return BitFields.Value20; >
inline static void SetValue( int32_t AValue )
class Variable21
<
public:
inline static bool GetValue() < return BitFields.Value21; >
inline static void SetValue( bool AValue )
class Variable22
<
public:
inline static bool GetValue() < return BitFields.Value22; >
inline static void SetValue( bool AValue )
class Variable23
<
public:
inline static bool GetValue() < return BitFields.Value23; >
inline static void SetValue( bool AValue )
class Variable24
<
public:
inline static bool GetValue() < return BitFields.Value24; >
inline static void SetValue( bool AValue )
class Variable25
<
public:
inline static bool GetValue() < return BitFields.Value25; >
inline static void SetValue( bool AValue )
class Variable26
<
public:
inline static bool GetValue() < return BitFields.Value26; >
inline static void SetValue( bool AValue )
class Variable27
<
public:
inline static bool GetValue() < return BitFields.Value27; >
inline static void SetValue( bool AValue )
class Variable28
<
public:
inline static bool GetValue() < return BitFields.Value28; >
inline static void SetValue( bool AValue )
// Arduino Constant Declarations
namespace VisuinoConstants
<
class FloatValue0
<
public:
inline static constexpr float GetValue() < return 80; >
>;
class FloatValue1
<
public:
inline static constexpr float GetValue() < return 250; >
>;
class TextValue1
<
public:
inline static constexpr const char *GetValue() < return «»; >
>;
class TextValue0
<
public:
inline static constexpr const char *GetValue() < return «GARAGE1»; >
>;
// Pin Call Declarations
namespace PinCalls
<
class PinCallerReceive0
<
public:
void Notify( void *_Data );
>;
class PinCallerReceive1
<
public:
void Notify( void *_Data );
>;
class PinCallerReceive2
<
public:
void Notify( void *_Data );
>;
class PinCallerReceive3
<
public:
void Notify( void *_Data );
>;
class PinCallerReceive4
<
public:
void Notify( void *_Data );
>;
class PinCallerReceive5
<
public:
void Notify( void *_Data );
>;
class PinCallerReceive6
<
public:
void Notify( void *_Data );
>;
class PinCallerReceive7
<
public:
void Notify( void *_Data );
>;
class PinCallerReceive8
<
public:
void Notify( void *_Data );
>;
class PinCallerReceive9
<
public:
void Notify( void *_Data );
namespace CallChains
<
class CheckPopulated1
<
public:
inline static uint32_t Count() < return 5; >
static void Call( bool & AIsPopulated );
>;
class GetSize1
<
public:
inline static uint32_t Count() < return 5; >
static void Call( int32_t AIndex, bool & AAlligned, int & AResult );
>;
class GetValue1
<
public:
inline static uint32_t Count() < return 0; >
static void Call( int32_t AIndex, uint8_t & AValue );
>;
class ApplyValues1
<
public:
inline static uint32_t Count() < return 0; >
static void Call( uint8_t * AValue );
// Arduino Board Declarations
namespace BoardDeclarations
<
namespace Types
<
typedef Mitov::SerialPort , // AfterSendingDelay
Mitov::ConstantProperty , // DataBits
Mitov::ConstantProperty , // Enabled
Mitov::ConstantProperty , // FEndTime
Mitov::ConstantProperty , // FSending
Mitov::GenericPin_NoImplementation , // OutputPin
Mitov::ConstantProperty , // Parity
Mitov::DigitalPin_NoImplementation , // SendingOutputPin
Mitov::ConstantProperty , // Speed
Mitov::ConstantProperty // StopBits
> SerialPort0;
> // Types
namespace Instances
<
Types::SerialPort0 SerialPort0;
> // Instances
namespace Types
<
typedef Mitov::ArduinoSerialInput_Binary > SerialPort0_Input_IOWByteStream_1;
> // Types
namespace Instances
<
Types::SerialPort0_Input_IOWByteStream_1 SerialPort0_Input_IOWByteStream_1;
> // Instances
namespace Types
<
typedef Mitov::ArduinoDigitalChannel , // InitialValue
Mitov::ConstantProperty , // IsAnalog
Mitov::ConstantProperty , // IsCombinedInOut
Mitov::ConstantProperty , // IsOpenDrain
Mitov::ConstantProperty , // IsOutput
Mitov::ConstantProperty , // IsPullDown
Mitov::ConstantProperty , // IsPullUp
Mitov::ConstantProperty , // IsRawInput
Mitov::DigitalPin_EmbeddedPinImplementation , // OutputPin
14 // PIN
> ArduinoDigitalChannel_14;
> // Types
namespace Instances
<
Types::ArduinoDigitalChannel_14 ArduinoDigitalChannel_14;
> // Instances
namespace Types
<
typedef Mitov::DigitalInput , // IsPullDown
Mitov::ConstantProperty , // IsPullUp
Mitov::DigitalPin_EmbeddedPinImplementation , // OutputPin
14 // PIN
> ArduinoAnalogInputChannel_AsDigital_14;
> // Types
namespace Instances
<
Types::ArduinoAnalogInputChannel_AsDigital_14 ArduinoAnalogInputChannel_AsDigital_14;
> // Instances
namespace Types
<
typedef Mitov::ESP32BluetoothLE , // ConnectedCountOutputPin
Mitov::ConstantPropertyString , // DeviceName
Mitov::TextPin_NoImplementation , // MACAddressOutputPin
Mitov::ConstantProperty , // MaximumTransmissionUnit
Mitov::ConstantProperty , // Security
Mitov::ESP32ServerImp, // Server
Mitov::ConstantProperty // TransmitPower
> TArduinoESP32BluetoothLEModule1;
> // Types
namespace Instances
<
Types::TArduinoESP32BluetoothLEModule1 TArduinoESP32BluetoothLEModule1;
> // Instances
namespace Types
<
typedef Mitov::ESP32BluetoothLEServer // Enabled
> TArduinoESP32BluetoothLEServer1;
> // Types
namespace Instances
<
Types::TArduinoESP32BluetoothLEServer1 TArduinoESP32BluetoothLEServer1;
> // Instances
namespace Declarations
<
namespace Types
<
typedef Mitov::ArduinoBluetoothLEUartService , // BufferSize
Mitov::ConstantProperty , // Enabled
Mitov::GenericPin_EmbeddedPinImplementation // OutputPin
> TArduinoBluetoothUartService1;
> // Types
namespace Instances
<
Types::TArduinoBluetoothUartService1 TArduinoBluetoothUartService1;
> // Instances
namespace Types
<
typedef Mitov::StepperMotor4Wire , // Enabled
Mitov::TypedVariable , // FStep
Mitov::ConstantProperty , // HalfStep
Mitov::DigitalPin_DirectBoardPinImplementation , // OutputPins_0
Mitov::DigitalPin_DirectBoardPinImplementation , // OutputPins_1
Mitov::DigitalPin_DirectBoardPinImplementation , // OutputPins_2
Mitov::DigitalPin_DirectBoardPinImplementation , // OutputPins_3
Mitov::TypedVariableValue , // Reversed
Mitov::StepperMotorSpeed, // Speed_Implementation
Mitov::ConstantPropertyFloat // StepsPerSecond
> TILT;
> // Types
namespace Instances
<
Types::TILT TILT;
> // Instances
namespace Types
<
typedef Mitov::Packet // Enabled
> >, // Checksum
Mitov::EmbeddedCallChain , // Elements_CheckPopulated
Mitov::EmbeddedCallChain , // Elements_Expand
Mitov::EmbeddedCallChain , // Elements_GetData
Mitov::EmbeddedCallChain , // Elements_GetSize
Mitov::TypedVariable , // FModified
Mitov::TypedVariable , // FNeedsNewSize
Mitov::TypedVariable , // FRefreshed
Mitov::NestedProperty , // Bytes
Mitov::EmbeddedCallChain , // Bytes_ApplyValues
Mitov::EmbeddedCallChain // Bytes_GetValue
> >, // HeadMarker
Mitov::ConstantProperty , // OnlyModified
Mitov::TypedPin_EmbeddedPinImplementation > // OutputPin
> Packet1;
> // Types
namespace Instances
<
Types::Packet1 Packet1;
> // Instances
namespace Types
<
typedef Mitov::PacketDigitalBinaryElement , // FBoolValue
Mitov::TypedVariable // FPopulated
> TArduinoDigitalBinaryPacketElement1;
> // Types
namespace Instances
<
Types::TArduinoDigitalBinaryPacketElement1 TArduinoDigitalBinaryPacketElement1 = Types::TArduinoDigitalBinaryPacketElement1( false );
> // Instances
namespace Types
<
typedef Mitov::PacketDigitalBinaryElement , // FBoolValue
Mitov::TypedVariable // FPopulated
> TArduinoDigitalBinaryPacketElement2;
> // Types
namespace Instances
<
Types::TArduinoDigitalBinaryPacketElement2 TArduinoDigitalBinaryPacketElement2 = Types::TArduinoDigitalBinaryPacketElement2( false );
> // Instances
namespace Types
<
typedef Mitov::PacketDigitalBinaryElement , // FBoolValue
Mitov::TypedVariable // FPopulated
> TArduinoDigitalBinaryPacketElement3;
> // Types
namespace Instances
<
Types::TArduinoDigitalBinaryPacketElement3 TArduinoDigitalBinaryPacketElement3 = Types::TArduinoDigitalBinaryPacketElement3( false );
> // Instances
namespace Types
<
typedef Mitov::PacketDigitalBinaryElement , // FBoolValue
Mitov::TypedVariable // FPopulated
> TArduinoDigitalBinaryPacketElement4;
> // Types
namespace Instances
<
Types::TArduinoDigitalBinaryPacketElement4 TArduinoDigitalBinaryPacketElement4 = Types::TArduinoDigitalBinaryPacketElement4( false );
> // Instances
namespace Types
<
typedef Mitov::PacketDigitalBinaryElement , // FBoolValue
Mitov::TypedVariable // FPopulated
> TArduinoDigitalBinaryPacketElement5;
> // Types
namespace Instances
<
Types::TArduinoDigitalBinaryPacketElement5 TArduinoDigitalBinaryPacketElement5 = Types::TArduinoDigitalBinaryPacketElement5( false );
> // Instances
namespace Types
<
typedef Mitov::StepperMotor4Wire , // Enabled
Mitov::TypedVariable , // FStep
Mitov::ConstantProperty , // HalfStep
Mitov::DigitalPin_DirectBoardPinImplementation , // OutputPins_0
Mitov::DigitalPin_DirectBoardPinImplementation , // OutputPins_1
Mitov::DigitalPin_DirectBoardPinImplementation , // OutputPins_2
Mitov::DigitalPin_DirectBoardPinImplementation , // OutputPins_3
Mitov::TypedVariableValue , // Reversed
Mitov::StepperMotorSpeed, // Speed_Implementation
Mitov::ConstantPropertyFloat // StepsPerSecond
> PAN;
> // Types
namespace Instances
<
Types::PAN PAN;
> // Instances
namespace RemoteXY_Declarations
<
namespace _o_RemoteXY1
<
#pragma pack(push, 1)
// RemoteXY configurate
static uint8_t const PROGMEM Config[] =
<
15, 25, 1, 1, 0, 23, 64, 19, 19, 2, 31, 68, 87, 78, 0, 1, 0, 23, 19, 19, 19, 2, 31, 85, 80, 0, 1, 0, 1, 40, 19, 19, 2, 31, 76, 69, 70, 84, 0, 1, 0, 43, 40, 19, 19, 2, 31, 82, 73, 71, 72, 84, 0
>;
// this structure defines all the variables of your control interface
struct
<
// input variable
uint8_t switch_0; // =1 if switch ON and =0 if OFF
uint8_t switch_1; // =1 if switch ON and =0 if OFF
uint8_t switch_2; // =1 if switch ON and =0 if OFF
uint8_t switch_3; // =1 if switch ON and =0 if OFF
// output variable
>
RemoteXY;
class Access
<
public:
inline static uint8_t *GetConfig()
<
return (uint8_t*)Config;
>
inline static uint8_t *GetData()
<
return (uint8_t*)&RemoteXY;
>
namespace Types
<
typedef Mitov::MitovRemoteXY // FProtocolConnectedFlags
> RemoteXY1;
> // Types
namespace Instances
<
Types::RemoteXY1 RemoteXY1;
> // Instances
namespace Types
<
typedef Mitov::MitovRemoteXYDigitalOutput , // InitialValue
Mitov::DigitalPin_EmbeddedPinImplementation , // OutputPin
Mitov::ConstantProperty // UseInitialValueOnDisconnect
> TArduinoRemoteXYButtonElement1;
> // Types
namespace Instances
<
Types::TArduinoRemoteXYButtonElement1 TArduinoRemoteXYButtonElement1;
> // Instances
namespace Types
<
typedef Mitov::MitovRemoteXYDigitalOutput , // InitialValue
Mitov::DigitalPin_EmbeddedPinImplementation , // OutputPin
Mitov::ConstantProperty // UseInitialValueOnDisconnect
> TArduinoRemoteXYButtonElement2;
> // Types
namespace Instances
<
Types::TArduinoRemoteXYButtonElement2 TArduinoRemoteXYButtonElement2;
> // Instances
namespace Types
<
typedef Mitov::MitovRemoteXYDigitalOutput , // InitialValue
Mitov::DigitalPin_EmbeddedPinImplementation , // OutputPin
Mitov::ConstantProperty // UseInitialValueOnDisconnect
> TArduinoRemoteXYButtonElement3;
> // Types
namespace Instances
<
Types::TArduinoRemoteXYButtonElement3 TArduinoRemoteXYButtonElement3;
> // Instances
namespace Types
<
typedef Mitov::MitovRemoteXYDigitalOutput , // InitialValue
Mitov::DigitalPin_EmbeddedPinImplementation , // OutputPin
Mitov::ConstantProperty // UseInitialValueOnDisconnect
> TArduinoRemoteXYButtonElement4;
> // Types
namespace Instances
<
Types::TArduinoRemoteXYButtonElement4 TArduinoRemoteXYButtonElement4;
> // Instances
namespace Types
<
typedef Mitov::MitovRemoteXYProtpcol , // 0_INTERFACE
Declarations::Types::RemoteXY1, // 0_TYPE_OWNER
Declarations::Instances::RemoteXY1, // 1_NAME_OWNER
Mitov::DigitalPin_NoImplementation , // ConnectedOutputPin
0, // INDEX
Mitov::ConstantPropertyString // Password
> TArduinoRemoteXYProtocolSerial1;
> // Types
namespace Instances
<
Types::TArduinoRemoteXYProtocolSerial1 TArduinoRemoteXYProtocolSerial1;
> // Instances
namespace Types
<
typedef Mitov::BooleanOperation , // FModified
Mitov::DigitalPin_EmbeddedPinImplementation_ChangeOnly > // OutputPin
> Or1;
> // Types
namespace Instances
<
Types::Or1 Or1;
> // Instances
namespace Types
<
typedef Mitov::BooleanOperation , // FModified
Mitov::DigitalPin_EmbeddedPinImplementation_ChangeOnly > // OutputPin
> Or2;
> // Types
namespace Instances
<
Types::Or2 Or2;
> // Instances
namespace Types
<
typedef Mitov::BooleanOperation , // FModified
Mitov::DigitalPin_EmbeddedPinImplementation_ChangeOnly > // OutputPin
> Or3;
> // Types
namespace Instances
<
Types::Or3 Or3;
> // Instances
namespace TypeConverters
<
Mitov::Convert_BinaryToClock > Converter0;
Mitov::Convert_BinaryToClock > Converter1;
> // TypeConverters
namespace CallChains
<
void CheckPopulated1::Call( bool & AIsPopulated )
<
Declarations::Instances::TArduinoDigitalBinaryPacketElement1.CheckPopulated( AIsPopulated );
Declarations::Instances::TArduinoDigitalBinaryPacketElement2.CheckPopulated( AIsPopulated );
Declarations::Instances::TArduinoDigitalBinaryPacketElement3.CheckPopulated( AIsPopulated );
Declarations::Instances::TArduinoDigitalBinaryPacketElement4.CheckPopulated( AIsPopulated );
Declarations::Instances::TArduinoDigitalBinaryPacketElement5.CheckPopulated( AIsPopulated );
>
void GetData1::Call( uint8_t *& ADataStart, uint32_t & ADataIndex, uint8_t & AOffset )
<
Declarations::Instances::TArduinoDigitalBinaryPacketElement1.GetData( ADataStart, ADataIndex, AOffset );
Declarations::Instances::TArduinoDigitalBinaryPacketElement2.GetData( ADataStart, ADataIndex, AOffset );
Declarations::Instances::TArduinoDigitalBinaryPacketElement3.GetData( ADataStart, ADataIndex, AOffset );
Declarations::Instances::TArduinoDigitalBinaryPacketElement4.GetData( ADataStart, ADataIndex, AOffset );
Declarations::Instances::TArduinoDigitalBinaryPacketElement5.GetData( ADataStart, ADataIndex, AOffset );
>
void GetSize1::Call( int32_t AIndex, bool & AAlligned, int & AResult )
<
switch( AIndex )
<
case 0: Declarations::Instances::TArduinoDigitalBinaryPacketElement1.GetSize( AAlligned, AResult ); break;
case 1: Declarations::Instances::TArduinoDigitalBinaryPacketElement2.GetSize( AAlligned, AResult ); break;
case 2: Declarations::Instances::TArduinoDigitalBinaryPacketElement3.GetSize( AAlligned, AResult ); break;
case 3: Declarations::Instances::TArduinoDigitalBinaryPacketElement4.GetSize( AAlligned, AResult ); break;
case 4: Declarations::Instances::TArduinoDigitalBinaryPacketElement5.GetSize( AAlligned, AResult ); break;
>
>
void Expand1::Call( int32_t AIndex, uint8_t * const & AInBuffer, uint8_t * const & AOutBuffer, int & ASize, bool & AResult )
<
switch( AIndex )
<
case 0: Declarations::Instances::TArduinoDigitalBinaryPacketElement1.Expand( AInBuffer, AOutBuffer, ASize, AResult ); break;
case 1: Declarations::Instances::TArduinoDigitalBinaryPacketElement2.Expand( AInBuffer, AOutBuffer, ASize, AResult ); break;
case 2: Declarations::Instances::TArduinoDigitalBinaryPacketElement3.Expand( AInBuffer, AOutBuffer, ASize, AResult ); break;
case 3: Declarations::Instances::TArduinoDigitalBinaryPacketElement4.Expand( AInBuffer, AOutBuffer, ASize, AResult ); break;
case 4: Declarations::Instances::TArduinoDigitalBinaryPacketElement5.Expand( AInBuffer, AOutBuffer, ASize, AResult ); break;
>
>
void GetValue1::Call( int32_t AIndex, uint8_t & AValue )
<
>
void ApplyValues1::Call( uint8_t * AValue )
<
>
// Pin Call Declarations
namespace PinCalls
<
void PinCallerConverterReceive1( void *_Data );
void PinCallerConverterReceive2( void *_Data );
> // PinCalls
// Pin Call Implementations
namespace PinCalls
<
void PinCallerReceive1::Notify( void *_Data )
<
Declarations::Instances::TArduinoRemoteXYProtocolSerial1._DirectPinReceive( _Data );
>
void PinCallerReceive0::Notify( void *_Data )
<
Declarations::Instances::TArduinoDigitalBinaryPacketElement5.InputPin_o_Receive( _Data );
>
void PinCallerReceive2::Notify( void *_Data )
<
BoardDeclarations::Instances::SerialPort0_Input_IOWByteStream_1.InputPin_o_Receive( _Data );
>
void PinCallerReceive3::Notify( void *_Data )
<
Declarations::Instances::TArduinoDigitalBinaryPacketElement1.InputPin_o_Receive( _Data );
TypeConverters::Converter0.Convert( _Data, PinCallerConverterReceive1 );
Declarations::Instances::Or1.InputPins_o_Receive( 0, _Data );
Declarations::Instances::Or3.InputPins_o_Receive( 0, _Data );
>
void PinCallerConverterReceive1( void *_Data )
<
Declarations::Instances::TILT.StepInputPin_o_Receive( _Data );
>
void PinCallerReceive4::Notify( void *_Data )
<
Declarations::Instances::TArduinoDigitalBinaryPacketElement2.InputPin_o_Receive( _Data );
Declarations::Instances::TILT.Reversed().InputPin_o_Receive( _Data );
Declarations::Instances::Or1.InputPins_o_Receive( 1, _Data );
Declarations::Instances::Or3.InputPins_o_Receive( 1, _Data );
>
void PinCallerReceive5::Notify( void *_Data )
<
Declarations::Instances::PAN.Reversed().InputPin_o_Receive( _Data );
Declarations::Instances::TArduinoDigitalBinaryPacketElement3.InputPin_o_Receive( _Data );
Declarations::Instances::Or2.InputPins_o_Receive( 0, _Data );
Declarations::Instances::Or3.InputPins_o_Receive( 2, _Data );
>
void PinCallerReceive6::Notify( void *_Data )
<
TypeConverters::Converter1.Convert( _Data, PinCallerConverterReceive2 );
Declarations::Instances::TArduinoDigitalBinaryPacketElement4.InputPin_o_Receive( _Data );
Declarations::Instances::Or2.InputPins_o_Receive( 1, _Data );
Declarations::Instances::Or3.InputPins_o_Receive( 3, _Data );
>
void PinCallerConverterReceive2( void *_Data )
<
Declarations::Instances::PAN.StepInputPin_o_Receive( _Data );
>
void PinCallerReceive7::Notify( void *_Data )
<
Declarations::Instances::TILT.Enabled().InputPin_o_Receive( _Data );
>
void PinCallerReceive8::Notify( void *_Data )
<
Declarations::Instances::PAN.Enabled().InputPin_o_Receive( _Data );
>
void PinCallerReceive9::Notify( void *_Data )
<
BoardDeclarations::Instances::ArduinoDigitalChannel_14.DigitalInputPin_o_Receive( _Data );
>
namespace ComponentsHardware
<
void SystemUpdateHardware()
<
>
> // ComponentsHardware
//The setup function is called once at startup of the sketch
void setup()
<
BoardDeclarations::Instances::TArduinoESP32BluetoothLEModule1.SystemInit();
BoardDeclarations::Instances::TArduinoESP32BluetoothLEServer1.SystemInit();
BoardDeclarations::Instances::ArduinoDigitalChannel_14.SystemInit();
Declarations::Instances::TArduinoBluetoothUartService1.SystemInit();
BoardDeclarations::Instances::SerialPort0.SystemInit();
BoardDeclarations::Instances::ArduinoAnalogInputChannel_AsDigital_14.SystemInit();
BoardDeclarations::Instances::ArduinoDigitalChannel_14.SystemStart();
BoardDeclarations::Instances::TArduinoESP32BluetoothLEModule1.SystemStart();
BoardDeclarations::Instances::TArduinoESP32BluetoothLEServer1.SystemStart();
Declarations::Instances::TArduinoBluetoothUartService1.SystemStart();
BoardDeclarations::Instances::ArduinoAnalogInputChannel_AsDigital_14.SystemStart();
Declarations::Instances::Packet1.SystemStart();
Declarations::Instances::TArduinoRemoteXYButtonElement1.SystemStart();
Declarations::Instances::TArduinoRemoteXYButtonElement2.SystemStart();
Declarations::Instances::TArduinoRemoteXYButtonElement3.SystemStart();
Declarations::Instances::TArduinoRemoteXYButtonElement4.SystemStart();
Declarations::Instances::TArduinoRemoteXYProtocolSerial1.SystemStart();
Declarations::Instances::Or1.SystemStart();
Declarations::Instances::Or2.SystemStart();
Declarations::Instances::Or3.SystemStart();
>
Источник
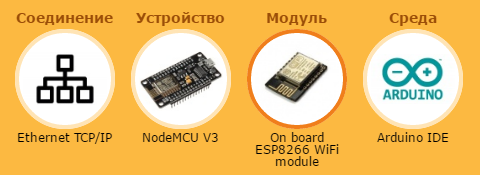
Продолжаем изучать сервис RemoteXY (предыдущая статья), в этой статье будут рассмотрены способы подключения различных модулей связи к ардуино и работы с ними в сервисе RemoteXY.
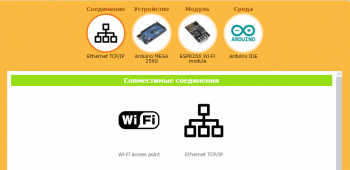
Конфигурация подключения
Способы подключения я буду демонстрировать на примере Arduino Nano и NodeMCU v3, в качестве модулей связи будут применяться Bluetooth модуль HC-05, Wi-Fi модуль ESP-01 и встроенный в NodeMCU модуль ESP-12.
Сразу опишу все преимущества и недостатки каждого типа подключения.
Bluetooth
Недостатки:
- малый радиус действия (около 10 метров);
- зачастую планшеты на android, не имеющие слота под SIM карту, так же не имеют и bluetooth модуля.
Преимущества:
- мобильное устройство может быть одновременно соединено с несколькими bluetooth устройствами;
- при этом не теряется связь с сетью интернет при подключении через wi-fi или мобильную сеть.
Wi-Fi как клиент
Преимущества:
- не теряется связь с сетью интернет при подключении к ней через wi-fi;
- больший радиус связи, чем у bluetooth;
- модуль связи wi-fi есть во всех смартфонах и планшетах;
- можно настроить роутер для доступа к контролеру с любой точки планеты (этот способ связи я не буду рассматривать, так как я им сам не пользовался, а давать непроверенную информацию мне не позволяет моя совесть).
Недостатки:
- необходим wi-fi роутер как точка доступа.
Wi-Fi как точка доступа
Преимущества:
- автономная работа без роутера.
Недостатки:
- невозможно одновременное подключение к контролеру и к сети интернет ни через сотовую связь, ни через другие сети Wi-Fi.
Таким образом у каждого способа связи есть свои преимущества
Bluetooth
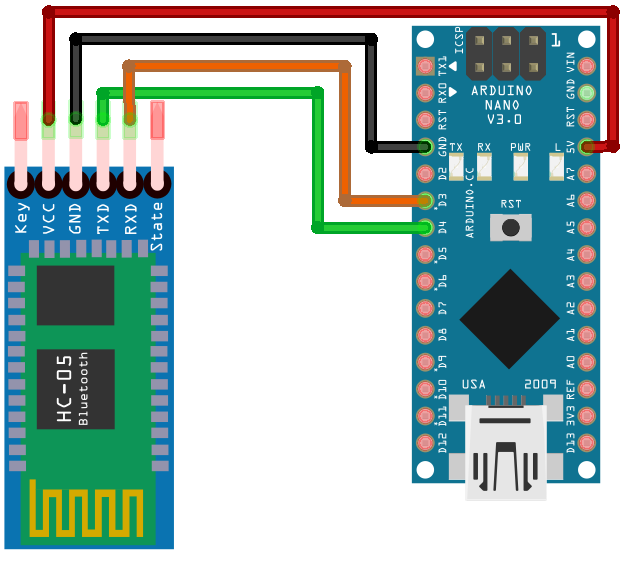
Соединение по bluetooth настраивается при помощи модулей связи HC-05 и HC-06 для Android и модуля HC-10 для iOS и осуществляется по протоколу UART. Подключаться можно как через Hardware Serial, так и через Software Serial. Рассмотрим оба способа.
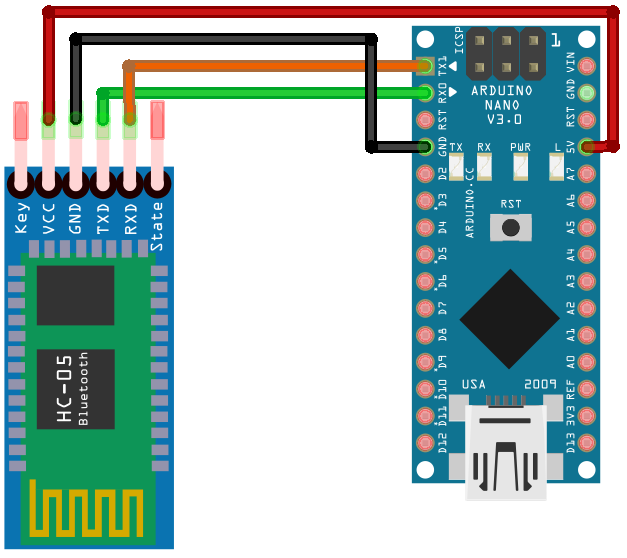
Hardware Serial
Аппаратные порты протокола UART выведены на 0 (RX) и 1(TX) выводы для плат UNO, Leonardo, Pro Mini, Nano, MICRO и 0 и 1 (Serial), 19 и 18 (Serial 1), 17 и 16 (Serial 2), 15 и 14 (Serial 3) для платы MEGA.
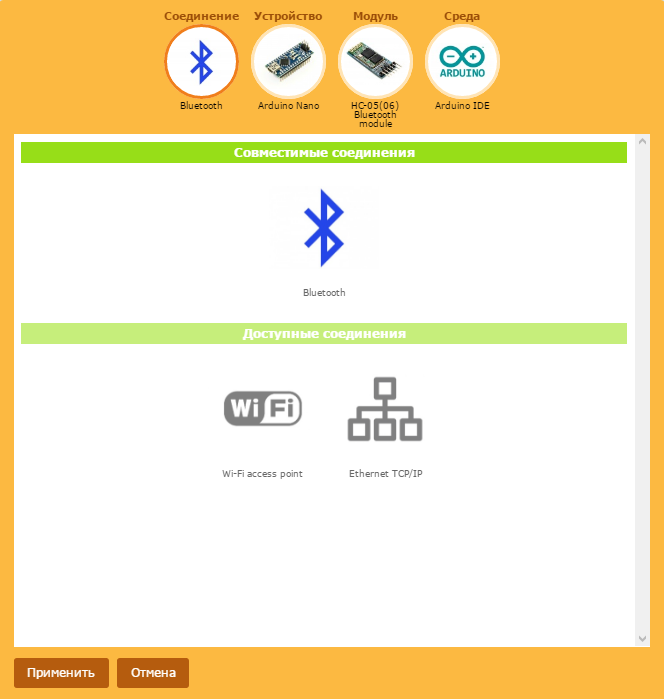
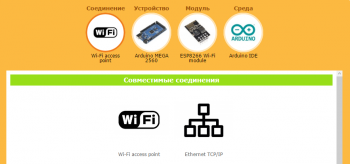
Чтобы настроить онлайн редактор на bluetooth соединение в панели настроек и свойств необходимо выбрать пункт «конфигурация» и нажать на любой пункт этого меню. Откроется меню конфигурации, в котором поочередно надо установить параметры: тип соединения, используемый контроллер, модуль связи и среда программирования. После необходимо нажать кнопку «Применить» и окно закроется.
Далее необходимо перейти в пункт «Подключение модуля» в панели настроек и свойств, установить интерфейс подключения «Hardware Serial», скорость обмена и порт.
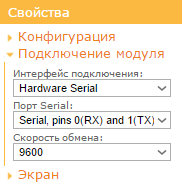
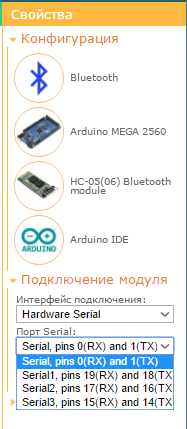
Выпадающий список портов будет содержать только один пункт для всех плат кроме MEGA. Для плат MEGA будет доступно четыре аппаратных порта.
Ввиду того, что аппаратный порт Serial используется для программирования arduino, необходимо отсоединять bluetooth модуль на время программирования. Для плат Mega этот вопрос строит не так остро, так как на выбор предоставлено четыре порта.
Software Serial
Подключение через Software Serial позволяет использовать отличные от аппаратных порты. Но с некоторыми ограничениями, которые связанны с поддержкой прерываний.
Так для плат UNO и Nano для RX нельзя использовать вывод 13. Для Mega для RX можно использовать только выводы 8, 10, 11, 12, 13, 14,15, 50, 52, 53, 62, 63, 64, 65, 66, 67, 68, 69. Для Leonardo и Micro для RX можно использовать только выводы 8, 9, 10, 11, 14,15, 16. Так же невозможна работа на скоростях выше 19200 бит/сек. Стоит заметить, что в онлайн редакторе интерфейса все эти ограничения учтены, и сам редактор вам просто не даст поставить значения скорости выше 19200, и предложит на выбор только подходящие выводы с учетом выбранной платы. Так зачем же я упомянул все эти ограничения? Ограничения на выбор портов можно обойти, когда онлайн редактор сгенерирует исходный код, ведь там номера портов указаны черным по белому.
// настройки соединения
#define REMOTEXY_SERIAL_RX 50 #define REMOTEXY_SERIAL_TX 51 #define REMOTEXY_SERIAL_SPEED 9600
Подключение Bluetooth модуля к смартфону. И вот тут-то можно исправить и номера выводов и скорость, и в итоге получить не работающее устройство. Вообще я не рекомендую править что-либо в исходном коде, начиная от комментария «RemoteXY include library» до «END RemoteXY include». Ну и еще одно ограничение: некоторые библиотеки (например, библиотека Servo) используют те же прерывания, что и Software Serial. Это может привести к непредсказуемой или неправильной работе устройства и потере связи по bluetooth.
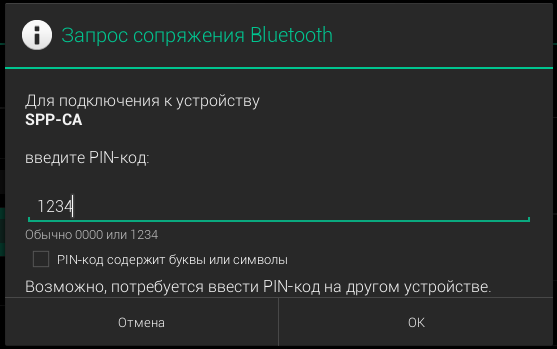
Данная инструкция для владельцев устройств, работающих под управлением операционной системы android.
- Перейти в настройки устройства, выбрать пункт «bluetooth», включить его. Начнется поиск доступных bluetooth устройств.
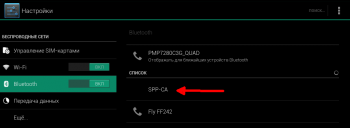
- Выбирать необходимое устройство из списка, дождаться запроса пароля, ввести пароль и нажать «ОК»
- Устройство появится в списке подключенных устройств
- Перейти в программу RemoteXY, нажать на + в правом верхнем углу
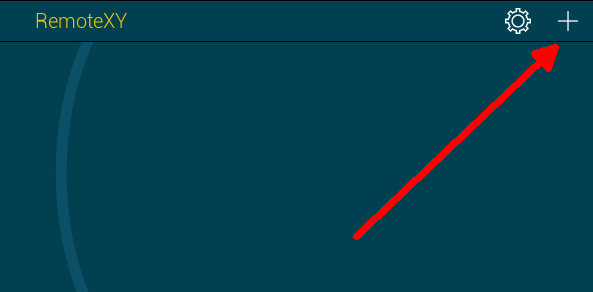
- Выбрать тип подключаемого устройства
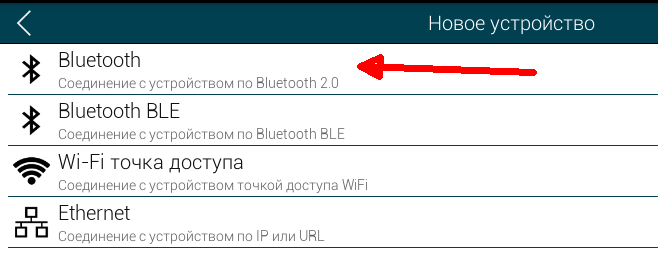
- Выбрать устройство из списка доступных устройств

- Устройство подсоединено, сразу открывается интерфейс устройства.
Практическое задание
Создать интерфейс со следующими параметрами:
- Соединение – bluetooth;
- Устройство – на ваш выбор (я буду использовать Mega);
- Модуль – HC-05 (для владельцев устройств с iOS – HC-10);
- Среда программирования – ArduinoIDE;
- Интерфейс подключения – Hardware Serial;
- Порт – Serial (владельцы Mega могут попробовать любой другой доступный порт, я буду использовать Serial 1);
- Скорость обмена – 9600.
Разместить на рабочем поле редактора кнопку, свойства кнопки не менять. Исходный код скомпилировать в ArduinoIDE и загрузить в контроллер.
Далее необходимо провести сопряжение bluetooth модуля с вашим мобильным устройством, подключить программу RemoteXY к устройству. Если при нажатии на кнопку загорается светодиод на плате контроллера, значит всё сделано правильно.
Вторая часть задания: изменить проект так, что бы он использовал Software Serial, использовать выводы на свое усмотрение.
Wi-Fi как точка доступа
Подключение модуля ESP-01 производится аналогично модулю Bluetooth, так как оба вида модулей работают по протоколу UART. Подключение абсолютно аналогично, как для Software Serial, так и для Hardware Serial, со всеми ограничениями, описанными в разделе о подключении по Bluetooth.
Исключение составляет конфигурация подключения. Рассмотрим подключение модуля ESP-01 к arduino Mega2560 в качестве точки доступа.
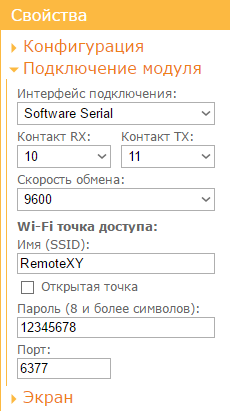
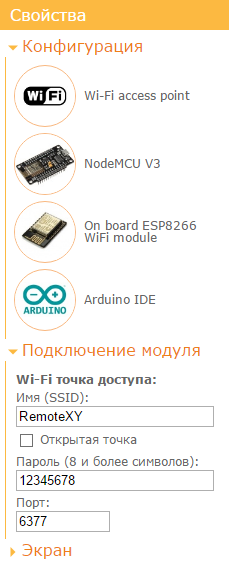
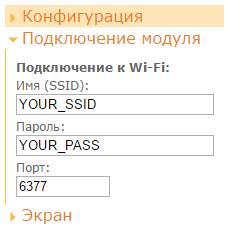
В выпадающем меню «Подключение модуля» кроме пунктов интерфейс подключения, порт Serial/контакты TX/RX и скорость обмена появляются еще четыре пункта, характерных только для подключения устройства как точки доступа.
Имя (SSID) – имя точки доступа, к которой будет подключаться смартфон. Доступ к контроллеру может быть защищен паролем, если не стоит галочка «открытая точка». Пункт «Порт» можно не трогать, так как он по умолчанию устанавливается таким же в программе RemoteXY, его смена может потом привести к неожиданным последствиям при подключении к контроллеру (если пользователь забудет, какой порт указал при наладке устройства).
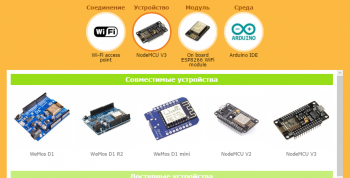
Отдельно стоит коснуться конфигурации устройств, построенных на модуле ESP-12: WeMos D1, D1 R2, D1 mini и NodeMCU v2, v3. Так как модуль связи встроен в эти платы, в меню «Подключение модуля» отсутствуют настройки интерфейса подключения.
|
|
Стоить заметить, что на изображении выше, подключение питания модуля ESP-01 подключено к выводу 3V3 на плате arduino nano. Тем не менее, мощность стабилизатора, установленного на плате nano, может не хватать для работы модуля ESP-01. Поэтому необходимо подключать его к внешнему источнику питания напряжением 3,3 вольта.
Подключение Wi-Fi модуля в режиме точки доступа к смартфону.
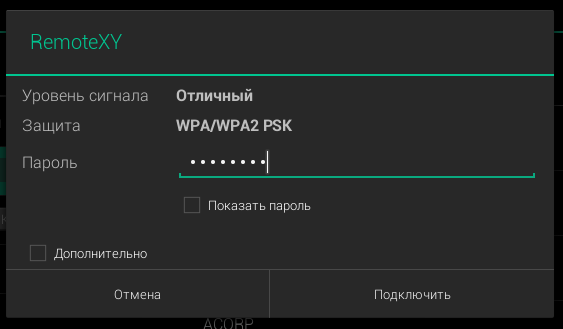
Для подключения Wi-Fi модуля в режиме точки доступа к смартфону необходимо:
- Перейти в настройки смартфона – беспроводные сети –Wi-Fi и убедиться, что созданная точка доступа находится в списке доступных устройств
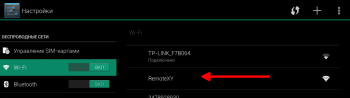
- Выбрать необходимую точку доступа и, если требуется, ввести пароль, нажать кнопку «подключить»
- Войти в программу RemoteXY и нажать + в правом верхнем углу
- Выбрать «Wi-Fi точка доступа»
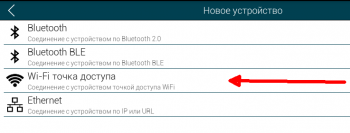
- В появившемся списке доступных сетей выбрать необходимую сеть
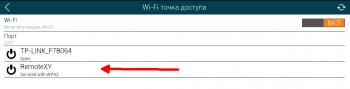
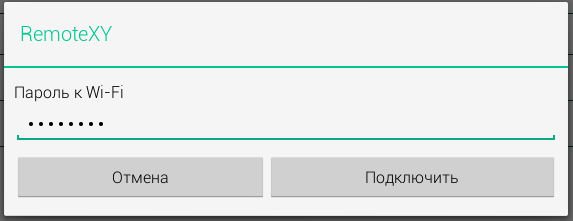
- В некоторых случаях программа вновь может запросить пароль точки доступа, необходимо ввести его вновь и нажать подключить
- Устройство подсоединено, сразу открывается интерфейс устройства.
Практическое задание
Закрепим полученные знания на практике.
Первая часть задания: создать соединение со следующими параметрами:
- Соединение — Wi-Fi access point;
- Устройство – на ваш выбор (я буду использовать Mega);
- Модуль – ESP8266 Wi-Fi module;
- Среда программирования – ArduinoIDE;
- Интерфейс подключения – Hardware Serial;
- Порт – Serial (владельцы Mega могут попробовать любой другой доступный порт, я буду использовать Serial2);
- Скорость обмена – 115200;
- Имя (SSID) – оставить по умолчанию;
- Пароль – оставить по умолчанию;
- Порт – оставить по умолчанию.
Разместить на рабочем поле редактора кнопку, свойства кнопки не менять. Исходный код скомпилировать в ArduinoIDE и загрузить в контроллер.
Далее необходимо подключить смартфон к созданной точке доступа, подключить программу RemoteXY к устройству. Если при нажатии на кнопку загорается светодиод на плате контроллера, значит всё сделано правильно.
Вторая часть задания: изменить проект так, что бы он использовал Software Serial, использовать выводы на свое усмотрение.
Третья часть задания: изменить проект для подключения платы NodeMCU.
Wi-Fi как клиент
Режим работы в качестве клиента требует, что бы устройство подключалось к существующей точке доступа Wi-Fi. Возможен доступ к контроллеру, как из локальной сети, так и по сети интернет. Для подключения к контроллеру из сети интернет возможно лишь при правильной настройке маршрутизатора. Этот способ подключения я не буду рассматривать, рассмотрю лишь способ подключения по локальной сети.
При этом физически подключение модуля ESP-01 в качестве клиента существующей сети Wi-Fi к arduino не отличается от рассмотренного выше примера подключения модуля ESP-01 в качестве точки доступа, со всеми ограничениями, рассмотренными ранее.
Пример конфигурации для arduino и ESP-01
|
|
В выпадающем меню «Подключения модуля», кроме уже знакомых пунктов интерфейса подключения, порта Serial, контактов, порта и скорости обмена, появились пункты характерные для подключения модуля ESP-01 в качестве клиента:
- Имя (SSID) — имя точки доступа, к которой необходимо подключить модуль ESP-01
- Пароль — пароль точки доступа, к которой необходимо подключить модуль ESP-01 (если пароль не используется, то необходимо оставить строку пустой)
Так же приведу конфигурацию для платы NodeMCU v3.
Подключение Wi-Fi модуля как клиента существующей точки доступа Wi-Fi к смартфону.
Первым делом надо узнать IP-адрес модуля ESP-01 в локальной сети. Для этого необходимо использовать сканер сети. Я использую программу Network Scanner для android.
Приведу пример работы с этой программой:
- Открыть программу Network Scanner

- Дождаться окончания сканирование локальной сети
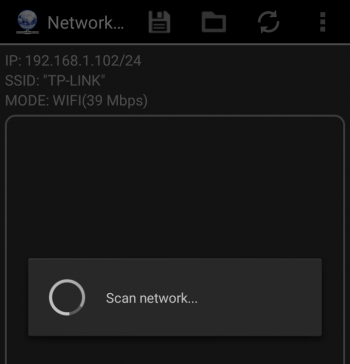
- Выбрать необходимое устройство из списка
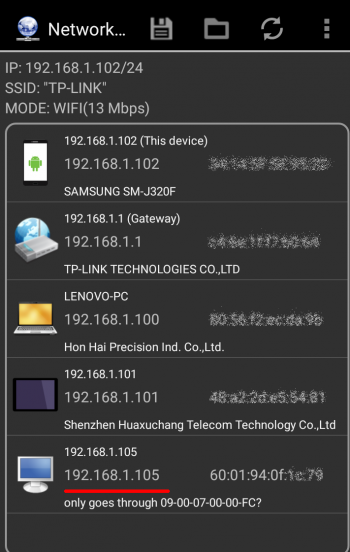
Далее необходимо запустить программу RemoteXY и дальнейшие шаги выполнять в ней:
- Нажать + в верхнем правом углу
- Из списка выбрать «Ethernet»
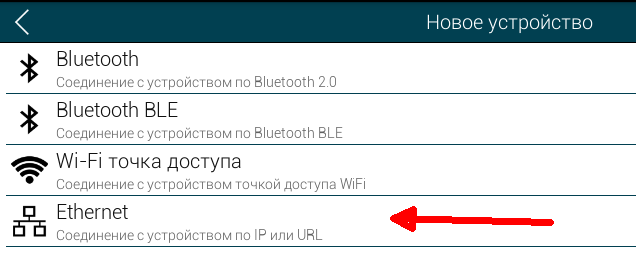
- Ввести IP-адрес, полученный в программе Network Scanner
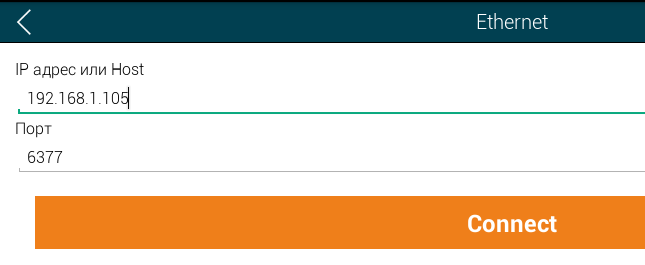
- Устройство подсоединено, сразу открывается интерфейс устройства.
Практическое задание
Закрепим полученные знания на практике.
Первая часть задания: создать соединение со следующими параметрами:
- Соединение — Ethernet TCP/IP;
- Устройство – на ваш выбор (я буду использовать Mega);
- Модуль – ESP8266 Wi-Fi module;
- Среда программирования – ArduinoIDE;
- Интерфейс подключения – Hardware Serial;
- Порт – Serial (владельцы Mega могут попробовать любой другой доступный порт, я буду использовать Serial2);
- Скорость обмена – 115200;
- Имя (SSID) – имя вашей точки доступа;
- Пароль – пароль вашей точки доступа;
- Порт – оставить по умолчанию.
Разместить на рабочем поле редактора кнопку, свойства кнопки не менять. Исходный код скомпилировать в ArduinoIDE и загрузить в контроллер.
Далее необходимо подключить смартфон к той же сети что и контроллер, просканировать локальную сеть для получения IP- адреса, подключить программу RemoteXY к устройству. Если при нажатии на кнопку загорается светодиод на плате контроллера, значит всё сделано правильно.
Вторая часть задания: изменить проект так, что бы он использовал Software Serial, использовать выводы на свое усмотрение.
Третья часть задания: изменить проект для подключения платы NodeMCU.
P.S. Использование смартфона в качестве точки доступа
Все современные смартфоны могут выступать в качестве точки доступа Wi-Fi. В начале этой главы я рассматривал достоинства и недостатки различных способов подключения устройства к смартфону. Так для способа Wi-Fi как точка доступа я указал недостаток: «невозможно одновременное подключение к контролеру и к сети интернет, ни через сотовую связь, ни через другие сети Wi-Fi». Использование смартфона, как точки доступа Wi-Fi, позволяет обойти это ограничение, при этом соединение между контроллером и смартфоном будет прямое, а доступ к сети интернет посредством сотовой связи останется доступным.
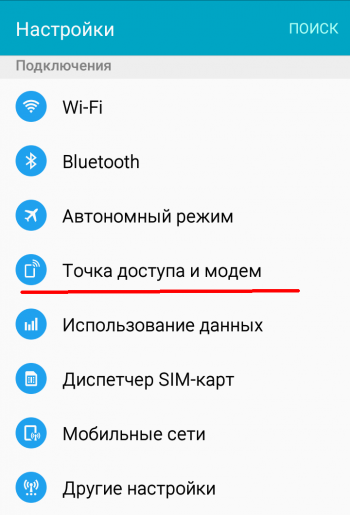
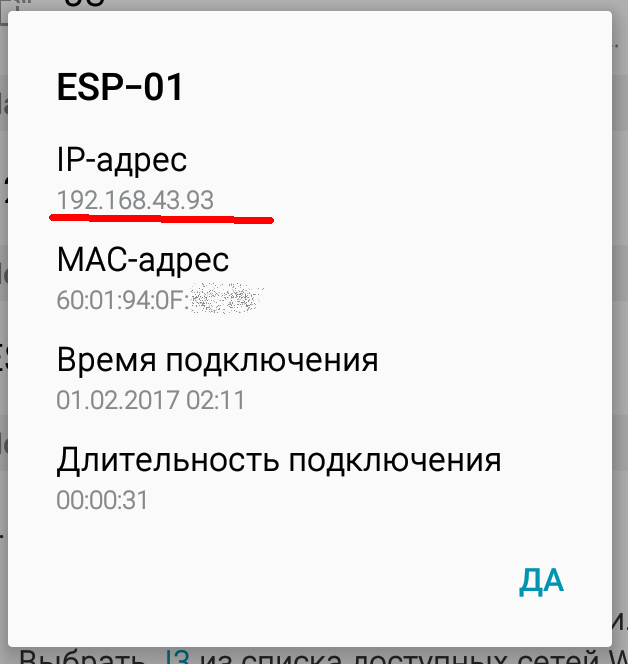
Для подключения контроллера к смартфону необходимо (все настройки смартфона показаны на примере смартфона под управлением ОС Android версии 5.1.1):
- Перейти в настройки смартфона, далее «точка доступа и модем» , «мобильная точка доступа»;
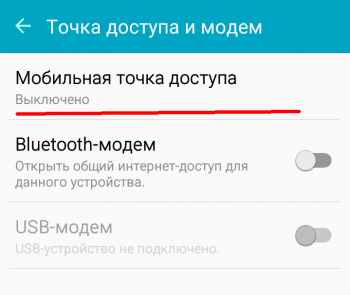
- Включить точку доступа, название сети и пароль использовать при настройке подключения модуля в редакторе интерфейса;
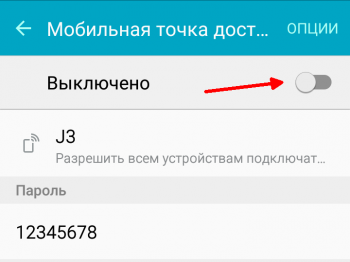
- Загрузить исходный код программы в контроллер, дождаться, когда модуль ESP-01 появится в списке подключенных устройств;
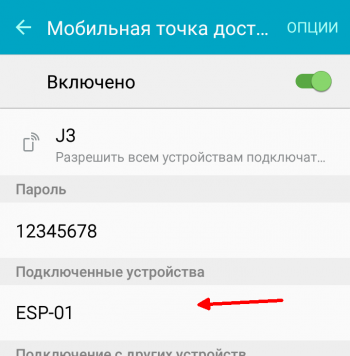
- Выбрать модуль ESP-01 из списка, появится окно с данными подключения, использовать IP-адрес в программе RemoteXY.
В операционных системах Android других версий интерфейс может отличаться, но порядок действий остается тем же.
P.P.S. В этой статье я не описал только один способ подключения, по глобальной сети, с настройкой роутера, виртуальными серверами и пробросом портов, того самого способа, который дает возможность подключаться к ардуино из любой точки планеты где есть интернет. Все рассмотренные способы предоставляют только локальный доступ, в небольшом радиусе действия.
Пока статья писалась, автор RemoteXY добавил функцию облачного сервера для связи смартфона и ардуино через интернет из любой точки мира. Теперь нет необходимости пробрасывать порты, устанавливать виртуальные сервера и прочее, теперь доступ к ардуино по интернет можно настроить намного проще.
Теги:
Подскажите, в сем может быть проблема, сделал на сайте код заполнять своими доработками не стал, хотел проверить исправность WiFi модуля, подключил как в статье, залил скетч. На устройстве появилась сеть AI-THINKER_(не помню), к которой не получается подключится. Что делать? Вот данные по прошивке с модуля.
AT+GMRAT version:0.40.0.0(Aug 8 2015 14:45:58)
SDK version:1.3.0
Ai-Thinker Technology Co.,Ltd.
Build:1.3.0.2 Sep 11 2015 11:48:04
Код Ниже.
//////////////////////////////////////////////
// RemoteXY include library //
// use library version 2.2.2 or up //
// use ANDROID app version 3.5.1 or up //
//////////////////////////////////////////////
/* определение режима соединения и подключение библиотеки RemoteXY */
[HASHTAG]#define[/HASHTAG] REMOTEXY_MODE__ESP8266POINT_HARDSERIAL
[HASHTAG]#include[/HASHTAG] <RemoteXY.h>
/* настройки соединения */
[HASHTAG]#define[/HASHTAG] REMOTEXY_SERIAL Serial
[HASHTAG]#define[/HASHTAG] REMOTEXY_SERIAL_SPEED 115200
[HASHTAG]#define[/HASHTAG] REMOTEXY_WIFI_SSID «RemoteXY»
[HASHTAG]#define[/HASHTAG] REMOTEXY_WIFI_PASSWORD «12345678»
[HASHTAG]#define[/HASHTAG] REMOTEXY_SERVER_PORT 6377
/* конфигурация интерфейса */
unsigned char RemoteXY_CONF[] =
{ 2,27,121,0,5,0,1,2,0,21
,35,22,11,2,79,78,0,79,70,70
,0,4,128,14,15,35,12,2,66,1
,28,51,7,16,2,66,4,46,36,13
,17,2,67,4,3,55,18,5,2,11
,67,4,44,56,18,5,2,11,65,6
,28,77,9,9,2,66,4,3,36,13
,16,2,129,0,7,28,18,6,9,208
,146,208,186,208,187,209,142,209,135,208
,184,209,130,209,140,32,209,135,208,176
,208,185,208,189,208,184,208,186,0,129
,0,24,68,15,6,9,208,146,208,190
,208,180,208,176,0 };
/* структура определяет все переменные вашего интерфейса управления */
struct {
/* input variable */
unsigned char switch_1; /* =1 если переключатель включен и =0 если отключен */
signed char slider_1; /* =0..100 положение слайдера */
/* output variable */
signed char level_1; /* =0..100 положение уровня */
signed char level_3; /* =0..100 положение уровня */
char text_1[11]; /* =строка оканчивающаяся нулем UNICODE */
char text_2[11]; /* =строка оканчивающаяся нулем UNICODE */
unsigned char led_1_r; /* =0..255 яркость красного цвета индикатора */
unsigned char led_1_g; /* =0..255 яркость зеленого цвета индикатора */
signed char level_2; /* =0..100 положение уровня */
/* other variable */
unsigned char connect_flag; /* =1 if wire connected, else =0 */
} RemoteXY;
/////////////////////////////////////////////
// END RemoteXY include //
/////////////////////////////////////////////
[HASHTAG]#define[/HASHTAG] PIN_SWITCH_1 13
void setup()
{
RemoteXY_Init ();
pinMode (PIN_SWITCH_1, OUTPUT);
// TODO you setup code
}
void loop()
{
RemoteXY_Handler ();
digitalWrite(PIN_SWITCH_1, (RemoteXY.switch_1==0)?LOW:HIGH);
// TODO you loop code
// используйте структуру RemoteXY для передачи данных
-
доброго времени суток Уважаемые форумчане ! столкнулся с большой проблемой для меня — использую сервис RemoteXY — все отлично сделал проект — все работает, но вот захотелось мне чтоб при нажатии кнопки — воспроизводилось звуковое уведомление ! сделал — но звук воспроизводится пока держу нажатой кнопку ! хочется чтоб звук воспроизводился допустим 4 секунды. но никак не могу разобраться с этим(( в написании я — полный ноль (( может кто поможет в реализации моей задумки? что не так в коде? код прилагаю :
/*
— фары JEEP —
This source code of graphical user interface
has been generated automatically by RemoteXY editor.
To compile this code using RemoteXY library 2.4.3 or later version
download by link http://remotexy.com/en/library/
To connect using RemoteXY mobile app by link http://remotexy.com/en/download/
— for ANDROID 4.5.1 or later version;
— for iOS 1.4.1 or later version;
This source code is free software; you can redistribute it and/or
modify it under the terms of the GNU Lesser General Public
License as published by the Free Software Foundation; either
version 2.1 of the License, or (at your option) any later version.
*///////////////////////////////////////////////
// RemoteXY include library //
//////////////////////////////////////////////// определение режима соединения и подключение библиотеки RemoteXY
#define REMOTEXY_MODE__ESP8266_HARDSERIAL_POINT#include <RemoteXY.h>
// настройки соединения
#define REMOTEXY_SERIAL Serial
#define REMOTEXY_SERIAL_SPEED 115200
#define REMOTEXY_WIFI_SSID «JEEP»
#define REMOTEXY_WIFI_PASSWORD «87654321»
#define REMOTEXY_SERVER_PORT 6377// конфигурация интерфейса
#pragma pack(push, 1)
uint8_t RemoteXY_CONF[] =
{ 255,12,0,2,0,19,1,10,187,0,
1,0,4,37,12,12,2,31,208,146,
208,155,208,149,208,146,208,158,0,1,
0,17,23,12,12,2,31,208,146,208,
146,208,149,208,160,208,165,0,1,0,
17,50,12,12,2,31,208,146,208,157,
208,152,208,151,0,1,0,31,37,12,
12,2,31,208,146,208,159,208,160,208,
144,208,146,208,158,0,1,0,58,36,
12,12,2,31,208,146,208,155,208,149,
208,146,208,158,0,1,0,71,22,12,
12,2,31,208,146,208,146,208,149,208,
160,208,165,0,1,0,84,36,12,12,
2,31,208,146,208,159,208,160,208,144,
208,146,208,158,0,1,0,71,50,12,
12,2,31,208,146,208,157,208,152,208,
151,0,1,9,4,2,12,12,134,31,
208,146,208,154,208,155,0,1,9,30,
2,12,12,134,31,208,161,208,146,208,
149,208,162,0,1,9,57,2,12,12,
134,31,208,161,208,146,208,149,208,162,
0,1,9,83,2,12,12,134,31,208,
146,208,154,208,155,0,129,0,12,16,
21,6,17,208,155,208,149,208,146,208,
144,208,175,0,129,0,65,16,24,6,
17,208,159,208,160,208,144,208,146,208,
144,208,175,0,129,0,42,23,15,6,
1,74,69,69,80,0,69,1,5,3,
10,10 };
// структура определяет все переменные и события вашего интерфейса управления
struct {// input variables
uint8_t button_1; // =1 если кнопка нажата, иначе =0
uint8_t button_2; // =1 если кнопка нажата, иначе =0
uint8_t button_3; // =1 если кнопка нажата, иначе =0
uint8_t button_4; // =1 если кнопка нажата, иначе =0
uint8_t button_5; // =1 если кнопка нажата, иначе =0
uint8_t button_6; // =1 если кнопка нажата, иначе =0
uint8_t button_7; // =1 если кнопка нажата, иначе =0
uint8_t button_8; // =1 если кнопка нажата, иначе =0
uint8_t button_9; // =1 если кнопка нажата, иначе =0
uint8_t button_10; // =1 если кнопка нажата, иначе =0
uint8_t button_11; // =1 если кнопка нажата, иначе =0
uint8_t button_12; // =1 если кнопка нажата, иначе =0// output variables
int16_t sound_1; // =0 нет звука, иначе ID звука, для примера 1001, смотри список звуков в приложении
// other variable
uint8_t connect_flag; // =1 if wire connected, else =0} RemoteXY;
#pragma pack(pop)/////////////////////////////////////////////
// END RemoteXY include //
/////////////////////////////////////////////#define PIN_BUTTON_1 5
#define PIN_BUTTON_2 4
#define PIN_BUTTON_3 7
#define PIN_BUTTON_4 6
#define PIN_BUTTON_5 11
#define PIN_BUTTON_6 10
#define PIN_BUTTON_7 12
#define PIN_BUTTON_8 13
#define PIN_BUTTON_9 2
#define PIN_BUTTON_10 3
#define PIN_BUTTON_11 8
#define PIN_BUTTON_12 9void setup()
{
RemoteXY_Init ();
pinMode (PIN_BUTTON_1, OUTPUT);
pinMode (PIN_BUTTON_2, OUTPUT);
pinMode (PIN_BUTTON_3, OUTPUT);
pinMode (PIN_BUTTON_4, OUTPUT);
pinMode (PIN_BUTTON_5, OUTPUT);
pinMode (PIN_BUTTON_6, OUTPUT);
pinMode (PIN_BUTTON_7, OUTPUT);
pinMode (PIN_BUTTON_8, OUTPUT);
pinMode (PIN_BUTTON_9, OUTPUT);
pinMode (PIN_BUTTON_10, OUTPUT);
pinMode (PIN_BUTTON_11, OUTPUT);
pinMode (PIN_BUTTON_12, OUTPUT);
// TODO you setup code
}void loop()
{
RemoteXY_Handler ();
digitalWrite(PIN_BUTTON_1, (RemoteXY.button_1==0)?LOW:HIGH);
digitalWrite(PIN_BUTTON_2, (RemoteXY.button_2==0)?LOW:HIGH);
digitalWrite(PIN_BUTTON_3, (RemoteXY.button_3==0)?LOW:HIGH);
digitalWrite(PIN_BUTTON_4, (RemoteXY.button_4==0)?LOW:HIGH);
digitalWrite(PIN_BUTTON_5, (RemoteXY.button_5==0)?LOW:HIGH);
digitalWrite(PIN_BUTTON_6, (RemoteXY.button_6==0)?LOW:HIGH);
digitalWrite(PIN_BUTTON_7, (RemoteXY.button_7==0)?LOW:HIGH);
digitalWrite(PIN_BUTTON_8, (RemoteXY.button_8==0)?LOW:HIGH);
digitalWrite(PIN_BUTTON_9, (RemoteXY.button_9==0)?LOW:HIGH);
digitalWrite(PIN_BUTTON_10, (RemoteXY.button_10==0)?LOW:HIGH);
digitalWrite(PIN_BUTTON_11, (RemoteXY.button_11==0)?LOW:HIGH);
digitalWrite(PIN_BUTTON_12, (RemoteXY.button_12==0)?LOW:HIGH);uint32_t start_time = 0;
if (RemoteXY.sound_1 == 0) { // если мелодия в данный момент не играет
if (RemoteXY.button_1 != 0) { // если кнопка нажата
start_time = millis (); // запоминаем время когда начали проигрывание
RemoteXY.sound_1 = 1; // и запускаем проигрывание
}
}
else { // иначе молодия играет
if (millis () — start_time >= 4000 ) { // если время проигрывания 4 секунды уже истекло
RemoteXY.sound_1 = 0; // останавливаем проигрывание мелодии в RemoteXY
}
}
}
// TODO you loop code
// используйте структуру RemoteXY для передачи данных
// не используйте функцию delay() -
вот тут нужно взводить флаг.
Далее в цикле loop сделать отдельный if для флага, если он взведен, то воспроизводим мелодию сколько нужно. По окончанию мелодии обязательно сбросить флаг.
PreD3D и NikitOS нравится это.
-
Не сочтите за наглость( , не могли бы Вы дописать чего не хватает ? Если конечно Вас не затруднит..
-
С самому не интересно разобраться?
-
имхо, в этом коде RemoteXY.sound_1 уже работает как флаг, если я правильно понял идею ТС
В этом случае достаточно statr_time обозначить как staticПоследнее редактирование: 6 май 2020
-
Я извиняюсь, но с RemoteXY я не работал, поэтому не буду писать код, который не могу проверить. Тем более, что выше уже начали предлагать другие варианты
-
наконец то сделал чтоб звук отыгрывал сколько нужно. Всем огромнейшее спасибо за помощь и подсказки !
400 — Bad Request (Некорректный запрос)
«Плохой запрос». Этот ответ означает, что сервер не понимает… Читать далее
Подробнее
401 — Unauthorized (Не авторизован)
«Неавторизовано». Для получения запрашиваемого ответа нужна … Читать далее
Подробнее
402 — Payment Required (Необходима оплата)
«Необходима оплата». Этот код ответа зарезервирован для буду… Читать далее
Подробнее
403 — Forbidden (Запрещено)
«Запрещено». У клиента нет прав доступа к содержимому, поэто… Читать далее
Подробнее
404 — Not Found (Не найдено)
«Не найден». Сервер не может найти запрашиваемый ресурс. Код… Читать далее
Подробнее
405 — Method Not Allowed (Метод не поддерживается)
«Метод не разрешен». Сервер знает о запрашиваемом методе, но… Читать далее
Подробнее
406 — Not Acceptable (Неприемлемо)
Этот ответ отсылается, когда веб сервер после выполнения ser… Читать далее
Подробнее
407 — Proxy Authentication Required (Необходима аутентификация прокси)
Этот код ответа аналогичен коду 401, только аутентификация т… Читать далее
Подробнее
408 — Request Timeout (Истекло время ожидания)
Ответ с таким кодом может прийти, даже без предшествующего з… Читать далее
Подробнее
409 — Conflict (Конфликт)
Этот ответ отсылается, когда запрос конфликтует с текущим со… Читать далее
Подробнее
410 — Gone (Удалён)
Этот ответ отсылается, когда запрашиваемый контент удален с … Читать далее
Подробнее
411 — Length Required (Необходима длина)
Запрос отклонен, потому что сервер требует указание заголовк… Читать далее
Подробнее
412 — Precondition Failed (Условие ложно)
Клиент указал в своих заголовках условия, которые сервер не … Читать далее
Подробнее
413 — Request Entity Too Large (Полезная нагрузка слишком велика)
Размер запроса превышает лимит, объявленный сервером. Сервер… Читать далее
Подробнее
414 — Request-URI Too Long (URI слишком длинный)
URI запрашиваемый клиентом слишком длинный для того, чтобы с… Читать далее
Подробнее
415 — Unsupported Media Type (Неподдерживаемый тип данных)
Медиа формат запрашиваемых данных не поддерживается сервером… Читать далее
Подробнее
416 — Requested Range Not Satisfiable (Диапазон не достижим)
Диапозон указанный заголовком запроса Range не может бы… Читать далее
Подробнее
417 — Expectation Failed (Ожидание не удалось)
Этот код ответа означает, что ожидание, полученное из заголо… Читать далее
Подробнее
418 — I’m a teapot (Я — чайник)
I’m a teapot — Этот код был введен в 1998 году как одна из т… Читать далее
Подробнее
419 — Authentication Timeout (not in RFC 2616) (Обычно ошибка проверки CSRF)
Authentication Timeout (not in RFC 2616) — Этого кода нет в … Читать далее
Подробнее
420 — Enhance Your Calm (Twitter) (Подождите немного (Твиттер))
Возвращается Twitter Search и Trends API, когда клиент отпра… Читать далее
Подробнее
421 — Misdirected Request (Неверный запрос)
Misdirected Request — запрос был перенаправлен на сервер, не… Читать далее
Подробнее
422 — Unprocessable Entity (Необрабатываемый экземпляр)
Запрос имел правильный формат, но его нельзя обработать из-з… Читать далее
Подробнее
423 — Locked (Заблокировано)
Целевой ресурс из запроса заблокирован от применения к нему … Читать далее
Подробнее
424 — Failed Dependency (Невыполненная зависимость)
Не удалось завершить запрос из-за ошибок к предыдущем запрос… Читать далее
Подробнее
425 — Too Early (Слишком рано)
Too Early — сервер не готов принять риски обработки «ранней … Читать далее
Подробнее
426 — Upgrade Required (Необходимо обновление)
Указание сервера, клиенту, обновить протокол. Заголовок отве… Читать далее
Подробнее
428 — Precondition Required (Необходимо предусловие)
Precondition Required — сервер указывает клиенту на необходи… Читать далее
Подробнее
429 — Too Many Requests (Слишком много запросов)
Too Many Requests — клиент попытался отправить слишком много… Читать далее
Подробнее
430 — Would Block (Будет заблокировано)
Код состояния 430 would Block — это код, который сервер мог … Читать далее
Подробнее
431 — Request Header Fields Too Large (Поля заголовка запроса слишком большие)
Request Header Fields Too Large — Превышена допустимая длина… Читать далее
Подробнее
434 — Requested host unavailable (Запрашиваемый адрес недоступен)
Сервер к которому вы обратились недоступен… Читать далее
Подробнее
444 — No Response (Nginx) (Нет ответа (Nginx))
Код ответа Nginx. Сервер не вернул информацию и закрыл соеди… Читать далее
Подробнее
449 — Retry With (Повторить с…)
Retry With — возвращается сервером, если для обработки запро… Читать далее
Подробнее
450 — Blocked by Windows Parental Controls (Microsoft) (Заблокировано родительским контролем Windows (Microsoft))
Расширение Microsoft. Эта ошибка возникает, когда родительск… Читать далее
Подробнее
451 — Unavailable For Legal Reasons (Недоступно по юридическим причинам)
Unavailable For Legal Reasons — доступ к ресурсу закрыт по ю… Читать далее
Подробнее
499 — Client Closed Request (Клиент закрыл соединение)
Нестандартный код состояния, представленный nginx для случая… Читать далее
Подробнее
Recommend Projects
-

React
A declarative, efficient, and flexible JavaScript library for building user interfaces.
-
Vue.js
🖖 Vue.js is a progressive, incrementally-adoptable JavaScript framework for building UI on the web.
-
Typescript
TypeScript is a superset of JavaScript that compiles to clean JavaScript output.
-
TensorFlow
An Open Source Machine Learning Framework for Everyone
-
Django
The Web framework for perfectionists with deadlines.
-
Laravel
A PHP framework for web artisans
-
D3
Bring data to life with SVG, Canvas and HTML. 📊📈🎉
Recommend Topics
-
javascript
JavaScript (JS) is a lightweight interpreted programming language with first-class functions.
-
web
Some thing interesting about web. New door for the world.
-
server
A server is a program made to process requests and deliver data to clients.
-
Machine learning
Machine learning is a way of modeling and interpreting data that allows a piece of software to respond intelligently.
-
Visualization
Some thing interesting about visualization, use data art
-
Game
Some thing interesting about game, make everyone happy.
Recommend Org
-
Facebook
We are working to build community through open source technology. NB: members must have two-factor auth.
-
Microsoft
Open source projects and samples from Microsoft.
-
Google
Google ❤️ Open Source for everyone.
-
Alibaba
Alibaba Open Source for everyone
-
D3
Data-Driven Documents codes.
-
Tencent
China tencent open source team.