Содержание
- Fixing «Unable to parse package file /var/lib/apt/lists» Error in Ubuntu and Other Linux Distributions
- Handling “Unable to parse package file” error in Ubuntu and Debian-based Linux distributions
- Step by step for beginners
- Too many files cannot be parsed?
- Explanation of how it fixed your problem
- Still facing error?
- Устранение ошибки «E: Unable to locate package» на Ubuntu
- Устранение ошибки «Unable to locate package» на Ubuntu
- 1. Имя пакета
- 2. Обновление кэша репозитория
- 3. Доступен ли пакет для используемой версии Ubuntu
- Ничего не помогло, что делать?
- How To Fix Ubuntu Update Error: Problem With MergeList
- Fixing MergeList problem in Ubuntu
- Fixing MergeList problem in Debian and Raspbian OS
Fixing «Unable to parse package file /var/lib/apt/lists» Error in Ubuntu and Other Linux Distributions
I have discussed a number of Ubuntu update errors in the past. If you use the command line to update Ubuntu, you might run into some ‘errors’.
Some of these ‘errors’ are basically built-in features to prevent unwarranted changes to your system. I am not going into those details in this quick tutorial.
In this quick tip, I’ll show you how to tackle the following error that you could encounter while updating your system or installing new software:
Reading package lists… Error!
E: Unable to parse package file /var/lib/apt/lists/archive.ubuntu.com_ubuntu_dists_bionic_InRelease
E: The package lists or status file could not be parsed or opened.
A similar error can be encountered in Debian:
E: Unable to parse package file /var/lib/apt/extended_states (1)
There is absolutely no need to panic even thought it says ‘The package cache file is corrupted‘. This is really easy to ‘fix’.
Handling “Unable to parse package file” error in Ubuntu and Debian-based Linux distributions
Here’s what you need to do. Take a closer look at the name and path of the file the Ubuntu is complaining about.
Reading package lists… Error!
E: Unable to parse package file /var/lib/apt/lists/archive.ubuntu.com_ubuntu_dists_bionic_InRelease
E: The package lists or status file could not be parsed or opened.
For example, in the above error, it was complaining about /var/lib/apt/lists/archive.ubuntu.com_ubuntu_dists_bionic_InRelease
This gives you the idea that something is not right with this file. Now all you need to do is to remove this file and regenerate the cache.
So in my case, I could use this command: sudo rm /var/lib/apt/lists/archive.ubuntu.com_ubuntu_dists_bionic_InRelease and then rebuild the cache with sudo apt update command.
Step by step for beginners
If you are familiar with Linux commands, you may know how to do delete the file with its absolute path. For novice users, let me guide you to safely delete the file.
First, you should go to the directory where the file is stored:
Now delete the file which is not being parsed:
Now if you run the update again, the apt cache will be regenerated.
Too many files cannot be parsed?
This is fine if you have one or two files that are not being parsed while updating the system. But if the system complains about ten or twenty such files, removing them one by one is too tiring.
What you can do in such a case to remove the entire cache and then generate it again:
Explanation of how it fixed your problem
The /var/lib/apt is the directory where files and data related to the apt package manager are stored. The /var/lib/apt/lists is the directory which is used for storing information for each package resource specified in your system’s sources.list.
In slightly non complicated terms, this /var/lib/apt/lists stores the package information cache. When you want to install or update a program, your system checks in this directory for the information on the said package. If it finds the detail on the package, then it goes to remote repository and actually download the program or its update.
When you run the “sudo apt update”, it builds the cache. This is why even when you remove everything in the /var/lib/apt/lists directory, running the update will build a fresh cache.
This is how it handles the issue of file not being parsed. Your system complained about a particular package or repository information that somehow got corrupted (either a failed download or manual change to sources.list). Removing that file (or everything) and rebuilding the cache solves the issue.
Still facing error?
This should fix the issue for you. But if the problem still persists or if you have some other related issue, let me know in the comment section and I’ll try to help you out.
Источник

Ошибка 1: E:Encountered a section with no Package: header, E: Problem with MergeList
Иногда при запуске процесса обновления Менеджер обновлений возвращает следующую ошибку:
Could not initialize the package information.
An unresolvable problem occurred while initializing the package information.
Please report this bug against the ‘update-manager’ package and include the following error message:
‘E:Encountered a section with no Package: header, E: Problem with MergeList /var/lib/apt/lists/archive.ubuntu.com_ubuntu_dists_natty_main_binary-amd64_Packages, E:The package lists or status file could not be parsed or opened.’
Аналогичная ошибка возникает если выполнять обновление с помощью команды apt-get update из терминала:
Reading package lists… Error!
E: Encountered a section with no Package: header
E: Problem with MergeList /var/lib/apt/lists/archive.ubuntu.com_ubuntu_dists_natty_main_binary-amd64_Packages
E: The package lists or status file could not be parsed or opened.
Для этой проблемы существует одно простое решение. Запустите терминал и выполните в нем по очереди следующие команды:
sudo rm -rf /var/lib/apt/lists/*
sudo apt-get clean
sudo apt-get update
Надеюсь это решение будет вам полезно.
Ошибка 2: E: Could not get lock /var/lib/dpkg/lock – open (11: Resource temporarily unavailable)
Часто при установке приложения или обновлении пакета встречается следующая ошибка:
E: Could not get lock /var/lib/dpkg/lock – open (11: Resource temporarily unavailable)
E: Unable to lock the administration directory (/var/lib/dpkg/), is another process using it?
Причина очевидна из текста самой ошибки “another process using it”. Это означает что другой процесс уже использует упомянутую выше директорию (/var/lib/dpkg/), которая необходима для установки приложения. Убедитесь что у вас не запущено одновременно следующие приложения: Менеджер пакетов Synaptic (Synaptic Package Manager), Менеджер обновлений (Update Manger), Центр приложений Ubuntu ( Ubuntu Software Center), обновление или установка пакетов с терминала. Идея состоит в том чтобы определить другое приложение, которое может устанавливать или обновлять этот пакет.
Дождитесь окончания процесса установки или отмените ее. Если вы не можете определить блокирующее приложение, то можете выполнить следующую команду в терминале:
sudo rm /var/lib/apt/lists/lock
Ошибка 3: The action would require the installation of packages from not authenticated sources
Бывает когда Менеджер обновлений отображает число новых обновлений, но при нажатии на кнопку установки возвращает следующую ошибку.
The action would require the installation of packages from not authenticated sources

Существуют следующие причины для этой ошибки:
Программное обеспечение является ограниченным авторскими правами; Приложение от партнеров из Canonical, но не было включено в список источников приложений; Приложение было установлено с исходных кодов; Отсутствует публичный ключ для сторонних источников.
Если вы не можете определить точную причину из выше описанного списка, то выполните следующие действия по очереди для каждой из ситуаций.
1) Программное обеспечение является ограниченным авторскими правами.
Запустите Менеджер обновлений и перейдите в меню настройки (Settings).

Теперь перейдите на вкладку Программное обеспечение Ubuntu ( Ubuntu Software) и убедитесь что напротив “Программы, ограниченные патентами или законами” (Software is restricted by copyright or legal issues) установлена галочка. Если нет, то выполните эту настройку и попробуйте обновится.

2) Приложение от партнеров из Canonical, но не было включено в список источников приложений.
В настройках Менеджера обновлений перейдите на вкладку Другое ПО (Other software) и включите исходный код (Source Code) для обновлений.

3) Приложение было установлено с исходных кодов.
В настройках Менеджера обновлений перейдите на вкладку Программное обеспечение Ubuntu ( Ubuntu Software) и отметьте опцию Исходный код (Source Code).

4) Отсутствует публичный ключ для сторонних источников.
Откройте терминал (Ctrl+Alt+T) и выполните в нем следующую команду:
sudo apt-get update
Теперь дождитесь окончания работы команды, после чего должен появится следующий текст:
W: GPG error: http:/something.something Release: The following signatures couldn’t be verified because the public key is not available: NO_PUBKEY XXXXXXXXXXXXXXXX
Скопируйте все числа, которые будут отображаться после фразы NO_PUBKEY. Эта ошибка вызвана отсутствием публичного ключа для добавленного стороннего источника. Чтобы решить эту проблему введите следующую команду в терминал:
sudo apt-key adv —recv-key —keyserver keyserver.ubuntu.com XXXXXXX XXXXXXXXX
После добавления отсутствующего ключа запустите еще раз команду на обновление:
sudo apt-get update
Надеюсь что эти действия решат вашу проблему.
Конечно же здесь не рассмотрены все ошибки при процедуре обновления, но на некоторые из них вы сможете найти решение.
| Пользователи |
| Последний пользователь:
Кто онлайн: Источник Устранение ошибки «E: Unable to locate package» на Ubuntu
Туториал для новичков: как избавиться от ошибки «E: Unable to locate package» на Linux Ubuntu. Команда apt или apt-get — один из способов установки ПО на Ubuntu. В терминале после команды прописывается название программы, которую нужно установить. Иногда в процессе установки происходит сбой. Уведомление выглядит следующим образом: Текст ошибки говорит сам за себя. Система не может найти пакеты, которые вы пытаетесь установить. Почему это происходит? Устранение ошибки «Unable to locate package» на Ubuntu
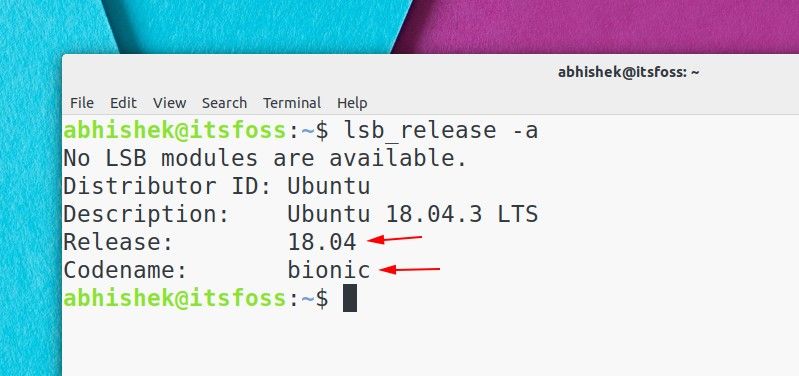
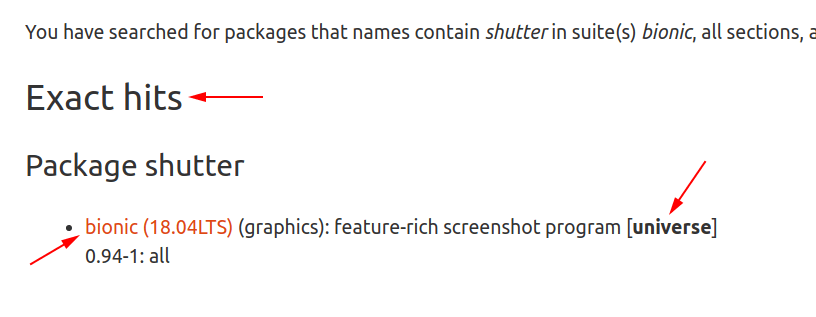
Шаг за шагом рассмотрим, что могло пойти не так. 1. Имя пакетаЭто нужно проверить в первую очередь. Возможно, в название закралась опечатка. Если нужно установить «vlc», а в команде прописано «vcl», то, вполне естественно, процесс прервётся. 2. Обновление кэша репозиторияВо время первого старта системы необходимо запустить обновление при помощи следующей команды: Эта команда не будет сразу же обновлять Ubuntu. Она предназначена для обновления информации о пакетах, содержащихся в репозиториях. Когда запускается команда установки, apt-менеджер находит в кэше информацию о пакете и его версии, после чего загружает файлы через репозиторий. Соответственно, если пакета нет в кэше, появится уведомление об ошибке. Сразу после установки новой системы, её кэш еще пуст. Именно поэтому в таких случаях необходимо прописать команду обновления как для Ubuntu, так и для любого другого дистрибутива на её основе (например, Linux Mint) во время первого запуска. Но даже при работе с давно установленной системой есть шанс, что нужный пакет не был подгружен. Чтобы исключить такую вероятность, стоит перестраховаться и обновить кэш. 3. Доступен ли пакет для используемой версии UbuntuИтак, название написано правильно, кэш обновлён, но ошибка всё равно появляется. Вероятно, пакет доступен через репозиторий Universe, а ваша система или не поддерживает его, или версия Ubuntu не поддерживается данной программой. Шаг первый – проверить актуальную версию Ubuntu через терминал. На выходе отображается номер версии и кодовое имя. Например, версия Ubuntu 18.04 c кодовым именем “bionic”. Шаг второй – расширенный поиск на сайте пакетов Ubuntu. На сайте доступна опция поиска по ключевому слову. Вводим название пакета и выставляем кодовое имя дистрибутива. В графе ”секция” нужно выставить значение ”any”. Запускаем поиск. Так можно узнать, доступен ли пакет для конкретной версии Ubuntu и, если доступен, то к какому репозиторию он относится. Разберём на примере Shutter, программы для создания скриншотов, которую не обновляли в течение последних лет. Для версии Ubuntu18.04 Bionic будут выведены следующие данные. В этом случае есть точное совпадение с названием пакета. Он доступен для версии Ubuntu 18.04 Bionic и относится к репозиторию Universe. Если искомый пакет доступен для вашей версии системы, но относится к Universe или Multiverse, необходимо установить дополнительные репозитории. После этого обновите кэш, чтобы убедиться, что пакеты доступны через репозитории. Ничего не помогло, что делать?Если пакет недоступен и на сайте Ubuntu, то нужно искать другой способ установки. Усилиями сторонних разработчиков были созданы персональные архивы пакетов (PPA). Здесь стоит быть осторожными с неофициальными архивами и не добавлять сомнительные версии в систему. Если этот способ не сработал, можно посетить официальный сайт проекта и уточнить, есть ли альтернативные способы установки их программ. На некоторых ресурсах доступны .DEB или AppImage файлы. Какие-то проекты могли перейти на пакеты Snap. Всегда есть вероятность, что проект был закрыт и более не поддерживается. В таком случае выход один: искать альтернативу самой программе. Источник How To Fix Ubuntu Update Error: Problem With MergeListOne of the most common error a user encounters while updating is Problem with MergeList. The error could be encountered while using both Ubuntu Update Manager and using the sudo apt-get update in terminal. The complete error looks something like this: It’s the second line that is important here. It tells you that the mentioned file in the second line got corrupted some how and so it cannot be parsed. Fixing MergeList problem in UbuntuThe one shot solution of this problem is to run the following two commands, one by one, in the terminal (Ctrl+Alt+T): You can generate a fresh one with this command: Voila! That should solve the “problem with merge list” error. Fixing MergeList problem in Debian and Raspbian OSIf you use Debian or Raspbian OS or even Ubuntu, you may see the MergeList error but the corrupted files may be different: This time, the issue is with /var/lib/dpkg/status. Handling this error is slightly different and slightly more complicated than the previous one. Now, you could but you shouldn’t just delete it straightaway. Make a backup first: What you need to do now is to get a backup of this status file and use it. The backup files are stored in /var/backups directory. You can list it out: Copy the latest backup: Try to run update now and see if the problem is fixed. If not, you can try with the next backup file. If the file is archived, you need to unzip it first. Once copied, run the update command again and check if it’s fixed. In other frequent Ubuntu update errors, one is Failed to download repository information. You may want to check them as well. Enjoy Ubuntu 🙂 Источник Adblock |


I have discussed a number of Ubuntu update errors in the past. If you use the command line to update Ubuntu, you might run into some ‘errors’.
Some of these ‘errors’ are basically built-in features to prevent unwarranted changes to your system. I am not going into those details in this quick tutorial.
In this quick tip, I’ll show you how to tackle the following error that you could encounter while updating your system or installing new software:
Reading package lists… Error!
E: Unable to parse package file /var/lib/apt/lists/archive.ubuntu.com_ubuntu_dists_bionic_InRelease
E: The package lists or status file could not be parsed or opened.
A similar error can be encountered in Debian:
E: Unable to parse package file /var/lib/apt/extended_states (1)
There is absolutely no need to panic even thought it says ‘The package cache file is corrupted‘. This is really easy to ‘fix’.
Handling “Unable to parse package file” error in Ubuntu and Debian-based Linux distributions
Here’s what you need to do. Take a closer look at the name and path of the file the Ubuntu is complaining about.
Reading package lists… Error!
E: Unable to parse package file /var/lib/apt/lists/archive.ubuntu.com_ubuntu_dists_bionic_InRelease
E: The package lists or status file could not be parsed or opened.
For example, in the above error, it was complaining about /var/lib/apt/lists/archive.ubuntu.com_ubuntu_dists_bionic_InRelease
This gives you the idea that something is not right with this file. Now all you need to do is to remove this file and regenerate the cache.
sudo rm <file_that_is_not_parsed>So in my case, I could use this command: sudo rm /var/lib/apt/lists/archive.ubuntu.com_ubuntu_dists_bionic_InRelease and then rebuild the cache with sudo apt update command.
Step by step for beginners
If you are familiar with Linux commands, you may know how to delete the file with its absolute path. For novice users, let me guide you to delete the file safely.
First, you should go to the directory where the file is stored:
cd /var/lib/apt/lists/Now delete the file which is not being parsed:
sudo rm archive.ubuntu.com_ubuntu_dists_bionic_InReleaseNow if you run the update again, the apt cache will be regenerated.
sudo apt updateToo many files cannot be parsed?
This is fine if you have one or two files that are not being parsed while updating the system. But if the system complains about ten or twenty such files, removing them one by one is too tiring.
What you can do in such a case to remove the entire cache and then generate it again:
sudo rm -r /var/lib/apt/lists/*
sudo apt update
Explanation of how it fixed your problem
The /var/lib/apt is the directory where files and data related to the apt package manager are stored. The /var/lib/apt/lists is the directory that is used for storing information for each package resource specified in your system’s sources.list.
In slightly noncomplicated terms, this /var/lib/apt/lists stores the package information cache. When you want to install or update a program, your system checks in this directory for the information on the said package, if it finds the detail on the package, then it goes to the remote repository and actually downloads the program or its update.
When you run the sudo apt update it builds the cache. This is why even when you remove everything in the /var/lib/apt/lists directory, running the update will build a fresh cache.
This is how it handles the issue of files not being parsed. Your system complained about a particular package or repository information that somehow got corrupted (either a failed download or manual change to the sources.list). Removing that file (or everything) and rebuilding the cache solves the issue.
Still facing error?
This should fix the issue for you. But if the problem still persists or if you have some other related issue, let me know in the comment section and I’ll try to help you out.
- Печать
Страницы: [1] Вниз

Тема: UPDATE проблема (решено) (Прочитано 13946 раз)
0 Пользователей и 1 Гость просматривают эту тему.

ABerezovsky

от такая от проблема ;
1.делаю апдейт
2.выдает
3.ищу в чем проблема
4.выдает
5.жмем Y
6.Я уже пробовал
1
2.
думал проблема в
3.
пробовал удалять
а потом апгрейднуть и поставить новие но безуспешно
а все началось когда во время апгрейда выдало Package system is broken ;unmet depencies
я уже не зеаю что делать
помогите пожалуста я новичок
спасибо
« Последнее редактирование: 06 Июня 2012, 00:55:17 от ABerezovsky »
san-alex
Он ругается на какой-то пакет в кэше. Попробуй, для начало почистить кэш:
sudo apt-get clean
v!tax
$ rm /var/cache/apt/archives/codeblocks-contrib_10.05-2_i386.deb
господь ведет твою руку, сын мой….
ABerezovsky
1.пробую под рутом
$ rm /var/cache/apt/archives/codeblocks-contrib_10.05-2_i386.deb
2.делаю апгрейд
видает что проблема в каком то пакете
тогда пробую почистить так sudo apt-get clean
смотрю в /var/cache/apt/archives/ пакетов нет
3. еще раз делаю апгрейд
Reading package lists… Done
Building dependency tree
Reading state information… Done
You might want to run ‘apt-get -f install’ to correct these.
The following packages have unmet dependencies:
 codeblocks-contrib : Depends: libwxsmithlib0 (= 10.05-1) but 10.05-2 is installed
                      Depends: codeblocks (= 10.05-1) but 10.05-2 is installed
4.пробую ставить через ubuntu software center
выдает
Package operation failed
The installation or removal of a software package failed.
details
installArchives() failed: (Reading database …
(Reading database … 5%
(Reading database … 10%
(Reading database … 15%
(Reading database … 20%
(Reading database … 25%
(Reading database … 30%
(Reading database … 35%
(Reading database … 40%
(Reading database … 45%
(Reading database … 50%
(Reading database … 55%
(Reading database … 60%
(Reading database … 65%
(Reading database … 70%
(Reading database … 75%
(Reading database … 80%
(Reading database … 85%
(Reading database … 90%
(Reading database … 95%
(Reading database … 100%
(Reading database … 170026 files and directories currently installed.)
Preparing to replace codeblocks-contrib 10.05-1 (using …/codeblocks-contrib_10.05-2_i386.deb) …
Unpacking replacement codeblocks-contrib …
dpkg: error processing /var/cache/apt/archives/codeblocks-contrib_10.05-2_i386.deb (—unpack):
trying to overwrite ‘/usr/include/wxSmithContribItems/wxchart/wxchart-1.0/include/wx/axis.h’, which is also in package codeblocks-contrib-common 10.05-1
No apport report written because MaxReports is reached already
dpkg-deb: error: subprocess paste was killed by signal (Broken pipe)
Errors were encountered while processing:
/var/cache/apt/archives/codeblocks-contrib_10.05-2_i386.deb
v!tax
господь ведет твою руку, сын мой….
Лерыч
Если команда ~Raven~-а выше не поможет, то попробуйте сперва удалить этот проблемный codeblocks-contrib:
sudo apt-get purge codeblocks-contrib*Ежели после этого проблема не исчезнет, или пакет откажется удаляться и/или система снова начнет ругаться, то попробуйте сперва:
cd /var/lib/dpkg/infoПосле чего снова:
sudo rm codeblocks-contrib.*
sudo apt-get -f install
sudo apt-get purge codeblocks-contrib*и пробуйте обновляться. А этот codeblocks-contrib Вы потом снова поставить сможете, если уж так нужОн…
« Последнее редактирование: 05 Июня 2012, 04:52:35 от Лерыч »
astrobeglec
Посмотри что пишется о пакете в /var/lib/dpkg/status
и выложи результат.
ABerezovsky
1.Сначала пробний апдейт
-прошол успешно
2.апгрейт
//стандартно codeblocks-contrib
The following packages have unmet dependencies:3.пробуем sudo apt-get -f install
codeblocks-contrib : Depends: libwxsmithlib0 (= 10.05-1) but 10.05-2 is installed
Depends: codeblocks (= 10.05-1) but 10.05-2 is installed
Unpacking replacement codeblocks-contrib ...3.пробуем sudo apt-get purge codeblocks-contrib*
dpkg: error processing /var/cache/apt/archives/codeblocks-contrib_10.05-2_i386.deb (--unpack):
trying to overwrite '/usr/include/wxSmithContribItems/wxchart/wxchart-1.0/include/wx/axis.h', which is also in package codeblocks-contrib-common 10.05-1
dpkg-deb: error: subprocess paste was killed by signal (Broken pipe)
Errors were encountered while processing:
/var/cache/apt/archives/codeblocks-contrib_10.05-2_i386.deb
E: Sub-process /usr/bin/dpkg returned an error code (1)
Reading package lists... Done4. еще раз апгрейт
Building dependency tree
Reading state information... Done
Note, selecting 'codeblocks-contrib' for regex 'codeblocks-contrib*'
Note, selecting 'codeblocks-contrib-dbg' for regex 'codeblocks-contrib*'
Note, selecting 'codeblocks-contrib-common' for regex 'codeblocks-contrib*'
Package codeblocks-contrib-dbg is not installed, so not removed
The following packages will be REMOVED:
codeblocks-contrib* codeblocks-contrib-common*
0 upgraded, 0 newly installed, 2 to remove and 29 not upgraded.
After this operation, 12,2 MB disk space will be freed.
Do you want to continue [Y/n]? y
(Reading database ... 170025 files and directories currently installed.)
Removing codeblocks-contrib ...
Removing codeblocks-contrib-common ...
Processing triggers for man-db ...
прошел успешно .Ура! 
Большое спасибо друзыя,особенно Лерыч.С большой радостью теперь сижу на Ubuntu как на основной системе.
Nikki1993
- Печать
Страницы: [1] Вверх