Рипер гибкая Daw не только в области создания различных экшенов, но и для настройки самого вида тема. Любую тему можно подстроить, изменяя её цветовую гамму, как вам заблагорассудится. И для этого есть несколько инструментов.
Во-первых — это твики, специальные утилиты. В моей конфигурации есть 2 твика:
- XR teame tweaker
- и твик developmen.
На первый взгляд XR teame tweaker — лучший для настройки и изменения темы, нежели твик developmen . Открывается он в actions и имеет такое описание: Script: X-Raym_Theme color tweaker.lua .

Достаточно набрать в строке поиска слово tweak и мы найдём два твикера: один — это будет скрипт, а другой твик developmen (Show theme tweak/configuration window) Оба они выполняют одну и ту же функцию и как я уже сказал, с их помощью можно настроить цвета темы. Например, изменить цвет курсора, бекграунд, и так далее…
Но разница между этим твиками такая:
- Xp teame tweaker подстраивает все изменения в реальном времени. Изменяете цвет элемента и тут же это увидели. Плюс в нем есть restore — восстановить значение по умолчанию.
- А в твик developmen — этого нет. Там настраивать сложнее. И на 2-3 клика дольше. Единственный его плюс — это компактность.

Поэтому для настройки темы лучше использовать Xp teame tweaker.
Другая опция для настройки тем — это глобальное изменение цветовой гаммы темы, а не её отдельных элементов.
Вводим в поисковой строке экшенов theme color и найдём следующее:
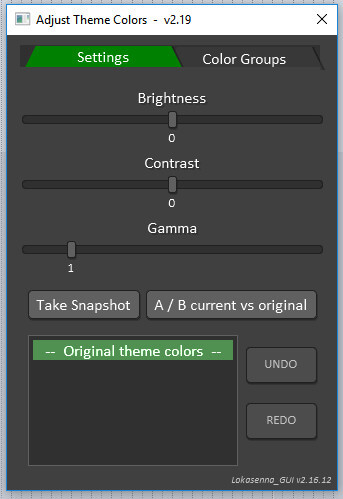
- Script: amagalma_Adjust theme colors.lua
- и Options: Show theme color controls
С их помощью можно сделать темы темнее светлее, контрастнее, добавить яркости. Но работают эти утилиты по-разному.
Script: amagalma_Adjust theme colors.lua добавляет яркости в общем для темы. Окно аранжировки можно сделать темнее, светлее. Панели треков точно также, но действия не затронут кнопки на панели, цвет фона браузера эффектов и так далее.
А вот Options: Show theme color controls — как раз таки будет влиять на многие мелки детали темы, на цвет иконок.

Таким образом тему можно настроить очень даже красиво и грамотно, с нужным контрастом и оттенком. Будет выглядеть не хуже, чем фирменный Cubase или Studio One.
Ещё что нужно знать, что касается тем в Рипере — это, что можно быстро переключаться между темами с помощью клавиш.
- Ctrl+Alt+Page Up
- или Ctrl+Alt + Page Down
Загруженные темы будут автоматически меняться. Не нужно заходить в options — tema и там выбирать тему. Конечно, можно тему настраивать и изменяя саму графику, но это уже задача больше для дизайнеров, а не для музыкантов.
Вообще, что касается настройки темы, я бы посоветовал выбрать одну из множества имеющихся и остановится на ней. Сразу не настраивать, а начать работать. И уже по ходу вы поймёте, что вам бы хотелось улучшить.
Я например, остановился на теме Janne. И вот её имею пару вариантов, светлую и тёмную.
Поэтому, что касается Рипера, то я советую — работайте в Рипере, а не настраивайте его!
Пусть у вас будет 90% — работа, а 10% настройка по мере необходимости. Потому что настраивать Рипер можно бесконечно долго. А вам ведь нужно его использовать а не настраивать.
Пусть настройка — это будет приятный бонус, который даёт программы, но не основной смысл её смысл.
|
|
#1 |
|
Human being with feelings Join Date: Apr 2016 Posts: 653 |
How would I go about adding specific color swatches on the toolbar? |

|
|


|
|
#2 |
|
Human being with feelings
Join Date: Jan 2010 Location: Just outside of Glacier National Park Posts: 14,387 |
Quote:
Originally Posted by Greg Savage How would I go about adding specific color swatches on the toolbar? What exactly are you asking, do you want a toolbar that you can use to color tracks and items? Or something else? |
|
|
|


|
|
#3 |
|
Human being with feelings Join Date: Apr 2016 Posts: 653 |
Quote:
Originally Posted by Tod What exactly are you asking, do you want a toolbar that you can use to color tracks and items? Yes exactly! |
|
|
|
|
|
#4 |
|
Human being with feelings
Join Date: Sep 2009 Posts: 856 |
Quote:
Originally Posted by Greg Savage Yes exactly! Like ED’s color toolbar ? … which is now unsupported I believe Or, you could use Airon’s colour swatch … which is in ReaPack — it can be configured to show a grid of colour rather than a full spectrum.
I created a couple of toolbar icons — One for the swatch, one for setting child tracks to parent colour, and one to set the default colour.
They’re on the stash if you want them. https://stash.reaper.fm/31913/neverb…ar%20icons.zip
Last edited by RobU; 10-16-2017 at 10:51 PM. Reason: Added icons to the Stash
|
|
|
|


|
|
#6 |
|
Human being with feelings
Join Date: Sep 2009 Posts: 856 |
Then its the first link, Ed’s colour toolbar. |
|
|
|
|
|
#7 |
|
Human being with feelings
Join Date: Jan 2010 Location: Just outside of Glacier National Park Posts: 14,387 |
It’s not too difficult to create your own, I did that some time ago. However, a friend of mine used Python to make a very handy little toolbar that’s very versatile.
It requires Python and requires you to make a little change in the S&M.ini file, but it works very well. It was created by my good friend, Robert Villwock (aka Big Bob), and I know he wouldn’t mind sharing it. If anybody would like to have it, please say so and I’ll try find some time to do that today or tomorrow. |
|
|
|


|
|
#8 |
|
Human being with feelings Join Date: Apr 2016 Posts: 653 |
Quote:
Originally Posted by RobU Then its the first link, Ed’s colour toolbar. Thanks boss |
|
|
|
|
|
#9 |
|
Human being with feelings Join Date: Apr 2016 Posts: 653 |
Quote:
Originally Posted by Tod It’s not too difficult to create your own, I did that some time ago. However, a friend of mine used Python to make a very handy little toolbar that’s very versatile.
It requires Python and requires you to make a little change in the S&M.ini file, but it works very well. It was created by my good friend, Robert Villwock (aka Big Bob), and I know he wouldn’t mind sharing it. If anybody would like to have it, please say so and I’ll try find some time to do that today or tomorrow. How are you doing it yourself? |
|
|
|
|
|
#10 |
|
Human being with feelings
Join Date: Jan 2010 Location: Just outside of Glacier National Park Posts: 14,387 |
Quote:
Originally Posted by Greg Savage How are you doing it yourself? Hi Greg, There are several SWS actions to set color for items/takes and tracks. It’s been quite a while ago, but I think it requires setting up the color pallet slots with your preferred colors, in my case I’m on Widows 7. Then SWS has actions that uses those slots. I thought I might have my original, but I looked and couldn’t find it. After setting up Bob’s toolbar there was no need. At any rate check the SWS actions for «color». |
|
|
|
|
|
#11 |
|
Human being with feelings Join Date: Apr 2016 Posts: 653 |
Quote:
Originally Posted by Tod Hi Greg, There are several SWS actions to set color for items/takes and tracks. It’s been quite a while ago, but I think it requires setting up the color pallet slots with your preferred colors, in my case I’m on Widows 7. Then SWS has actions that uses those slots. I thought I might have my original, but I looked and couldn’t find it. After setting up Bob’s toolbar there was no need. At any rate check the SWS actions for «color». Gotcha |
|
|
|
|
Forum Jump |

All times are GMT -7. The time now is 06:33 PM.
Powered by vBulletin® Version 3.8.11
Copyright ©2000 — 2023, vBulletin Solutions Inc.
In this video I’m sharing some of the things I learned recently about modifying the REAPER 6 theme. My notes and links to more resources are in the blog below.
02:36 – Comparing Default 6 to my R6 Reaperblog theme
03:56 – Basic Theme Adjustments
05:45 – Unpacking the theme
08:09 – Theme Images Folder
10:17 – Reloading the theme
11:06 – Media item volume knob
13:05 – Toolbar button borders
16:39 – Custom track meters
21:36 – rtconfig.txt
23:01 – Transport buttons
29:42 – TCP Button Order
32:47 – The Mixer
Basic Adjustments
There are two ways to modify the REAPER 6 theme from inside reaper. First there is the new theme adjuster window. Use this to configure the name width, folder indents, and hiding of buttons in the TCP, MCP and transport. Once you make your custom theme you might find the menu option is disabled, but you should still be able to open it from the action list.
After adjusting the theme with this script the settings should be written into a file called “reaper-themeconfig.ini”
The second place to make changes is in the Theme Development Tweaker window. You’ll also find this in the action list. You can adjust many of the theme colors in here. Some of these do not override what’s been written into the theme settings file.
We’ll have to come back to this window in a bit.
Unpacking the theme
Let’s go over to the colorthemes folder and duplicate the default 6 theme (Default_6.0.ReaperThemeZip), rename to change the file extension to .zip, and confirm.Now we can unpack this zip file to access all the theme image files.
If the folder has “unpacked” suffix or anything else you can rename it. The theme and the folder of images should have the same name.
Let’s quickly go back to REAPER and load the custom theme. It’s going to look very broken at this point because the image folder changed. We just have to go back to the theme tweak window to pick the images folder, then save again. It should look exactly the same as the default 6 theme again.
Theme Images Folder
Back to the theme folder.
This is a HiDPI theme so there are 3 image folders. The main folder, then the 150 and 200 folders for higher res images.
My main monitor is a MacBook Pro Retina screen, so it’s HiDPI, but my second monitor is an older Dell and standard DPI. That means if I want to modify an image I should probably do it in both the main folder and 200 folder. Not all theme files will be in all 3 folders. If something isn’t in the 200 folder then it will fall back on the standard folder.
If you’re not sure which folder the theme is using for files, try renaming the 200 folder and see if that totally breaks it.
Reloading the theme
Each time we change something in the theme we have to reload it in reaper to see the changes.
You can do this in several ways:
– Press the “reload images” button in the Theme Development window
– run “Script: Lokasenna_Refresh current theme.lua”
– switch to another theme and back,
– using the SWS Resources window, if you have that set up.
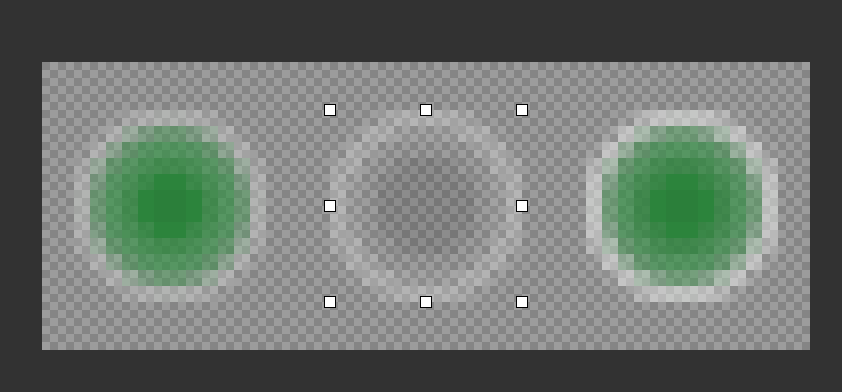
Editing Media Item Volume knob
I don’t like the way the item volume knobs look in the default 6 theme. They stand out too much and distract me. For any file I modified I added zz to the file name of the original so I can easily find and revert. I opened “zz_item_volknob.png” in Pixelmator Pro and for the 3 knob states changed them all to be the same. Then filled in the center with the same green hue as the other item icons. It fits in with the track much better.
A lot of the images in the theme will be a 3-slice image format with normal, mouseover, and pressed versions of the button. Some of the buttons have two files like “transport_play.png” and “transport_play_on.png”. And some are a special overlay style like “track_solo_off_ol.png”.
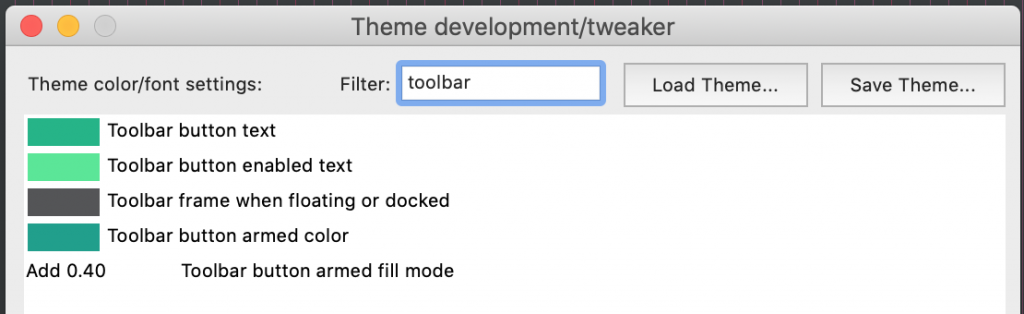
Toolbar Button Borders
Let’s fix the toolbar buttons
The default theme has no border around buttons or overlay, so they don’t really look like buttons unless they’re pressed. If you look at the buttons in v5 default and pretty much every other theme you’ll see there’s a different color, a border, and highlights that make them stand out.
toolbar_blank.png is used as the background of the button under whatever icon or text you add.If you want a border, this is the one to use.
composite_toolbar_overlay.png isn’t used in this theme but was used in older themes for a shadow and highlight effect on all toolbar buttons.
You may notice that some toolbar buttons don’t get the border, that’s because specific toolbar buttons in the theme folder will override the generic ones that are in the data/toolbar icons folder. The lock and metronome buttons on the main toolbar have custom icons in the theme folder. So be prepared to modify those as well if you want a completely unified look.
The other parts of the appearance of toolbar buttons is done in the theme tweaker. “Toolbar button text” and “toolbar button text enabled” is used for your text icons. “Toolbar button armed color” and “Toolbar button armed fill mode” is used when you right-click a button. I like Add mode with alpha of 0.4
Custom Track Meters
Like most things in the theme there are two ways to adjust the meter colors. First is by modifying a few image files…
- meter_bg_v.png
- meter_bg_h.png
- meter_bg_mcp.png
- meter_bg_mcp.png
- meter_bg_tcp.png
- meter_bg_tcp.png
- meter_bg_tcp.png
- meter_clip_h.png
- meter_clip_v_rms2.png
- meter_clip_v.png
- meter_strip_v.png
- meter_strip_v_rms.png
- meter_strip_h.png
If you remove or renaming those images you can change the colors directly in the theme tweaker.
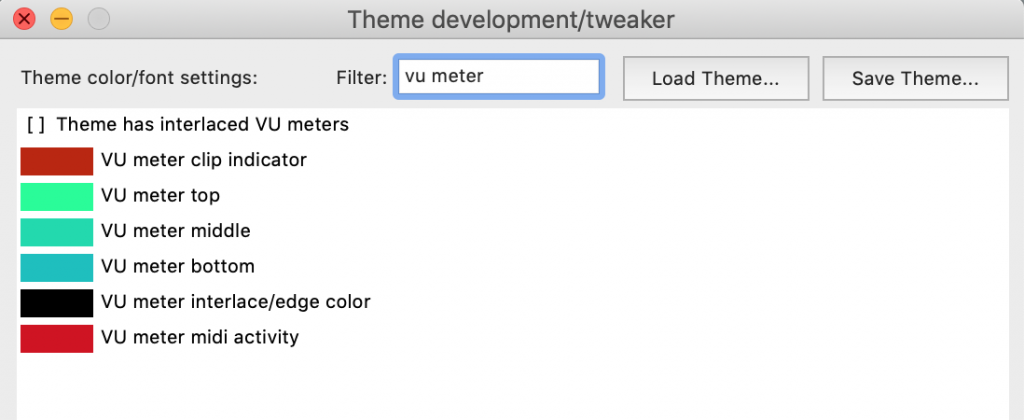
If you want complete control over the meter colors, use the meter_strip files. You can copy them from other themes or download some from the reaper stash and forum. The one I’m using is by the user Blankfiles, which I’ve adapted for horizontal and RMS versions meter_strip_v.png meter_strip_v_rms.png meter_strip_h.png
strip_v is the main one used in TCP and MCPstrip_h is used by the master track in arrange viewstrip_v_rms is used by the master track in mixer if RMS is enabled
I also modified meter_clip_h.png and meter_clip_v.png for the clip indicators
Here’s where the real pain begins
rtconfig.txt
“rtconfig.txt” contains all the code that connects the theme images and colors and functions to make it work. This is not something that you can learn in an afternoon. This is something I still feel pretty much hopeless trying to figure out.
Luckily I’m not trying to make big changes so I’ve been able to use a lot of trial and error to get by. Most of the documentation from version 4 and 5 should still help you if you want to dig into what White Tie has written.
The top section has some global settings. You probably won’t want to change any of these, although I will point out “tcp_heights” is where you would change the heights of your child tracks when collapsed in a folder.
Transport buttons
Jump down to the Transport section
look for “; draw content in sec_buttons”
I want to hide the rewind and forward buttons for the layoutI’m commenting out the line “set trans.rew” and “set trans.fwd” using a semicolon.
I can add a semicolon to the start of any lines to make it a comment, and prevent it from being used.
Things will probably be weird if we save and reload the theme now.
A ton of stuff in the theme file uses the position of some other element as their anchor point, that’s what we see here
[trans.rew sec_buttons]
If we hide the rewind button, and then use it’s position for the next element things are going to look wrong. We need to change the anchor for the next visible button to what the rewind was using originally.
[sec_buttons sec_buttons]
Basically we define the position of one of the buttons in the Transport, then make all the other buttons position themselves after.
But things are still also control by the section labeled “; Set absolute sizes…”
When you combine the absolute sizes, plus the relative position, plus scaling for different DPIs, and different layout presets… none of this is very straightforward, but not impossible.
Transport Images
Once you start moving the transport buttons around you’ll have to edit them all to adjust the drop shadows and anything else that looks out of place.
Don’t forget to edit all versions of the transport buttons. Its easiest to edit the 200 file and then export pngs in 3 sizes.
Track controls order
The TCP section of rtconfig starts at line 150 and goes to 640. I’m not going to go through most of this stuff, just the layouts section.
Stuff in the TCP can fairly easily be rearranged just by changing the order in the “then” section. This is actually a bit easier than editing the Transport section.
Line 413 is the start of Layout A. The layout has the pan as one of the last visible controls.
In the “then” section I’m going to simply cut and paste to change the order, and put the pan right after the volume. I going to repeat this change on all the other layout A scaled versions so I know it will look the same on both of my screens.
And there we go, the pan knob is now beside the volume.
You can do some other things like putting the routing button beside the record enable, add some padding, but it will look a bit wrong unless you customize the images.
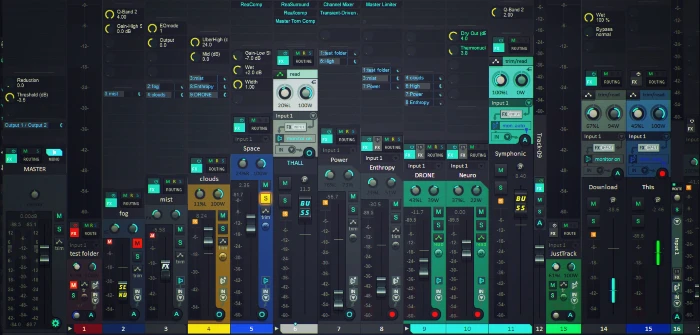
Mixer controls order
I would love to get the routing button between the fx and the panning, but I can’t make any sense of the mixer section of rtconfig. I’ll have come back to this another time.
So that’s where I’m at with learning to edit the REAPER theme. I’ve done a lot but I’m still stuck on several things.
Hope this has been helpful and interesting. It’s been exhausting!
I have so much respect now for the “real” themers that put in countless hours and share the them for free in the end.
Links and resources
White Tie’s WALTER themer’s guide (PDF)
REAPER Color Themes forum
REAPER Stash – download complete themes, meter strips and other assets

-
#2
Собственно вопрос.
Я столкнулся со странным поведением. В коде rtconfig.txt
Имеются строки отвечающие за цвет порядкового номера треков.
set tcp.trackidx.color ?track_selected [50 50 50]
Начиная с 6й версии Рипера, цвет порядкового номера и имени трека динамически изменяется в зависимости от выбранной пользователем окраски трека (custom color), однако этот цвет
четко определяется в случае если трек выбранвыделенн (что подтверждает вторая строка с значением ?track_selected 50 50 50)
От того что цвет динамический, строка «set tcp.trackidx.color»
не имеит определенного значения. Тем не менее когда вы создадите новый трек, цвет порядкового номера будет определенным в оттенках светло серого хотя строка этого значения пуста, если вы попытаетесь изменить это значение то пропадает динамическая функция цвета и при окраски пользовательским цветом этот номер уже не подстроиться под выбранный цвет.
Суть задачи: как правильно изменить яркость цвета порядкового
номера сохраняя его динамическую функцию, это нужно чтоб не окрашенные новые треки читались в темных темах. т. к. разробатываемая тема темная, я изменяю фон стандартного неокрашенного трека на темный, и цвет порядковых номеров теряется и сливается с этим фоном, пока вы не окрасите трек. Это также касается цвета порядковых номеров в микшере по аналогии с окном арранжировки.
Это странно так как у этих элементов имеется определенный цвет «из коробки», но строки за это отвечающие пусты.
Я предполагаю что где то существует строка определяющая данный оттенок позволяющая не разрушать идею динамического изменения, если вы располагаете такой информацией прошу поделитесь.
P.S: Принципы Inquasar Dark Matter подробно изложены в источниках, и одним из главных принципов является преображение интерфейса с максимальным сохранением дефолтного расположения элементов управления и заложенных функций, я могу справиться с изложенной проблемой просто задав дискретное значение trackidx в качестве незначительного компромисса, но хочется сохранить эту восхитительную деталь.

Последнее редактирование: 25 Июн 2022
-
#3
в стандартной теме там вот такая строка есть
text_over_custom tcp.trackidx.color
set tcp.trackidx.color ?track_selected [50 50 50] .
поиск по строке «text_over_custom» в текстовом редакторе выдаёт вот такое
; —— GLOBAL SETTINGS FOR TEXT COLORS ——
set custom_col [trackcolor_r trackcolor_g trackcolor_b]
set luma + + * 0.299 [trackcolor_r] * 0.587 [trackcolor_g] * 0.114 [trackcolor_b]
; macro for the color of text that is drawn over custom colors
set swapLuma 130 ; (0 to 255) custom color brightness to switch from ‘light’ to ‘dark’ text
set pushLuma 90 ; (0 to 255) very dim custom color brighness
macro text_over_custom element
set element ?trackcolor_valid
?track_selected
+ custom_col luma{0}<swapLuma{0}
luma{0}<pushLuma [220 220 220] [-100 -100 -100]
[-120 -120 -120]
+ custom_col luma{0}<swapLuma{0}
luma{0}<pushLuma [180 180 180] [100 100 100]
[-120 -120 -120]
?track_selected [66 67 67] [54 57 57]
endmacro
меняя цифры 100 100 100 на, например 150 150 150 у меня получилось сделать текст ярче и он был по прежнему окрашен в цвет канала
+ custom_col luma{0}<swapLuma{0}
luma{0}<pushLuma [180 180 180] [100 100 100]
[-120 -120 -120]
я не понимаю как вся эта дичь работает но возможно вас это натолкнёт на решение
Последнее редактирование: 28 Июн 2022
На момент изучения этого секвенсера мне приходилось постоянно копаться в интернете, дабы найти ответы на свои вопросы, в итоге решил составить полный перечень ответов, взятый с разных источников, на часто (да и редко тоже ![]() ) задаваемые вопросы по настройке программы, работы в ней, визуального оформления и.т.п.
) задаваемые вопросы по настройке программы, работы в ней, визуального оформления и.т.п.
Итак, начнем с самой программы, которую можно скачать на нашем сайте (старая версия 4.72), программа с таблеткой внутри, либо качаем на официальном сайте самую свежую версию программы. Можете пользоваться официальной версией, ограничений на использование этой daw никаких нет, единственное, при запуске программы у вас будет висеть окно с лицензионным соглашением и приглашением приобрести программу, в течении 5 секунд, ну а по юридическим правилам, согласно этого соглашения, вы просто обязаны приобрести ее через 60 дней использования. Надеюсь совесть у вас есть-)
Ну а теперь собственно и сами ответы:
1. Имеется ли встроенный Bridge в хосте?
Конечно, и довольно неплохой
2. Корректный ли русификатор тут http://stash.reaper.fm/v/12052/Russian.ReaperLangPack последняя версия от декабря 2013.
Корректный, но переведено не все, точнее даже меньшая часть программы, в основном меню. Лучше посмотреть этот русификатор или скачать инструкцию
3. Имеются ли в составе программы все необходимые плагины (миди/аудио) для обработки?
Смотря какие плагины вам нужны. В пакете JS их огромное количество (но в оформлении они «никакие»). Советую скачать некоторые бесплатные, которые по качеству не уступают коммерческим, либо установить те, которые вы больше любите.
4. Возможно ли сохранить все необходимые настройки программы для быстрого вызова, либо сделать их по умолчанию?
Конечно можно сохранить/загрузить нужные вам настройки. Options->Preferences->General Export configuration…
5. Существует ли заморозка vst инструмента?
Конечно, правой кнопкой на нужном эффекте и Freeze с нужными параметрами.
- Заморозка инструмента
6. Можно ли миди трэк быстро преобразовать в аудио как например в S1, а не экспорт-импорт…
Все делается в меню Freeze. См предыдущий пункт. Либо правой кнопкой на дорожку или объект и выбрать Render с нужными настройками
7. Возможно ли привязать/открепить окна (микшер и.т.п)
Правой кнопкой на заголовке нужного окна и внизу Dock … in Docker(поставить/снять галочку)
8. Можно ли группировать дорожки в папки?
Здесь группируется не в папку, немного иначе.
Создаете новую дорожку, выделяете нужные дорожки(с крутилками), которые нужно кинуть в папку, и наводите на созданную, чтобы синяя линия была не на всю ширину трека(обрезанная слева)
9. Можно ли на дорожку ставить визуальную иконку?
Правой кнопкой на дорожку(где все ручки) Custom track icons
- Выбрать и установить иконку на трэк
10. Где можно скачать темы визуального оформления программы?
11. Скачал цветные иконки треков в — .jpg Положил в папу с иконками Рипера, но он их не видит
Тыкаешь по треку, якобы хочешь присвоить ему иконку, откроется папка для выбора, берешь и перетаскиваешь туда все что тебе надо… оп, теперь иконки доступны для юзанья
12. Как избавится от воспроизведения хвостов midi нот, а так же плавно останавливать воспроизведение без рывка?? см. видео
Решение на данный момент (27.09.14) еще не найдено ![]()
13. Как окрашивать весь трек и айтем полностью, а не только подпись и нотки???
Options->Preferences->Peaks/Waveforms Custom colors и поставьте нужные галочки
- Выделить цветом весь трэк
14. Как добавить регионы — те которые сверху? Они вроде отвечают за рендер. Еще вопрос: можно ли в рипере управлять порядком воспроизведения item’ов — как это сделано в кубейсе через трек- аранжировку?
Регионы создаются сочетанием клавиш shift+R, можете проверить в меню Insert -> Region (from time selection). в рипере нет трека аранжировки, поэтому порядок айтемов проще всего менять как раз с помощью регионов, меняя их местами, захватите регион и потяните в нужную сторону, все что внутри региона так же переместится.
15. Как сделать так,чтоб мастер канал был справа,а остальные фэйдеры слева?
16. Поддерживает Reaper VST3 или нет?
На момент публикации ответа версия была 4.731 — НЕТ не поддерживает.
Версии 5.х уже имеют поддержку VST3
17. Как сделать клипы цветными? А то цвет получается изменить только у нот в клипе, а сам клип постоянно серый((
Можно
- Цвет клипа полностью, не только нот
18. Как убрать привязку к темпу WAV файла? Т.е. например темп проекта стоит 120, я закидываю WAV файл на дорожку и когда меняю темп проекта меняется темп этого WAV файла, вот где это отключить можно?
В project settings переключите просто параметр «timebase for items/envelopes/markers» на «Beats (position only)».
19. Можно ли делать дупликейт ноты,или группы нот в миди редакторе ? чтобы они вставали сразу за последним миди сообщением.то есть не копи паст,а дупликейт, как с итэмами
Выделяешь и ctrl+d
20. Можно ли назначить кнопки в Reaper с миди клавиатуры, если да, то как это сделать?
Конечно можно. В меню выбрать Actions->Show action list. Найти необходимый параметр и добавить нажатие миди кнопки путем нажатия самой кнопки.
- Назначить кнопки управления с миди клавиатуры
21. Как сделать что бы Takes (тэйки) в одном треке играли одновременно?
Правой клавишей на клипе Item settings->Play all takes
If you have ever used Reaper, you know it’s a great DAW. And one of the best features is Reaper themes. You can easily change the design and make it custom.
Many Reaper users and developers create different color themes and icon sets for Reaper. They enhance the interface and make more modern and classy interface designs.
What’s The Best Reaper Theme?
I love Reaper and think it’s the best digital audio workstation. It is very affordable and professional, comes with some amazing free plugins, and is very customizable. For this post, I chose the ten best color themes for Reaper. You can download and use all these color themes for free.
1. Analog API

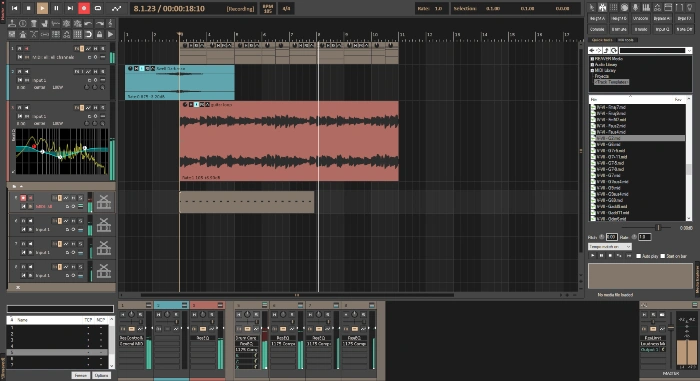
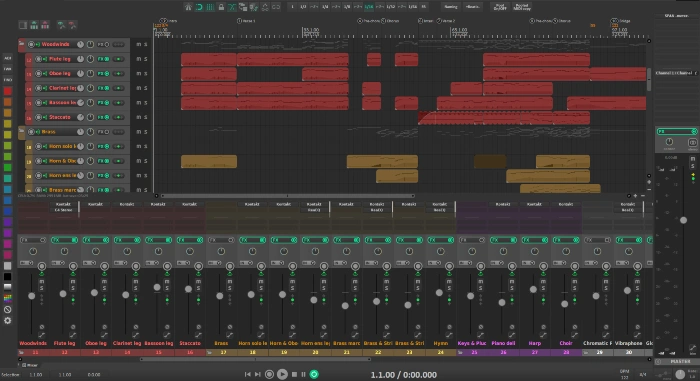
Analog API is an amazingly beautiful theme for Reaper. It’s a dark theme with gold and blue accent colors. The design looks somewhat retro but modern at the same time. The mixer and transport sections look great and it’s easy to use. There is a very good contrast between the background and elements such as tracks, buttons, sequencers, etc. This theme has a metallic feel to it. If you like dark themes in general, then the Analog API theme for Reaper will be a great choice.
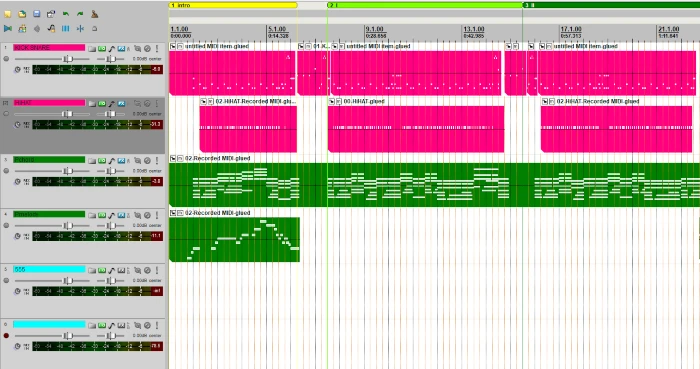
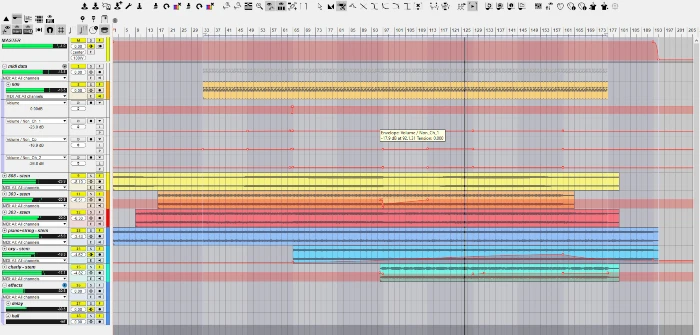
2. Inquasar Dark Matter
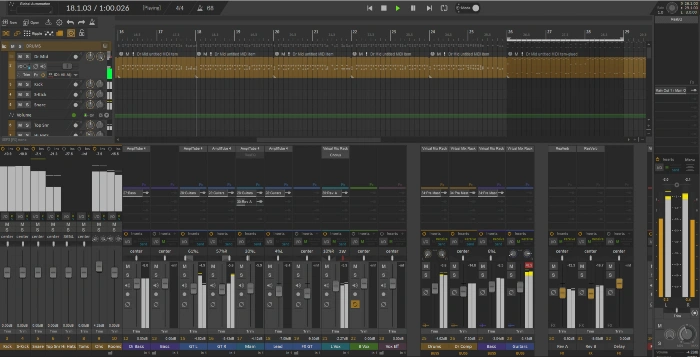
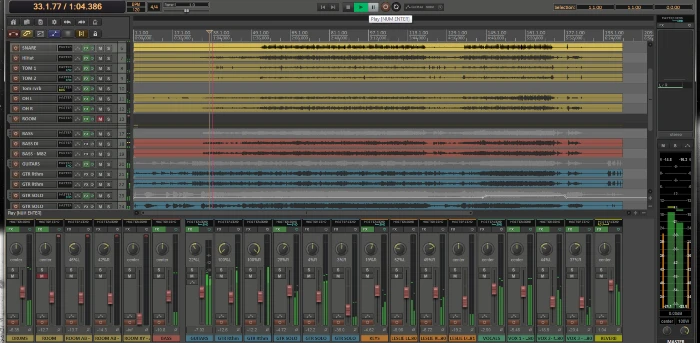
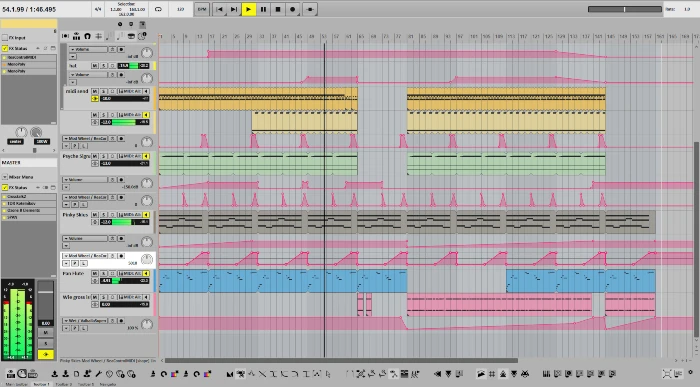
Inquasar Dark Matter is one of the most beautiful Reaper themes. It’s a very colorful dark theme with a beautiful interface. The contrast between different elements and backgrounds is very good. That makes it easy to navigate. It uses LED-like colors and is very vibrant. When you create a bus track, the fader has the name on it and it’s very intuitive. Every element is custom and works well with each other.
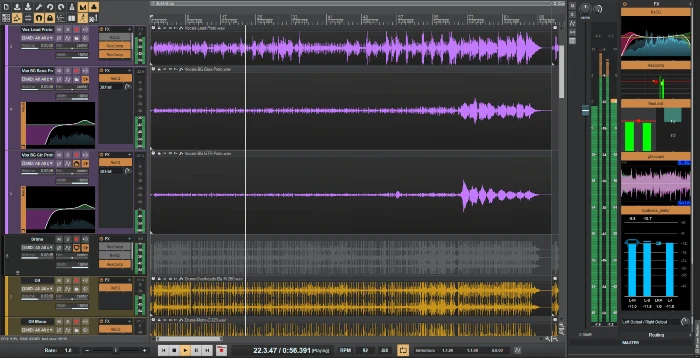
3. Classic Colorful Pro
Classic Colorful Pro is for those who like light themes. And it’s one of the best light themes for Reaper. Has a very simple and intuitive interface and works with other colors too. Custom faders, track colors, sequencers, and other elements work great together. It reminds me old Windows interface. Feels like an old app. This is a good theme for those who love retro style and light app interfaces.
4. ReaCoffee
ReaCoffee has a very minimalistic, modern, and classy interface. The color palette of this theme is beautiful and very high quality. Buttons and elements have slick and flat designs which look amazing. It’s very easy to navigate and understand the interface because of the colors and structure. The tracks are compact and the layout is really good. Also, contrast is good between elements.
5. Hydra
Hydra is one of the best themes for Reaper you can find. It has so many great features, elements, design, and feel that it’s hard to surpass. You will love it if you like dark themes in general. Different UI elements have a beautiful flat design and the interface looks very modern. One of the greatest features is the mixer. Especially, the layout. Also, the color palette is amazing.
6. Default Analog
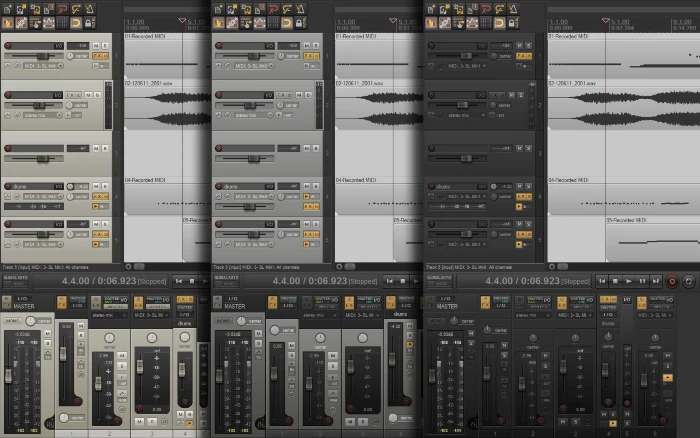
Default Analog is an old Reaper theme that gets regular updates. It’s an enhanced version of the default Reaper interface. A great thing is that it has three color variants. You can choose between a creme, gray, and black. So, this is a light and dark theme at the same time. The main accent color is yellow and looks great. It feels like a real device. My favorite style is the dark version.
7. Grey Hound
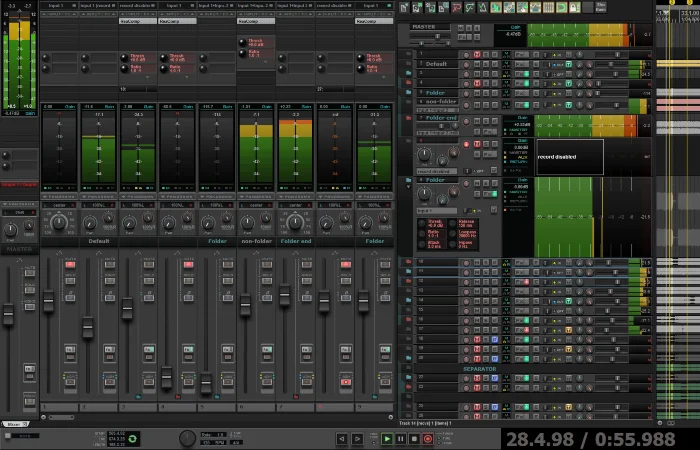
Grey Hound is another cool free theme for Reaper. It features low and dimmed colors, a modern interface, and beautiful elements. Tracks, mixers, and inserts have a good and easy-to-understand design. Play and record buttons are in the center, on the top panel which makes it more convenient. I love the style of the volume meter, especially on the master bus. This theme has a modern design and is a great dark theme.
8. VGS
VGS is a very interesting Reaper theme. It has a light and dark version but I like the light one more. It’s very simple and minimalistic. Icons have a flat design and the whole interface looks flat and modern. Simple designs for tracks, mixers, sequencers, meters, etc. The pastel color scheme works great with the light background. If you are switching from a dark theme it might be difficult to adjust. Instead, you can use a black version of the theme.
9. Echolot
Echolot is one of my favorite Reaper themes. The design, especially the buttons remind me of a Reason interface which I love. The interface has a flat design that looks modern. Vibrant colors work great with a dark background. Special buttons have a light color and they stand out. I love how volume meters look on Echolot. It’s very easy to understand the volume of your tracks.
10. LCS Gold
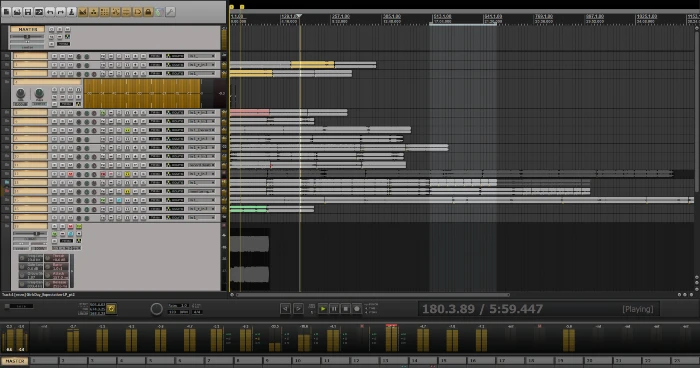
An amazing dark theme is LCS Gold. It’s so simple yet beautiful. It really reminds me of an analog, real device. Especially the mixer and buttons. It’s like you work with a real console. The background is dark gray and the accent color is yellow. That’s where the name of this theme comes from. There are not many colors and I really like it. It’s simple, modern, and beautiful.
11. Concept Six Basic
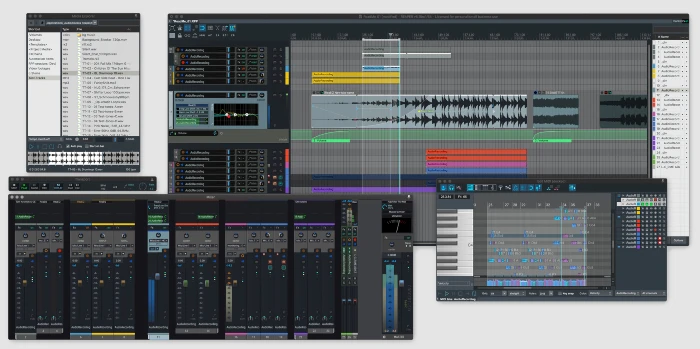
Concept Six Basic is a good theme if you like dark themes with blue accent colors. In general, colors are configured in a way that makes navigation very easy. You can see every button or option. The tracks and mixer look amazing. Even audio meters have a light blue color and it looks excellent. Faders have neon colors and they stand out. The colors are configured very tastefully. A very stylish theme for your DAW.
12. MyTaste
MyTaste is one of the greatest themes for Reaper DAW. It’s tasty, looks modern, has a great color scheme, and has a great layout. You can download dark and light versions but in my opinion, the dark one looks better. Has a flat design and green is the main color. The mixer has a minimalistic design and looks amazing. I love how the FX panel turns green when engaged.
13. TC Original
TC Original stands out among other Reaper themes. It’s a light theme and has almost the exact interface as Ableton has. So, if you are switching from Ableton to Reaper, then this is the perfect theme for you. Buttons, tracks, mixers, meters, inserts, and other elements look like Ableton. Also, the layout is similar to Ableton. A really great light theme for Reaper users.
14. Solaris LCS Gray
Solaris LCS Gray has a perfect design for a DAW. It really feels like a real device. Buttons have a 3D-like flavor and it feels like you press the real buttons. Its light dark background sits well with red, blue, yellow, and green colors. Faders, buttons, knobs, and switches look real, and it’s easy to find them. The whole layout is great with this theme. When you work on this theme, it feels like a real console. I love Solaris LCS Gray and I highly recommend it.
15. Blackmore
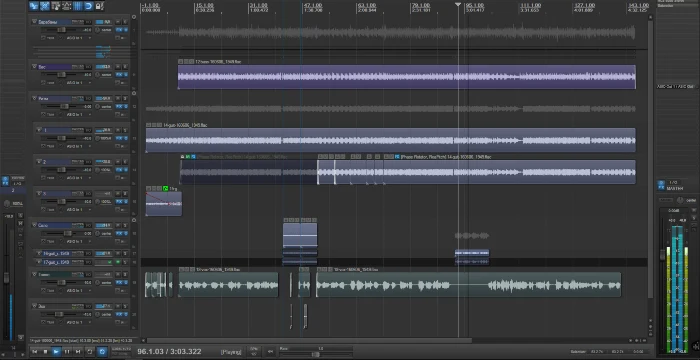
Blackmore Reaper theme is an elegant-looking dark theme for Reaper with a beautiful and slick interface. I tested it recently and it looks amazing. If you love dark app interfaces then you will like it. The accent color is blue and it fits in the black layout. Tracks, faders, and buttons are all black with blue as an active color. Also, volume meters are blue instead of green which looks amazing.
How To Install A Reaper Theme
Installing a Reaper theme is the easiest thing to do. You don’t need to know anything special to accomplish it. Changing the Reaper layouts is a great way to customize the Reaper interface and make it custom.
Reaper themes have custom file extensions – ReaperTheme. So, an example of a simple Reaper theme name is mytheme.ReaperTheme.
To install a theme in Reaper go to the theme page and download it. Open Reaper and then you have two options:
- You can just double-click on the theme
- Or drag the theme file in the Reaper interface
And that’s it. A new theme is installed in Reaper and you will see the new Reaper DAW skins immediately. You can install as many themes as you wish.
And to switch themes in Reaper you need to go to Options > Themes. There will be all the themes you have installed plus the default themes. Click on it and it will change.
Conclusion
There are many reasons why Reaper is the greatest DAW. And one of the reasons is the ability for customization. Reaper themes are a great asset to have. They are free to use and you can find countless great color themes for your DAW. Also, you can create your custom themes and share them with others. Also, Reaper comes with amazing free VST plugins.