This page explains how to display and customize the reCAPTCHA v2 widget on your webpage.
To display the widget, you can either:
- Automatically render the widget or
- Explicitly render the widget
See Configurations to learn how to customize your widget. For example, you may want to specify the language or theme for the widget.
See Verifying the user’s response to check if the user successfully solved the CAPTCHA.
Automatically render the reCAPTCHA widget
The easiest method for rendering the reCAPTCHA widget on your page is to include
the necessary JavaScript resource and a g-recaptcha tag. The g-recaptcha tag
is a DIV element with class name g-recaptcha and your site key in the
data-sitekey attribute:
<html>
  <head>
    <title>reCAPTCHA demo: Simple page</title>
    <script src="https://www.google.com/recaptcha/api.js" async defer></script>
  </head>
  <body>
    <form action="?" method="POST">
      <div class="g-recaptcha" data-sitekey="your_site_key"></div>
      <br/>
      <input type="submit" value="Submit">
    </form>
  </body>
</html>
The script must be loaded using the HTTPS protocol and can be included from any
point on the page without restriction.
Explicitly render the reCAPTCHA widget
Deferring the render can be achieved by specifying your onload callback function
and adding parameters to the JavaScript resource.
-
Specify your
onloadcallback function. This function will get called when
all the dependencies have loaded.<script type="text/javascript"> var onloadCallback = function() { alert("grecaptcha is ready!"); }; </script> -
Insert the JavaScript resource, setting the
onloadparameter to the name
of your onload callback function and therenderparameter toexplicit.<script src="https://www.google.com/recaptcha/api.js?onload=onloadCallback&render=explicit" async defer> </script>When your callback is executed, you can call the
grecaptcha.rendermethod
from the JavaScript API.
Configuration
JavaScript resource (api.js) parameters
| Parameter | Value | Description |
|---|---|---|
| onload | Optional. The name of your callback function to be executed once all the dependencies have loaded. | |
| render | explicit onload |
Optional. Whether to render the widget explicitly. Defaults to onload, which will render the widget in the first g-recaptcha tag it finds. |
| hl | See language codes | Optional. Forces the widget to render in a specific language. Auto-detects the user’s language if unspecified. |
g-recaptcha tag attributes and grecaptcha.render parameters
| g-recaptcha tag attribute | grecaptcha.render parameter | Value | Default | Description |
|---|---|---|---|---|
| data-sitekey | sitekey | Your sitekey. | ||
| data-theme | theme | dark light | light | Optional. The color theme of the widget. |
| data-size | size | compact normal | normal | Optional. The size of the widget. |
| data-tabindex | tabindex | 0 | Optional. The tabindex of the widget and challenge. If other elements in your page use tabindex, it should be set to make user navigation easier. | |
| data-callback | callback | Optional. The name of your callback function, executed when the user submits a successful response. The g-recaptcha-response token is passed to your callback. |
||
| data-expired-callback | expired-callback | Optional. The name of your callback function, executed when the reCAPTCHA response expires and the user needs to re-verify. | ||
| data-error-callback | error-callback | Optional. The name of your callback function, executed when reCAPTCHA encounters an error (usually network connectivity) and cannot continue until connectivity is restored. If you specify a function here, you are responsible for informing the user that they should retry. |
JavaScript API
| Method | Description |
|---|---|
|
grecaptcha.render(
container, parameters ) |
Renders the container as a reCAPTCHA widget and returns the ID of the newly created widget. container The HTML element to render the reCAPTCHA widget. Specify either the ID of the container (string) or the DOM element itself. parameters An object containing parameters as key=value pairs, for example, {«sitekey»: «your_site_key», «theme»: «light»}. See grecaptcha.render parameters. |
|
grecaptcha.reset(
opt_widget_id ) |
Resets the reCAPTCHA widget. opt_widget_id Optional widget ID, defaults to the first widget created if unspecified. |
|
grecaptcha.getResponse(
opt_widget_id ) |
Gets the response for the reCAPTCHA widget. opt_widget_id Optional widget ID, defaults to the first widget created if unspecified. |
Examples
Explicit rendering after an onload callback
<html>
<head>
<title>reCAPTCHA demo: Explicit render after an onload callback</title>
<script type="text/javascript">
var onloadCallback = function() {
grecaptcha.render('html_element', {
'sitekey' : 'your_site_key'
});
};
</script>
</head>
<body>
<form action="?" method="POST">
<div id="html_element"></div>
<br>
<input type="submit" value="Submit">
</form>
<script src="https://www.google.com/recaptcha/api.js?onload=onloadCallback&render=explicit"
    async defer>
</script>
</body>
</html>
Explicit rendering for multiple widgets
<html>
  <head>
    <title>reCAPTCHA demo: Explicit render for multiple widgets</title>
    <script type="text/javascript">
      var verifyCallback = function(response) {
        alert(response);
      };
      var widgetId1;
      var widgetId2;
      var onloadCallback = function() {
        // Renders the HTML element with id 'example1' as a reCAPTCHA widget.
        // The id of the reCAPTCHA widget is assigned to 'widgetId1'.
        widgetId1 = grecaptcha.render('example1', {
          'sitekey' : 'your_site_key',
          'theme' : 'light'
        });
        widgetId2 = grecaptcha.render(document.getElementById('example2'), {
          'sitekey' : 'your_site_key'
        });
        grecaptcha.render('example3', {
          'sitekey' : 'your_site_key',
          'callback' : verifyCallback,
          'theme' : 'dark'
        });
      };
    </script>
  </head>
  <body>
    <!-- The g-recaptcha-response string displays in an alert message upon submit. -->
    <form action="javascript:alert(grecaptcha.getResponse(widgetId1));">
      <div id="example1"></div>
      <br>
      <input type="submit" value="getResponse">
    </form>
    <br>
    <!-- Resets reCAPTCHA widgetId2 upon submit. -->
    <form action="javascript:grecaptcha.reset(widgetId2);">
      <div id="example2"></div>
      <br>
      <input type="submit" value="reset">
    </form>
    <br>
    <!-- POSTs back to the page's URL upon submit with a g-recaptcha-response POST parameter. -->
    <form action="?" method="POST">
      <div id="example3"></div>
      <br>
      <input type="submit" value="Submit">
    </form>
    <script src="https://www.google.com/recaptcha/api.js?onload=onloadCallback&render=explicit"
        async defer>
    </script>
  </body>
</html>
This page describes methods of the reCAPTCHA Enterprise JavaScript API
and their configuration parameters that you can
use to render the web pages with a site key.
JavaScript API
The following table lists the methods of the reCAPTCHA Enterprise JavaScript
API.
| Method | Description |
|---|---|
grecaptcha.enterprise.render(
) |
Renders the container as a reCAPTCHA widget and returns the ID of the container The HTML element to render the reCAPTCHA widget. Specify either the parameters An object containing parameters as key=value pairs, for example, action Specify the action name associated with the protected element. |
grecaptcha.enterprise.reset(
|
Resets the reCAPTCHA widget. opt_widget_id Optional. Widget ID returned from For more information about using multiple widgets, see the second example |
grecaptcha.enterprise.execute
|
Programmatically invokes the reCAPTCHA Enterprise verification. opt_widget_id Optional. Widget ID returned from For more information about using multiple widgets, see the second example |
grecaptcha.enterprise.execute
|
Programmatically invokes the reCAPTCHA Enterprise verification for score-based site keys. site_key Specify the reCAPTCHA site key to be protected. action Specify the action name associated with the protected element. For more information about using this method, see |
grecaptcha.enterprise.ready
|
Runs your function when the reCAPTCHA library loads. For more information about using this method, see |
grecaptcha.enterprise.getResponse
|
Gets the response for the reCAPTCHA widget. opt_widget_id Optional. Widget ID returned from For more information about using multiple widgets, see the second example |
Configuration
JavaScript resource (enterprise.js) parameters
The following table lists the parameters of the JavaScript resource (enterprise.js)
that you can use to render a widget automatically or explicitly on a web page.
| Parameter | Value | Description |
|---|---|---|
onload |
Optional. The name of your callback function to be executed once all the dependencies have loaded. |
|
render |
explicit onload |
Optional. Whether to render the widget explicitly. Defaults to onload, For more information about using these parameters, |
hl |
See language codes. | Optional. Forces the widget to render in a specific language. Auto-detects the user’s language if unspecified. |
g-recaptcha tag attributes and grecaptcha.enterprise.render parameters
The following table lists the g-recaptcha tag attributes and the corresponding
grecaptcha.enterprise.render() parameters.
g-recaptcha tag attribute |
grecaptcha.enterprise.render parameter |
Value | Default | Description |
|---|---|---|---|---|
data-sitekey |
sitekey |
reCAPTCHA Key. | ||
data-badge |
badge |
bottomright bottomleft inline | bottomright | Optional. Reposition the reCAPTCHA badge. ‘inline’ lets you position it with CSS. |
data-action |
action |
Optional. String describing current action. | ||
data-theme |
theme |
dark light | light | Optional. The color theme of the widget. |
data-size |
size |
compact normal | normal | Optional. The size of the widget. |
data-tabindex |
tabindex |
0 | Optional. The tabindex of the widget and challenge. If other elements in your page use tabindex, it should be set to make user navigation easier. |
|
data-callback |
callback |
Optional. The name of your callback function, executed when the user submits a successful response. The g-recaptcha-responsetoken is passed to your callback. |
||
data-expired-callback |
expired-callback |
Optional. The name of your callback function, executed when the reCAPTCHA response expires and the user needs to re-verify. |
||
data-error-callback |
error-callback |
Optional. The name of your callback function, executed when reCAPTCHA encounters an error (usually network connectivity) and cannot continue until connectivity is restored. If you specify a function here, you are responsible for informing the user that they should retry. |
reCAPTCHA

Author: Jason L Perry (http://ambethia.com)
Copyright: Copyright (c) 2007-2013 Jason L Perry
License: MIT
Info: https://github.com/ambethia/recaptcha
Bugs: https://github.com/ambethia/recaptcha/issues
This gem provides helper methods for the reCAPTCHA API. In your
views you can use the recaptcha_tags method to embed the needed javascript, and you can validate
in your controllers with verify_recaptcha or verify_recaptcha!, which raises an error on
failure.
Table of Contents
- Obtaining a key
- Rails Installation
- Sinatra / Rack / Ruby Installation
- reCAPTCHA V2 API & Usage
recaptcha_tagsverify_recaptchainvisible_recaptcha_tags
- reCAPTCHA V3 API & Usage
recaptcha_v3verify_recaptcha(use with v3)recaptcha_reply
- I18n Support
- Testing
- Alternative API Key Setup
Obtaining a key
Go to the reCAPTCHA admin console to obtain a reCAPTCHA API key.
The reCAPTCHA type(s) that you choose for your key will determine which methods to use below.
| reCAPTCHA type | Methods to use | Description |
|---|---|---|
| v3 | recaptcha_v3 |
Verify requests with a score |
| v2 Checkbox («I’m not a robot» Checkbox) |
recaptcha_tags |
Validate requests with the «I’m not a robot» checkbox |
| v2 Invisible (Invisible reCAPTCHA badge) |
invisible_recaptcha_tags |
Validate requests in the background |
Note: You can only use methods that match your key’s type. You cannot use v2 methods with a v3
key or use recaptcha_tags with a v2 Invisible key, for example. Otherwise you will get an
error like «Invalid key type» or «This site key is not enabled for the invisible captcha.»
Note: Enter localhost or 127.0.0.1 as the domain if using in development with localhost:3000.
Rails Installation
If you are having issues with Rails 7, Turbo, and Stimulus, make sure to check this Wiki page!
You can keep keys out of the code base with environment variables or with Rails secrets.
In development, you can use the dotenv gem. (Make sure to add it above gem 'recaptcha'.)
See Alternative API key setup for more ways to configure or override
keys. See also the
Configuration
documentation.
export RECAPTCHA_SITE_KEY   = '6Lc6BAAAAAAAAChqRbQZcn_yyyyyyyyyyyyyyyyy'
export RECAPTCHA_SECRET_KEY = '6Lc6BAAAAAAAAKN3DRm6VA_xxxxxxxxxxxxxxxxx'
If you have an Enterprise API key:
export RECAPTCHA_ENTERPRISE            = 'true'
export RECAPTCHA_ENTERPRISE_API_KEY    = 'AIzvFyE3TU-g4K_Kozr9F1smEzZSGBVOfLKyupA'
export RECAPTCHA_ENTERPRISE_PROJECT_ID = 'my-project'
Add recaptcha_tags to the forms you want to protect:
<%= form_for @foo do |f| %>
  # …
  <%= recaptcha_tags %>
  # …
<% end %>
Then, add verify_recaptcha logic to each form action that you’ve protected:
# app/controllers/users_controller.rb
@user = User.new(params[:user].permit(:name))
if verify_recaptcha(model: @user) && @user.save
  redirect_to @user
else
  render 'new'
end
Please note that this setup uses reCAPTCHA_v2. For a recaptcha_v3 use, please refer to reCAPTCHA_v3 setup.
Sinatra / Rack / Ruby installation
See sinatra demo for details.
- add
gem 'recaptcha'toGemfile - set env variables
include Recaptcha::Adapters::ViewMethodswhere you needrecaptcha_tagsinclude Recaptcha::Adapters::ControllerMethodswhere you needverify_recaptcha
reCAPTCHA v2 API and Usage
recaptcha_tags
Use this when your key’s reCAPTCHA type is «v2 Checkbox».
The following options are available:
| Option | Description |
|---|---|
:theme |
Specify the theme to be used per the API. Available options: dark and light. (default: light) |
:ajax |
Render the dynamic AJAX captcha per the API. (default: false) |
:site_key |
Override site API key from configuration |
:error |
Override the error code returned from the reCAPTCHA API (default: nil) |
:size |
Specify a size (default: nil) |
:nonce |
Optional. Sets nonce attribute for script. Can be generated via SecureRandom.base64(32). (default: nil) |
:id |
Specify an html id attribute (default: nil) |
:callback |
Optional. Name of success callback function, executed when the user submits a successful response |
:expired_callback |
Optional. Name of expiration callback function, executed when the reCAPTCHA response expires and the user needs to re-verify. |
:error_callback |
Optional. Name of error callback function, executed when reCAPTCHA encounters an error (e.g. network connectivity) |
:noscript |
Include <noscript> content (default: true) |
JavaScript resource (api.js) parameters:
| Option | Description |
|---|---|
:onload |
Optional. The name of your callback function to be executed once all the dependencies have loaded. (See explicit rendering) |
:render |
Optional. Whether to render the widget explicitly. Defaults to onload, which will render the widget in the first g-recaptcha tag it finds. (See explicit rendering) |
:hl |
Optional. Forces the widget to render in a specific language. Auto-detects the user’s language if unspecified. (See language codes) |
:script |
Alias for :external_script. If you do not need to add a script tag by helper you can set the option to false. It’s necessary when you add a script tag manualy (default: true). |
:external_script |
Set to false to avoid including a script tag for the external api.js resource. Useful when including multiple recaptcha_tags on the same page. |
:script_async |
Set to false to load the external api.js resource synchronously. (default: true) |
:script_defer |
Set to true to defer loading of external api.js until HTML documen has been parsed. (default: true) |
Any unrecognized options will be added as attributes on the generated tag.
You can also override the html attributes for the sizes of the generated textarea and iframe
elements, if CSS isn’t your thing. Inspect the source of recaptcha_tags
to see these options.
Note that you cannot submit/verify the same response token more than once or you will get a
timeout-or-duplicate error code. If you need reset the captcha and generate a new response token,
then you need to call grecaptcha.reset().
verify_recaptcha
This method returns true or false after processing the response token from the reCAPTCHA widget.
This is usually called from your controller, as seen above.
Passing in the ActiveRecord object via model: object is optional. If you pass a model—and the
captcha fails to verify—an error will be added to the object for you to use (available as
object.errors).
Why isn’t this a model validation? Because that violates MVC. You can use it like this, or how ever
you like.
Some of the options available:
| Option | Description |
|---|---|
:model |
Model to set errors. |
:attribute |
Model attribute to receive errors. (default: :base) |
:message |
Custom error message. |
:secret_key |
Override the secret API key from the configuration. |
:enterprise_api_key |
Override the Enterprise API key from the configuration. |
:enterprise_project_id |
Override the Enterprise project ID from the configuration. |
:timeout |
The number of seconds to wait for reCAPTCHA servers before give up. (default: 3) |
:response |
Custom response parameter. (default: params['g-recaptcha-response-data']) |
:hostname |
Expected hostname or a callable that validates the hostname, see domain validation and hostname docs. (default: nil, but can be changed by setting config.hostname) |
:env |
Current environment. The request to verify will be skipped if the environment is specified in configuration under skip_verify_env |
invisible_recaptcha_tags
Use this when your key’s reCAPTCHA type is «v2 Invisible».
For more information, refer to: Invisible reCAPTCHA.
This is similar to recaptcha_tags, with the following additional options that are only available
on invisible_recaptcha_tags:
| Option | Description |
|---|---|
:ui |
The type of UI to render for this «invisible» widget. (default: :button):button: Renders a <button type="submit"> tag with options[:text] as the button text.:invisible: Renders a <div> tag.:input: Renders a <input type="submit"> tag with options[:text] as the button text. |
:text |
The text to show for the button. (default: "Submit") |
:inline_script |
If you do not need this helper to add an inline script tag, you can set the option to false (default: true). |
It also accepts most of the options that recaptcha_tags accepts, including the following:
| Option | Description |
|---|---|
:site_key |
Override site API key from configuration |
:nonce |
Optional. Sets nonce attribute for script tag. Can be generated via SecureRandom.base64(32). (default: nil) |
:id |
Specify an html id attribute (default: nil) |
:script |
Same as setting both :inline_script and :external_script. If you only need one or the other, use :inline_script and :external_script instead. |
:callback |
Optional. Name of success callback function, executed when the user submits a successful response |
:expired_callback |
Optional. Name of expiration callback function, executed when the reCAPTCHA response expires and the user needs to re-verify. |
:error_callback |
Optional. Name of error callback function, executed when reCAPTCHA encounters an error (e.g. network connectivity) |
JavaScript resource (api.js) parameters:
| Option | Description |
|---|---|
:onload |
Optional. The name of your callback function to be executed once all the dependencies have loaded. (See explicit rendering) |
:render |
Optional. Whether to render the widget explicitly. Defaults to onload, which will render the widget in the first g-recaptcha tag it finds. (See explicit rendering) |
:hl |
Optional. Forces the widget to render in a specific language. Auto-detects the user’s language if unspecified. (See language codes) |
:external_script |
Set to false to avoid including a script tag for the external api.js resource. Useful when including multiple recaptcha_tags on the same page. |
:script_async |
Set to false to load the external api.js resource synchronously. (default: true) |
:script_defer |
Set to false to defer loading of external api.js until HTML documen has been parsed. (default: true) |
With a single form on a page
- The
invisible_recaptcha_tagsgenerates a submit button for you.
<%= form_for @foo do |f| %>
  # ... other tags
  <%= invisible_recaptcha_tags text: 'Submit form' %>
<% end %>
Then, add verify_recaptcha to your controller as seen above.
With multiple forms on a page
- You will need a custom callback function, which is called after verification with Google’s reCAPTCHA service. This callback function must submit the form. Optionally,
invisible_recaptcha_tagscurrently implements a JS function calledinvisibleRecaptchaSubmitthat is called when nocallbackis passed. Should you wish to overrideinvisibleRecaptchaSubmit, you will need to useinvisible_recaptcha_tags script: false, see lib/recaptcha/client_helper.rb for details. - The
invisible_recaptcha_tagsgenerates a submit button for you.
<%= form_for @foo, html: {id: 'invisible-recaptcha-form'} do |f| %>
  # ... other tags
  <%= invisible_recaptcha_tags callback: 'submitInvisibleRecaptchaForm', text: 'Submit form' %>
<% end %>
// app/assets/javascripts/application.js
var submitInvisibleRecaptchaForm = function () {
  document.getElementById("invisible-recaptcha-form").submit();
};
Finally, add verify_recaptcha to your controller as seen above.
Programmatically invoke
- Specify
uioption
<%= form_for @foo, html: {id: 'invisible-recaptcha-form'} do |f| %>
  # ... other tags
  <button type="button" id="submit-btn">
    Submit
  </button>
  <%= invisible_recaptcha_tags ui: :invisible, callback: 'submitInvisibleRecaptchaForm' %>
<% end %>
// app/assets/javascripts/application.js
document.getElementById('submit-btn').addEventListener('click', function (e) {
  // do some validation
  if(isValid) {
    // call reCAPTCHA check
    grecaptcha.execute();
  }
});

var submitInvisibleRecaptchaForm = function () {
  document.getElementById("invisible-recaptcha-form").submit();
};
reCAPTCHA v3 API and Usage
The main differences from v2 are:
- you must specify an action in both frontend and backend
- you can choose the minimum score required for you to consider the verification a success
(consider the user a human and not a robot) - reCAPTCHA v3 is invisible (except for the reCAPTCHA badge) and will never interrupt your users;
you have to choose which scores are considered an acceptable risk, and choose what to do (require
two-factor authentication, show a v3 challenge, etc.) if the score falls below the threshold you
choose
For more information, refer to the v3 documentation.
Examples
With v3, you can let all users log in without any intervention at all if their score is above some
threshold, and only show a v2 checkbox recaptcha challenge (fall back to v2) if it is below the
threshold:
  …
  <% if @show_checkbox_recaptcha %>
    <%= recaptcha_tags %>
  <% else %>
    <%= recaptcha_v3(action: 'login', site_key: ENV['RECAPTCHA_SITE_KEY_V3']) %>
  <% end %>
  …
# app/controllers/sessions_controller.rb
def create
  success = verify_recaptcha(action: 'login', minimum_score: 0.5, secret_key: ENV['RECAPTCHA_SECRET_KEY_V3'])
  checkbox_success = verify_recaptcha unless success
  if success || checkbox_success
    # Perform action
  else
    if !success
      @show_checkbox_recaptcha = true
    end
    render 'new'
  end
end
(You can also find this example in the demo app.)
Another example:
<%= form_for @user do |f| %>
  …
  <%= recaptcha_v3(action: 'registration') %>
  …
<% end %>
# app/controllers/users_controller.rb
def create
  @user = User.new(params[:user].permit(:name))
  recaptcha_valid = verify_recaptcha(model: @user, action: 'registration')
  if recaptcha_valid
    if @user.save
      redirect_to @user
    else
      render 'new'
    end
  else
    # Score is below threshold, so user may be a bot. Show a challenge, require multi-factor
    # authentication, or do something else.
    render 'new'
  end
end
recaptcha_v3
Adds an inline script tag that calls grecaptcha.execute for the given site_key and action and
calls the callback with the resulting response token. You need to verify this token with
verify_recaptcha in your controller in order to get the
score.
By default, this inserts a hidden <input type="hidden" class="g-recaptcha-response"> tag. The
value of this input will automatically be set to the response token (by the default callback
function). This lets you include recaptcha_v3 within a <form> tag and have it automatically
submit the token as part of the form submission.
Note: reCAPTCHA actually already adds its own hidden tag, like <textarea id="g-recaptcha-response-data-100000" name="g-recaptcha-response-data" class="g-recaptcha-response">,
immediately ater the reCAPTCHA badge in the bottom right of the page — but since it is not inside of
any <form> element, and since it already passes the token to the callback, this hidden textarea
isn’t helpful to us.
If you need to submit the response token to the server in a different way than via a regular form
submit, such as via Ajax or fetch,
then you can either:
- just extract the token out of the hidden
<input>or<textarea>(both of which will have a
predictable name/id), likedocument.getElementById('g-recaptcha-response-data-my-action').value, or - write and specify a custom
callbackfunction. You may also want to passelement: falseif you
don’t have a use for the hidden input element.
Note that you cannot submit/verify the same response token more than once or you
will get a timeout-or-duplicate error code. If you need reset the captcha and
generate a new response token, then you need to call grecaptcha.execute(…) or
grecaptcha.enterprise.execute(…) again. This helper provides a JavaScript
method (for each action) named executeRecaptchaFor{action} to make this
easier. That is the same method that is invoked immediately. It simply calls
grecaptcha.execute or grecaptcha.enterprise.execute again and then calls the
callback function with the response token.
You will also get a timeout-or-duplicate error if too much time has passed between getting the
response token and verifying it. This can easily happen with large forms that take the user a couple
minutes to complete. Unlike v2, where you can use the expired-callback to be notified when the
response expires, v3 appears to provide no such callback. See also
1 and
2.
To deal with this, it is recommended to call the «execute» in your form’s submit handler (or
immediately before sending to the server to verify if not using a form) rather than using the
response token that gets generated when the page first loads. The executeRecaptchaFor{action}
function mentioned above can be used if you want it to invoke a callback, or the
executeRecaptchaFor{action}Async variant if you want a Promise that you can await. See
demo/rails/app/views/v3_captchas/index.html.erb
for an example of this.
This helper is similar to the recaptcha_tags/invisible_recaptcha_tags helpers
but only accepts the following options:
| Option | Description |
|---|---|
:site_key |
Override site API key |
:action |
The name of the reCAPTCHA action. Actions may only contain alphanumeric characters and slashes, and must not be user-specific. |
:nonce |
Optional. Sets nonce attribute for script. Can be generated via SecureRandom.base64(32). (default: nil) |
:callback |
Name of callback function to call with the token. When element is :input, this defaults to a function named setInputWithRecaptchaResponseTokenFor#{sanitize_action(action)} that sets the value of the hidden input to the token. |
:id |
Specify a unique id attribute for the <input> element if using element: :input. (default: "g-recaptcha-response-data-" + action) |
:name |
Specify a unique name attribute for the <input> element if using element: :input. (default: g-recaptcha-response-data[action]) |
:script |
Same as setting both :inline_script and :external_script. (default: true). |
:inline_script |
If true, adds an inline script tag that calls grecaptcha.execute for the given site_key and action and calls the callback with the resulting response token. Pass false if you want to handle calling grecaptcha.execute yourself. (default: true) |
:element |
The element to render, if any (default: :input):input: Renders a hidden <input type="hidden"> tag. The value of this will be set to the response token by the default setInputWithRecaptchaResponseTokenFor{action} callback.false: Doesn’t render any tag. You’ll have to add a custom callback that does something with the token. |
:turbolinks |
If true, calls the js function which executes reCAPTCHA after all the dependencies have been loaded. This cannot be used with the js param :onload. This makes reCAPTCHAv3 usable with turbolinks. |
JavaScript resource (api.js) parameters:
| Option | Description |
|---|---|
:onload |
Optional. The name of your callback function to be executed once all the dependencies have loaded. (See explicit rendering) |
:external_script |
Set to false to avoid including a script tag for the external api.js resource. Useful when including multiple recaptcha_tags on the same page. |
:script_async |
Set to true to load the external api.js resource asynchronously. (default: false) |
:script_defer |
Set to true to defer loading of external api.js until HTML documen has been parsed. (default: false) |
If using element: :input, any unrecognized options will be added as attributes on the generated
<input> element.
verify_recaptcha (use with v3)
This works the same as for v2, except that you may pass an action and minimum_score if you wish
to validate that the action matches or that the score is above the given threshold, respectively.
result = verify_recaptcha(action: 'action/name')
| Option | Description |
|---|---|
:action |
The name of the reCAPTCHA action that we are verifying. Set to false or nil to skip verifying that the action matches. |
:minimum_score |
Provide a threshold to meet or exceed. Threshold should be a float between 0 and 1 which will be tested as score >= minimum_score. (Default: nil) |
Multiple actions on the same page
According to https://developers.google.com/recaptcha/docs/v3#placement,
Note: You can execute reCAPTCHA as many times as you’d like with different actions on the same page.
You will need to verify each action individually with a separate call to verify_recaptcha.
result_a = verify_recaptcha(action: 'a')
result_b = verify_recaptcha(action: 'b')
Because the response tokens for multiple actions may be submitted together in the same request, they
are passed as a hash under params['g-recaptcha-response-data'] with the action as the key.
It is recommended to pass external_script: false on all but one of the calls to
recaptcha since you only need to include the script tag once for a given site_key.
recaptcha_reply
After verify_recaptcha has been called, you can call recaptcha_reply to get the raw reply from recaptcha. This can allow you to get the exact score returned by recaptcha should you need it.
if verify_recaptcha(action: 'login')
  redirect_to @user
else
  score = recaptcha_reply['score']
  Rails.logger.warn("User #{@user.id} was denied login because of a recaptcha score of #{score}")
  render 'new'
end
recaptcha_reply will return nil if the the reply was not yet fetched.
I18n support
reCAPTCHA supports the I18n gem (it comes with English translations)
To override or add new languages, add to config/locales/*.yml
# config/locales/en.yml
en:
  recaptcha:
    errors:
      verification_failed: 'reCAPTCHA was incorrect, please try again.'
      recaptcha_unreachable: 'reCAPTCHA verification server error, please try again.'
Testing
By default, reCAPTCHA is skipped in «test» and «cucumber» env. To enable it during test:
Recaptcha.configuration.skip_verify_env.delete("test")
Alternative API key setup
Recaptcha.configure
# config/initializers/recaptcha.rb
Recaptcha.configure do |config|
  config.site_key  = '6Lc6BAAAAAAAAChqRbQZcn_yyyyyyyyyyyyyyyyy'
  config.secret_key = '6Lc6BAAAAAAAAKN3DRm6VA_xxxxxxxxxxxxxxxxx'

  # Uncomment the following line if you are using a proxy server:
  # config.proxy = 'http://myproxy.com.au:8080'

  # Uncomment the following lines if you are using the Enterprise API:
  # config.enterprise = true
  # config.enterprise_api_key = 'AIzvFyE3TU-g4K_Kozr9F1smEzZSGBVOfLKyupA'
  # config.enterprise_project_id = 'my-project'
end
Recaptcha.with_configuration
For temporary overwrites (not thread-safe).
Recaptcha.with_configuration(site_key: '12345') do
  # Do stuff with the overwritten site_key.
end
Per call
Pass in keys as options at runtime, for code base with multiple reCAPTCHA setups:
recaptcha_tags site_key: '6Lc6BAAAAAAAAChqRbQZcn_yyyyyyyyyyyyyyyyy'

# and

verify_recaptcha secret_key: '6Lc6BAAAAAAAAKN3DRm6VA_xxxxxxxxxxxxxxxxx'
hCaptcha support
hCaptcha is an alternative service providing reCAPTCHA API.
To use hCaptcha:
- Set a site and a secret key as usual
- Set two options in
verify_urlandapi_service_urlpointing to hCaptcha API endpoints. - Disable a response limit check by setting a
response_limitto the large enough value (reCAPTCHA is limited by 4000 characters). - It is not required to change a parameter name as official docs suggest because API handles standard
g-recaptchafor compatibility.
# config/initializers/recaptcha.rb
Recaptcha.configure do |config|
  config.site_key  = '6Lc6BAAAAAAAAChqRbQZcn_yyyyyyyyyyyyyyyyy'
  config.secret_key = '6Lc6BAAAAAAAAKN3DRm6VA_xxxxxxxxxxxxxxxxx'
  config.verify_url = 'https://hcaptcha.com/siteverify'
  config.api_server_url = 'https://hcaptcha.com/1/api.js'
  config.response_limit = 100000
end
hCaptcha uses a scoring system (higher number more likely to be a bot) which is inverse of the reCaptcha scoring system (lower number more likely to be a bot). As such, a maximum_score attribute is provided for use with hCaptcha.
result = verify_recaptcha(maximum_score: 0.7)
| Option | Description |
|---|---|
:maximum_score |
Provide a threshold to meet or fall below. Threshold should be a float between 0 and 1 which will be tested as score <= maximum_score. (Default: nil) |
Misc
- Check out the wiki and leave whatever you found valuable there.
- Add multiple widgets to the same page
- Use Recaptcha with Devise
Tutorial
How to set up
Google reCAPTCHA & Invisible reCAPTCHA
in Joomla
Google introduced a no CAPTCHA reCAPTCHA API in December 2014. The reCAPTCHA plugin, which protects your contact and registration forms against spam, has been updated in Joomla! 3.4.0. While still supporting the old reCAPTCHA 1.0, you can use the reCAPTCHA version 2.0. A significant number of your users can now attest they are human without having to solve a CAPTCHA. Instead with just a single click, they’ll confirm they are not a robot!
As of Joomla 3.9, a new plugin CAPTCHA — Invisible reCAPTCHA has been added, allowing you to use Invisible reCAPTCHA on your websites. It allows you to validate requests in the background. Your users don’t have to perform any action to validate a form.
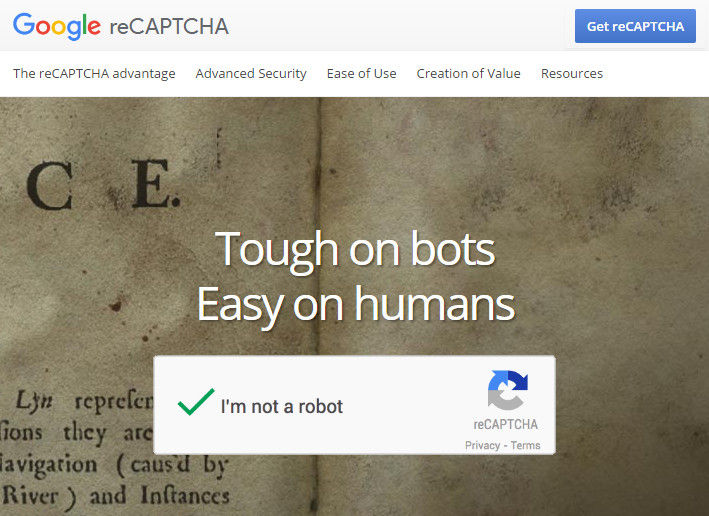
Get reCAPTCHA[edit]
- Go to: https://www.google.com/recaptcha
- Click on the top right button Admin Console or Get ReCaptcha.
- Sign in with your Google account. If you don’t have one, create one.
- Choose the type of reCAPTCHA you would like to use. Prefer the reCAPTCHA V3 type.
- Register your new site by filling the necessary fields.
For additional guidance in choosing the type of reCAPTCHA, visit Google’s Guide page,
Choosing the type of reCAPTCHA.
Google reCAPTCHA will provide you two keys:
- One Site key
- One Secret key
Set Up Captcha[edit]
Choose one of the reCAPTCHA types below.
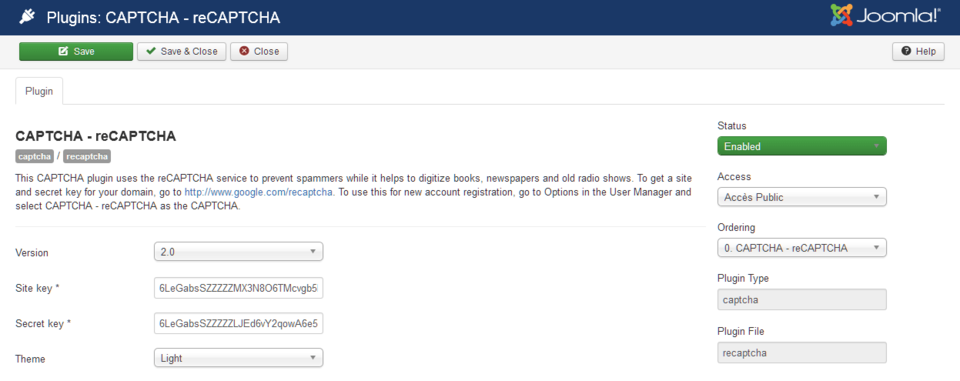
Set Up Captcha — reCAPTCHA Plugin (V2 Only)[edit]
- Log into your website’s Administrator.
- Go to Extensions → Plugins → CAPTCHA — reCAPTCHA
- Edit the plugin:
- Status Set to Enable.
- Version Choose 2.0.
- Site key and Secret key Copy and paste the Site and Secret keys provided by Google reCAPTCHA into their appropriate fields.
- Theme Choose one of the two available themes.
- Click Save & Close.
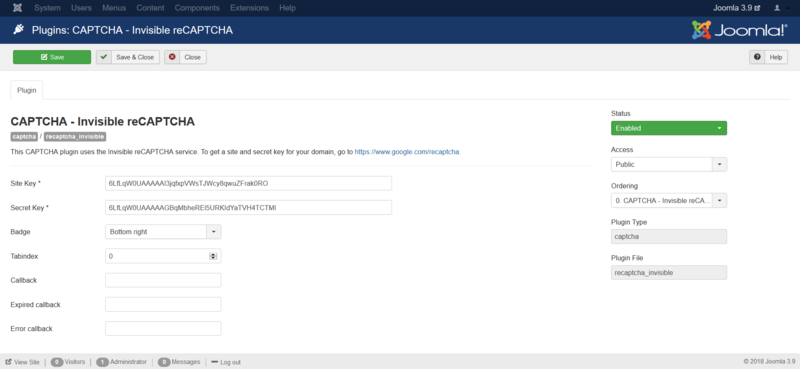
Set Up CAPTCHA — Invisible reCAPTCHA Plugin[edit]
- Login to your website’s Administrator.
- Go to Extensions → Plugins → CAPTCHA — Invisible reCAPTCHA
- Edit the plugin:
- Status: Set to Enable.
- Site key and Secret key Copy and paste the Site and Secret keys provided by Google reCAPTCHA into their appropriate fields.
- Badge Select the position of the badge on your front end.
- Tabindex The tabindex of the challenge. This option can be useful if other elements on your page use tabindex and you want to make the navigation easier. The default value is 0, but you can change it so that your user can focus on the challenge after a certain amount of tab hits.
- Callback (Optional) JavaScript callback, executed after successful reCAPTCHA response
- Expired callback (Optional) JavaScript callback, executed when the reCAPTCHA expired
- Error callback (Optional) A JavaScript callback, executed when the reCAPTCHA encounters an error
- Click Save & Close.
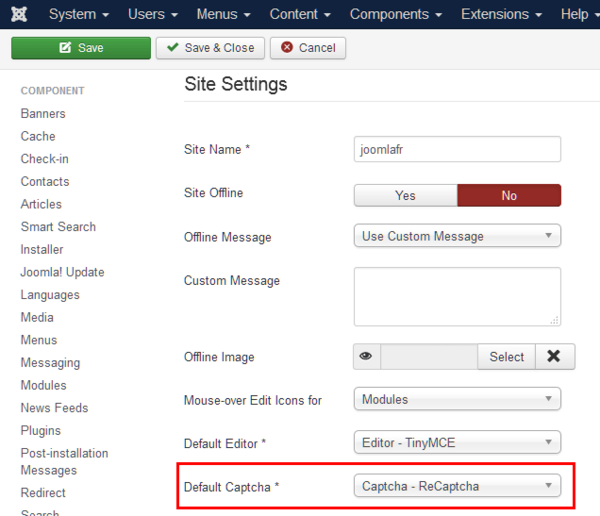
Enable CAPTCHA — reCAPTCHA or CAPTCHA — Invisible reCAPTCHA[edit]
For Contact and Registration Form[edit]
- Go to System → Global Configuration → Site tab
- Default Captcha Select CAPTCHA — reCAPTCHA or CAPTCHA — Invisible reCAPTCHA.
- Click Save & Close.

Edit the Contact Form Options Setting
- Go to Components → Contacts → Options → Form tab → Allow Captcha on Contact.
- Select Use Global
- Select Save and Close
For the Registration Form Only[edit]
- Go to Users → Manage
- Click on the Options button at the top right and select the User Options tab.
- In the CAPTCHA option, choose one of the following:
- None Selected: This setting ignores the Default CAPTCHA setting in Global Configuration. Use it when you want reCAPTCHA in the Contact forms but not in the Registration form.
- CAPTCHA — reCAPTCHA/CAPTCHA — Invisible reCAPTCHA: Only needed if the default CAPTCHA in Global Configuration is set to None Selected but you want the reCAPTCHA in the Registration form only, and not in the contact forms.
- Click Save & Close.
You can now use the reCAPTCHA in your forms.
Test your reCAPTCHA to ensure it is working correctly.


Статья, в которой рассмотрим, как подключить recaptcha к форме обратной связи, работающей по технологии ajax.
Google reCAPTCHA – это сервис для защиты вашего сайта от ботов и других атак.
Формы обратной связи, комментирования, регистрации, авторизации, оформление заказа довольно часто подвергаются спам атаке. Чтобы их защитить от ботов и злоупотребление можно воспользоваться reCAPTCHA.
Версии Google reCAPTCHA:
- reCAPTCHA v2 – проверка пользователя с нажатием на флажок «Я не робот» («I’m not a robot»), бесплатно до 1 млн проверок в месяц;
- reCAPTCHA v3 – проверка пользователя в фоновом режиме не требующая от него никаких действий (бесплатно до 1 млн запросов в месяц);
- reCAPTCHA Enterprise – предназначена для комплексной защиты всего сайта от мошеннических действий (версия платная, ориентировочная стоимость около 1$ за 1000 запросов).
Подключение reCAPTCHA v2 или v3
Установку Google reCAPTCHA v2 или v3 для проверки форм можно представить в виде следующих шагов:
- получение ключей (site и secret) для сайта;
- вставка виджета и скриптов гугл капчи на HTML страницу;
- передача ответа на сервер;
- получение на сервере результата решения капчи.
Получение ключей reCAPTCHA
Получение ключей для reCAPTCHA v2 или v3 необходимо перейти на страницу «www.google.com/recaptcha/admin».
Для доступа к консоли администратора необходимо иметь аккаунт в Gmail. Если учётной записи нет, то её нужно завести.
После этого необходимо нажать на значок «+».
В открывшейся форме нужно:
- вести название ярлыка (например, Мой сайт);
- выбрать нужный тип reCAPTCHA;
- укажите один или несколько доменов (например, «mysite.ru»);
- принять условия использования reCAPTCHA.
После заполнения всех полей нажать на кнопку «Отправить».
При успешной регистрации Google будут выданы 2 ключа:
- публичный (его нужно вставить в HTML-код);
- секретный (на сервере, для установления обмена данными между сайтом и сервисом reCAPTCHA, т.е. для получения ответа о результатах решения капчи пользователем);
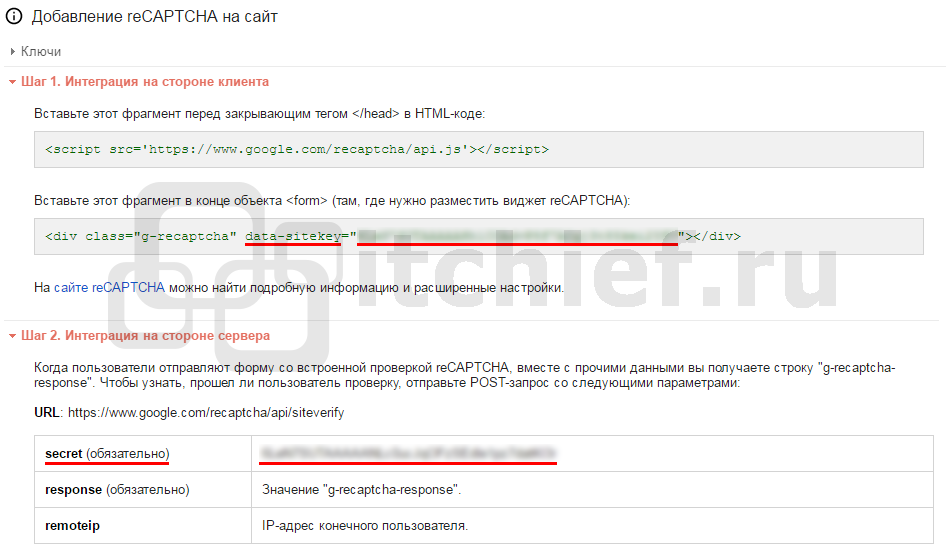
Установка recaptcha на сайт
Подключение reCAPTCHA к сайту (странице) осуществляется как на стороне клиента (в HTML), так на стороне сервера (в PHP).
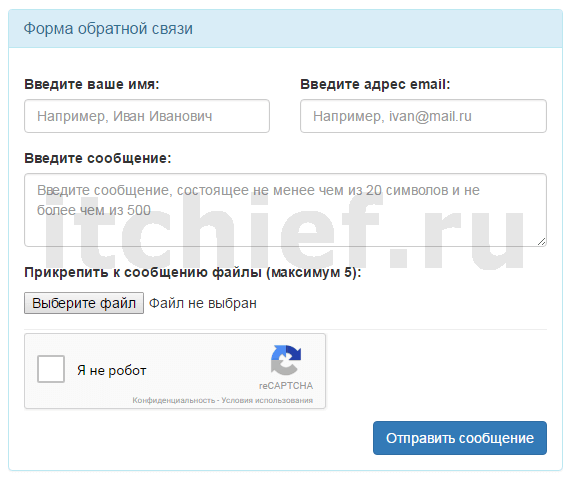
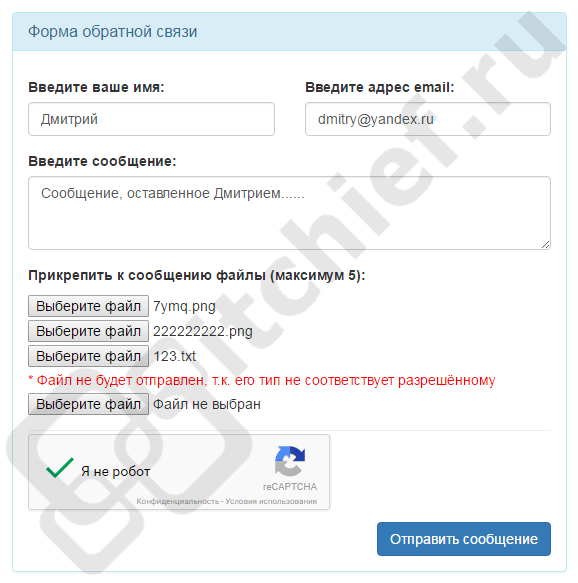
Разберём, как это осуществляется более подробно. В качестве примере выберем ajax форму обратной связи.
Подключение recaptcha к HTML-документу
Подключение виджета reCAPTCHA к странице осуществляется посредством выполнения 2 действий:
- Включения в страницу JavaScript скрипта recaptcha.
- Добавление элемента
divс классом"g-recaptcha"и атрибутомdata-sitekey, имеющий в качестве значения ваш публичный ключ (public key) капчи.
Кроме этого, добавим на страницу ещё элемент div с идентификатором id=»recaptchaError». Данный элемент будем использовать для отображения ошибки, связанной с google racaptcha.
<!-- добавление элемента div -->
<div class="g-recaptcha" data-sitekey="6KepjAsTFFFFFFMqccY0ZiGqc3TEd3YVxo8cHsGX"></div>

<!-- элемент для вывода ошибок -->
<div class="text-danger" id="recaptchaError"></div>

<!-- js-скрипт гугл капчи -->
<script src='https://www.google.com/recaptcha/api.js'></script>
Кроме этого необходимо будет внести ещё изменения в файл script.js, т.к. форма обратной связи отправляется на сервер через AJAX.
// Работа с виджетом recaptcha
// 1. Получить ответ гугл капчи
var captcha = grecaptcha.getResponse();

// 2. Если ответ пустой, то выводим сообщение о том, что пользователь не прошёл тест.
// Такую форму не будем отправлять на сервер.
if (!captcha.length) {
  // Выводим сообщение об ошибке
  $('#recaptchaError').text('* Вы не прошли проверку "Я не робот"');
} else {
  // получаем элемент, содержащий капчу
  $('#recaptchaError').text('');
}

// 3. Если форма валидна и длина капчи не равно пустой строке, то отправляем форму на сервер (AJAX)
if ((formValid) && (captcha.length)) {
  ...
  // добавить в formData значение 'g-recaptcha-response'=значение_recaptcha
  formData.append('g-recaptcha-response', captcha);
  ...
}

// 4. Если сервер вернул ответ error, то делаем следующее...
// Сбрасываем виджет reCaptcha
grecaptcha.reset();
// Если существует свойство msg у объекта $data, то...
if ($data.msg) {
  // вывести её в элемент у которого id=recaptchaError
  $('#recaptchaError').text($data.msg);
}
Интегрирование recaptcha в php скрипт
Установка recaptcha в скрипт php осуществляется посредством внесения в файл process.php следующих изменений:
- создание переменной
$secret, содержащей секретный ключ вашего сайта; - подключения клиентской библиотеки reCAPTCHA PHP посредством включения в скрипт файла
autoload.php; - проверка наличия ключа
g-recaptcha-responseв суперглобальном массиве POST; - если данное имя (
g-recaptcha-response) есть, то создать экземпляр службы recaptcha, используя ваш секретный ключ; - получить результат проверки кода: если результат положительный, то выполнить необходимые действия (например, отправить информацию на почту).
- если возникла ошибка, то отправить клиенту отрицательный результат.
// ваш секретный ключ
$secret = '6NepjAsGBBABBN7_Qy9yfzShcKmc70X2kXQyX1WO';
// однократное включение файла autoload.php (клиентская библиотека reCAPTCHA PHP)
require_once (dirname(__FILE__).'/recaptcha/autoload.php');
// если в массиве $_POST существует ключ g-recaptcha-response, то...
if (isset($_POST['g-recaptcha-response'])) {
  // создать экземпляр службы recaptcha, используя секретный ключ
  $recaptcha = new ReCaptchaReCaptcha($secret);
  // получить результат проверки кода recaptcha
  $resp = $recaptcha->verify($_POST['g-recaptcha-response'], $_SERVER['REMOTE_ADDR']);
  // если результат положительный, то...
  if ($resp->isSuccess()){
    // действия, если код captcha прошёл проверку
    //...
  } else {
    // иначе передать ошибку
    $errors = $resp->getErrorCodes();
    $data['error-captcha']=$errors;
    $data['msg']='Код капчи не прошёл проверку на сервере';
    $data['result']='error';
  }

} else {
  //ошибка, не существует ассоциативный массив $_POST["send-message"]
  $data['result']='error';
}
Готовая форма обратной связи с recaptcha
Бесплатно загрузить форму обратной связи с recaptcha можно по следующей ссылке:
Форма обратной связи с recaptcha
Изображения готовой формы, в которую интегрирована recaptcha.

Статьи, связанные с этой темой:
- Форма обратной связи на php, html и bootstrap
- Всплывающая форма обратной связи
captchaai.com API
CaptchaAI is an AI-powered image and CAPTCHA recognition service. captchaAI’s main purpose is solving your CAPTCHAs in a quick and cost effictive way by using AI «Artificial Intelligence».
Introduction
We provide an API that allows you to automate the process and integrate your software with our service.
We also have a software to emulate other captcha services. Check CaptchaAI Emulator
There are few simple steps to solve your captcha or recognize the image:
- 1. Send your image or captcha to our server.
- 2. Get the ID of your task.
- 3. Start a cycle that checks if your task is completed.
- 4. Get the result.
Solving Captchas
Our API is based on HTTP requests and supports both HTTP and HTTPS protocols.
API endpoints:
https://ocr.captchaai.com/in.phpis used to submit a captchahttps://ocr.captchaai.com/res.phpis used to get the captcha solution
NEW For image captcha, now you can use https://ocr.captchaai.com/solve.php instead of in.php to directly get the results.
The process of solving captchas with captchaai is really easy and it’s mostly the same for all types of captchas:
- Get your API key from your API key. Each user is given a unique authentication token, we call it API key. It’s a 32-characters string that looks like:
347bc2896fc1812d3de5ab56a0bf4ea7
This key will be used for all your requests to our server. - Submit a HTTP POST request to our API URL:
https://ocr.captchaai.com/in.phpwith parameters corresponding to the type of your captcha.
Server will return captcha ID or an error code if
something went wrong. - Make a timeout: 20 seconds for reCAPTCHA, 5 seconds for other types of captchas.
- Submit a HTTP GET request to our API URL:
https://ocr.captchaai.com/res.phpto get the result.
If captcha is already solved server will return the answer in format corresponding to the type of your captcha.
By default answers are returned as plain text like: OK|Your answer. But answer can also be returned as JSON {«status»:1,»request»:»TEXT»} if json parameter is used.
If captcha is not solved yet server will return CAPCHA_NOT_READY result. Repeat your request in 5 seconds.
If something went wrong server will return an error code.
Normal Captcha
Normal Captcha is an image that contains distored but human-readable text. To solve the captcha user have to type the text from the image.
To solve the captcha with our service you have to submit the image with HTTP POST
request to our API URL: https://ocr.captchaai.com/in.php
Server accepts images in multipart or base64 format.
NEW For image captcha, now you can use https://ocr.captchaai.com/solve.php instead of in.php to directly get the results.
Multipart sample form
  Your key:

  The CAPTCHA file:
YOUR_APIKEY is Your API key.
Base64 sample form
  Your key:

  The CAPTCHA file body in base64 format:
YOUR_APIKEY is here your API key.
BASE64_FILE is base64-encoded image body.
You can provide additional parameters with your request to define what kind of captcha you’resending and to help OCR servers to solve your captcha correctly. You can find the full list of parameters in the table below.
If everything is fine server will return the ID of your captcha as plain text, like:OK|123456789 or as JSON {«status»:1,»request»:»123456789″} if json parameter was used.
If something went wrong server will return an error. See Error Handling chapter for the list of errors.
Make a 5 seconds timeout and submit a HTTP GET request to our API URL: https://ocr.captchaai.com/res.php providing the captcha ID. The list of parameters is in the table below.
If everything is fine and your captcha is solved server will return the answer as plain text, like: OK|TEXT or as JSON {«status»:1,»request»:»TEXT»} if json parameter was used.
Otherwise server will return CAPCHA_NOT_READY that means that your captcha is not solved yet. Just repeat your request in 5 seconds.
If something went wrong server will return an error. See Error Handling chapter for the list of errors.
List of POST request parameters for https://ocr.captchaai.com/in.php
| POST parameter | Type | Required | Description |
| key | String | Yes | your API key |
| method | String | Yes | post — defines that you’re sending an image with multipart form base64 — defines that you’re sending a base64 encoded image |
| file | File | Yes* | Captcha image file. * — required if you submit image as a file (method=post) |
| body | String | Yes* | Base64-encoded captcha image * — required if you submit image as Base64-encoded string (method=base64) |
| phrase | Integer Default: 0 |
No | 0 — captcha contains one word 1 — captcha contains two or more words |
| regsense | Integer Default: 0 |
No | 0 — captcha in not case sensitive 1 — captcha is case sensitive |
| numeric | Integer Default: 0 |
No | 0 — not specified 1 — captcha contains only numbers 2 — captcha contains only letters 3 — captcha contains only numbers OR only letters 4 — captcha contains both numbers AND letters |
| calc | Integer Default: 0 |
No | 0 — not specified 1 — captcha requires calculation (e.g. type the result 4 + 8 = ) |
| min_len | Integer Default: 0 |
No | 0 — not specified 1..20 — minimal number of symbols in captcha |
| max_len | Integer Default: 0 |
No | 0 — not specified 1..20 — maximal number of symbols in captcha |
| language | Integer Default: 0 |
No | 0 — not specified 1 — Cyrillic captcha 2 — Latin captcha |
| lang | String | No | Language code. See the list of supported languages. |
| json | Integer Default: 0 |
No | 0 — server will send the response as plain text 1 — tells the server to send the response as JSON |
List of GET request parameters for https://ocr.captchaai.com/res.php
| GET parameter | Type | Required | Description |
| key | String | Yes | your API key |
| action | String | Yes | get — get the asnwer for your captcha |
| id | Integer | Yes | ID of captcha returned by in.php. |
| json | Integer Default: 0 |
No | 0 — server will send the response as plain text 1 — tells the server to send the response as JSON |
| header_acao | Integer Default: 0 |
No | 0 — disabled 1 — enabled. If enabled res.php will include Access-Control-Allow-Origin:* header in the response.Used for cross-domain AJAX requests in web applications. |
Request URL example:
https://ocr.captchaai.com/res.php?key=347bc2896fc1812d3de5ab56a0bf4ea7&action=get&id=123456789reCAPTCHA V2
reCAPTCHA V2 also known as I’m not a robot reCAPTCHA is a very popular type of captcha that looks like this:

Solving reCAPTCHA V2 with our method is pretty simple:
-
Look at the element’s code at the page where you found reCAPTCHA.
-
Find a link that begins with www.google.com/recaptcha/api2/anchor or find data-sitekey parameter.
-
Copy the value of k parameter of the link (or value of data-sitekey parameter).
-
Submit a HTTP GET or POST request to our API URL:
https://ocr.captchaai.com/in.phpwith method set to userrecaptcha and the value found on previous step as value for googlekey and full page URL as value for pageurl. Sending proxies is not obligatory ar the moment but it’s recommended.
You can find the full list of parameters in the table below.Request URL example:
https://ocr.captchaai.com/in.php?key=347bc2896fc1812d3de5ab56a0bf4ea7&method=userrecaptcha&googlekey=6Le-wvkSVVABCPBMRTvw0Q4Muexq1bi0DJwx_mJ-&pageurl=https://mysite.com/page/with/recaptcha -
If everything is fine server will return the ID of your captcha as plain text, like:
OK|123456789 or as JSON {«status»:1,»request»:»123456789″} if
json parameter was used.
Otherwise server will return an error code. -
Make a 15-20 seconds timeout then submit a HTTP GET request to our API URL:
https://ocr.captchaai.com/res.phpto get the result.
The full list of parameters is in the table below.If captcha is already solved server will respond in plain text or JSON and return the
answer token that looks like:03AHJ_Vuve5Asa4koK3KSMyUkCq0vUFCR5Im4CwB7PzO3dCxIo11i53epEraq-uBO5mVm2XRikL8iKOWr0aG50sCuej9bXx5qcviUGSm4iK4NC_Q88flavWhaTXSh0VxoihBwBjXxwXuJZ-WGN5Sy4dtUl2wbpMqAj8Zwup1vyCaQJWFvRjYGWJ_TQBKTXNB5CCOgncqLetmJ6B6Cos7qoQyaB8ZzBOTGf5KSP6e-K9niYs772f53Oof6aJeSUDNjiKG9gN3FTrdwKwdnAwEYX-F37sI_vLB1Zs8NQo0PObHYy0b0sf7WSLkzzcIgW9GR0FwcCCm1P8lB-50GQHPEBJUHNnhJyDzwRoRAkVzrf7UkV8wKCdTwrrWqiYDgbrzURfHc2ESsp020MicJTasSiXmNRgryt-gf50q5BMkiRH7osm4DoUgsjc_XyQiEmQmxl5sqZP7aKsaE-EM00x59XsPzD3m3YI6SRCFRUevSyumBd7KmXE8VuzIO9lgnnbka4-eZynZa6vbB9cO3QjLH0xSG3-egcplD1uLGh79wC34RF49Ui3eHwua4S9XHpH6YBe7gXzz6_mv-o-fxrOuphwfrtwvvi2FGfpTexWvxhqWICMFTTjFBCEGEgj7_IFWEKirXW2RTZCVF0Gid7EtIsoEeZkPbrcUISGmgtiJkJ_KojuKwImF0G0CsTlxYTOU2sPsd5o1JDt65wGniQR2IZufnPbbK76Yh_KI2DY4cUxMfcb2fAXcFMc9dcpHg6f9wBXhUtFYTu6pi5LhhGuhpkiGcv6vWYNxMrpWJW_pV7q8mPilwkAP-zw5MJxkgijl2wDMpM-UUQ_k37FVtf-ndbQAIPG7S469doZMmb5IZYgvcB4ojqCW3Vz6QIf captcha is not solved yet server will return CAPCHA_NOT_READY result. Repeat your request in 5 seconds.
If something went wrong server will return an error code.
-
Locate the element with id g-recaptcha-response and make it visible deleting display:none parameter.
Please note: sometimes content on the page is generated dynamically and you will not see this element in html source.
In such cases you have to explore javascript code that generates the content. «Inspect» option in Google Chrome can help in that.As an alternative you can just use javascript to set the value of g-recaptcha-response field:
document.getElementById("g-recaptcha-response").innerHTML="TOKEN_FROM_captchaai"; -
An input field will appear on the page. And you just have to paste the answer token to that field and submit the form.
-
Congratulations, you’ve passed the recaptcha


reCAPTCHA Callback
Sometimes there’s no submit button and a callback function is used isntead. The function is when reCAPTCHA is solved.
Callback function is usually defined in data-callback parameter of reCAPTCHA, for example:
data-callback="myCallbackFunction"Or sometimes it’s defined as callback parameter of grecaptcha.render function, for example:
grecaptcha.render('example', {'sitekey' : 'someSitekey','callback' : myCallbackFunction,'theme' : 'dark'});Also there’s another way to find the callback function — open javascript console of your browser and explore reCAPTCHA configuration object:
___grecaptcha_cfg.clients[0].aa.l.callbackNote that aa.l may change and there can be multiple clients so you have to check clients[1], clients[2] too.
Finally all you have to do is to call that function:
myCallbackFunction();Or even this way:
___grecaptcha_cfg.clients[0].aa.l.callback();Sometimes it is required to provide an argument and in most cases you should put the token there. For example:
myCallbackFunction('TOKEN');Invisible reCAPTCHA V2
reCAPTCHA V2 also has an invisible version.
You may check how it looks like here: https://www.google.com/recaptcha/api2/demo?invisible=true
We added parameter invisible=1 that should be used for invisible reCAPTCHA.
Invisible reCAPTCHA is located on a DIV layer positioned -10 000 px from top that makes it invisible for user.
reCAPTCHA is activated on page load or on user’s actions like click somewhere or submit a form — that depends on the website. If user’s cookies are good enough then he will just pass it utomatically and no additional actions will be required. Otherwise user will see standard eCAPTCHA form with a challenge.
In most cases when challenge is completed a callback function is executed. You can read more about callback here.
If you are still not sure — there are few ways to determine that reCAPTCHA is in invisible mode:
- You don’t see «I’m not a robot» checkbox on the page but getting recaptcha challenge making some actions there
- reCAPTCHA’s iframe link contains parameter
size=invisible - reCAPTCHA’s configuration object contains parameter size that is set to invisible, for example
___grecaptcha_cfg.clients[0].aa.l.sizeis equal toinvisible
How to bypass invisible reCAPTCHA in browser?
Method 1: using javascript:
- Change the value of g-recaptcha-response element to the token you received from our server:
-
Execute the action that needs to be performed on the page after solving reCAPTCHA.
- Voila! You’ve done that with just 2 strings of code.
document.getElementById("g-recaptcha-response").innerHTML="TOKEN_FROM_captchaai"; Usually there’s a form that should be submitted and you need to identify the form by id or name or any other attribute and then submit the form. Here are few examples:
document.getElementById("recaptcha-demo-form").submit(); //by id "recaptcha-demo-form"
document.getElementsByName("myFormName")[0].submit(); //by element name "myFormName"
document.getElementsByClassName("example").submit(); //by class name "example"
Or sometimes there’s a callback function executed when reCAPTCHA is solved.
Callback function is usually defined in data-callback parameter of reCAPTCHA, for example:
data-callback="myCallbackFunction"Or sometimes it’s defined as callback parameter of
grecaptcha.render function, for example:
grecaptcha.render('example', {
  'sitekey' : 'someSitekey',
  'callback' : myCallbackFunction,
  'theme' : 'dark'
});
And all you have to do is to call that function:
myCallbackFunction();Method 2: changing HTML:
- Cut the div containing reCAPTCHA from page body.
- Cut the whole block:
- Put the following code instead of the block you’ve just cut:
- You will see “Submit query” button.
Press the button to submit the form with g-recaptcha-response and all other form
data to the website.
Where %g-recaptcha-response% — is an answer token you’ve got from our service.
List of GET/POST request parameters for https://ocr.captchaai.com/in.php
| Parameter | Type | Required | Description |
| key | String | Yes | your API key |
| method | String | Yes | userrecaptcha — defines that you’re sending a reCAPTCHA V2 with new method |
| googlekey | String | Yes | Value of k or data-sitekey parameter you found on page |
| pageurl | String | Yes | Full URL of the page where you see the reCAPTCHA |
| domain | String Default: google.com |
No | Domain used to load the captcha: google.com or recaptcha.net |
| invisible | Integer Default: 0 |
No | 1 — means that reCAPTCHA is invisible. 0 — normal reCAPTCHA. |
| data-s | String | No | Value of data-s parameter you found on page. Curenttly applicable for Google Search and other Google services. |
| cookies | String | No | Your cookies that will be passed to our OCR server who solve the captha. We also return OCR server’s cookies in the response if you use json=1.Format: KEY:Value, separator: semicolon, example: KEY1:Value1;KEY2:Value2;
|
| userAgent | String | No | Your userAgent that will be passed to our OCR server and used to solve the captcha. |
| header_acao | Integer Default: 0 |
No | 0 — disabled 1 — enabled. If enabled in.php will include Access-Control-Allow-Origin:* header in the response.Used for cross-domain AJAX requests in web applications. Also supported by res.php.
|
| json | Integer Default: 0 |
No | 0 — server will send the response as plain text 1 — tells the server to send the response as JSON |
| proxy | String | No | Format: login:[email protected]:3128 You can find more info about proxies here. |
| proxytype | String | No | Type of your proxy: HTTP, HTTPS, SOCKS4, SOCKS5. |
List of GET request parameters for https://ocr.captchaai.com/res.php
| GET parameter | Type | Required | Description |
| key | String | Yes | your API key |
| action | String | Yes | get — get the asnwer for your captcha |
| id | Integer | Yes | ID of captcha returned by in.php. |
| json | Integer Default: 0 |
No | 0 — server will send the response as plain text 1 — tells the server to send the response as JSON |
Request URL example:
https://ocr.captchaai.com/res.php?key=347bc2896fc1812d3de5ab56a0bf4ea7&action=get&id=123456789reCAPTCHA V3
reCAPTCHA V3 is the newest type of captcha from Google. It has no challenge so there is no need for user interaction. Instead it uses a «humanity» rating — score.
reCAPTCHA V3 technically is quite similar to reCAPTCHA V2: customer receives a token from
reCAPTCHA API which is then sent inside a POST request to the target website and
verified via reCAPTCHA API.
The difference is now reCAPTCHA API returns rating of a user detecting whether he was a real human or a bot. This rating is called score and could be a number from 0.1 to 0.9. his score is passed to the website which then decides what to do with the user request.
Also there is a new parameter action allowing to process user actions on the website differently. After the verification of token reCAPTCHA API returns the name of the action user performed.
How to solve reCAPTCHA V3 using captchaai:
-
First you’ve got to be sure the target website is actually using reCAPTCHA V3
There should be V3 if:
- there is no captcha and no images to click on
- api.js script is loading with the render=sitekey parameter, for example:
https://www.google.com/recaptcha/api.js?render=6LfZil0UAAAAAAdm1Dpzsw9q0F11-bmervx9g5fE - clients array of ___grecaptcha_cfg object is using index 100000: ___grecaptcha_cfg.clients[100000]
-
To start solving reCAPTCHA V3 using our API first you’ve got to find three
parameters:sitekey — this parameter could be obtained from the URI of
api.js as a value of render parameter. It could also be found inside
URI of iframe with reCAPTCHA, in javascript code of the website where it’s
calling grecaptcha.execute function or in ___grecaptcha_cfg configuration
object.action — you’ve got to find this inspecting javascript code of the website looking for call of grecaptcha.execute function. Example:
grecaptcha.execute(‘6LfZil0UAAAAAAdm1Dpzsw9q0F11-bmervx9g5fE’, {action:
do_something}).
Sometimes it’s really hard to find it and you’ve got to dig through all js-files loaded by website. You may also try to find the value of action parameter inside___grecaptcha_cfg configuration object but usually it’s undefined. In that case you have to call grecaptcha.execute and inspect javascript code. If you can’t find it try to use the default value «verify» — our API will use it if you don’t provide action in your request.pageurl — full URL of the page where you see the reCAPTCHA V3.
Now you need to understand the score you need to solve V3. You can’t
predict what score is acceptable for the website you want to solve at. It can
only be figured out by trial and error. The lowest score is 0.1 which means
«robot», the highest is 0.9 which means «human». But most sites uses thresholds
from 0.2 to 0.5 because real humans receive a low score oftenly. Our service is
able to provide solutions which requires the score of 0.3. Higher score is
extreamly rare. -
Having all necessary parameters stated above you may send request to our API.
-
Submit a HTTP GET or POST request to our API URL:
https://ocr.captchaai.com/in.php
with method set to
userrecaptcha and version set to v3 along with
min_score set to score website requires, sitekey inside
googlekey parameter and full page URL as value for pageurl.
You have to include action parameter to or else we will use default
value verify.List of request parameters below.
URL request sample:
https://ocr.captchaai.com/in.php?key=347bc2896fc1812d3de5ab56a0bf4ea7&method=userrecaptcha&version=v3&action=verify&min_score=0.3&googlekey=6LfZil0UAAAAAAdm1Dpzsw9q0F11-bmervx9g5fE&pageurl=https://mysite.com/page/
-
If everything is fine server will return the ID of your captcha as plain text,like: OK|123456789 or as JSON
{«status»:1,»request»:»123456789″} if json parameter was used.If something went wrong server will return an error. See Error Handling chapter for the list of errors.
-
Make a 10-15 seconds timeout and submit a HTTP GET request to our API
https://ocr.captchaai.com/res.phpproviding the captcha ID. The list of parameters is in the table below.If everything is fine and your captcha is solved server will return the answer as plain text or as JSON. The answer is a token like this:
03AHJ_Vuve5Asa4koK3KSMyUkCq0vUFCR5Im4CwB7PzO3dCxIo11i53epEraq-uBO5mVm2XRikL8iKOWr0aG50sCuej9bXx5qcviUGSm4iK4NC_Q88flavWhaTXSh0VxoihBwBjXxwXuJZ-WGN5Sy4dtUl2wbpMqAj8Zwup1vyCaQJWFvRjYGWJ_TQBKTXNB5CCOgncqLetmJ6B6Cos7qoQyaB8ZzBOTGf5KSP6e-K9niYs772f53Oof6aJeSUDNjiKG9gN3FTrdwKwdnAwEYX-F37sI_vLB1Zs8NQo0PObHYy0b0sf7WSLkzzcIgW9GR0FwcCCm1P8lB--gf50q5BMkiRH7osm4DoUgsjc_XyQiEmQmxl5sqZP7aKsaE-EM00x59XsPzD3m3YI6SRCFRUevSyumBd7KmXE8VuzIO9lgnnbka4-eZynZa6vbB9cO3QjLH0xSG3--o-fxrOuphwfrtwvvi2FGfpTexWvxhqWICMFTTjFBCEGEgj7_IFWEKirXW2RTZCVF0Gid7EtIsoEeZkPbrcUISGmgtiJkJ_KojuKwImF0G0CsTlxYTOU2sPsd5o1JDt65wGniQR2IZufnPbbK76Yh_KI2DY4cUxMfcb2fAXcFMc9dcpHg6f9wBXhUtFYTu6pi5LhhGuhpkiGcv6vWYNxMrpWJW_pV7q8mPilwkAP-zw5MJxkgijl2wDMpM-UUQ_k37FVtf-ndbQAIPG7S469doZMmb5IZYgvcB4ojqCW3Vz6QIf the captcha is not solved yet server will return CAPCHA_NOT_READY.Just repeat your request in 5 seconds.
If something went wrong server will return an error. See Error Handling chapter for the list of errors.
Sample request:
https://ocr.captchaai.com/res.php?key=347bc2896fc1812d3de5ab56a0bf4ea7&action=get&json=1&id=123456789 -
After receiving the token from our API you’ve got to use it properly on the
target website. Best way to understant that is to check the requests sent to
site when you act as a normal user. Most browsers has developer’s console tool
where you should check Network tab.Usually token is sent using POST request. It could be g-recaptcha-response just like reCAPTCHA V2 does or g-recaptcha-response-100000. It could be other parameter too. So you’vegot to inspect the requests and find out how exactly the token supposed to be sent. Then you have to compose your request accordingly.
List of GET/POST request parameters for https://ocr.captchaai.com/in.php
| Parameter | Type | Required | Description |
| key | String | Yes | your API key |
| method | String | Yes | userrecaptcha — defines that you’re sending a reCAPTCHA |
| version | String | Yes | v3 — defines that you’re sending a reCAPTCHA V3 |
| googlekey | String | Yes | Value of sitekey parameter you found on page |
| pageurl | String | Yes | Full URL of the page where you see the reCAPTCHA |
| domain | String Default: google.com |
No | Domain used to load the captcha: google.com or recaptcha.net |
| action | String Default: verify |
No | Value of action parameter you found on page |
| min_score | Integer Default: 0.4 |
No | The score needed for resolution. Currently it’s almost impossible to get token with score higher than 0.3 |
| header_acao | Integer Default: 0 |
No | 0 — disabled 1 — enabled. If enabled in.php will include Access-Control-Allow-Origin:*: header in theresponse. Used for cross-domain AJAX requests in web applications. Also supported by res.php.
|
| json | Integer Default: 0 |
No | 0 — server will send the response as plain text 1 — tells the server to send the response as JSON |
List of GET request parameters for https://ocr.captchaai.com/res.php
| GET parameter | Type | Required | Description |
| key | String | Yes | your API key |
| action | String | Yes | get — get the asnwer for your captcha reportgood — — report the asnwer was accepted reportbad — — report the asnwer was declined |
| id | Integer | Yes | ID of captcha returned by in.php. |
| json | Integer Default: 0 |
No | 0 — server will send the response as plain text 1 — tells the server to send the response as JSON |
| header_acao | Integer Default: 0 |
No | 0 — disabled 1 — enabled. If enabled res.php will include Access-Control-Allow-Origin:* header in the response. Used for cross-domain AJAX requests in web applications. |
hCaptcha
hCaptcha is a quite new type of captcha that is really similar to reCAPTCHA and looks
like this:

Solving hCaptcha is pretty simple:
-
Find the value of data-sitekey parameter in the source code of the page.
-
Submit a HTTP GET or POST request to our API URL:
http://ocr.captchaai.com/in.phpwith method set to hcaptcha and
provide the value found on previous step as value for sitekey and full page
URL as value for pageurl.
You can find the full list of
parameters in the table below.Request URL example:
http://ocr.captchaai.com/in.php?key=1abc234de56fab7c89012d34e56fa7b8&method=hcaptcha&sitekey=10000000-ffff-ffff-ffff-000000000001&pageurl=http://mysite.com/register -
If everything is fine server will return the ID of your captcha as plain text, like:
OK|2122988149 or as JSON {«status»:1,»request»:»2122988149″} if
json parameter was used.
Otherwise server will return an error code. -
Make a 15-20 seconds timeout then submit a HTTP GET request to our API URL:
http://ocr.captchaai.com/res.phpto get the result.
The full list of parameters is in the table below.If captcha is already solved server will respond in plain text or JSON and return the
answer token that looks like:P0_eyJ0eXAiOiJKV1QiLCJhbGciOiJIUzI1NiJ9.eyJwYXNza2V5IjoiNGQ3MTI5ZmUtOTQxZi00NGQ4LWI5MzYtMzAwZjUyMmM3Yzc2IiwiZXhwIjoxNTY4MTA3MjY4LCJzaGFyZF9pZCI6MzAyMzQ1NDg4fQ.yJuANPBc1uzCw9tW6CoLqiijBgh6zF00KdsnqaJtuggIf captcha is not solved yet server will return CAPCHA_NOT_READY result.
Repeat
your request in 5 seconds.If something went wrong server will return an error
code. -
Place the token into h-captcha-response and g-recaptcha-response
hidden elements and submit the form.
Please note, hcaptcha also has a callback. If there is no form to submit you MUST
explore the website code and find the callback.
List of GET/POST request parameters for http://ocr.captchaai.com/in.php
| Parameter | Type | Required | Description |
| key | String | Yes | your API key |
| method | String | Yes | hcaptcha — defines that you’re sending hCaptcha |
| sitekey | String | Yes | Value of data-sitekey parameter you found on page |
| pageurl | String | Yes | Full URL of the page where you bypass the captcha |
| invisible | Number Default: 0 |
No | Use 1 for invisible version of hcaptcha. Currently it is a very rare case. |
| domain | String Default: hcaptcha.com |
No | Domain used to load the captcha: hcaptcha.com or js.hcaptcha.com |
| data | String | No | Custom data that is used in some implementations of hCaptcha, mostly withinvisible=1. In most cases you see it as rqdata insidenetwork requests. IMPORTANT: you MUST provide userAgent if yousubmit captcha with data paramater. The value should match theUser-Agent you use when interacting with the target website. |
| userAgent | String | No | Your userAgent that will be passed to our OCR server and used to solve the captcha. Required for hCaptcha with data parameter.
|
| header_acao | Integer Default: 0 |
No | 0 — disabled 1 — enabled. If enabled in.php will includeAccess-Control-Allow-Origin:* header in the response. Used for cross-domain AJAX requests in web applications. Also supported by res.php.
|
| json | Integer Default: 0 |
No | 0 — server will send the response as plain text 1 — tells the server to send the response as JSON |
| proxy | String | No | Format: login:[email protected]:3128 You can find more info about proxies here. |
| proxytype | String | No | Type of your proxy: HTTP, HTTPS, SOCKS4, SOCKS5. |
List of GET request parameters for http://ocr.captchaai.com/res.php
| GET parameter | Type | Required | Description |
| key | String | Yes | your API key |
| action | String | Yes | get — get the asnwer for your captcha |
| id | Integer | Yes | ID of captcha returned by in.php. |
| json | Integer Default: 0 |
No | 0 — server will send the response as plain text 1 — tells the server to send the response as JSON |
Request URL example:
http://ocr.captchaai.com/res.php?key=1abc234de56fab7c89012d34e56fa7b8&action=get&id=2122988149Language support
Our API allows you to set the language of captcha with lang parameter.
The list of supported languages is available in the table below.
Language code (lang value) |
Language |
| en | English |
| ru | Russian |
| es | Spanish |
| pt | Portuguese |
| uk | Ukrainian |
| vi | Vietnamese |
| fr | French |
| id | Indonesian |
| ar | Arab |
| ja | Japanese |
| tr | Turkish |
| de | German |
| zh | Chinese |
| fil | Philippine |
| pl | Polish |
| th | Thai |
| it | Italian |
| nl | Nederlands (Dutch) |
| sk | Slovak |
| bg | Bulgarian |
| ro | Romanian |
| hu | Hungarian (Magyar) |
| ko | Korean |
| cs | Czech |
| az | Azerbaijani |
| fa | Persian (Farsi) |
| bn | Bengali |
| el | Greek |
| lt | Lithuanian |
| lv | Latvian |
| sv | Swedish |
| sr | Serbian |
| hr | Croatian |
| he | Hebrew |
| hi | Hindi |
| nb | Norwegian |
| sl | Slovenian |
| da | Danish |
| uz | Uzbek |
| fi | Finnish |
| ca | Catalan |
| ka | Georgian |
| ms | Malay |
| te | Telugu |
| et | Estonian |
| ml | Malayalam |
| be | Belorussian |
| kk | Kazakh |
| mr | Marathi |
| ne | Nepali |
| my | Burmese |
| bs | Bosnian |
| hy | Armenian |
| mk | Macedonian |
| pa | Punjabi (Punjabi) |
Using proxies
Please note that we disable this option by default to get better results, please contact support if you know you want to open it for your account.
Proxies can be used to solve most types of javascript-based captchas:
- reCAPTCHA V2
- hCaptcha
Proxy allows to solve the captcha from the same IP address as you load the page.
Using proxies is not obligatory in most cases. But for some kind of protection you should use it. For example: Cloudflare and Datadome protection pages require IP matching.
Proxies are not supported for reCAPTCHA V3 as proxies dramatically decrease the success rate for this types of captcha.
If you send us the proxy, we check it’s availability trying to open the website through you proxy, and if we can’t do that we will not use your proxy.
If we’re able to use your proxy — we’ll load the reCAPTCHA through it for solving.
We support the following proxy types: SOCKS4, SOCKS5, HTTP, HTTPS with authentication by IP address or login and password.
If your proxy uses login/password authentication you have to include your credentials in proxy parameter.
POST parameters for proxies
| POST parameter | Type | Required | Description |
| proxy | String | No | Format for IP authentication: IP_address:PORT Example: proxy=123.123.123.123:3128 Format for login/password authentication: login:[email protected]_address:PORT Example: proxy=proxyuser:[email protected]:3128 |
| proxytype | String | No | Type of your proxy: HTTP, HTTPS, SOCKS4, SOCKS5. Example: proxytype=SOCKS4 |
Cookies
Please note that we disable this option by default to get better results, please contact support if you know you want to open it for your account.
Our API provides extended Cookies support for reCAPTCHA V2.
You can provide your cookies using the format below as the value of json_cookies parameter. We will set the cookies on our OCR server’s browser.
After the captcha was solved succesfully, we will return all the cookies set for domains: google.com and the domain of your target website from pageurl parameter value.
You should use json=1 parameter in your request to res.php endpoint to get the
cookies.
Cookies format:
{
    "json_cookies": [
        {
            "name": "my-cookie-name-1",
            "value": "my-cookie-val-1",
            "domain": "example.com",
            "hostOnly": true,
            "path": "/",
            "secure": true,
            "httpOnly": false,
            "session": false,
            "expirationDate": 1665434653,
            "sameSite": "strict"
        },
        {
            "name": "my-cookie-name-2",
            "value": "my-cookie-val-2",
            "domain": ".google.com",
            "hostOnly": false,
            "path": "/",
            "secure": true,
            "httpOnly": false,
            "session": false,
            "expirationDate": 1668015805.8028,
            "sameSite": "no_restriction"
        }
    ]
}
The following properties are required for each cookie:
domain(String) — the domain for cookiename(String) — the cookie namevalue(String) — the cookie valuesecure(Boolean) — should we set secure attribute?
Error Handling
It’s very important to use proper error handling in your code to avoid suspension of your account and service interruption.
Normally if something is wrong with your request server will return an error.
Below you can find tables with lists of errors with descriptions:
-
errors returned by https://ocr.captchaai.com/in.php
-
errors returned by https://ocr.captchaai.com/res.php
Errors can be returned as plain text or as JSON if you provided json=1 parameter.
In very rare cases server can return HTML page with error text like 500 or 502 — please keep it in mind and handle such cases correctly.
If you received anything that doesn’t looks like the answer or error code — make a 5 seconds timeout and then retry your request.
List of in.php errors
| Error code | Description | Action |
| ERROR_WRONG_USER_KEY | You’ve provided key parameter value in incorrect format, it should contain 32 symbols. | Stop sending requests. Check your API key. |
| ERROR_KEY_DOES_NOT_EXIST | The key you’ve provided does not exists. | Stop sending requests. Check your API key. |
| ERROR_ZERO_BALANCE | You don’t have free threads. | Send less captchas at a time or upgrade your plan. |
| ERROR_PAGEURL | pageurl parameter is missing in your request. | Stop sending requests and change your code to provide valid pageurl parameter. More info. |
| ERROR_ZERO_CAPTCHA_FILESIZE | Image size is less than 100 bytes. | Check the image file. |
| ERROR_TOO_BIG_CAPTCHA_FILESIZE | Image size is more than 100 kB. | Check the image file. |
| ERROR_WRONG_FILE_EXTENSION | Image file has unsupported extension. Accepted extensions: jpg, jpeg, gif, png. | Check the image file. |
| ERROR_IMAGE_TYPE_NOT_SUPPORTED | Server can’t recognize image file type. | Check the image file. |
| ERROR_UPLOAD | Server can’t get file data from your POST-request. That happens if your POST-request is malformed or base64 data is not a valid base64 image. |
You got to fix your code that makes POST request. |
| IP_BANNED | Your IP address is banned due to many frequent attempts to access the server using wrong authorization keys. | Ban will be automatically lifted after 5 minutes. |
| ERROR_BAD_TOKEN_OR_PAGEURL |
You can get this error code when sending reCAPTCHA V2. That happens if your request contains invalid pair of googlekey and pageurl. The common reason for that is that reCAPTCHA is loaded inside an iframe hosted on another domain/subdomain. |
Explore code of the page carefully to find valid pageurl and sitekey values. |
| ERROR_GOOGLEKEY | You can get this error code when sending reCAPTCHA V2. That means that sitekey value provided in your request is incorrect: it’s blank or malformed. | Check your code that gets the sitekey and makes requests to our API. |
| ERROR_WRONG_GOOGLEKEY | googlekey parameter is missing in your request |
Check your code that gets the sitekey and makes requests to our API. |
| ERROR_CAPTCHAIMAGE_BLOCKED | You’ve sent an image that is marked in our database as unrecognizable. Usually that happens if the website where you found the captcha stopped sending you captchas and started to send «deny access» image. |
Try to override website’s limitations. |
| ERROR_BAD_PARAMETERS | The error code is returned if some required parameters are missing in your request or the values have incorrect format. | Check that your request contains all the required parameters and the values are in proper format. |
| ERROR_BAD_PROXY | You can get this error code when sending a captcha via proxy server which ismarked as BAD by our API. | Use a different proxy server in your requests. |
| ERROR_SERVER_ERROR | Something went worng with our server. | Try again after 10 seconds. |
| ERROR_INTERNAL_SERVER_ERROR | Something went worng with our captcha processing servers. | Try again after 10 seconds. |
List of res.php errors
| Error code | Description | Action |
| CAPCHA_NOT_READY | Your captcha is not solved yet. | Make 5 seconds timeout and repeat your request. |
| ERROR_CAPTCHA_UNSOLVABLE | We are unable to solve your captcha it may be not supported. | Check if supported & you can retry to send your captcha. |
| ERROR_WRONG_USER_KEY | You’ve provided key parameter value in incorrect format, it shouldcontain 32 symbols. | Stop sending requests. Check your API key. |
| ERROR_KEY_DOES_NOT_EXIST | The key you’ve provided does not exists. | Stop sending requests. Check your API key. |
| ERROR_WRONG_ID_FORMAT | You’ve provided captcha ID in wrong format. The ID can contain numbers only. | Check the ID of captcha or your code that gets the ID. |
| ERROR_WRONG_CAPTCHA_ID | You’ve provided incorrect captcha ID. | Check the ID of captcha or your code that gets the ID. |
| ERROR_EMPTY_ACTION | Action parameter is missing or no value is provided for action parameter. |
Check your request parameters and add the neccessary value, e.g. get or getbalance. |
| ERROR_PROXY_CONNECTION_FAILED |
You can get this error code if we were unable to load a captcha through your proxy server. The proxy will be marked as BAD by our API and we will not accept requests with the proxy during 10 minutes. You will recieve ERROR_BAD_PROXY code from in.php API endpoint in such case. |
Use a different proxy server in your requests. |
| ERROR_INTERNAL_SERVER_ERROR | Something went worng with our captcha processing servers. | Try again after 10 seconds. |
Google reCAPTCHA is a popular service for protecting website forms against spam and bots. The reCAPTCHA asks users to solve simple puzzles that are easy for humans but hard for bots. Your form should not proceed until the reCAPTCHA challenge is resolved. Ultimately it saves the server space from inserting unnecessary spam records into the database. It also saves us time as we never get spam comments in our mailbox. So no more cleaning up of the email inbox.
To add a Google reCAPTCHA in website forms, it needs to write a piece of code to validate the response of reCAPTCHA. If a response is valid then only the form should proceed.
There are 2 ways to validate the response – one is server-side and the other is client-side. In this article, we focus on client-side validation and thus we study how to validate Google reCAPTCHA using JavaScript.
If you are looking for server-side validation, please refer to the article Using Google reCAPTCHA On Your Website Forms With PHP.
Register the Site and Get API Keys
To get started, you need to register your site with Google reCAPTCHA – https://www.google.com/recaptcha/admin.

Choose the option ‘reCAPTCHA v2’ which gives an “I’m not a robot” Checkbox. If you want to test this tutorial on a local server then add ‘localhost’ as a domain.
Once you enter details in the above form you will get your Site key and Secret key. As we are dealing with the client-side validation, we only need a Site Key.
Validate Google reCAPTCHA using JavaScript
Next, you need to add Google reCAPTCHA to your form. You can do it using the code below.
<form method="post" onsubmit="return submitUserForm();">
    <div class="g-recaptcha" data-sitekey="YOUR_SITE_KEY" data-callback="verifyCaptcha"></div>
    <div id="g-recaptcha-error"></div>
    <input type="submit" name="submit" value="Submit" />
</form>
<script src='https://www.google.com/recaptcha/api.js'></script>
Replace the placeholder ‘YOUR_SITE_KEY’ with your actual site key.
In the above code, I am using the onsubmit JavaScript event. This is because when a user hits a submit button, we need to check first reCAPTCHA response and then actually submit a form.
I also added a ‘verifyCaptcha’ as a callback function using the ‘data-callback’ attribute. This callback method is executed when the user submits a successful response. The g-recaptcha-response token is passed to your callback.
I used a div with an id ‘g-recaptcha-error’ to display the error message. It will populate if users try to submit a form without solving the reCAPTCHA challenge. Upon receiving a successful response, I will remove the error message from the callback function.
Finally, let’s write a JavaScript code that handles the reCAPTCHA response. And based on the response it shows either an error message or allows the form to proceed.
<script>
var recaptcha_response = '';
function submitUserForm() {
    if(recaptcha_response.length == 0) {
        document.getElementById('g-recaptcha-error').innerHTML = '<span style="color:red;">This field is required.</span>';
        return false;
    }
    return true;
}

function verifyCaptcha(token) {
    recaptcha_response = token;
    document.getElementById('g-recaptcha-error').innerHTML = '';
}
</script>
The verifyCaptcha method receives a token after users solve the puzzles of reCAPTCHA. We are assigning this response to the <code>recaptcha_response</code> variable.
In the method <code>submitUserForm</code>, I check if the response is empty. It returns ‘false’ for an empty response. It means a user has not yet validated reCAPTCHA. And so, it appends an error to the div having the id ‘g-recaptcha-error’.
When Google reCAPTCHA sends a valid response I am returning a true value, which submits the form for further processing.
Our final code is:
<form method="post" onsubmit="return submitUserForm();">
    <div class="g-recaptcha" data-sitekey="YOUR_SITE_KEY" data-callback="verifyCaptcha"></div>
    <div id="g-recaptcha-error"></div>
    <input type="submit" name="submit" value="Submit" />
</form>
<script src='https://www.google.com/recaptcha/api.js'></script>
<script>
var recaptcha_response = '';
function submitUserForm() {
    if(recaptcha_response.length == 0) {
        document.getElementById('g-recaptcha-error').innerHTML = '<span style="color:red;">This field is required.</span>';
        return false;
    }
    return true;
}

function verifyCaptcha(token) {
    recaptcha_response = token;
    document.getElementById('g-recaptcha-error').innerHTML = '';
}
</script>
I hope you understand how to Validate Google reCAPTCHA using JavaScript. Give it a try and share your thoughts or suggestions in the comment section below.
Related Articles
- Integrate Google Invisible reCAPTCHA with PHP
- A Guide on Adding Google reCAPTCHA v3 to your Laravel Website
- How to Add I’m not a robot captcha in Laravel Forms
If you liked this article, then please subscribe to our YouTube Channel for video tutorials.
Google reCAPTCHA – популярный выбор для защиты форм веб-сайтов от спама и ботов. ReCAPTCHA предлагает пользователям решать простые головоломки, которые легки для людей, но трудны для ботов. В результате можно сэкономить место на сервере от вставки ненужных записей спама в базу данных. Это также экономит наше время, поскольку мы никогда не получаем спам-комментарии в почтовый ящик.
Когда мы добавляем Google reCAPTCHA в формы веб-сайтов, нам нужно написать фрагмент кода для проверки ответа reCAPTCHA. Если ответ действителен, то должна продолжаться только наша форма.
Есть два способа проверить ответ: один на стороне сервера, а другой – на стороне клиента. В этой статье мы сосредоточимся на проверке на стороне клиента и изучаем, как проверять Google reCAPTCHA с помощью JavaScript.
Если вам нужна проверка на стороне сервера, обратитесь к статье Использование Google reCAPTCHA в формах вашего веб-сайта с помощью PHP.
Зарегистрируйте сайт и получите ключи API
Для начала вам необходимо зарегистрировать свой сайт здесь – https://www.google.com/recaptcha/admin.
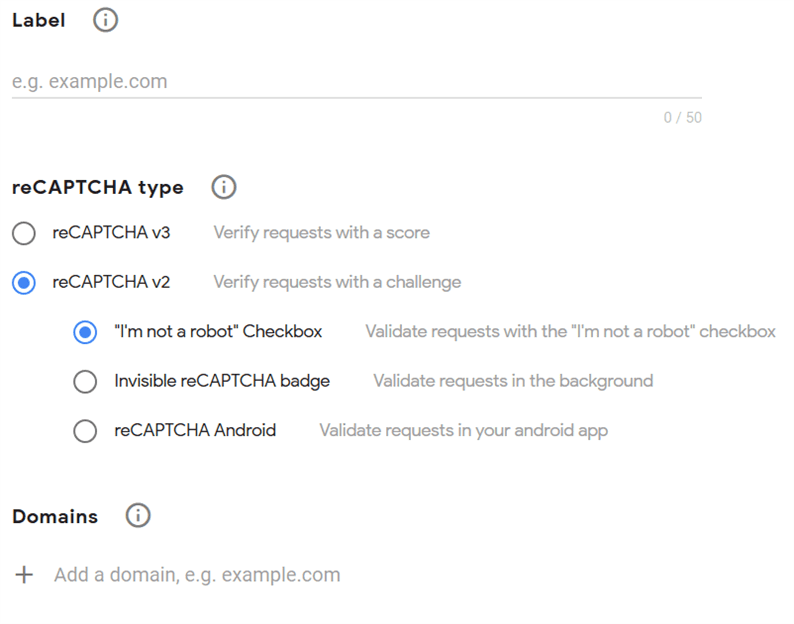
Выберите вариант «reCAPTCHA v2», который устанавливает флажок «Я не робот».
После того, как вы введете данные в форму выше, вы получите ключ сайта и секретный ключ. Поскольку мы имеем дело с проверкой на стороне клиента, нам нужен только ключ сайта.
Если вы хотите протестировать его на локальном сервере, добавьте localhost в качестве домена.
Проверить Google reCAPTCHA с помощью JavaScript
Во-первых, вам нужно добавить Google reCAPTCHA в вашу форму. Вы можете сделать это, используя приведенный ниже код.
<form method="post" onsubmit="return submitUserForm();">
    <div class="g-recaptcha" data-sitekey="YOUR_SITE_KEY" data-callback="verifyCaptcha"></div>
    <div id="g-recaptcha-error"></div>
    <input type="submit" name="submit" value="Submit" />
</form>
<script src='https://www.google.com/recaptcha/api.js'></script>
В приведенном выше коде я использую onsubmitсобытие. Это связано с тем, что, когда пользователь отправляет форму, нам нужно проверить ответ reCAPTCHA, а затем разрешить ему отправить форму.
Затем я добавил «verifyCaptcha» в качестве имени функции обратного вызова к атрибуту «data-callback». Я буду использовать этот метод обратного вызова, чтобы удалить сообщение об ошибке после прохождения проверки. Я также добавил div с идентификатором g-recaptcha-error для отображения сообщения об ошибке.
Замените заполнитель “YOUR_SITE_KEY” фактическим ключом сайта.
Наконец, давайте напишем код JavaScript, который обрабатывает ответ reCAPTCHA. И в зависимости от ответа он показывает либо сообщение об ошибке, либо позволяет форме продолжить работу.
<script>
function submitUserForm() {
    var response = grecaptcha.getResponse();
    if(response.length == 0) {
        document.getElementById('g-recaptcha-error').innerHTML = '<span style="color:red;">This field is required.</span>';
        return false;
    }
    return true;
}

function verifyCaptcha() {
    document.getElementById('g-recaptcha-error').innerHTML = '';
}
</script>
В методе submitUserFormмы получаем ответ reCAPTCHA, используя grecaptcha.getResponse(). Это встроенная функция, предоставляемая сервисом Google reCAPTCHA.
Если ответ недействителен, он возвращает 0. Это означает, что пользователь еще не проверил reCAPTCHA. Итак, он выдает ошибку и добавляется к div с идентификатором g-recaptcha-error.
Когда Google reCAPTCHA отправляет действительный ответ, я возвращаю истинное значение, которое позволяет форме продолжить работу.
verifyCaptchaМетод получает вызов, когда вы решить все головоломки рекапчи. Затем мы удаляем сообщение об ошибке, как только загадка будет решена.
Наш последний код:
<form method="post" onsubmit="return submitUserForm();">
    <div class="g-recaptcha" data-sitekey="YOUR_SITE_KEY" data-callback="verifyCaptcha"></div>
    <div id="g-recaptcha-error"></div>
    <input type="submit" name="submit" value="Submit" />
</form>
<script src='https://www.google.com/recaptcha/api.js'></script>
<script>
function submitUserForm() {
    var response = grecaptcha.getResponse();
    if(response.length == 0) {
        document.getElementById('g-recaptcha-error').innerHTML = '<span style="color:red;">This field is required.</span>';
        return false;
    }
    return true;
}

function verifyCaptcha() {
    document.getElementById('g-recaptcha-error').innerHTML = '';
}
</script>
Надеюсь, вы понимаете, как проверить Google reCAPTCHA с помощью JavaScript. Попробуйте это в своем проекте и поделитесь своими мыслями или предложениями в разделе комментариев ниже.
Статьи по Теме
- Интегрируйте Google Invisible reCAPTCHA с PHP
- Руководство по добавлению Google reCAPTCHA v3 на ваш сайт Laravel
- Как добавить капчу “Я не робот” в формах Laravel
Источник записи: artisansweb.net
reCAPTCHA by Google is a free service that protects your website from spam and abuse. It’s designed to be friendly to humans, much more friendly than image-based CAPTCHA. It uses advanced risk analysis techniques to tell humans and bots apart to protect your website from spam.
The invisible reCAPTCHA badge does not require the user to click on a checkbox. Instead, it is invoked directly when the user clicks on an existing button on your site or can be invoked via a JavaScript API call. The integration requires a JavaScript callback when reCAPTCHA verification is complete. By default, only the most suspicious traffic will be prompted to solve a captcha.
![]()
Get started
To get started with reCAPTCHA you must first have a Google account. Once you are logged into Google go to https://www.google.com/recaptcha/admin to register your new website. The usage of reCAPTCHA is limited to the domains that you register. It’s recommended that if you have multiple domains that you register each one separately.
- Label — Give a meaningful, but short name that describes your site.
- reCAPTCHA type — Choose «reCAPTCHA v2» and then choose «Invisible reCAPTCHA badge».
- Domains — Enter the domain or domains that you plan to use reCAPTCHA on.
- Owners — this should be your Google account email
- Accept the reCAPTCHA Terms of service
- Check off the «Send alerts to owners»
- Click the «Submit» button.
See the Settings documentation on the Google site for more information.
Get the API keys
Once you’ve registered your site you then need to get the API credentials. reCAPTCHA gives you a «Site Key» and «Secret Key»
You will need to copy those to the Google reCAPTCHA V2 Invisible configuration page in BranchCMS.
Integrate into BranchCMS
- In BranchCMS click on the «Site Settings» link at the upper right of the administration and then click on «Spam Protection».
- Then click on «Configure reCAPTCHA V2 (Invisible reCAPTCHA badge)».
- Copy the «Site key» value from the Google reCAPTCHA page and paste it into the «Site Key» field.
- Copy the «Secret key» value from the Google reCAPTCHA page and past it into the «Secret Key» field.
Make sure that if either of those values ends in punctuation that you get the punctuation too.
Customize the display
When you’re setting up the reCAPTCHA integration you can also configure the display options. These values will be the default display choices for all places that reCAPTCHA is used throughout the site. You can, however, override them with each form that uses reCAPTCHA.
Integrate with your form
Now that reCAPTCHA is setup for your site you can use it on your forms. By default CAPTCHA is disabled on all forms. To enable it edit the form and go to the CAPTCHA tab.

Choose «Google reCAPTCHA V2 Invisible» for the «CAPTCHA Type» field. That will show you the status of the reCAPTCHA integration.
Output the CAPTCHA in the template
There are three ways to invoke the invisible reCAPTCHA in your templates. It’s a bit more involved than simply using the {{ form.captcha.tag }} variable.
- Automatically bind the challenge to a button
- Programatically bind the challenge to a button
- Programatically invoke the challenge
Testing for CAPTCHA type
You may want to use some logic to display the reCAPTCHA in your templates if there is a chance that a different type of CAPTCHA could be chosen.
The reCAPTCHA V2 Invisible CAPTCHA type is designated by the «recaptchaV2Invisible» value for the form.captcha.type variable.
{% if form.captcha.type == 'recaptchaV2Invisible' %}
   {# Display the Google reCAPTCHA V2 Invisible here #}
{% endif %}
Setting the reCAPTCHA data attributes
There are a few ways that you can set the data attributes such as the data-callback or data-expired-callback attributes. If you set them then they are set on the <div> tag for the programatically invoke the challenge option and the <button> tag that can be used for either of the button options.
Below are examples of the three ways that the data attribute could be set.
{% set form.captcha.data.callback = 'onSubmit' %}
{% do form.captcha.data.set('expired-callback', 'expiredCallback') %}
{% do form.captcha.set('data-error-callback', 'errorCallback') %}
Automatically bind the challenge to a button
The easiest method for using the invisible reCAPTCHA widget on your page is to include the <script> tag to load the Google Javascript file and to add a few attributes to your HTML button.
The required attributes are a class name of g-recaptcha, your site key in the data-sitekey attribute, and the name of the Javascript callback function to handle completion of the CAPTCHA in the data-callback attribute.
{% set form.class = 'myForm' %}
{{ form.openTag }}
   {# Display fields #}
   {% for field in form.fields %}
     <p>{{ field.label.tag }}<br>{{ field.tag }}</p>
   {% endfor %}

   {# Set the callback function #}
   {% set form.captcha.data.callback = 'onSubmit' %}
   <p><button class="{{ form.captcha.class }}" {{ form.captcha.button.dataAttr }}>Submit</button></p>
   <script>
   function onSubmit() {
     document.querySelector('.myForm').submit();
   }
   </script>
   {{ form.captcha.js.tag }}
{{ form.closeTag }}
Programatically bind the challenge to a button
Deferring the binding can be achieved by specifying your onload callback function and adding parameters to the JavaScript resource.
{% set form.class = 'myForm' %}
{{ form.openTag }}
   {# Display fields #}
   {% for field in form.fields %}
     <p>{{ field.label.tag }}<br>{{ field.tag }}</p>
   {% endfor %}

   <p><button>Submit</button></p>
   <script>
   function onSubmit() {
     document.querySelector('.myForm').submit();
   }
   function onloadCallback() {
         grecaptcha.render(document.querySelector(".myCustomCaptcha"), {
            'sitekey': '{{ form.captcha.data.sitekey }}',
            'callback': onSubmit
         });
    }
   </script>
   {% set form.captcha.js.src = form.captcha.js.src ~ '?onload=onloadCallback&render=explicit' %}
   {{ form.captcha.js.tag }}
{{ form.closeTag }}
Programmatically invoke the challenge
Invoking the reCAPTCHA verification programmatically can be achieved by rendering the challenge in a div with an attribute data-size=’invisible’ and programmatically calling execute.
The {{ form.captcha.tag }} holds the HTML for the <div> tag.
This option requires that grecaptcha.execute() is called in order to validate the CAPTCHA. If that’s not called then the form cannot be processed as the required reCAPTCHA value would not be submitted.
Typically the grecaptcha.execute() function is called after the form is validated with Javascript.
{% set form.class = 'myForm' %}
{{ form.openTag }}
   {# Display fields #}
   {% for field in form.fields %}
     <p>{{ field.label.tag }}<br>{{ field.tag }}</p>
   {% endfor %}

   {# Set the callback function #}
   {% set form.captcha.data.callback = 'recaptchaCallback' %}
   {% set form.captcha.button.class = form.captcha.button.class ~ ' myCustomCaptcha' %}
   <p>{{ form.captcha.button.tag }}</p>
   <script>
   function recaptchaCallback() {
     document.querySelector('.myForm').submit();
   }
   function onloadCallback() {
      grecaptcha.render(document.querySelector(".myCustomCaptcha"));
   }
   function validate(event) {
      event.preventDefault();
      if (!document.getElementById('field').value) {
        alert("You must add text to the required field");
      } else {
        grecaptcha.execute();
      }
   }
   </script>
   {% set form.captcha.js.src = form.captcha.js.src ~ '?onload=onloadCallback' %}
   {{ form.captcha.js.tag }}
{{ form.closeTag }}