Встретить ситуацию с пропаданием связи, когда нарушается интернет-соединение, можно достаточно часто. Отключение чаще всего происходит не по вине пользователя. Что делать, если пишет «Internet connection error» (имеется в виду предупреждение, содержащееся в системном сообщении), мы сейчас и посмотрим. Более того, попробуем разобрать основные причины возникновения таких ситуаций и обратим внимание на возможные методы их устранения.
Internet connection error: что делать?
Итак, если рассматривать основные причины отключения интернета, чаще всего в их числе приоритетное место занимает проникновение на компьютер вирусов, исполняемых апплетов, называемых Malware и Adware, а также неправильная настройка самого подключения.

Сейчас будем исходить из того, что с оплатой услуг провайдера все в порядке, а сетевое оборудование работает без сбоев. Хотя, в общем-то, в некоторых случаях при постоянном появлении сообщения об отсутствии подключения может потребоваться повторная инсталляция драйверов сетевых устройств или установка корректных параметров маршрутизатора, например роутера при наличии сетевых подключений.
Восстановление системы
Если сбой произошел ни с того ни с сего, раньше все работало как часы, а сейчас на экране появилось сообщение Internet connection error, что делать, будет понятно, если обратить внимание именно на время возникновения такой ситуации.
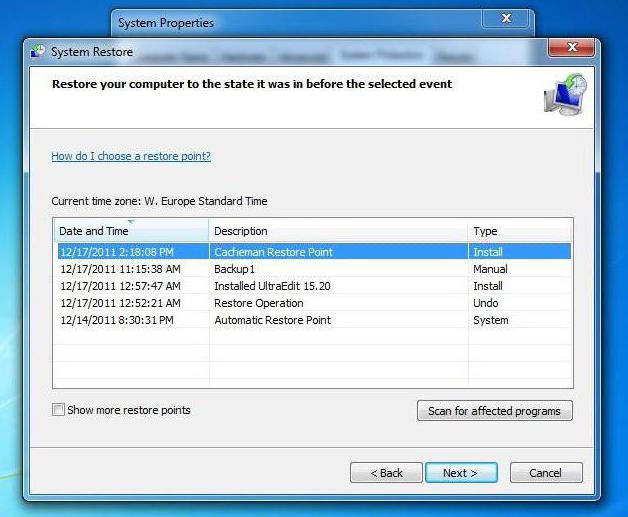
Действительно, мало ли какие настройки «слетели». Самым простым способом устранения проблемы станет обычный откат системы до контрольной точки, но она во временном промежутке может быть более ранней, чем время появления сбоя.
Проверка на вирусы и вредоносные коды
Теперь посмотрим, как поступить, если первый способ ничего не дал, и система снова выдает предупреждение Internet connection error. Что делать? В обязательном порядке проверить систему на вирусы, используя какую-нибудь портативную версию программы (ведь инсталлированный антивирус уже мог пропустить угрозу).
В качестве пакета можно взять KVRT, в наилучшей степени зарекомендовавший себя в области портативных приложений. К тому же и со штатным антивирусом конфликты полностью исключаются.
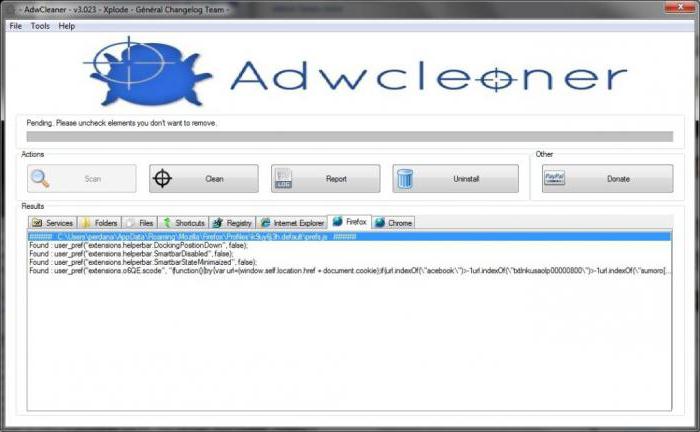
Но и такие утилиты могут не определять потенциально нежелательное ПО, заменяющее оригинальный файл HOSTS или вносящее в него собственные записи. В этом случае потребуется использовать утилиты вроде Adware Cleaner или что-то похожее.
Проверка параметров подключения
Если потенциальных или существующих угроз не обнаружено, можно проверить настройки самого подключения. Допустим, система снова выдает предупреждение вроде Internet connection error. Что делать теперь?
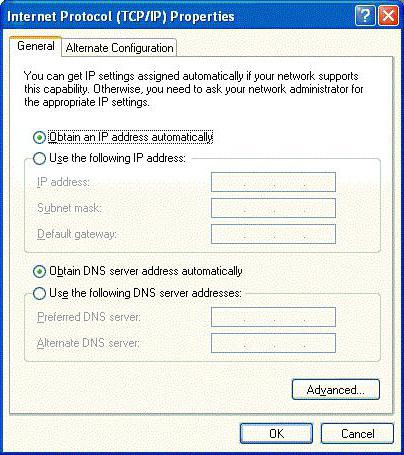
Необходимо зайти в свойства подключения и проверить настройки протокола TCP/IP. Желательно (что применяется в большинстве случаев) использовать автоматическое получение адресов IP и DNS-сервера. Иногда стоит обратить внимание на задействование прокси. Если провайдер не поддерживает предоставление таких услуг, прокси-сервер необходимо отключить (снять галочку на соответствующем поле). В крайнем случае нужно ввести правильные значения для всех задействованных полей (их предоставляет провайдер при подключении пользовательского компьютера к интернету или системный администратор в случае с сетевыми терминалами).
Использование специальных утилит восстановления
Кроме всего вышесказанного, если пользователь не хочет или не может заниматься устранением проблемы самостоятельно, могут помочь специальные программы восстановления интернет-подключения и всего, что с этим связано.
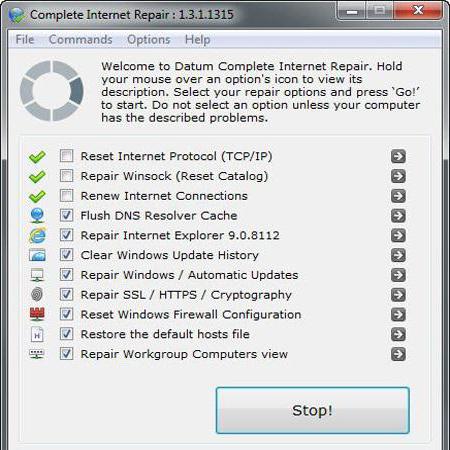
Одной из самых простых и интересных автоматизированных утилит является программа Complete Internet Repair. По большому счету пользователю нужно всего лишь запустить процесс сканирования на наличие проблем, после чего активировать их исправление. В обоих процессах участие юзера сведено к минимуму.
Заключение
Естественно, это далеко не все причины, которые могут повлиять на отключение интернета. Скажем так: здесь были рассмотрены наиболее часто возникающие штатные и нештатные ситуации. Но, как уже можно заметить, способы устранения проблемы в большинстве случаев достаточно просты и могут быть выполнены юзером любого уровня подготовки.
Содержание
- Как решить проблему «speech recognition could not start»
- «Напридумывал, чтобы не работать. » 1977 год, СССР, художник В. А. Травин
- Васю побили?
- О начальстве
- Может, стоит попробовать?
- Ответ на пост «Васю побили?»
- Детский режим Кинопоиска не по-детски
- М+Ж+М=ММ
- Это какой-то позор, православные.
- Два способа отключить Распознавание голоса в Windows 10.
- Чтобы отключить распознавание голоса в Windows 10, выполните следующие действия.
- Отключить распознавание речи в сети с помощью настройки реестра.
- Fix: Speech Recognition could not start Cryptic Error in Windows 10
- Fix: Speech Recognition could not start Cryptic Error in Windows 10
- Add ctfmon.exe to Startup
- Using Speech Recognition Settings
- By Regional Settings
- Train Profile
- Create New Recognition Profile
- Speech recognition error windows 10 как исправить
- Asked by:
- Question
- All replies
- Как скачать Speech Recognition.lnk и устранить сообщения об ошибках
- Обзор файла
- Что такое сообщения об ошибках Speech Recognition.lnk?
- Общие ошибки выполнения Speech Recognition.lnk
- Как исправить ошибки Speech Recognition.lnk — 3-шаговое руководство (время выполнения:
- Шаг 1. Восстановите компьютер до последней точки восстановления, «моментального снимка» или образа резервной копии, которые предшествуют появлению ошибки.
- Шаг 2. Запустите средство проверки системных файлов (System File Checker), чтобы восстановить поврежденный или отсутствующий файл Speech Recognition.lnk.
- Шаг 3. Выполните обновление Windows.
- Если эти шаги не принесут результата: скачайте и замените файл Speech Recognition.lnk (внимание: для опытных пользователей)
Как решить проблему «speech recognition could not start»

друзья, помогите избавиться от ошибки или полностью отключить распознавание речи на винде 10.
в любой непонятной ситуации, хоть винду запустил, хоть любую другую программу, выскакивает эта ошибка, что скрином выше.

в настройках распознавания пишет о не поддерживаем модуле.
пролистывая гугл я выяснил, что можно как то излечить ошибку изменив язык интерфейса на английский

но беда в том, что у меня домашняя версия для одного языка

может кто сталкивался и знает как исправить?
Совет «переустановить винду» нельзя назвать помощью

Кортану видимо отключить


«Напридумывал, чтобы не работать. » 1977 год, СССР, художник В. А. Травин


Васю побили?
Upd: как предыстория https://youtu.be/sy-OhRH81F4 спасибо модератору 1337 что нашел (Вася удалил видео из-за которого произошёл данный инцидент)

О начальстве
Будете смеяться, но была такая ситуация. Начальство забило на топливо и мой экскаватор обсох за 4 часа до конца смены. Полчаса три «Больших Босса» хором уговаривали меня: «Владимирыч, надо доработать смену. Кровь из носу, дерьмо из попы, надо!»
Еще через полчаса я, под изумленные взгляды коллег, торжественно заливал в 600-литровый бак своего Коматсу 5 (пять) литров соляры. Нда.


Может, стоит попробовать?


Ответ на пост «Васю побили?»
Комментарий от Васи
Детский режим Кинопоиска не по-детски


М+Ж+М=ММ


Это какой-то позор, православные.
Давайте вспомним определения:
А что происходит на этом виде?:
Такая форма защиты веры, с применением силы, лично меня, как верующего, оскорбляет.
А теперь давайте заглянем в источники:
«Не делайте себе кумиров, и изваяний, и столбов не ставьте у себя, и камней с изображениями не кладите в земле вашей, чтобы кланяться пред ними, ибо Я Господь, Бог ваш.»
«3. Да не будет у тебя других богов пред лицом Моим.
4. Не делай себе кумира и никакого изображения того, что на небе вверху, и что на земле внизу, и что в воде ниже земли;
5. не поклоняйся им и не служи им, ибо Я Господь, Бог твой, Бог ревнитель, наказывающий детей за вину отцов до третьего и четвертого рода, ненавидящих Меня,
6. и творящий милость до тысячи родов любящим Меня и соблюдающим заповеди Мои.»
Не обманывайтесь: Бог поругаем не бывает. Что посеет человек, то и пожнет: сеющий в плоть свою от плоти пожнет тление, а сеющий в дух от духа пожнет жизнь вечную.
Т.е. то, что делает человек, на совести самого человека. Бога, веру нельзя оскорбить какими-либо действиями.
Так а что мы видим на видео? Кто такие пришли к Васе и действуют, якобы, во имя веры? Во имя какой и чьей веры. Если они про православный крест, так цитаты из православных текстов выше. Сектанты? Гопники? Как по мне, так возможные фигуранты 282 УК РФ.
Может эти люди объявятся? Покажут лицо, назовут свои ФИО. Ну если им нечего стыдиться. Или есть чего?
Источник
Два способа отключить Распознавание голоса в Windows 10.
Публикация: 21 October 2018 Обновлено: 7 August 2019
Windows предоставляет функцию распознавания речи на основе устройств (доступную как с помощью приложения Windows Recech Recognition Desktop), так и с помощью облачной службой распознавания речи на тех рынках и регионах, где доступна Cortana. Microsoft может использовать голосовые данные, взаимодействия с компьютером, чтобы улучшить услуги распознавания речи.
Чтобы использовать распознавание речи, необходимо включить параметр «Знакомство с вами» (параметр конфиденциальности в разделе «Персонализация рукописного ввода и ввода с клавиатуры»), поскольку голосовые службы существуют как в облаке, так и на вашем устройстве. Информация, которую Microsoft собирает с их помощью, позволяет их улучшить. Речевые службы, которые не передаются в облако и присутствуют только на вашем устройстве, такие как «Диктор» и «Распознавание речи Windows», по-прежнему будут работать, если этот параметр отключен, но Microsoft уже не будет собирать данные.
Если для параметра «Диагностика и использование данных» («Параметры» → «Конфиденциальность» → «Диагностика и отзывы») установлено значение «Полные», входящие данные для рукописного ввода и ввода текста отправляются в Microsoft, и компания использует эти данные в совокупности, чтобы улучшить платформу для всех пользователей.
Чтобы отключить распознавание голоса в Windows 10, выполните следующие действия.

Теперь функция отключена.
Кроме того, вы можете применить настройки реестра.
Отключить распознавание речи в сети с помощью настройки реестра.
Чтобы отменить изменение при необходимости, используйте файл On-Online Speech Recognition.reg.
Файлы реестра, выше, изменяют ветвь реестра
Они изменяют параметр DWORD (32 бита) с именем HasAccepted.
Наконец, вы можете отключить распознавание речи в сети на странице конфиденциальности программы установки Windows во время установки ОС с нуля.
Источник
Fix: Speech Recognition could not start Cryptic Error in Windows 10
Many users are complaining that they are receiving Speech Recognition could not start cryptic error in Windows 10 when they try to start the feature. This problem mostly occurs when ctfmon.exe is not set to automatically start with Windows. However, there are other causes such as a change in the recognizer language that lead to this error.
This issue is not new in Windows as users are experiencing this since Vista edition. Whenever they make an attempt to initiate the Speech Recognition, the following error note shows up on the PC screen. To bypass this problem, there are few solutions like starting ctfmon.exe during Startup, changing Speech settings, adding new recognition profile and so on. Let us move on to the workarounds one by one and see which one fixes your problem.

Fix: Speech Recognition could not start Cryptic Error in Windows 10
Here is how to fix Speech Recognition could not start Cryptic Error in Windows 10 –
Add ctfmon.exe to Startup
Step-1: First of all, press “Windows + R” hotkeys to open Run dialog box. When the box shows up, type regedit and click OK or press Enter to start the process.
Step-2: When the Registry Editor opens, navigate to the below-given path on the left column.
Step-3: Shift to the corresponding pane of Run and make a right-click on an empty space. Hover over New and from the submenu choose String Value.

Step-4: Name it as ctfmon and double-click on it to change its value. On its Value data field, assign its value as ctfmon.exe.

Step-5: Now, you just need to close Registry Editor and restart Windows 10 PC to check how it fixes.
After adding ctfmon.exe to the Startup, if the system still shows Speech Recognition could not start, go ahead with other solutions.
Using Speech Recognition Settings
Open Start Menu, type cp, and press Enter. Choose Speech Recognition applet when Control Panel comes into view.

Click Advanced Speech Options on the left side of the following screen (see snapshot).

When the Speech Properties screen displays, ensure to set the Language in the correct locale. Moving ahead, also uncheck the option namely “Review Documents and mail to improve accuracy”.

Simply click OK and reboot your computer.
It is done, you can check how is the speech recognition feature. If it is still not fixed, you continue to try the solution 3.
By Regional Settings
Press “Win + I” shortcut keys simultaneously in order to open Windows Settings app.
When the main interface of the application comes into view, go to Time & Language category.
Select the Region tab on the left column of the following page. Switch to its right pane and click the drop-down underneath the option Country or region. From the list, choose another location.

Now, reboot the computer and again head towards the Region settings and this time set the correct location of your choice.
Finally, again make an attempt to restart your PC and this time Speech Recognition will work wonder. Doing this will eventually clear out any settings on your system that are may be corrupted by other updates or software that you might have installed.
Train Profile
In case you are still encountering Speech Recognition could not start, give an attempt to Train profile.
First, open Control Panel by using any of your preferred procedures.
Go to Speech Recognition and perform a hit on Advanced speech options on the top left side.
On the Speech Properties dialog, click the button namely Train Profile.

Now, follow the on-screen guidelines of the wizard and complete the training.
Create New Recognition Profile
If the training process and other workarounds fail to bypass Speech Recognition could not start Cryptic Error in Windows 10, you should create a new recognition profile.
Go to Control Panel and get access to Speech Recognition applet.
Make a click on “Advanced speech options“.
In the Speech Properties dialog, click the New button under the ‘Recognition Profiles‘ section as indicated in the below snapshot.

Provide a new name to the profile and when you successfully create it, delete the old one.
Lots of experienced users said that they have tried the above-mentioned methods, and it works effectively. So, you also give a shot to these workarounds and let us know which one helped you out. If you have more tips to solve this trouble, don’t forget to drop them in the comments below.
Источник
Speech recognition error windows 10 как исправить
This forum has migrated to Microsoft Q&A. Visit Microsoft Q&A to post new questions.
Asked by:

Question
Os win10 v. 1803 in Inglese, più italiano lingua secondaria; Date & time su Roma.
Quando provo a eseguire «speech recognize», fallisce per il mismatch della lingua (https://answers.microsoft.com/en-us/windows/forum/all/speech-recognition-windows-10/e31b0c92-01a3-4f85-b34f-2dbdcd1e2331)
Il pacchetto italiano è già installato.
in Settings> Speech è tutto disabilitato.
per policy abbiamo cortana bloccato.
Quali sono gli step per abilitare lo speech recognize? Grazie
Aggiungo: Control PanelAll Control Panel ItemsSpeech Recognition mi manca la voce «avanzate»
ho aggiunto anche la chiave ctfmon.exe, senza risolvere
Thank you for coming TechNet forum.
I noticed you post this thread with Italian, however, this forum just support for English which will be more convenient to share experience between many English customers.
If you prefer a Italian support, please post thread in the following link.
Thank you for your understanding.
Please remember to mark the replies as answers if they help.
If you have feedback for TechNet Subscriber Support, contact tnmff@microsoft.com.
I can’t install any other italian language, because is already installed.
in Control PanelAll Control Panel ItemsSpeech Recognition «advanced option» is missing.
I’ve already trid to add ctfmon.exe in regedit, but still does not work fine.
Could you please help me to run Speech Recognition? Thank you in advance
Thank you for your translation.
As you said advanced option is not exists in your environment, so I think we need to check if any related speech recognition has been disable through Group Policy.
Please run command line «gpresult /h c:gp.html» as administrator and generate a report about applied group policy, then check any thing related with speech recognition. If you have problem about checking it, please upload it to One Drive and paste the link here.
Please remember to mark the replies as answers if they help.
If you have feedback for TechNet Subscriber Support, contact tnmff@microsoft.com.
thanks for your kind reply. I’ve already checked my applied gpo, reading the html report of a standard client. In gpresult there are not any references to «speech» or «recognition».
I add another info: also form a client in workgroup not in domain, editing local policy, I can’t find no reference to speech recognition.
I think it could be an issue about language, but I’m not able to solve: If I configure all just in English, i recieve the same error popup. If I set regional language in Italian with OS in Eglish, i see always the same error:
https://answers.microsoft.com/en-us/windows/forum/windows_10-desktop/speech-recognition-error-language-configuration/ad43d50a-b99f-4519-b53c-000586499afc
So: the error is caused by a language mismatch. Plus: i can’t find «advanced option» in speech recognition control panel. And: cortana is disabled by policy, but on a client outside domain with cortana, i’ve the same error.
Any idea?
Источник
Как скачать Speech Recognition.lnk и устранить сообщения об ошибках
Последнее обновление: 07/01/2022 [Время на прочтение статьи: 5 мин.]
Файлы Windows File Shortcut, такие как Speech Recognition.lnk, используют расширение LNK. Файл считается файлом Ярлык (Windows File Shortcut) и впервые был создан компанией Microsoft для пакета ПО Windows 10.
Файл Speech Recognition.lnk изначально был выпущен с Windows Vista 11/08/2006 для ОС Windows Vista. Датой самого последнего выпуска файла для Windows 10 является 07/29/2015 [версия 10]. Файл Speech Recognition.lnk входит в комплект Windows 10, Windows 8.1 и Windows 8.
Продолжайте читать, чтобы найти загрузку правильной версии файла Speech Recognition.lnk (бесплатно), подробные сведения о файле и порядок устранения неполадок, возникших с файлом LNK.

Рекомендуемая загрузка: исправить ошибки реестра в WinThruster, связанные с Speech Recognition.lnk и (или) Windows.
![]()

Совместимость с Windows 10, 8, 7, Vista, XP и 2000
Средняя оценка пользователей
Обзор файла
| Общие сведения ✻ | |
|---|---|
| Имя файла: | Speech Recognition.lnk |
| Расширение файла: | расширение LNK |
| Тип файла: | Ярлык |
| Описание: | Windows File Shortcut |
| Пользовательский рейтинг популярности: |
| Сведения о разработчике и ПО | |
|---|---|
| Программа: | Windows 10 |
| Разработчик: | Microsoft |
| Программное обеспечение: | Windows |
| Версия ПО: | 10 |
| Сведения о файле | |
|---|---|
| Размер файла (байты): | 1244 |
| Дата первоначального файла: | 11/02/2006 |
| Дата последнего файла: | 03/18/2017 |
✻ Фрагменты данных файлов предоставлены участником Exiftool (Phil Harvey) и распространяются под лицензией Perl Artistic.
Что такое сообщения об ошибках Speech Recognition.lnk?
Общие ошибки выполнения Speech Recognition.lnk
Ошибки файла Speech Recognition.lnk часто возникают на этапе запуска Windows, но также могут возникать во время работы программы. Эти типы ошибок LNK также известны как «ошибки выполнения», поскольку они возникают во время выполнения Windows. К числу наиболее распространенных ошибок выполнения Speech Recognition.lnk относятся:
Программа: C:ProgramDataMicrosoftWindowsStart MenuProgramsAccessibilitySpeech Recognition.lnk
Среда выполнения получила запрос от этого приложения, чтобы прекратить его необычным способом.
Для получения дополнительной информации обратитесь в службу поддержки приложения.
В большинстве случаев причинами ошибок в LNK являются отсутствующие или поврежденные файлы. Файл Speech Recognition.lnk может отсутствовать из-за случайного удаления, быть удаленным другой программой как общий файл (общий с Windows) или быть удаленным в результате заражения вредоносным программным обеспечением. Кроме того, повреждение файла Speech Recognition.lnk может быть вызвано отключением питания при загрузке Windows, сбоем системы при загрузке или сохранении Speech Recognition.lnk, наличием плохих секторов на запоминающем устройстве (обычно это основной жесткий диск) или заражением вредоносным программным обеспечением. Таким образом, крайне важно, чтобы антивирус постоянно поддерживался в актуальном состоянии и регулярно проводил сканирование системы.
Как исправить ошибки Speech Recognition.lnk — 3-шаговое руководство (время выполнения:
Если вы столкнулись с одним из вышеуказанных сообщений об ошибке, выполните следующие действия по устранению неполадок, чтобы решить проблему Speech Recognition.lnk. Эти шаги по устранению неполадок перечислены в рекомендуемом порядке выполнения.
Шаг 1. Восстановите компьютер до последней точки восстановления, «моментального снимка» или образа резервной копии, которые предшествуют появлению ошибки.
Чтобы начать восстановление системы (Windows XP, Vista, 7, 8 и 10):
Если на этапе 1 не удается устранить ошибку Speech Recognition.lnk, перейдите к шагу 2 ниже.

Шаг 2. Запустите средство проверки системных файлов (System File Checker), чтобы восстановить поврежденный или отсутствующий файл Speech Recognition.lnk.
Средство проверки системных файлов (System File Checker) — это утилита, входящая в состав каждой версии Windows, которая позволяет искать и восстанавливать поврежденные системные файлы. Воспользуйтесь средством SFC для исправления отсутствующих или поврежденных файлов Speech Recognition.lnk (Windows XP, Vista, 7, 8 и 10):
Следует понимать, что это сканирование может занять некоторое время, поэтому необходимо терпеливо отнестись к процессу его выполнения.
Если на этапе 2 также не удается устранить ошибку Speech Recognition.lnk, перейдите к шагу 3 ниже.
Шаг 3. Выполните обновление Windows.
Когда первые два шага не устранили проблему, целесообразно запустить Центр обновления Windows. Во многих случаях возникновение сообщений об ошибках Speech Recognition.lnk может быть вызвано устаревшей операционной системой Windows. Чтобы запустить Центр обновления Windows, выполните следующие простые шаги:
Если Центр обновления Windows не смог устранить сообщение об ошибке Speech Recognition.lnk, перейдите к следующему шагу. Обратите внимание, что этот последний шаг рекомендуется только для продвинутых пользователей ПК.

Если эти шаги не принесут результата: скачайте и замените файл Speech Recognition.lnk (внимание: для опытных пользователей)
Если этот последний шаг оказался безрезультативным и ошибка по-прежнему не устранена, единственно возможным вариантом остается выполнение чистой установки Windows 10.
Источник
An error occurred in the upload. Please try again later.
If you get this error while uploading image or any media to WordPress you can only suspect some things and start investigation by changing and checking settings one by one.
Good news — WordPress returns exact error message!
Getting error details
Error details are in the HTTP response from async_upload.php script formatted as JSON.
You can easily find it using build in Developer Tools in Firefox or Developers Console in Chrome.
-
In Chrome or Firefox press F12 and go to Network tab.
-
Try to upload image again or do any other action that will trigger the error.
-
At the bottom left of Developer Tools/Console find async_upload.php file name and click it.
-
Go to Preview tab (see attached images). This will show you the error details. Click screenshot below to enlarge.

Developers Console in Chrome — Click To Enlarge

Firefox Developer Tools — Click To Enlarge


Fix: Unable to create directory uploads
{"success":false,"data":{"message":"Unable to create directory uploads/2015/07. Is its parent directory writable by the server?","filename":"wordpressErrorImageUpload1.png"}}
-
Check permissions for upload folder. It should have 755 mask.

Correct WordPress upload folder permissions -
Check upload path. It can change for example when you switch your hosting company.
Go to https://your_server/wp-admin/options.php and find upload_path. Check if it is correct.

Fix: This file type is not permitted for security reasons
{"success":false,"data":{"message":"Sorry, this file type is not permitted for security reasons.","filename":"wordpressErrorImageUpload1.pdn"}}
Simple — check extension.
Maybe you are uploading file with the same name but different extension. png and pdn can get mixed up. List of allowed extension can be found here https://codex.wordpress.org/Uploading_Files
Images
- .jpg
- .jpeg
- .png
- .gif
- .ico
- .svg
Documents
- .pdf (Portable Document Format; Adobe Acrobat)
- .doc, docx (Microsoft Word Document)
- .ppt, .pptx, .pps, .ppsx (Microsoft PowerPoint Presentation)
- .odt (OpenDocument Text Document)
- .xls, .xlsx (Microsoft Excel Document)
- .psd (Adobe Photoshop Document)
Audio
- .mp3
- .m4a
- .ogg
- .wav
Video
- .mp4
- .m4v (MPEG-4)
- .mov (QuickTime)
- .wmv (Windows Media Video)
- .avi
- .mpg
- .ogv (Ogg)
- .3gp (3GPP)
- .3g2 (3GPP2)
Troubleshoot OneDrive mobile app problems
OneDrive for Business OneDrive (work or school) OneDrive (home or personal) More…Less
We’re sorry you’re having trouble with your OneDrive mobile app. Let’s get the issue sorted out as quickly as possible.
For all OneDrive mobile sync, sharing, and upload issues, make sure you can connect to the Internet. Some apps and features may only work with Wi-Fi, depending on your device settings, or your mobile data plan.
If automatic camera upload isn’t working, or only some pictures are uploaded, follow these steps:
-
Check Wi-Fi connectivity.
-
If you’re not connected to Wi-Fi, check your mobile OneDrive settings for camera upload on metered connections are not switched off.
-
Some photos may have been uploaded into Year > Month sub-folders within Camera Roll.
-
iOS users: Apple recommends that customers leave the OneDrive app running in the background. Automatic uploading cannot work if the app has been Force Closed (double-tap Home and swipe up and away).
If your camera upload is taking too long to set up or look for photos, without giving any error message, it could be because you have too many photos in your camera roll.
Note: This delay can be longer if facial recognition and location data are included in your photos. Uploading may also be slower if your internet connection prioritizes downloads over uploads.
To resolve this:
-
Reduce the number of photos in your camera roll by moving some of your photos to another folder.
-
In iOS photo & picture settings, turn off optimize storage.
-
Leave OneDrive running overnight to finish uploading. For large amounts of data, especially if you also connect to iCloud, the upload process can take some time and signing out or reinstalling the app will only cause the process to begin again.
-
You need to open the OneDrive app on your device to force synchronization.
-
Check Settings > Battery > Battery Usage > OneDrive > Launch (options). This will show a Manage Automatically option and a Manage Manually option. Select Manage Manually, then enable Run in background.
-
If sync doesn’t work, OneDrive is not launching, or OneDrive is crashing, please try to re-install OneDrive:
-
Open Settings.
-
Select Applications.
-
Tap Manage Applications.
-
Find and tap OneDrive.
-
Tap Force Stop and then tap Clear data and Clear cache.
-
Once completed, uninstall the app.
-
Reinstall the app from Google Play.
Note: The Google Play store and the OneDrive app for Android aren’t available in China. Also, because OneDrive.com is blocked in China by the government firewall, the OneDrive app won’t work in China when you sign in with a Microsoft account.
If sync doesn’t work, OneDrive is not launching, or OneDrive is crashing, please try to re-install OneDrive:
-
Uninstall the OneDrive app by pressing and holding the OneDrive app icon. Tap the ‘X’ in the corner and then accept the confirmation message to delete it.
-
Enable your device’s Location Services. Changes in location are used to trigger background activity and is recommended by Apple. For more information, visit Apple Support.
-
Perform a “soft reset” by pressing and holding both the Sleep/Wake and Home buttons simultaneously for at least 10 seconds, until you see the Apple logo. You can let go of both buttons after the Apple logo appears.
-
Reinstall the OneDrive app from the App Store.
-
Make sure that OneDrive is kept up-to-OneDrivedate by enabling it in your device’s Settings > General > Background App Refresh.
If sync doesn’t work, OneDrive is not launching, or OneDrive is crashing, please try a soft reset:
-
While the phone is turned on, press and hold the volume down + power buttons until your phone vibrates and restarts.
Note that you should not touch the device screen during the process (not even when the ‘slide down to power off’ prompt appears).
If this doesn’t help, you can also try Hard reset.
-
Backup your data.
-
Perform a hard reset of your phone.
If sync doesn’t work, OneDrive is not launching, or OneDrive is crashing, please try to reset the app:
-
Open the app and click on the Menu
 .
. -
Click Settings
. -
Click About OneDrive.
-
Click Reset app and confirm the action.
 .
. .
.Alternatively, from the App list, go to Settings > Apps > Apps & Features > OneDrive > Advanced options > Reset
If you’re having problems getting connected to a Wi Fi network and can’t connect to the Internet, you can try to fix Wi Fi connection issues in Windows 10 Mobile.
If this doesn’t help, you can also try Hard reset.
-
Backup your data.
-
Perform a hard reset of your phone.
Rename the file you’re uploading.
The filename contains characters that aren’t allowed. Change its name so that it doesn’t begin or end with a space, end with a period, or include any of these characters / < > : * » ? |
These names aren’t allowed for files or folders: AUX, PRN, NUL, CON, COM0, COM1, COM2, COM3, COM4, COM5, COM6, COM7, COM8, COM9, LPT0, LPT1, LPT2, LPT3, LPT4, LPT5, LPT6, LPT7, LPT8, LPT9
A file won’t upload if it doesn’t fit in your available OneDrive storage space. To see how much space you have remaining or get more storage, go to your Storage page.
The file name (including the path) is too long. The filename and path must contain fewer than 442 characters. Shorten the name of your file or the name of subfolders in OneDrive, or select a subfolder that’s closer to the top-level folder, and then try to upload the file again.
The file might have been moved, renamed, or deleted before you tried to upload it. Locate the file, and then try to upload it again.
Note: You may receive this message if you have moved the file on your computer after an automatic upload has occurred.
The file might be open in another app. Save any changes to the file, close the app, and then try to upload the file again.
Learn more
-
Find lost or missing files in OneDrive
-
Fix problems uploading files on the OneDrive website
-
More fixes for recent OneDrive issues