“E/recyclerview: no adapter attached; skipping layout” is a programming error that occurs mainly due to missing Layout Manager or when the setAdapter(adapter) function is called before the layout manager.
This article explains the causes and fixes of the error in detail, so make sure to read it thoroughly for better understanding. Let’s begin by discussing why this problem occurs in the first place!
Why Is E/Recyclerview: No Adapter Attached; Skipping Layout Error occurring?
The e/recyclerview: no adapter attached; skipping layout error occurs due to the absence of Layout manager or syntax errors, which is most common in coding. As the name of the error describes, “attached skipping layout” means the layout manager is not attached to the recycler view.
Some of the other common mistakes that bring forward this error are:
- Syntax error.
- Wrong setup of the RecyclerView.
- Wrong layout format.
- Default RecyclerView.Adapter.
- RecyclerView is put into a ScrollView.
- Programming logical issues.
- A layout manager is not set.
- Called setAdapter(adapter) before layout manager.
- The inflated layout is different from the one being called.
– Syntax Errors
Sometimes, a syntax error can cause a “no adapter attached skipping layout” error. Many things are included in syntax errors, from putting the wrong functions to the wrong order of the functions.
Given below is an example of a program that demonstrates a syntax error.
Program:
override fun onCreate(saveInstanceState: Bundle?) {
super.onCreate(saveInstanceState)
setContentView(R.layout.activity_users)
RetrofitClient.instance.getUsers().enqueue(object: Callback>{
override fun onResponse(call: Call>, responses: Responses>) {
showData(responses.body()!!)
}
override fun onFailure(call: Call>, e: Throwable) {
g(“Fail”,”onFailure”)
}
})
}
private fun showData(usersLists: Lists) {
listUsersRecycle.apply {
layoutManager = LinearLayoutManager(this@UsersActivity)
adapter = UsersAdapter(usersList)
}
}
Here, the syntax error lies in the showData() function. Thus, it becomes the cause of the recyclerview adapter error.
– Wrong Setup of the Recyclerview
The wrong setup of recyclerview can cause errors, although, in some programming languages, it may work perfectly fine. If the error occurs due to this particular reason, do watch some tutorials on the setup of recyclerview. However, don’t forget to mention the name of the programming language.
Given below is an example that shows the wrong setup of a RecyclerView. Such errors can cause RecyclerView errors.
android:id=”@+id/RecyclerView”
class=”android.support.v6.widget.RecyclerView”
android:layout_width=”match_parent”
android:layout_height=”match_parent” />
There are multiple syntax errors here, like the placement of /> in the same line.
– Wrong Layout Format
Understanding this format is very important as well. If the programmer is using the command: CardView layout_width=” match parent”, and the layout format is wrong, it will not match the parent RecyclerView width and thus cause an issue.
Therefore, below is an example of a program with the wrong layout format. Do not repeat this mistake if the user doesn’t want errors.
.inflate(R.layout.card_itemlist,null);
– Default Recyclerview.adapter
The program’s default setting of RecyclerView.adapter is another reason why the error occurs. This is because the functions the programmer uses are not compatible with the default setting of the Recycleview.adapter.
By default, when the users implement methods in the RecyclerView.adapter, it generates the following:
public int getItemCount() {
return 0;
}
– Recyclerview Is Put Into a Scrollview
Once the error occurs, run a check on the program and try to identify common mistakes and implementation methods. The error message will pop up if the RecyclerView is put into a ScrollView. This is because the height is unspecified during the measuring step (because ScrollView allows any height).
Therefore, as a result, it gets equal to the minimum height (as per the implementation done by the user). If that height is zero, the width will become zero too, and in this way, the error will occur.
– Programming Logical Issues
Program logical errors occur when the programmer uses a command that is not compatible with the coding software. Since the software cannot identify the command, it shows a recycler review error.
For instance, doing programming in kotlin, the following command is not accepted by the program:
adapter = adapter
layoutManager = LinearLayoutManager(activity)
}
– Layout Manager Is Not Set
Turns out layout is the most important factor to consider when trying to remove the recycler view error. If the layout manager is skipped or not set in the appropriate way, the error message will be shown. Following are the times when the layout manager is not set:
- Certain heights, dimensions and instructions are not properly given.
- The scrollview.fillviewport is set to “false”.
- The RecyclerView is inside of ScrollView.
For example:
android:id=”@+id/reccylerview”
android:layout_width=”0dp”
android:layout_height=”0dp”
android:layout_marginTop=”8dp”
android:scrollbars=”vertical”
app:layoutManager=”androidx.recyclerview.widget.LinearLayoutManager”/>
– Called Setadapter(Adapter) Before Layout Manager
This is a type of error where the adapter function is placed before calling out the layout manager. Remember, when setting an adapter, the layout manager must get called out first by the programmer.
Let’s take the same example that we discussed earlier for a better understanding:
adapter = adapter
layoutManager = LinearLayoutManager(activity)
}
As it can be seen here, the adapter is called before the layout manager.
– Inflated Layout Is Different From the One Being Called
This error occurs for those who usually use the RecyclerView within a fragment and inflate it from other views. It is recommended that when inflating the whole fragment view, make sure that the RecyclerView is bind to its root view.
The error message is that the actual inflated layout is different from the one referred to by the programmer while finding the recyclerView. When the fragment is created, the onCreateView method appears as given below, which causes a recyclerview error.
Program error line:
Return inflater.inflate(R.layout.,container.false);
How To Fix the “E/Recyclerview: No Adapter Attached; Skipping Layout” Error?
To fix the e/recyclerview: no adapter attached; skipping layout error, a very common method is to run a check on the syntax of the program. Correcting the syntax will remove the error. You can also fix it by running a check on the layout manager and its positioning.
However, various other methods are discussed in this article. They are given below:
– Use the Correct Syntax
Finding syntax errors and correcting them can be pretty hectic. Therefore, make a list of the common syntax used before coding.
Doing so will save a bit of time by not making syntax errors. Here’s an example of correct syntax in a program:
listUsersRecycle.layoutManager = LinearLayoutManager(this@UsersActivity)
//Apply layout manager here.
listUsersRecycle.apply {
adapter = UsersAdapter(usersList)
}
}
– Use the Correct Setup Recyclerview
Check the recyclerView setup and update or correct it according to the type of code a programmer is coding.
Here’s an example of the correct setup of RecyclerView:
android:layout_width=”match_parent”
android:layout_height=”match_parent”
/>
Ensure that this “/>” function comes at the end after the last program line.
– Use the Right Layout Format
Layout manager and layout format are both important to check in order to remove the error message. Thus, coding with the correct layout format with the correct functions and syntax is extremely important.
Here’s a quick example of the correct layout format:
.inflate(R.layout.card_listitem, parent, false);
– Change the Default Recyclerview.adapter
As said above, the RecyclerView.adapter is sometimes not compatible with the functions or syntax that are being used in the program. Thus, updating or changing the code can remove the recyclerview error.
Also, if there are zero items in the adapter, then the user will get zero things displayed in the output of the program.
Here’s an example of the correct codes used in RecyclerView.Adapter:
public int getItemCount() {
return artists.size();
}
– Don’t Put Recyclerview Into a Scrollview
If the programmer puts the RecyclerView into a ScrollView, then the RecyclerView error is a must. Therefore, be careful to make separate identities for these two instead of putting them into each other.
Some various ways to fix this issue. They are given below:
- Set a specific height for the RecyclerView.
- Set the ScrollView.fillViewport to “True”.
- Keep RecyclerView out from ScrollView.
Programmers recommend the last option. If the RecyclerView height is not limited (which is the case when it is put into ScrollView), then all adapter’s views have enough space vertically and get created all at once. This means there will be no view recycling anymore, which kind of breaks the purpose of RecyclerView.
– Fix the Programming Logical Issues
Before starting the coding, note down the logical errors a program can possibly make; a bit of research will be required. Doing so will save a lot of time and unnecessary error messages, such as recyclerview errors.
Moreover, it will also make the coder avoid using commands that are not recognized by the program.
Here’s the correct way of typing a program and avoiding errors:
mBinding.serviceProviderCertificates.layoutManager = LinearLayoutManager(activity)
– Fix Layout Manager Issue
By fixing the layout manager setup, the error message will be resolved. Remember to check and reset the layout manager before calling out the recyclerview.adapter.
Here’s an example of the correct layout manager for Kotlin and Java programming languages:
Kotlin:
linearLayoutManager.orientation = LinearLayoutManager.HORIZONTAL{or VERTICAL}
recycleView.layoutManager = linearLayoutManager
Java:
linearLayoutManager.setOrientation(LinearLayoutManager.HORIZONTAL{or VERTICAL});
list.setLayoutManager(linearLayoutManager);
– Call Layout Manager Before Setadapter(Adapter)
The error will occur if the programmer calls the adapter before the layout manager. Therefore, the solution to this issue is to stop calling the setAdapter(adapter) before the layout manager.
Following is an example of a program with the correct layout manager position and setAdapter(adapter) function.
recyclerView = (RecyclerView) findViewById(R.id.cardList);
recyclerView.setHasFixedSize(true);
recyclerView.setLayoutManager(new LinearLayoutManager(this));
recyclerView.setAdapter(adapter);
– Separately Create the View To Refer to the Recyclerview
The last method one can use to remove the error message is by separately creating the view to call out or refer to the recyclerView.
Create the view separately and use that to refer to recyclerView. Here’s a quick example for better understanding:
recyclerview=view.findViewById(R.id.);
return view;
Conclusion
After reading this guide, the reader will be able to identify the causes behind the recyclerview error and how to deal with them. The key points of this guide are:
- Run a syntax check on the program to see if there is any error in the syntax.
- While programming, make sure to update the setup of the layout manager as well as the default recyclerview.adapter.
- Do not use functions or syntax that are not recognized by the program that is being used. Otherwise, errors will pop up.
After reading this guide, you can start typing your own program and avoid conflict with e/recyclerview: no adapter attached; skipping layout error message. Happy Coding To You!
- Author
- Recent Posts

Position Is Everything: Your Go-To Resource for Learn & Build: CSS,JavaScript,HTML,PHP,C++ and MYSQL.
New issue
Have a question about this project? Sign up for a free GitHub account to open an issue and contact its maintainers and the community.
By clicking “Sign up for GitHub”, you agree to our terms of service and
privacy statement. We’ll occasionally send you account related emails.
Already on GitHub?
Sign in
to your account
Closed
thincal opened this issue
Jan 6, 2015
· 8 comments
Comments
![]()
test env
android studio:1.0.1
robolectric:2.4
sdk-17
build.gradle
dependencies {
// needed libraries
compile ‘com.android.support:support-v4:+’
compile (‘com.android.support:recyclerview-v7:+’)
// Test libraries
androidTestCompile 'junit:junit:4.11'
androidTestCompile 'org.robolectric:robolectric:2.4'
}
error info
build is ok, but when running the test, it reports bellow error:
android.view.InflateException: XML file /home/zhaoliang/git/test-glass-apps/launcher/build/intermediates/res/debug/layout/card_launcher.xml line #-1 (sorry, not yet implemented): Error inflating class android.support.v7.widget.RecyclerView
at android.view.LayoutInflater.createView(LayoutInflater.java:613)
at android.view.LayoutInflater.createViewFromTag(LayoutInflater.java:687)
at android.view.LayoutInflater.rInflate(LayoutInflater.java:746)
at android.view.LayoutInflater.inflate(LayoutInflater.java:489)
at android.view.LayoutInflater.inflate(LayoutInflater.java:396)
at android.view.LayoutInflater.inflate(LayoutInflater.java:352)
at cn.test.glasswidget.cardview.GlassCardListView.init(GlassCardListView.java:103)
at cn.test.glasswidget.cardview.GlassCardListView.(GlassCardListView.java:59)
at cn.test.glasslauncher.launcher.GlassLauncherActivity.onCreate(GlassLauncherActivity.java:34)
at android.app.Activity.performCreate(Activity.java:5104)
at org.robolectric.internal.ReflectionHelpers$3.run(ReflectionHelpers.java:64)
at org.robolectric.internal.ReflectionHelpers.traverseClassHierarchy(ReflectionHelpers.java:114)
at org.robolectric.internal.ReflectionHelpers.callInstanceMethodReflectively(ReflectionHelpers.java:59)
at org.robolectric.util.ActivityController$1.run(ActivityController.java:115)
at org.robolectric.shadows.ShadowLooper.runPaused(ShadowLooper.java:268)
at org.robolectric.util.ActivityController.create(ActivityController.java:111)
at org.robolectric.util.ActivityController.create(ActivityController.java:122)
at org.robolectric.util.ActivityController.setup(ActivityController.java:202)
at org.robolectric.Robolectric.setupActivity(Robolectric.java:1388)
at cn.test.glasslauncher.launcher.GlassLauncherActivityTest.testActivityFound(GlassLauncherActivityTest.java:27)
at org.junit.runners.model.FrameworkMethod$1.runReflectiveCall(FrameworkMethod.java:47)
at org.junit.internal.runners.model.ReflectiveCallable.run(ReflectiveCallable.java:12)
at org.junit.runners.model.FrameworkMethod.invokeExplosively(FrameworkMethod.java:44)
at org.junit.internal.runners.statements.InvokeMethod.evaluate(InvokeMethod.java:17)
at org.junit.internal.runners.statements.RunBefores.evaluate(RunBefores.java:26)
at org.robolectric.RobolectricTestRunner$2.evaluate(RobolectricTestRunner.java:236)
at org.junit.runners.ParentRunner.runLeaf(ParentRunner.java:271)
at org.junit.runners.BlockJUnit4ClassRunner.runChild(BlockJUnit4ClassRunner.java:70)
at org.junit.runners.BlockJUnit4ClassRunner.runChild(BlockJUnit4ClassRunner.java:50)
at org.junit.runners.ParentRunner$3.run(ParentRunner.java:238)
at org.junit.runners.ParentRunner$1.schedule(ParentRunner.java:63)
at org.junit.runners.ParentRunner.runChildren(ParentRunner.java:236)
at org.junit.runners.ParentRunner.access$000(ParentRunner.java:53)
at org.junit.runners.ParentRunner$2.evaluate(ParentRunner.java:229)
at org.robolectric.RobolectricTestRunner$1.evaluate(RobolectricTestRunner.java:158)
at org.junit.runners.ParentRunner.run(ParentRunner.java:309)
at org.gradle.api.internal.tasks.testing.junit.JUnitTestClassExecuter.runTestClass(JUnitTestClassExecuter.java:86)
at org.gradle.api.internal.tasks.testing.junit.JUnitTestClassExecuter.execute(JUnitTestClassExecuter.java:49)
at org.gradle.api.internal.tasks.testing.junit.JUnitTestClassProcessor.processTestClass(JUnitTestClassProcessor.java:69)
at org.gradle.api.internal.tasks.testing.SuiteTestClassProcessor.processTestClass(SuiteTestClassProcessor.java:48)
at org.gradle.messaging.dispatch.ReflectionDispatch.dispatch(ReflectionDispatch.java:35)
at org.gradle.messaging.dispatch.ReflectionDispatch.dispatch(ReflectionDispatch.java:24)
at org.gradle.messaging.dispatch.ContextClassLoaderDispatch.dispatch(ContextClassLoaderDispatch.java:32)
at org.gradle.messaging.dispatch.ProxyDispatchAdapter$DispatchingInvocationHandler.invoke(ProxyDispatchAdapter.java:93)
at com.sun.proxy.$Proxy2.processTestClass(Unknown Source)
at org.gradle.api.internal.tasks.testing.worker.TestWorker.processTestClass(TestWorker.java:105)
at org.gradle.messaging.dispatch.ReflectionDispatch.dispatch(ReflectionDispatch.java:35)
at org.gradle.messaging.dispatch.ReflectionDispatch.dispatch(ReflectionDispatch.java:24)
at org.gradle.messaging.remote.internal.hub.MessageHub$Handler.run(MessageHub.java:360)
at org.gradle.internal.concurrent.DefaultExecutorFactory$StoppableExecutorImpl$1.run(DefaultExecutorFactory.java:64)
at java.util.concurrent.ThreadPoolExecutor$Worker.runTask(ThreadPoolExecutor.java:895)
at java.util.concurrent.ThreadPoolExecutor$Worker.run(ThreadPoolExecutor.java:918)
at java.lang.Thread.run(Thread.java:662)
![]()
Btw the card_launcher.xml is:
< LinearLayout xmlns:android=»http://schemas.android.com/apk/res/android»
xmlns:tools=»http://schemas.android.com/tools»
android:layout_width=»match_parent»
android:layout_height=»match_parent»
tools:context=»cn.test.glasslauncher.launcher.GlassLauncherActivity» >
<android.support.v7.widget.RecyclerView
    android:id="@+id/recyclerview_horizontal"
    android:layout_width="match_parent"
    android:layout_height="match_parent"
    android:scrollbars="horizontal" />
< /LinearLayout>
![]()
I test with another TestView created by myself, and inflate it from a related xml file, it still reports the error:
line #-1 (sorry, not yet implemented): Error inflating class cn.test.TestView.
And the layout inflate code is:
View contentView = LayoutInflater.from(mContext).inflate(R.layout.test_view, this)»
so what’s wrong here ? it works in a normal build but failed in the test.
@erd, if possible could you help have a quick check ? many thanks 
![]()
this issue is always present if using the jdk6, but will be gone when run test in the second time if using jdk7 or jdk8.
anyway, since that I still can’t find a final solution, but it is fine when using jdk7/8 if I build the project first then run test.
Hope it will help other people if meet same issue.
![]()
What a timely coincidence. I’ve just come across the same error, but for me using a newer JDK didn’t help (I upgraded from 7 to 8).
![]()
Update: my temporary workaround is to use Dagger to inject the R.id… for inflating the CardView. I can then inject a different R.id… for my tests which mirrors the layout with the sole exception of using a LinearLayout instead of a CardView.
![]()
This should be fixed with the RobolectricGradleTestRunner support added in 3.0.
![]()
I am having problems with this still in the 3.0 version.
android.view.InflateException: XML file .srctest..mainreslayoutsearch_activity.xml line #-1 (sorry, not yet implemented): Error inflating class fragment
    at android.view.LayoutInflater.createViewFromTag(LayoutInflater.java:713)
And the search_activity has a fragment inside the layout that this fragment has a RecyclerView if I remove the recylcerview works, so I guess is because of that.
Gradle file:
    testCompile('org.robolectric:robolectric:3.0') {
        exclude module: 'commons-logging'
        exclude module: 'httpclient'
    }
    testCompile 'org.robolectric:shadows-multidex:3.0'
    testCompile 'org.robolectric:shadows-support-v4:3.0'
Any solution?
![]()
I’m using a simple implementation of RecyclerView taken from the Android website using a StaggeredGridLayoutManager and I keep getting this error that crashes my app:
java.lang.IllegalArgumentException: Scrapped or attached views may not be recycled. isScrap:false isAttached:true at android.support.v7.widget.RecyclerView$Recycler.recycleViewHolderInternal(RecyclerView.java:3501) at android.support.v7.widget.RecyclerView$LayoutManager.scrapOrRecycleView(RecyclerView.java:5355) at android.support.v7.widget.RecyclerView$LayoutManager.detachAndScrapAttachedViews(RecyclerView.java:5340) at android.support.v7.widget.StaggeredGridLayoutManager.onLayoutChildren(StaggeredGridLayoutManager.java:572) at android.support.v7.widget.RecyclerView.dispatchLayout(RecyclerView.java:1918) at android.support.v7.widget.RecyclerView.onLayout(RecyclerView.java:2155) at android.view.View.layout(View.java:14008) at android.view.ViewGroup.layout(ViewGroup.java:4373) at android.widget.RelativeLayout.onLayout(RelativeLayout.java:1021) at android.view.View.layout(View.java:14008) at android.view.ViewGroup.layout(ViewGroup.java:4373) at android.widget.FrameLayout.onLayout(FrameLayout.java:448) at android.view.View.layout(View.java:14008) at android.view.ViewGroup.layout(ViewGroup.java:4373) at android.widget.FrameLayout.onLayout(FrameLayout.java:448) at android.view.View.layout(View.java:14008) at android.view.ViewGroup.layout(ViewGroup.java:4373) at android.support.v7.internal.widget.ActionBarOverlayLayout.onLayout(ActionBarOverlayLayout.java:502) at android.view.View.layout(View.java:14008) at android.view.ViewGroup.layout(ViewGroup.java:4373) at android.widget.FrameLayout.onLayout(FrameLayout.java:448) at android.view.View.layout(View.java:14008) at android.view.ViewGroup.layout(ViewGroup.java:4373) at android.widget.LinearLayout.setChildFrame(LinearLayout.java:1663) at android.widget.LinearLayout.layoutVertical(LinearLayout.java:1521) at android.widget.LinearLayout.onLayout(LinearLayout.java:1434) at android.view.View.layout(View.java:14008) at android.view.ViewGroup.layout(ViewGroup.java:4373) at android.widget.FrameLayout.onLayout(FrameLayout.java:448) at android.view.View.layout(View.java:14008) at android.view.ViewGroup.layout(ViewGroup.java:4373) at android.view.ViewRootImpl.performLayout(ViewRootImpl.java:1892) at android.view.ViewRootImpl.performTraversals(ViewRootImpl.java:1711) at android.view.ViewRootImpl.doTraversal(ViewRootImpl.java:989) at android.view.ViewRootImpl$TraversalRunnable.run(ViewRootImpl.java:4351) at android.view.Choreographer$CallbackRecord.run(Choreographer.java:749) at android.view.Choreographer.doCallbacks(Choreographer.java:562) at android.view.Choreographer.doFrame(Choreographer.java:532) at android.view.Choreographer$FrameDisplayEventReceiver.run(Choreographer.java:735) at android.os.Handler.handleCallback(Handler.java:725) at android.os.Handler.dispatchMessage(Handler.java:92) at android.os.Looper.loop(Looper.java:137) at android.app.ActivityThread.main(ActivityThread.java:5041) at java.lang.reflect.Method.invokeNative(Native Method) at java.lang.reflect.Method.invoke(Method.java:511) at com.android.internal.os.ZygoteInit$MethodAndArgsCaller.run(ZygoteInit.java:793) at com.android.internal.os.ZygoteInit.main(ZygoteInit.java:560) at dalvik.system.NativeStart.main(Native Method)
By simple, I literally mean it’s the same implementation taken from this page on their website, the only difference being is that my grid item’s layout is an ImageView and a couple of TextViews, so I won’t bother reposting my code.
Anyone else getting this error and know how to deal with it?
In this article, we will see how we can monitor internet connection changes. When the phone is online, we will fetch data from an API, otherwise, we will display an error page. Here’s what we want to create:

Many applications require an internet connection to either fetch or save data. However, it’s normal for internet connection to be lost every now and then. As a developer, it falls to you to make sure the user has a smooth experience when using our applications and the internet connection is lost.
Prerequisites
In other to follow the tutorial, you need the following:
- Android Studio (version >= 3.x recommended). Download here.
- Basic knowledge of Kotlin.
Building our application
Launch Android Studio and create a ‘New Project…’ using the wizard. You should choose the “Basic Activity” template and select your preferred target, we are using (API 26: Android 8.0). You should also enable Kotlin support for the project.

Asides the usual dependencies that come with a new project, we need to add some dependencies. One of the dependencies we need to add is Retrofit. Retrofit is a client for making HTTP calls.
Open your build.gradle file and add the following dependencies:
    implementation 'com.android.support:design:27.1.1'
    implementation 'com.squareup.retrofit2:retrofit:2.3.0'
    implementation 'com.squareup.retrofit2:converter-scalars:2.3.0'
Sync the gradle file so that the dependencies will be downloaded.
Next, we will request two permissions:
- Internet permission – to gain access to make network calls
- Network state – to check the network state of a device so that we know when we have an internet connection or not.
Open your AndroidManifest.xml file and add the permissions like so:
    <manifest xmlns:android="http://schemas.android.com/apk/res/android"
        package="com.example.android.internetconnectivity">

        <uses-permission android:name="android.permission.ACCESS_NETWORK_STATE"/>
        <uses-permission android:name="android.permission.INTERNET"/>

        [...]

    </manifest>
When there is a network connection, we will fetch data from an API. Let’s set up an interface to hold the endpoints we will access. Create a new Kotlin file named ApiService and paste this:
    import retrofit2.Call
    import retrofit2.http.GET

    interface ApiService {
        @GET(".")
        fun getFeeds(): Call<String>
    }
For this demo, we are only going to access one endpoint, which is equivalent to our base URL. It’s for this reason we used a dot instead of the usual /some-url in the @GET annotation.
When these items are fetched, we will display the items in a list. We, therefore, need a RecyclerView in the layout and a matching adapter. Create a new Kotlin file named RecyclerAdapter and paste this:
    import android.support.v7.widget.RecyclerView
    import android.view.LayoutInflater
    import android.view.View
    import android.view.ViewGroup
    import android.widget.TextView

    class RecyclerAdapter : RecyclerView.Adapter<RecyclerAdapter.ViewHolder>() {

        private var list = ArrayList<String>()

        fun setItems(newList: ArrayList<String>){
            this.list = newList
            this.notifyDataSetChanged()
        }

        override fun getItemCount() = list.size

        override fun onCreateViewHolder(parent: ViewGroup, viewType: Int): ViewHolder {
            val view = LayoutInflater.from(parent.context)
                    .inflate(android.R.layout.simple_list_item_1, parent, false)

            return ViewHolder(view)
        }

        override fun onBindViewHolder(holder: ViewHolder, position: Int) {
            holder.textView.text = list[position]
        }

        inner class ViewHolder(itemView: View?): RecyclerView.ViewHolder(itemView) {
            var textView: TextView = itemView!!.findViewById(android.R.id.text1)
        }

    }
The adapter handles the display of items on a list. It has some overridden methods like:
getItemCount– to tell the size of the list to be populated.onCreateViewHolder– used to choose a layout for a list row.onBindViewHolder– to bind data to each row depending on the position, etc.
Next, we will update the layout of our MainActivity‘s activity_main.xml file like so:
    <?xml version="1.0" encoding="utf-8"?>
    <android.support.constraint.ConstraintLayout
        xmlns:android="http://schemas.android.com/apk/res/android"
        xmlns:app="http://schemas.android.com/apk/res-auto"
        xmlns:tools="http://schemas.android.com/tools"
        android:layout_width="match_parent"
        android:layout_height="match_parent"
        tools:context=".MainActivity">

        <android.support.v7.widget.RecyclerView
            android:layout_width="match_parent"
            android:layout_height="match_parent"
            android:id="@+id/recyclerView"
            app:layout_constraintBottom_toBottomOf="parent"
            app:layout_constraintLeft_toLeftOf="parent"
            app:layout_constraintRight_toRightOf="parent"
            app:layout_constraintTop_toTopOf="parent" />

        <ImageView
            android:id="@+id/imageView"
            android:layout_width="match_parent"
            android:layout_height="wrap_content"
            android:src="@drawable/no_internet_connection" />

    </android.support.constraint.ConstraintLayout>
The layout contains a RecyclerView for our list items and an ImageView to show an error message.
We also need an error message image. Once you have an image, rename the file to no_internet_connection and save it to your drawable folder: NameOfProject/app/src/main/res/drawable.
For us to monitor when the connectivity changes, we need broadcast receivers. Broadcast receivers are components that allow you to register and listen to Android system and application events. Usually, the Android system sends broadcast events when various system events occur and your app needs to register to get these events.
Let’s register a listener to be triggered when the internet connection is online or offline. Open your MainActivity file and paste the following code:
    import android.content.BroadcastReceiver
    import android.content.Context
    import android.content.Intent
    import android.content.IntentFilter
    import android.net.ConnectivityManager
    import android.support.v7.app.AppCompatActivity
    import android.os.Bundle
    import android.support.v7.widget.LinearLayoutManager
    import android.util.Log
    import android.view.View
    import kotlinx.android.synthetic.main.activity_main.*
    import okhttp3.OkHttpClient
    import org.json.JSONObject
    import retrofit2.Call
    import retrofit2.Callback
    import retrofit2.Response
    import retrofit2.Retrofit
    import retrofit2.converter.scalars.ScalarsConverterFactory


    class MainActivity : AppCompatActivity() {

        private val arrayList = ArrayList<String>()
        private val adapter = RecyclerAdapter()
        private val retrofit = Retrofit.Builder()
                .baseUrl("https://api.reddit.com/")
                .addConverterFactory(ScalarsConverterFactory.create())
                .client(OkHttpClient.Builder().build())
                .build()

        private var broadcastReceiver: BroadcastReceiver = object : BroadcastReceiver() {
            override fun onReceive(context: Context, intent: Intent) {
                val notConnected = intent.getBooleanExtra(ConnectivityManager
                        .EXTRA_NO_CONNECTIVITY, false)
                if (notConnected) {
                    disconnected()
                } else {
                    connected()
                }
            }
        }

        override fun onCreate(savedInstanceState: Bundle?) {
            super.onCreate(savedInstanceState)
            setContentView(R.layout.activity_main)
            setupRecyclerView()
        }

    }
Above, we initialized some variables:
arrayList– we will add fetched items to this list.adapter– this is the instance of the adapter class.retrofit– a Retrofit instance.broadcastReciever– this instance implements theonRecievecallback. This callback method is called when the system has notified us of a change in the network connection. In the callback, we then check to know the connectivity status thereby calling either a privateconnectedordisconnectedfunction.
After creating the broadcast receiver, we have to register it to get updates and unregister if there are no more activities. To do this, add the following functions to the code above in the MainActivity:
    override fun onStart() {
        super.onStart()
        registerReceiver(broadcastReceiver, IntentFilter(ConnectivityManager.CONNECTIVITY_ACTION))
    }

    override fun onStop() {
        super.onStop()
        unregisterReceiver(broadcastReceiver)
    }
In the onCreate function, we set up our RecyclerView by calling the setupRecyclerView. Create a private function in the MainActivity class and set it up like this:
    private fun setupRecyclerView(){
        with(recyclerView){
            layoutManager = LinearLayoutManager([email protected])
            adapter = [email protected]
        }
    }
Remember we mentioned the connected and disconnected functions earlier in this post. We will now add them to the class. Add them to the MainActivity file like so:
    private fun disconnected() {
        recyclerView.visibility = View.INVISIBLE
        imageView.visibility = View.VISIBLE
    }

    private fun connected() {
        recyclerView.visibility = View.VISIBLE
        imageView.visibility = View.INVISIBLE
        fetchFeeds()
    }
The disconnected function is called when there is no network connection. It hides the RecyclerView and shows the ImageView. The connected function is called when there is an active internet connection. It shows the RecyclerView, hides the ImageView, and finally calls the fetchFeeds function.
Next, in the same file, paste the following code:
    private fun fetchFeeds() {
        retrofit.create(ApiService::class.java)
                .getFeeds()
                .enqueue(object : Callback<String> {
                    override fun onFailure(call: Call<String>, t: Throwable) {
                        Log.e("MainActivityTag", t.message)
                    }

                    override fun onResponse(call: Call<String>?, response: Response<String>) {
                        addTitleToList(response.body()!!)
                    }

                })
    }
This function calls the API to get data. When the call is successful, we have another function that helps us add the title of the posts gotten from the endpoint to our list and then to our adapter. Create a function named addTitleToList and set it up like so:
    private fun addTitleToList(response: String) {
        val jsonObject = JSONObject(response).getJSONObject("data")
        val children = jsonObject.getJSONArray("children")

        for (i in 0..(children.length()-1)) {
            val item = children.getJSONObject(i).getJSONObject("data").getString("title")
            arrayList.add(item)
            adapter.setItems(arrayList)
        }
    }
We manually parsed the JSON here to get the title. When you ‘Run’ the app, you should have this:
Conclusion
In this post, we have learned how to monitor network changes using broadcast receivers. We saw how we register and unregister for broadcasts sent by the Android system. You have gained some valuable knowledge on handling network errors in your app. You can play around the repo here and feel free to drop your feedback.
The source code to the GitHub repo is here.
Endless or Infinite scrolling is called pagination. You do this in Android using RecyclerView. However, there are a few critical error scenarios to handle.
This is the third post in the Android Pagination article series.
In the previous article, (Android Pagination: Using APIs with Retrofit and Gson), we fetched real API data in Pagination. We used themoviedb.org for our data source. Additionally, Retrofit was used for networking, Glide for image loading and Gson for JSON parsing.
However, when networking is involved, one simply cannot ignore the various errors that occur. A good app intelligently handles all errors. This article aimed towards that.
This article has been updated for AndroidX!
Pagination Series Overview
- Android Pagination Tutorial: Getting Started
- Using APIs with Retrofit and Gson
- Error Handling
- Using Multiple RecyclerView Types
- Adding Swipe-to-Refresh Support
Unlike one-off API calls, which involve one request to display data on-screen, Pagination is different.
Those who’ve followed my Pagination post series, know that the first-page call happens separately. This means error handling for page 1 will be different than that for page 2 and beyond.
Pagination involves 2 crucial error handling scenarios. Let’s deal with both.
Pagination Error Handling for Page 1
For pagination, page 1 is our one-off API call.
Now if the API call fails here, the screen will be empty with nothing to display. So unless you have cached data as a backup, you have nothing to show.
So what can we do? Use the entire screen to tell people what went wrong.
Ideally, stick to a crisp one or two liner about the error. Nothing too technical. Also, don’t forget to include a ‘Call-to-Action’ (CTA) button.
Mostly, the CTA would and should be a retry button.
Here’s how I’ve modified my existing screen to accommodate an error layout:
activity_main.xml layout skeleton
<FrameLayout>
    <androidx.recyclerview.widget.RecyclerView />
    <ProgressBar/>
    <include layout="@layout/error_layout"/>
</FrameLayout>
error_layout.xml
<merge
       android:layout_width="match_parent"
       android:layout_height="match_parent">

    <LinearLayout
        android:id="@+id/error_layout"
        android:layout_width="wrap_content"
        android:layout_height="wrap_content"
        android:layout_gravity="center"
        android:orientation="vertical"
        android:visibility="gone"
        tools:visibility="visible">

        <!--Displays a generic error message-->
        <TextView
            style="@style/TextAppearance.AppCompat.Subhead"
            android:layout_width="wrap_content"
            android:layout_height="wrap_content"
            android:text="@string/error_msg"/>

  <!--Displays a reason for the error—>
        <TextView
            android:id="@+id/error_txt_cause"
            style="@style/TextAppearance.AppCompat.Caption"
            android:layout_width="wrap_content"
            android:layout_height="wrap_content"
            android:layout_gravity="center"
            android:layout_marginTop="@dimen/activity_margin_quarter"
            tools:text="The server took too long to respond."/>

        <!—CTA— prompting user to retry failed request>
        <Button
            android:id="@+id/error_btn_retry"
            style="@style/Widget.AppCompat.Button.Borderless"
            android:layout_width="wrap_content"
            android:layout_height="wrap_content"
            android:layout_gravity="center_horizontal"
            android:layout_marginTop="@dimen/activity_margin_content"
            android:text="@string/btn_retry"
            android:textColor="@color/colorPrimary"/>

    </LinearLayout>
</merge>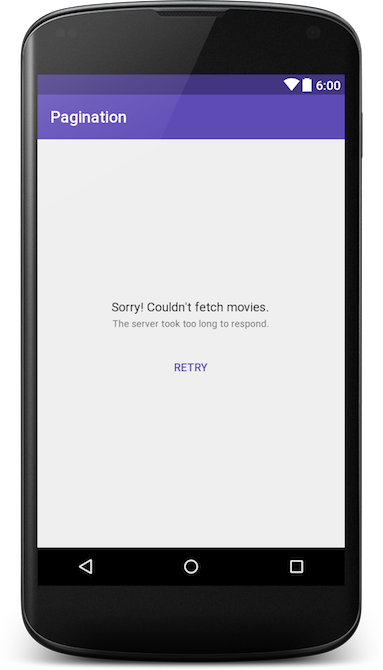
Use humor to reduce the seriousness of the error
While this is the bare minimum, use the available screen estate effectively. Use this opportunity to display an image associated with the error. Even better if you can use a short GIF to go with it.
Some examples from material.uplabs.com:
Remember, adding a bit of humor goes a long way. But this may offend a few, so use it sparingly.
Handling Failure
Once the call fails, we must do three things:
- Hide the
ProgressBar(loading indicator) - Display error layout
- Show the appropriate error message
We can handle all of this by writing a convenient method showErrorView(Throwable t) called in onFailure() of our API call.
callTopRatedMoviesApi().enqueue(new Callback < TopRatedMovies > () {
 @Override
 public void onResponse(Call < TopRatedMovies > call, Response < TopRatedMovies > response) {
  hideErrorView();
  // TODO: handle data
 }

 @Override
 public void onFailure(Call < TopRatedMovies > call, Throwable t) {
  t.printStackTrace();
  showErrorView(t);
 }
});

private void showErrorView(Throwable throwable) {
 if (errorLayout.getVisibility() == View.GONE) {
  errorLayout.setVisibility(View.VISIBLE);
  progressBar.setVisibility(View.GONE);

  // display appropriate error message
  // Handling 3 generic fail cases.
  if (!isNetworkConnected()) {
   txtError.setText(R.string.error_msg_no_internet);
  } else {
   if (throwable instanceof TimeoutException) {
    txtError.setText(R.string.error_msg_timeout);
   } else {
    txtError.setText(R.string.error_msg_unknown);
   }
  }
 }
}
showErrorView() takes a Throwable parameter, that can be used to know what the error is.
NOTE
Don’t forget to hide the error view! A good place to do this is BEFORE executing your API call.
Notice our error layout has a retry button. This is our CTA which effectively allows retrying the failed request. So hopefully our screen will have something to show now.
Next, let’s add a click listener.
btnRetry.setOnClickListener(new View.OnClickListener() {
   @Override
   public void onClick(View view {
     loadFirstPage();
   }
});
The button allows users to retry the first request if it failed.
Let’s run through a quick recap of what we just did. We:
- modified our activity_main.xml layout to include an error view
- displayed error view whenever the one-off API call failed
- used
onFailure()to display an appropriate error message - allowed users to retry the request after failure, via a CTA (Retry
Button)
Pagination Error Handling for Page 2 and above
As mentioned earlier, errors for Page 2 and above will be handled differently. Initially, when expecting a page to load, a ProgressBar (loading indicator) is display at the footer.
If the API successfully returns a response, then we remove our ProgressBar and append the new data. However, for some reason, if that fails, we need to handle it.
Similar to page 1, we need to do two things:
- Hide the footer
ProgressBarand show an error (in the footer) instead - Tell the user what went wrong
- Allow them to retry
While the steps to perform remain the same, the key difference lies in executing this and displaying it to the user.
Open item_progress.xml. We need to add an error layout to this.
<FrameLayout android:layout_width="match_parent"
             android:layout_height="wrap_content">

    <ProgressBar
        android:id="@+id/loadmore_progress"
        android:layout_width="wrap_content"
        android:layout_height="wrap_content"
        android:layout_gravity="center"/>

    <LinearLayout
        android:id="@+id/loadmore_errorlayout"
        android:layout_width="match_parent"
        android:layout_height="match_parent"
        android:background="?attr/selectableItemBackground"
        android:clickable="true"
        android:orientation="horizontal"
        android:paddingBottom="@dimen/activity_margin"
        android:paddingTop="@dimen/activity_margin"
        android:visibility="gone">

        <ImageButton
            android:id="@+id/loadmore_retry"
            android:layout_width="wrap_content"
            android:layout_height="wrap_content"
            android:layout_gravity="center"
            android:layout_marginLeft="@dimen/activity_margin_content"
            android:layout_marginStart="@dimen/activity_margin_content"
            android:background="@drawable/rety_selector"
            android:padding="@dimen/activity_margin_half"
            android:src="@drawable/ic_refresh_black_24dp"
            android:tint="@color/placeholder_grey"
            android:tintMode="src_in"
            tools:targetApi="lollipop"/>

        <LinearLayout
            android:layout_width="match_parent"
            android:layout_height="match_parent"
            android:layout_marginEnd="@dimen/activity_margin_content"
            android:layout_marginLeft="@dimen/activity_margin"
            android:layout_marginRight="@dimen/activity_margin_content"
            android:layout_marginStart="@dimen/activity_margin"
            android:gravity="center_vertical"
            android:orientation="vertical">

            <TextView
                android:id="@+id/loadmore_errortxt"
                style="@style/Base.TextAppearance.AppCompat.Body1"
                android:layout_width="match_parent"
                android:layout_height="wrap_content" />

            <TextView
                style="@style/Base.TextAppearance.AppCompat.Caption"
                android:layout_width="match_parent"
                android:layout_height="wrap_content"
                android:text="@string/tap_to_reload"/>

        </LinearLayout>
    </LinearLayout>
</FrameLayout>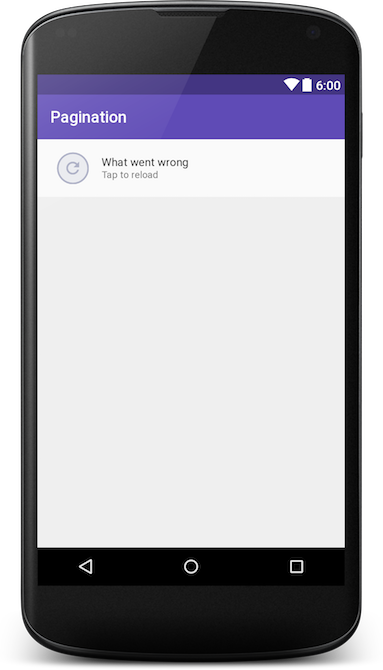
Notice that our design now does two things. It:
- allows a user to retry
- tells them what went wrong
Listening to Retry button clicks
Go to PaginationAdapter.java. Let’s add the click action for the retry button.
protected class LoadingVH extends RecyclerView.ViewHolder implements View.OnClickListener {
 private ProgressBar mProgressBar;
 private ImageButton mRetryBtn;
 private TextView mErrorTxt;
 private LinearLayout mErrorLayout;

 public LoadingVH(View itemView) {
  super(itemView);

  …
  mErrorTxt = (TextView) itemView.findViewById(R.id.loadmore_errortxt);
  mErrorLayout = (LinearLayout) itemView.findViewById(R.id.loadmore_errorlayout);

  mRetryBtn.setOnClickListener(this);
  mErrorLayout.setOnClickListener(this);
 }

 @Override
 public void onClick(View view) {
  switch (view.getId()) {
   case R.id.loadmore_retry:
   case R.id.loadmore_errorlayout:
    showRetry(false, null);
    mCallback.retryPageLoad();
    break;
  }
 }
}
Notice that mCallback.retryPageLoad() is a listener which MainActivity will implement.
public interface PaginationAdapterCallback {
 void retryPageLoad();
}
Head back to MainActivity.java and implement the PaginationAdapterCallback interface. Then, go to the loadNextPage() method and make the following changes:
private void loadNextPage() {
 callTopRatedMoviesApi().enqueue(new Callback < TopRatedMovies > () {
  @Override
  public void onResponse(Call < TopRatedMovies > call,
   Response < TopRatedMovies > response) {
   adapter.removeLoadingFooter();
   isLoading = false;…
  }

  @Override
  public void onFailure(Call < TopRatedMovies > call, Throwable t) {
   adapter.showRetry(true, fetchErrorMessage(t));
  }
 });
}
Add the showRetry() method in PaginationAdapter.java.
public void showRetry(boolean show, @Nullable String errorMsg) {
 retryPageLoad = show;
 notifyItemChanged(movieResults.size() - 1);

 if (errorMsg != null) this.errorMsg = errorMsg;
}
adapter.showRetry() is responsible for changing the footer ProgressBar into a retry button. It additionally displays an error message saying what went wrong.
Displaying an error message matters
Typically, apps tend to show a retry button on failure. They miss out on telling us what exactly went wrong. The reason for failure could be anything. Does the user have a network issue? Or did the server fail to respond?
Most importantly, the error message tells us on whose side the issue is.
Here is how Instagram and DailyHunt (NewsHunt) handle pagination errors:
Take a good look at both these examples. Which one do you think did a better job of telling you what went wrong? That’s right, Dailyhunt. The app clearly tells us what the issue is. Also, it tells us what to do, to rectify it. Finally, the error footer is clickable, allowing us to retry that failed request.
While Instagram certainly does have a clean design, simply showing a retry option doesn’t really tell us the problem.
Finally, with everything done, let’s go ahead and run our app.
Final Results
We’ve now successfully handled both use cases. Page 1 is a separate call compared to the rest of the pages.
When page 1 fails, we don’t have any content to show the user. This leaves the entire screen blank. We handled this by smartly using the available screen estate. An appropriate error message was displayed. Additionally, we allowed users to retry the failed request.
We then followed a similar approach to handle page 2 and beyond. In addition, to display a retry button in the footer, we displayed the reason for failure as well. Finally, we inferred from 2 famous apps about how they handled a similar scenario.
Some key takeaways:
- Pagination primarily has 2 error cases to be handled
- Errors can be unavoidable, but we can take steps to handle them
- Tell users what exactly went wrong, but don’t get too technical
- Be forgiving with errors (consider using humor) and allow users to retry requests
I hope this post helped make your paginated apps error-prepared.
Read next – Part 4: Handling multiple View Types with Pagination.
As always, I’d like to hear what you think. Tell me if I covered all the use cases. Did I miss out on anything? Drop ’em in the comments below.
I’m happy you took the time to read this. All I need for you is to help me spread the word!

Product Designer who occasionally writes code.
Have you been experiencing some irregularities in your recyclerview? Issues like:
- The recyclerview pre-setting the (wrong) value of some of the views in the list.
- Some views being visible when they shouldn’t be and vice versa.
and so on…

99% of the time, this is a problem with recyclerview recycling the views. The 1% percent left could come from human error.
Let’s quickly revisit how RecyclerView works.
How does RecyclerView work?
RecyclerView can easily be called the better ListView. It works just like a ListView — displays a set of data on the screen but uses a different approach for the purpose. RecyclerView, as its name suggests, recycles views once they get out of scope (screen) with the help of ViewHolder pattern.
So how does this affect your app?
Just like I wrote up there, RecyclerView recycles the views once they get out of the screen. While trying to reuse the cache view, binding with the new data sometimes goes wrong. The RecyclerView either retains the old data for the view or fail to reset the view.
Solution
There is an okay solution and there a boom! solution.
1. Reset your views
This may seem trivial but really, a simple thing like resetting your view to their default state during binding could save you a lot of time.
fun bind(question: Question) {
    itemView.rb1.isSelected = false
    itemView.rb2.isSelected = false
    itemView.rb3.isSelected = false
    itemView.rb4.isSelected = false

    //Other code goes here
}
What we are basically doing is making sure that we have a default state for the views when our actual data is not being set. This implementation would be different for your different use cases.
2. Use the god-method – Disable recycling
For a situation whereby the first solution above doesn’t work, there is a solution that works like boom!
Add the following line of code in your bindViewHolder() method:
holder.setIsRecyclable(false)
override fun onBindViewHolder(holder: QuestionsViewHolder, position: Int) {
    holder.setIsRecyclable(false) //Disable recycling

    val question = questions[holder.adapterPosition]
    holder.bind(question)
}
What this line of code does is to basically disable recycling for the recyclerview. That way, new views are created for each list item.

Works like charm!
But isn’t this against what RecyclerView is made to do?
You may want to ask the question, isn’t this against what the recyclerview is made to do?
Google deliberately created RecyclerView.ViewHolder.setIsRecyclable() for cases where RecyclerView should not recycle views or recycling views have adverse effects.
NB:
- A way you can make it more efficient is to take note of which views to recycle and which not to recycle, by handling that based on the number of items in the list.
- If you are working on an interactive list like mine in the example above, you can find a way to save and keep track of user selection (or any other form of interaction with the views). Like the options chosen by the users as it is in my example above. Reason being that the recyclerview uses entirely new views when scrolling through the list.
Voila!
Thanks for reading. Also, let me know if the solution works for you. And you can give suggestions of other solutions that might have worked for you.
Peace out ✌
Just implemented RecyclerView in my code, replacing ListView.
Everything works fine. The data is displayed.
But error messages are being logged:
15:25:53.476 E/RecyclerView: No adapter attached; skipping layout

15:25:53.655 E/RecyclerView: No adapter attached; skipping layout
for the following code:
ArtistArrayAdapter adapter = new ArtistArrayAdapter(this, artists);
recyclerView = (RecyclerView) findViewById(R.id.cardList);
recyclerView.setHasFixedSize(true);
recyclerView.setAdapter(adapter);
recyclerView.setLayoutManager(new LinearLayoutManager(this));
As you can see I have attached an adapter for RecyclerView.
So why do I keep getting this error?
I have read other questions related to the same problem but none of them help.
30 Answers
Can you make sure that you are calling these statements from the «main» thread outside of a delayed asynchronous callback (for example inside the onCreate() method).
As soon as I call the same statements from a «delayed» method. In my case a ResultCallback, I get the same message.
In my Fragment, calling the code below from inside a ResultCallback method produces the same message. After moving the code to the onConnected() method within my app, the message was gone…
LinearLayoutManager llm = new LinearLayoutManager(this);
llm.setOrientation(LinearLayoutManager.VERTICAL);
list.setLayoutManager(llm);
list.setAdapter( adapter );
I was getting the same two error messages until I fixed two things in my code:
(1) By default, when you implement methods in the RecyclerView.Adapter it generates:
@Override
public int getItemCount() {
    return 0;
}
Make sure you update your code so it says:
@Override
public int getItemCount() {
    return artists.size();
}
Obviously if you have zero items in your items then you will get zero things displayed on the screen.
(2) I was not doing this as shown in the top answer: CardView layout_width=»match_parent» does not match parent RecyclerView width
//correct
LayoutInflater.from(parent.getContext())
            .inflate(R.layout.card_listitem, parent, false);

//incorrect (what I had)
LayoutInflater.from(parent.getContext())
        .inflate(R.layout.card_listitem,null);
(3) EDIT: BONUS:
Also make sure you set up your RecyclerView like this:
<android.support.v7.widget.RecyclerView
    android:id="@+id/RecyclerView"
    android:layout_width="match_parent"
    android:layout_height="match_parent"
    />
NOT like this:
<view
    android:id="@+id/RecyclerView"
    class="android.support.v7.widget.RecyclerView"
    android:layout_width="match_parent"
    android:layout_height="match_parent" />
I have seen some tutorials using the latter method. While it works I think it generates this error too.
I have the same situation with you, display is ok, but error appear in the locat.
That’s my solution:
(1) Initialize the RecyclerView & bind adapter ON CREATE()
RecyclerView mRecycler = (RecyclerView) this.findViewById(R.id.yourid);
mRecycler.setAdapter(adapter);
(2) call notifyDataStateChanged when you get the data
adapter.notifyDataStateChanged();
In the recyclerView’s source code, there is other thread to check the state of data.
public RecyclerView(Context context, @Nullable AttributeSet attrs, int defStyle) {
    super(context, attrs, defStyle);
    this.mObserver = new RecyclerView.RecyclerViewDataObserver(null);
    this.mRecycler = new RecyclerView.Recycler();
    this.mUpdateChildViewsRunnable = new Runnable() {
        public void run() {
            if(RecyclerView.this.mFirstLayoutComplete) {
                if(RecyclerView.this.mDataSetHasChangedAfterLayout) {
                    TraceCompat.beginSection("RV FullInvalidate");
                    RecyclerView.this.dispatchLayout();
                    TraceCompat.endSection();
                } else if(RecyclerView.this.mAdapterHelper.hasPendingUpdates()) {
                    TraceCompat.beginSection("RV PartialInvalidate");
                    RecyclerView.this.eatRequestLayout();
                    RecyclerView.this.mAdapterHelper.preProcess();
                    if(!RecyclerView.this.mLayoutRequestEaten) {
                        RecyclerView.this.rebindUpdatedViewHolders();
                    }

                    RecyclerView.this.resumeRequestLayout(true);
                    TraceCompat.endSection();
                }

            }
        }
    };
In the dispatchLayout(), we can find there is the error in it:
void dispatchLayout() {
    if(this.mAdapter == null) {
        Log.e("RecyclerView", "No adapter attached; skipping layout");
    } else if(this.mLayout == null) {
        Log.e("RecyclerView", "No layout manager attached; skipping layout");
    } else {
i have this problem , a few time problem is recycleView put in ScrollView object
After checking implementation, the reason appears to be the following. If RecyclerView gets put into a ScrollView, then during measure step its height is unspecified (because ScrollView allows any height) and, as a result, gets equal to minimum height (as per implementation) which is apparently zero.
You have couple of options for fixing this:
- Set a certain height to RecyclerView
- Set ScrollView.fillViewport to true
- Or keep RecyclerView outside of ScrollView. In my opinion, this is the best option by far. If RecyclerView height is not limited — which is the case when it’s put into ScrollView — then all Adapter’s views have enough place vertically and get created all at once. There is no view recycling anymore which kinda breaks the purpose of RecyclerView .
(Can be followed for android.support.v4.widget.NestedScrollView as well)
It happens when you are not setting the adapter during the creation phase:
@Override
protected void onCreate(Bundle savedInstanceState) {
    super.onCreate(savedInstanceState);
    setContentView(R.layout.activity);
    mRecyclerView.setLayoutManager(new LinearLayoutManager(this));
    ....
}

public void onResume() {
    super.onResume();
    mRecyclerView.setAdapter(mAdapter);
    ....
}
Just move setting the adapter into onCreate with an empty data and when you have the data call:
mAdapter.notifyDataSetChanged();
1) Create ViewHolder that does nothing
// SampleHolder.java
public class SampleHolder extends RecyclerView.ViewHolder {
    public SampleHolder(View itemView) {
        super(itemView);
    }
}
2) Again create RecyclerView that does nothing
// SampleRecycler.java
public class SampleRecycler extends RecyclerView.Adapter<SampleHolder> {
    @Override
    public SampleHolder onCreateViewHolder(ViewGroup parent, int viewType) {
        return null;
    }

    @Override
    public void onBindViewHolder(SampleHolder holder, int position) {

    }

    @Override
    public int getItemCount() {
        return 0;
    }
}
3) Now when your real recycler is not ready just use the sample one like below.
RecyclerView myRecycler = (RecyclerView) findViewById(R.id.recycler_id);
myRecycler.setLayoutManager(new LinearLayoutManager(this));
myRecycler.setAdapter(new SampleRecycler());
This is not best solution though but it works! Hope this is helpful.
Make sure you set the layout manager for your RecyclerView by:
mRecyclerView.setLayoutManager(new LinearLayoutManager(context));
Instead of LinearLayoutManager, you can use other layout managers too.
Check if you have missed to call this method in your adapter
@Override
public int getItemCount() {
    return list.size();
}
I had the same error I fixed it doing this if you are waiting for data like me using retrofit or something like that
Put before Oncreate
private ArtistArrayAdapter adapter;
private RecyclerView recyclerView;
Put them in your Oncreate
 recyclerView = (RecyclerView) findViewById(R.id.cardList);
 recyclerView.setHasFixedSize(true);
 recyclerView.setLayoutManager(new LinearLayoutManager(this));
 adapter = new ArtistArrayAdapter( artists , R.layout.list_item ,getApplicationContext());
 recyclerView.setAdapter(adapter);
When you receive data put
adapter = new ArtistArrayAdapter( artists , R.layout.list_item ,getApplicationContext());
recyclerView.setAdapter(adapter);
Now go in your ArtistArrayAdapter class and do this what it will do is if your array is empty or is null it will make GetItemCount return 0 if not it will make it the size of artists array
@Override
public int getItemCount() {

    int a ;

    if(artists != null && !artists.isEmpty()) {

        a = artists.size();
    }
    else {

        a = 0;

     }

   return a;
}
ArtistArrayAdapter adapter = new ArtistArrayAdapter(this, artists);
recyclerView = (RecyclerView) findViewById(R.id.cardList);
recyclerView.setHasFixedSize(true);
recyclerView.setLayoutManager(new LinearLayoutManager(this));
recyclerView.setAdapter(adapter);
Just replace above code with this and it should work. What you did wrong is you called setAdapter(adapter) before calling layout manager.
These Lines must be in OnCreate:
mmAdapter = new Adapter(msgList);
mrecyclerView.setAdapter(mmAdapter);
For those who use the RecyclerView within a fragment and inflate it from other views: when inflating the whole fragment view, make sure that you bind the RecyclerView to its root view.
I was connecting and doing everything for the adapter correctly, but I never did the binding.
This answer by @Prateek Agarwal has it all for me, but here is more elaboration.
Kotlin
    override fun onCreateView(inflater: LayoutInflater?, container: ViewGroup?, savedInstanceState: Bundle?): View? {

    val rootView =  inflater?.inflate(R.layout.fragment_layout, container, false)
    recyclerView = rootView?.findViewById(R.id.recycler_view_id)
    // rest of my stuff
    recyclerView?.setHasFixedSize(true)
    recyclerView?.layoutManager = viewManager
    recyclerView?.adapter = viewAdapter
    // return the root view
    return rootView
}
Java
  @Override
public View onCreateView(LayoutInflater inflater, ViewGroup container, Bundle savedInstanceState) {

    View rootView= inflater.inflate(R.layout.fragment_layout,container,false);
    recyclerview= rootView.findViewById(R.id.recycler_view_id);
    return rootView;
}
In Kotlin we had this weird illogical issue.
This didn’t work:
 mBinding.serviceProviderCertificates.apply {
            adapter = adapter
            layoutManager =  LinearLayoutManager(activity)
        }
While this worked:
mBinding.serviceProviderCertificates.adapter = adapter
mBinding.serviceProviderCertificates.layoutManager = LinearLayoutManager(activity)
Once I get more after work hours, I will share more insights.
This happens because the actual inflated layout is different from that which is being referred by you while finding the recyclerView. By default when you create the fragment, the onCreateView method appears as follows:
return inflater.inflate(R.layout.<related layout>,container.false);
Instead of that, separately create the view and use that to refer to recyclerView
View view= inflater.inflate(R.layout.<related layout>,container.false);

recyclerview=view.findViewById(R.id.<recyclerView ID>);

return view;
First initialize the adapter
public void initializeComments(){
    comments = new ArrayList<>();

    comments_myRecyclerView = (RecyclerView) findViewById(R.id.comments_recycler);
    comments_mLayoutManager = new LinearLayoutManager(myContext);
    comments_myRecyclerView.setLayoutManager(comments_mLayoutManager);

    updateComments();
    getCommentsData();

}

public void updateComments(){

    comments_mAdapter = new CommentsAdapter(comments, myContext);
    comments_myRecyclerView.setAdapter(comments_mAdapter);
}
When ever there is a change in the dataset set, just call the updateComments method.
I had this error, and I tried to fix for a while until I found the solution.
I made a private method buildRecyclerView, and I called it twice, first on onCreateView and then after my callback (in which I fetch data from an API). This is my method buildRecyclerView in my Fragment:
private void buildRecyclerView(View v) {
        mRecyclerView = v.findViewById(R.id.recycler_view_loan);
        mLayoutManager = new LinearLayoutManager(getActivity());
        ((LinearLayoutManager) mLayoutManager).setOrientation(LinearLayoutManager.VERTICAL);
        mRecyclerView.setLayoutManager(mLayoutManager);
        mAdapter = new LoanAdapter(mExampleList);
        mRecyclerView.setLayoutManager(mLayoutManager);
        mRecyclerView.setAdapter(mAdapter);
}
Besides, I have to modify the method get-Item-Count in my adapter, because On on-Create-View the list is null and it through an error. So, my get-Item-Count is the following:
@Override
    public int getItemCount() {
        try {
            return mLoanList.size();
        } catch (Exception ex){return 0;}

    }
This is really a simple error you are getting, there in no need of doing any codes in this.
This error occurs due to the wrong layout file used by the activity. By IDE i automatically created a layout v21 of a layout which became a default layout of the activity.
all codes I did in the old layout file and new one was only having few xml codes, which led to that error.
Solution: Copy all codes of old layout and paste in layout v 21
In my case, I was setting the adapter inside onLocationChanged() callback AND debugging in the emulator. Since it didn’t detected a location change it never fired. When I set them manually in the Extended controls of the emulator it worked as expected.
I have solved this error. You just need to add layout manager
and add the empty adapter.
Like this code:
myRecyclerView.setLayoutManager(...//your layout manager);
        myRecyclerView.setAdapter(new RecyclerView.Adapter() {
            @Override
            public RecyclerView.ViewHolder onCreateViewHolder(ViewGroup parent, int viewType) {
                return null;
            }

            @Override
            public void onBindViewHolder(RecyclerView.ViewHolder holder, int position) {

            }

            @Override
            public int getItemCount() {
                return 0;
            }
        });
//other code's
// and for change you can use if(mrecyclerview.getadapter != speacialadapter){
//replice your adapter
//}
In my layout xml file, the bottom line with layoutManager was missing. The error disappeared after I added it.
   <androidx.recyclerview.widget.RecyclerView
    android:id="@+id/recycler_view_chat"
    android:layout_width="match_parent"
    android:layout_height="0dp"
    android:layout_weight="1"
    app:layoutManager="LinearLayoutManager"/>
In my situation it was a forgotten component which locates in ViewHolder class but it wasn’t located in layout file
I had the same problem and realized I was setting both the LayoutManager and adapter after retrieving the data from my source instead of setting the two in the onCreate method.
salesAdapter = new SalesAdapter(this,ordersList);
        salesView.setLayoutManager(new LinearLayoutManager(getApplicationContext()));
        salesView.setAdapter(salesAdapter);
Then notified the adapter on data change
               //get the Orders
                Orders orders;
                JSONArray ordersArray = jObj.getJSONArray("orders");
                    for (int i = 0; i < ordersArray.length() ; i++) {
                        JSONObject orderItem = ordersArray.getJSONObject(i);
                        //populate the Order model

                        orders = new Orders(
                                orderItem.getString("order_id"),
                                orderItem.getString("customer"),
                                orderItem.getString("date_added"),
                                orderItem.getString("total"));
                        ordersList.add(i,orders);
                        salesAdapter.notifyDataSetChanged();
                    }
This issue is because you are not adding any LayoutManager for your RecyclerView.
Another reason is because you are calling this code in a NonUIThread. Make sure to call this call in the UIThread.
The solution is only you have to add a LayoutManager for the RecyclerView before you setAdapter in the UI Thread.
recyclerView.setLayoutManager(new LinearLayoutManager(getContext()));
My problem was my recycler view looked like this
        <android.support.v7.widget.RecyclerView
        android:id="@+id/chatview"
        android:layout_width="0dp"
        android:layout_height="0dp"
        app:layout_constraintTop_toTopOf="parent"
        app:layout_constraintLeft_toLeftOf="parent"
        app:layout_constraintRight_toRightOf="parent">
    </android.support.v7.widget.RecyclerView>
When it should have looked like this
       <android.support.v7.widget.RecyclerView
        android:id="@+id/chatview"
        android:layout_width="395dp"
        android:layout_height="525dp"
        android:layout_marginTop="52dp"
        app:layout_constraintTop_toTopOf="parent"
        tools:layout_editor_absoluteX="8dp"></android.support.v7.widget.RecyclerView>
</android.support.constraint.ConstraintLayout>
In your RecyclerView adapter class, for example MyRecyclerViewAdapter, make a constructor with the following params.
MyRecyclerViewAdapter(Context context, List<String> data) {
    this.mInflater = LayoutInflater.from(context); // <-- This is the line most people include me miss
    this.mData = data;
}
mData is the data that you’ll pass to the adapter. It is optional if you have no data to be passed.
mInflater is the LayoutInflater object that you have created and you use in the OnCreateViewHolder function of the adapter.
After this, you attach the adapter in the MainActivity or wherever you want to on the main/UI thread properly like
MyRecyclerViewAdapter recyclerAdapter;
OurDataStuff mData;

    ....
    @Override
    protected void onCreate(Bundle savedInstanceState) {
        super.onCreate(savedInstanceState);
        setContentView(R.layout.activity_main);

        //Like this:

        RecyclerView recyclerView = findViewById(R.id.recyclerView);
        recyclerView.setLayoutManager(new LinearLayoutManager(this));
        recyclerAdapter = new RecyclerAdapter(this, mData); //this, is the context. mData is the data you want to pass if you have any
        recyclerView.setAdapter(recyclerAdapter);
    }
   ....
Solved by setting the initialized empty list and adapter at the bottom and calling notifyDataSetChanged when results are fetched.
    LinearLayoutManager linearLayoutManager = new LinearLayoutManager(getContext());
    recyclerviewItems.setLayoutManager(linearLayoutManager);
    someAdapter = new SomeAdapter(getContext(),feedList);
    recyclerviewItems.setAdapter(someAdapter);
I lost 16 minutes of my life with this issue, so I’ll just admit to this incredibly embarrassing mistake that I was making- I’m using Butterknife and I bind the view in onCreateView in this fragment.
It took a long time to figure out why I had no layoutmanager — but obviously the views are injected so they won’t actually be null, so the the recycler will never be null .. whoops!
@BindView(R.id.recycler_view)
RecyclerView recyclerView;

    @Override
public View onCreateView(......) {
    View v = ...;
    ButterKnife.bind(this, v);
    setUpRecycler()
 }

public void setUpRecycler(Data data)
   if (recyclerView == null) {
 /*very silly because this will never happen*/
       LinearLayoutManager linearLayoutManager = new LinearLayoutManager(getActivity());
       //more setup
       //...
    }
    recyclerView.setAdapter(new XAdapter(data));
}
If you are getting an issue like this trace your view and use something like uiautomatorviewer
In my case it happened cause i embedded a RecyclerView in a LinearLayout.
I previously had a layout file only containing one root RecyclerView as follows
<?xml version="1.0" encoding="utf-8"?>
<android.support.v7.widget.RecyclerView
    android:id="@+id/list"
    android:layout_width="match_parent"
    android:layout_height="match_parent"
    tools:listitem="@layout/fragment_products"

    android:name="Products.ProductsFragment"
    app:layoutManager="LinearLayoutManager"
    tools:context=".Products.ProductsFragment"

    xmlns:android="http://schemas.android.com/apk/res/android"
    xmlns:app="http://schemas.android.com/apk/res-auto"
    xmlns:tools="http://schemas.android.com/tools"/>
I believe the problem is within the 3 lines separated. Anyway, I think its a simple problem, ill be working on it tomorrow; thought i should write what i found before forgetting about this thread.
Just add the following to RecyclerView
app:layoutManager="android.support.v7.widget.LinearLayoutManager"
Example:
   <android.support.v7.widget.RecyclerView xmlns:android="http://schemas.android.com/apk/res/android"
        xmlns:app="http://schemas.android.com/apk/res-auto"
        android:id="@+id/recyclerView"
        android:layout_width="match_parent"
        android:layout_height="match_parent"
        android:scrollbars="vertical"
        app:layoutManager="android.support.v7.widget.LinearLayoutManager"
        app:layout_constraintBottom_toTopOf="parent"
        app:layout_constraintEnd_toEndOf="parent"
        app:layout_constraintStart_toStartOf="parent"
        app:layout_constraintTop_toTopOf="parent">

    </android.support.v7.widget.RecyclerView>
Adding yet another answer since I came across this thread googling the error. I was trying to initialize a PreferenceFragmentCompat but I forgot to inflate the preference XML in onCreatePreferences like this:
class SettingsFragment : PreferenceFragmentCompat() {
    override fun onCreate(savedInstanceState: Bundle?) {
        super.onCreate(savedInstanceState)

        val inflater = LayoutInflater.from(context)
        inflater.inflate(R.layout.fragment_settings, null)
    }

    override fun onCreatePreferences(savedInstanceState: Bundle?, rootKey: String?) {
        // Missing this line here:
        //   setPreferencesFromResource(R.xml.settings, rootKey)
    }
}
The error was a mystery until I realized that PreferenceFragmentCompat must be using a RecyclerView internally.