
Seeing reduce DNS lookup errors for your WordPress site in GTmetrix YSlow?
DNS lookups are caused by third party domains on your site. If your WordPress site is connecting to many different hosts, it creates additional requests and slows down your site.
So how do you fix them?
Some third party domains can be hosted locally like Google Fonts, Google Analytics, and Facebook Pixel. Other third party domains can be optimized through lazy loading or delaying loading of JavaScript using a plugin like WP Rocket or Flying Scripts. For DNS lookups that can’t be eliminated and still appear in GTmetrix YSlow, you can prefetch them to reduce load times.
You can also check out my recommended WP Rocket and W3 Total Cache settings which will help you setup your cache plugin settings for better scores, load times, and less DNS lookups.
1. Identify DNS Lookups In GTmetrix
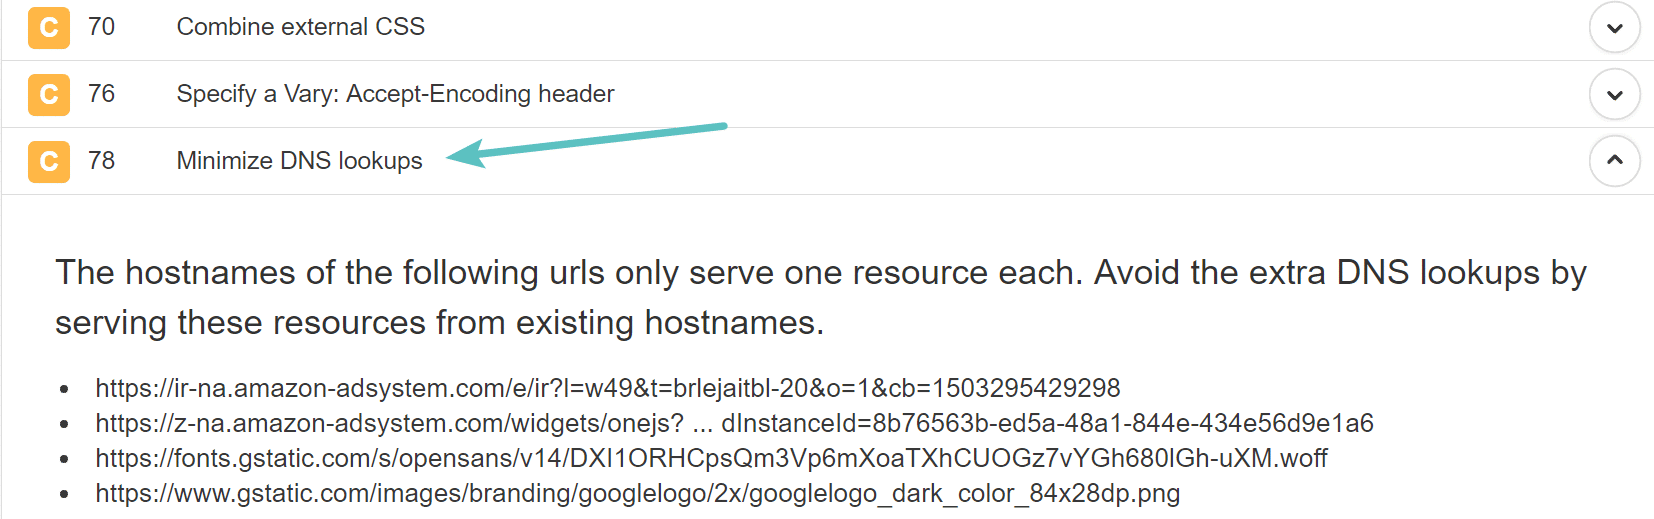
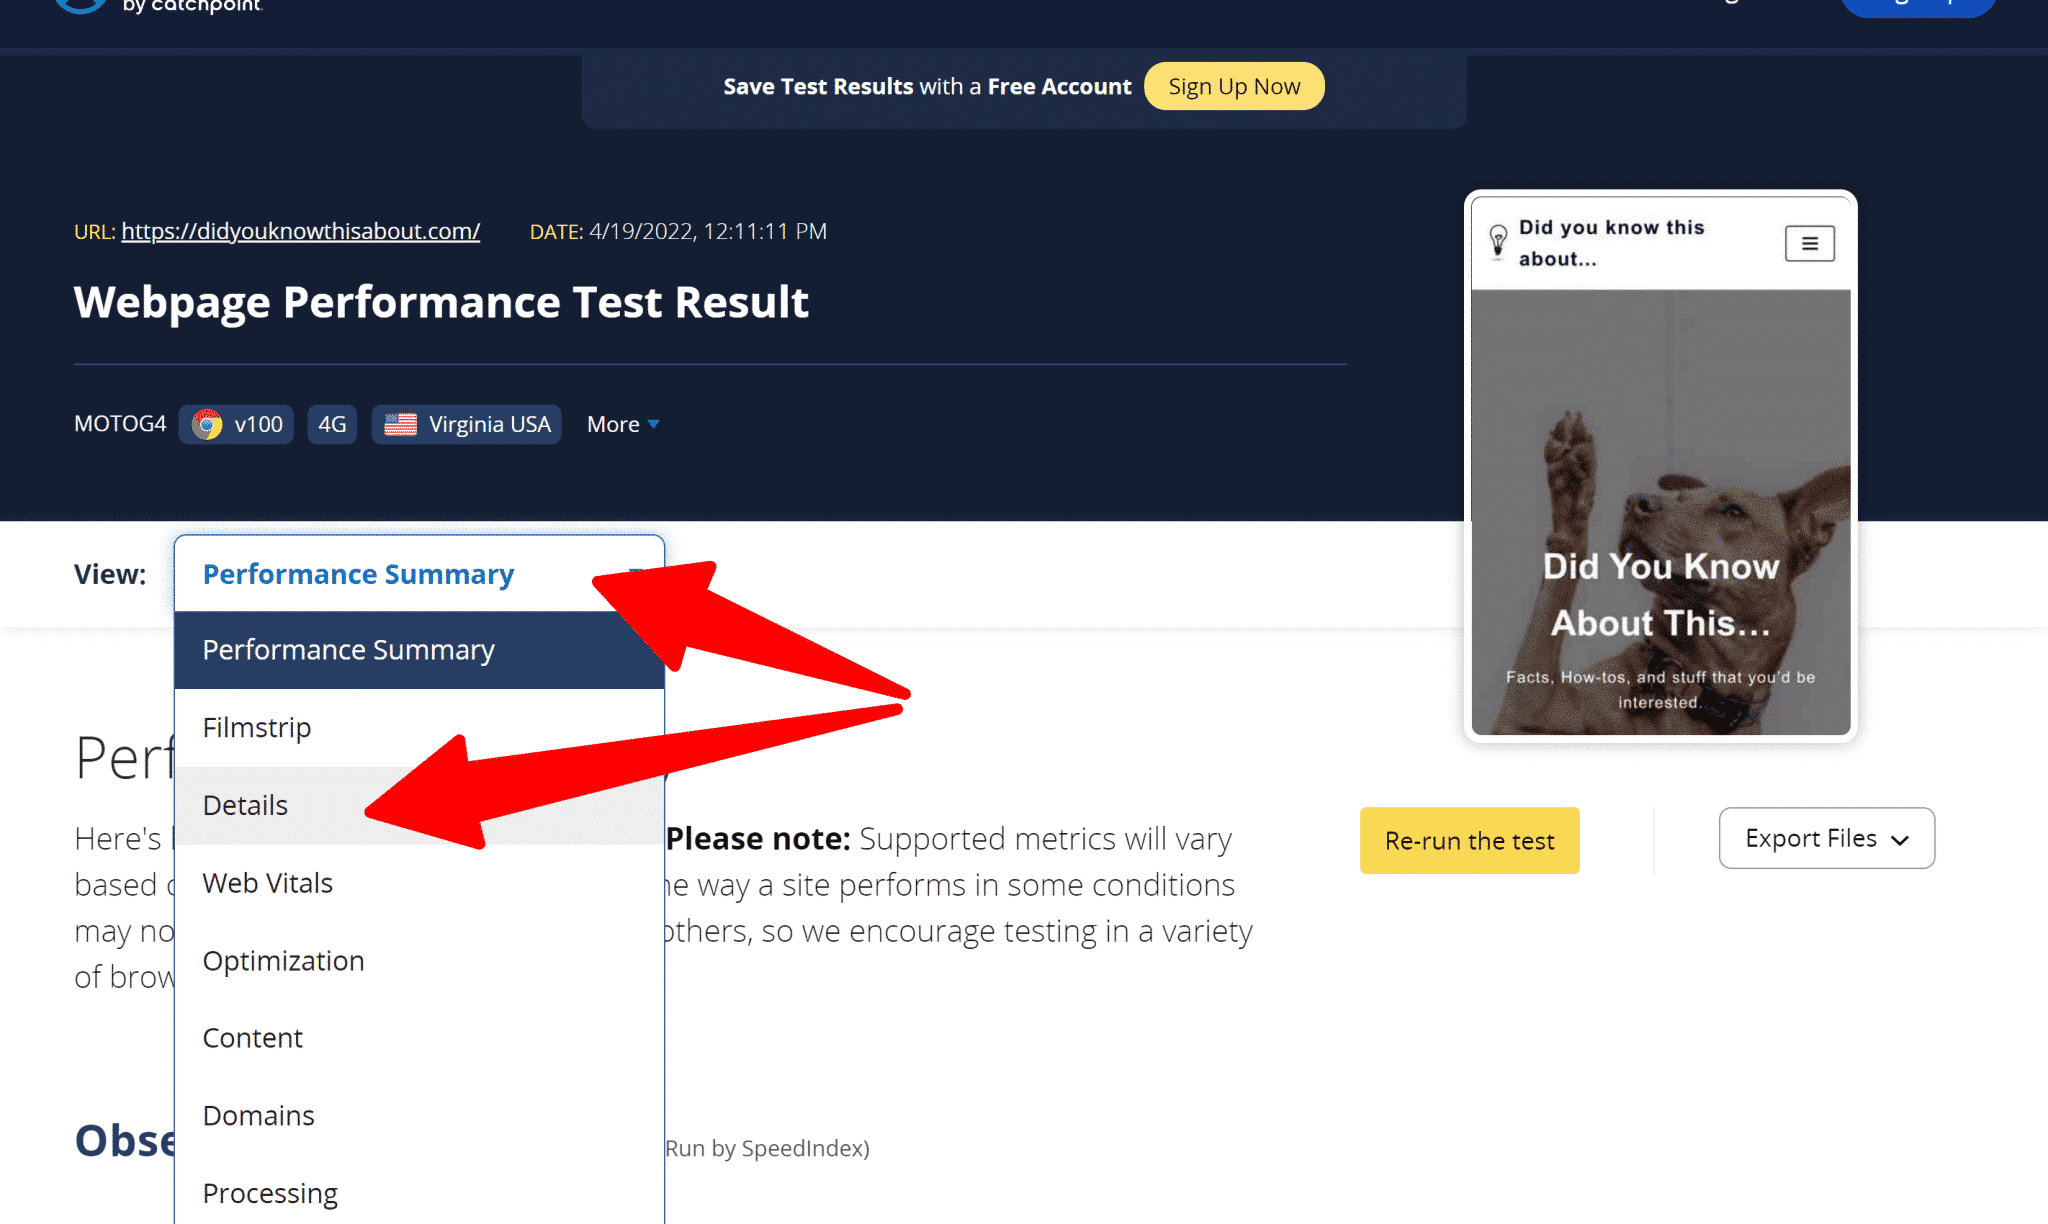
Run your site through GTmetrix, view your YSlow report, and click “reduce DNS lookups.” Take note of all third party domains loading on your site, then see the specific instructions for each domain listed in this tutorial. I tried to include instructions for the most common DNS lookups.

2. Host Google Fonts Locally
Google Fonts and other external fonts usually create a DNS lookup.
Hosting fonts locally using the OMGF plugin should fix this error. Keep in mind there are many other ways to optimize fonts which can reduce DNS lookups while also making them load faster.
- Combine Google Fonts files into 1 single file
- Be minimal with fonts
- Be minimal with font weights
- Be minimal with font icons (e.g. in Elementor)
- Preload fonts
/assets/vendor/googleapis
//fonts.gstatic.com
Preload Fonts – preloading fonts won’t reduce DNS lookups but can make them load faster. View your GTmetrix Waterfall report (the Fonts tab), copy your font URLs, then use WP Rocket or Pre* Party Resources Hints to preload them. This tells browsers to start downloading fonts immediately. Only preload fonts that really slow down your site and always test your results.


3. Host Google Analytics Locally
Google Analytics not only creates a DNS lookup in GTmetrix, but you will usually see a “leveraging browser caching” error for Google Analytics as well.
You can host Google Analytics locally using WP Rocket’s Google Tracking Add-on, CAOS Analytics, Perfmatters (also used in step 11), or a number of other plugins. WP Rocket sometimes doesn’t fix this error. In this case, you can use Flying Analytics which should fix it.

//google-analytics.com
//www.google-analytics.com
//ssl.google-analytics.com
4. Rethink Google AdSense
Google Adsense alone creates an enormous amount of DNS lookups.
Any DNS lookup you see in GTmetrix with the word “ad” in it is probably coming from Google AdSense (including adservice.google.com, googleads.g.doubleclick.net, and likely a few others).
AdSense is a GTmetrix killer and it will likely ruin your report.
You can try loading it asynchronously or lazy loading AdSense, but those are the only optimizations I know of. Generally, I recommend affiliate marketing instead and if you absolutely have to use Google AdSense, make sure you’re using fast WordPress hosting.
//adservice.google.com
//googleads.g.doubleclick.net
//stats.g.doubleclick.net
//cm.g.doubleclick.net
//pagead2.googlesyndication.com
//tpc.googlesyndication.com
5. Rethink Google Tag Manager
Google Tag Manager is often only beneficial for large, unoptimized sites.
Otherwise, it usually does more harm than good.
If you absolutely need it, use a good Google Tag Manager plugin and be minimal with tags, but that’s about all you can do. I don’t use GTM on my website (my load times are more important).

//www.googletagmanager.com
//www.googletagservices.com
6. Adjust Cloudflare’s TTL Value
If using Cloudflare, their default TTL value is set to 5 minutes which is very low.
You can find this under Caching > Configuration, but also check your DNS TTL values.
Depending on how often content changes on your site, you can increase this to a higher number. This results in less frequent caching for visitors but saves on resources since the cache doesn’t need to refresh as often. Although I personally use RocketCDN instead of Cloudflare.


//cdnjs.cloudflare.com7. Avoid Plugins Known For DNS Lookups
Hotjar, Leadpages, live chat, and other plugins add scripts for tracking.
These ultimately result in more DNS lookups and can usually not be fixed.
Just like Google AdSense or Google Tag Manager, it’s a tradeoff. Do you care more about using the tools or do you want your website to load faster? Take a look at this list of common slow plugins and avoid them if possible. Aside from avoiding plugins that cause DNS lookups, you also want to avoid resource-hungry plugins with heavy JavaScript or CSS files (like Elementor).
*Most slow plugins are page builders, ultimate addons, social sharing, statistic, portfolio, slider, backup, chat, calendar, contact form, related post, or those running ongoing scans + processes. WooCommerce sites can be especially resource-hungry.
- Anything using Google AdSense
- Backup Buddy
- Beaver Builder
- Broken Link Checker
- Contact Form 7
- Disqus Comment System
- Divi Builder
- Elementor
- Jetpack
- Query Monitor
- Ultimate Addons For Elementor + Beaver Builder
- WooCommerce
- Wordfence
- WPML
- View full list of 70+ slow plugins
Many social sharing plugins cause DNS lookups to Facebook, Twitter, and other networks.
I recommend the Grow by Mediavine which are social sharing buttons that don’t cause DNS lookups. For more plugin alternatives, see WP Rocket’s list of fastest social sharing plugins.

//connect.facebook.net
//platform.twitter.com
//syndication.twitter.com
//platform.instagram.com
//api.pinterest.com
//platform.linkedin.com
9. Lazy Load Videos
Embedded videos create third party requests from the source (usually YouTube or Vimeo).
By lazy loading videos and replacing the iframe with a preview image, you can significantly reduce your video’s load time while reducing DNS lookups. Most cache plugins like WP Rocket, SG Optimizer, and W3TC let you lazy load videos, otherwise use the WP YouTube Lyte plugin.

A Better Way To Embed Videos Using Elementor – if you’re using Elementor, follow this YouTube video by WPCrafter which should fix all GTmetrix errors related to YouTube using the Ultimate Addons “video” element. Although my blog doesn’t use Elementor, my pages do, and when I tested this on pages I was able to see zero GTmetrix errors related to YouTube while being able to customize the YouTube play button, border, and branding of embedded videos.

//youtube.com
//player.vimeo.com
10. Delay Loading Of JavaScript
Comments, Gravatars, and other third party scripts can be delayed.
You can do this with WP Rocket’s delay loading of JavaScript feature or Flying Scripts. WP Rocket delays JavaScript until user interaction (e.g. scroll, click) while Flying Scripts lets you set a timeout period (1-10 seconds) until a script is loaded. So while a script might be loaded later, it won’t load immediately and can reduce your initial load times while eliminating DNS lookups.
I did this with comments (wpDiscuz) and Gravatars.
Some of my posts have hundreds of comments while also showing Gravatars. But neither wpDiscuz or Gravatars create a DNS lookup in my GTmetrix report (they normally would). That’s because I delayed them! They won’t load right away, but take about 7 seconds. By doing this, I was able to show Gravatars and reduce many of my post’s load times by about 3 seconds.

Try delaying other third party scripts if they don’t need to load right away.
11. Remove jQuery Migrate
jQuery migrate can also result in a DNS lookup.
Since most sites don’t need it, try removing this which can be done using Perfmatters, WP Rocket, or the Remove jQuery Migrate plugin. Be sure to check for visible errors on your site.

//code.jquery.com12. Enable Caching For Facebook Pixel
To my knowledge, the only way to reduce DNS lookups for Facebook Pixel is with WP Rocket’s Facebook Pixel add-on.
![]()
//pixel.wp.com13. Optimize The wpDiscuz Comment Plugin
When using wpDiscuz, there are multiple ways to make it load faster while reducing DNS lookups. It involves configuring a few settings in wpDiscuz, delaying comments loading using WP Rocket’s delay JavaScript or Flying Scripts, and WP User Avatar for Gravatar DNS lookups.
Step 1: Configure wpDiscuz to load faster.
Comment thread displaying → initiate AJAX loading after page and lazy load comment.

General → disable “use WordPress native AJAX functions” and enable combine/minify JS/CSS.

Styles and colors → disable “load font awesome CSS lib.”

Step 2: Delay Gravatar loading with Flying Scripts or WP Rocket’s delay JavaScript loading.

Step 3: Upload a custom, optimized photo using WP User Avatar.
![]()
Retest your GTmetrix report and your comments should load much faster with little to no errors. You can try the Disqus Conditional Load, but I found the previous method worked best.
//disqus.com
//referrer.disqus.com
//c.disquscdn.com
//0.gravatar.com
//2.gravatar.com
//1.gravatar.com
//secure.gravatar.com
//sitename.disqus.com
14. Selectively Disable Plugins
Some plugins load across your entire site but are only needed on certain pages/posts.
Selectively disabling plugins can reduce DNS lookups while improving load times for pages and posts that don’t need to load those plugins. This isn’t just limited to selectively disabling plugins: you can also selectively disable scripts, styles, fonts, and some Elementor CSS + JavaScript files.
Step 1: Install the Asset CleanUp or Perfmatters plugin.
Step 2: Edit a page or post and scroll down to the Asset CleanUp section. Here you’ll see an entire list of plugins, scripts, and styles loading on the page. If you don’t use something but it’s still loading on the page, disable it by unloading it on the single page, by post type, or through regular expressions (however, RegEx is only included with Asset CleanUp’s premium version).

A few examples include disabling social sharing plugins on pages, disabling slider plugins on content not using sliders, or disabling fonts if they’re only used in specific areas of your website.
15. Prefetch External Domains
DNS prefetching tells browsers to start a connection to a third party domain before the file is needed. This won’t fix reduce DNS lookup errors, but can shorten their load times significantly.
To prefetch external domains, open the “reduce DNS lookups” section of your GTmetrix YSlow report, copy all the URLs, and add them to a prefetching plugin. A few plugins that incorporate prefetching are WP Rocket, Pre* Party Resources Hints, and Perfmatters. Alternatively, you can use this list of common domains to prefetch (check the comments to see even more domains).

If you’re using SiteGround’s hosting, their SG Optimizer plugin already comes with DNS prefetching (found under Environment Optimization > DNS Pre-fetch for External Domains).
16. Use A Premium DNS Provider
Hosts like Cloudways and Kinsta offer a premium DNS which can reduce DNS lookup times.
Kinsta says:
“DNS providers typically work just like a CDN, they have multiple POPs around the globe. Large DNS providers out there like Amazon, Cloudflare, Dyn, and DNS Made Easy all have massive infrastructures specifically designed for DNS with low-latency environments”
If you’re using GoDaddy, NameCheap, or another cheap DNS, consider using a premium DNS.
Still need help reducing DNS lookups?
Leave me a comment with your GTmetrix report and I can have a look.
See Also: How I Got 100% GTmetrix Scores
Cheers,
Tom
![]()
Разработка интернет-магазина от 200 000 ₽
Продвижение сайтов от 20 000 ₽
Техническая поддержка от 5000 ₽

Содержание
- 1 Что такое DNS Lookup
- 2 Совет 1 — Используйте быстрый провайдер DNS
- 3 Совет 2 — Измените значения TTL, чтобы использовать преимущества кэша DNS
- 4 Совет 3 — Уменьшите количество доменов (имен хостов)
- 5 Совет 4 — Используйте альтернативные сервисы с более быстрым DNS
- 6 Совет 5 — Перемещение и размещение ресурсов на CDN
- 7 Font Awesome
- 8 Gravatars
- 9 Google Fonts
- 10 Совет 6 — Воспользуйтесь преимуществом предварительной выборки DNS
- 11 Совет 7 — отложенная загрузка JavaScript
- 12 Резюме
Существует множество различных способов оптимизации сайта, которые вы можете сделать, когда речь идет о WordPress, и некоторые из них более важны, чем другие. Фактором, который часто упускают из виду, является время поиска, связанное с DNS, и то, насколько сильно это влияет на ваш сайт. Как и в случае с TTFB и задержкой в сети , это важная часть головоломки, когда дело доходит до расчета общего времени загрузки страницы. Итак, сегодня мы рассмотрим несколько рекомендаций о том, как сократить поиск DNS и ускорить его, почему вы должны это делать и как это влияет на производительность вашего сайта WordPress.
Что такое DNS Lookup
Чтобы показать вам, что такое поиск DNS, вам нужно сначала понять, как работает DNS. DNS (система доменных имен) по сути является основой Интернета. Общее объяснение того, как работает DNS — это думать о нем, как о телефонной книге для всемирной паутины . Каждый веб-сайт и домен, который вы посещаете, сопоставляются с IP-адресом.
Когда вы вводите Google.com в адресную строку, ваш провайдер выполняет DNS-запрос для запроса серверов имен, связанных с доменом. Затем сопоставление с IP-адресом выполняется сервером, что позволяет затем использовать доменное имя для доступа к нему. Без DNS вы должны были бы напечатать что-то вроде 216.58.217.206, чтобы запустить Google. Это было бы очень весело 🙂

Когда вы заходите на веб-сайт, необходимо выполнить поиск DNS для каждого домена, который запрашивается, прежде чем браузер что-либо загрузит. Однако поиск DNS не обязательно должен выполняться для каждого ресурса.
Совет 1 — Используйте быстрый провайдер DNS
Важно понимать, что, как и в случае с хостингом, существуют более быстрые и медленные провайдеры DNS . Это первое, что необходимо исправить.
Обычно бесплатный DNS, предоставляемый регистраторами доменов, такими как GoDaddy и Namecheap, очень медленный. DNS-провайдеры обычно работают так же, как CDN , у них есть несколько POP по всему миру. Крупные провайдеры DNS, такие как Amazon, Cloudflare, Dyn и DNS Made Easy, имеют обширную инфраструктуру, специально разработанную для DNS с средами с низкой задержкой.
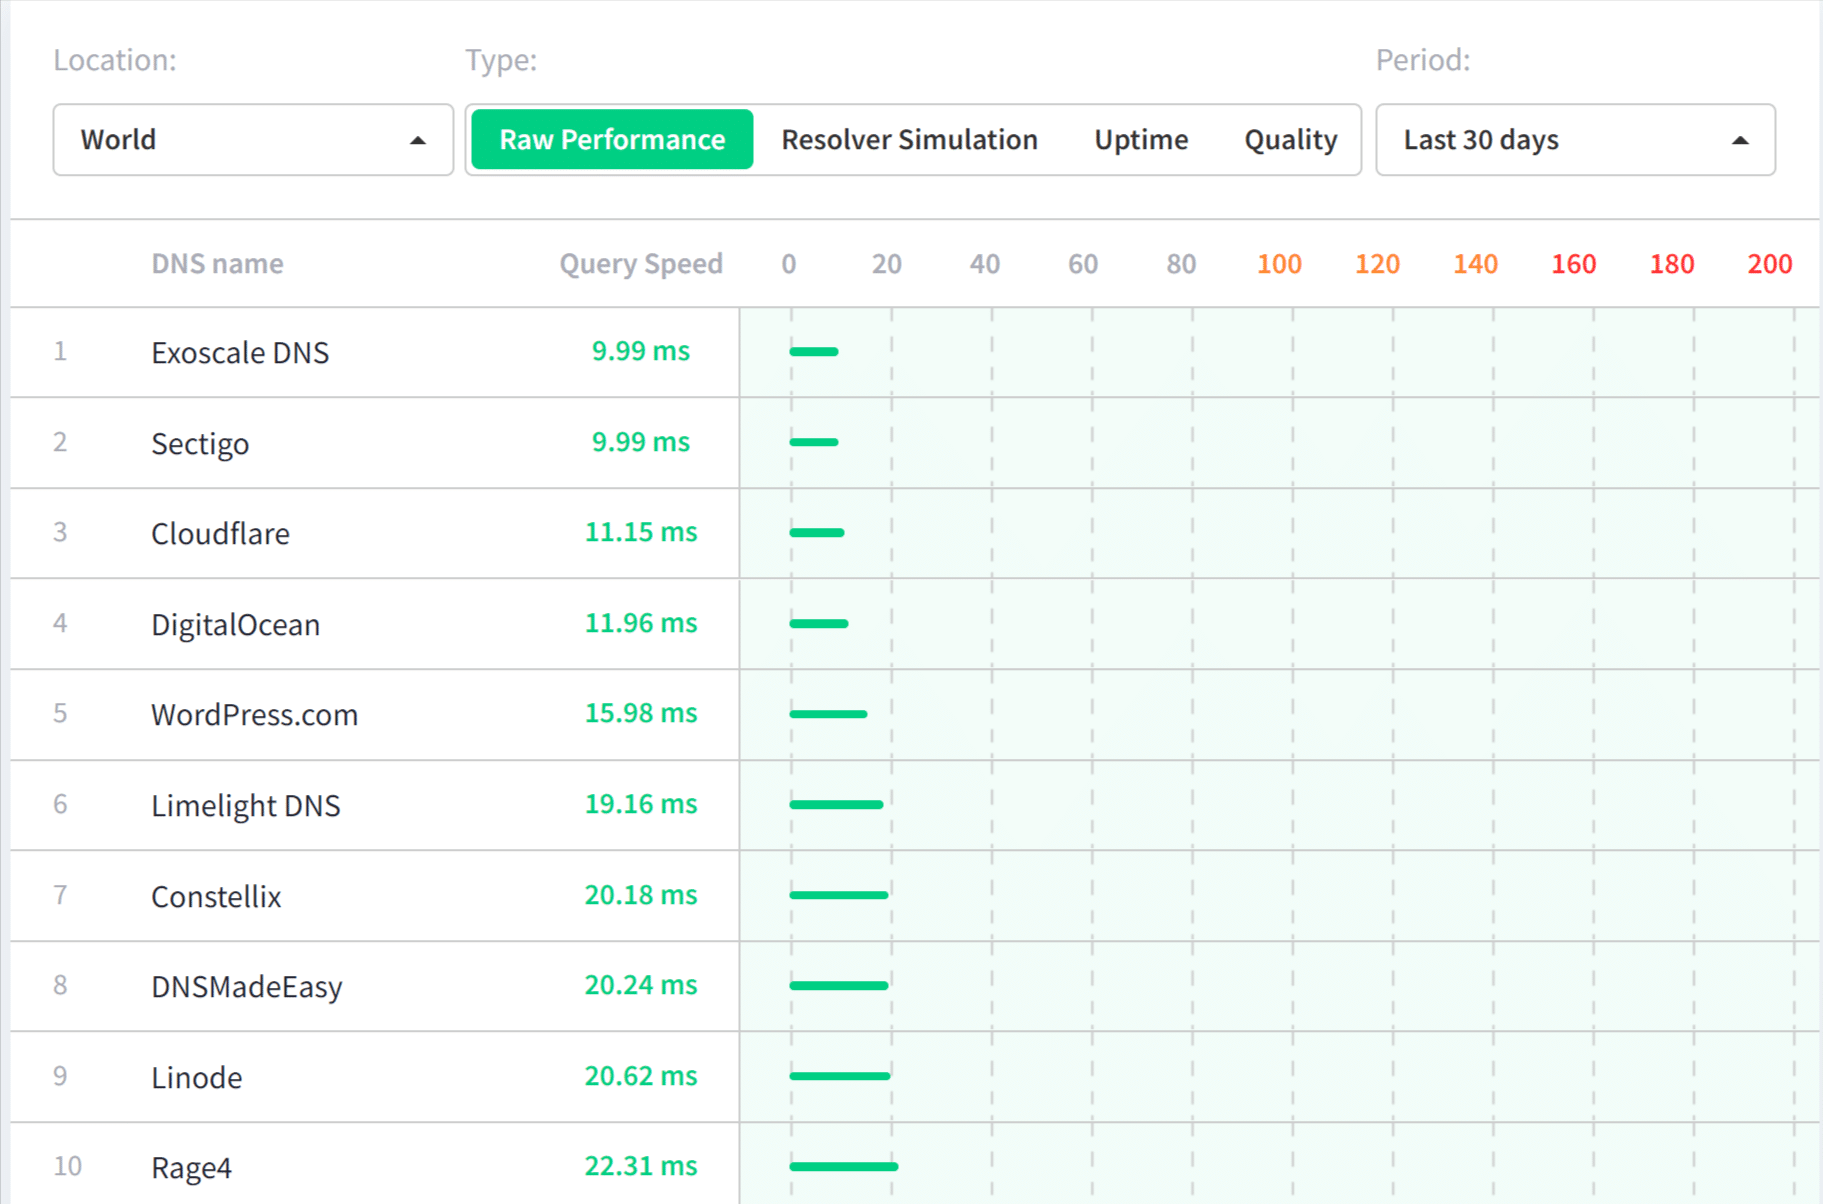
Мы провели несколько тестов, чтобы сравнить скорости некоторых популярных провайдеров DNS. Мы использовали инструмент производительности KeyCDN, а также тест скорости SolveDNS и взяли среднее значение. Скорости были измерены из разных мест по всему миру. Как видите, кроме Cloudflare, бесплатные DNS-провайдеры, безусловно, работают медленнее. Вот почему, если вы серьезно относитесь к своему бизнесу и веб-сайту, мы настоятельно рекомендуем обратиться к первоклассному провайдеру DNS .

Некоторые из перечисленных выше провайдеров также работают быстрее, чем другие в определенных регионах, поэтому важно определить, где вам нужно быстрое время поиска DNS, региональное или глобальное. DNSPerf — еще один новый инструмент сравнения скорости DNS, который вы можете использовать при выборе поставщика.
Совет 2 — Измените значения TTL, чтобы использовать преимущества кэша DNS
К счастью, как мы упоминали выше, благодаря DNS-кешу вам не нужно беспокоиться о поисках, которые происходят при каждой загрузке страницы. Кеш DNS работает так же, как вы кешируете свой сайт WordPress. DNS подается из кэша до истечения срока его действия. Длина кеша DNS определяется значением времени жизни (TTL). Чем выше TTL, тем меньше вероятность, что браузеру потребуется выполнить другой поиск DNS.
Значения TTL могут быть изменены вашим регистратором домена или сторонним поставщиком DNS, чтобы сократить время кэширования DNS. Важно отметить, что интернет-провайдеры также кэшируют DNS. Ниже приведены несколько общих значений TTL.
- 300 секунд = 5 минут
- 1800 секунд = 30 минут
- 3600 секунд = 1 час
- 43200 секунд = 12 часов
- 86400 секунд = 24 часа

От 30 минут до часа, как правило, наиболее часто используемые значения TTL. Тем не менее, некоторые также устанавливают свои TTL очень низкими для быстрого обновления. Cloudflare — один из примеров, который по умолчанию равен 5 минутам, если вы используете их автоматический TTL. Также может быть полезно взглянуть на различные типы записей DNS и установить их соответствующим образом в зависимости от того, как часто они меняются. Вот пример:
- Записи A и AAAA: меняются чаще, обычно от 5 минут до часа.
- Записи CNAME: почти никогда не меняются, обычно более высокий TTL, такой как 24 часа
- Записи MX: Меняются реже, обычно высокий TTL, такой как 12 часов
- Записи TXT: Меняются реже, обычно высокие значения TTL, такие как 12 часов
В этом вопросе действительно нет правильного или неправильного ответа, когда дело доходит до TTL. Но это может улучшить время поиска DNS, выбрав TTL, совпадающий с частотой внесения изменений на вашем сайте.
Совет 3 — Уменьшите количество доменов (имен хостов)
Самый простой способ уменьшить количество DNS-запросов на вашем сайте — это просто избавиться от запросов, которые запрашивают разные имена хостов. Помните, что при поиске DNS речь идет не о количестве запросов, а о количестве разных доменов. Запустите свой сайт WordPress с помощью такого инструмента, как Pingdom, и определите, действительно ли каждый запрос необходим. Поскольку DNS является отображением имени хоста на IP, вы можете спросить, почему люди просто не указывают на IP вместо этого? Это связано с тем, что IP-адрес может часто меняться, а имена хостов — нет.
Совет 4 — Используйте альтернативные сервисы с более быстрым DNS
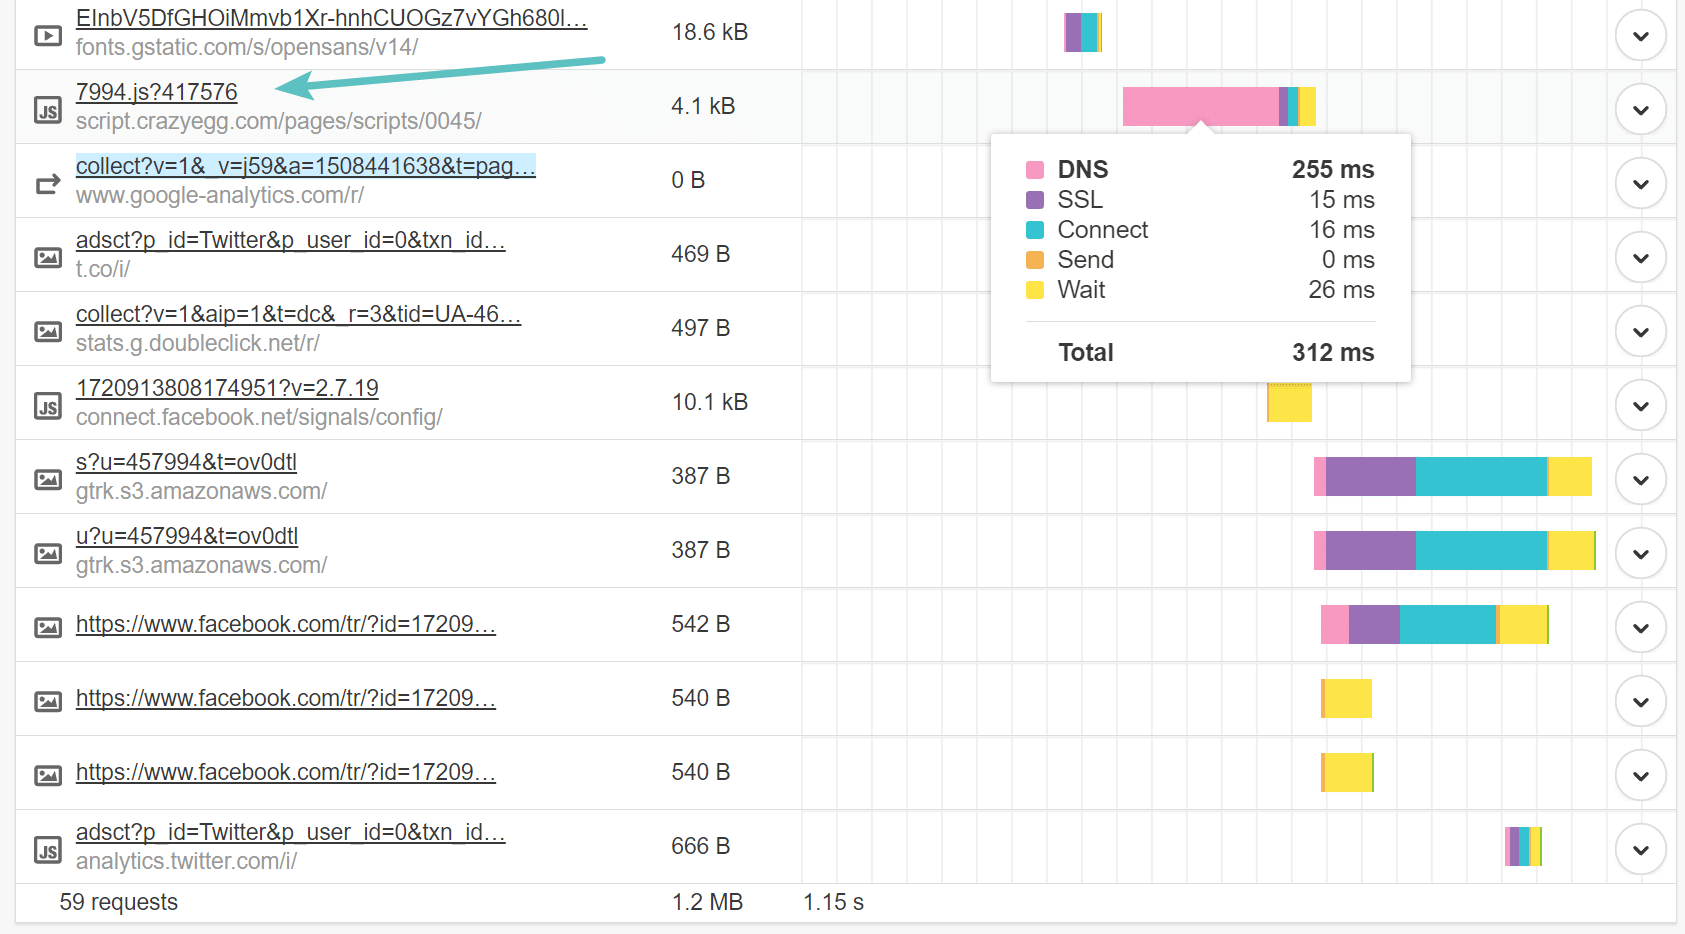
Хотя простое сокращение количества доменов (имен хостов) легче сказать, чем сделать, мы рекомендуем в первую очередь взглянуть на те, у которых время поиска DNS выше. Например, на этом сайте, который мы тестировали ниже, мы можем легко заметить, что время поиска DNS для скрипта отслеживания Crazy Egg было намного больше, чем у других. Скорее всего, это связано с тем, что их DNS-провайдер работает не так быстро, как некоторые другие.

Совет 5 — Перемещение и размещение ресурсов на CDN
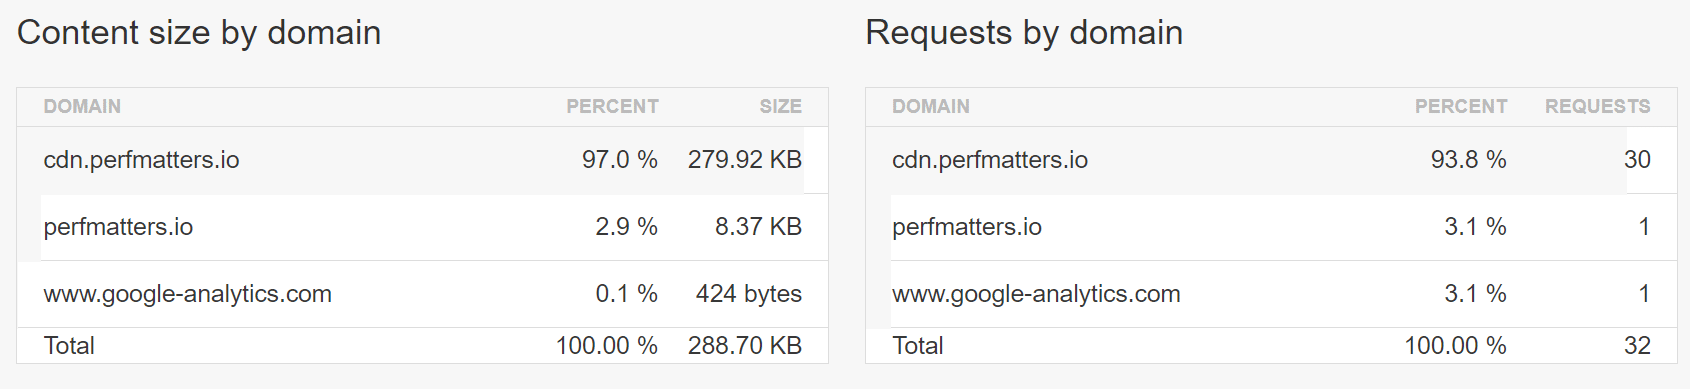
Один из самых простых способов уменьшить количество DNS-запросов — переместить столько ресурсов, сколько вы можете, вашему провайдеру CDN. Если вы запускаете свой сайт через Pingdom, вы можете увидеть общее количество запросов по доменам . Как видно из этого примера, 93,8% запросов относятся к URL CDN. Существует один запрос к хосту и один к Google Analytics. Перемещая в CDN столько ресурсов, сколько возможно, это уменьшает количество обращений к DNS и, следовательно, уменьшает время загрузки.

Конечно, не всегда возможно перенести все на ваш CDN. Всегда будут какие-то внешние ресурсы или сервисы, требующие загрузки их со своих серверов. Ниже приведены несколько ресурсов, которые мы часто видим и которые можно улучшить:
Font Awesome
Мы иногда видим разработчиков плагинов и тем, которые включают Font Awesome на сайтах WordPress, но иногда ставят его в очередь таким образом, чтобы по умолчанию плагин, такой как CDN enabler, не улавливал его. В этом случае мы рекомендуем обратиться к разработчику, чтобы спросить его, как вы можете загрузить его из CDN.
Другой распространенный сценарий с Font Awesome — это то, что он иногда загружается из BootstrapCDN по умолчанию (MaxCDN). Хотя в этом нет ничего плохого, но он добавляет еще один DNS-запрос, который вам не нужен. В большинстве случаев было бы лучше загрузить Font Awesome из собственного CDN, чтобы не было другого поиска.
Gravatars
Если вы используете собственные комментарии WordPress, у вас может быть дополнительный поиск к secure.gravatar.com для загрузки gravatars. Одним из простых решений здесь может быть использование плагина для отложенной загрузки комментариев . Хотя это не уменьшит поиск DNS, оно задержит его, пока пользователь не прокрутит страницу вниз. Таким образом, в некотором смысле, вы уменьшаете поиск DNS при загрузке первой страницы. Обязательно ознакомьтесь с нашим сообщением в блоге о других способах ускорения комментариев .
Google Fonts
С помощью Google Fonts у вас есть один дополнительный DNS-запрос для поиска fonts.googleapis.com, чтобы получить файл CSS. Затем у вас есть дополнительные запросы к fonts.gstatic.com для загрузки файлов шрифтов. Когда вы размещаете локально, все запросы поступают из одного домена или CDN, и, скорее всего, вам не понадобится другой файл CSS, так как он будет внутри файла CSS вашей темы WordPress.
Совет 6 — Воспользуйтесь преимуществом предварительной выборки DNS
Еще один совет по ускорению DNS — использовать предварительную выборку DNS. Это позволяет браузеру выполнять поиск DNS на странице в фоновом режиме . Вы можете сделать это, добавив несколько строк кода в заголовок вашего сайта WordPress.
Совет 7 — отложенная загрузка JavaScript
Если вы отложите загрузку JavaScript, это может помешать загрузке чего-либо до полной загрузки документа. Это не уменьшит количество необходимых запросов DNS, но предотвратит их немедленный вызов, что может ускорить работу пользователя.
В WordPress вы можете использовать бесплатный плагин, такой как Async JavaScript, чтобы отложить загрузку JavaScript. Тем не менее, важно знать, что вам, скорее всего, придется пройтись и перечислить любые сценарии, которые вы хотели бы исключить из отложенного применения.
Резюме
DNS часто является одним из тех факторов производительности, который упускается из виду, но он может легко повлиять на большую часть вашего общего времени загрузки. Важно понимать, как работает DNS, что есть более быстрые и медленные провайдеры, и как вы можете уменьшить количество обращений, чтобы ускорить ваш сайт.
Есть ли у вас какие-либо дополнительные советы по ускорению DNS или сокращению поисков? Если это так, мы хотели бы услышать о них ниже в комментариях!
Источник — kinsta.com/blog/reduce-dns-lookups
There are a lot of different optimizations you can make when it comes to WordPress, and some are more important than others. A factor that is often overlooked is the lookup times associated with DNS, and just how much of an impact it has on your site. Just like with TTFB and network latency, it’s an important piece of the puzzle when it comes to calculating your total page load times. So today we’ll dive into a few recommendations on how to reduce DNS lookups and speed them up, why you should, and how it plays a part in the performance of your WordPress site.
What is DNS Lookup?
To show you what a DNS lookup is, you need to first understand how DNS works. DNS (domain name system) is essentially the backbone of the internet. A common reference to explaining how DNS works is to think of it like a phone book for the world wide web. Every website and domain you visit are all mapped to an IP address.
When you type Google.com into your address bar, a DNS query is performed by your ISP to request the nameservers associated with the domain. The mapping to the IP address is then done behind the scenes by the server which allows you to then use the domain name to access it. Without DNS you would have to type something like 216.58.217.206 to get to Google. Wouldn’t that be fun!

When you browse to a website, a DNS lookup has to be made for each domain that is requested before anything is downloaded. However, a DNS lookup doesn’t have to be performed on every resource. So for example, let’s say we have the following HTTP requests:
https://wpdev.ink/
https://js.stripe.com/v3/
https://cdn.wpdev.ink/wp-content/themes/twentyseventeen/assets/images/header.jpg
https://cdn.wpdev.ink/wp-content/themes/twentyseventeen/assets/js/skip-link-focus-fix.js
https://cdn.wpdev.ink/wp-content/themes/twentyseventeen/assets/js/global.js
https://cdn.wpdev.ink/wp-content/themes/twentyseventeen/assets/js/jquery.scrollTo.js
https://cdn.wpdev.ink/fonts/open-sans-v13-latin-regular.woff2
https://cdn.wpdev.ink/fonts/open-sans-v13-latin-700.woff2
Even though there is a total of eight HTTP requests above, there are only three total unique domains. Which means there are three DNS lookups.
https://wpdev.ink
https://js.stripe.com
https://cdn.wpdev.ink
You can’t visit a website without first accessing a Domain Name Server (DNS). If DNS issues occur, you might face the error “DNS server not responding”, which suggests that the decentralized naming systems responsible for turning hostnames into IP addresses failed to respond.
DNS Lookups in Pingdom
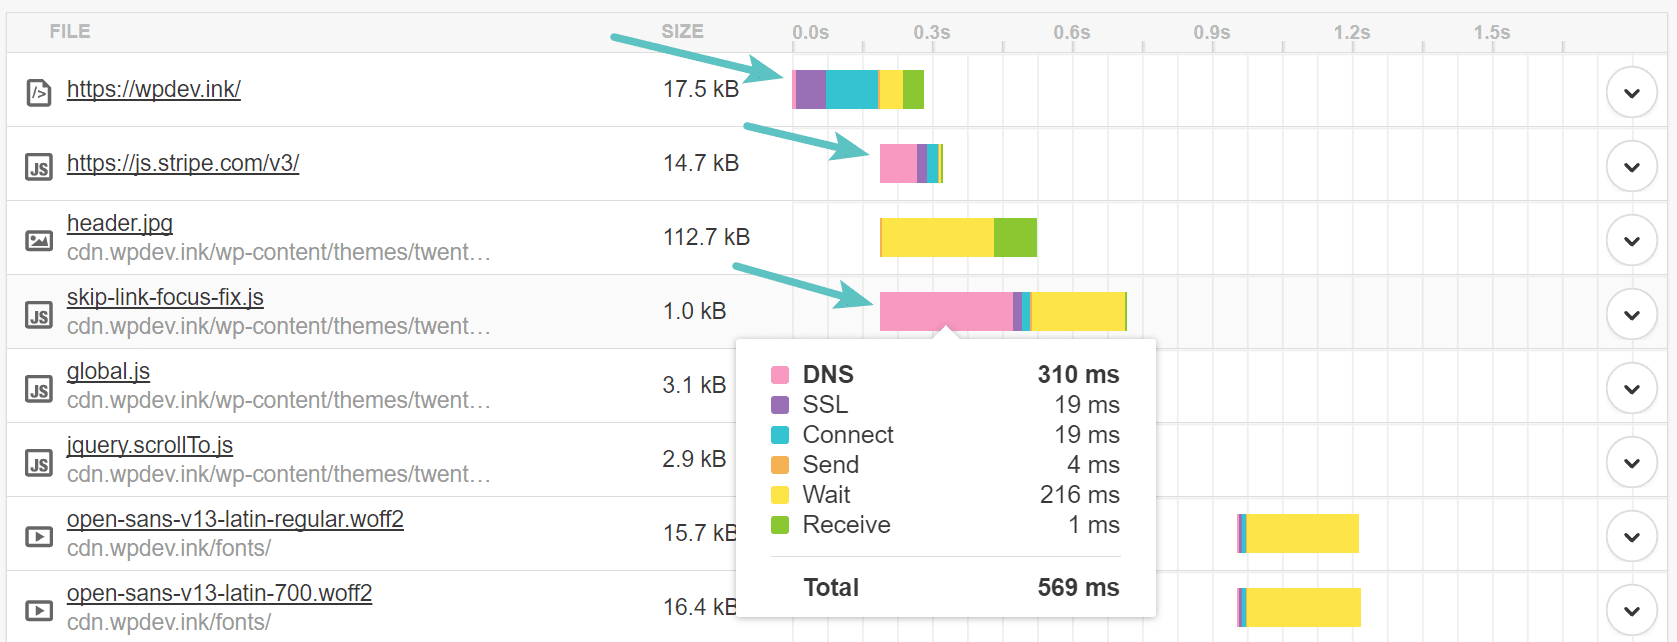
Below is how the above requests appear in the Pingdom website speed test tool. DNS is represented as the pink bar and measured in ms. When you first run your website through Pingdom, it performs a fresh look up, and it has to query the DNS record of each domain to get the IP information. Notice it doesn’t have to query DNS multiple times on the cdn.wpdev.ink domain. That is how DNS works. It only has to query a domain once. So there are 8 total requests below, but only 3 DNS lookups.
This DNS lookups result in additional load time, due to the fact that nothing can load until the DNS lookups are finished. Notice below that the DNS lookup on the one CDN URL took over 300 ms. And that doesn’t include the lookups on wpdev.ink or js.stripe.com. So you can see how this can add up over time.
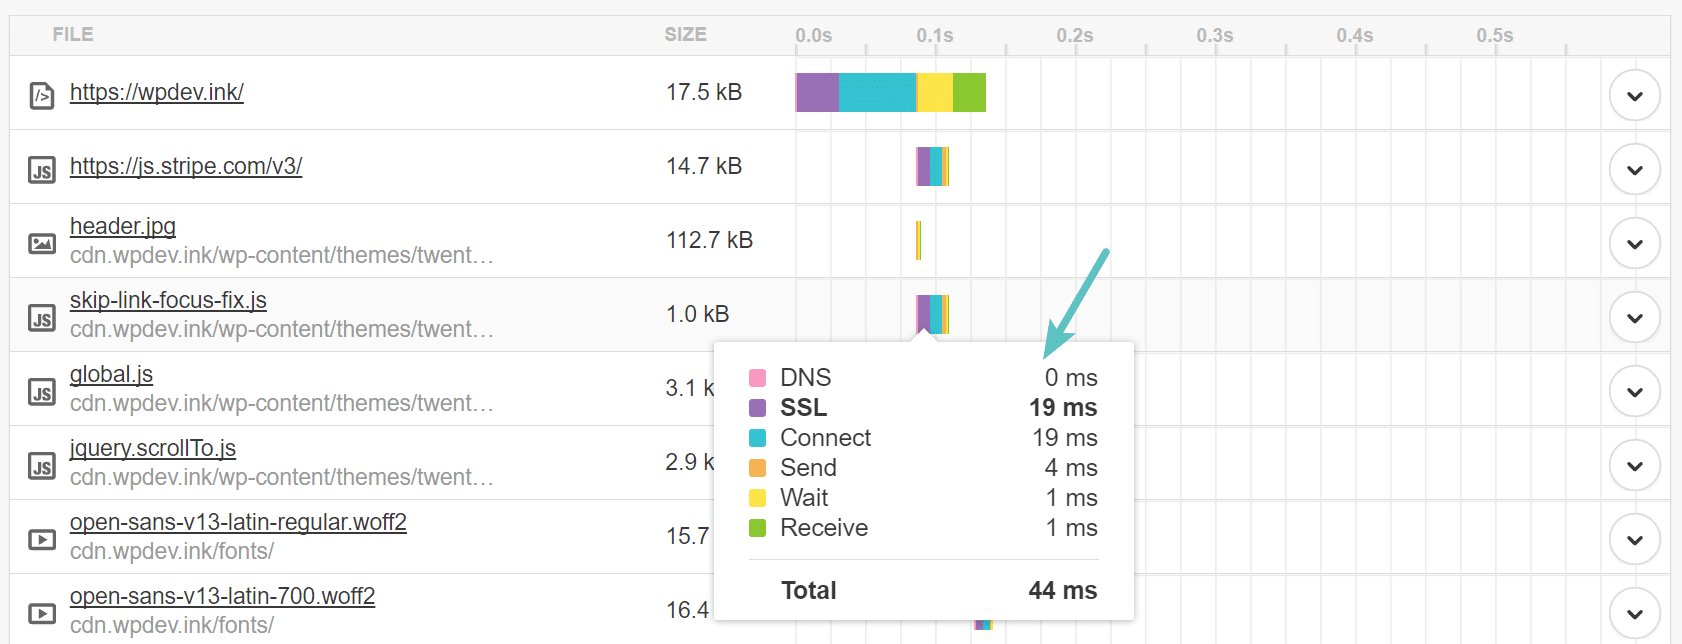
When you run your website through Pingdom more than once, it caches the DNS because it already knows the IP information and doesn’t have to perform the lookup again. This is one reason why your website appears faster after running it through Pingdom multiple times. As you can see in the screen below, on the 2nd test, the DNS lookup time on the CDN URL is 0 ms. This is one area a lot of people misinterpret. But don’t worry, we’ll dive more into DNS cache below.
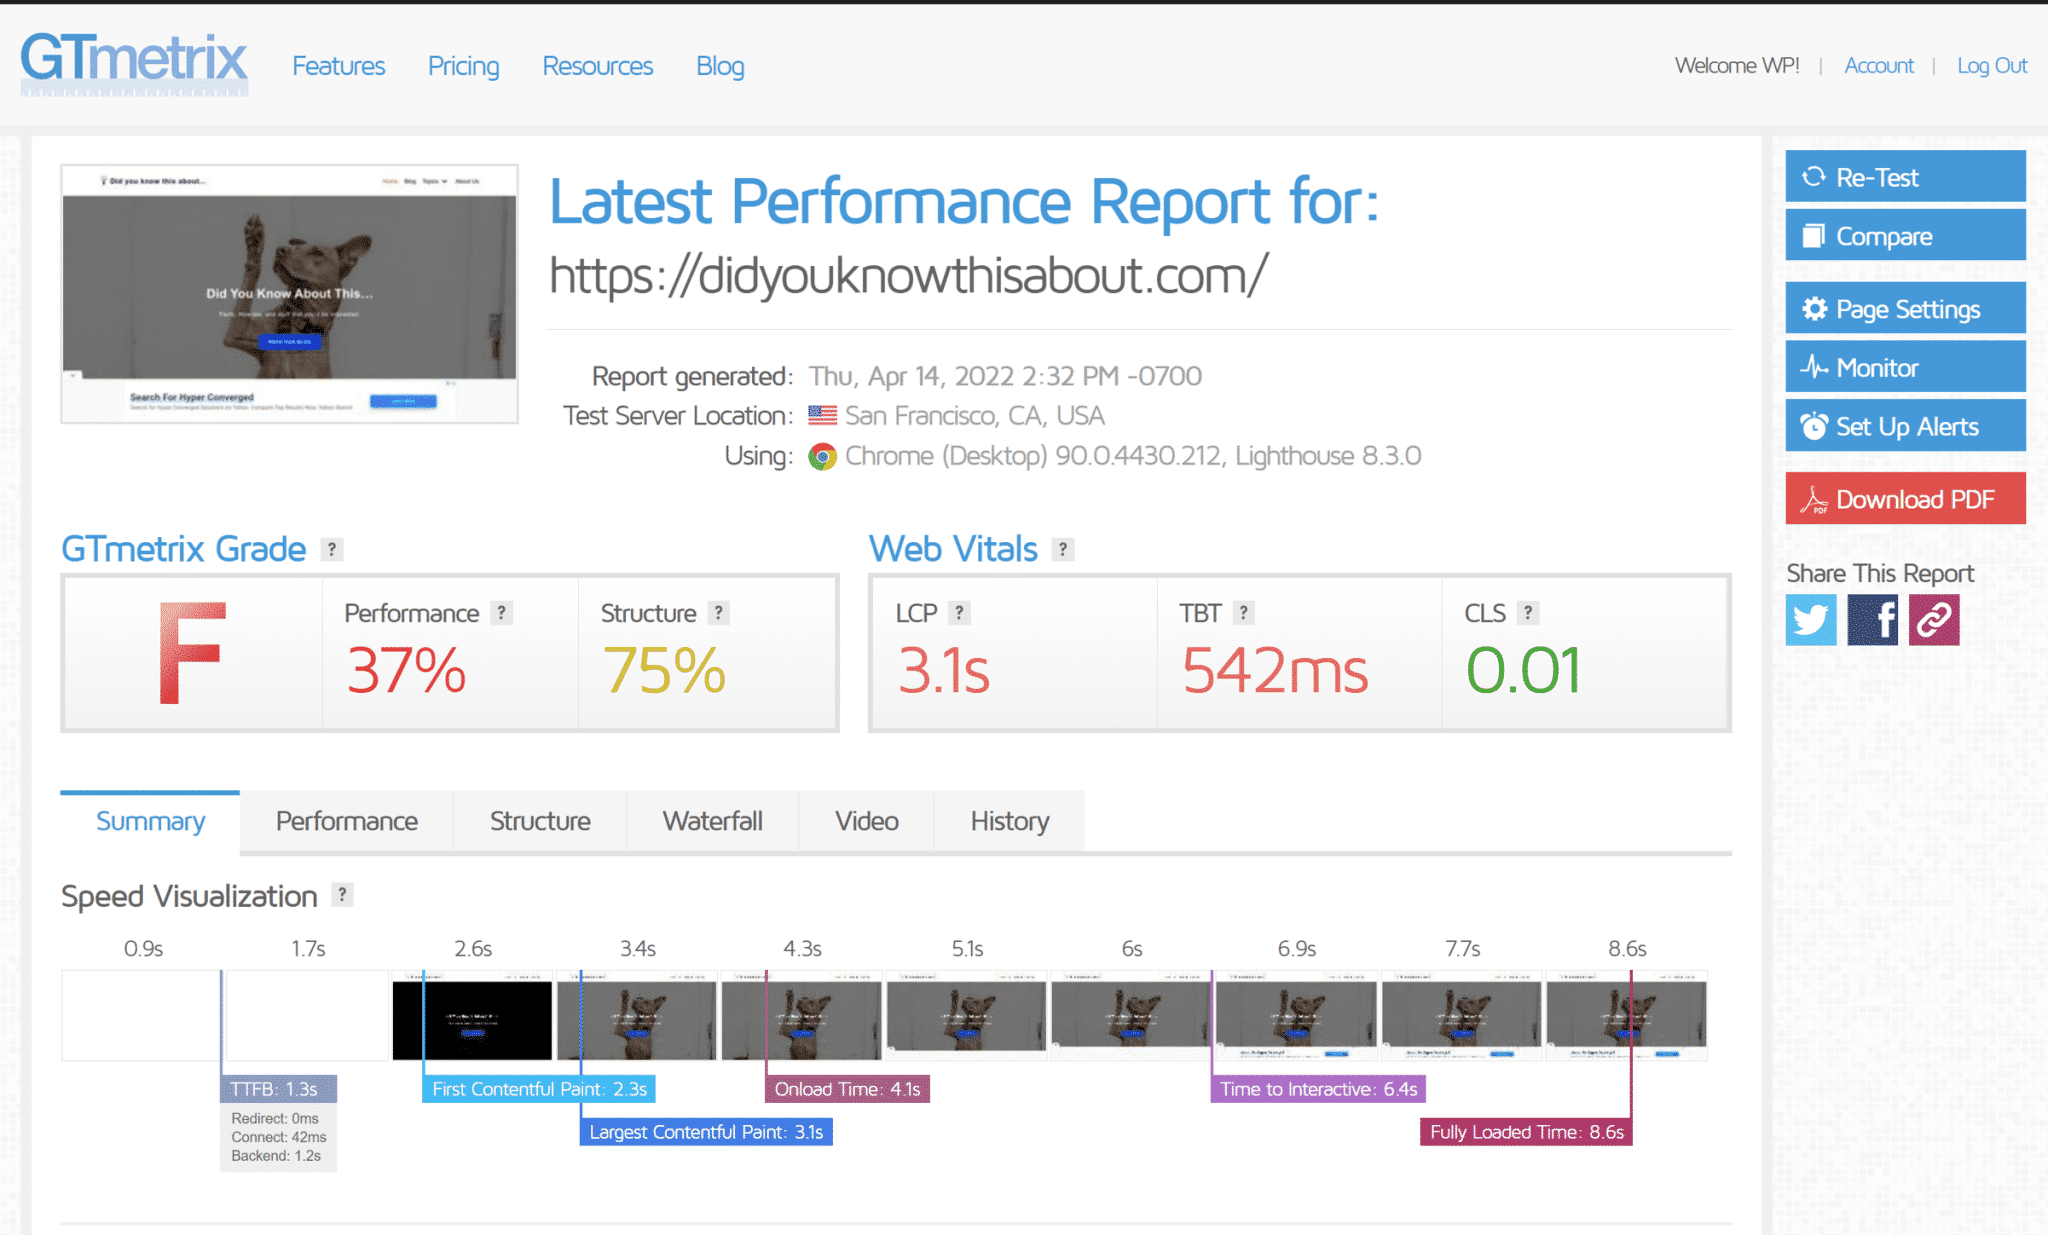
DNS Lookups in GTmetrix
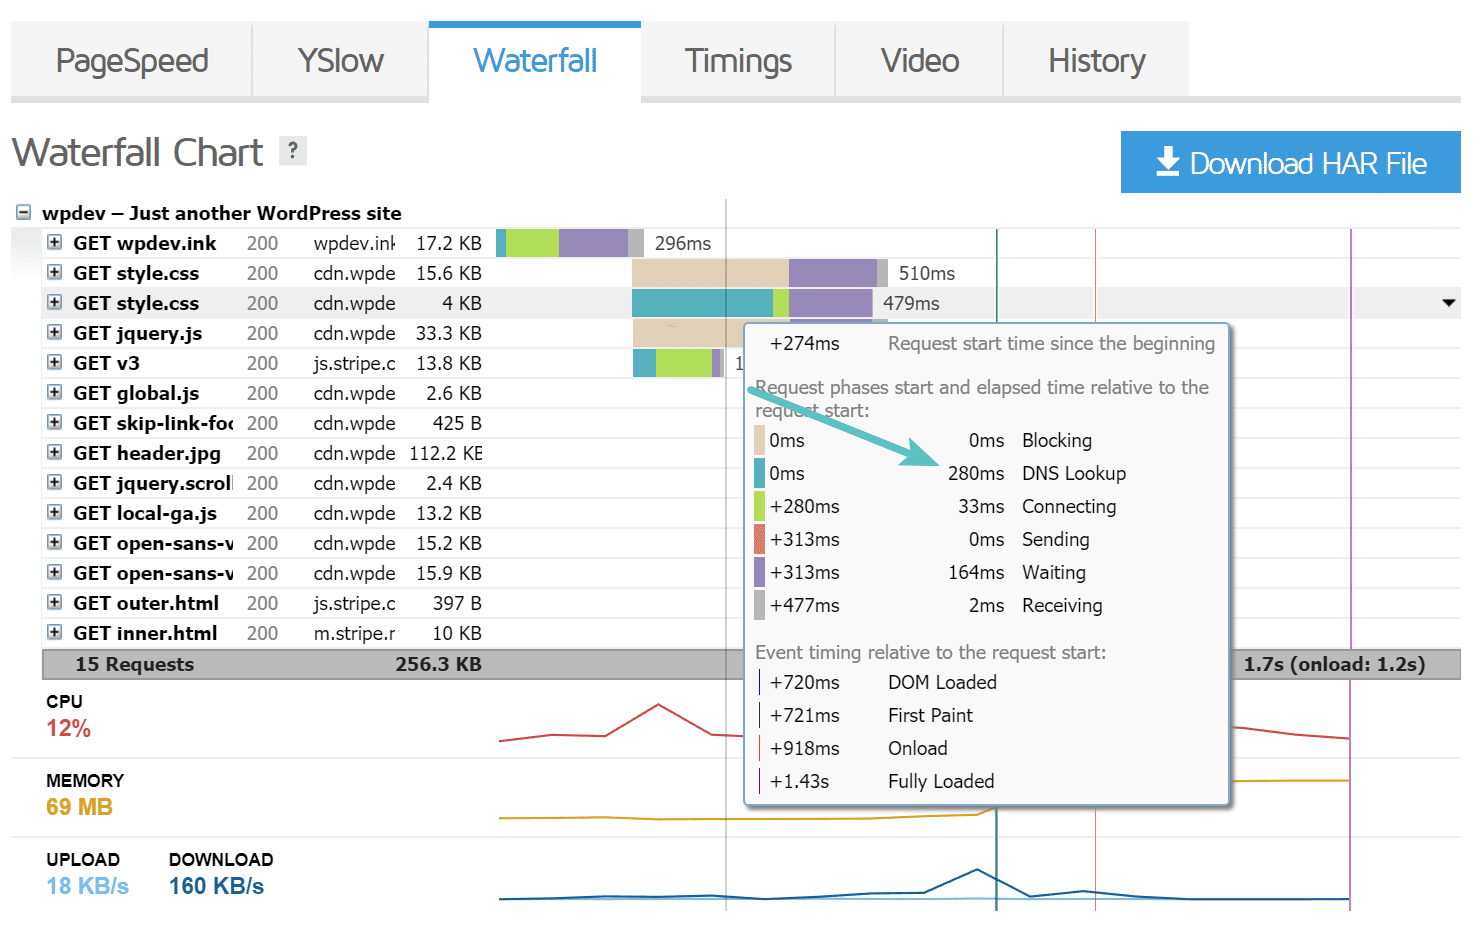
Every website speed test tool works slightly different, but almost all of them calculate DNS lookup times for you. Below is how the same requests appear in GTmetrix. DNS is represented as the green bar and measured in ms.
DNS Lookups in WebPagetest
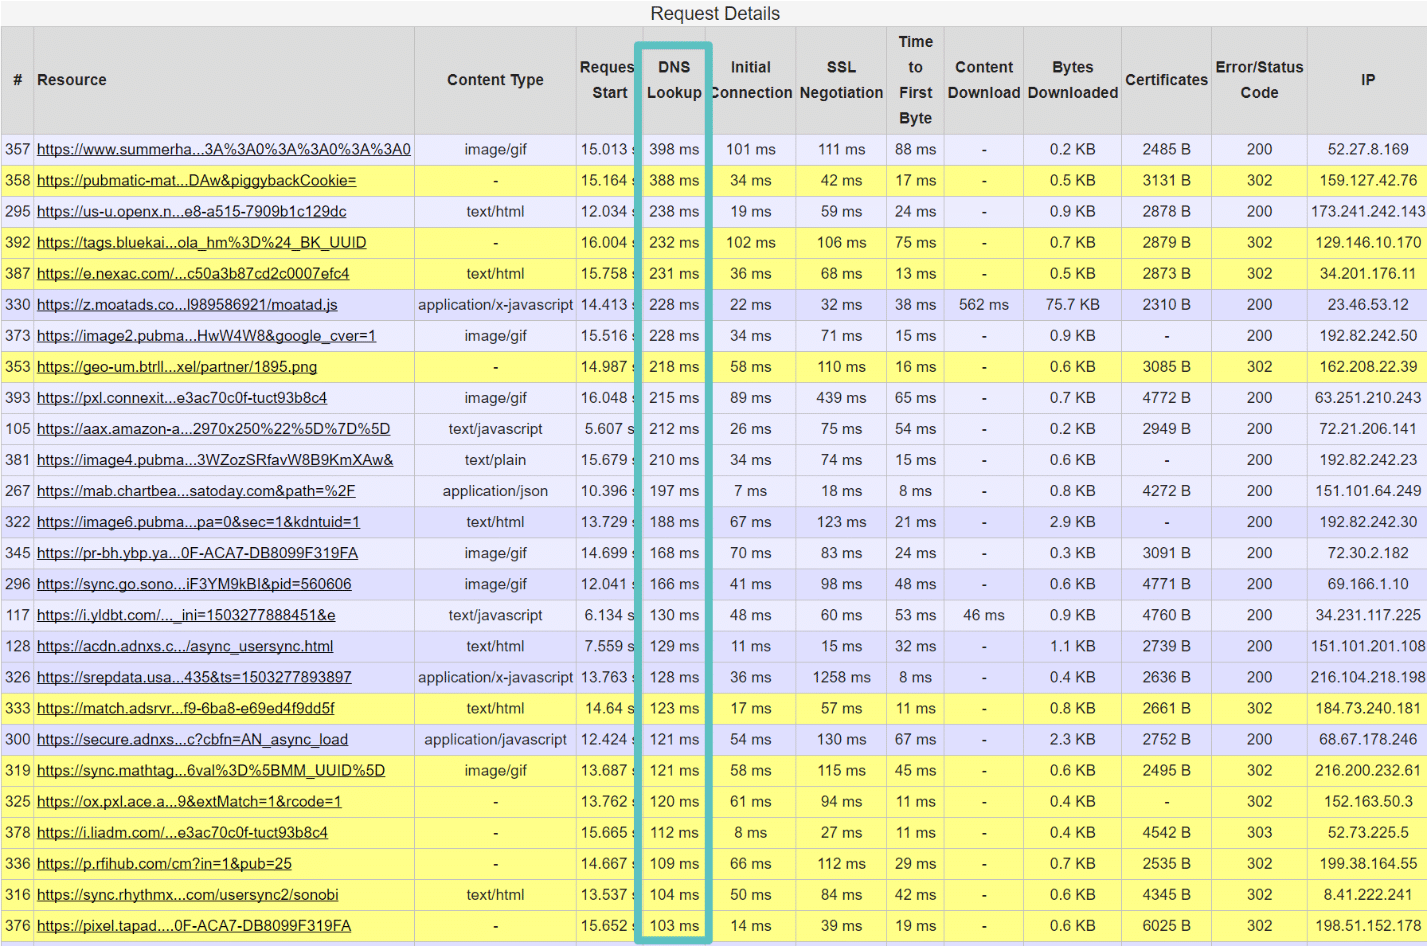
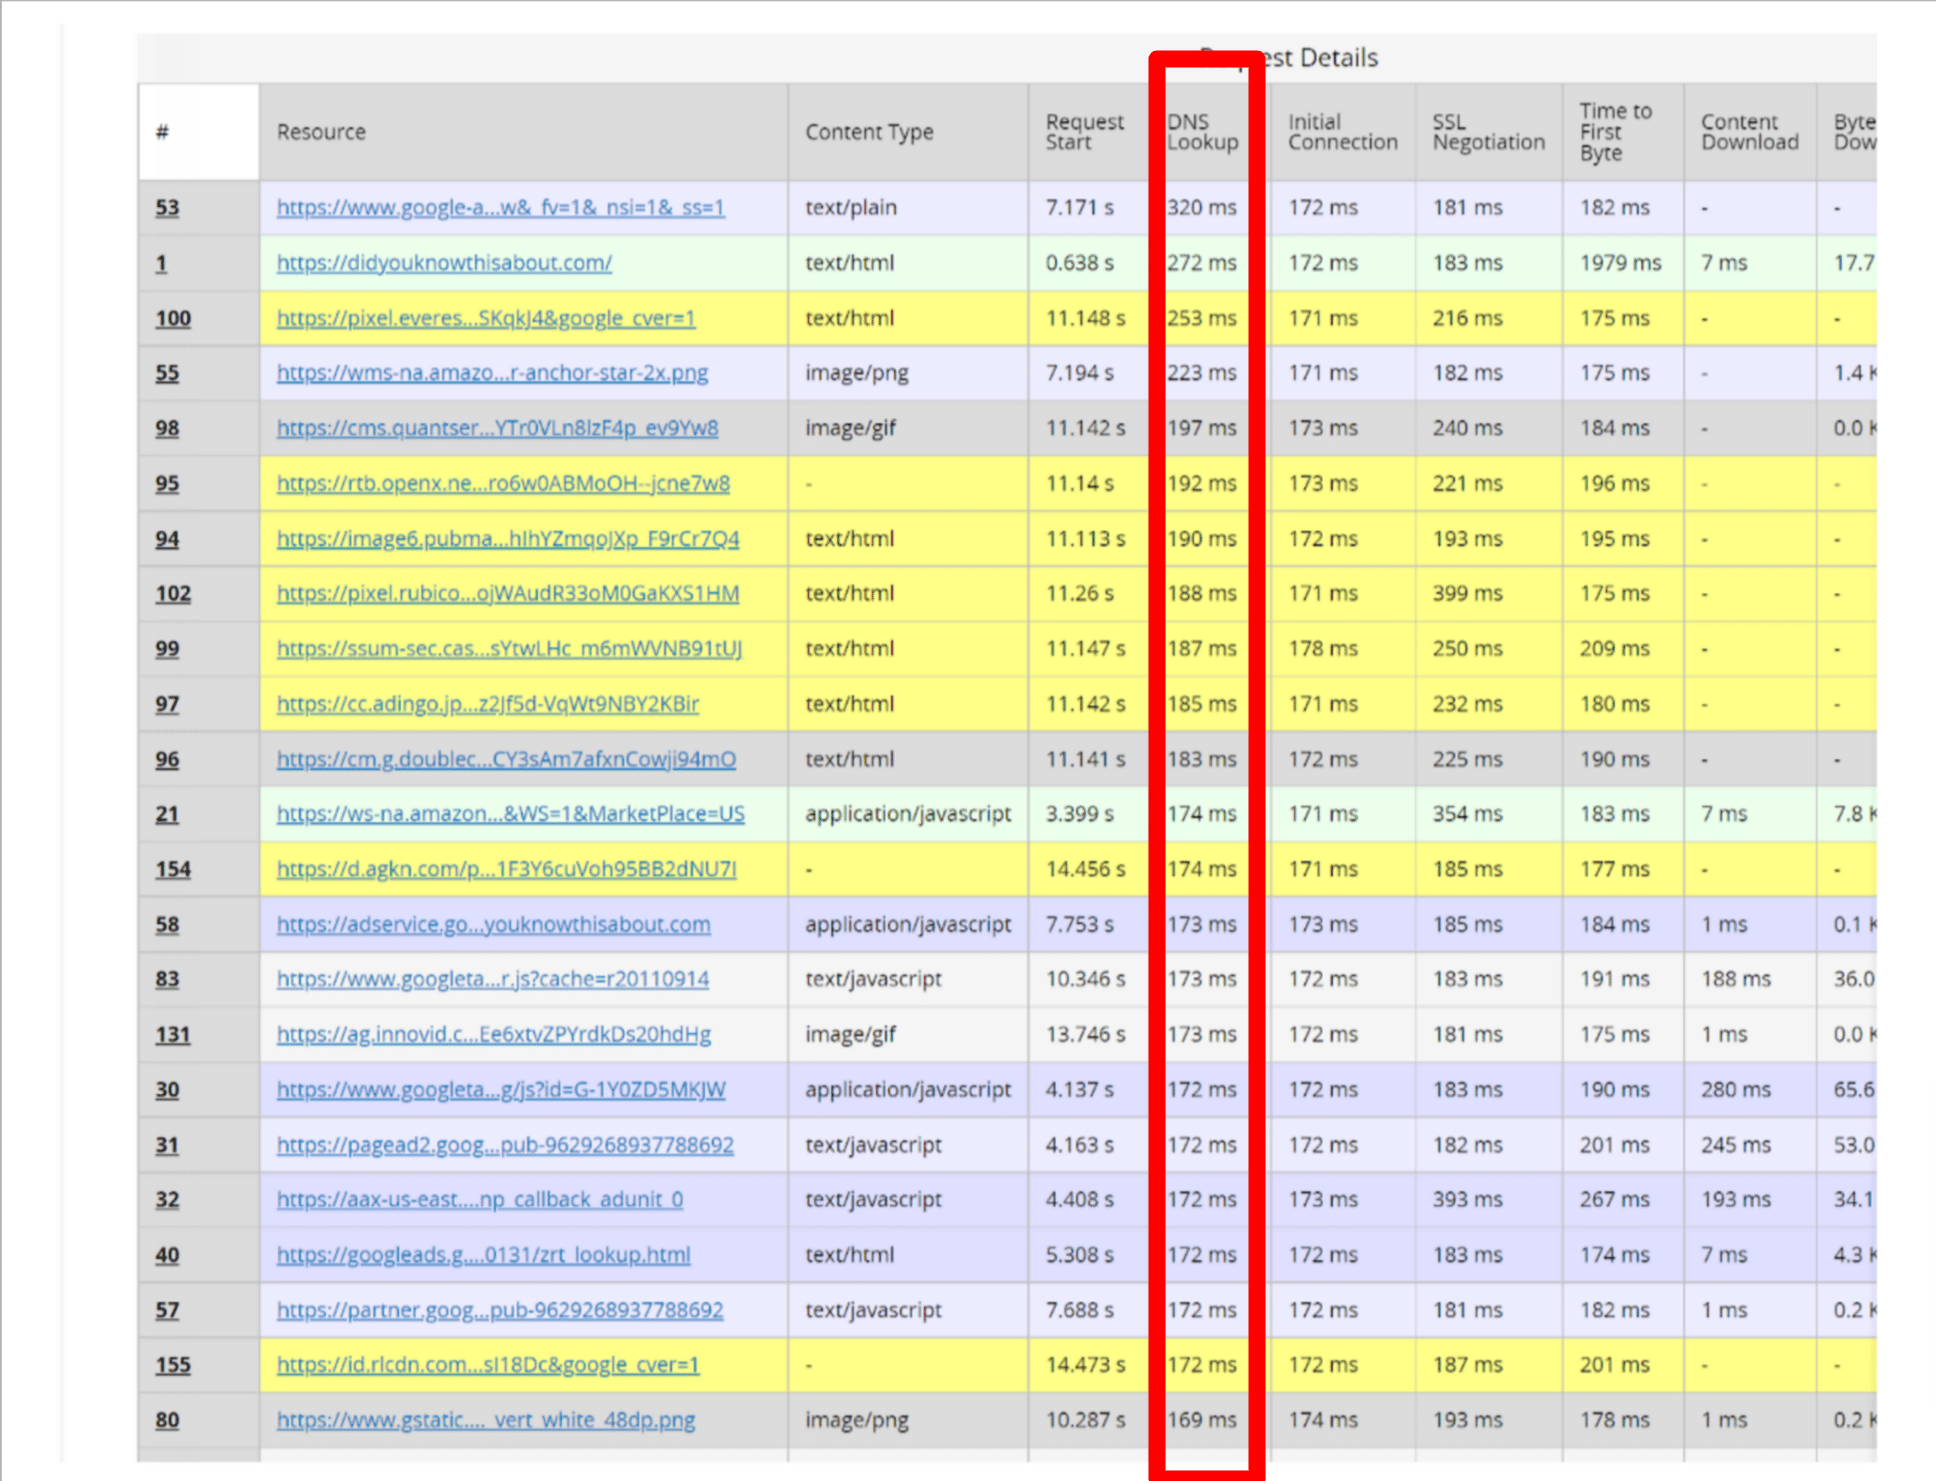
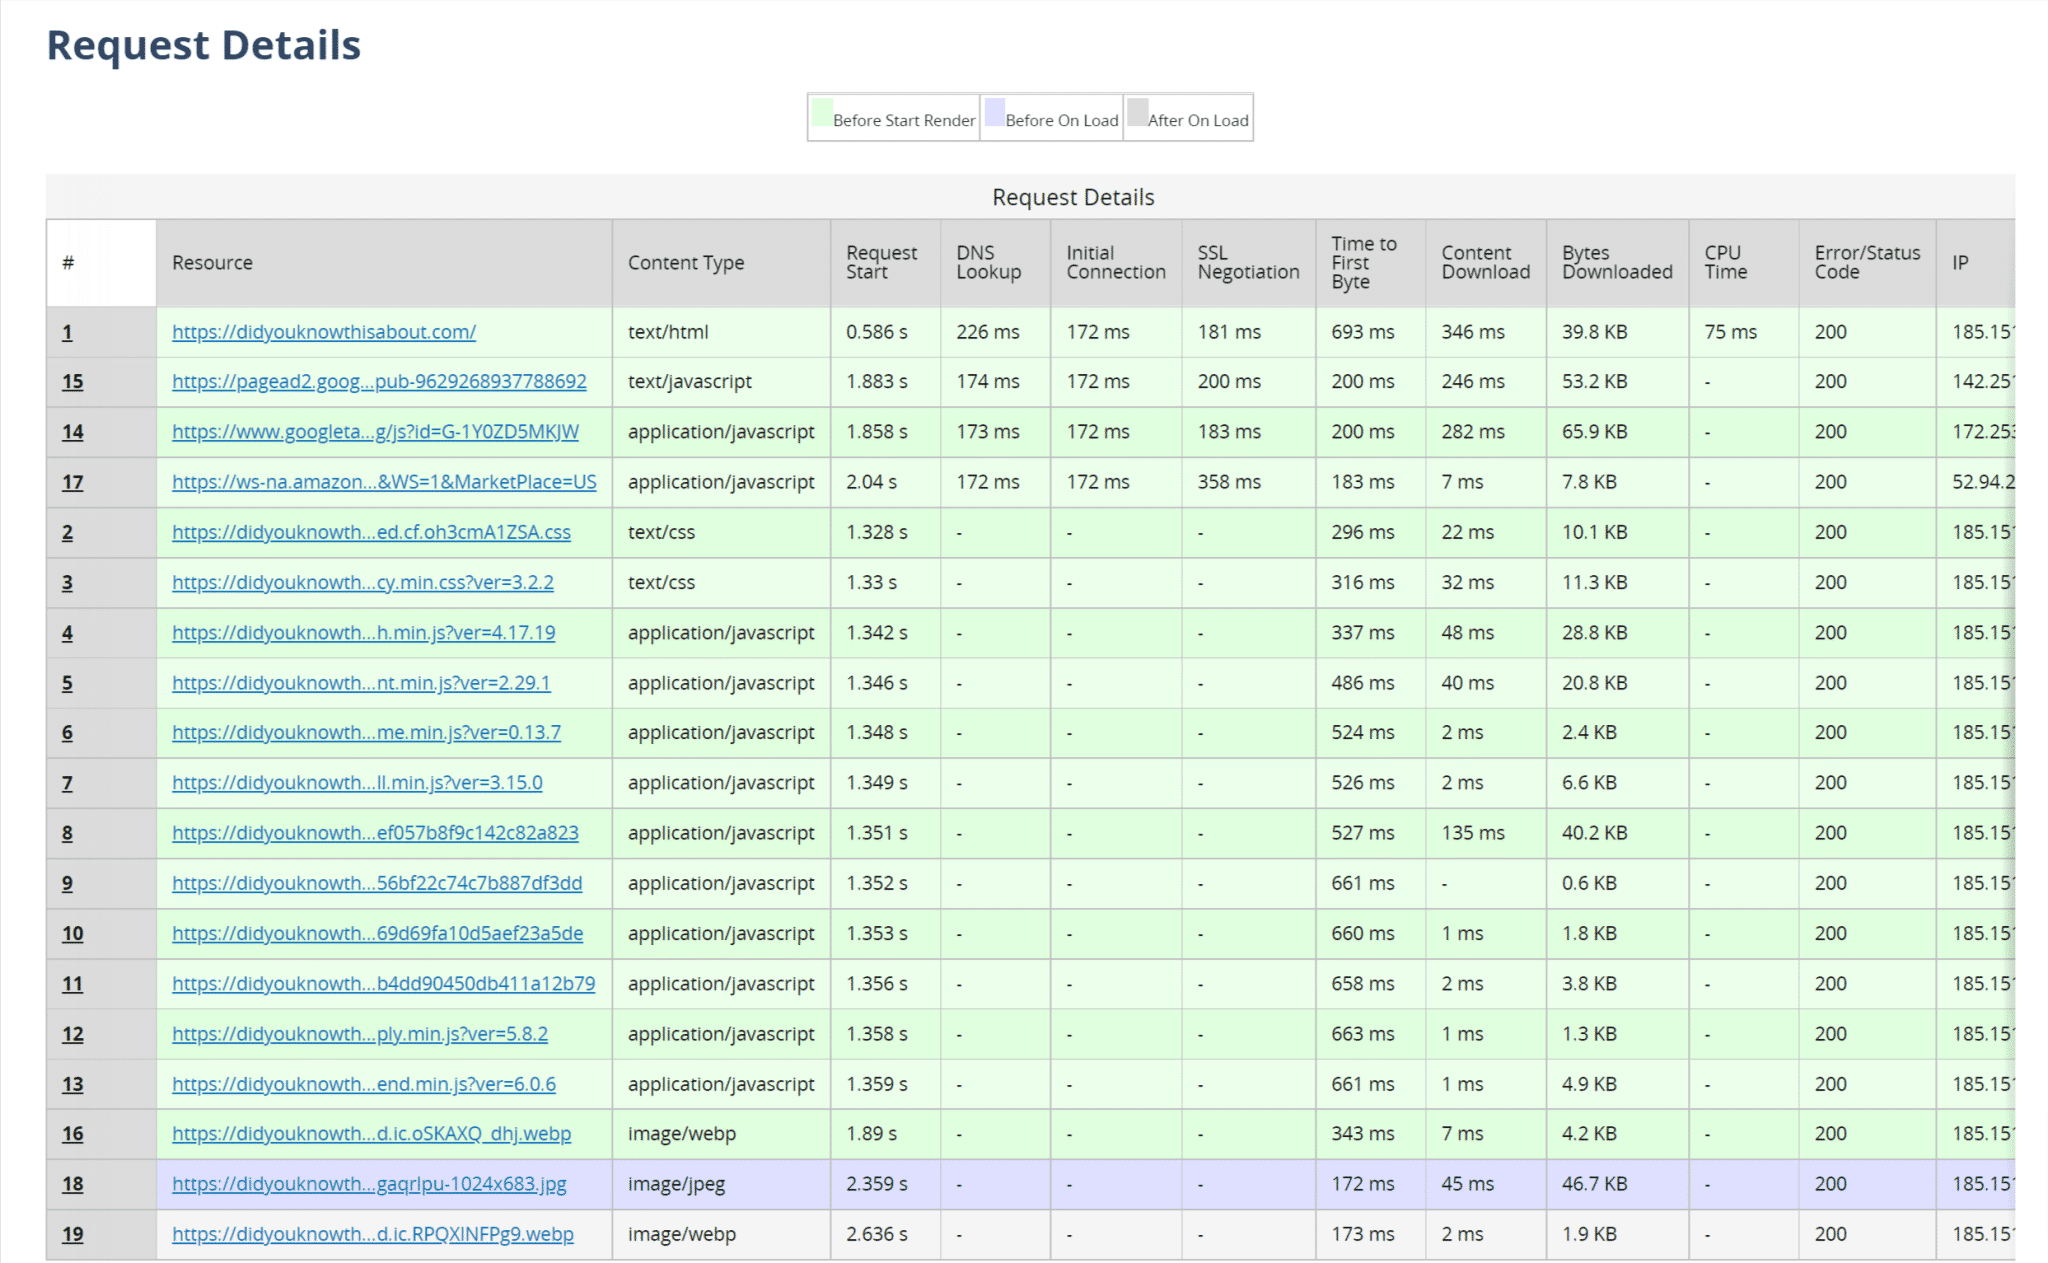
Here is an example using WebPageTest. They actually have a quick overview of your request details in which you can click the “DNS lookup” column and sort it by the highest response times. We ran usatoday.com through the tool as an example, and the DNS lookup time alone took 6.5 seconds!
It is fairly common for a lot of these news sites to not be highly optimized due to all of their external requests. But as you can see, the DNS lookup time on their site probably took more time than most people’s entire sites. This is why DNS does matter.
How to Reduce and Speed Up DNS Lookups
Now that you know a little more about how DNS works, we’ll show you some recommendations on how to reduce DNS lookups and speed them up on your WordPress site. In some website speed test tools, this is also sometimes referred to as “minimize DNS lookups.”
Tip 1 – Use a Fast DNS Provider
It is important to understand that just like with hosting, there are faster and slower DNS providers out there. This should be one of the first things you fix.
Typically the free DNS provided by domain registrars like GoDaddy and Namecheap is very slow. DNS providers typically work just like a CDN, they have multiple POPs around the globe. Large DNS providers out there like Amazon, Cloudflare, Dyn, and DNS Made Easy, all have massive infrastructure’s specifically designed for DNS with low-latency environments.
We ran a few tests to compare the speeds of some popular DNS providers. We used KeyCDN’s performance tool as well as SolveDNS speed test, and took the average. Speeds were measured from multiple locations across the globe. As you can see, other than Cloudflare, the free DNS providers are definitely slower. That’s why if you are serious about your business and website we highly recommend going with a premium DNS provider.
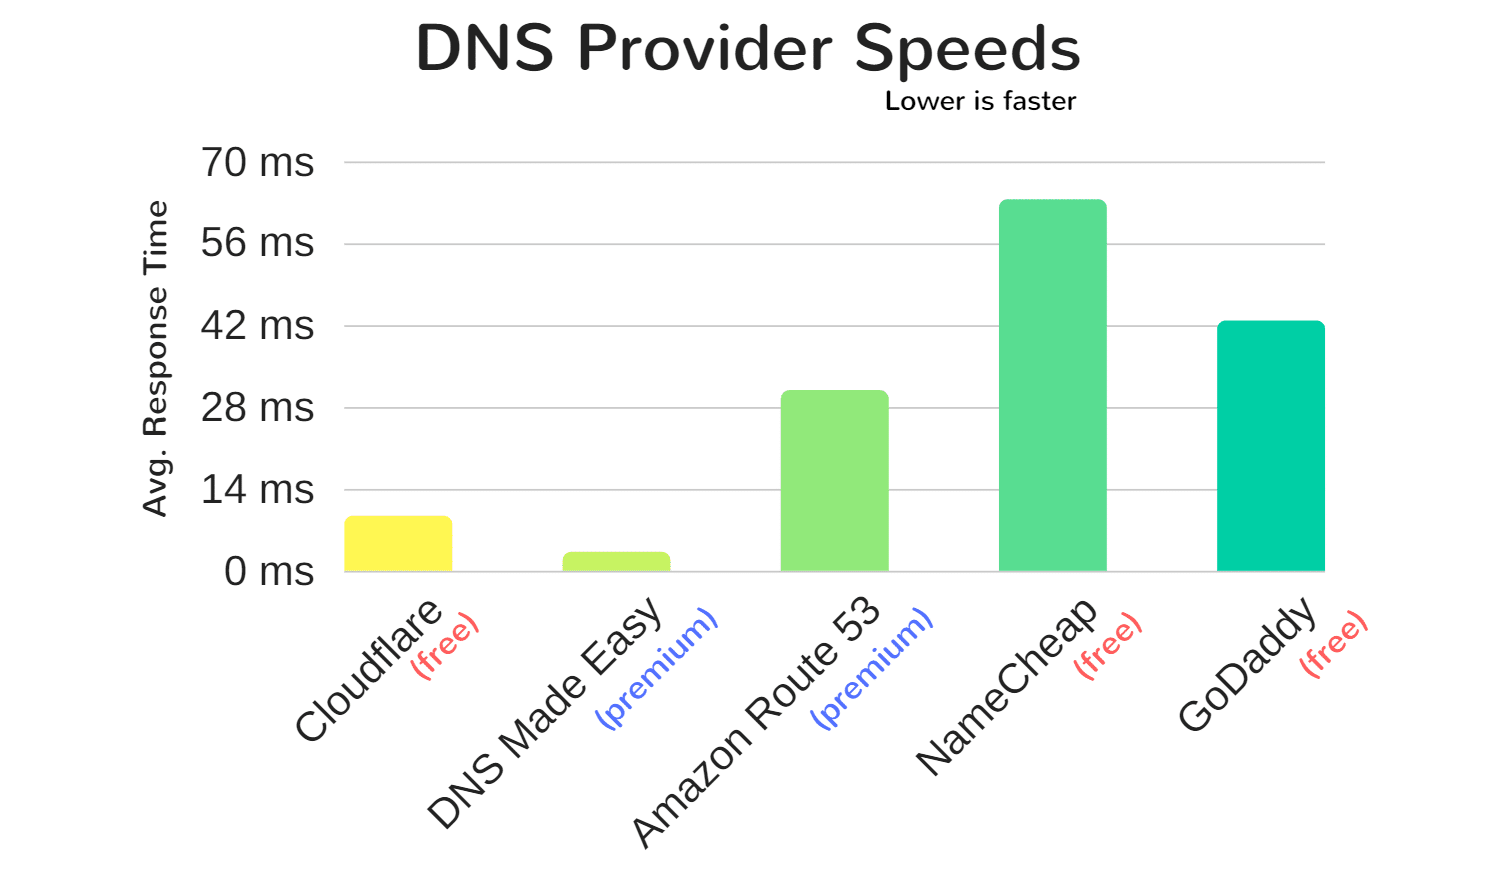
Some of the providers above are also faster than others in certain regions, so it is important to determine where you need fast DNS lookup times, regionally or globally. DNSPerf is another newer DNS speed comparison tool you could use when choosing a provider. Did you know that you can also use Cloudflare’s DNS without their CDN functionality?
Tip 2 – Change TTL Values to Take Advantage of DNS Cache
Thankfully, like we mentioned above, due to DNS Cache you don’t have to worry about lookups happening on every single page load. It is really about the first time requests. DNS cache works similarly to how you cache your WordPress site. DNS is served from cache until it expires (here’s how to flush your DNS cache). The length of DNS cache is determined by what they call a TTL (Time to Live) value. The higher the TTL, the less likely the browser will need to perform another DNS lookup.
TTL values can be changed with your domain registrar or 3rd-party DNS provider to improve your DNS cache times. It is important to note that ISPs also cache DNS. Below are a few common TTL values.
- 300 seconds = 5 minutes
- 1800 seconds = 30 minutes
- 3600 seconds = 1 hour
- 43200 seconds = 12 hours
- 86400 seconds = 24 hours
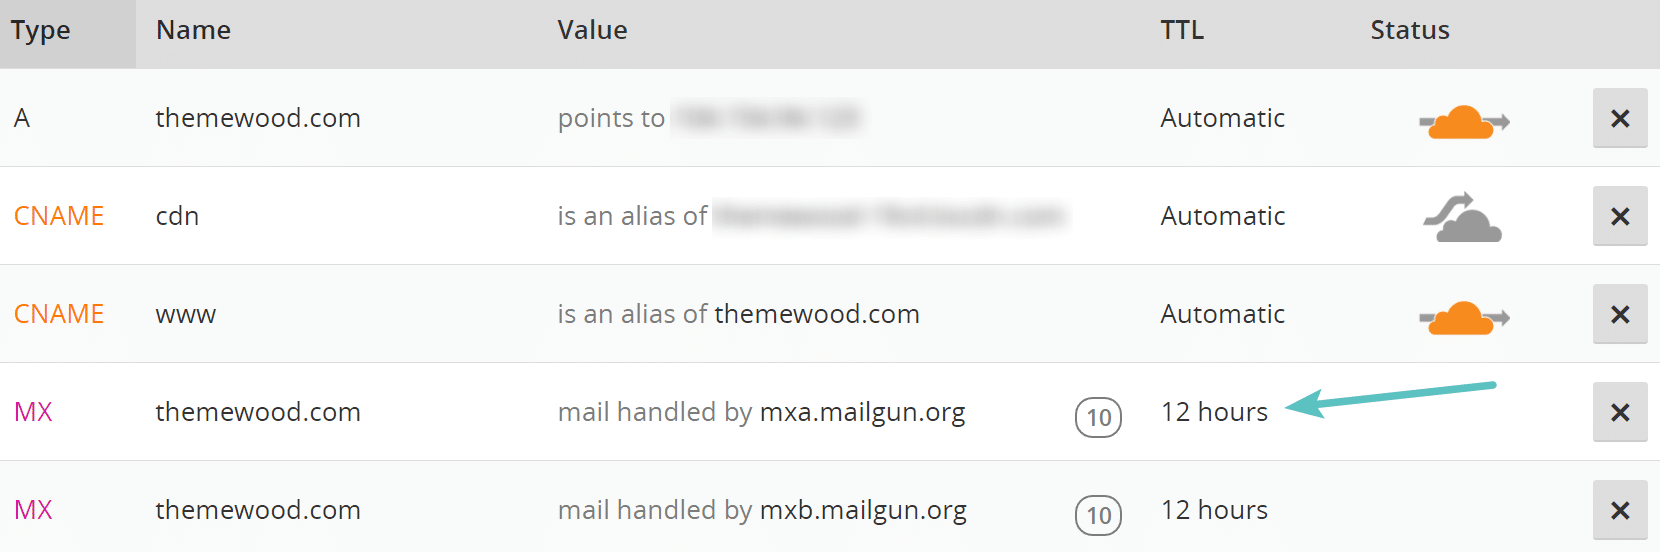
30 minutes to an hour are typically the most commonly used TTL values. However, some also set their TTL very low to allow for quick updates. Cloudflare is one example that defaults to 5 minutes if you use their automatic TTL. It can also be beneficial to look at your different types of DNS records and set them accordingly based on how often they change. Here is an example:
- A and AAAA records: Change more frequently, anywhere from 5 minutes to an hour is usually OK
- CNAME records: Almost never change, a higher TTL like 24 hours is usually OK
- NS records: Almost never change, a higher TTL like 24 hours is usually OK
- MX records: Change less often, a high TTL like 12 hours is usually OK
- TXT records: Change less often, a high TTL like 12 hours is usually OK
There is really no right or wrong answer when it comes to TTL. But it can improve your DNS lookup times by choosing a TTL that coincides with how often changes are made on your site.
Tip 3 – Reduce Number of Domains (hostnames)
The easiest way to reduce DNS lookups on your site is to simply get rid of requests that query different hostnames. Remember, with DNS lookups it is not about the number of requests, but about the number of different domains. Run your WordPress site through a tool like Pingdom and determine if each request is really necessary. Since DNS is a mapping of a hostname to an IP, you might wonder why people don’t just point to an IP instead? This is because an IP address can change frequently, whereas hostnames will not.
Tip 4 – Use Alternative Services With Faster DNS
While simply reducing the number of domains (hostnames) is easier said than done, we recommend looking first at those with higher DNS lookup times. For example, in this site we tested below, we can easily spot that the DNS lookup time to the Crazy Egg tracking script was a lot longer than others. This is most likely due to their DNS provider not being as fast as some of the others.
This is one scenario where perhaps you could look at other providers such as Hotjar, who provide the same service, but perhaps are utilizing a faster DNS provider. It can be very important when adding external services to your WordPress site that you evaluate their performance.
Tip 5 – Move and Host Resources on a CDN
One of the easiest ways to reduce DNS lookups is to move as many resources as you can to your CDN provider. If you run your site through Pingdom, you can see the total number of requests by domain. As you can see in this example, 93.8% of the requests are to the CDN URL. There is one request to the host, and one to Google Analytics. By moving as many resources to the CDN as possible, this reduces the number of DNS lookups involved, therefore decreasing the load times.
Now, of course, it won’t always be possible to move everything to your CDN. There will always be some external resources or services that require you load them from their servers. But we recommend looking through your site. Many times, we see that WordPress users have a lot of resources not properly hosted on their CDN. By doing this, you can also take better advantage of HTTP/2 and parallelization. Below are a few resources we often see that could be improved:
Font Awesome
We occasionally see plugin developers and themes include Font Awesome on WordPress sites, but sometimes the enqueue it in such a way that by default a plugin like CDN enabler won’t catch it. In this case, we recommend reaching out to the developer to ask them how you can load it from your CDN.
Another common scenario with Font Awesome is that it’s sometimes loaded from the default BootstrapCDN (MaxCDN). While there is nothing wrong with this, it adds another DNS lookup that you don’t need. It would be better in most cases to load Font Awesome from your own CDN so there isn’t another lookup.
Gravatars
If you are using WordPress native comments you might have an additional lookup to secure.gravatar.com to load the gravatars. One easy solution here could be to utilize the lazy load comments plugin. While this won’t reduce the DNS lookup, it will delay it until the user scrolls down the page. So in a sense, you are reducing the DNS lookup on first-page load. Make sure to check out our blog post on other ways to speed up comments.
Google Fonts
With Google Fonts you have one extra DNS request to lookup fonts.googleapis.com to grab the CSS file. You then have additional requests to fonts.gstatic.com to download the font files. When you host locally all the requests are from the same domain or CDN, and most likely you will not need another CSS file as it will be inside of your WordPress theme’s CSS file. There are pros and cons of doing this, but check out our in-depth article on how to host fonts locally.

Font Awesome, Gravatars, and Google Fonts are just a couple examples of ways you can reduce DNS lookups by ensuring they are loading from your CDN. Are you currently loading everything possible from your CDN? It’s always good to take a look.
Tip 6 – Take Advantage of DNS Prefetching
Another tip on speeding up DNS is to use DNS prefetching. This allows the browser to perform DNS lookups on a page in the background. You can do so by adding some lines of code to the header of your WordPress site. See some examples below.
<!-- Prefetch DNS for external assets -->
<link rel="dns-prefetch" href="//fonts.googleapis.com">
<link rel="dns-prefetch" href="//www.google-analytics.com">
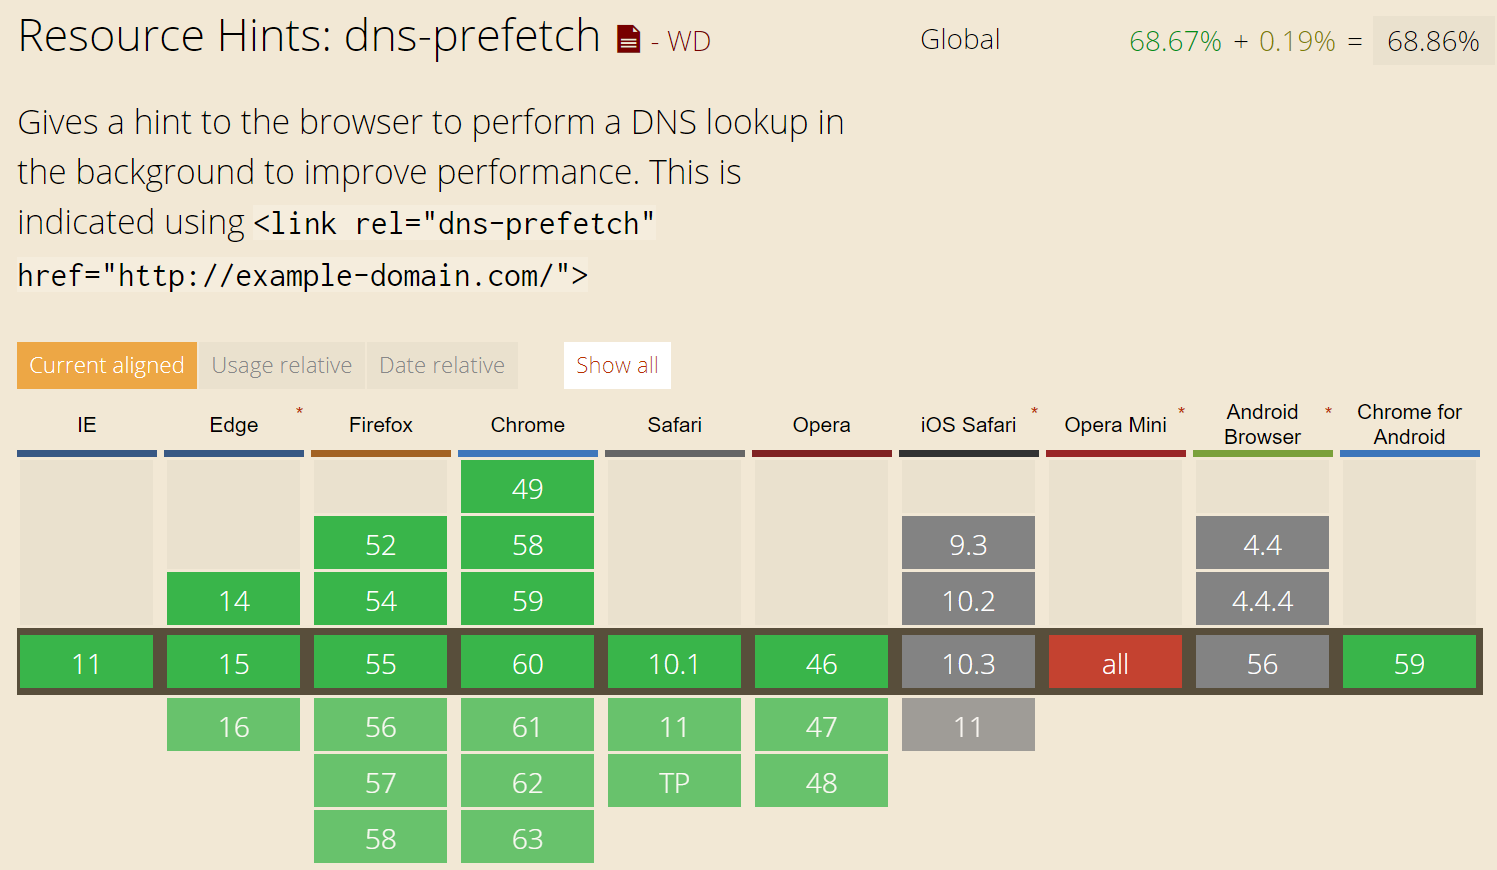
<link rel="dns-prefetch" href="//cdn.domain.com">DNS prefetch is also supported by all major browsers except for iOS Safari, Opera Mini, and Android Browser.
Or if you are running WordPress version 4.6 or newer, you might want to use resource hints. Developers can use the wp_resource_hints filter to add custom domains and URLs for dns-prefetch, preconnect, prefetch or prerender.
Tip 7 – Defer Loading of JavaScript
If you defer the loading of JavaScript, this can prevent things from loading until after the document has fully loaded. This won’t reduce the number of DNS lookups required, but it will prevent them from being called immediately, which can speed up the user experience. Varvy has a great explanation of on how to defer JavaScript. An example he uses on his site is his Google Analytics script, since there is no reason for it to load above the fold.
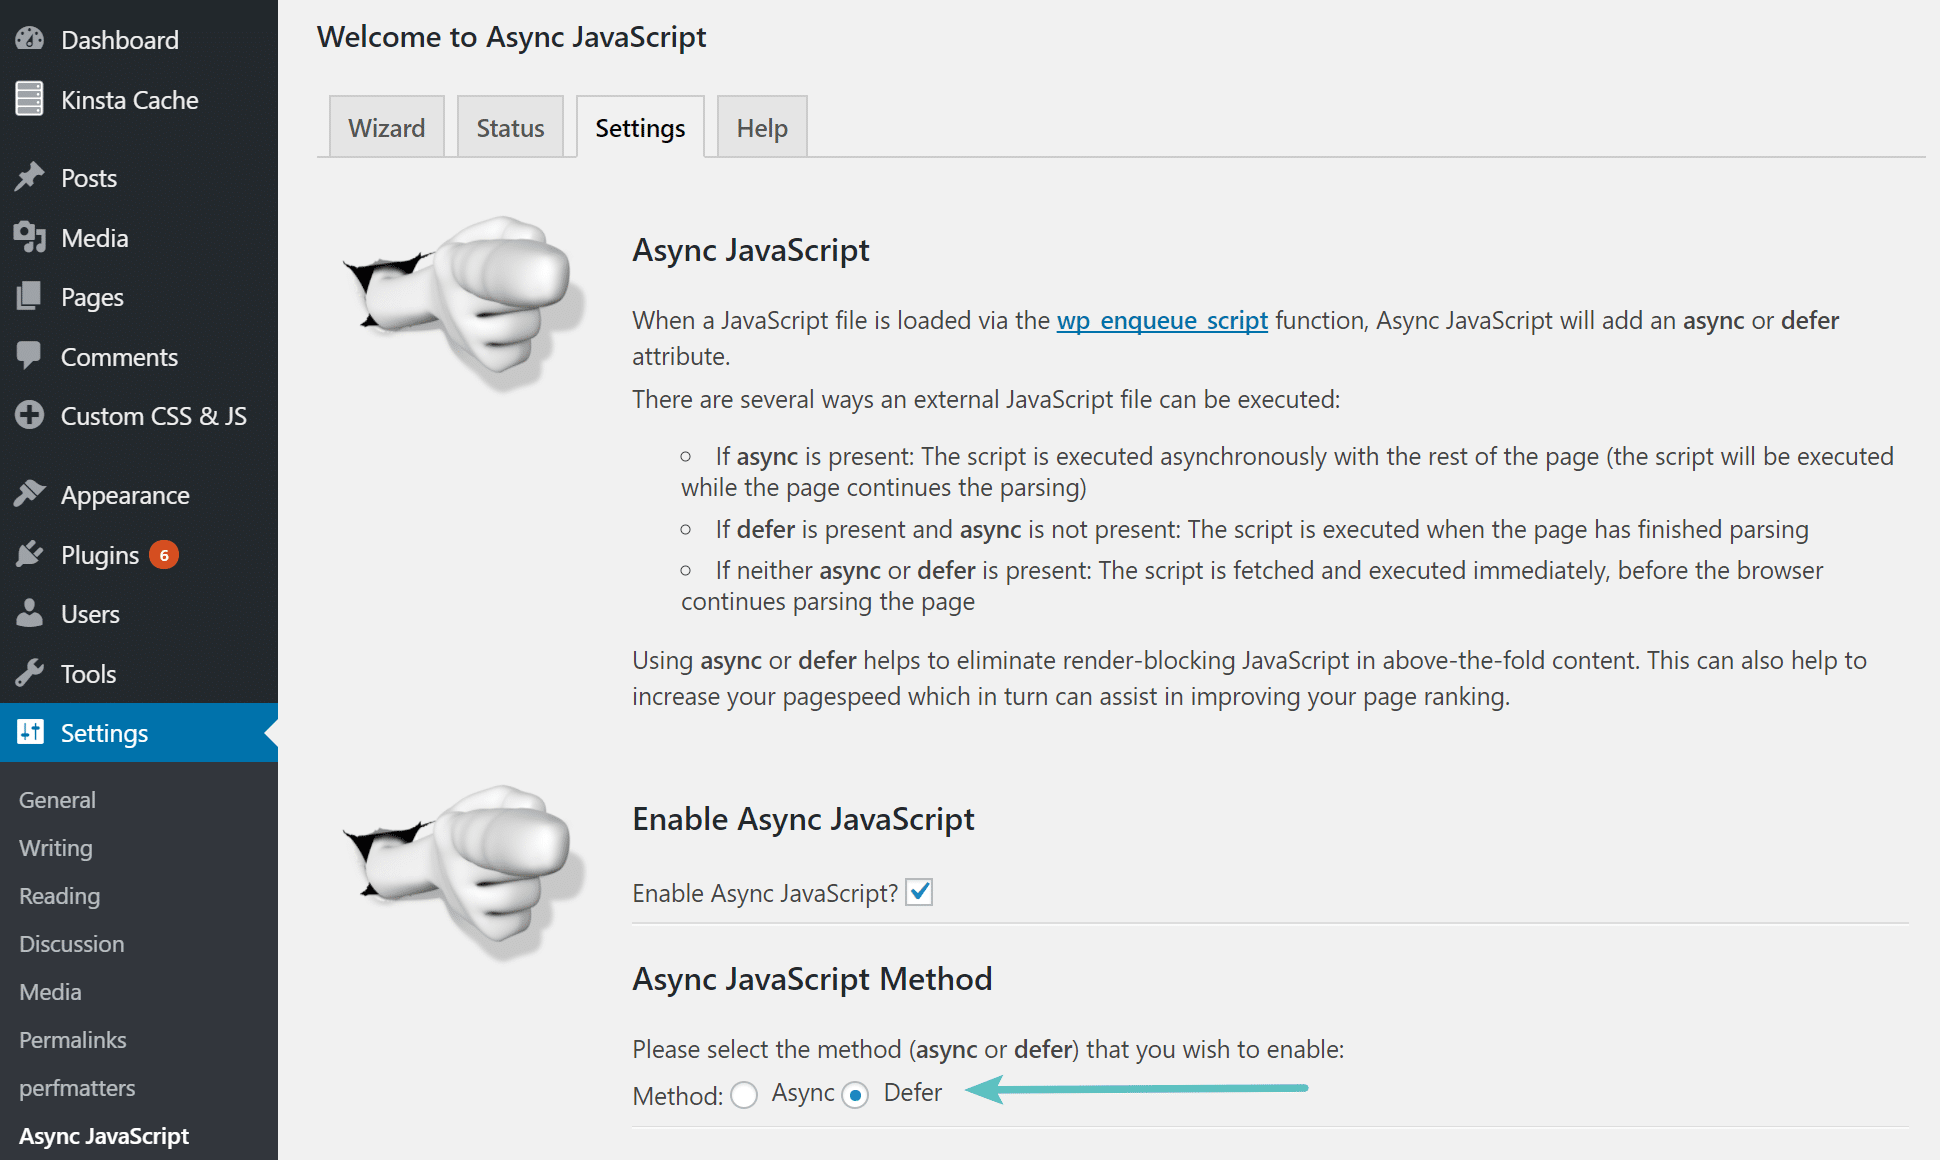
In WordPress, you can use a free plugin like Async JavaScript to defer the loading of JavaScript. However, it is important to know that you will most likely have to go through and list any scripts which you would like excluded from having defer applied. Why? Because some JavaScript will be required to render above the fold. Async JavaScript is also fully compatible with the Autoptimize plugin.
Make sure to also check out our in-depth post on how to eliminate render-blocking JavaScript and CSS.
Tip 8 – Take Advantage of ANAME Records and CNAME Flattening
There are additional records from providers like DNS Made Easy and Cloudflare which can help reduce the number of requests on the backend.
ANAME Records With DNS Made Easy
ANAME records give you the functionality of a CNAME record, but at the root level. So for example, let’s say you have a CNAME configured for www.domain.com. The www has to first resolve to the hostname, and then resolve to the IP address. This requires two requests. With an ANAME record, you can skip one of these requests! If setup correctly these can also be used in conjunction with a CDN.
CNAME
ANSWER SECTION:
www.domain.com. 1799 IN CNAME domain.com.
domain.com. 1799 IN A 192.168.1.2
ANAME
ANSWER SECTION:
www.domain.com. 1799 IN A 192.168.1.2
However, this is not always true. If the hostname is in the same DNS zone, the A record might be retrieved in the same request.
CNAME Flattening With Cloudflare
Similarly to ANAME records, Cloudflare provides automatic CNAME Flattening at the zone apex (or root) for their customers.
Summary
DNS is often one of those performance factors that is overlooked, but it can easily contribute to a large portion of your overall load time if you aren’t careful. It’s important to understand how DNS works, that there are faster and slower providers out there, and how you can reduce lookups to speed up your site.
Do you have any additional tips on speeding up DNS or reducing lookups? If so, we would love to hear about them below in the comments!
Get all your applications, databases and WordPress sites online and under one roof. Our feature-packed, high-performance cloud platform includes:
- Easy setup and management in the MyKinsta dashboard
- 24/7 expert support
- The best Google Cloud Platform hardware and network, powered by Kubernetes for maximum scalability
- An enterprise-level Cloudflare integration for speed and security
- Global audience reach with up to 35 data centers and 275 PoPs worldwide
Test it yourself with $20 off your first month of Application Hosting or Database Hosting. Explore our plans or talk to sales to find your best fit.
You’ll most likely hit the back button faster than it takes for a website to load, wouldn’t you agree? Waiting for a site to finish loading is not something we do today. I myself don’t.
As a consumer myself, I don’t enjoy waiting. And as a site owner, I know the pains of high bounce rate and my traffic diminishing as my site takes longer to load. I spent a great deal trying to perfect my site performance so that people would stay on my site and read my content.
So let’s tackle a specific problem regarding web performance.
The problem is how too many DNS lookups can slow down the loading of your pages.
DNS lookup load times are an issue on websites of all sizes. So this concerns everyone who owns a site!
I own several sites of my own and today, I want to share my process for optimizing my site, specifically for DNS lookup. Without being too technical.
This article explains the problem, how to reduce DNS lookups for a WordPress site, and some practical tips to optimize your site’s DNS.
You can follow our guide to getting your WordPress site optimized.
Hint: We used our WP Rocket plugin! And a few bonus tips and tricks at the end.
But first…
What Is a DNS Lookup?
Domain Name Servers (DNSs) are the foundation of the world wide web. They work like phone books for websites, linking them to their IP addresses. In turn, a DNS lookup is the process of finding the correct IP address for a given website URL.
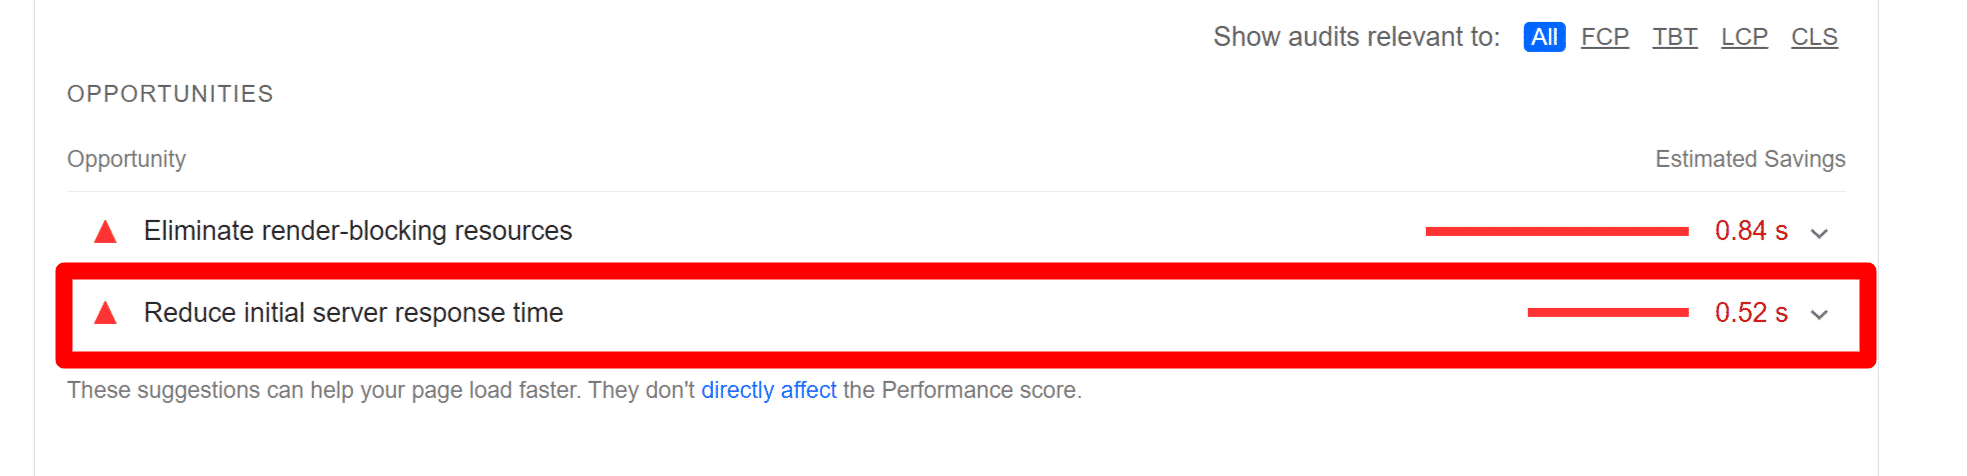
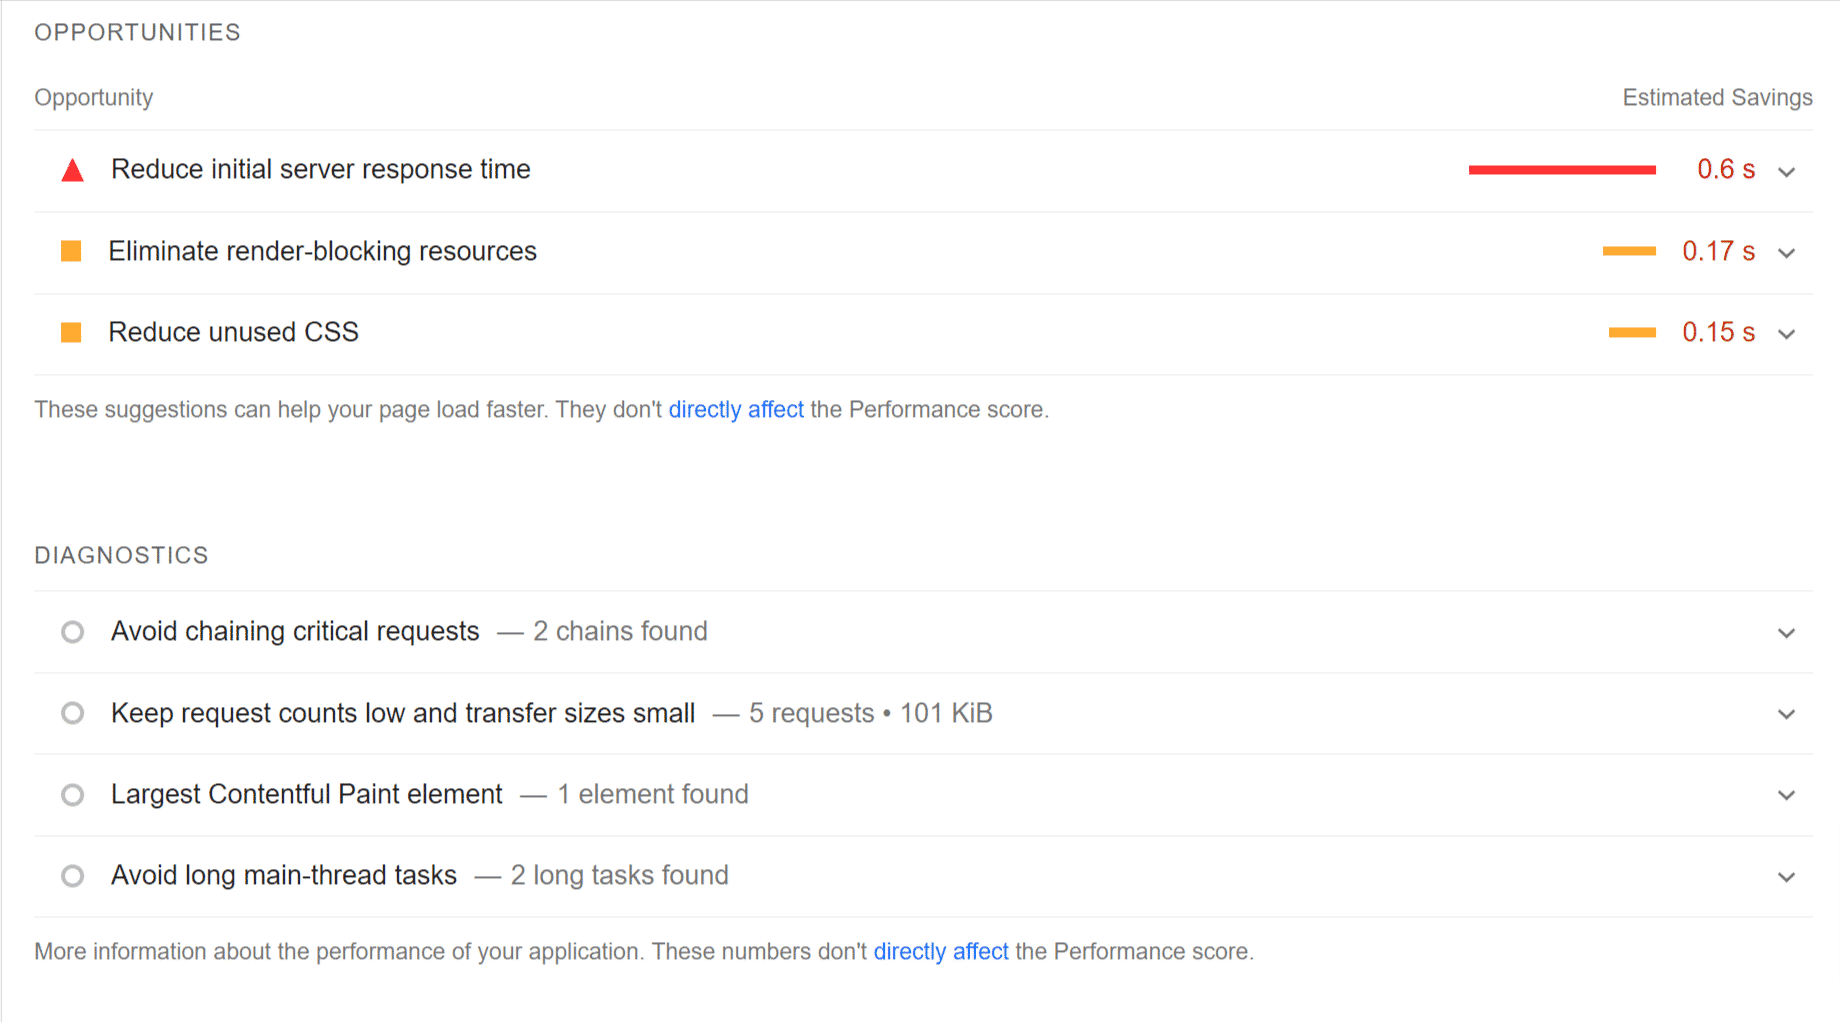
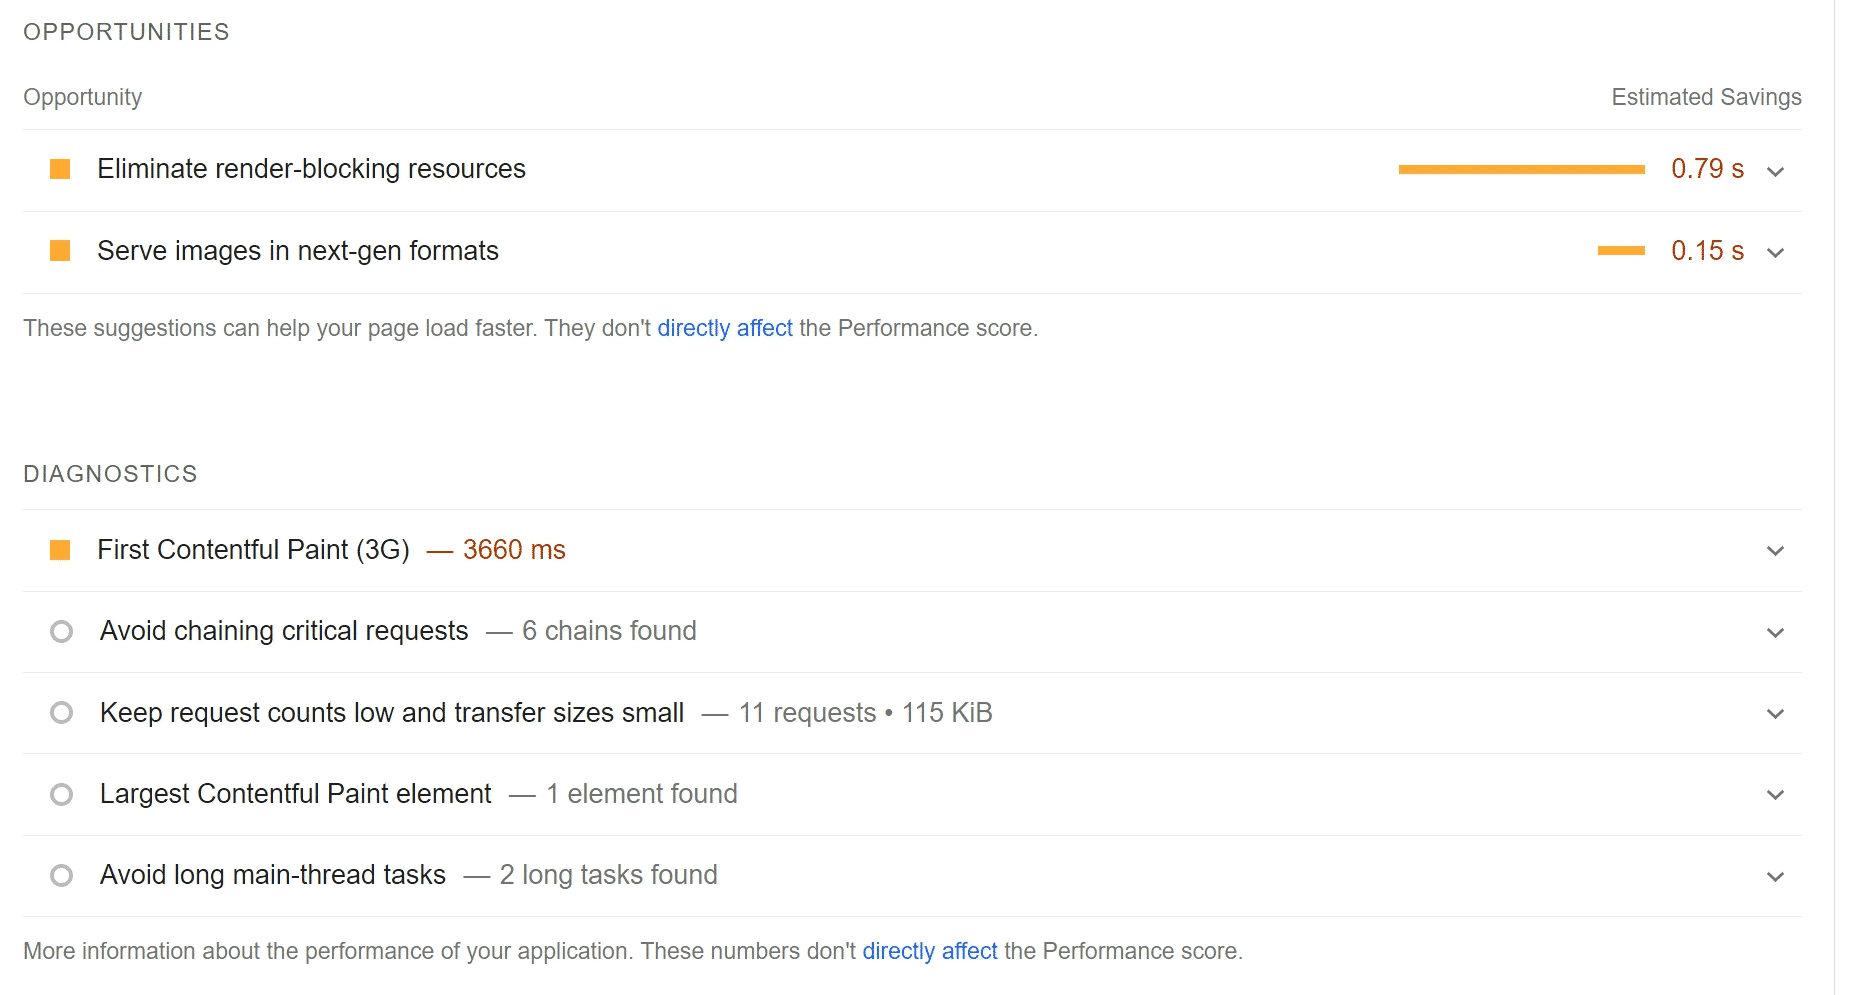
If you are using PageSpeed Insight, DNS lookup is associated with “Reduce initial server response time”:
Time spent waiting for the initial response, also known as the Time To First Byte (TTFB) starts with the HTTP request.
The time it takes for a server to receive the request depends on the time it takes to perform a DNS lookup, the speed of the user’s network, the distance to the server, and any interruptions in the connection.
Since PageSpeed Insight does not help us identify what is causing DNS Lookup, we will need to use other tools, to help us isolate and fix this problem. And for us to know how to fix it, let’s see how DNS lookup works.
How Does DNS Lookup Work?
When you visit a website, your browser discovers all resources that necessitate a DNS query. After that, it waits for the lookup to complete before downloading any resources.
The greater the number of lookups a website requires, the longer it takes the browser to produce its pages.
Here’s a simple explanation.
DNS Lookup Example
If we take a phone book as “optimization” of DNS lookup, you can look at car repairs and find a name and phone number, and call them.
Once you call them, they will answer “ACME car repair” and you found what you were looking for. The same goes with a DNS lookup.
Another example is calling your cell phone provider. Maybe you want to talk to customer service about billing discrepancies. You call, and an automated assistant will tell you to press 1 English 2 for Spanish. For your account information, press 2, and the thing goes on and on.
You just want to talk to customer service, and the automated assistant is trying to figure out what you need and guide you to the right department. While we are most likely to stay on for an hour to talk to customer service about our cellphone bill, your consumer won’t wait for your site to load if there is a long DNS lookup!
If you want the technical answer:
The computer initially checks to see if the website entered is already in its cache or in its hosts’ file. If this is not the case, it approaches the server in charge. This was allocated to it via DHCP or is permanently configured.
When a client or DNS server asks a DNS server to resolve a domain name, the query might be recursive or non-recursive.
Clients, such as PCs, often perform recursive queries, which instruct the DNS server to return solely with a response and not a referral.
A referral is simply a response. If it does not know the answer, it will point to another server.
DNS servers perform non-recursive or iterative queries, which effectively directs the other DNS server to deliver an answer or the address of another DNS server that may have the answer.
If the server can answer the request, it sends the response to the requester. If not, it contacts another server that is in charge of the domain. The browser may connect with the webserver through the IP network using the IP address provided.
I hope that helps you understand the multiple routes DNS lookup can take for it to work and why fast DNS response time is essential.
What Is a Good DNS Response Time?
A good DNS lookup response time is roughly 40 ms, so aim for that or better.
It’s worth noting that every website is unique, so this isn’t a one-size-fits-all timetable.
Higher DNS lookup times, for example, maybe acceptable for a website with a completely local and low traffic website. However, if you have a global audience and want your site to receive a lot of traffic, your DNS response time should be less than 40 ms.
How to Check for DNS Lookup Response Time
The critical part is identifying what is causing the problem. Let’s look at three tools (Pingdom, GTmetrix, and WebPageTest, each with different features and benefits) you can use to identify your DNS lookup response time and how each tool provides that data.
- Pingdom
- GTmetrix
- WebPageTest
Note: There could be several reasons for long response time, including server load, network variability, race conditions in your JavaScript that cause the load order to change, etc. If your site is loading inconsistently, you should try running a profile in the performance tab of developer tools a few times with network throttling enabled to see what happens.
Pingdom DNS Lookups
To check your DNS lookup with Pingdom, go to their tools page and enter your website URL:
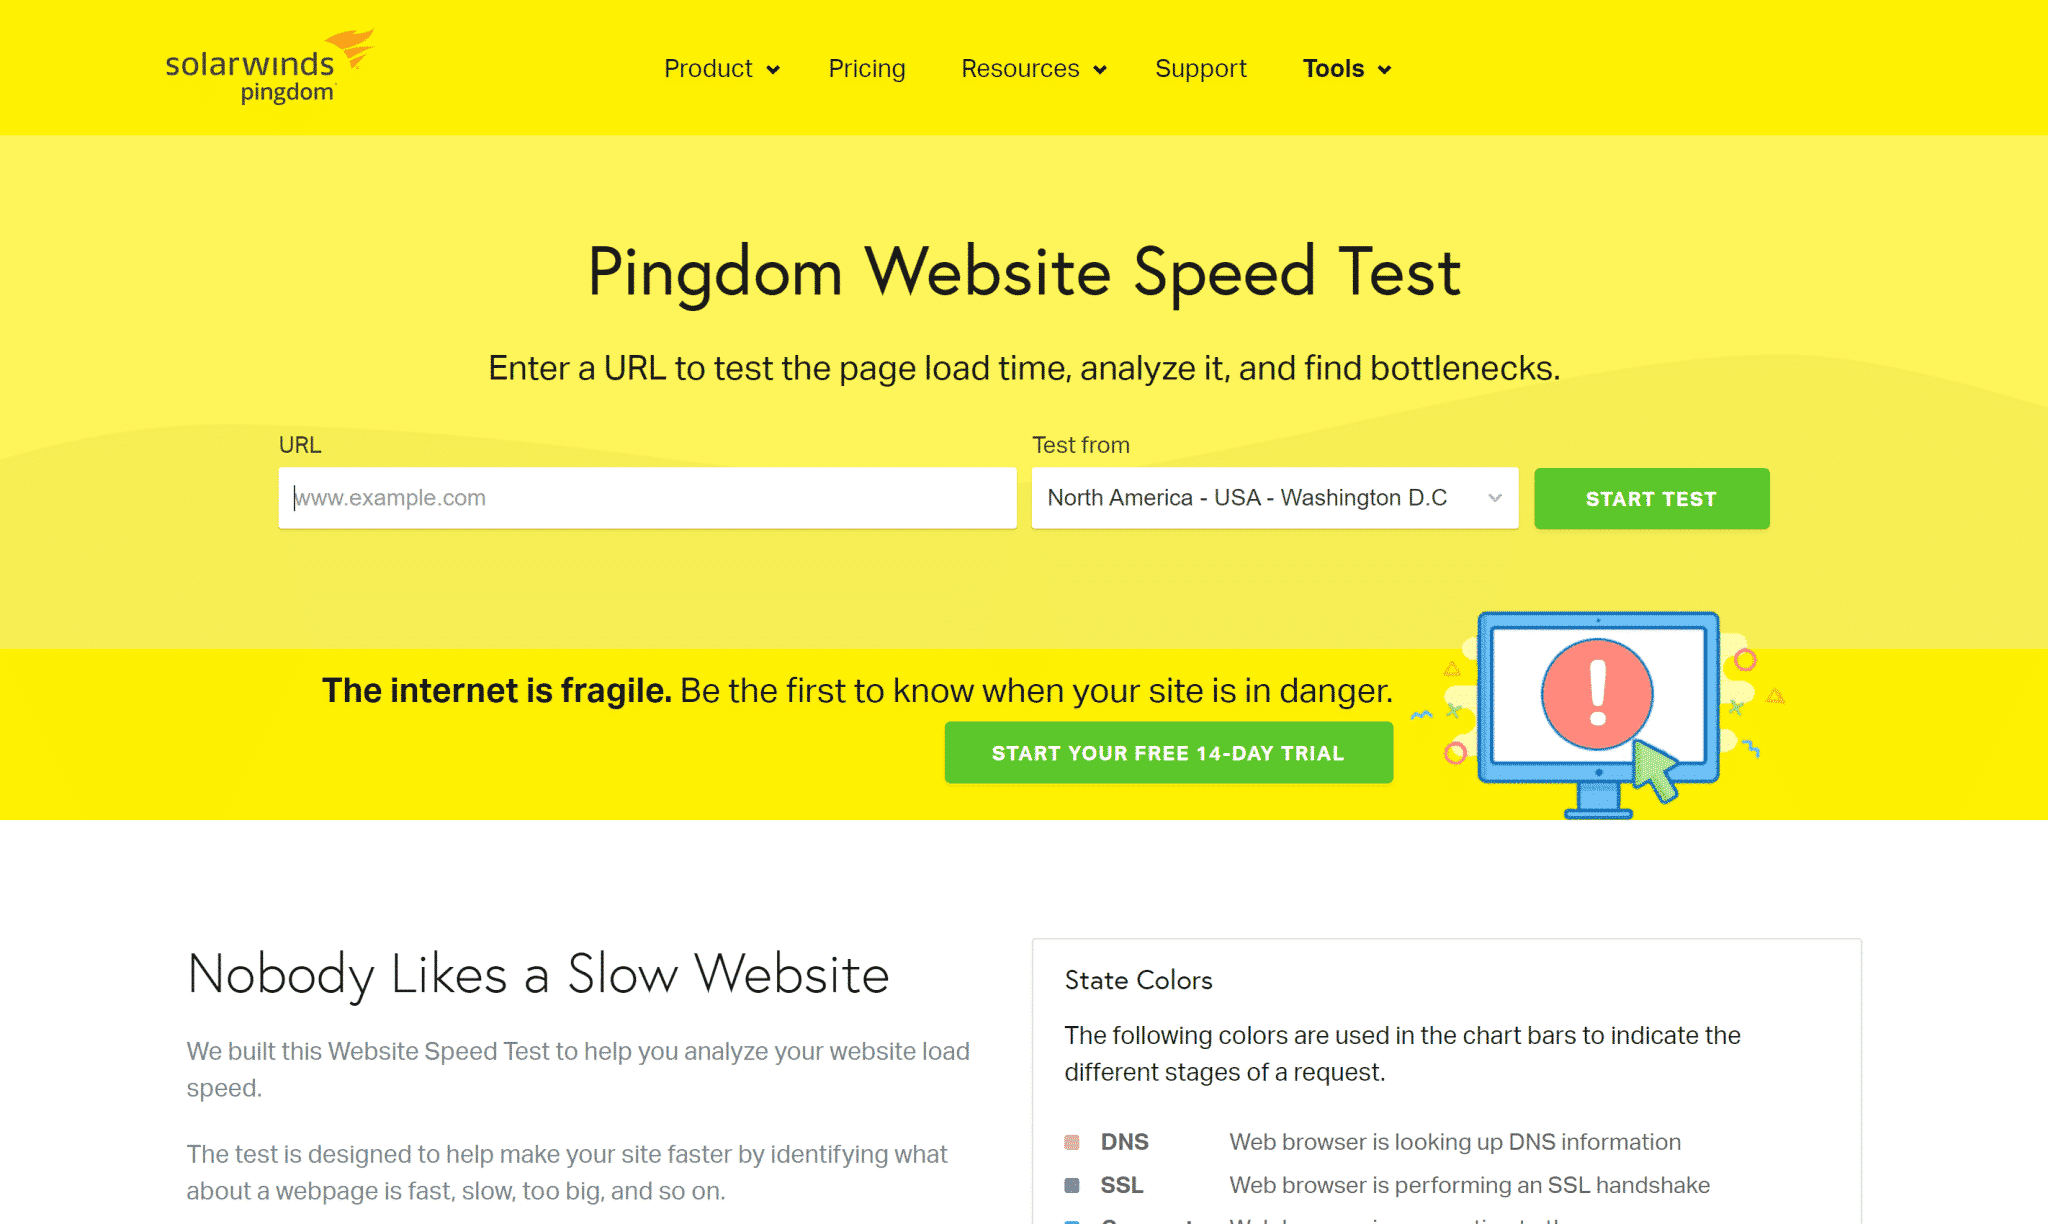
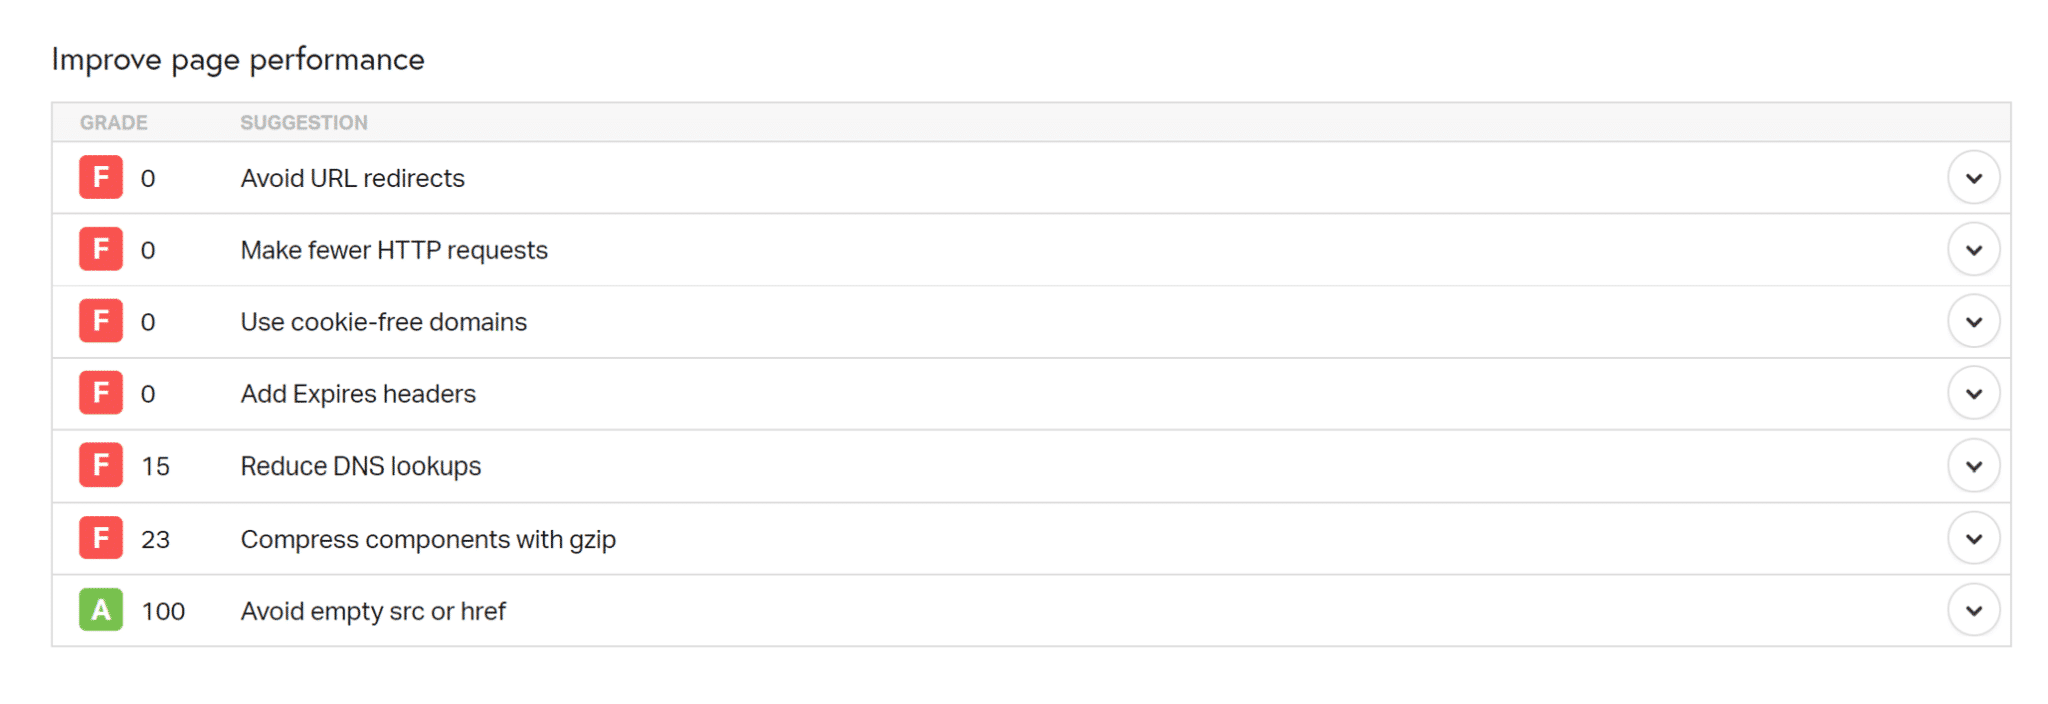
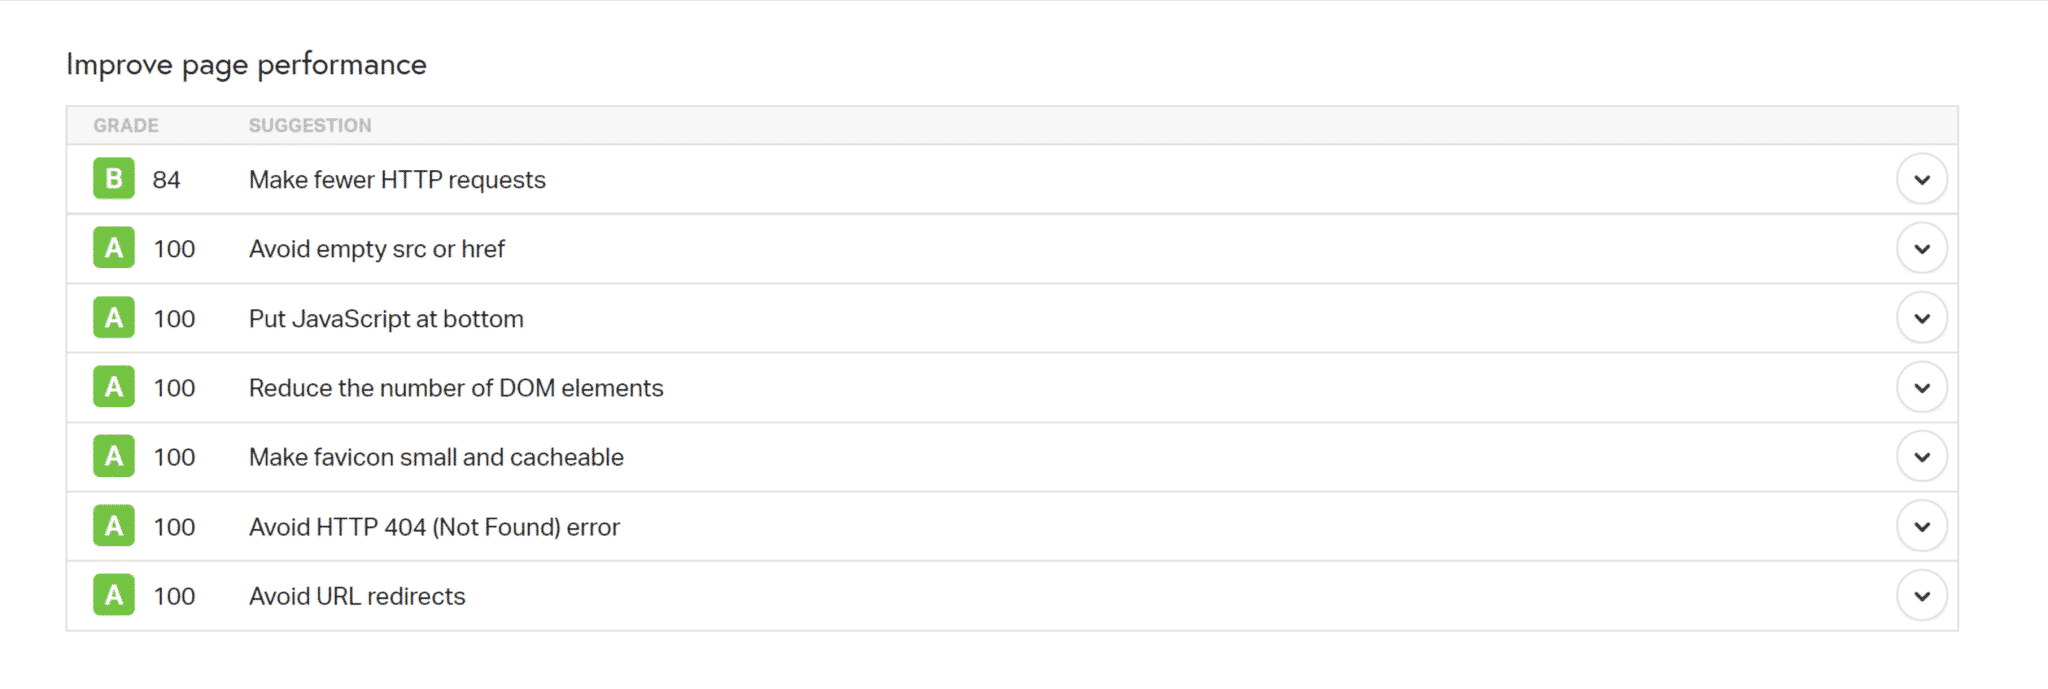
At a glance, you can see if you are having this issue under the “Improve page performance” section (see below):
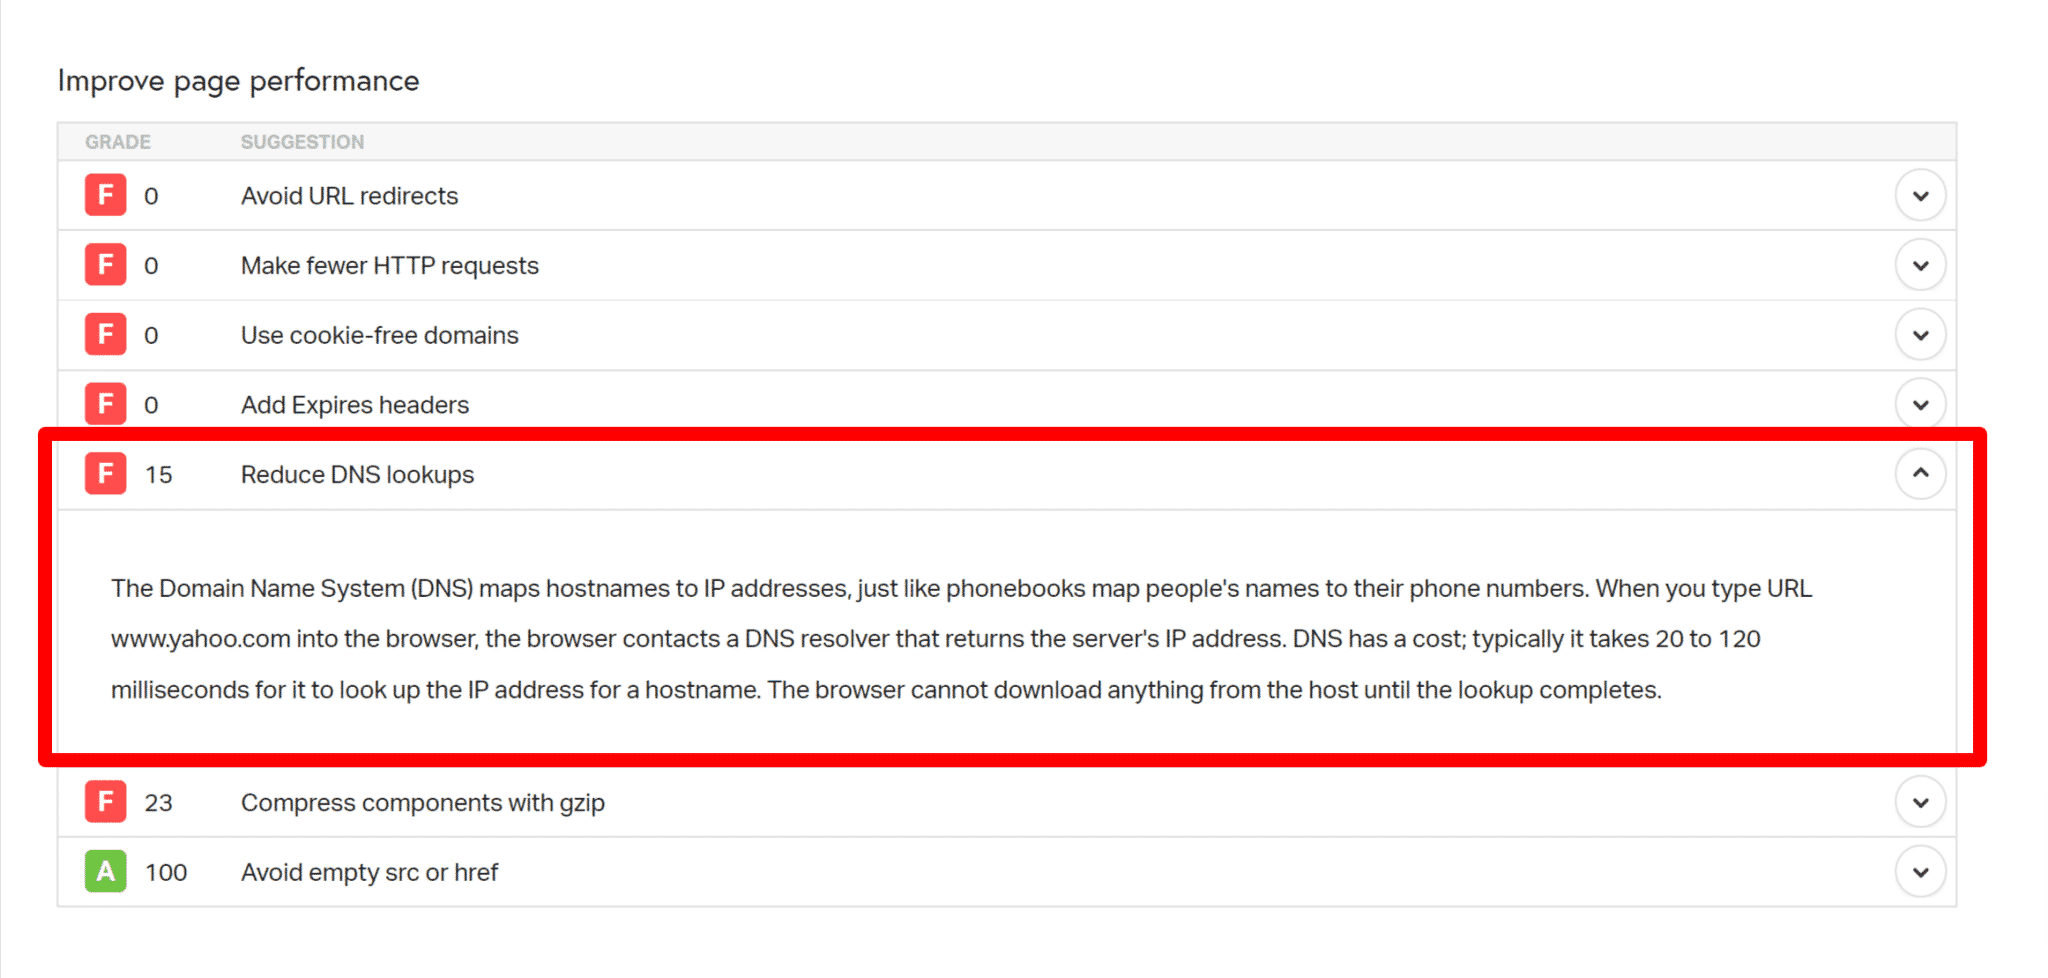
You can see “Reduce DNS lookup” in red and a score of F. This site does not have any caching, no performance plugins, and a ton that causes issues.
Scroll down to get a better-detailed view of what is causing the DNS lookup issue. The DNS is displayed by the pink bar and is measured in milliseconds. Hover over each file request to see which of the files is causing a DNS lookup and how long it takes to load.

When you run your website through Pingdom many times, it caches the DNS because it already knows the IP address and does not need to conduct the query again.
This is one of the reasons why your website seems quicker after many Pingdom tests. The second test’s DNS lookup time on the CDN URL is 0 ms, as seen in the screenshot below. This is an area where many people do it wrong.
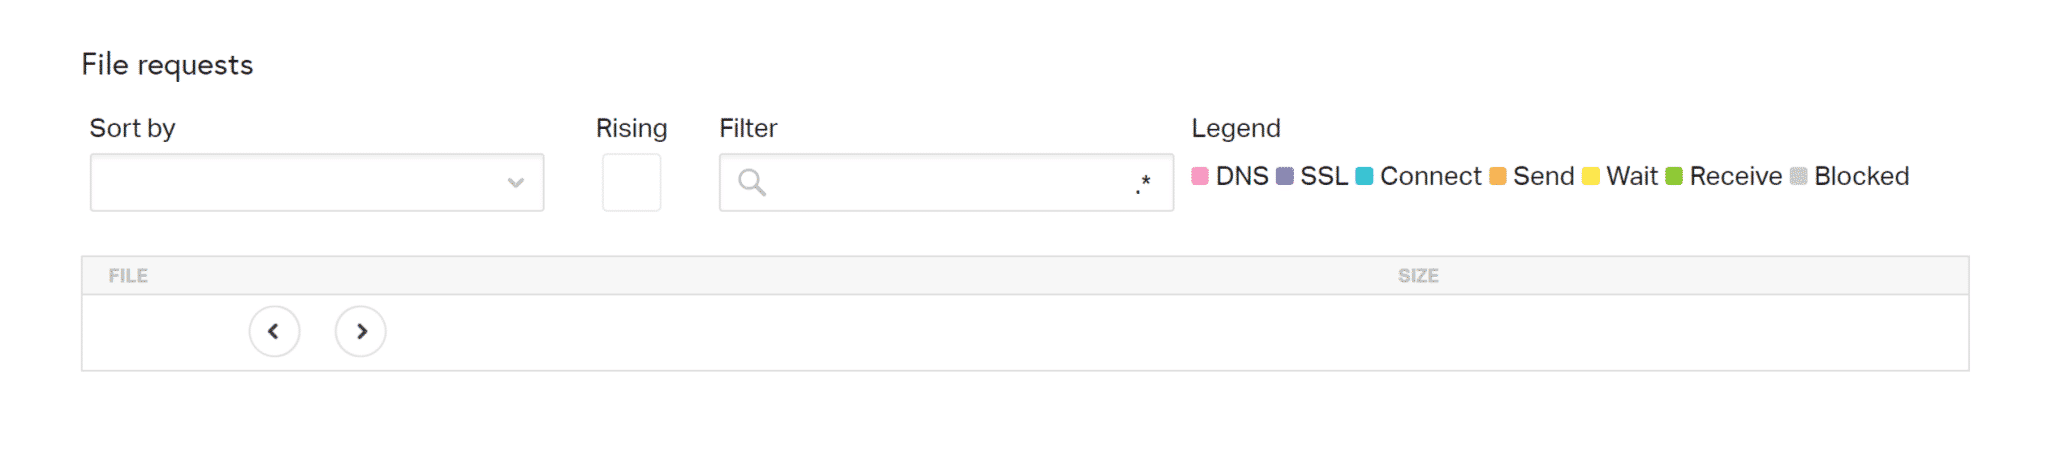
You can see that the file request section does not show any requests after running multiple tests with Pingdom. No matter what I tried, I could not get this to show up again!
I would use Pingdom tools to quickly identify if you have Reduce DNS lookup problems and a high level and then go through either GTmetrix or WebPageTest tools to dig deeper.
It’s much easier to see what is wrong with your website performance by looking at the Pingdom result compared with the others:
Note: If you are using a CDN or a WordPress cache plugin, then tools.pingdom.com will show the caching result. You can try to deactivate CDN or WordPress plugin or purge cache and check again on Pingdom.
GTmetrix DNS Lookups
To check what is causing more prolonged DNS lookup on GTmetrix, enter your URL:
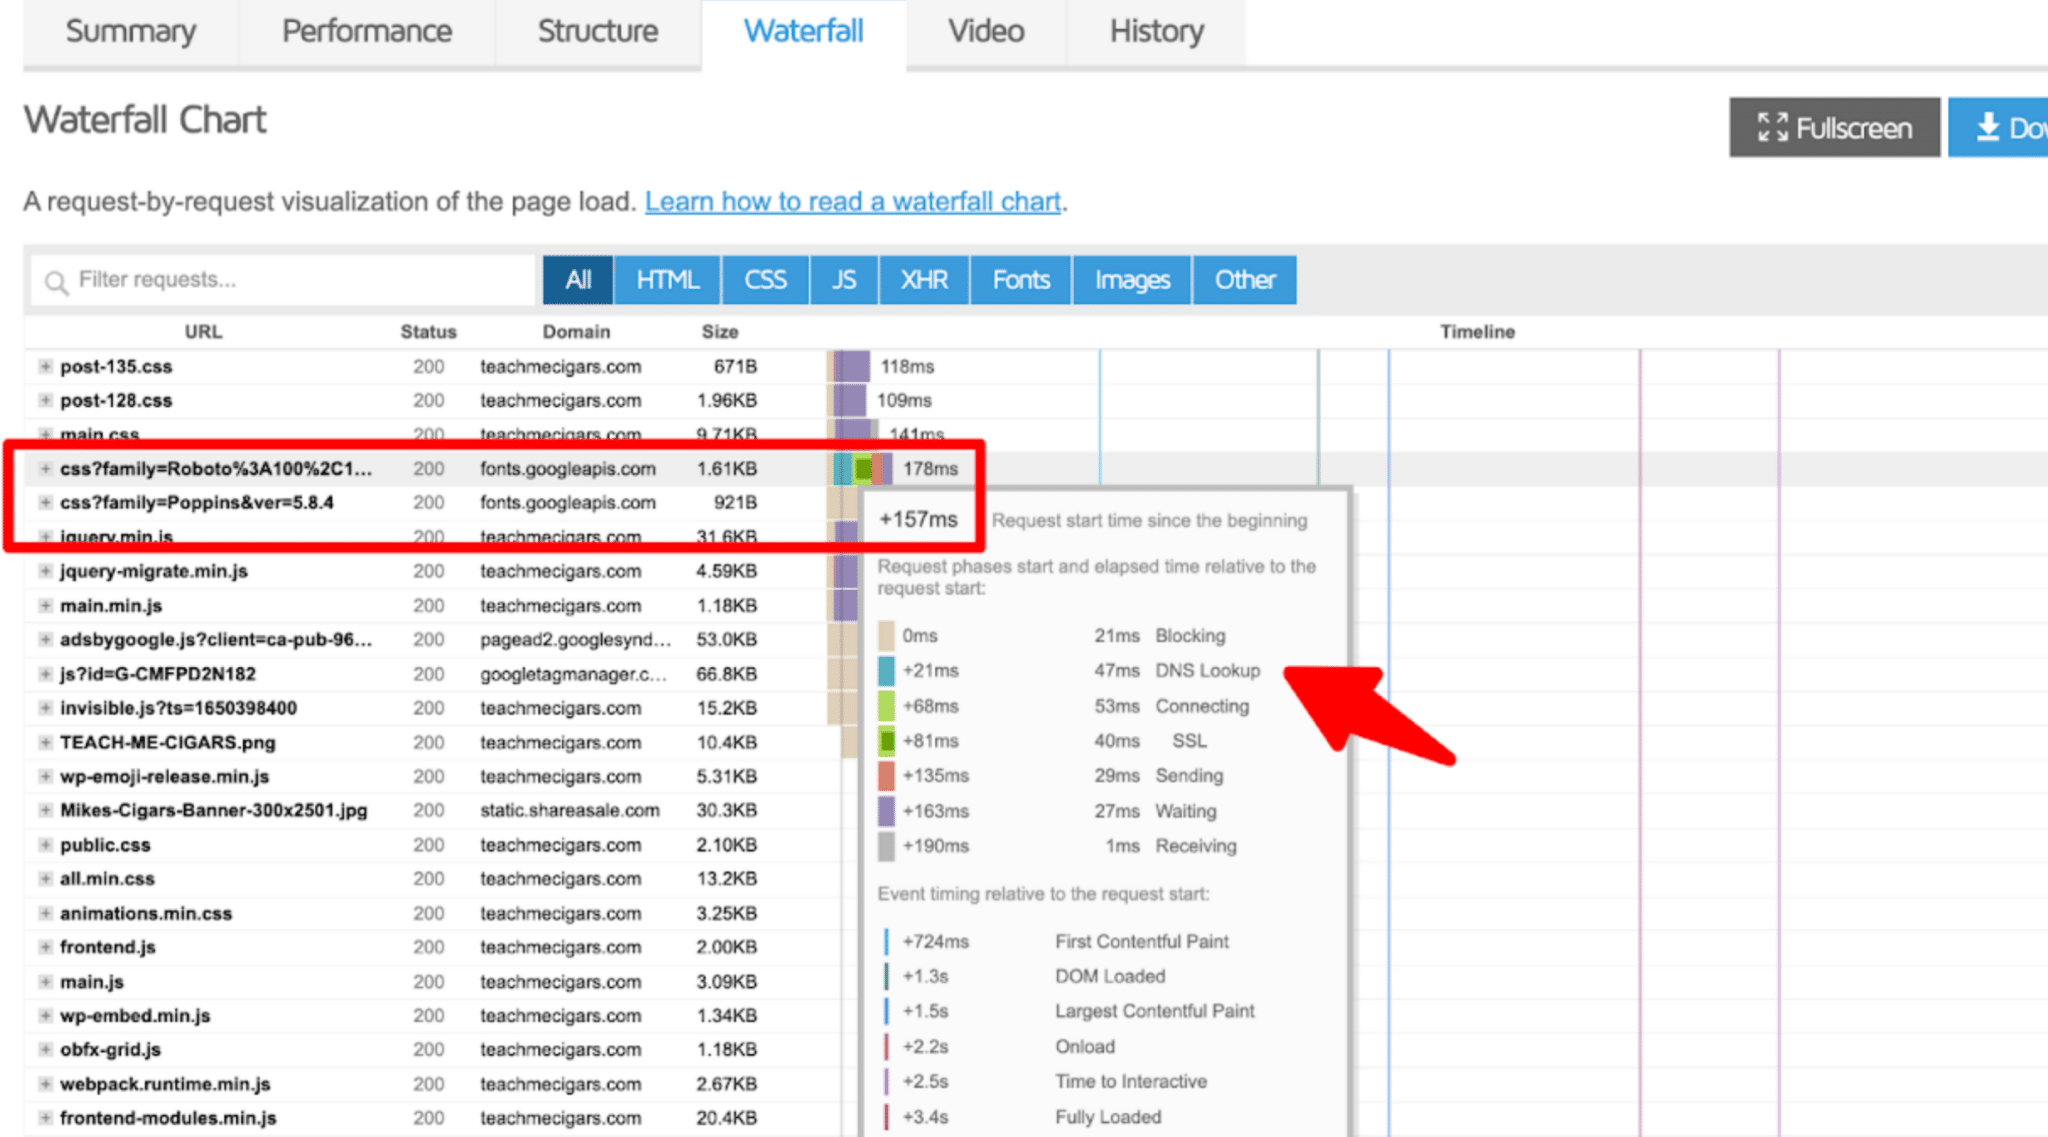
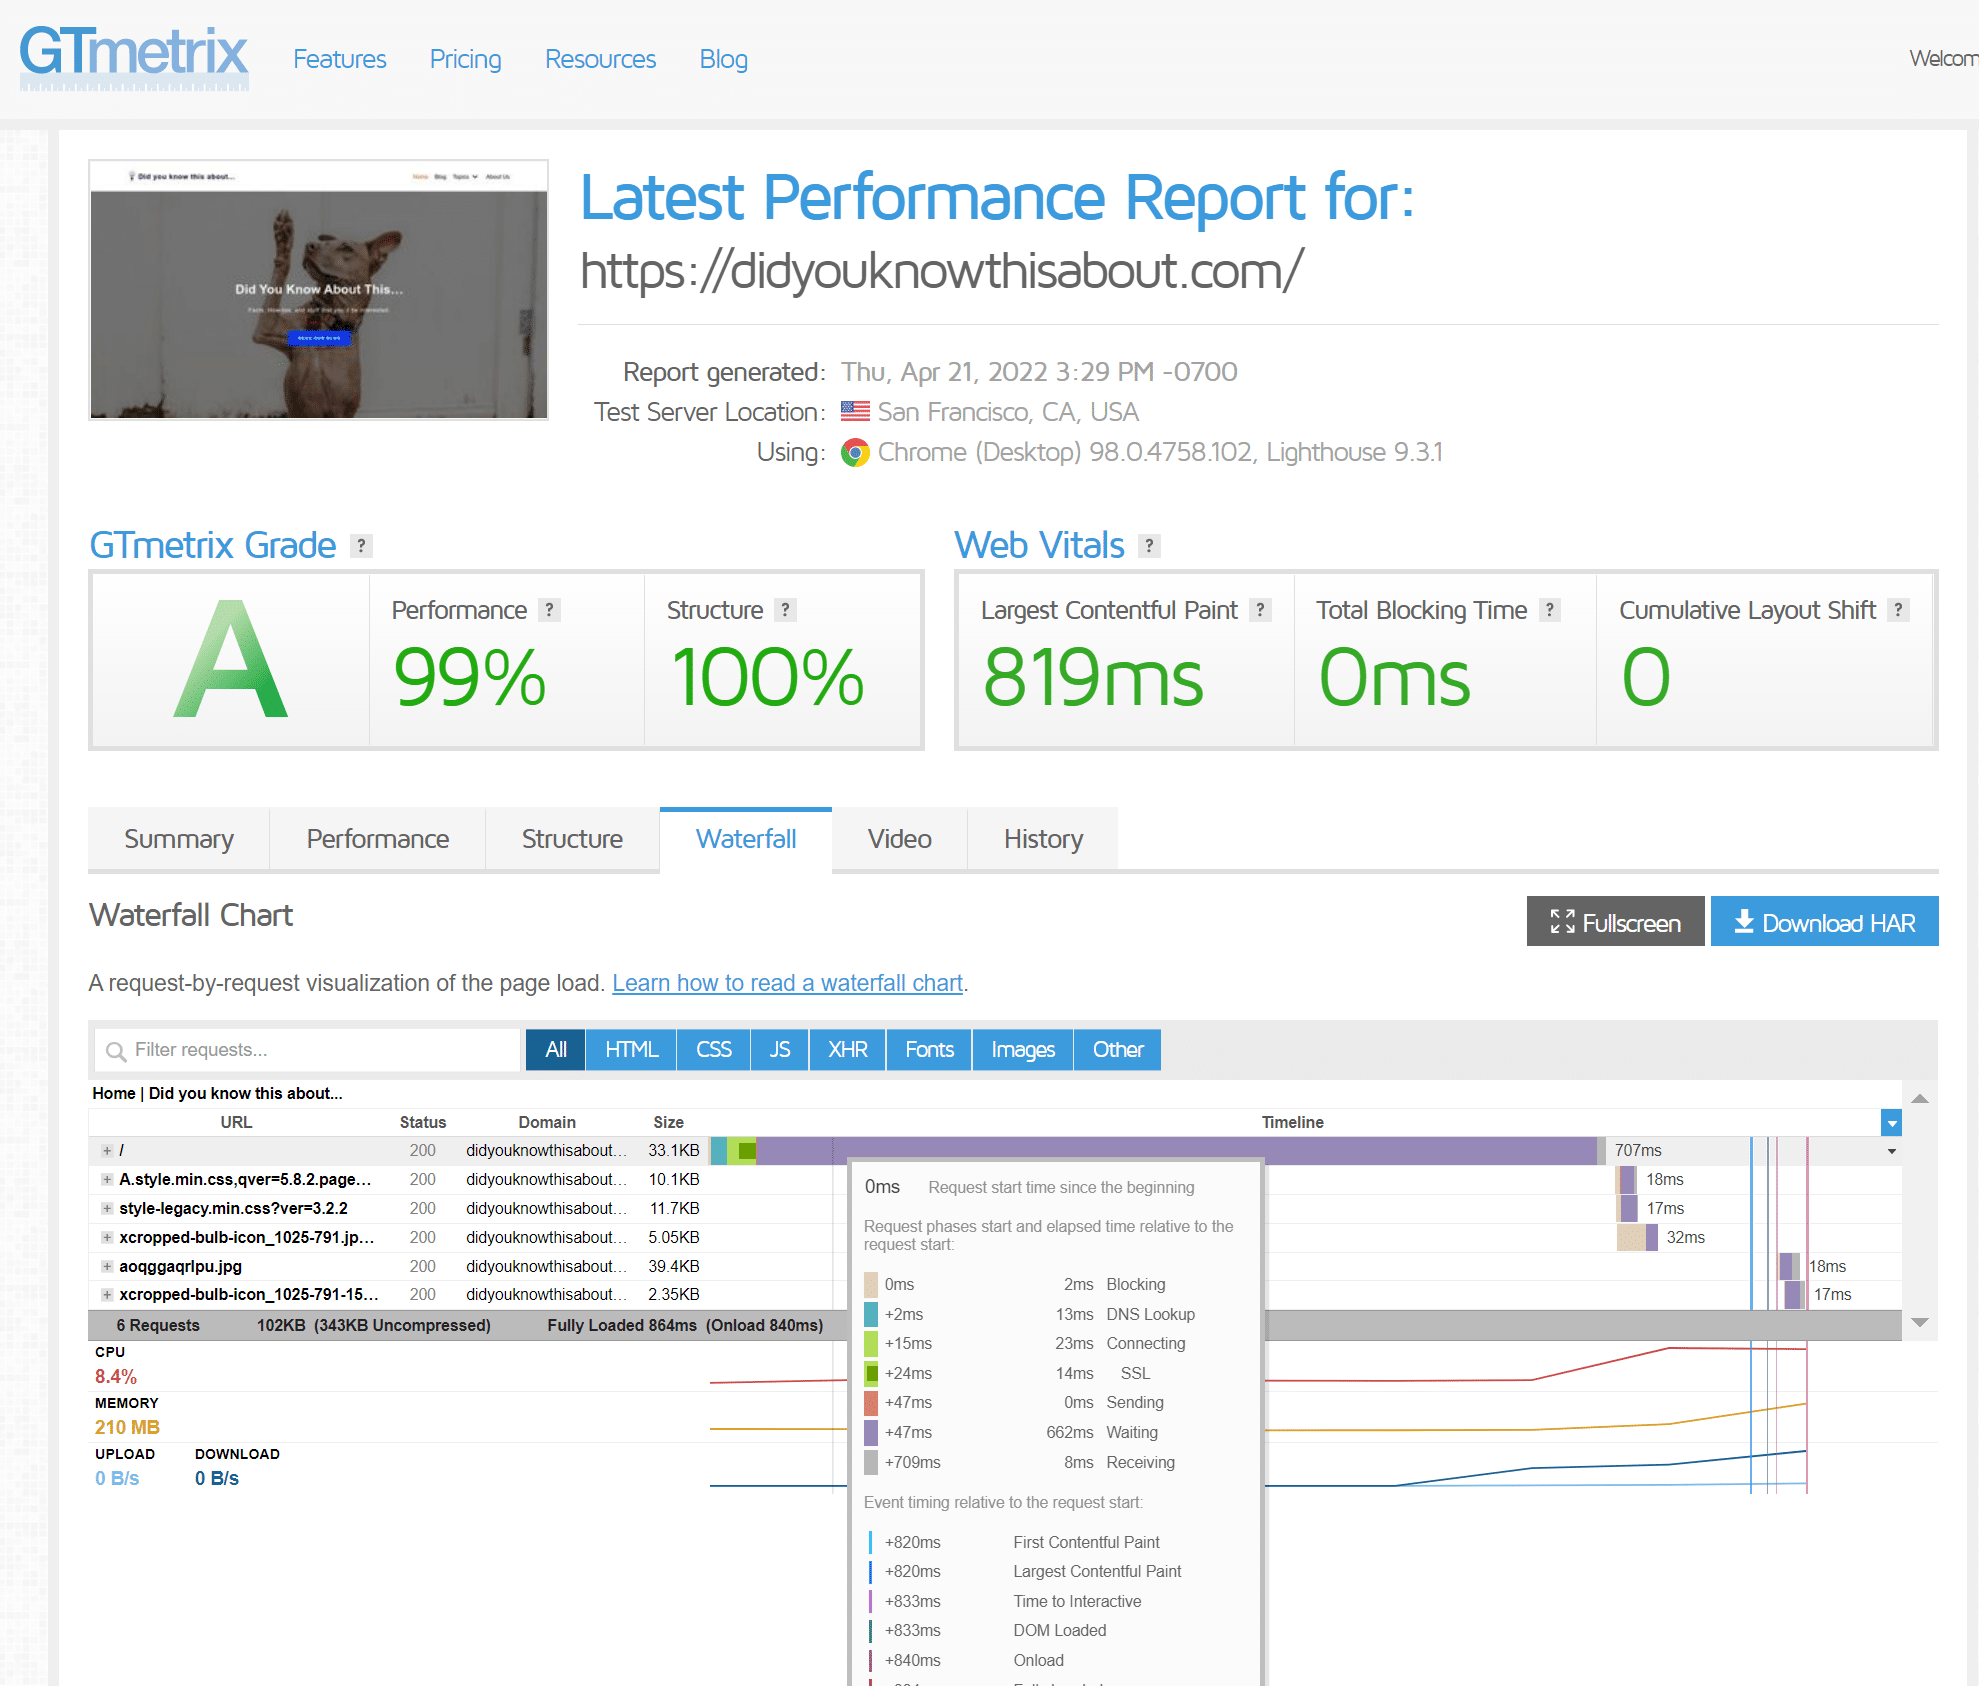
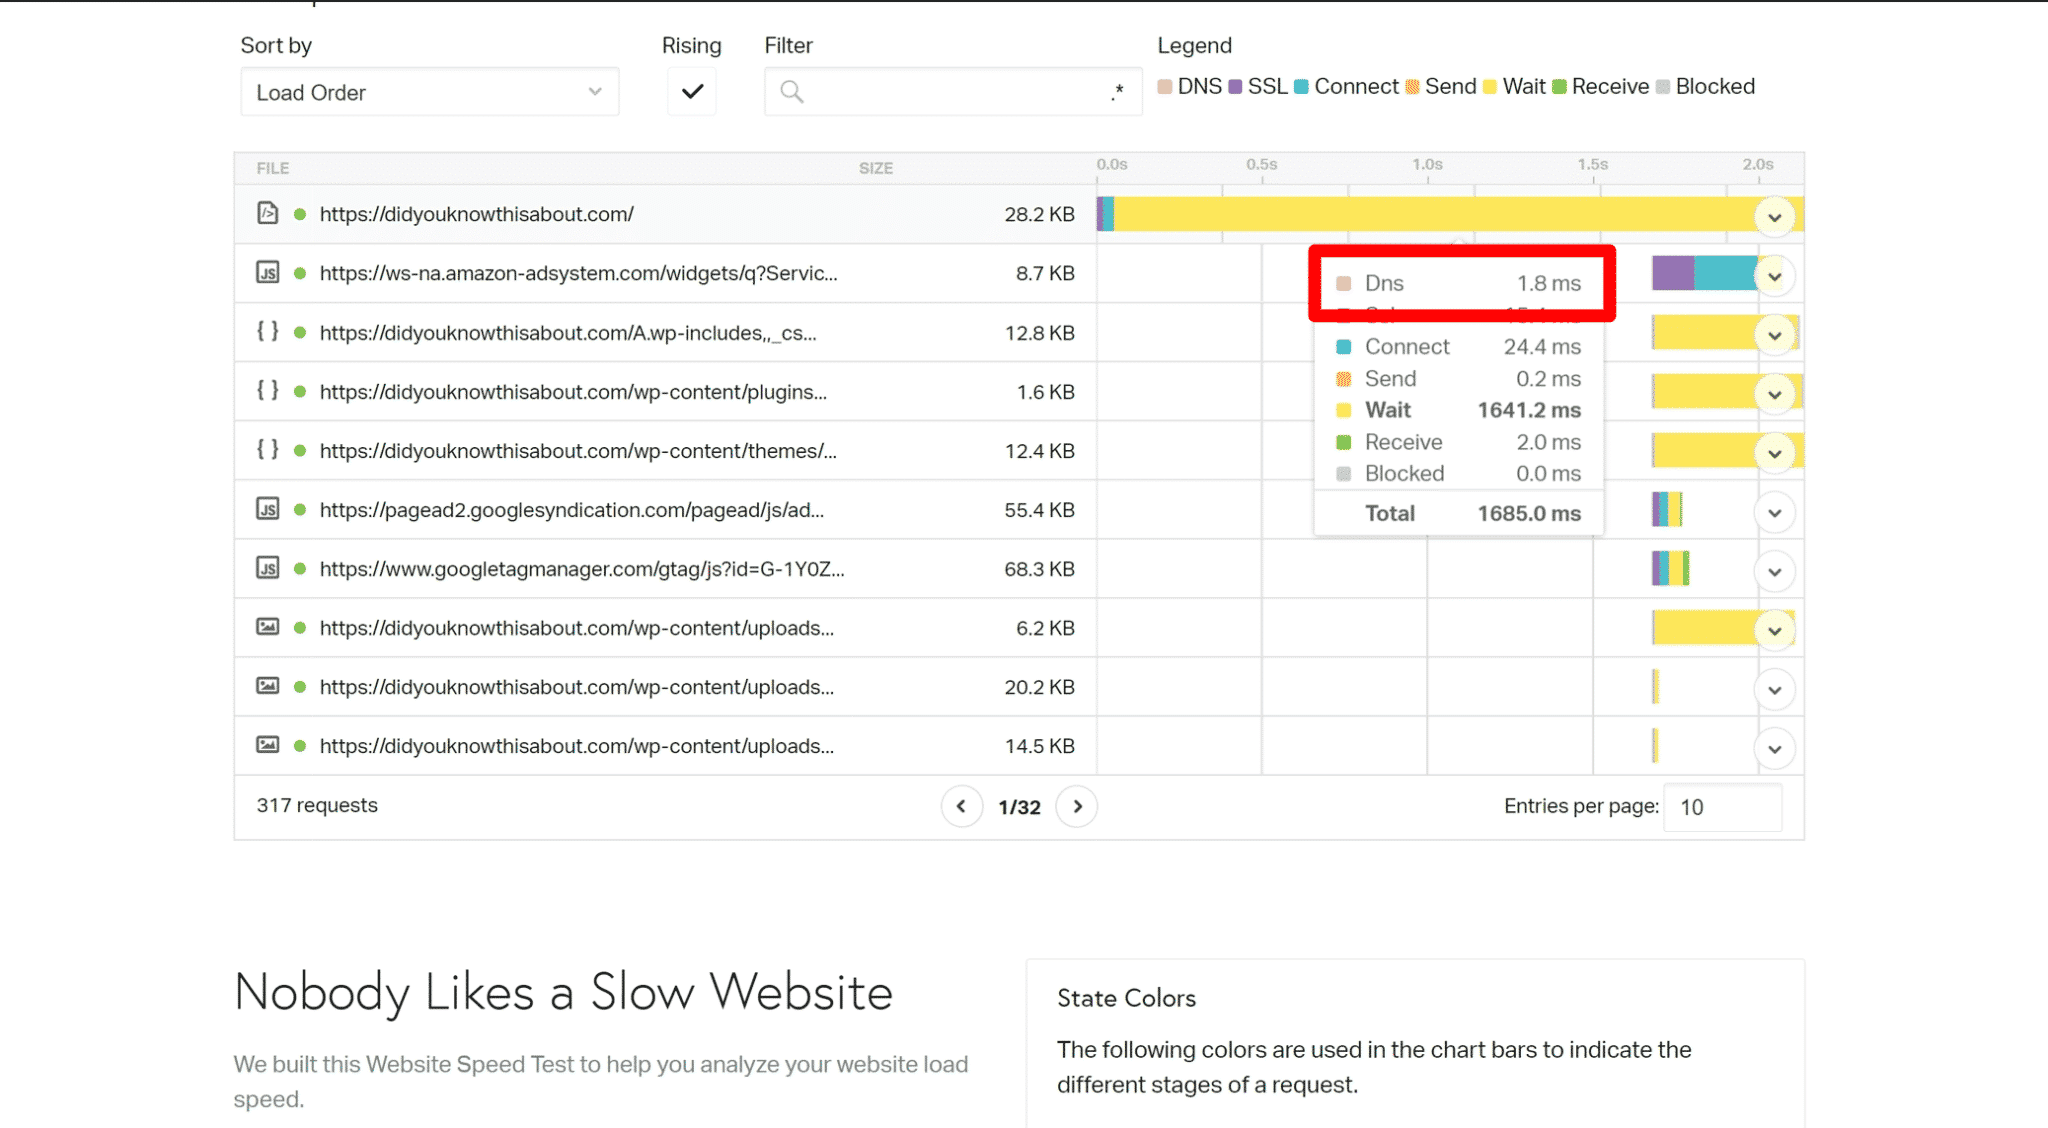
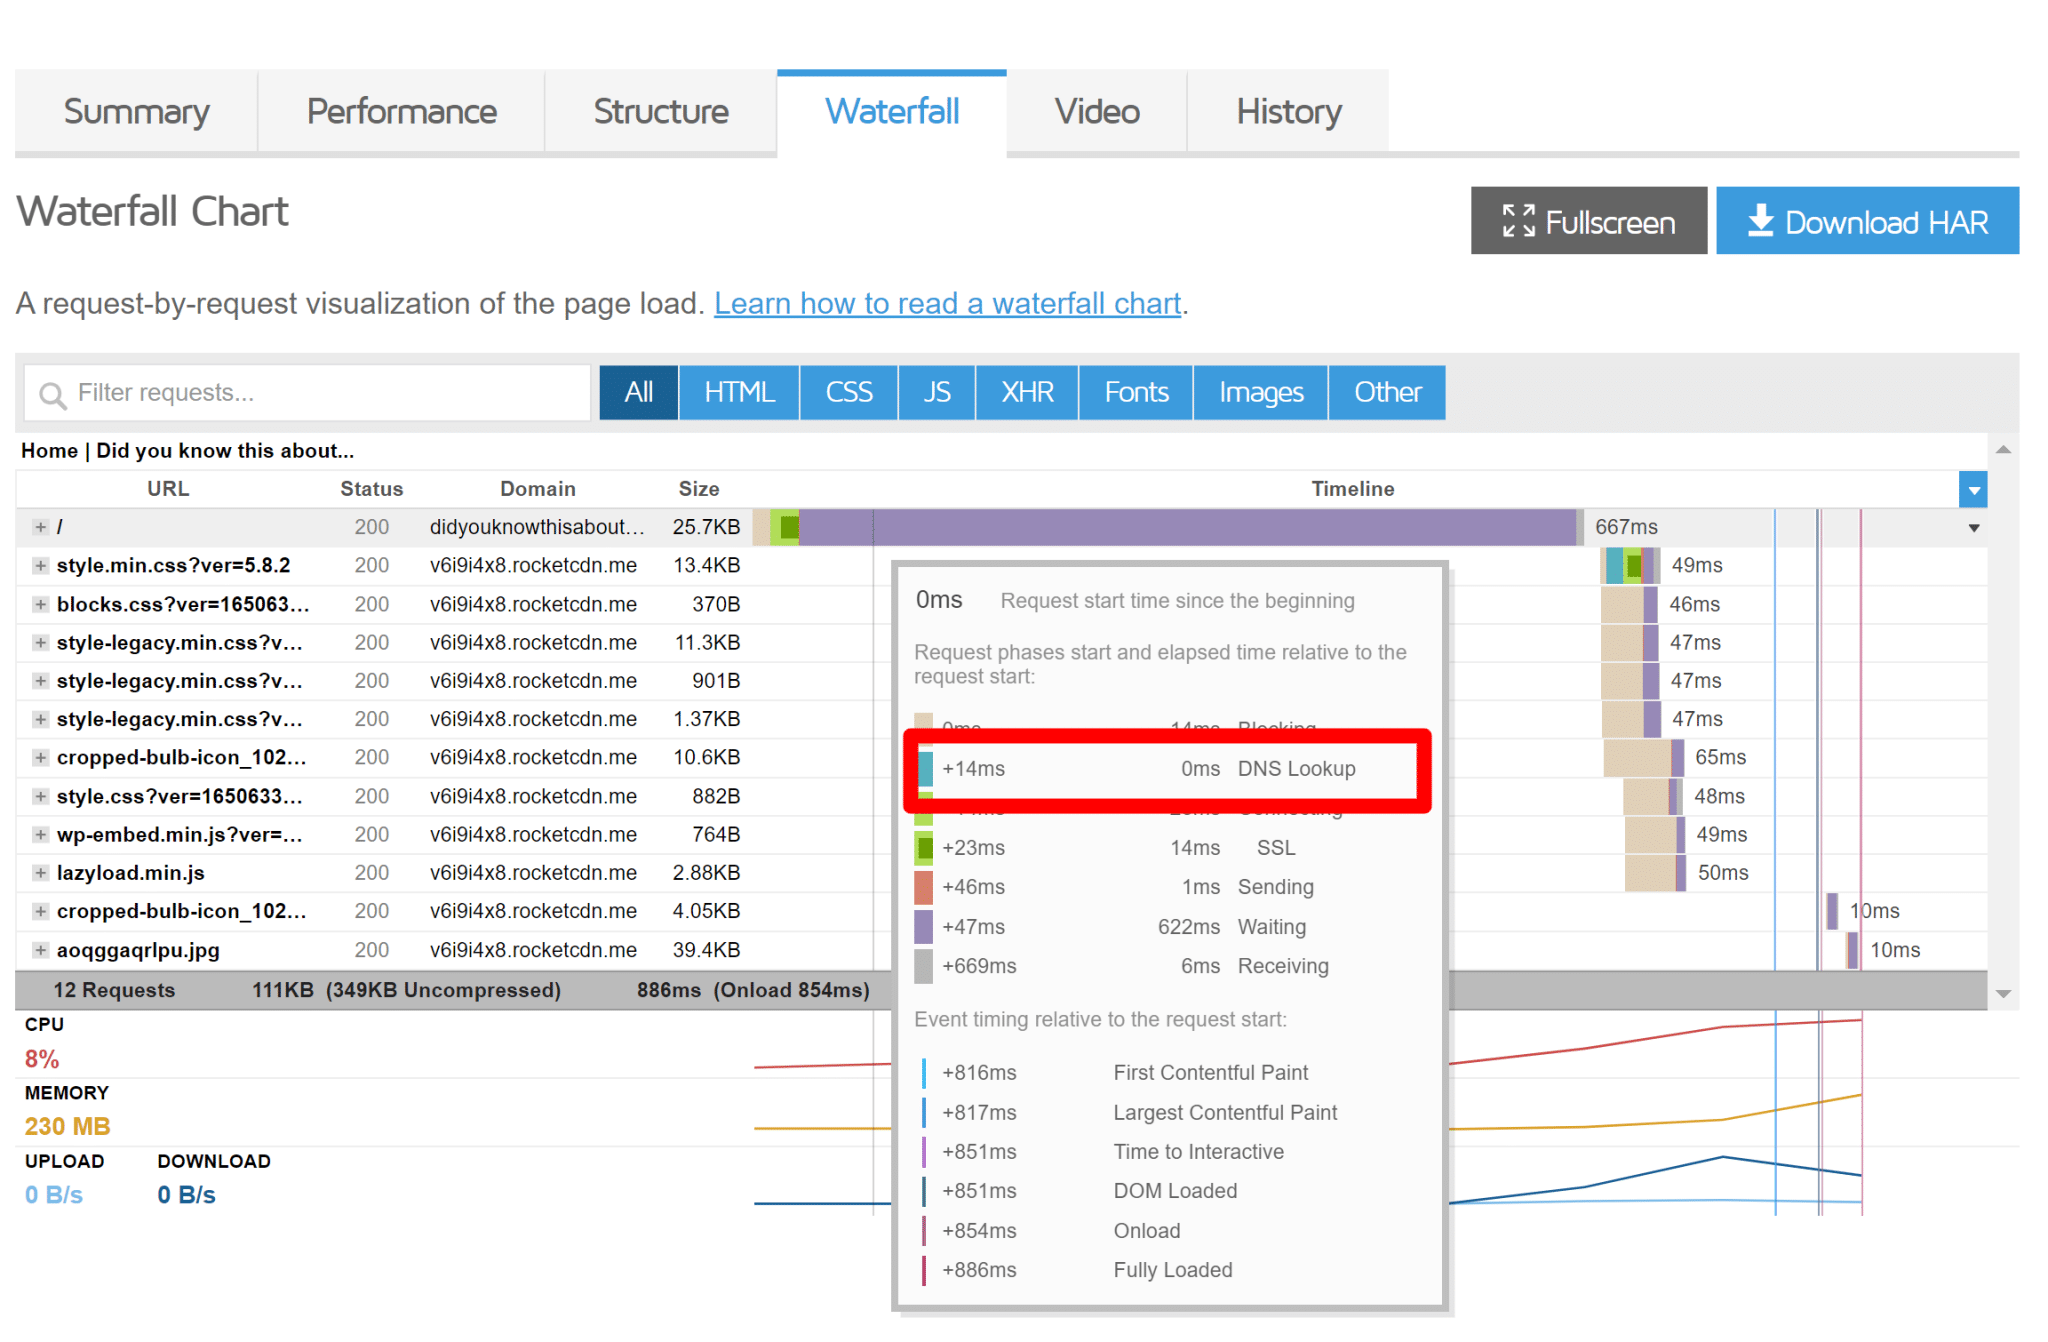
Go to the Waterfall tab, and when you hover specific file request, the DNS lookup is labeled with a green bar and is measured in milliseconds.
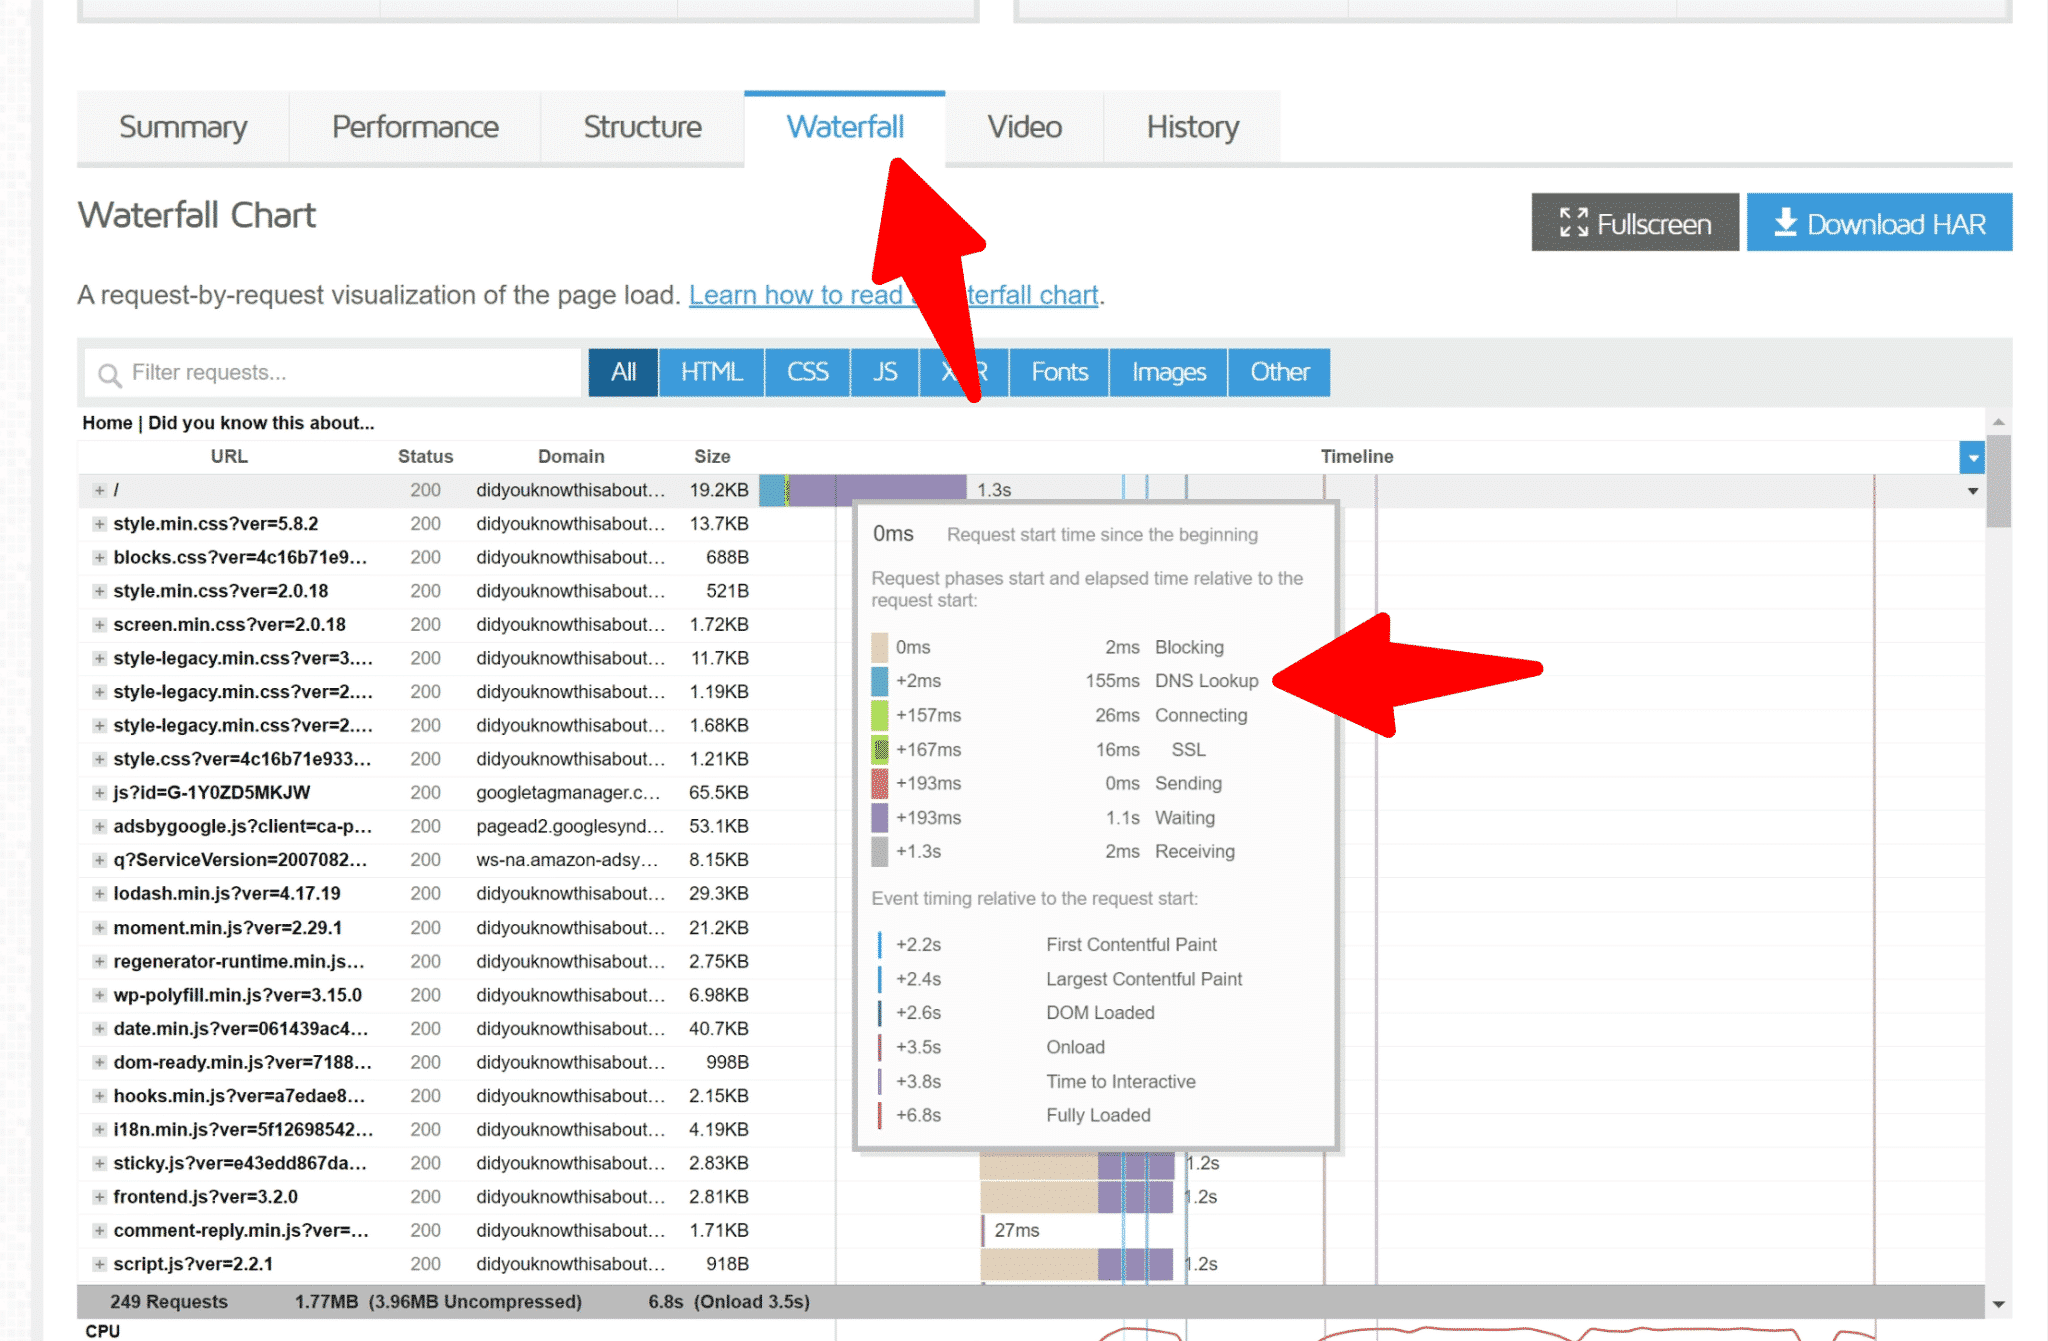
You’ll need to review each file, see which one has a DNS lookup and see their load time. Remember, 40ms or better is what we’re trying to aim for.
WebPagetest DNS Lookups
While Pingdom and GTmetrix are great tools, WebPagetest seems to provide more straightforward to read data.
Go to their site and enter your URL:
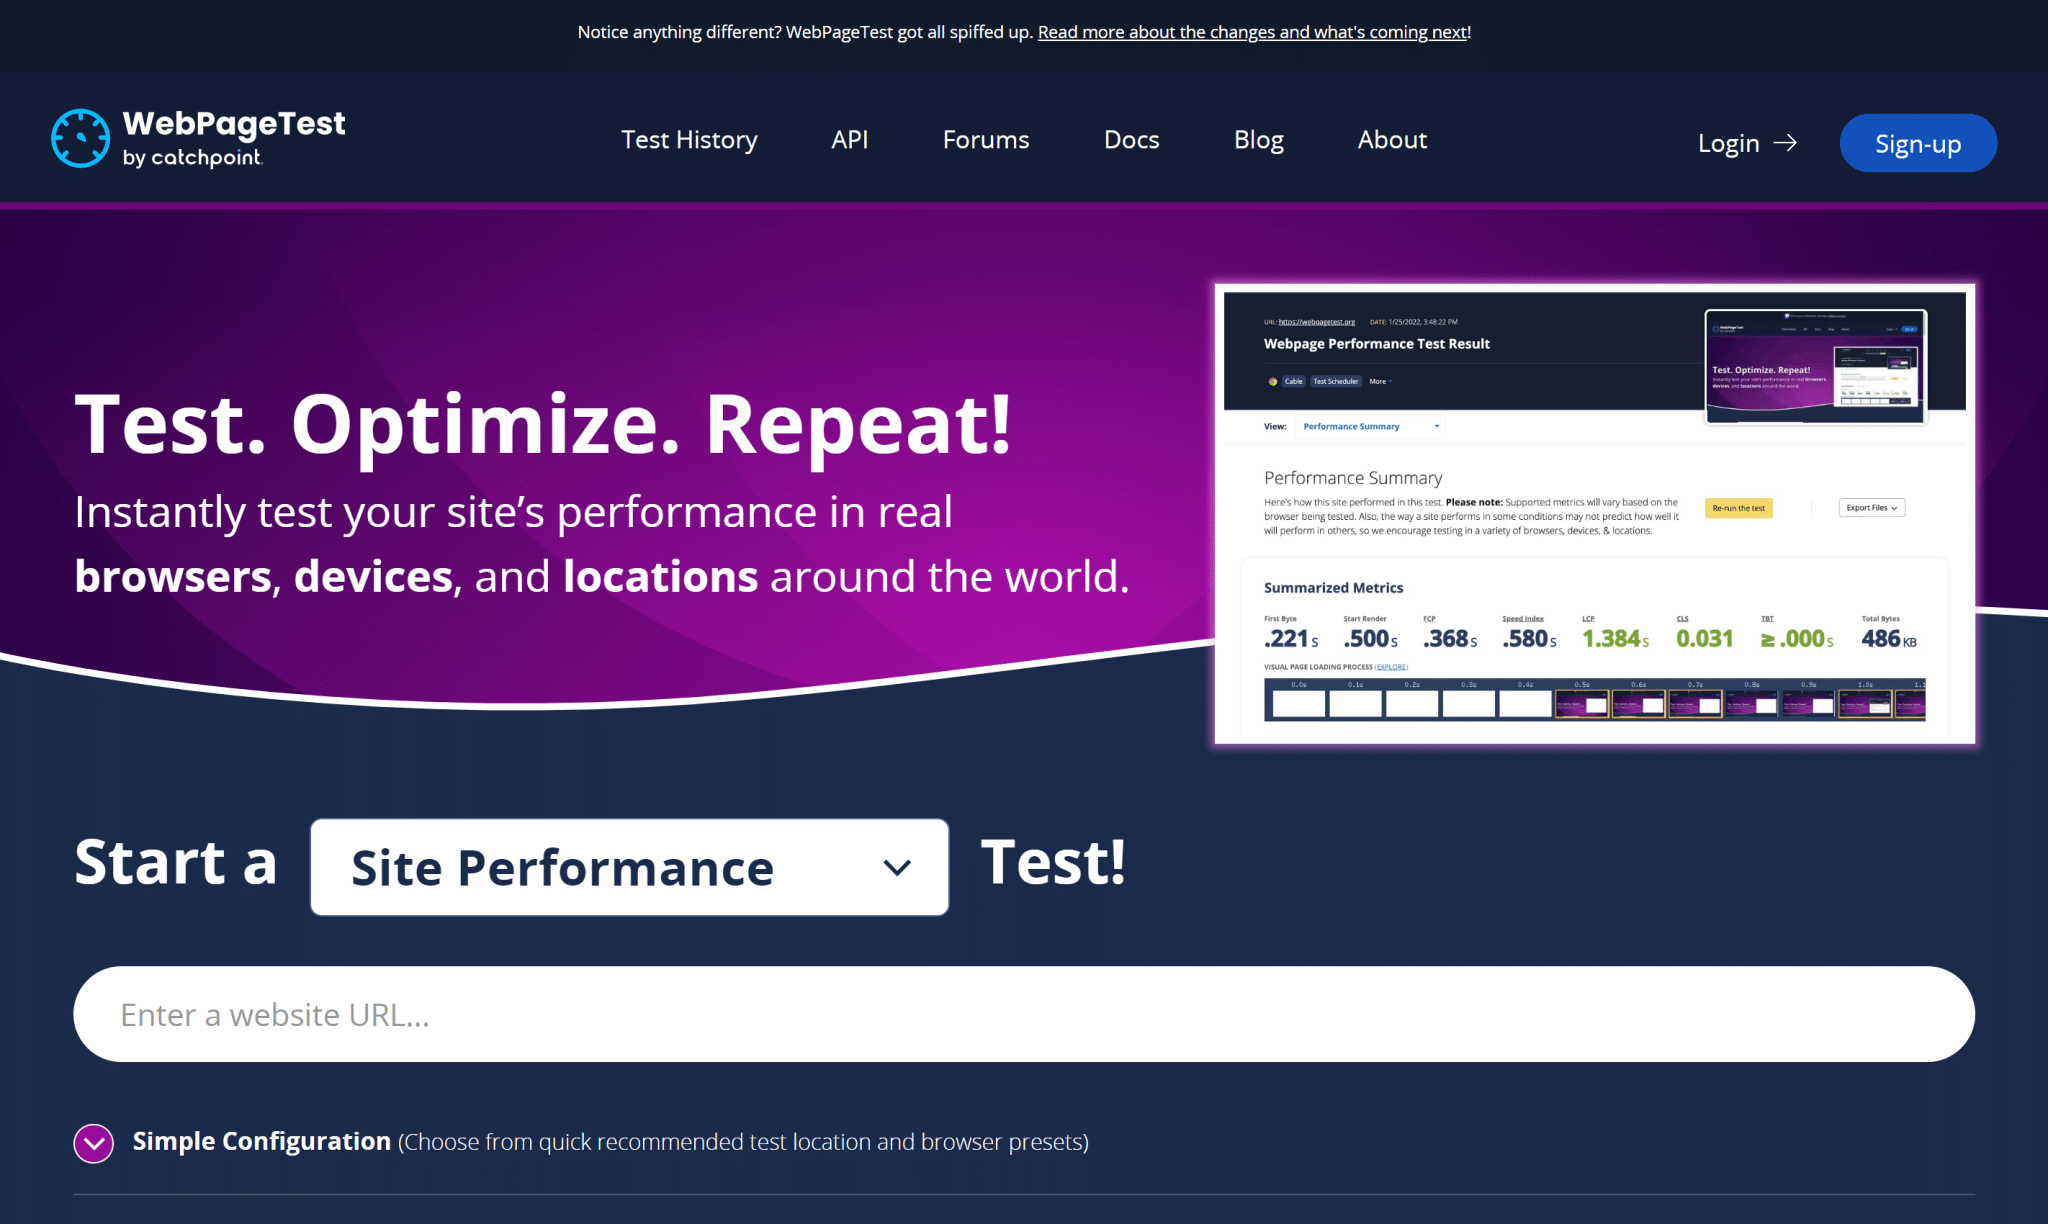
Once the test is completed, go to “View” and select “Details”:
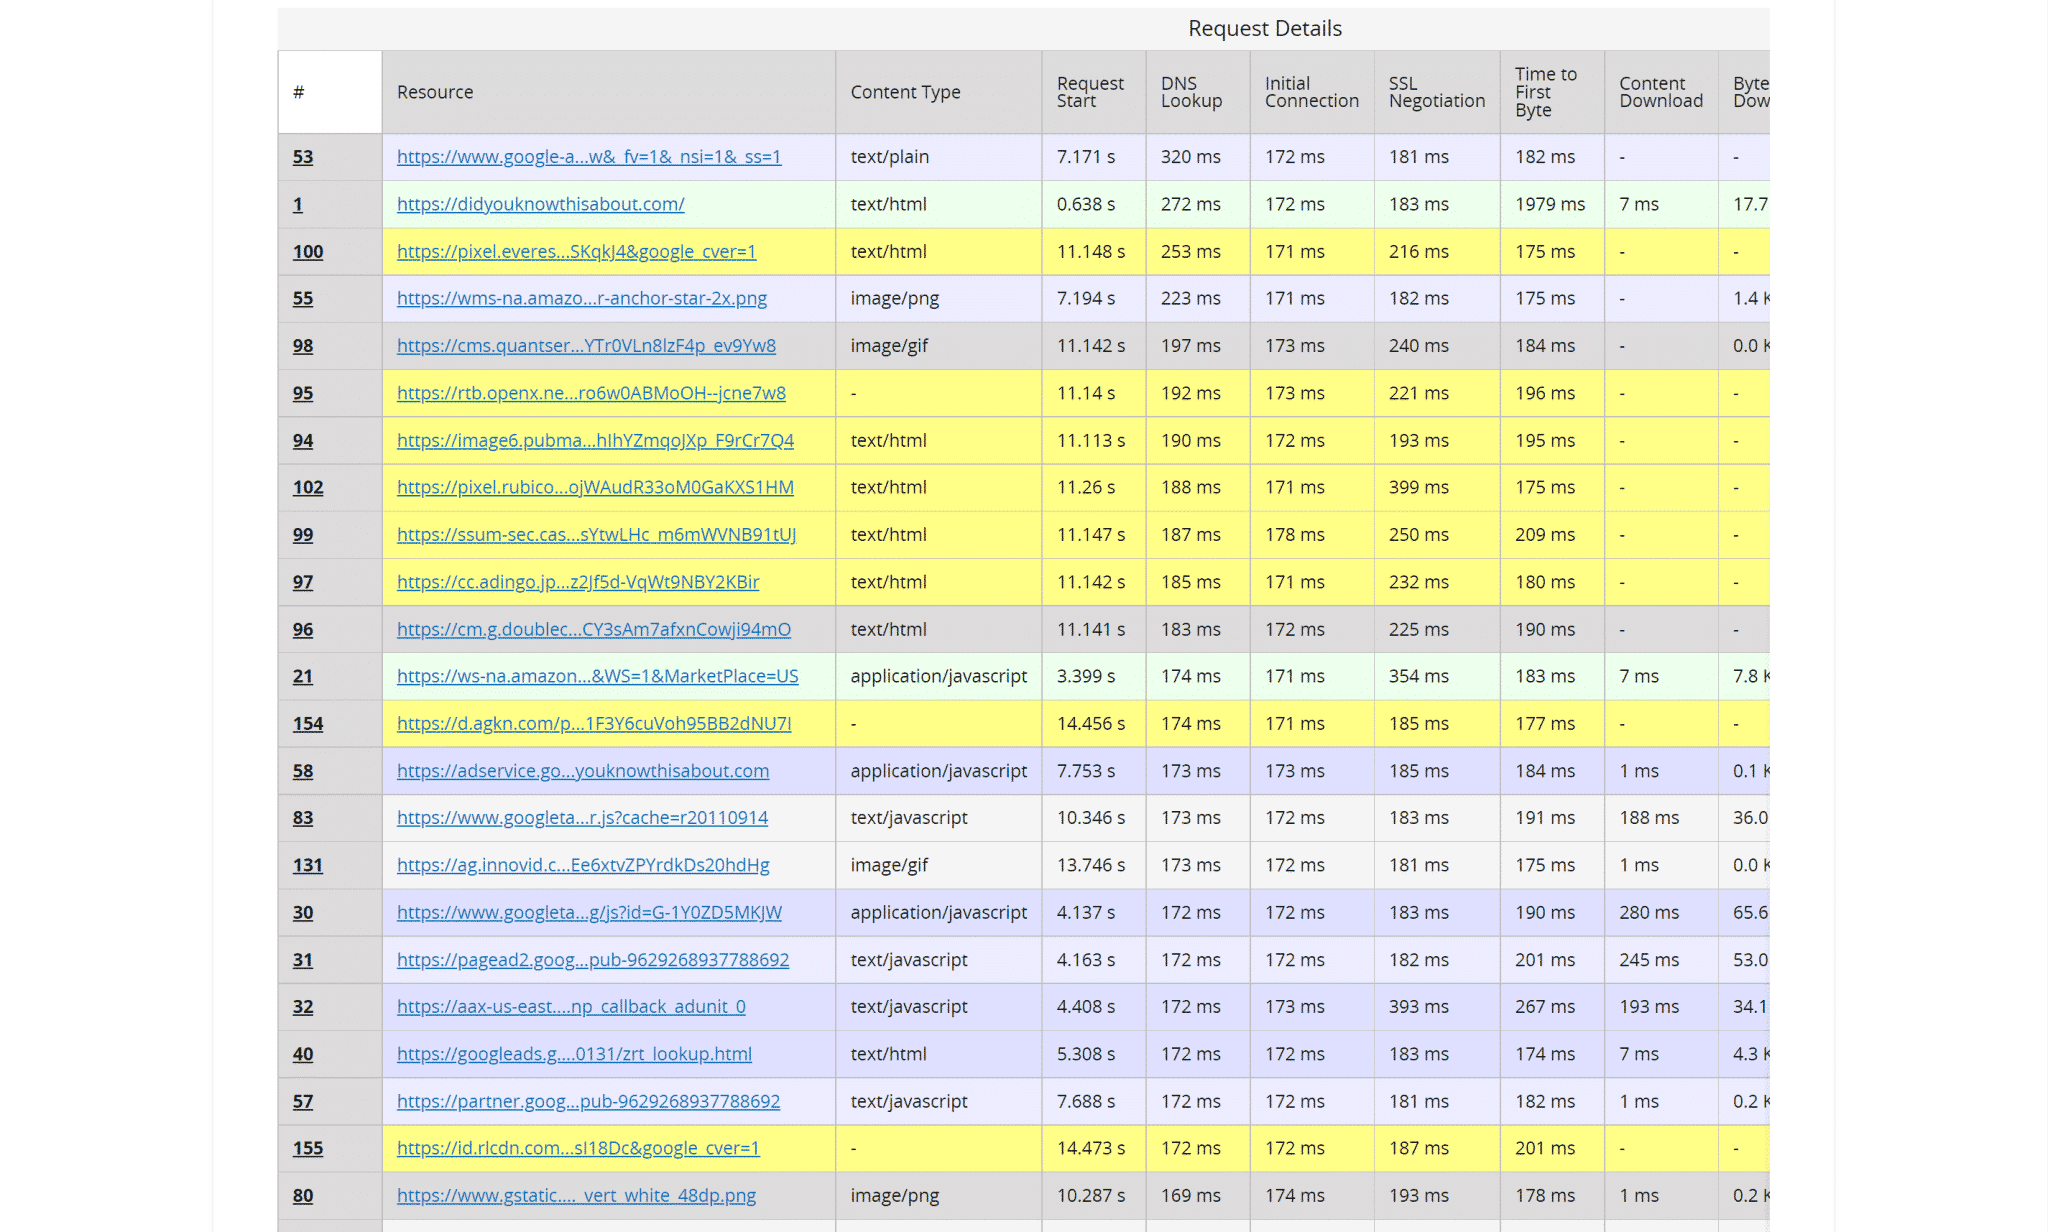
They give a short overview of your request information where you may arrange it by the fastest response times by clicking the “DNS lookup” column.
This is a much easier way to find the culprit causing a slow reduced DNS lookup.
How to Reduce DNS Lookups for WordPress
Many factors contribute to a slow DNS lookup. Here are a few ways to reduce DNS lookups for your site and the best ways to do so.
1. Use a Fast DNS Provider or CDN
The first step to reducing the DNS lookup response time is using a fast DNS service or CDN. Like hosting, several DNS service providers are available, but all providers don’t work the same.
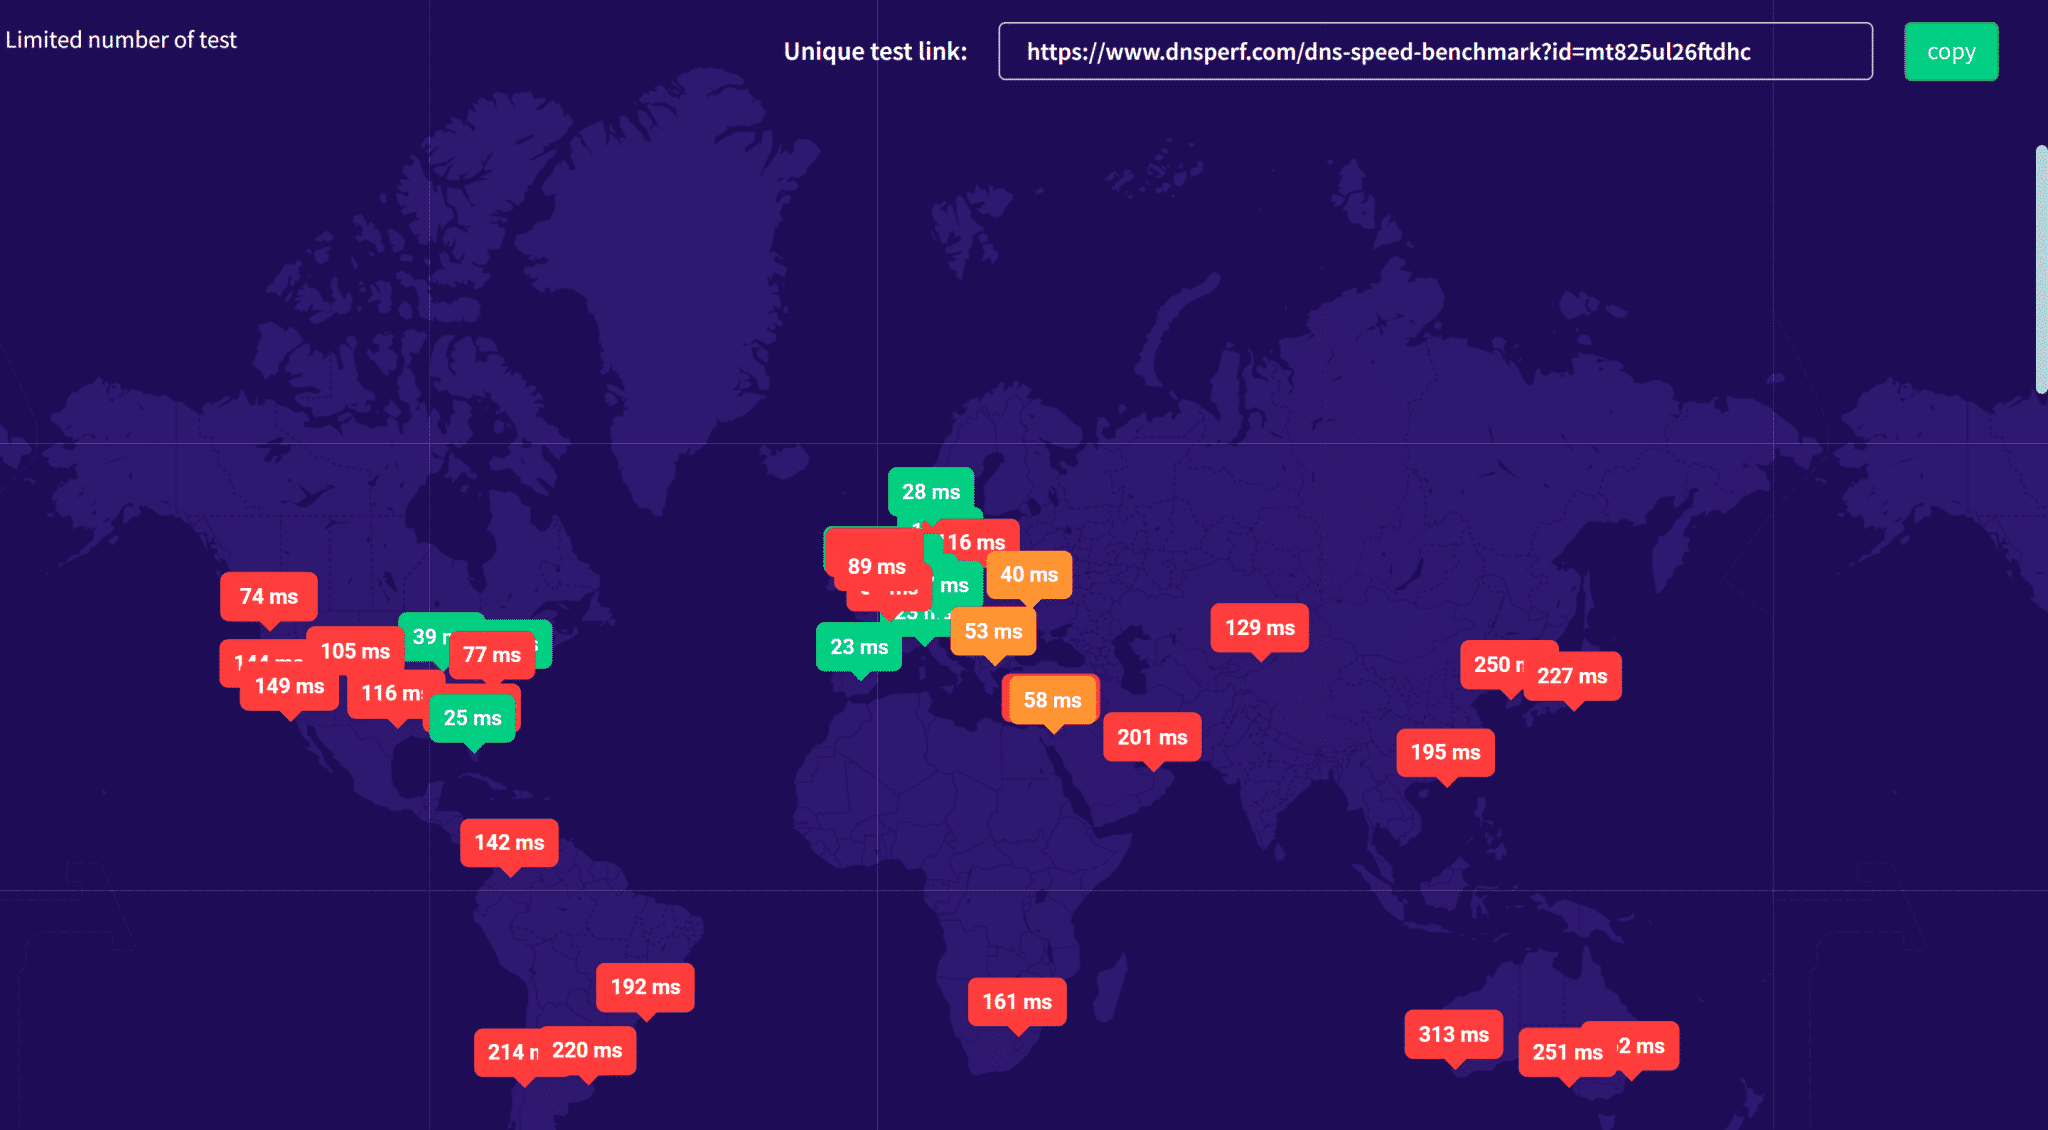
If you find a reliable DNS provider, you can switch to them to reduce DNS lookups. You can also check providers’ speed using DNSPerf, DNS Speed Benchmark, or DNS Speed Test.
If you are looking for a reliable DNS provider, DNSPerf provides all the different providers and their benchmarks. So it’s easy to see which DNS provider you should go with.
Alternatively, if you want to see how well your current DNS provider performs, you can use DNS Speed Benchmark to see which area of the world serves the best. This way, you can stay with your provider based on your targeted countries. See below:
You can also reduce DNS lookups by using a reliable Content Delivery Network (CDN) such as Cloudflare.
A CDN is a service used as an intermediary between a browser and your website. It uses a cluster of high-performance servers rather than just one like what’s available in a typical hosting plan.
You can use it to cache as much of your website’s content as possible so your site can take advantage of the optimized performance to load your website quickly.
2. Take Advantage of DNS Caching
Caching can be used to minimize DNS lookups since fewer lookups are required for each subsequent page load.
The DNS cache acts as storage holding the hostname for a set amount of time. When a browser requests the element, the cache provides the hostname instead of requiring a DNS lookup.
Change the Time to Live (TTL) settings for your DNS records to enable DNS caching.
The length of the DNS cache is determined by the Time To Live (TTL).
Not all DNS records should be cached for the same amount of time. Some commonly-accepted guidelines are:
- CNAME Records: 24 hours
- A and AAAA Records: Five minutes to an hour
- TXT Records: 12 hours
- MX Records: 12 hours
Your A and AAAA records must be set to lesser numbers. However, CNAME, MX, and TXT records can normally be set to higher values, such as 12 or 24 hours.
When setting up DNS caching, keep in mind that the TTL values will usually be shown in seconds. This will need to be taken into account when defining your values.
3. Setting Up DNS Prefetching
You can reduce latency by setting DNS Lookups to perform in the background with DNS prefetching. Prefetching enabled browsers to perform DNS lookups in the background. The browser will request prefetch elements as a user reads one web page. This is primarily used for links within your content.
You can set this for assets such as Google Analytics, Font Awesome, Google Fonts, and others.
To enable DNS prefetching on your WordPress site, add the following code to the header of your page files:
<!-- DNS Prefetching -->
<link rel="dns-prefetch" href="//asset1.com">
<link rel="dns-prefetch" href="//asset2.com">
Don’t forget to replace “asset1.com,” and “asset2.com” with the appropriate URLs. You can also repeat the last line as needed.
4. Enable Keep-Alive
Another way you can reduce DNS lookups is by enabling keep-alive. It means keeping the connection between a server and browser consistently active to load more asset files at one time.
Without it, resource files are all loaded as separate requests even though there are multiple resources included in a single domain.
For example, one asset from “website1.com,” and three resources from “website2.com” would collectively be four DNS requests.
With keep-alive enabled, those same resources would be loaded as only two total requests.
All major browsers support keep-alive, and it’s enabled by default in most cases. If it’s disabled, you can re-enable it on Apache and Nginx servers.
For Apache
On the Apache server, you should add the following code via your .htaccess file.
<ifModule mod_headers.c>
Header set Connection keep-alive
</ifModule>
For NGINX
To enable keep-alive on your NGINX server, find out the HTTP core module (ngx_http_core_module), search for a line similar to keep-disable, and replace it with the following one.
keepalive_disable none;5. Reduce the Number of Hostnames
The easiest way to reduce DNS lookups is to get rid of requests for different hostnames. Run your website through a speed test with a speed test tool like Google PageSpeed Insights. The result will show a list of hostnames and assets that trigger a DNS request.
You can audit this list to reduce the number of requests. For instance, external requests for graphics like each social icon button require a DNS lookup. Therefore, while auditing, look out to see if these resources are essential to your website.
6. Locally Host Third-Party Resources
If your hostnames audit reveals that you still have several external resources, try hosting the resources locally instead. Local hosting also allows for additional control over caching and delivery of these resources and the elimination of the DNS search phase.
Download the files you need from wherever they are now kept and upload them to your web server or CDN to host the resources.
However, if you receive requests for constantly updated scripts, such as font libraries, hosting them locally may not be ideal. Because these resources are often changed, it is best to leave their scripts alone, and other efforts can be made to limit the impact of their DNS lookup.
Here are a few common third-party resources that cause long DNS lookup.
Third-Party fonts: Google Fonts or Awesome Fonts
Externally hosted fonts like Google Fonts are also one of the heaviest third-party resources to load. To obtain the CSS file from Google Fonts, you must make an additional DNS request to fonts.googleapis.com. You can then send further queries to fonts.gstatic.com to obtain the font files.
When you host locally, all requests come from the same domain or CDN, and you won’t need another CSS file because it will be contained within your WordPress theme’s CSS file. There are advantages and disadvantages to doing so, but see our in-depth post on how to host fonts locally for more information.
We occasionally see plugin developers and themes incorporate Font Awesome on WordPress sites. However, sometimes they are added in a way that a plugin like CDN enabler would miss by default and cause it to increase your load time. In this scenario, we recommend contacting the developer to inquire about loading it from your CDN.
Another typical Font Awesome situation is that it is occasionally loaded from the default BootstrapCDN (MaxCDN). While there is nothing wrong with this, it adds a DNS query that you do not require. In most circumstances, it is preferable to load Font Awesome from your own CDN to avoid extra lookup.
Locally host Google Analytics
Google’s own script issues a caching warning, but this is due to their HTTP caching header expiration being set so short. When you host it yourself, your own CDN or server’s HTTP caching headers will be applied automatically. In other words, you have complete control over the script’s caching.
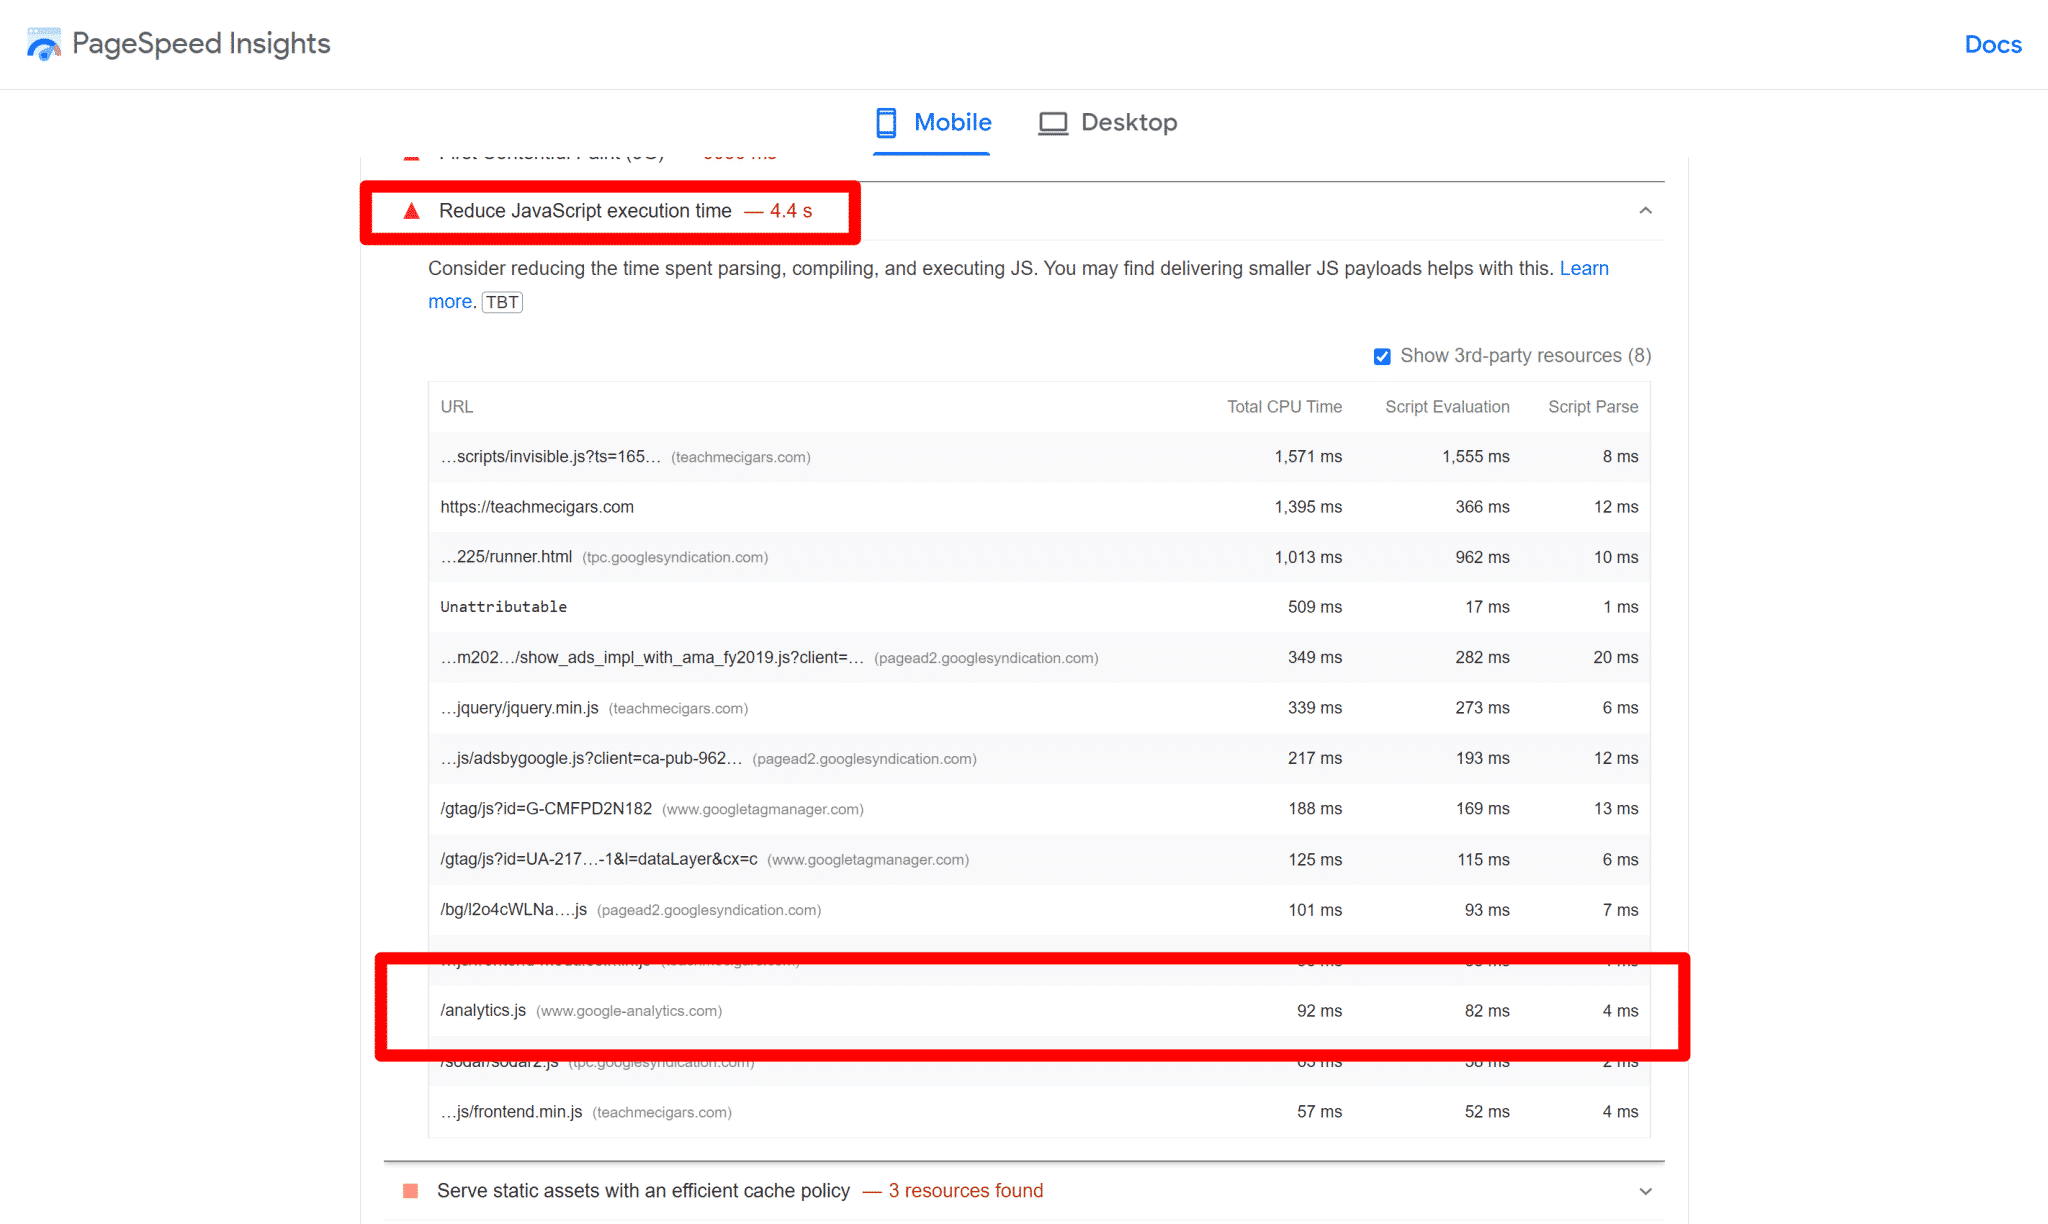
Google Analytics not only generates a DNS search in GTmetrix, but it also generates a “Serve static assets with an efficient cache policy” issue.

Videos for Slow Loading
Third-party requests from the source are generated by embedded videos (usually YouTube or Vimeo).
You can dramatically improve video load time and DNS lookups by slow loading videos and replacing the iframe with a preview picture.
Using a caching plugin, such as WP Rocket, can grab the YouTube thumbnail as the preview image and allow you to lazy load images and videos.
Alternatively, you can use another plugin to help with video lazy loading:
- YouTube by EmbedPlus
- WP YouTube Lyte
7. Defer the Loading of JavaScript
Deferring JavaScript is the best solution, without getting too technical. It will not necessarily speed up DNS lookups, but optimize your above-the-fold content.
As a result, users will notice that your website is loading faster, which improves perceived performance. Furthermore, delaying JavaScript processing allows the crucial material to be loaded first, followed by the non-critical JS.
You may also utilize WP Rocket WordPress plugin, which allows you to quickly defer and delay Javascript loading.
However, it is important to note that you must go through all of the running Java scripts and identify the JS ones you do not want to delay. This is due to the fact that some javascript is required to render material above the fold.
8. Avoid Plugins That Are Known For DNS Lookups
Hotjar, Leadpages, live chat, and other plugins that have tracking scripts.
These eventually result in additional DNS lookups and are typically unfixable.
It’s a compromise, much as Google AdSense or Google Tag Manager.
So how do you determine if they should stay on your site or not?
Well, ask yourself if you worry more about how the tools are used or how quickly your website loads?
Look through this list of common sluggish plugins and try to avoid them if at all feasible. Aside from avoiding plugins that do DNS lookups, you should also avoid resource-intensive plugins with large JavaScript or CSS files (like Elementor).
Page builders, ultimate addons, social sharing, statistics, portfolio, slider, backup, chat, calendar, contact form, related post, and those performing continual scans + processes are the most sluggish plugins. WooCommerce sites may be very resource-intensive.
How to Find the Slowest Plugins and Themes
It is typical for a typical website to have 20-30 plugins installed.
Some plugins cause the frontend to load slowly, while others create resource-intensive background processes that raise CPU use. As these plugins gather data, create backups, or construct big database tables.
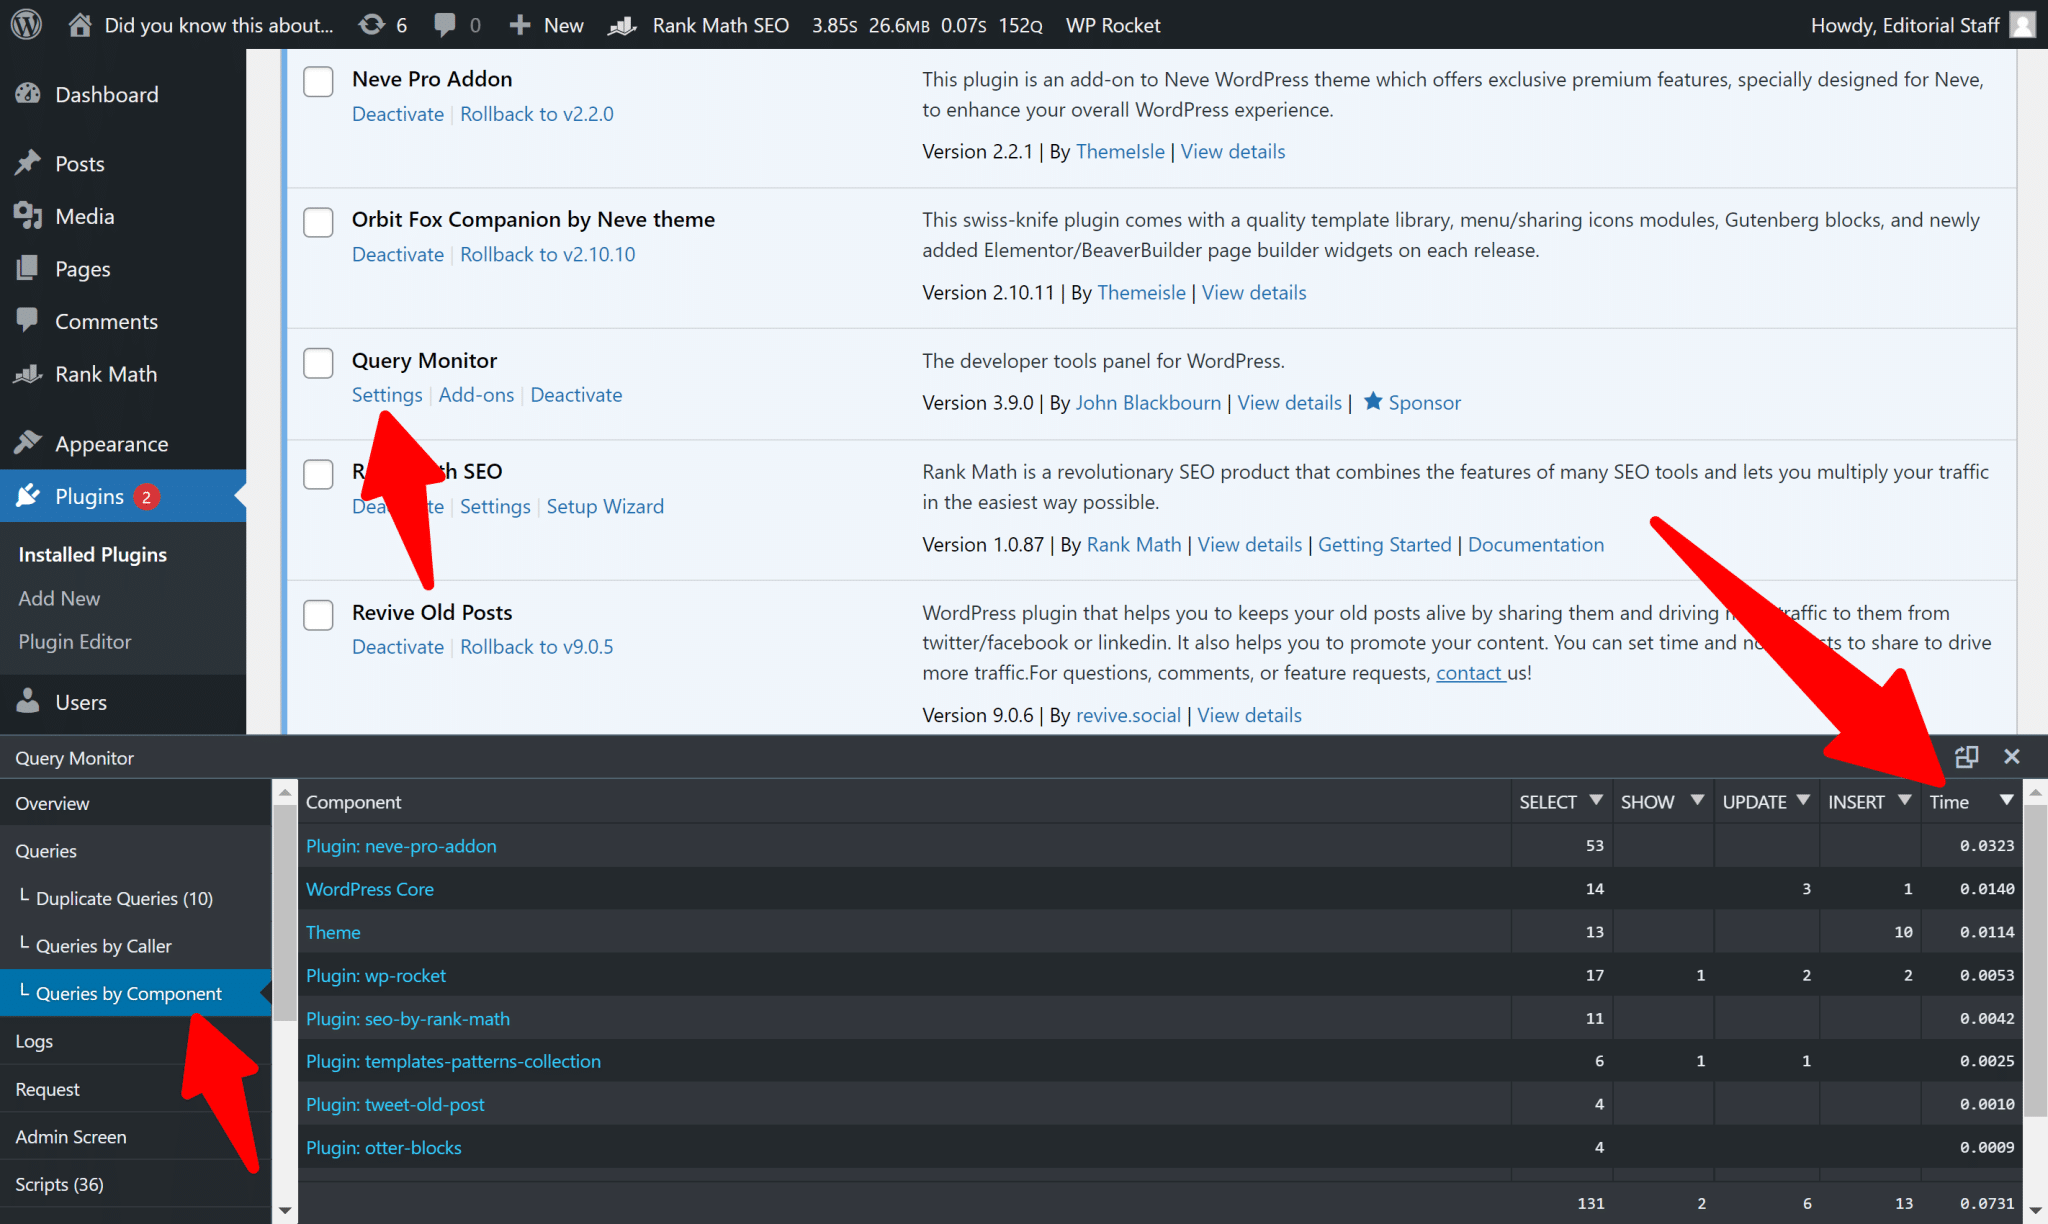
Query Monitor is an excellent WordPress debugging tool. It gives a wealth of data that might assist users in determining what is causing speed and performance difficulties.
Once installed, go to Query Monitor Settings>>Queries>>Queries by Component. There you can see the load time for each plugin you have installed.
Other tools like New Relic, GTmetrix, and Chrome Developer Tools might also work, but I believe it is more complex to understand than Query Monitor.
Always go for plugins created by specialists with a strong reputation. These plugins will adhere to WordPress code standards and should not have a detrimental influence on the speed and performance of your site.
Don’t forget about themes and how they might cause your site to load slowly. Check out our article on how select the fastest WordPress theme for your site.
9. Reduce DNS Lookups by Using WordPress Plugins
I briefly talked about reducing the number of plugins you should be using. So, why am I recommending a plugin?
I’m no hypocrite! If you can opt-in for an all-in-one solution to help with your whole Core Web Vital performance, I would definitely recommend it, compared to installing several different plugins to do the same job. But if you’re looking for free options, plugins like Asset Cleanup, and Autoptimize, can help reduce DNS lookups.
While manual approaches are recommended for reducing more effective DNS lookups, various WordPress plugins are also available to assist you to minimize DNS lookups more effectively. Call it lazy on my end, I didn’t want to write whole technical documentation on how to do everything manually!
However, do note that plugins will not be able to cover all elements of DNS lookup reduction, but they can make some stages quicker and more automated, such as CDN hosting and browser caching.
Why You Should Install WP Rocket to Reduce DNS Lookup
Writing a whole tutorial on how to use Asset Cleanup, Autoptimize, and other methods would make this article bit too long for anyone to read.
Let’s take a shortcut!
You can install and enable WP Rocket on your WordPress site to automatically speed up your site. WP Rocket is the easiest way to achieve outstanding speed improvements while stopping to use of different plugins to improve performance, no technical knowledge is required.
Remember all of the screenshots I’ve provided earlier in this article? Those horrible scores just got better, simply by installing WP Rocket.
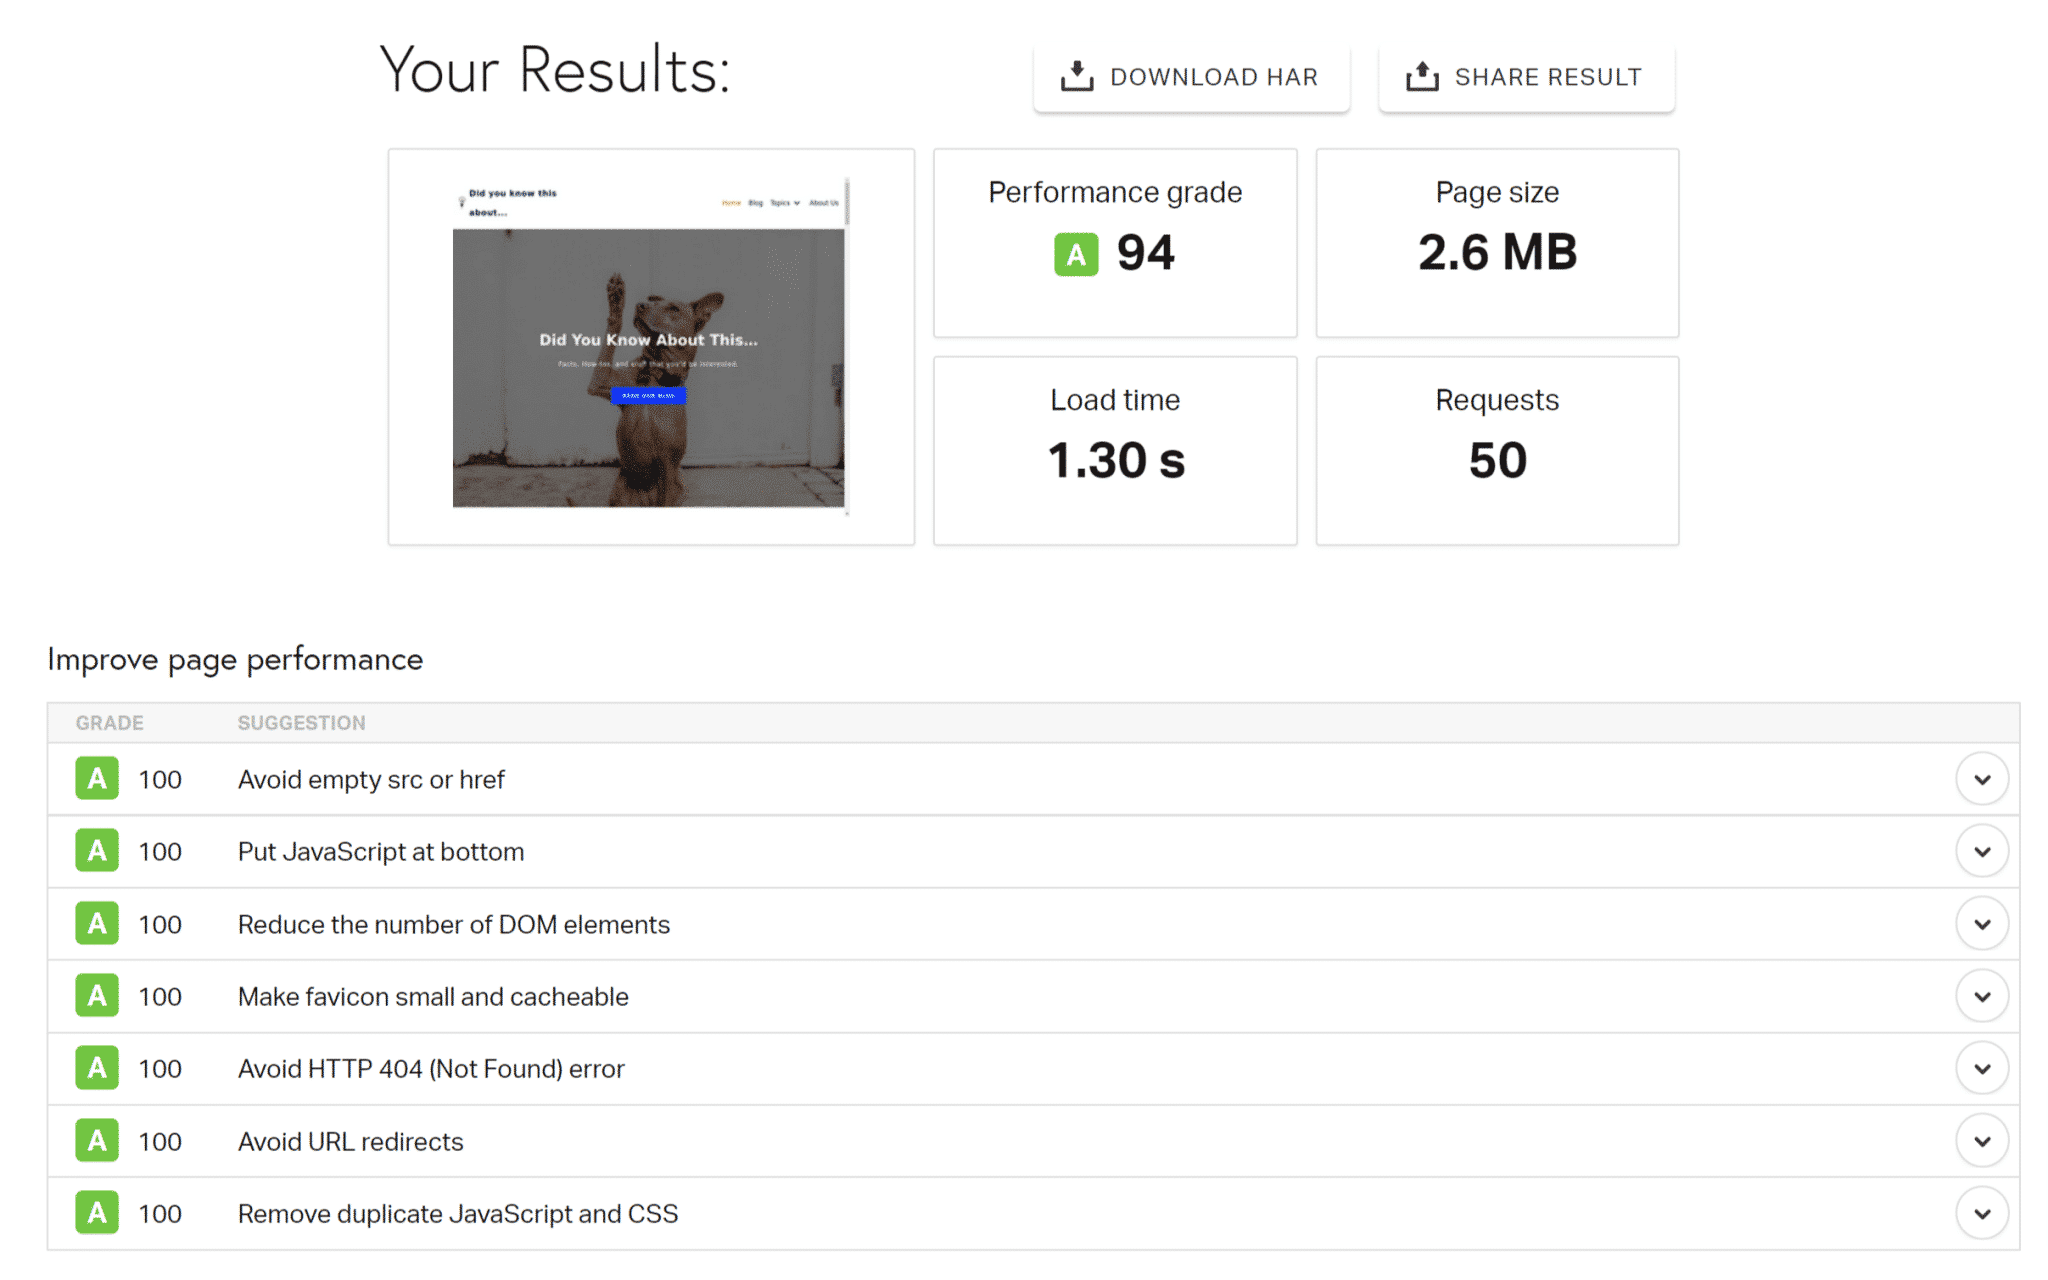
Take a look at the PageSpeed Insight results, simply by installing WP Rocket, and no CDN installed:
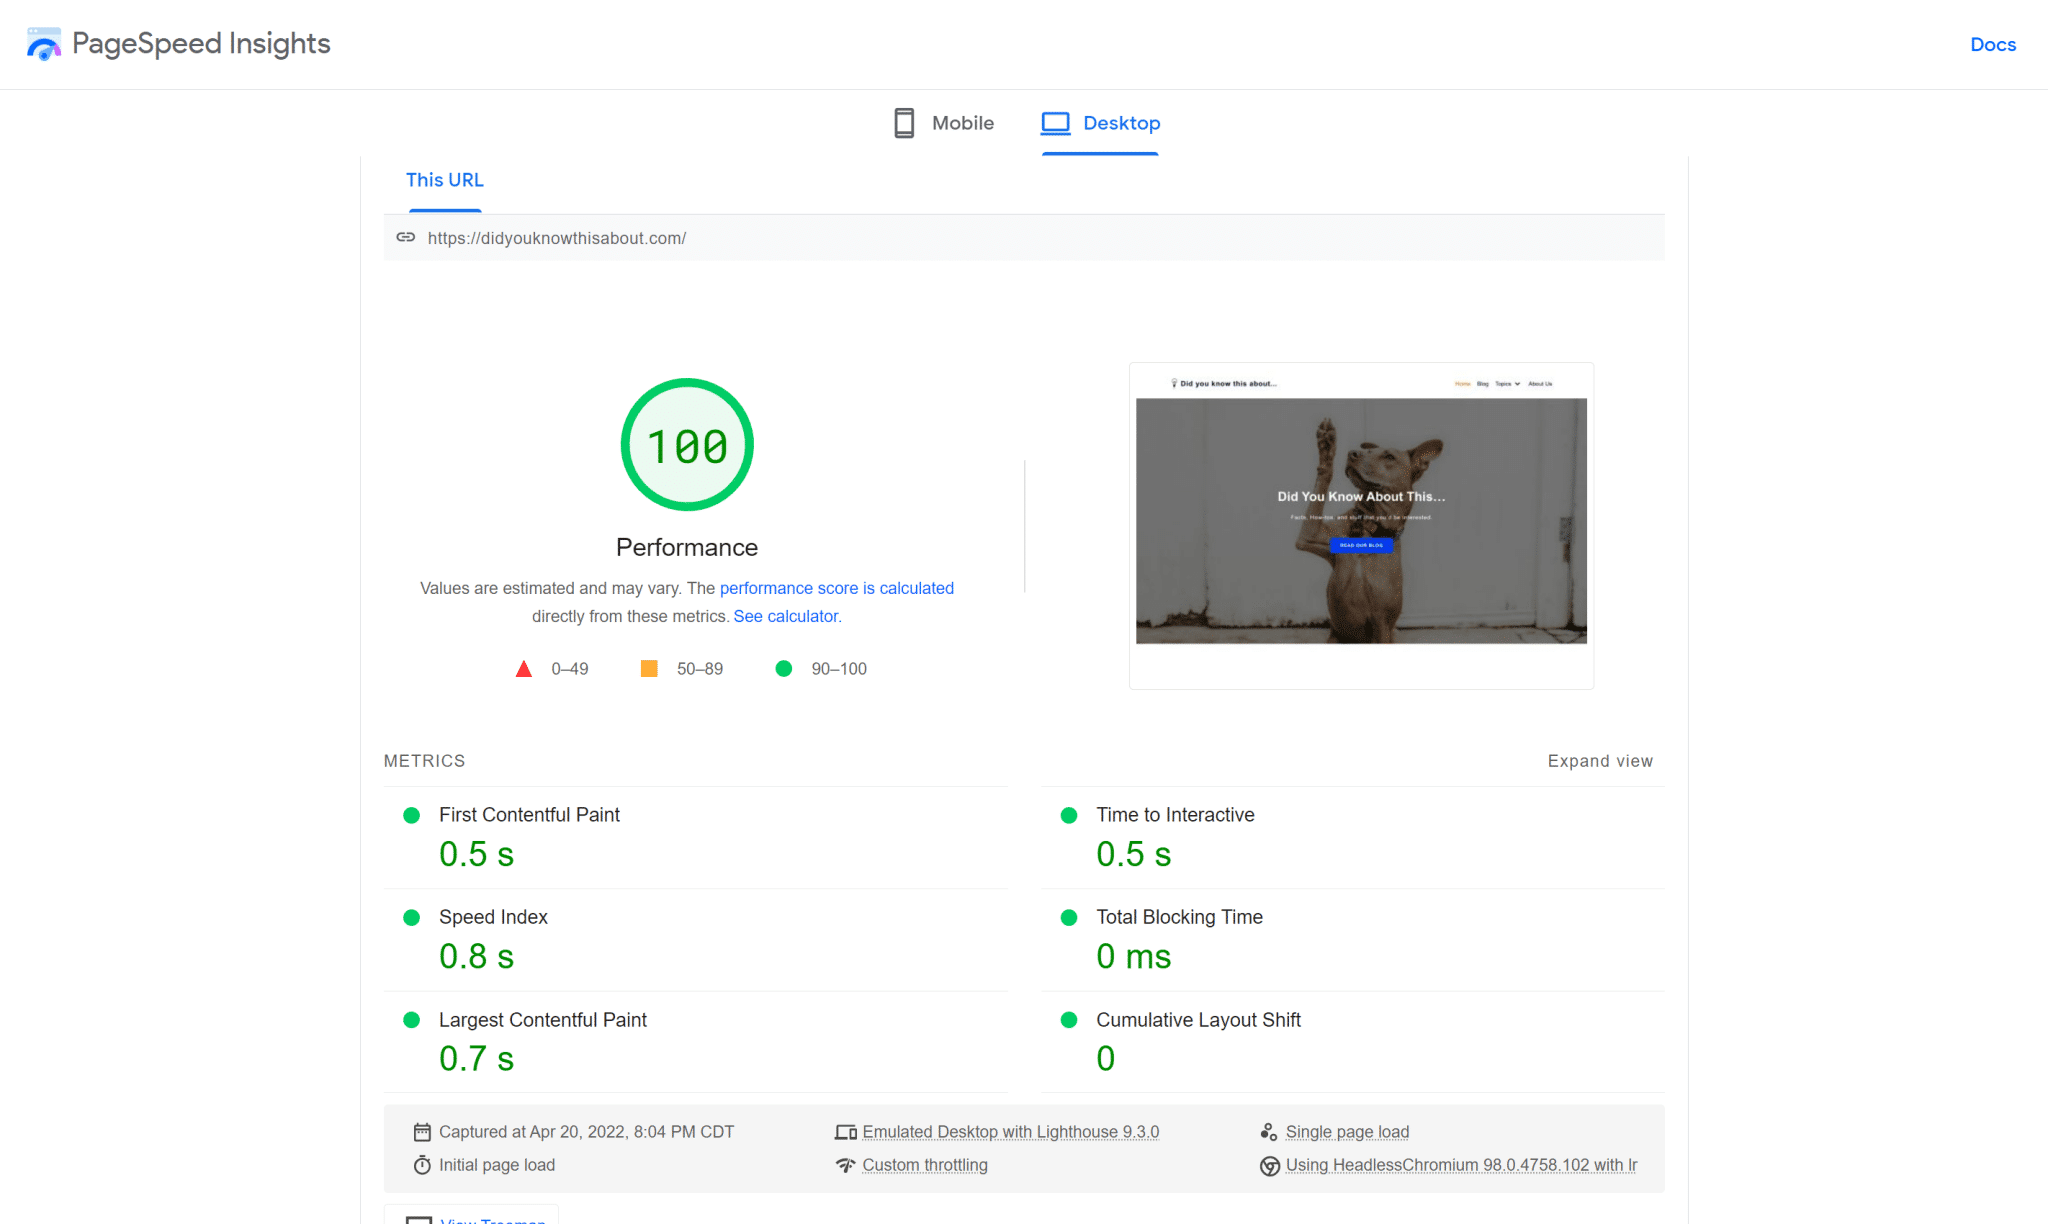
You still see “Reduce initial server response time” due to my hosting provider, but that can be easily resolved by adding a CDN or changing hosting:
GTmetrix shows a better grade and the DNS lookup is now at 13 ms versus 115 ms prior to installing WP Rocket:
Same goes for Pingdom (see below)
And finally, here’s my previous screenshot of my site without WP Rocket, tested with WebPageTest:
Here, you can see the main DNSlookup contributors left are just Google Adsense and the website server:
While WP Rocket won’t directly reduce DNS lookups in some cases, it complements the strategies above since it helps speed up page load times dramatically.
The reason why each web performance tool score improved drastically is because, with WP Rocket, you can:
- Remove unused CSS
- Enable browser caching
- Use DNS prefetching as mentioned above
- Defer JavaScript and delay JavaScript execution
- Automatically enable a ton more speed optimization options, such as, optimize Google Fonts
While WP Rocket works great out of the box, there are some customizations, depending on your site.
How WP Rocket Can Help Reduce Dns Lookup With DNS Prefetching
One feature I want to highlight is the DNS prefetching. It enables you to resolve domain names performance.
How does this work? By the time the user clicks a link as anticipated, the DNS look has already taken place, thus reducing latency.
There is no way to use third-party content without a DNS lookup for each domain. The Prefetch option doesn’t remove the need for the lookup; it just processes it sooner.
DNS prefetching can be added to a specific URL by adding the rel=”dns-prefetch” tag to the link attribute. For example:
<link rel="dns-prefetch" href="//fonts.googleapis.com">To prefetch DNS requests with WP Rocket in a few clicks, first install and enable it on your WordPress site
Next, go to Settings > WP Rocket and click on the Preload tab.
Then, scroll down to the Prefetch DNS Requests section and enter the URLs of the resource hostnames into the multi-line text box that you want to prefetch to reduce DNS lookups.
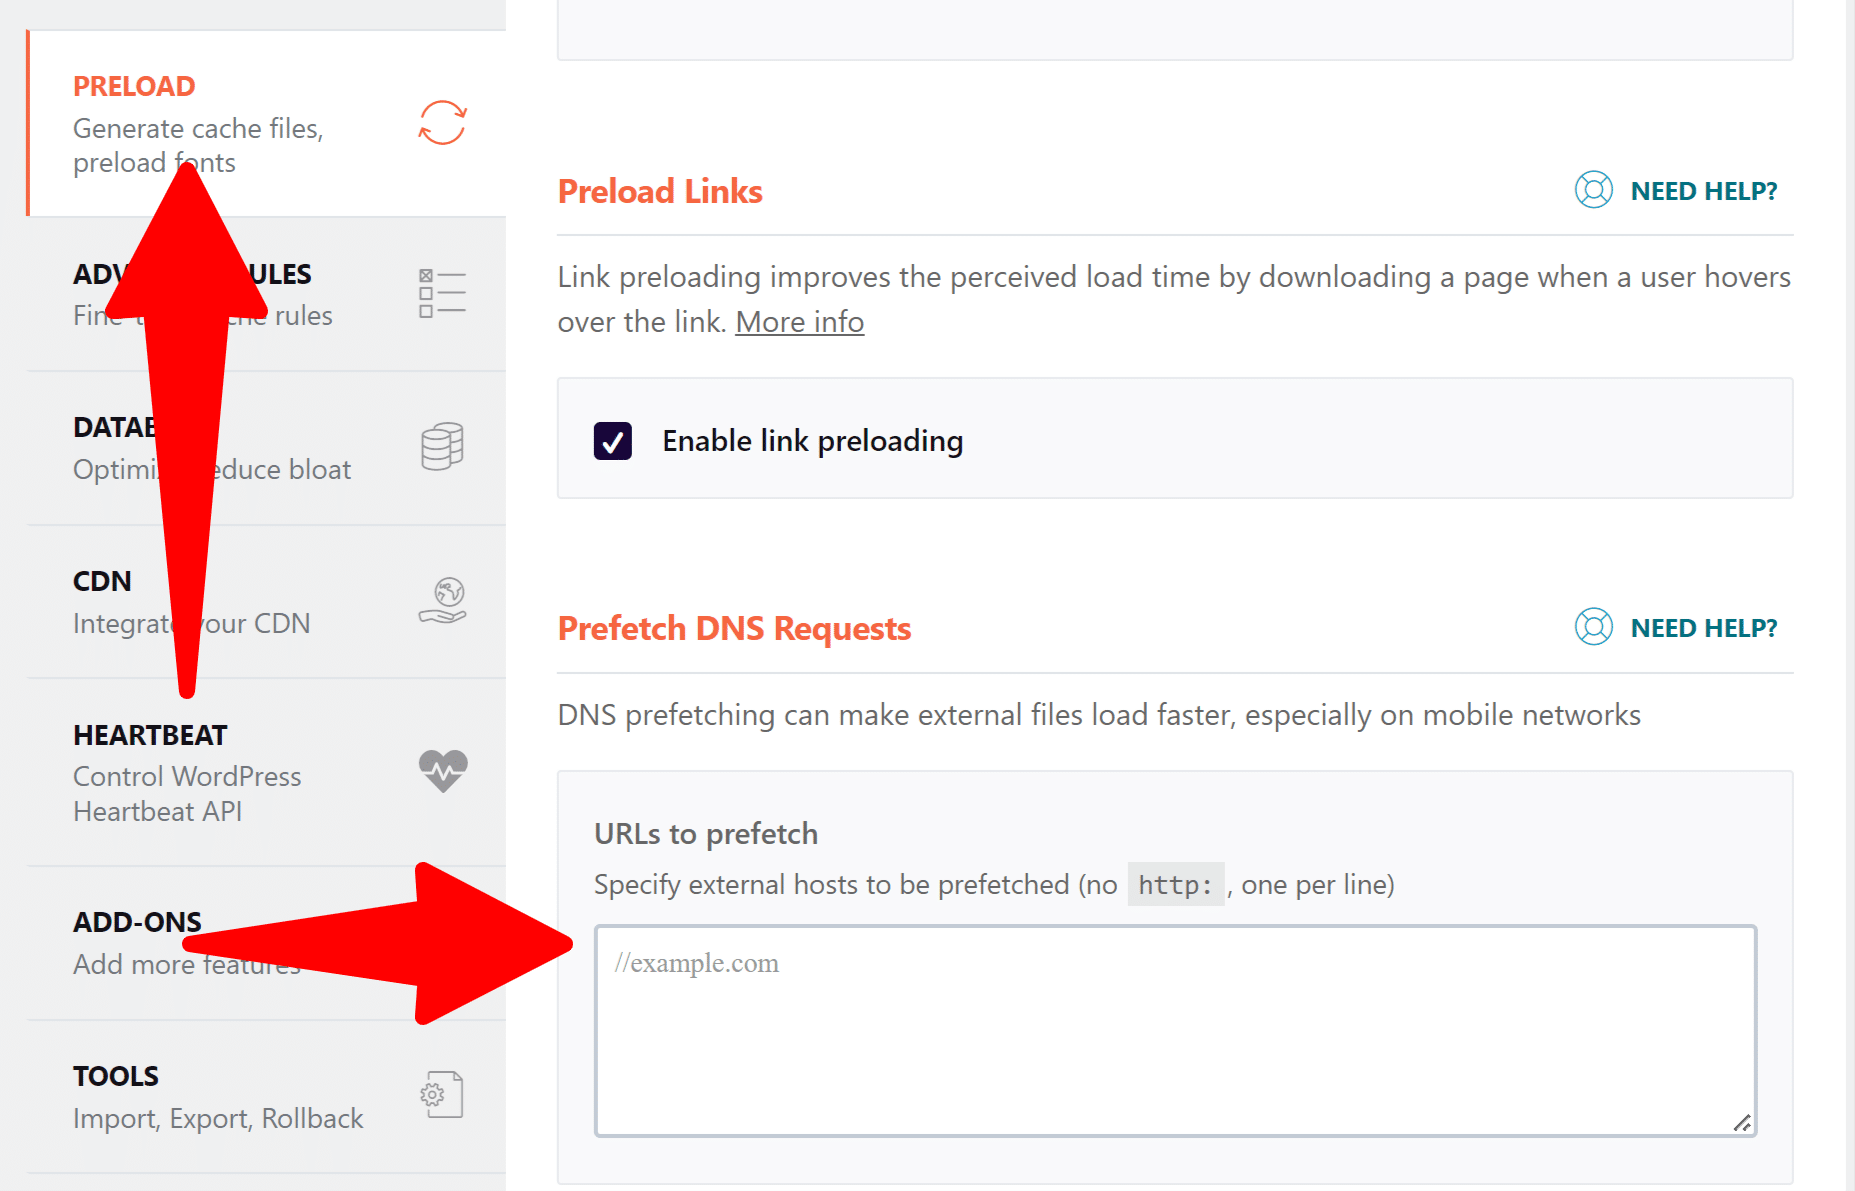
Add the origin host, i.e., the domain on which the file is hosted, like so:
- Remove the http or https
- Keep the double slash
For example, if there is a request like this:
https://fonts.googleapis.com/css?family=Roboto:900%2C400%2C500%2C300%7CRaleway:700%2C300%7COpen+Sans:300%2C800
You would enter it as:
//fonts.googleapis.com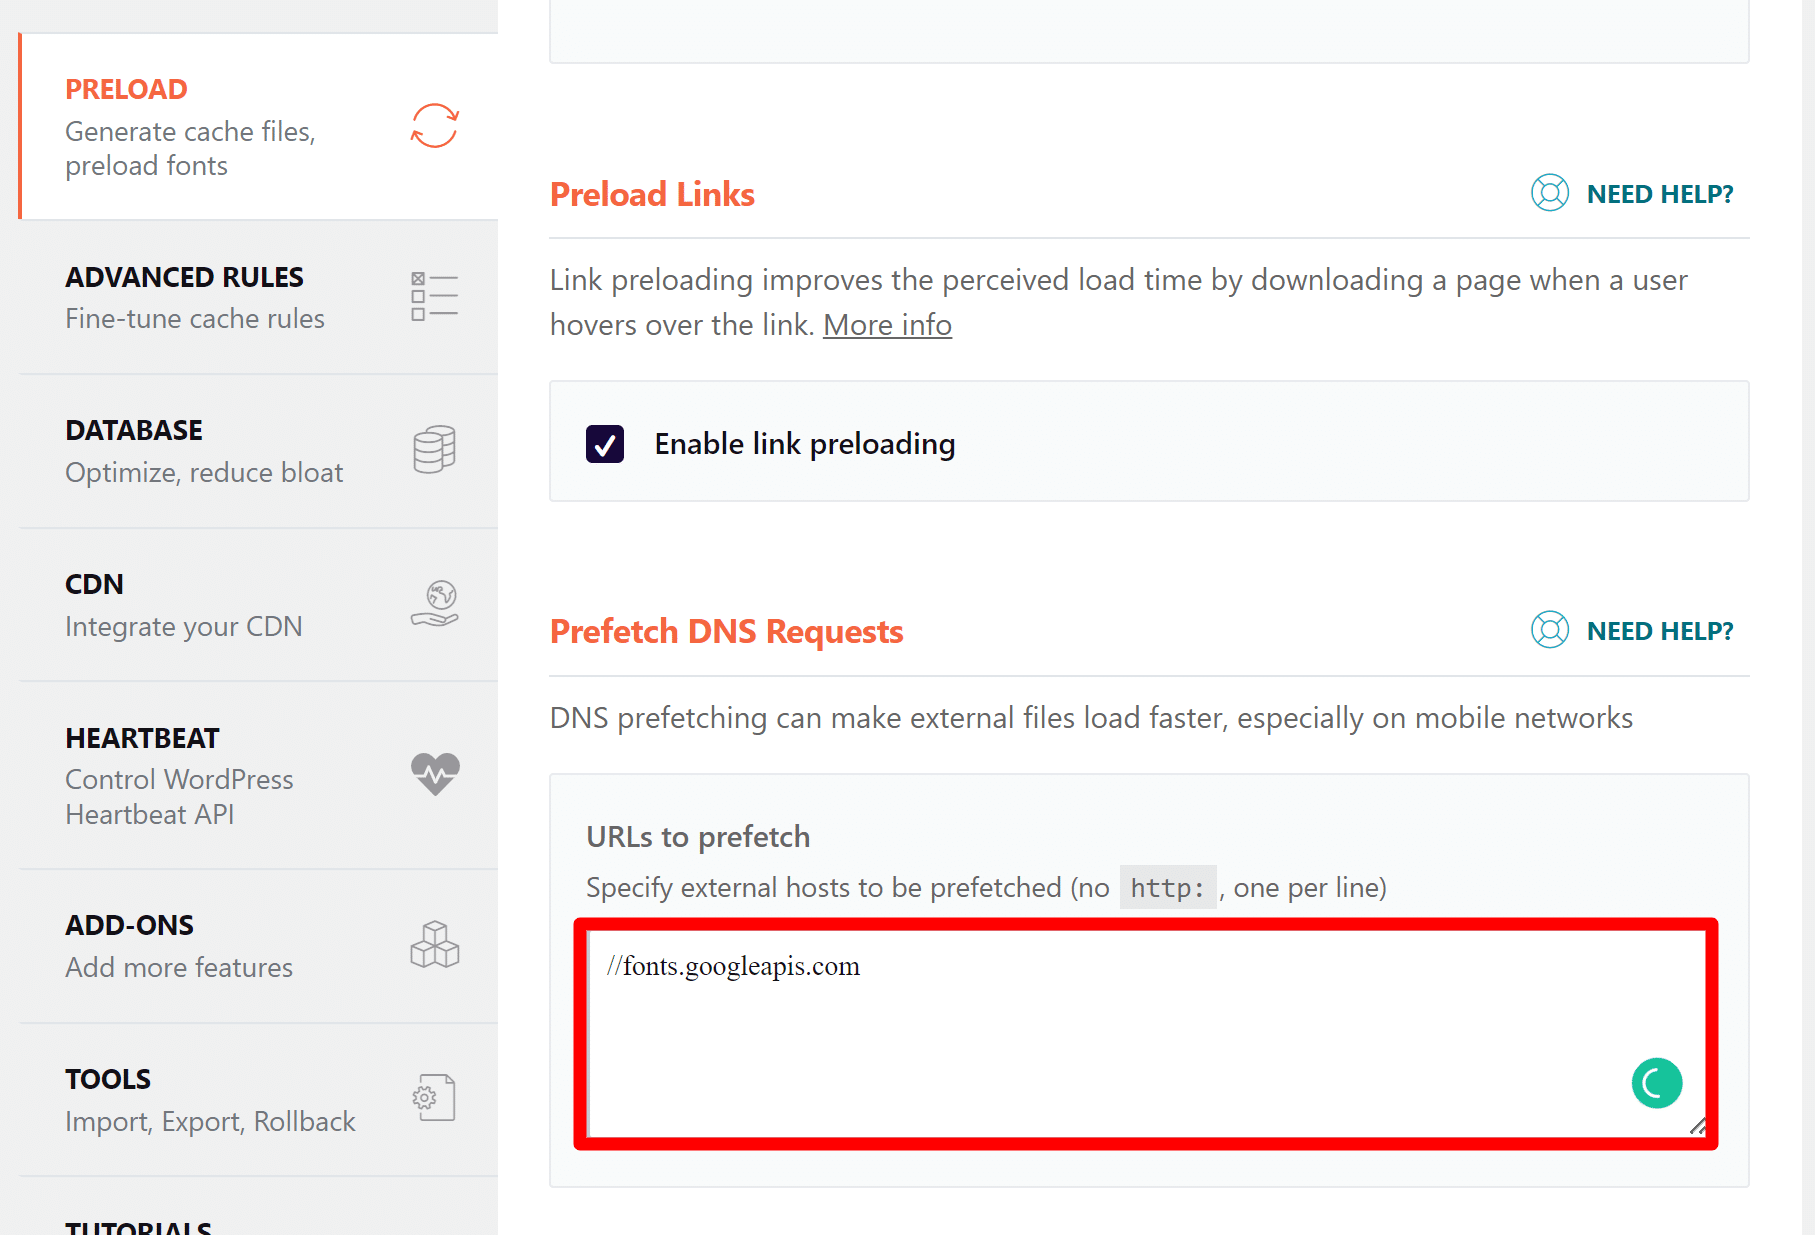
You can add external URLs that are used on a site, e.g. some chat plugins, Fontawesome, other fonts, tracking scripts, etc.
Examples would be:
//ajax.googleapis.com
//maps.google.com
//fonts.google.com
//www.youtube.com
//use.fontawesome.com
///api.twitter.com
Click the following link if you want to know more about how to use our Prefetch DNS feature.
DNS prefetching tells the browser to perform this connection before the file is needed so that it’s already complete by the time the file is requested.
There are other WP Rocket features that run automatically. Optimize Google Fonts for example. While this does not host the fonts locally, it does improve the DNS Lookup.
Bonus: RocketCDN
Our first recommendation to reduce your DNS lookup for your WordPress site was to use a fast DNS provider or a CDN. There’s a variety of options, and we wrote an article on how to choose a CDN and how to test a DNS provider to make sure you get the maximum performance.
In this article, however, I went with RocketCDN, for affordability but also great performance.
While you might able to reduce some with a free Cloudflare account, there’s nothing like a paid service that can get the job done. But if anyone reading this article can produce same or better results with a free Cloudflare account, feel free to leave a comment below!
You can see how Pingdom tool test shows everything green with 100 score:
GTMetrix shows 0 DNS lookup compared to WP Rocket 13 ms:
And prior to installing RocketCDN WebPageTest shows only Google Adsense and Amazon widgets to be the only ones that are causing the issue.

If WP Rocket was not enough to provide all the performance you need, using RocketCDN reduced these ad tracking scripts!
Take a look at the PageSpeed Insight and you can see that “Reduce initial server response time” is no longer showing up:
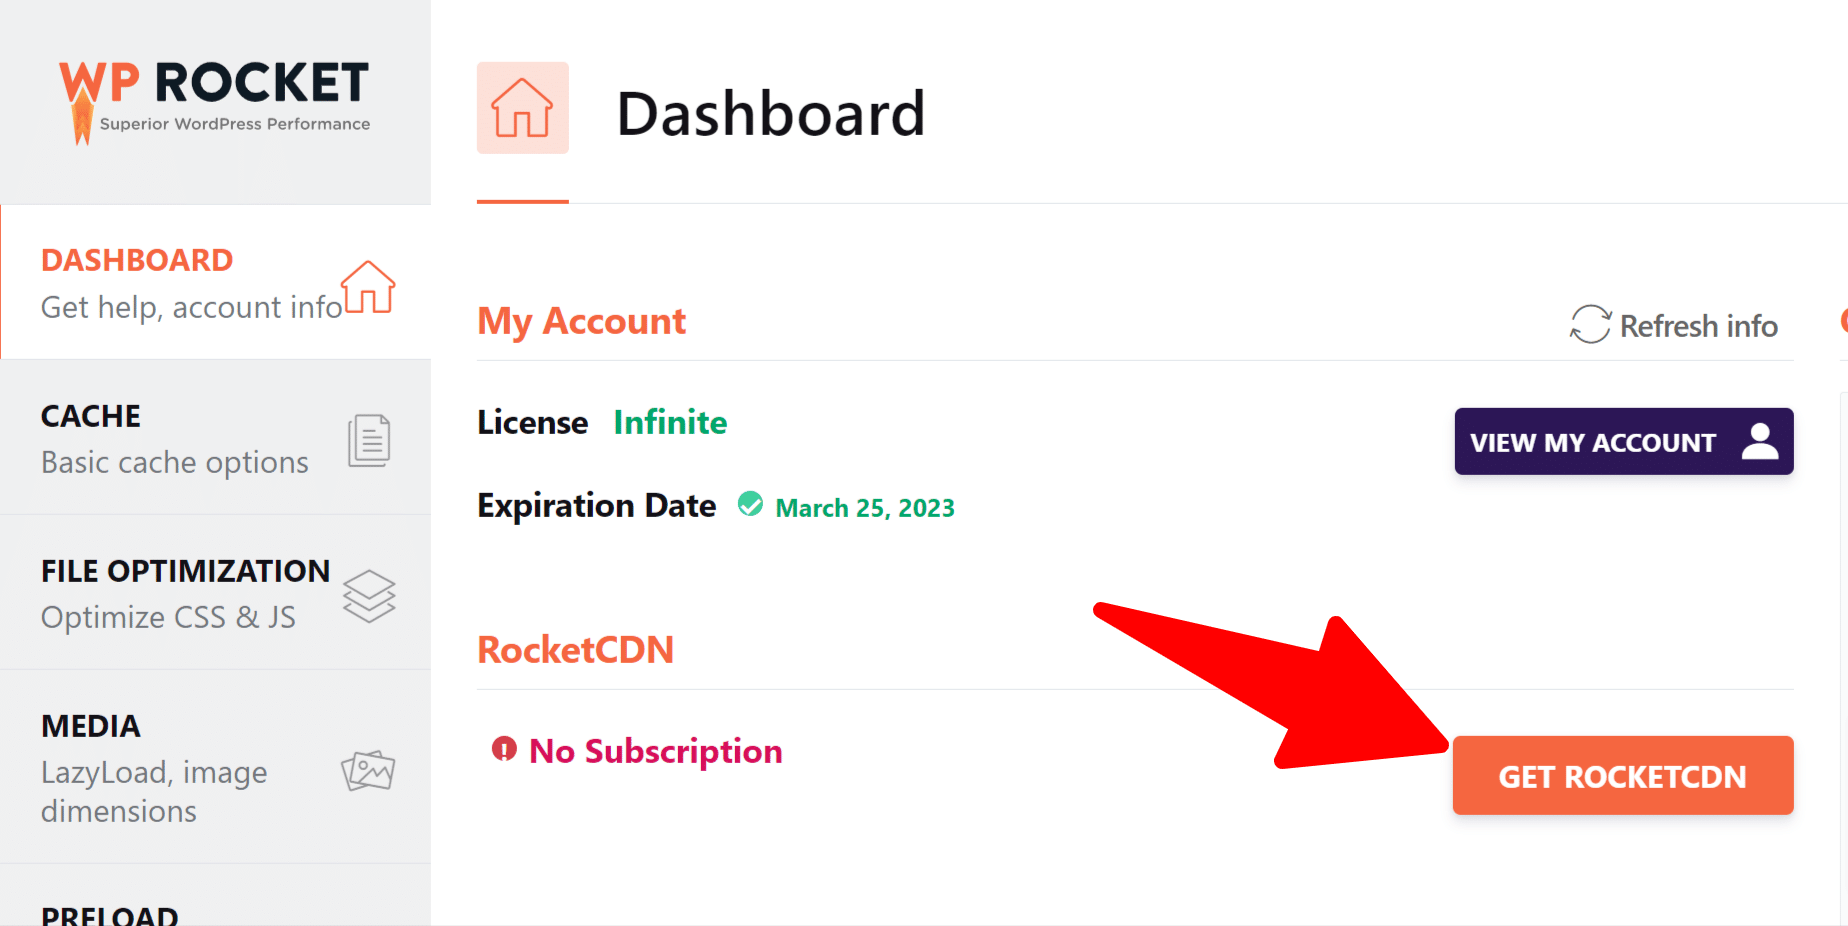
Installing RocketCDN along with WP Rocket is just one click away. Simply go to WP Rocket Dashboard and click “Get RocketCDN”, subscribe and that’s it!
Conclusion
There you have it! Reducing DNS lookups is important in optimizing your site’s performance. Due to abundant third-party services, external requests increase a lot, and it increases the latency for your website visitors.
You can reduce DNS lookups in WordPress much more quickly following all the above steps from this guide.
Save yourself time and let WP Rocket do the job for you: WP Rocket will automatically apply 80% of web performance best practices.
Hopefully, this guide helps you to learn to reduce DNS lookups in easy ways.

Guide to Reducing DNS Lookups
Posted in Performance by Samantha Rodriguez
Last updated on February 2nd, 2022
DNS lookups are an element that many website owners overlook. This is a mistake, however, because too many lookups can reduce the loading speed of your pages. Slow loading speeds can in turn lead to higher bounce rates and lower search engine rankings.
Fortunately, there are steps you can take to reduce your DNS lookups. There are also WordPress plugins that can handle this task for you. To get the job done effectively, though, you’ll need to first understand more about DNS lookups and what kind of response time you’re aiming for.
In this article, we’ll discuss what DNS lookups are and what a good DNS response time is. We’ll then explain how to reduce DNS lookups, and consider some of the plugins you can use. Let’s get started!
What Is a DNS Lookup?
Domain Name Servers (DNSs) are the foundation of the internet. They work like phone books for websites, linking them to their IP addresses. In turn, a DNS lookup is the process of finding the right IP address for a given website URL.
The responsibility of this lookup falls on the web browser. When you navigate to a website, your browser finds all the resources that require a DNS lookup. It then waits for the lookup to process before downloading any of those resources. The more lookups a website requires, therefore, the longer it takes for the browser to render its pages.
What Is a Good DNS Response Time?
Knowing what DNS lookups are can help you understand the importance of reducing them. However, you still need to check and see if they are currently causing a problem on your website. To do this, you can use an online testing solution such as UltraTools.
To run a DNS lookup test, you’ll simply need to provide your website’s URL. Then click on Go, and Ultra Tools will test your DNS response time.
While this provides some insight into your website, you still need to know what a good DNS response time is. These tools record lookups in microseconds. The lower the number is, the better the response time will be.
According to YSlow, DNS lookups generally take between 20ms and 120ms. If the test places your site’s response time on the higher end of that scale, you might want to consider reducing your lookups.
How Do I Reduce My DNS Lookups?
Reducing DNS lookups on your website can improve loading speeds and reduce bounce rates. If you use a page speed tester, many will provide you with recommendations on how to get started. Otherwise, here are some of the best steps you can take.
1. Use a Fast DNS Service
The first step is to reduce the response time for DNS lookups. One of the best ways to do this is by using a fast DNS service. Many people use the DNS provided by their domain registrars, such as Namecheap or GoDaddy. However, these free DNS options are often too slow.
Premium DNS providers generally have faster response times. For example, large providers such as Cloudflare have extensive infrastructure and global data centers. This can reduce the impact that DNS lookups have on the speed of your website.
2. Reduce the Number of Hostnames
One of the easiest ways to reduce DNS lookups is to get rid of requests for different hostnames. When you run your website through a speed test such as Google PageSpeed Insights, a list of hostnames and assets that trigger a DNS request is provided.
You can audit this list to reduce the number of requests. External requests for graphics such as social icon buttons each require a DNS lookup. During your audit, therefore, check to see if these resources are essential to your website. You can weigh the speed cost of the DNS lookup against the benefit of keeping the resource.
3. Host Third-Party Resources Locally
If you find that you still have a number of external resources after your hostnames audit, consider hosting the resources locally instead. Local hosting also provides more control over caching and the delivery of these resources, and eliminates the DNS lookup step.
To host the resources, download the files you need from whenever they’re currently stored, and upload them to your web server or CDN. If you use WP Engine, you can enable our CDN and host the files there.
If you have requests for frequently-updated scripts such as font libraries, however, hosting them locally might not be the best solution. As these resources are updated often, their scripts are better left alone, and other steps can be taken to reduce the impact of their DNS lookup.
4. Use DNS Caching
Another method of reducing DNS lookups is to take advantage of DNS caching. This stops the browser from requesting a lookup every time it requires an element on your website.
The DNS cache acts as storage holding the hostname for a set amount of time. When a browser requests the element, the cache provides the hostname instead of requiring a DNS lookup.
The length of the DNS cache is determined by the Time To Live (TTL). Not all DNS records should be cached for the same amount of time. Some commonly-accepted guidelines are:
- CNAME Records: 24 hours
- A and AAAA Records: Five minutes to an hour
- TXT Records: 12 hours
- MX Records: 12 hours
When setting up DNS caching, keep in mind that the TTL values will usually be shown in seconds. This will need to be taken into account when defining your values.
5. Make Use of DNS Prefetching
Prefetching enables browsers to perform DNS lookups in the background. As a user reads one web page, the browser will request prefetch elements. This is primarily used for links within your content.
It is easy to set up DNS prefetching, by adding the following code to the header of your single.php file (under Appearance > Theme Editor):
<!-- DNS Prefetching -->
<link rel="dns-prefetch" href="//asset1.com">
<link rel="dns-prefetch" href="//asset2.com">
Paste the code in this file either at the top or bottom, and change asset1.com and asset2.com to the links you want to prefetch. You can also add as many additional URLs as you need.
Plugins to Reduce DNS Lookups
While it is possible to manually reduce your DNS lookups in WordPress, there are plugins that can make the process easier. These plugins won’t handle every aspect of reducing DNS lookups. However, they can automate certain steps, such as using browser caching and CDN hosting.
1. WP Rocket
WP Rocket is a premium plugin that works with WP Engine’s caching layers. It offers preloading of content and lazy loading for images. This speeds up the rendering of your website and reduces the DNS lookups.
2. LiteSpeed Cache
LiteSpeed Cache offers browser caching and a free CDN cache. You can also use it to configure DNS prefetch if you are unsure about adding code manually. LiteSpeed Cache also enables code minification and object caching. You can even use the plugin to lazy load images, in order to further improve loading speeds.
Build Customized Digital Experiences on WP Engine
Reducing your DNS lookups is a key method of improving your website’s loading speeds. There are many steps you can take to reduce these lookups and speed up response times. Taking advantage of DNS caching and prefetching is important, but you also need a fast DNS service.
A quality WordPress hosting provider can help with that last step. At WP Engine, we offer built-in caching and DNS services. This leaves you with more time to focus on WordPress development and creating an incredible digital experience!
Your WordPress site speed matters a lot. With the Google Page Experience update around the corner, you shouldn’t take your website speed and performance for granted. The time to work on your WordPress site’s performance is now. And, this post is about one specific website optimization, that is, reduce DNS lookups.
In this article, we’ll understand what are DNS lookups and learn various optimizations that you can perform to reduce DNS lookups.
Let’s get to it!
TABLE OF CONTENTS
- What is a DNS lookup?
- What do DNS lookups have to do with site speed?
- How to Reduce DNS Lookups?
- Reduce the number of Hostnames
- Use DNS Caching
- DNS Prefetching
- Defer Parsing of JavaScript
- Enable Keep-alive
- Keep-alive for Apache
- Keep-alive for Nginx
- Use fewer hostnames by relocating
- Use a speedy DNS provider
- Final Words
What is a DNS lookup?

DNS stands for Domain Name System. It maintains records that determine which domain name maps to which IP address. A DNS is like a phonebook that associates people’s names with a particular phone number.
DNS lookup is the process of finding which IP the domain name belongs to. This Domain Name System allows you to use simple domains such as https://mywebsite.com while still being able to communicate with the server that stores the requested information.
It is the browser’s responsibility to perform the DNS lookups. While loading a web page, the browser finds all resources which require a DNS lookup. The browser must wait until the lookup completes before it can download anything. As per YSlow, DNS lookups on average take between 20-120 milliseconds to complete.
What do DNS lookups have to do with site speed?
Let’s assume your site processes DNS lookups quickly. As a result of that, your pages have a better chance to load within Google’s suggested timeframe.
A DNS lookup happens every time you enter a domain like “your-website.com” into your address bar. The process begins with the website’s Domain Name System (DNS) acknowledging the site address you want to visit. Subsequently, the DNS matches the domain with the website’s IP address and fetches it. The site’s content is able to load after that.
Without a DNS lookup, you would have to enter an IP address like “216.79.25.478” instead of “your-website.com.” That doesn’t sound very convenient or user-friendly, does it?
So, you understand how important DNS lookups are and why they should be completed quickly. Your site speed depends on it!
You should aim for a DNS lookup time of under 100ms. Ideally, you should try to get it below 50ms.
To reduce DNS lookups for your WordPress site, follow the steps below should help vastly improve the DNS lookup time.
1. Reduce the number of Hostnames
You can easily reduce DNS lookups by reducing the number of hostnames used to generate your web page. So, you must go through your site and audit the hostnames or assets that are triggering requests.
If you’re making external requests to generate social icons, fonts, libraries, etc., these all require a DNS lookup. You must determine whether all the external resources are in fact necessary. Evaluate the cost/benefit ratio between keeping the external resources and the additional loading time that it adds.
2. Use DNS Caching
With DNS caching, DNS lookups are not required every time a browser requests an asset. The DNS server’s cache can provide the hostname to the browser without having to look it up. Time to live or TTL defines the length of the DNS cache.
Different kinds of DNS records should not all be cached equally. Caching of each record depends on the type of record you use. The type of record you use should determine what its TTL should be. You can set values as per your preference but you can use the following as a good baseline:
- CNAME Records – 24 hours
- A and AAAA Records – Anywhere between 5 minutes to 1 hour
- TXT Records – 12 hours
- MX Records – 12 hours
In some cases, TTL values are shown in seconds instead of minutes or hours. So make sure that you do the conversion before you define a value
3. DNS Prefetching
DNS prefetching can help you reduce latency by setting DNS Lookups to perform in the background. So, when the visitor clicks on a link with prefetched resources, they won’t need to wait for the DNS lookup to occur. You can set this for assets like Font Awesome, Google Analytics, Google Fonts, and others.
You can easily enable DNS prefetching on your WordPress site. Simply add the following code to the header of your page files:
< !– DNS Prefetching –>
<link rel=”dns-prefetch” href=”//asset1.com”>
<link rel=”dns-prefetch” href=”//asset2.com”>
Make sure that you replace “asset1.com,” and “asset2.com” with the relevant URLs. You can also repeat the last line as necessary.
4. Defer Parsing of JavaScript
If you defer the parsing of JavaScript, it won’t necessarily speed up your DNS lookups. But, it will optimize your above-the-fold content. So, visitors will notice your website being loaded sooner, which helps improve perceived performance.
If you defer the parsing of JS, it’ll allow the important content to be loaded first and then load the non-critical JS.
5. Enable Keep-alive
You can also reduce DNS lookups by enabling keep-alive. Keep-alive implies keeping the connection between a server and browser consistently active. This allows the browser to load more asset files at one time.
Without keep-alive, all resource files are loaded as separate requests even if multiple resources are included in a single domain. So, one asset from “WordPress1.com,” and four resources from “WordPress2.com” would collectively be a total of five DNS requests.
With keep-alive, all those resources would be loaded as only two total requests.
All major browsers support keep-alive. It’s also enabled by default in most cases. If it’s disabled, you can re-enable it on Apache and Nginx servers using the following guides:
Keep-alive for Apache
To enable keep-alive on Apache servers, add the code below to your .htaccess file:
<ifModule mod_headers.c>
Header set Connection keep-alive
</ifModule>
Keep-alive for Nginx
To enable keep-alive for Nginx, find the HTTP core module(ngx_http_core_module). Search for a line that’s similar tokeepalive_disable, and change it to the following:
keepalive_disable none;
6. Use fewer hostnames by relocating
Once you have enabled keep-alive, you can combine or relocate as many resources as you want under fewer hostnames.
Combining everything into one hostname might be difficult, but you might be able to relocate some resources like stylesheets.
7. Use a speedy DNS provider
You can also use a fast DNS provider to optimize your DNS lookups. There are many DNS providers to choose from but all are not the same or equal. Perform your research before reaching a final decision and run performance tests to compare them against your current DNS provider.
You can analyze the speed of providers using DNS Speed Benchmark,DNSPerf, or DNS Speed Test.
Final Words
Reducing DNS lookups is important in optimizing your site’s performance. Due to abundant third-party services, external requests increase a lot and it increases the latency for your website visitors.
Is your site slow, and PageSpeed Insights & GTMetrix are recommending you to reduce DNS lookups? If yes, then you can use the suggestions in this post to resolve the issue and improve your site’s performance.
Do you want to reduce DNS Lookups to improve the site loading speed?
When you optimize the WordPress site for the speed, there is so much you can do—such as TTFB, Optimizing Images, Caching, etc.
During the website speed tests, you will find the suggestion of reducing the number of DNS lookups in almost every test. It is an important factor for improving the loading time of the site.
In this post, I will tell you all about it, and how you can reduce DNS lookups.
What is DNS Lookup?
DNS means Domain Name System.
Every Domain points to an IP address. That IP Address is responsible for making the site accessible to the browser. Without the IP address, the connection will not form.
But these IP addresses are complicated numerical. Humans can’t remember them all the time. On the other hand, a word is easy to remember and track, and also brandable.
Now, each domain name gets an IP address. A person puts that domain name in the browser, and the ISP (Internet Service Provider) asks for the nameserver associated with the domain.
The DNS system is like a phonebook with the information about what IP address the domain name points to.
The time it takes to find out the IP address of any domain name is DNS Lookup.
DNS Lookup is the time taken by the browser and the system to find the domain’s IP address, so the downloading can begin. The average time for DNS is 20-120 milliseconds to complete.
DNS Lookup Time in Various Speed Test
Let’s see the DNS lookup of a site in the two most popular Speed Test tools.
GTMetrix
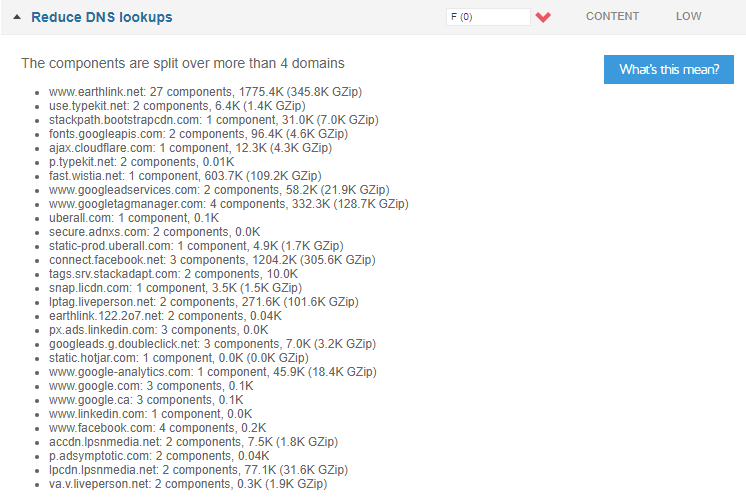
Pingdom
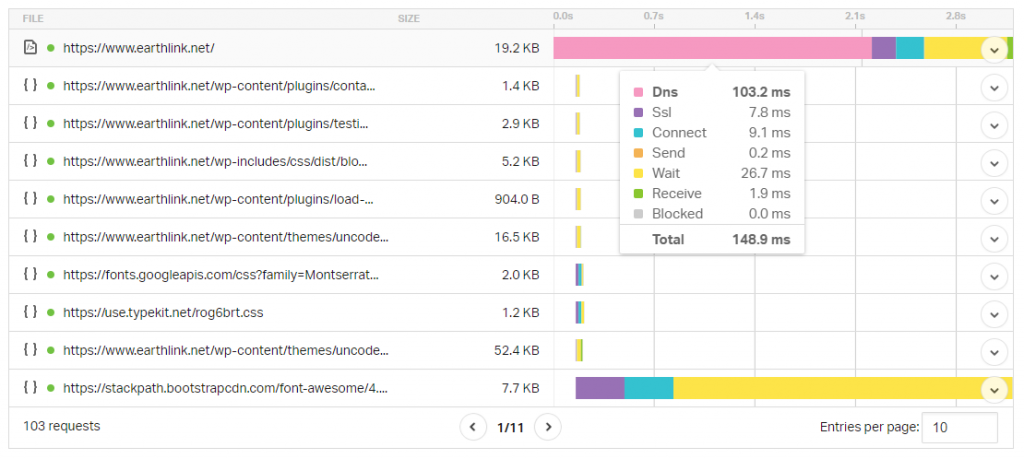
As you can see, the Pingdom and GTMetrix are recommending the site to reduce DNS lookups.
Let’s look at the GTMetrix result. Total DNS Requests:
earthlink.net: 1 component, 0.1K
www.earthlink.net: 27 components, 1775.4K (345.7K GZip)
use.typekit.net: 2 components, 6.4K (1.4K GZip)
stackpath.bootstrapcdn.com: 1 component, 31.0K (7.0K GZip)
fonts.googleapis.com: 2 components, 96.4K (4.6K GZip)
ajax.cloudflare.com: 1 component, 12.3K (4.3K GZip)
p.typekit.net: 2 components, 0.01K
fast.wistia.net: 1 component, 603.7K (109.2K GZip)
www.googleadservices.com: 2 components, 58.2K (21.9K GZip)
www.googletagmanager.com: 4 components, 332.7K (129.0K GZip)
uberall.com: 1 component, 0.1K
secure.adnxs.com: 2 components, 0.0K
static-prod.uberall.com: 1 component, 4.9K (1.7K GZip)
connect.facebook.net: 3 components, 1204.2K (302.9K GZip)
tags.srv.stackadapt.com: 2 components, 10.0K
snap.licdn.com: 1 component, 3.5K (1.5K GZip)
lptag.liveperson.net: 2 components, 271.6K (101.6K GZip)
px.ads.linkedin.com: 3 components, 0.0K
static.hotjar.com: 1 component, 3.4K (1.5K GZip)
earthlink.122.2o7.net: 2 components, 0.04K
googleads.g.doubleclick.net: 3 components, 7.0K (3.2K GZip)
www.linkedin.com: 1 component, 0.0K
www.google-analytics.com: 1 component, 45.9K (18.4K GZip)
script.hotjar.com: 1 component, 372.4K (71.6K GZip)
www.facebook.com: 4 components, 0.2K
p.adsymptotic.com: 2 components, 0.04K
www.google.com: 3 components, 0.1K
www.google.ca: 3 components, 0.1K
vars.hotjar.com: 1 component, 2.0K (0.8K GZip)
accdn.lpsnmedia.net: 2 components, 7.5K (1.8K GZip)
in.hotjar.com: 1 component, 0.1K (0.3K GZip)
lpcdn.lpsnmedia.net: 2 components, 77.1K (31.6K GZip)
va.v.liveperson.net: 2 components, 0.3K (1.9K GZip)
The site is making so many DNS Lookups, which affects the speed of the website.
This is the result of an unoptimized site. That’s why you must work to speed up the WordPress site. So it can load fast, and the visitor can have a better surfing experience.
Reduce DNS Lookups
Here are a few tips to Reduce DNS Lookups.
- Use a Fast DNS Provider
- Reduce Number of Domains
- Fast Alternatives
- Host third party resources locally
- Use DNS cache to your advantage
- DNS prefetching
- Minimize the number of CNAME records
- Defer parsing of JavaScript
#1 Use a Fast DNS Provider
The most important thing is to use a high-quality DNS provider. There are many DNS providers, free and paid.
When you buy domain names from any popular registrar, such as GoDaddy, NameCheap, or Namesilo, you get free DNS. These DNS providers are usually slow and when the request increases, DNS lookup time rises too.
Then there are DNS providers such as Amazon, and Cloudflare, with their POPs expanding to multiple countries. Premium DNSs are fast and have very low latency.
Best DNS Providers:
- Microsoft Azure
- GoogleDNS
- Oracle
- OpenDNS
- Infoblox
- Cloudflare
- Akamai
- NS1
- Verisign
- Neustar
According to DNSPerf Metrics:
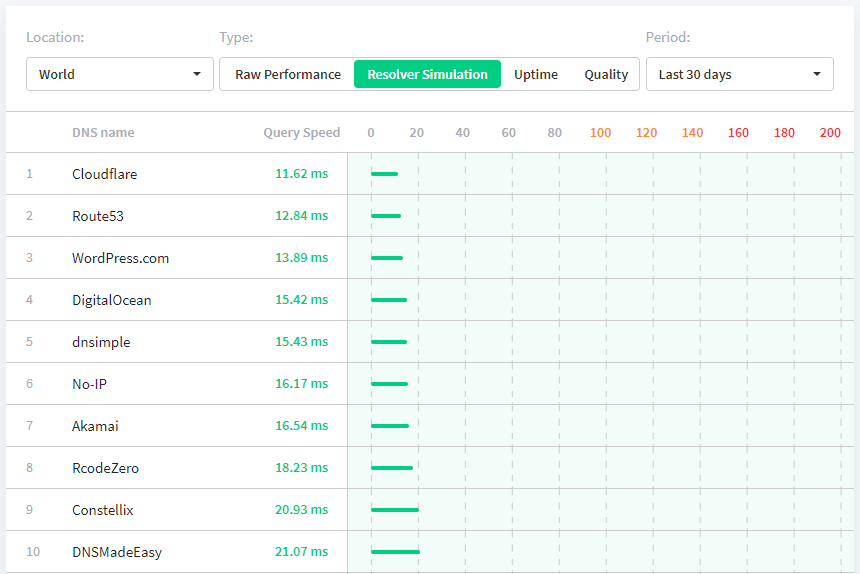
However, it keeps changing. Check the latest.
#2 Reduce Number of Domains
The quickest way to reduce DNS lookups is to reduce the number of hostnames.
As we saw a large number of hostname requests in the GTMetrix test, we can reduce the DNS lookup time if we can reduce those numbers.
But you have to understand, it is not about the number of requests, but the number of requests to each separate domain. Check out the number of individual domain requests, and if they are high, try to reduce their number.
Run your site through a speed test tool, and evaluate all the external requests. Do you need those tools on your website?
Find a balance between usability and speed of the site.
#3 Faster Alternatives
In point #2 I talked about removing the tools that have high DNS lookup time.
But what if you want those add-ons and services.
Such as Analytical tools. Now maybe the analytical tools have a high DNS lookup time, but it is important to know the number of visitors on your site and all those metrics.
You can tackle this situation by using alternative methods. A faster alternative with better DNS lookup time.
Find out the alternative tool or any other programs that perform the same task.
Compare the DNS lookup time of the tools before implementing them on the site. It is vital to evaluate how the external program will affect the loading speed of your website.
#4 Host third party resources locally
If you do not want to remove the third-party resources from your site, and the alternatives are not good enough, you can host the third resources locally.
This way, there will be no external request. Also, you will be able to control how the resources should be loaded. You can manage the caching of the assets, and decide whether CDN should deliver it or not.
To do this, you have to download the file from the external resource, and then host it on your server. If you install it on the CDN instead of your server, it will improve the loading time of the site more.
However, you can not use this method for all the resources. Some third-party scripts have to be load from their server, and they require regular updates, so it is not possible to load them from your hosting.
But this works for many types of assets, such as loading Gravatars, Fonts, Embed pics, etc..
#5 Use DNS cache to your advantage
The DNS caching allows the browser to remember the IP address of the domain. The browser does not have to make a request to find the IP. That’s why the DNS lookup time is often high in the first speed test compared to the second one.
You should take advantage of the DNS caching to your advantage. With the caching, the browser can find the hostname without looking up the DNS.
The length of the DNS cache is known as TTL or Time to Live.
However, there is no ideal TTL. But there are the averages you can use that are considered to be performed well.
- CNAME Records – 24 hours
- A and AAAA Records – Anywhere between 5 minutes to 1 hour
- TXT Records – 12 hours
- MX Records – 12 hours
#6 DNS prefetching
DNS Prefetching enables the browser to silently perform the DNS lookup in the background while the user browses the current page.
When the person clicks on any link to open up the next page, the page does not take the time to look up the DNS. Hence, the next page loads quickly.

You can quickly add the DNS prefetching with the simple line of tag.
<link rel="dns-prefetch" href="https://www.yourlink.com">A tiny link attribute can make a difference in the landing speed of the DNS.
#7 Minimize the number of CNAME records
CNAME records add one more step in the process of DNS lookup. That adds up to increase the overall DNS lookup time.
Having multiple CNAME records is the usual practice; however, if you want to reduce DNS lookups, you should keep them at minimum. The best option is to use the ANAME records, which serve the same purpose as CNAME but at the root level.
As a result, ANAME records help in speeding up the site better than CNAME records.
Therefore, instead of the following lookup process with a CNAME record:
www.yourwebsite.com. 43200 IN CNAMEyourwebsite.com.
yourwebsite.com. 43200 IN A 192.1.1.1
An ANAME record will return the following:
www.yourwebsite.com. 43200 IN A 192.1.1.1#8 Defer parsing of JavaScript
Deferring the javascript means that the parsing of javascript will start only after page content has loaded.
Loading Javascript before the other elements of the page will affect the loading speed of the page as Java holds the loading of other resources until it gets parsed fully.
The simple solution is to load the Javascript in the end or load it Asynchronously. WordPress users can use various free Plugins such as Async Javascript.

FAQ
Why is DNS Propagation taking so long?
DNS Propagation takes time to update because nameservers keep the domain record information in the cache for some time before flushing it. Once cache is cleared, the new information could be restores and the DNS is updated.
Wrap Up
When optimizing the page for speed, the DNS lookup plays a significant role. It is small, but it can increase a lot with the number if you take it lightly.
In this post, I mentioned how DNS lookup works, how you can reduce DNS lookup, and why you should use faster DNS providers.
I hope after reading the post, you can reduce DNS lookups for your site.
If there are any questions, leave them in the comment box.