Google PageSpeed Insights tool shows many recommendations for improving the page loading time of a website. For WordPress site, you can easily fix most of the issues with the help of plugins. However, fixing certain issues like “Reduce initial server response time” needs a better understanding of how WordPress works and other external factors affecting your site loading time. If you are struggling with this issue, here is a complete guide to fix reduce initial server response time in WordPress.
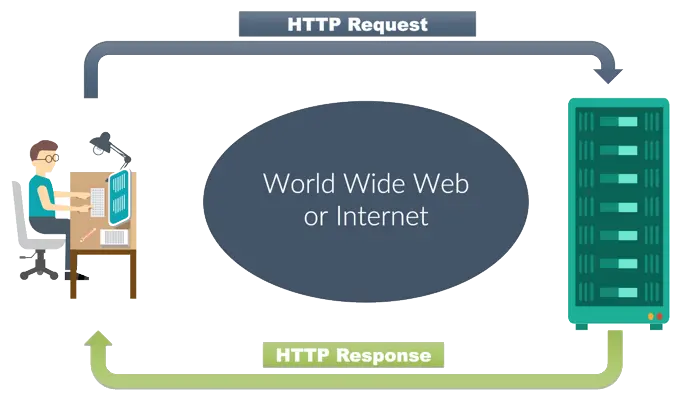
When you open a webpage, browser sends a request to your web server. After receiving the request, server checks the correctness and sends a response back with a proper HTTP status code. In this process, the time taken between opening a webpage and the first byte of response received from a server is called Time to First Byte or TTFB.
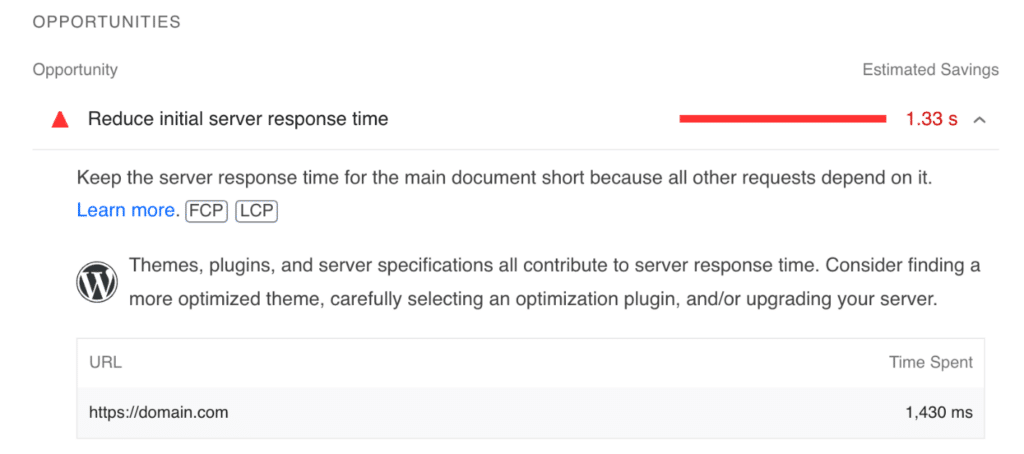
Google measures this TTFB as a performance metrics since delayed response from server can annoy the user and affect the experience. When TTFB is longer, you will see the warning “Reduce initial server response time” under “Opportunities” section as shown below.

You can find the actual response time from your server in seconds and suggestion to reduce the time under the recommendation.
Why You Should Fix this Issue?
Server response time is something you should consider improving regardless of whether it is showing in Google PSI or not. Slow initial server response essentially means that the content on the page is not loading for long time after the user initiated the request through browser. Due to this delay, users may leave your site causing potential revenue loss to you. Hence, you need to fix slow server response to retain the user on your site and offer good user experience. Remember, happy users can potentially become your long term paying customers.
Fixing Slow Initial Server Response Time
Earlier, the guidance was to have less than 200 milliseconds response time while the Google PSI audit will still pass if TTFB is lower than 600 milliseconds. However, this is not directly applied when calculating Core Web Vitals score with the latest Lighthouse version used in Google PSI. As you can see in the above image, it affects two metrics in Google PSI – FCP and LCP. These are First Contentful Paint (FCP) and (Largest Contentful Paint).
Here is what Google says about the best TTFB score on the official page:
Due to the wide variation of network and application backend stacks, an arbitrary number can’t be placed on what consists of a “good” TTFB score. Because TTFB precedes user-centric metrics such as First Contentful Paint (FCP) and Largest Contentful Paint (LCP), it’s recommended that your server responds to navigation requests quickly enough so that the 75th percentile of users experience an FCP within the “good” threshold.
The FCP threshold is 1.8 seconds for 75th percentile separately measured for desktop and mobile devices. On other hand, LCP metrics is used for Core Web Vitals and hence this issue can directly affect your search ranking visibility.
Therefore, fixing “Reduce initial server response time” issue is the task of reducing FCP to less than 1.8 seconds for 75 percentile of your page loads.
Keeping this complex stuff away, you can simply focus on reducing TTFB below 600ms. Once this is done, you will see the audit passes and the message moves under “Passed Audits” section with green bullet.

How to Fix Reduce Initial Server Response Time Issue in WordPress?
You can click on the “Learn more” link showing in Google PageSpeed Insights tool to get an idea of the issue and the suggestions for fixing. However, it may not be a quick fix like how you can fix other issues like enable text compression, reduce total blocking time or unused CSS/JS. Below is the image from Google’s TTFB page indicating the components involved in TTFB from the request to receiving first byte of response.

As you can see, there are multiple factors like redirects, DNS and caching can affect the TTFB and result in slow initial server response time. Based on this input, let us explain some basic stuffs you have to look for fixing reduce initial server response time issue in WordPress to improve the TTFB.
1. Quality Hosting
As the warning message indicates, server response time depends on the quality of your hosting company. Do not expect to get <600ms response time when using shared hosting services from Bluehost or HostGator. Even when you have a small blog, these servers are shared across multiple websites and hence will respond slowly. If you are determined to have a good website, then upgrade your hosting plan in which you get sufficient server resources.
The best way is to check the server usage dashboard in your hosting panel to understand the current situation.
- Check how many CPUs are used and how many more can help you to handle the traffic.
- Find the RAM usage to understand how your server handles the traffic spike and how many GBs you need to increase.

In summary, you need to go for managed WordPress hosting companies like WPEngine or Kinsta. Alternatively, you can use VPS or dedicated servers with any hosting company to dynamically allocate resources for your need. For example, we use Cloud VPS hosting with SiteGround with autoscale feature to dynamically increase CPU and RAM.
2. Use CDN
Having a premium quality hosting service will not be simply sufficient to fix “Reduce initial server response time” warning in Google PSI. In fact, the above screenshot of warning is from this website which we host on Cloud VPS. The reason is simple – network latency affects the server response time. The origin sever of this site is located in United States but we did the testing from India using VPN. The warning message will not appear if we check the Google PSI tool from US.
That’s being said, obviously user’s location will affect the server’s response time. The solution is to use Content Delivery Network (CDN) to deliver the content from the nearest location of the user. This will help you in reducing the load on origin server as well as reduce the TTFB thus increasing the server response time. Most hosting companies offer free Cloudflare CDN integration. Or you can connect your WordPress site to Cloudflare by creating an account and change the DNS nameservers. If you do not like to change nameservers, try CNAME setup with StackPath, BunnyCDN or similar services.
Note: Tools like GTmetrix will explicitly shows to use a CDN while Google PSI will not detect this.
3. Use Dedicated Private DNS
DNS comes as part of you hosting service and generally use the common nameservers provided by the company. Though this will work fine, you can always go for a dedicated IP and private DNS setup. This will help to propagate through the network of servers and reduce the DNS lookup time considerably.
- Go to Pingdom speed test tool and test any page on your site.
- After the test finished, scroll down and check under “File Requests” section.
- You will see a waterfall chart with different colors or each item loaded on your site.
- Hover over the first item, which should be your URL to see breakup of time taken from the request till response.
- Check the time taken for DNS and make sure it is lowest as possible in few milliseconds.

As you can see the “Wait” time is too high causing delay in page loading. In this case, it is a clear indication of problem with the response from the server and not with DNS or TLS connection.
4. Avoid Multiple Redirects
Another issue with delayed response is having multiple redirects before reaching the final requested page. For example, you might have migrated from another platform with .html page extension to WordPress and then changed the slug of a page two times to setup 301 redirects. In this case, someone trying to access your old .html page will be redirected three times before the request reaches the final and correct resource on the server. We have migrated our site from Weebly to WordPress more than five years back and still receive hits from the old Weebly URL. This is due to the reason that many websites linked old URLs at that time and we can’t change those external URLs pointing to our site.
Though you can’t change the externally linked URLs, here are some of the ways you can avoid multiple redirects in WordPress.
- Avoid updating the slug (which will change URL), instead only the title of the page. For example, many users recycle the content by updating the year in the slug like “Top 10 WordPress Plugins for 2021” to “Top 10 WordPress Plugins for 2022”. In this case, you can only change the title of the page and keep the slug as common as “Top 10 WordPress Plugins”. Since URLs do not have direct SEO impact, this will not affect your ranking in search results.
- Do not change the permalink once set. Also, do not change the setup for adding or removing category in the URL.
- When you have to change the slug multiple times, make sure to update all old URLs to the latest URL. This can help to connect with single redirect instead of looping multiple times.
5. Check Your Plugins
In 99% of cases, using quality hosting with CDN will fix reduce initial server response time warning in Google PSI (especially if you have new site without redirect issues). If not, it’s time to audit your website setup by checking the plugins you installed on your site. Some plugins will create complex database query and take long time for retrieving the data from your database. Since these queries are dynamic in nature, CDN will not help much as it is only used for caching static resources like images, CSS and JS files.
The best example is using popular post plugin to show content recommendation below the article. It may work well when you have a smaller site but will fail with long database query when you have larger database. It will considerably slow the TTFB when the plugin needs to pull related content from thousands of posts and this has to happen dynamically each time the user loads the page.
Due to this fact, hosting companies like WPEngine does not allow query intensive plugins that slow down the server. You may need to disable the plugins one by one and find which one is causing the issue for your site. Alternatively, you can use Query Monitor plugin and monitor the response time from your dashboard to find which request takes longer time. Once you identified the culprit plugin, simply delete it from your site and use better replacement.
Here are some types of plugins that you should avoid in WordPress:
- Using page builder plugins for posts, make sure to use page builder only for pages.
- Related and popular posts plugins.
- WooCommerce on shared hosting.
- JavaScript intensive plugins like sliders and gallery.
Other example of heavy plugins include page builder plugins and WooCommerce.
6. Check Your Theme
Next thing to optimize is your theme. We strongly recommend using minimalist themes like GeneratePress or Astra. You can get all needed features with these themes and install a plugin when you need additional features. Besides slow initial server response time, you can find some indications when you have a slow theme.
- Warning for removing unused CSS and JavaScript and avoiding render blocking resources in Google PSI.
- Query Monitor plugin shows the theme files are taking too long time to load.
- Theme not updated frequently and does not support the latest PHP or WordPress version.
- Bundled with large number of plugins which do not use on the site.
If you find any of the symptoms with your theme, then it is high time to consider changing the theme.
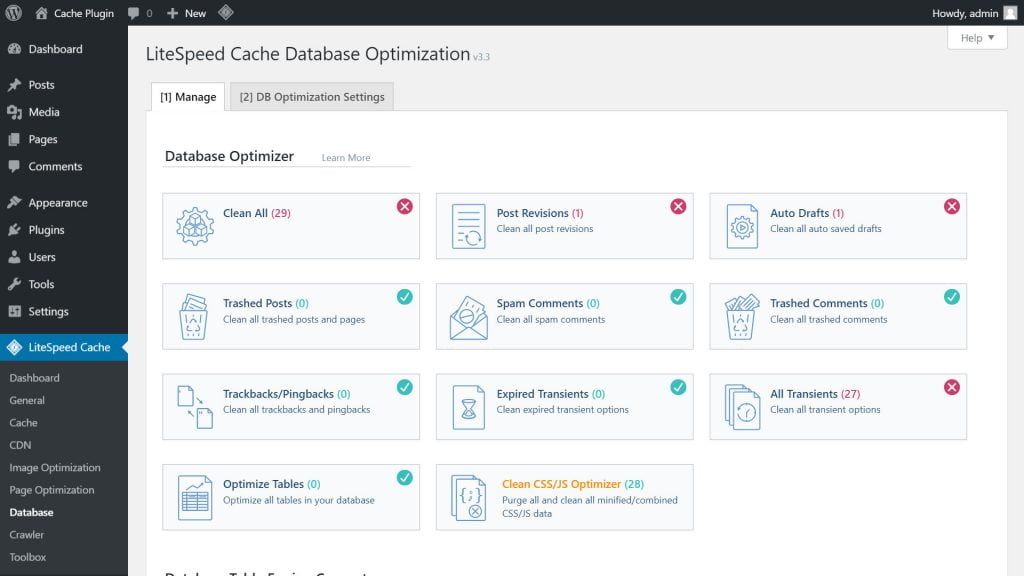
7. Clean Your Database
Over period, WordPress accumulates plenty of stuffs in the database. These stored options in database may load on the page, even though you do not need and affect the loading time. Though you can cleanup some of the items, you may need a professional SQL developer to completely cleanup the junk. Here are some of the ways to avoid accumulating junk in your database.
- Schedule database cleanup with WP Optimize or any similar plugin to delete post revisions, autosaves and spam comments. Hosting companies like SiteGround offers custom plugins (SiteGround Optimizer) which you can use for this purpose.
- Avoid installing unnecessary plugins and delete the database tables related to those plugins that you have already deleted. For example, if you use WP Rocket plugin for used CSS generation, you need to delete the table in database where it stores huge CSS while deleting the plugin from your site.
- Search and delete all unused custom fields stored in wp_options and wp_postmeta tables.
- Avoid using a theme or plugin that adds meta box with custom fields. Each value for the custom field you add in the post meta box will be stored in the database and needs to be retrieved during page loading. This can intensify the database query and delay the content loading.
8. Use Optimized Caching Solution
If you have a CDN setup, it is possible to enable minify and combine CSS and JS at CDN server level. However, using a strong caching plugin like WP Rocket can help you in complete level of optimization. You can get page level caching, browser caching, lazy loading and integrate CDN to super charge the loading of your pages. If your hosting company offers a caching plugin or server level caching, make sure to use that option.
9. Disable Heartbeat API
Heartbeat API is a real-time service to call the server and get updates for you. For example, you can have a WooCommerce sales widget in your WordPress dashboard section to monitor the sales in your online store. However, this can slow down your site by sending frequent AJAX calls to your server and not required if you do not have to monitor real-time statistics.
You can disable heartbeat API using WP Rocket, Perfmatters, SiteGround Optimizer for SiteGround hosting or any other similar plugin.
10. Update WordPress, PHP, Themes and Plugins
PHP updates bring a big speed boost by optimizing the code level performance. Therefore, make sure to update to the latest PHP version to reduce slow server response time and improve TTFB. WordPress always supports the latest stable PHP version; hence you have to keep the WordPress core to the latest version to make use of the PHP benefits.
You may face problems with theme or plugin that do not support the latest PHP version. We recommend monitoring the status with your developer and consider a switch if the developer do not have plan to update regularly.
11. PHP Memory, Execution Time and Service Workers
Since WordPress needs to run PHP files to get the content from your database, it needs sufficient memory and execution time set in the server configuration. Otherwise, it will affect the performance by delaying the response. Therefore, you have to consider few PHP factors when purchasing a hosting plan. Unfortunately, most of the hosting companies do not declare the limits on the sales page. Since most of the commercial WordPress themes need higher PHP resources to work properly, you need to configure the server properly to reduce the response time. For example, below is the system status warning in a minimalist Breek theme, showing the server limits are not sufficient.

Make sure the following PHP related stuffs are sufficient for your server, otherwise discuss with your host to increase the capacity to improve TTFB.
- Host supports latest PHP version.
- Allow changing PHP memory limit to custom level needed by you. In general, you may need 256M depending on the resources needed for your site.
- Default maximum PHP execution time limit is 30 seconds in most hosting companies. This will not work when you need to run a PHP script for 120 or 300 seconds.
- Allowed PHP workers for handling requests.
Below is the pricing plan page from Kinsta indicating the supported PHP version and the PHP workers available for each plan. If your hosting company does not offer your sufficient details, contact them to know the situation and the possibilities of increasing the limits.

12. Reduce Third-Party Code
In our earlier article, we have explained the way to delay third-party code loading to make the total blocking time to zero. Using too much third-party code like Google AdSense advertisements will considerably delay the page loading time regardless of your hosting and theme/plugins quality. This is a kind of trade-off between revenue Vs speed and you have to choose one depending on your need. If you are focusing on speed, then use plugins like Flying Scripts, Perfmatters or WP Rocket to delay the loading of third-party codes on your site to improve the TTFB.
Final Words
As you can see, there are too many factors that could affect slow server response time in WordPress. For a normal WordPress blog without online store or complex theme, having a quality hosting, CDN and caching plugin are sufficient to improve TTFB and fix slow initial server response time.
The “Reduce initial server response time” warning is triggered by PageSpeed Insights when your time-to-first-byte (TTFB), also referred to as wait time, is higher than 600 ms (source). High TTFB happens when caching isn’t set up properly, or your website isn’t hitting cache. It also has a big impact on First Contentful Paint (FCP) and Largest Contentful Paint (LCP).
We always recommend running your speed test at least three times. If your site’s cache just expired, you might see the above warning the first time you run the test. If you do have caching properly set up, this warning will go away with a repeat test. If it doesn’t, you might need to install a caching plugin or check your caching configuration.
Fix the “Reduce initial server response time” warning
Here are a couple of things you can do to fix the “Reduce initial server response time” warning, along with some recommendations.
- Install a caching solution
- Clear cache less often
- Increase cache length
- Decrease the distance of your server
- Invest in fast hosting
Install a caching solution or plugin
The very first thing you should do is check to ensure you have a proper caching solution or plugin in place on your WordPress site. If you’re using a managed WordPress hosting provider like Kinsta, this should simply work out of the box, as they have server-level caching. There is no configuration or caching plugin needed. That’s the beauty of a managed WordPress host.
If you’re using another type of hosting provider, you will most likely need to install a caching plugin. We recommend the following caching plugins (both of these work great alongside Perfmatters):
- WP Fastest Cache (free)
- WP Rocket (premium)
Clear cache less often
This might seem obvious, but once you’re done optimizing, it’s recommended that you don’t clear your entire site cache too often. The more uncached crawls or hits to your site can actually hurt your Core Web Vitals scores over time. You want your site to hit cache as much a possible.
If you’re curious, we have a regular plugin update schedule every two weeks, where we back up sites, update plugins (test them), etc. We then do a full site cache clear. So on our sites, we’re never clearing the cache more than twice per month (unless something goes wrong). The longer things are cached, the faster they will be for users and Google when they crawl your site.
Increase cache length (TTL)
A great way to reduce the “Reduce initial server response time” warning from showing frequently is to increase the cache expiration time (TTL) on your site. Longer cache times lead to improved site performance, and better cache HIT ratios. It can also fix the warning from Google to “serve static assets with an efficient cache policy.”
If you’re hosting with Kinsta, the following cache length times are available right from the MyKinsta dashboard:
- 1 hour
- 2 hours
- 4 hours
- 8 hours
- 24 hours
- 7 days

If you’re using a different hosting provider or caching plugin, check their documentation or ask their support to see how to increase your WordPress site’s expiration time.
If you’re using full-page caching with Cloudflare, you can also change this from their dashboard. Under the “Caching” tab, click on the “Configuration” tab. Set your “Browser Cache TTL” to something higher. We recommend at least 7 days or a month.

Decrease the distance of your server
As mentioned above, high TTFB can trigger the “Reduce initial server response time” warning from PageSpeed Insights. If your server is hosted in the United States, and someone is visiting it from Germany, this will result in higher TTFB. And it could put you over the under 600 ms threshold that Google is wanting.
Why does this happen? It’s mainly due to the physical distance and the network latency involved.
However, there is a solution. And that is using Cloudflare. They have a service called Automatic Platform Optimization (APO), which caches your entire site, not just the assets but also HTML, at different edge servers all around the globe, eliminating the distance problem altogether. This results in really low TTFB!
The CDN service from Cloudflare is free, and the APO service costs $5/month per domain, regardless of how much traffic you get. If you’re curious, we’re using Cloudflare’s APO service on this website. All you do is sign up for APO and install the free Cloudflare WordPress plugin. It works great with our Perfmatters plugin.
Make sure to also check out our recommended settings for Cloudflare for the best performance.
Invest in fast hosting
Another reason you might see the “Reduce initial server response time” warning is that you’re using a slow WordPress hosting provider. You get what you pay for when it comes to hosting. Many cheap hosting providers try to get as many customers onto one server as possible. This results in you sharing all of the server’s resources with everyone else, in turn slowing down your site. We always recommend investing in fast WordPress hosting where many of these headaches disappear.
In This Article
- What Is the Initial Server Response Time (Time to First Byte)?
- The Server Response Journey
- What Causes Slow Server Response Time?
- Does TTFB Equal Server Response Time?
- How Are UX and SEO Affected by Long Initial Server Response Time?
- How to Fix “Reduce Initial Server Response Time” and Achieve Good TTFB on WordPress?
- How to Fix the Error Manually
- How to Fix the Error With a WordPress Plugin
- How to Fix the Error by Choosing a Better Hosting
- Still Can’t Get Rid of “Reduce Initial Server Response Time” Note? Try These 3 Tips
- Conclusion
- FAQ
If you’re struggling with the Reduce Initial Server Response Time error displaying on Google’s Pagespeed Insights or some other page analytics tool and want to fix it now, you’ve come to the right place. Though the message seems innocent, a lot can go on behind the scenes that might need fixing.
The message usually refers to the Time to First Byte (TTFB), a concept related to how well a website performs in terms of speed. We certainly don’t want to have slow-loading websites, as it can be detrimental to your business since it can lead to high visitor bounce rates. But TTFB is different from the page loading time – a common misconception.
This article will discuss the ins and outs of how to reduce initial server response time in WordPress and will help you fix the issue at its root. Several quick fixes exist, i.e, reducing the number of plug-ins your site uses. But such solutions only touch the surface of the problems that cause the error. So let’s start by understanding TTFB and how it relates to the Initial Server Response Time and then move on to how to reduce TTFB in WordPress.
What is the Initial Server Response Time (Time to First Byte)?
Initial server response time is the time the server takes to respond to a user’s initial request. TTFB is one common way of computing it, which suggests how long it takes to deliver the first byte of a web page after the initial request. As you can expect, the lower the TTFB, the better – as a lower TTFB means the page takes less time to render.
But TTFB differs from page loading time conceptually. Let’s look at the server response journey more closely to understand the point.
The Server Response Journey
The TTFB metric considers three components that make up the server’s response. First, there’s the HTTP request, then the processing of that request, and then the response.
- The HTTP Request: It begins with the user sending an HTTP request, which is triggered when the user first loads the page. The time it takes for the relevant server to receive the request depends primarily on network speed, the time required for Domain Name System (DNS) lookup, and the physical distance of the server.
- Processing the Request: After receiving the request, the server prepares a response. The process involves running several queries, executing scripts, and triggering other tasks, such as pinging other networks, fetching data from registered databases, etc.
- The Response: Finally, the server sends the response back to the user’s web browser. The response time depends on the user’s web hosting service and the internet connection speed. The faster they are, the lower the time it takes for the page to load.
Together, all three components are essential for calculating TTFB. But getting to the actual cause of a high TTFB requires understanding the processes involved within these components. And this brings us to the next question.
What Causes Slow Server Response Time?
As you can realize from the description above, the server response journey time depends on several factors, such as:
- the distance of the server,
- the network speed,
- the DNS response time,
- the time for executing scripts and queries on the server,
- the quality of the internet connection,
- the hosting web service.
But we can go one step further and see elements like plug-ins, dynamic content, heavy DB queries, etc., increase TTFB as it may increase the execution time of specific scripts.
Of course, you can quickly implement fixes like reducing dynamic content or removing heavy elements to manage TTFB. But as mentioned earlier, such solutions are superficial at best, and you may have to compromise the look and feel of your website. Conversely, you can’t control other factors as they may depend on network traffic, security protocols, and server configurations. So, we’ll have to go a bit deeper to truly understand what it means to reduce initial server response time in WordPress and identify the proper fix.
Does TTFB Equal Server Response Time?
After studying the components of the server response journey, it should be a bit clearer that TTFB is not just the initial server response time. It also includes the time it takes for the user’s request to reach the server and the time required to get the response back.
TTFB = Initial Response Time + Request and Response Travel Time
The two terms are often used interchangeably. But that’s a common misconception, and things get even more confusing as many well-known speed testing tools, such as Google PageSpeed Insights, refer to “initial server response time” but mean TTFB. Initial server response time is only the time the server takes to respond to the request – it doesn’t include the time the response takes to reach the client. It also doesn’t account for network latency which is a crucial determinant of user experience.
TTFB is much more holistic, as it factors in the entire process from start to finish. And what it implies is that reducing TTFB can be challenging if you overlook the technicalities. This includes more than just replacing the existing web server by a more powerful one. Also, understanding TTFB thoroughly helps you realize its significance to your business’ success. A high TTFB can severely affect your entire digitalization strategy. Besides affecting user experience, a high TTFB score can also bring down your website’s ranking as Google’s new algorithm now looks for more things to rank a website apart from the semantics. So before moving on to how to reduce TTFB, let’s go over a high TTFB score’s effects.
Want to speed up your website instantly?
Get 90+ PageSpeed Score automatically with 10Web Booster ⚡ On any hosting!
How are UX and SEO Affected by Long Initial Server Response Time?
A long initial server response time can make a visitor leave your site due to poor user experience (UX). Indeed, 40% of users leave a website if it takes more than 3 seconds for a page to load. But let’s distinguish page loading time from TTFB and initial server response time. A slower initial server response time may increase TTFB, which may or may not increase the loading time. But a poor UX is not where it ends – TTFB is now a significant Search Engine Optimization (SEO) factor.
It is a part of something we commonly refer to as the Core Web Vitals, measuring a website’s speed, responsiveness, and visual stability. It helps Google assess User Experience and rank the website based on how these vitals measure against established benchmarks. More precisely, Core Web Vitals consist of three things:
- Largest Contentful Display (LCP)
- First Input Delay (FID)
- Cumulative Layout Shift (CLS)
TTFB is a part of the LCP criteria, which means the lower the site’s TTFB, the higher the rank it can get on Google search. But let’s briefly explore these three factors.
You can understand LCP as the page loading time. More precisely, the LCP measures the time it takes to render the most prominent elements in the main display area. Such components include large images, text blocks, background images, and video poster images. A lower LCP score – measured in seconds – suggests superior user experience and therefore helps boost your website’s rankings. Usually, a score of 2.5 seconds or less is considered good.
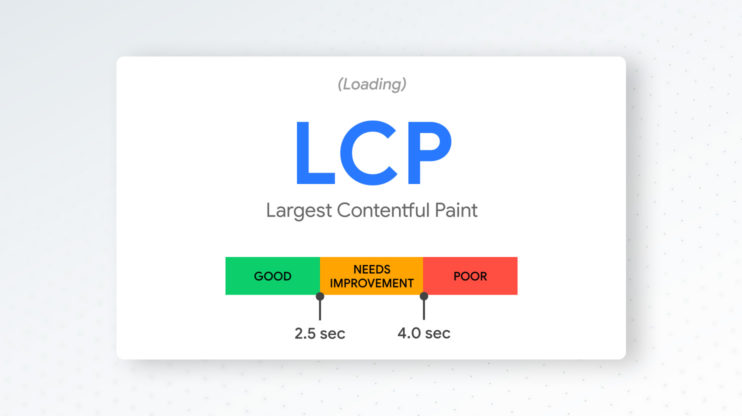
Among all these, LCP is the factor that relates to the TTFB score. But there’s an indirect relationship since WordPress slow server response time can cause the LCP score to drop. Slow rendering on the client side and large images can also reduce it. However, as TTFB includes server response time, a high LCP score may suggest poor TTFB. And since LCP is part of Core Vitals, poor TTFB can adversely affect a site’s ranking on Google. TTFB of scripts and styles used for rendering images, videos, or text, can also affect LCP since such elements form part of the LCP score. TTFB of images, videos or fonts directly affects LCP.
TTFB is a crucial metric to improve as it affects user experience and Google rankings. More fundamentally, it determines the profitability of your business. Surely, a poor website will not give as many conversions as you want, eventually losing potential clients. So, let’s discuss the possible fixes to avoid all such issues.
How to Fix “Reduce Initial Server Response Time” and Achieve Good TTFB on WordPress?
There are several ways to reduce initial service response time in WordPress. You can take the manual route, where you patch things up without the help of any external tool or service. Or, you can use automated third-party solutions to boost your server response time. Of course, there are costs and benefits to both, but that’s not the subject of this article. Here, we’ll discuss how you can solve the problem of high TTFB and suggest the most optimal way among them.
How to Fix the Error Manually
Let’s first look into some manual fixes we can apply to reduce initial server response time in WordPress without plugin or some other automated software and thereby reduce TTFB.
Optimize HTML Code
Minimizing code without affecting its primary functionality is known as minification. Unnecessary indentations, spaces, new lines, line breaks, whitespaces, and variables increase TTFB. One straightforward way of improving it is to ensure your HTML code is clean and minimal. You can also remove irrelevant CSS and Javascript to reduce processing time. Also, minification results in less bandwidth usage and page size.
File Compression
You can always compress files, such as documents, images, and videos, to reduce processing time and boost server response time. You can use GZIP compression, which is a lossless compression algorithm – meaning it keeps the data intact before and after compression. It works by identifying repeated sequences of bytes and representing them with shorter ones. The algorithm assigns a number of bits to the shorter sequences based on their occurrence frequency – the higher the frequency, the smaller the bits assigned. In WordPress, GZIP is commonly enabled. If not, you can enable file compression through htaccess configuration files (you can search “reduce initial server response time WordPress htaccess” to get more technical details).
Use Server-Side Caching
Server caching is another way to reduce TTFB where a server can store generated web pages to deliver the results faster when the user re-visits a particular website. The technique reduces the load on a server as it doesn’t have to process everything from scratch. We have created a list of the best caching plugins to help you find the right one for your website.
Use CDN
You will likely have users distributed across the globe accessing your website through different geographical locations. However, your host servers may be physically pretty far from the user’s location. The larger the distance, the higher the TTFB will be. A content delivery network (CDN) is one way to overcome the problem as it implements several proxy servers in several regions, which can automatically detect a user’s request and route them to the closest server, which stores a copy of your site’s static and dynamic elements. It reduces latency which results in a lower TTFB.
Optimization of server-side scripts and logic
Unoptimized server-side code can slow down server response time and increase TTFB. Fixing this includes not only removing or optimizing such scripts , but also involves optimizing your database queries so they can quickly fetch and process data, allowing the server to deliver results in minimal time.
Choose faster hosting
Getting a better host can also boost your TTFB score. You can choose a scalable cloud host over which you have full control – it will help you optimize server elements as per your needs. You can also get a fully managed hosting service that ensures you get a streamlined delivery.
How to Fix the Error with a WordPress Plugin
Although manual fixes can considerably boost server response time and improve TTFB, you may still need a specialized plug-in that can handle most of the back-end elements that are out of your direct control. However, finding a plug-in is a hassle (just googling “reduce initial server response time wordpress plugin” will produce overwhelming results). So, to make your life easier, we recommend the 10Web Booster, as it has numerous features which will automatically boost your PageSpeed score to 90+.
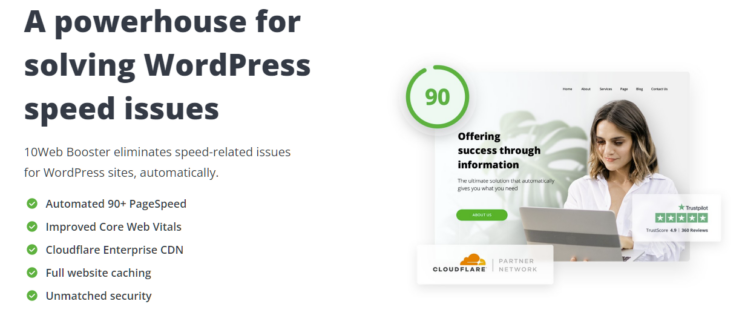
From robust security features, full page caching, and Cloudflare Enterprise Content Delivery Network (CDN) to better Core Web Vitals, the tool is not your everyday TTFB WordPress plugin. Instead, it is an entirely automatic solution requiring minimal manual input from the user to reduce TTFB. The plug-in takes care of all the manual fixes we stated above; it automatically minifies CSS, HTML, and Javascript code, optimizes images, fonts, and videos, removes non-essential external scripts, compresses large files, and applies lazy load techniques to iFrames and images.
More precisely, the tool converts images into WebP format which decreases the file size of images so that they load faster.
Also, it implements container-specific image optimization which means it automatically adjusts the dimensions of the image according to the size of the screen – so if you’re viewing a website on a smaller screen, 10Web Booster will display a small-sized image instead of the full-size. You will also benefit from Cloudflare’s Mirage option, which optimizes images based on the network connection and type of device.
Want to speed up your website instantly?
Get 90+ PageSpeed Score automatically with 10Web Booster ⚡ On any hosting!
We should know how the manual fixes (which the plugin performs automatically) reduce TTFB and how improving Core Web Vitals (LCP, FID, and CLS scores) affect a site’s ranking. However, we haven’t yet discussed how other features – full page caching, and Cloudflare Enterprise CDN – help reduce initial server response time in WordPress.
With full-page caching, the servers save a complete copy of a web page’s data so that when a user re-visits the site, the server doesn’t have to process everything from scratch. Instead, it fetches the files from the cache and delivers the page immediately. The techniques reduce the load on the server and bandwidth consumption. Apart from full-page caching, server caching can be in the form of object caching and fragment caching. With object caching, the server stores database queries, whereas with fragment caching, the server stores particular elements, such as widgets, page titles, extensions, etc.
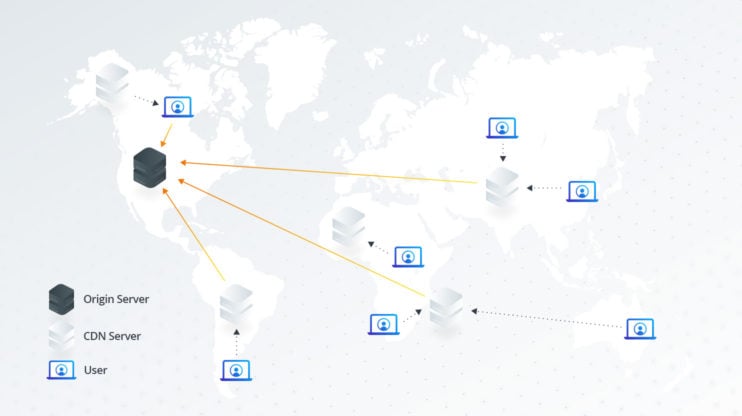
Earlier, we discussed how physical distance to a server could affect server response time – well, a CDN can take care of that. The CDN is a collection of proxy servers that cache website data and deliver the contents to an international user, even if the primary server is far away. The solution reduces the strain on the central server and improves user experience. 10Web Booster uses Cloudfare’s CDN services as it has a vast network spanning over 100 countries, which can deliver content in 50 milliseconds to almost 95% of the world!
How to Fix the Error by Choosing a Better Hosting
The quality of the web hosting service is another factor that determines server response time and TTFB. A host with superior infrastructure, minimal downtime, rigorous security, and dedicated customer support can boost response time considerably and improve your website’s rank on Google. And if you’re having trouble finding a reliable host, you can always try 10Web Hosting, which offers all such features and more. Together with the 10WebBooster’s PageSpeed optimization and Cloudflare’s CDN, the 10Web Hosting service can guarantee a remarkable increase in server response time.
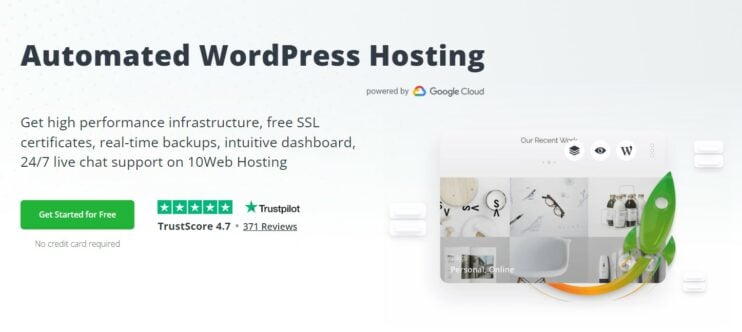
Offering free SSL certificates, real-time back-ups, user-friendly dashboards, and constant live chat support, 10Web hosting will undoubtedly give you the competitive edge you’re looking for at a profitable rate. Backed by the Google Cloud platform, you’ll benefit from a vast network of Google Cloud servers, which means you don’t have to worry about speed as we offer the best throughput and boast a strong infrastructure throughout the world. The servers use Solid State Drives (SSDs), which means there are no physical moving parts like a Hard Disk Drive (HDD) to slow things down, offering low latency and high resistance to shocks.
Furthermore, there’s FastCGI caching with Nginx (Engine X). Nginx is a web server software that speeds up content and application delivery. Within Nginx, FastCGI is a proxying protocol that interfaces with a server to help process dynamic content more quickly. Additionally, it offers a Linux container hypervisor (LXD) to work with Linux containers (LXC) for efficiently managing multiple Linux operating systems on a single Linux server by giving you more control over compute resources. Moreover, 10Web Hosting comes with the latest version of PHP 8, which can handle more requests than its predecessors and has a simpler syntax resulting in minimal server-side code.
Finally, there’s no downtime as Google Compute Engine ensures you get 99.9% uptime and makes scaling up a cinch – you only pay $2 for additional 10,000 visitors and 5GB of SSD storage.
Apart from superior hosting performance, you also get an interactive dashboard and a staging server to test your website with different WordPress versions and plug-ins. You also get a Slack Channel where you can get instant support on any technical issue and access more information on the 10Web Help Center.
Along with 10Web Booster, 10Web hosting offers a complete package to boost your server’s response time through high-quality CDN and other valuable features. It can help improve Core Web Vitals, increase your Google rankings, and increase visitor traffic and conversion rates.
WordPress hosting that’s fully automated
Host on 10Web’s high performance infrastructure and enjoy all the benefits of a secure Google Cloud Partner hosting.
Still Can’t Get Rid of “Reduce Initial Server Response Time WordPress” Note? Try These 3 Tips
Fixing a high TTFB is tricky. And if you’re still getting the “reduce initial server response time” message even after applying all the fixes mentioned above, then it’s time to try some unconventional fixes.
1. Database Optimization
Databases become more extensive as you post more blogs, include additional content, get more subscribers, etc. Server response time increases as the size of your database grows since it takes more time to fetch relevant data. You can fix database issues by removing unwanted data, optimizing queries, and changing database structures for faster processing.
2. Remove 404 errors
404 errors pop up when you visit a page that doesn’t exist. Such pages put extra load on the server as visiting non-existent pages still generates HTTP requests. You can remove such pages from your website using helpful tools that identify URLs with 404 errors. You can only eliminate the URLs that generate traffic or configure redirects if needed.
3. Prefetching
Web browsers use pre-fetching to load the relevant resources of a page or link in advance so that when a user visits the page or clicks on the link, the browser delivers the content immediately.
Link prefetching occurs when the browser runs all the scripts and queries associated with a link before a user clicks on it. Typically, you have to specify such links – they’re usually the ones you expect the user is most likely to click. You can also apply DNS prefetching, where browsers perform DNS lookups in advance for specific domain names (you can learn about how to reduce DNS lookups in our article). Pre-rendering is another option that lets you render page elements in advance. Such techniques reduce server load and deliver the content immediately when a user visits a particular link or page. But only some browsers, like Chrome and Edge, support all types of pre-fetching.
Conclusion
With time, as the content’s complexity increases and the data’s size expands, reducing server response time will become more challenging. Not to mention Google’s increasing focus on user experience will require businesses to be more sensitive to users’ needs and upgrade their websites accordingly. If not, companies can risk losing their brand value and incur substantial revenue losses. But with the fixes, tools, and plug-ins mentioned in this article, you can quickly reduce initial server response time in WordPress and improve TTFB.
10Web hosting services and the 10Web Booster plug-in are straightforward and efficient solutions to reduce TTFB. Allowing you to achieve a 90+ PageSpeed score quickly, they will keep your site secure from malicious bot traffic and improve Core Web Vitals. So, to get to the top spot on Google’s search results and increase conversions, sign up to try 10Web Booster and 10Web’s Automatic WordPress hosting for free today!
Want to speed up your website instantly?
Get 90+ PageSpeed Score automatically with 10Web Booster ⚡ On any hosting!
FAQ
How to measure TTFB?
You can quickly measure TTFB using online webpages testing tools like GTMetrix, Pingdom, and WebPageTest. Just enter the website’s URL to get the TTFB score (referred to as “Wait” in Pingdom’s “File Requests” section). They’ll also provide a detailed report with intuitive visuals to understand better where your website may need improvement.
What is a good initial server response time?
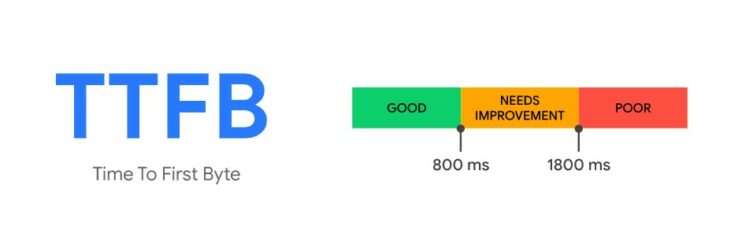
According to Google, TTFB below 100 milliseconds is excellent. Between 100 and 200 milliseconds is good. Between 300 and 500 milliseconds is standard, and anything over 600 indicates some severe issues with the site.
How can I improve my server speed?
You can apply the fixes below to improve server speed.
- Get a reliable web hosting service.
- Enable full-page caching
- De-fragment your database
- Optimize database queries
- Minify JS, CSS, and HTML
- Optimize images and videos
- Remove unnecessary plug-ins
- Use the latest version of PHP
- Implement a robust and widely available CDN
You can manually implement some of these fixes, such as minifying JS, CSS, and HTML code. But for others, you’ll need tools such as 10Web Booster to enable caching, implement CDN, and update PHP, and a better hosting service to complement them.
How do I reduce initial server response time in Cloudflare?
Fixing the “reduce initial server response time” error on WordPress with Cloudflare is a simple process – just sign up with your email and get started with the free version. But since it’s free, you won’t get the advanced features for improving your website’s performance. Still, you can quickly configure your website through Cloudflare’s dashboard and see how to improve server response time by exploring the menu. Or, you can use a plug-in like 10Web Booster to automatically benefit from Cloudflare’s optimizing features.
How do I reduce initial server response time on mobile?
The process to fix the “reduce initial server response time” message on mobile is similar to that required for desktops. But specific factors take precedence when optimizing TTFB for mobile. For example, page size plays a crucial role in mobile. Also, responsive images reduce server response time significantly. You can replace heavy elements with lighter ones and build a responsive layout so that the content adjusts to different screen sizes automatically.
TTFB vs. initial server response time
Even though many web testing tools consider WordPress TTFB and initial server response time the same, they are practically quite different. WordPress TTFB is a much broader concept that includes the entire server response journey, which consists of a user initiating a request, the server receiving and processing the request, and sending an appropriate response. In addition to the initial server response time, WordPress TTFB includes the time it takes for the user’s request to reach the server and the time it takes for the response to travel back to the user.
You need to reduce initial server response time WordPress to under 100ms to get a really fast website speed. Once you reduce server response time, your overall WordPress site speed will improve. Besides, you will see increased stability from your WordPress site performance at all times.
However, reducing server response time requires some extra attention because it is dependent on individual website setups.
Basically, you will need to use a fast web hosting server, a caching plugin, optimize WordPress database, update PHP version, and avoid resource intensive themes and plugins to reduce the initial server response time of your WordPress website.
These may look very simple but it can get a little complicated to get under 100ms initial server response time for your website. That’s why, in this article, I have simplified everything that will get you the fastest initial server response time without having years of experience in this field.
What Is Server Response Time?
Server response time defines how long it takes for a web server to process a response to a visitor’s request. This time is counted from when the server receives an HTTP request (request for any webpage, image, video, or other types of files) to the time it starts sending a response to the request.
Here, by server response time, we specifically mean the server response time for the webpage, more specifically the HTML file. And because the HTML file is the first/initial file that browsers receive from the web server, this server response time is also called initial server response time.
Here is a definition of server response time by Google:
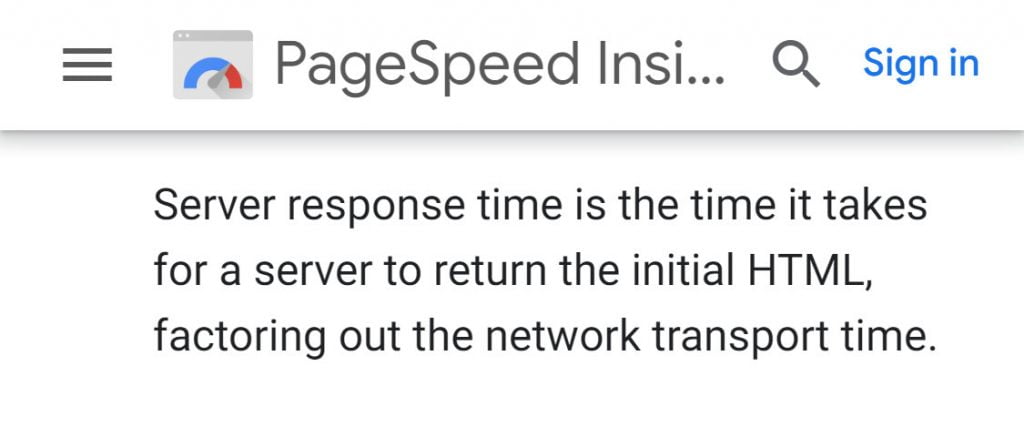
The server response time doesn’t include the network latency between the browser and the web server. However, you will see that server response time measuring tools also include this network latency in their server response time measurement because it is hard to identify them differently by any web browser or online speed testing tools.
Server response time is commonly used interchangeably with Time to First Byte but they aren’t the same thing. Time to First Byte or TTFB is the combination of server response time, network latency, DNS lookup time, TCP connection time, and SSL handshake time. Take a look at this article to know how to reduce TTFB for your WordPress website.
How Do I Check Server Response Time?
Being able to properly check the initial server response time of your website is the first step towards optimizing it for faster speed. There are two methods of doing that. One method is to use an online website speed testing tool like GTmetrix, Pingdom, KeyCDN and so on. And the other method is to locally test it using your web browser like Chrome.
Online testing tools generally give a more consistent load time throughout multiple testing. This is because the internet speed used in the online testing tools are usually more consistent than your local internet speed.
A consistent test result is necessary to compare the effect of using any optimization techniques because it will allow you to reliably compare the result from before the optimization to the result from after the optimization. That’s why I recommend using online testing tools over your web browser.
Additionally, the results from different tools will vary to some extent. That’s why it is better to use only one tool for having consistency in the page speed results throughout your testing.
I like to use GTmetrix because it is a very popular website testing tool and it gives all kinds of necessary information for speed optimization.
Use GTmetrix to Check Server Response Time
In order to find out the server response time for any webpage in GTmetrix, you can follow the below instructions.
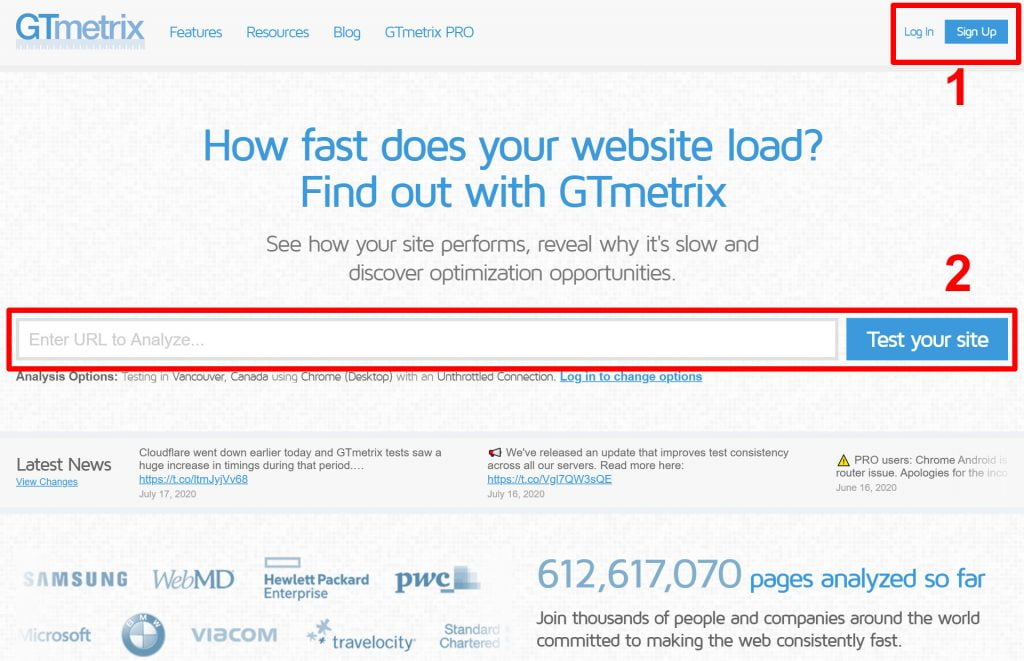
First, go to gtmetrix.com, then log in to your account. If you don’t have an account, then you can create one for free. After that, enter your webpage URL in the input field and then click on “Test your site”
After the test is completed and you are presented with the performance report, click on the “Timings” tab. It will show you a timing breakdown where you will see the “Backend” time. This backend time is the initial server response time for your webpage.

Note that, it isn’t required to log in to GTmetrix in order to test your webpage. However, in order to see the results in the Timings tab, you will need to log in before you test your webpage.
There is another way of identifying the initial server response time in the GTmetrix report that doesn’t require logging in. For that, you will need to go to the “Waterfall” tab then hover over the timing bar of your webpage’s URL. This will show you a timing breakdown for that URL where you will see the “Waiting” time. This waiting time is the initial server response time for your webpage and therefore it will be the same as the “Backend” time from the “Timings” tab.
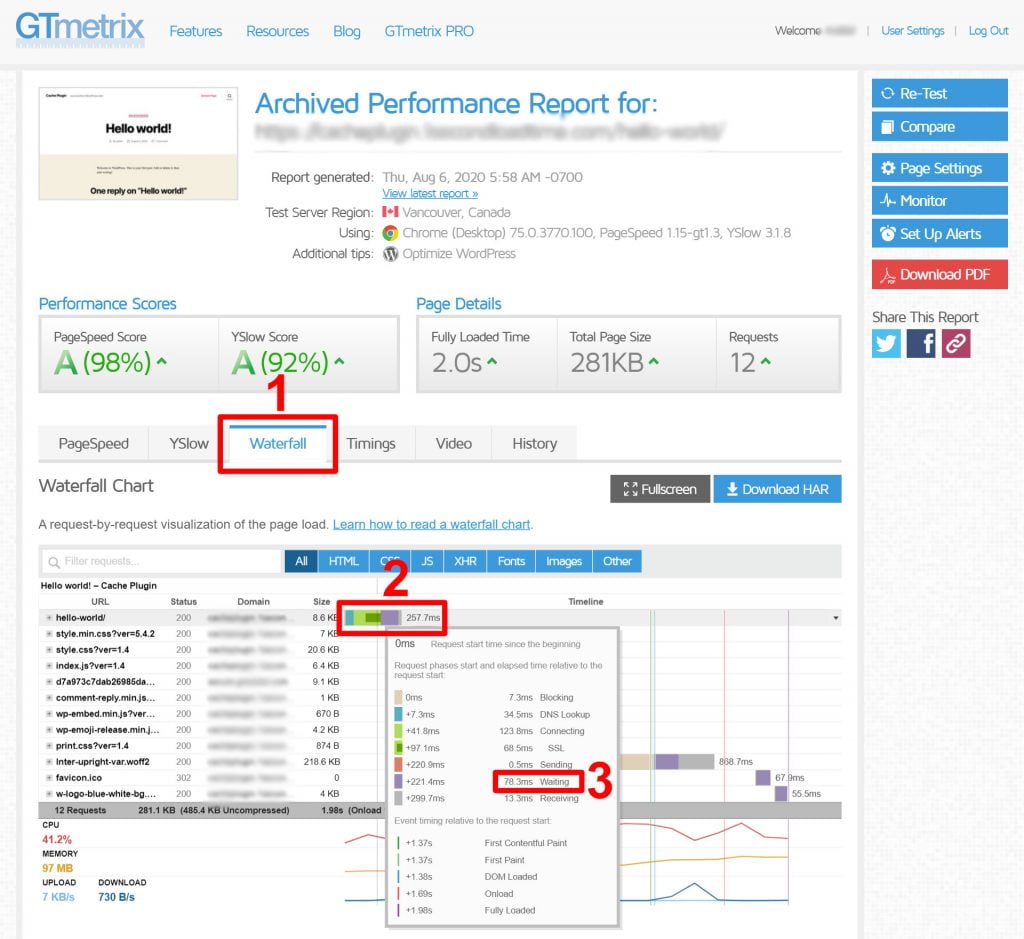
Every asset (like HTML, JS, CSS, fonts, images, etc.) used in your website will have a different load time breakdown in the waterfall chart beside the asset’s URL. And to see the server response time for any of these assets, you will need to hover over the timing bar of that individual asset’s URL. This will show you the timing breakdown for that asset and there you will see the “waiting” time. But for this article, you will need just the waiting time for the webpage and not any other asset.
Note: The «waiting» time in a waterfall chart includes three things; the network latency of the HTTP request (from the browser to the server), the request processing and response creation time by the web server, and the network latency of the HTTP response (from the server to the browser).
Now that you know the server response time of your website, note that down so that you can compare it with the results after you have applied the optimization techniques described here.
What Is a Good Server Response Time?
Server response time varies based on a lot of factors. So, it might be faster or slower based on your particular website setup. But having a specific initial server response time target can help you in the way of achieving it.
As for a recommendation, according to Google, you should keep your server response time under 200ms. But I recommend keeping it under 100ms if you want the fastest loading speed for your website.
If you have a WordPress site that lacks proper optimizations and has limited server resources, then your initial server response time may even go upwards of 500ms. Then as you optimize your site, you will start to see a faster server response time.
What Causes Long Server Response Time?
There are many elements that are responsible for a long initial server response time. Some of them are related to your server hardware and the others are related to the server application and the setup of your website as a whole. Here is a list of the most common elements that are responsible for longer server response time in WordPress.
- Limited server resources
- Insufficient server hardware (like CPU and RAM)
- Inefficient web server application
- High stress on the server (like heavy traffic)
- Dependence on dynamic files
- Large database size
- Old PHP version
- Resource intensive themes and plugins
Some of these elements affect the server response time more than the others. But their combined effect can have a high impact on the total server response time. That’s why it is necessary to give importance to every individual element when optimizing your site for faster speed.
How to Reduce Initial Server Response Time WordPress?
We have taken a look at the most common elements that affect the server response time of WordPress websites. And because these elements include the hardware and software side of your web server as well as the setup of your WordPress website, we need to focus on all these components in order to reduce initial server response time WordPress sites.
So, from choosing a fast and reliable web hosting provider to optimizing your server application and your WordPress elements like the plugins, themes, caching, and others are all necessary to ensure the fastest possible server response time in WordPress.
Upgrade to Fast Web Hosting Server
At the core, the initial server response time is dependent on how fast your web server can process responses to webpage requests by the visitors. And the web server mainly consists of the server hardware and the server application. So, their combined performance largely determines how fast your server response time will be.
Here, I have broken down the web server elements in the following three basics.
Use Sufficient Web Server Resources
Your web server resources (or the hardware configuration of your server) will make it possible to process any kind of activities in your server. So, the capability of your server resources will decide how fast it can process any page request and how many requests it can handle at any given time.
If you have a website that has only a few webpages and doesn’t have many website visitors, then your website won’t require much processing power form your web server. So, any amount of hosing resources will be enough for you. However, if you have a website that has lots of webpages and millions of monthly visitors, then your website will need a lot of processing power. And that will require a considerable amount of hosting resources.
This is why you will need to be aware of choosing a web hosting package that fulfills your website needs. Based on the availability of their server resources, there are four types of web hosting packages as follows:
- Shared Hosting: In this type of hosting, the same server resources are shared among many users. So, here you won’t have any server resources that are allocated to your usage only. Instead, you will share the same server resources like CPU, RAM, and storage with other website owners. And because of this sharing, the price of shared hosting plans are the cheapest.
- VPS Hosting: In this type of hosting, a specific amount of server resources are allocated to your use only. Here, you and a few other website owners use the same physical web server but everyone gets their own separate server resources that aren’t shared with anyone else. And that’s why it is more expensive than shared hosting.
- Dedicated Hosting: In this type of hosting, you get an entire physical server that is dedicated to your use only. So, this is a very powerful hosting solution. But because of its no sharing aspect, this is the most expensive hosting plan.
- Cloud Hosting: This type of hosting is similar to VPS hosting but here the server resources are highly scalable. That means, hosting resources are distributed to users at an on-demand basis and so they can upgrade to more resources or downgrade to fewer resources at any time. This is also why cloud hosting gives users more control over their cost.
Here is an article outlining the different types of web hosting plans in detail.
For most people, shared hosting is all they need. Basically, if you have a new website or a website with a few thousand monthly visitors, then a shared hosting plan will be enough for you. Then once your website starts getting more visitors and you start to see performance issue with your website, you can upgrade to a VPS, dedicated, or a cloud hosting plan.
Use Efficient Web Server Application
Your web server resources (the hardware configuration) are important but their efficiency is determined by the web server application you are using. A good server application can improve your server response time as well as handle more website visitors for fewer server resources. So, a good web server application allows you to get more performance from spending less on server resources.
Here is the list of web server applications by their popularity. This list is provided by W3Techs.

Among all these server applications, Apache, NGINX, and LiteSpeed are the most popular ones in recent times.
Apache used to be the go to server application for WordPress. Apache is fully compatible with WordPress and therefore this combination of Apache and WordPress has been very popular. However, Apache has its drawback in that it isn’t very efficient for high traffic websites.
Then NGINX became popular because of its capability to handle high traffic. But NGINX isn’t fully compatible with WordPress that’s why people face many issues when using this combination.
In contrast, LiteSpeed is an Apache drop-in replacement so it is fully compatible with WordPress. It is even better than NGINX at handling high traffic. In addition to that, LiteSpeed provides a LiteSpeed Cache plugin for WordPress. This caching plugin is a server level caching plugin and works seamlessly between WordPress and LiteSpeed server. As described in the later section in this article, caching is a very important element for reducing initial server response time.
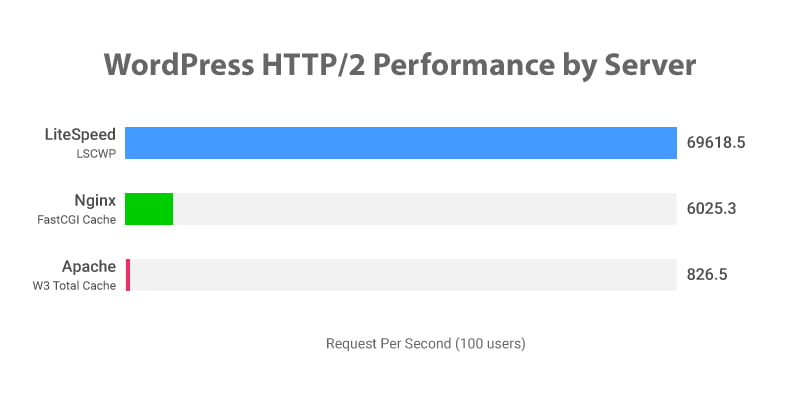
This is a performance benchmark comparison between LiteSpeed, NGINX, and Apache done by LiteSpeed.
However, because of being a latecomer, LiteSpeed hasn’t been as widely adopted as the other two. But considering all its benefits, LiteSpeed is now the best server application that you can use for your WordPress website.
If you want to know more, then check out the differences between Apache, NGINX, and LiteSpeed web servers in this article.
Choose Reliable Web Hosting Provider
If you have a site with long initial server response time, there is a high chance that your web hosting provider is largely responsible for that. More importantly, web server is the single most important element for your website because it is the one that stores your website and makes it available on the internet. So, if anything goes wrong with it, then your website may not be accessible at all. That’s why it is crucial to choose a reliable web hosting provider for your WordPress website.
There are lots of hosting providers offering different kinds of hosting plans. But as you do your research, you will find lots of user complaints against them.
The most common complaints against the web hosting providers are:
- Frequent downtime
- Poor server response time
- Bad customer support
- Security issues
- Hidden limitations.
That’s why it is always a good idea to carefully choose a hosting provider that has a past record of being reliable at all these things. After that, you can focus on the pricing.
Note that, most web hosting providers offer discounts for the first term and so be careful about their renewal price as they may increase significantly.
Now, apart from the above things, I always look out for the web server application that the web hosting provider uses. As discussed in the earlier section, the server application I look out for is LiteSpeed.
You can read this article to know more in detail about the criteria that I use to evaluate hosting providers.
See this best LiteSpeed hosting article to know about the best hosting provider that uses the industry-leading LiteSpeed server and fulfills all other web hosting criteria.
Use Caching
One of the most important reasons for WordPress sites having slow initial server response time is that they are dynamic websites. Dynamic websites are those that need to regenerate the same webpage every time that page is requested by a visitor.
So, every time, a visitor wants to browse a webpage, WordPress needs to dynamically generate an HTML document for that page and then serve that to the visitors. And this dynamic page creation process requires running PHP scripts, making database queries and then compiling them to make an HTML file. As you can guess this process takes time to complete and that time gets added to your total WordPress server response time. Therefore, serving dynamic files is very inefficient for your website.
That’s why static websites are much efficient for your website. Here, static websites are those that serve the same webpage to all the visitors accessing that page. So, webpages don’t need to be regenerated every time they are requested by a visitor.
Therefore, the initial server response time for static files is generally faster than that of dynamically generated files. So, to reduce initial server response time WordPress, you can convert your dynamic files into static files whenever possible.
Caching is just the right thing to do that. Simply, caching is the process of temporarily storing copies of different files. So, after a dynamic file has been generated, a copy of that file is stored for faster delivery of that file in the future. Therefore, after a dynamic file has been cached, it doesn’t require recreating that file to serve to the next visitors. This way the cached files behave exactly like a static file and thus significantly reduce initial server response time.
Additionally, because the cached files don’t require going through the process of dynamic page creation, less of your web server resources are used to serve the pages. Consequently, your web server can handle more website traffic for the same resources.
I have discussed in the earlier section about LiteSpeed server and its seamless integration with LiteSpeed Cache for WordPress. And because of that, I find LiteSpeed Cache perform the best among all other caching plugins for WordPress.
You can look into this comparison of the best WordPress caching plugins in terms of providing the fastest loading speed.
In short, if you are using LiteSpeed web server, the best WordPress caching plugin will be the LiteSpeed Cache plugin. But if you are on Apache or NGINX server, the best WordPress caching plugin will be the WP Rocket plugin.
If you want to know more about caching, check out this article about caching and its types.
Optimize Database
Database is at the core of WordPress functionalities. Everything you do in WordPress is linked to the database. Your posts, comments, settings of themes and plugins, user information, and other similar data are all stored in the WordPress database. Consequently, the database size starts to grow over time.
This also means that there are many unnecessary data that too contribute to this growing size of the database. For instance, the database may contain trashed comments, post revisions, data from deleted plugins, and many other things that aren’t necessary anymore.
Therefore, these unnecessary data make the database size bigger than it needs to be. Consequently, when any queries are made to the database, this large database size causes the query completion time to be longer.
Now, because WordPress needs to make many database queries to generate webpages, this longer query completion time results in a longer initial server response time. Therefore, removing these unnecessary data can make your WordPress server response time considerably faster.
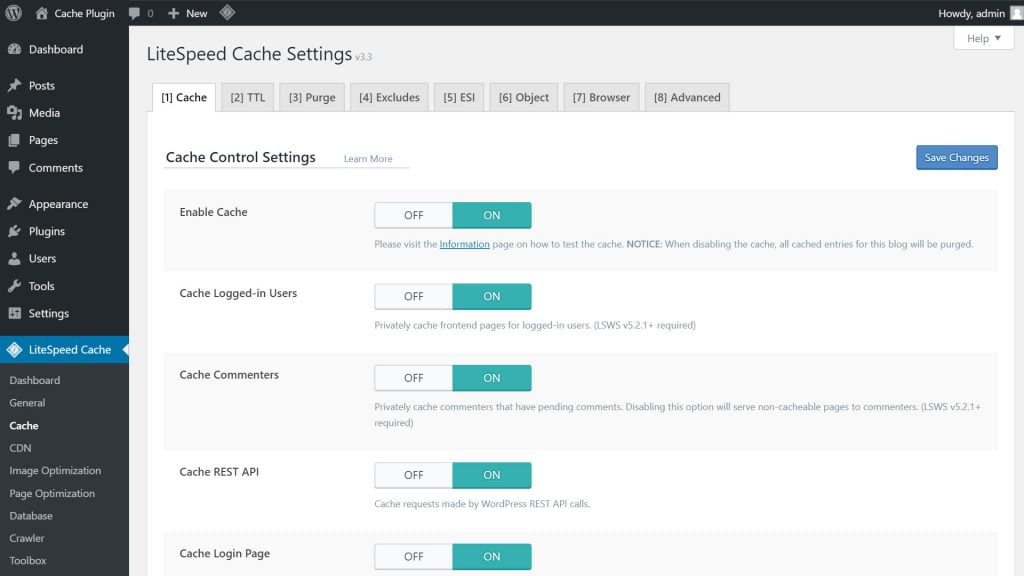
LiteSpeed Cache plugin comes with database optimization feature that you can use to optimize your WordPress database very easily.
Update PHP
WordPress is built using PHP language and so it plays a big role in the processing speed of WordPress. So, by utilizing the full power from PHP, you can reduce initial server response time of WordPress. increased performance from your WordPress website. And the way to do that is to use the latest PHP version.
The release cycle of PHP is around a year so every year we get to see a new PHP version. Some of the newer versions give a slightly faster performance while some give significantly faster performance. Though the latest versions of PHP 7 may be slightly faster than the previous versions of PHP 7, the difference is very significant when it is compared to the much older versions of PHP 5.
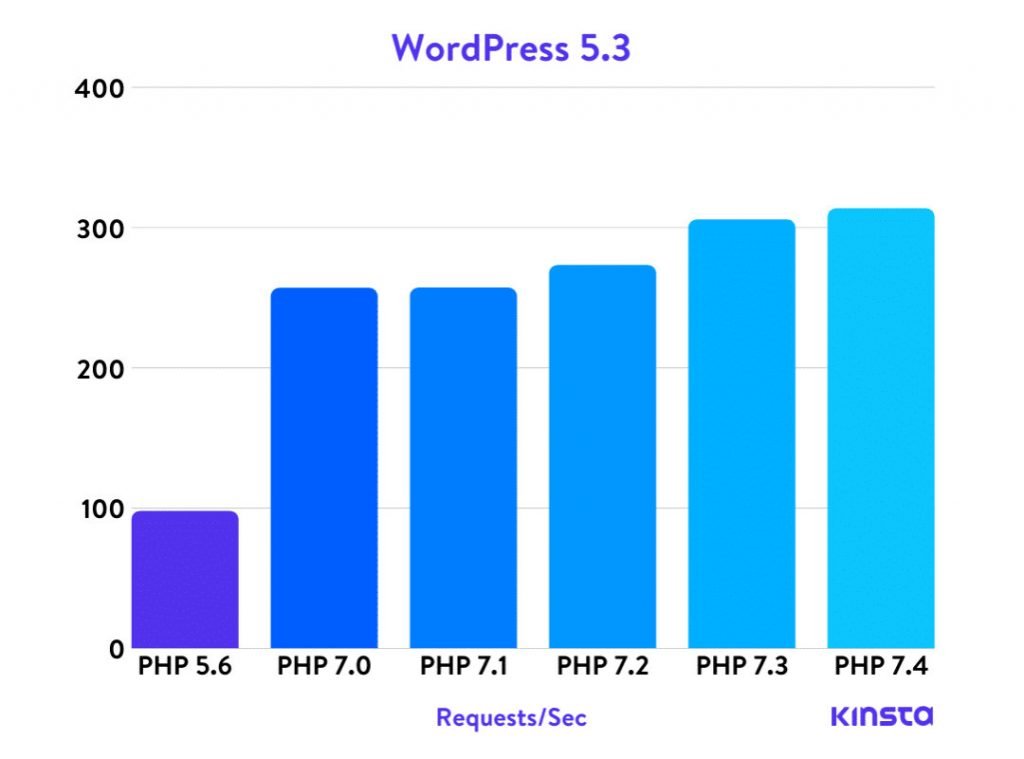
The latest PHP version, which is PHP 7.4, gives over 3 times faster performance for WordPress than the last version of PHP 5 which is PHP 5.6. So, as you can see, by upgrading to the latest PHP version you can get quite a bit of improvement in your WordPress site’s initial server response time.

However, about 25 percent of all WordPress installations are still using PHP version 5.6 or lower.
Before upgrading to the latest PHP version, you should be careful about compatibility issues. This PHP Compatibility Checker plugin can help you identify if any of your themes or plugins will have any compatibility issues with the newer PHP version. But this plugin won’t give accurate results in all scenarios (as described in the plugin page) so you should be careful about this beforehand and make a backup of you website before upgrading your PHP version.
Update Themes and Plugins
Newer versions of themes and plugins come with improvements in security, features, and many other things.
These new versions also improve the efficiency and optimizations of these plugins that in turn reduce server response time WordPress. That’s why you can improve your server response time by keeping your themes and plugins updated to the latest version.
Avoid Resource Intensive Themes
Themes outline how our website looks and feels to the visitors. So, it is a very important part in WordPress. These themes add resources like HTML, CSS, and JS codes to your website and need to run PHP scripts, make database queries, and perform other activities in your website. And these things take time which in turn affects the initial server response time of WordPress and total load time of your website.
Some themes are better optimized and some aren’t. So, by using the better optimized themes, you can instantly reduce initial server response time in WordPress sites. Conversely, using poorly coded themes will cause longer server response time, and slower loading speed of your website.
Take a look at this comparison between the fastest WordPress themes. Try to use a theme that gives faster server response time.
Avoid Resource Intensive Plugins
Plugins allow us to easily add different functionalities in WordPress. For instance, you can use plugins to add page builder, form, analytics, backup, SEO, social sharing, and many other features in your WordPress website.
Furthermore, there are multiple plugins that fundamentally do the same things. So, when it comes to choosing a plugin, you generally have many options to choose from.
Some of those plugins use more server resources than others. Therefore by choosing a less resource intensive plugin, you can save a lot of the processing power of your web server. This in turn will help reduce initial server response time of WordPress.
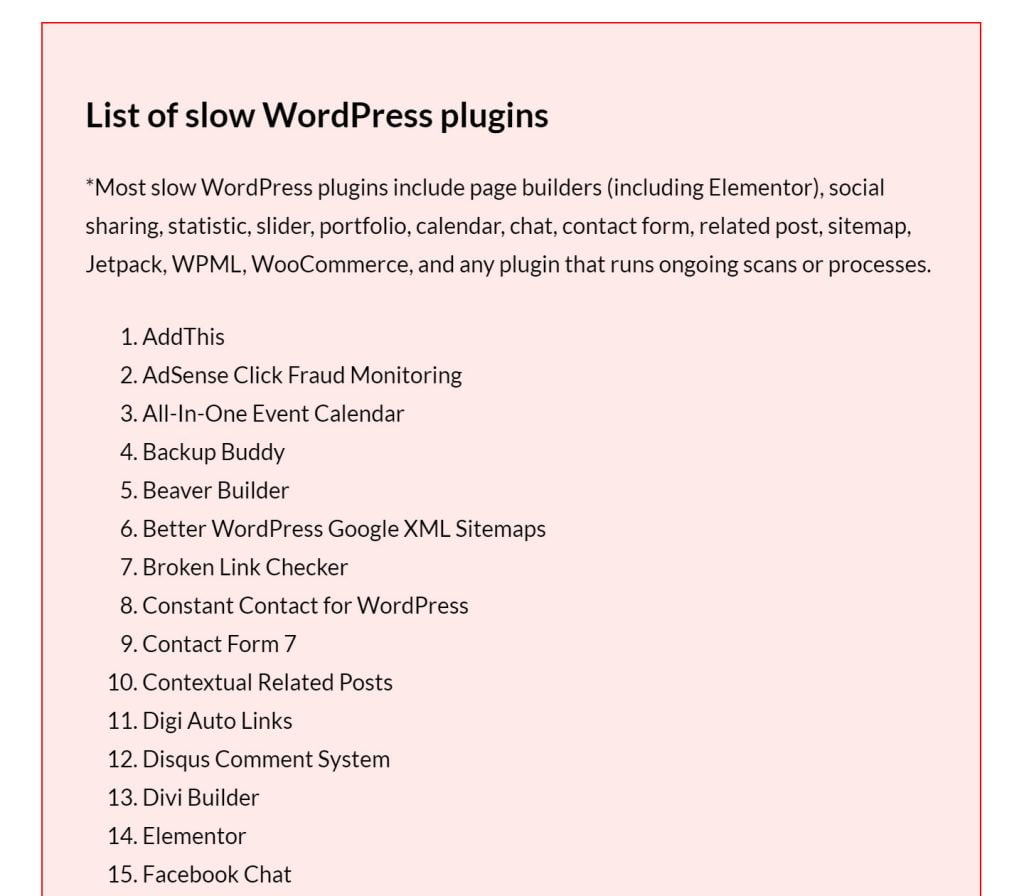
This is a list of such resource intensive plugins provided by Online Media Masters.
Reduce Network Latency
Network latency is the time it takes for a bit of data to travel from one place to another. Here, it describes the data travel time between the web server and the web browser. So, it doesn’t directly affect your initial server response time. However, website speed testing tools include this network latency in the initial server response time measurement. Therefore, if you reduce network latency, website speed testing tools will show you faster initial server response time when tested from a remote location from your web server.
Use CDN for Full Page Caching
Content Delivery Network (CDN) brings your website closer to the people visiting your website. CDN providers have many data center around the world. So, whenever someone visits your website, the CDN will deliver the website to him from the data center that is nearest to him. This way, CDNs reduce the distance between your web server and your visitors’ browsers.
One of the few things that can significantly reduce initial server response time WordPress in a matter of minutes, is full page caching in CDN. It literally eliminates any WordPress processing time and takes your site closer to the visitors. If you aren’t utilizing it already, you can see a huge gain WordPress speed performance by doing so.
Checkout this article to know more about full page caching in CDN.
Reduce Initial Server Response Time is part of the Front-end optimization tweaks when dealing with improving website performance. However, improving how fast the response of the server where your website resides is equally essential. In this article, I will discuss how to reduce initial server response time or Time to First Byte (TTFB), its importance and provide some insights to improve this metric.
First, allow me to define some terms and explain the importance of reducing TTFB.
Waiting (TTFB) Meaning — (Time to First Byte)
Google defines TTFB as the time spent waiting for a server to deliver the initial response and includes network latency in addition to the actual time spent waiting for a resource to be received from the server.
The table below shows an example of an excellent TTFB test result for one of my client’s websites. The first five items shown are network-related tasks. The next one, ‘Waiting,’ is the actual time spent by the server to process the request. The last item shows the time it took to send the first byte of data in response to the request.

Figure 1 – TTFB Phases
Website performance testing sites recommend reducing initial server response time to provide a better experience to your website visitors.
Your Time to First Byte Is Slow
A server needs to perform many tasks in response to requests it receives. After receiving a request, it loads up the necessary files, reads through the instructions contained therein, and executes it. Poorly coded scripts significantly impact the server performance, and other factors would be inefficient database queries and the physical hardware and network resources.
Common factors affecting server response times are:
- Slow application logic
- Slow database queries
- Slow routing
- Frameworks
- Libraries
- CPU resource starvation
- Memory starvation
- Slow disk speed
- High server traffic
In the latter part of this article, I will show you six ways to resolve the issues on why your time to the first byte is slow.
How to Reduce Initial Server Response Time (TTFB)
Reduce initial server response time depends on many factors and may vary based on your website setup. Google recommends keeping your server response time under 200ms. Lower is better, of course, because Google emphasizes website speed in its ranking algorithm, so:
- If your server response time is under 100ms, it’s excellent.
- Between 100ms and 200ms is considered good.
- Between 200ms and 600ms gives a warning signal so it should be improved.
- Above 600ms is too slow. You should reduce server response times.

Figure 2 – PageSpeed Insights Result (Fast TTFB)
TTFB longer than 600ms will fail these performance tests and make users wait longer to receive a response from your server and consequently a slower page load time and poorer SERP ranking.

Figure 3 – PageSpeed Insights Result (Slow TTFB)
Here are some important factors that affect the loading speed of a website:
Hosting Service: In many cases, a high server response time is caused by a bad web hosting provider, especially if you are using shared instead of dedicated hosting. If it’s dirt cheap or unreputable, you might not be getting the latest equipment. You might also be sharing bandwidth with dozens, hundreds, or even thousands of other sites.
Configurations: Your hosting service and/or server settings might not be properly optimized. Your users will be faced with slower reaction times.
Resources: If your website has a lot of pages, images, plugins, extensions, and apps, and they aren’t structured well, they will significantly slow down your website.
Caching: Proper caching allows the web browser to pull up assets from the local cache instead of making a new request to the server every single time. Optimal caching can significantly improve the page’s load speed even if it won’t directly reduce server response time.
Website Traffic: As a general rule of thumb, when more visitors make requests on your website than your server’s capacity, it will slow down the server response time. In such cases, visitors might not be able to access your website at all. If more web users are clicking around your website than it can handle, it could slow down your TTFB.
To reduce TTFB, we must first understand what happens when users visit your website.
- HTTP Request
When a user navigates to your website, TTFB starts with the HTTP request. TTFB depends on the time it takes to perform a DNS lookup—when the browser looks for the actual location of your website–the visitor’s network speed and proximity to the server, collectively called latency, and any interruptions in the network connection. - Server Processing
Upon receiving the request, the server starts processes, runs scripts, and makes database requests. - Sending the Response
A response consisting of the first bits of data is sent back to the browser. The speed by which this is done depends on the server’s and visitor’s network speed. Slow network connections affect TTFB.
How to Test Time to First Byte (TTFB)
Knowing your website’s initial server response time is the first step to improving TTFB. Several website speed testing tools are available free to use, such as GTmetrix, Google PageSpeed Insights, KeyCDN, and more.
Below are steps on how to use each website speed testing tool:
GTmetrix
Go to GTmetrix, enter your website URL in the input field, and click the Test Your Site button.

Figure 4 – GTmetrix Speed Test Result
When the result shows up, click on the ‘Waterfall’ tab, then hover your mouse over the first bar of the waterfall chart. The items making up the initial server response time will be listed. In it, you will see the network-related timings and the actual waiting time where the server prepares the response it will send back.
Google PageSpeed Insights
Go to PageSpeed Insights and enter the URL you want to test, then click on the ‘Analyze’ button and wait for the result. Google emphasizes the performance of your website on mobile devices running on cellular data and presents the mobile results first. Desktop results are available on the tab next to it.
If you don’t see a warning that states “Reduce initial server response time”, your site passed the Audit and responded within 600 milliseconds.
In that case, you will see the result under the ‘Passed Audits’ section.
KeyCDN
KeyCDN is a great tool to measure TTFB from 14 different test locations. This tool would give you an idea of how slow or fast your initial server response time is when accessed from different geographical areas.
Go to KeyCDN’s Web Performance Test tool, input your website’s URL, and click the ‘Test’ button.

Figure 5 – KeyCDN Performance Test Result
Other ways to test TTFB
There are several other online TTFB testing tools that you can use. Notable ones are Pingdom, GeekFlare’s TTFB Test, and WebPageTest, which also shows your website’s security score.
Offline test tools are also available such as TTFB For Web Developer, which runs on a Chrome browser as an extension. You can also use Chrome DevTools.
6 Ways to Reduce Server Response Times (TTFB) in WordPress
Let’s now look at the six most important ways to reduce the TTFB of your WordPress site.
1. Use a Fast Web Host
Selecting a web host with good hardware and network architecture is essential for delivering dynamic content in the fastest way possible. Poor hardware, such as those with slow hard drives, overworked CPUs, or not having enough memory to handle processes, will significantly impact serving your web pages. Heavy network traffic on low bandwidth allocation, such as those on shared hosting services or improperly configured networks resulting in bad routing, will also take its toll on how fast your server can respond to requests.
Another critical thing to consider is the server location. Select hosts that have servers as near as possible to the location of your users. If your website visitors are in Europe or the Middle East and the server is located in the US, the TTFB might be longer by half a second or more just because of the network latency due to the distance.
I did a TTFB performance test on a website without any other speed optimization and got the following results:

Figure 6 – TTFB Results on Different Hosts
As you can clearly see, using a different hosting provider can significantly impact TTFB. More on hosting comparison can be read in my Fastest Web Hosting Comparison.
2. Use Caching
Caching is probably the most significant factor for TTFB as it can reduce the duration by up to 95%. WordPress serves dynamic pages, and it is time-consuming to build the HTML to be sent to the browser on the fly. HTML caching plugins take the built page, store the cached or saved version of the page to disk or memory, and serve them on subsequent requests resulting in faster web page loading.
Another thing you can consider in selecting a fast web host is that of server-level caching. Some hosts offer LiteSpeed, Nginx, Apache/Nginx, or Varnish, allowing page caching. Sites running on PHP will also benefit if the server has opcode caching such as OpCache, Zend, or XCache. Lower TTFB can be achieved by serving pages already on cache instead of dynamically generating the pages on each request.
There are also application-level caching plugins for applications like WordPress, Drupal, or Magento. The most commonly used cache plugins for WordPress are WP-Rocket, Swift, W3 Total Cache, WP Fastest Cache, LSCache, and more.
3. Use a CDN
A Content Delivery Network (CDN) improves your server response times by delivering static content like images and scripts via a network of servers located worldwide. This system helps by having a server geographically nearest to your user deliver these files, thereby reducing network latency between your website and your users.
Not all CDNs are equally good, though. Select one with a point of presence (PoP) near your users and runs on a good network. Some also offer firewalls to block access from malicious origins.
Popular CDNs are Cloudflare CDN, RocketCDN, StackPath, and Bunny CDN.
4. Optimize your Database
Your website’s database more than likely runs on MySQL or its open-source fork MariaDB. Your web server should run the latest MySQL/MariaDB version, as these updates usually include performance and security optimizations. An updated version means new features and general improvements to existing ones. Though you may not need some of these extra features, more recent MySQL/MariaDB versions are better optimized, runs faster, and are more secure.
In time, a database can have stale content, posts revisions, trashed or deleted content, spam comments, and temporary files used by plugins. This bloat will affect processing speed and should be regularly removed to improve server response time, and automatically having these deleted regularly is preferable.
Improper database queries also have an enormous impact on server response times. Look for time-consuming slow queries and try to improve them. Sometimes, an index on a critical column would vastly cut the query processing time.
5. Use a Premium DNS Service
DNS Lookups play a part in the initial server response time. When a user visits your website, a DNS Lookup is performed to determine the actual address where your website is located. There are fast and slow providers, and you should select a fast one to reduce DNS Lookup times.
Most notorious are DNS servers offered by your ISPs because they usually use not optimized servers for this task. Some of the free ones provided by your domain registrars or web hosts also don’t perform well because serving DNS requests is not their primary business line.
A good free option is CloudFlare which performs impressively and runs on premium hardware. Amazon Route 53’s premium DNS service has excellent speed. Typically, premium DNS service providers have better performance compared to the free ones.
6. Keep Your System Updated
Server Configuration (PHP Version)
WordPress runs on PHP, and it needs the latest PHP version for best performance. Over 62% of all WordPress websites still run on an old version of PHP, which presents a security risk and affects the performance. Based on performance tests done by Cloudways, the average response time for PHP 7.4 is more than twice faster as PHP 5.6. So, check your server’s PHP version, and if it’s not running the latest version, I recommend you do an upgrade. WordPress recommends running PHP version 7.4 as a minimum.
Please note that PHP 5.6 and other versions before PHP 7.4 are already the end of life (EOL), are no longer maintained, and might have security issues. Be aware, though, that upgrading your PHP version might break your website due to some plugins or code that have not been updated to the latest PHP version yet, so check your website after upgrading.
If you are running WordPress version 5.2 or later, a built-in tool called Health Check shows the PHP version currently running on your server. For older versions of WordPress, you can install the plugin Display PHP Version to check the PHP version. Delete this plugin after checking your PHP version, as it will no longer be needed after the checking.
If your website is running on an old PHP version on shared hosting, just contact your hosting support to request a PHP update.
Server Performance
As stated before, WordPress uses the PHP engine to process the instructions required to construct the HTML sent to the browser. These instructions take time to process. PHP and database versions are essential, as mentioned above, but server hardware performance also plays a vital role in the entire process. Having a faster CPU with sufficient resources allocated by your hosting provider coupled with faster hardware will better process those files. Hence, your TTFB will be shorter.
Understanding the reasons for slow server response time and how to improve TTFB is essential to gaining a performance boost for your website.
The optimizations mentioned above would lower your TTFB and positively impact the rest of the elements. These elements comprise the Core Web Vitals, such as how quickly a page loads, how quickly a user can interact with your website, and how stable your website is when it loads in the browser.
Page Speed Optimization Course
Are you ready to learn more about advanced techniques & reduce initial server response time? Head over to my WordPress page speed optimization course and deep-dive into all the amazing knowledge of website performance optimization!
If you just ran a Web Vitals Performance Test on a Website and failed the audit, “Reduce Initial Server Response Time”, then you’ve arrived at the right place.
Today, I’ll not only show how you can pass this audit but also make your website lightning fast across every geographical region.
This is the ultimate guide to improve TTFB (Time-to-first-byte) for any website irrespective of the Back-end Framework, Programming Language, or the CMS.
Both TTFB and Server Response Time have the same meaning so we will be using these words interchangeably throughout this article.
Server Response Time is the time taken by the client (browser) to recieve the first byte of data from the server.
To get a gist of the performance improvements we will achieve in this article, just visit our TTFB Test Tool and measure the performance of this URL: https://speedvitals.com
If you’ve come across any articles claiming that TTFB doesn’t matter, they always end up with the conclusion that “Overall Page Speed Matters more”. But in almost every case, a Web Page with high TTFB will have slow speed overall and vice versa.
TTFB has a big impact on nearly every Web Vitals metric. Optimizing it is a crucial step in passing the Web Vitals Test.
When you open a Web Page with a high response time on your browser, you’ll see a blank white screen until the server responds and that’s not so great for user experience.
I consider Optimizing TTFB as the basic first step to lay the groundwork for making a website fast. All the other optimizations come later for me.
So without any further ado, let’s jump right into the optimization process.
What Causes High Server Response Time
High Server Response Time is due to a combination of two factors:
- Server Processing Time
- Physical Distance between the User and Server (Network Latency)
We can consider Server Processing Time as the base value that will be present in every request. While the Network Latency will be the lowest for the user closest to the server and will increase as we move farther away geographically.
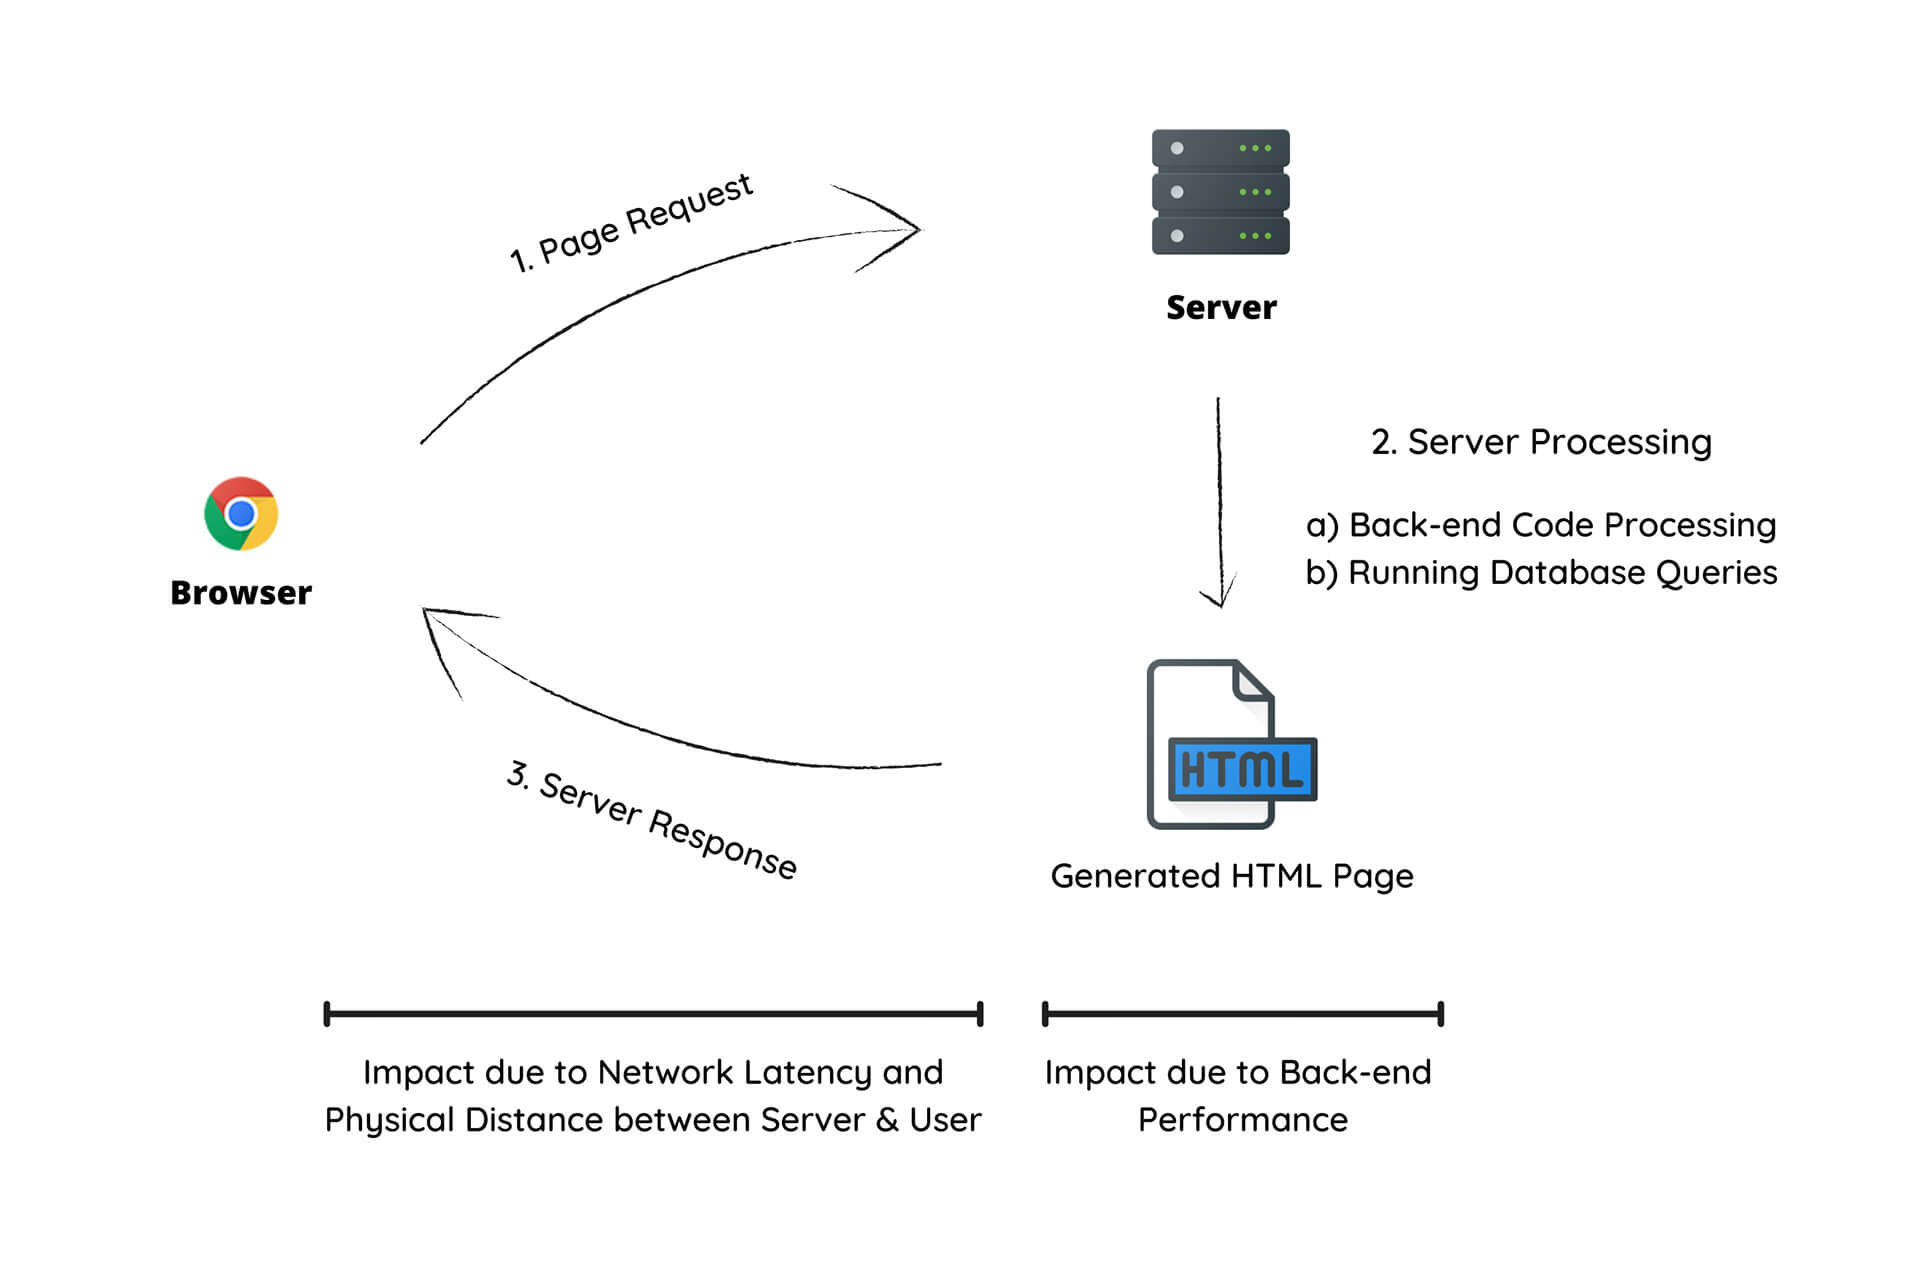
Here’s exactly what contributes in each of these cases:
Server Processing
- Unoptimized & Heavy Backend Code
- Excess Database Queries and Unoptimized Databases
- Low Hardware Resources (Especially in Shared Hosting)
- Excessive Number of Plugins (WordPress & other CMS)
These are some of the major contributors to TTFB. The fourth point is simply an extension to the first point as many Plugins add excessive and unoptimized code to the Back-end (PHP code in case of WordPress) which requires extra time to process.
We will simply eliminate all of these factors for the majority of sites as you’ll see later in this article.
Physical Network Distance (Latency)
- Poor Traffic Routing
- Poor Network Performance (Either the Server, the User or both)
Here’s an example of the difference in initial server response time at different locations around the globe for a website hosted in London, UK. This test was performed using our TTFB Test Tool that can measure Response Time from 25 locations in just one go.
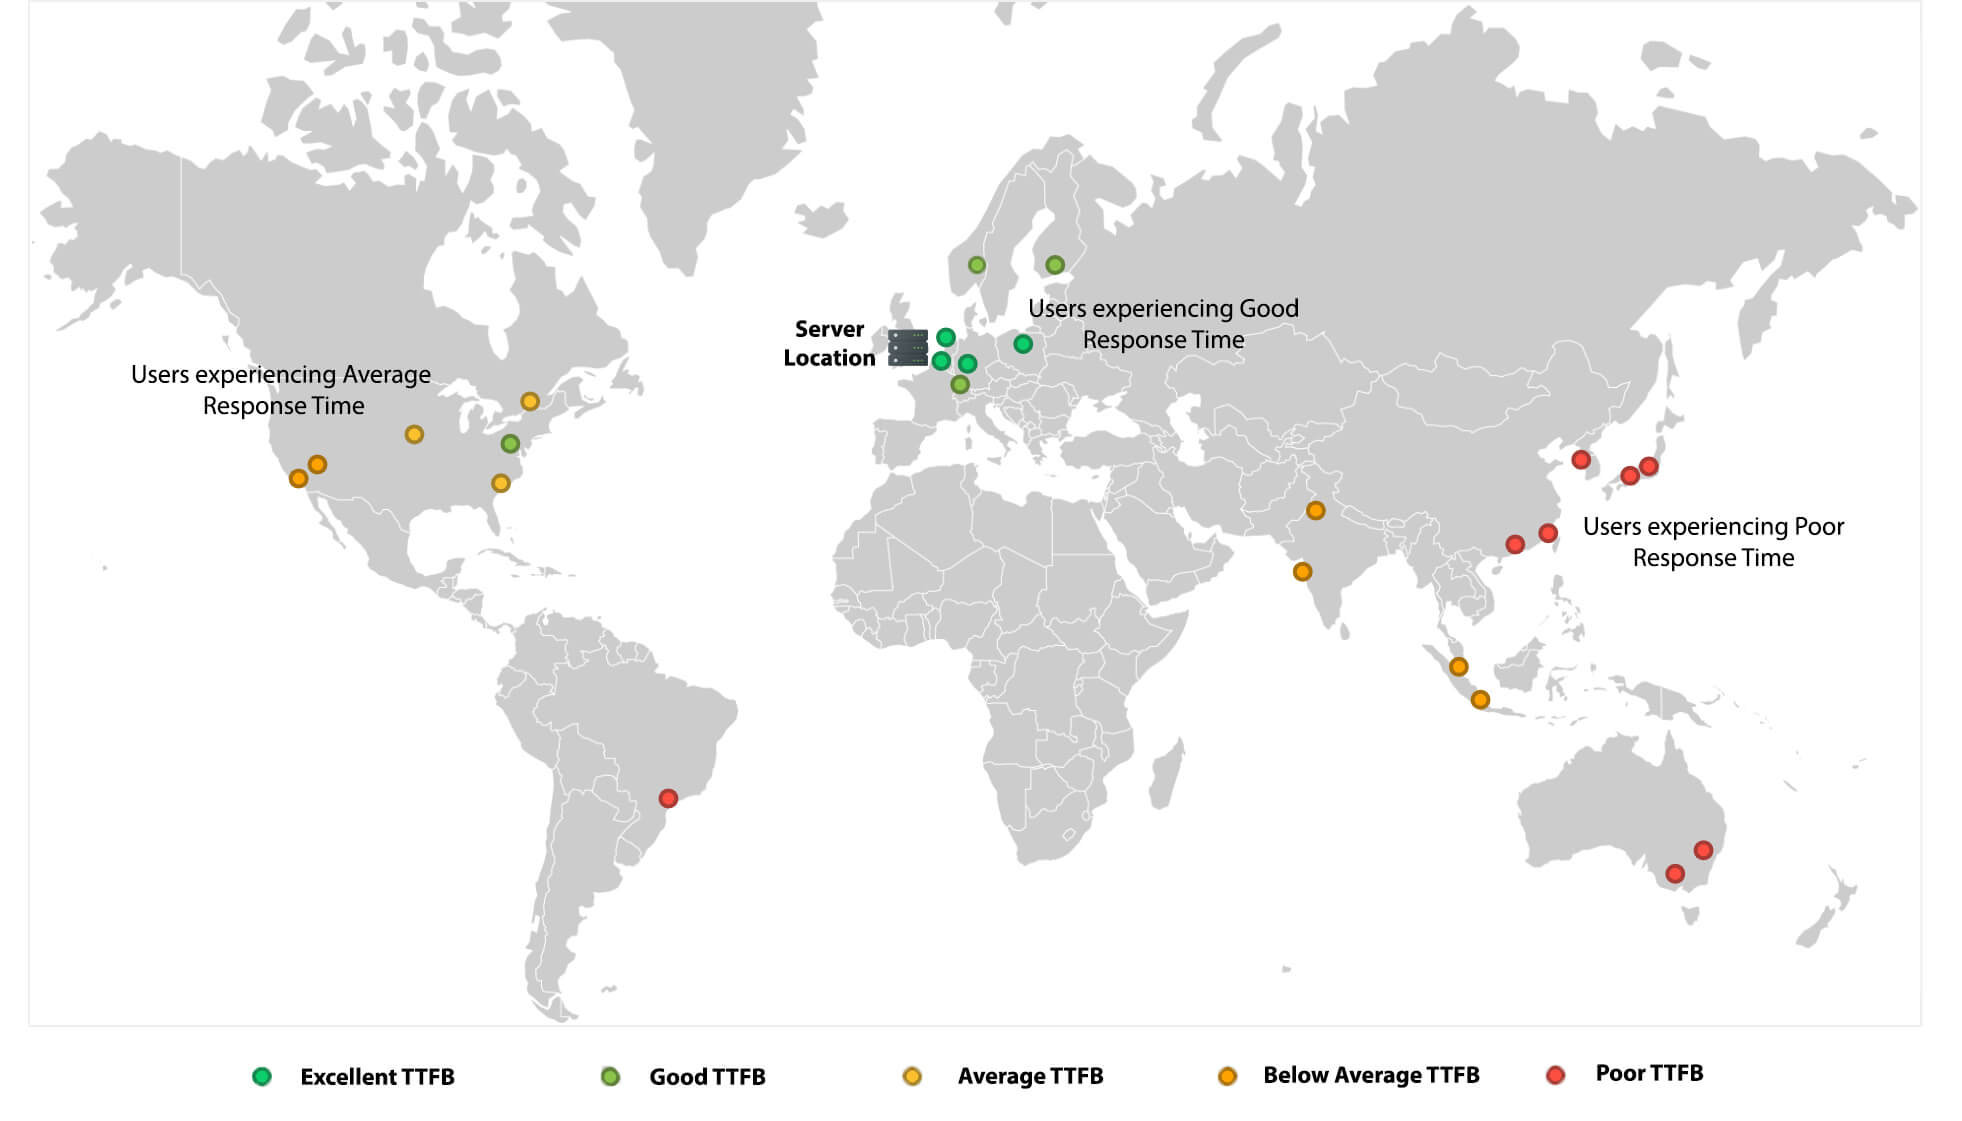
As you can see, the Server Response Time is great in the European Countries as they are physically closer to the Server.
But as we move East to South Asia or West to North America, the response times have increased significantly due to the increased Network Latency. It gets even worse as we move farther to South Korea, Japan, and Australia.
Why CDNs Cannot Fix High TTFB (with solution)
When you integrate a CDN on your Website, the CDN’s job is to deliver the static resources through their edge servers distributed across the globe. However, they only deliver static resources such as CSS, JavaScript, Fonts, and Images and not the HTML.
Thus, when you measure the TTFB of a Web Page after integrating a CDN, you’ll observe no difference. You’ll only observe the difference when you measure the response time of the static resource that is being served by the CDN.
Hence, integrating a CDN will not help you pass the “Reduce Initial Server Response Time” Audit on Lighthouse Powered Tools like Google Page Speed Insights & SpeedVitals.
Solution
A CDN can reduce Server Response Time only if it is also serving the cached HTML Page (which most of them don’t by default). We will have to manually configure a CDN to do so.
Caching the HTML at CDN is also known as “Full Page Caching” or “HTML Caching”.
So far, I’ve only tested Full Page Caching with Cloudflare and BunnyCDN. If you find more CDN Providers where it is supported, let me know in the comments and I’ll test that out.
In the next section, we will discuss how you can implement the same.
Since one of the biggest contributors to Server Response Time is the Back-End Code Processing Time, the best approach that will result in the biggest performance improvement is to completely eliminate Back-End Processing by converting a Website into a Static Site (or by storing the static version as Cache) and delivering the Static Version from the Edge Locations of a CDN.
And guess what? You can convert most of the dynamic sites into Static without compromising on the dynamic features.
To better understand the different approaches we will be implementing in this article, let us classify a Website into three categories:
Static Site: A website written in HTML, CSS, and JavaScript with no backend Code.
Dynamic Site: A website that uses a Backend that is built-in a programming language such as PHP, JavaScript (Node.js), Ruby, Python, etc, and/or a Database Server such as MySQL, MongoDB, PostgreSQL, etc. These types of sites have templates with Programming Languages Embedded within them. Every time a request is sent to the Server, these templates are converted to HTML files in real-time. Most of the Content Management Systems such as WordPress, Drupal, Joomla, Magento fall in this category. And same goes for Applications built using Web Frameworks like Django, Laravel, ExpressJS, NestJS, Ruby on Rails, Flask, Spring Boot, ASP.NET.
Truly Dynamic Site: A dynamic site but the HTML file Content also changes based on the User’s Authentication Status, and its device characteristic such as Location, Device Type, Operating System, Browser, etc.
While we can convert most of the Dynamic sites into Static with ease since their content only changes based on the URL of the requested Web Page, the same cannot be done in the case of Truly Dynamic Sites. For truly dynamic sites, we will need to implement Cache Invalidation techniques for specific situations.
For example, let’s consider a Dynamic Site with User Authentication functionality. The Navigation Bar of this website displays a “Login” or “Logout” button based on the current authentication status of the user. If the cache is cleared and an authenticated user visits the Website, the server will serve an HTML page that displays “Logout” in Navigation Bar, and this version will get cached.
Hence, there’s a possibility that a non-logged user will also end up seeing the “Logout” option in the Navbar when they are not actually logged in. The same can happen with the Cart Page of an E-commerce Store or the Search Feature of any website. We do not want to cache the dynamic features.
But, there are solutions to improve the TTFB of Truly Dynamic sites as well without implementing HTML Caching and we will go through those later in this article.
But first, let us see how we can improve the initial server response time for WordPress. Later on, we will move on to Static/Dynamic sites, and at last, we will discuss Truly Dynamic Sites.
For WordPress Sites
For reducing Server Response Time on WordPress sites, I follow a two-step process:
- Installing a Caching Plugin that can generate Static HTML Pages
- Using a CDN that can replicate HTML Pages to its edge locations across the globe
Here, the first step only comes into play when Cache Hit is not successful but I still recommend this step since it plays a big role in overall performance optimization as Cache plugins perform a lot of other optimizations as well.
Caching Plugin
I use and recommend either WP-Rocket or FlyingPress for WordPress. Both of them generate Static HTML Pages and can dramatically reduce TTFB.
Full Page WordPress Cache on CDN
While the above step takes care of High Response Times due to Back-end Processing, we still need to reduce the Response Times due to Network Latency.
There are various approaches you can follow to enable HTML Caching at your CDN. Here are some that I recommend:
Cloudflare APO
The easiest and one of my favorite options is to enable Cloudflare APO (Automatic Platform Optimizations). However, this isn’t a free feature and costs $5/month. But if you’re on Cloudflare Pro or a higher plan, this feature is available for free.
Cloudflare Full Page Cache using Page Rules
If you want to achieve the same performance as APO for free, you can use enable Full Page Caching using Page Rules. Here’s a guide for the same.
Make sure you follow the guide carefully and handle the things that will break. You’ll need to disable the Admin Bar at the front end. For Search & eCommerce sites using WooCommerce, use themes that use Ajax.
BunnyCDN Full Page Cache
Just like Cloudflare, you can enable Full Page Caching at other CDN Providers such as BunnyCDN. Here’s an excellent guide for the same.
For Static & Dynamic Sites
For Static sites, by default, the TTFB would be great but you’ll need to replicate the same Worldwide. This can be done simply by setting up Cloudflare Page Rules.

Simply replace example.com with your domain name. This rule will apply to all subdomains on this Website as well. To apply it only on a specific subdomain, replace it with *www.example.com/* where www is the name of the subdomain you want to apply it to.
For Cache Level, select Cache Everything to Enable HTML Caching.
For Edge Cache TTL, select a value based on how often the content changes on your website. I recommend 7 days or 14 days.
The same thing can be applied on dynamic sites as well that meet the following criteria:
- Websites whose content doesn’t change based on the User Characteristics like Device Type, Browser, OS, etc
- Websites whose content doesn’t change based on User Authentication Status and they have separate Dashboards for Logged In Users. Example: A website that doesn’t serve different content to Logged in and Logged Out users on the same URLs. If a user is logged in, instead of changing the home page to User Dashboard for that particular user, they’ll redirect the users to a different location such as example.com/dashboard or app.example.com.
- Use Ajax for features such as Searching and updating the Cart items in case of E-Commerce.
You can use Cloudflare Rules to exclude Website Pages you’re not supposed to Cache such as Admin/User Dashboard, Search Page, Cart, or anything else that could potentially break.
Instead of using Cloudflare Page Rules, there are many alternative solutions that you can give a try. Building Jamstack sites is one of my favorite approaches to building lightning-fast websites. You can host a Jamstack site on places like Netlify, Github Pages, Vercel, Cloudflare Pages, and AWS Amplify.
We have an article that compares the performance difference between Cloudflare Pages & Netlify.
Also, don’t forget to check out Gatsby.js. It is one of my favorite static site generators.
For Truly Dynamic Sites
This approach is for sites that serve different content based on User Characteristics (Authentication Status, Country, Device Type, etc). These are the websites that will require a little more effort to convert into Static Sites.
Hybrid Approach
In Hybrid Approach, we will implement HTML Caching for the guest users but will invalidate the Cache for Authenticated Users.
This approach should be applicable for most sites that fall into this category. Here are the exact steps you need to take for this approach:
- Cache HTML for Non-logged in users (Using the Guide for Static/Dynamic Sites in the previous section)
- Invalidate Cache for Logged-in Users by Cookies, Query Strings, or by redirecting to a dashboard on another page such as example.com/dashboard that you exclude from Full Page Caching.
- Move all the detection scripts (Country, Device, Browser, OS, etc) on the front-end and manipulate the DOM content accordingly.
- (Optional) Use Load Balancing with Multiple Servers for Logged-in Users so that they can experience better performance as well irrespective of their distance from the Hosting Server
Reducing TTFB without Caching HTML
This section is for websites where implementing Hybrid Techniques is not possible due to some reason.
Hence, instead of converting the Website into a Static one, we will need to optimize the Dynamic Version. Here are some of the steps you can take to reduce TTFB.
Optimizing the Code
This will vary for every framework and you’ll need to explore the best practices to improve response times. You’ll need to profile the code and trace the slowest portions of the code and modules/plugins affecting the performance.
Try using Algorithms with the least Complexity and follow good Programming Practices.
Upgrading Server Hardware
This can have a major impact on Server Response Times if the hardware is the major limiting factor. I’ll highly recommend avoiding Shared Hosting if you want to optimize the response times of a Truly Dynamic Website.
If you’re already using a VPS, test your website with a new server with higher hardware resources to see if you observe any performance benefits.
Switching to NVMe SSDs, Multi-Core CPUs, and Increasing the Memory can give a major boost to your Web Application.
For small to medium scale websites, I recommend Vultr’s High-Frequency VPS, Digitalocean Premium AMD Droplet, and Digitalocean’s General Purpose & CPU-Optimized Droplets.
For bigger and more complex websites, I recommend Google Cloud, Amazon Web Services, Microsoft Azure.
Moving some of the Back-end Calculations to Client-Side
Try moving some portion of code from the Back-end to the Client-Side. Modern devices are getting powerful each year and they can perform a lot of operations without any slowdown.
Alternatively, you can use Web Workers to offload some of the Computation using a service such as Cloudflare Workers, AWS Lambda, and Akamai EdgeWorkers.
Choosing a Faster Web Server
I recommend OpenLiteSpeed and Nginx over Apache for better performance.
Optimizing Database
Here are some steps you can take to optimize the Database Performance:
- Choose a Performance optimized Database like MariaDB over MySQL
- Write and Execute more Efficient Queries
- Implement Beter Indexing
- Clean Up Databases Regularly
- Keep the Database Version Up to Date
Keeping Framework/Programming Language Up to Date
Keep your Web App to date with the latest versions of the Programming Language and Framework. The new updates can bring in several performance improvements and bug fixes.
For example, the latest PHP version, i.e. PHP 8 can handle nearly twice as many requests per second when compared to PHP 5.6.
Implementing Caching Techniques
Caching Techniques like Memcached, Redis, and Varnish can improve Server Response Times by a big margin. For PHP-based sites, I highly recommend PHP-FPM.
Reducing TTFB Globally
For all the Non-Truly-Dynamic Sites, it was easy to reduce Server Response Time Globally by serving HTML from CDN’s Edge Locations.
But in this case, we will need multiple servers across the globe. Then, we will use a Load Balancer to deliver content to your users from the closest Server Geographically.
For this approach, we will need to decide geographical locations for our Servers.
You should choose the Locations based on where the majority of websites users live. If you have a global audience, I’ll recommend at least three locations to host the servers:
- California, United States (For North & South America)
- London, United Kingdom (For Europe)
- Singapore (For Asia Pacific)
If you get a lot of visitors from South Asia, Africa, and the Middle East, you can also opt for another server in the following locations: Mumbai, India for South Asia, Dubai for the Middle East, and Johannesburg, South Africa for the Africa region.
If you have higher budgets, you can always deploy a lot more servers across different geographical regions to ensure all your users get an excellent experience.
I highly recommend Cloudflare’s Load Balancer or Akamai Load Balancer for this Purpose. Alternatively, you can also check out Google Cloud Load Balancing, Digitalocean Load Balancer, Azure Load Balancer, and Elastic Load Balancer.
Summing Up
In this article, we mainly discussed all the possible ways to convert a Dynamic site into Static since it is one of the most effective ways to dramatically reduce the Server Response Time. You can easily achieve a response time below 200 ms worldwide using the techniques I mentioned in this article.
A low response time makes websites lightning fast and makes a site more likely to pass the Web Vitals test. Once you implement one of the above strategies, do share the before vs after results with me in the comments section.
Bonus Tip: Use our TTFB Testing Tool to warm the HTML Cache at your CDN every time you clear it so that the first visitors at each edge location don’t experience sluggish performance.
I am sure you have run some kind of page speed test on your WordPress website if not I’ll tell you later in this article how you can do that. When you run PageSpeed insight on your website you have probably seen “Reduce Initial Server Response Time”. In this article, we are going to learn what is initial server response and how to reduce its time.
What does initial server response mean?
To understand the initial server response time first we need to understand the process of rendering the content on your browser. It is a four-step process that is mentioned below.
- Request: Request sends by the visitor’s web browser.
- Response: The request gets processed by the server and the necessary assets (web page files, resources, and such) sent back to the visitor’s web browser.
- Build: The visitor’s browser uses these assets to start rendering the requested web page.
- Render: After that, the web page is displayed to the visitor.
Initial server response time is also known as Time to First Byte (TTFB) means the time browser takes to receive the first byte of the request browser makes from the server. Meanwhile, TTFB consists of these three components:
1. The time is taken in sending the HTTP request
TTFB starts with an HTTP request. The time browser takes to send the request and the time server takes to receive the request. It depends on multiple factors such as DNS lookup time, the speed of the user’s internet, the distance to the server, and any interruptions in the connection.
2. The time is taken to process the request
Once the server receives the request from the visitor’s browser, it processes the request and generates a response. It involves starting the processes, making database calls, running scripts, and communicating with other network systems.
3. The time is taken by the server to send back the first byte of the response
Finally, the server needs to send the response to the visitor’s browser. The first byte of this response is the calculating factor.
As you can see this process depends on both the network speed of the user and the server. Since we can’t do anything about the user network speed we can improve our server speed.
What is a good server response time?
So what is a good server response time? According to Google recommended TTFB time is less than 200ms as shown in the table below.
How does it affect your website?
Now let’s know how slow server response time affects our website and visitors? When your server response is slow your visitors see a blank page for few milliseconds and then content starts to load. Also, it is a deciding factor for ranking your website on google. Not just google most of the search engines rank your website based on initial server response time.
How to check your website’s TTFB?
Their many tools are available to check the TTFB of your website.
Lighthouse

Lighthouse is recommended and the most viable solution to check your website speed since index the site on Google is anyone’s first priority. To check the initial server response time in the lighthouse go to the link and type your website URL and click on analyze.

After a few seconds report of your website gets visible to you and if it is more than 200ms you will see the alert “Reduce initial server response time” or if it is less than 200ms in the passed audit section you will see the “Initial server response time was short“.
Always check this for both mobile and desktop and run this test multiple times to be sure.
Key CDN

Another very great tool is to check your TTFB is Key CDN. This tool lets you test your website on 14 different locations and you can get TTFB of your site for 14 different locations. If your website is targeted at global users you should check your site performance for multiple locations since location is also a factor of your TTFB and site speed.
Some other tools which you can use to test your site TTFB are mentioned below:
- GT Metrix: In GT Metrix you can test your site performance, you don’t get the option to choose the location until you signup.
- Pingdom: In Pingdom, you can choose between seven different locations to check your website performance.
How to reduce server response time in WordPress?
Now let’s know about how we can reduce our initial server response time.
1. Use a good hosting
One of the most important factors for faster server response is good hosting service, you should completely avoid using shared hosting and switch to managed hosting. Since managed WordPress hostings are specially tailored for hosting WordPress websites they are the best suitable option.
Your hosting should be scalable also since the number of traffic increases anytime and you should scale your site accordingly to avoid any delay in loading time.
You should also choose a server near your target user or most of the users are. For example, if most of your users are from Asia you should choose a server located in Asia, not in the US or Europe.
2. Use caching for your site
You should also use caching for your site, many hosting providers offer caching options and you should enable it for reducing initial server response time.
Not just hosting there are several different plugins available for WordPress which can cache your website for faster initial server response. Such as WP Rocket, Light Speed Cache, WP-Optimize, and so on.
3. Use CDN
A good CDN can also boost your website speed, CDN can transfer your website content very fast. CDN stands for Content Delivery Network and it is a geographically distributed network of proxy servers and their data centers. CDNs are used for high availability and faster accessibility to your server.
CDN lets your visitors access your website from farther away from your physical server at a very faster speed. The best part about CDNs is they are available for free. You can also use paid CDNs for better performance. Some good CDNs are StackPath, Cloudflare, KeyCDN, and Google Cloud CDN.
4. Avoid slow plugins and update regularly
A bad plugin can also slow down your website’s initial plugin, that’s why you should always update your plugins and avoid using unoptimized and old plugins. Query Monitor is a good plugin to monitor bad plugins. You can use the WP Hive chrome extension to monitor your plugin.
5. Optimize your database
Your WordPress database has many unnecessary data such as spam comments, post revisions, temporary files created by plugins, and others. This unnecessary data is also a reason for the slower websites. You can use plugins like WP-Optimize, WP Rocket, and Breeze.
6. Enable GZIP compression
Enabling a GZIP compression can also reduce the initial server response time for your website. Check out your hosting provider if they offer GZIP compression ask them to enable it and you can also use plugins for GZIP compression you can use a plugin called Enable Gzip Compression. WP Rocket also supports GZIP compression.
7. Use premium DNS
Typical cheap hostings don’t provide premium DNS, and normal DNS is usually slow you should consider using some premium DNS for faster initial server response time. You can also use DNS fetching for an even faster response. DNS fetching does DNS lookup in the background while the user is browsing.
8. Don’t combine CSS and JavaScript
Don’t get me wrong combining CSS and JavaScript can improve your website speed but it is recommended for small websites. If you have a very large and heavy website avoid combining them cause it can make a single file much bigger which takes extra download time. However, you should minify your CSS and JavaScript for faster performance.
9. Update to latest PHP version
The current latest version of PHP is 7.4 and you should use this version for the fastest performance. Many hosting providers offer old PHP versions and you need to ask them for the latest version. So always check and if your hosting provider has the latest PHP version.
10. Use .htacesss to reduce initial server response time
You can also use your website’s .htaccess file to improve your website’s performance. You can use several different methods using .htacesss to improve your website’s initial server response time.
You can use two main methods using .htacess to enable browser caching for your site, one is ExpireByTime and another is Cache-Control header.
ExpiresByType: To use browser caching using can simply useExpiresByTypefollowed by the resource type and the cache time period. The example code is given below:
### Optimize default expiration time - BEGIN
<span class="token directive-block tag"><span class="token punctuation"><</span>IfModule</span><span class="token directive-block-parameter attr-value"> mod_expires.c</span><span class="token punctuation">></span>
    # Enable expiration control
    ExpiresActive On

    # CSS and JS expiration: 1 week after request
    ExpiresByType text/css "now plus 1 week"
    ExpiresByType application/javascript "now plus 1 week"
    ExpiresByType application/x-javascript "now plus 1 week"

    # Image files expiration: 1 month after request
    ExpiresByType image/bmp "now plus 1 month"
    ExpiresByType image/gif "now plus 1 month"
    ExpiresByType image/jpeg "now plus 1 month"
    ExpiresByType image/jp2 "now plus 1 month"
    ExpiresByType image/pipeg "now plus 1 month"
    ExpiresByType image/png "now plus 1 month"
    ExpiresByType image/svg+xml "now plus 1 month"
    ExpiresByType image/tiff "now plus 1 month"
    ExpiresByType image/x-icon "now plus 1 month"
    ExpiresByType image/ico "now plus 1 month"
    ExpiresByType image/icon "now plus 1 month"
    ExpiresByType text/ico "now plus 1 month"
    ExpiresByType application/ico "now plus 1 month"
    ExpiresByType image/vnd.wap.wbmp "now plus 1 month"

    # Font files expiration: 1 week after request
    ExpiresByType application/x-font-ttf "now plus 1 week"
    ExpiresByType application/x-font-opentype "now plus 1 week"
    ExpiresByType application/x-font-woff "now plus 1 week"
    ExpiresByType font/woff2 "now plus 1 week"
    ExpiresByType image/svg+xml "now plus 1 week"

    # Audio files expiration: 1 month after request
    ExpiresByType audio/ogg "now plus 1 month"
    ExpiresByType application/ogg "now plus 1 month"
    ExpiresByType audio/basic "now plus 1 month"
    ExpiresByType audio/mid "now plus 1 month"
    ExpiresByType audio/midi "now plus 1 month"
    ExpiresByType audio/mpeg "now plus 1 month"
    ExpiresByType audio/mp3 "now plus 1 month"
    ExpiresByType audio/x-aiff "now plus 1 month"
    ExpiresByType audio/x-mpegurl "now plus 1 month"
    ExpiresByType audio/x-pn-realaudio "now plus 1 month"
    ExpiresByType audio/x-wav "now plus 1 month"

    # Movie files expiration: 1 month after request
    ExpiresByType application/x-shockwave-flash "now plus 1 month"
    ExpiresByType x-world/x-vrml "now plus 1 month"
    ExpiresByType video/x-msvideo "now plus 1 month"
    ExpiresByType video/mpeg "now plus 1 month"
    ExpiresByType video/mp4 "now plus 1 month"
    ExpiresByType video/quicktime "now plus 1 month"
    ExpiresByType video/x-la-asf "now plus 1 month"
    ExpiresByType video/x-ms-asf "now plus 1 month"
<span class="token directive-block tag"><span class="token punctuation"></</span>IfModule</span><span class="token punctuation">></span>
### Optimize default expiration time - END
You can change the time limit of the cache by using these codes "now plus 1 day", "now plus 1 week", "now plus 1 month", "now plus 1 year".
Cache-Control: Another awesome method is theHeaderdirective you can use this to declare a custom header for the resource. For this, you can modify your .htaccess file as shown below.
<span class="token comment">### 1 Month for most static resources</span>
<span class="token directive-block tag"><span class="token punctuation"><</span>filesMatch<span class="token directive-block-parameter attr-value"> <span class="token string">".(css|jpg|jpeg|png|gif|js|ico)$"</span></span><span class="token punctuation">></span></span>
<span class="token directive-inline property">     Header</span> set Cache-Control <span class="token string">"max-age=2592000, public"</span>
<span class="token directive-block tag"><span class="token punctuation"></</span>filesMatch<span class="token punctuation">></span></span>
You can use Headermethods to writing less and clean code. Themax-age=2592000uses seconds to tell the browser how long you wanna keep the cache 2592000 is equivalent to a month you can put whatever second you want here.
Conclusion
Now you know what is initial server response time, how you can measure it, and how you can reduce it. If you face any issues while following this article let us know in the comment below. If you know some other methods for improving initial server response time do share them in the comments.
If you have ever run a PageSpeed Insights test, you likely came across the following recommendation: “Reduce initial server response time”. The initial server response time affects the overall loading time and performance metrics such as the Largest Contentful Paint, one of the Core Web Vitals metrics. Therefore, it will also affect your PageSpeed score.
Reducing the initial server response time means that you should lower your site’s time to first byte (TTFB). TTFB refers to the amount of time it takes a browser to create a connection to the server and start downloading a web page’s contents. So, the more you can improve your TTFB, the better your performance will get.
Let’s understand what TTFB is and what causes a slow TTFB. You’ll find out how to reduce it and address the PSI recommendation. You’ll make your pages load faster and improve your LCP grade.
First, you can watch our video:
What is Time to First Byte (TTFB)?
Google defines Time to First Byte as a period of “waiting”:
“Time spent waiting for the initial response, also known as the Time To First Byte. This time captures the latency of a round trip to the server in addition to the time spent waiting for the server to deliver the response.”
To put it simply, TTFB is the amount of time from the moment you navigate to a web page to the moment it starts rendering – that is, the moment you’ll start seeing some content displayed on your screen.
TTFB is made up of three separate components:
1. The time it takes to send the HTTP request
TTFB starts with the HTTP request. The time it takes for a server to receive the request depends on the time it takes to perform a DNS lookup, the speed of the user’s network, the distance to the server, and any interruptions in the connection.
2. The time it takes to process the request
Once the server receives the request, it has to process it and generate a response. This involves starting processes, making database calls, running scripts, and communicating with other network systems.
3. The time it takes for the server to send back the first byte of the response to the browser
Finally, the server needs to send the response to the user. This step is dependent on both the network speed of the server and the user. If the user has a slow wifi connection, it’s going to affect the TTFB.
Basically, the longer it takes to send a request to the server, process it, and send it back to the user’s browser, the longer it takes to display your page to the user.
Why is TTFB Important?
TTFB is a factor that contributes to your overall page speed, so it’s an important metric to keep an eye on and optimize – also to improve your Core Web Vitals grades.
It’s also worth pointing out that you shouldn’t confuse TTFB with page speed. It’s simply a metric that gives you an idea of your site’s responsiveness.
TTFB is a metric that’s (mostly) within your control that you can tweak to speed up your site. So why not reduce it to make your site faster and get a better PageSpeed score?
What’s more, when you reduce TTFB:
- Users spend less time waiting for your site to start loading, improving the user experience – don’t forget that LCP is related to the Page Experience Update, the latest SEO ranking factor.
- Users are less likely to bounce while waiting for content to appear on the page, meaning higher engagement and retention.
What is a Good Time to First Byte (TTFB)?
Google recommends a TTFB under 200 ms. Lighthouse audit fails when the browser waits more than 600ms for the server to respond to the main document request.
If your TTFB is more than a few hundred milliseconds, there might be some bottlenecks on your server that you need to investigate.
Google recommends that sites should process user actions/inputs within 50ms to ensure a visible response within 100ms. For actions that take longer than 50ms to complete, always provide feedback, i.e., display a loading indicator or change the color for the active state.
What Causes a Slow TTFB?
When it comes to WordPress sites, several different factors can affect Time to First Byte:
- Network latency
- High web traffic
- Server configuration and performance
- Dynamic content
- DNS response time
There isn’t much you can do to solve high web traffic or network issues. But there are ways you can address server configuration, dynamic content, and DNS response times, which we’ll explore below.
How to Measure Time To First Byte: 4 Options
The first step to uncovering why your TTFB is time is high is to measure it. There are several ways you can measure TTFB, but keep in mind that each of the tools below will output different TTFB, so I recommend using the tool you’re more familiar and comfortable with.
1. Measuring TTFB with GTmetrix
You can easily measure TTFB with GTMetrix, which refers to this metric as “waiting” time.
To see your results, scan your site and open the waterfall. When you hover over the first result in the list, you’ll see your loading metrics, including wait time (aka TTFB).
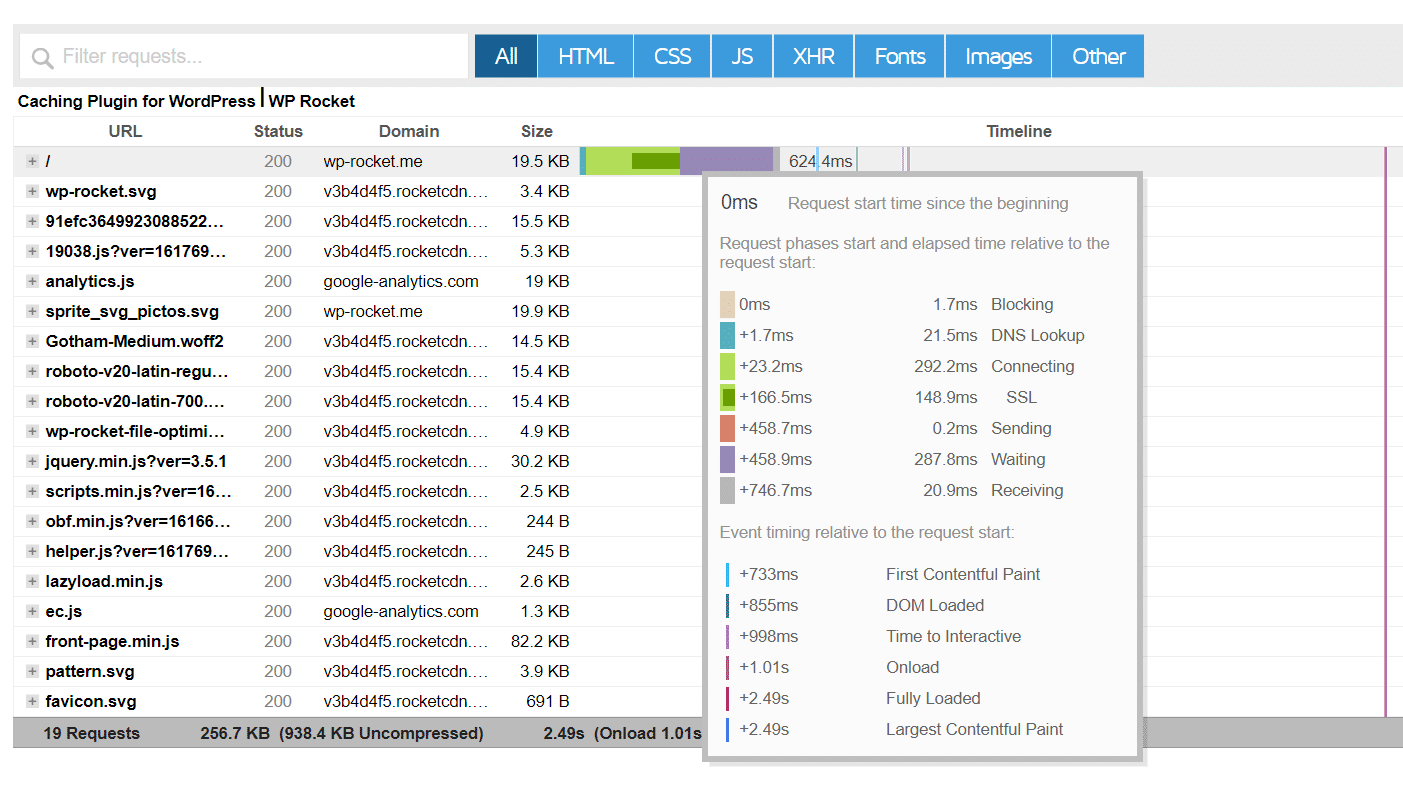
2. Measuring TTFB with WebPageTest
You can also measure your TTFB with WebPageTest. When you scan your site, you’ll get your TTFB in seconds.
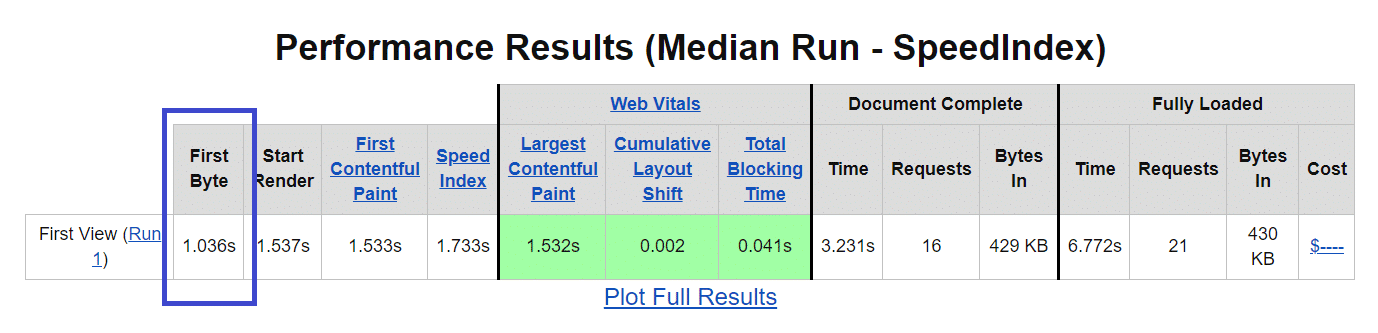
3. Measuring TTFB with Pingdom
Pingdom also measures TTFB, referring to it as “wait” time. To use this tool, simply scan your site and scroll down the results to the “File Requests” section, where you’ll see wait times for your site and individual requests.
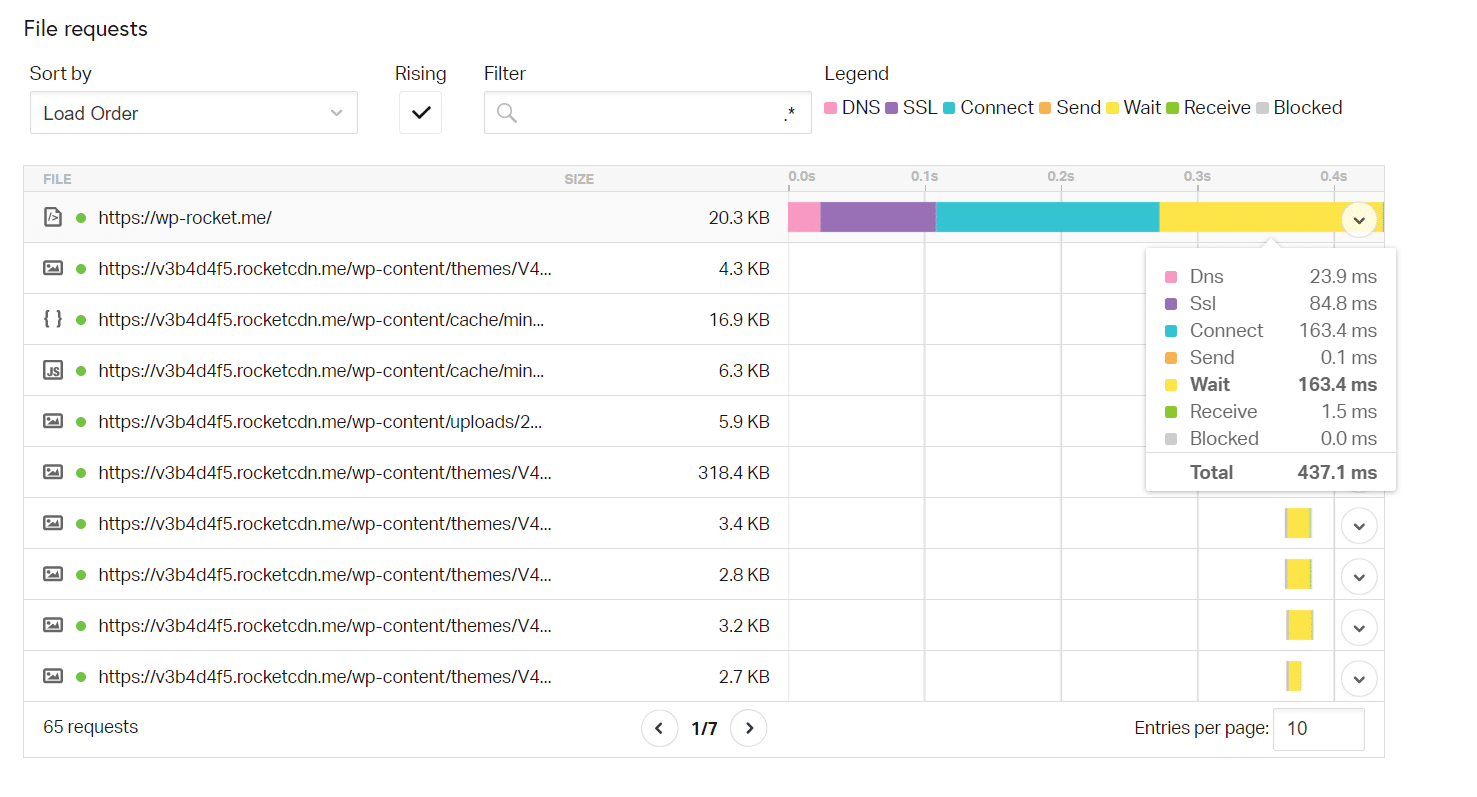
4. Measuring TTFB with KeyCDN’s Web Performance Tool
Another fantastic tool for measuring TTFB is KeyCDN’s online Web Performance Test. It lets you quickly measure your TTFB from 14 different test locations. As you can see in the results below, the TTFB for the WordPress.org site is lower in the United States and higher in Europe, Asia, and Australia—proof that distance and latency play a big role in TTFB.
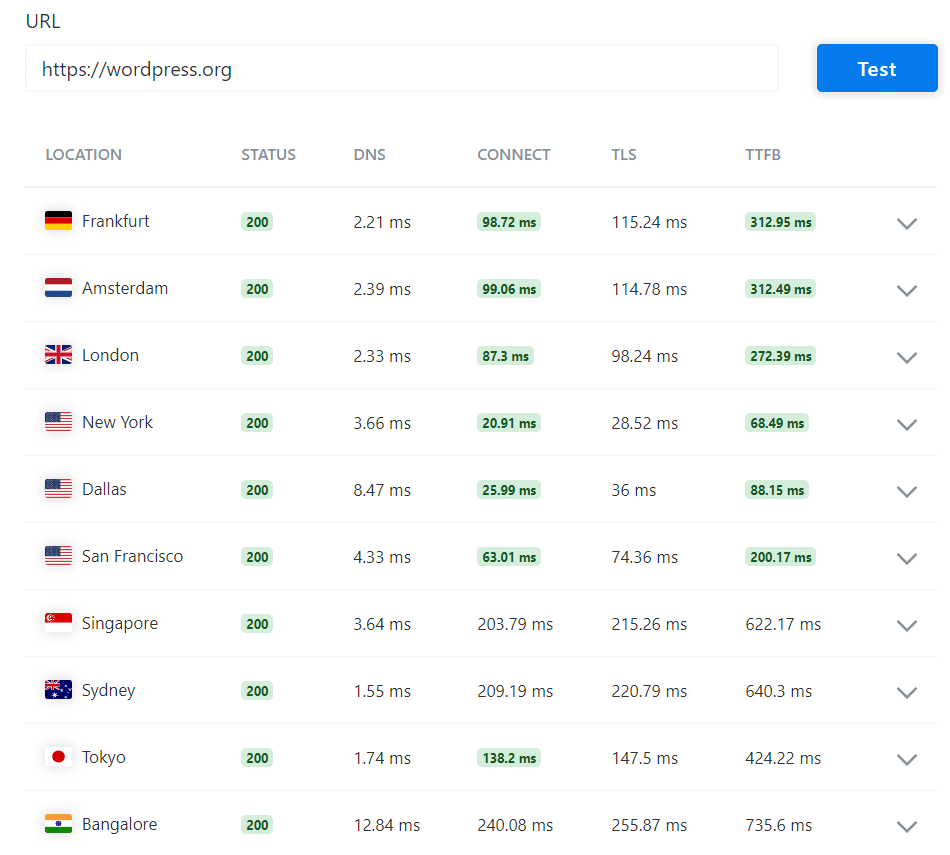
9 Ways to Reduce Time to First Byte (TTFB) on WordPress
Let’s look at how you can reduce the TTFB and the server response times for your WordPress site.
1. Use a Fast Web Host
Using a fast web host that has a carefully thought-out architecture will go a long way to reducing your TTFB. Managed WordPress hosts configure their servers specifically for WordPress sites, so you can be confident your dynamic content is in good hands.
You must consider where your host’s servers are located. Choose a host that is located physically closer to where your users are. For example, if most of your users are located in Europe, it would make sense to host your site in Europe, not in the United States. (Although you can get around this with a CDN, which we’ll look at below.)
While you can’t control your site’s amount of traffic, you can manage your site’s scalability. So if you’re expecting high traffic to your site, ensure your host can scale your site quickly to improve its TTFB.
2. Use Caching
One of the easiest ways to decrease TTFB is to set up caching on your WordPress site. Caching helps decrease TTFB by helping reduce the server processing time.
Check with your web host to see what they offer as far as object caching does. Often, all you need to do is ask your host to enable it.
You can also enable WP Rocket to cache pages on your site, so your pages are delivered faster to returning site visitors. You’ll get the job done with no effort from your side. Once you enable WP Rocket, the plugin will do the job for you.
Get WP Rocket now, and test the improvement right away!
3. Use GZIP Compression
By applying GZIP compression, you’ll reduce the size of HTML, CSS, and JS files – all resources will download faster, and you’ll reduce the TTFB.
Check out your hosting provider: some hosts enable GZIP compression by default.
WP Rocket also applies GZIP compression on sites running on Apache – you only have the enable it!
As a free alternative, you can use a plugin such as Enable Gzip Compression.
4. Optimize Your Database
A database containing too much unnecessary data – such as posts revisions, trashed and spam comments, and temporary files created by plugins – will affect your server response time. You should optimize your database’s size and run regular cleanups.
WP Rocket gives you an easy way to optimize your database, reduce bloat, and schedule automatic cleanups.
You’ll find a dedicated tab including all the features, such as Post, Comments, and Automatic cleanup (daily, weekly, or monthly frequency):
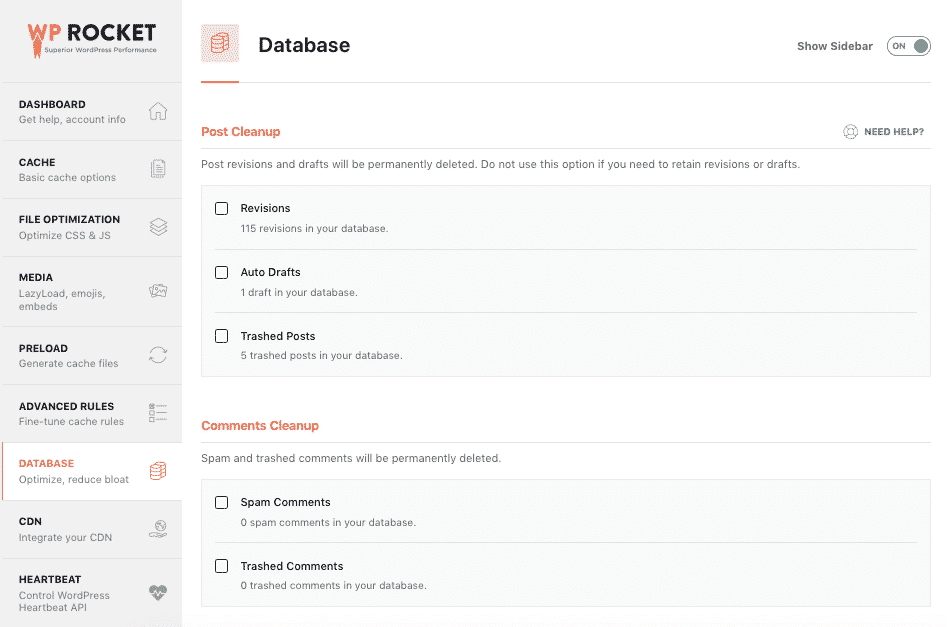
As an alternative, you can choose a straightforward database plugin such as WP-DBManager, or an all-in-one plugin like WP-Optimize, that cleans the database, compresses images and caches the site.
5. Use a CDN
Using a good quality CDN like RocketCDN can help deliver your static content, like images and scripts, faster to users via a network of servers worldwide. This means that if your server is geographically located in Europe, for example, and your users are mostly in the United States, they will receive your site’s content from a server location that’s closer to them.
This reduces the network latency between your site’s server and your visitors.
For more on CDNs and choose the find one, check out How to Choose a CDN: Discover the Best CDNs for WordPress. You can also learn more about which benefits and advantages a CDN will offer.
6. Keep WordPress, Plugins, and Themes Updated
The WordPress core team and plugin and theme authors often add performance optimizations to their updates. Sometimes, this means they have optimized the queries that their code runs to the database or made updates that affect the PHP code’s efficiency.
It’s a best practice only to keep the plugins and themes you need and delete the rest. So regularly review your plugins and themes, and remove any that you’re no longer using.
The quality of your plugins can also impact your TTFB, so look out for plugins that are affecting your site’s performance. Broken Link Checker, for example, is designed to run in the background, checking for broken links every so often. The result is a slow WordPress admin and increased TTFB.
7. Reduce Queries
Often, the number of queries your site runs to get information from the database can affect TTFB. To help identify any query bottlenecks, try installing a diagnostic plugin like Query Monitor or consider a more heavy-duty tool like New Relic. The latter will help you dig into database queries that are the most time-consuming or have the slowest query time so you can find which plugins, themes, or settings are affecting your site’s page speed.
8. Use a Premium DNS Service
Typical hosting packages don’t offer premium DNS (although some managed WordPress hosts do). Investing in a premium DNS provider will ensure DNS queries are answered with low latency by using a global network of DNS servers, in turn helping to reduce your TTFB.
If you want to take this a step further, consider enabling DNS prefetching on your site. This technique lets you tell the browser to perform DNS lookups on a page in the background while the user is browsing. For more on this, check out Preload, Prefetch, Preconnect: How to Speed Up Your Site With Browser Resource Hints.
9. Don’t Forget the Latest Version of PHP
Using a 7+ PHP version will also improve your time to first byte. To give you a straightforward reason, PHP 7+ can handle almost 50% more requests per second. So, if you are still on PHP 5.6, it’s time for an upgrade!
Improve your Time to First Byte Right Away
You could implement loads of other advanced techniques on your site to improve your TTFB, such as Disk IO, TLS overhead, reducing autoloaded data, and more. But the methods we’ve covered in this article are relatively simple to implement and will give you the biggest boost for your site’s performance.
WP Rocket is the easiest way to improve your TTFB and achieve outstanding speed improvements while stopping using different plugins to boost performance. And you don’t even have to touch the code!
If you’ve ever ran a PageSpeed Insights test, you’ve probably seen the recommendation:”reduce initial server response time.” As a result, it will have an impact on your PageSpeed score. Reduce the time it takes for your site to respond to the first byte by reducing the initial server response time (TTFB). The time it takes a browser to build a connection with a server and begin downloading the contents of a web page is referred to as TTFB. As a result, the higher your TTFB, the better your performance will be. Let’s look at what TTFB is and what causes it to be slow. You’ll learn how to reduce initial server response time wordpress. So let’s explore.
Before coming to explore how to reduce initial server response time WordPress, we will learn the definition of Time to First Byte (TTFB).
What is Time to First Byte (TTFB)?
“Time spent waiting for the initial response, also known as the Time To First Byte,” Google defines Time to First Byte as a period of “waiting.” This time includes the time spent waiting for the server to respond as well as the latency of a round trip to the server.”
Another way, TTFB is the time it takes for a web page to render from the time you browse to it. That is, the point at which you will begin to see some content on your screen.
TTFB is made up of three different parts:
- The time it takes to send the HTTP request:
The HTTP request is the first step of TTFB. The time it takes a server to receive a request is determined by the time for doing a DNS lookup, the speed of the user’s network, the distance between the user and the server, and any connection interruptions.
- The time it takes to complete the request
The server must process the request and generate a response after it has received it. Starting processes, making database calls, running scripts, and connecting with other network systems are all part of this process.
- The time it takes the server to deliver the browser the first byte of the response.
Finally, the server must offer the user the response. This stage is influenced by the server’s and user’s network speeds. The TTFB will be affected if the user has a slow wifi connection.
In general, the longer for sending a request to the server, processing it, and returning it to the user’s browser, the longer for displaying your page to them.
What is a good TTFB?
A TTFB of less than 200ms is recommended by Google.
For some WordPress sites, this is feasible. However, you’ll require a fast infrastructure (hosting, theme, plugins). In case TTFB exceeds 600ms. So it is considered slow and the audit will fail.
| 0-200ms | Google Recommended |
| 200-600ms | Passes Lighthouse |
| 600-1000ms | Fails Lighthouse |
| 1000ms+ | Very Slow |
Why is TTFB important?
Because TTFB affects your overall page speed, it’s a crucial measure to monitor and adjust if you want to enhance your Core Web Vitals scores.
It’s also worth noting that TTFB is not to be confused with page speed. It’s basically a measure that indicates how responsive your site is.
TTFB is a measure that you can change to speed up your site. So why not cut it in half to speed up your site and improve your PageSpeed score?
Furthermore, lowering TTFB improves:
- User experience by spending less time waiting for your site to load. Moreover, LCP is linked to the Page Experience Update. This is the most recent SEO ranking criterion.
- While waiting for content to display on the page, users are less likely to bounce. Therefore, you can increase engagement and retention.
What causes a slow TTFB?
Time to First Byte can be affected by a number of factors when it comes to WordPress sites:
- Latency in the network
- Web traffic is high.
- Configuration and functioning of the server
- Dynamic content
- DNS response time
You won’t be able to do anything about high online traffic or network problems. But, as we’ll see below, there are solutions to manage server configuration, dynamic content, and DNS response delays.
How to test your TTFB?
GTmetrix
GTMetrix, which refers to this parameter as “waiting” time, makes measuring TTFB simple.
Scanning your site and opening the waterfall will give your results. You may check your loading metrics, including wait time in the first result in the list (aka TTFB).

WebPageTest
WebPageTest can also be used to determine your TTFB. You’ll obtain your TTFB in seconds after scanning your site.

Pingdom
TTFB is also measured by Pingdom. You just need to Simply scan your site and scroll down to the “File Request”. As a result, you can see the wait times for your site and individual requests.

KeyCDN
KeyCDN (which is also my preferred tool) measures TTFB in 14 different locations. When testing sites close to your origin server, TTFBs can be quick. However, when testing distant distances, they can be slow.

So now let’s come to see how to reduce initial server response time WordPress
How to reduce initial server response time WordPress?
Lower CPU usage
One of the most effective techniques to improve server response times is to lower CPU (found in your hosting account). The majority of this article will be devoted to lowering CPU usage and, as a result, lowering server load. To keep your server calm, don’t use more than 75% of its CPU.

That’s why selecting a plan with sufficient server capacity is critical. Host companies give you recommendations based on monthly visitors. However, they don’t consider how many plugins you have, if they use a lot of resources, or whether you use a CDN.

Avoid shared hosting
Because shared hosting has limited server resources, TTFB is often slow.
Your website is starving if your neighbors (other sites on the server) are hogging resources. Not to mention the fact that the majority of shared hosts have low CPU restrictions. That’s why 500 errors are common on shared hosting.


Make the switch to a faster hosting service
The majority of hosting recommendations are rubbish. So you should join the WP Speed Matters Facebook Group. It isn’t controlled by affiliates or SiteGround’s community manager, who “moderates” unfavorable postings about their brand in other groups.
Avoid slow plugins + page builders
TTFB, some plugins can cause your website to slow down and use more CPU.

- Find the slowest plugins: Tools like Query Monitor and New Relic can help you find your slowest plugins. Install Query Monitor, browse to Queries Queries By Component on the Query Monitor tab, and visit a page on your site. For different inquiries, you can check several pages/posts.

- Avoid heavy page builders: Elementor and Divi were crushed in core web vitals. These websites generally rely on additional third-party plugins and addons besides the CSS, JavaScript, and many div wrappers. This causes even greater bloating. We switched from Elementor to Gutenberg and saw a significant difference. Even hard coding your menu, header, footer, and sidebar in CSS can help you get rid of a lot of page builder clutter. You can also utilize Asset CleanUp and Perfmatters (together with Elementor’s Experimental features) to unload unwanted CSS and JS. However, I would avoid them.

Clean your database
TTFB can be improved by cleaning up your database.
Many of you are utilizing WP Rocket to clean up your database automatically. However, this does not allow you to browse through your database tables and delete tables left behind by previous plugins. We recommend the WP-Optimize for you. Look for plugins that are “Not Installed” in the “Tables” tab. You can uninstall a plugin (or disable a plugin module) in case you don’t use it anymore.

Increase cache lifespan
The cache lifespan may usually be set in most cache plugins. By increasing this, you can save server resources. If you don’t publish information frequently (like a news website), this is an excellent option. Otherwise, you should probably leave it as is.

Disable WordPress heartbeat
By displaying real-time plugin notifications, when other users are modifying a post, WordPress Heartbeat uses resources. It usually causes more harm for most website owners. Furthermore, there are numerous plugins to disable this (WP Rocket, Perfmatters, most cache plugins).
Go to Appearance > Theme Editor, then change your theme’s functions.php file. Therefore, you can disable the WordPress Heartbeat API without using a plugin. After that, paste the following code after the <?php tag:

add_action( 'init', 'stop_heartbeat', 1 );
function stop_heartbeat() {
wp_deregister_script('heartbeat');
}
Don’t combine CSS + JavaScript
CSS/JS should combine on smaller pages, but not on larger sites. According to WP Johnny, websites with a CSS/JS size of less than 10KB should merge, while those with a CSS/JS size of more than 10KB should not.

Install PHP 7.4
Many hosting companies have already made PHP 8.0, newer MySQL versions. Moreover, new features are available to help you speed up your site while lowering TTFB. Make sure you’re taking advantage of whatever optimizations your host provides. Many plugins/themes are still incompatible with PHP 8.0. Therefore you should stick with PHP 7.4.


Increase memory limit
Both Elementor and WooCommerce require a 256MB memory limit. However, you should bump it up to 256MB regardless, especially if you’re getting fatal memory limit issues on your site.
Before “Happy Blogging,” add the following to your wp-config.php file.
define('WP_MEMORY_LIMIT', '256M');
In certain hosts’ dashboards, you can also choose to increase it.

Use server-level caching
Many servers provide server-level caching, which lowers time to first page and speeds up your site. In Cloudways, I use memcached, NGINX, and Redis (with Varnish disabled). Because it comes from your server, which is faster than file-based caching. So server-level caching is faster than cache plugins.

Offload resources to CDNs
CDNs offload resources to their data centers and reduce the burden on your server.
If you’re using LiteSpeed Cache, I recommend Cloudflare, BunnyCDN, QUIC.cloud, or Cloudfront. Also, StackPath, which is utilized by several CDNs such as RocketCDN and CloudwaysCDN, should be avoided.
The other three CDNs are generally faster than Cloudflare, although they are all expensive.
Cloudflare has more capabilities. Because it can reduce TTFB (such as Brotli, HTTP/3, bot prevention, page rules, and their APO)
Step 1: Create a free Cloudflare account, add your website, and execute the Cloudflare-prompted scan. After a while, you’ll reach a screen where Cloudflare will assign you two nameservers.

Step 2: Configure NameCheap to use Cloudflare nameservers. Go to Domain List > Manage Nameservers > Custom DNS on the Dashboard. Cloudflare has given you two nameservers.

Enable Brotli
Brotli compression is more efficient than GZIP compression. Because both will make your HTML, CSS, and JavaScript files smaller. This improves TTFB by allowing certain resources to download faster. In Cloudflare’s speed options, you can enable Brotli; otherwise, your cache plugin will utilize Gzip.

Enable HTTP/3
According to the Cloudflare blog, with HTTP/3, the first byte appears after 176 ms on average. With HTTP/2, the response time is 201ms. Therefore, it shows that HTTP/3 is already 12.4 % faster.
HTTP/3 can be activated in your Cloudflare dashboard’s Network settings. Also, if you’re utilizing Quic.cloud or another CDN, make sure to check if they support HTTP/3.

Enable bot protection
Bad bots are really interested in your wp-login page.
Even if bots are unsuccessful in logging onto your site, they may attempt to do so, consuming server resources. Therefore, y ou can block them by redirecting your login page to a custom login URL (using Perfmatters or WPS Hide Login). And then you can enable bot protection in Cloudflare’s settings.
Step 1: Download and install Wordfence.
Step 2: Look at the live traffic report to see who is visiting your site in real time.

Step 3: Change the location of your wp-login page. This can be accomplished with Perfmatters or WPS Hide Login.

Step 4: Enable bot fight mode in Cloudflare Firewall Bots Bot Fight Mode (Cloudways also provides bot protection) or try Blackhole For Bad Bots to further block spam bots.

Create a cache everything page rule
Add a page rule to cache everything in case you’re using Cloudflare.
Go to Page Rules on your Cloudflare dashboard. Replace my domain with yours by copying/pasting the rule below. In case you’re having trouble applying the cache everything page rule because you have WooCommerce or a dynamic site. So you can use the WP Cloudflare Super Page Cache plugin.

Moreover, you can secure the wp-admin section by creating a page rule for it, bypassing the cache and preventing apps and performance features (such as Rocket Loader) from executing in the admin area.
Take a look at Cloudflare’s APO.
Cloudflare evaluated their APO on 500 sites. Besides that, they discovered that it reduced TTFB by 90ms on average. Cloudflare’s edge network will serve your complete site. It’s $5 a month. However, in case you have a slow TTFB. So it’s worth a try. Because it isn’t included in WP Rocket. Therefore, you have to make sure it works with your cache plugin.


Use a faster cache plugin
The gold standards for caching plugins are WP Rocket and LiteSpeed Cache.
Most people, however, do not set these to their optimal settings.
Most other cache plugins require you to install about six more plugins to acquire these functions. However WP Rocket includes them all, minimizing the amount of plugins on your site. If you only want to use one plugin; otherwise, you’ll have to figure out the functions your cache plugin has and then install additional plugins if it doesn’t.
- Database cleanup: WP-Optimize
- CSS/JS optimization: Autoptimize
- Delay JavaScript execution: Flying Scripts
- Host Google Analytics locally: Flying Analytics
- CDN URL integration: BunnyCDN / CDN Enabler
- Heartbeat control: Heartbeat Control / manual code
- Lazy load images/videos: Optimole / WP YouTube Lyte
- Preload links / instant page: Perfmatters or Flying Pages
- Host Facebook Pixel locally: no plugin does this that I know
- Prefetch/preload: Pre* Party Resource Hints / manual code
- Font-display:swap: Swap Google Fonts Display / manual code
In plugins, disable data sharing
If any plugins ever ask for your data, deactivating it will lower CPU consumption significantly. Because your server will not have to send the data to the plugin developers.

Limit post revisions and autosaves
WordPress does not limit post revisions by default. Furthermore, the autosave interval is short (1 minute). Therefore, increasing the autosave interval and decreasing post revisions will help to reduce CPU consumption and avoid a bloated database. You can do both with Perfmatters or by editing your wp-config.php file with the following code.

define('WP_POST_REVISIONS', 5);
define('AUTOSAVE_INTERVAL', 300); // seconds
Conclusion
You might use a variety of advanced strategies to optimize your TTFB on your site, including disk IO, TLS overhead, minimizing autoloaded data, and more. However, the strategies about how to reduce initial server response time WordPress in this post are quite easy to implement. More importantly, it will provide your site the most performance increase.
ArrowTheme by AHT TECH JSC is the simplest approach to optimize your TTFB and get amazing speed improvements. So fill your information into this CONTACT FORM. And then you will get our assistance as soon as possible. Or our WordPress Website Packages will be the great choice if you are seeking the full solution for your WordPress Ecommerce business. More importantly, our WordPress Website Packages will offer you two options for a full ecommerce website solution: Standard and Advance. The Advance package includes more features than the Standard package. Simply select one of our packages, and our dedicated specialists will assist you with the rest of your Ecommerce Website Construction Process. Do you want to find out more about it?
The User Experience (UX) and SEO of your WordPress site are both greatly influenced by how quickly it loads (SEO). Your rankings may suffer if your web pages take a long time to load, and your conversion rates may also suffer.
Concentrating to reduce initial server response time WordPress or lowering Time to First Byte (TTFB) is one of the best approaches to enhance server response times on your WordPress website. This can assist in ensuring that your website loads as rapidly as possible in visitors’ browsers, decreasing the likelihood that they will leave it.
What is Response Time of a WordPress Site?
The amount of time that passes between a web browser’s request for data and the server’s answer is known as the server response time (SRT).
The Time To First Byte is another name for it (TTFB).
After taking into account network delay between Web Browser and your server, server response time calculates how long it takes for the required HTML to load and start rendering on your server. Variation between runs is possible, although the variations shouldn’t be too significant.
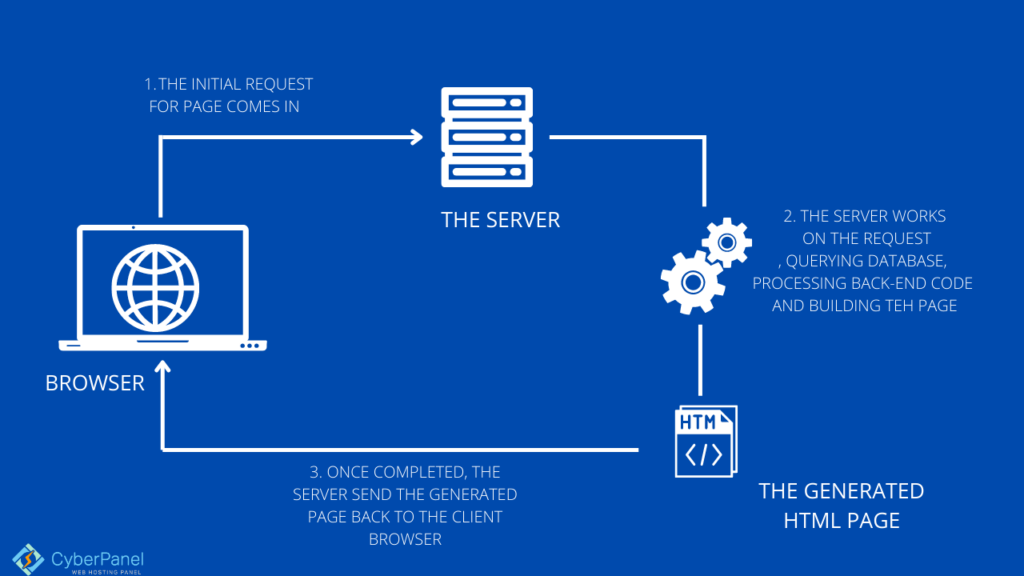
The TTFB measurements consist of three elements.
Sending HTTP Request
When a user first loads a webpage, an HTTP request is initiated. When the server receives this request, it gets to work on the proper reply. The amount of time it takes for the server to accept the request depends on a number of variables, including network speed and geographic distance.
Taking care of the Request
The server starts a number of activities, including running scripts, retrieving data from databases, and doing back-end tasks, as soon as it receives the request from the browser.
Taking Care of the Response
The server transmits the whole answer to the user once all of its components have been created. The effectiveness of your website hosting server and the user’s internet connection speed will determine how quickly you complete this phase.
What is considered a good TTFB?
You must have a TTFB of no more than 200 milliseconds (ms). The sort of content on your web page also affects this number. Dynamic content must load between 200 and 500 ms faster than static material, which should load in 100 ms.
So because the rest of the site still needs to load once the initial byte arrives, 500ms is the maximum time that Google and your users will tolerate.
How to check your Server Response Time or TTFB?
You may gauge TTFB using the internet testing tool GTmetrix. The measure is here, however, referred to as «wait time»:
Enter your website’s URL and press the Test your site button to get started. This platform does not let you choose a location to test from, unlike some of the other website speed test tools.
Depending on how big or complicated your site is, it can take the tool a minute or two to retrieve and evaluate it.
Your performance report will appear after it is finished:
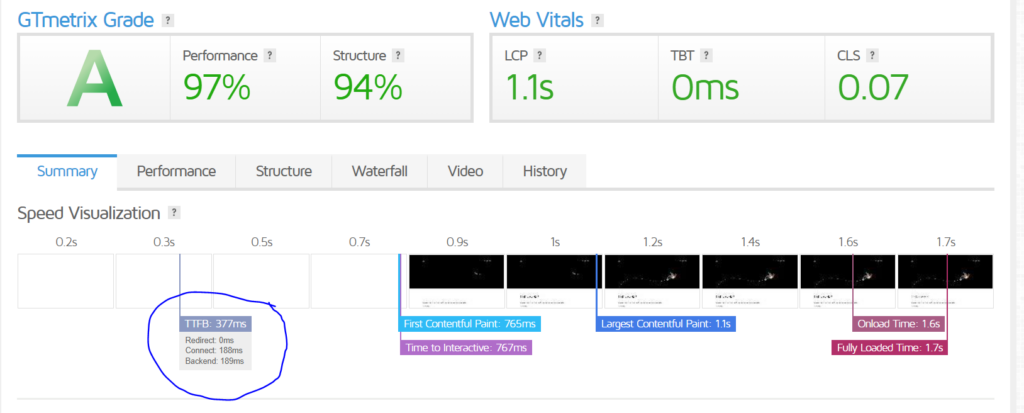
You may go to the Waterfall tab to gain more particular information on TTFB, or in this case wait time:
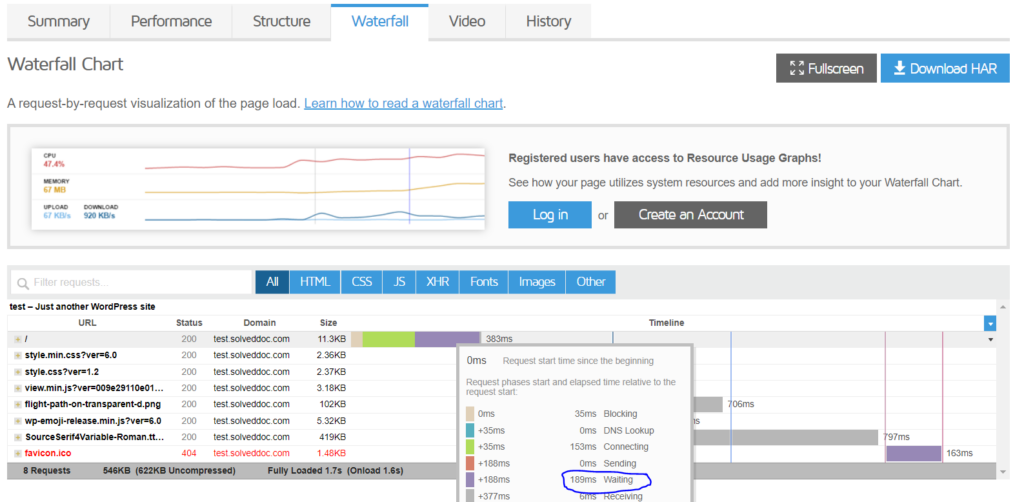
How to Reduce Initial Server Response time WordPress?
We will now discuss ways to reduce initial server response time for your WordPress site.
Method 1: Distance Between Server and Visitors
You should have a very solid understanding of who and what your target audience is before choosing a hosting server. You can select the data center that is closest to your target market using this information. Due to the shorter distance that data must travel to and from the server, this guarantees that latency is kept to a minimum. As a consequence, the server response time was considerably enhanced.
You can benefit from WordPress CDN services that store a copy of the website resources on widely dispersed nodes if your audience is international. Instead of the original hosting server, the closest node serves a page when a user requests it.
Method 2: Upgrade your PHP version
To upgrade your PHP version, you have to follow the below mentioned steps.
Go to your CyberPanel dashboard

Click on WordPress -> List WordPress from the left hand side menu
You will enter the List WordPress Websites. From here, Click on your WordPress Site Title

This is your CyberPanel WordPress manager. Click on Manage Application.
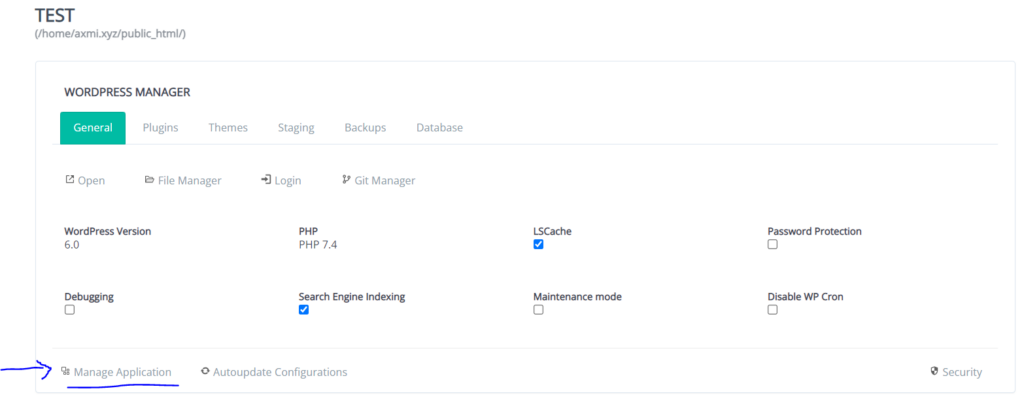
On this Manage Application page you will scroll down to Change PHP. Click on that
Now choose your required PHP and your done.
Method 3: Optimize your images
The majority of the data on a web page is typically made up of images. Image optimization is therefore the most efficient approach to shorten server response times.
Your photos should be no larger than 100 kb for a website that loads quickly.
With CyberPanel you will get LSCache with every WordPress site deployment. If your not using CyberPanel, download your LSCache here.
Go to your WordPress Site’s Dashboard
Click on LiteSpeed Cache -> Image optimization from the left hand side menu
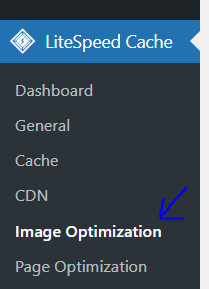
Click on Image Optimization Settings from the top bar and turn on the Optimize Original Images and click Save Changes
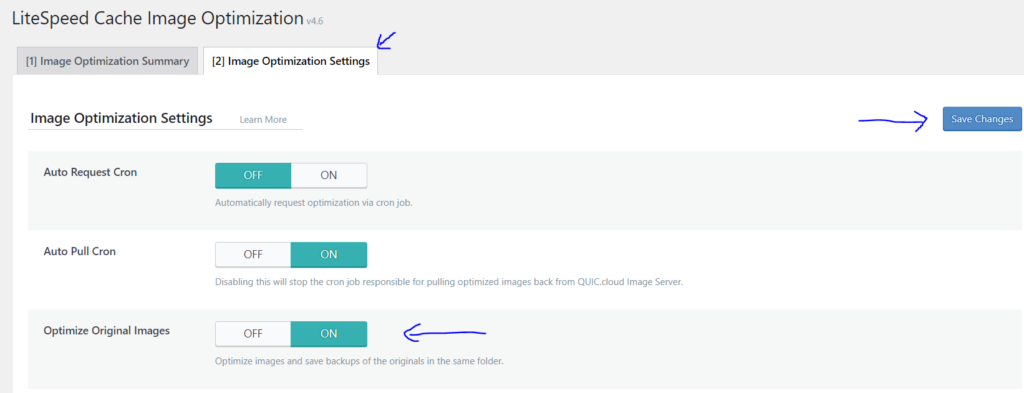
This will optimize all your images on your site. Of course you can skip it, if you have an image oriented site where you don’t want to compromise the quality of the images.
Method 4: Use a Cache Plugin
Another method to speed up server response time is caching. In order to avoid fetching dynamically created HTML files from scratch with each page request, cache plugins work by preserving them so they can be reused.
This indicates that the files are delivered from the cache rather than needing to load the PHP scripts from start each time someone visits your website.
Go to your WordPress Site’s Dashboard

Click on LiteSpeed Cache -> Cache from the left hand side menu
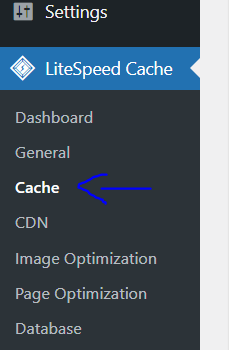
Click on Cache Settings from the top bar and turn on Enable cache and Click Save changes.
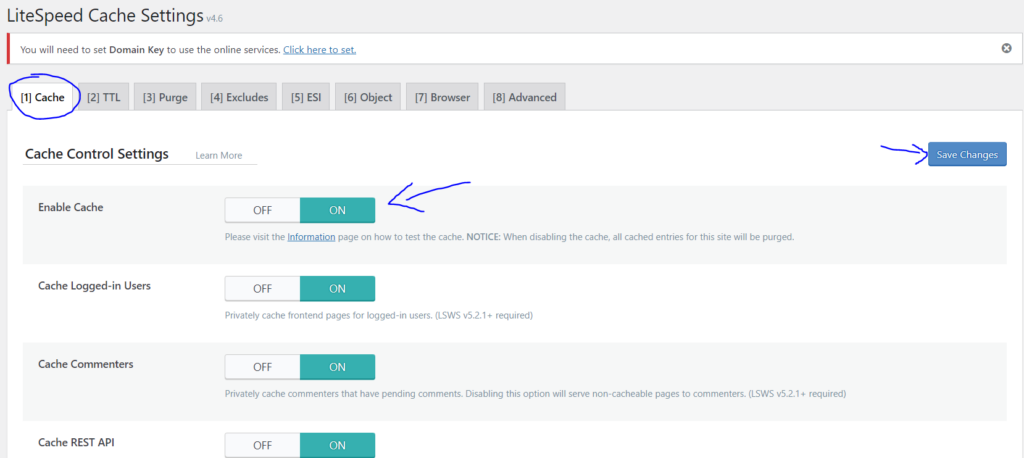
Method 5: Make sure your plugins are up to date
Your site will load more slowly than it should if you are using outdated versions of your plugins.
Therefore, if you notice an update message, make sure to update your plugins.
You can update all your plugins from your CyberPanel WordPress Manager
For that, Go to your CyberPanel dashboard
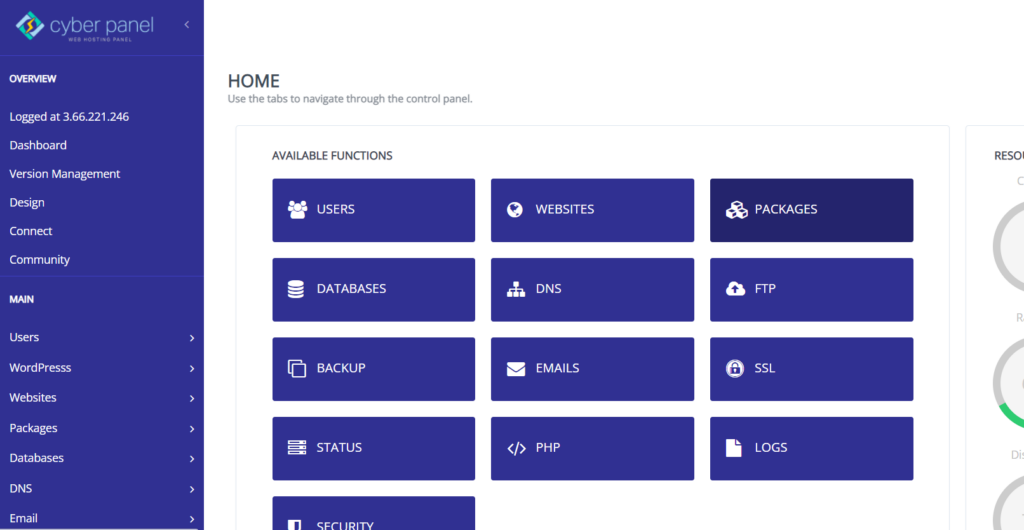
Click on WordPress -> List WordPress from the left hand side menu

You will enter the List WordPress Website. From here click on your WordPress Website Title
This is your CyberPanel WordPress Manager. Click on Plugins from the top bar
This will show you your plugins and which of them are installed, activated or needs updating. Update your plugins which needs updating by clicking on Update
Method 6: Fix Database related issues
The entirety of the necessary data is kept in a database. It needs to be streamlined so that the server can handle, update, and access data immediately. Huge, poorly maintained databases take longer to retrieve the correct data, increasing the overall server response time.
Try to remove unneeded and outdated data and rewrite queries for quicker and smarter execution to address database-related problems.
Additionally, you may want to think about Database Optimization and employing WordPress plugins that are specifically designed for database optimization, one of the best one for that purpose is LiteSpeed Cache.
Go to your WordPress Site’s Dashboard

Click on LiteSpeed Cache -> Database from the left hand side menu
Click on Manage from the top bar and click on Optimize Tables. This will optimize tables in your database.
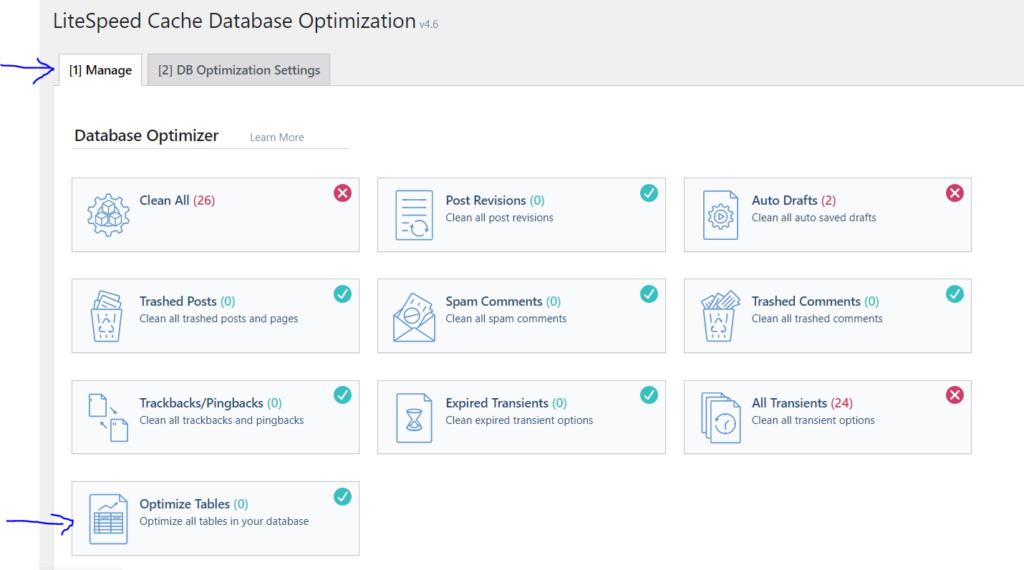
Method 7: Dynamic vs Static
Dynamic content is typically unique for each user and is created at runtime based on the request made by a visitor.
The website’s HTML, JS, CSS, and pictures have hardcoded references to the static content. The server transmits the same material to every visitor, and these assets do not vary for varied user input. This method uses fewer server resources and increases server response time, making it the fastest way to provide content.
To decrease load times and the use of server resources, experts advise shifting static content to a WordPress CDN.
Method 8: Choose WordPress Hosting wisely
Always choose a hosting service for your WordPress website after doing your research. The ideal situation is a dedicated setting where you can manage and optimize the server parts in accordance with your performance needs.
Just choose a highly-optimized managed WordPress hosting service who handles server management concerns if you lack technical knowledge.
The CyberPanel environment is fantastic for meeting all of your demands. And in any situation where you might need assistance, the wonderful support is always there to assist you in any way that they can.
Conclusion
Your site’s speed and overall performance are impacted by the crucial indicator known as TTFB. Your site’s UX may suffer and your SEO may suffer if the TTFB is greater than 500 ms.
Lower your server response time by using some of these techniques; the effort will be worthwhile.
Server response time is now becoming a crucial ranking element as more people use mobile devices instead of desktop computers.
It is a matter of adhering to all the best practices to enhance overall speed and decrease server response time for a WP site.