While importing files in Registry Editor, if you get Cannot import reg key, Error accessing the registry error, these troubleshooting suggestions will help you fix the issue. This unusual error message can appear on your computer when the Registry Editor has some issues or some other process is controlling the Registry Editor files.

The entire error message says:
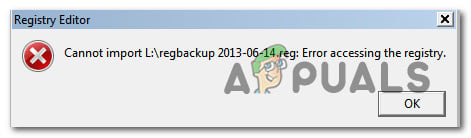
Registry Editor, Cannot import reg file: Error accessing the registry
If you cannot import a .reg Registry file and see Error accessing the registry message, follow these steps to resolve the issue:
- Restart your computer
- Try in Safe Mode
- Use Administrator account
- Take full ownership of the Registry key
To learn more about these solutions in detail, continue reading.
1] Restart your computer
As mentioned earlier, if the Registry Editor or Registry file is being processed by another program in any way, there is a chance of getting this error on your computer. No matter how many ways you try to import, you will encounter the same issue while importing.
The worst thing is that you may not be able to detect the program using Task Manager. However, you can use the Task Manager to close all the opened programs or recently opened programs and corresponding processes.
However, if it doesn’t help, you can restart your computer. It will close all the processes and apps at once. Following that, you will be able to import the Registry files without any error.
2] Try in Safe Mode
If you have recently installed any driver or hardware, and the problem started after that, you can try to import the Registry files in Safe Mode. Safe Mode excludes all the third-party processes at once so that you can get a fresh-like experience while using your computer. Therefore, follow this guide to boot your PC in Safe Mode. Then, try to import the Registry file.
3] Use Administrator account
At times, not having permission might cause this issue. For your information, some HKEY_LOCAL_MACHINE keys might not work when you do not sign in to an administrator account. If so, you need to use an administrator account to get this problem resolved. If you wish, you can enable the in-built administrator account and try to import the data with it.
4] Take full ownership of the Registry key
There are some Registry keys and values that require to have proper permissions. Otherwise, you might encounter the aforementioned issue. Let’s assume that your exported Registry files include some keys that your user account doesn’t have permission to access. In such situations, you must take full ownership of the file. No matter whether you want to modify the key or import it into the Windows Registry, you must obtain full ownership.
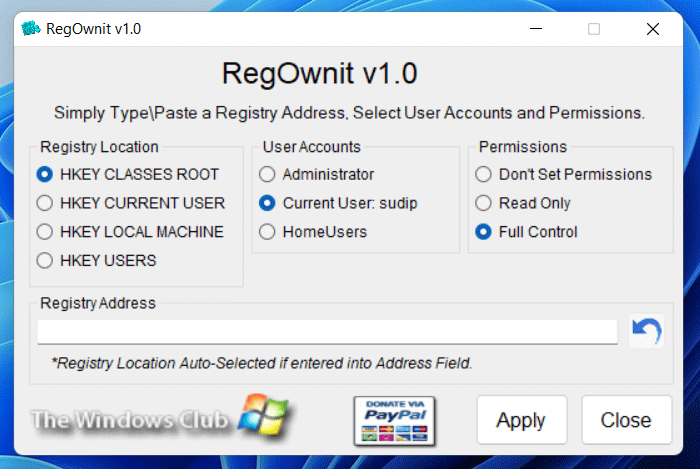
There are two ways to gain ownership of a Registry key. First, you can use the manual method. However, if you want to get things done quickly, you can opt for our RegOwnit. This freeware allows users to take full control and ownership of Windows Registry keys with a click.
This should resolve your problem.
Read: How to monitor and track Registry changes in Windows
How do you fix Cannot import, Not all data was successfully written?
If you see Cannot import Registry File, Not all Data was successfully written to the Registry error, you need to follow almost the same guide as mentioned above. For example, you need to sign in to an administrator account, boot in the Safe Mode and try again, take full control of the Registry key, etc.
Read: Cannot import file: The specified file is not a registry script
How do you fix Cannot import, Error accessing the registry?
If you get Cannot import error accessing the registry error while importing, you must sign in to an administrator account to get it resolved. However, if it doesn’t work, you need to use the System Restore point to get it fixed. However, before using the System Restore point, it is highly recommended to use the first solution.
Read: How to switch between HKLM and HKCU quickly in Registry Editor.
Some users are getting the “error accessing the registry” error when trying to merge a registry key on a Windows computer. Most affected users report that the issue occurred after they did a re-install of their Windows version and tried to open a .reg file. The issue is mostly encountered on Windows 7, Windows 8 and Windows 10.
What is causing the “error accessing the registry” issue?
We researched this error message by looking at various user reports and the repair strategies that they used to either circumvent or resolve the issue entirely. Based on our investigations, there are a couple of common scenarios that will trigger this particular error message:
- Registry File doesn’t have administrative privileges – This scenario is quite common with fresh Windows installs/reinstall. If Registry Editor hasn’t been opened before, it’s likely that the program doesn’t have the necessary permissions to merge the .reg file with your current registry.
- System file corruption is causing the error – There are confirmed cases where this error appeared due to a suite of corrupted system files that were interfering with the importing abilities of the Registry Editor utility. If that’s the case, there are two confirmed solutions (system restore and repair install) that are known to resolve the issue.
If you’re struggling to resolve this particular error message, this article will provide you with a selection of verified troubleshooting steps. In the area that follows, you’ll discover several potential fixing methods that other users in a similar situation have used to get the issue resolved.
For the best results, follow the methods below in order until you discover a fix that is applicable to your current situation and manages to resolve the issue.
Method 1: Importing the registry file with administrator privileges
As several affected users have suggested, chances are that you’re dealing with a privilege issue. Most likely the Registry Editor utility doesn’t have enough permissions to merge the file yet. This is a fairly common thing with new Windows installations where the Registry Editor hasn’t been opened before.
Several users that were struggling to resolve the same error message have reported that the issue was finally resolved after they opened Registry Editor with Administrative privileges and use the Import menu to merge the files. Here’s a quick guide on how to do this:
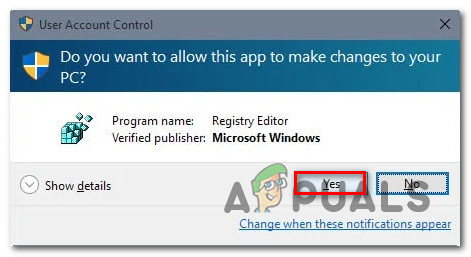
- Press Windows key + R to open up a Run dialog box. Then, type “regedit” and press Ctrl + Shift + Enter to open up Registry Editor with administrative privileges.

Typing Regedit in Run to Open Registry Editor - At the UAC (User Account Control) prompt, choose Yes to grant administrative privileges.

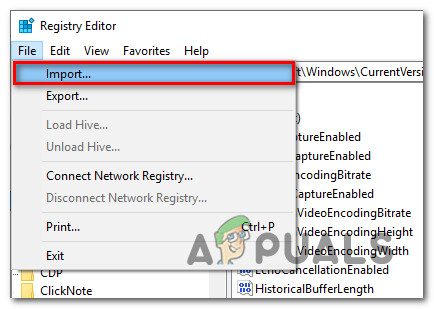
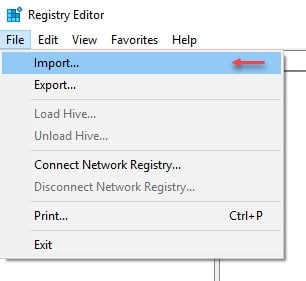
Granting administrative permissions to Registry Editor - Inside Registry Editor, go to File > Import using the ribbon bar at the top.

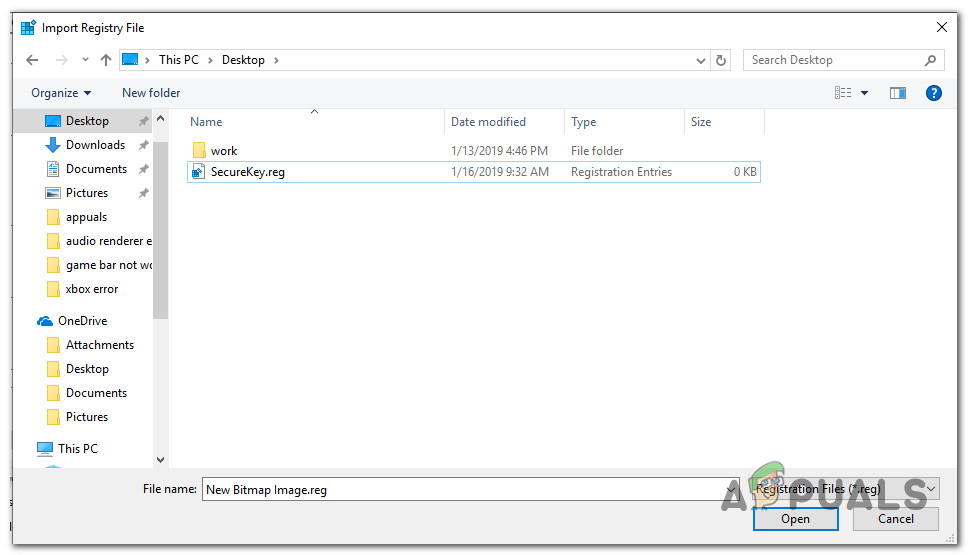
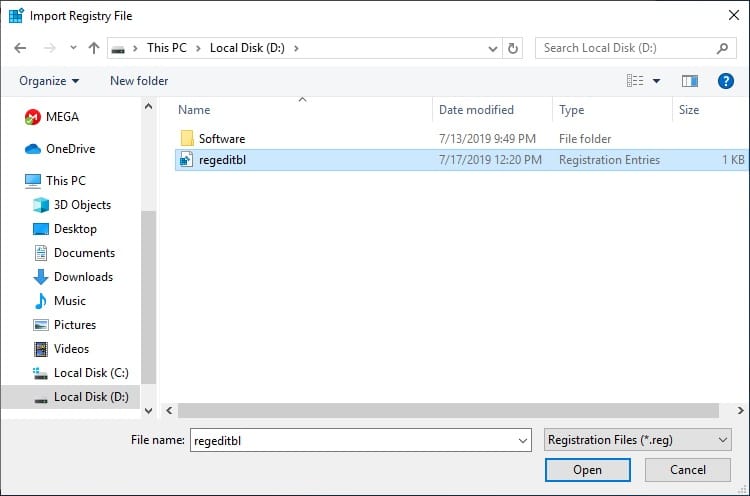
Using the built-in Import menu of Registry Editor - Use the Import menu to navigate to the location of the file that you’re trying to merge. Once you get there, select it and click Open to merge it with your current registry.

Merging the key with the current registry Note: The same principle applies to those situations where you encounter the error when trying to import a .reg key automatically via a .bat file. In order for it to work, you’ll need to run it from an elevated CMD window – press Windows key + R, type “cmd” and press Ctrl + Shift + Enter to open a Command Prompt window with administrative privileges.
This procedure should have successfully circumvented the “error accessing the registry” error. If you’re still getting the error or this method is not applicable to your current situation, move down to the next method below.

Method 2: Performing a System Restore
If you’ve just started getting this error message out of the blue (you didn’t perform a Windows reinstall recently), it’s possible that a system file has become corrupted and is preventing the merging operation from completing.
In this particular case, users finding themselves in a similar situation have managed to get the issue resolved by using the System Restore wizard to revert the machine to a previous point in time (when registry operations were functioning properly).
Using an older system restore point will return your machine state to how it was when the backup was created. This will fix any errors that might have appeared during that time, but will also get rid of any applications and user settings that you installed or created during that time.
Here’s a quick guide on using the System Restore wizard:
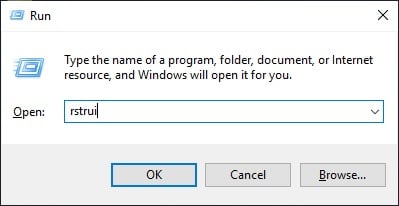
- Press Windows key + R to open up a Run dialog box. Then, type “rstrui” and press Enter to open the System Restore wizard.
- Once you get to the first System Restore screen, you will be asked whether you want to use the recommended restore point. Change the toggle to Choose a different restore point and hit Next to continue.
- Choose a system restore point from the list and hit Next to proceed.
- Hit Finish to finalize the restoring process. After a short while, your computer will restart and the old state will be restored.
- Once the next startup is complete, try to merge/import the file again and see if the error message has been resolved.

If you’re still encountering the “error accessing the registry” error, move down to the next method below.
Method 3: Performing a repair install
If you’ve come this far without a result, it’s very likely that you’re encountering this issue because of system file corruption. Most likely, a system file or service that is used during the registry importing process is corrupted and can no longer be accessed.
Several users that have been struggling with precisely the same error have reported that the issue was finally resolved after they performed a repair install.
A repair install is a non-destructive procedure that will refresh all Windows components without touching any of your personal files or applications. It does roughly the same thing as a clean install, but leaves your applications, user preferences and personal files out of the equation.
If you decide to do a repair install, you can follow the instructions present in this article (here).

Kevin Arrows
Kevin is a dynamic and self-motivated information technology professional, with a Thorough knowledge of all facets pertaining to network infrastructure design, implementation and administration. Superior record of delivering simultaneous large-scale mission critical projects on time and under budget.
Содержание
- Fix: Error Accessing the Registry
- What is causing the “error accessing the registry” issue?
- Method 1: Importing the registry file with administrator privileges
- Method 2: Performing a System Restore
- Method 3: Performing a repair install
- Cannot import .REG file; Not all data was successfully written to registry
- Cause
- Fix: Error “Not all data was successfully written to the registry”
- How do you find out which entry in a .reg file is causing the problem?
- Narrowing down the registry key
- Что делать с ошибкой при доступе к реестру, когда не удается импортировать на Windows 10
- Причины проблемы
- Что делать при ошибке записи в реестре
- Применение программы ExecTI
- Импорт REG-файла в безопасном режиме
- С помощью Registrar Registry Manager
Fix: Error Accessing the Registry
Some users are getting the “error accessing the registry” error when trying to merge a registry key on a Windows computer. Most affected users report that the issue occurred after they did a re-install of their Windows version and tried to open a .reg file. The issue is mostly encountered on Windows 7, Windows 8 and Windows 10.
Cannot import. Error accessing the registry
What is causing the “error accessing the registry” issue?
We researched this error message by looking at various user reports and the repair strategies that they used to either circumvent or resolve the issue entirely. Based on our investigations, there are a couple of common scenarios that will trigger this particular error message:
- Registry File doesn’t have administrative privileges – This scenario is quite common with fresh Windows installs/reinstall. If Registry Editor hasn’t been opened before, it’s likely that the program doesn’t have the necessary permissions to merge the .reg file with your current registry.
- System file corruption is causing the error – There are confirmed cases where this error appeared due to a suite of corrupted system files that were interfering with the importing abilities of the Registry Editor utility. If that’s the case, there are two confirmed solutions (system restore and repair install) that are known to resolve the issue.
If you’re struggling to resolve this particular error message, this article will provide you with a selection of verified troubleshooting steps. In the area that follows, you’ll discover several potential fixing methods that other users in a similar situation have used to get the issue resolved.
For the best results, follow the methods below in order until you discover a fix that is applicable to your current situation and manages to resolve the issue.
Method 1: Importing the registry file with administrator privileges
As several affected users have suggested, chances are that you’re dealing with a privilege issue. Most likely the Registry Editor utility doesn’t have enough permissions to merge the file yet. This is a fairly common thing with new Windows installations where the Registry Editor hasn’t been opened before.
Several users that were struggling to resolve the same error message have reported that the issue was finally resolved after they opened Registry Editor with Administrative privileges and use the Import menu to merge the files. Here’s a quick guide on how to do this:
- Press Windows key + R to open up a Run dialog box. Then, type “regedit” and press Ctrl + Shift + Enter to open up Registry Editor with administrative privileges.
 Typing Regedit in Run to Open Registry Editor
 - At the UAC (User Account Control) prompt, choose Yes to grant administrative privileges. Granting administrative permissions to Registry Editor
- Inside Registry Editor, go to File > Import using the ribbon bar at the top. Using the built-in Import menu of Registry Editor
- Use the Import menu to navigate to the location of the file that you’re trying to merge. Once you get there, select it and click Open to merge it with your current registry. Merging the key with the current registry
Note: The same principle applies to those situations where you encounter the error when trying to import a .reg key automatically via a .bat file. In order for it to work, you’ll need to run it from an elevated CMD window – press Windows key + R, type “cmd” and press Ctrl + Shift + Enter to open a Command Prompt window with administrative privileges.
This procedure should have successfully circumvented the “error accessing the registry” error. If you’re still getting the error or this method is not applicable to your current situation, move down to the next method below.
Method 2: Performing a System Restore
If you’ve just started getting this error message out of the blue (you didn’t perform a Windows reinstall recently), it’s possible that a system file has become corrupted and is preventing the merging operation from completing.
In this particular case, users finding themselves in a similar situation have managed to get the issue resolved by using the System Restore wizard to revert the machine to a previous point in time (when registry operations were functioning properly).
Using an older system restore point will return your machine state to how it was when the backup was created. This will fix any errors that might have appeared during that time, but will also get rid of any applications and user settings that you installed or created during that time.
Here’s a quick guide on using the System Restore wizard:
- Press Windows key + R to open up a Run dialog box. Then, type “rstrui” and press Enter to open the System Restore wizard.
If you’re still encountering the “error accessing the registry” error, move down to the next method below.
Method 3: Performing a repair install
If you’ve come this far without a result, it’s very likely that you’re encountering this issue because of system file corruption. Most likely, a system file or service that is used during the registry importing process is corrupted and can no longer be accessed.
Several users that have been struggling with precisely the same error have reported that the issue was finally resolved after they performed a repair install.
A repair install is a non-destructive procedure that will refresh all Windows components without touching any of your personal files or applications. It does roughly the same thing as a clean install, but leaves your applications, user preferences and personal files out of the equation.
If you decide to do a repair install, you can follow the instructions present in this article (here).
Источник
Cannot import .REG file; Not all data was successfully written to registry
Sometimes, when applying the registry settings using a .reg file, you may get one of the following errors:
Registry files (or registration entries) are files that are used to deploy registry settings quickly to other computers. The registration entries have a file extension .reg that can be run by double-clicking or using the reg.exe command line. You can also manually import .reg files from the Registry Editor window.
Cause
The above errors are caused if the user account that’s running the .reg file doesn’t have the necessary write permissions for the registry keys mentioned inside the file. It could be possible that you’re trying to modify a system-wide setting while logged in as a Limited user. If you’re logged in as administrator and still the error is seen, read below:
- The first error “ Not all data was successfully written to the registry ” denotes that the system was able to access the registry key, but unable to create or write to the specified registry values.
- The other error “ Error accessing the registry ” occurs when the system is not able to create or access the registry branch specified in the .reg file.
Either way, these errors are caused by missing write permissions for the specified registry keys.
When an error is encountered during the registry import process, Windows would skip to the next line and execute the rest of the instructions in the .reg file, without abruptly stopping the merge/import process. Let’s say, the .reg file is configured to write to two different registry locations. If it’s unable to write to the 1st location, it skips to the next line and attempts to run the rest of the commands.
Fix: Error “Not all data was successfully written to the registry”
To prevent the “Error accessing the registry”, “Not all data was successfully written to the registry” or similar errors from occurring, reapply the registry file from an administrator account.
If the problem persists, from an administrator account, launch the Registry Editor ( regedit.exe ) assign the necessary (write) permissions for the registry keys you’re trying to modify. Registry Editor – Permissions… context menu option
But, for which registry key should I modify the permissions? Read below for the answer.
How do you find out which entry in a .reg file is causing the problem?
Sample Scenario: Let’s say you have a .reg file that has instructions to modify values in different registry branches. Here’s an example:
When you run that .reg file, you may get the following error:
(Once an error is encountered, Windows skips to the next line and carries out the rest of the instructions in the file.)
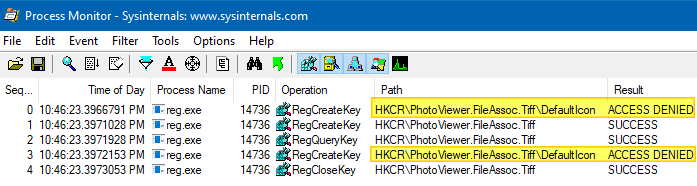
Narrowing down the registry key
To know which registry key is causing the problem, track down the ACCESS DENIED event(s) using the Process Monitor utility from Microsoft. Process Monitor tracks registry and file system accesses in real-time and logs the result for each event.
Note: If the Registry Editor (which runs the .reg file type by default) knows that certain registry keys can’t be written to, it doesn’t attempt to modify those registry values. However, it carries out the registry key (not value) creation operation if the .reg file has instructions to create a new key. In case the operation fails, it would encounter the ACCESS DENIED error.Whereas the reg.exe command-line tool would right away create the key or write to every key/value mentioned in the .reg file. So, the reg.exe tool would be ideal for us to track the ACCESS DENIED events.
So, with Process Monitor tracking mode On, open a Command Prompt (admin) window and use the following command-line syntax to import a .reg file:
If Process Monitor is currently in tracking mode, it shows the ACCESS DENIED entries exactly.
The error occurs because the PhotoViewer.FileAssoc.Tiff branch is owned by the TrustedInstaller account and your account doesn’t have write access to it.
(Likewise, in a production environment, you may have a locked-down Policies registry key. In that case, attempting to write to a subkey under Policies would cause the error “Error accessing the registry”)
Источник
Что делать с ошибкой при доступе к реестру, когда не удается импортировать на Windows 10

Через реестр вносятся изменения в системные параметры ПК. Чтобы не копаться в настройках редактора, многие люди импортируют готовые твики. Но иногда не удается импортировать файл «.reg», так как выскакивает ошибка при доступе к реестру на Windows 10. Из-за этого изменения не вступают в силу, и приходится вручную редактировать настройки. Для решения проблемы нужно ознакомиться с причинами ее возникновения, а затем обратиться к рекомендациям специалистов.
Причины проблемы
Ошибка при импорте файла доставляет пользователю массу неудобств. И, как показывает практика, перезагрузка компьютера или повторная загрузка твика не помогают решить проблему. Дело в том, что неполадки касаются не целостности самого reg-файла, а отдельных настроек доступа и конфигурации системы.

В связи с этим в качестве причин возникновения неполадок выделяются следующие факторы:
- отсутствие прав администратора;
- повреждение системных файлов;
- воздействие вирусов.
Хотя специалистами выделяется не так много причин данной проблемы, устранение неполадок порой занимает длительное время. Поэтому рекомендуется обратиться к алгоритму, который будет представлен далее. Он включает в себя все нюансы выполнения процедуры и позволяет сэкономить время, отказавшись от лишних действий.

Что делать при ошибке записи в реестре
Сообщение об ошибке пользователь видит при попытке запуска REG-файла двойным кликом ЛКМ. Обычно этого действия достаточно, чтобы править реестр. Однако появление сообщения о невозможности выполнения операции свидетельствует о проблемах файла или системных настроек. Устранить неполадки удается как встроенными, так и сторонними средствами.
Применение программы ExecTI
Первым делом стоит обратить внимание на приложение ExecTI. Оно вносит записи нового значения параметра в обход системным средствам, благодаря чему любые неполадки в работе ОС не влияют на процесс изменений реестра.

Выполнив подготовительные действия, можно переходить к непосредственному решению проблемы, когда не сохраняются изменения в реестре. В данном случае нужно действовать по следующему алгоритму:
- Запустите ExecTI.
- Укажите путь к BAT-файлу, нажав на кнопку «Browse».
- Нажмите на кнопку «ОК».
После трех нехитрых шагов откроется синее окно, оповещающее о процессе выполнения операции. При условии, что все действия были обработаны верно, в окне появится сообщение «Операция успешно завершена».

Импорт REG-файла в безопасном режиме
Если вы испытываете проблемы с импортом файла через программное обеспечение от сторонних разработчиков, то можете выполнить операцию системными средствами. Правда, для этого придется запустить компьютер в безопасном режиме:
- Откройте окно «Выполнить» комбинацией клавиш «Win» + «R».
- Введите запрос «msconfig».

- Нажмите на кнопку «ОК».
- Перейдите в раздел «Загрузка» открывшегося окна «Конфигурация системы».

- Отметьте галочкой пункт «Безопасный режим».
- Нажмите на кнопку «Применить» для сохранения настроек.

После перезагрузки компьютер будет запущен в безопасном режиме. Теперь попробуйте импортировать REG-файл стандартным способом, используя двойной клик левой кнопкой мыши. В большинстве случаев это позволяет обработать запрос, а затем вы можете перейти в стандартный режим работы компьютера, вновь открыв «Конфигурацию системы» и внеся необходимые изменения в настройки.
С помощью Registrar Registry Manager
Мощный инструмент редактирования реестра Windows 10 без обращения к встроенным средствам компьютера. Преимущество Registrar Registry Manager заключается в том, что вам не придется конвертировать файлы. Все действия выполняются с исходным REG-файлом в соответствии с инструкцией:

- Нажмите на кнопку «Home Edition».

- Кликните ЛКМ по вкладке «File» и выберите пункт «Import».

- Укажите путь к REG-файлу и нажмите на кнопку «Открыть».

После импорта должно появиться небольшое окошко с сообщением «Import successfully completed». Оно станет свидетельством успешного выполнения операции, и вам останется нажать на кнопку «ОК», чтобы сохранить настройки. Если и через Registrar Registry Manager выскочит ошибка (что маловероятно), то не поленитесь осуществить дополнительные действия:
- Выполните очистку компьютера от мусора и лишних записей в реестре. Для этого можно воспользоваться приложением CCleaner.
- Запустите проверку на вирусы и удалите подозрительные файлы.
- Восстановите системные файлы в случае их повреждения через запрос «sfc/scannow», который обрабатывается средствами Командной строки.
Теперь нет ни единого шанса, что проблема продолжит давать о себе знать. Конфликт будет исчерпан, и вы без труда импортируете файл любым удобным способом.
Источник
Sometimes, when applying the registry settings using a .reg file, you may get one of the following errors:
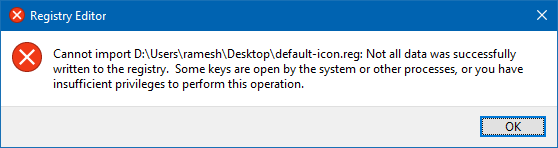
Cannot import file.reg: Not all data was successfully written to the registry. Some keys are open by the system or other processes, or you have insufficient privileges to perform this operation.
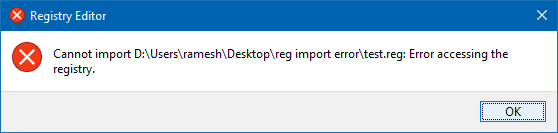
Cannot import file.reg: Error accessing the registry.
Registry files (or registration entries) are files that are used to deploy registry settings quickly to other computers. The registration entries have a file extension .reg that can be run by double-clicking or using the reg.exe command line. You can also manually import .reg files from the Registry Editor window.
Cause
The above errors are caused if the user account that’s running the .reg file doesn’t have the necessary write permissions for the registry keys mentioned inside the file. It could be possible that you’re trying to modify a system-wide setting while logged in as a Limited user. If you’re logged in as administrator and still the error is seen, read below:
- The first error “
Not all data was successfully written to the registry” denotes that the system was able to access the registry key, but unable to create or write to the specified registry values. - The other error “
Error accessing the registry” occurs when the system is not able to create or access the registry branch specified in the .reg file.
Either way, these errors are caused by missing write permissions for the specified registry keys.
When an error is encountered during the registry import process, Windows would skip to the next line and execute the rest of the instructions in the .reg file, without abruptly stopping the merge/import process. Let’s say, the .reg file is configured to write to two different registry locations. If it’s unable to write to the 1st location, it skips to the next line and attempts to run the rest of the commands.
To prevent the “Error accessing the registry”, “Not all data was successfully written to the registry” or similar errors from occurring, reapply the registry file from an administrator account.
If the problem persists, from an administrator account, launch the Registry Editor (regedit.exe) assign the necessary (write) permissions for the registry keys you’re trying to modify.
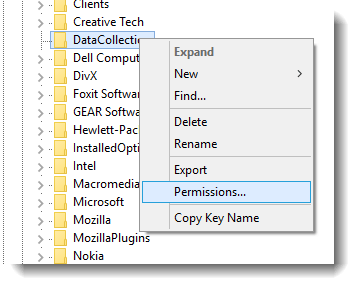
Check out these articles to know how to fix the permissions for a specific registry key:
- Take Ownership of a Registry Key And Assign Full Permissions
- Take Ownership of Registry Key & Assign Permissions Using Command-line
But, for which registry key should I modify the permissions? Read below for the answer.
How do you find out which entry in a .reg file is causing the problem?
Sample Scenario: Let’s say you have a .reg file that has instructions to modify values in different registry branches. Here’s an example:
Windows Registry Editor Version 5.00

[HKEY_LOCAL_MACHINESOFTWAREClassesPhotoViewer.FileAssoc.PngDefaultIcon]
"oldicon"="%SystemRoot%System32imageres.dll,-71"

[HKEY_LOCAL_MACHINESOFTWAREClassesPhotoViewer.FileAssoc.TiffDefaultIcon]
@="d:iconsicons.dll,5"
"oldicon"="%SystemRoot%System32imageres.dll,-122"

[HKEY_LOCAL_MACHINESOFTWAREClassesPhotoViewer.FileAssoc.BitmapDefaultIcon]
"oldicon"="%SystemRoot%System32imageres.dll,-70"
When you run that .reg file, you may get the following error:
Cannot import file.reg: Not all data was successfully written to the registry. Some keys are open by the system or other processes, or you have insufficient privileges to perform this operation.
(Once an error is encountered, Windows skips to the next line and carries out the rest of the instructions in the file.)
Narrowing down the registry key
To know which registry key is causing the problem, track down the ACCESS DENIED event(s) using the Process Monitor utility from Microsoft. Process Monitor tracks registry and file system accesses in real-time and logs the result for each event.
For more information, check out the following articles:
- How to Track “Access Denied” Registry and File Events Using Process Monitor
- How to Use Process Monitor to Track Registry and File System Changes
Note: If the Registry Editor (which runs the .reg file type by default) knows that certain registry keys can’t be written to, it doesn’t attempt to modify those registry values. However, it carries out the registry key (not value) creation operation if the .reg file has instructions to create a new key. In case the operation fails, it would encounter the ACCESS DENIED error.Whereas the reg.exe command-line tool would right away create the key or write to every key/value mentioned in the .reg file. So, the reg.exe tool would be ideal for us to track the ACCESS DENIED events.
So, with Process Monitor tracking mode On, open a Command Prompt (admin) window and use the following command-line syntax to import a .reg file:
reg.exe import filename_with_path.reg

If Process Monitor is currently in tracking mode, it shows the ACCESS DENIED entries exactly.
The error occurs because the PhotoViewer.FileAssoc.Tiff branch is owned by the TrustedInstaller account and your account doesn’t have write access to it.
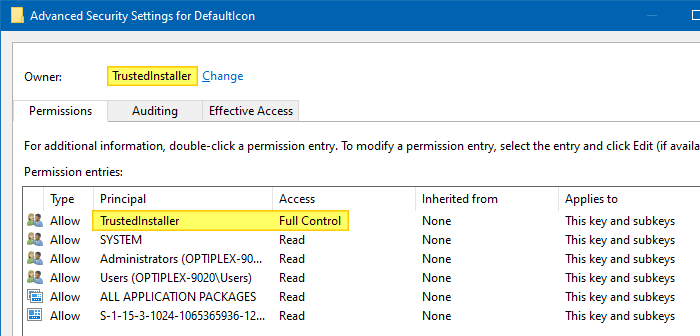
(Likewise, in a production environment, you may have a locked-down Policies registry key. In that case, attempting to write to a subkey under Policies would cause the error “Error accessing the registry”)
Now, all you need to do is launch the Registry Editor and fix the permissions for those registry keys. This resolves the “Cannot import filename.reg. Not all data was successfully written to the registry.” error.
One small request: If you liked this post, please share this?
One «tiny» share from you would seriously help a lot with the growth of this blog.
Some great suggestions:
- Pin it!
- Share it to your favorite blog + Facebook, Reddit
- Tweet it!
So thank you so much for your support. It won’t take more than 10 seconds of your time. The share buttons are right below. 

You are here: Home / Windows / ‘Error Accessing the Registry’- How To Solve The Issue?
When you want to update your registry or want to merge an additional file to your registry for making some changes to your system, you may run across an error that says:
‘Cannot import <filename.reg>: Error accessing the registry’.
If you also have faced this problem, read on to find out how to solve ‘Error accessing the registry’ error using the methods given below.
Contents
- 1 What Causes This Issue?
-
-
- 1.0.0.1 Registry Editor Doesn’t Have Administrative Privileges:
- 1.0.0.2 System Files Corrupted:
-
-
- 2 How To Fix Error Accessing The Registry
- 2.1 # FIX 1 (Importing With Admin Privileges)
- 2.2 # FIX 2 (System Restore)
- 2.3 # FIX 3 (Repair Install)
What Causes This Issue?
By looking at various user reports and repair strategies given, we have narrowed it down to the fact that this error can be caused because of two reasons:
Registry Editor Doesn’t Have Administrative Privileges:
If you have never opened registry editor, it is possible that the registry editor or the registry files don’t have the administrative permissions required to make the necessary changes to the system.
System Files Corrupted:
Sometimes a suite of corrupted system files interferes with the importing abilities of the Registry Editor.
If you are also facing this error, you can follow the fixes given below to solve this error.
If you are also suffering from the same error, I will provide you 2 fixes to get ‘Error accessing the registry’ problem resolved.
# FIX 1 (Importing With Admin Privileges)
If you have never opened the registry editor before, or have installed a fresh copy of Windows, it is possible that the Registry Editor may not have the necessary permissions to enforce its import/export capabilities.
If that is the case, you can open the Registry Editor with admin privileges and use the import menu to merge the files.
The steps to import a registry file with administrative privileges are:
- In the search bar, type the entry Registry Editor and right-click on the search entry, select Run as Administrator.
Alternatively,
Press Win + R to open the Run dialogue, and type regedit. Press Ctrl + Shift + Enter to open it with administrative privileges.
2. At the UAC Prompt, select ‘Yes’ to grant the aforementioned Administrative Privileges to Registry Editor.
3. Inside the registry editor, click on File. Select Import.
4. Use this import menu to navigate to the location of the file you want to merge with your registry. Once you select the file, click on Open to merge it with your current registry.
If you are using CMD to merge a registry file in a .bat format, you need to follow the next given steps.
Press Win + R to open Run, type cmd. Press Ctrl + Shift + Enter to enter CMD in administrator mode.
This should solve the issue you were having with not being able to access the registry editor or merge the files with your current registry.
If this does not solve your issue, there may be deeper problems like corrupt system files.
# FIX 2 (System Restore)
If you started receiving this error suddenly out of nowhere, you may have made some changes on your PC that is causing this error. You need to perform a system restore in order to reverse these changes and fix this issue.
I will show the easy method to perform a system restore.
- Open Run dialogue box by pressing Win + R. type rstrui and press Enter.
2. If you have system protection off, the prompt will ask you to turn it on to turn on System Restore.
3. Once you are inside the system restore dialogue, choose the restore point to which version you want to change it back to.
4. Choose a system restore point and select ‘Next’.

5. Select Finish finalizing the restoring process. After some time, your system will reboot and the old state which you chose will be restored.
Using these methods, the error may have been resolved. If it still shows the ‘error accessing the registry’ and does not let you into the Registry Editor, you may have to perform a repair install using a boot media.
# FIX 3 (Repair Install)
You may download the latest update available for your system, or create (or use an already available) a USB boot media to perform a reinstall.
You can use third-party software like Rufus and MiniTool Partition Wizard to create a bootable USB media device.
Here you can choose to keep your files and settings or perform a clean install that will remove everything. Read the on-screen instructions carefully before making any changes to the system.
Conclusion
If you follow the fixes given above, you now know how to fix the Error accessing the registry issue using 3 fixes given above. Comment down below if you found these steps useful in accessing the registry editor and which method helped you fix this issue.
If you encounter an error saying, “error accessing the registry” when you try to merge a registry key on your Windows 10 computer, you’re not alone as some users also experienced the same problem. According to these users, they encounter the error after they’ve re-installed their Windows version and tried to open a .reg file.
Based on the reports, this error could occur if the registry file does not have administrative privileges. Meaning to say, the program does not have the necessary permission to merge the .reg file. This is common with fresh installs as well as reinstalls. Moreover, this kind of issue could also occur due to system file corruption. Whichever the case may be, here are some troubleshooting tips you can check out to resolve the error.
Option 1 – Try to import the .reg file with admin privileges
As pointed out, the error may be due to a lack of admin privileges. It could be that the Registry Editor does not have admin privileges to merge the registry file. This is common with new Windows installations especially since the Registry Editor hasn’t been opened before. So you need to import the .reg file again and this time, with admin privileges.
- Tap the Win + R keys to open the Run dialog box.
- Then type “Regedit” in the field and tap the Ctrl + Shift + Enter keys to open the Registry Editor with admin privileges.
- A User Account Control or UAC prompt will appear where you have to click Yes to proceed.
- After opening the Registry Editor, go to File > Import using the ribbon bar at the top.
- Next, use the import menu to go to the location of the file you were trying to merge. Once you’ve found it, click Open to merge it with your current registry. This should fix the problem. If not, refer to the next options below.
Option 2 – Try performing a System Restore
Running System Restore can also help you fix the error when accessing the Registry. You can do this option either by booting into Safe Mode or in System Restore. If you are already in the Advanced Startup Options, just directly select System Restore and proceed with the next steps. And if you have just booted your PC into Safe Mode, refer to the steps below.
- Tap the Win + R keys to open the Run dialog box.
- After that, type in “sysdm.cpl” in the field and tap Enter.
- Next, go to the System Protection tab then click the System Restore button. This will open a new window where you have to select your preferred System Restore point.
- After that, follow the on-screen instructions to finish the process and then restart your computer and check if the problem is fixed or not.
- Once the next startup is complete, you have to merge or import the file again and see if the error is now fixed or not.
Option 3 – Try to perform repair install by creating a Windows 10 installation media
- Click this link and then click the Download Tool Now button.
- Next, click the “Use the tool to create installation media (USB flash drive, DVD, or ISO file)…” option and follow the next given instructions on the screen.
- Now select the ISO file option in step 5.
- After that, you should now have an ISO file.
- Next, go to the location where you’ve downloaded the ISO file.
- Then right-click on the Windows 10 ISO file and select the Open with option and then select File Explorer.
- Now click on “setup.exe” and follow the next instructions that appear on the screen. When asked, you have to select either Nothing (clean install) or Keep personal files only option. Take note that you must not select the “Keep personal files, apps, and Windows settings since it doesn’t really work.
Option 4 – Try running the System File Checker Scan
As mentioned, the error when accessing the Registry might be caused by file corruption. And that’s where the SFC scan comes in. The SFC or System File Checker scan could detect and automatically repair damaged system files. SFC is a built-in command utility that helps in restoring corrupted files as well as missing files. It replaces bad and corrupted system files with good system files. To run the SFC command, follow the steps given below.
- Tap Win + R to launch Run.
- Type in cmd in the field and tap Enter.
- After opening Command Prompt, type in sfc /scannow
The command will start a system scan which will take a few whiles before it finishes. Once it’s done, you could get the following results:
- Windows Resource Protection did not find any integrity violations.
- Windows Resource Protection found corrupt files and successfully repaired them.
- Windows Resource Protection found corrupt files but was unable to fix some of them.
- Now restart your computer.
Advanced System Repair Pro
One-click automated PC repair solution
![]()
With Advanced System Repair Pro you can easily
DOWNLOAD
Advanced System Repair Pro is compatible with all versions of Microsoft Windows including Windows 11
Share this article:
You might also like
Long working hours on a laptop can have some issues with laptop heating and thus slowing down. Today we will take a look at how can you prevent it from heating and keep it in a normal temperature range so it lasts longer and works better.

Close unnecessary programs or browser tabs
Usually, the main reason for high laptop temperature is the heavy and constant workload. Of course, the solution is very simple, turn off unnecessary browser tabs or applications running in the background, and less power will be needed for operation thus directly reducing workload and temperature.
Place it on a hard flat surface
Laptops generally have vents on the side and even under them, these vents, of course, are made so hot air is disposed of through them but if they are covered that will create issues. Placing computers on textiles, pillows, and legs can obstruct their venting holes and increase heat also since they are materials that are not taking heat away.
Your best practice should be placing the laptop onto a hard flat surface so air can flow freely and if you need to keep it in your lap there are lap desks made for this purpose.
Clean the laptop
With some good cleaning, the laptop can stop overheating, and generally, it will be cooler. Vents that has for ventilation can get clogged over large periods of time due to dust which is always present. Compressed air can be a quick easy solution to open the vents and redust it. Other methods include a compressor, vacuum, or brush in order to quickly remove any dust clogs. Taking it into service for complete redusting and paste change is also a great option.
Place it on the dedicated pad
There is some disagreement about using dedicated cooling pads for laptops, some say they are not effective at all, and some swear by them but from my experience good paired laptop and pad can indeed help with cooling it down. Usually, cooling pads will come with fans that will take away heat from the laptop itself reducing its overall heat.
Change your Windows power plan
If your laptop is constantly hot but you are not doing much with him check Windows power settings. There is a good chance it is set to run on a high-performance plan and if this is the case switch it back to a balanced power setting. Power plan like high performance will drain more power and more power will mean more heating. Of course, this will affect performance as well but for regular work that excludes some power gaming, video, and picture manipulations and other demanding tasks this power plan will work just fine.
Take control of the fans inside your laptop
Internal cooling is important and sometimes fans are not running to their full capacity so increasing their speed or changing their plan of work can cool down the computer nicely. Some laptops have fans controlling application already on them, especially gaming laptops but most of them do not. If your laptop does not have it, go to your laptop brand website and see if such an application exists for your model, if it does, download and install it but if there is no such application try general free ones like SpeedFan or Argus Monitor.
Reduce voltage of CPU and GPU
How more power means more heat, reducing the power that CPU and/or GPU take can be reduced inside BIOS by lowering voltage of these 2 components. First, go to BIOS and write down the voltage that is currently assigned to your CPU and/or GPU so you can bring it back if ever needed, also take note that reducing voltage and thus power will not affect negatively your components but increasing it thus overclocking can and will so be careful when bringing voltage back not to overdo it. You can always also reset your BIOS settings to bring them back to factory settings.
Do not use the laptop when charging it
When the laptop is placed on the charger in order to be charged and used at the same time, more power is drawn to it, and since the battery is taking electric charge instead of providing it more heat will be generated now since two different sources will be generating it, the battery itself and computer. When you really can not wait for the laptop to be charged, use it, but turn it off and wait to be fully charged if you can.
Read More
 Without any fanfare, news, or information Bethesda has released a completely free upgrade for legendary Quake 1. Free upgrade is automatically applied to all users who possess the original game and it has already been rolled out.
What has changed for good?
New textures, effects, and resolutions are one thing that will come first into your focus when you start the game. From the moment game is started it feels and looks like a game you remember from a long time ago. Models are also upgraded with a higher polygon count.
Another thing that will hit you right away is the legendary OST by Trent Reznor in its full glory. If you have the original Quake and played it you will know that OST was missing from the Steam release and having it fully back is a great feature. I would argue that placing just OST alone in the steam release is enough for people to play it again since it adds so much atmosphere.
Deathmatch and other multiplayer goodies are all here as well and there is a completely free new episode in the game with several levels. Yes, you get a free Quake upgrade in HD with an extra episode completely free.
The bad side of Quake coin
So this might come as a purist or obsessive nit-picking but there were two things that I, personally am not a fan of and have noticed during my gameplay. Please know that this is personal preference and by no other chance reflects the quality of the game itself but I just had to talk about it.
Quake remake is made in a new engine and as such dynamic and gunplay feel different from the original, granted they have done the best they could to replicate the authentic feeling of the original game but there are parts of the game where I have felt that simply put, it feels different.
Another thing is also tied to technology and the overall game is somewhat a little brighter and in some areas little softer in dark areas. Like I said this is purely personal preference and might come as nitpicking but I preferred the darker and grittier look of the original game. Darkplaces, the free custom-made upgrade did this in my opinion better.
Read More
 Microsoft has announced Windows 365, a new cloud-based operating system aimed mainly at businesses of all sizes.
Just after Windows 11 announcement and presentation, we are seeing another Windows announcement from Microsoft. Dive into the following text in order to find out what exactly is new Windows 365, its role in today’s IT world, and do you need it?
What is Windows 365 and when it is coming out?
Windows 365 is planned to be released this year (2021) on August 2nd. It is the first Microsoft cloud-based operating system meaning that OS itself will be installed on the cloud server and it will be accessed by the user via a web browser.
Essentially you are accessing a remote PC with Windows on it, you can install whatever Windows application you want and use it as it was on your computer. When you disconnect from the cloud computing and reconnect again from the same or another device you will continue exactly where you left off.
Cloud PC will remember the state it was left off and will greet you in that same state once it is awakened again. This of course offers some great benefits like moving from laptop to desktop and continuing exactly where you left off.
How can I access Windows 365?
Any device which has a web browser will be able to access Windows 365 making it a really great solution for business on the move or for anyone who switches devices during the day.
That being said it is clear to see that Windows 365 can be accessed via Linux, macOS, iOS, Android, or any other operating system on any computer, tablet or phone.
Who is this OS made for?
Microsoft’s general idea is that Windows 365 is primarily made for business which in their minds can benefit most out of it.
So far it is not made for a single user although there is a possibility that even a one-man business can subscribe and create accounts for it.
Price and technical characteristic
Microsoft will bill Windows 365 on a per-user, per-month basis. In other words, businesses will pay a fixed amount per employee every month.
There will be two tiers: Windows 365 Business and Windows 365 Enterprise. Microsoft also said it will offer different performance tiers. Businesses can choose to pay for more CPU, RAM, and storage resources for certain cloud PCs depending on their needs.
Microsoft told me the smallest configuration would be one CPU, 2GB of RAM, and 64GB of storage. The largest will be eight CPUs, 32GB of RAM, and 512GB of storage.
After a business has chosen its plan tier and performance options, that business will pay a fixed amount every month. This is unlike Azure Virtual Desktop, which Windows 365 is built on. With Azure Virtual Desktop, companies pay on a usage model, depending on how much the remote system is used every month.
Conclusion
Windows 365 is around the corner and if you are a business no matter small or large with the need for software on the go, Windows 365 might be a worthwhile investment and a great asset to your business.
Read More
nslookup is a command-line tool that helps in finding the DNS records of a website. It sends a name server query to the DNS and obtains the corresponding IP address. Aside from that, it can also perform some complex functionality such as finding details about FTP server, Mail server and many more but most of them are used by administrators. The best thing about nslookup is that it queries the DNS server directly and it does not rely on the cache.
On the other hand, there is another tool called PING that is used to verify connectivity. PING sends a packet of information to the IP address or Domain and gets back a response in the form of packets. So if everything goes well, all packets are received but if not, it will help you find out where the delay in the network exactly is. However, the ping command does not always attempt a DNS lookup which means that it might be using the DNS cache and use the IP address available in that table.
Although both nslookup and PING help you in identifying the host or IP address, however, they don’t always work and sometimes fail. So if your nslookup works but ping fails on your Windows 10 PC when querying the IP address of a website then it could be caused by many reasons. It could be that the nslookup queries work for you but when you try to use PING, it fails. For instance, if you open the abc.com website, here’s how it will look like:
nslookup xyz.com
Server: dns.company.com
Address: 192.168.1.38
C:> ping xyz.com
Ping request could not find host xyz.com. Please check the name and try again.
The domain is converted into an IP address and then data is sent to that IP address when you use PING. So when a reply comes back it means that the data is going back and forth to that domain without any problem. However, if the DNS fails to resolve the IP address of the website or if your PC does not attempt a DNS lookup, you will receive a similar error message that says, “Could not find host” and so on. To resolve this issue, here are some options that might help.
Option 1 – Reset Winsock, TCP/IP & Flush DNS
Resetting Winsock, TCP/IP, and flushing DNS might help you resolve the issue with nslookup and PING. To do so, follow these steps:
- Right-click on the Start button and click on Command Prompt (administrator) so you can pull up an elevated Command Prompt.
- After that, execute each one of the commands listed below. And after you typed in one after the other, you have to hit Enter.
- netsh winsock reset – type in this command to reset Winsock
- netsh int ip reset resettcpip.txt – type in this command to reset TCP/IP
- ipconfig /flushdns – type in this command to flush the DNS cache
- Next, restart your PC and check if the problem’s fixed.
Option 2 – Force Windows to do a DNS lookup using FQDN
- Go to Settings > Network & Internet > Status > Change adapter options.
- From there, right-click on the network and select Properties.
- Next, in case you’re using IPv6, from the list of connections available in the list, select Internet Protocol Version 4.
- Then click on Properties and click Advanced.
- After that, switch to the DNS tab and select “Append these DNS suffixes (in order)” and click on the Add button and then add “.” as a suffix so that each time you query using PING and another tool, it will add a “.” at the end and will force the lookup.
Option 3 – Make sure that there is only one default gateway
If your computer has more than one NIC connected and there are multiple default gateways, then it will most likely create confusion which is why you need to remove the default gateway from the configuration of all NICs and make sure that there is only one default gateway.
Option 4 – Use the Google Public DNS
You might want to change your DNS to Google Public DNS as it could also help you in fixing the nslookup and PING issues. To do so, follow the steps below.
- The first thing you have to do is right-click on the network icon in the Taskbar and select Network and Sharing Center.
- Next, click on the “Change Adapter Settings” option.
- After that, search for the network connection that you are using to connect to the internet. Note that the option might be “Wireless Connection” or “Local Area Connection”.
- Right-click on your network connection and click on Properties.
- Then select the new window to choose the “Internet Protocol 4 (TCP/IPv4)” option.
- After that, click on the Properties button and click the checkbox in the new window for the option “Use the following DNS server addresses”.
- Type in “8.8.8.8” and “8.8.4.4” and click OK and exit.
Option 5 – Check the Windows Host file
You can also try to cross-check the Windows Hosts file to find out if the website you are trying to open has been blocked, because if it is, then it’s no wonder why PING fails even when nslookup works. There are instances when some third-party application modifies the file and adds some websites to the blocklists. So if the website is indeed blocked, you need to remove it from the list.
Option 6 – Delete the WLAN Profiles
Deleting the WLAN Profiles might be a good idea if you are not able to connect to the internet on your computer and if you’re using Wi-Fi. It could be that the networks that were connected previously have gone rogue which is why it is not connecting properly. And so deleting the WLAN profiles might help you in fixing the issue with nslookup and PING.
Option 7 – Reinstall the Network Adapter Drivers
- Tap the Win + R keys to launch the Run window and then type in the “msc” command and hit Enter to open the Device Manager window.
- Under the Device Manager, you will see a list of drivers. From there, look for the Network Adapters and expand it.
- Then right-click on each one of the Network drivers and select “Uninstall device”.
- Restart your PC.
Read More
Faraday bag is a new take on security and privacy for people using a lot of electronic devices and credit cards. So what is exactly a Faraday bag?

Faraday bag explained
Faraday bag is designed in the same manner as the Faraday cage which was invented by Michael Faraday, who was an English scientist who contributed to the study of electromagnetism and electrochemistry. His main discoveries include the principles underlying electromagnetic induction, diamagnetism, and electrolysis.
The idea of the Faraday cage is that anything inside a cage that is made of specific grid size is completely isolated from outside current and magnetic fields since the cage itself will pick up everything upon itself. This means that for example, a human could be inside a cage that is struck by lightning and be perfectly safe and fine.
This idea led to the Faraday bag design, which takes this concept and places a wiring pattern inside clothing in order to isolate all magnetic fields from the outside so your devices and cards are completely cut off from any kind of influence and electromagnetic waves. If the pattern and quality of material for the bag are good, you have a fully safe placeholder for your stuff.
Advantages of Faraday bag
The main advantages, of course, are the privacy and safety of mobile phones and credit cards from outside influences and this is why this bag has been designed in the first place. If the bag is designed properly your phone would not be able to be hacked nor accessed from any outside source, GPS tracking will also be disabled and your phone location will not be visible. Credit cards will also be completely safe from any malicious attack via wi-fi signals.
Disadvantages of bag
Well, the disadvantage of using this bag is a very simple one, since your phone is isolated from outside influence that will also mean that you will not be able to take messages or calls on it while it is in the bag. Notifications from the internet would also be disabled so it is security vs usability deal.
Read More
What Is Error 106?
Error 106 is a common error experienced by Windows 7 users. Generating as a result of Misconfigured, damaged or corrupt system files on the computer, this is not a critical error.
However, troubleshooting this error is important to keep any undesired inconvenience at bay. Essentially, error 106 is one of the error codes employed by Windows and other compatible driver and software vendors.
The 106 in this error is essentially the memory address or location where the instructions reside when the error was generated.
Solution
 Error Causes
 Error Causes
Primarily, error 106 is caused by the damaged, Misconfigured or corrupt system files. The error may appear harmless at first.
However, if allowed to persist, it can lead to grave consequences. Allowing an error to thrive on your system is synonymous with putting the well-being of your system at risk.
As far as the events, conditions, or scenarios are concerned that lead to the generation of error 106, they are listed below as follows.
It is important to understand that these conditions lead to the corruption of system files in most cases.
- An improper or incomplete installation or uninstallations
- Improper or incomplete deletion of hardware or applications
- Improper, unintentional or sudden system shutdown
- Existence of adware, spyware, malware, or virus on your computer
It is worth mentioning that any of the conditions listed above can lead to the corruption of system files or registry entries in the system. Since the system needs correct and complete files for proper functioning which the system will be unable to find, it will result in unexplained behavior.
This also happens because the system will be lead to wrongly linked or missing information.
Further Information and Manual Repair
There are different ways to rectify this error but two of the most useful ones are briefly listed below as follows.
- This solution is for the advanced user. First and foremost, turn on your system. Log on to it as the Administrator. Now click on the start button and follow this sequence: All Programs -> Accessories -> System Tools -> System Restore.A new window will appear in front of you. On this window, choose the option, ‘Restore my computer to an earlier time’. Now click Next.A list of restore points will appear in front of you. From this list, choose the most recent Restore Point and click Next. Click Next on the confirmation windows. Restart the computer when the restoration is complete.
- This solution for the novice user. Download an error 106 windows repair utility. Now install this program on your computer and use it to scan your computer. Try to locate the option for fixing errors as soon as the scan complete. Make use of this option. Once all the errors have been fixed, restart your computer once again. You will now realize that the error has vanished and your computer is now free of error 106.
Use any of the solutions listed above according to your skill level.
Read More
WeatherGenie is a Browser Extension that allows users to check the current weather in any town at any time. This extension adds the “Weather:” search option to your new tab, and changes your default search engine to Yahoo.com. It also ads system Registry Entities that allow it to run each time the computer is restarted, several task schedulers are also added to allow it to run at various times during the day.
While installing this extension monitor browsing data from your computer. You may also see additional injected ads, sponsored links, and pop-up ads through your browser sessions.
Weather games have been marked as a Browser Hijacker by several anti-virus scanners and are therefore not recommended to keep on your computer. It is flagged as potentially unwanted for optional removal.
About Browser Hijackers
Browser hijacking is a very common type of online fraud where your web browser settings are altered to allow it to do things you do not intend. Browser hijackers could do a variety of things on your PC. Often, hijackers will force hits to sites of their preference either to increase targeted traffic generating higher ad earnings, or to gain a commission for every user visiting there. Even though it might seem naive, all browser hijackers are harmful and thus always regarded as security risks. As soon as the malware attacks your computer or laptop, it begins to mess things up a whole that slows your system down to a crawl. In the worse case, you might be pushed to tackle serious malware threats too.
How you can know whether the web browser is hijacked?
Symptoms that an internet browser is hi-jacked include:
1. you notice unauthorized modifications to your web browser’s home-page
2. bookmark and the new tab are also changed
3. the essential web browser settings are modified and unwanted or insecure sites are put into the trusted sites list
4. you’re getting new toolbars you have never witnessed before
5. you’ll notice random pop-ups start showing on a regular basis
6. web pages load slowly and at times incomplete
7. you can’t navigate to particular web pages, such as security software-related websites.
How does a PC get infected with a browser hijacker?
There are a number of ways your PC can become infected with a browser hijacker. They usually arrive by way of spam e-mail, via file-sharing networks, or by a drive-by download. They can be included with toolbars, BHO, add-ons, plugins, or browser extensions. Other times you might have mistakenly accepted a browser hijacker as part of a software bundle (generally freeware or shareware). A good example of some popular browser hijackers includes Conduit, Anyprotect, Babylon, SweetPage, DefaultTab, RocketTab, and Delta Search, but the names are regularly changing.
The existence of any browser hijacker on your system might substantially diminish the browsing experience, record your internet activities that lead to critical privacy concerns, diminish overall system performance and cause software instability as well.
The best ways to get rid of browser hijackers
Some browser hijacking can be simply reversed by identifying and eliminating the corresponding malware software from your control panel. But, many hijackers are harder to find or eliminate as they could get themselves connected with certain crucial computer files which allow them to operate as a necessary operating-system process. Besides, browser hijackers could modify the Computer registry so it could be very tough to repair manually, especially if you’re not a very tech-savvy individual.
You can go for automatic browser hijacker removal by just installing and running a reliable anti-malware application. SafeBytes Anti-Malware discovers all kinds of hijackers – such as WeatherGenie – and eliminates every trace quickly and efficiently. Utilize a pc optimizer (such as Restoro) together with your antivirus software to repair various registry issues, remove system vulnerabilities, and improve your computer performance.
How To Get Rid Of Malware That Is Blocking Anti-Malware Installation?
Practically all malware is detrimental and the effects of the damage may vary based on the specific type of malware. Some malware goes to great lengths to stop you from downloading or installing anything on your PC, particularly anti-virus software programs. If you’re reading this, chances are you’re stuck with a malware infection that is preventing you to download or install the Safebytes Anti-Malware program on your system. Refer to the instructions below to get rid of malware through alternative ways.
Remove malware in Safe Mode
Safe Mode is actually a special, basic version of Windows where only bare minimum services are loaded to stop viruses and also other problematic programs from loading. In the event the malware is blocking internet access and affecting your computer, starting it in Safe Mode enables you to download anti-malware and run a scan whilst limiting possible damage. In order to enter into Safe Mode or Safe Mode with Networking, press the F8 key while the PC is starting up or run MSConfig and locate the “Safe Boot” options in the “Boot” tab. Once you’re in Safe Mode, you can attempt to install your anti-malware software without the hindrance of the malware. After installation, run the malware scanner to get rid of most standard infections.
Switch to an alternative internet browser
Some malware mainly targets specific internet browsers. If this is your situation, use another internet browser as it can circumvent the computer virus. The best solution to avoid this problem is to opt for a web browser that is well known for its security features. Firefox contains built-in Phishing and Malware Protection to help keep you safe online.
Make a bootable USB anti-virus drive
Here’s yet another solution which is using a portable USB anti-virus software that can scan your system for malware without needing installation. Follow these steps to employ a USB flash drive to clean your corrupted computer system.
1) Download the anti-malware on a virus-free PC.
2) Insert the USB drive on the same computer.
3) Double-click the Setup icon of the anti-malware program to run the Installation Wizard.
4) Choose the flash drive as the location for saving the file. Follow the instructions to complete the installation process.
5) Now, transfer the flash drive to the infected computer.
6) Run the Safebytes Anti-malware directly from the flash drive by double-clicking the icon.
7) Click on “Scan Now” to run a scan on the affected computer for viruses.
Top Features of SafeBytes Anti-Malware
Today an anti-malware tool can protect your computer or laptop from various forms of online threats. But how do choose the best one amongst several malware protection software that is available in the market? Perhaps you might be aware, there are several anti-malware companies and tools for you to consider. A few of them are great but there are many scamware applications that pretend as genuine anti-malware software waiting to wreak havoc on the computer. When searching for an anti-malware tool, pick one which provides dependable, efficient, and complete protection against all known computer viruses and malware. One of the highly recommended software is SafeBytes AntiMalware. SafeBytes carries a superb history of excellent service, and customers are happy with it.
Safebytes is one of the well-established PC solutions companies, which offer this comprehensive anti-malware tool. When you have installed this software, SafeByte’s sophisticated protection system will ensure that absolutely no viruses or malware can seep through your computer.
SafeBytes anti-malware takes PC protection to a whole new level with its advanced features. The following are a few of the great ones:
Active Protection: SafeBytes provides complete and real-time security for your PC. It will inspect your personal computer for suspicious activity at all times and shields your personal computer from illegal access.
Robust Anti-malware Protection: Safebytes is based on the best virus engine within the industry. These engines can find and eliminate threats even during the early stages of a malware outbreak.
Fast Scan: SafeBytes’s high-speed malware scanning engine reduces scanning times and extends battery life. Simultaneously, it’ll effectively identify and remove infected computer files or any online threat.
Internet Security: SafeBytes checks and provides a unique safety ranking to every website you visit and block access to web pages considered to be phishing sites, thus safeguarding you from identity theft, or known to contain malicious software.
Very Low CPU and Memory Usage: SafeBytes is a lightweight tool. It consumes a very small amount of processing power as it runs in the background so you are free to use your Windows-based PC the way you would like.
Premium Support: For any technical issues or product assistance, you could get 24/7 professional assistance via chat and email.
To conclude, SafeBytes Anti-Malware is pretty great for securing your laptop or computer against all sorts of malware threats. Malware problems will become a thing of the past when you put this software program to use. So if you’re looking for a comprehensive antivirus program that’s still easy to use, SafeBytes Anti-Malware is exactly what you will need!
Technical Details and Manual Removal (Advanced Users)
To remove WeatherGenie manually, navigate to the Add/Remove programs list in the Control Panel and choose the program you want to remove. For internet browser extensions, go to your browser’s Addon/Extension manager and choose the plug-in you wish to disable or remove. You’ll probably also want to reset your browser to its default configuration settings.
In order to ensure the complete removal, manually examine your hard drive and Windows registry for all of the following and eliminate or reset the values as needed. Please keep in mind that only experienced users should attempt to manually edit the registry because deleting any single critical system file results in a serious problem or even a system crash. In addition, certain malware is capable of replicating or preventing deletion. It is advisable that you do the removal process in Safe Mode.
Files:
%UserProfile%Application DataMicrosoft%random%.exe
%System Root%Samples
%windows%system32driversSearch.weather-genie.com.sys
%User Profile%Local SettingsTemp
%Documents and Settings%All UsersStart MenuProgramsSearch.weather-genie.com
%Documents and Settings%All UsersApplication Data
%Program Files%Search.weather-genie.com
C:ProgramData%random numbers%
Search And Delete:
doguzeri.dll
3948550101.exe
3948550101.cfg
Registry:
HKEY_LOCAL_MACHINESOFTWAREMicrosoftWindows NTCurrentVersionImage File Execution Optionsmsseces.exe Debugger = svchost.exe
HKEY_LOCAL_MACHINESOFTWAREMicrosoftWindowsCurrentVersionUninstallSearch.weather-genie.com
HKEY_CURRENT_USERSoftwareMicrosoftWindowsCurrentVersionInternet Settings WarnOnHTTPSToHTTPRedirect = 0
HKEY_LOCAL_MACHINESOFTWAREMicrosoftWindowsCurrentVersionInternet Settings WarnOnHTTPSToHTTPRedirect = 0
HKEY_LOCAL_MACHINESOFTWAREMicrosoftWindows NTCurrentVersionSystemRestore DisableSR = 1
HKEY_LOCAL_MACHINESOFTWAREMicrosoftWindows NTCurrentVersionImage File Execution Optionsekrn.exe Debugger = svchost.exe
HKEY_LOCAL_MACHINESOFTWAREMicrosoftWindows NTCurrentVersionImage File Execution Optionsmsascui.exe Debugger = svchost.exe
HKEY_LOCAL_MACHINESOFTWAREMicrosoftWindowsCurrentVersionRun 3948550101
HKEY_CURRENT_USERSoftwareMicrosoftWindowsCurrentVersionRunxas
HKEY_CURRENT_USERSoftwareSearch.weather-genie.com
Read More
As you know, the Microsoft store is a built-in tool in Windows 10 where you can find a variety of applications. It helps users in downloading or updating apps in the system. However, there are instances when you could encounter issues while using it. One of the issues that you could face when using the Microsoft Store app is when it keeps on offering apps you have just updated or when you are not able to update any apps at all.
This kind of issue in the Microsoft Store app might be caused by other issues like a damaged Windows Store cache. There are several options you can check out to resolve the problem. You can try to check the registry setting or run the Windows Store apps troubleshooter or clear the Windows Store cache manually or reset its settings. You could also try to re-register the Microsoft Store app. For more details, refer to each one of the options provided below but before you troubleshoot the problem, make sure that you create a System Restore point.
Option 1 – Run the Windows Store App troubleshooter
The Windows 10 Store Apps Troubleshooter will help you in fixing the problem in Microsoft Store. This is a great built-in tool from Microsoft that helps users fix any app issues. To use the Windows Store Apps Troubleshooter, follow the steps below.
- Tap Win + I keys again to open the Windows Settings panel.
- Go to Update & Security and then go to Troubleshoot.
- Under the Troubleshoot section, on your left-hand side, scroll down to find Window Store Apps.
- Then click on the Run the troubleshooter option and follow the on-screen instructions and then see if it fixes the problem.
Option 2 – Try checking the settings in the Windows Registry
The next thing you can do to fix the problem is to check the Registry settings for the Windows Store.
- Tap the Win + R keys to open the Run utility and type “Regedit” in the field and then hit Enter to open the Registry Editor.
- Next, navigate to this registry path: HKEY_LOCAL_MACHINESOFTWAREMicrosoftWindows NTCurrentVersionCurrentVersion
- From there, look for the DWORD named “CurrentVersion” and make sure that its value data is set to 6.3, but if it’s not then change its value data to 6.3
- Exit the Registry Editor and restart your computer and then see if it fixed the problem with the Microsoft Store app.
Option 3 – Try to reset the Microsoft Store cache
Just like browsers, Microsoft Store also caches as you view apps and games so it is most likely that the cache is no longer valid and must be removed. To do so, follow the steps below.
- Right-click on the start button and click on Command Prompt (administrator).
- Next, type in the command, “exe” and tap Enter. Once you do, the command will clear the cache for the Windows Store app.
- Now restart your PC and afterward, try opening Microsoft Store again and then try to install your app or update your computer again.
Option 4 – Try to re-register the Microsoft Store app via Windows PowerShell
- Tap the Win + X key combination or right-click on the Start button and click on the Windows PowerShell (Admin) option.
- If a User Account Control or UAC prompt appears, just click on Yes to proceed and open the Windows PowerShell window.
- Next, type in or copy-paste the following command to re-register the Microsoft Store app and tap Enter:
powershell -ExecutionPolicy Unrestricted Add-AppxPackage -DisableDevelopmentMode -Register $Env:SystemRootWinStoreAppxManifest.xml
- Wait for the process to be completed and then restart your computer.
Read More
If you suddenly encountered a Windows Error Code 0x80070017 during an Update, Installation or System Restore then it’s probably due to some missing or corrupted system files. This kind of error code can occur during an update, installation, or system restore and the only way out of it is to download the file once again and re-run the installation from the top.
Before you start to troubleshoot the problem, you need to create a System Restore Point first. After you create a System Restore point, you can follow the troubleshooting options laid out below to fix the Windows Error Code 0x80070017. You just have to follow the troubleshooting option that applies to your situation and whether you got the error during an update, installation, or during System Restore.
Whether you got the error 0x80070017 while updating Windows 10 or installing it or during a system restore, the first thing you must do is run the System File Checker. As pointed out early on, the Windows Error Code 0x80070017 might be caused by corrupted or missing system files so the first thing you can try is to run the System File Checker scan.
- Tap Win + R to launch Run.
- Type in cmd in the field and tap Enter.
- After opening Command Prompt, type in sfc /scannow and hit Enter.
The command will start a system scan which will take a few whiles before it finishes. Once it’s done, you could get the following results:
- Windows Resource Protection did not find any integrity violations.
- Windows Resource Protection found corrupt files and successfully repaired them.
- Windows Resource Protection found corrupt files but was unable to fix some of them.
If you have encountered Windows Error Code 0x80070017 during an Update, then here are some options you need to try:
Option 1 – Delete the files/contents in the SoftwareDistribution Folder
The Software Distribution folder in the Windows operating system is a folder that can be found in the Windows directory and is used to store files temporarily which might be required to install the Windows Update on your PC. Thus, it is required by the Windows Update and maintained by WUAgent. A lot of users tried deleting the files in this folder to fix the problem and so far it has worked. Like them, you can try clearing the Windows Update cache by simply deleting the contents of the folder named “SoftwareDistribution” since Windows apparently can’t clear and re-download the update contents once they are corrupted. Thus, deleting the contents of this folder will make Windows download the contents again which will fix the problem. To do that, follow the steps below.
- Open the WinX Menu.
- From there, open Command Prompt as admin.
- Then type in the following command – don’t forget to hit Enter right after typing each one of them.
net stop wuauserv
net stop bits
- After entering these commands, it will stop the Windows Update Service and the Background Intelligent Transfer Service.
- Next, go to the C:/Windows/SoftwareDistribution folder and get rid of all the folders and files thereby tapping the Ctrl + A keys to select them all and then click on Delete. Note that if the files are in use, you won’t be able to delete them.
- Once all the contents in the Software Distribution folder are deleted, restart your PC and then go back to Command Prompt and input the following commands again.
net start wuauserv
net start bits
Since the folder has already been flushed, it will be populated afresh the instant your restart your computer and open Windows Update.
Option 2 – Run the Windows Update Troubleshooter
Running the built-in Windows Update troubleshooter could also help you resolve the Windows Update Error Code 0x80070017. To run it, go to Settings and then select Troubleshoot from the options. From there, click on Windows Update and then click the “Run the troubleshooter” button. After that, follow the next on-screen instructions and you should be good to go.
On the other hand, if you got the error code 0x80070017 during a Windows 10 installation, then it’s because of bad media or corruption in ISO. Here are some troubleshooting steps for this kind of situation:
Option a – Try to create Windows 10 ISO media again
In this option, you will have to create a Windows 10 bootable media and use it to install the latest Windows 10 version. Most users reported that this option works and the reason why it does have something to do with the Windows Update client since the Windows Updates downloaded from the regular Windows Update client seem to create issues such as the error 0x80070017. However, issues like this one don’t occur when the very same Windows Updates are downloaded and installed via an ISO file.
Take note that when using a Windows ISO file, you will be asked to choose what you want to do with the previous settings and apps. A lot of users opted for the “Not to keep the old Windows settings” option which has resolved the issue. So if you want to keep the previous settings then you must try to update Windows first while keeping the old settings. However, if it doesn’t work, you have to try installing the latest version of Windows without keeping the previous settings.
- Click this link and then click the Download Tool Now button.
- Next, click the “Use the tool to create installation media (USB flash drive, DVD, or ISO file)…” option and follow the next given instructions on the screen.
- Now select the ISO file option in step 5.
- After that, you should now have an ISO file.
- Next, go to the location where you’ve downloaded the ISO file.
- Then right-click on the Windows 10 ISO file and select the Open with the option and then select File Explorer.
- Now click on “setup.exe” and follow the next instructions that appear on the screen. When asked, you have to select either Nothing (clean install) or Keep personal files only option. Take note that you must not select the “Keep personal files, apps, and Windows settings since it doesn’t really work.
Option b – Run Microsoft’s online troubleshooter
Running Microsoft’s online troubleshooter might also help you fix the Windows update error 0x80070017. This online troubleshooter is known to help in fixing Windows Update errors, it scans your computer for issues that might be causing the problem and then fixes them automatically.
If you got the error during System Restore then this means that the files that are being copied from the disk are not making it to the hard drive. To resolve it, here’s what you can do:
Option 1 – Run System Restore in Safe Mode
You might want to run System Restore in Safe Mode and see if it works. Just reboot your PC into Safe Mode and then run System Restore.
Option 2 – Reset Repository
- Boot your PC into Safe Mode.
- Then open Command Prompt as admin.
- Next, type the “net stop winmgmt” command and hit Enter to stop the Windows Management Instrumentation Service.
- After that, go to C:/Windows/System32/wbem. From there, rename the repository folder to “repository-old”.
- Restart your computer.
- After your computer has restarted, open Command Prompt as admin again and then type the “net stop winmgmt” command and hit Enter.
- Next, type the “winmgmt /resetRepository” and hit Enter to reset Repository.
- Restart PC and check if System Restore now works.
Option 3 – Try resetting Windows 10
To fix the error 0x80070017, you can try resetting Windows 10. Doing so won’t get rid of any file in your system – instead of erasing all your media files and documents, it only resets all the system settings and files. Simply go to Settings > Recovery. From there click the Get started button under the Reset This PC section.
Read More
![]()
Copyright © 2022, ErrorTools. All Rights Reserved
Trademarks: Microsoft Windows logos are registered trademarks of Microsoft. Disclaimer: ErrorTools.com is not affiliated with Microsoft, nor claim direct affiliation.
The information on this page is provided for information purposes only.
![]()
Repair your PC with one click
Please be aware that our software needs to be installed on a PC system with Windows on it, Open this website on a desktop PC and download the software for easy and quick elimination of your issues.
If you run into any error while accessing the Windows 7 registry import on your system, we hope this user guide can help you solve it.
PC running slow?
Improve the speed of your computer today by downloading this software — it will fix your PC problems.
User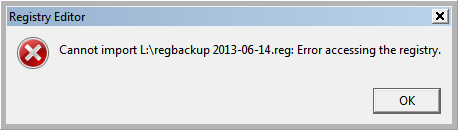
Some people get the “Cannot find registry” error when trying to mix a registry key on a Windows personal computer. Most affected users report that the download occurred after reinstalling the linked version of Windows and attempting to enter the .reg file. The problem mostly occurs on Windows 7, Windows 8 as well as Windows 10.

What Is Causing The “Unable To Access The Registry” Problem?
How do I fix error access to the registry?
For this to work, you need to do it with a long CMD timeout – press Windows Key + R, exit “cmd” and press Ctrl + Shift + Enter to open a Command Prompt window with administrator privileges. This procedure should have successfully worked around the “Error accessing registry” error.
We investigated this post aboutb error by examining various user reports and recovery strategies they have used to avoid or completely fix the problem. Based on our research, there are several common scenarios that cause a series of error messages:
PC running slow?
ASR Pro is the ultimate solution for your PC repair needs! Not only does it swiftly and safely diagnose and repair various Windows issues, but it also increases system performance, optimizes memory, improves security and fine tunes your PC for maximum reliability. So why wait? Get started today!

If you’re having trouble resolving this particular error message, this article provides a number of proven troubleshooting steps. In the next area, you will see several potential troubleshooting methods that many users in a similar situation use to solve the problem.
For improvement, it is best to follow the methods below until you find a solution that generally applies to your current situation and fixes the problem.
Method 1. Import The Current Recording File With Administrator Rights

As a few enthusiastic users have suggested, you may be facing a permission issue. In most cases, the Registry Editor utility does not yet have sufficient permissions to be merged into the file. It’s literallypretty common thing with new Windows installations where the registry editor hasn’t opened yet.
Several users who struggled to fix the same error message stated that the issue was finally resolved shortly after opening Registry Editor with administrator privileges and using menu import to reconcile files. Here’s a quick guide:
- Press the Windows R + key to open the Run chat window. Then type “regedit” and press + Ctrl Shift + Enter to open the Registry Editor with administrator rights. Aria -describedby = “caption-attachment-91443″>
Type regedit back Run to open the registry editor - At the UAC (User Account Control) prompt, select Yes, this gives administrator rights.
Granting Administrator Permissions for Registry Editor - In Registry Editor navigate to> Import Content via Menu Ribbon. new maximum.
Using the precise built-in import menu from Registry Editor - Use the Import To menu to navigate to the location of a difficult file. When you get there , select it and click “Open” to merge it with the current registry. Width: 968px) 100vw, 968px “src =” https://cdn.Silicon Valley Gazette.com/wp-content/uploads/2019/01/importing- the-key.jpg “srcset =” https: //cdn.Silicon Valley Gazette. com / wp-content / uploads / 2019/01 / importing-the-key.jpg 968w, https://cdn.Silicon Valley Gazette.com/wp- content / uploads / 2019/01 / importing-the-key-150×86.jpg 150 W,https://cdn.Silicon Valley Gazette.com/wp-content/uploads/2019/01/importing-the-key-300×172.jpg 300W, https://cdn.Silicon Valley Gazette.com/wp-content/uploads/2019 / 01 / importing-the-key-768×440.jpg 768w “>
Definitely merge the key with the current registry Note: The above principle applies to situations where the ‘. Key error occurs automatically when trying to scan .reg through the a.bat directory For it to do its job you need to launch it in an accelerated CMD window – most importantly, press Windows + R, type “cmd” and press ctrl + Shift + Enter to open a Command Prompt window with administrator rights.
This procedure should have successfully bypassed the “Unable to ‘access the registry.” If the error persists: a If it does, or if this method does not apply to your situation, skip to the next product below.


Method 2: Perform A System Restore
If you get this error message out of nowhere (you haven’t done a significant reinstallation of Windows recently), the system file may be corrupted and usually prevents the merge. The operation has not been completed.
In this particular case, users who were in a similar waIn a similar situation, solved their problem using the System Restore Wizard to restore the computer to an earlier time (when the registry projects were working fine). .A
If you are using a restore point for an older system, the state of your computer will be restored to the state it was when the backup was created. This will fix any errors that may have occurred during this time, but it will also remove any software and user preferences that you created or used during this time.
- Press Windows Important + R to open the Run chat window. Then type “rstrui” and press Enter to open the System Restore Wizard.
- Once the audience gets to the first System Restore exhibition, they will ask you if you want to use the recommended restore point. Set the radio button to “Choose another correct point” and click “Next” to continue.
- Select a restore point from the list and click Next to continue.
- Click Finish toComplete the recovery process, and after a while your computer will restart and return to an outdated state.
- After completing the next attachment, try merging / importing the document again and see if the error is fixed.

If you still get the registry access error, please scroll down to help you with the following method below.
Method 3: Make A Very Good Setup
If you have gone this far in the recovery process, but have not received any results, it is very likely that this problem is related to file corruption on the system computer. Most likely, the system file or, alternatively, the service used when importing the PC registry will simply become more accessible.
Several users who actually struggled with the same error reported that the issue was eventually resolved after issueFixes the installation.
A measure of correct installation is a non-destructive process that should be able to update all Windows components without affecting your personal or file apps, your apps, your subscribers’ settings, and your personal files.
If you decide to install services, you can follow the instructions in this article (here).
- The registry does not have file administrator rights – this scenario is quite common with new installations / reinstallations of Windows. If Registry Editor hasn’t opened yet, the program probably does not have the read / write permissions required to merge the .reg file into the current registry.
- A system file corruption causes a specific error – confirmed. Cases when this error occurred due to a set of corrupted system files affecting the import capabilities of the Register Editor utility. If so, there are usually two proven solutions (System Restore and Repair Install) that are known to fix the problem.
Kevin is a dynamic and always motivated IT expert with deep knowledgeyami in all aspects of the design and administration of the implementation of network systems. An excellent track record while delivering large scale business critical projects that stay within budget and on time.
Improve the speed of your computer today by downloading this software — it will fix your PC problems.
Try to run regedit “as administrator” and then import ours. reg file. You can right click on the current Windows icon and run Command Prompt (Admin) from Command Prompt. Typically launch Regedit from the user interface to import the file. Administrator / Lecturer at Malware Removal University You can teach too I help others.
How do I import registry keys into Windows 7?
Fehler Beim Importieren Der Registrierung Von Windows 7? Sofort Reparieren
Errore Durante L’apertura Dell’importazione Del Registro Da Windows 7? Ripara Subito
Fout Bij Toegang Tot Registerimport Afkomstig Van Windows 7? Onmiddellijk Repareren
Erreur Lors De L’accès à L’importation D’ordinateurs Personnels à Partir De Windows 7 ? Réparer Immédiatement
Windows 7에서 레지스트리 가져오기에 도달하는 동안 오류가 발생했습니까? 즉시 수리
Erro Ao Acessar Laptop Ou Computador Importado Do Windows 7? Repare Imediatamente
Fel Vid åtkomst Till Registerviktighet Från Windows 7? Reparera Omedelbart
Ошибка при импорте реестра из Windows 7? Немедленно отремонтируйте
Błąd Dostępu Do Importu Komputera Z Systemu Windows 7? Napraw Natychmiast
¿Error Al Acceder A La Importación Del Registro Desde Windows 7? Reparar Inmediatamente