You may encounter the “Repairing disk errors. This might take over an hour to complete.” error message when booting up Windows. How to fix it? This article will show you top 5 solutions to fix repairing disk errors Windows 10.
Have you ever come across the error message “Repairing disk errors. This might take over an hour to complete.” at Windows startup? Just like the following picture showing, Windows stuck on the repairing disk errors page. And you are unable to boot into Windows.
Well, you may wonder: what causes repairing disk errors?
When you come across “Repairing disk errors. This might take over an hour to complete.” error message, it indicates that something was wrong on the boot disk which leads system unable to boot from the disk.
It may be caused by unexpected system shutdown, bad sectors on hard drive, faulty hard drive and so on. Many laptop and desktop computer users have come across the repairing disk errors at Windows startup. If you have the same issue but don’t know how to fix repairing disk errors Windows 10, this article is exactly what you need.
Before you try the following solutions, you can restart your computer to see if the issue appears again. Sometimes, restarting is helpful.
You can also leave your computer running overnight to let it finish. However, if the Repairing disk errors issue persists, you can try the following fixes.
Solution 1. Perform Startup Repair
Step 1. Boot the Computer Through the Installation Media
- Create an installation media on a normal PC with Windows 10 Media Creation Tool.
- Insertthe USB drive or DVD on your PC with repairing disk errors.
- Restart your PC and change BIOS order to boot from the USB drive.
Note: The key to boot menu may vary due to different computer brands and manufacturers. Usually you will see a message like “Press DEL to Enter Setup” to remind you how to enter BIOS. You may refer the user manual to find out which key to enter BIOS.
Step 2. Run Startup Repair
1. Select your language preferences, and click Next.
2. Click Repair your computer on the lower left corner.
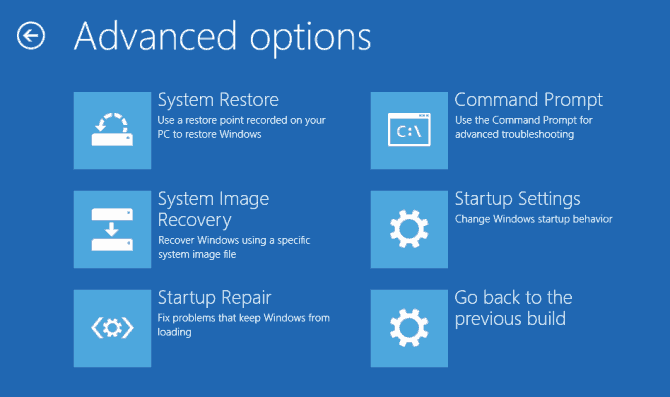
3. Click Troubleshoot, advanced option and then click Startup Repair.

After Startup Repair finished, restart your PC to see if the repairing disk error message has disappeared. However, if the Startup Repair is unable to help you and you might resort to other methods instead.
Solution 2. Check and Fix Hard Drive Errors with a Bootable Disk
If you want to fix the “Repairing disk errors. This might take over an hour to complete.” issue, you can create a bootable disk with MiniTool Partition Wizard to check and fix hard drive errors on your system disk.
MiniTool Partition Wizard Pro is a professional partition manager. It can help you perform many advanced operations like resize partition, convert MBR to GPT, rebuild MBR, change cluster size, convert NTFS to FAT32 and so on. As a reliable hard drive management tool, you can use it to fix hard drive issues at ease.
How to utilize this tool when you encounter repairing disk errors Windows 10? Firstly, you need to get the MiniTool Partition Wizard Pro Edition on a normal computer. And install it.
Buy Now
Step 1. Create a Bootable USB Flash Drive
1. Launch MiniTool Partition Wizard Pro on a normal computer.
2. Click Bootable Media on the top tool bar.
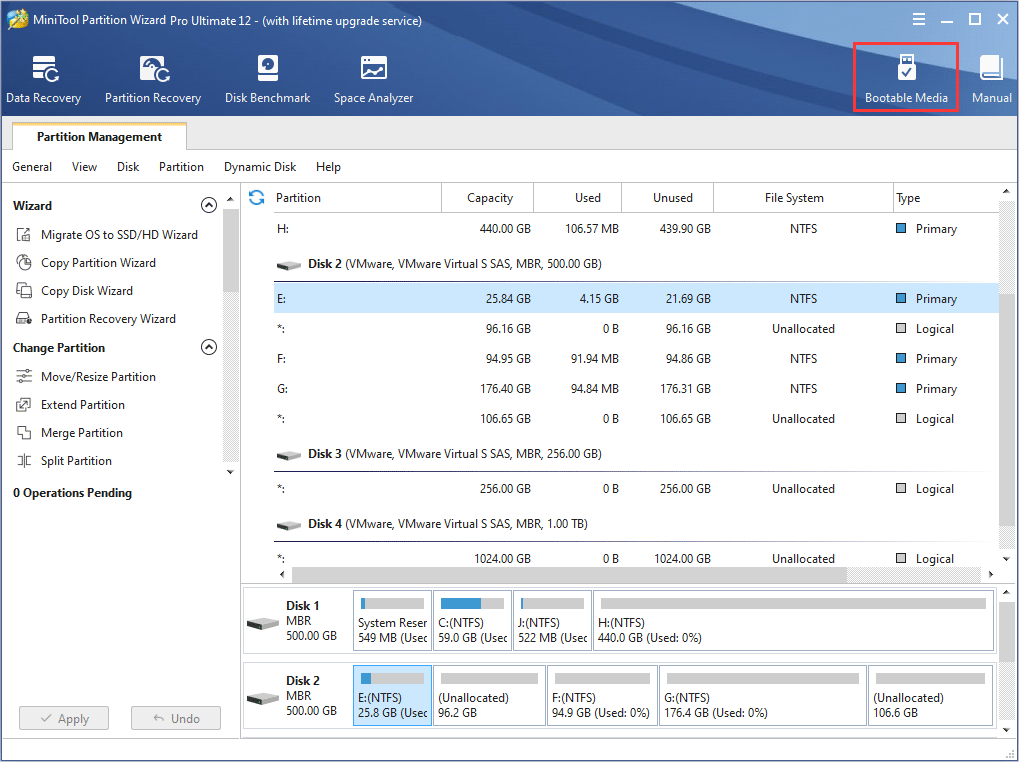
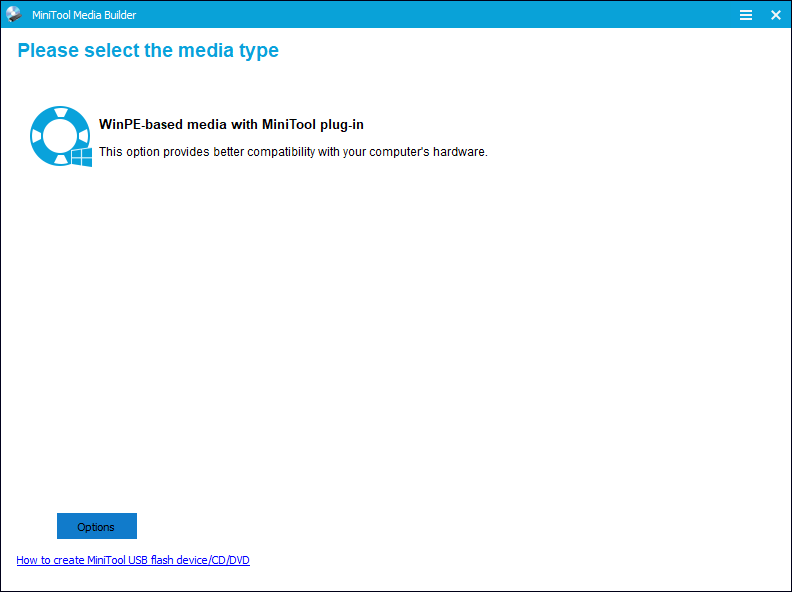
3. Select WinPE-based media with MiniTool plug-in to continue.
4. Click USB Flash Disk option and select the correct USB flash drive.
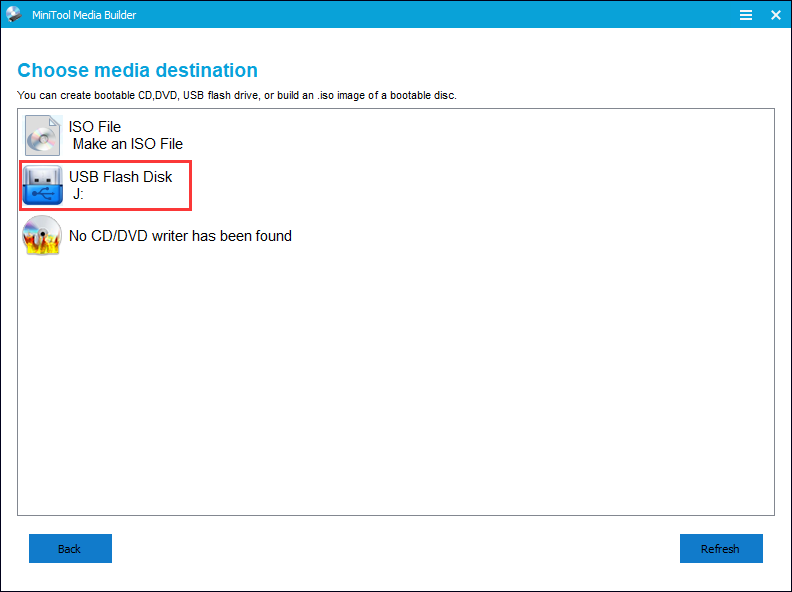
Tip: MiniTool Partition Wizard will format your disk, so make sure there is no important file on your USB flash drive.
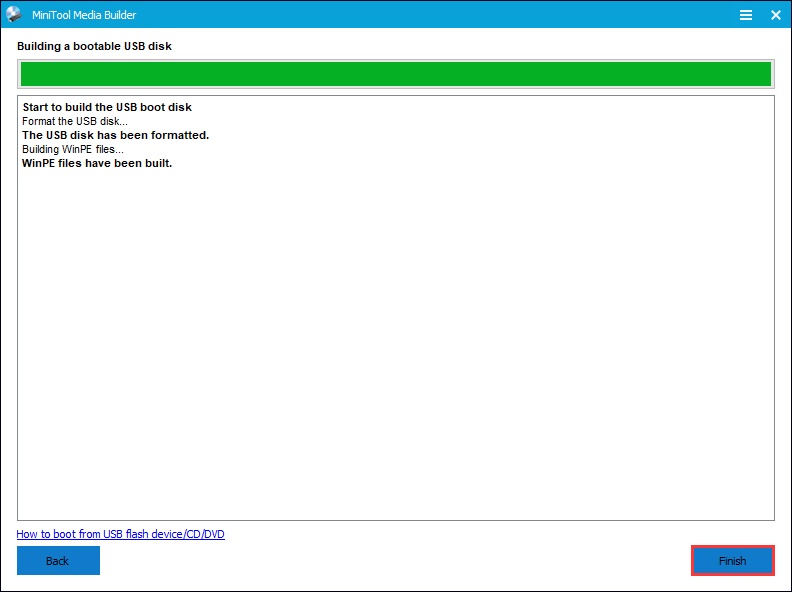
5. Click Finish after successful burning.
Step 2. Check and Fix File System Error.
1. Plug the bootable USB flash drive on your computer and boot from it.
2. Launch MiniTool Partition Wizard Pro to get the main interface.
3. Choose the system partition and click Check File System from the left action panel.
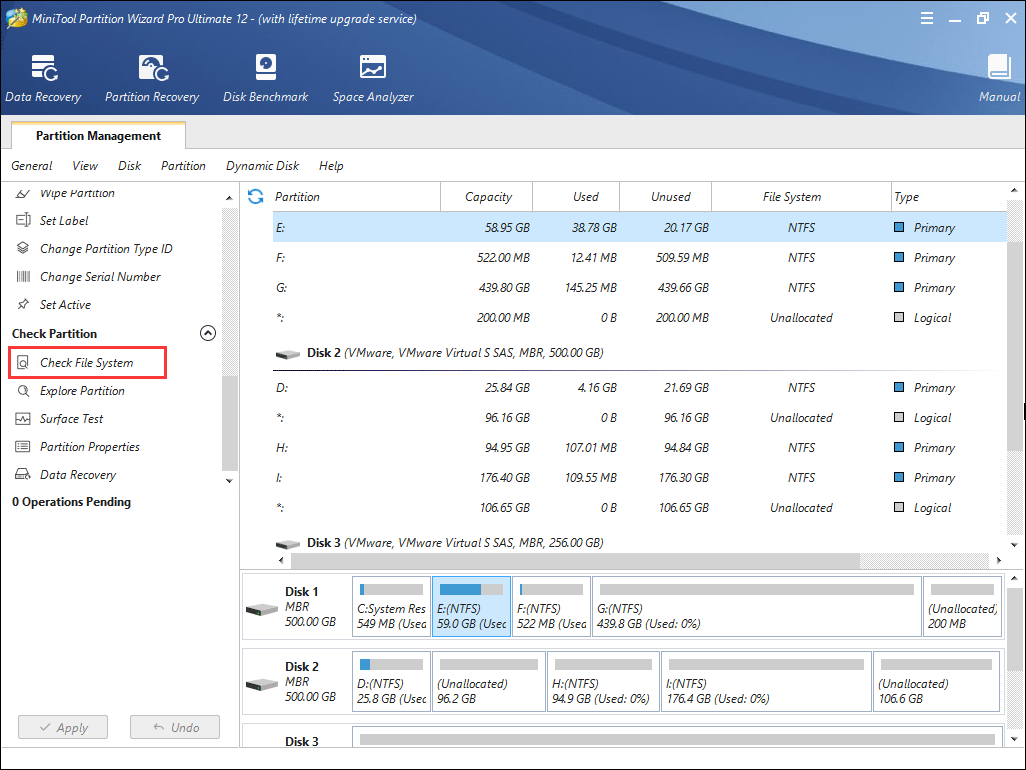
Note: In the bootable edition of MiniTool Partition Wizard, all partitions including the system reserved partition and EFI system partition will be given a drive letter, so the original system partition’s drive letter may not be partition C.
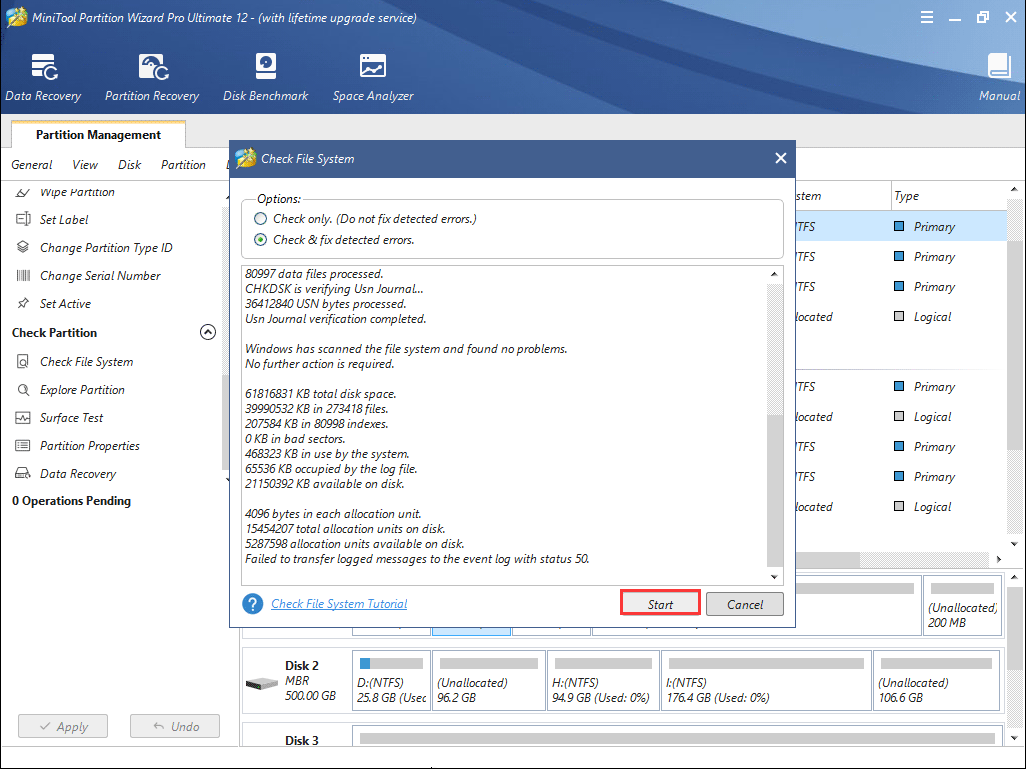
4. On the pop-up window, choose Check & fix detected errors.
- Check only: it will only scan the drive for errors but will not repair the hard drive errors.
- Check & fix detected errors: it will scan and fix any detected hard drive errors automatically.
5. Click Start button to check and fix file system immediately.
If this method cannot help you fix repairing disc errors Windows 10 issue, you can try the next method with MiniTool Partition Wizard Pro Edition.
Solution 3. Check Bad Sectors on Hard Drive
When “Repairing disk errors. This might take over an hour to complete.” shows up, you can check if there are bad sectors on your hard drive.
Repairing disk errors means that there is something wrong with your system disk. If you are unable to fix hard drive errors with Check File System feature, you can perform surface test to check bad sectors on your computer.
MiniTool Partition Wizard can scan each sector status by reading data from the sector. After scanning, disk block without reading error will be marked with green color, while disk block with reading error will be marked with red.
How to perform surface test when Windows failed to start? Well, you need to get the disk surface test tool in the first place.
Buy Now
Step 1. Create a Bootable USB Drive
Follow the Step 1 in Solution 2 to create a bootable USB drive with MiniTool Partition Wizard Pro Edition.
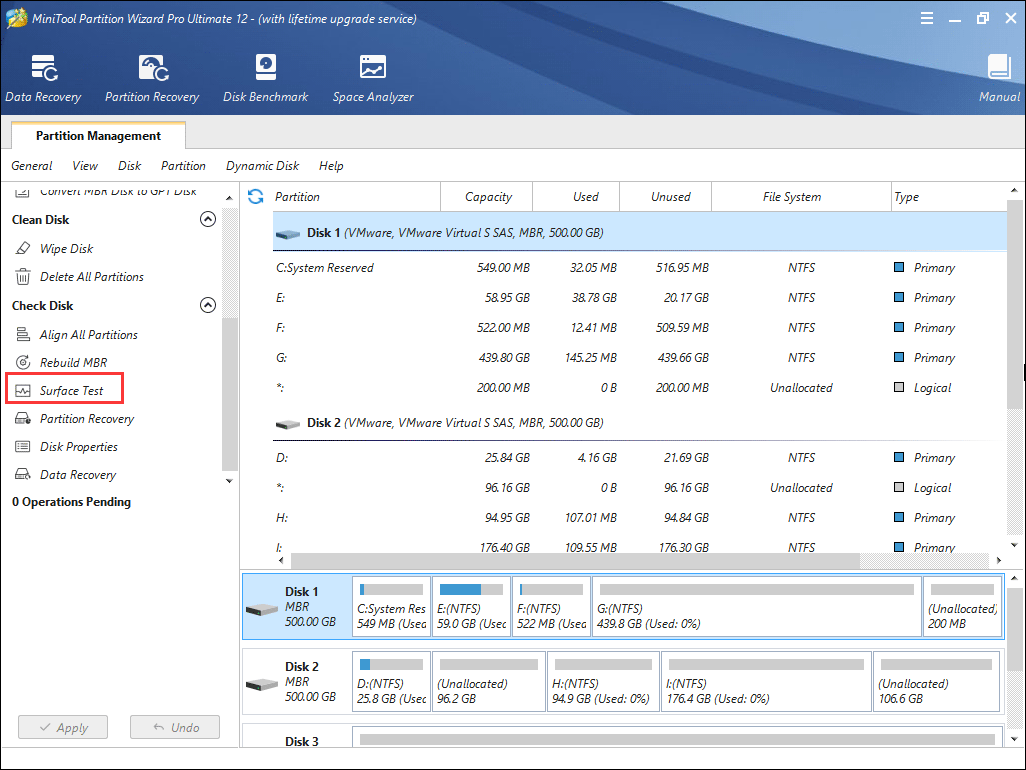
Step 2. Choose the System Disk to Test
- Boot from the USB flash drive.
- Launch MiniTool Partition Wizard Pro to get the main interface.
- Select the system disk.
- Click Surface Test from the left action panel.
Step 3. Start the Disk Surface Test
1. Click Start Now button to start disk surface test.
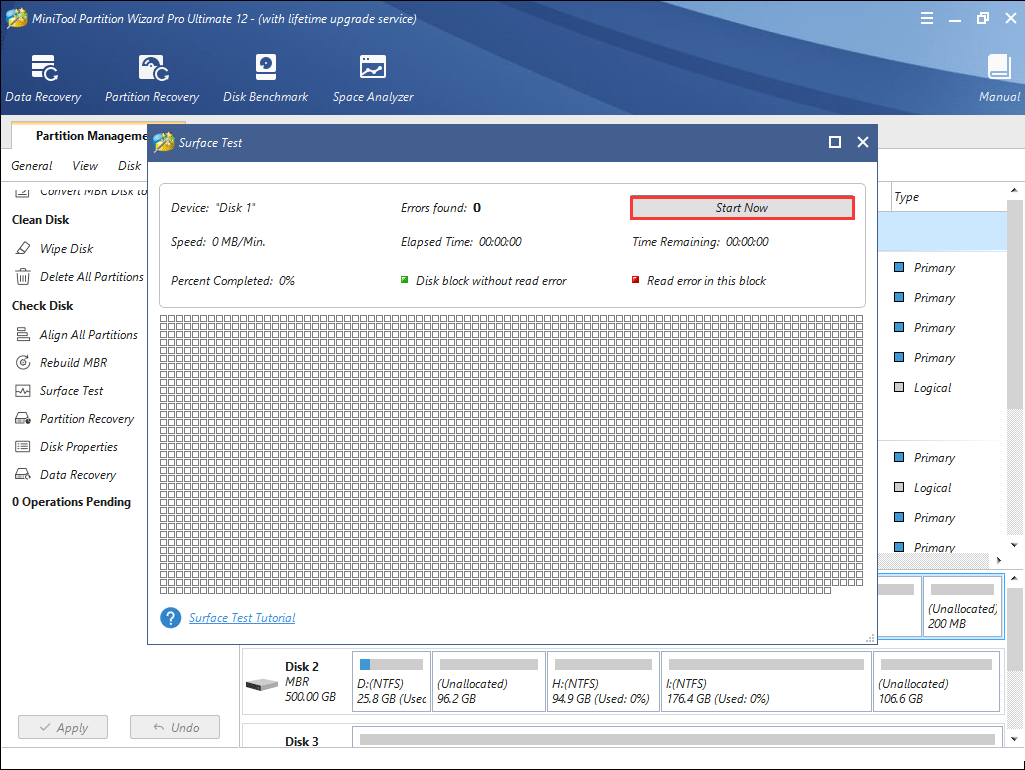
Then MiniTool Partition Wizard Pro will start checking your hard drive for bad sector. This might take some time. Just wait patiently.
2. After it is done, click OK and exit the application.
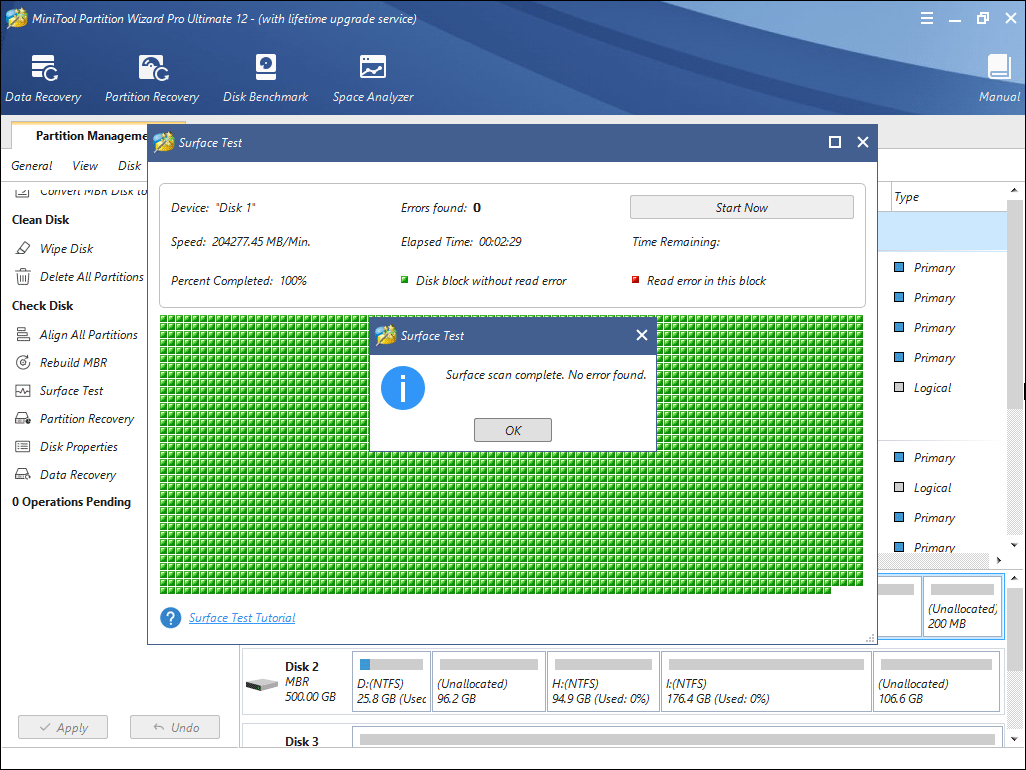
If there is no bad sector on the disk, you can feel at ease, as your disk is very healthy. If there are some bad sectors on disk, you use specific software to shield bad tracks.
What if there are too many bad sectors on your disk? What should you do? If there are too many bad sectors on your hard drive, it could be the reason for repairing disk errors Windows 10 issue. And it also indicates that your hard drive is failing. You’d better replace the disk as soon as possible.
Solution 4. System Restore
Another solution to repairing disk errors is to perform system restore. It enables you to return your system files and settings to an earlier point without affecting your personal files.
You can follow the steps as below to perform a system restore when your PC won’t start.
Step 1.Create a Bootable USB Drive
- Create an installation media on a normal PC.
- Insert the USB drive or DVD on your PC.
- Restart the computer and boot from the USB drive.
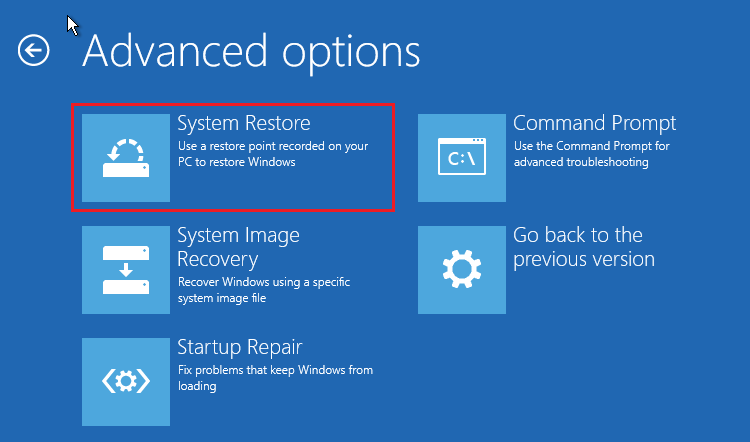
Step 2. Perform System Restore
- Select language preferences and click Next.
- On the Install Windows page, choose Repair your computer.
- On the Choose an option screen, go to Troubleshoot> Advanced options >System Restore.
Solution 5.Replace the System Disk
If the above fixes cannot help you resolve the “Repairing disk errors. This might take over an hour to complete.” issue, it is possible that your hard disk is faulty.
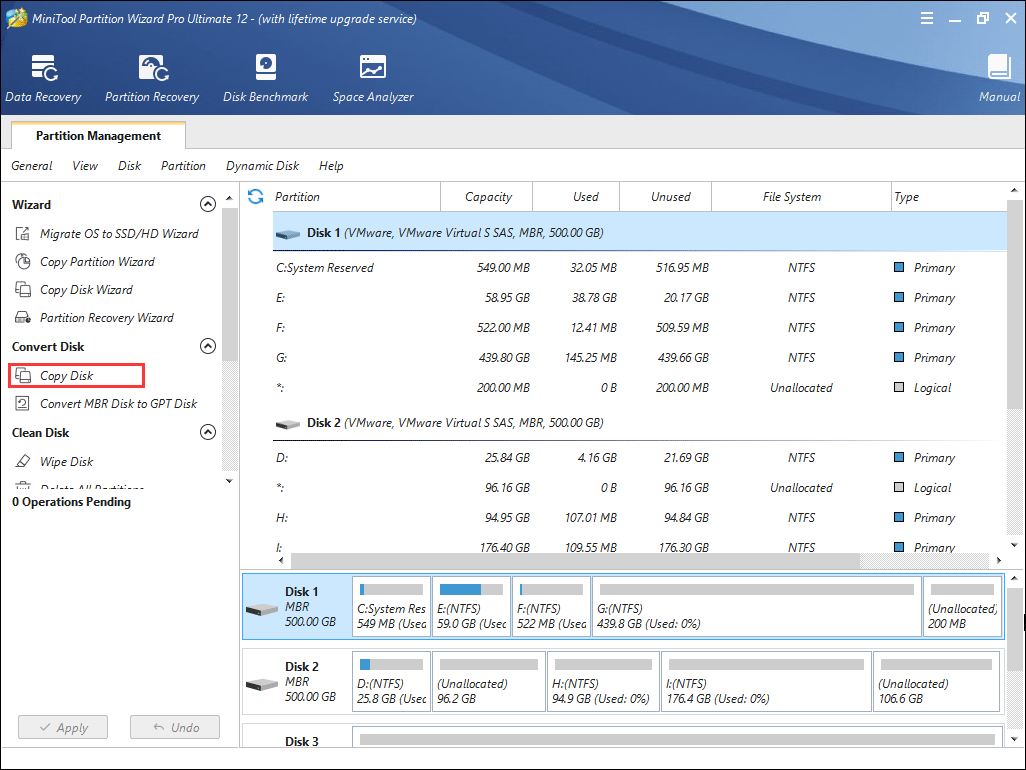
Under this situation, the best way is to backup the whole disk and replace the disk with a new and healthy disk. The most convenient way is to copy all the data on the system disk to another disk with a professional disk cloning software.
Here you can try using the Copy Disk feature embedded in MiniTool Partition Wizard Pro. It enables you to copy all the data on system disk to a new disk without reinstalling OS. You can use your original operating system on the new disk. And all you need to do is to change BIOS boot order.
Here are detailed steps about how to copy disk with MiniTool Partition Wizard Pro.
Step 1. Create a Bootable USB Drive with MiniTool Partition Wizard
- Launch MiniTool Partition Wizard Pro on a normal computer.
- Click Bootable Media on the top tool bar.
- Select WinPE-based media with MiniTool plug-in to continue.
- Click USB Flash Disk option and select the correct USB flash drive.
- Click Finish after successful burning.
Step 2. Start Coping Disk
1. Connect the USB drive to your computer and boot from it.
2. On the main interface of MiniTool Partition Wizard, select your system disk and choose Copy Disk.
3. Select a target disk and click Next. Then click Yes on the pop-up window.
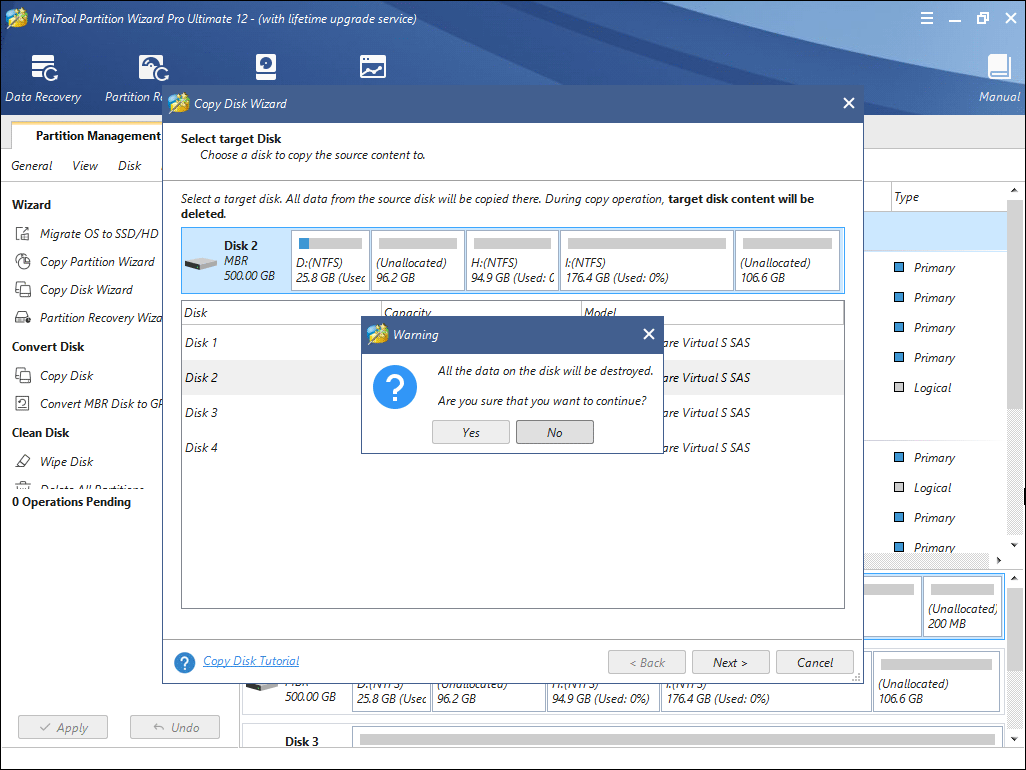
Note: Make sure there is no important file on the target disk, as all the data on the target disk will be destroyed during the disk cloning process.
4. Choose a copy method and click Next.
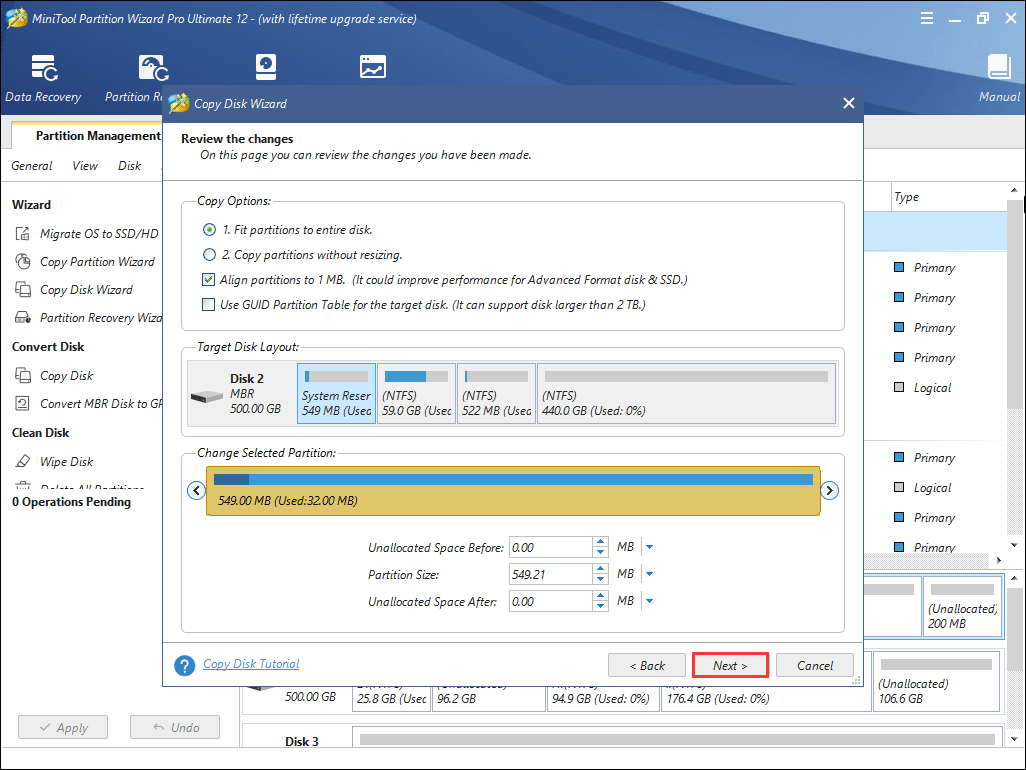
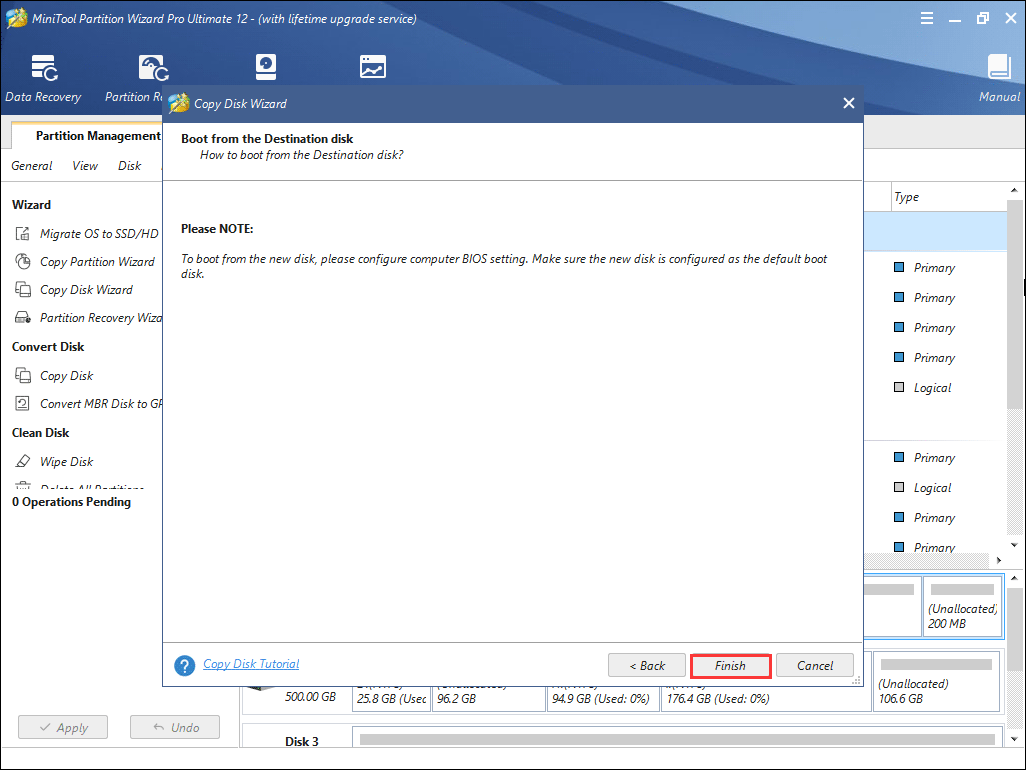
5. This page will remind you how to boot from the new disk. Click Finish after reading.
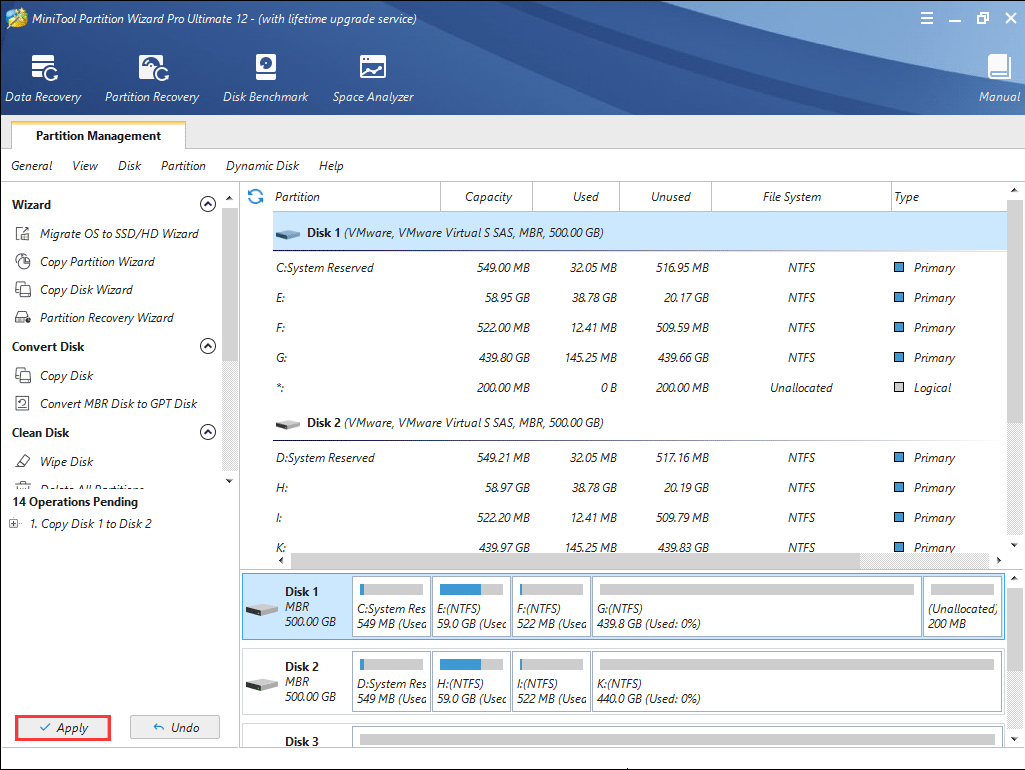
6. Click Apply to allow the pending operation.
After disk cloning, you can go to BIOS to change the boot order so as to boot from the new disk. And this method should fix the repairing disk errors Windows 10 issue.
After trying the fixes in this post, I successfully fixed repairing disk errors Windows 10 issue. I would like to share this post with more friends who have the same issue.Click to Tweet
If you encounter laptop repairing disk errors or your desktop computer come across this issue, just try the above methods to fix it quickly.
Bottom Line
After trying the above fixes, have you resolved the repairing disk errors Windows 10 issue? Among the above methods, the hard drive repair tool MiniTool Partition Wizard Pro Edition is worth trying. If you have not solved this repairing disk errors issue, try the methods in this post.
If you have any question about how to fix the “Repairing disk errors. This might take over an hour to complete.” error in Windows 10, you can leave a message on the following comment zone and we will reply as soon as possible. If you need any help when using MiniTool software, you can contact us via [email protected].
by Ivan Jenic
Passionate about all elements related to Windows and combined with his innate curiosity, Ivan has delved deep into understanding this operating system, with a specialization in drivers and… read more
Updated on December 23, 2022
- Many users claimed that the error message Repairing disk errors. This operation may take more than an hour to complete. occurs when they start Windows 10.
- You should run the Check Disk command in order to fix this startup problem.
- The Windows Registry could be bloated or corrupt, so you need to repair the registry.
- Also, rebuild the Boot Configuration Data by following our step-by-step guide below.

Are you getting the Repairing disk errors. This might take more than 1 hour startup error message? You are not alone, and we have got the solutions for this startup problem.
Many users reported getting the error alert Repairing disk errors. This might take over an hour to complete, when they boot into Windows 10, and the startup screen error still won’t go away.
If you experience this problem, the basic workaround would be to wait for more than one hour for the boot process to complete. However, waiting won’t clear off this problem.
Hence, the Windows Report team has compiled a list of solutions to fix this problem, so be sure to take a closer look.
- How long should I wait for repairing disk errors?
- How do I fix Repairing disk errors. This might take over an hour to complete ?
- 1. Run CHKDSK
- 2. Repair PC registry
- 3. Set the boot disk at the top of the computer’s boot order in BIOS
- 4. Run Automatic Repair/Startup Repair
- 5. Use System Restore
- 6. Install Microsoft Hotfix
- 7. Roll back to Windows 8.1/7
- 8. Rebuild BCD
- 9. Reset this PC
How long should I wait for repairing disk errors?
The usual wait time for this procedure is around 10-15 minutes. Sometimes you can get an error that says that it takes over an hour or even a day in some cases.
How do I fix Repairing disk errors. This might take over an hour to complete ?
1. Run CHKDSK
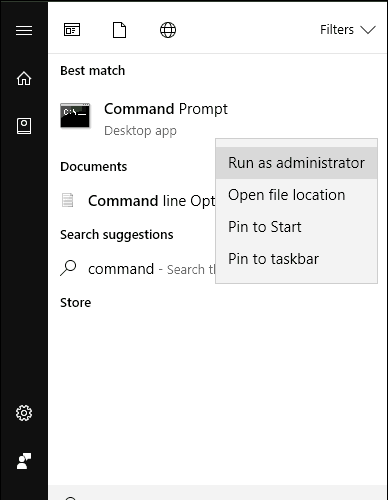
- Press the Windows Key + X, and select Command Prompt (Admin).

- When Command Prompt opens, enter chkdsk /f /r and press Enter.
- If you see a message saying that you need to restart your PC before you can scan the C partition, be sure to follow the instructions, and restart your PC.
One of the fixes that worked for those who encountered this startup problem, was to run chkdsk. If you are still experiencing the error, you might want to proceed to the next solution.
Also, if you are experiencing corrupt directories on your Windows PC, check out our dedicated guide to fix it in no time.
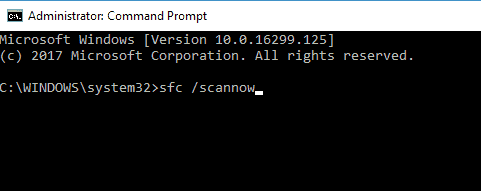
2. Repair PC registry
- In Safe Mode, go to Start and type cmd.
- Right-click Command Prompt, and select Run as Administrator.

- Now, type the following command, and press Enter:
sfc /scannow
- Wait for the scanning process to complete and then restart your computer. All corrupted files will be replaced on reboot.
Sometimes, the Windows Registry might be bloated or corrupted; hence, you need to repair the registry.
Meanwhile, Microsoft’s System File Checker verifies the integrity of all system files and repairs files with problems when possible.
The simplest way to repair your Windows registry is to use a dedicated tool that scans your PC for any errors and irregularities and fixes faulty registries and files from the moment they appear.
We recommend Restoro because it is quick and easy to use. It gives you to scan reports on the problems it detects and what needs to be done about it. It can also detect and remove unnecessary clutter from your PC.
3. Set the boot disk at the top of the computer’s boot order in BIOS
- Power up your computer.
- Press the F1 key or any specified key to enter the BIOS (other keys such as F1, F12 or Delete may be used depending on your HP system).
- Locate your computer’s boot order under BIOS Boot.
- Select the HDD/SSD i.e. the boot disk and move it upward using the arrow key.
- Save the changes by following the screen prompts, and exit the BIOS.
Another reason for this startup problem is because the HDD/ boot disk is not at the top of the boot order. The system retrieves boot information and OS details by following a boot order.
The boot order consists of the sequence of sources which the computer searches in order to retrieve valid information.
However, if the HDD/boot disk is not at the top of the boot order, the computer tries to boot from another source, which results in an error message.
If you intend to set the boot disk i.e. HDD at the top of the boot order in BIOS (Basic Input/Output System), follow the above steps.
4. Run Automatic Repair/Startup Repair
- Insert the Windows bootable installation DVD, and restart your PC afterwards.
- Press any key to boot from CD or DVD when prompted to continue.
- Select your language preferences, and click Next.
- Click Repair your computer in the bottom-left.
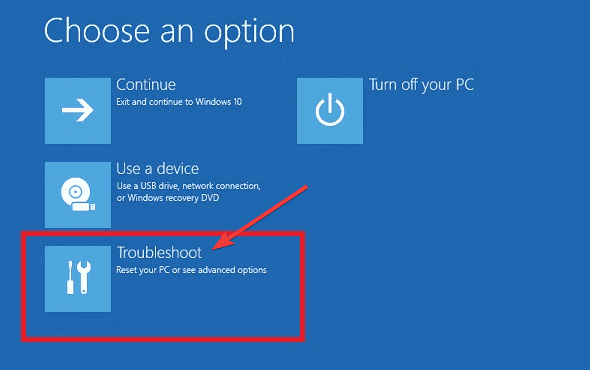
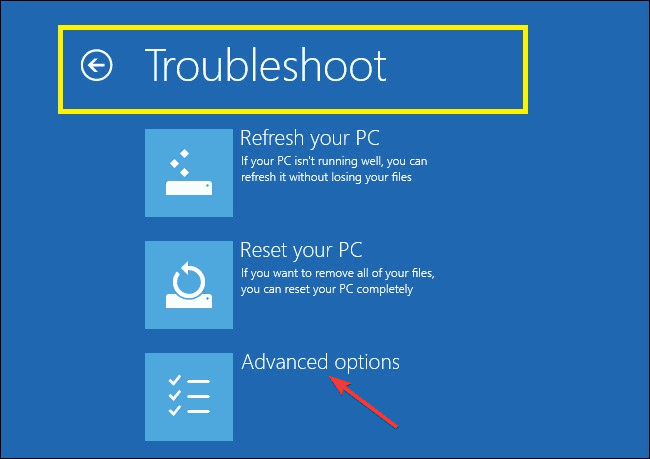
- In the Choose an option screen, click on Troubleshoot.

- Select the Advanced option, and choose Automatic Repair or Startup Repair.

- Then, wait for the Windows Automatic/Startup Repair to be complete.
- Restart your PC, and boot to Windows.
- Attach the second hard drive afterwards.

NOTE
Ensure you already have Windows bootable installation drive or USB with you before you proceed with this fix.
Some PC issues are hard to tackle, especially when it comes to corrupted repositories or missing Windows files. If you are having troubles fixing an error, your system may be partially broken.
We recommend installing Restoro, a tool that will scan your machine and identify what the fault is.
Click here to download and start repairing.
You can also fix the Repairing drive This might take more than 1 hour to complete issue by performing automatic repair/startup repair on your system using a Windows bootable installation DVD.
5. Use System Restore
- Press down the power button until the Automatic Repair message appears.
- Go to Troubleshoot, select Advanced options, and choose System Restore.
- Now, select your username and enter your password.
- Click on Next, select the desired restore point, and follow the on-screen instructions to restore your PC.

- After your PC is restored, check if the problem still appears.
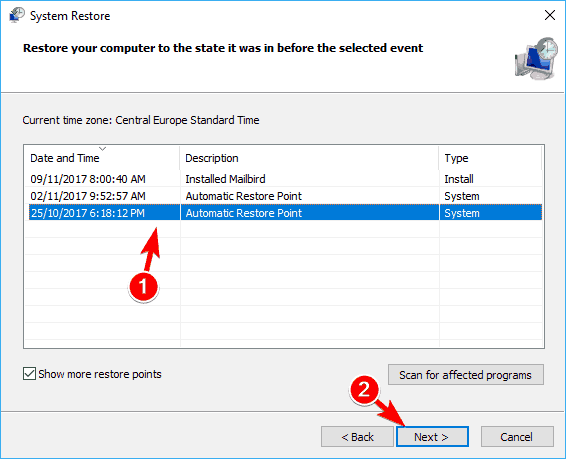
System Restore reinstates your system to a previous state and fix any recent issues, most especially related to the startup issue. Follow the above steps to run system restore on your Windows 10 PC.
6. Install Microsoft Hotfix
- Go to the Microsoft Support link.
- Now, click on the Hotfix download option.
- After download, install the Hotfix by following the prompts.
- Restart your PC afterwards.
Some Windows users have reported great success in resolving the problem by installing Microsoft Hotfix, so it’s worth giving it a try.
However, if this method does not fix the problem, you may proceed to the next method.
7. Roll back to Windows 8.1/7
- Press the Windows Key + I to open the Settings app.
- Go to the Update & security menu.
- Select the Recovery tab, and click on the button Get started.

- Follow the prompts to finish the downgrade processes.
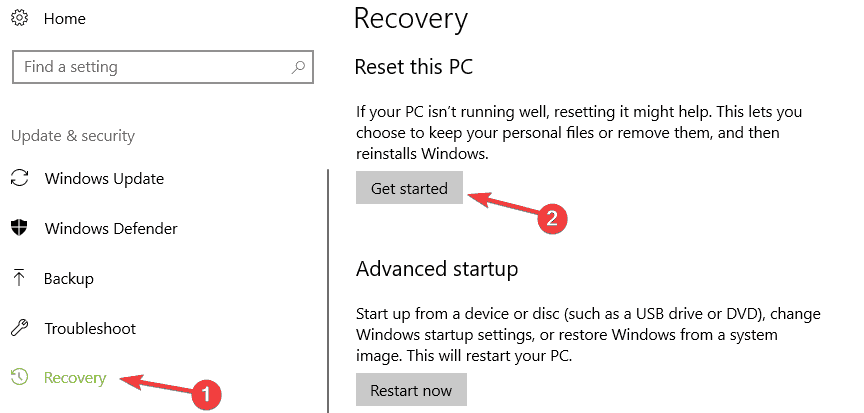
Sometimes, the startup problem might be related to a recent upgrade from Windows 7/8/8.1 to Windows 10.
Hence, you may consider downgrading your Windows OS back to its previous OS, besides this fix won’t take more than 1 hour to complete.
However, you may have to enter Safe Mode in order to downgrade.
- Fix: Restart to repair drive errors on Windows 10/11
- Fix: Automatic Repair couldn’t repair your PC [Windows 10]
8. Rebuild BCD
- Insert the Windows 10 bootable media (USB stick or DVD), and restart your PC.
- Set USB/DVD as the primary boot device. Either by entering the Boot menu (F10, F11, or F12) or from the BIOS settings.
- The loading process of the installation file should start.
- Select the language, time/format, and keyboard input of choice and click the Next button.
- Choose Repair your computer from the bottom left corner.
- Open the Troubleshoot option, and select the Advanced Options.

- Open Command Prompt. Select your account, and enter the password if asked.
- Copy-paste the following commands, and press Enter after each:
bootrec /FixMbrbootrec /FixBootbootrec /ScanOsbootrec /RebuildBcd
Although the BCD (Boot Configuration Data) is rarely affected, it still can get corrupted.
Sometimes, incomplete OS installation or frequent installation of different operating systems results in incomplete BCD, and your PC won’t be able to boot; hence, the BCD corruption.
This solution should finalize the repair procedure, and you should be able to boot your PC to Windows.
Also, if the operating system version is incompatible with Startup Repair, take a closer look at our detailed guide and fix it with ease.
9. Reset this PC
- Hard power off your PC 3 times until the Advanced Recovery environment appears.
- Choose the Advanced options, and select Troubleshoot.
- Click on the Reset this PC option.
- Choose whether you want to keep or delete your files and apps.
- Click Reset to proceed.
Finally, you can fix this problem by resetting your PC. This option is an advanced recovery option that restores your PC to its factory state.
The Repairing drive. This might take more than 1 hour to complete startup error can potentially be fixed by any of the solutions we mentioned above.
If you encounter the message Windows found errors on this drive that need to be repaired, be sure to take a look at our comprehensive guide and fix them in no time.
Also, feel free to share your experience with us and let us know how you were able to tackle the problem using our listed solutions. Comment below if you have any question.
![]()
Newsletter
Did your windows 10 stuck on Repairing disk errors this might take over an hour to complete. Several users report, While turn on the laptop Windows 10 logo pops up and then goes black. After a while, it comes up again with the message “Preparing automatic repair.” Then goes onto “Diagnosing your PC.” Or whatever then goes to the Repairing disk errors part for hours. This issue mostly occurs either if Windows startup files are missing or corrupt. Again sometimes bad sector on a disk drive also cause this problem. If you are also struggling with this problem here are some effective solutions to apply.
This problem mostly occurs if previously windows didn’t shut down properly or Windows 10 computer, Laptop Shutdown unexpectedly due to an interrupted power supply or some other reason. And performing Startup repair from advanced options helps to get rid of this issue.
- Disconnect all non-essential devices that might be attached to your computer, Windows setup might be trying to detect them.
- If you are connected to a network, disconnect this also.
- As we all know, CHKDSK indeed plays a good role in scanning and repairing disk problems. Plus, most of the time, CHKDSK may take a pretty long time to finish. We recommend leaving it until complete the process. But if the “Repairing disk errors” issue persists again on the next boot, you must apply the solutions below.
Perform startup repair
This is the most recommended method you must apply whenever windows 10 fails to start normally. Performing startup repair detects and automatically fixes the problems that prevent Windows 10 to start normally.
As windows won’t start normally, we need windows 10 installation media to access advanced options and perform Startup repair if you don’t have to check how to create windows 10 installation media from here.
- When you are ready with Installation media, please insert it into the DVD drive.
- Then shut down your computer and press “F12” to enter the Boot menu, in which change the boot drive to the installation media.
- When getting a prompt of “Press any key to boot from CD or DVD,” press any key.
- Next, choose the time and keyboard type.
- Subsequently, choose “Repair your computer.”
- Lastly, click “Troubleshooting” > “Advanced option” > “Startup repair”.
- Wait until the system is repaired.
- Then remove the installation/repair disc or USB drive and restart the system and let Windows 10 boot normally.

Rebuild BCD
If startup repair fails to fix the problem, then again access advanced options and select command prompt. Here on the advanced command prompt window, perform the command below to repair and rebuild Boot Configuration Data File.
- Bootrec /fixmbr
- Bootrec /fixboot
- Bootrec /rebuildbcd
- Bootrec /scanos
Restart windows and check, this time windows 10 started normally.

Boot into safe mode
If both options fail to fix the problem, Windows 10 is still stuck on repairing disk errors, then Boot into safe mode. This is a window diagnostic mode that only allows essential system programs and services to start up at boot and allows to perform troubleshooting steps to fix different problems.
To boot into safe mode:
- Again open advanced options,
- This time click startup settings,
- Click on the restart, then press F4 to safe mode and F5 to safe mode with networking.

Check for corrupted system files
This is another common problem behind this problem. If, due to some reason, system files are corrupted or missing you may face different problems include Windows 10 fails to start normally or being stuck for hours for repairing windows 10. We recommend run DISM command and system file checker utility that scan and restores missing system files with the correct one.
- Search for cmd, Right-click on the command prompt and select run as administrator,
- now run DISM restore health command DISM /Online /Cleanup-Image /RestoreHealth
- Then after run the system file checker utility command sfc /scannow
- this will detect the system for missing corrupted system files if found any the SFC utility automatically restores them from %WinDir%System32dllcache
- Restart windows after complete the scanning process.
- Now check Windows start normally.

Also, we recommend manually run chkdks utility with advanced parameters /f /r to detect and fix disk drive errors.
How to stop disk repair windows 10
If you are looking to completely eliminate this Windows 10 Startup disk repair, “repairing disk errors might take over an hour to complete,” Here follow the steps below.
- Boot from installation media and skip the installation screen.
- On the next screen, press Shift + F10 keyboard shortcut to open the command prompt,
- Type command bcdedit and press enter key.
- You will see a list of boot options with its {GUID} identifiers. Look for the one containing the line resumeobject.
- Note or copy the identifier which contains the resumeobject item.
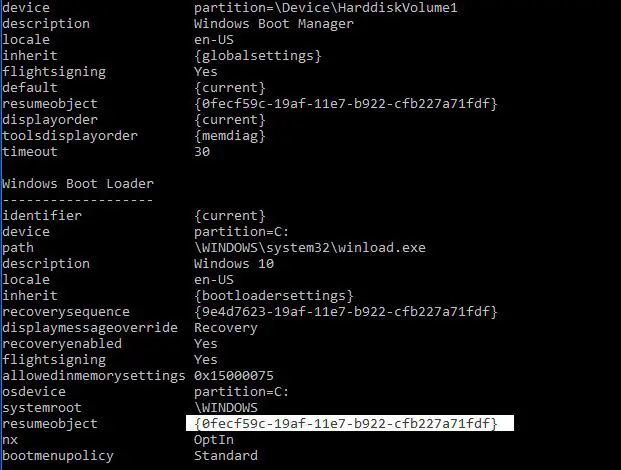
Type the following command And hit enter to execute the command.
bcdedit /set {GUID} recoveryenabled No
Note: In the above command, substitute {GUID} by the identifier you copied earlier.
This will you just disable the automatic recovery feature for the installed operating system.
Did these solutions help to fix repairing disk errors in windows 10? Let us know in the comments below, also read:
- Start menu not working after Windows 10 Update? Here is how to fix
- 5 solutions to fix page fault in nonpaged area windows 10 boot loop
- DISM error 0x800f081f, source files could not be found on windows 10
- How to Fix Google chrome Class not Registered Error on Windows 10
- Solved: Driver_power_state_failure Blue Screen Error on Windows 10
Some Windows users are reporting an issue in which their computer gets stuck at Repairing disk errors, This might take an hour to complete screen. It usually occurs due to Hard Disk issues. Disk errors can occur for a number of reasons, but they generally happen due to a physical failure, such as a scratched disc or bad sectors on the disk. Recently some users reported experiencing an error message when they start their Windows.

What is Repairing disk errors this might take an hour?
Disk errors are a common experience on your hard drive. They’re usually not critical, and they can be fixed in just a few minutes. But sometimes you might need to fix disk errors that take a long time. This is because there’s another problem with your hard drive or the computer’s configuration. But before you go out and buy a new hard drive, let this article show you how to repair disk errors that take an hour.
Windows is stuck on Repairing disk errors
This error occurs because of a potentially failing HDD/SDD. We will be seeing all the solutions to fix the error.
- Wait for a few hours and see
- Remove all external devices
- Restart in Safe Mode and use CMD to run chkdsk
- Run Repair-volume command
- Use System Restore
- Run Automatic Startup Repair
- Repair computer using Installation Media
- Check and replace your Hard Disk
Let us talk about them in detail.
To carry out some of these operations, you need to boot into Safe Mode or to the Advanced Startup Options screen.
1] Wait for a few hours and see
You need to first wait for a few hours or overnight as sometimes, the computer will automatically rectify the error. This is somewhat obvious if you read the error message appearing on your screen. So, wait for some time before moving to the next solution.
2] Remove all external devices
There is a possibility that Windows could detect the external drive as the system boot partition, causing your PC to crash upon booting. To avoid this problem, you first need to disconnect all external drives attached to your computer and then restart your computer. Now check if your PC can boot normally after it starts. If this works, reconnect all your external devices one by one and check which one is causing the problem. When you find the faulty device, replace that with a new one.
Related: How to stop or cancel ChkDsk in Windows.
3] Restart in Safe Mode and use CMD to run chkdsk
Run CHKDSK to repair bad sectors of the Hard Drive. If you know that there are bad sectors in your Hard Drive, try using the CHKDSK command of Command Prompt to rectify the issue.
We know that your computer is not booting, therefore, we have given the following steps to run the command.
- Hold the Shift button and select Power > Restart.
- Go to Choose an option screen > Troubleshoot > Advanced options > Startup Settings > Restart.
- Now, select Safe Mode.
- Open Command Prompt and execute the following command.
chkdsk /f C:
This will run the command for the “C” or System drive.
Related: ChkDsk stuck at a particular % or hangs at some Stage.
4] Run Repair-volume command
You could run the repair-volume command using Windows PowerShell and see if it helps. These are steps you can use to accomplish this:
Before you go to the steps, note down the drive letter of your external drive.
- Open the elevated Windows PowerShell window on your computer
- Type the following command and press Enter:-
Repair-Volume drive-letter –Scan
Please replace “drive-letter” with your original drive letter in the command line above
- Now run the following commands:
Repair-Volume drive-letter –OfflineScanAndFix
Repair-Volume drive-letter –SpotFix
- Once you complete the steps, wait until the scanning process is complete. Restart your computer when it’s finished.
5] Use System Restore
If you have created a System Restore point, try using it to fix the issue. You can use the following steps to do that.
- Download the Windows 10 ISO file and use a tool to make your USB bootable.
- Select Repair your computer > Troubleshoot > Advanced option > System Restore.
Finally, perform the System Restore and see if the issue is resolved.
6] Run Automatic Startup Repair
If you don’t have a System Restore point, you can run Automatic Startup Repair. To do that, you have to first force Shutdown your computer and then when it starts again, press the power button to shut it down. Do this for 2-3 iterations and you will see the “Preparing Automatic Repair” screen.
If the Automatic Repair is capable of fixing the issue, it will automatically do that you rectify the issue for you.
7] Repair OS using Installation Media
If nothing works, you need to do is repair your computer using Installation Media.
This won’t delete your files, so, you can do that without any worry.
8] Check and replace your Hard Disk
If repairing didn’t work, try checking your Hard Disk, and see if it has malfunctioned. Unfortunately, if your hard disk is irreparable, you have to get a new one.
You can use WMIC to check Hard Disk Health. But since your computer is not booting, you have to plug your Hard Disk into a different system and check its health.
Related: The disk does not have enough space to replace bad clusters
How long does Repairing disk errors take in Windows 10?
It normally takes 10-15 minutes depending on the Disk size and state. But as you can see in the error message itself that it may take an hour to finish – but sometimes, you have to wait for a day before starting the troubleshooting process. So, do that and check if the issue persists. If it does not get fixed automatically, you can refer to the aforementioned solutions.
How do I fix the Hard Disk error?
If you are sure that Hard Disk has malfunctioned, there is always a way to fix the issue. There is a command that you can run to rectify the issue. You need to run the CHKDSK command (aforementioned) to fix the Hard Disk error on your computer.
What causes Repairing disk errors?
The most common cause for repairs is system file corruption or registry error. When these files are corrupted, Windows is unable to run, which causes the error message to pop up. And since Windows 10 is mostly reliant on system files, it’s pretty easy for it to malfunction when they get corrupted. Some other common causes include malware infection, stuck keys in keyboard or mouse, hard drive failure.
Related:
- Fix Non-system disk or disk error Black screen
- The selected disk is not a fixed MBR disk message.