![]()
Tell us about your setup:
- What iDevice are you using?
- On what version of iOS is it?
- What version of checkra1n are you using? GUI or CLI?
- What is your host system (OS version? Hackintosh? VM? etc.)?
- How are you connecting to the device (USB-A? USB-C? Apple/3rd party cable? Through a USB hub?)?
What are the steps to reproduce the issue?
- 5s
- 12.4.3
- 0.9.8 (Try both GUI & CLI
- XUbuntu live
- USB-A
…
What do you expect, and what is happening instead?
Stuck at Right Before trigger (this is the real bug setup) about 6 min after that i just reboot
Any other info, error logs, screenshots, …?

![]()
Same with 5s running 12.4 on Arch Linux.
![]()
Same here, Ubuntu 19.10, iphone 7 Ios 13.3. don’t know what to do.
![]()
same here, stuck like that…
im using cli mode with argument: checkra1n -c -v
stuck like that stage… but i forgot to take pics..
i see
blablabala… xfer
in last line
btw im using lubuntu 16.04 64 bit (live mode) UEFI
iPhone 5s 12.4.4
![]()
Same here on Arch Linux.
Kernel logs show:
usb 1-1: usbfs: process 47350 (checkra1n) did not claim interface 0 before use
usb 1-1: usbfs: USBDEVFS_CONTROL failed cmd checkra1n rqt 0 rq 0 len 1280 ret -110
iPhone SE 13.1.1
edit: Swapping usb ports a few times seems to have resolved the issue.
![]()
Same thing here. iPhone 5s, iOS 12.4, kubuntu 18.04
![]()
Same here.
iPad Mini 2 iOS 12.4.3
Unetbootin , Ubuntu Desktop Japanese Remix
![]()
Same here,
iPad Air
iOS 12.4.5
Ubuntu
![]()
Same here.
iPhone 7
iOS 12.4.1
Checkra1n 0.9.8 CLI version
Ubuntu
Usb A (Original Apple Ligthning)
![]()
Same here. What I can see is that we all are trying on ios 12.x devices.
![]()
![]()
Same here!
iPhone 6s
iOS 13.3
Ubuntu
Checkra1n 0.9.8 CLI Version
![]()
I was running into the same problem.
(6s, iOS 13.3, Ubuntu)
AHCI was disabled in my bootloader (grub).
Make sure AHCI is enabled in your BIOS and your bootloader.
It worked for me afterwards
![]()
![]()
i had the same issue iphone7 ios 12.4 on xubuntu , tried again on kali and it worked
![]()
Same! It seems that the issue is having an iPhone 5s
![]()
Same exact issue.
iPhone 8
12.4.1
Ubuntu
Also, it wasn’t responding even to button combos to escape dfu mode. Starting to restore the device broke it out of the mode.
![]()
![]()
Same here on Arch Linux.
Kernel logs show:
usb 1-1: usbfs: process 47350 (checkra1n) did not claim interface 0 before use
usb 1-1: usbfs: USBDEVFS_CONTROL failed cmd checkra1n rqt 0 rq 0 len 1280 ret -110
iPhone SE 13.1.1edit: Swapping usb ports a few times seems to have resolved the issue.
After these errors I see that in kernel logs
INFO: task checkra1n:9733 blocked for more than 120 seconds.
Tainted: G C 5.0.0-23-generic #24~18.04.1-Ubuntu
«echo 0 > /proc/sys/kernel/hung_task_timeout_secs» disables this message.
checkra1n D 0 9733 9654 0x00000000
Call Trace:
__schedule+0x2bd/0x850
schedule+0x2c/0x70
schedule_timeout+0x1db/0x360
? __next_timer_interrupt+0xe0/0xe0
wait_for_completion_timeout+0xb3/0x140
? wake_up_q+0x80/0x80
usb_start_wait_urb+0x8c/0x180
usb_control_msg+0xdc/0x140
proc_control+0x144/0x3e0
usbdev_do_ioctl+0x9e3/0x1180
? __check_object_size+0xd6/0x1a0
usbdev_ioctl+0xe/0x20
do_vfs_ioctl+0xa9/0x640
? putname+0x4c/0x60
ksys_ioctl+0x75/0x80
__x64_sys_ioctl+0x1a/0x20
do_syscall_64+0x5a/0x120
entry_SYSCALL_64_after_hwframe+0x44/0xa9
RIP: 0033:0x7f7e00a265d7
Code: Bad RIP value.
RSP: 002b:00007f7df3ffd988 EFLAGS: 00000246 ORIG_RAX: 0000000000000010
RAX: ffffffffffffffda RBX: 000000000000000c RCX: 00007f7e00a265d7
RDX: 00007f7df3ffd9b0 RSI: 00000000c0185500 RDI: 000000000000000c
RBP: 00007f7df3ffda90 R08: 0000000000000000 R09: 0000000000000004
R10: 0000000000a54b4b R11: 0000000000000246 R12: 00000000018a12b0
R13: 00000000f3c2b618 R14: 0000000000000040 R15: 0000000001841c60
BTW tried on Mac Mini on Catalina and it worked. Tried different USB ports.
iPad mini with Retina display, iOS 12.4
Ubuntu 18.10
![]()
also occurring on ATV4, on tvOS 13.3.1
xubuntu 18.04.1
checkra1n 0.9.8 cli version
had to unplug the device from power to get it out of recovery/DFU
![]()
Same here
iDevice: iPad Air 1
checkra1n: 0.9.8
Distro: Manjaro
uname -a:
Linux (hostname) 5.5.0-1-MANJARO #1 SMP PREEMPT Mon Jan 27 09:39:12 UTC 2020 x86_64 GNU/Linux
![]()
After these errors I see that in kernel logs
…
…
BTW tried on Mac Mini on Catalina and it worked. Tried different USB ports.
iPad mini with Retina display, iOS 12.4
Ubuntu 18.10
Strange question, do you have a secondary iDevice?
I did manage to successfully jailbreak my iPhoneSE using Arch and the checkra1n binary.
I initially thought that the reason I was successful was because of all the usb port swapping that I did, but I’m thinking it may have had something to do with the fact that I connected and disconnected my other iPhone (7) after the failed attempt to jailbreak my SE.
I then ran the checkra1n binary again on my SE with complete success.
iPhone 7 13.3.1
iPhone SE 13.1.1
![]()
Strange question, do you have a secondary iDevice?
Unfortunately not.
BTW Did everyone notice that almost everywho here`s got a linux kernel version 5? Latest ubuntu comes with 5 kernel. Will try to do it with old Debian. However, a lot of people successfully done it on 18.10. And Arch seems to be affected too.
edit: kernel 4.19 have that issue too.
![]()
You have to write „sudo apt-get install checkra1n“ in terminal.
Of course also disable Passcode and sign out from Icloud before trying to jailbreak
![]()
You have to write „sudo apt-get install checkra1n“ in terminal.
Of course also disable Passcode and sign out from Icloud before trying to jailbreak
Of course I installed checkra1n properly.
Tried it, but same thing. It has something to deal with USB controllers. Maybe. Or it`s just a bug.
![]()
Quick update: got to Download Mode: when it stucked I quickly pulled cable out and in. But unfortunately gets stuck at «allocating static region for rdsk». Will research further
![]()
Same device, same error, don’t know why
![]()
Same issue, I’ve tried multiple cables, three types of usb ports, all USB-A on Xubuntu 18.04LTS
I installed the current package, and tried both the GUI and CLI.
Included all the relevant info from the kernel log for the usb device and the whole process of using checkra1n.
kern2.txt
![]()
usbfs: USBDEVFS_CONTROL failed cmd checkra1n rqt 128 rq 6 len 65 ret -110
Yep, seems that’s the bug itself. My friend did the same thing with iPhone 7 on Xubuntu 18.04, jailbreak was successful and that strings never appeared in kernel log. Now we need(not actually we, but checkra1n devs since it’s closed source) to find the bug. But unfortunately the fix will probably take a long time. By the way, on Mac running Catalina latest version works.
edit: long time means at least a couple of days.
![]()
Disable your passcode that worked for me
![]()
Unfortunately it doesn’t work for me.
Tried it on my friends pc with AMD platform, means on X470 chipset and still this errors on my iPad. However my friend successfully jailbreak his iPhone 7.
edit: strange thing that it works on my Mac Mini. So that bug is stick to Linux.
![]()
![]()
Try this i was stuck trying all this other crap 3 days myself. This worked first try 4 separate devices different combo of cables and ports. All on 13.3 from iPhone 7, 8+, X, iPad air2 https://github.com/foxlet/bootra1n/blob/master/README.md
That would do the trick!!!!
Thank you very very much, I was lost…
Tried with different pc, different cables, different ios, downgrade…
iPhone 7, 13.3
![]()
Did it work for you?
…
Sent from my iPhone
On Feb 9, 2020, at 4:55 AM, Arkaddin ***@***.***> wrote:
Try this i was stuck trying all this other crap 3 days myself. This worked first try 4 separate devices different combo of cables and ports. All on 13.3 from iPhone 7, 8+, X, iPad air2 https://github.com/foxlet/bootra1n/blob/master/README.md
That would do the trick!!!!
Thank you very very much, I was lost…
Tried with different pc, different cables, different ios, downgrade…
iPhone 7, 13.3
—
You are receiving this because you commented.
Reply to this email directly, view it on GitHub, or unsubscribe.
![]()
Yes truff1ep1g it worked perfectly,
I commented just to thank you and leaving a note hoping that will help others
I saw a lot of posts of people in similar situation
I lost my previous jailbreak status (unc0ver) due to a unaspected reboot
I update from 12 and was having «_irec_handle_device_add: failed to get string descriptor» error… no idea why except something not quite correct from my
previous jailbreak (i didn’t have the opportunity to do a RootFS)
Thanks again
![]()
Sweet. After i spent
A few hours adding repos and tweaks on my phone and iPad. I went into every thread (almost every thread). And posted that at the bottom. I just wanted to get it to those who appeared that they were having the same issues as me. Also I was hoping to steal away some viewers from these two guys on YouTube that were getting so much clickbait adding new tutorials claiming to have fixed the errors. New videos everyday. And
You could read the comments and see the same amount of people having the same problems so obviously they weren’t fixing anything Anyways I should shut up. On my way to my step son so to speak. Otw to his 22 birthday lunch or dinner or whatever. I’m the car with his sister and my headache. Take it easy. Keep a usb handy in case u need to reboot. Ha.
…
Sent from my iPhone
On Feb 9, 2020, at 12:08 PM, Arkaddin ***@***.***> wrote:
Yes truff1ep1g it worked perfectly,
I commented just to thank you and leaving a note hoping that will help others
I saw a lot of posts of people in similar situation
I lost my previous jailbreak status (unc0ver) due to a unaspected reboot
I update from 12 and was having «_irec_handle_device_add: failed to get string descriptor» error… no idea why except something not quite correct from my
previous jailbreak (i didn’t have the opportunity to do a RootFS)
Thanks again
—
You are receiving this because you commented.
Reply to this email directly, view it on GitHub, or unsubscribe.
![]()
Keep a usb handy in case u need to reboot
Already have…
Installed a problematic tweak,
Used the method once to go in Safe Mode and uninstall the tweak
and a second time to re-jailbreak
works perfectly
Now I’m satisfied… I take a break in installing things, enjoy my phone…
Thanks
![]()
Right. I here ya. It has been quite a few years since I had been on iOS much less jailbreaking. Not since the iPhone 6. I switched to android while back and liked the open source nature of it. Man nothing’s like an older nexus or note rooted with Kali nethunter installed. So easy to copy and paste Lazy scripts or run Ruckey on that thing. WiFi security forces the most part is a joke. Everywhere u scan the network names are all “myspectrumWiFi90” etc. and u know if they left the name they left the password the same too. Right off the sticker on the router knock em off wait for them to handshake again and hello airdump what’s this u have for me? Encrypted passwords? My neighbors like porn you say? And playing Fortnite? kids stay away from next door!
…
Sent from my iPhone
On Feb 11, 2020, at 7:08 AM, Arkaddin ***@***.***> wrote:
Keep a usb handy in case u need to reboot
Already have…
Installed a problematic tweak,
Used the method once to go in Safe Mode and uninstall the tweak
and a second time to re-jailbreak
works perfectly
Now I’m satisfied… I take a break in installing things, enjoy my phone…
Thanks
—
You are receiving this because you commented.
Reply to this email directly, view it on GitHub, or unsubscribe.
![]()
Same issue on a PocketBeagle with debian 9 IOT for Beaglebone. However, sometimes it does work.
Updated to Debian 10. Now I get this log:
https://pastebin.com/QAyFmEba
Number one was successful, number 2 (rebooted after first attempt) hangs.
![]()
Same exact issue.
iPhone 8
12.4.1
Ubuntu
Also, it wasn’t responding even to button combos to escape dfu mode. Starting to restore the device broke it out of the mode.
just use unc0ver ios 11 to 12.4.1
![]()
This is a known issue. #984
![]()
Marking this as duplicate of #984 (this issue is older, but the other one is more generic and thoroughly documented).
![]()
checkra1n
locked and limited conversation to collaborators
Mar 21, 2020

Не так давно был выпущен джейлбрейк Checkra1n v0.10.1 разработчиком Джими Бишопом, но только для операционной системы Linux и macOS.
Но как же установить новую версию джейлбрейка Checkra1n через Windows и взломать свое устройство на iOS? Давайте разберемся!
Не стоит пугаться инструкции которая будет ниже, самое главное набраться немного терпения и выпрямить руки, и подготовить флешку. Проверил лично на своем гаджете, он был взломан. Так что для вас взломаю его еще раз.
1. Качаем Live версию системы Linux. Я лично взял Kali Linux (версия Live написана возле самого названия и системы для которой она предназначена)
2. Качаем программу через которую будем записывать скачанный ISO-файл на флешку. Предпочитаю Rufus, не раз спасала программа.
3. Начинаем установку. Вставляем флешку (не забудьте сохранить нужные файлы на свой компьютер), и запускаем ранее скачанную программу Rufus.
- Выбираем флешку на которую будем записывать наш Linux.
- Выбираем ранее скачанный ISO файл.
- Жмем старт.

- Когда программа спросит в каком формате записать образ, выбираем — DD-образ.

- Ждем окончания установки дистрибутива Linux на флешку. Занимает определенное время.
4. После того как установка была завершена, перезагружаем компьютер, и жмем F8 на клавиатуре, пока не будет предложено с какого устройства сделать загрузку.
- Выбираем флешку на которую устанавливали наш Linux. В моем случае это Leef Bridge с 32 Гб и жмем на клавишу “Enter”.

- Загрузилось меню? Смело жмем на первую строчку.

Самую главную задачу мы уже сделали. Мы уже в Linux, и осталось совсем чуть-чуть, что бы мы могла взломать наше устройство на iOS и установить на него джейлбрейк. Приступим.
- Первое что нам нужно, это надо запустить командную строку, в системе Linux называется Terminal. Его можно найти или в пуске, или уже в панели загруженных задач. Ярлык выглядит так:
![]()
- Далее вводим команды. Если вы читаете статью, и еще не приступили к установке, советую вам эту страницу сохранить и скопировать команды, что легче было установить джейлбрейк Checkra1n.
Первая команда:
echo “deb https://assets.checkra.in/debian /” | sudo tee -a /etc/apt/sources.list

Вторая команда:
sudo apt-key adv –fetch-keys https://assets.checkra.in/debian/archive.key

Третья команда:
sudo apt update

Четвертая команда:
sudo apt-get install checkra1n
- Когда команда спросит установить пакет или нет, нажмите на клавиатуре “Y”

Что-бы запустить джейлбрейк Checkra1n, нужно использовать уже следующую команду:
sudo /usr/bin/checkra1n -g
Увидели такое окно — радуемся! Все сделано правильно!

Самое тяжелое закончено! Осталось пару минут чтоб порадоваться взлому вашего устройства на iOS системе.
Запуск и установка джейлбрейка Checkra1n
Основная установка завершена, но что бы установить Checkra1n нужно пару манипуляций. Давайте же разберем их.
1. Жмем на открывшемся окне кнопку “Options” и ставим галку на “Allow untested iOS/iPadOS/tvOS versions”

2. Подключаем устройство и жмем далее.
3. Сама программа уведомит нас что перезагрузит устройство и введет его в режим восстановления.

4. Когда Checkra1n переведет ваш девайс в DFU, он сам же предложит установить джейбрейк, нужно нажать на кнопку “Start” и внимательно смотреть на экран, и зажимать кнопки которые просит программа (в моей версии iPhone X).

Как будет завершена установка, значит это всё. Можно перезагружать компьютер и открывать свой джейлбрейк Checkra1n на устройстве который мы загрузили благодаря Windows системе, хоть и через танцы с бубном.
- Находим ярлык Checkra1n и жмем Install Cydia.
Не забывайте, после каждой перезагрузки джелбрейк слетает, так что советую вас сохранить флешку!
Поделиться ссылкой:
There has been a lot of excitement about the newly released checkra1n jailbreak, which allows certain devices to be jailbroken on the latest version of iOS. It is easy to forget however, that in its current form the checkra1n jailbreak is only an early beta, and therefore it is not recommended to use it on a primary device.
If you want to use checkra1n, you’ll most likely have no problems using it. However, if you’re reading this article then you must be one of the unlucky people experiencing issues.
Error -20
It has been reported that this error can be caused by the lightning cable being used to connect the device to your computer. Try a different cable, and if you’re using a Lightning to USB-C cable, try using a Lighting to USB-A cable instead.
The checkra1n development team officially stated on Twitter that the use of Lightning to USB-C cables could cause problems entering DFU mode.

Unable to Boot Into DFU Mode
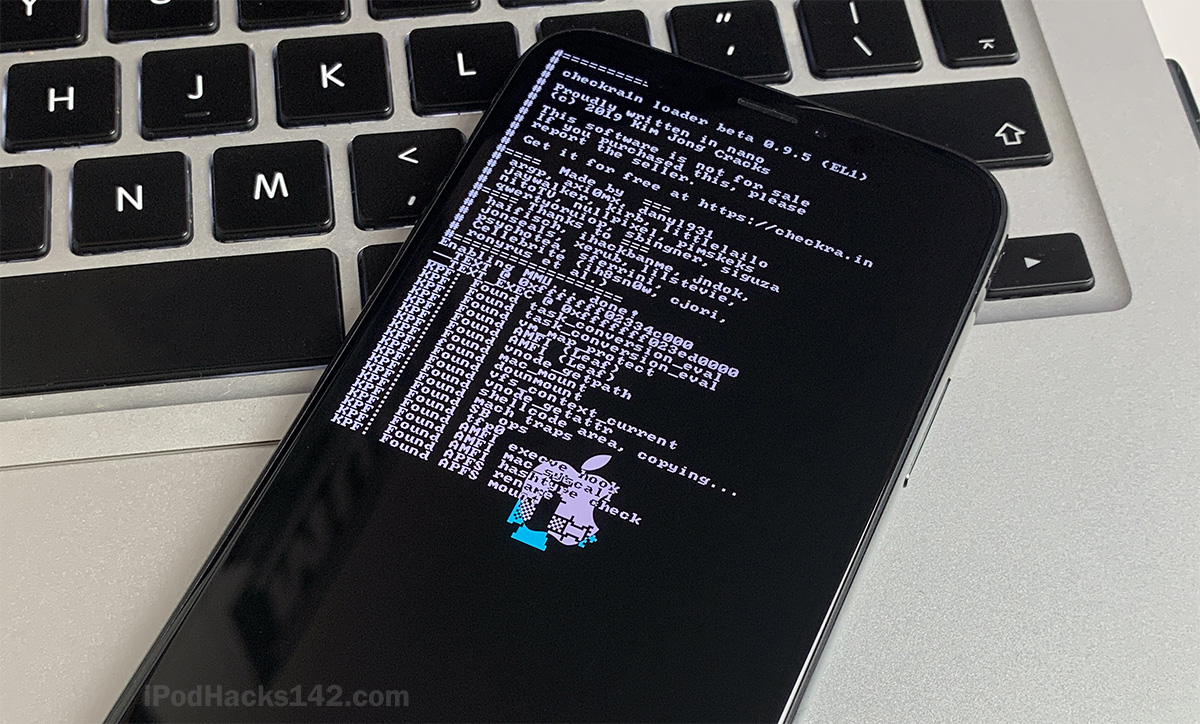
I have personally found that the DFU instructions in the first few versions of checkra1n were incorrect and did not work. However, as of version 0.9.5 the instructions have been fixed, so as long as you do exactly as they say you shouldn’t have any issues.
If you do have trouble booting into DFU mode, the cable you’re using could be the cause. Try a different cable, and if you’re using a Lightning to USB-C cable, try using a Lighting to USB-A cable instead.
Device or iOS Version Not Supported
The checkm8 bootrom exploit used by checkra1n only works with devices using an A5 to A11 processor. This basically means that newer devices including the iPhone Xs and iPhone 11 will never be supported by this jailbreak. Please see the list below of unsupported devices.
- iPhone 11 Pro
- iPhone 11
- iPhone Xs
- iPhone Xr
- iPhone SE (2nd generation)
- iPad Pro 3
- iPad Pro 4
- iPad Air 3
- iPad Mini 5
- iPad 7
Problem Not Listed?
The first thing to check is that you are using the latest version of checkra1n. During development, new versions are being released constantly to fix bugs. Download the latest version available and try the jailbreak again.
If you’re still experiencing issues with the latest version fo checkra1n, leave a comment below and either myself or another user may be able to help.
ALSO SEE: How to Jailbreak iOS 13 – 13.2.2 using checkra1n on iPhone, iPad or iPod touch