$begingroup$
Using rigify when generating the rig I get this error message Does someone know how I can fix this I don´t want to start it all over :_C
asked Mar 12, 2020 at 19:09
![]()
$endgroup$
1
$begingroup$
This worked for me…
I went to Bone Properties for Spine004.
‘Inherit Rotation’ was checked, I unchecked it.
…no more Error
answered Aug 19, 2020 at 20:29
![]()
$endgroup$
$begingroup$
Select the spine004 bone in edit mode, hit Alt + P and select Disconnect Bone.
![]()
answered Apr 8, 2020 at 22:01
![]()
$endgroup$
$begingroup$
The same things occurred to me. I used Blender 2.90. What worked for me: delete the problematic bone. Select Spine 3 and 5 (the spheres at the end of missing spine 4) and click F. Rename the bone to Spine 4. Save, go back to object mode, and try rigifying again. It should work now. Cheers.
answered Nov 8, 2020 at 14:32
![]()
$endgroup$
$begingroup$
You’ll have to use the original 2.80 Blender build to avoid this error. It doesn’t work in 2.83 nor 2.82, and not even in the final 2.81 version (although some interim 2.81 builds appear to be ok).
answered May 8, 2020 at 15:06
![]()
$endgroup$
$begingroup$
Had same issue. Here’s what I did to fix it & successfully generate a rig:
- Go into edit mode.
- Select the lower joint spine004 (around neck area).
- While this above is selected, hold the Shift key & select the top joint of Spine003.
- While both joints are now selected (highlighted), click the F key to create a new bone that will connect your selection OR right-click to open up a menu & select «Fill Between Joints».
answered Aug 15, 2020 at 7:56
![]()
$endgroup$
$begingroup$
I deleted the problematic bone, then selected the bones on both sides of the empty space, then pressed F.
![]()
answered Oct 7, 2020 at 15:41
![]()
AnjAnj
111 silver badge3 bronze badges
$endgroup$
Содержание
- Blender rigify error cannot connect chain
- Blender
- Blender rigify error cannot connect chain
- Blender
- RIGIFY ERROR: Bone ‘spine.004’: Cannot connect chain — bone position
- 2 ответов
- Похожие вопросы
- Blender rigify error cannot connect chain
Blender rigify error cannot connect chain


Blender


From the error given, I must ask; Was the neck bone in the chain moved from the correct position?
Some of the Rigify bones aren’t connected, but are parented with offset. And as such, moving ends without moving the parent ends might mess it up. Save a copy in case something worse happens and move the bone end that’s causing the error to the same position as it’s parent.
If it’s not that, I apologise, but I wouldn’t know what next to try.
Find the «neck» bone, and follow the dotted line (offset parent) to the previous bone.
Given the error, the dotted line is not what you want to see.
To remove it, just make sure that the two bone ends are in the exact same position.
To avoid this in the future, select both bone ends and move them together.
Источник
Blender rigify error cannot connect chain
Blender
From the error given, I must ask; Was the neck bone in the chain moved from the correct position?
Some of the Rigify bones aren’t connected, but are parented with offset. And as such, moving ends without moving the parent ends might mess it up. Save a copy in case something worse happens and move the bone end that’s causing the error to the same position as it’s parent.
If it’s not that, I apologise, but I wouldn’t know what next to try.
Some of the Rigify bones aren’t connected, but are parented with offset. And as such, moving ends without moving the parent ends might mess it up. Save a copy in case something worse happens and move the bone end that’s causing the error to the same position as it’s parent.
If it’s not that, I apologise, but I wouldn’t know what next to try.
Find the «neck» bone, and follow the dotted line (offset parent) to the previous bone.
Given the error, the dotted line is not what you want to see.
To remove it, just make sure that the two bone ends are in the exact same position.
To avoid this in the future, select both bone ends and move them together.
Источник
RIGIFY ERROR: Bone ‘spine.004’: Cannot connect chain — bone position
is disjoint. Incorrect armature for type ‘chain_rigs’ как решить эту проблему?
2 ответов
Нет соединения между костями шейной области
эээ блин хз что делать
Похожие вопросы

Всем привет! Почему при запекании карты нормалей на лоуполи отображаются странные вырезы, хотя их на хайполи нет.
Скажите пожалуйста как сделать так чтобы объект перестал иметь статус link? Если я нажимаю unlink он просто исчезает.
а как исправить? )
Посоветуйте пожалуйста гайд по гео нодам? Задумал сделать свой генератор sci-fi платформ и панелей.
Добрый день, Боги блендера) подскажите, пожалуйста — как убрать тело под particals что б его не было видно при рендере и как сделать что бы шары друг на друга не залазили? дел.
Товарищи, в Geometry Nodes можно из float цивилизованно сделать boolean? Я вывод Math -> Greater Than соединяю с boolean-входом, это допустимо, но хочется избавиться от пункти.
Ребят.Привет.Помогите пожалуйста.У меня изображение,которое я импортировал в блендер принимает освещение HDRI карты,а как сделать так чтобы не принимало?
Ребятки, кто понимает, вот в аддонах сообщение, он просит удалить эти файлы что в путях прописаны?
Так, а почему вот тут пунктир? Соединяю вектор с вектором же.
когда я пытаюсь анимировать 100 флагов в течение 1 минуты, компьютер застревает, а блендер выключается. Оперативная память: 32 ГБ. Видеокарта: 6 ГБ. Почему так?
Источник
Blender rigify error cannot connect chain


| 4,038 | уникальных посетителей |
| 521 | добавили в избранное |

Learning how to effectively use Rigify took me a lot of time and effort. Most of it was spent searching the Blender forums for answers, trial and error and reverse engineering. I would like to save at least a couple poor souls from having to experience the same fate.
Rigify is a powerful tool that can save you a 3/4 of the entire rigging process with only a small portion of manual tweaking left to do. It automates the process of creating IK/FK controls, creates tweak bones from scratch and allows you to customize each part of it. Learning how to use it is definitely a time saver if you’re interested in e.g. asset ripping or converting models from other platforms (SFM, Garry’s Mod, UE, Unity) to Blender.
With this guide you should be able to create a full functioning rig in less than a day. You’ll also learn a lot about just rigging character models in general, making use of the wide array of quality of life tools Blender provides.
I’m stating this question because I genuinely asked myself this at some point during my first months with Blender. Was a newbie, wanted to skip the time-consuming parts of creating a rig and weight painting it, looked for cheap alternatives to hard work.
The answer is simple. Mixamo was never intended to be used for anything beyond mocap in the first place.
Mixamo and other «generate rig to a model» services are fun to use, especially since they come with their own library of animations perfect for cheap dancing Shrek animations . You can import the character file to Blender and have a freshly generated rig to work with. If you can afford a mocap retargeting addon, it’s a godsend. However, they are frankly quite limited when it comes to what can be done with them if you’re interested in more control over your character model. The only big advantage is their animation library, but what’s the point of those if you’re going to animate the character yourself?
RIGIFY DOES WHAT MIXAMODON’T
I’m basing my knowledgly solely off of Mixamo, since that’s what I’d had the pleasure of using (thanks to a tutorial on YT)
- You can only create a singular simple rig.
- Beyond the initial position of knees, elbows, head etc.. You have no options for custom bones. Want a pair of breast bones and a tail for your hot furry anthro gf? No chance, pal. Anything beyond a simple human shape will not work.
Rigify, on the other hand, can be used for rigging even the wildest of character designs.
Let’s use a Gecko model from Fallout: New Vegas as an example.
Mixamo handled it surprisingly well. However, there are issues. There are multiple weight paint related problems such as with the hips and the shoulders, ending up with a lot of stretching and nasty mesh deformations. Besides that, the rig lacks bones for the tail and toes.
Rigify, in the meantime, can offer a much better result despite the fact the character is far from the standard t-pose. The culmination of generated IK, FK, tweak bones and arguably better automatic weights gives a lot more control over the model.
Can’t exactly make any corrections by hand if anything messes up. While you could arguably fix stuff like the horrid wrist rotation in Blender, that’s not exactly the point of automatic rigging. You want to cut down the manual work as much as possible.
With Rigify you can place all bones by hand, study and fix any issues by being able to return to the metarig at any point in time. Quick and efficient, not nearly as time consuming if you can wrap your head around it.
LAST BUT NOT LEAST.
The rig from such sources has no Inverse Kinematics, no additional tweak bones, no custom shapes, is overall unprepared if you’re looking for something animation-ready. I’m also talking about rigs of models imported from Source Filmmaker, Unreal Engine, Garry’s Mod etc.
Once you use a fully fleshed out Rigify rig, you’ll never want to go back to the primitive ways of rotating each bone of the limb by hand. Get ready to become addicted to Rigifying every single mesh you have in your arsenal.
I don’t own the addon, nor do I understand it to such depth as Rigify, so I can’t really go about comparing the two and state which one is objectively «the best». I can make some light comparisons, though, based on my small experience with it.
On surface level, AutoRig automates the process of generating a metarig kinda like Mixamo, but with more control over the final result. Rigify doesn’t have that, the process of adjusting the metarig remains manual. That’s definitely one advantage worth mentioning.
I have seen and toyed around with some AutoRig Pro rigs and just like with Rigify, and AutoRig will break without the script to run most of its functions. One clear downside it has over Rigify in my opinion is the unintuitive bone naming conventions. With DEF-f_index.01 you can at least tell it’s a DEForm bone. What the hell is a root.x?
I’m certain the addon is worth the price tag. Rigify can most likely offer the same quality, but with more manual work being necessary to reach that level.
In order to make things easier for Rigify, let’s strip the mesh to its basic components and fix anything that could affect the weight painting.
The mesh might be made out of smaller parts that are disconnected from one another even though they shouldn’t be, say, seams that separate the torso from the arms/legs or common stuff like how the Xnalara importer often breaks the mesh down into weird chunks. That can lead to a lot of issues down the line as you apply automatic weights.
Huge warning, BE CAREFUL WHEN MERGING BY DISTANCE, ESPECIALLY WITH THE VERTICES OF THE LIPS. Last thing you want is finding out you accidentally sewn the mouth together! Consider avoiding that part of the mesh altogether unless necesary.
Always, just in case, select the entire mesh (except for the lips in some cases) using A in Edit Mode, then Merge By Distance with settings set to 0.000. Enable Sharp Edges to fix shading issues, especially for geometric objects like weapons.
Doing just that should connect everything together, ranging from hundreds to thousands of vertices. In case it results in 0 merged vertices, it means the mesh is actually okay. Whether’s that’s true or not, you will find out when Parenting with Automatic Weights. That’s explained later down the line.
Make sure that the UV Maps for each object are named the same way. Otherwise the UVs will break and the textures will get messed up irreversibly. The «UV Maps» tab can be found under Object Data Properties, go there and rename your UV Maps to, say, «UVMap».
Shapekeys of the following objects are combined and should mostly remain uncorrupted even after removing doubles.
Recently discovered a neat tool that makes separating the mesh parts a lot easier.
In Edit Mode, select Mesh -> Separate -> By Loose Parts. The mesh will be then automatically separated into all individual parts. Usually those include:
- head mesh
- body mesh
- tongue, teeth
- eyes
- eyelashes
- hair
- clothing
- clothing accessories
- armor pieces
- disconnected arms, legs, depends on the model
- fingernails, toenails
- etc.
It’s best to merge the head and body mesh together and hide everything else except for the eyes/teeth/tongue (needed for the metarig). The clothing and accessories will be applied to the mesh later as seen in the following chapters.
Having hidden everything unnecessary for Rigify, now you should be ready for preparing the metarig.
If the model comes with its own rig/has preexisting vertex groups, you can save a lot of time by having Rigify use those instead! Naturally, this minimizes any issues caused by Automatic Weights by simply depending on them as little as we can.
Make sure the model is parented to the rig or the changes won’t affect its vertex groups! By now I remember 3/4 of the Rigify armature by heart, but you may want to have a metarig on the side to copy.
If the model doesn’t have bones you could use for the tweak bones (upper_arm.R.001, shin.L.001), you can simply ignore those. They’re not necessary and you can even delete them later if they don’t generate well. If you’re having trouble finding the right bone to rename (3 bones in the same spot), peek into the mesh’s vertex groups for reference.
You can skip the finger bones/face bones and leave that to automatic weight painting, unless Rigify completely ♥♥♥♥♥ the bed. Then you can also take the time to rename the original finger bones to counter this issue. It’s always a 50/50 with Blender whether or not any serious issues occur, so it’s good to have a backup plan.
It saves time. As you rename the bones, the vertex groups of the meshes parented to this armature are automatically renamed. If the model comes with separate parts/clothing/accessories, they will all have their vertex groups renamed, too. No need to rename them one by one when you can do all at once.
Once you’re done renaming all the bones you want, make sure to Lock the vertex groups of each mesh so that they’re not overwritten as you apply Automatic Weights. Choose the Lock All option. It also includes those vertex groups you’re not planning to use/haven’t renamed, just in case.
Afterwards, you can Sort By Bone Hierarchy to make this list easier to look through.
And just like that, by cleverly reusing preexisting vertex groups, we’ve saved ourselves a lot of headaches.
For this section, we’ll be using a cheeky bugger from Killing Floor. Exported from the game files using Umodel [www.gildor.org] and imported using a .psk importer addon [github.com]
(If you haven’t done that already, install Rigify. Edit -> User Preferences -> Addons -> type in Rigify and voila!)
Make sure to check if the model is facing the front view (1 on numpad). If that’s not the case, e.g. it’s facing the back view, enter top view and rotate it by typing in R and then 180. We’re doing this simply to make things easier for ourselves.
Press Shift+S -> Cursor to World Origin.
Once that’s done, select the rig (not the mesh) and press Shift+S -> Selection to Cursor. The model should be in the middle of all the axis.
If your mesh is without a rig, you can perform the same action. Just mind the warning in the WHY section.
- It’s generally better to have the model in the middle of the viewport display. That way, if you were to import it to another Blender file, it wouldn’t get lost
- It’s important to have it in the middle so the X-Axis Mirror works as intended.
- If a rig is made out of multiple meshes (head, body, hands, fingernails etc.), if you were to only select the meshes and send them to the cursor, they would all pile up in the middle, ruining the mesh. However, if connected to the rig, they won’t (since the rig controls their transformation).
A temporary solution is to ctrl+j articles of clothing to the main body mesh. They will copy the origin of it and move along with it. Once you’re done moving them, enter Edit Mode, use «L» hotkey to select separate meshes and press «p» to separate them By Selection.
Select the mesh (not the rig) (also select clothing, hair etc.), press alt+p (or go to Object -> Parent) and choose Clear and Keep Transformation. If at any point you resized the rig, say, made it the size of that tiny cube between the model’s feet, disconnecting the mesh from the rig would lead to resetting it back to the giant size.
If you posed the model and want to retain this transformation, Apply the Armature modifier for each mesh affected by it. Will not work if your mesh already has shape keys.
Then select the rig and press X to delete it.
Unless you’re planning on adding custom bones for the accessories, hide any additional content such as clothing, jewelry, guns etc. using the «h» hotkey (alt + h to unhide) or doing it manually in the Outliner. Put them in a separate Collection if possible, just to keep things clean and tidy. You don’t need them right now for the metarig.
- The mesh is connected to an armature, a.k.a. the rig.
If you do any sort of scale, location, rotation changes to the rig and THEN disconnect it from the mesh (or straight up delete it), it will reset all those changes done to the mesh, usually ending up with the model becoming gigantic (notice how small the cube is compared to the model).
However, if you edit the mesh and not the rig, the rig remains the same size. If you were to delete the rig, the mesh wouldn’t reset.
an example of what happens when the mesh and the rig aren’t the same size
Make sure Pivot Point is set to 3D Cursor so the armature spawns at its location.
Having done that, press Shift + A -> Armature.
WHICH ARMATURE FOR WHICH PROJECT
- HUMAN (META-RIG) — HAS HAND FINGERS AND FACE
- ANIMALS — CAT (META-RIG), WOLF (META-RIG). — HAVE PAW FINGERS AND FACE
The armatures listed above are for characters that demand movable fingers/face. However, if your character does not necessarily need those elements, you can either remove them from the rig yourself or use the rigs listed below.
My character will use the HUMAN (META-RIG) with manually removed face bones.
If you’ve done everything correctly up to this point, the armature should spawn at the 3D Cursor.
Make sure you have In Front selected so you can see it at all times.
Check if the rig has been selected. If it is, enter Edit Mode and scale it up to fit the model.
Shoulders are usually the best indicator for the scale.
You can switch the Pivot Point back to Bounding Box Center when editing, we only needed it to place the armature and scale it.
Press N to open up the right sidebar and Tools select X Axis Mirror. It will make mirroring bones much easier.
Let’s explain the workflow of setting up the bones. The face bones have their own separate chapter.
- Make use of the radial selection tool (c hotkey), it’s useful when dealing with fingers and bone connections. Use the scroll on your mouse to change the size of the selected area.
- DON’T LET ANY OF THE BONES DISCONNECT FROM EACH OTHER, OTHERWISE IT WILL LEAD TO THE RIG REFUSING TO GENERATE.
Start with the knees and elbows. Make sure they’re slightly bent so the tool knows which way it’s supposed to bend. Heels should be on the same horizontal line as the toes.
Try and don’t move the palm bones too much, it might disrupt the way the tool weight paints the hand.
Don’t forget to look at them from all angles.
The shoulder bases always stick out at an angle while most armatures have them perfectly horizontal. Adjust them by select the should bone, pressing S, then Z to scale along the Z axis and 0. It should make the bone perfectly straight. Then rotate it accordingly.
If you want to add bones for controlling accessories, small moving parts etc. DON’T USE RIGIFY FOR IT. You can always add bones on top of the rig Rigify generates. It’s much less of a hassle and easier to adjust.
However, if your mesh has things that would benefit from more complex controls (ears, tail) etc. it’s definitely worth giving a try.
Manipulating the rig is quite simple, actually. It’s just a matter of understanding how this tool works behind the scenes.
Certain bones of the rig are given specific Types. Each type of bone (or chain thereof) tells the Rigify script how the bone should bevahe, what set of IK and FK it should receive etc.
You set the Types by entering Pose Mode and selecting specific bones.
For example — limbs.super.finger
It needs a set of at least two bones (starting with the one I selected on the image). It means you can delete the last bone and still have a functional finger rig!
You could get rid of all the fingers except for this one and it would still generate a functional rig AS LONG AS the bones are not disconnected from each other and have appropiate Types.
Using this knowledge you can apply a tail to your hot furry anthro gf and make it as long as you’d like! (you only need to apply a Type to the first bone of the tail, not all of them)
- basic.super_copy — singular bones with 0 extra controls, it basically generates a custom bone shape (better off doing that yourself tbh)
limbs.simple.tentacle — bone chain that rolls up and is flexible, can be stretched using multiple tweak bones
NEW BONES WITHOUT A TYPE WILL NOT BE GENERATED
If the bone doesn’t have a set Type, Rigify ignores it and it will not appear in the rig.
WORK ON ONE SIDE, THEN SYMMETRIZE IT TO THE OTHER
No need to double the amount of work, use the quality of life tools Blender provides. More about Symmetrizing below.
ALWAYS REMEMBER TO PARENT THEM TO APPROPIATE BONES OF THE METARIG, OTHERWISE THEY WON’T MOVE WITH THE RIG
If you’d like to add toes, parent them to the Toe.L/Toe.R. If you’d like to add a tail, parent the base to Spine etc
ALWAYS CHECK ONE BY ONE IF THE NEW BONES WORK WITH «GENERATE RIG» AND IF THE WEIGHT PAINT IS APPLIED CORRECTLY
It will save you a lot of headaches later on.
DON’T BE LAZY. NAME THE CUSTOM BONES
The tool needs this and YOU need this as well.
For the tail, it’s best to name the first bone «Tail» and leave the rest to Blender. As you extrude the bones, it will automatically name new ones:
Tail, Tail.001, Tail.002.
When naming bones that will appear on left or right side, use names that contain side indicators. That way the Symmetrize and X-Axis Mirror will work correctly when editing custom bones.
Let’s take a look at how Rigify names bones.
Small letters instead of capital letters work as well.
Once your left or right side is finished, use the Context Menu («w» hotkey») or go to Armature -> Symmetrize to mirror the bones. If everything has been named correctly they will even automatically parent to their respective bones (toes to Toe.L, toes to Toe.R etc.)
If you’re certain your character would be better off without a face rig or that the face will be posed using shapekeys, you can remove the face rig entirely. Unfortunately you can not keep any part of this rig, it must be either completely intact or removed entirely.
Bones are placed in separate layers. The first layer is dedicated solely to the face. Select it.
Once you have, select the entirety of this rig and delete it. Done!
Hold shift and select layers one by one (or slide on top of them while holding LMB) in order to make them all visible again.
Seeing the face bones for the first time can be a terrifying experience. Besides the stern, pride-shattering stare, the luscious lips and wide ears, the sheer amount of what could go wrong is enough to break a man.
Not you, however. You’ll learn to tame this beast. The pros are worth the cons.
Rigify’s facial rig is both an absolute work of art and trashcan material at the same time — it depends on how you handle the placing of the bones. It can produce a working rig for the face even for most non-anthropomorhic faces. At the same time the result can be a mishmash of stitched together lips, barely working jaw and broken eyelids with disconnected eyelashes. The weight paint of the face will unfortunately always need some manual tweaking.
Make sure to ask yourself this question — do you need a face rig? Could you get better results by uisng shape keys? If your answer to the first question is yes, keep reading this chapter lol
It’s merely a matter of following a couple rules.
However, ask yourself if the rig needs something this advanced. There’s no point in trying to stretch this tool to its limits when you can add a jaw and a pair of eyes yourself or simply using shae keys.
Underneath the fancy UI lies your regular rig. It’s just a matter of finding an appropiate bone, e.g. connecting a jaw bone to «head», eyes to «head».
- You can not delete any part of this rig. If the mesh doesn’t need the ears, just leave them be. You can just not use them, hide them etc.
Maintain symmetry. Try to keep as close to the Z axis as possible.
If the mesh’s head is slightly to the left or right, you’ll notice it doesn’t fit the face rig. The ear will be off, the eye, the temple bones. You can solve this by temporarily moving the mesh a little to the correct side. Once you’re done, simply reset the mesh back into position and (with X-axis mirror disabled), select the face bones and move them.
Mouth corner positioning. Keep the «jaw.» bone near «ear.» bone. Make sure the top and bottom lips bones are no too close to each other so they don’t sew the mouth shut with weight paint. Also, keep the chin. bones inside the mesh so as to minimize automatic weight painting errors (chin. bones weight painting the chest amor etc.) With more advanced meshes (or just meshes in which the bottom lip goes under the top one) you have to unfortunately suck it up and just edit the weight paint by hand in that case.)
Set the eyebrow bones as needed, but keep the forehead bones far away from that area! Preferably place them at the top half of the forehead so they don’t interfere with weight painting the eyebrows.
With a bit of trial and error, you should be able to end up with a good result.
Once you’re generally done with the bones, you can try to create a prototype of the rig.
Enter Object Mode, press ctrl+a and Apply Rotation and Scale. We’re doing this so the rig stays the way it is and doesn’t suddenly shrink when we apply the Armature Deform etc.. That might happen if you scale the armature in Object Mode instead of doing that in Edit Mode.
Go into the Advanced Options to give the rig a name. NEWER VERSIONS OF RIGIFY DON’T HAVE THIS FEATURE ANYMORE 🙁 You need to rename it post-generation
Moment of truth.
Fingers crossed. it worked. You’ll end up with a wonderful looking rig. It’s not connected to the mesh, it doesn’t have vertex groups, it’s just the controls themselves.
If you don’t, if Rigify says something akin to Bone heat weighting: failed to find solution for one or more bones or the rig is mispositioned, please jump to the Troubleshooting section below.
Make sure to check if the finger roll bones are working correctly! Change the Pivot Point to Individual Origins and scale the Orange Finger bones. The green finger bones will follow suit and either clench the hand into a fist or spread the fingers.
If the green finger bones are going sideways or in a wrong direction in general, a fix for this is explained in the Rig Troubleshooting section.
If the finger roll looks like this:
You might have an older version of Rigify. Please update the addon if you haven’t already. I personally never stumbled upon this.
Update: Rigify now has DEF- bones for eyes and teeth. This part used to teach you about using MCH-eye stuff but that’s unnecessary now.
Rigify weight paints eyes in a weird way. The eye, when weight painted automatically, is spread between all individual bones of the eyelids instead of having its own dedicated bone. It’s pretty odd since it does have its own dedicated eye bones. And the teeth, too. None of the mesh except for the eyes/teeth/tongue themselves need to be weight painted to those bones.
- separate the eyes if you haven’t already
- clear all Vertex Groups from the eyes
- add both DEF-eye.L and .R vertex groups
- 100% Assign for respective eyeball.
- (optional) you can glue half-sphere eyes to the sockets by assigning their back edges to DEF-spine.006
Done! The stretchy eyeball syndrome should be fixed.
Same situation as with the eyes for the teeth. This time they’re:
Create them as Vertex Groups for the teeth. Use the UV editor to manually paint the top and bottom sides with 1.000 Weight.
As for the tongue, separate it, then automatic weight paint it again. Remove all vertex groups except for DEF-tongue ones.
Once the rig has been generated, you can hide the metarig for now. You will need it later, so store it somewhere in the background instead of deleting it.
Examine the rig. Turn on In Front in the Armature Tab -> Viewport Display so you can see all bones.
Make sure to check if the bones fit both sides of the mesh, they might not be symmetrical. You can adjust just one side of the armature by returning to the metarig, turning off X-Axis Mirror and editing one side only.
A rig that looks like this NEEDS to be fixed.
Anything akin to that means you either deleted too many bones from somewhere or the new bone chain doesn’t fit the requirements of the Rigify Type you gave it. This specific error is for the limbs.super_finger but there are countless other Rigify Types inside the metarig of yours. If all else fails, just delete it and start over with a fresh metarig.
Read the Adding/Removing Bones section for more detailed info.
Something went wrong when you were posing the fingers in the metarig.
The first simple solution is to clear roll of the finger bones. You can do this by selecting the bones and clicking alt+r. Make sure the flat surface of the octathedral (that’s what the funky bone shape with spheres is called) is facing down. You can also go in edit mode and edit the Roll property of bones in the side panel menu. On top of that, make the fingers in the Metarig bent a little, so Rigify isn’t confused as to which direction they’re supposed to rotate.
Happened to me once, doing the mesh from scratch (or switching to a new .blend file) fixed it somehow.
You can just select it in Object Mode and move it to the mesh by hand. Perhaps you forgot to Apply Rotation and Scale, try applying Location.
If it’s so messed up that the root is somewhere far away from the feet, I’d try and look into the metarig if I messed something up with the spine, the heels. As always, be ready for the occassion that you might just have to redo the whole metarig from scratch.
- Overwriting a preexisting rig will remove any additional bones added to it (for example, adding a normal bone to the generated rig. Separate these new bones from the rig to avoid losing them. Do that by selecting them in Edit Mode and pressing P and choose Separate. Later merge rigs using «Ctrl + J». Remember to parent those bones once you’re done with overwriting.
- The rig must be visible, not hidden, when overwriting it, otherwise something bugs out and the rig completely breaks. E.g. after overwriting the rig is just a root bone.
If the rig looks okay:
Select the mesh, then shift+select the rig. Press ctrl+p and select Armature Deform (connects mesh to the rig a.k.a. the armature) with Automatic Weights. If you utilized preextising vertex groups, double check if they’re locked so they’re not overwritten by accident.
If at that stage Blender spits out an error, look at the Troubleshooting section.
You’ll find most of the solutions here viable for all Rigify rigs.
- The mesh has vertices that aren’t merged to anything, resulting in a gap that the tool doesn’t know what to do with (it can still work even with large gaps, don’t force changes that don’t have to be made)
- Some accessories/clothing/armor/hair are confusing Rigify
- It’s a very complex model with a high poly count
As a universal solution, consider scaling the mesh and the armature, say, by 10 (press S and type in 10) and then parenting them with automatic weights. Doing that should fix the issue If it works, the mesh will probably shrink back to normal size separately from the armature. Scale it by 10 again to fix this.
As stated before, look into stripping the mesh of as much unnecessary parts as possible. Best case scenario would be going from full outfit to underwear. Everything will be added back either by hand or by using Transfer Mesh Data anyway.
Multiple different variables can cause crappy automatic weights:
- The metarig is missing bones.
Missing crucial Rigify Type bones such as limbs.super_palm leads to the tool straight up missing out on information on how to weight paint the rig.
you might have to either recycle the original weight paint of the model or just do the weight painting manually.
- The mesh is triangulated/ too complex for the automatic weights to handle
Meshes that are triangulated and not made out of quads will result with bad weight painting a lot more.
- The mesh has some enabled shape keys
Shape keys are not taken into account when weight painting, if they change the mesh drastically (height, size, position of mesh etc.), the result will look bad unless you apply those shape keys permanently.
- The mesh had not been stripped of smaller unconnected parts
The mesh might be made out of smaller, separate parts, for example bandages, armor pieces etc. As these different pieces pile up, automatic weights are prone to fail more and more.
You can try manually tweaking these parts by selecting them entirely using «L» hotkey and assigning weight. Otherwise separate them from the main body mesh and experiment with Transfer Mesh Data (read the Adding Clothing section). This is an issue that will constatly come up and fixing it by hand takes a lot of time and effort.
Check each vertex group if they aren’t overlapping or controlling wrong parts of the mesh.
For example, pieces of the armor are not attached to any part of the mesh. I can tell from studying the model that they’re supposed to be weight painted to the middle and ring finger.
Once you’ve located the appropiate Vertex Group, enter Edit Mode, select the disjointed mesh with «l», then Assign Weight to it. In this case, 100% Weight is best for armor pieces so as not to make them unrealistically stretch. Usually, though, the general rule is to make it follow the strength of the Weight Paint of the Vertex Group (a.k.a. if upper arm is «yellow», make the disjointed parts that are supposed to be connected to it also «yellow» (somewhere around 0.7-0.8 Weight).
Rigify’s bad reputation often comes from the fact that people who use automatic weight painting don’t clean it up after.
Automatic weight painting in Blender has an issue where it often overreaches how much certain vertex groups control their respective bodyparts. The most common issues are:
- DEF-spine.003 has zero influence on the chest area, leading the mesh to stretch in awful ways as it’s shared between all the smaller bones.
- DEF-thigh bones controlling the other leg/huge chunk of the torso up to the armpit and the crotch
- DEF-pelvis controlling a huge chunk of the torso up to the armpit and the crotch
- DEF-shoulder controlling the neck
- DEF-spine.005/004 controlling half of the head when only .006 should have any control of the head
- DEF-upperarm controlling the chest and not just the, well, upper arm
- DEF-spine having zero influence on the crotch area, making that area stretched and inconsistent when the legs are bent
- DEF-tail bones controlling the waist/torso/sometimes even the hair when its influence should stop at the base of the tail
And the face rig, oh the face rig.
- DEF-ear bones often have some weight paint on the shoulders
- DEF-jaw bones suffer the same issue, but on the chest and the neck
- Realistic eyelashes always look like a mess if you try to automatically weight paint them.
- DEF-forehead bones have too much control over that part of the head, causing it to shrink or inflate when you move the bones around (best visible on a bald head model)
That is without mentioning the plethora of issues that happen when the character is wearing clothing/armor. Automatic weight painting is why it’s so necessary to separate the main mesh from all clothing/accessories/earrings/eyelashes and merge loose vertices.
Due to this I insist you make use of the mesh’s preexisting vertex groups if it has them. It can save a lot of headaches. If you’re in a situation where that isn’t possible, though.
Generally I would resort to two options:
If I need to be precise, I use Vertex Selection to clean up bits and pieces of the rig
I can also use Vertex Selection to check which vertex groups affect a vertex. Makes it easier to hunt down the culprits.
There are two ways to add back clothing to the mesh, either via Transfer Mesh Data or by hand.
In order to apply clothing to the mesh, we’ll be transfering the vertex groups of the main body. We’re doing this instead of Automatic Weights because it guarantees the clothing copies the weight painting of the mesh you’re attaching it to.
With the meshes prepared, first select the clothing then the mesh the vertex groups of which it’s supposed to copy. Go down into Object -> Link/Transfer Data-> Transfer Mesh Data. Add it to your Quick Favorites so it’s available at the press of a button.
Change the tool settings to these:
Data Type — Vertex Groups
Vertex Mapping — Nearest Face Interpolated
Source Layers Selection — All Layers
If the mesh overlapped in certain areas it might lead to incorrect parenting. The best way to prevent this is to just move the vertices apart before weight painting. Otherwise, to try and fix this you can enter Weight Paint Mode of the clothing, enter Vertex Selection and hunt down the individual vertices causing this deformation.
With the vertexes selected, either fix them by hands or use the Smooth tool under the Weight panel. Subset to All Groups and change the Factor until it looks just right.
Some parts of the mesh that shouldn’t stretch, e.g. armor pieces, small accessories, can only need one vertex group to be applied to the mesh.
In that case it’s a matter of studying to which vertex group it should be applied. The chestpiece in this example would work best for DEF-spine.003. I set the Weight to 1.000 to avoid any kind of stretching.
A helm only needs to be connected to DEF-spine.006, pauldrons to DEF-shoulder.L/R, vambraces only to DEF-forearm.001.L/R and so on, so forth.
Rigify has plenty of options that make posing or animating easier. Most of them are controlled by the .py script that generates alongside the rig.
Rig Layers, along with other Rigify layers, are hidden in the viewport’s right sidebar, under the Items tab.
You can add more layers to this list, I address this in its own separate chapter in the guide.
With the IK/FK bone selected you may dynamically change and animate transitioning between IK/FK.
You can also snap (copy the pose) IK to FK and vice versa, allowing for seamless movement.
You can also toggle controlling the elbow movement with either the default «automatic» rotation or by using a pole target that you move by hand. The pole target is a preferred option for e.g. scenes where the character has their elbows on the table or when the default «automatic» option is just broken.
On top of it all, you can switch the parent of the IK bones and the pole targets. However, a word of warning, animating this is possible but it breaks apart very easily. Do not experiment with this on a project without at least a backup file.
Using the Rubber Tweak, you can quickly solve issues that previously demanded reconstructing the knee sections of the rig.
Select the desired Tweak Bone and adjust the Rubber Tweak slider.
You can adjust every tweak bone, be it by moving the slider or moving the tweak bones by hand. Just don’t forget that there’s only so much that Rigify can do. If the model has bad topology, it will bend and deform badly. Simple as that.
Assuming everything works correctly up to this point, you can scale the orange finger bones down to curl them up into a fist or to open the hand up. Normally creating a system like this is extremely time consuming, as you have to add a constraint to each individual bone.
If you made a bunch of custom bones and wanted to sort them separately from other ones, I recently discovered a way to modify the script responsible for controlling the Rig UI.
Once generated, the rig comes with its own rig_id that can be seen in its Custom Properties and a script called «rig_ui.py».
- The script controls the newly added Rig Main Properties and Rig Layers (right viewport sidebar —> Item)
- The rig_id tells the script to which rig it should be applied
Adding on top of this system is surprisingly easy.
First, open the Text Editor and select the rig_ui.py file.
- If you see more than one script (e.g. rig_ui.py.001), it can be caused by having other Rigify rigs in your project or having generated more than one rig.
- If you can’t tell which script is for the rig you’re working on, compare the rig_id as stated above. That and run each script one by one and check if the Rig Layers pop up.
- If none of the scripts work for your rig, there are two ways to solve this:
- copy-paste the rig_id of your rig to the rig_id of the script
- create a simplified version of the Rigify UI with only the Rig Layers (more on that later)
Feel free to rename the script to something akin to «character_rig_ui.py», it shouldn’t cause any errors and will make finding it easier in the future.
Go to the very bottom of the script and start scrolling up, you’ll eventually find a section that looks like this:
BOUNDARIES OF THE RIG LAYERS CODE
Between these lines of code:
lies the code responsible for Rig Layers.
RIG LAYERS CODE EXPLAINED
is used to make a new row. If you make more than one layer in one row, they’ll be put next to each other (example, Face (Primary) and (Secondary))
is made to make a space between the rows. Spam it together with row = col.row() to make large spaces between rows (as seen in the example at the end)
is the entire layer.
MAKING A NEW LAYER
It’s just a matter of copy pasting these three lines of code and editing two variables — the index and the name of the layer.
The number of the index translates to the Layer of the rig as seen in the rig’s Object Data Properties, starting with 0 and ending with 32.
The text bit is self-explanatory.
You can put the code between any of the preexisting layers, at the very top, the very bottom, however you please. Make sure not to make any spelling errors.
You can also remove Layers by simply deleting their code.
Example of new rig layers with big spaces:
The changes will only apply once you run the script.
In case you completely break the script or it somehow gets lost, assuming that the rigs are identical in structure, you can always make a new one by generating a new Rigify rig. Then you simply change the rig_id and you preserve all of the IK/FK functions and the Rig Layers.
If you only want the Rig Layers themselves, the ability to visualize the layers without any extra bells or whistles, you can!
Since the original rig_id is no longer needed, you can rename it to whatever you want, for example «char_rig«.
Create a new text file (in Blender, don’t mistake this with Notepad or anything) and make sure it ends with .py (so you’re 100% sure it’s supposed to be a script that has to be run). Once you’ve done that, copy-paste the following code. It’s basically ripped straight from the original Rigify rig.
Parts that you have to rename are called XYZ.
- VIEW3D_PT_rig_layers_XYZ — to your character’s name (pure text without any symbols)
The rig is stuffed with lots of different parts that are making it work. In order not to make the Outline hardly readable and easier to maneuver around, consider moving all different objects to their respective collections. There’s also a good reason for doing it which is addressed later in this chapter.
Make a one main Character_Name collection and put everything inside it. That includes the Widgets collection.
Once you’re done, select Scene Collection (so the character isn’t imported inside a random folder) and go to File -> Append.
Enter the character’s blend file and for the sake of the tutorial, take a look at what’s inside the folder Object. Most of them are custom shapes the rig had generated for itself.
If you didn’t decide to sort the character files using collections, you can select everything by hand here, but I seriously do not recommend it.
Go back and enter the Collection folder. Simply select your main Collection, append it and you’re done!
Appending a collection will automatically append every collection that was inside it, preserving hierarchy and keeping things neat and tidy. That includes the Widgets and its hundreds of custom bone shapes.
Also consider putting the metarig inside this collection so that anyone more experienced can improve upon your rig!
Done! This technique should help keep things as clean as possible.
tl;dr — put everything in one Collection — the rig, the meshes, the Widgets — and append that.
Rigify can be used to bring any kind of creature to life, be it a human, a dog, a shark (no kidding, there’s a metarig for a shark), trees etc. Due to the way it’s scripted, custom bones aren’t a problem.
If you’re willing to put in some, work, you can make an advanced rig for just about any SFM model, asset ripped video game characters, your own original works.
Its flexibility allows for easily adding whatever it is you need to have control over in animation. It’s relatively reliable and anyone can make it work if they try hard enough.
However, let’s not forget that Rigify is not a complete replacement for manual work. You will find yourself adding on top of the generated rig since it can’t do all the job for you. At least, not yet.
In any case, I hope I helped. Have fun animating!
- Elaborated on mocap retargeting
- Mentioned Sharp Edges when Merging by Distance
- Updated multiple chapters regarding rig generation, troubleshooting etc.
19.12.2021
- Overhauled the entire guide from top to bottom, adding a ton of new images, introducing gif images, erasing entire chapters and updating information based on what I had learned over the year of 2021.
29.03.2021
- Talked about AutoRig Pro a bit
- Updated the Rig Appending section
- Updated the Rig Generation and Rig Troubleshooting sections
22.03.2021
- Updated the mesh/rig preparation section with new info/experience
- Updated the rig troubleshooting section
- Replaced some pictures
- Added the Cleaning up the automatic weight painting section
11.10
- Cleaned up the new section
- Added a warning about the finger rolls in the «Rig Generation» section
10.10
- added «Modifying Rig Layers — adding/restructuring/removing» section
13.08
- added «Merge By Distance, separating clothing» section
- expanded upon the «Adding clothing to the mesh» section
3.08
- added «The finger roll bones roll fingers sideways» to the RIG GENERATION TROUBLESHOOTING section
- overhauled the whole «merging meshes» section of the tutorial
- added metarig examples
24.07
- reworked the IMPORTING THE RIG TO OTHER .BLEND PROJECTS topic, making it into its own chapter and added an easier way of appending files
- exchanged a porn joke for something more informative
28.06
- added a tidbit about chin. bones in the FACE RIG section
21.06
- expanded upon the IMPORTING THE RIG TO OTHER .BLEND PROJECTS topic of the Using the Rigify rig section
19.06
- added How the hell do I weight paint the teeth? to RIG GENERATION TROUBLESHOOTING section
15.06
- expanded upon the RIG GENERATION TROUBLESHOOTING section
- added «Merge meshes using the Merge/Join tool»
Источник
![]()
is disjoint.
Incorrect armature for type ‘chain_rigs’
как решить эту проблему?
russian
software
blender
19:21 13.12.2021
2
ответов
Нет соединения между костями шейной области
19:22 13.12.2021
Павел Евгеньевич
Нет соединения между костями шейной области
эээ блин хз что делать
19:23 13.12.2021
Похожие вопросы
This is the third chapter in my course “Rig Anything with Rigify”. If you stumbled upon it be accident you can go to the course overview HERE.
Chapter 3-1 Rigging a Biped/Human
Chapter 3-2 Rigging a Quadruped/Dog
My goal with this course is to help you build your own custom Rigs. However Rigify provides a number of prebuilt ones. Using those is an excellent way for beginners to learn the basics and get a feel for the Rigify workflow.
Ready to Rig a character
Here we’re going to rig a simple biped/human character, as well as a quadruped/dog.
For people with some Rigify experience this may seem simple but I’ll also cover common issues that I see posted on community forums all the time. Read/Watch till the end to learn how to avoid them.
Activate Rigify
Rigify is already included in Blender and you activate it (almost) as any other addon.
From the main Blender menu click Edit > Preferences
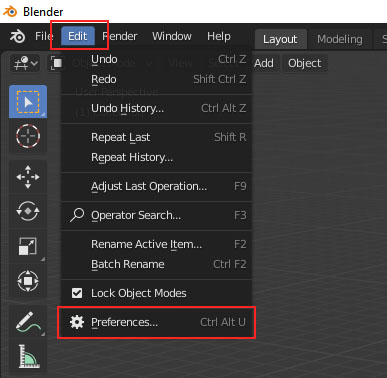
Go to the addons tab. In the search field type Rigify. Put a check-mark next to “Rigging: Rigify”.

With that the addon is active and ready for use. But there is one more step that you need to take to make sure that Rigify runs smoothly. Go to the Save&Load tab and activate Auto Run Python Scripts.

What happens after Rigify has been activated?
After activation, this addon adds several new menus scattered throughout Blender’s interface. This is a personal pet peeve of mine. If the addon was better organized it would be easier to make these tutorials 🙂 We’ll gradually explore all Rigify options and learn where to find them.
To keep things simple I’ll only focus on two Rigify menus in this chapter.

When you press Shift+A in Blender’s 3d view you’ll see a few new rig types under Armature.

In the Properties Panel > Armature Tab (aka Object Data Properties) you’ll see the Generate Rig button. Below it there is a button which says “Advanced Options” which contains additional functions.
That’s all we’ll work with in this chapter. EASY-PEASY!
Exercise 1: Rigging a Human with Human Meta rig
The following video will show you how to rig a Human character using some of the basic Rigify tools.
You’ll also learn how to avoid two of the most common issues that people struggle with all the time.
- the Generated Rigs is the wrong size
- RIGIFY ERROR: Bone ‘spine.004’: Cannot connect chain – bone position is disjoint. Incorrect armature for type ‘chain_rigs’
The second one is an Error message that Rigify spits out when the Spine and Head of your character are not properly connected. These cryptic error messages are one of the weak spots of this addon. They are hard to understand and troubleshoot. Thus it is useful to know the most common problems in advance so you can avoid and/or fix them.
Exercise 2: Rigging a Dog with Quadruped Meta rig
In this exercise we’ll rig a dog character. The process is very similar to the previous one but, again, stick around to learn how to troubleshoot common problems.
Problems we’ll solve:
- Disconnected spine/tail (similar to disconnected spine/head) RIGIFY ERROR: Bone ‘spine.003’: Cannot connect chain – bone position is disjoint.
- generating two rigs in the same scene (Advanced options: overwrite vs new)
- Rig does not generate properly
- Limbs bending in the wrong direction
Good work!
Now you know how to use Rigify’s basics meta-rigs. Using the more complex ones is not so different. If you feel like it try to create the Animal meta rigs and explore them. They may confuse you at first and that’s fine. In the next chapters we’ll get a good grasp of the way these meta-rigs are constructed and then it will all make perfect sense.
In the next chapter we’ll explore bad practices when rigging with Rigify. Stay tuned. To get the next chapter subscribe to my newsletter and I’ll send you an email when it’s available.
Choose your next step!
I think I just ran into a similar «Could not match control node» error using the Human Metarig, in this case involving the «chin_end_glue.001» bone. I was able to reproduce the error on an unedited Human Metarig by moving the tail of the bone away from touching the head of «lip.B.L». However, after snapping the tail of chin_end_glue.001 to the head of «lip.B.L» the rig generated without errors. Unfortunately, this fix only worked in an unedited stock rig. I was unable to fix the error in my own edited rig despite making sure the affected bone’s head and tail were perfectly aligned.
Fetch rig.
Clear rig animation data.
Create main WGTS: 0.003
Duplicate rig: 0.326
Instantiate rigs: 0.005
Rigify: failed to generate rig.
Traceback (most recent call last):
  File "C:blender-3.1.0-windows-x643.1scriptsaddonsrigifyui.py", line 799, in execute
    generate.generate_rig(context, metarig)
  File "C:blender-3.1.0-windows-x643.1scriptsaddonsrigifygenerate.py", line 630, in generate_rig
    raise e
  File "C:blender-3.1.0-windows-x643.1scriptsaddonsrigifygenerate.py", line 618, in generate_rig
    generator.generate()
  File "C:blender-3.1.0-windows-x643.1scriptsaddonsrigifygenerate.py", line 478, in generate
    self.invoke_initialize()
  File "C:blender-3.1.0-windows-x643.1scriptsaddonsrigifybase_generate.py", line 336, in invoke_initialize
    self.__run_object_stage('initialize')
  File "C:blender-3.1.0-windows-x643.1scriptsaddonsrigifybase_generate.py", line 302, in __run_object_stage
    self.plugin_list[i].rigify_invoke_stage(method_name)
  File "C:blender-3.1.0-windows-x643.1scriptsaddonsrigifyutilsmetaclass.py", line 146, in rigify_invoke_stage
    getattr(self, stage)()
  File "C:blender-3.1.0-windows-x643.1scriptsaddonsrigifyutilsnode_merger.py", line 122, in initialize
    group.build(final_nodes)
  File "C:blender-3.1.0-windows-x643.1scriptsaddonsrigifyutilsnode_merger.py", line 226, in build
    node.merge_done()
  File "C:blender-3.1.0-windows-x643.1scriptsaddonsrigifyutilsnode_merger.py", line 316, in merge_done
    self.rig.raise_error(
  File "C:blender-3.1.0-windows-x643.1scriptsaddonsrigifyutilserrors.py", line 45, in raise_error
    raise MetarigError("RIGIFY ERROR: " + message)
rigify.utils.errors.MetarigError: "RIGIFY ERROR: Bone 'chin_end_glue.001': Could not match control node for ORG-chin_end_glue.001"
Error: RIGIFY ERROR: Bone 'chin_end_glue.001': Could not match control node for ORG-chin_end_glue.001
Incorrect armature for type 'base_generate'
I think I just ran into a similar «Could not match control node» error using the Human Metarig, in this case involving the «chin_end_glue.001» bone. I was able to reproduce the error on an unedited Human Metarig by moving the tail of the bone away from touching the head of «lip.B.L». However, after snapping the tail of chin_end_glue.001 to the head of «lip.B.L» the rig generated without errors. Unfortunately, this fix only worked in an unedited stock rig. I was unable to fix the error in my own edited rig despite making sure the affected bone’s head and tail were perfectly aligned.
«`
Fetch rig.
Clear rig animation data.
Create main WGTS: 0.003
Duplicate rig: 0.326
Instantiate rigs: 0.005
Rigify: failed to generate rig.
Traceback (most recent call last):
File «C:blender-3.1.0-windows-x643.1scriptsaddonsrigifyui.py», line 799, in execute
generate.generate_rig(context, metarig)
File «C:blender-3.1.0-windows-x643.1scriptsaddonsrigifygenerate.py», line 630, in generate_rig
raise e
File «C:blender-3.1.0-windows-x643.1scriptsaddonsrigifygenerate.py», line 618, in generate_rig
generator.generate()
File «C:blender-3.1.0-windows-x643.1scriptsaddonsrigifygenerate.py», line 478, in generate
self.invoke_initialize()
File «C:blender-3.1.0-windows-x643.1scriptsaddonsrigifybase_generate.py», line 336, in invoke_initialize
self.__run_object_stage(‘initialize’)
File «C:blender-3.1.0-windows-x643.1scriptsaddonsrigifybase_generate.py», line 302, in __run_object_stage
self.plugin_list[i].rigify_invoke_stage(method_name)
File «C:blender-3.1.0-windows-x643.1scriptsaddonsrigifyutilsmetaclass.py», line 146, in rigify_invoke_stage
getattr(self, stage)()
File «C:blender-3.1.0-windows-x643.1scriptsaddonsrigifyutilsnode_merger.py», line 122, in initialize
group.build(final_nodes)
File «C:blender-3.1.0-windows-x643.1scriptsaddonsrigifyutilsnode_merger.py», line 226, in build
node.merge_done()
File «C:blender-3.1.0-windows-x643.1scriptsaddonsrigifyutilsnode_merger.py», line 316, in merge_done
self.rig.raise_error(
File «C:blender-3.1.0-windows-x643.1scriptsaddonsrigifyutilserrors.py», line 45, in raise_error
raise MetarigError(«RIGIFY ERROR: » + message)
rigify.utils.errors.MetarigError: «RIGIFY ERROR: Bone ‘chin_end_glue.001’: Could not match control node for ORG-chin_end_glue.001»
Error: RIGIFY ERROR: Bone ‘chin_end_glue.001’: Could not match control node for ORG-chin_end_glue.001
Incorrect armature for type ‘base_generate’
«`
I’m using py.test to test my Flask application but I am getting IntegrityError because I am creating the same model in two different tests.
I am using postgreSQL 9.3.5 and Flask-SQLAlchemy 1.0.
EDIT I’ve updated my sessoin fixture with Jeremy Allen’s answer and it fixed a lot of the errors. However it seems when I use the user fixture that I still get IntegrityErrors
Error
E       IntegrityError: (IntegrityError) duplicate key value violates unique constraint "ix_users_email"
E       DETAIL:  Key (email)=(not_used@example.com) already exists.
E        'INSERT INTO users (email, username, name, role_id, company_id, password_hash, confirmed, member_since, last_seen) VALUES (%(email)s, %(username)s, %(name)s, %(role_id)s, %(company_id)s, %(password_hash)s, %(confirmed)s, %(member_since)s, %(last_seen)s) RETURNING users.id' {'username': 'not_used', 'confirmed': True, 'name': 'To be Removed', 'member_since': datetime.datetime(2014, 10, 29, 19, 19, 41, 7929), 'company_id': None, 'role_id': 3, 'last_seen': datetime.datetime(2014, 10, 29, 19, 19, 41, 7941), 'email': 'not_used@example.com', 'password_hash': 'pbkdf2:sha1:1000$cXUh6GbJ$6f38242871cff5e4cce4c1dc49a62c4aea4ba1f3'}
conftest.py
@pytest.yield_fixture(scope='session')
def app():
    app = create_app('testing')
    app.config['SERVER_NAME'] = 'example.com:1234'
    ctx = app.app_context()
    ctx.push()
    app.response_class = TestResponse
    app.test_client_class = TestClient
    yield app
    ctx.pop()


@pytest.fixture(scope='session')
def db(app):
    _db.drop_all()
    _db.create_all()

    Permission.insert_initial()
    Role.insert_initial()
    Technology.insert_initial()
    Product.insert_initial()
    Actor.insert_initial()
    Industry.insert_initial()
    DeliveryCategory.insert_initial()
    DeliveryMethod.insert_initial()

    user = User(email='admin@example.com', username='admin', confirmed=True, password='admin', name='Admin')
    user.role = Role.query.filter_by(name='Administrator').first()
    _db.session.add(user)
    _db.session.commit()

    return _db


@pytest.yield_fixture(scope='function')
def session(db):
    db.session.begin_nested()
    yield db.session
    db.session.rollback()


@pytest.yield_fixture(scope='function')
def user(session):
    yield session.query(User).filter_by(email='admin@example.com').first()


@pytest.yield_fixture(scope='function')
def client(app, user):
    client = app.test_client()
    client.auth = 'Basic ' + b64encode((user.email + ':' + 'admin').encode('utf-8')).decode('utf-8')
    yield client
Tests that fail
def test_edit_agenda_add_company_rep_without_company(session, client, user):
    user2 = User(name='To be Removed', password='not_used', username='not_used', confirmed=True,
                email='not_used@example.com', role=Role.query.filter_by(name='User').first())
    agenda = Agenda(name='Invalid Company Rep', creator=user)
    session.add(agenda)
    session.commit()

    response = client.jput('/api/v1.0/agendas/%s' % agenda.id,
        data={
            'company_representative': user2.id
        }
    )
    assert response.status_code == 200

def test_edit_agenda_add_user_already_in_agenda(session, client, user):
    user2 = User(name='To be Removed', password='not_used', username='not_used', confirmed=True,
                email='not_used@example.com', role=Role.query.filter_by(name='User').first())
    agenda = Agenda(name='Invalid Company Rep', creator=user)
    agenda.users.append(user2)
    session.add(agenda)
    session.commit()

    response = client.jput('/api/v1.0/agendas/%s' % agenda.id,
        data={
            'users': [user2.id]
        }
    )
    assert response.status_code == 200
Tests that pass
def test_get_agenda_modules_where_agenda_that_does_not_exist(session, app):
    # Create admin user with permission to create models
    user = User(email='admin2@example.com', username='admin2', confirmed=True, password='admin2')
    user.role = Role.query.filter_by(name='Administrator').first()
    session.add(user)
    session.commit()

    client = app.test_client()
    client.auth = 'Basic ' + b64encode(
        (user.email + ':' + 'admin2').encode('utf-8')).decode('utf-8')
    response = client.jget('/api/v1.0/agenda-modules/%s/%s' % (5, 4))
    assert response.status_code == 404

def test_get_agenda_modules_agenda_modules_does_not_exist(session, app):
    agenda = Agenda(name='Is tired in the AM')
    session.add(agenda)

    # Create admin user with permission to create models
    user = User(email='admin2@example.com', username='admin2', confirmed=True, password='admin2')
    user.role = Role.query.filter_by(name='Administrator').first()
    session.add(user)
    session.commit()

    client = app.test_client()
    client.auth = 'Basic ' + b64encode(
        (user.email + ':' + 'admin2').encode('utf-8')).decode('utf-8')
    response = client.jget('/api/v1.0/agenda-modules/%s/%s' % (agenda.id, 4))
    assert response.status_code == 400
    assert response.jdata['message'] == 'AgendaModule does not exist.'