Содержание
- 1 Root-прав на Android: как получит/скачать root на все устройства
- 1.1 Root-права — что это?
- 1.2 KingRoot
- 1.3 Скачать рут права через ПК
- 1.4 Kingo Android Root
- 1.5 VRoot
- 1.6 Через программу
- 2 How To Trick Apps Into Thinking Your Android Is Not Rooted
- 2.1 Install Xposed
- 2.2 Install RootCloak
- 2.3 Tweak RootCloak If Necessary
- 2.4 The Results
- 2.5 Your Mileage May Vary
- 3 This device is not rooted что делать. Как проверить наличие на андроиде рут-прав — Закон24
- 3.1 Подготовка устройства
- 3.2 Как получить рут права
- 3.3 Через смартфон
- 3.4 Framaroot
- 3.5 Проверка результатов рутирования
- 3.6 Как удалить root права
- 3.7 Как удалить root-права вручную
- 4 This device is not rooted что делать?
- 4.1 What is an OTA Update?
- 4.2 Why You Can’t Install OTA Updates on Rooted Android Devices Automatically?
- 4.3 Magisk Root, A/B Partitions, and OTA Updates
- 4.4 How to Install OTA Updates on Rooted Android Devices?
- 4.5 Step 1: Disable Automatic System Updates in Settings
- 4.6 Step 2: Restore Stock Boot Image When an OTA is Available
Root-прав на Android: как получит/скачать root на все устройства

По умолчанию все устройства защищены от «проникновения» в систему и предоставляют пользователю доступ только к основным функциям, которые необходимы для комфортной работы. Но могут возникнуть случаи, когда нужно получить полный доступ к системе. Рассмотрим как получить рут права на Android.
Root-права — что это?
Root — это суперпользователь. Рут-права нужны для получения полного доступа к системе, что позволит полноценно модернизировать (кастомизировать) ОС Android.
Superuser имеет ряд преимуществ, среди которых возможность:
- удалять встроенные приложения;
- изменять системные файлы;
- настраивать интерфейс «под себя» (начиная шрифтами, заканчивая анимацией загрузки);
- бесплатно совершать покупки в приложениях;
- делать резервные копии;
- менять прошивку устройства;
- блокировать рекламу;
- устанавливать приложения на карту памяти;
- и т.д.
Важно! После установки Root ваше устройство теряет гарантию! Также существует большой риск «окирпичивания» устройства, что происходит по вине пользователя!
Перед тем, как получить рут права на Android, нужно правильно подготовить девайс, чтобы исключить возможность потери данных:
- контакты;
- фотографии;
- пароли;
- заметки;
- и т.д.
Перед установкой стоит выполнить 5 главных требований:
- Сделать резервную копию данных (на внешний накопитель).
- Включить режим отладки по USB (если установка через ПК).
- Зарядить устройство минимум до 80%.
- Подключиться к сети Wi-Fi.
- Разрешить установку с неизвестных источников (если установка без ПК).
Обратите внимание! Описанные ниже действия показаны на примере Meizu M5 с версией Android 6.0. На разных устройствах названия и расположение пунктов может отличаться.
Для создания резервной копии:
- Зайдите в «Настройки» → «Память и резервные копии».
- «Копирование и восстановление» → «Резервное копирование».
- Выберите место хранения (обязательно SD-карта).
- Укажите данные, которые хотите сохранить.
- Нажмите «Начать копирование».
- После завершения процесса в «Копирование и восстановление» отобразится точка восстановления.
Если установка Root произойдет через компьютер, то также нужно включить отладку по USB.
- «Настройки» → «О телефоне».
- 7 раз нажмите на версию прошивки до появления сообщения о том, что вы теперь разработчик.
- Перейдите в «Настройки» → «Спец. возможности» → «Для разработчиков».
- Переведите тумблер «Отладка по USB» в активное положение.
- Перезагрузите устройство.
Если компьютер использоваться не будет, то необходимо разрешить установку из неизвестных источников.
- Зайдите в «Настройки» → «Отпечатки и безопасность».
- Переведите тумблер «Неизвестные источники» в активное положение.
Рассмотрим способы получения Root-прав на примере Meizu M5 и ПК под управлением Windows 10.
Важно! Ваш телефон потеряет гарантию после получения прав суперпользователя. Возможно «окирпичивание» устройства при нарушении процедуры, не прерывайте процесс! Все действия вы делаете на свой страх и риск!
Наиболее популярные программы для получения Рут без компьютера — Kingroot и Framaroot. Каждая из этих утилит гарантирует положительный результат в 97% случаев.
KingRoot
Получить рут права можно через KingRoot. Данная утилита универсальна и подходит почти для всех моделей смартфонов. Разработчики заявляют, что шанс «окирпичивания» равняется 0,1% и только по вине пользователя.
- Скачайте приложение и установите его.
- Запустите программу → Нажмите «Try to Root».
- Дождитесь завершения установки и появления надписи «ROOT SUCCEEDED».
- Если не получилось, то запустите процесс заново.
- Перезагрузите устройство.
Обратите внимание! Программа использует разные алгоритмы во время работы и они выполняются поочередно. Повторный запуск процесса может быть более успешным.
Список поддерживаемых устройств менее разнообразный, чем у предыдущей программы, но процесс получения прав суперпользователя значительно быстрее.
- Скачайте программу и установите ее.
- Запустите → Укажите «Установить SuperSU».
- Выберите «Gandalf» («Boromir») → Дождитесь появления смайлика, символизирующего успешную установку.
- Перезагрузите устройство.
Обратите внимание! В случае успешной установки на главном экране появится приложение SuperSU.
Скачать рут права через ПК
Способ установки Рут через компьютер более надежный. Вероятность успешного окончания процесса — 99%. Рассмотрим две популярных программы.
Kingo Android Root
Приложение от популярной команды разработчиков, которые специализируются на изучении уязвимостей Android-устройств.
- Скачайте инсталлятор Kingo для Windows.
- Запустите программу → Подключите устройство через USB-кабель.
Обратите внимание! Утилита автоматически распознает ваш девайс и загрузит нужные драйвера.
- Разрешите подключение, поставив галочку на экране смартфона → «ОК».
- Нажмите «ROOT» в окне программы → Дождитесь завершения процесса (перезагрузки телефона).
- Если рутирование прошло успешно, то в окне появится надпись «Root Succeeded».
VRoot
Данная программа специализируется на рутировании китайских смартфонов, но подходит и для других моделей.
Обратите внимание! Интерфейс VRoot на китайском языке.
- Скачайте и установите программу (выбрав зеленую кнопку).
- Запустите VRoot → Подключите устройство через USB-кабель (начнется поиск телефона).
- Нажмите на зеленую кнопку после того, как определилась модель смартфона.
- Дождитесь окончания процесса и перезагрузки устройства.
- На главном экране телефона появятся 2 китайских приложения, которые можете удалить.
- Определить успешность получения Root-прав можно с помощью специальной программы.
- Скачайте приложение SuperSU, если оно не появилось автоматически.
- Скачайте Root Checker → запустите утилиту.
- Нажмите «Принять» под отказом от ответственности.
- Кликните «Verify Root Status» → «Предоставить».
- После чего появится сообщение:
- «Congratulations! Root access is properly installed on this device!» (В случае успешного подтверждения).
- «Sorry! Root access is not properly installed on this device!» (если рут отсутствует).
Удалить права суперпользователя можно программно либо вручную. Основные причины отказа от Root:
- Устройство нужно отдать в сервисный центр (по гарантии);
- Появились сбои во время работы;
- Возникли опасения, связанные с безопасностью.
Через программу
Данный способ достаточно простой, программа в автоматическом режиме произведет удаление.
- Скачайте SuperSU из Play Маркета (если не установлен ранее).
- Запустите программу → Вкладка «Настройки».
- Выберите пункт «Полное удаление Root» → дождитесь перезагрузки устройства.
Обратите внимание! Процесс перезагрузки может занять какое-то время. Не стоит беспокоиться.
Данный способ подходит для продвинутых пользователей, которые уверенно чувствуют себя в «окружении» системных файлов.
Важно! Все действия делаете на свой страх и риск. Удаление не того системного файла приведет к «окирпичиванию» гаджета.
- Установите Root Browser из Play Маркета → Запустите программу.
- Перейдите в директорию /system/bin/ → Удалите файлы «su» и «busybox».
- Зайдите в /system/xbin/ → Удалите такие же файлы.
- В /system/app/ сотрите приложение «Superuser.apk».
- Перезагрузите телефон.
Совет! Сброс к заводским настройкам полностью уничтожит следы рутирования.
Источник: https://geekon.media/poluchenie-root-prav-na-android/
How To Trick Apps Into Thinking Your Android Is Not Rooted

Unfortunately, some developers block access to their apps if they detect that the device they’re installed on is rooted. This is due to a variety of reasons, but usually its due to security (banking apps) or Digital Rights Management What Is DRM & Why Does It Exist If It’s So Evil? [MakeUseOf Explains] Digital Rights Management is the latest evolution of copy protection. It’s the biggest cause of user frustration today, but is it justified? Is DRM a necessary evil in this digital age, or is the model… Read More (video apps).
Advertisement
The worry is that rooted devices, if compromised, have access to more sensitive information thanks to their unrestricted access, as well as the fact that users could find and extract normally hidden DRM content on their devices using a file manager with root access Root Explorer Lets You Reach Deep Into Android’s File System If you need to access root files to tinker with your Android device, this app can help you out. Read More .
But you’re the kind of person who roots your Android device and refuses to let others tell you what you can and cannot do with it, so let’s work around this annoyance.
Install Xposed
The Xposed Framework is a super handy app that allows you to customize your rooted Android phone Customize Your Phone Without Flashing a ROM With The Xposed Framework It is common knowledge that the best way to customize your Android device is to flash it with a new ROM. It is also wrong. Read More without flashing a custom ROM. Before installing it, though, make sure that in your security settings you have checked the option to allow the installation of apps from “Unknown sources”.
Now go ahead and install the Xposed Framework. The quickest and easiest way is to go to the official Xposed website on your Android device and download the apk file. Once downloaded, tap on the file to install it.
However, Xposed by itself doesn’t do you much good; you’ll need RootCloak to really get anything done.
Install RootCloak
Open up Xposed and go into the Download section as shown below. All of the available modules will be listed in alphabetical order, so you can either scroll through or search for RootCloak.
Tap on RootCloak, and it will bring up the page shown below. Download the most current version, which as of now is 1.4.
Accept the installation, and the module is installed. But it won’t do anything without a reboot. If you’re running Android 4.1 or higher, you can select “Activate and reboot” from your notification pane, which will automatically turn on the RootCloak module and restart your device. You’ll need to grant the Xposed Installer root access to do this, as shown below.
If you’re running Android 4.0 or lower, or you just didn’t get a notification, you can activate the module manually from within Xposed as shown below. Just check the box next to RootCloak under the Modules section. Remember to reboot your device afterwards.
Tweak RootCloak If Necessary
RootCloak automatically enables certain apps, but it’s possible that it doesn’t cover the specific app that you’re trying to use. There is a list of all the apps that RootCloak is confirmed to work with over on the XDA Developers Forum, but if you want to give something a try that’s not activated by default, you’ll need to play with RootCloak’s settings.
Access RootCloak’s menu either through the RootCloak icon that is now in your app drawer, or through the Modules section of Xposed. Once there, click on Add/Remove Apps, then tap the + icon in the upper right. This will show you a list of all the apps on your device, and you can select the one that you want enabled. You’ll have to reboot for the changes to take effect.
The Results
It works exactly as it should.
Below you can see the error notifications I got when trying to run Best Buy CinemaNow and Fox Digital Copy before installing RootCloak.
But after installing RootCloak, I was free to access these apps without a problem.
Your Mileage May Vary
Even though this trick is awesome, it won’t work for all devices. Since there are so many apps that could search for so many signs of rooting, it’s impossible for RootCloak to detect them all. If you’re running a custom ROM, it’s even more ly that you could run into problems. Still, it’s worth a shot, and you could always try out RookCloak+, which the developer says is able to unblock a wider range of apps.
If you haven’t rooted your Android device, take a look at our Android Rooting Guide. Rooting certainly isn’t for everyone, but if you’re willing to take the dive, the benefits can be huge. After all, rooting is (mostly) legal, and blocking apps for use on rooted devices seems to go against the whole point of rooting — getting more control over your device.
When you’re done tricking your apps, how about tricking your pals with these entertaining voice changing apps for Android 6 Entertaining Voice Changing Apps for Android Here are the best voice changer apps for Android, great for a laugh with friends or even professional projects. Read More ?
Image Credit: Flickr/Johan Larsson
Affiliate Disclosure: By buying the products we recommend, you help keep the site alive. Read more.
Источник: https://www.makeuseof.com/tag/trick-apps-android-rooted/

По умолчанию все устройства защищены от «проникновения» в систему и предоставляют пользователю доступ только к основным функциям, которые необходимы для комфортной работы. Но могут возникнуть случаи, когда нужно получить полный доступ к системе. Рассмотрим как получить рут права на Android.
Подготовка устройства
Перед тем, как получить рут права на Android, нужно правильно подготовить девайс, чтобы исключить возможность потери данных:
- контакты;
- фотографии;
- пароли;
- заметки;
- и т.д.
Перед установкой стоит выполнить 5 главных требований:
- Сделать резервную копию данных (на внешний накопитель).
- Включить режим отладки по USB (если установка через ПК).
- Зарядить устройство минимум до 80%.
- Подключиться к сети Wi-Fi.
- Разрешить установку с неизвестных источников (если установка без ПК).
Обратите внимание! Описанные ниже действия показаны на примере Meizu M5 с версией Android 6.0. На разных устройствах названия и расположение пунктов может отличаться.
Для создания резервной копии:
- Зайдите в «Настройки» → «Память и резервные копии».
- «Копирование и восстановление» → «Резервное копирование».
- Выберите место хранения (обязательно SD-карта).
- Укажите данные, которые хотите сохранить.
- Нажмите «Начать копирование».
- После завершения процесса в «Копирование и восстановление» отобразится точка восстановления.
Если установка Root произойдет через компьютер, то также нужно включить отладку по USB.
- «Настройки» → «О телефоне».
- 7 раз нажмите на версию прошивки до появления сообщения о том, что вы теперь разработчик.
- Перейдите в «Настройки» → «Спец. возможности» → «Для разработчиков».
- Переведите тумблер «Отладка по USB» в активное положение.
- Перезагрузите устройство.
Если компьютер использоваться не будет, то необходимо разрешить установку из неизвестных источников.
- Зайдите в «Настройки» → «Отпечатки и безопасность».
- Переведите тумблер «Неизвестные источники» в активное положение.
Как получить рут права
Рассмотрим способы получения Root-прав на примере Meizu M5 и ПК под управлением Windows 10.
Важно! Ваш телефон потеряет гарантию после получения прав суперпользователя. Возможно «окирпичивание» устройства при нарушении процедуры, не прерывайте процесс! Все действия вы делаете на свой страх и риск!
Через смартфон
Наиболее популярные программы для получения Рут без компьютера — Kingroot и Framaroot. Каждая из этих утилит гарантирует положительный результат в 97% случаев.
Framaroot
Список поддерживаемых устройств менее разнообразный, чем у предыдущей программы, но процесс получения прав суперпользователя значительно быстрее.
- Скачайте программу и установите ее.
- Запустите → Укажите «Установить SuperSU».
- Выберите «Gandalf» («Boromir») → Дождитесь появления смайлика, символизирующего успешную установку.
- Перезагрузите устройство.
Обратите внимание! В случае успешной установки на главном экране появится приложение SuperSU.
Проверка результатов рутирования
- Определить успешность получения Root-прав можно с помощью специальной программы.
- Скачайте приложение SuperSU, если оно не появилось автоматически.
- Скачайте Root Checker → запустите утилиту.
- Нажмите «Принять» под отказом от ответственности.
- Кликните «Verify Root Status» → «Предоставить».
- После чего появится сообщение:
- «Congratulations! Root access is properly installed on this device!» (В случае успешного подтверждения).
- «Sorry! Root access is not properly installed on this device!» (если рут отсутствует).
Как удалить root права
Удалить права суперпользователя можно программно либо вручную. Основные причины отказа от Root:
- Устройство нужно отдать в сервисный центр (по гарантии);
- Появились сбои во время работы;
- Возникли опасения, связанные с безопасностью.
Как удалить root-права вручную
Данный способ подходит для продвинутых пользователей, которые уверенно чувствуют себя в «окружении» системных файлов.
Важно! Все действия делаете на свой страх и риск. Удаление не того системного файла приведет к «окирпичиванию» гаджета.
- Установите Root Browser из Play Маркета → Запустите программу.
- Перейдите в директорию /system/bin/ → Удалите файлы «su» и «busybox».
- Зайдите в /system/xbin/ → Удалите такие же файлы.
- В /system/app/ сотрите приложение «Superuser.apk».
- Перезагрузите телефон.
Совет! Сброс к заводским настройкам полностью уничтожит следы рутирования.
Понравилась публикация? Оцените её! (15,00
Источник: https://zakn24.ru/this-device-is-not-rooted-chto-delat-kak-proverit-nalichie-na-androide-rut-prav.html
This device is not rooted что делать?

An OTA update has arrived, but you cannot install it because your Android device is rooted? Well, that’s a known downside of rooting Android. In this guide, you will learn how to install OTA updates on rooted Android devices using Magisk. By using the method provided in this guide, you will also be able to retain root and TWRP after installing the OTA update. Before we get any further, let us take a quick look at what OTA updates are and how they work.
What is an OTA Update?
An OTA Update a.k.a an Over-the-Air Update is a wireless method of receiving and installing updates to an Android device’s software.
It is remotely pushed by the device manufacturer (Also known as the ‘OEM’) and is the easiest and most effective way to update an Android device’s software to the latest available version. Once an OTA update arrives, it is either automatically installed or prompts the user to manually download and install it.
So, how does one install an OTA update on a rooted Android device? You will know more about it in the next section. Read ahead.
Why You Can’t Install OTA Updates on Rooted Android Devices Automatically?
Rooting an Android device is great, it gives the user tremendous control over the device’s software and allows making any sort of modifications to it. However, it comes with its own drawbacks. The biggest one is losing the ability to take automatic OTA (over-the-air) updates. And users (Generally who are new to the scene) often tend to overlook this factor when they root their Android device.
In Android 5.0 and above, Google introduced the concept of block-based OTAs. This new mechanism does certain pre-OTA block checks to verify the integrity of the device’s software. In layman terms, once the installation begins, the device partitions ( system, boot, vendor, dtbo, etc) are checked for modifications Root, TWRP, etc. And if detected, the OTA update will fail to install.
Magisk Root, A/B Partitions, and OTA Updates
But thanks to Magisk, you can easily install OTA updates on rooted Android devices without losing root. For those who don’t know, Magisk is a Universal Systemless Interface that allows you to make modifications to your Android device’s software systemless-ly, that is, without altering the /system partition.
Not just that, it has also developed to be the most prominent modern-day rooting solution for Android using MagiskSU. Want to know more about how it came into existence? Then there’s no better way but to hear out the story directly from its creator – topjohnwu.
The developer devised two different methods to install Magisk and root Android devices:
- The first method follows the traditional process of installing a custom recovery (TWRP, OrangeFox, etc) and then using it to flash the Magisk installer zip (root package). But since you will install a custom recovery during this method, it makes it even harder to take OTA updates.So, to regain the ability to take automatic OTA updates or install them manually, you would require to first uninstall/remove root and other modifications applied to the software. And further, restore the stock Android recovery on your device.
- The second method was introduced when Google first released the Google Pixel devices in 2016. These devices came with dual A/B partition system to support seamless updates and removed the recovery partition from the devices completely. So, the first method failed rigorously.This new method involves patching the stock boot image using Magisk and then flashing the patched boot image via fastboot.
The best part about rooting your Android device with Magisk is that it gives you the ability to install OTA updates easily. So, follow the instructions below on how to do it.
How to Install OTA Updates on Rooted Android Devices?
Now, since most new OEM Android devices come with the A/B partition scheme, OTA updates are seamlessly installed to the inactive slot. When you root using Magisk, it is only installed to the currently active slot of your Android device. And thus, the inactive slot/partitions stay untouched.
When an OTA arrives, you can simply restore the stock boot image from within Magisk Manager, then install the OTA update to the inactive slot. And finally, right before you reboot your phone, you can install Magisk to the inactive slot to preserve root after the update.
Still sounds a bit confusing? Don’t worry, the instructions below will take you through the complete process in detail. For your convenience, we have split the instructions into 5 different steps so that you can understand exactly what you’re doing.
Step 1: Disable Automatic System Updates in Settings
In Android 8.0 Oreo (and above), Google introduced a new automatic updates policy that downloads and installs OTA updates as soon as they are available.
Although this is great for an average Android user, but not for those who have rooted their devices. In order to update your rooted Android phone, you must first prevent the system from automatically installing updates without your acknowledgment.
Simply follow the steps below to disable Automatic System Updates in Android:
- Go to the Settings menu on your Android device.
- Navigate through the settings and select the About phone menu.
- Scroll down to the bottom and find the Build number section.
- Note: In the case of some OEM devices, the Build Number section could be nested further in the Settings menu. For example, in Samsung Galaxy devices, you will need to go to Settings → About phone → Software information.
- Now, continuously tap on the ‘Build number’ section for five (5) times to enable ‘Developer options‘ on your device.
- Once enabled, go to Settings → System → Developer options.
- Scroll down and turn off the Automatic system updates toggle.
Step 2: Restore Stock Boot Image When an OTA is Available
Now your Android device is rooted and an OTA update notification has arrived. When an OTA update is available, you will need to restore the stock boot image (and dtbo, if applicable) and uninstall Magisk from the current slot.
To do so, go to the app drawer and launch the ‘Magisk Manager‘ app. Then tap on the UNINSTALL button and select the RESTORE IMAGES option. You should now see the “Restoration done!” message on the screen.
Do not! Absolutely do not reboot your phone now, or else Magisk will be uninstalled completely.
Источник: https://don-sputnik71.ru/this-device-is-not-rooted-chto-delat/
Did you encounter an error message “SuperUser Error Android Gaining Root Access Failed” or “SuperUser Installed, No Root Access” after rooting your Android device?
The same situation I have faced once and it was really worrying for me. But later on I managed to fix the error and how, I will discuss it below.
Most of the Android users love to root their device because it gives super access and lots of freedoms. But when something goes wrong then this freedom seems to inject from every way to user and they think why I have opted to root the device.
Many users try to root their device via several apps and SuperUser/SuperSU is one of them. After installing this app to root the device, sometimes it throws an error message that it fails to get root permission.
Most of the time, it’s the app issue and this means that the root process is incomplete. So what to do when you get an error message “SuperUser Error Android Gaining Root Access Failed” or “SuperUser Installed, No Root Access“?
Don’t worry, read this blog completely and you will get a complete guide on how to fix the issue above mentioned.
Practical scenario
Superuser installed, No Root Access
Hello androidcentral members,
It seems that I accidentally changed the ownership of the su file to “system, sdcard_rw” and now I have no way to change it back to “root, root”. Everything was working fine beforehand. Any suggestions on how to fix the su file? I have already attempted to reroot using the same way I originally rooted the device with no luck.
Thanks!
Source: https://forums.androidcentral.com/virgin-mobile-optimus-slider/265291-superuser-installed-no-root-access.html
What is SuperUser/SuperSU Root?
Super User is one of the popular app developed by Android developer Chainfire. It allows advanced management of superuser access on rooted device. However, rooting is done via two methods- first is by Android Application Package(APK) that you will get from 3rd party rooting service and second one is manually granting access to root which is done through recovery mode.
Why Users Want To Root Their Phone
Rooting allow Android users to optimize, tweak and customize the device completely. It means that after rooting, your device will work as you want it to work and importantly, manufacturer’s warranty will be lost.
But still people root their device because they get more benefits instead of not rooted phones. Remember that rooting should be done properly and accurately otherwise it creates lots of problem.
However, different OEMs have different rooting and can be achieved via automated script, installing a flashable root package, by flashing pre-rooted ROM or by custom recovery.
Reasons Why you Fail to Root an Android Phone
As told earlier that if rooting is not done in proper way then it can create lots of trouble for user. You should know what the reasons for rooting failed on Android phone are.
Reason 1: Rooting version fails to match phone model
It is obvious that rooting tool may not be compatible with your phone model and this may give an error message. So before opting any tool for rooting your Android phone, just ensure whether the tool is best for your device or not.
Reason 2: Recovery mode
Some rooting tool that you download on your phone may ask you to flash the entire device in recovery mode. In such situation, its impossible to root your device.
Reason 3: Different root package
After you download root tool, it may give you challenge as well. This is because most of the Android phone support OTA or ICS update through which new software are delivered.
Reason 4: Bad internet connection
While rooting your device, stable internet connection is must. If sometimes, the network fluctuates then it may stop the rooting process

Reason 5: Phone driver
Sometimes, there is a need to connect your phone to PC while rooting your device. But before this, you should ensure that all the necessary drivers are installed on computer for your phone otherwise rooting process will not go smoothly.
Reason 6: Battery is low
Make sure your phones battery is charged completely as many tool require high battery for rooting. So, low battery can stop you from rooting your phone.
How to Manage Root Permissions With SuperUser App
After successfully rooting your Android phone with SuperSu app, your phone will reboot and an icon of this app will be in your drawer. It has full control over other apps those who want to get root permission.
If any app request for root permission then first SuperSu app has grant it. When you tap on Grant and receive a message successfully, it means that rooting is done successfully on your phone.
If you want to check whether the root is working or not, simply download Root Checker app and verify the status. Even you can also download the app that you wanted to install from long time after rooting your phone.

However, if you can manage root permission by opening the app drawer and then click on SuperUser icon. There a list of apps will be available those are granted or denied access from SuperUser. If you want to change its permission then click on the app.
How To Use SuperUser On Android Phone And Gain Root Access
The SuperUser/SuperSu app is available on Play Store but sometimes it don’t give access to it. So you can click on this link and can get the latest version of SuperSu. This is also in .zip format so you can simply download it on your computer, connect your phone to USB cable and simply drag the SuperUser zip on your phone internal memory.
Now reboot your device into TWRP recovery, you can get it from TWRP site. After it is installed, now your phone is ready to gain root access.
Now follow the below steps on how to root Android phone.
- Now enter “Recovery Mode” and then you will be on TWRP home screen. Simply tap on Install button
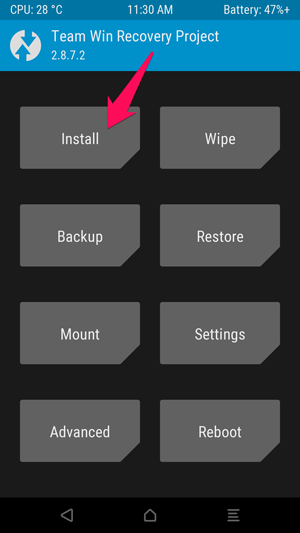
- Then as you can see the image below will appear. Move down and click on SuperSu ZIP file

- After that, you will come with the below screen, swipe to confirm flash

- This will take some time and soon you will get “Wipe cache/Dalvik” option on screen

- Then, click on “Reboot System” to again boot back into Android.
But after this, many users have reported that they have come through the error message that really frustrate them as gaining root accessed failed from SuperUser.
So let us read further and know what are the ways to solve such error.
How To Fix SuperUser Error Android Gaining Root Access Failed
Now here come the solutions that will help you to solve SuperUser error gaining root access failed. Go through them and hopefully, you will able able to fix the error.
NOTE– First, check whether your phone is rooted successfully or not. You will get the below image on your screen after rooting.
Now follow the below steps if you are facing the above error after rooting your phone.
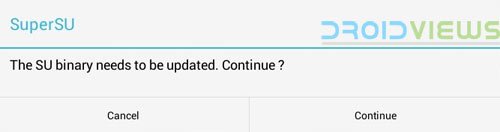
Step 1: Open SuperSu and update the app when prompts you for this

Step 2: May be the issue is related to any app and other apps work fine then its because you have not accepted the rooting permission of that particular app. Its simple to fix by going to Settings >Application > All > SuperSu and then click on it. Now clear app data > open app in question and grant permission when poped up.
Step 3: Open the app from drawer and then go to Settings > try to disable and enable it. After that, reboot your device and try to use the apps. If it still shows error then move ahead for better solutions.
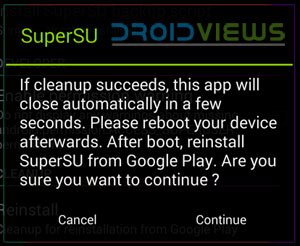
Step 4: Open SuperSu > Settings and click on Reinstall option > choose Continue

Step 5: When your phone don’t have TWRP installed then below solutions can help you:
- First, download Chainfire’s SuperSu flashable zip file: UPDATE-SuperSU-vx.xx.zip
- Then unzip the file and go to extracted folder
- There, you can see “Common” folder and open it

- Now copy apk on device and install it. After that, use a root app to check if the issue was resolved or not
After following the above steps, if you still face the same error on your Android phone then you should search for a proper root exploit and again try to root your phone.
Video Guide:
source: iTechKnow
Bonus Tip: Best Way To Root Your Android Phone Without Any Error
If you want to root your Android phone without any issue then you can use a professional tool named as Android Root. This is one of the popular programs that easily root Android phone and tablets without having any knowledge.
It is easy to use and compatible with almost every android phones. It works by simply one click and can make your phone as you want. It’s completely safe and secure.
btn_img btn_img
Note: It is recommended to download and use the software on your PC or laptop. It is because recovery of phone data on the phone itself is risky as you may end up losing all your data because of data overriding.
Conclusion
Many users root their Android device using several rooting tool from play store just to gain access without any interruption. But sometimes, the thing does not work accordingly and goes wrong, hence an error popups.
In this blog, rooting Android phone with SuperUser/SuperSu tool failed to gain access and how to fix is explained along with other details. I hope the solutions will work for you and you can easily gain root access on your Android phone using SuperUser tool.

James Leak is a technology expert and lives in New York. Previously, he was working on Symbian OS and was trying to solve many issues related to it. From childhood, he was very much interested in technology field and loves to write blogs related to Android and other OS. So he maintained that and currently, James is working for androiddata-recovery.com where he contribute several articles about errors/issues or data loss situation related to Android. He keeps daily updates on news or rumors or what is happening in this new technology world. Apart from blogging, he loves to travel, play games and reading books.

Rooting in Android is the key to all kinds of system tweaking or optimization and visual customization. You need to have proper root access to be able to install root apps from the Play Store. In most cases rooting an Android device simply means losing the manufacturer’s warranty. However, people still root their device because they find the benefits of having root access irresistible.
The method of rooting devices from different OEMs differ in some way or other. It can be achieved using an automated script or an easy-root toolkit, by flashing a pre-rooted ROM, or by installing a flashable root package via stock or custom recovery. I have no idea what method you used to acquire root access on your phone or tablet, but if you have been facing issues with root privileges on your device, the tips provided on this page might be of some help to you.
Have you been facing “Root Access Possibly Lost” issue while trying to back up, restore a flash a ROM in CWM or TWRP recovery? Do you see “Root access missing” message on your rooted device when you open an app that requires root? Try one of the solutions suggested below to fix missing or lost root access issue on rooted Android devices
- First off, make sure that your device has been rooted properly. To verify root access on your device, try this free app: [googleplay url=”https://play.google.com/store/apps/details?id=com.joeykrim.rootcheck”] Make sure that you see the following message in Root Checker.

- If you’re facing missing root issue just after rooting your device, open SuperSU and update SU binary if the app prompts you to do so.

- In case root permission issue is related to a specific app and it works fine with other apps, you might have accidentally denied root permission to that app. To fix it, go to device Settings> Applications> All> SuperSU and tap it. Then clear app data. Now open the app in question and grant root permission when prompted.
- Open SuperSU from your device’s app drawer, go to app Settings and try disabling and enabling it. Then reboot the device and try using root apps. If the lost root problem is not fixed yet, try the solution given below.
- Open SuperSU> Settings and tap the Reinstall option and select Continue.

- If your device doesn’t have a custom recovery like CWM or TWRP installed on it, you can try this solution.
- Download the latest version of Chainfire’s SuperSU flashable ZIP file: UPDATE-SuperSU-vx.xx.zip
- Unzip the file and open the extracted folder.
- Go to a folder called common and open it.

- Copy Superuser.apk to your device and install it. Then try using a root app to check if the problem has been solved.
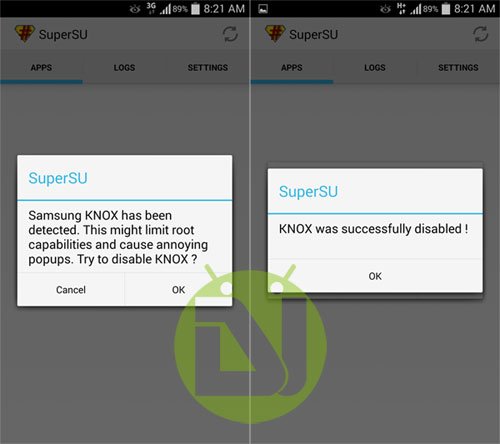
- If you have a Samsung Galaxy device with KNOX on it, and you are getting issues with root access, the above solution might be helpful to you too. After installing Superuser.apk, open the app. When you see the following message, select OK: “Samsung Knox has been detected. This might limit root capabilities and cause annoying popups. Try to disable KNOX.”

- If your device has CWM or TWRP, download the latest SuperSU APK. Copy the zip to your device and flash it using Install option (in TWRP), or install zip from sdcard option (in CWM).


If none of the above tips could help your problem with root privileges and did not fix missing or lost root access issue on your Android device, find a proper root exploit for your device and root it again.
Update:
If the methods described in this tutorial did not work for you, please head over to our new guide for fixing the lost root issue on Android devices.
Got Root on Your Device?
Find Best Apps for Rooted Android Devices
Reader Interactions
I’ve installed Linux Mint and Manjaro Linux on my computer. I installed only the Linux mint on the MBR. For Manjaro, I created a /boot/efi partition, but I have not checked to install to MBR.
So, I am controlling grub from mint. Now, when I try to boot Manjaro, it shows :
ERROR: resume: no device specified for hibernation: performing fsck on
dev/sda11  /dev/sda11: clean 1727/915712 files, .... blocks

WARNING: The root device is not configured to be mounted read-write!It
may be fsck'd again later

:mounting /dev/sda11 on real boot running cleanup hook [udev]

ERROR: Root device mounted successfully, but /sbin/init does not exist.

sh:can't access tty; job control turned off

[rootfs /]#
After the shell prompt, I can’t write anything. It hangs, or sometimes it shows me messages continuously like :
usb 3-3: device not accepting address 2, error -62
and so on…
I tried to add init=/usr/lib/systemd/systemd to grub, as I saw in google, but still the same.
I must note that for the Manjaro installation I am using a separate partition for / and for /usr and for /var.
This maybe have an influence? As I saw here .
But the problem is that I can’t write anything, it hangs.
I also found a comment on a blog post here that states:
“If you keep /usr as a separate partition, you must adhere to the following requirements:
“ — Add the shutdown hook. The shutdown process will pivot to a saved copy of the initramfs and allow for /usr (and root) to be properly unmounted from the VFS.“ — Add the fsck hook, mark /usr with a passno of 0 in /etc/fstab. While recommended for everyone, it is mandatory if you want your /usr partition to be fsck’ed at boot-up. Without this hook, /usr will never be fsck’d.
“ — Add the usr hook. This will mount the /usr partition after root is mounted. Prior to 0.9.0, mounting of /usr would be automatic if it was found in the real root’s /etc/fstab.”
And never forget to run mkinitcpio -p linux every time after you make changes to mkinitcpio.conf to actually create the new images and get them the right place.
That sounds promising since my /usr is indeed on a separate partition. What are these «hooks» and how do I add them?
parted -l:
Model: ATA TOSHIBA MQ01ABD0 (scsi)
Disk /dev/sda: 750GB
Sector size (logical/physical): 512B/512B
Partition Table: gpt

Number  Start   End     Size    File system     Name                  Flags
 1      1049kB  1075MB  1074MB  ntfs            Basic data partition  hidden, diag
 2      1075MB  1347MB  273MB   fat32           Basic data partition  boot
 3      1347MB  1482MB  134MB   ntfs            Basic data partition  msftres
 4      1482MB  80,1GB  78,6GB  ntfs            Basic data partition  msftdata
 5      80,1GB  80,4GB  262MB   ext4
 6      80,4GB  90,4GB  10,0GB  ext4                                  msftdata
 7      93,0GB  102GB   9000MB  ext4                                  msftdata
 9      102GB   106GB   3999MB  linux-swap(v1)
10      106GB   106GB   250MB   fat32                                 boot
11      106GB   121GB   15,0GB  ext4                                  msftdata
12      121GB   151GB   30,0GB  ext4                                  msftdata
13      151GB   165GB   14,0GB  ext4                                  msftdata
14      165GB   206GB   40,9GB  ext4                                  msftdata
 8      206GB   743GB   537GB   ext4                                  msftdata
15      743GB   747GB   4000MB  linux-swap(v1)                        msftdata
grub:
menuentry 'Linux Mint 17 Cinnamon 64-bit, 3.13.0-24-generic (/dev/sda5)' --class ubuntu --class gnu-linux --class gnu --class os {
    recordfail
    gfxmode $linux_gfx_mode
    insmod gzio
    insmod part_gpt
    insmod ext2
    set root='hd0,gpt5'
    if [ x$feature_platform_search_hint = xy ]; then
      search --no-floppy --fs-uuid --set=root --hint-bios=hd0,gpt5 --hint-efi=hd0,gpt5 --hint-baremetal=ahci0,gpt5  19af2e09-8946-4ca2-9655-75921f3609a5
    else
      search --no-floppy --fs-uuid --set=root 19af2e09-8946-4ca2-9655-75921f3609a5
    fi
    linux   /vmlinuz-3.13.0-24-generic root=UUID=9356f543-f391-4ba5-9dcc-e8484d6935e0 ro   quiet splash $vt_handoff
    initrd  /initrd.img-3.13.0-24-generic
}
menuentry 'Linux Mint 17 Cinnamon 64-bit, 3.13.0-24-generic (/dev/sda5) -- recovery mode' --class ubuntu --class gnu-linux --class gnu --class os {
    recordfail
    insmod gzio
    insmod part_gpt
    insmod ext2
    set root='hd0,gpt5'
    if [ x$feature_platform_search_hint = xy ]; then
      search --no-floppy --fs-uuid --set=root --hint-bios=hd0,gpt5 --hint-efi=hd0,gpt5 --hint-baremetal=ahci0,gpt5  19af2e09-8946-4ca2-9655-75921f3609a5
    else
      search --no-floppy --fs-uuid --set=root 19af2e09-8946-4ca2-9655-75921f3609a5
    fi
    echo    'Loading Linux 3.13.0-24-generic ...'
    linux   /vmlinuz-3.13.0-24-generic root=UUID=9356f543-f391-4ba5-9dcc-e8484d6935e0 ro recovery nomodeset
    echo    'Loading initial ramdisk ...'
    initrd  /initrd.img-3.13.0-24-generic
}


menuentry 'Manjaro Linux (0.8.10) (on /dev/sda11)' --class gnu-linux --class gnu --class os $menuentry_id_option 'osprober-gnulinux-simple-95ed019d-9269-4869-9f99-a03f002a53c6' {
    insmod part_gpt
    insmod ext2
    set root='hd0,gpt11'
    if [ x$feature_platform_search_hint = xy ]; then
      search --no-floppy --fs-uuid --set=root --hint-bios=hd0,gpt11 --hint-efi=hd0,gpt11 --hint-baremetal=ahci0,gpt11  95ed019d-9269-4869-9f99-a03f002a53c6
    else
      search --no-floppy --fs-uuid --set=root 95ed019d-9269-4869-9f99-a03f002a53c6
    fi
    linux /boot/vmlinuz-312-x86_64 root=/dev/sda11
    initrd /boot/initramfs-312-x86_64.img
}
submenu 'Advanced options for Manjaro Linux (0.8.10) (on /dev/sda11)' $menuentry_id_option 'osprober-gnulinux-advanced-95ed019d-9269-4869-9f99-a03f002a53c6' {
    menuentry 'Manjaro Linux (0.8.10) (on /dev/sda11)' --class gnu-linux --class gnu --class os $menuentry_id_option 'osprober-gnulinux-/boot/vmlinuz-312-x86_64--95ed019d-9269-4869-9f99-a03f002a53c6' {
        insmod part_gpt
        insmod ext2
        set root='hd0,gpt11'
        if [ x$feature_platform_search_hint = xy ]; then
          search --no-floppy --fs-uuid --set=root --hint-bios=hd0,gpt11 --hint-efi=hd0,gpt11 --hint-baremetal=ahci0,gpt11  95ed019d-9269-4869-9f99-a03f002a53c6
        else
          search --no-floppy --fs-uuid --set=root 95ed019d-9269-4869-9f99-a03f002a53c6
        fi
        linux /boot/vmlinuz-312-x86_64 root=/dev/sda11
        initrd /boot/initramfs-312-x86_64.img
    }
}
This is what I see when I try to install my app on my device (I’m using Android Studio 0.8.2):
Waiting for device.
Target device: samsung-gt_s7500-cf994b04
Uploading file
local path: C:UsersAdministratorAndroidStudioProjectsTestaquaappbuildoutputsapkapp-debug.apk
remote path: /data/local/tmp/com.example.administrator.testaqua
Installing com.example.administrator.testaqua
DEVICE SHELL COMMAND: pm install -r "/data/local/tmp/com.example.administrator.testaqua"
pkg: /data/local/tmp/com.example.administrator.testaqua
Failure [INSTALL_FAILED_INVALID_URI]
What in the seven hells does this error mean?
[Edited] I installed my app on another rooted device, and it worked; it seems the problem is my device, android studio is running fine.
![]()
ben75
28.8k9 gold badges88 silver badges134 bronze badges
asked Jul 23, 2014 at 13:40
![]()
1
I get similar error message, I fixed it by passing the absolute path instead of filename, e.g. inside adb shell, this command will shows:
shell@example:/sdcard $ pm install -r -d app-release.apk
        pkg: app-release.apk
Failure [INSTALL_FAILED_INVALID_URI]
Change it to absolute path fixed that error message, e.g.:
pm install -r -d /sdcard/app-release.apk
[Second reason]
Another reason is the file not exist. It happen when I interrupt adb push <apk> /sdcard/ by Ctrl+C recently. Re-push apk twice required.
[Third reason]
This error occurred if the apk reside /mnt/runtime/default/<thumb_drive_mounted_directory>, I have to move the apk to /sdcard/ first to install.
answered Jul 11, 2017 at 12:37
![]()
林果皞林果皞
7,3813 gold badges52 silver badges69 bronze badges
From this blog try this :
Change permission of /data/local to rwxrwxrwx (normally it must be rwxrwxrw-)
i.e. grant execution privileges to all users.
answered Jul 23, 2014 at 14:53
![]()
ben75ben75
28.8k9 gold badges88 silver badges134 bronze badges
2
symptoms: `
$ adb install xyz.apk
[100%] /data/local/tmp/xyz.apk
    pkg: cat
    ver: /data/local/tmp/xyz.apk
Failure [INSTALL_FAILED_INVALID_URI]
solution:
check if u have allow installation from unknown sources enabled 

answered Mar 21, 2016 at 15:02
![]()
ceph3usceph3us
7,1683 gold badges35 silver badges42 bronze badges
Finally, I found the reason is dir and file permission.
Android seems to use another user to access the dir and file.
chmod 775 /data/local/tmp/somedir         ==> rwxrwx<b>r-x</b><br>
chmod 774 /data/local/tmp/somedir/a.apk   ==> rwxrwx<b>r</b>--<br>
The above setting will be OK!
![]()
answered May 15, 2015 at 9:36
![]()
osexp2003osexp2003
2,73428 silver badges26 bronze badges
It happened with my Flutter app once. Removing apk file from your-project-namebuildappoutputsapkdebug and running the app again solved the issue. Before this issue happened, I closed running Flutter app manually from the phone while it was still attached to terminal and running.
answered Dec 16, 2021 at 5:09
![]()
ElmarElmar
1,23313 silver badges16 bronze badges
- Index
- » Newbie Corner
- » Root device mounted successfully, but /sbin/init does not exist.
#1 2016-11-03 10:18:39
- rohithreddy
- Member
- Registered: 2016-04-05
- Posts: 38
Root device mounted successfully, but /sbin/init does not exist.
I upgraded system and restarted,now I’m stuck here
/dev/sda1: recovering journal
Error:Root device mounted successfully, but /sbin/init does not exist.
Bailing out, you are on your own.Good luck.
sh: can’t access tty; job control turned off
[rootfs ]#
[rootfs ]# ls
VERSION  config hooks lib proc sbin usr
Bin dev init lib64 root sys
buildconfig  etc init_functions new_root run to
[rootfs new_root]#ls -l /sbin/init  -> busybox
From chroot
ls -l /sbin/init ->lib/systemd/systemd
mkinitcpio -p linux
Building image from preset: /etc/mkinitcpio.d/linux.preset:'default'
Starting build: 4.8.6-1-ARCH
Running build hook: [base]
Running build hook: [udev]
ERROR: file not found '/usr/lib/systemd/systemd-udevd'
ERROR:binary dependency 'libsystemd-shared-231.so' not found for '/usr/bin/systemd-tmpfiles'
Running build hook: [autodetect]
Running build hook: [modconf]
Running build hook: [block]
WARNING: errors were encountered during the build.the image may not be complete.Fallback initramfs
systemd-tmpfiles: error while loading shared libraries: libsystemd-shared-231.so: cannot open shared object file: No such file or directory
/Init:line 23:/usr/lib/systemd/systemd-udevd':not found
ERROR : device 'UUID=769248f5-7eab-4bc6-777d-14b24f8731f8 'not found.Skipping fsck.
ERROR: Unable to find root device 'UUID='769248f5-7eab-4bc6-777d-14b24f8731f8'.
You are being dropped to a recovery shell
   Type 'exit' to try and continue booting
Sh: can't access tty; job control turned off
[Rootfs ]#
Tried pacman -S systemd
Warning: could not get file information for /usr/lib/systemd/libsystemd-shared-231.so
Warning: could not get file information for /usr/lib/systemd/systemd
Warning: could not get file information for /usr/lib/systemd/systemd-journald
Warning: could not get file information for /usr/lib/systemd/systemd-logind
Warning: could not get file information for /usr/lib/systemd/udevd
How can I resolve this?Please help me
Last edited by rohithreddy (2016-11-04 09:09:59)
#2 2016-11-03 11:06:43
- rohithreddy
- Member
- Registered: 2016-04-05
- Posts: 38
Re: Root device mounted successfully, but /sbin/init does not exist.
Hey,can anyone please help me
my boot partition and root partitions are same and root partition is mounted at new_root
sbin/init points to /lib/systemd/systemd
#3 2016-11-03 11:22:47
- WorMzy
- Forum Moderator

- From: Scotland
- Registered: 2010-06-16
- Posts: 11,019
- Website

Re: Root device mounted successfully, but /sbin/init does not exist.
Sakura:-
Mobo: MSI MAG X570S TORPEDO MAX // Processor: AMD Ryzen 9 5950X @4.9GHz // GFX: AMD Radeon RX 5700 XT // RAM: 32GB (4x 8GB) Corsair DDR4 (@ 3000MHz) // Storage: 1x 3TB HDD, 6x 1TB SSD, 2x 120GB SSD, 1x 275GB M2 SSD
Making lemonade from lemons since 2015.
#4 2016-11-03 11:26:26
- rohithreddy
- Member
- Registered: 2016-04-05
- Posts: 38
Re: Root device mounted successfully, but /sbin/init does not exist.
Wow,Got reply!
I was reading other threads and moderator asked to post where sbin/init points to so I posted that
#5 2016-11-03 14:32:19
- Scimmia
- Fellow

- Registered: 2012-09-01
- Posts: 10,046

Re: Root device mounted successfully, but /sbin/init does not exist.
This usually happens because you’re mounting the wrong partition as «root» in the kernel command line.
#6 2016-11-03 16:06:48
- rohithreddy
- Member
- Registered: 2016-04-05
- Posts: 38
Re: Root device mounted successfully, but /sbin/init does not exist.
I’ve not changed anything,I just upgraded with command pacman -Syyu and after that my system stuck for a while,so I restarted and I got error.
What should I do in order to recover?
I can’t even edit files with nano
#7 2016-11-03 17:22:36
- ewaller
- Administrator
- From: Pasadena, CA
- Registered: 2009-07-13
- Posts: 19,011

Re: Root device mounted successfully, but /sbin/init does not exist.
Tell us about your partition scheme ( lsblk -af )
Tell us which bootloader you are using.
Tell us about your bootloader configuratuion
I don’t have any idea what files you are trying to edit with nano, or what environment you are in (I suspect a recovery shell). You may need to boot an install media and work from there.
Nothing is too wonderful to be true, if it be consistent with the laws of nature — Michael Faraday
Sometimes it is the people no one can imagine anything of who do the things no one can imagine. — Alan Turing
—
How to Ask Questions the Smart Way
#8 2016-11-03 18:17:32
- rohithreddy
- Member
- Registered: 2016-04-05
- Posts: 38
Re: Root device mounted successfully, but /sbin/init does not exist.
Hi ewaller, I’m at [rootfs ]# , I tried lsblk -af ,I got lsblk not found.
Bootloader is grub,I was referring to rookie comment https://bbs.archlinux.org/viewtopic.php?id=219105 he asked to edit bootloader configuration to include init=/usr/lib/systemd/systemd
#9 2016-11-04 04:20:40
- rohithreddy
- Member
- Registered: 2016-04-05
- Posts: 38
Re: Root device mounted successfully, but /sbin/init does not exist.
Somehow I managed to get a live usb ,could anyone help me from here?
I’ve only one partition /dev/sda1 that uuid is same as in grub.cfg file
Here is grub.cfg
insmod part_gpt
insmod part_msdos
If [ -s $prefix/grubenv]; then
 load_env
Fi
if [$nextentry]
  set default=$next_entry
  set next_entry=
  save_env next_entry
  set boot_once =true
else
  Set default="0"
Fi
.
.
insmod part_msdos
insmod ext2
set root='hd0,msdos1'
if[x$feature_platform_search_hint =xy];then
 Search --no-floppy --fs-uuid --set=root --hint-bios=hd0,msdos1 --hint-bios metal=ahci0,msdos1 769248f5-7eab-4bc6-777d-14b24f8731f8
else
 search --no-floppy --fs-uuid --set=root 769248f5-7eab-4bc6-777d-14b24f8731f8
Fi
 Font="/usr/share/grub/Unicode.pf2"
Fi
.
.
menu entry 'arch linux' --class 'arch --class gnu-linux --class gnu-linux --class os $menuentry_id_option 'gnulinux-simple-uuid' {
 load_video
 set gfxpayload=keep
 Insmod gzio
insmod part_msdos
 set root='hd0,msdos1'
if[x$feature_platform_search_hint =xy];then
 Search --no-floppy --fs-uuid --set=root --hint-bios=hd0,msdos1 --hint-bios metal=ahci0,msdos1 769248f5-7eab-4bc6-777d-14b24f8731f8
else
 search --no-floppy --fs-uuid --set=root #uuid
Fi
echo 'Loading Linux linux...'
linux /boot/vmlinuz-linux root=UUID=769248f5-7eab-4bc6-777d-14b24f8731f8 rw quiet
echo 'Loading initial ramdisk'
United /boot/initramfs-linux.img
}
Last edited by rohithreddy (2016-11-04 05:52:59)
#10 2016-11-04 04:47:33
- jasonwryan
- Anarchist

- From: .nz
- Registered: 2009-05-09
- Posts: 30,376
- Website

Re: Root device mounted successfully, but /sbin/init does not exist.
grub config wrote:
linux /boot/vmlinuz-linux root=UUID=uuid rw quiet
That isn’t going to work…
Arch + dwm • Mercurial repos • Surfraw
Registered Linux User #482438
#11 2016-11-04 05:14:17
- rohithreddy
- Member
- Registered: 2016-04-05
- Posts: 38
Re: Root device mounted successfully, but /sbin/init does not exist.
So,I can’t recover?
Does it work if I install grub on /dev/sda1 again?
Everytime I upgrade I run into some problem,I don’t want to loose my data
#13 2016-11-04 05:34:12
- rohithreddy
- Member
- Registered: 2016-04-05
- Posts: 38
Re: Root device mounted successfully, but /sbin/init does not exist.
linux /boot/vmlinuz-linux root=UUID=769248f5-7eab-4bc6-777d-14b24f8731f8 rw quietIt actually points to correct UUID
I wrote uuid in short for my uuid(769248f5-7eab-4bc6-777d-14b24f8731f8) in the code as I’m on mobile rn
What am I missing?
Here’s my /etc/default/grub
GRUB_DEFAULT=0
GRUB_TIMEOUT=5
GRUB_ DISTRIBUTOR="'arch"
GRUB_CMDLINE_LINUX_DEFAULT="QUEIT"
Grub_CMDLINE_LINUX=""
grub_PRELOAD_MODULES="part_gpt part_msdos"
.
.
#GRUB_DISABLE_LINUX_UUID=true

GRUB_DISABLE_RECOVERY=true
Last edited by rohithreddy (2016-11-04 06:01:06)
#14 2016-11-04 06:21:05
- rohithreddy
- Member
- Registered: 2016-04-05
- Posts: 38
Re: Root device mounted successfully, but /sbin/init does not exist.
From chroot I’m trying to install grub but I get
pacman: error while loading shared libraries:/usr/lib/liblz4.so.1: invalid ELF header
Tried to generate grub.cfg file
grub-mkconfig -o /boot/grub/grub.cfg
Generating linux image:/boot/vmlinuz-linux
Found initrd image(s) int /boot: initramfs-linux.cfg
Found fallback initrd image in/boot:initramfs-linux-fallback.cfg
logger:error while loading shared libraries:/usr/lib/liblz4.so.1: invalid ELF header
logger:error while loading shared libraries:/usr/lib/liblz4.so.1: invalid ELF header
logger:error while loading shared libraries:/usr/lib/liblz4.so.1: invalid ELF header
logger:error while loading shared libraries:/usr/lib/liblz4.so.1: invalid ELF header
logger:error while loading shared libraries:/usr/lib/liblz4.so.1: invalid ELF header
logger:error while loading shared libraries:/usr/lib/liblz4.so.1: invalid ELF header
logger:error while loading shared libraries:/usr/lib/liblz4.so.1: invalid ELF header
logger:error while loading shared libraries:/usr/lib/liblz4.so.1: invalid ELF header
  Warning: Failed to connect to lvmetad. Falling back to device scanning
logger:error while loading shared libraries:/usr/lib/liblz4.so.1: invalid ELF header
done
Could anyone please help
Last edited by rohithreddy (2016-11-04 06:35:14)
#15 2016-11-04 06:43:20
- jasonwryan
- Anarchist
- From: .nz
- Registered: 2009-05-09
- Posts: 30,376
- Website
Re: Root device mounted successfully, but /sbin/init does not exist.
While in the chroot, reinstall lz4 and -Syu.
Arch + dwm • Mercurial repos • Surfraw
Registered Linux User #482438
#16 2016-11-04 07:01:53
- rohithreddy
- Member
- Registered: 2016-04-05
- Posts: 38
Re: Root device mounted successfully, but /sbin/init does not exist.
I get same error:
pacman -S lz4
pacman: error while loading shared libraries:/usr/lib/liblz4.so.1: invalid ELF headerEverytime I upgrade I run into some problem and I had to reinstall again,Is there a way to get in?
Last edited by rohithreddy (2016-11-04 07:06:15)
#17 2016-11-04 07:04:07
- jasonwryan
- Anarchist
- From: .nz
- Registered: 2009-05-09
- Posts: 30,376
- Website
Re: Root device mounted successfully, but /sbin/init does not exist.
From outside the chroot do `pacman -r /mnt -S lz4`.
Arch + dwm • Mercurial repos • Surfraw
Registered Linux User #482438
#18 2016-11-04 07:11:06
- rohithreddy
- Member
- Registered: 2016-04-05
- Posts: 38
Re: Root device mounted successfully, but /sbin/init does not exist.
No errors with lz4
grub-mkconfig -o /boot/grub/grub.cfg
Generating linux image:/boot/vmlinuz-linux
Found initrd image(s) int /boot: initramfs-linux.cfg
Found fallback initrd image in/boot:initramfs-linux-fallback.cfg
  Warning: Failed to connect to lvmetad. Falling back to device scanning
done
#19 2016-11-04 07:13:02
- jasonwryan
- Anarchist
- From: .nz
- Registered: 2009-05-09
- Posts: 30,376
- Website
Re: Root device mounted successfully, but /sbin/init does not exist.
Ignore the lvm warning. Check the grub config to make sure it actually does have a valid kernel line and then reboot.
Arch + dwm • Mercurial repos • Surfraw
Registered Linux User #482438
#20 2016-11-04 07:15:02
- rohithreddy
- Member
- Registered: 2016-04-05
- Posts: 38
Re: Root device mounted successfully, but /sbin/init does not exist.
Thanks for helping and your patience.
I didn’t get» valid kernel line».what is that?
linux /boot is pointing to correct uuid
#21 2016-11-04 07:44:13
- rohithreddy
- Member
- Registered: 2016-04-05
- Posts: 38
Re: Root device mounted successfully, but /sbin/init does not exist.
Here’s the entire grub.cfg file
insmod part_gpt
insmod part_msdos
If [ -s $prefix/grubenv]; then
 load_env
Fi
if [$nextentry]
  set default=$next_entry
  set next_entry=
  save_env next_entry
  set boot_once =true
else
  Set default="0"
Fi
if [ x"${feature_menuentry_id}" = xy]; then
  menuentry_id_option="--id"
else
  menuentry_id_option=""
Fi
export menuentry_id_option
if ["${prev_saved_entry}"];then]
  set saved_entry=$prev_saved_entry
  save_env saved_entry
  set prev_saved_entry=
  save_env prev_saved_entry
  set boot_once =true
fi
function savedefault {
  if[-z "${boot_once}"]; then
     saved_entry="$chosen"
      Save_env saved_entry
   Fi
}

insmod part_msdos
insmod ext2
set root='hd0,msdos1'
if[x$feature_platform_search_hint =xy];then
 Search --no-floppy --fs-uuid --set=root --hint-bios=hd0,msdos1 --hint-bios metal=ahci0,msdos1 769248f5-7eab-4bc6-777d-14b24f8731f8
else
 search --no-floppy --fs-uuid --set=root 769248f5-7eab-4bc6-777d-14b24f8731f8
Fi
 Font="/usr/share/grub/Unicode.pf2"
Fi
.
.
menu entry 'arch linux' --class 'arch --class gnu-linux --class gnu-linux --class os $menuentry_id_option 'gnulinux-simple-uuid' {
 load_video
 set gfxpayload=keep
 Insmod gzio
insmod part_msdos
 set root='hd0,msdos1'
if[x$feature_platform_search_hint =xy];then
 Search --no-floppy --fs-uuid --set=root --hint-bios=hd0,msdos1 --hint-bios metal=ahci0,msdos1 769248f5-7eab-4bc6-777d-14b24f8731f8
else
 search --no-floppy --fs-uuid --set=root #uuid
Fi
echo 'Loading Linux linux...'
linux /boot/vmlinuz-linux root=UUID=769248f5-7eab-4bc6-777d-14b24f8731f8 rw quiet
echo 'Loading initial ramdisk'
United /boot/initramfs-linux.img
}
submenu 'Advanced options for 'Arch Linux' $menuentry_id_option 'gnulinux-advanced-769248f5-7eab-4bc6-777d-14b24f8731f8'{
  menu entry 'arch linux, with Linux linux' --class 'arch --class gnu-linux --class gnu-linux --class os $menuentry_id_option 'gnulinux-linux-advanced- 769248f5-7eab-4bc6-777d-14b24f8731f8'{
 load_video
 set gfxpayload=keep
 Insmod gzio
insmod part_msdos
insmod ext2
 set root='hd0,msdos1'
if[x$feature_platform_search_hint =xy];then
 Search --no-floppy --fs-uuid --set=root --hint-bios=hd0,msdos1 --hint-bios metal=ahci0,msdos1 769248f5-7eab-4bc6-777d-14b24f8731f8
else
 search --no-floppy --fs-uuid --set=root 769248f5-7eab-4bc6-777d-14b24f8731f8
Fi
echo 'Loading Linux linux...'
linux /boot/vmlinuz-linux root=UUID=769248f5-7eab-4bc6-777d-14b24f8731f8 rw quiet
echo 'Loading initial ramdisk'
initrd /boot/initramfs-linux.img
}
menu entry 'arch linux, with Linux linux(fallback initramfs)' --class 'arch --class gnu-linux --class gnu-linux --class os $menuentry_id_option 'gnulinux-linux-advanced- 769248f5-7eab-4bc6-777d-14b24f8731f8'{
 load_video
 set gfxpayload=keep
 Insmod gzio
insmod part_msdos
insmod ext2
 set root='hd0,msdos1'
if[x$feature_platform_search_hint =xy];then
 Search --no-floppy --fs-uuid --set=root --hint-bios=hd0,msdos1 --hint-bios metal=ahci0,msdos1 769248f5-7eab-4bc6-777d-14b24f8731f8
else
 search --no-floppy --fs-uuid --set=root 769248f5-7eab-4bc6-777d-14b24f8731f8
Fi
echo 'Loading Linux linux...'
linux /boot/vmlinuz-linux root=UUID=769248f5-7eab-4bc6-777d-14b24f8731f8 rw quiet
echo 'Loading initial ramdisk'
initrd /boot/initramfs-linux-fallback.img
}

}
Last edited by rohithreddy (2016-11-04 07:46:22)
#22 2016-11-04 07:46:07
- jasonwryan
- Anarchist
- From: .nz
- Registered: 2009-05-09
- Posts: 30,376
- Website
Re: Root device mounted successfully, but /sbin/init does not exist.
Reboot and see if it works. Don’t expect us to hold your hand through every step here…
Arch + dwm • Mercurial repos • Surfraw
Registered Linux User #482438
#23 2016-11-04 07:48:48
- rohithreddy
- Member
- Registered: 2016-04-05
- Posts: 38
Re: Root device mounted successfully, but /sbin/init does not exist.
I did pacman -Syu and I did reboot but still I’m stuck at
/dev/sda1: recovering journal
Error:Root device mounted successfully, but /sbin/init does not exist.
Bailing out, you are on your own.Good luck.
sh: can't access tty; job control turned off
[rootfs ]#
Rookie asked to edit https://bbs.archlinux.org/viewtopic.php?id=219105 he asked to edit bootloader configuration to include init=/usr/lib/systemd/systemd
Where should I add that?
Last edited by rohithreddy (2016-11-04 07:51:34)
#25 2016-11-04 08:01:39
- rohithreddy
- Member
- Registered: 2016-04-05
- Posts: 38
Re: Root device mounted successfully, but /sbin/init does not exist.
I’ve only one desktop and now I’m using mobile though. I opened this thread after reading several threads with same problem.None of them helped me.
[rootfs ]# ls
VERSION  config hooks lib proc sbin usr
Bin dev init lib64 root sys
buildconfig  etc init_functions new_root run to
[rootfs new_root]#ls -l /sbin/init  -> busybox
From chroot
ls -l /sbin/init ->lib/systemd/systemd
Appreciate your help
Last edited by rohithreddy (2016-11-04 08:01:53)