vue-error-page [NO LONGER MAINTAINED]

Provides a wrapper for router-view that allows you to show error pages without changing the URL.
Why?
Because:
- Trigger router-view change without changing current URL
- How to load 404 component conditionally
- Handling 404’s with router
- 404 after xmlhttprequest
- 404 in SPA
Install
You can install this package via yarn (or npm):
$ yarn add vue-error-page
Usage
Setup
This package depends on a global event bus in order to emit events that will show the error page. You must first define an event bus on the window object. By default it looks for the eventBus key but you can configure this to use a different key.
import Vue from 'vue';
import ErrorPage from 'vue-error-page';

window.eventBus = new Vue();

Vue.use(ErrorPage);
Options
Vue.use(ErrorPage, {
    tagName: 'app-view',
    bus: 'eventBus',
    event: 'error-page',
    resolver: (component) => {
        return require('./views/Errors/' + component).default;
    }
});
| Option | Default Value | Description |
|---|---|---|
| tagName | ‘app-view’ | The name of the component that wraps router-view. |
| bus | ‘eventBus’ | The name of the event bus. (Must be defined on window.) |
| event | ‘error-page’ | The name of the event being emitted and listened to. |
| resolver | (component) => { return component; } | This is essentially just a shortcut for importing the component. This will not work with SSR. |
The wrapper component
Then you can swap router-view with app-view (or whatever you defined for tagName).
<template>
    <div>
        <header></header>
        <nav></nav>
        <app-view></app-view>
        <footer></footer>
    </div>
</template>
Triggering the error page
Finally, you can use the $_error() method injected into all components. You can call it to display a specific error page.
Example route
{
    path: '/profile/:username',
    component: require('./views/Profile').default
}
views/Errors/NotFound.vue
<template>
    <div>
        <h1>404 Error</h1>
        <p>The resource could not be found.</p>
        <router-link to="/" exact>
            Go to home page
        </router-link>
    </div>
</template>
views/Profile.vue
import NotFound from './views/Errors/NotFound';

axios.get('/profile/' + this.$route.params.username)
    .then((response) => {
        // user was found
    })
    .catch((error) => {
        if (error.response.status === 404) {
            this.$_error(NotFound);
        }
    });
If you decided to define a resolver, you can directly specify the filename of the component like this this.$_error('NotFound').
Additionally, if you name your error components after status codes like this 404.vue, you can trigger error pages like this this.$_error(404).
Passing additional data to the error page
You can pass a payload as an additional argument to $_error().
this.$_error(404, {
    username: this.$route.params.username
});
The payload will be available as a prop in the component.
<template>
    <div>
        <h1>404 Error</h1>
        <p>User {{ payload.username }} not found.</p>
        <router-link to="/" exact>
            Go to home page
        </router-link>
    </div>
</template>

<script>
export default {
    props: ['payload']
};
</script>
Contributing
Please see CONTRIBUTING for details.
License
Released under the MIT License.
Последнее обновление: 04.11.2020
Распространенной задачей в веб-приложениях является обработка несущеcтвующих путей, когда приложение не может сопоставить запрошенный адрес ни с одним из ресурсов приложения.
Рассмотрим, как это можно сделать во Vue 3.
<!DOCTYPE html>
<html>
<head>
<title>Маршрутизация во Vue 3</title>
<meta charset="utf-8" />
<style>
ul{list-style-type: none;padding: 0;}
li{display: inline-block;}
a{padding: 5px;}
a.router-link-active, li.router-link-active>a {
  color: red;
}
</style>
</head>
<body>
<div id="app">
	<ul>
      <li><router-link to="/">Home</router-link></li>
      <li><router-link to="/about">About</router-link></li>
    </ul>
    <router-view></router-view>
</div>
<script src="https://unpkg.com/vue@next"></script>
<script src="https://unpkg.com/vue-router@next"></script>
<script>
const Home = { template: '<h2>Home Page</h2>' }
const About = { template: '<h2>About Page</h2>' }
const NotFound = { template: '<h2>Page Not Found</h2>' }

const routes = [
  { path: '/', component: Home },
  { path: '/about', component: About },
  { path: '/:pathMatch(.*)*', component: NotFound },
];
const router = VueRouter.createRouter({
  history: VueRouter.createWebHistory(),
  routes,
});

const app = Vue.createApp({});
app.use(router);
app.mount('#app');
</script>
</body>
</html>
Для обработки запросов к несуществующим ресурсам применяется компонент NotFound, который просто выводит соответствующую информацию:
const NotFound = { template: '<h2>Page Not Found</h2>' }
Этом компонент обрабатывает запросы по следующему маршруту:
{ path: '/:pathMatch(.*)*', component: NotFound }
В данном случае шаблон маршрута выглядит несколько замыславато: «/:pathMatch(.*)*». Фактически он означает, что вся часть после слеша расценивается
как параметр pathMatch, который может иметь произвольное количество символов и произвольное количество сегментов. То есть по сути он будет представлять запрос, которому
не соответствуют другие маршруты.
В итоге при обращении к несуществующему ресурсу запрос будет будет обрабатываться компонентом NotFound:
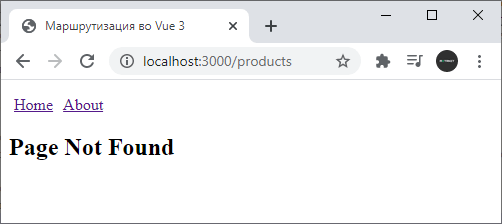

Константин Базров
ведущий разработчик NGRSOFTLAB
С появлением веб-приложений пришла потребность в смене URL-адресов с помощью JS. На помощь пришел History API браузера.
Благодаря этому все основные современные фреймворки позволяют программно управлять маршрутизацией с синхронизацией URL-адреса с представлением приложения.
Для маршрутизации во Vue-приложениях можно создать свою собственную интеграцию с History API, но лучше использовать официальную библиотеку от Vue — Vue-Router.
Базовые вещи
Использование можно начать хоть с установки с CDN:
<script src="https://unpkg.com/vue-router"></script>
Но мы начнем сразу с «правильного» варианта — с Vue Cli:
yarn global add @vue/cli

# ИЛИ

npm i -g @vue/cli
Создадим проект с помощью VUE CLI с базовым шаблоном — Default ([Vue 2] babel, eslint):
vue create vue-router-test-app
Минимальная конфигурация
Добавим роутер:
yarn add vue-router

# или

npm i --save vue-router
Добавим в Main.js минимальную конфигурацию для роутера:
/src/main.js
import Vue from "vue";
import App from "@/App.vue";
import VueRouter from "vue-router";
import HelloWorld from "@/components/HelloWorld";

Vue.use(VueRouter);

const routes = [
  {
    path: "",
    component: HelloWorld,
  },
];

const router = new VueRouter({
  routes,
  mode: "history",
});

Vue.config.productionTip = false;

new Vue({
  router,
  render: (h) => h(App),
}).$mount("#app");
Роуты представляют собой массив, каждый элемент которого — объект, где требуется указать path и component.
Чтобы увидеть изменения надо вывести компонент роутера — routerView, который отвечает за отображение. Для этого изменим App.vue:
/src/App.vue
<template>
  <div id="app">
    <router-view />
  </div>
</template>
Теперь, зайдем на http://localhost:8080/. Увидим страницу с маршрутом «/», где отображается компонент HelloWorld.vue, вместо тега router-view, который мы писали в App.vue.
Иерархия путей
Добавим маршрут в main.js (массив routes):
const routes = [
  {
    path: "",
    component: HelloWorld,
  },
  {
    path: "/board",
    component: {
      render: (h) => h("div", ["Board Page"]),
    },
  },
];
Зайдем по адресу http://localhost:8080/board. Увидим вторую страницу с отображением рендер-функции.
Параметры (Props) маршрута
Поправим дочерний маршрут для маршрута /board в main.js. Для дочерних компонентов надо указывать где в родительском компоненте отображать дочерние — компонентом router-view. В нашем случае — это в рендер-функция:
import Board from "@/components/Board";
const routes = [
  {
    path: "",
    component: HelloWorld,
  },
  {
    path: "/board",
    component: {
      render: (h) => h("div", ["Board Page", h("router-view")]),
    },
    children: [
      {
        path: '/board/:id',
        component: Board,
      }
    ]
  },
];
Напомню, что рендер-функция в template-представлении будет выглядеть следующим образом:
<template>
  <div>
    Board Page
    <router-view />
  </div>
</template>
Создадим компонент Board.vue с содержимым:
/src/components/Board.vue
<template>
  <div>Board with prop id: {{ id }}</div>
</template>

<script>
export default {
  computed: {
    id() {
      return this.$route.params.id;
    },
  },
};
</script>
Перейдем по адресу http://localhost:8080/board/21 и увидим родительский и дочерний компоненты Board с передачей параметра id равным 21.
Параметры маршрута доступны в компоненте по this.$route.params.
Если хотим более явно отобразить зависимость компонента от входных параметров, используем настройку props: true при настройке маршрута:
/src/main.js
children: [
  {
    path: '/board/:id',
    component: Board,
    props: true,
  }
]
А в компоненте Board.vue принять id как входной параметр компонента:
/src/components/Board.vue
<template>
  <div>Board with prop id: {{ id }}</div>
</template>

<script>
export default {
  props: {
    id: {
      type: String,
      default: null,
    },
  },
};
</script>
Метаданные (meta) маршрута
/src/main.js
  const routes = [
    {
      path: "",
      component: HelloWorld,
      meta: {
        dataInMeta: "test",
      },
    },
     ....
   ]
Теперь мы можем обратиться к метаданным роута из компонента HelloWorld.vue следующим образом:
this.$route.meta.dataInMeta.
Глубже (nested children)
В дочерние компоненты можно углубляться до бесконечности (до ограничений сервера).
Сделаем дочерний роут для дочернего роута.
/src/main.js
const routes = [
  {
    path: "",
    component: HelloWorld,
  },
  {
    path: "/board",
    component: {
      render: (h) => h("div", ["Board Page", h("router-view")]),
    },
    children: [
      {
        path: "/board/:id",
        component: Board,
        props: true,
        children: [
          {
            path: "child",
            component: {
              render: function(h) {
                return h("div", ["I'm Child with prop", this.propToChild]);
              },
              props: {
                propToChild: {
                  type: Number,
                  required: true,
                  default: null,
                },
              },
            },
          },
        ],
      },
    ],
  },
];
Рендер-функция теперь записана обычной функцией, т.к. нужен контекст компонента.
/src/components/Board.vue
<template>
  <div>
    Board with prop id: {{ id }}
    <router-view :prop-to-child="parseInt(id)" />
  </div>
</template>

<script>
export default {
  props: {
    id: {
      type: String,
      default: null,
    },
  },
};
</script>
Передаем дочернему компоненту дочернего компонента параметры через компонент router-view как обычному компоненту. Звучит сложно, но интуитивно понятно. И так, спускаем пропсы в дочернем — дочернему дочернего:
<router-view :prop-to-child="parseInt(id)" />
Пояснение за Path
Запись вида path: "child" означает, что мы обращаемся к пути родителя и продолжаем его путь: {parent-route}/child
Из дочернего компонента можно сослаться на любой другой уровень роута:
/src/main.js (routes):
children: [
      {
        path: "/first-level",
        ....
      }
    ]
Эта запись обрабатывает страницу с адресом: http://localhost:8080/first-level.
Шире (несколько router-view)
Можно использовать несколько router-view в 1 компоненте. Для этого в конфигурации маршрутов (routes) пишем вместо component — components, который принимает объект, где ключ — атрибут name у router-view. Если указать ключ «default», то такой компонент будет отображаться, если router-view безымянный (без атрибута name).
/src/main.js
const routes = [
  {
    path: "",
    component: HelloWorld,
  },
  {
    path: "/board",
    component: {
      render: (h) => h("div", ["Board Page", h("router-view")]),
    },
    children: [
      {
        path: "/board/:id",
        component: Board,
        props: true,
        children: [
          {
            path: "child",
            components: {
              default: { render: (h) => h("div", ["I'm Default"]) },
              user: { render: (h) => h("div", ["I'm User"]) },
              guest: { render: (h) => h("div", ["I'm Guest"]) },
            },
          },
        ],
      },
    ],
  },
];
/components/Board.vue
<template>
  <div>
    Board with prop id: {{ id }}
    <div>
      <label for="is-user">
        Is User?
        <input v-model="isUser" id="is-user" type="checkbox" />
      </label>
      <router-view :prop-to-child="parseInt(id)" />
      <router-view v-if="isUser" name="user" />
      <router-view v-else name="guest" />
    </div>
  </div>
</template>

<script>
export default {
  props: {
    id: {
      type: String,
      default: null,
    },
  },
  data() {
    return {
      isUser: false,
    };
  },
};
</script>
Перейдем по адресу: http://localhost:8080/board/23/child и увидим небольшой интерактив с переключением активных router-view.
Страница ошибки 404
Чтобы создать страницу ошибки, достаточно положить в конец списка маршрутов такую конструкцию:
/src/main.js(routes)
{
  path: "*",
  component: { render: (h) => h("div", ["404! Page Not Found!"]) },
},
Теперь, при переходе по несуществующему пути (например — http://localhost:8080/mistake), будет выведен компонент ошибки.
Лучше писать в таком виде:
/src/main.js
{
  path: "/page-not-found",
  alias: '*',
  component: { render: (h) => h("div", ["404! Page Not Found!"]) },
},
Теперь у нас есть страница с ошибкой, куда мы можем со спокойной совестью переадресовывать пользователей (вдруг когда-нибудь понадобится это делать).
Защита маршрутов
Защиту маршрутов осуществляют с использованием метаданных маршрутов и хука beforeEach роутера.
/src/main.js
import Vue from "vue";
import App from "@/App.vue";
import VueRouter from "vue-router";

import HelloWorld from "@/components/HelloWorld";
import Board from "@/components/Board";

Vue.use(VueRouter);

const routes = [
  {
    path: "",
    component: HelloWorld,
  },
  {
    path: "/board",
    component: {
      render: (h) => h("div", ["Board Page", h("router-view")]),
    },
    meta: {
      requiresAuth: true,
    },
    children: [
      {
        path: "/board/:id",
        component: Board,
        props: true,
        children: [
          {
            path: "child",
            components: {
              default: { render: (h) => h("div", ["I'm Default"]) },
              user: { render: (h) => h("div", ["I'm User"]) },
              guest: { render: (h) => h("div", ["I'm Guest"]) },
            },
          },
        ],
      },
    ],
  },
  {
    path: "/auth-required",
    component: { render: (h) => h("div", ["Auth required!"]) },
  },
  {
    path: "/*",
    component: { render: (h) => h("div", ["404! Page Not Found!"]) },
  },
];

const router = new VueRouter({
  routes,
  mode: "history",
});

const isAuthenticated = () => false;

router.beforeEach((to, from, next) => {
  if (to.matched.some((route) => route.meta?.requiresAuth)) {
    if (isAuthenticated()) {
      next();
    } else {
      next("/auth-required");
    }
  } else {
    next();
  }
});

Vue.config.productionTip = false;

new Vue({
  router,
  render: (h) => h(App),
}).$mount("#app");
Теперь, при попытке получить доступ к странице, которая требует авторизации, нас перебросит на страницу /auth-required.
Навигация между маршрутами
Программная навигация
Программная навигация может вызываться из любого места вашего приложения таким образом:
$router.push('/dash/23/child')
Если мы хотим передать параметры, нам нужно использовать другой подход, основанный на использовании имен роутов.
Укажем имя роуту /board/:id:
  ...
   children: [
      {
        path: "/board/:id",
        name: 'board',
        component: Board,
        props: true,
        children: [
   ....
Теперь мы можем передавать параметры:
$router.push({ name: 'board', params: { id: 100500 }})
Получим ошибку «Invalid prop: type check failed for prop «id». Expected String with value «100500», got Number with value 100500».
Причина в том, что url — это всегда тип данных String, а мы передали программно id с типом Number. Исправляется это просто: перечислим возможные типы данных в компоненте.
components/Board.vue
props: {
  id: {
    type: [String, Number],
    default: null,
  },
},
Компонент routerLink
Компонент routerLink позволяет создавать ссылки внутри сайта, которые преобразуются в «нативные» браузерные ссылки (тег <а>):
<router-link to='/dash/23/child'> Link </router-link>
К таким ссылкам автоматически могут добавляться классы:
router-link-exact-active— точное совпадение;router-link-active— частичное (активен дочерний компонент указанного в атрибутеtoроута).
Чтобы не отображать активный класс родительских, достаточно написать атрибут exact:
<router-link to='/dash/23/child' exact> Link </router-link>
Мы можем переопределить создаваемый элемент:
<router-link tag="button" to='/dash'> Button </router-link>
К сожалению, в таком случае, классы не проставляются.
Также можем передавать объект:
<router-link :to="{ path: '/dash/23' "> Link </router-link>
<router-link :to="{ name: 'board', params: { id: 123 } }"> Link </router-link>
Лучшие практики
Этот раздел мы посвятим рефакторингу того, что мы написали выше.
Создаем структуру папок для роутера:
src/router/router.js
src/router/routes.js
Перенесем в router.js все, что касается настроек роутера:
import Vue from "vue";
import VueRouter from "vue-router";
import routes from "/routes";

Vue.use(VueRouter);

const router = new VueRouter({
  routes,
  mode: "history",
  base: process.env.BASE_URL,
});

const isAuthenticated = () => true;

router.beforeEach((to, from, next) => {
  if (to.matched.some((route) => route.meta?.requiresAuth)) {
    if (isAuthenticated()) {
      next();
    } else {
      next("/auth-required");
    }
  } else {
    next();
  }
});

export default router;
Перенесем routes.js все, что касается настроек маршрутов.
И сразу заменим импорты на динамические.
Если у Вас уже прописано много роутов, ручное изменение может потребовать много времени. Поможет регулярка:
^import (w+) from (".+")$
заменить на
const $1 = () => import(/* webpackChunkName: "$1" */ $2)
Теперь в Chrome Dev Tools во вкладке Network будет видно когда-какой компонент грузится из сети, а раньше все роуты загружались сразу в 1 мега-бандле.
src/router/routes.js
const HelloWorld = () => import(/* webpackChunkName: "HelloWorld" */ "@/components/HelloWorld")
const Board = () => import(/* webpackChunkName: "Board" */ "@/components/Board")

const routes = [
  {
    path: "",
    component: HelloWorld,
  },
  {
    path: "/board",
    component: {
      render: (h) => h("div", ["Board Page", h("router-view")]),
    },
    meta: {
      requiresAuth: true,
    },
    children: [
      {
        path: "/board/:id",
        name: "board",
        component: Board,
        props: true,
        children: [
          {
            path: "child",
            components: {
              default: { render: (h) => h("div", ["I'm Default"]) },
              user: { render: (h) => h("div", ["I'm User"]) },
              guest: { render: (h) => h("div", ["I'm Guest"]) },
            },
          },
        ],
      },
    ],
  },
  {
    path: "/auth-required",
    component: { render: (h) => h("div", ["Auth required!"]) },
  },
  {
    path: "/*",
    component: { render: (h) => h("div", ["404! Page Not Found!"]) },
  },
];

export default routes;
Продвинутые приемы
Под «продвинутостью» подразумевается «приятность» их использования. К таким приемам можно отнести, например, такие темы как:
- разбиение прав по уровням доступа;
- анимацию переходов между страницами;
- индикацию загрузки при переходе между роутами;
- изменение тайтлов при переходе между роутами;
- плавный скролл по странице при переходе назад;
- и т.п.
Итак, обо всем по-порядку.
Разбиение прав по уровням доступа
Бывает ситуация, когда у пользователей бывает более двух состояний: не только авторизация, но и другие. Например, платная подписка. С этих пор мы задумываемся про неограниченный уровень разделения прав. Делается это буквально парой десятков строчек кода, но для краткости, удобства и чтобы не изобретать велосипед, мы будем использовать готовую библиотеку. Установим ее:
yarn add vue-router-middleware-plugin
Создадим специальные файлы middleware для проверки прав пользователей:
router/middleware/authMiddleware.js
const isLoggedIn = () => !!window.localStorage.getItem("logged-in")

const authMiddleware = async ({ /* to, from to,*/ redirect }) => {
  if (!isLoggedIn()) {
    redirect({
      name: "login",
    });
  }
};

export default authMiddleware;
router/middleware/guestMiddleware.js
const isLoggedIn = () => !!window.localStorage.getItem("logged-in");

const guestMiddleware = async ({ /* to, from to,*/ redirect }) => {
  if (isLoggedIn()) {
    redirect({ name: "main" });
  }
};

export default guestMiddleware;
router/middleware/subscribersMiddleware.js
const isSubscribed = () => Promise.resolve(!!window.localStorage.getItem("has-license"))

const subscribersMiddleware = async ({ /* to, from, */ redirect }) => {
  if (!await isSubscribed()) {
    console.log("isn't subscribed, redirect to license")
    redirect({ name: 'license' })
  }
}

export default subscribersMiddleware
В последнем листинге, приведен пример асинхронной проверки, что значит — можно обращаться в actions стора и делать запросы на сервер.
Теперь поставим проверку на авторизацию на все роуты, а затем сделаем исключения для некоторых роутов:
/src/router/router.js
import Vue from "vue";
import VueRouter from "vue-router";
import routes from "./routes";
import MiddlewarePlugin from "vue-router-middleware-plugin";
import authMiddleware from "./middleware/authMiddleware";


Vue.use(VueRouter);

const router = new VueRouter({
  routes,
  mode: "history",
  base: process.env.BASE_URL,
});

Vue.use(MiddlewarePlugin, {
  router,
  middleware: [authMiddleware],
});

export default router;
Теперь разберемся с конкретными маршрутами.
Поработаем над архитектурой нашего приложения, чтобы сделать его более предсказуемым. Сделаем отдельный шаблон Auth.vue и положим его в pages, а компоненты, которые там используются, т.е. в разделе /auth, положим в соответствующий раздел components.
Т.о. получается удобная структура:
pages
--Auth.vue
components
-- auth
---- Login.vue
---- Register.vue
---- Forgot.vue
Создадим вспомогательную функцию для генерации подобных роутов genAuthRoutes.
/src/router/routes.js
import guestMiddleware from "./middleware/guestMiddleware";
import authMiddleware from "./middleware/authMiddleware";
import subscribersMiddleware from "./middleware/subscribersMiddleware";

const MainBoard = () =>
  import(/* webpackChunkName: "MainBoard" */ "@/pages/MainBoard");
const BoardComponent = () =>
  import(
    /* webpackChunkName: "BoardComponent" */ "@/components/board/BoardComponent"
  );

const clearAndUpper = (text) => text.replace(/-/, "").toUpperCase();
const toPascalCase = (text) => text.replace(/(^w|-w)/g, clearAndUpper);

const genAuthRoutes = ({ parent, tabs = [] }) => ({
  path: `/${parent}`,
  name: parent,
  component: () => import(/* webpackChunkName: "auth" */ "@/pages/Auth"),
  redirect: { name: tabs[0] },

  children: tabs.map((tab) => {
    const tabPascalCase = toPascalCase(tab);
    return {
      path: tab,
      name: tab,
      component: () =>
        import(
          /* webpackChunkName: "[request]" */ `@/components/${parent}/${tabPascalCase}`
        ),
      meta: {
        middleware: {
          ignore: [authMiddleware],
          attach: [guestMiddleware],
        },
      },
    };
  }),
});
const routes = [
  genAuthRoutes({ parent: "auth", tabs: ["login", "register", "forgot"] }),
  {
    path: "/",
    name: "main",
    component: MainBoard,
    children: [
      {
        path: "/board",
        name: "board",
        component: {
          render: (h) => h("div", ["Board Page", h("router-view")]),
        },
        children: [
          {
            path: "/board/:id",
            name: "board-child",
            component: BoardComponent,
            props: true,
            children: [
              {
                path: "child",
                components: {
                  default: { render: (h) => h("div", ["I'm Default"]) },
                  user: { render: (h) => h("div", ["I'm User"]) },
                  guest: { render: (h) => h("div", ["I'm Guest"]) },
                },
                meta: {
                  middleware: {
                    attach: [subscribersMiddleware],
                  },
                },
              },
            ],
          },
        ],
      },
      {
        path: "/license",
        name: "license",
        component: {
          render: (h) => h("div", ["License Page"]),
        },
      },
    ],
  },
  {
    path: "/auth-required",
    name: "auth-required",
    component: { render: (h) => h("div", ["Auth required!"]) },
    meta: {
      middleware: {
        ignore: [authMiddleware],
      },
    },
  },
  {
    path: "/*",
    component: { render: (h) => h("div", ["404! Page Not Found!"]) },
    meta: {
      middleware: {
        ignore: [authMiddleware],
      },
    },
  },
];

export default routes;
Удаляем глобальную проверку на авторизацию в свойстве ignore и добавляем другую проверку в свойстве attach объекта meta.middleware:
 middleware: {
    ignore: [authMiddleware],
    attach: [guestMiddleware],
 }
Создадим компоненты
- src/components/auth/Login.vue;
- src/components/auth/Register.vue;
- src/components/auth/Forgot.vue,
с типовым шаблоном:
<template>
  <div>
    Forgot Page
  </div>
</template>
Также отрефакторим страницу Board, назовем его MainBoard
/src/pages/MainBoard.vue
<template>
  <div>
    <h1>Main Board Page</h1>
    <router-view />
  </div>
</template>
Соответственно, добавляем компоненты в соответствующую категорию в components:
/src/components/board/BoardComponent.vue
<template>
  <div>
    Board with prop id: {{ id }}
    <div>
      <label for="is-user">
        Is User?
        <input v-model="isUser" id="is-user" type="checkbox" />
      </label>
      <router-view :prop-to-child="parseInt(id)" />
      <router-view v-if="isUser" name="user" />
      <router-view v-else name="guest" />
    </div>
  </div>
</template>

<script>
export default {
  props: {
    id: {
      type: [String, Number],
      default: null,
    },
  },
  data() {
    return {
      isUser: false,
    };
  },
};
</script>
Осталось отрефакторить главный компонент — App.vue:
/src/App.vue
<template>
  <div id="app">
    <div class="links">
      <router-link :to="{ name: 'register' }">Register</router-link>
      <router-link :to="{ name: 'login' }">Login</router-link>
      <router-link :to="{ name: 'forgot' }">Forgot</router-link>
      <template v-if="loggedIn">
        <router-link :to="{ name: 'license' }">License</router-link>
        <router-link :to="{ name: 'board' }">Board</router-link>
        <router-link :to="{ name: 'board-child', params: { id: 33 } }"
          >Board:33</router-link
        >
        <router-link :to="{ path: '/board/33/child' }"
          >Board:33/child</router-link
        >
        <router-link :to="{ path: '/404' }">404</router-link>
      </template>

      <label for="logged-in"
        >Logged In
        <input type="checkbox" id="logged-in" v-model="loggedIn" />
      </label>
      <label for="has-license"
        >Has License
        <input type="checkbox" id="has-license" v-model="hasLicense" />
      </label>
    </div>

    <router-view />
  </div>
</template>

<script>
export default {
  data() {
    return {
      loggedIn: !!window.localStorage.getItem("logged-in"),
      hasLicense: !!window.localStorage.getItem("has-license"),
    };
  },
  watch: {
    loggedIn(e) {
      window.localStorage.setItem("logged-in", e ? true : "");
    },
    hasLicense(e) {
      window.localStorage.setItem("has-license", e ? true : "");
    },
  },
};
</script>

<style scoped>
.links > * {
  margin: 1em;
}
</style>
Теперь, снимем отметку с «Logged In» и попробуем перейти по маршруту http://localhost:8080/board. Нас незамедлительно переадресует на страницу «auth-required».
Поставим отметку на «Logged In», снимем с «Has License» и перейдем по маршруту http://localhost:8080/board/33/child. Нас перенесет на страницу license, однако, если снять отметку с «Logged In» и обновить страницу, то мы снова перейдем на страницу «auth-required».
Теперь проверим, можно ли зайти на страницу авторизации, когда пользователь уже прошел авторизацию. Поставим отметку «Logged In» и перейдем по адресу http://localhost:8080/auth/register. Нас перебросит на главную страницу.
Анимация переходов между страницами
Это просто. Оборачиваем главный RouterView компонентом анимации transition и добавляем стили:
src/App.vue
<template>
 ....
  <transition name="fade">
   <router-view />
  </transition>
 ...
</template>
<style scoped>
  ...
.fade-enter-active,
.fade-leave-active {
  transition-property: opacity;
  transition-duration: 0.25s;
}

.fade-enter-active {
  transition-delay: 0.25s;
}

.fade-enter,
.fade-leave-active {
  opacity: 0;
}
<style>
Индикация загрузки при переходе между роутами
Это тоже просто. Ставим библиотеку nprogress:
yarn add nprogress
Добавляем в router.js:
/src/router/router.js
import NProgress from 'nprogress'
import 'nprogress/nprogress.css';
router.beforeResolve((to, from, next) => {
  if (to.name) {
      // Запустить отображение загрузки
      NProgress.start()
  }
  next()
})

router.afterEach(() => {
  // Завершить отображение загрузки
  NProgress.done()
})
Изменение тайтлов при переходе между роутами
И это тоже просто.
Заполняем meta.title маршрутам и ставим document.title каждой странице в хуке beforeEach:
/src/router/router.js
...
router.beforeEach(async (to, from, next) => {
  const { title } = to.meta;
  const brand = "NGRSoftlab";
  document.title = `${title ? title + " | " : ""}${brand}`;
  next();
});
...
Плавный скролл по странице при переходе вперед/назад
Когда жмешь по браузерным «системным» кнопкам назад или вперед, браузер запоминает положение прокрутки и возвращает. Такое поведение мы можем повторить.
/src/router/router.js
import VueScrollTo from "vue-scrollto";
const router = new VueRouter({
  routes,
  mode: "history",
  scrollBehavior(to, from, savedPosition) {
    if (savedPosition) {
      VueScrollTo.scrollTo("#app", 500, { offset: savedPosition.y });
      return savedPosition;
    } else {
      VueScrollTo.scrollTo("#app");
    }
  },
});

![]()
In this tutorial, you’ll learn how to add a custom 404 page to a Vue app (generated using the Vue CLI) with a basic Vue router configuration.
For this tutorial, I will be using a Vue router starter app generated using the Vue CLI. Here’s how the project file tree might look:

Right now, all we need to focus on are src/router/index.js and the components of the src/views folder.
This is how src/router/index.js should somewhat look:
import Vue from 'vue';
import VueRouter from 'vue-router';
import Home from '../views/Home.vue';
import About from '../views/About.vue';

Vue.use(VueRouter)

  const routes = [
  {
    path: '/',
    name: 'Home',
    component: Home
  },
  {
    path: '/about',
    name: 'About',
    // route level code-splitting
    // this generates a separate chunk (about.[hash].js) for this route
    // which is lazy-loaded when the route is visited.
    component: () => import(/* webpackChunkName: "about" */ '../views/About.vue')
  }
]

const router = new VueRouter({
  routes
})

export default router
Enter fullscreen mode
Exit fullscreen mode
1) Visit the home page of the Vue app. /
What do you see?

2) Visit the about page of the Vue app. /about
What do you see?

3) Visit a random url of the app. Like /hi/someurl/404
What do you see?

(I customised my Vue app a lot, so it looks a whole lot different from the starter Vue router app, kindly excuse me for that 😅)
What do we notice from the above 3 scenarios?
If we visit a URL that exists, it correctly renders the component associated with that route. But if the URL does not exist, it just redirects it to the homepage, instead of showing some sort of error or a default 404 page. You might also have noticed that the URL of the default Vue app has /#/ suffixed to the URL.

We can fix all of these issues.
For the redirecting-to-homepage-when-it-doesn’t-exist case, we can create a custom 404 page, by specifying a wildcard route after all the other routes. First, we will have to create a 404 component.
In src/views folder, create a file named NotFound.vue. Add some basic text and images that makes it look like a 404 page.
<template>
  <center>
    <h1>Not Found!</h1>
    <p>
      <a href="/">Go home?</a>
    </p>
  </center>
</template>

<script>

  export default {
    name: 'NotFound'
  }

</script>

<style scoped>

  center {
    margin: 15vw;
  }

  h1 {
    color: var(--border);
    font-size: 2em;
  }

</style>
Enter fullscreen mode
Exit fullscreen mode
Once you have created NotFound.vue, in src/router/index.js add a wildcard route pointing towards the NotFound.vue component.
import Vue from 'vue';
import VueRouter from 'vue-router';
import Home from '../views/Home.vue';
import About from '../views/About.vue';
import NotFound from '../views/NotFound.vue';

Vue.use(VueRouter)

const routes = [
  {
    path: '/',
    name: 'Home',
    component: Home
  },
  {
    path: '/about',
    name: 'About',
    // route level code-splitting
    // this generates a separate chunk (about.[hash].js) for this route
    // which is lazy-loaded when the route is visited.
    component: () => import(/* webpackChunkName: "about" */ '../views/About.vue')
  },
  {
    path: '*',
    name: 'Not Found',
    component: NotFound
  }
]

const router = new VueRouter({
  routes
})

export default router
Enter fullscreen mode
Exit fullscreen mode
But we need to do one more thing, only then can we «successfully» create a 404 page.
The weird URL.
The «weird» URL is because the Vue router uses hash mode for routing by default. It uses the URL hash to simulate a full URL so that the page won’t be reloaded when the URL changes.
We can prevent the Vue router from doing this by enabling History mode.
const router = new VueRouter({
  mode: 'history',
  routes
});
Enter fullscreen mode
Exit fullscreen mode
The final src/router/index.js:
import Vue from 'vue';
import VueRouter from 'vue-router';
import Home from '../views/Home.vue';
import About from '../views/About.vue';
import NotFound from '../views/NotFound.vue';

Vue.use(VueRouter)

const routes = [
  {
    path: '/',
    name: 'Home',
    component: Home
  },
  {
    path: '/about',
    name: 'About',
    // route level code-splitting
    // this generates a separate chunk (about.[hash].js) for this route
    // which is lazy-loaded when the route is visited.
    component: () => import(/* webpackChunkName: "about" */ '../views/About.vue')
  },
  {
    path: '*',
    name: 'Not Found',
    component: NotFound
  }
]

const router = new VueRouter({
  mode: 'history',
  routes
})

export default router
Enter fullscreen mode
Exit fullscreen mode
And now, our URL looks normal!

And that’s it! We have a fully functional 404 page now! Hope you enjoyed this tutorial!

Vue Router 4 is in beta and it’s subject to change.
To build a single page app easily, we got to add routing so that URLs will be mapped to components that are rendered.
In this article, we’ll look at how to use Vue Router 4 with Vue 3.
Catch-All / 404 Not Found Route
We can create a catch-all or 404 route by using the asterisk pattern as the path.
For example, we can write:
<!DOCTYPE html>
<html lang="en">
  <head>
    <script src="https://unpkg.com/vue@next"></script>
    <script src="https://unpkg.com/vue-router@4.0.0-beta.7/dist/vue-router.global.js"></script>
    <title>App</title>
  </head>
  <body>
    <div id="app">
      <p>
        <router-link to="/foo">Foo</router-link>
      </p>
      <router-view></router-view>
    </div>
    <script>
      const Foo = {
        template: "<div>foo</div>"
      };

      const NotFound = {
        template: "<div>not found</div>"
      };

      const routes = [
        { path: "/foo", component: Foo },
        { path: "/:catchAll(.*)", component: NotFound }
      ];

      const router = VueRouter.createRouter({
        history: VueRouter.createWebHistory(),
        routes
      });

      const app = Vue.createApp({});
      app.use(router);
      app.mount("#app");
    </script>
  </body>
</html>
We define a catch-all route with the /:catchAll(.*) capture group instead of * as in Vue Router 3.
Now when we go to any path that isn’t foo , we’ll see the ‘not found’ message.
Nested Routes
We can create nested routes with the children property.
For instance, we can write:
<!DOCTYPE html>
<html lang="en">
  <head>
    <script src="https://unpkg.com/vue@next"></script>
    <script src="https://unpkg.com/vue-router@4.0.0-beta.7/dist/vue-router.global.js"></script>
    <title>App</title>
  </head>
  <body>
    <div id="app">
      <p>
        <router-link to="/parent/home">parent</router-link>
      </p>
      <router-view></router-view>
    </div>
    <script>
      const Parent = {
        template: `<div>
          parent
          <router-view></router-view>
        </div>`
      };

      const Home = {
        template: `<div>home</div>`
      };

       const routes = [
        {
          path: "/parent",
          component: Parent,
          children: [{ path: "home", component: Home }]
        }
      ];

      const router = VueRouter.createRouter({
        history: VueRouter.createWebHistory(),
        routes
      });

      const app = Vue.createApp({
        watch: {
          $route() {
            console.log(this.$route.resolve);
          }
        }
      });
      app.use(router);
      app.mount("#app");
    </script>
  </body>
</html>
We have a routes array with an object that has the children property.
The property has an object with the path and component properties like a regular route.
In the router-link , the to prop has the path to the nested route.
The Parent component has the router-view component so that we can view the content of the child route.
Therefore, when we click on the parent link, we see the:
parent
home
text displayed.
We can have URL parameters in the parent route.
For example, we can write:
<!DOCTYPE html>
<html lang="en">
  <head>
    <script src="https://unpkg.com/vue@next"></script>
    <script src="https://unpkg.com/vue-router@4.0.0-beta.7/dist/vue-router.global.js"></script>
    <title>App</title>
  </head>
  <body>
    <div id="app">
      <p>
        <router-link to="/parent/1/home">parent</router-link>
      </p>
      <router-view></router-view>
    </div>
    <script>
      const Parent = {
        template: `<div>
          <div>parent {{ $router.currentRoute.value.params.id }}</div>
          <div><router-view></router-view></div>
        </div>`
      };

      const Home = {
        template: `<div>home</div>`
      };

      const routes = [
        {
          path: "/parent/:id",
          component: Parent,
          children: [{ path: "home", component: Home }]
        }
      ];

      const router = VueRouter.createRouter({
        history: VueRouter.createWebHistory(),
        routes
      });

      const app = Vue.createApp({
        watch: {
          $route() {
            console.log(this.$route.resolve);
          }
        }
      });
      app.use(router);
      app.mount("#app");
    </script>
  </body>
</html>
To add the :id URL parameter placeholder.
Since the router-link ‘s to prop is now /parent/1/home and we have the $router.currentRoute.value.params.id in the Parent ‘s template, we’ll see the number 1 displayed.
The URL parameter placeholder of the parent stays with the parent.
Conclusion
The way we define 404 and nested routes are slightly different from Vue Router 3 in Vue Router 4.
Web developer specializing in React, Vue, and front end development.
View Archive