This is a quick solution to solve the error “Another instance of Certbot is already running”. This error is usually encountered when you attempt to create a new or to renew an SSL certificate on your Linux systems such as Ubuntu, CentOS, Debian, Fedora, or other common server distros.
This message can be posted when you try to run Let’s Encrypt Certbot. The cause could step from any situation that causes one to end up back on the terminal’s command prompt while there is an active instance of Certbot running.
Seeing that Let’s Encrypt Certbot can only have one instance running at a time, you would need to kill the current instance before trying to invoke another one.
How to Fix “Another Instance of Certbot is Already Running”
Kill the Let’s Encrypt Certbot process by doing either of the following:
a) Reboot Your Linux System
This solution may not be practical on a live server so here is a better option:
b) Kill the Certbot Process
Find the Certbot process using the following command:
$ ps -ef | grep certbot

Output
brightwhiz      368020  367989  0 09:27 pts/1    00:00:00 sudo certbot --apache certonly
brightwhiz      368023  368020 11 09:27 pts/1    00:00:03 /usr/bin/python3 /usr/bin/certbot --apache certonly
The process ID is the first number after the user. In the above example that would be (368020 and 368023)
Kill the process(es) using this:
$ sudo kill 368020Replacing 368020 with your actual process ID.
Run the Certbot command again and you should be able to use it as expected.
What if the Above Fails
In cases where your server may have rebooted unexpectedly during the renewal process, it could be that Certbot is not running but it left some .certbot.lock files behind. Let’s see if they exist and if they do, we remove the lock files.
Check whether there are .certbot.lock files in your system using this command:
$ find / -type f -name ".certbot.lock"If there are, you can remove them using this command:
$ sudo find / -type f -name ".certbot.lock" -exec rm {} ;Conclusion
These are the sure methods you can use to fix the “Another instance of Certbot is already running” error message you get when you try to renew an SSL using Let’s Encrypt Certbot on your Linux systems such as Ubuntu or CentOS.
Found this article interesting? Follow Brightwhiz on Facebook, Twitter, and YouTube to read and watch more content we post.
Запуская какую-либо программу (обычно игровую) пользователь может столкнуться с отказом программы от запуска, что сопровождается сообщением «Another instance is already running». Обычно это означает, что такая же программа уже была запущена ранее, и пользователь пытается запустить её вновь. В нашем материале мы разберём, что это за ошибка, какими причинами она вызвана, и как её можно исправить.

Содержание
- Another instance is already running – что это означает?
- Удалите процесс из Диспетчера задач
- Перезагрузите ваш ПК
- Удалите Ad-Aware Web Companion
- Обновите вашу ОС
- Заключение
Another instance is already running – что это означает?
В переводе текст данного уведомления выглядит как «Другой образец уже запущен». Это означает, что процесс данной программы был уже ранее запущен пользователем или системой, и работает в фоне вашей ОС. При запуске вами данной программы её новый процесс обнаруживает уже работающий идентичный процесс в фоне, и автоматически закрывается, поскольку не настроен на параллельную работу двух одинаковых процессов. Впрочем, для некоторых программ бывают и исключения.
Также другими причинами появления сообщения «Another instance is already running» могут быть следующие:
- Другая версия данной программы ранее была установлена на компьютер. В некоторых случаях такая программа стартует с запуском ПК и работает в фоне;
- Инсталляция данной программы была выполнена некорректно, и её процесс остался работать в фоне;
- На вашем ПК установлена программа «Ad-Aware Web Companion». Данный софт является частым фактором появления сообщения «Another instance is already running»;
- Также причиной ошибки в редких случаях может выступать устаревшая версия Виндовс;
- В редких случаях причиной может выступать приложение «lolpatcher» при запуске игры «League of Legends».
Давайте разберём, как исправить ошибку «Another instance is already running».

Удалите процесс из Диспетчера задач
Первым и наиболее эффективным способом устранить ошибку «Another instance is already running» — это удаление процесса программы, которую вы запускаете, из Диспетчера задач. Выполните следующие действия:
- Нажмите на сочетание клавиш Ctrl+Shift+Escape;
- В открывшемся Диспетчере задач во вкладке «Процессы» найдите процесс, имя которого совпадает с именем запускаемой вами программы, во время работы которой вы получаете рассматриваемую ошибку;
- Кликните на данный процесс, после чего нажмите внизу на кнопку «Снять задачу»;

- Выполните данную процедуру для всех процессов, с именем запускаемой вами программы;
- Затем попробуйте запустить нужную программу. В большинстве случаев она запустится без каких-либо проблем.

Перезагрузите ваш ПК
Довольно простым и эффективным способом борьбы с ошибкой «Another instance is already running» является перезагрузка вашего ПК. Перезагрузите ваш компьютер стандартным образом, и рассматриваемая нами ошибка может пропасть.

Как упоминалось выше, часто встречающимся источником проблемы является приложение «Ad-Aware Web Companion», поставляемая с антишпионским инструментом «Ad-Aware». Удаление данного софта должно решить данную проблему.
Выполните следующие действия:
- Нажмите на Win+R;
- В появившейся табличке введите команду appwiz.cpl и нажмите ввод;
- Найдите в перечне программ «Web Companion», кликните на него и удалите программу с вашего ПК.
Обновите вашу ОС
Также сообщение «Another instance is already running» может возникнуть в случае, если версия вашей ОС Виндовс устарела. Обновление вашей ОС до последней версии может устранить возникшую проблему. Выполните следующее:
- Нажмите на сочетание клавиш Win+R;
- Введите там команду ms-settings:windowsupdate и нажмите на клавишу Энтер;

- Запустится Центр обновления Виндовс;
- Нажмите там на кнопку проверки наличия обновлений;

- ОС Виндовс проверит, есть ли какие-либо обновления, ожидающие установки. При наличии таковых установите их в системе. После этого рассматриваемая нами ошибка может пропасть.


Это полезно знать: Произошла ошибка. Перезапустите игру, чтобы использовать эту возможность в КС:ГО.
Заключение
В нашем материале мы разобрали, что за ошибка «Another instance is already running», какими причинами она вызвана, и как исправить возникшую проблему. Обычно фактором ошибки выступает процесс запускаемой программы, работающий в фоновом режиме операционной системы. Достаточно удалить данный процесс в Диспетчере задач, после чего указанное сообщение перестанет вам досаждать.
Опубликовано 16.03.2022 Обновлено 16.03.2022
I’ve written before about Certbot and how wonderful it is. Recently I’ve come across a situation where certbot renewals aren’t going thru:
root@host:~# certbot renew --force-renewal
Another instance of Certbot is already running.

root@host:~# ps waux | grep certbot
root     20947  0.0  0.0   4500   744 ?        Ss   16:52   0:00 /bin/sh -c /usr/local/sbin/certbot-renew.sh
root     20949  0.0  0.0   4500   736 ?        S    16:52   0:00 /bin/sh /usr/local/sbin/certbot-renew.sh
root     20953  0.3  4.4 148704 45440 ?        S    16:52   0:00 /usr/bin/python3 /usr/bin/certbot renew --post-hook touch /var/lib/letsencrypt/updated
root     21049  0.0  0.0  12940  1012 pts/4    S+   16:54   0:00 grep --color=auto certbot

root@host:~# certbot --version
certbot 0.31.0
If I check the logfile /var/log/letsencrypt/letsencrypt.log I can see that it keeps on trying and trying to do renewals.
grep "random delay" /var/log/letsencrypt/letsencrypt.log

2020-04-14 16:16:02,526:INFO:certbot.renewal:Non-interactive renewal: random delay of 5 seconds
2020-04-14 16:17:02,135:INFO:certbot.renewal:Non-interactive renewal: random delay of 409 seconds
2020-04-14 16:24:01,684:INFO:certbot.renewal:Non-interactive renewal: random delay of 290 seconds
2020-04-14 16:29:01,744:INFO:certbot.renewal:Non-interactive renewal: random delay of 190 seconds
2020-04-14 16:33:02,261:INFO:certbot.renewal:Non-interactive renewal: random delay of 283 seconds
2020-04-14 16:38:01,813:INFO:certbot.renewal:Non-interactive renewal: random delay of 350 seconds
2020-04-14 16:44:01,613:INFO:certbot.renewal:Non-interactive renewal: random delay of 117 seconds
2020-04-14 16:46:02,187:INFO:certbot.renewal:Non-interactive renewal: random delay of 309 seconds
2020-04-14 16:52:01,834:INFO:certbot.renewal:Non-interactive renewal: random delay of 453 seconds
Here’s what I do next:
- find any running certbot processes.
- kill them (with -9) one by one
- find and lock files
- remove them
root@host:~# ps waux | grep cert
root     20947  0.0  0.0   4500   744 ?        Ss   16:52   0:00 /bin/sh -c /usr/local/sbin/certbot-renew.sh
root     20949  0.0  0.0   4500   736 ?        S    16:52   0:00 /bin/sh /usr/local/sbin/certbot-renew.sh
root     20953  0.1  4.4 148704 45440 ?        S    16:52   0:00 /usr/bin/python3 /usr/bin/certbot renew --post-hook touch /var/lib/letsencrypt/updated
root     21152  0.0  0.0  12940   936 pts/4    S+   16:57   0:00 grep --color=auto cert

root@host:~# kill -9 20947
root@host:~# kill -9 20949
root@host:~# kill -9 20953
root@host:~# find / -type f -name ".certbot.lock"
/var/lib/letsencrypt/.certbot.lock
/var/log/letsencrypt/.certbot.lock
/etc/letsencrypt/.certbot.lock

root@host:~# rm /var/lib/letsencrypt/.certbot.lock  /var/log/letsencrypt/.certbot.lock /etc/letsencrypt/.certbot.lock
Next, I want to uninstall it.
root@host:~# apt list --installed | grep certbot

WARNING: apt does not have a stable CLI interface. Use with caution in scripts.

certbot/xenial,now 0.31.0-1+ubuntu16.04.1+certbot+1 all [installed]
python3-acme/xenial,now 0.31.0-2+ubuntu16.04.6+certbot+2 all [installed,automatic]
python3-asn1crypto/xenial,now 0.22.0-2+ubuntu16.04.1+certbot+1 all [installed,automatic]
Next, I want to uninstall it:
root@host:~#  apt-get remove certbot
Reading package lists... Done
Building dependency tree
Reading state information... Done
The following packages were automatically installed and are no longer required:
  python3-acme python3-certbot python3-configargparse python3-funcsigs python3-future python3-icu python3-josepy
  python3-mock python3-parsedatetime python3-pbr python3-requests-toolbelt python3-rfc3339 python3-tz
  python3-zope.component python3-zope.event python3-zope.hookable python3-zope.interface
Use 'apt autoremove' to remove them.
The following packages will be REMOVED:
  certbot
0 upgraded, 0 newly installed, 1 to remove and 9 not upgraded.
After this operation, 39.9 kB disk space will be freed.
Do you want to continue? [Y/n]
Type in Y to continue, then after that, get rid of code you no longer need
root@mhs02:~#  apt-get remove certbot
Reading package lists... Done
Building dependency tree
Reading state information... Done
The following packages were automatically installed and are no longer required:
  python3-acme python3-certbot python3-configargparse python3-funcsigs python3-future python3-icu python3-josepy
  python3-mock python3-parsedatetime python3-pbr python3-requests-toolbelt python3-rfc3339 python3-tz
  python3-zope.component python3-zope.event python3-zope.hookable python3-zope.interface
Use 'apt autoremove' to remove them.
The following packages will be REMOVED:
  certbot
0 upgraded, 0 newly installed, 1 to remove and 9 not upgraded.
After this operation, 39.9 kB disk space will be freed.
Do you want to continue? [Y/n] y
(Reading database ... 158315 files and directories currently installed.)
Removing certbot (0.31.0-1+ubuntu16.04.1+certbot+1) ...
Processing triggers for man-db (2.7.5-1) ...
root@host:~# apt autoremove
Reading package lists... Done
Building dependency tree
Reading state information... Done
The following packages will be REMOVED:
  python3-acme python3-certbot python3-configargparse python3-funcsigs python3-future python3-icu python3-josepy
  python3-mock python3-parsedatetime python3-pbr python3-requests-toolbelt python3-rfc3339 python3-tz
  python3-zope.component python3-zope.event python3-zope.hookable python3-zope.interface
0 upgraded, 0 newly installed, 17 to remove and 9 not upgraded.
After this operation, 6,352 kB disk space will be freed.
Do you want to continue? [Y/n] y
(Reading database ... 158306 files and directories currently installed.)
Removing python3-certbot (0.31.0-1+ubuntu16.04.1+certbot+1) ...
Removing python3-acme (0.31.0-2+ubuntu16.04.6+certbot+2) ...
Removing python3-configargparse (0.11.0-1+certbot~xenial+1) ...
Removing python3-mock (1.3.0-2.1ubuntu1) ...
Removing python3-funcsigs (0.4-2) ...
Removing python3-parsedatetime (2.4-3+ubuntu16.04.1+certbot+3) ...
Removing python3-future (0.15.2-4+ubuntu16.04.1+certbot+3) ...
Removing python3-icu (1.9.2-2build1) ...
Removing python3-josepy (1.1.0-2+ubuntu16.04.1+certbot+1) ...
Removing python3-pbr (1.8.0-4ubuntu1) ...
Removing python3-requests-toolbelt (0.8.0-1+ubuntu16.04.1+certbot+1) ...
Removing python3-rfc3339 (1.0-4+certbot~xenial+1) ...
Removing python3-tz (2014.10~dfsg1-0ubuntu2) ...
Removing python3-zope.component (4.3.0-1+ubuntu16.04.1+certbot+3) ...
Removing python3-zope.event (4.2.0-1) ...
Removing python3-zope.hookable (4.0.4-4+ubuntu16.04.1+certbot+1) ...
Removing python3-zope.interface (4.3.2-1+ubuntu16.04.1+certbot+1) ...
Check to see if that removed the process
root@host:~# ps waux | grep cert
root     21304  0.0  0.0   4500   748 ?        Ss   17:01   0:00 /bin/sh -c /usr/local/sbin/certbot-renew.sh
root     21306  0.0  0.0   4500   776 ?        S    17:01   0:00 /bin/sh /usr/local/sbin/certbot-renew.sh
root     21310  0.2  4.7 157436 48228 ?        S    17:01   0:00 /usr/bin/python3 /usr/bin/certbot renew --post-hook touch /var/lib/letsencrypt/updated
root     22017  0.0  0.1  12940  1092 pts/4    S+   17:08   0:00 grep --color=auto cert
root@host:~# ls /usr/local/sbin
certbot-renew.sh

root@host:~#  mv /usr/local/sbin/certbot-renew.sh   /usr/local/sbin/certbot-renew.sh.hide
Triple check nothings running
root@mhs02:~# ps waux | grep cert
root     22118  0.0  0.1  12940  1020 pts/4    S+   17:09   0:00 grep --color=auto cert
Follow the instructions at:
https://certbot.eff.org/instructions on how to install certbot for your installation.
sudo apt-get install certbot python-certbot-apacheFinally, let’s check the server uptime, check the expiration date of a site running on this server, gracefully restart apache, then check the expiration date again:
root@host:~# apachectl status | grep uptime
   Server uptime: 11 days 22 hours 45 minutes 34 seconds

root@host:~# echo | openssl s_client -servername www.example.org -connect www.example.org:443 2>/dev/null | openssl x509 -noout -dates
notBefore=Mar  3 16:27:55 2020 GMT
notAfter=Jun  1 16:27:55 2020 GMT

root@host:~# apachectl graceful
[Tue Apr 14 17:17:24.937566 2020] [so:warn] [pid 26644] AH01574: module security2_module is already loaded, skipping

root@host:~# apachectl status | egrep 'uptime|Restart'
   Restart Time: Thursday, 02-Apr-2020 18:29:10 UTC
   Server uptime: 11 days 22 hours 52 minutes 3 seconds


root@host:~# echo | openssl s_client -servername www.example.org -connect www.example.org:443 2>/dev/null | openssl x509 -noout -dates
notBefore=Apr 14 16:13:15 2020 GMT
notAfter=Jul 13 16:13:15 2020 GMT
Success! We can see that the new renewal dates are in place.
To make sure that renewals happen automatically, I like to have this crontab in place:
# Let's keep let's encrypt ssl certs up to date.
31 3,15 * * * /usr/bin/certbot renew --quiet
While using your computer you may have come across Another instance is running error, which appears sometimes when you trying to open certain files, applications or games.
This error can also appear as another instance is running configuration system failed to initialize or another instance of this application is already running. This error can be very annoying, which is why in this article we have discussed the various ways one can diagnose and troubleshoot this problem.
What Is Causing The “Another Instance Is Running Error”?
Contents
- 1 What Is Causing The “Another Instance Is Running Error”?
- 2 Fixing The Another Instance Is Running Error
- 2.1 Solution 1: Uninstall Ad-Aware Web Companion
- 2.2 Solution 2: Update Windows
- 2.3 Solution 3: Close Down Background Processes
- 2.4 Solution 4: Change The Properties Of The Workstation Service
- 2.5 Solution 5: Create A New User Account For Windows 10
- 2.6 Solution 6: Troubleshooting This Error For The League Of Legends Game
- 2.7 Solution 6.1: Close Down All Lolpatcher Processes In The Background
- 2.8 Solution 6.2: Use Netsh Winsock Reset Command
- 2.9 Solution 6.3: Run LOL As Administrator
- 3 Wrapping Up
There can be various different causes of this error. Now, let’s take a look at those causes:
- The most common cause of this error is the Ad-Aware Web Companion. For most of the users affected by this error, this app was the culprit.
- Outdated Windows can cause several problems for your computer including this error.
- If the processes of the file that are instigating this error, is already running in the background while you try to open it again, then this error can get triggered.
- If this error occurs while installing Adobe product updates, then most likely it is caused by improper Workstation Service settings.
- The lolpatcher application is generally the culprit for this error if the error gets triggered when you try to open the League of Legends (LOL) game.
Now that you have seen the various different causes of this error, it’s time to troubleshoot them one by one. Read and execute the following solutions carefully.
Solution 1: Uninstall Ad-Aware Web Companion
As mentioned above, the most common instigator of this problem is the Web companion that comes with the Ad-Aware anti-spyware tool. If Ad-Aware anti-spyware tool is also installed on your computer, then you probably have found the culprit.
In this scenario, uninstalling the Web companion from your computer should fix this problem.
To uninstall Web companion, follow the steps given below:
- Type Apps & features in the Windows search bar and select the appropriate option.
- Now, scroll down and locate the Web Companion application and click on it.
- Click on the Uninstall option to uninstall the Web companion from your PC.
If you can’t find the Web Companion software among the other apps then, you will have to remove the Ad-Aware directly from your computer.
To remove Ad-Aware directly from your computer, follow the steps given below:
- Press the Windows + R keys to open the Run dialogue.
- Type appwiz.cpl and press Enter.
It will open the Programs and Features panel.
- Locate the Ad-Aware SE file and right-click on it.
- Click on the Uninstall option from the pop-up menu. Follow the instructions on your screen and wait for the uninstallation to finish.
By uninstalling the Web companion and Ad-Aware another instance of this application is already running error should be fixed. However, if the error persists, then try the other solutions given below.
Solution 2: Update Windows
This error can also occur if the Windows is outdated. For many users, updating Windows to the latest version fixed this error. Check if you have any updates pending, if yes then update them.
To update your Windows, follow the steps given below:
- Type Check for updates in the Windows search bar and select the appropriate option.
- Click on the Check for updates option.Now, Windows will check if there is any update pending and then update it automatically.
Once the update is finished, restart your computer. Now, check if the error has resolved.
Solution 3: Close Down Background Processes
Sometimes, this error can be triggered while opening/installing apps if the processes of the app are already running in the background. In this scenario, closing down the background processes of the problematic app should fix this error.
To close down the background processes of the problematic app, follow the steps given below:
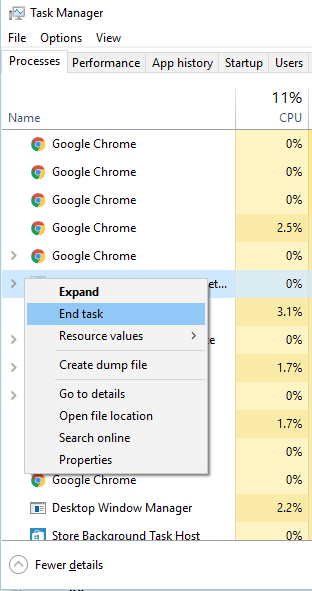
- Right-click on the Taskbar and click on the Task Manager option.
- Under the Processes tab locate the processes of the problematic app and right-click on it.
- Click on the End Task option on the pop-up menu.
Once, you have closed down all the processes running in the background of the app causing this problem, check if the Another instance is running error has resolved.
Solution 4: Change The Properties Of The Workstation Service
If you are facing this error while installing Adobe product updates, then the improper setting in the Workstation service is probably causing this error.
In this scenario, changing the startup type and starting the service manually should solve this error. To change the startup type of the Workstation service, follow the steps given below:
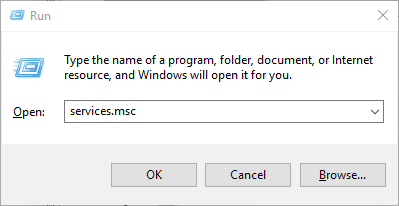
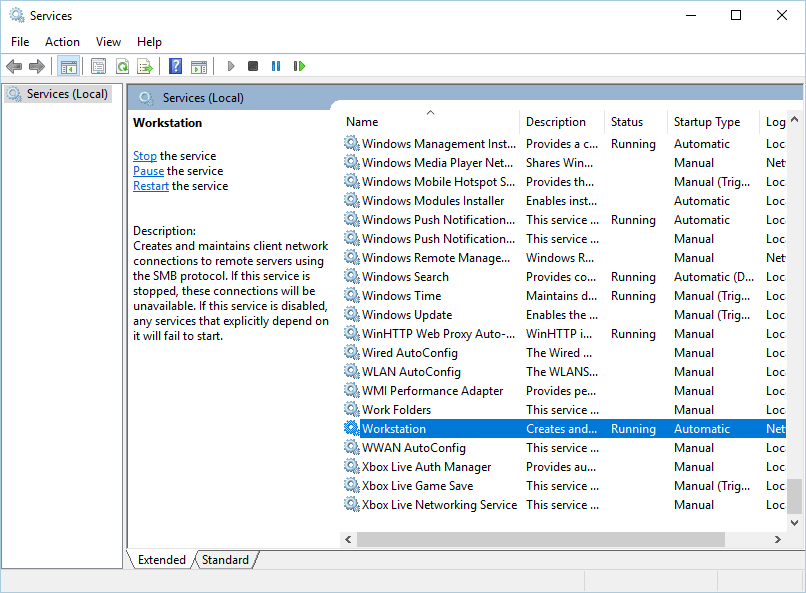
- Type Services in the Windows search bar and click on the appropriate option.
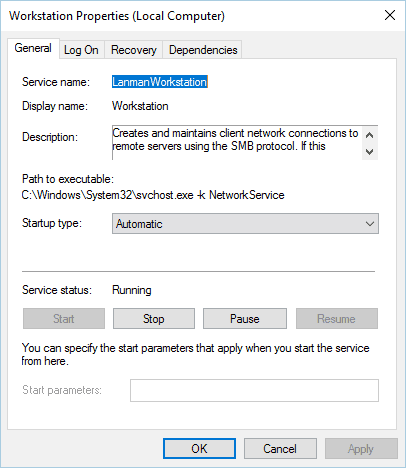
- Locate the Workstation service and right-click on it. Click on the Properties option to open the properties of the Workstation service.
- Change the Startup Type to Automatic and if the service is not shown as running, then click on the Start option to start it manually.
- Click OK to save the changes made.
Try to install the Adobe product updates again and see if the error has resolved.
Solution 5: Create A New User Account For Windows 10
If none of the above solutions has worked, then you can try creating a new Windows 10 user account. To create a new user account in Windows 10, follow the steps given below:
- Type Settings in the Windows search bar and select the appropriate option.
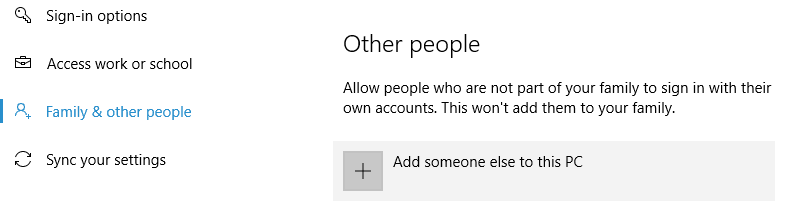
- Click on the Accounts option and then select the Family & other users section.
- Under the Other Users, click on the Add someone else to this PC option.
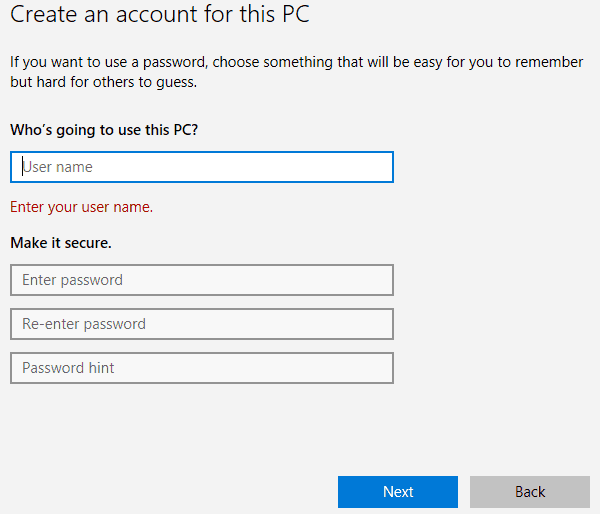
- Now, on the Microsoft account page, click on the I don’t have this person’s sign-in information option.
- Click on the Add a user without a Microsoft account option.
- Finally, fill in the name and the password of your new account and then click on the Next option.
Once the new account is created, sign out from your current account and login on to your new account. Check if the error persists. If the error has been resolved, then you should probably only use this account. Remember this solution is only just a work-around, you will probably face the error again if you log in to your old account.
If you are facing the “Another instance is running configuration system failed to initialize” error while opening the League Of Legends (LOL) game, then you can try the following solutions.
Solution 6.1: Close Down All Lolpatcher Processes In The Background
Many users who have faced the “another instance of this application is already running” error while using LOL have reported that the lolpatcher application opening at the same time with the LOL was causing it.
In this scenario, closing all the background processes of lolpatcher before opening LOL should fix this problem.
To close down all the lolpatcher background processes, follow the steps given below:
- Press the Ctrl + Shift + Esc keys on your desktop. This will open up the Task Manager on your screen.
- Locate the lolpatcher process in the Processes tab and right-click on it.
- Finally, click on the End Task option and then close down the Task Manager.
Now, check if another instance of this application is already running error persists.
Solution 6.2: Use Netsh Winsock Reset Command
Some users have reported that for LOL, this error can be fixed by simply running the winsock reset command in an elevated Command Prompt.
To open an elevated Command prompt and run the winsock reset command, follow the steps given below:
- Press the Windows + R keys to open the Run
- Type cmd and while holding the Ctrl + Shift keys click on OK. Now, an elevated Command prompt will open on your screen.
- Type netsh winsock reset and press Enter.
Now, check if another instance is running configuration system failed to initialize error persists. This solution should solve this error in LoL.
Solution 6.3: Run LOL As Administrator
If none of the above solutions worked for fixing this error for LOL, try running LOL as administrator. To open LOL as an administrator, follow the steps given below:
- Right-click on the LOL shortcut on your desktop.
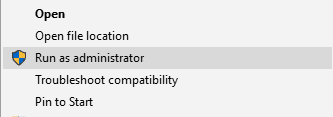
- Then, click on the Run as administrator option in the pop-up menu.
- Click on the Yes option on the pop-up dialog box. Now, LOL should open as an administrator.
Wrapping Up
So, now you know what to do if you ever face the Another instance is running error. The above solutions should help you solve this error so read and execute them carefully. As always, feel free to share your thoughts on this article in the comment section below.
by Milan Stanojevic
Milan has been enthusiastic about technology ever since his childhood days, and this led him to take interest in all PC-related technologies. He’s a PC enthusiast and he… read more
Updated on January 26, 2023
- Users have reported receiving the another instance is already running error on their computers.
- For some users, this issue appears when starting certain software, but it can also come up in specific apps such as League of Legends.
- Read on to find out how to fix this issue on your PC and restore its proper functionality.

XINSTALL BY CLICKING THE DOWNLOAD FILE
This software will repair common computer errors, protect you from file loss, malware, hardware failure and optimize your PC for maximum performance. Fix PC issues and remove viruses now in 3 easy steps:
- Download Restoro PC Repair Tool that comes with Patented Technologies (patent available here).
- Click Start Scan to find Windows issues that could be causing PC problems.
- Click Repair All to fix issues affecting your computer’s security and performance
- Restoro has been downloaded by 0 readers this month.
Computer errors will occur sooner or later, and while some computer errors are relatively harmless, others can prevent you from starting your applications.
One of these errors is Another instance is running error, and today we’ll show you how to fix it on Windows 10 & Windows 11.
How to fix the Another instance is running error?
According to users, this issue occurs every time Windows 10 starts, and it seems that the culprit is Ad-Aware. This is a solid anti-spyware tool, but like many other security tools it comes with Web Companion.
Users reported that Web Companion causes Another instance is running error to appear, and the only way to fix this problem is to uninstall the application.
To do that, follow these simple steps:
- Press Windows Key + I to open the Settings app.
- Go to System section and then choose Apps & features.
- List of all installed applications will appear. Select Web Companion app and click the Uninstall button to remove it. If you can’t find this application, you might have to remove Ad-Aware in order to fix the problem.
Users reported that removing Ad-Aware Web Companion fixes the problem, but we have to mention that almost any other tool can cause this error to appear.
If the issue still persists, or if you don’t use Ad-Aware at all, you might have to find the problematic application on your own and remove it.
2. Create a new user account
As we previously mentioned, almost any application can cause Another instance is running error to appear.
If you can’t find the problematic application, you might want to try creating a new Windows 10 user account.
To do that, you need to follow these simple steps:
- Open the Settings app and go to Accounts section.
- Navigate to Family & other people tab. In Other people section click on Add someone else to this PC button.


- Select I don’t have this person’s sign-in information.

- Now click on Add a user without a Microsoft account.

- Enter the desired user name and password for the new user and click the Next button once you’re done.


After creating a new user account you need to log off and switch to it.
If the problem doesn’t appear on your new user account, you might want to consider switching to it and using it as your primary account.
3. Download the latest updates
Microsoft is working hard to address Windows 10 hardware and software issues, and most issues are fixed with Windows updates.
According to users, this issue can be fixed simply by installing the latest updates. Windows 10 installs updates automatically, but you can also check for updates manually if you want.
To do that, follow these simple steps:
- Open the Settings app and go to Update & security section.
- Click the Check for updates button and wait while Windows 10 downloads the available updates.
After downloading and installing the latest updates, check if the problem is resolved.
4. Stop the problematic processes
Users reported that this issues occurs while trying to install AutoCAD software. It seems that this problem is caused by another AutoCAD process running in the background, so to fix the problem you need to close that process.
This is a simple procedure, and you can do it by using Task Manager. To close the problematic process, do the following:
- Press Ctrl + Shift + Esc to open Task Manager.
- When Task Manager starts, go to Processes tab and look for any AutoCAD process. Right click it and choose End Task from the menu. Repeat this for all AutoCAD processes.

- After ending all problematic processes, close Task Manager and check if the problem is resolved.
Keep in mind that this problem can affect almost any application and not just AutoCAD. Therefore be sure to close multiple instances of the problematic application and check if that solves the problem.
5. Reinstall the problematic application
According to users, Another instance is running error appears when they try to run a specific application. Many users reported that the error appears while trying to run a specific game on their PC.
Some PC issues are hard to tackle, especially when it comes to corrupted repositories or missing Windows files. If you are having troubles fixing an error, your system may be partially broken.
We recommend installing Restoro, a tool that will scan your machine and identify what the fault is.
Click here to download and start repairing.
If you’re having this error with any game or application, we recommend that you reinstall it completely. After reinstalling the problematic software, check if the problem is resolved.
6. Change the Startup type of Workstation service
Users reported that Another instance is running error appears while trying to install updates for certain Adobe products.
It seems that this error is related to Workstation service in Windows 10, and to fix it you need to change that service’s settings. To do that, follow these steps:
- Press Windows Key + R to open the Run dialog. Enter services.msc and press Enter or click OK.

- Services window will now appear. Locate Workstation service and double click it to open its properties.

- Make sure that Startup type is set to Automatic.
- Check the Service status. If it isn’t set to Running, start the service by clicking the Start button.
- After changing the Startup type and starting the service, click Apply and OK to save changes.

- Close Services window and try to install the application again.
1. Close lolpatcher processes
Users reported Another instance is running error while trying to start League of Legends. According to them, the issue appears because lolpatcher application starts simultaneously with the game.
To fix this problem, you need to find and end all running lolpatcher processes. To do this, you’ll need to use Task Manager and find the problematic process in the Process tab.
We already explained how to end a process using Task Manager in one of our previous solutions, so be sure to check it for detailed instructions.
Few users reported that they had multiple League of Legends clients running, but after ending their processes the issue was completely resolved.
2. Run netsh command
If you’re getting Another instance is running error while trying to start League of Legends, you might be able to fix the problem by using Command Prompt.
Users reported that they fixed the issue simply by running netsh winsock reset command. To do that, follow these steps:
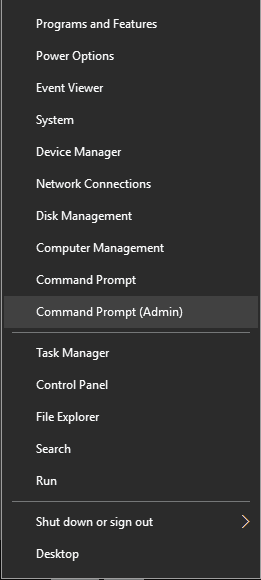
- Press Windows Key + X to open Win + X menu. Select Command Prompt (Admin) from the list of results.

- When Command Prompt starts, enter netsh winsock reset and press Enter.
- Wait for the command to execute and then close Command Prompt.
- Restart your PC.
After your PC restarts, try running LoL and check if the problem still persists.
According to users, one potential solution is to pin League of Legends icon to your Taskbar and try to start it from there.
Users reported that two League of Legends icons appear in their Taskbar when they want to start it. According to them, you need to pin the new icon to your Taskbar and close the other one.
After doing that, go to Task Manager and close all processes related to the League of Legends. Lastly, start the game by using the pinned Taskbar icon.
Users also reported that you might have to click the icon couple of times before the game starts, so keep that in mind. This isn’t the best solution, but it’s a potential workaround, so you might want to try it out.
4. Run the game as administrator
If you’re getting Another instance is running error while trying to run League of Legends, you might want to try running it as administrator.
This is quite simple, and to do so you’ll need to find the application, right click it and choose Run as administrator from the menu.
If running the application as an administrator fixes the problem, you’ll have to repeat this process every time you want to start the game.
If none of the previous solutions work, you might have to reinstall League of Legends to fix the problem.
- How to Get to Advanced System Settings on Windows 10
- Windows 10 Undoing Changes Made to Your Computer [Fix]
Another instance is running error will prevent your applications from starting, but you can fix the problem by ending the problematic application.
If that doesn’t work, feel free to try any other solution from this article.
![]()