How can I change the validator language messages. For example if I want to change the ‘required’ text ‘The kilometerszakelijk field is required.’ to something else?
![]()
asked Jul 22, 2015 at 20:44
![]()
All language specific content is stored in your resources/lang// folder. One of the files you’ll find in this folder is validation.php that holds validation messages for given language, so if you want to change the translations, you’ll need to edit that file.
Depending on the language that is used by the application, messages will be read from different folders in resources/lang/. You can set language/locale using
App::setLocale('en');
You can also set fallback locale (that is used when there are no translations for current language) by setting it in your config/app.php file, e.g.:
'fallback_locale' => 'en',
See more details in the docs: http://laravel.com/docs/5.0/localization
answered Jul 22, 2015 at 20:56
![]()
jedrzej.kurylojedrzej.kurylo
38.8k9 gold badges95 silver badges106 bronze badges
1
Create a folder named like your language code in
resources/lang
then create a file in this folder called validation.php and in there, write something like
return [

    'required'    => 'Das Feld :attribute ist ein Pflichtfeld.',

]

answered Jul 22, 2015 at 20:55
![]()
baaobaao
69.5k17 gold badges135 silver badges192 bronze badges
For the default messages, you can adjust the translations in resources/lang/<language>/validation.php.
You can also pass entirely custom messages to the validator.
answered Jul 22, 2015 at 20:54
![]()
ceejayozceejayoz
175k40 gold badges296 silver badges364 bronze badges
Laravel-lang
In this repository, you can find the lang files for the framework PHP, Laravel 4&5.
you can see here for use that.
answered Sep 3, 2019 at 21:01
![]()
Amir KaftariAmir Kaftari
1,18510 silver badges13 bronze badges
Version
![]()
![]()
Localization
-
Introduction
- Configuring The Locale
- Pluralization Language
-
Defining Translation Strings
- Using Short Keys
- Using Translation Strings As Keys
-
Retrieving Translation Strings
- Replacing Parameters In Translation Strings
- Pluralization
- Overriding Package Language Files
Introduction
Laravel’s localization features provide a convenient way to retrieve strings in various languages, allowing you to easily support multiple languages within your application.
Laravel provides two ways to manage translation strings. First, language strings may be stored in files within the lang directory. Within this directory, there may be subdirectories for each language supported by the application. This is the approach Laravel uses to manage translation strings for built-in Laravel features such as validation error messages:
/lang
    /en
        messages.php
    /es
        messages.php
Or, translation strings may be defined within JSON files that are placed within the lang directory. When taking this approach, each language supported by your application would have a corresponding JSON file within this directory. This approach is recommended for applications that have a large number of translatable strings:
/lang
en.json
es.json
We’ll discuss each approach to managing translation strings within this documentation.
Configuring The Locale
The default language for your application is stored in the config/app.php configuration file’s locale configuration option. You are free to modify this value to suit the needs of your application.
You may modify the default language for a single HTTP request at runtime using the setLocale method provided by the App facade:
use IlluminateSupportFacadesApp;

Route::get('/greeting/{locale}', function ($locale) {
    if (! in_array($locale, ['en', 'es', 'fr'])) {
        abort(400);
    }

    App::setLocale($locale);

    //
});
You may configure a «fallback language», which will be used when the active language does not contain a given translation string. Like the default language, the fallback language is also configured in the config/app.php configuration file:
'fallback_locale' => 'en',
Determining The Current Locale
You may use the currentLocale and isLocale methods on the App facade to determine the current locale or check if the locale is a given value:
use IlluminateSupportFacadesApp;

$locale = App::currentLocale();

if (App::isLocale('en')) {
    //
}
Pluralization Language
You may instruct Laravel’s «pluralizer», which is used by Eloquent and other portions of the framework to convert singular strings to plural strings, to use a language other than English. This may be accomplished by invoking the useLanguage method within the boot method of one of your application’s service providers. The pluralizer’s currently supported languages are: french, norwegian-bokmal, portuguese, spanish, and turkish:
use IlluminateSupportPluralizer;

/**
 * Bootstrap any application services.
 *
 * @return void
 */
public function boot()
{
    Pluralizer::useLanguage('spanish');

    // ...
}
Warning
If you customize the pluralizer’s language, you should explicitly define your Eloquent model’s table names.
Defining Translation Strings
Using Short Keys
Typically, translation strings are stored in files within the lang directory. Within this directory, there should be a subdirectory for each language supported by your application. This is the approach Laravel uses to manage translation strings for built-in Laravel features such as validation error messages:
/lang
    /en
        messages.php
    /es
        messages.php
All language files return an array of keyed strings. For example:
<?php

// lang/en/messages.php

return [
    'welcome' => 'Welcome to our application!',
];
Warning
For languages that differ by territory, you should name the language directories according to the ISO 15897. For example, «en_GB» should be used for British English rather than «en-gb».
Using Translation Strings As Keys
For applications with a large number of translatable strings, defining every string with a «short key» can become confusing when referencing the keys in your views and it is cumbersome to continually invent keys for every translation string supported by your application.
For this reason, Laravel also provides support for defining translation strings using the «default» translation of the string as the key. Translation files that use translation strings as keys are stored as JSON files in the lang directory. For example, if your application has a Spanish translation, you should create a lang/es.json file:
{
    "I love programming.": "Me encanta programar."
}
Key / File Conflicts
You should not define translation string keys that conflict with other translation filenames. For example, translating __('Action') for the «NL» locale while a nl/action.php file exists but a nl.json file does not exist will result in the translator returning the contents of nl/action.php.
Retrieving Translation Strings
You may retrieve translation strings from your language files using the __ helper function. If you are using «short keys» to define your translation strings, you should pass the file that contains the key and the key itself to the __ function using «dot» syntax. For example, let’s retrieve the welcome translation string from the lang/en/messages.php language file:
echo __('messages.welcome');
If the specified translation string does not exist, the __ function will return the translation string key. So, using the example above, the __ function would return messages.welcome if the translation string does not exist.
If you are using your default translation strings as your translation keys, you should pass the default translation of your string to the __ function;
echo __('I love programming.');
Again, if the translation string does not exist, the __ function will return the translation string key that it was given.
If you are using the Blade templating engine, you may use the {{ }} echo syntax to display the translation string:
{{ __('messages.welcome') }}
Replacing Parameters In Translation Strings
If you wish, you may define placeholders in your translation strings. All placeholders are prefixed with a :. For example, you may define a welcome message with a placeholder name:
'welcome' => 'Welcome, :name',
To replace the placeholders when retrieving a translation string, you may pass an array of replacements as the second argument to the __ function:
echo __('messages.welcome', ['name' => 'dayle']);
If your placeholder contains all capital letters, or only has its first letter capitalized, the translated value will be capitalized accordingly:
'welcome' => 'Welcome, :NAME', // Welcome, DAYLE
'goodbye' => 'Goodbye, :Name', // Goodbye, Dayle
Object Replacement Formatting
If you attempt to provide an object as a translation placeholder, the object’s __toString method will be invoked. The __toString method is one of PHP’s built-in «magic methods». However, sometimes you may not have control over the __toString method of a given class, such as when the class that you are interacting with belongs to a third-party library.
In these cases, Laravel allows you to register a custom formatting handler for that particular type of object. To accomplish this, you should invoke the translator’s stringable method. The stringable method accepts a closure, which should type-hint the type of object that it is responsible for formatting. Typically, the stringable method should be invoked within the boot method of your application’s AppServiceProvider class:
use IlluminateSupportFacadesLang;
use MoneyMoney;

/**
 * Bootstrap any application services.
 *
 * @return void
 */
public function boot()
{
    Lang::stringable(function (Money $money) {
        return $money->formatTo('en_GB');
    });
}
Pluralization
Pluralization is a complex problem, as different languages have a variety of complex rules for pluralization; however, Laravel can help you translate strings differently based on pluralization rules that you define. Using a | character, you may distinguish singular and plural forms of a string:
'apples' => 'There is one apple|There are many apples',
Of course, pluralization is also supported when using translation strings as keys:
{
    "There is one apple|There are many apples": "Hay una manzana|Hay muchas manzanas"
}
You may even create more complex pluralization rules which specify translation strings for multiple ranges of values:
'apples' => '{0} There are none|[1,19] There are some|[20,*] There are many',
After defining a translation string that has pluralization options, you may use the trans_choice function to retrieve the line for a given «count». In this example, since the count is greater than one, the plural form of the translation string is returned:
echo trans_choice('messages.apples', 10);
You may also define placeholder attributes in pluralization strings. These placeholders may be replaced by passing an array as the third argument to the trans_choice function:
'minutes_ago' => '{1} :value minute ago|[2,*] :value minutes ago',

echo trans_choice('time.minutes_ago', 5, ['value' => 5]);
If you would like to display the integer value that was passed to the trans_choice function, you may use the built-in :count placeholder:
'apples' => '{0} There are none|{1} There is one|[2,*] There are :count',
Overriding Package Language Files
Some packages may ship with their own language files. Instead of changing the package’s core files to tweak these lines, you may override them by placing files in the lang/vendor/{package}/{locale} directory.
So, for example, if you need to override the English translation strings in messages.php for a package named skyrim/hearthfire, you should place a language file at: lang/vendor/hearthfire/en/messages.php. Within this file, you should only define the translation strings you wish to override. Any translation strings you don’t override will still be loaded from the package’s original language files.
Localization
- Introduction
- Configuring The Locale
- Pluralization Language
- Defining Translation Strings
- Using Short Keys
- Using Translation Strings As Keys
- Retrieving Translation Strings
- Replacing Parameters In Translation Strings
- Pluralization
- Overriding Package Language Files
Introduction
Laravel’s localization features provide a convenient way to retrieve strings in various languages, allowing you to easily support multiple languages within your application.
Laravel provides two ways to manage translation strings. First, language strings may be stored in files within the lang directory. Within this directory, there may be subdirectories for each language supported by the application. This is the approach Laravel uses to manage translation strings for built-in Laravel features such as validation error messages:
/lang
/en
messages.php
/es
messages.php
Or, translation strings may be defined within JSON files that are placed within the lang directory. When taking this approach, each language supported by your application would have a corresponding JSON file within this directory. This approach is recommended for applications that have a large number of translatable strings:
We’ll discuss each approach to managing translation strings within this documentation.
Configuring The Locale
The default language for your application is stored in the config/app.php configuration file’s locale configuration option. You are free to modify this value to suit the needs of your application.
You may modify the default language for a single HTTP request at runtime using the setLocale method provided by the App facade:
use IlluminateSupportFacadesApp;
Route::get('/greeting/{locale}', function ($locale) {
if (! in_array($locale, ['en', 'es', 'fr'])) {
abort(400);
}
App::setLocale($locale);
//
});
You may configure a «fallback language», which will be used when the active language does not contain a given translation string. Like the default language, the fallback language is also configured in the config/app.php configuration file:
'fallback_locale' => 'en',
Determining The Current Locale
You may use the currentLocale and isLocale methods on the App facade to determine the current locale or check if the locale is a given value:
use IlluminateSupportFacadesApp;
$locale = App::currentLocale();
if (App::isLocale('en')) {
//
}
Pluralization Language
You may instruct Laravel’s «pluralizer», which is used by Eloquent and other portions of the framework to convert singular strings to plural strings, to use a language other than English. This may be accomplished by invoking the useLanguage method within the boot method of one of your application’s service providers. The pluralizer’s currently supported languages are: french, norwegian-bokmal, portuguese, spanish, and turkish:
use IlluminateSupportPluralizer;
/**
* Bootstrap any application services.
*
* @return void
*/
public function boot()
{
Pluralizer::useLanguage('spanish');
// ...
}
Warning
If you customize the pluralizer’s language, you should explicitly define your Eloquent model’s table names.
Defining Translation Strings
Using Short Keys
Typically, translation strings are stored in files within the lang directory. Within this directory, there should be a subdirectory for each language supported by your application. This is the approach Laravel uses to manage translation strings for built-in Laravel features such as validation error messages:
/lang
/en
messages.php
/es
messages.php
All language files return an array of keyed strings. For example:
<?php
// lang/en/messages.php
return [
'welcome' => 'Welcome to our application!',
];
Warning
For languages that differ by territory, you should name the language directories according to the ISO 15897. For example, «en_GB» should be used for British English rather than «en-gb».
Using Translation Strings As Keys
For applications with a large number of translatable strings, defining every string with a «short key» can become confusing when referencing the keys in your views and it is cumbersome to continually invent keys for every translation string supported by your application.
For this reason, Laravel also provides support for defining translation strings using the «default» translation of the string as the key. Translation files that use translation strings as keys are stored as JSON files in the lang directory. For example, if your application has a Spanish translation, you should create a lang/es.json file:
{
"I love programming.": "Me encanta programar."
}
Key / File Conflicts
You should not define translation string keys that conflict with other translation filenames. For example, translating __('Action') for the «NL» locale while a nl/action.php file exists but a nl.json file does not exist will result in the translator returning the contents of nl/action.php.
Retrieving Translation Strings
You may retrieve translation strings from your language files using the __ helper function. If you are using «short keys» to define your translation strings, you should pass the file that contains the key and the key itself to the __ function using «dot» syntax. For example, let’s retrieve the welcome translation string from the lang/en/messages.php language file:
echo __('messages.welcome');
If the specified translation string does not exist, the __ function will return the translation string key. So, using the example above, the __ function would return messages.welcome if the translation string does not exist.
If you are using your default translation strings as your translation keys, you should pass the default translation of your string to the __ function;
echo __('I love programming.');
Again, if the translation string does not exist, the __ function will return the translation string key that it was given.
If you are using the Blade templating engine, you may use the {{ }} echo syntax to display the translation string:
{{ __('messages.welcome') }}
Replacing Parameters In Translation Strings
If you wish, you may define placeholders in your translation strings. All placeholders are prefixed with a :. For example, you may define a welcome message with a placeholder name:
'welcome' => 'Welcome, :name',
To replace the placeholders when retrieving a translation string, you may pass an array of replacements as the second argument to the __ function:
echo __('messages.welcome', ['name' => 'dayle']);
If your placeholder contains all capital letters, or only has its first letter capitalized, the translated value will be capitalized accordingly:
'welcome' => 'Welcome, :NAME', // Welcome, DAYLE
'goodbye' => 'Goodbye, :Name', // Goodbye, Dayle
Object Replacement Formatting
If you attempt to provide an object as a translation placeholder, the object’s __toString method will be invoked. The __toString method is one of PHP’s built-in «magic methods». However, sometimes you may not have control over the __toString method of a given class, such as when the class that you are interacting with belongs to a third-party library.
In these cases, Laravel allows you to register a custom formatting handler for that particular type of object. To accomplish this, you should invoke the translator’s stringable method. The stringable method accepts a closure, which should type-hint the type of object that it is responsible for formatting. Typically, the stringable method should be invoked within the boot method of your application’s AppServiceProvider class:
use IlluminateSupportFacadesLang;
use MoneyMoney;
/**
* Bootstrap any application services.
*
* @return void
*/
public function boot()
{
Lang::stringable(function (Money $money) {
return $money->formatTo('en_GB');
});
}
Pluralization
Pluralization is a complex problem, as different languages have a variety of complex rules for pluralization; however, Laravel can help you translate strings differently based on pluralization rules that you define. Using a | character, you may distinguish singular and plural forms of a string:
'apples' => 'There is one apple|There are many apples',
Of course, pluralization is also supported when using translation strings as keys:
{
"There is one apple|There are many apples": "Hay una manzana|Hay muchas manzanas"
}
You may even create more complex pluralization rules which specify translation strings for multiple ranges of values:
'apples' => '{0} There are none|[1,19] There are some|[20,*] There are many',
After defining a translation string that has pluralization options, you may use the trans_choice function to retrieve the line for a given «count». In this example, since the count is greater than one, the plural form of the translation string is returned:
echo trans_choice('messages.apples', 10);
You may also define placeholder attributes in pluralization strings. These placeholders may be replaced by passing an array as the third argument to the trans_choice function:
'minutes_ago' => '{1} :value minute ago|[2,*] :value minutes ago',
echo trans_choice('time.minutes_ago', 5, ['value' => 5]);
If you would like to display the integer value that was passed to the trans_choice function, you may use the built-in :count placeholder:
'apples' => '{0} There are none|{1} There is one|[2,*] There are :count',
Overriding Package Language Files
Some packages may ship with their own language files. Instead of changing the package’s core files to tweak these lines, you may override them by placing files in the lang/vendor/{package}/{locale} directory.
So, for example, if you need to override the English translation strings in messages.php for a package named skyrim/hearthfire, you should place a language file at: lang/vendor/hearthfire/en/messages.php. Within this file, you should only define the translation strings you wish to override. Any translation strings you don’t override will still be loaded from the package’s original language files.
Локализация интерфейса
-
Введение
- Конфигурирование языка по умолчанию
-
Определение строк перевода
- Использование коротких ключей
- Использование строк перевода в качестве ключей
-
Получение строк перевода
- Замена параметров в строках перевода
- Плюрализация
- Переопределение языковых файлов пакета
Введение
Функционал локализации Laravel предоставляют удобный способ извлечения строк разных языков, что позволяет легко поддерживать мультиязычность интерфейса вашего приложения.
Laravel предлагает два способа управления строками перевода. Во-первых, языковые строки могут храниться в файлах в каталоге resources/lang. В этом каталоге могут быть подкаталоги для каждого языка, поддерживаемого приложением. Это подход, который Laravel использует для управления строками перевода собственного функционала, например сообщений об ошибках валидации:
/resources
    /lang
        /en
            messages.php
        /es
            messages.php
Или строки перевода могут быть определены в файлах JSON, которые помещаются в каталог resources/lang. При таком подходе каждый язык, поддерживаемый вашим приложением, будет иметь соответствующий файл JSON в этом каталоге. Этот подход рекомендуется для приложений с большим количеством переводимых строк:
/resources
    /lang
        en.json
        es.json
Мы обсудим каждый подход по управлению строками перевода в этой документации.
Конфигурирование языка по умолчанию
Язык по умолчанию для вашего приложения хранится в параметре locale конфигурационного файла config/app.php. Вы можете изменить это значение в соответствии с потребностями вашего приложения.
Вы можете изменить язык по умолчанию для одного HTTP-запроса во время выполнения, используя метод setLocale фасада App:
use IlluminateSupportFacadesApp;

Route::get('/greeting/{locale}', function ($locale) {
    if (! in_array($locale, ['en', 'es', 'fr'])) {
        abort(400);
    }

    App::setLocale($locale);

    //
});
Вы можете указать «резервный язык», который будет использоваться, когда активный язык не содержит конкретной строки перевода. Как и язык по умолчанию, резервный язык также задается в конфигурационном файле config/app.php:
'fallback_locale' => 'en',
Определение текущего языка
Вы можете использовать методы currentLocale и isLocale фасада App, чтобы определить текущий язык или проверить соответствие указанного языка:
use IlluminateSupportFacadesApp;

$locale = App::currentLocale();

if (App::isLocale('en')) {
    //
}
Определение строк перевода
Использование коротких ключей
Обычно строки перевода хранятся в файлах в каталоге resources/lang. В этом каталоге должен быть подкаталог для каждого языка, поддерживаемого вашим приложением. Это подход, который Laravel использует для управления строками перевода собственного функционала, например сообщений об ошибках валидации:
/resources
    /lang
        /en
            messages.php
        /es
            messages.php
Все языковые файлы возвращают массив строк с ключами. Например:
<?php

// resources/lang/en/messages.php

return [
    'welcome' => 'Welcome to our application!',
];
Для языков, отличающихся территориально, вы должны назвать языковые каталоги в соответствии со стандартом ISO 15897. Например, для британского английского следует использовать «en_GB», а не «en-gb».
Использование строк перевода в качестве ключей
Для приложений с большим количеством переводимых строк определение каждой строки с помощью «короткого ключа» может сбивать с толку при обращении к ключам в ваших шаблонах, и постоянно изобретать ключи для каждой строки перевода, поддерживаемой вашим приложением, затруднительно.
По этой причине Laravel предлагает определение строк перевода с использованием переводимой строки в качестве ключа «по умолчанию». Файлы перевода, которые используют строки перевода в качестве ключей, хранятся как файлы JSON в каталоге resources/lang. Например, если ваше приложение имеет испанский перевод, то вы должны создать файл resources/lang/es.json:
{
    "I love programming.": "Me encanta programar."
}
Конфликты ключей и имен файлов
Вы не должны определять строковые ключи перевода, которые конфликтуют с именами файлов перевода. Например, перевод __('Action') для языка NL при условии существования файла nl/action.php и отсутствии файла nl.json приведет к тому, что переводчик Laravel вернет содержимое всего файла nl/action.php.
Получение строк перевода
Вы можете получить строки перевода из ваших языковых файлов с помощью глобального помощника __. Если вы используете «короткие ключи» для определения ваших строк перевода, то вы должны передать файл, содержащий ключ, и сам ключ в функцию __, используя «точечную нотацию». Например, давайте извлечем строку перевода welcome из языкового файла resources/lang/en/messages.php:
echo __('messages.welcome');
Если указанная строка перевода не существует, то функция __ вернет ключ строки перевода. Итак, используя приведенный выше пример, функция __ вернет messages.welcome, если строка перевода не существует.
Если вы используете свои строки перевода в качестве ключей перевода, то вы должны передать перевод вашей строки по умолчанию в функцию __:
echo __('I love programming.');
Опять же, если строка перевода не существует, то функция __ вернет ключ строки перевода, который ей был передан.
Если вы используете шаблонизатор Blade, то вы можете использовать синтаксис {{}} для вывода строки перевода:
{{ __('messages.welcome') }}
Замена параметров в строках перевода
При желании вы можете определить метку-заполнитель в строках перевода. Все заполнители имеют префикс :. Например, вы можете определить приветственное сообщение с именем-заполнителем:
'welcome' => 'Welcome, :name',
Чтобы заменить заполнители при получении строки перевода, вы можете передать массив для замены в качестве второго аргумента функции __:
echo __('messages.welcome', ['name' => 'dayle']);
Если все буквы заполнителя заглавные или заполнитель имеет только первую заглавную букву, то переведенное значение будет с соответствующим регистром:
'welcome' => 'Welcome, :NAME', // Welcome, DAYLE
'goodbye' => 'Goodbye, :Name', // Goodbye, Dayle
Плюрализация
Плюрализация – сложная задача, поскольку разные языки имеют множество сложных правил плюрализации; однако Laravel может помочь вам переводить строки по-разному в зависимости от правил множественного числа, которые вы определяете. Используя мета-символ |, вы можете различать формы единственного и множественного числа строки:
'apples' => 'There is one apple|There are many apples',
Конечно, множественное число также поддерживается при использовании строк перевода в качестве ключей:
{
    "There is one apple|There are many apples": "Hay una manzana|Hay muchas manzanas"
}
Вы даже можете создать более сложные правила множественного числа, которые определяют строки перевода для нескольких диапазонов значений:
'apples' => '{0} There are none|[1,19] There are some|[20,*] There are many',
После определения строки перевода, которая имеет параметры множественного числа, вы можете использовать функцию trans_choice для извлечения строки соответствующую указанному «количеству». В этом примере, поскольку количество больше единицы, возвращается форма множественного числа строки перевода:
echo trans_choice('messages.apples', 10);
Вы также можете определить метку-заполнитель в строках множественного числа. Эти заполнители могут быть заменены передачей массива в качестве третьего аргумента функции trans_choice:
'minutes_ago' => '{1} :value minute ago|[2,*] :value minutes ago',

echo trans_choice('time.minutes_ago', 5, ['value' => 5]);
Если вы хотите отобразить целочисленное значение, переданное в функцию trans_choice, то вы можете использовать встроенный заполнитель :count:
'apples' => '{0} There are none|{1} There is one|[2,*] There are :count',
Переопределение языковых файлов пакета
Некоторые пакеты могут содержать собственные языковые файлы. Вместо того чтобы изменять строки файлов пакета, вы можете переопределить их, поместив файлы в каталог resources/lang/vendor/{package}/{locale}.
Так, например, если вам нужно переопределить строки перевода на английский в messages.php для пакета с именем skyrim/hearthfire, вы должны поместить языковой файл в каталог: resources/lang/vendor/hearthfire/en/messages.php. В этом файле вы должны определять только те строки перевода, которые хотите переопределить. Любые строки перевода, которые вы не меняете, все равно будут загружены из исходных языковых файлов пакета.
How can I change the validator language messages. For example if I want to change the ‘required’ text ‘The kilometerszakelijk field is required.’ to something else?
![]()
asked Jul 22, 2015 at 20:44
![]()
All language specific content is stored in your resources/lang// folder. One of the files you’ll find in this folder is validation.php that holds validation messages for given language, so if you want to change the translations, you’ll need to edit that file.
Depending on the language that is used by the application, messages will be read from different folders in resources/lang/. You can set language/locale using
App::setLocale('en');
You can also set fallback locale (that is used when there are no translations for current language) by setting it in your config/app.php file, e.g.:
'fallback_locale' => 'en',
See more details in the docs: http://laravel.com/docs/5.0/localization
answered Jul 22, 2015 at 20:56
![]()
jedrzej.kurylojedrzej.kurylo
38.8k9 gold badges95 silver badges106 bronze badges
1
Create a folder named like your language code in
resources/lang
then create a file in this folder called validation.php and in there, write something like
return [

    'required'    => 'Das Feld :attribute ist ein Pflichtfeld.',

]
answered Jul 22, 2015 at 20:55
![]()
baaobaao
69.5k17 gold badges135 silver badges192 bronze badges
For the default messages, you can adjust the translations in resources/lang/<language>/validation.php.
You can also pass entirely custom messages to the validator.
answered Jul 22, 2015 at 20:54
![]()
ceejayozceejayoz
175k40 gold badges296 silver badges364 bronze badges
Laravel-lang
In this repository, you can find the lang files for the framework PHP, Laravel 4&5.
you can see here for use that.
answered Sep 3, 2019 at 21:01
![]()
Amir KaftariAmir Kaftari
1,18510 silver badges13 bronze badges
В этой статье мы расскажем всё, что вам нужно знать о том, как сделать локализацию в Laravel.
- Настройка локали.
- Типы файлов перевода.
- Расположение файлов перевода.
- Функции, хелперы и директивы.
- Как получить строку с переводом.
- Плейсхолдеры.
- Плюрализация.
- Как перевести языковые файлы установленных пакетов.
1. Настройка локали
Дефолтный язык вашего приложения хранится в конфигурационном файле config/app.php (‘locale’ => ‘en’,) .
Вы можете настроить резервный язык, который будет использоваться, если активный язык не содержит заданную строку перевода (‘fallback_locale’ => ‘en’,) .
Вы также можете изменить активный язык во время выполнения, используя App::setLocale().
2. Типы файлов перевода
Существует два типа файлов перевода:
- Файлы, которые возвращают массив ключевых строк.
- Файлы перевода JSON в виде ключей.
# массив ключевых строк
return [
    'welcome' => 'Welcome to our application'
];

# json перевод
{
    "I love programming.": "Me encanta programar."
}
3. Расположение файлов перевода
Переводы хранятся в файлах каталога resources/lang.
Для массива ключевых строк каждый язык, поддерживаемый приложением, должен находиться в своём подкаталоге.
Для json перевода, если ваше приложение переведено на русский язык, вы должны создать файл resources/lang/ru.json.
/resources
    /lang
       ru.json
        /en
            messages.php
        /ru
            messages.php
4. Функции, хелперы и директивы.
Используйте App::getLocale() и App::isLocale(), чтобы определить текущую локаль и проверить, является ли локаль заданным значением.
Все функции, хелперы и директивы описаны в этой статье.
App::setLocale()
App::getLocale()
App::isLocale()
@lang()
__()
trans()
trans_choice()
5. Как получить строку с переводом
# перевод приветственной строки из resources/lang/messages.php
# используя массив ключевых строк
echo __('messages.welcome');

# using json перевод
echo __('I love programming.');

# в Blade, используя {{ }} или директиву @lang
{{ __('messages.welcome') }}
@lang('messages.welcome')
Если указанная строка перевода не существует, то __() вернет ключ строки перевода, в данном примере будет возвращено messages.welcome.
6. Плейсхолдеры (Placeholders)
Вы можете определить плейсхолдер в ваших переводах через префикс : (только для массива ключевых строк). Чтобы заполнить плейсхолдер при извлечении перевода, передайте массив для замены в качестве второго аргумента в функцию __().
return [
    'welcome' => 'Welcome to our application',
    'welcome' => 'Welcome, :name', // Welcome, dayle
    'welcome' => 'Welcome, :NAME', // Welcome, DAYLE
    'goodbye' => 'Goodbye, :Name', // Goodbye, Dayle
];

# используем плейсхолдер
echo __('messages.welcome', ['name' => 'dayle']);
7. Плюрализация
Используйте символ | для разделения единственного и множественного числа. Вы можете даже создать более сложные правила множественного числа для нескольких числовых диапазонов.
Используйте trans_choice() для получения строки с опциями плюрализации.
Вы также можете определять плейсхолдеры. Их можно заменить, передав массив в качестве третьего аргумента функции trans_choice().
# единственное число | множественное число
'apples' => 'Одно яблоко|Много яблок',

trans_choice('pluralization.apples', 1) // Одно яблоко
trans_choice('pluralization.apples', 2) // Много яблок

# несколько числовых диапозонов
'amount' => '{0} Ни одного|[1,19] Несколько|[20,*] Много',

trans_choice('pluralization.amount', 0)  // Ни одного
trans_choice('pluralization.amount', 12) // Несколько
trans_choice('pluralization.amount', 22) // Много

# с плейсхолдером :count
'amount count' => '{0} Здесь нет ни одного|{1} Здесь один|[2,*] Здесь :count',

trans_choice('pluralization.amount count', 0) // Здесь нет ни одного
trans_choice('pluralization.amount count', 1) // Здесь один
trans_choice('pluralization.amount count', 2) // Здесь 2

# с плейсхолдерами
'minutes_ago' => '{1} :value минуту назад|[2,*] :value минут назад'

trans_choice('pluralization.minutes_ago', 5, ['value' => 5]) // 5 минут назад
8. Как перевести языковые файлы установленных пакетов
Некоторые пакеты могут поставляться со своими языковыми файлами. Вместо того, чтобы изменять основные файлы пакета, вы можете переопределить их, поместив файлы в каталог resources/lang/vendor/{package}/{locale}.
Например, если вам нужно перевести с английского языка на русский строки в messages.php для пакета с названием skyrim/hearthfire, вы должны поместить языковой файл по адресу resources/lang/vendor/hearthfire/ru/messages.php.
Автор: Flavio Rosselli
Перевод: Алексей Широков
Задать вопросы по урокам можно на нашем форуме.
-
1. Введение
- 1.1. Настройка языка
-
2. Получение языковых строк
- 2.1. Замена частей в строках
- 3. Множественное число
- 4. Перекрытие языковых файлов пакета
Введение
Возможности для локализации в Laravel предоставляют удобный способ получения языковых строк, позволяя вашему приложению поддерживать несколько языков интерфейса. Языковые строки хранятся в папке resources/lang. Внутри неё должны располагаться подпапки для всех языков, поддерживаемых приложением:
/resources
  /lang
    /en
      messages.php
    /es
      messages.php
Все языковые файлы (скрипты) просто возвращают массив пар ключ/значение. Например:
PHP
<?phpreturn [
  'welcome' => 'Добро пожаловать на мой сайт!'
];
Настройка языка
Язык по умолчанию указан в файле настроек config/app.php. Само собой, вы можете изменить это значение для вашего приложения при необходимости. Вы также можете изменить текущий язык во время работы вашего приложения методом PHPsetLocale() фасада App:
PHP
Route::get('welcome/{locale}', function ($locale) {
  App::setLocale($locale);//
});
Вы можете настроить «запасной язык», который будет использоваться, когда в файле текущего языка нет соответствующей строки. Как и язык по умолчанию, запасной язык также настраивается в файле config/app.php:
PHP
'fallback_locale' => 'en',
+
5.3 5.2
добавлено в
5.3
(28.01.2017)
5.2
(08.12.2016)
Определение текущего языка
Вы можете использовать методы PHPgetLocale() и PHPisLocale() фасада App для определения текущего языка и для проверки на совпадение текущего языка с переданным значением:
PHP
$locale = App::getLocale();if (
App::isLocale('en')) {
//
}
Получение языковых строк
Вы можете получить строки из языкового файла с помощью функции PHPtrans(). Метод PHPtrans() принимает файл и ключ языковой строки первым аргументом. Например, давайте получим языковую строку welcome из файла resources/lang/messages.php:
PHP
echo trans('messages.welcome');
Конечно, если вы используете шаблонизатор Blade, то для получения языковой строки можете использовать синтаксис {{ }} или директиву PHP@lang (для версии 5.2 и выше):
PHP
{{ trans('messages.welcome') }}@
lang('messages.welcome')
Если строка не найдена, то метод PHPtrans() вернёт её имя (ключ). В нашем примере это будет messages.welcome.
+
5.0
добавлено в
5.0
(08.02.2016)
Получение строк из языкового файла
PHP
echo Lang::get('messages.welcome');
Первый аргумент метода PHPget() — имя языкового файла, а затем указывается имя строки, которую нужно получить.
Если строка не найдена, то метод PHPget() вернёт её имя (ключ).
Замена частей в строках
Если хотите, задайте место для замены в языковой строке. Все места для замены начинаются с двоеточия (:). Например, вы можете задать сообщение приветствия с использованием замены для имени:
PHP
'welcome' => 'Welcome, :name',
Для подстановки значения при получении языковой строки передайте массив замен вторым аргументом метода PHPtrans():
PHP
echo trans('messages.welcome', ['name' => 'dayle']);
+
5.2
добавлено в
5.2
(08.12.2016)
Подставляемое значение будет преобразовано в соответствии с тем, как задано место для замены (все символы заглавные или только первый):
PHP
'welcome' => 'Welcome, :NAME', // Welcome, DAYLE
'goodbye' => 'Goodbye, :Name', // Goodbye, Dayle
+
5.0
добавлено в
5.0
(08.02.2016)
PHP
echo Lang::get('messages.welcome', ['name' => 'Dayle']);
Проверка существования языковой строки
PHP
if (Lang::has('messages.welcome'))
{
  //
}
Множественное число
Формы множественного числа — проблема для многих языков, так как все они имеют разные сложные правила формирования множественного числа. Однако вы можете легко справиться с ней в ваших языковых файлах используя символ | для разделения форм единственного и множественного числа:
PHP
'apples' => 'Это одно яблоко|Это много яблок',
После определения языковой строки с вариантами для разных чисел, вы можете использовать функцию PHPtrans_choice() для получения строки в нужном числе. В данном примере возвратится вариант во множественном числе, так как указано число большее 1:
PHP
echo trans_choice('messages.apples', 10);
+
5.0
добавлено в
5.0
(08.02.2016)
PHP
echo Lang::choice('messages.apples', 10);
Вы также можете передать аргумент локали, чтобы указать язык. Например, если вы хотите использовать русский (ru) язык:
PHP
echo Lang::choice('товар|товара|товаров', $count, [], 'ru');
Благодаря тому, что Laravel использует компонент Symfony Translation вы можете легко создать более точные правила, которые будут указывать языковые строки для нескольких числовых промежутков:
PHP
'apples' => '{0} Это нисколько|[1,19] Это несколько|[20,Inf] Это много',
Перекрытие языковых файлов пакета
Многие пакеты поставляются с собственными языковыми файлами. Вместо того, чтобы вскрывать файлы внутри пакета, чтобы настроить строки в них, вы можете перекрыть их, разместив файлы в каталоге resources/lang/vendor/{package}/{locale} (для версии Laravel 5.0 — resources/lang/packages/{locale}/{package}).
Например, если вам необходимо изменить строки английского языка в messages.php для пакета skyrim/hearthfire, вам надо поместить языковой файл в resources/lang/vendor/hearthfire/en/messages.php. В этом файле вам надо задать только те строки, которые вы хотите перекрыть. Все остальные строки, которые вам не надо перекрывать, будут загружаться из языковых файлов самого пакета.
In this tutorial, you will learn by example how to perform Laravel localization and present your application in multiple languages. You will learn how to work with translation files, perform pluralization, create a language switcher, and more with laravel localization and multi-language examples.
Localization is the second phase of the Laravel internationalization (i18n) process. In Laravel i18n, an application is designed to fit various languages and cultures. Localization is adapting said internationalized applications to a specific language through translation.
So, shall we begin?
Huge thanks go to my colleague Andrejs Bekešs, who prepared the code samples and technical explanations for this article.
Prerequisites and assumptions
- We will be using Laravel version 8.x in this tutorial.
- This tutorial has been created with the assumption that you have the necessary knowledge of the PHP programming language and the Laravel framework.
- Your domain is
localhost. If not, then replacelocalhostwith your domain name or IP address (depending on your installation).
Working with translation files
So, in Laravel, just like in many other frameworks, you will store translations for different languages in separate files. There are two ways to organize Laravel translation files:
- An old approach which involves storing your files under the following path:
resources/lang/{en,fr,ru}/{myfile.php}. - A new approach of having
resources/lang/{fr.json, ru.json}files.
For languages that differ by territory, you should name the language directories/files according to ISO 15897. For example, for British English you would use en_GB rather than en-gb. In this article, we will focus on the second approach, but the same applies to the first one (with the exception of how translation keys are named and retrieved). Also, we’ll be using the default welcome.blade.php file as our playground.
Simple translations
Now, let’s head over to the resources/views/welcome.blade.php file and replace the contents of the body tag with our own, like so:
<body class="antialiased">
    <div class="relative flex items-top justify-center min-h-screen bg-gray-100 dark:bg-gray-900 sm:items-center py-4 sm:pt-0">
        <div class="max-w-6xl mx-auto sm:px-6 lg:px-8">
            <div class="flex justify-center pt-8 sm:justify-start sm:pt-0">
                Welcome to our website
            </div>
        </div>
    </div>
</body>
We’ll start by preparing our welcome message for localization, which is really easy in Laravel. All you need to do is replace the “Welcome to our website” text with the following code: {{ __('Welcome to our website') }}. This will instruct Laravel to display “Welcome to our website” by default and look for translations of this string if a non-English language is set (we’ll get to this later on). English will be set as a default language of our app, so by default we will simply display the “Welcome to our website” text. If the locale is different, we’ll try to search for the corresponding translation that will be created in a moment.
Locales in Laravel
But how does Laravel know what the current language is or what languages are available in the application? It does this by looking at the locale setup in the config/app.php app. Open up this file and look for these two array keys:
/*
|--------------------------------------------------------------------------
| Application Locale Configuration
|--------------------------------------------------------------------------
|
| The application locale determines the default locale that will be used
| by the translation service provider. You are free to set this value
| to any of the locales which will be supported by the application.
|
*/

'locale' => 'en',

/*
|--------------------------------------------------------------------------
| Application Fallback Locale
|--------------------------------------------------------------------------
|
| The fallback locale determines the locale to use when the current one
| is not available. You may change the value to correspond to any of
| the language folders that are provided through your application.
|
*/

'fallback_locale' => 'en',
The descriptions shown above the keys should be self-explanatory, but in short, the locale key contains the default locale of your application (at least, if no other locale was set in the code). The fallback_locale is the one being activated in the case that we set a non-existent locale in our application.
While we have this file open, let’s add a new key in here for our convenience later on by listing all the locales that our application is going to support. We’ll use this later when adding a locale switcher. However, this is an optional task as Laravel does not require us to do it.
/*
|--------------------------------------------------------------------------
| Available locales
|--------------------------------------------------------------------------
|
| List all locales that your application works with
|
*/

'available_locales' => [
  'English' => 'en',
  'Russian' => 'ru',
  'French' => 'fr',
],
Great! Now our application supports three languages: English, Russian, and French.
Translation files
Now that we have established all the locales we’ll work with, we can go ahead and move on to translating our default welcome message.
Let’s start by adding new localization files in the resources/lang folder. First, create a resources/lang/ru.json file and add the corresponding translations, as follows:
{
  "Welcome to our website": "Добро пожаловать на наш сайт"
}
Next, create a resources/lang/fr.json file:
{
  "Welcome to our website": "Bienvenue sur notre site"
}
As you can see, we’re always referencing the default message that we added in the welcome.blade.php file (which was {{ __('Welcome to our website') }}). The reason we don’t have to create an en.json file is because Laravel already knows that messages we pass in by default to the __() function are for our default locale, which is en (as explained in the section above).
Switching locales in Laravel
At this point, Laravel does not know how to switch locales so let’s perform translations directly inside the route for now. Edit the default welcome route as shown below:
Route::get('/{locale?}', function ($locale = null) {
    if (isset($locale) && in_array($locale, config('app.available_locales'))) {
        app()->setLocale($locale);
    }

    return view('welcome');
});
We can now visit our website, specifying any of the available languages as the first route segment: for example, localhost/ru or localhost/fr. You should see the localized content. In the case that you specify a non-supported locale or don’t specify a locale at all, Laravel will use en by default.
Middleware
Passing the locale for every site link might not be what you want and could look not quite so clean esthetically. That’s why we’ll perform language setup via a special language switcher and use the user session to display the translated content. Therefore, create a new middleware inside the app/Http/Middleware/Localization.php file or by running artisan make:middleware Localization.
<?php

namespace AppHttpMiddleware;

use Closure;
use IlluminateHttpRequest;
use IlluminateSupportFacadesApp;
use IlluminateSupportFacadesSession;

class Localization
{
    /**
    * Handle an incoming request.
    *
    * @param  IlluminateHttpRequest  $request
    * @param  Closure  $next
    * @return mixed
    */
    public function handle(Request $request, Closure $next)
    {
        if (Session::has('locale')) {
            App::setLocale(Session::get('locale'));
        }
        return $next($request);
    }
}
This middleware will instruct Laravel to utilize the locale selected by the user if this selection is present in the session.
Since we need this operation to be run on every request, we also need to add it to the default middleware stack at app/http/Kernel.php for the web middleware group:
* The application's route middleware groups.
*
* @var array
*/
protected $middlewareGroups = [
  'web' => [
      AppHttpMiddlewareEncryptCookies::class,
      IlluminateCookieMiddlewareAddQueuedCookiesToResponse::class,
      IlluminateSessionMiddlewareStartSession::class,
      // IlluminateSessionMiddlewareAuthenticateSession::class,
      IlluminateViewMiddlewareShareErrorsFromSession::class,
      AppHttpMiddlewareVerifyCsrfToken::class,
      IlluminateRoutingMiddlewareSubstituteBindings::class,
      AppHttpMiddlewareLocalization::class, /* <--- add this */
  ],
Changing routes
Next, we have to add a route to change locale. We’re using a closure route, but you can use exactly the same code inside your controller if you wish:
Route::get('language/{locale}', function ($locale) {
    app()->setLocale($locale);
    session()->put('locale', $locale);

    return redirect()->back();
});
Also, don’t forget to remove the previously added locale switching previously added in our default welcome route:
Route::get('/', function () {
    return view('welcome');
});
With this being done, the only way for the user to switch the currently set language is by entering localhost/language/{locale}. The locale selection will be stored inside the session and redirect users back to where they came from (check the Localization middleware). To test it out, head over to localhost/language/ru (as long as your session cookie is present in your browser), and you will see the translated content. You can freely move around the website or try to refresh the page and see that the selected language is being preserved.
The actual switcher
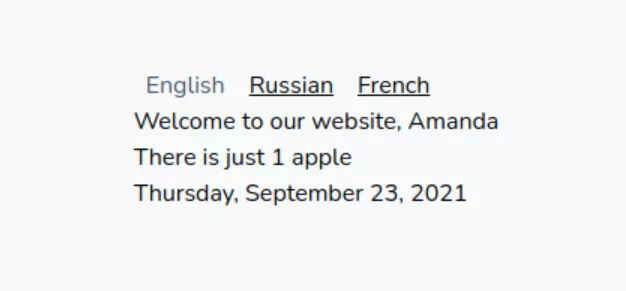
Now we need to create something that the user can click on to change the language instead of entering locale codes into the URL manually. To do this, we’ll add a very simple language control. Therefore, create a new resources/views/partials/language_switcher.blade.php file with the following code:
<div class="flex justify-center pt-8 sm:justify-start sm:pt-0">
    @foreach($available_locales as $locale_name => $available_locale)
        @if($available_locale === $current_locale)
            <span class="ml-2 mr-2 text-gray-700">{{ $locale_name }}</span>
        @else
            <a class="ml-1 underline ml-2 mr-2" href="language/{{ $available_locale }}">
                <span>{{ $locale_name }}</span>
            </a>
        @endif
    @endforeach
</div>
Include the newly created switcher into the “welcome” view:
<body class="antialiased">
    <div class="relative flex items-top justify-center min-h-screen bg-gray-100 dark:bg-gray-900 sm:items-center py-4 sm:pt-0">
        <div class="max-w-6xl mx-auto sm:px-6 lg:px-8">
            @include('partials/language_switcher')
            <div class="flex justify-center pt-8 sm:justify-start sm:pt-0">
                {{ __('Welcome to our website') }}
            </div>
        </div>
    </div>
</body>
Open the app/Providers/AppServiceProvider.php file and add the code to be shared when our language switcher is composed. Specifically, we’ll share the current locale that can be accessed as {{ $current_locale }}.
* Bootstrap any application services.
 *
 * @return void
 */
public function boot()
{
    view()->composer('partials.language_switcher', function ($view) {
        $view->with('current_locale', app()->getLocale());
        $view->with('available_locales', config('app.available_locales'));
    });
}
Advanced translation options in PHP Laravel
We will mostly be working with resources/views/welcome.blade.php, so everything needs to happen in our welcome view unless specified otherwise.
Parameters in translation strings
For instance, let’s greet our imaginary user (Amanda) instead of simply displaying a generic message:
{{ __('Welcome to our website, :Name', ['name' => 'amanda']) }}
Please note that we have used the name with a lowercase first letter, but the placeholder with an uppercase first letter. In this way, Laravel can help you capitalize the actual word automatically. This will occur if the placeholder starts with a capital letter, i.e., :Name produces “Amanda” or a full uppercase word, :NAME, produces “AMANDA”.
Additionally, let’s update our resources/lang/fr.json and resources/lang/ru.json translation files, since right now we’ll only see the English version everywhere as the translation keys do not match the translations.
French:
{
  "Welcome to our website, :Name": "Bienvenue sur notre site, :Name"
}
Russian:
{
  "Welcome to our website, :Name": "Добро пожаловать на наш сайт, :Name"
}
Great job!
Pluralization
To see pluralization in action, let’s add a new paragraph of text. To perform pluralization, you have to use the trans_choice function instead of __(), for instance:
{{ __('Welcome to our website, :Name', ['name' => 'amanda']) }}
<br>
{{ trans_choice('There is one apple|There are many apples', 2) }}
As you can see, the plural forms are separated with a |.
Now, what if we need more plural forms? This is possible as well:
{{ trans_choice('{0} There :form no apples|{1} There :form just :count apple|[2,19] There :form :count apples', 24) }}
In this case, we allow the numbers 0, 1, from 2 to 19, and finally from 20 onwards. Of course, you can add as many rules as you need.
Next, what if we want placeholders in our plural forms? No problem with that either:
{{ trans_choice('{0} There :form no apples|{1} There :form just :count apple|[2,19] There :form :count apples', 24, ['form' => 'is']) }}
We can also use count passed into `trans_choice`, if needed, by using a special :count placeholder:
{{ trans_choice('{0} There :form no apples|{1} There :form just :count apple|[2,19] There :form :count apples', 1, ['form' => 'is']) }}
Finally, don’t forget to update your translation files with all the changes we made to the base translation.
Russian:
{
  "Welcome to our website, :Name": "Добро пожаловать на наш сайт, :Name",
  "{0} There :form no apples|{1} There :form just :count apple|[2,19] There :form :count apples": "{0} Нет яблок|{1} Только :count яблоко|[2,19] :count яблок"
}
French:
{
  "Welcome to our website, :Name": "Bienvenue sur notre site, :Name",
  "{0} There :form no apples|{1} There :form just :count apple|[2,19] There :form :count apples": "{0} Il n'y a pas de pommes|{1} Il n'y :form :count pomme|[2,19] Il y :form :count pommes"
}
Working with localized dates in Laravel
To localize dates, we will be leveraging the power of Carbon, which is shipped with Laravel by default. Take a look at the Carbon documentation; you can do lots of cool things with it. For instance, we could invent our own locale with rules for date and time localization.
For our simple example, we will display the current date localized for the selected language. In our routes/web.php, let’s update the welcome page route and pass the localized date message over to our welcome view:
<?php
Route::get('/', function () {
    $today = CarbonCarbon::now()
        ->settings(
            [
                'locale' => app()->getLocale(),
            ]
        );

    // LL is macro placeholder for MMMM D, YYYY (you could write same as dddd, MMMM D, YYYY)
    $dateMessage = $today->isoFormat('dddd, LL');

    return view('welcome', [
        'date_message' => $dateMessage
    ]);
});
Let’s update resources/views/welcome.blade.php and add our date message, like so:
{{ __('Welcome to our website, :Name', ['name' => 'amanda']) }}
<br>
{{ trans_choice('{0} There :form :count apples|{1} There :form just :count apple|[2,19] There :form :count apples', 1, ['form' => 'is']) }}
<br>
{{ $date_message }}
Try switching languages on the localhost homepage — you’ll see that the dates are now localized, for example:
Formatting numbers and currencies with NumberFormatter
In different countries, people use different formats to represent numbers, for example:
- The United States → 123,123.12
- France → 123 123,12
Thus, to reflect these differences in your Laravel app, you could use NumberFormatter in the following way:
<?php
$num = NumberFormatter::create('en_US', NumberFormatter::DECIMAL);

$num2 = NumberFormatter::create('fr', NumberFormatter::DECIMAL);
You can even spell out the number in a particular language and display something like “one hundred twenty-three thousand one hundred twenty-three point one two”:
<?php
$num = NumberFormatter::create('en_US', NumberFormatter::SPELLOUT);

$num2 = NumberFormatter::create('fr', NumberFormatter::SPELLOUT);
On top of that, NumberFormatter enables you to localize currencies with ease, for example:
<?php
$currency1 = NumberFormatter::create('fr', NumberFormatter::CURRENCY);

$currency2 = NumberFormatter::create('en_US', NumberFormatter::CURRENCY);
So, for fr you will see Euros, while for en_US the currency will be US dollars.
Simplifying the translation process with Lokalise
The actual translation of all your text is probably the most time-consuming process of Laravel localization. However, finding a good translation management solution like Lokalise can rescue you from ending up with a lot of work on your hands. With Lokalise, the translation process can be carried out in just a few steps. Here are some basic guidelines on how to do it:
- Grab your free trial to continue.
- Next, install the Lokalise CLI. You can use it to create projects and upload and download translation files. Of course, there’s also a GUI available.
- Open the Lokalise website and proceed to the “API tokens” section on your personal profile page. Generate a new read/write token.
- Create a new translation project and set English as the base language.
- Open project settings and copy the project ID.
- Next, to upload your Laravel translation files to Lokalise, run:
lokalise2 file upload --token <token> --project-id <project_id> --lang_iso en --file PATH/TO/PROJECT/resources/lang/en.json. - Return to the newly created Lokalise project. All your translation keys and values should be there. You can modify them as much as you like by editing, deleting, and adding new ones. You can filter the keys; for example, you can find the untranslated ones which is very convenient.
- When you are ready, download the edited translations back to Laravel by running:
lokalise2 file download --token <token> --project-id <project_id> --format json --dest PATH/TO/PROJECT/resources/lang.
Lokalise supports many platforms and formats. With its multiple features, you have the ability to order translations from professionals, upload screenshots in order to read text from them, and lots more. So, integrate your applications with Lokalise today and make your life a whole lot easier.
Conclusion
In this article, we have seen how to get started with Laravel localization. We’ve discussed how to perform translations, use placeholders, take advantage of pluralization, and how to add a language switcher. Hopefully, you found this article interesting and useful. Thank you for dropping by today and until the next time!
Further reading
- How to choose the best translation management system for your team and company
- Date and time localization
- I18n and l10n: List of developer tutorials