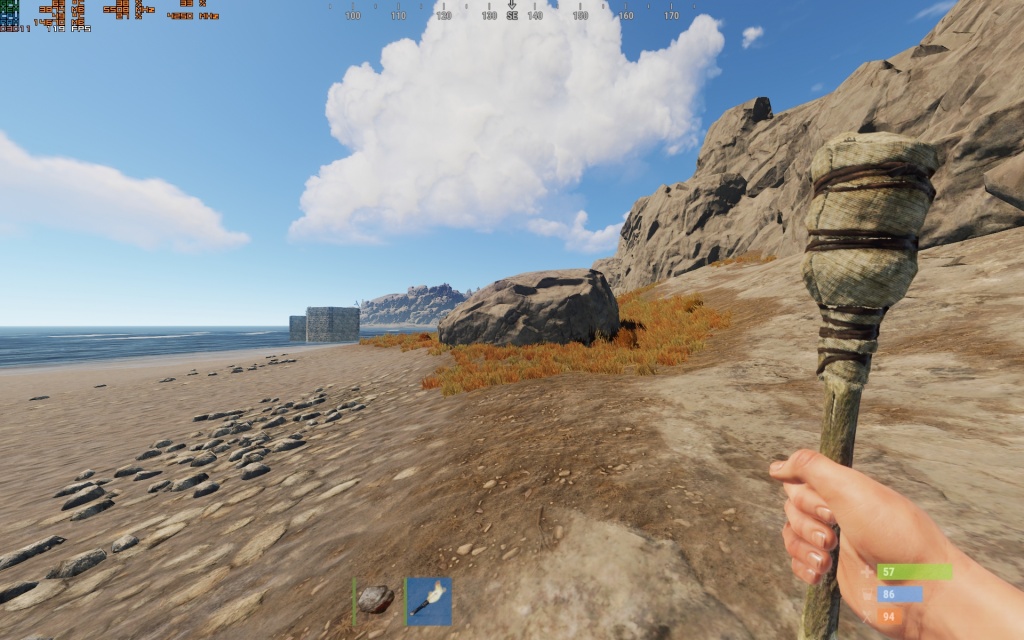
Настройка игры – как правило, одна из самых важных частей любой игры. Важно настроить всё так, чтобы было комфортно играть, ведь у каждого пользователя своя конфигурация компьютера. Именно поэтому разработчики Rust и предусмотрели возможность тонкой настройки своего продукта, чтобы каждый пользователь смог подобрать для себя идеальный баланс, позволяющий без проблем запускать игру. В этой статье детально разобраны все параметры игры, а также приведены примеры сборок для ваших компьютеров.
К сожалению, Facepunch отложили новую графику раст 2020, что радует только людей со слабым ПК, которые и так страдают от низкого ФПС. Благо в этой статье мы продемонстрировали оптимальные настройки графики раст под различные системы.
Содержимое статьи
- 1 Настройки Rust — описание пунктов
- 1.1 Image Effects — эффекты изображения
- 1.2 Graphics Quality — настройки графики в Rust
- 1.3 Mesh quality – качество сетки
- 1.4 Physics — физика в игре
- 1.5 Experimental — экспериментальное
- 2 Рекомендованные настройки графики
- 2.1 Настройки графики для слабых компьютеров Rust
- 2.2 Настройки графики для средних компьютеров Rust
- 2.3 Настройки графики для мощных компьютеров Rust
- 3 Настройки игры Rust ютуберов
Настройки Rust — описание пунктов
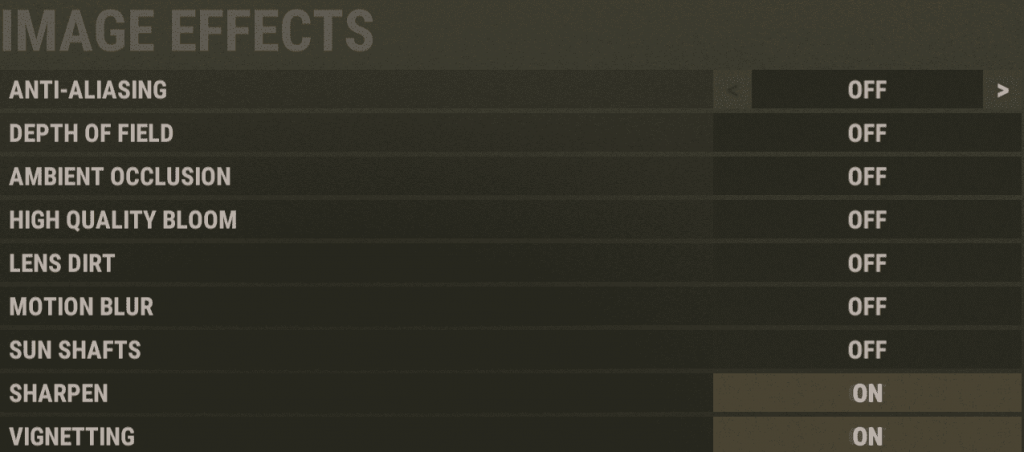
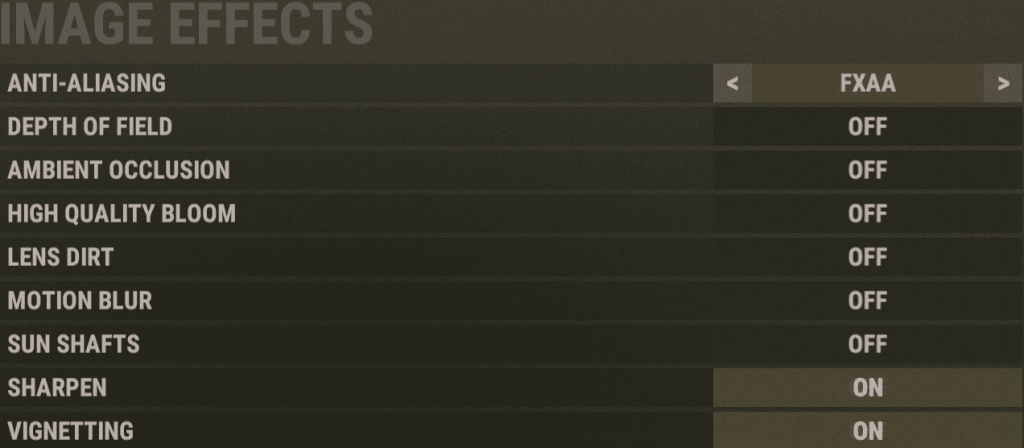
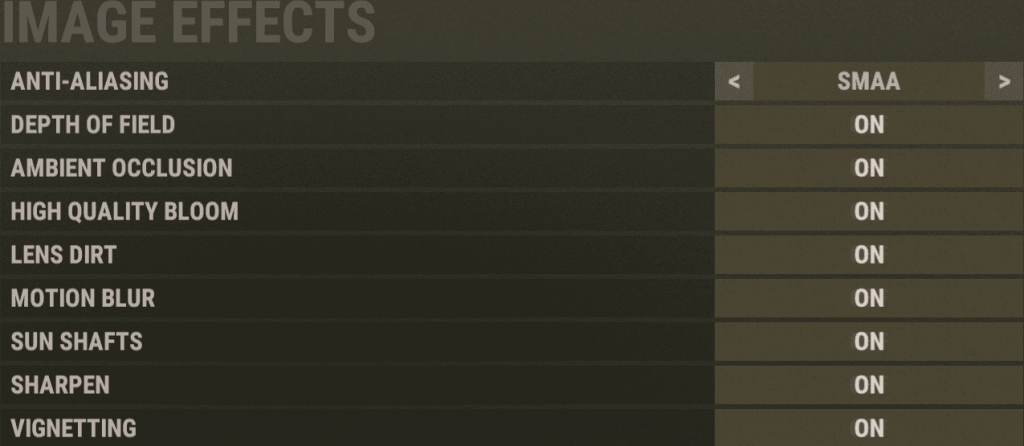
Image Effects — эффекты изображения
Anti–Aliasing – сглаживание. Имеет 4 вариации настройки:
- OFF – полностью отключает сглаживание;
- FXAA — метод сглаживания от NVidia, представляющий собой однопроходный пиксельный шейдер, который обсчитывает результирующий кадр на этапе постобработки;
- SMAA — (Subpixel Morphological anti-aliasing) — смесь FXAA и MLAA. По сути, несколько улучшенный MLAA, но работающий на видеокарте. Дает картинку лучше, чем FXAA, однако потребляет больше ресурсов;
- TSSAA (Temporal Super Sampling Anti-Aliasing) — в отличии от других типов сглаживания, которые работают только с одним, он умеет работать с движущимися объектами и хорошо убирает «мельтешение» картинки. По сути, является смесью MSAA и SMAA, дает очень качественную картинку, однако немного ее мылит и очень требовательно к ресурсам.
Depth of field – глубина резкости. Она относится к эффекту размытия вещей на заднем плане. Точно так же, как и размытие в движении, этот параметр отвлекает наши глаза и создает качество, как в фильмах – это не всегда отлично смотрится. К тому же эта настройка может повлиять на производительность. Её нужно настраивать, отталкиваясь от личных предпочтений.
Ambient Occlusion – фоновое затенение. Технология Ambient Occlusion позволяет формировать тени на основе одного или большего источников теней. В простейшей форме AO формирует контрастную тень от неяркого источника света. Чем ярче будет источник света, тем мягче будет переход между тенью и остальной частью сцены.
High quality bloom – освещение высокого качества. Это графическая настройка, которая относится к эффекту естественного света, качающихся/движущихся деревьев, растений, цветов и т.д.
Lens dirt – грязь объектива. Это эффект, разработанный, чтобы сделать Rust более реалистичным с точки зрения первого лица, сделав его так, как будто воображаемая камера, которая является глазами игрока, имела грязь на них. Это заставляет воображаемую камеру выглядеть немного запотевшей и пыльной, а в качестве побочного эффекта может заставить все выглядеть ярким, даже ночью.
Motion blur – размытость. Добавляет размытие изображения при повороте камеры, воспроизведении сцен движения или быстро движущихся объектов.
Sun shafts – вал солнца. Это такой эффект, который виден, когда пар или туман просвечивается лучами, пробивающимися, например, через листву. Короче, когда между игроком и источником света есть какое-то дырявое препятствие, а в воздухе висят какие-то мелкие частицы.
Sharpen – резкость. Делает объекты более чёткими.
Vignetting – затемнение. Снижает яркость изображения к краям поля зрения системы.
Данные эффекты не сильно повлияют на производительность.
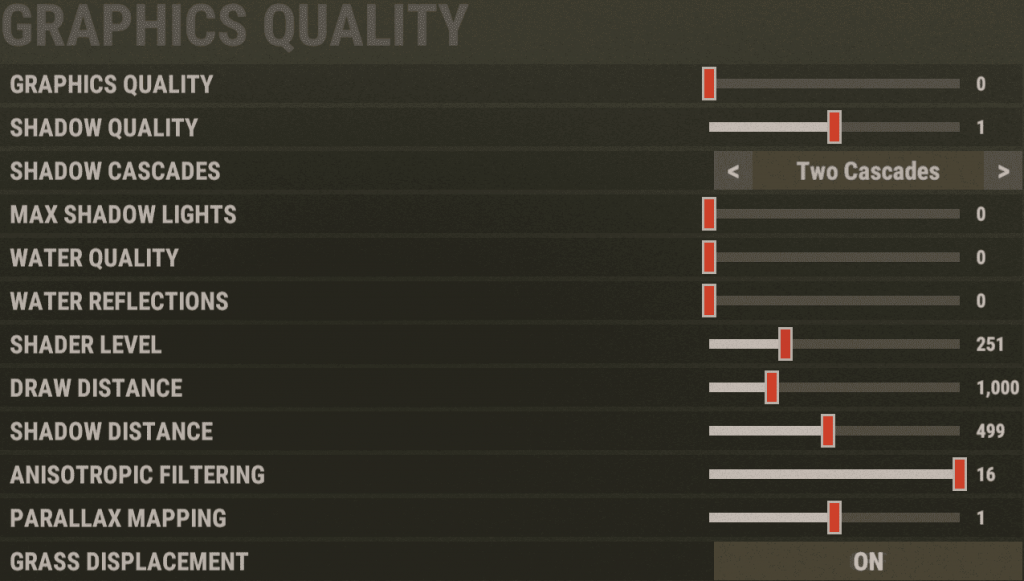
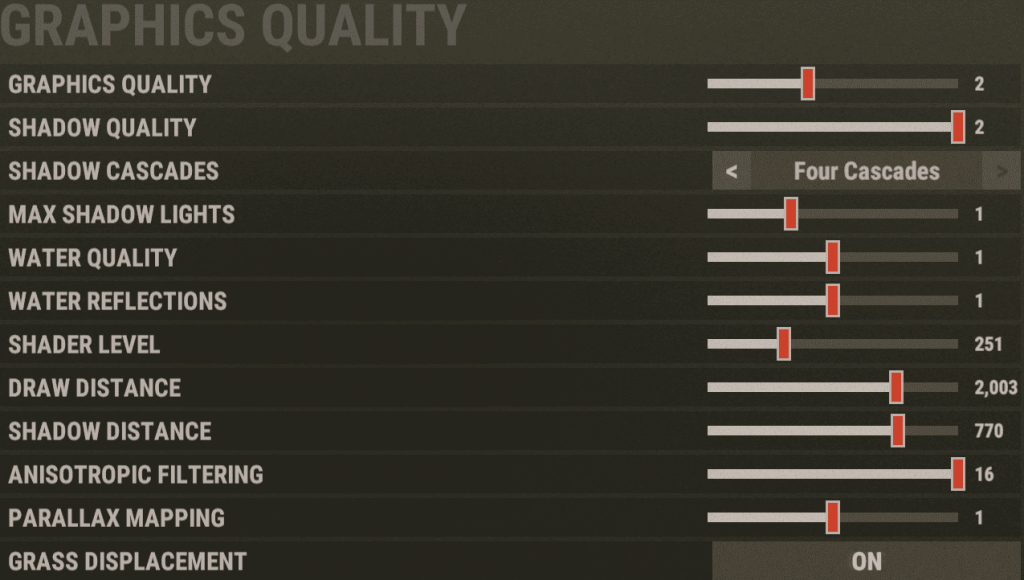
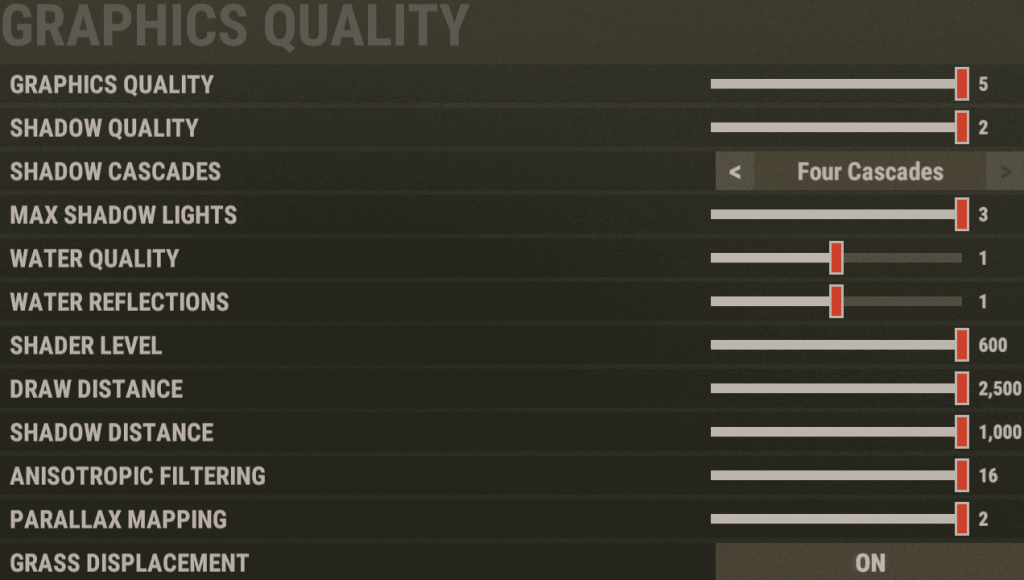
Graphics Quality — настройки графики в Rust
Graphics Quality – общее качество графики. Имеет 6 видов настройки (От 0 до 5). Устанавливайте в соответствии с остальными настройками.
Shadow quality – качество теней. Имеет 3 вида настройки (От 0 до 2).
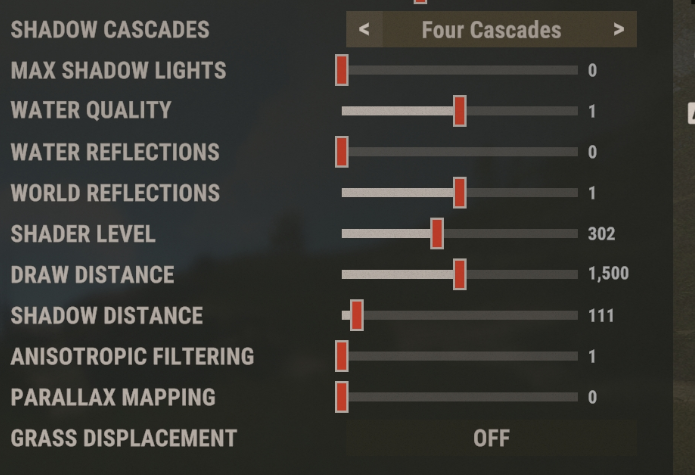
Shadow cascades — каскады теней. Имеет 3 вида настройки (0 каскадов – 2 каскада – 4 каскада). Ухудшает качество теней, повышая производительность.
Max Shadow lights – данный параметр отвечает за проход света между стенами. Имеет 4 варианта настройки (От 0 до 3).
Water quality – общее качество воды. Имеет 3 варианта настройки (От 0 до 2). При значении 1 и выше на воде появляются эффекты.
Water reflections – отражения на воде. Имеет 3 вида настройки (От 0 до 2). Добавляет отражения на воде при значении выше 1.
Shader level – уровень шейдеров. Имеет настройку от 100 до 600. Чем больше показатель, тем больше деталей на земле.
Draw distance – дальность прорисовки. Данный параметр отвечает за прорисовку всех объектов.
Shadow distance – дальность теней. Данный параметр влияет на дальность прорисовки теней.
Anisotropic filtering – анизотропная фильтрация. Правильно отображает объекты под большим углом.
Parallax mapping — параллактическое отображение. Делает изображение более объёмным. Имеет настройку от 0 до 2.
Grass displacement – смещение травы (приминается под вами или нет). Данный параметр имеет 2 варианта настройки – ON и OFF. Включенный параметр мнёт траву под вами.
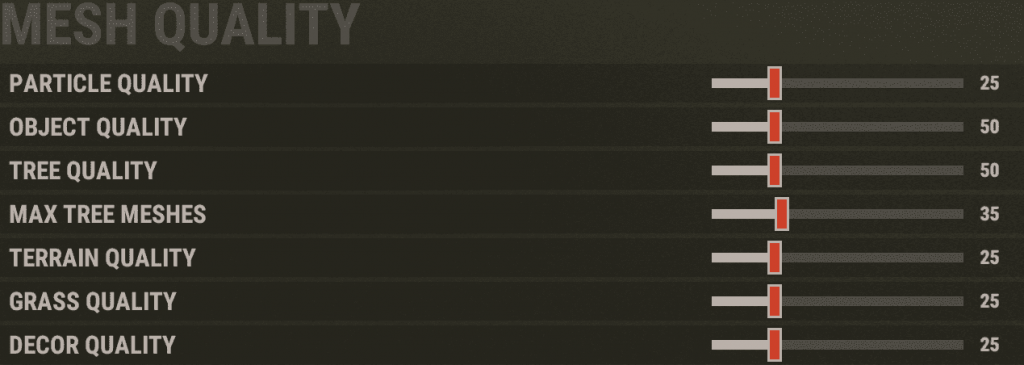
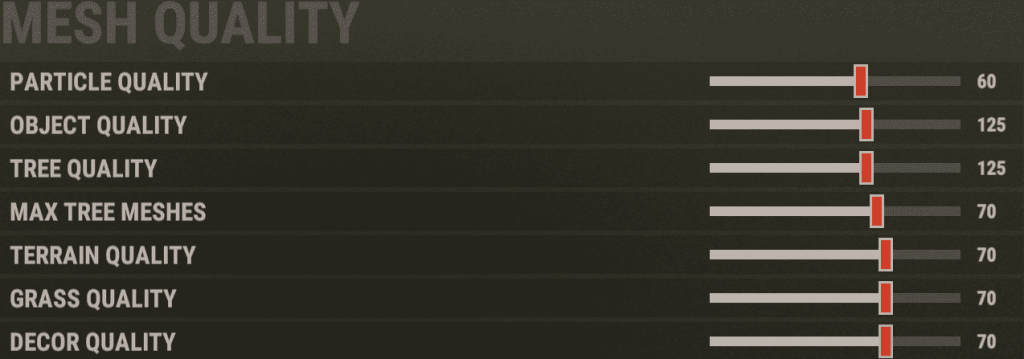
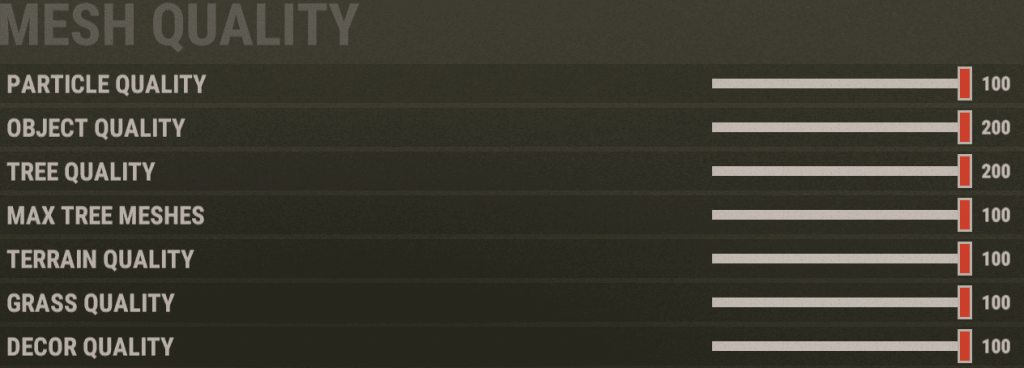
Mesh quality – качество сетки
Particle quality – качество частиц. Данный параметр делает частицы более качественными. Легче всего заметить на костре ночью. Имеет настройку от 0 до 100.
Object quality – качество объектов. В основном отвечает за прорисовку зданий. Имеет настройку от 0 до 200.
Tree quality – качество деревьев. Отвечает за качество прорисовки деревьев. Настраивается от 0 до 200.
Max tree meshes – максимальное количество сеток деревьев. Данный параметр ограничивает количество древовидных сеток для визуализации, независимо от того, сколько объектов на самом деле вокруг вас. Имеет настройку от 0 до 100.
Terrain quality – качество местности. Данный параметр отвечает за качество местности. Имеет настройку от 0 до 100.
Grass quality – качество травы. Отвечает за качество прорисовываемой травы. Имеет настройку от 0 до 100.
Décor quality – качество декораций. Отвечает за общее качество декораций в игре. Имеет настройку от 0 до 100.
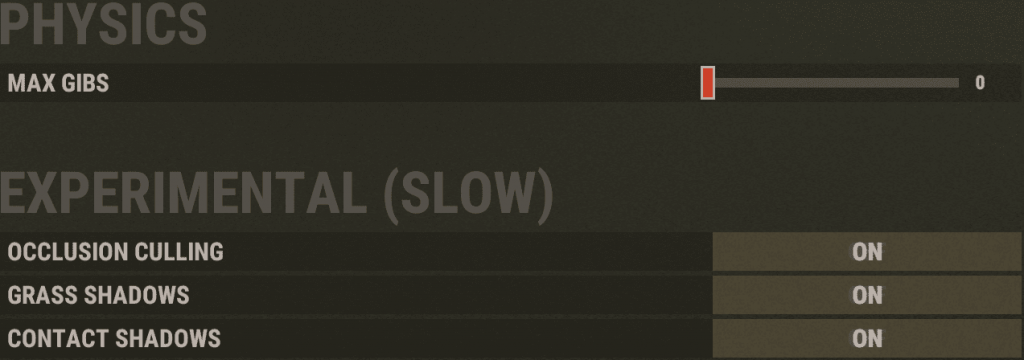
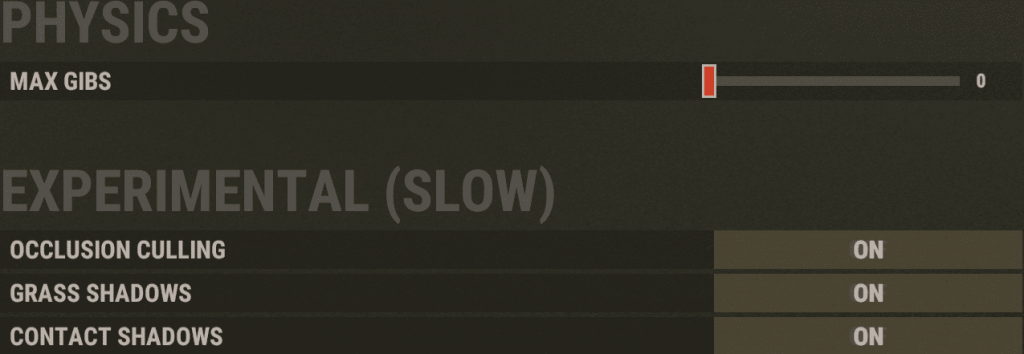
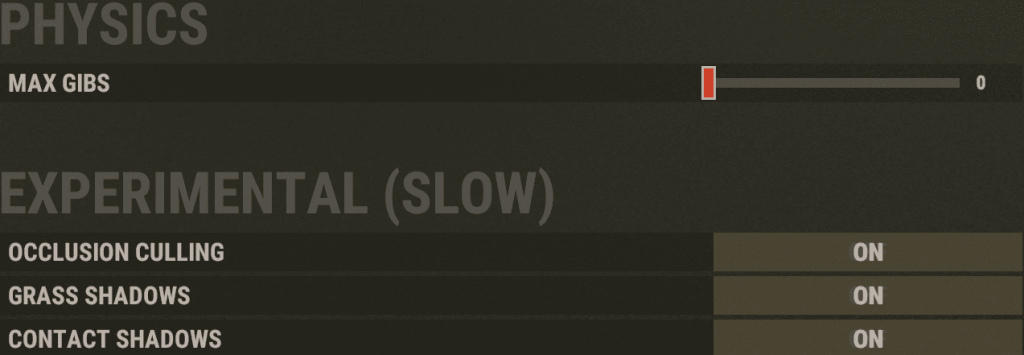
Physics — физика в игре
Max gibs – максимальное количество разрушаемых объектов. Отвечает за то, сколько объектов появится от разрушения постройки. Имеет настройку от 0 до 2000.
Experimental — экспериментальное
Occlusion culling – позволяет скрывать объекты за стеной. Имеет 2 вида настройки – On и Off.
Grass shadows – тень травы. Включает отбрасывание тени на траву.
Contact shadows — добавляет контактные тени, чтобы улучшить детализацию теней в поле зрения, которые в противном случае могут быть пропущены теневыми картами.
Рекомендованные настройки графики
Здесь мы представили несколько вариантов настроек для игры Rust, в зависимости от мощности вашего компьютера. Учтите, что данные параметры не идеальны и не применимы на 100% ко всем ПК, однако в большинстве случаев это такой «универсальный вариант».
Настройки графики для слабых компьютеров Rust
Настройки графики для средних компьютеров Rust
Настройки графики для мощных компьютеров Rust
Настройки игры Rust ютуберов
Быть может, вы не знали, но многие ютуберы по игре Rust выкладывают свои настройки, которые у них установлены по умолчанию для комфортной игры. Как правило, большинство из них публикует подобную информацию в своих пабликах Вконтакте. Поэтому, если вы смотрите определенных ютуберов и хотите играть с такими же настройками, как и у них, можно зайти в их официальную группу и поискать информацию там. Если же таких данных там нет, вы всегда можете написать человеку напрямую и попросить его выложить эту информацию для всех или прислать конкретно вам в виде скриншотов.
Если Вы наблюдали у ютуберов такую ситуацию, что у них меняется угол обзора, то вероятнее всего они используют бинд в Rust на изменение угла обзора Bind <button> «graphics.fov 60-90;graphics.lodbias 2»
![]() Загрузка…
Загрузка…

Простой софт для подмены текстур частей домов в rust, знаю, что раньше все просто заменяли в названии текстур букву и тем самым заставляли ее исчезать. Тем самым вызывались дикие лаги при открытии консоли и проникнуть в большой дом было труднее, чем взорвать его с C4. Теперь проблема решена. Текстуры будут заменяться, тем самым не вызывая лагов вообще.
Список заменяемых вещей:
WoodWall => WoodBox
WoodCeiling => LootSack
MetalWall => WoodPillar
MetalCeiling => Workbench
MetalDoor => Furnace
Программу
ОБЯЗАТЕЛЬНО
надо кидать в папку со стимом. Например: Стим находится в D:Steam. Софт кидаем просто на локальный диск D.
По умолчанию галочки стоят везде, для того, что-бы совершить замену текстуры их необходимо
СНЯТЬ
.

Для тех, кто не в курсе — опишу систему.
Выключаем раст, запускаем софт. Снимаем нужные галки, жмем сохранить.
Раст запустится сам и теперь текстуры будут заменены до тех пор, пока вы не запустите прогу и не сохраните со всеми поставленными галками.
Итак, мы в расте, текстуры заменены.
На скрине представленны: Синее — дверь, которая стала печкой, зеленое — деревянная стена, которая стала сундуком

Крафтим спальник.
Ищем богатый с виду дом.
Подходим к стене со спальником в руках.
Наводим спальник на пол в доме.

Быстро кликаем ЛКМ и «входим» в стену(или дверь), которой у нас нет.
Вауля, спальник внутри.

F1 => suicide

Воруем вещи, если нашли C4 — взрываем стену, если нет — крафтим с украденного дерева тройной сундук и стоя боком к стене ставим его оочень близко к оной, начиная с середины стены сдвигаем сундук к себе по миллиметру.

Теперь вылезаем спальником и снаружи можно открыть сундук.

Bonus: Если на сервере есть /home или /tp — вы знаете, что делать.
Bonus2: Железные двери, которые заменяются на лежащие на полу зажженные печки очень заметны, если искать дома ночью.
Свои
двери по прежнему можно открывать нажав «Open» на лежащую печку. Зрительно — никакого эффекта, но выходить можно.
Bonus3: На серверах под оксидом и с плагином /remove вы можете обманывать кровати. После того, как мы суициднулись — просто сносим кровать /remove и вы можете опять ставить и суицидиться (это если дом большой и стен много.)
Всего за час игры можно иметь фулл кевлар, C4, болты и М4
СКАЧАТЬ
VirusTotal
VAC бан не дают!
100% В процесс игры софт не лезет, даже текстуры заменяются путем перестановки в конфиге игры.
Всем спасибо, писал как всегда сам, софт не мой, писал некто GIB130.
bigpapka
Вопрос о FPS в Rust стоит уже очень давно. С каждым новым обновлением разработчики пишут про оптимизацию и повышение FPS, но сама графика игры тоже не стоит на месте, и требует всё больше и больше ресурсов вашего ПК. В этой статье мы разберём основные настройки графики, минимальные и оптимальные требования, с учётом всех последних обновлений, и покажем примерные настройки, чтобы ваш FPS не проседал даже в самые ожесточённые битвы. Поехали!
Минимальные и оптимальные системные требования.
Системные требования, указанные на странице игры в Steam очень давно устарели.

Странно, что такие трудолюбивые разработчики как Facepunch до сих пор не исправили эту информацию. С тех пор вышло уже много других моделей видеокарт и процессоров, да и сама игра стала намного требовательнее. И так, для игры со стабильным FPS, и как-никак, приятной для глаз картинкой нам понадобится:
- Процессор: Intel Core i3, i5, i7(не менее 4 физических ядер); AMD Ryzen(не меньше 4 ядер); AMD FX(не ниже 8300)
- Оперативная память: Не менее 12GB
- Видеокарта: Nvidia GeForce 1050ti и выше: RX 560 и выше
- SSD не помешает
Не стоит переживать, если ваш системник слабее, по своему опыту играть можно и на GTX 660, ведь настройки всегда можно выкрутить в картошку, но будет ли приносить вам такая игра удовольствие?(Будет, но от фризов в перестрелке, ваша жеппа будет подгорать не меньше, поверьте мне)
Перейдём к настройкам для Бояр 21 века. Если ваш ПК имеет схожее железо, то для вас игра будет не только стабильной, но ещё и красивой:
- Процессор Intel Core i5, i7, AMD Ryzen (не менее 6 ядер)
- Оперативная память: 16 GB но Rust может сказать что ему мало ¯_(ツ)_/¯
- Видеокарта Nvidia GTX 1060 S и выше
- SSD обязателен
Настройки графики
Предлагаю разобрать полочкам- какие пункты настроек за что отвечают, чтобы самим понять, что вам нужно, а что нет.
Graphics Quality — настройки графики
Graphics Quality – общее качество графики. Имеет 6 видов настройки (От 0 до 5). Устанавливайте в соответствии с остальными настройками.
Shadow quality – качество теней.
Shadow cascades — каскады теней. Ухудшает качество теней, повышая производительность.
Max Shadow lights – данный параметр отвечает за проход света между стенами.
Water quality – общее качество воды. При значении 1 и выше на воде появляются эффекты.
Water reflections – отражения на воде. Добавляет отражения на воде при значении выше 1.
Shader level – уровень шейдеров. Чем больше показатель, тем больше деталей на земле.
Draw distance – дальность прорисовки. Данный параметр отвечает за прорисовку всех объектов.
Shadow distance – дальность теней. Данный параметр влияет на дальность прорисовки теней.
Anisotropic filtering – анизотропная фильтрация. Правильно отображает объекты под большим углом.
Parallax mapping — параллактическое отображение. Делает изображение более объёмным. Имеет настройку от 0 до 2.
Grass displacement – смещение травы (приминается под вами или нет).
ImageEffects — эффекты изображения
Anti–Aliasing – сглаживание. Имеет 4 вариации настройки:
- OFF – полностью отключает сглаживание;
- FXAA — метод сглаживания от NVidia, представляющий собой однопроходный пиксельный шейдер, который обсчитывает результирующий кадр на этапе постобработки;
- SMAA — (Subpixel Morphological anti-aliasing) — смесь FXAA и MLAA. По сути, несколько улучшенный MLAA, но работающий на видеокарте. Дает картинку лучше, чем FXAA, однако потребляет больше ресурсов;
- TSSAA (Temporal Super Sampling Anti-Aliasing) — в отличии от других типов сглаживания, которые работают только с одним, он умеет работать с движущимися объектами и хорошо убирает «мельтешение» картинки. По сути, является смесью MSAA и SMAA, дает очень качественную картинку, однако немного ее мылит и очень требовательно к ресурсам.
Depth of field – глубина резкости. Она относится к эффекту размытия вещей на заднем плане. Точно так же, как и размытие в движении, этот параметр отвлекает наши глаза и создает качество, как в фильмах – это не всегда отлично смотрится. К тому же эта настройка может повлиять на производительность. Её нужно настраивать, отталкиваясь от личных предпочтений.
Ambient Occlusion – фоновое затенение. Технология Ambient Occlusion позволяет формировать тени на основе одного или большего источников теней. В простейшей форме AO формирует контрастную тень от неяркого источника света. Чем ярче будет источник света, тем мягче будет переход между тенью и остальной частью сцены.
High quality bloom – освещение высокого качества. Это графическая настройка, которая относится к эффекту естественного света, качающихся/движущихся деревьев, растений, цветов и т.д.
Lens dirt – грязь объектива. Это эффект, разработанный, чтобы сделать Rust более реалистичным с точки зрения первого лица, сделав его так, как будто воображаемая камера, которая является глазами игрока, имела грязь на них. Это заставляет воображаемую камеру выглядеть немного запотевшей и пыльной, а в качестве побочного эффекта может заставить все выглядеть ярким, даже ночью.
Motion blur – размытость. Добавляет размытие изображения при повороте камеры, воспроизведении сцен движения или быстро движущихся объектов.
Sun shafts – вал солнца. Это такой эффект, который виден, когда пар или туман просвечивается лучами, пробивающимися, например, через листву. Короче, когда между игроком и источником света есть какое-то дырявое препятствие, а в воздухе висят какие-то мелкие частицы.
Sharpen – резкость. Делает объекты более чёткими.
Vignetting – затемнение. Снижает яркость изображения к краям поля зрения системы.
Данные эффекты не сильно повлияют на производительность.
Mesh quality – качество сетки
Particle quality – качество частиц. Данный параметр делает частицы более качественными. Легче всего заметить на костре ночью.
Object quality – качество объектов. В основном отвечает за прорисовку зданий.
Tree quality – качество деревьев. Отвечает за качество прорисовки деревьев.
Max tree meshes – максимальное количество сеток деревьев. Данный параметр ограничивает количество древовидных сеток для визуализации, независимо от того, сколько объектов на самом деле вокруг вас.
Terrain quality – качество местности. Данный параметр отвечает за качество местности.
Grass quality – качество травы. Отвечает за качество прорисовываемой травы.
Décor quality – качество декораций. Отвечает за общее качество декораций в игре.
Physics — физика в игре
Max gibs – максимальное количество разрушаемых объектов. Отвечает за то, сколько объектов появится от разрушения постройки.
Experimental — экспериментальное
Occlusion culling – позволяет скрывать объекты за стеной.
Grass shadows – тень травы. Включает отбрасывание тени на траву.
Contact shadows — добавляет контактные тени, чтобы улучшить детализацию теней в поле зрения, которые в противном случае могут быть пропущены теневыми картами.
Примерные настройки графики для слабых ПК в Rust


Настройки графики для сильных ПК в Rust


От себя хочу добавить, что все эти настройки лишь пример, и настроить игру индивидуально под ваш ПК можете только вы сами. Удачи в рейдах и стабильного FPS. До скорых встреч!
Despite being released 7 Years Ago, Rust still has loads of optimization and performance problems that need to be addressed. No matter what the problem, the game still makes it to the best-sellers of Steam and consecutively dominates the Top 5 Concurrent Players Record. We are perfectly aware of how good the game is; however, that’s not the subject of today. Instead, we’ll focus on in-depth analysis on how to increase FPS In Rust, what are the Best Rust Settings, and getting the most out of your System. The methods shared in this performance guide are perfectly safe, and guaranteed to show results.
Our guide like always would be divided into three segments. The first one will focus on Windows Optimizations, while the second would be related to the application settings. And third is going to highlight the Best Nvidia/AMD Graphics Settings For Rust. Besides, If you are trying to learn how to Craft Auto Turret in Rust, go through that as well.
It’s reasonable to presume that considering its a 2013 game, your PC already has modern hardware that could play the game. However, just to let you know, Rust has gotten significant graphical improvement over the years, which ultimately fueled to newer system requirements. These are attached below, and make sure to comply with your system requirements with them.
RECOMMENDED:
-
- Requires a 64-bit processor and operating system
- OS: Windows 10 64bit
- Processor: Intel Core i7-4790K / AMD Ryzen 5 1600
- Memory: 16 GB RAM
- Graphics: GTX 980 / AMD R9 Fury
- DirectX: Version 12
- Network: Broadband Internet connection
- Storage: 20 GB available space
- Additional Notes: SSD is highly recommended.
Windows 10 Optimizations

As suggested above, before jumping to the main Best Rust Settings, the first segment would contain all the necessary Windows 10 Optimizations, which will guarantee significant performance improvements. These methods aren’t done through third-party, and you wouldn’t need any additional softwares. Instead, we will configure the default settings that are aimed towards balance power plans and not for gaming. Once changed, you are bound to see a dramatic increase in not just Rust, but across all games.
Don’t forget to create a System Restore Point, so you could roll-back, incase of any misunderstanding.
Maximize Your CPU While Playing Rust
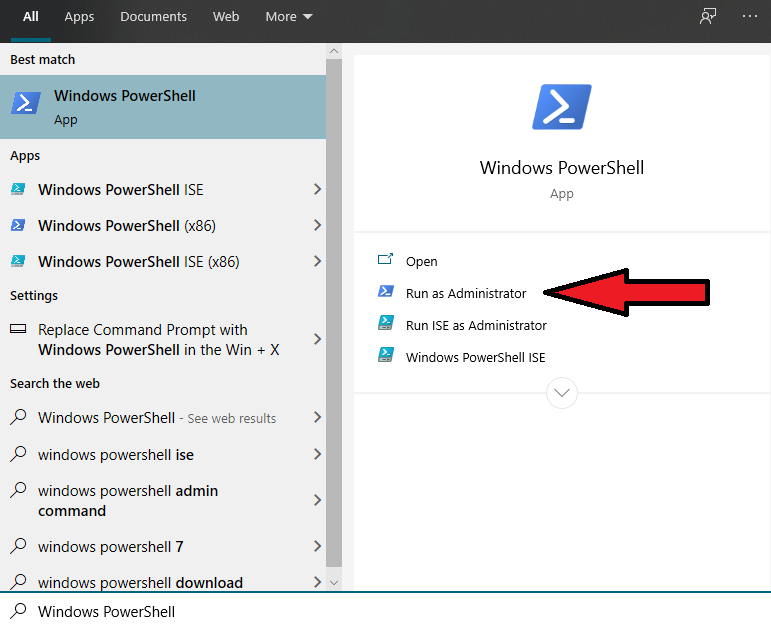
The title might sound a bit confusing, but it’s true that your CPU is not always being utilized 100% while playing Rust. Often, Windows 10 sets a balanced Power Plan that limits the power through various thresholds, resulting in very limited amount of FPS. This can be specifically changed through Ultimate Performance, which involves a code, that uncloks all the barriers while you play Overwatch. This method has time and time again proven to be effective. Laptop users are generally the ones who benefit the most.
- Search and Open “Windows PowerShell” With Administrator Privileges

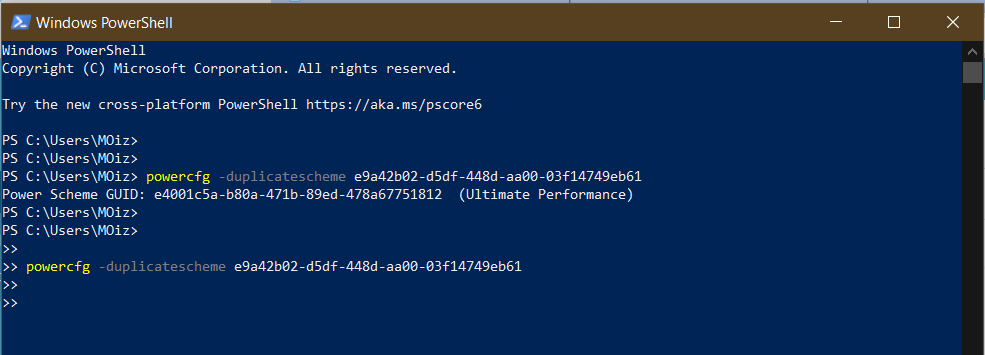
Windows PowerShell - Paste this code shown below, and you will see a message indicating that Ultimate Performance was successfully initiated. Suppose, it didn’t, and you had to face some sort of error. Replicate the same steps inside Command Prompt.

Command Prompt - powercfg -duplicatescheme e9a42b02 -d5df -448d -aa00 -03f14749eb6
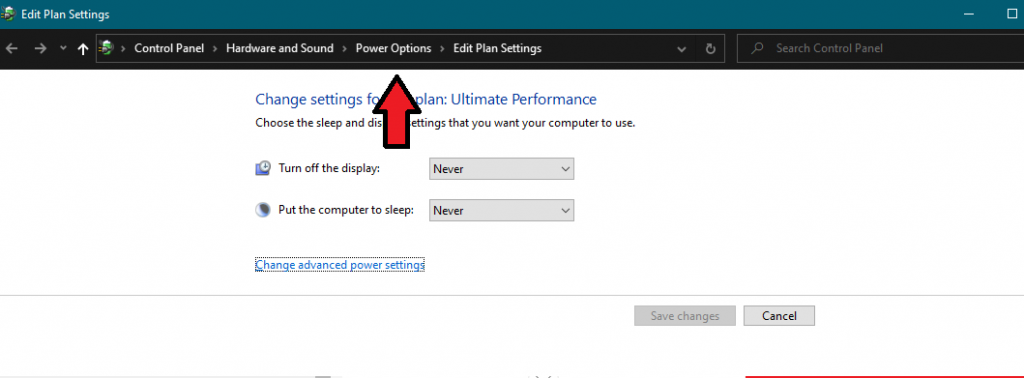
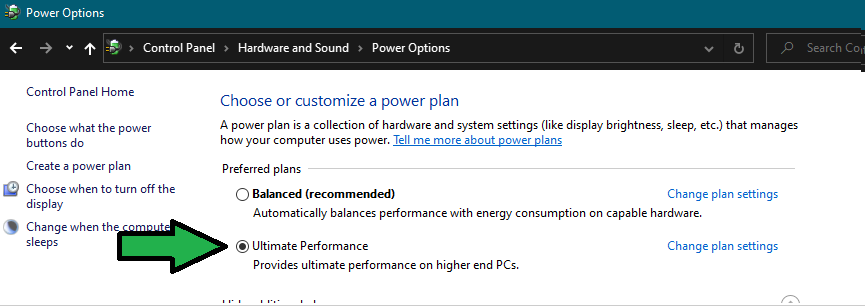
- After you are done adding the code, head over to Edit Power Plan and Power Options.

- Checkmark Ultimate Performance and you are done.
 From now on, always expect your CPU to push the limits and give you all it has while playing Rust.
Disable Unnecessary Animations
While using Windows 10, you might have noticed the fancy animations while clicking on anything. These illustrious animations might look good, but they come with the price of performance, which we aren’t going to compromise on. Luckily Windows 10 allows you to disable these fancy animations and speed up the entire process. Likewise, you will also save lots of performance and reduce significant burden on CPU/Memory, which can then be utilized by the game instead.
- Open View Advanced System Settings > Performance > Settings > Enable Custom and Only Checkmark the options shown below.

Animations - After the changes are made, click on apply and ok to save the settings.
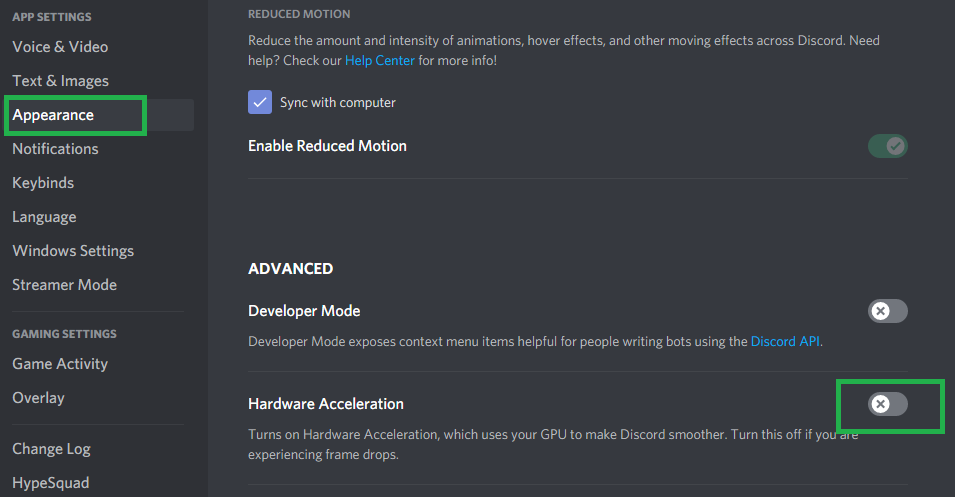
Get Rid Of Hardware Acceleration
The term hardware acceleration might sound good, indicating higher performance boosts and so forth. However, that’s not the case in reality. Hardware Acceleration runs your program through a new meta, that it describes as efficient, because of the way how resources are unpacked. This isn’t generally beneficial for common apps like Discord, Google Chrome, and Steam; because the core purpose of these apps remain the same.
Consequently, on the other hand, Hardware Acceleration uses many resources to run the apps through the new meta. This ultimately results in low FPS, while you play Rust, and the CPU is always being utilized without your information. Thankfully, these resources can be saved through a couple of steps, and you will see a tremendous FPS boost across all games.
We will only highlight the general way on how to disable this across the three common applications. We expect you to disable them across any third-party application that has this option.
- Under Discord Settings > Appearance > Disable Hardware Acceleration.

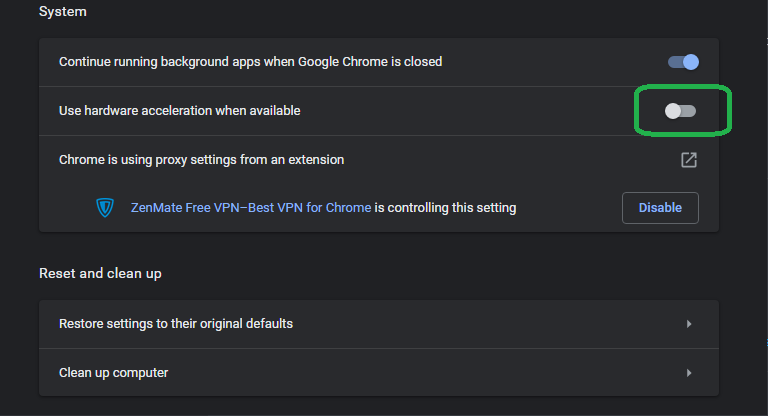
Disable Hardware Acceleration. - Proceed To Google Chrome Settings > Advanced > System > Uncheck “Use Hardware Acceleration When Available”

Google Chrome Settings - Go to Steam Settings > Interface > Disable the following four options
“Enable smooth scrolling in web views (requires restart)
“Enable GPU accelerated rendering in web views”
“Enable Hardware Video Decoding”
“Enable DirectWrite For Improved Font Smoothing and Kerning”

Make Sure No Extra Applications Are Running In The Background
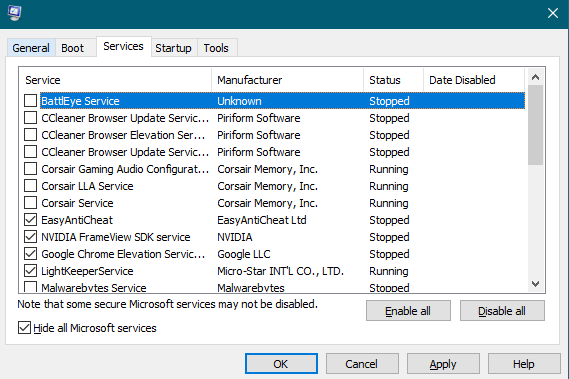
While Playing Rust, you should be perfectly aware that no extra application beside the Anti-Cheat is running in the background. You wouldn’t normally give this a lot of attention, but If I were to tell you that while playing Rust, you should check your Task Manager. You would find out the insane amounts of unnecessary applications and services that are nearly squeezing 40% of your CPU and Memory Usage.
Likewise, you can wonder how much performance would improve, If you disable these unnecessary applications and services. Follow the steps below and see results for yourself!
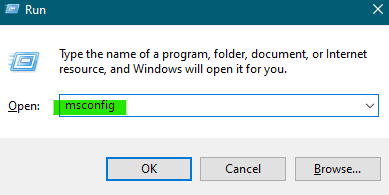
- Open Run > type and enter MSConfig

MSConfig - Head over to the services tab and checkmark “Hide All Microsoft Services” – This would hide the important services that are compulsory for your Windows 10 to operate.

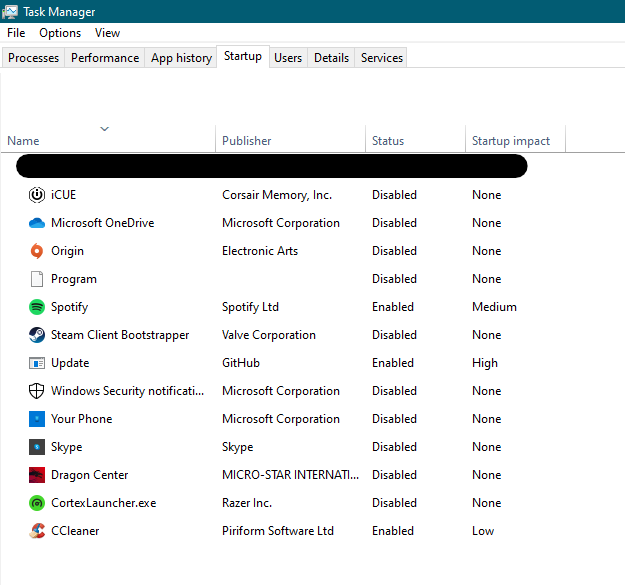
Hide All Microsoft Services - Now from the new list, disable all the unnecessary third-party services, that could burden your PC while playing Rust.
third-party services - After making the suitable changes, click on Apply and head over to the Startup Tab. There will be a new list with similar applications, and your job is to disable the one’s with high priority.

Startup Tab
Making the changes suggested above will not only increase your FPS in Rust, but it’ll also significantly change the boot times.
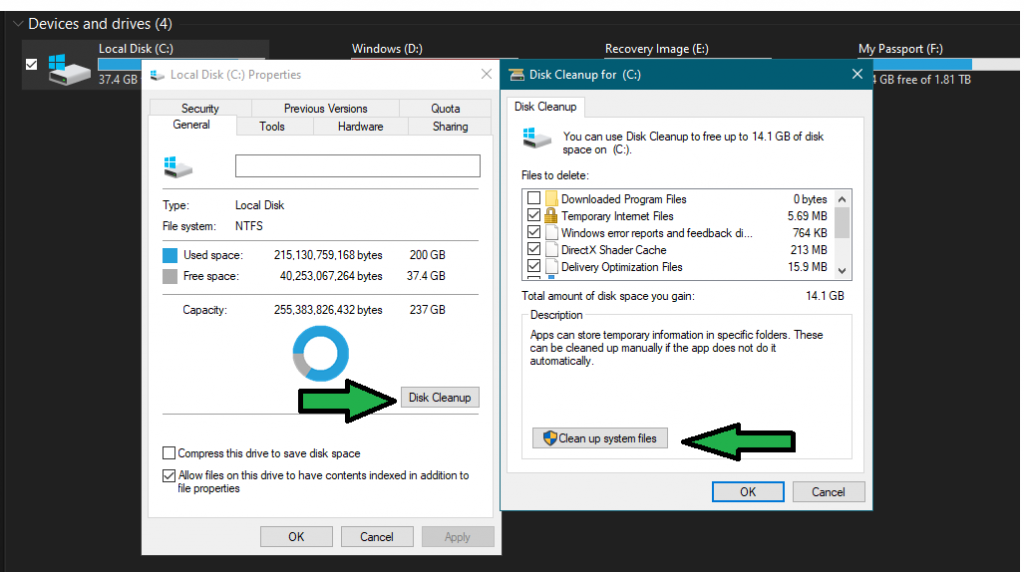
Perform a Disk Cleanup
A Hard Drive excessively filled with useless files, potentially crash reports, leftovers, and more can temporarily slow down its speed, ultimately resulting in lower FPS while playing Rust. Having said that, this is isn’t a huge problem, and as you might have accomplished the 50% of this step by cleaning the temp files. You should now also perform a Disk Cleanup, that will ensure rapid responsiveness and blazing speeds. This will further benefit you while playing Rust, and then again, things like these often are the fix for stuttering, crashes, and all sorts of FPS Drop related problems. Keep in mind, alongside our Best Rust Settings, and these tweaks, you will see massive improvement.
- Right Click on the Drive where Rust Is Installed And Go To Properties
- Checkmark all the unnecessary files and avoid the important ones because they will be completely deleted.

Disk Cleanup - With that done, finally, click on “Clean Up System Files.”
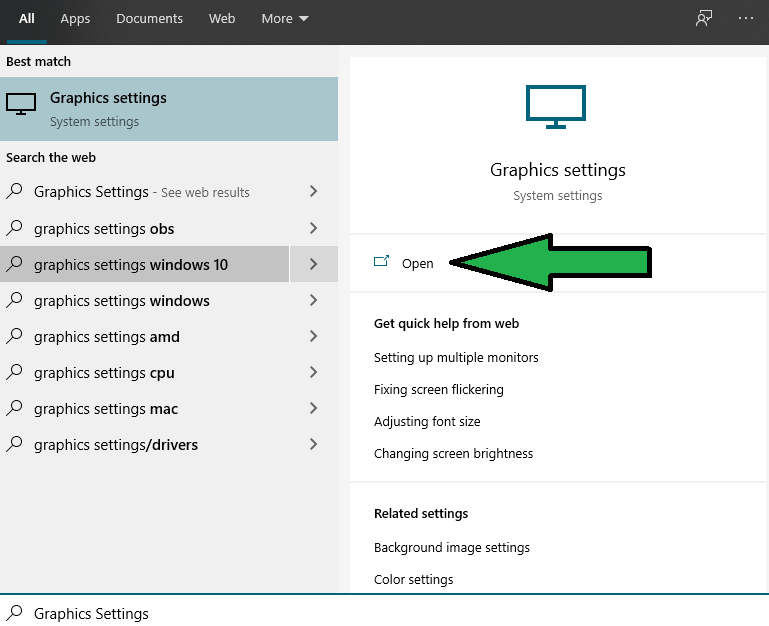
Maximize GPU Usage While Playing Rust
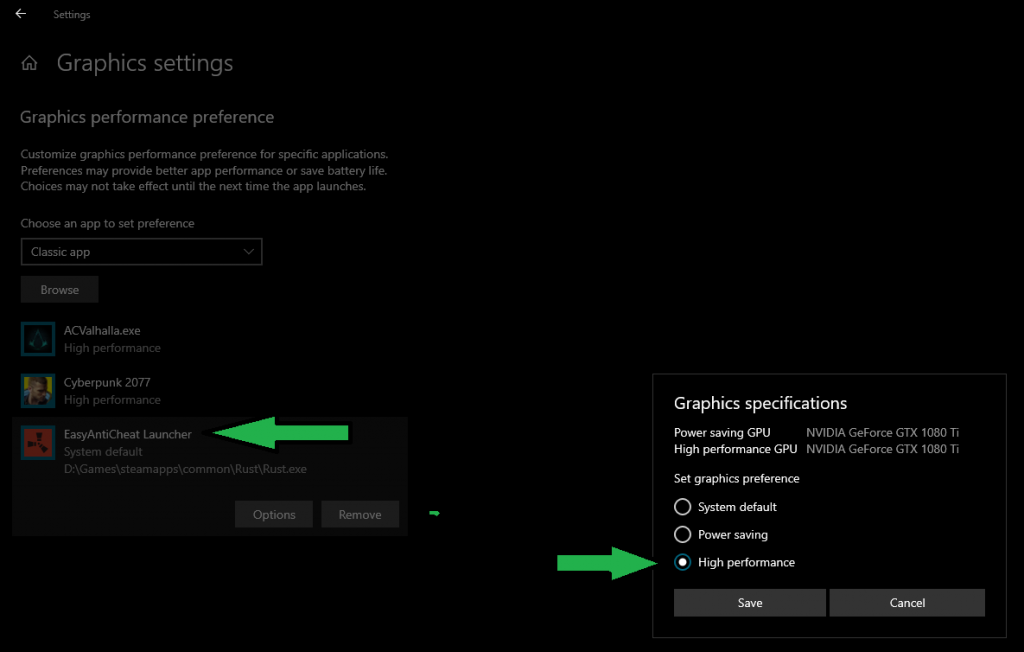
Similar to many other Windows 10 features we introduced above. There is also another feature called Graphics Profile, which essentially allows you to change the priority of your Graphics Card for a specific game. This results in tremondous FPS Boost, and furthermore ensures that the Hardware is running at its max potential. The process is entirely safe, and this can also work with other games. Just keep in mind that If you add an unncesary program to the graphics profile, your PC could crash. Besides, this feature is only available in Windows 10.
- Here is how you can add Rust to the Graphics Profile.
- Open Graphics Settings through Search

Graphics Settings - Add Rust to the profiles > checkmark High Performance and click on save

Graphics Settings
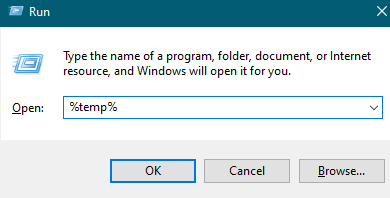
Delete Temp Files
Usually, one would think that after uninstalling various harmful programs, the virus would be gone. Sadly, this isn’t the case, and Windows always seems to have a soft spot for uninstalled programs. These programs that are deleted or uninstalled have some files that go to the temp folder. A lot of them have leftovers that are mostly virus-infected and can cause serious trouble to your drive. This ultimately results in SSD/HDD being slower, and you see that impact in Rust.
- In order to get rid of these, you have to open Run
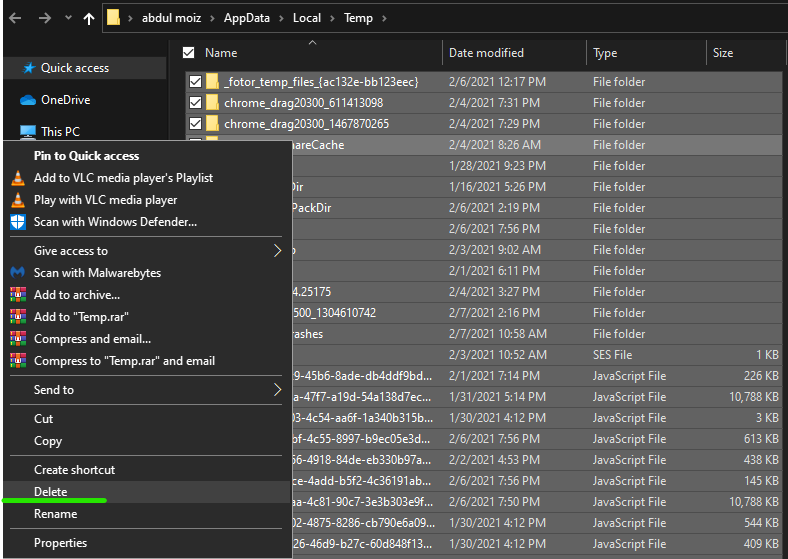
- Now enter %Temp%

Temp Files - Delete all the files by ALT + A > Right Click and Delete.

Temp Files
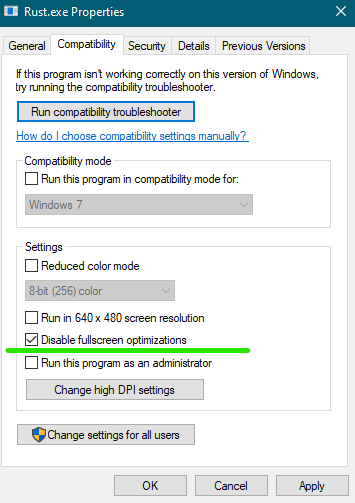
Disable Full-Screen Optimization

Full-Screen Optimization Full-Screen Optimization is another important setting that should always be disabled. There are lots of reasons as to why this should be disabled, however, the most important one is to avoid the borderless hybrid mode. By default, Windows 10 forces the applications to run in an irregular mode, which does not allow the hardware to run the game properly. This often results in stuttering, crashes, and more problems, which are further regulated through the slow ALT Tabbing. You can fix this by locating Rust.exe file and disabling full-screen optimization.
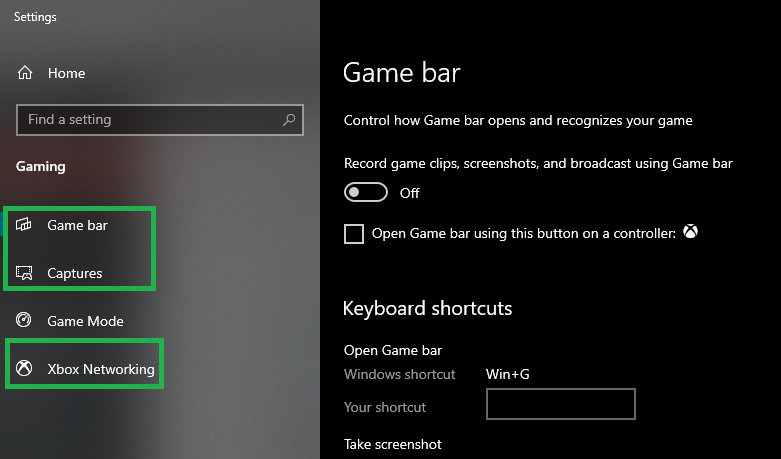
Disable Xbox Game Bar
How many times have you tried to figure out why the FPS in Rust are struggling to reach their average level? I have too, and as per my experience after playing the game for nearly 2000 hours. I can assure you that sometimes, it’s Xbox Game Bar with the annoying notifications at the bottom right of the window, asking you to begin a record, and so forth. Usually, these aren’t taken seriously by gamers, and suppose you dig deep. You would find out there are several Keybinds that can automatically trigger live streams and screen-recordings.

Xbox Game Bar To Disable, Xbox Game Bar > Head over to the settings tab > Disable everything in these three sections.
Enable Game Mode

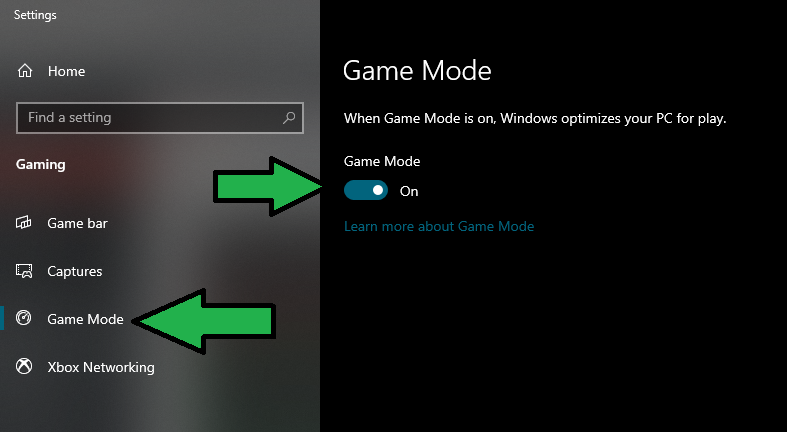
Game Mode Besides Xbox Game Bar, Microsoft does well in the Game Mode Department, which has consistently proven to be a top-tier setting. Subsequently, If you don’t know much about it; Game Mode is a built-in feature within Windows 10, which is oriented towards gamers, providing with improved FPS across all games. This can also be beneficial in games like Rust, and describing Game Mode for itself would require a article on its own, but rest assured, this isn’t something you would want to miss on.

Game Mode In order to Enable Game Mode, simply head over to the same Xbox Game Bar Settings and turn this slider to the right.
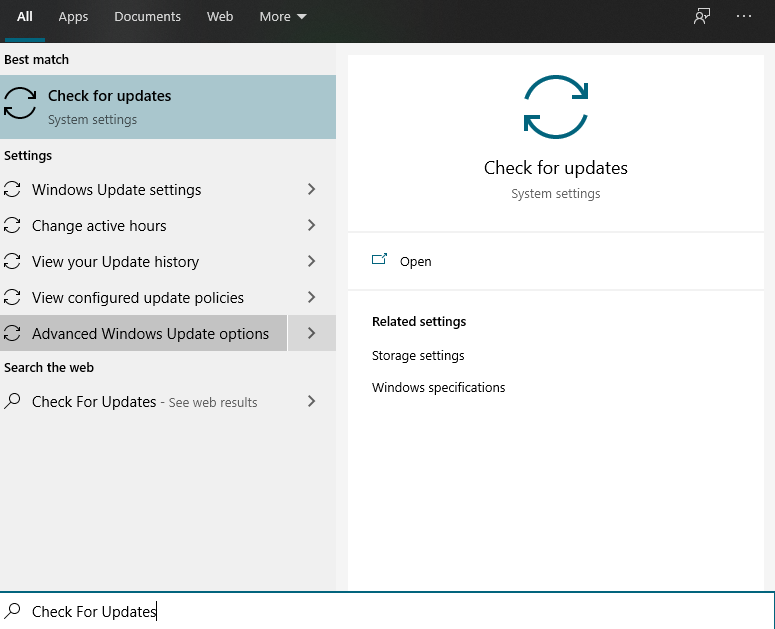
Update Windows 10 To The Latest Version
While lots of gamers struggle to find options that permanently disable Windows 10 Updates. We haven’t really supported this idea, and while benchmarking tons of games here at exputer. We have always noticed similar performance improvements just like new Graphics Drivers through the latest Windows Updates. There are numerous reasons as to why this happens. Firstly, it’s worth noting that Microsoft itself wants the game to run properly on Windows 10 because after all, they publish games on PC as well. Moreover, the new updates always bring stronger support for drivers, therefore, allowing Hardware to run better. All these factors result in tremendous FPS Boost, and this was the case while playing Rust.
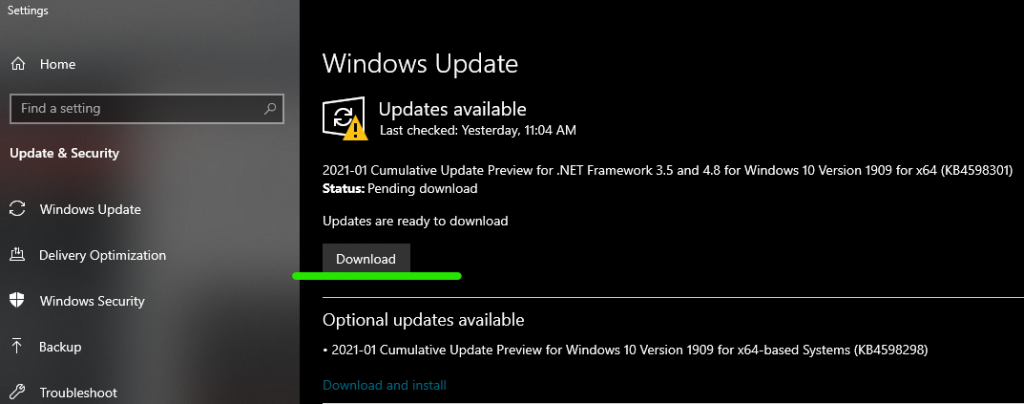
- Click on Start Button > Search for Check For Updates

- Search for Updates, and as you can see In my case, new updates are available to download

So these were all the necessary Windows 10 Optimizations that you had to make. Obviously, there will be instant FPS Boost after all these configurations. However, we recommend to not jumping directly in Rust, instead, work on those that are suggested below too, and then make conclusions. This is afterall, a long process, and the core purpose of these Windows Optimization were to make sure that extra applications weren’t burdening the hardware.
Now that you are done, let’s dive right into the best in-game Rust Settings.
Best Launch Options For Rust
Launch Options play a vital role in improving our Best Rust Settings. Usually, lots of players debate over the use of launch options in Rust, as most suggest they do not work anymore and compatibility is a serious problem. We acknowledged this but still went above and beyond to test the game.
As per our benchmarks, only some launch options worked, and these are listed below.
- -window-mode exclusive – Rust has serious full-screen problems, that are further expanded by the weird hybrid mode in which the game mostly runs in borderless mode. This can be fixed through two options, the first is -window-mode exclusive, which will guarantee the full-screen option, and the second is -high which runs the application on priority.
- -high – This expands on window mode exclusive, and also provides an additional benefit by running Rust in high priority mode. This ultimately results in more FPS, as the PC focuses on deriving all resources to the game.
- -forcee-feature-level-11-0 – Many argue this isn’t needed as, by default, Force feature level works fine. Nonetheless, it’s better than anything, and insurance is always worthy.
- -malloc=system – The malloc system command line varies and would not benefit in all cases. In case you don’t know about this class code, it simply enhances or configures what memory allocator is being used by the game.
- -maxMem=14000 – The MaxMem command has proven to be the most beneficial of all. We noticed that Rust wasn’t utilizing all the Ram available, therefore, Assets wouldn’t load faster and there were terrible frame drops. This was later fixed through the maxMem command that utilizes a certain value associated. You can check your Memory through the Task Manager, and utilize 20% for Windows, while the remaining for the game. In this picture, 14000 refers to 14 GB.
- -cpuCount=6 – Similar to maxMem, you can also change the cpuCount for the game. Once again, this can be checked through the Task Manager. In my case, I’m using the Ryzen 3600x, so the core count would be 6.

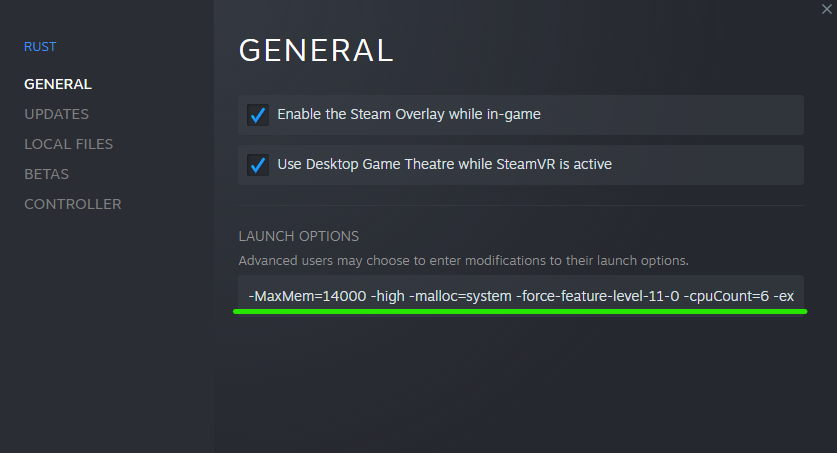
Task Manager - -exThreads=12 – The last enhancement would be through the exThreads amount. You can make sure that Rust is utilizing all the cores through this command line. We have 12 threads in our Ryzen 3600x, so the value would be 12.

exThreads amount - All in all, these command lines sum up to this. You can enter them in the Steam Launch Options.

Steam Launch Options
-MaxMem=14000 -high -malloc=system -force-feature-level-11-0 -cpuCount=6 -exThreads=12 -window-mode exclusive
Nvidia Settings For Rust
Before we jump to the in-game Rust settings, it’s highly imperative that we first setup Nvidia and AMD Control Panel for further optimization. These configurations will result in tremondous FPS Boost and Sync well with the in-game settings we have shown below. The goal while benchmarking Rust was to find the correct combination that would result in High FPS while still showing excellent visuals and fidelity.
Similar Best Settings FPS Guide: Best Valorant Settings
If you miss on these Nvidia Settings, you are likely to see a 20% performance loss, which translates into lots of FPS.

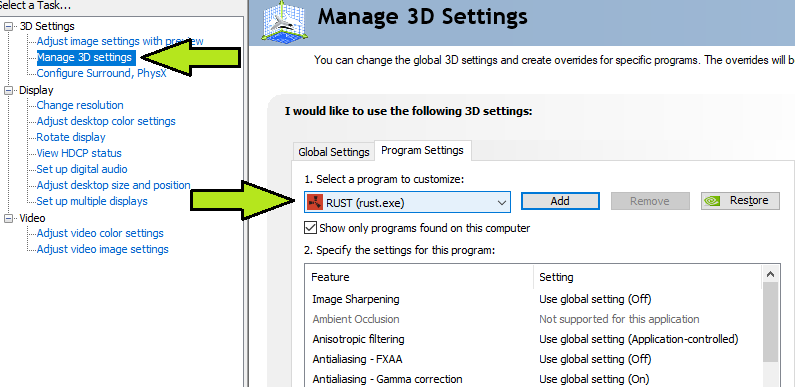
Nvidia Control Panel Open Nvidia Control Panel > Manage 3D Settings > Add Rust.exe
Afterward, make the following tweaks.
- Image Sharpening: Use Global Settings (Off)
- Anisotropic Filtering: 16x
- Antialiasing – FXAA: Use Global Settings (Off)
- Enable Antialiasing – Gamma Correction
- Ovverdie Any Application Setting under Antialiasing Mode
- Depending on your system, select either 4x or 8x under Antialiasing – Setting
- Use Global Setting (Off) Under Antialiasing – Transparency
- Once Again, Use Global Setting (Off) Under Background Application Max Frame Rate
- Select Your Primary Graphics Card Under CUDA – GPus
- Low Latency Mode: Use Global Settings (Off)
- Max Frame Rate: Although, many suggest turning it to max. But, we encountered many bugs while doing this.
- Multi-Frame Sampled AA (MFAA) – Off
- OpenGL Rendering GPU: Select Your Primary Graphics Card
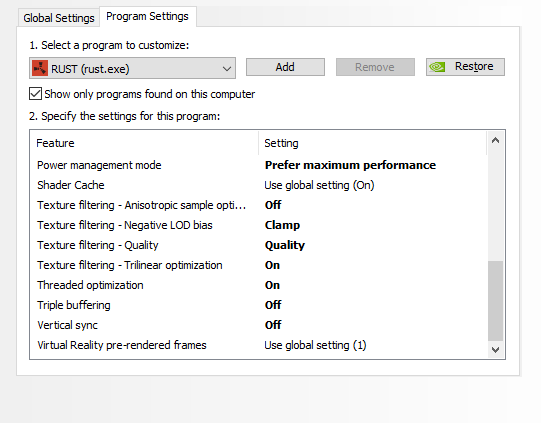
- Checkmark “Prefer Maximum Performance” Under Power Management Mode
- Shader Cache: On

Rust Nvidia Settings - Texture Filtering – Anisotropic Sample Optimization – Off
- Select Clamp under Texture Filtering – Negative LOD bias
- Texture Filtering Quality – Quality
- Texture Filtering – Trilinear Optimization – On
- Threaded Optimization – OIn
- Triple Buffering – Off
- Vertical Sync – Off
- Virtual Reality pre-rendered frames – Use Global Setting

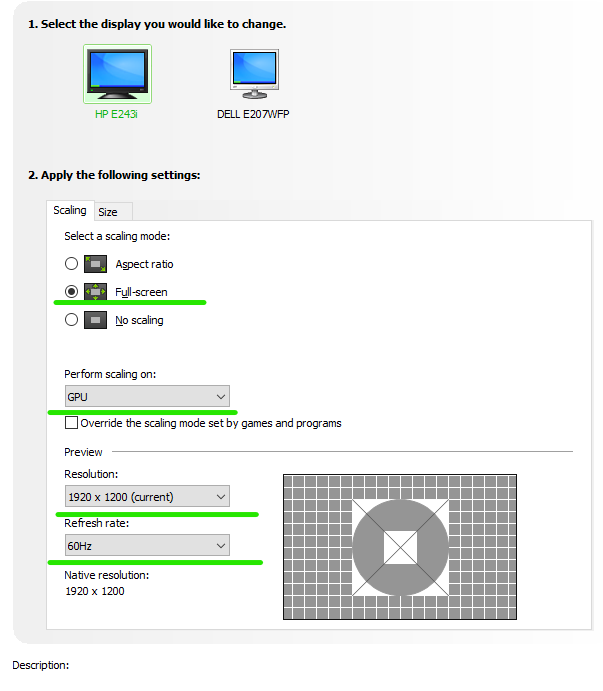
Don’t forget to select the primary monitor while configuring these changes. After making changes, proceed to Adjust Desktop Size and Position. Under there, Select Full-Screen Under Scaling, and GPU in tab Perform Scaling Tab. Besides, also make sure that the Resolution entered is Native, and you are selecting the max refresh rate.

Nvidia In the Change Change Resolution Tab, Select your Native Resolution plus Refresh Rate. Also under the color settings, checkmark the Nvidia Color Settings, and proceed with the configurations shown below.
- Open View Advanced System Settings > Performance > Settings > Enable Custom and Only Checkmark the options shown below.
 From now on, always expect your CPU to push the limits and give you all it has while playing Rust.
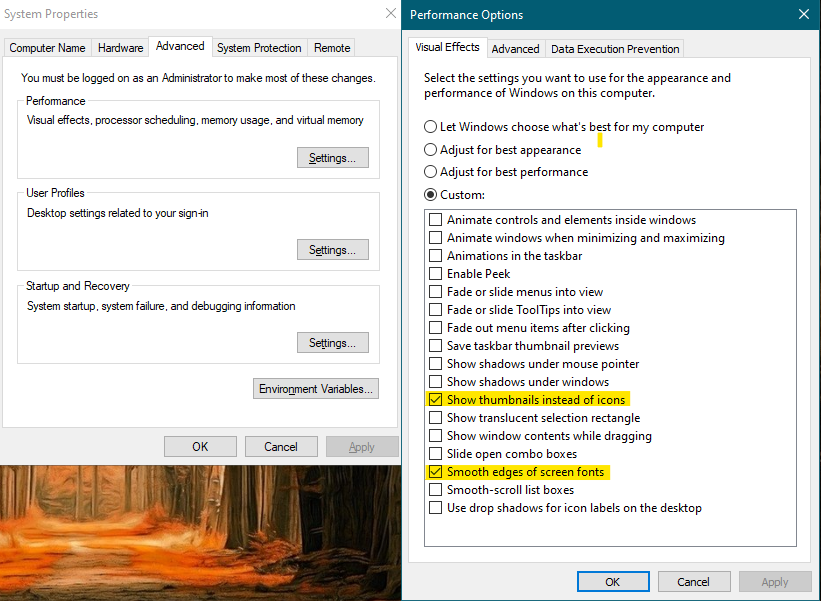


Nvidia Ansel Settings For Rust
Initially, you might be thinking why Nvidia? Do I need configurations for AMD FreeStyle? Well, we aren’t able to provide accurate metrics for AMD. But that isn’t hard, and all you have to do is see whatever settings fit your likings. Our Rust Setting Guide was layed out through Nvidia GeForce 1080 Ti, therefore, finding a good Reshade Combination was easy.
Make notes that this subject of the guide isn’t mandatory, all it does is that it enhances the image quality without any performance compromisation. Rest assured, it’s imperative to first enable Nvidia Game Mode and then find out how the configuration works.
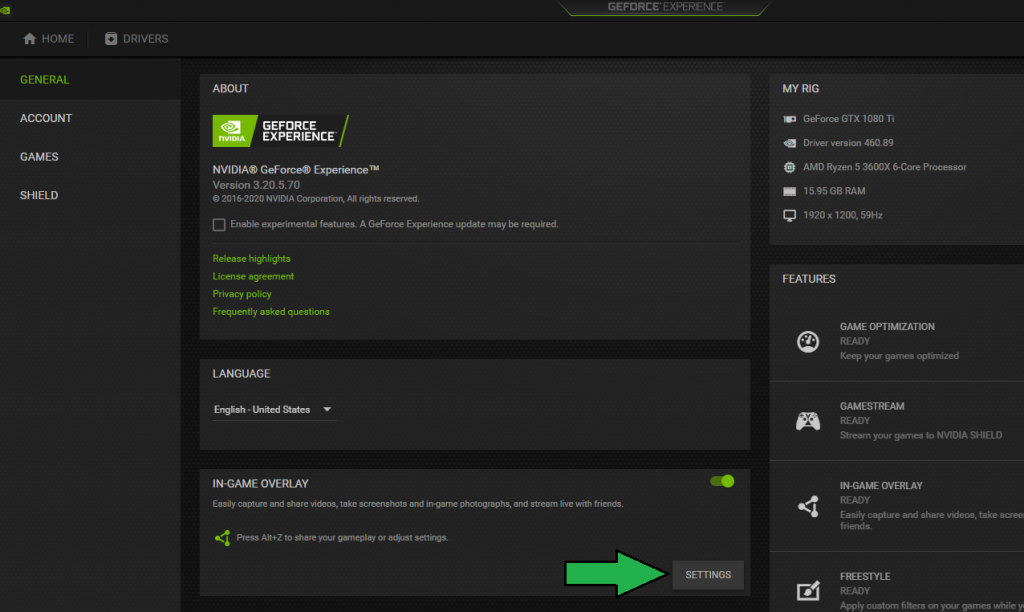
- Open GeForce Experience And Proceed To Settings

GeForce Experience - Now Click on In-Game Overlay Settings

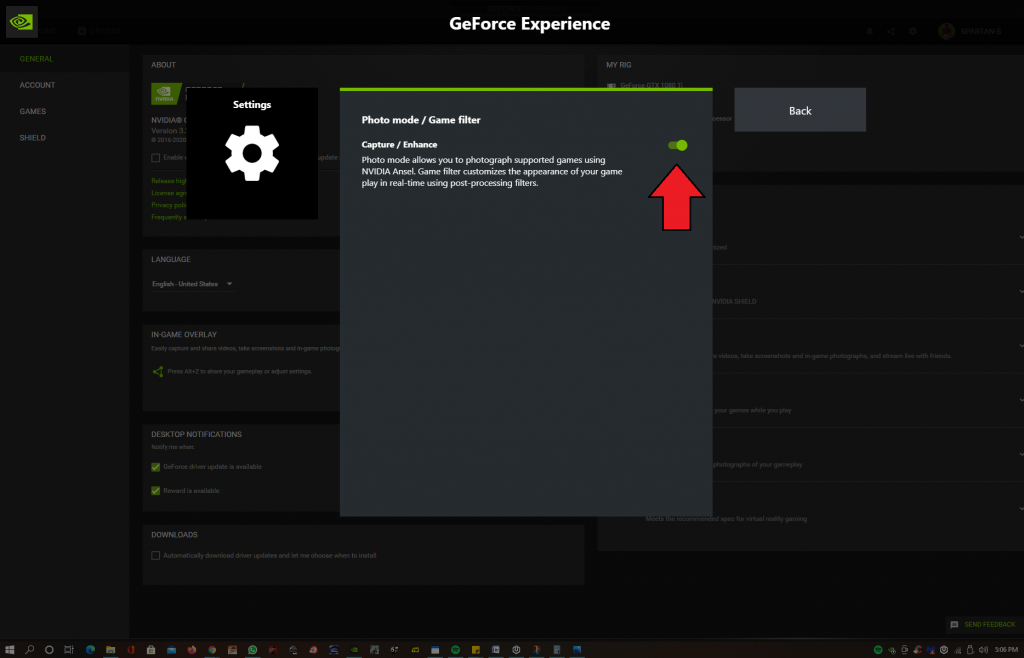
Overlay Settings - Proceed to Photo Mode / Game Filter from the menu and checkmark the Capture / Enhance Tab.

Game Filter - Launch Rust and Open the Nvidia Ansel Overlay By ALT + F9 on Keyboard, Add Details and Color Tab
- Now make the following changes under both sections
- Sharpen 18%
- Clarity 22%
- HDR Toning 70%
- Bloom 26%
- Tint Color 0%
- Tint Intensity 0%
- Temperature 0
- Vibrance 42
Having said that, Nvidia Ansel and AMD FreeStyle could do wonders for your Rust Image Quality. You might be wondering what are the differences? To illustrate, there is a notable difference in the Sharpness and Vibrance of Images, along with brightness collaboration across all graphical elements. This truly transcends the gameplay and takes it to a whole new level, both in terms of Graphics and Performance. Here are some screenshots, that are heavily de-compressed but still show the stunning difference between default and reshade.
Default Settings
Reshade:
Although, these photos are highly de-compressed and won’t show you the results that we are trying to portray. We still recommend trying it out and seeing the difference for yourself.

Similar to the Nvidia Tweaks we have shared above. AMD users can also get access to their own Control Panel and arrange further enhancements. The difference in result between both GPU’s isn’t huge, and you are likely to get the same result. Besides, these configurations are mostly dependent on the in-game settings, therefore, make adequate changes so you can get the correct combination for High FPS and Best Rust Settings.
- Add Rust to the AMD Control Panel > Edit Profile
- Make the following changes.
- Graphics Profile: Custom – This will allow you to make custom changes.
- Radeon Anti-Lag: Disabled
- Radeon Chill: Disabled
- Radeon Image Sharpening: Disabled
- Radeon Enhanced Sync: Enabled
- Anti-Aliasing: Override Application Settings
- Anti-Aliasing LEvel: 8xEQ
- Anti-Aliasing Method: Supersampling
- Morphological Anti-Aliasing: Disabled
- Anisotropic Filtering: Enabled
- Anisotropic Filtering Level: 16x
- Texture Filtering Quality: Standard
- Surface Format Optimization: Enabled
- Tesselation Mode: AMD Optimized
- Triple Buffering: Disabled
- Radeon FreeSync: The Radeon FreeSync is a great feature, that does not make you realize the drop in frames due to the constant refresh-rate cap. However, most players debate over its input lag, and competitive players aren’t big fan of it. We don’t find Rust any insanely competitive like CS:GO, where every second matters. Thus, it’s recommended to keep it enabled.
- Scaling Mode: Center
- Integer Scaling: Disable
- Custom Color: Disabled
Lastly, don’t forget to update your drivers to the latest version.
Best Rust Settings
Hopefully, now that you have finally made all the configurations suggested above. It’s time to dive into the final piece and optimize the in-game Best Rust settings which are the most crucial part of this guide. Our settings as always are focused on High FPS and Sharp Visuals, so the goal is to find the right balance. In addition, we also benchmarked the game several times and avoided focusing on settings that had huge performance impact, while showing little to no improvement in Graphical Sector. This also seems to be a pretty common problem in Rust, and you would also notice that the majority of settings including Max Shadows Lights, Water Reflections, and Parallax Mapping have zero to no effect on fidelity. Anyhow, here are the best rust settings for high fps and sharp visuals.
Screen Resolution: Select Native
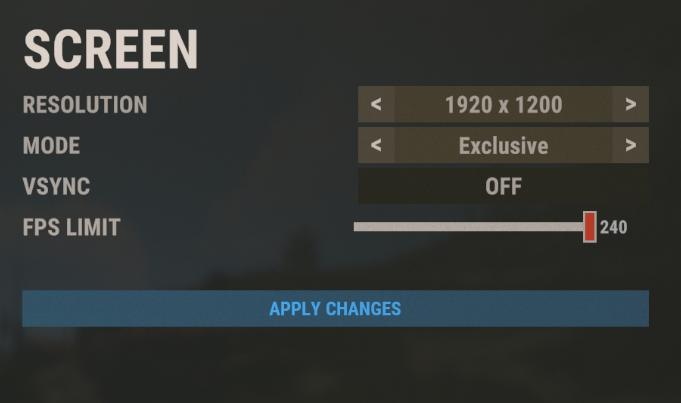
Mode: Exclusive
This is another word used for full-screen which is necessary for max refresh rate and high performance. Some people also prefer Borderless due to the quick Alt Tabbing, however, we noticed several crashes with that.
VSync: Off
Enabling this would ultimately mean that you are going to experience high input lag, and also cap your framerates to 60. This isn’t helpful, especially if you are playing at High Refresh Rate Monitor, because the frames wouldn’t reach the desired cap.
Graphical Quality: 4

The Graphical Quality setting maintains an overall meta for the entire preset in the game. During our benchmarks, we noticed heavy lagg on anything above 4, and while testing it on 1,2, and 3. We were griefly disappointed with the poor graphics. The main difference between higher Graphical Quality and lower is only related to the quality of shadows, which makes a huge difference especially in Rust because of the open maps.
Shadow Quality: 1
![]()
No Major difference in all other presets. One seems to be the most optimized setting.
Shadow Cascades: Four Cascades

Although in the majority of climates, you aren’t going to see much of this setting, because of what it does. However, in bright light maps, there is immense difference due to the shadow quality. Moreover, there is also slight change in the dimensions of shadow, which does signify to the overall quality. If you go with lower Shadow Cascades quality, make notes, that the Shadow Distance quality will also be limited.
Max Shadow Lights: 0
Similar to Shadow Quality and Cascades. The Max Shadow Light also shows impressive results in the overall graphics. But that seems really limited, because unlike cascades and Shadow Quality, which play an essential role 24/7. The Max Shadow Lights only seems to have a purpose when there is a reflection from objects. Subsequently, If you look at the performance, this setting does seem to be a problem and to sum it up. It is not worth it.
Water Quality: 1

Another performance hogg was the Water Quality, which does seem like a big problem, but unfortunately it needs to be kept down. The essential difference between Water Quality 1-3 boils down to the texture, blurriness, and reflections. It isn’t noticeable across all places and therefore, we must keep it at one.
Water Reflections: 0

It is imperative to keep water reflections at 0 due to two reasons. The first being that we have already kept Water Quality at one, which will play a significant role in setting the overall meta. And the second is due to performance problem, which is reasonably huge in water reflections.
World Reflections: 1
The Water Reflection setting maintains an astounding clarity and adds exception fidelity to the overall world of rust. Likewise, it also has its drawbacks but luckily at one, we were only able to find a roughly 2% performance loss which isn’t a big deal, considering the massive improvements.
Anisotropic Filtering: 1
Subsequent to finishing our test bench, we were heavily bugged with how Anisotropic Filtering, because it provided very grainy graphics. Incase you don’t know much, grainy graphics in the PC World refers to extremely sharp textures that can sometimes give you headache. In addition, the gripping textures also have a huge impact on performance and all in all, it’s not worth it to be kept above 1.
Despite what is explained above, and If you still feel like the textures aren’t sharp enough. We still don’t recommend tuning up Anisotropic Filtering, and instead take benefit of Nvidia Ansel and AMD’s FreeStyle, which is explained in the last section of this guide.
Parallax Mapping: 0
Keeping Parallax Mapping at Zero is the best thing you can do in Rust. That is to say, the impact on performance was roughly 30%, and on the dark side, it has zero to no benefits except showing slight illusions that are merely rare, depending on the weather.
Grass Displacement: Off
The Grass Displacement feature seems to be another unnecessary setting that impacts performance while having no meaningful purpose.
Particle Quality: 0
While showing little to no improvement across the Graphical Sector. It’s reasonable to presume that Particle Quality Should be kept at 0. The difference in performance is vast, and unlike many other games, where Particle Quality sets the base framework for all graphics. It wasn’t the case in Rust, and all we noticed was added elements that weren’t always noticeable.
Object Quality: 150

Have you ever come across numerous objects that aren’t rendered, and you are able to see through walls? Well, that is definitely due to Object Quality, which pre-renders all graphical elements to an extent depending on the quality. Similarly, the performance problem isn’t that serious here, but the core purpose of this setting is important as it changes the overall experience. We recommend keeping it at 150 for best FPS and realistic fidelity.
More From Settings Guide: Black Ops Cold War PC Settings
Tree Quality: 145
Simialr to Object Quality, the Tree Quality preset also focuses on rendering the bushes, trees, and more. This gets further expanded through the Tree Quality, and enhancing the overall object. If you keep it at 50-100, the Trees Look something out of 2D Game, and performance isn’t also very noticeable. The best results come in at 150 with accurate greenery element and detailed graphics.
Max Tree Meshes: 100
Terrain Quality: 10
Although many Rust Players Across Steam, YouTube, and Forums conclude that apart from the quality itself, the Terrain Quality feature also improves the rendering distance, which isn’t actually true. We couldn’t find this feature, and apart from that. The Terrain Quality slider that goes up to 100 didn’t marginally improve the graphics by a lot. The most optimized and best setting seems to be at 10, which gets further compensated by Anti-Aliasing.
Grass Quality: 50
The Grass Quality setting doesn’t really require an explanation. All it does is changes the textures and quantity of all grass across Rust. This setting does have a reasonable impact on performance but at the same time. Its results are really noticeable, and as you would already know. The grass is all over the place in Rust. We found 50 to be very optimized, and also it resulted in a 4% FPS Drop, which is perfectly fine.
Decor Quality: 0
As the title sub-heading suggests, Decor Quality only works around extra-added decor elements, that include things like Flowers and numerous other leafs you wouldn’t normally notice. Furthermore, the experienced Rust players would know that Decor Quality needs to be turned off, because once enabled, the Grass Density increases significantly, and it becomes harder to find items. We tested Decor Quality across numerous green belts, and weren’t able to find any performance differnet. The takeaways are that If you are a competitive player, keep it enable, and likewise disable it If you are playing Rust Casually.
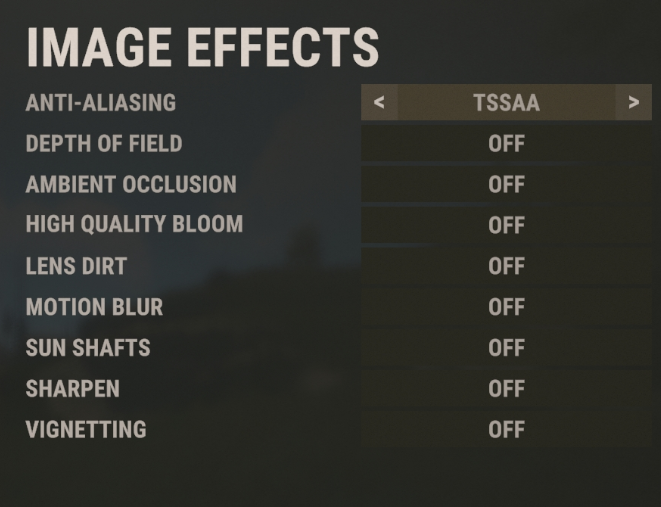
Anti-Aliasing: TSSAA
Under the Forest Portion of Image Effects Settings Tab, you will find numerous entries including the Anti-Aliasing, which is considered as the core feature of all graphics. We were really adamant about the setting and decided to go with TSSAA for two reasons. Firstly, the texture quality in TSAA was really smooth and it bent properly with the environment. Besides, looking at long-distances also didn’t hurt the eyes, the textures weren’t too noisy. This was also our main problem with SMAA and FXAA, where the textures became incredibly sharp and it started to hurt the eyes after a while. You can certainly go with SMAA which is also a decent choice, but remember, that sharpness can also be figured through Nvidia Ansel, which doesn’t come with the consequence of performance.
Depth of Field: Off
Keep Depth of Field disabled, because it has added layers that increase the blurriness in long-distance objects. The game does look fabulous, but it’s more of a cinematic feature and not good for gameplay.
Ambient Occlusion: Off
As many rust players complain about the graphics being too washed out. The Ambient Occlusion feature could be a decent fix, because not only does it provides added shadows, but it also improves their depth. The setting is handy in situations like these, but since we have already enabled Four Cascaded Shadows, you can turn it off to save performance.
High-Quality Bloom: Off
Enabling this would improve the brightness and lighting across rare places, and apart from that, this setting doesn’t seem to have lots of value. We recommend keeping it disabled, and you will find more about this in the Nvidia Ansel section.
Lens Dirt: Enable
The Lens Dirt feature is subjective and can be both enabled or disabled, depending on the performance. We couldn’t find a noticeable difference in performance, and that goes the same for the fidelity. According to Rust, this adds dirt effect in extremely bright places, which ultimately means a new layer that are similar to glass pane.
Motion Blur: Off
We have always recommended turning off Motion Blur, because it’s an unnecessary feature that has a huge impact on performance.
Sun Shafts: Off
We tested Sun Shafts for a few hours and weren’t able to find any noticeable difference. The only place where we found any noticeable difference was also in bright sunlight and rays seemed to have an extra-layer of features. Moreover, the impact on performance is also barely noticeable.
Sharpen: Off
Initially, we enabled Sharpen for better texture quality. However, in the later phases of our testings, it was disabled due to two reasons. One, If Anti-Aliasing is disabled, there is no point in adding an extra depth of sharpness. Secondly, Sharpen seemed to have a notable impact on performance, and we achieved the exact same results with Nvidia Ansel, without compromising on performance.
Vignetting: Off
No noticeable difference in fidelity and performance
Occlusion Culling: Enabled
Under the Experimental Settings, Only Enable Occlusion Culling and disable the rest.
Field of View: 90
The Field of View, commonly known as FOV, changed the dynamics of camera, allowing you to show more pixels at a time with higher FOV. This setting usually accounts for 30% performance in numerous games. However, that was not the case in Rust. We only figured a roughly 8% FPS Loss on Max FOV and similarly, the diffrence in gameplay was very meaningful. Other than this, FOV also depends on your monitor size and your distance to the desk, so I’d say this setting is subjective.
Compass Visibility: On
It’s literally impossible to play Rust without Compass Visiblity.
Streamer Mode: Off
Are you a streamer? If so, Enable this in Rust. Likewise, keep it disabled if you aren’t.
Nudity: Uncensored
With Censored, there is roughly a 4% reduction in performance. Therefore, see If you would like to trade that for the change.
How To Check Your Current FPS In Rust
To see if you have the best settings for maximum FPS in Rust or not, you should check your current FPS by following the method below.
- First, open up the Rust client and click on F1.
- Doing so will lead you to the Console Screen.
- In the console screen type perf one and click enter key.
When you connect to any server, you will be able to see your FPS in the bottom left corner of your screen. The FPS will be shown in a large wide font and this method will only work for Rust and not for any other game.
Also if you want to see the memory usage as well as the accurate FPS in the game, type perf 2 in the Console Menu. You can also use the FPS.limit 0 command if you want to remove any unintentional FPS limits.
Poor FPS Causes
There are several reasons why your FPS might not be the best when it comes to rust settings. Most of the time your hardware is the number one reason for your low FPS.
However, it can be overcome by upgrading your CPU or your graphics processor. You can also upgrade your memory size as it can have a huge impact on your overall gameplay and your FPS as well. If you can afford to upgrade your PC then go for it if not you can just try out different Rust settings for Max FPS and best performance.
Tips And Tricks For Best FPS Settings In Rust
It is important to have some of the best rest settings so that you can perform well in the combat and the PvP mode. here are some tips and tricks that will help you get the maximum FPS for Rust.
- First, make sure to update your driver as well as windows.
- It is recommended that you use a new version of Windows 7 while playing Rust. A good option is the 64-bit version of Windows 7.
- Furthermore, your GPU in usage must be your dedicated GPU. Many players make the mistake of using an integrated GPU for rust which makes their FPS performance quite low.
- Before playing Rust or any other game always check your temperature. Thermal throttling may occur if a high temperature is kept for a long time. Also, check your temperature midway while playing the game.
- Also, always manually update your drivers instead of relying on an automatic system.
- Make sure that the background apps that you are not using are always closed.
- The window power settings should always be set to high performance even if you’re using a desktop.
- Instead of the dropdown menu, change your graphics settings in the game. doing so will give you a lot more options and this is the best way to get Max FPS settings in Rust.
- Always try running with a lower resolution when you are using the drop-down menu.
- Also, make sure that your animation quality is turned down.
- In case you are stuck or the items on your character are glitched out, ask an admin or your friend to kill your sleeper to fix the problem.
- For a network lag issue. Always check that you are not populating any server list in the background.
- We don’t recommend using the game under 8GB of RAM.
Rust Optimization Takeaways
We weren’t really impressed with the quality of guides on the Best Rust settings out there, and therefore, it was really hard to find the purpose of all settings and explain it, so they were readable. Apart from that, It also seemed that the problem was with Rust too, because unlike Modern Games, which have Low to Ultra High Tweaks, Rust has sliders that are hard to figure out. Moreover, we were also frustrated over numerous settings that didn’t show any difference and were performance hogg. This gets topped off by the poor interface of the game… that is to say, a lot of settings do not have descriptions, and their purpose remains anonymous.
Apart from Rust Settings, we have also configured numerous Windows 10 Optimizations that will be fruitful for you across all games. Besides, all these were safe, and as always, our guide has never forced users to download external software, which often leads to malware.
Let us know in the comments below If you have any suggestions or complaints.
Despite being released 7 Years Ago, Rust still has loads of optimization and performance problems that need to be addressed. No matter what the problem, the game still makes it to the best-sellers of Steam and consecutively dominates the Top 5 Concurrent Players Record. We are perfectly aware of how good the game is; however, that’s not the subject of today. Instead, we’ll focus on in-depth analysis on how to increase FPS In Rust, what are the Best Rust Settings, and getting the most out of your System. The methods shared in this performance guide are perfectly safe, and guaranteed to show results.
Our guide like always would be divided into three segments. The first one will focus on Windows Optimizations, while the second would be related to the application settings. And third is going to highlight the Best Nvidia/AMD Graphics Settings For Rust. Besides, If you are trying to learn how to Craft Auto Turret in Rust, go through that as well.
It’s reasonable to presume that considering its a 2013 game, your PC already has modern hardware that could play the game. However, just to let you know, Rust has gotten significant graphical improvement over the years, which ultimately fueled to newer system requirements. These are attached below, and make sure to comply with your system requirements with them.
RECOMMENDED:
-
- Requires a 64-bit processor and operating system
- OS: Windows 10 64bit
- Processor: Intel Core i7-4790K / AMD Ryzen 5 1600
- Memory: 16 GB RAM
- Graphics: GTX 980 / AMD R9 Fury
- DirectX: Version 12
- Network: Broadband Internet connection
- Storage: 20 GB available space
- Additional Notes: SSD is highly recommended.
Windows 10 Optimizations
As suggested above, before jumping to the main Best Rust Settings, the first segment would contain all the necessary Windows 10 Optimizations, which will guarantee significant performance improvements. These methods aren’t done through third-party, and you wouldn’t need any additional softwares. Instead, we will configure the default settings that are aimed towards balance power plans and not for gaming. Once changed, you are bound to see a dramatic increase in not just Rust, but across all games.
Don’t forget to create a System Restore Point, so you could roll-back, incase of any misunderstanding.
Maximize Your CPU While Playing Rust
The title might sound a bit confusing, but it’s true that your CPU is not always being utilized 100% while playing Rust. Often, Windows 10 sets a balanced Power Plan that limits the power through various thresholds, resulting in very limited amount of FPS. This can be specifically changed through Ultimate Performance, which involves a code, that uncloks all the barriers while you play Overwatch. This method has time and time again proven to be effective. Laptop users are generally the ones who benefit the most.
- Search and Open “Windows PowerShell” With Administrator Privileges
Windows PowerShell - Paste this code shown below, and you will see a message indicating that Ultimate Performance was successfully initiated. Suppose, it didn’t, and you had to face some sort of error. Replicate the same steps inside Command Prompt.
Command Prompt - powercfg -duplicatescheme e9a42b02 -d5df -448d -aa00 -03f14749eb6
- After you are done adding the code, head over to Edit Power Plan and Power Options.
- Checkmark Ultimate Performance and you are done.From now on, always expect your CPU to push the limits and give you all it has while playing Rust.
Disable Unnecessary Animations
While using Windows 10, you might have noticed the fancy animations while clicking on anything. These illustrious animations might look good, but they come with the price of performance, which we aren’t going to compromise on. Luckily Windows 10 allows you to disable these fancy animations and speed up the entire process. Likewise, you will also save lots of performance and reduce significant burden on CPU/Memory, which can then be utilized by the game instead.
- Open View Advanced System Settings > Performance > Settings > Enable Custom and Only Checkmark the options shown below.
Animations - After the changes are made, click on apply and ok to save the settings.
Get Rid Of Hardware Acceleration
The term hardware acceleration might sound good, indicating higher performance boosts and so forth. However, that’s not the case in reality. Hardware Acceleration runs your program through a new meta, that it describes as efficient, because of the way how resources are unpacked. This isn’t generally beneficial for common apps like Discord, Google Chrome, and Steam; because the core purpose of these apps remain the same.
Consequently, on the other hand, Hardware Acceleration uses many resources to run the apps through the new meta. This ultimately results in low FPS, while you play Rust, and the CPU is always being utilized without your information. Thankfully, these resources can be saved through a couple of steps, and you will see a tremendous FPS boost across all games.
We will only highlight the general way on how to disable this across the three common applications. We expect you to disable them across any third-party application that has this option.
- Under Discord Settings > Appearance > Disable Hardware Acceleration.
Disable Hardware Acceleration. - Proceed To Google Chrome Settings > Advanced > System > Uncheck “Use Hardware Acceleration When Available”
Google Chrome Settings - Go to Steam Settings > Interface > Disable the following four options
“Enable smooth scrolling in web views (requires restart)
“Enable GPU accelerated rendering in web views”
“Enable Hardware Video Decoding”
“Enable DirectWrite For Improved Font Smoothing and Kerning”
Make Sure No Extra Applications Are Running In The Background
While Playing Rust, you should be perfectly aware that no extra application beside the Anti-Cheat is running in the background. You wouldn’t normally give this a lot of attention, but If I were to tell you that while playing Rust, you should check your Task Manager. You would find out the insane amounts of unnecessary applications and services that are nearly squeezing 40% of your CPU and Memory Usage.
Likewise, you can wonder how much performance would improve, If you disable these unnecessary applications and services. Follow the steps below and see results for yourself!
- Open Run > type and enter MSConfig
MSConfig - Head over to the services tab and checkmark “Hide All Microsoft Services” – This would hide the important services that are compulsory for your Windows 10 to operate.
Hide All Microsoft Services - Now from the new list, disable all the unnecessary third-party services, that could burden your PC while playing Rust.
third-party services - After making the suitable changes, click on Apply and head over to the Startup Tab. There will be a new list with similar applications, and your job is to disable the one’s with high priority.
Startup Tab
Making the changes suggested above will not only increase your FPS in Rust, but it’ll also significantly change the boot times.
Perform a Disk Cleanup
A Hard Drive excessively filled with useless files, potentially crash reports, leftovers, and more can temporarily slow down its speed, ultimately resulting in lower FPS while playing Rust. Having said that, this is isn’t a huge problem, and as you might have accomplished the 50% of this step by cleaning the temp files. You should now also perform a Disk Cleanup, that will ensure rapid responsiveness and blazing speeds. This will further benefit you while playing Rust, and then again, things like these often are the fix for stuttering, crashes, and all sorts of FPS Drop related problems. Keep in mind, alongside our Best Rust Settings, and these tweaks, you will see massive improvement.
- Right Click on the Drive where Rust Is Installed And Go To Properties
- Checkmark all the unnecessary files and avoid the important ones because they will be completely deleted.
Disk Cleanup - With that done, finally, click on “Clean Up System Files.”
Maximize GPU Usage While Playing Rust
Similar to many other Windows 10 features we introduced above. There is also another feature called Graphics Profile, which essentially allows you to change the priority of your Graphics Card for a specific game. This results in tremondous FPS Boost, and furthermore ensures that the Hardware is running at its max potential. The process is entirely safe, and this can also work with other games. Just keep in mind that If you add an unncesary program to the graphics profile, your PC could crash. Besides, this feature is only available in Windows 10.
- Here is how you can add Rust to the Graphics Profile.
- Open Graphics Settings through Search
Graphics Settings - Add Rust to the profiles > checkmark High Performance and click on save
Graphics Settings
Delete Temp Files
Usually, one would think that after uninstalling various harmful programs, the virus would be gone. Sadly, this isn’t the case, and Windows always seems to have a soft spot for uninstalled programs. These programs that are deleted or uninstalled have some files that go to the temp folder. A lot of them have leftovers that are mostly virus-infected and can cause serious trouble to your drive. This ultimately results in SSD/HDD being slower, and you see that impact in Rust.
- In order to get rid of these, you have to open Run
- Now enter %Temp%
Temp Files - Delete all the files by ALT + A > Right Click and Delete.
Temp Files
Disable Full-Screen Optimization
Full-Screen Optimization Full-Screen Optimization is another important setting that should always be disabled. There are lots of reasons as to why this should be disabled, however, the most important one is to avoid the borderless hybrid mode. By default, Windows 10 forces the applications to run in an irregular mode, which does not allow the hardware to run the game properly. This often results in stuttering, crashes, and more problems, which are further regulated through the slow ALT Tabbing. You can fix this by locating Rust.exe file and disabling full-screen optimization.
Disable Xbox Game Bar
How many times have you tried to figure out why the FPS in Rust are struggling to reach their average level? I have too, and as per my experience after playing the game for nearly 2000 hours. I can assure you that sometimes, it’s Xbox Game Bar with the annoying notifications at the bottom right of the window, asking you to begin a record, and so forth. Usually, these aren’t taken seriously by gamers, and suppose you dig deep. You would find out there are several Keybinds that can automatically trigger live streams and screen-recordings.
Xbox Game Bar To Disable, Xbox Game Bar > Head over to the settings tab > Disable everything in these three sections.
Enable Game Mode
Game Mode Besides Xbox Game Bar, Microsoft does well in the Game Mode Department, which has consistently proven to be a top-tier setting. Subsequently, If you don’t know much about it; Game Mode is a built-in feature within Windows 10, which is oriented towards gamers, providing with improved FPS across all games. This can also be beneficial in games like Rust, and describing Game Mode for itself would require a article on its own, but rest assured, this isn’t something you would want to miss on.
Game Mode In order to Enable Game Mode, simply head over to the same Xbox Game Bar Settings and turn this slider to the right.
Update Windows 10 To The Latest Version
While lots of gamers struggle to find options that permanently disable Windows 10 Updates. We haven’t really supported this idea, and while benchmarking tons of games here at exputer. We have always noticed similar performance improvements just like new Graphics Drivers through the latest Windows Updates. There are numerous reasons as to why this happens. Firstly, it’s worth noting that Microsoft itself wants the game to run properly on Windows 10 because after all, they publish games on PC as well. Moreover, the new updates always bring stronger support for drivers, therefore, allowing Hardware to run better. All these factors result in tremendous FPS Boost, and this was the case while playing Rust.
- Click on Start Button > Search for Check For Updates
- Search for Updates, and as you can see In my case, new updates are available to download
So these were all the necessary Windows 10 Optimizations that you had to make. Obviously, there will be instant FPS Boost after all these configurations. However, we recommend to not jumping directly in Rust, instead, work on those that are suggested below too, and then make conclusions. This is afterall, a long process, and the core purpose of these Windows Optimization were to make sure that extra applications weren’t burdening the hardware.
Now that you are done, let’s dive right into the best in-game Rust Settings.
Best Launch Options For Rust
Launch Options play a vital role in improving our Best Rust Settings. Usually, lots of players debate over the use of launch options in Rust, as most suggest they do not work anymore and compatibility is a serious problem. We acknowledged this but still went above and beyond to test the game.
As per our benchmarks, only some launch options worked, and these are listed below.
- -window-mode exclusive – Rust has serious full-screen problems, that are further expanded by the weird hybrid mode in which the game mostly runs in borderless mode. This can be fixed through two options, the first is -window-mode exclusive, which will guarantee the full-screen option, and the second is -high which runs the application on priority.
- -high – This expands on window mode exclusive, and also provides an additional benefit by running Rust in high priority mode. This ultimately results in more FPS, as the PC focuses on deriving all resources to the game.
- -forcee-feature-level-11-0 – Many argue this isn’t needed as, by default, Force feature level works fine. Nonetheless, it’s better than anything, and insurance is always worthy.
- -malloc=system – The malloc system command line varies and would not benefit in all cases. In case you don’t know about this class code, it simply enhances or configures what memory allocator is being used by the game.
- -maxMem=14000 – The MaxMem command has proven to be the most beneficial of all. We noticed that Rust wasn’t utilizing all the Ram available, therefore, Assets wouldn’t load faster and there were terrible frame drops. This was later fixed through the maxMem command that utilizes a certain value associated. You can check your Memory through the Task Manager, and utilize 20% for Windows, while the remaining for the game. In this picture, 14000 refers to 14 GB.
- -cpuCount=6 – Similar to maxMem, you can also change the cpuCount for the game. Once again, this can be checked through the Task Manager. In my case, I’m using the Ryzen 3600x, so the core count would be 6.
Task Manager - -exThreads=12 – The last enhancement would be through the exThreads amount. You can make sure that Rust is utilizing all the cores through this command line. We have 12 threads in our Ryzen 3600x, so the value would be 12.
exThreads amount - All in all, these command lines sum up to this. You can enter them in the Steam Launch Options.
Steam Launch Options
-MaxMem=14000 -high -malloc=system -force-feature-level-11-0 -cpuCount=6 -exThreads=12 -window-mode exclusive
Nvidia Settings For Rust
Before we jump to the in-game Rust settings, it’s highly imperative that we first setup Nvidia and AMD Control Panel for further optimization. These configurations will result in tremondous FPS Boost and Sync well with the in-game settings we have shown below. The goal while benchmarking Rust was to find the correct combination that would result in High FPS while still showing excellent visuals and fidelity.
Similar Best Settings FPS Guide: Best Valorant Settings
If you miss on these Nvidia Settings, you are likely to see a 20% performance loss, which translates into lots of FPS.
Nvidia Control Panel Open Nvidia Control Panel > Manage 3D Settings > Add Rust.exe
Afterward, make the following tweaks.
- Image Sharpening: Use Global Settings (Off)
- Anisotropic Filtering: 16x
- Antialiasing – FXAA: Use Global Settings (Off)
- Enable Antialiasing – Gamma Correction
- Ovverdie Any Application Setting under Antialiasing Mode
- Depending on your system, select either 4x or 8x under Antialiasing – Setting
- Use Global Setting (Off) Under Antialiasing – Transparency
- Once Again, Use Global Setting (Off) Under Background Application Max Frame Rate
- Select Your Primary Graphics Card Under CUDA – GPus
- Low Latency Mode: Use Global Settings (Off)
- Max Frame Rate: Although, many suggest turning it to max. But, we encountered many bugs while doing this.
- Multi-Frame Sampled AA (MFAA) – Off
- OpenGL Rendering GPU: Select Your Primary Graphics Card
- Checkmark “Prefer Maximum Performance” Under Power Management Mode
- Shader Cache: On
Rust Nvidia Settings - Texture Filtering – Anisotropic Sample Optimization – Off
- Select Clamp under Texture Filtering – Negative LOD bias
- Texture Filtering Quality – Quality
- Texture Filtering – Trilinear Optimization – On
- Threaded Optimization – OIn
- Triple Buffering – Off
- Vertical Sync – Off
- Virtual Reality pre-rendered frames – Use Global Setting
Don’t forget to select the primary monitor while configuring these changes. After making changes, proceed to Adjust Desktop Size and Position. Under there, Select Full-Screen Under Scaling, and GPU in tab Perform Scaling Tab. Besides, also make sure that the Resolution entered is Native, and you are selecting the max refresh rate.
Nvidia In the Change Change Resolution Tab, Select your Native Resolution plus Refresh Rate. Also under the color settings, checkmark the Nvidia Color Settings, and proceed with the configurations shown below.
- Open View Advanced System Settings > Performance > Settings > Enable Custom and Only Checkmark the options shown below.
Nvidia Ansel Settings For Rust
Initially, you might be thinking why Nvidia? Do I need configurations for AMD FreeStyle? Well, we aren’t able to provide accurate metrics for AMD. But that isn’t hard, and all you have to do is see whatever settings fit your likings. Our Rust Setting Guide was layed out through Nvidia GeForce 1080 Ti, therefore, finding a good Reshade Combination was easy.
Make notes that this subject of the guide isn’t mandatory, all it does is that it enhances the image quality without any performance compromisation. Rest assured, it’s imperative to first enable Nvidia Game Mode and then find out how the configuration works.
- Open GeForce Experience And Proceed To Settings
GeForce Experience - Now Click on In-Game Overlay Settings
Overlay Settings - Proceed to Photo Mode / Game Filter from the menu and checkmark the Capture / Enhance Tab.
Game Filter - Launch Rust and Open the Nvidia Ansel Overlay By ALT + F9 on Keyboard, Add Details and Color Tab
- Now make the following changes under both sections
- Sharpen 18%
- Clarity 22%
- HDR Toning 70%
- Bloom 26%
- Tint Color 0%
- Tint Intensity 0%
- Temperature 0
- Vibrance 42
Having said that, Nvidia Ansel and AMD FreeStyle could do wonders for your Rust Image Quality. You might be wondering what are the differences? To illustrate, there is a notable difference in the Sharpness and Vibrance of Images, along with brightness collaboration across all graphical elements. This truly transcends the gameplay and takes it to a whole new level, both in terms of Graphics and Performance. Here are some screenshots, that are heavily de-compressed but still show the stunning difference between default and reshade.
Default Settings
Reshade:
Although, these photos are highly de-compressed and won’t show you the results that we are trying to portray. We still recommend trying it out and seeing the difference for yourself.
Similar to the Nvidia Tweaks we have shared above. AMD users can also get access to their own Control Panel and arrange further enhancements. The difference in result between both GPU’s isn’t huge, and you are likely to get the same result. Besides, these configurations are mostly dependent on the in-game settings, therefore, make adequate changes so you can get the correct combination for High FPS and Best Rust Settings.
- Add Rust to the AMD Control Panel > Edit Profile
- Make the following changes.
- Graphics Profile: Custom – This will allow you to make custom changes.
- Radeon Anti-Lag: Disabled
- Radeon Chill: Disabled
- Radeon Image Sharpening: Disabled
- Radeon Enhanced Sync: Enabled
- Anti-Aliasing: Override Application Settings
- Anti-Aliasing LEvel: 8xEQ
- Anti-Aliasing Method: Supersampling
- Morphological Anti-Aliasing: Disabled
- Anisotropic Filtering: Enabled
- Anisotropic Filtering Level: 16x
- Texture Filtering Quality: Standard
- Surface Format Optimization: Enabled
- Tesselation Mode: AMD Optimized
- Triple Buffering: Disabled
- Radeon FreeSync: The Radeon FreeSync is a great feature, that does not make you realize the drop in frames due to the constant refresh-rate cap. However, most players debate over its input lag, and competitive players aren’t big fan of it. We don’t find Rust any insanely competitive like CS:GO, where every second matters. Thus, it’s recommended to keep it enabled.
- Scaling Mode: Center
- Integer Scaling: Disable
- Custom Color: Disabled
Lastly, don’t forget to update your drivers to the latest version.
Best Rust Settings
Hopefully, now that you have finally made all the configurations suggested above. It’s time to dive into the final piece and optimize the in-game Best Rust settings which are the most crucial part of this guide. Our settings as always are focused on High FPS and Sharp Visuals, so the goal is to find the right balance. In addition, we also benchmarked the game several times and avoided focusing on settings that had huge performance impact, while showing little to no improvement in Graphical Sector. This also seems to be a pretty common problem in Rust, and you would also notice that the majority of settings including Max Shadows Lights, Water Reflections, and Parallax Mapping have zero to no effect on fidelity. Anyhow, here are the best rust settings for high fps and sharp visuals.
Screen Resolution: Select Native
Mode: Exclusive
This is another word used for full-screen which is necessary for max refresh rate and high performance. Some people also prefer Borderless due to the quick Alt Tabbing, however, we noticed several crashes with that.
VSync: Off
Enabling this would ultimately mean that you are going to experience high input lag, and also cap your framerates to 60. This isn’t helpful, especially if you are playing at High Refresh Rate Monitor, because the frames wouldn’t reach the desired cap.
Graphical Quality: 4
The Graphical Quality setting maintains an overall meta for the entire preset in the game. During our benchmarks, we noticed heavy lagg on anything above 4, and while testing it on 1,2, and 3. We were griefly disappointed with the poor graphics. The main difference between higher Graphical Quality and lower is only related to the quality of shadows, which makes a huge difference especially in Rust because of the open maps.
Shadow Quality: 1
![]()
No Major difference in all other presets. One seems to be the most optimized setting.
Shadow Cascades: Four Cascades
Although in the majority of climates, you aren’t going to see much of this setting, because of what it does. However, in bright light maps, there is immense difference due to the shadow quality. Moreover, there is also slight change in the dimensions of shadow, which does signify to the overall quality. If you go with lower Shadow Cascades quality, make notes, that the Shadow Distance quality will also be limited.
Max Shadow Lights: 0
Similar to Shadow Quality and Cascades. The Max Shadow Light also shows impressive results in the overall graphics. But that seems really limited, because unlike cascades and Shadow Quality, which play an essential role 24/7. The Max Shadow Lights only seems to have a purpose when there is a reflection from objects. Subsequently, If you look at the performance, this setting does seem to be a problem and to sum it up. It is not worth it.
Water Quality: 1
Another performance hogg was the Water Quality, which does seem like a big problem, but unfortunately it needs to be kept down. The essential difference between Water Quality 1-3 boils down to the texture, blurriness, and reflections. It isn’t noticeable across all places and therefore, we must keep it at one.
Water Reflections: 0
It is imperative to keep water reflections at 0 due to two reasons. The first being that we have already kept Water Quality at one, which will play a significant role in setting the overall meta. And the second is due to performance problem, which is reasonably huge in water reflections.
World Reflections: 1
The Water Reflection setting maintains an astounding clarity and adds exception fidelity to the overall world of rust. Likewise, it also has its drawbacks but luckily at one, we were only able to find a roughly 2% performance loss which isn’t a big deal, considering the massive improvements.
Anisotropic Filtering: 1
Subsequent to finishing our test bench, we were heavily bugged with how Anisotropic Filtering, because it provided very grainy graphics. Incase you don’t know much, grainy graphics in the PC World refers to extremely sharp textures that can sometimes give you headache. In addition, the gripping textures also have a huge impact on performance and all in all, it’s not worth it to be kept above 1.
Despite what is explained above, and If you still feel like the textures aren’t sharp enough. We still don’t recommend tuning up Anisotropic Filtering, and instead take benefit of Nvidia Ansel and AMD’s FreeStyle, which is explained in the last section of this guide.
Parallax Mapping: 0
Keeping Parallax Mapping at Zero is the best thing you can do in Rust. That is to say, the impact on performance was roughly 30%, and on the dark side, it has zero to no benefits except showing slight illusions that are merely rare, depending on the weather.
Grass Displacement: Off
The Grass Displacement feature seems to be another unnecessary setting that impacts performance while having no meaningful purpose.
Particle Quality: 0
While showing little to no improvement across the Graphical Sector. It’s reasonable to presume that Particle Quality Should be kept at 0. The difference in performance is vast, and unlike many other games, where Particle Quality sets the base framework for all graphics. It wasn’t the case in Rust, and all we noticed was added elements that weren’t always noticeable.
Object Quality: 150
Have you ever come across numerous objects that aren’t rendered, and you are able to see through walls? Well, that is definitely due to Object Quality, which pre-renders all graphical elements to an extent depending on the quality. Similarly, the performance problem isn’t that serious here, but the core purpose of this setting is important as it changes the overall experience. We recommend keeping it at 150 for best FPS and realistic fidelity.
More From Settings Guide: Black Ops Cold War PC Settings
Tree Quality: 145
Simialr to Object Quality, the Tree Quality preset also focuses on rendering the bushes, trees, and more. This gets further expanded through the Tree Quality, and enhancing the overall object. If you keep it at 50-100, the Trees Look something out of 2D Game, and performance isn’t also very noticeable. The best results come in at 150 with accurate greenery element and detailed graphics.
Max Tree Meshes: 100
Terrain Quality: 10
Although many Rust Players Across Steam, YouTube, and Forums conclude that apart from the quality itself, the Terrain Quality feature also improves the rendering distance, which isn’t actually true. We couldn’t find this feature, and apart from that. The Terrain Quality slider that goes up to 100 didn’t marginally improve the graphics by a lot. The most optimized and best setting seems to be at 10, which gets further compensated by Anti-Aliasing.
Grass Quality: 50
The Grass Quality setting doesn’t really require an explanation. All it does is changes the textures and quantity of all grass across Rust. This setting does have a reasonable impact on performance but at the same time. Its results are really noticeable, and as you would already know. The grass is all over the place in Rust. We found 50 to be very optimized, and also it resulted in a 4% FPS Drop, which is perfectly fine.
Decor Quality: 0
As the title sub-heading suggests, Decor Quality only works around extra-added decor elements, that include things like Flowers and numerous other leafs you wouldn’t normally notice. Furthermore, the experienced Rust players would know that Decor Quality needs to be turned off, because once enabled, the Grass Density increases significantly, and it becomes harder to find items. We tested Decor Quality across numerous green belts, and weren’t able to find any performance differnet. The takeaways are that If you are a competitive player, keep it enable, and likewise disable it If you are playing Rust Casually.
Anti-Aliasing: TSSAA
Under the Forest Portion of Image Effects Settings Tab, you will find numerous entries including the Anti-Aliasing, which is considered as the core feature of all graphics. We were really adamant about the setting and decided to go with TSSAA for two reasons. Firstly, the texture quality in TSAA was really smooth and it bent properly with the environment. Besides, looking at long-distances also didn’t hurt the eyes, the textures weren’t too noisy. This was also our main problem with SMAA and FXAA, where the textures became incredibly sharp and it started to hurt the eyes after a while. You can certainly go with SMAA which is also a decent choice, but remember, that sharpness can also be figured through Nvidia Ansel, which doesn’t come with the consequence of performance.
Depth of Field: Off
Keep Depth of Field disabled, because it has added layers that increase the blurriness in long-distance objects. The game does look fabulous, but it’s more of a cinematic feature and not good for gameplay.
Ambient Occlusion: Off
As many rust players complain about the graphics being too washed out. The Ambient Occlusion feature could be a decent fix, because not only does it provides added shadows, but it also improves their depth. The setting is handy in situations like these, but since we have already enabled Four Cascaded Shadows, you can turn it off to save performance.
High-Quality Bloom: Off
Enabling this would improve the brightness and lighting across rare places, and apart from that, this setting doesn’t seem to have lots of value. We recommend keeping it disabled, and you will find more about this in the Nvidia Ansel section.
Lens Dirt: Enable
The Lens Dirt feature is subjective and can be both enabled or disabled, depending on the performance. We couldn’t find a noticeable difference in performance, and that goes the same for the fidelity. According to Rust, this adds dirt effect in extremely bright places, which ultimately means a new layer that are similar to glass pane.
Motion Blur: Off
We have always recommended turning off Motion Blur, because it’s an unnecessary feature that has a huge impact on performance.
Sun Shafts: Off
We tested Sun Shafts for a few hours and weren’t able to find any noticeable difference. The only place where we found any noticeable difference was also in bright sunlight and rays seemed to have an extra-layer of features. Moreover, the impact on performance is also barely noticeable.
Sharpen: Off
Initially, we enabled Sharpen for better texture quality. However, in the later phases of our testings, it was disabled due to two reasons. One, If Anti-Aliasing is disabled, there is no point in adding an extra depth of sharpness. Secondly, Sharpen seemed to have a notable impact on performance, and we achieved the exact same results with Nvidia Ansel, without compromising on performance.
Vignetting: Off
No noticeable difference in fidelity and performance
Occlusion Culling: Enabled
Under the Experimental Settings, Only Enable Occlusion Culling and disable the rest.
Field of View: 90
The Field of View, commonly known as FOV, changed the dynamics of camera, allowing you to show more pixels at a time with higher FOV. This setting usually accounts for 30% performance in numerous games. However, that was not the case in Rust. We only figured a roughly 8% FPS Loss on Max FOV and similarly, the diffrence in gameplay was very meaningful. Other than this, FOV also depends on your monitor size and your distance to the desk, so I’d say this setting is subjective.
Compass Visibility: On
It’s literally impossible to play Rust without Compass Visiblity.
Streamer Mode: Off
Are you a streamer? If so, Enable this in Rust. Likewise, keep it disabled if you aren’t.
Nudity: Uncensored
With Censored, there is roughly a 4% reduction in performance. Therefore, see If you would like to trade that for the change.
How To Check Your Current FPS In Rust
To see if you have the best settings for maximum FPS in Rust or not, you should check your current FPS by following the method below.
- First, open up the Rust client and click on F1.
- Doing so will lead you to the Console Screen.
- In the console screen type perf one and click enter key.
When you connect to any server, you will be able to see your FPS in the bottom left corner of your screen. The FPS will be shown in a large wide font and this method will only work for Rust and not for any other game.
Also if you want to see the memory usage as well as the accurate FPS in the game, type perf 2 in the Console Menu. You can also use the FPS.limit 0 command if you want to remove any unintentional FPS limits.
Poor FPS Causes
There are several reasons why your FPS might not be the best when it comes to rust settings. Most of the time your hardware is the number one reason for your low FPS.
However, it can be overcome by upgrading your CPU or your graphics processor. You can also upgrade your memory size as it can have a huge impact on your overall gameplay and your FPS as well. If you can afford to upgrade your PC then go for it if not you can just try out different Rust settings for Max FPS and best performance.
Tips And Tricks For Best FPS Settings In Rust
It is important to have some of the best rest settings so that you can perform well in the combat and the PvP mode. here are some tips and tricks that will help you get the maximum FPS for Rust.
- First, make sure to update your driver as well as windows.
- It is recommended that you use a new version of Windows 7 while playing Rust. A good option is the 64-bit version of Windows 7.
- Furthermore, your GPU in usage must be your dedicated GPU. Many players make the mistake of using an integrated GPU for rust which makes their FPS performance quite low.
- Before playing Rust or any other game always check your temperature. Thermal throttling may occur if a high temperature is kept for a long time. Also, check your temperature midway while playing the game.
- Also, always manually update your drivers instead of relying on an automatic system.
- Make sure that the background apps that you are not using are always closed.
- The window power settings should always be set to high performance even if you’re using a desktop.
- Instead of the dropdown menu, change your graphics settings in the game. doing so will give you a lot more options and this is the best way to get Max FPS settings in Rust.
- Always try running with a lower resolution when you are using the drop-down menu.
- Also, make sure that your animation quality is turned down.
- In case you are stuck or the items on your character are glitched out, ask an admin or your friend to kill your sleeper to fix the problem.
- For a network lag issue. Always check that you are not populating any server list in the background.
- We don’t recommend using the game under 8GB of RAM.
Rust Optimization Takeaways
We weren’t really impressed with the quality of guides on the Best Rust settings out there, and therefore, it was really hard to find the purpose of all settings and explain it, so they were readable. Apart from that, It also seemed that the problem was with Rust too, because unlike Modern Games, which have Low to Ultra High Tweaks, Rust has sliders that are hard to figure out. Moreover, we were also frustrated over numerous settings that didn’t show any difference and were performance hogg. This gets topped off by the poor interface of the game… that is to say, a lot of settings do not have descriptions, and their purpose remains anonymous.
Apart from Rust Settings, we have also configured numerous Windows 10 Optimizations that will be fruitful for you across all games. Besides, all these were safe, and as always, our guide has never forced users to download external software, which often leads to malware.
Let us know in the comments below If you have any suggestions or complaints.
Все самое важное.
В Rust не обойтись без консольных команд. Они бывают разными – с ником или Steam ID игрока, числовыми и текстовыми значениями, значениями «True» и «False». Некоторые консольные команды работают для всех игроков, другими можно настроить клиент под себя, а третьи работают только для админов серверов.
Для ввода всех этих команд нужно воспользоваться консолью.
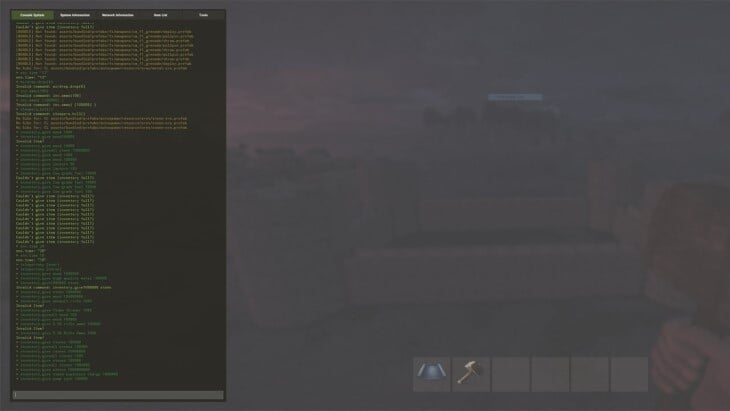
Общие команды Rust
С этими командами можно быстро присоединяться к серверам Раст и выполнять некоторые другие действия.
- connect [Server IP]:[Server Port] / connect [Server IP]:[Server Port] – Команда подключения клиента к серверу. Обязательно нужно указывать IP-адрес и порт сервера в формате IP:порт.
- client.disconnect / disconnect – Отключение клиента от сервера.
- chat.say [Text] – Выводит вашего сообщения в чат.
- clperf / global.clperf / perf / global.perf – Выводит данные о производительности клиента.
- find / global.find – Отображает список доступных консольных команд и их описание. Следует помнить, что некоторые из них имеют административный статус, поэтому будут недоступны.
- quit / global.quit – Закрывает игровой клиент
- sleep / global.sleep – Укладывает игрового персонажа спать.
- wakeup / global.wakeup – Отменяет действие предыдущей команды, пробуждая персонажа ото сна.
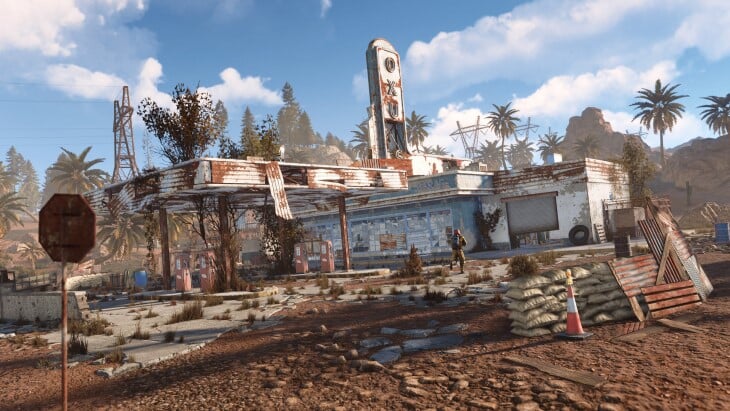
Команды настройки клиента Rust
С помощью этих команд можно отрегулировать все параметры игры.
- aianimation.qualitydistance [Value] – Регулировка шага расстояния, на котором качество LOD-текстуры изменится.
- aianimation.speedscale [Boolеan] – Включает или выключает анимацию перемещения животных.
- audio.game [Value] – Регулирует общую громкость в игре (для уменьшения используйте отрицательное значение)
- audio.ambience [Boolеan] – Включает или выключает звук окружения.
- audio.master [Value] – Регулирует общую громкость в игре.
- audio.music [Value] – Регулирует громкость музыки в игре.
- audio.speakers [Value] – Регулирует громкость голосов других игроков.
- audio.voice [Value] – Регулирует громкость микрофона.
- chat.add – отправляет аргумент в чат как сообщение
- chat.enabled [Boolеan] – Включает или выключает игровой чат.
- chat.open – Отображает окно чата.
- client.fps – Отображает FPS клиента в консоли по состоянию на момент ввода команды.
- client.report [Value] – Создает отчет о работе клиента и сохраняет его в папке, где установлена игра. Аргумент определяет время тестирования клиента.
- fps.graph [Value] – Показывает простой график с кадрами клиента внутри интерфейса игры.
- fps.limit [Value] – Устанавливает ограничение FPS. Максимальное значние – 100.
- censornudity [Boolеan] / entity.nudge [Boolеan] – Включение-отключение цензуры модели персонажа
- colliders [Value] / global.colliders [Value] – Отвечает за количество коллайдеров. Значение 0 полностью отключает их.
- effects.aa [Boolеan] – Включение/выключение полноэкранного сглаживания
- effects.ao [Boolеan] – Включение/отключение Ambient Occlusion

- effects.color [Boolеan] – Включение/отключение коррекции цвета
- effects.footsteps [Boolеan] – Включает или выключает следы на земле.
- effects.gibs [Boolеan] – Включение/отключение фрагментации при разрушении строений.
- effects.maxgibs [Value] – Задание максимального количества фрагментов здания при разрушении, высокое значение может привести к сильным фризам.
- effects.lensdirt [Boolеan] – Включение/отключение эффекта «пыльной линзы»
- effects.motionblur [Boolеan] – Включение/отключение размытия движения
- effects.shafts [Boolеan] – Включение/отключение объемного света
- effects.vignet [Boolеan] – Включение/отключение виньетирования
- graphics.af [Boolеan] – Включение/отключение анизотропной фильтрации
- graphics.branding [Boolеan] – Включение/отключение брендинга (плашки с версией игры в правом верхнем углу экрана)
- graphics.chat [Boolеan] – Включение/отключение чата
- graphics.dof [Boolеan] – Включение/отключение глубины резкости
- graphics.drawdistance [Value] – Настройка дистанции прорисовки
- graphics.fov [Value] – Настройка угол обзора от первого лица. Чем выше число, тем больше угол обзора. Чем меньше число, тем меньшую область изображения видно на экране.
- graphics.hud [Boolеan] – Включение/отключение интерфейса пользователя
- graphics.lodbias [Boolеan] – Настройка дальности смены LOD-моделей разного уровня
- graphics.parallax [Value] – Включение/отключение параллакс-мэппинга
- graphics.quality [Value] – настройка общего качества графики (от 0 до 5, 0 — самое низкое качество и большая производительность)
- graphics.shaderlod [Value] – Настройка дальности отрисовки шейдерных эффектов
- graphics.shadowdistance [Value] – Настройка дальности прорисовки теней, большое значение может снижать FPS
- graphics.shadowlights [Value] – Настройка качества отрисовки теней
- graphics.uiscale [Value] – Настройка масштаба интерфейса
- gc.collect – Выгрузка «мусорных» данных из оперативной памяти
- physics_steps / global.physics_steps – Количество шагов персонажа за секунду
- terrain.pvt [Boolеan]terrain.quality [Value] – Включение виртуального текстурирования
- voice.distance [Value] – дистанция, на которой слышен голос
- voice.loopback [Boolеan] – слышать звук с собственного микрофона
Команды для разработчиков
Эти команды были нужны разработчикам Раст.
- developer [Boolеan] / global.developer [Boolеan] – Показывает некоторую информацию для разработчиков.
- vis.attack [Boolеan] – Отображает траекторию полета пуль
- vis.damage [Boolеan] – Отображает нанесенный урон
- vis.metab [Boolеan] – Отображает информацию по метаболизму
- vis.triggers [Boolеan] – Отображает триггеры
- dev.netgraph [Boolеan] – Отображает качество связи с сервером
- dev.showlayer – Отображает количество игроков на сервере
- entity.debug_toggle [Value] – Включение отладки объектов
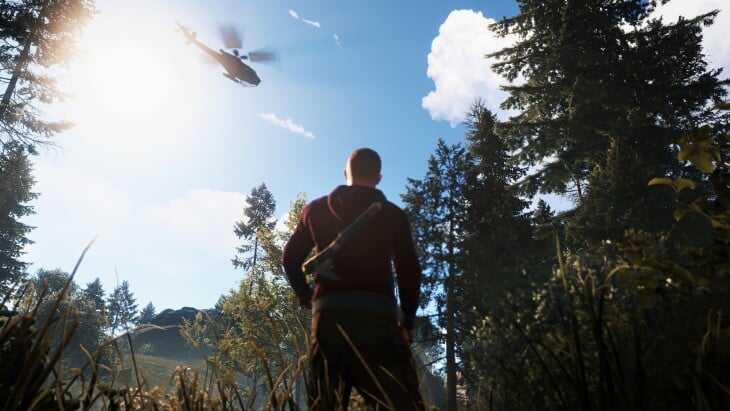
Админские команды Rust – команды для серверов
Эти команды доступны только администраторам серверов Rust.
- ownerid [Steam ID] / global.ownerid [Steam ID] – Дает заданному игроку права администратора.
- removeowner [Steam ID] / global.removeowner [Steam ID] – Снимает права администратора с заданного игрока.
- moderatorid [Steam ID] / gloval.moderatorid [Steam ID] – Дает выбранному игроку права модератора.
- removemoderator [Steam ID] / gloval.removemoderator [Steam ID] – Команда позволяет снять права модератора с определенного игрока.
- god [Boolеan] / dmg.godmode [Boolеan] – Команда включает или выключает «God» мод для администратора.
- readcfg – Загрузить конфигурацию сервера.
- restart / global.restart – Перезагрузить сервер. После ввода команды, тайм-аут перед перезагрузкой сервера составляет 60 секунд.
- save.all – Сохраняет карту мира и инвентарь игроков.
- notice.popupall [Text] – Отправляет всплывающее посередине экрана сообщение всем игрокам.
- sleepers.on [Boolеan] / global.sleepers.on [Boolеan] – Включает или выключает спящих игроков на сервере.
- status / global.status – Показывает список игроков, которые в данный на сервере.
- teleport [Player Name] – Телепортирует к указанному игроку.
- teleport [Player Name 1] [Player Name 2] / teleport.toplayer [Player Name 1] [Player Name 2] – Телепортирует игрока 1 к игроку 2.
- teleport.topos [Player Name] [X] [Y] [Z] – Телепортирует игрока по заданным координатам.
- teleport2me [Player Name] – Телепортироует игрока к себе.
- teleportany [Value] – Телепортирует к ближайшему животному.
- players / global.players – Выводит список подключенных на данный момент игроков и всю информацию о них (ник, Steam-ID, пинг, местоположение, время в онлайне).
- users [Player Name / Steam ID] / global.users [Player Name / Steam ID] – Просмотр детальной информации об игроке.
- admin.mutechat [Player Name] – Блокировка чата игроку.
- admin.mutevoice [Player Name] – Блокировка голосового чата для данного игрока.
- admin.unmutechat [Player Name] – Разблокировка чата для игрока.
- admin.unmutevoice [Player Name] – Разблокировать голосовой чат игроку.
- kick [Player Name] / global.kick [Player Name] – Отключает определенного игрока от сервера.
- kickall / global.kickall – Отключает всех игроков от сервера.
- kill [Player Name] / global.kill [Player Name] – Убивает определенного игрока.
- ban [Player Name / Steam ID] / global.ban [Player Name / Steam ID] – Заблокировать игрока на сервере.
- banid [Steam ID] [Desc] / global.banid [Steam ID] [Desc] / Заблокировать игрока на сервере по Steam ID, где Desc — указание причины блокировки.
- banlist / global.banlist – Показать список заблокированных Steam ID.
- unban [Player Name / Steam ID] / global.unban [Player Name / Steam ID] – Разбанить определенного игрока.
- unbanall / global.unbanall – Разбанить всех ранее заблокированных игроков.
- listid / global.listid – Показать список заблокированных Steam ID в компактном виде.
- banlistex / global.banlistex – Показать список заблокированных игроков. Выводит Steam ID, имя игрока и причину блокировки.
- inv.giveall [Item ID] [Col] – Дает всем игрокам заданный предмет.
- inv.giveplayer [Item] [Col] [Player Name] – Дает заданный предмет указанному игроку.
- inventory.give [Item] [Col] [Player Name] – Позволяет выбранному игроку положить в инвентарь любой предмет в любом количестве. Если параметр [Play Name] отсутствует, предмет появится в инвентаре администратора. Если инвентарь переполнен, предмет не будет получен.
- inventory.giveall [Item] [Col] – Позволяет раздать всем игрокам определенный предмет.
- inventory.givebp [Item] [Col] [Player Name] – Позволяет выбранному игроку положить в инвентарь рецепт любого предмета в любом количестве. Если параметр [Play Name] не задан, предмет появится в инвентаре администратора. Если инвентарь переполнен, предмет не будет получен.
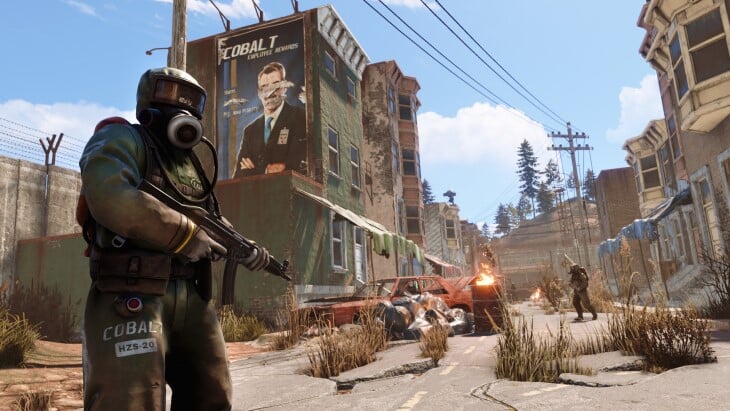
- inventory.giveid [Item ID] [Col] [Player Name] – Позволяет выбранному игроку положить в инвентарь любой предмет в любом количестве. Если параметр [Play Name] не задан, предмет появится в инвентаре администратора. Если инвентарь переполнен, предмет не будет получен.
- craft.cancel – Отменяет процесс крафта для всех игроков на сервере.
- craft.complete – Завершает процесс крафта для всех игроков на сервере.
- craft.instant_admins [Boolеan] – Инстакрафт без модификаций. Включает быстрый крафт, при котором любой предмет крафтится за 2 секунды. Работает только для администраторов сервера.
- craft.instant [Boolеan] – Инстакрафт без модификаций. Включает быстрый крафт, при котором любой предмет крафтится за 2 секунды.
- craft.timescale [Value] – Настраивает скорость крафта (0.5 = быстрее вдвое).
- env.time [Value] – Настраивает время суток
- env.timescale [Value] – Настраивает скорость смены дня и ночи.
- falldamage.enabled [Boolеan] – Включает или выключает урон от падения с большой высоты.
- falldamage.max_vel [Value] – Настраивает максимальный урон от падения.
- falldamage.min_vel [Value] – Настраивает минимальный урон от падения.
- heli.call – Вызов вертолета
- heli.calltome – Вызов вертолета к вашему местоположению.
- heli.lifetimeMinutes [Value] – Указывает интервал между появлениями вертолета. 0 — отключает вертолет.
- heli.bulletAccuracy [Value] – Коэффициент точности стрельбы вертолета. По умолчанию — 2 (50%). Чем больше значение, тем меньше точность.
- heli.bulletDamageScale [Value] – Настройка силы атаки вертолета. Чем больше значение, тем мощнее атака.
- client.maxunack [Value] – Устанавливает планку количества рассинхронизаций с игроком, при котором сервер начинает считать себя перегруженным.
- construct.frameminutes [Value] – Регулирует время до начала распада.
- ai.move [Boolеan] – Включает и отключает работу животных. Значние false остановит всех животных.
- ai.think [Boolеan] – Включает и отключает интеллект животных.
- chat.serverlog [Boolеan] – Включает и отключает логирование чата в игре.
- maxthreads – Позволяет администраторам, которые имеют более одного сервера на машине, настраивать потребление ресурсов ядра для каждого сервера.
- nametags.enabled – Скрывает мета-теги сервера.
- report / global.report – Создает файл отчета reportDATETIME.txt в корневом каталоге сервера.
- skincol [Value] / global.skincol [Value] – С помощью этой команды администратор может изменить свой цвет кожи.
- skinmesh [Value] / global.skinmesh [Value] – С помощью этой команды администратор может изменить текстуру лица.
- skintex [Value] / global.skintex [Value] – С помощью этой команды администратор может изменить текстуру кожи.
- truth.enforce – Сервер будет автоматически выкидывать игроков, делающих «странные вещи».
- water.quality – Регулирует качество погодных явлений.
- weather.clouds – Регулирует степень облачности. Допустимые значения — от 0 до 9. Чем выше значение, тем сильнее погодное явление. Значение 0 — отключает облака.
- weather.fog – Регулирует степень тумана. Допустимые значения — от 0 до 9. Чем выше значение, тем сильнее погодное явление. Значение 0 — отключает туман.
- weather.rain – Регулирует степень дождя. Допустимые значения — от 0 до 9. Чем выше значение, тем сильнее погодное явление. Значение 0- отключает дождь.
- weather.wind – Регулирует степень ветра. Допустимые значения — от 0 до 9. Чем выше значение, тем сильнее погодное явление. Значение 0 — отключает ветер.
- world.monuments – Включает монументы на карте
- terrain.pvt false или true – включает или отключает Procedural Virtual Texturing
- graphics.quality 1 — 5 – Устанавливает качество графики – от низшего к высочайшему
Теперь вы знаете все консольные команды Rust.
* * *
Rust – главный хит Twitch в новом году. Игре 7 лет, но она только набирает популярность
Скачать Rust – где купить на ПК симулятор выживания
Как получить Твич Дропс Раст
Rust — это игра на выживание с открытым миром, в которую вы можете играть онлайн с множеством других игроков или против них. Недавно у него появилось второе дыхание, когда все крупные стримеры играли в ролевой аспект Rust. Если вы хотите играть в чрезвычайно популярную игру, вам следует следовать нашему лучшему руководству по настройке Rust. Хотя игра была выпущена около 7 лет назад, вам, возможно, все же придется оптимизировать настройки самостоятельно, чтобы добиться максимальной производительности.

Наилучшие настройки также позволят вам иметь более высокий FPS и лучше играть против других игроков (PvP). Однако, если вы все еще сталкиваетесь с какими-либо проблемами, мы будем рады помочь вам, если вы сообщите нам об этом в комментариях ниже. Итак, не теряя времени, давайте начнем и выясним лучшие настройки Rust для ПК.
Содержание
- Системные требования Rust для ПК
- Минимальные системные требования
- Рекомендуемые системные требования
- Настройки графики Rust (максимальная оптимизация FPS)
- Разрешение
- Режим: эксклюзивный
- Вертикальная синхронизация: выкл.
- Качество графики: 4
- Качество тени: 1
- Каскады теней: четыре каскада
- Макс. количество света в тени: 0
- Качество воды: 1
- Отражения в воде: 0
- World Reflections: 1
- Анизотропная фильтрация: 1
- Parallax Mapping: 0
- Смещение травы: выключено
- Качество частиц: 0
- Качество объекта: 150
- Качество дерева: 145
- Качество местности: 10
- Качество травы: 50
- Качество декора: 0
- Сглаживание: TSSAA
- Глубина резкости: выключена
- Окружающая окклюзия: выкл.
- Цветение высокого качества: выключено
- Загрязнение линз: включить
- Размытие в движении: выкл.
- Sun Shafts: Off
- Резкость: Выкл.
- Виньетирование: выключено
- Поле обзора: 90
- Видимость компаса: вкл.
- Нагота: без цензуры
- Лучшие настройки интерфейса Rust
- Настройки звука Rust
- Настройки элементов управления Rust

Вот официальные системные требования, предоставленные разработчиками игры. Для того, чтобы просто запустить игру, вам нужно будет выполнить только минимальные необходимые настройки, однако, чтобы запустить ее на ультра, вам, возможно, даже придется выйти за рамки рекомендуемых настроек.
Минимальные системные требования
| Подробности | Требования |
|---|---|
| Операционная система | Windows 8.1 или более поздняя версия (64-разрядная версия) |
| Процессор | Intel i7-3770/AMD FX-9590 или лучше |
| Память | 10 ГБ ОЗУ или выше |
| Графика | NVIDIA GeForce GTX 670 2 ГБ/AMD R9 280 или лучше |
| DirectX | Версия 11 |
| Подключение к Интернету | Широкополосное подключение к Интернету |
| Место для хранения | доступно 25 ГБ |
Рекомендуемые системные требования
| Подробности | < strong>Требования |
|---|---|
| Операционная система | Windows 11 (64-разрядная версия) |
| Процессор | Intel Core i7-4790k/AMD 5 1600 или лучше |
| Память | 16 ГБ ОЗУ или выше |
| < strong>Графика | GeForce GTX 980/AMD R9 Fury или лучше |
| DirectX | Версия 12 |
| Подключение к Интернету | Широкополосное подключение к Интернету |
| Место для хранения | 25 ГБ доступно |
Настройки графики Rust (максимальная оптимизация FPS)

Убедившись, что у вас есть требования к ПК, перейдите к настройке игры с этими настройками. Тем не менее, перед запуском игры необходимо отметить несколько вещей:
- Обновите графические драйверы до последней версии.
- Настройте параметры текстур в соответствии с оперативной памятью вашей видеокарты
Rust в целом относительно требовательная игра. Тем не менее, мы придумали несколько графических настроек, которые позволят вам играть в игру как на младших, так и на средних ПК. Итак, приступим.
< td class=»has-text-align-center» data-align=»center»>Разрешение
< td class=»has-text-align-center» data-align=»center»>Выкл.
Поле обзора
| Имя | Настройка |
| Исходное разрешение рабочего стола (1080p) | |
| Режим< /td> | Эксклюзивные |
| Ограничение FPS | 240 |
| Качество графики | 4 |
| Качество теней | 1 |
| <сильный>Теневые каскады | 4 |
| Max Shadow Light | 0 |
| Качество теней | Самый быстрый |
| < strong>Качество воды | 1 |
| Отражение в воде | 0 |
| Анизотропная фильтрация | 1 |
| Отображение параллакса | 0 |
| Смещение травы | Вкл. |
| Качество частиц | 0 |
| Качество объекта | 150 |
| Качество дерева | 145 |
| Max Tree Meshes | 100 |
| Качество рельефа | 10 |
| Качество травы | 50 |
| Качество оформления | 0 |
| Сглаживание | TSSAA |
| Глубина резкости | Выкл. |
| Затенение окружающей среды | Выкл. |
| Высококачественное цветение | Выкл. |
| Загрязнение линз | Включить |
| Размытие в движении | Выкл. |
| Солнечные валы | Выкл. |
| Повышение резкости | Выкл. |
| Виньетирование | |
| Отсечение окклюзии | Включено |
| 90 | |
| Видимость компаса | В |
| Режим стримера | Выкл. |
| Нагота | Без цензуры (или на ваше усмотрение. Цензура вызывает небольшое снижение производительности) |
< td class=»has-text-align-center» data-align=»center»>
Если вам интересно узнать, что делает каждый из этих параметров, не беспокойтесь, потому что мы подробно объяснили их ниже.
Разрешение
<р>Это родное разрешение вашего монитора. Если вы хотите получить хороший и стабильный FPS на ПК низкого/среднего уровня, вам следует играть в игру с разрешением 1080p. Все, что выше, может сказаться на вашей производительности.
Режим: эксклюзивный
Этот параметр в основном представляет собой полноэкранный режим. Хотя вы можете предпочесть оставить его без границ, я не предлагаю этого. Да, это позволит вам легко выйти из игры с помощью Alt-Tab, но при этом игра часто вылетает.
Вертикальная синхронизация: выкл.
Хотя этот параметр предотвращает разрыв экрана в игре, в конечном итоге он приводит к снижению производительности. В любой многопользовательской игре я рекомендую отключить эту функцию, если только у вас нет высокопроизводительного ПК и вы не можете позволить себе потерю производительности.
Качество графики: 4
Сохранение качества графики на уровне 4 обеспечит оптимальный FPS и визуальные эффекты. Если ваш компьютер может работать с более высокой графикой, то двигайтесь вперед, но 4, кажется, является лучшим местом. Все, что ниже этого, делает игру довольно плохой по качеству.
Качество тени: 1
Этот параметр регулирует качество теней, которые вы видите в игре. Так как требуется отрисовать много теней, оставьте значение 1, иначе игра будет тормозить.
Каскады теней: четыре каскада
Сохранение этой настройки на более низком уровне означает, что это также влияет на расстояние тени. Поскольку вы не хотите, чтобы игра отображала что-либо, что вам не нужно, наличие более высокого расстояния между тенями — это роскошь, которой вам следует избегать, если у вас нет высокопроизводительного ПК. Однако в большинстве случаев вы даже не заметите эту настройку. Он вступает в игру, только когда вы смотрите на яркие области в дневное время.
Макс. количество света в тени: 0
Эта настройка может нанести большой урон вашей системе, если вы оставите его на высоком уровне. Это позволяет отражениям от источников света выделяться сильнее и добавлять реалистичности в вашу игру. Однако, если вы хотите увеличить FPS, лучше оставить его равным 0.
Качество воды: 1
Качество воды — одна из главных причин, по которой у вас может быть низкий FPS или вы можете чувствовать, что ваша игра тормозит. От этого зависит, какое качество воды будет в игре. Поскольку вы не хотите выигрывать какие-либо визуальные соревнования, рекомендуется оставить это значение около 1.
Отражения в воде: 0
Отражения в воде занимают много вашего FPS, так как это требовательная настройка. Если оставить его равным 0, у вас будет гораздо лучший FPS. Кроме того, поскольку у вас уже есть качество воды на уровне 1, нет смысла повышать этот параметр.
World Reflections: 1
Хотя вы, возможно, захотите добавить реалистичности в свою игру, установка значения выше 1 постепенно приведет к сказывается на вашей производительности. Таким образом, чтобы получить стабильный FPS — даже при более длительном прохождении — вы должны немного пожертвовать визуальными эффектами.
Анизотропная фильтрация: 1
Этот параметр в основном делает текстуры в игре более резкими и делает их более заметными. Однако это не только требует много FPS, но и может выглядеть довольно отвлекающим и раздражающим. Таким образом, использование этого параметра при любом значении выше 1 не рекомендуется.
Parallax Mapping: 0
Причина, по которой я сохраняю этот параметр в 0 в том, что он не предоставляет никакого значения. Вместо этого он потребляет много производительности и в большинстве случаев вызывает отставание вашей игры. Этот параметр вступает в игру только в зависимости от погоды (что может быть весьма ситуативным).
Смещение травы: выключено
Как и предыдущий параметр, согласно моим тестам, смещение травы не имеет какой-либо важной цели. Я не заметил, чтобы он делал что-либо при включении, кроме снижения FPS.
Качество частиц: 0
Если вы продолжите при значении выше 0 вы заметите очень незначительное графическое улучшение. Тем не менее, потеря FPS будет довольно значительной, учитывая, как мало на самом деле делает этот параметр.
Качество объекта: 150
Эта настройка рендерит различные объекты в игре, чтобы текстуры и все остальное загружалось вовремя. Причина, по которой мы держим его на уровне 150, заключается в том, что это не только дает лучший FPS, но и не заставляет игру чувствовать, что она не отображает текстуры должным образом.
Качество дерева: 145
Подобно тому, как Object Quality визуализирует различные объекты вокруг карты, Tree Quality визуализирует всю листву в Rust. Согласно моим тестам, удержание его на отметке 145 дает наилучшие результаты с точки зрения производительности и визуальных эффектов.
Качество местности: 10
Хотя вы, возможно, захотите сдвинуть этот параметр до 100, я не предлагаю этого. Это не имеет большого значения с точки зрения визуальных эффектов, но, безусловно, сильно сказывается на вашей производительности. Удерживая его на уровне 10, вы получите наилучшие результаты. Не беспокойтесь, потому что другие настройки компенсируют потерю качества местности, чтобы вы не чувствовали, что игра выглядит плохо.
Качество травы: 50
Как и настройки качества объектов и деревьев, качество травы влияет на то, насколько хорошо или плохо выглядит трава в Rust. Я заметил, что если оставить его выше 50, это сильно снизит ваш FPS, но не даст оправданных результатов. Поэтому лучше всего оставить значение 50.
Качество декора: 0
Есть две основные причины, по которым мы сохраняем качество декора на уровне 0. Во-первых, очевидно, что это сильно влияет на ваш FPS. Так как он повышает качество различного декора вроде цветов и прочих мелочей, ваш FPS будет довольно нестабилен при ходьбе по миру. Во-вторых, это также увеличивает (или уменьшает) плотность травы. Таким образом, это означает, что вы не сможете легко заметить предметы на земле, если установите значение выше 0.
Сглаживание: TSSAA
Причина, по которой TSSAA является рекомендуемой настройкой, заключается в том, что она придает текстурам гладкий вид. Другие варианты делают игру очень резкой, но при длительной игре могут повредить глаза.
Глубина резкости: выключена
С точки зрения производительности этот параметр не сильно скажется на вашем ПК. Тем не менее, причина, по которой эта функция отключена, заключается в улучшении игрового процесса. Это придает игре кинематографический вид, но когда дело доходит до игрового аспекта, из-за этого вы можете пропустить вещи на расстоянии.
Окружающая окклюзия: выкл.
Хотя этот параметр обеспечивает хорошие тени и делает игру менее размытой, это скажется на вашей производительности. Поскольку у нас есть настройка Shadow Cascade на 4, нет причин включать эту настройку.
Цветение высокого качества: выключено
Включение этого параметра улучшит общую яркость и освещение в игре, но, на мой взгляд, оно того не стоит. Отключение этого параметра обеспечит вам более высокий FPS, и это не будет иметь большого значения с точки зрения визуальных эффектов.
Загрязнение линз: включить
Этот параметр не сильно влияет на вашу производительность, поэтому вы можете включить или отключить его по своему вкусу. С точки зрения визуала, он также не имеет заметной разницы.
Размытие в движении: выкл.
Этот параметр не только сказывается на вашей производительности, но и вызывает головную боль при взгляде на мир. Это также сделает вашу игру размытой в некоторых случаях.
Sun Shafts: Off
Честно говоря, эта настройка не имеет особого значения, кроме случаев, когда вы смотрите прямо на яркое солнце. Он добавляет несколько слоев света, но на самом деле это не имеет значения с точки зрения визуальных эффектов или производительности. Таким образом, вам решать, включить или отключить эту функцию.
Резкость: Выкл.
Если сглаживание выключено, то нет смысла включать эту настройку. Во-вторых, это также сказывается на производительности, поэтому лучше всего отключить это.
Виньетирование: выключено
Нет заметной разницы в точности и производительности
Поле обзора: 90
Более высокое поле зрения позволит вам видеть больше, но это не выглядит естественным, и это не только скажется на вашей производительности, но и заставит игру выглядеть по-другому — и не в хороший способ. Согласно различным тестам, FOV на уровне 90 — лучшая настройка.
Видимость компаса: вкл.
Этот параметр не требует пояснений. Буквально невозможно играть в игру, не поддерживая это. В противном случае вы заблудитесь на каждом втором этапе, так как не будете знать, в каком направлении идти.
Нагота: без цензуры
Хотя вы, возможно, захотите оставить этот параметр цензурным, я заметил, что в этом случае производительность снижается примерно на 4%. Так как игра должна подвергнуть цензуре каждого игрока, это, естественно, потребует больше вашего FPS.
Лучшие настройки интерфейса Rust

| Имя | Настройка |
|---|---|
| Масштаб пользовательского интерфейса | 1,0 |
| Показывать HUD | Вкл. |
| Показать чат | Вкл |
| < strong>Отключить глобальный чат | Выкл. |
| Автоматическое переключение каналов чата | Вкл. |
| Показать теги имен | Вкл. |
| Советы по игре | Выкл. (включите, если вы новичок) |
| Модель проигрывателя инвентаря | Вкл< /td> |
Настройки звука Rust

Во время игры в Rust важно выбрать хорошие настройки звука. Таким образом, вы сможете отчетливо слышать шаги, а также другие важные звуки в игре. Хотя вы можете предпочесть свои собственные настройки звука, я предлагаю попробовать упомянутые ниже, чтобы увидеть, как они работают для вас.
< /tbody>
Настройки элементов управления Rust
В Rust существует множество элементов управления для ПК, которые нужно отслеживать, поэтому вам необходимо освоить основные сначала строят наземную базу. Как только вы освоите их, вам будет легче двигаться дальше. Обратите внимание, что эти элементы управления можно изменить, и вы можете полностью настроить их, если захотите.
| Имя | Настройка |
|---|---|
| Основной том | 1.0 |
| Громкость музыки | 0.0 (или по вашему желанию) |
| Громкость музыки в меню | 0.0 |
| Громкость голоса | 3.0 |
| Громкость игровых звуков | 1.0 |
| Объем инструментов | 1.0 |
| Имя | Настройка | ||
|---|---|---|---|
| Вперед | W | ||
| Слева | D | ||
| Назад | S<тр> | Вправо | A |
| Переход | Пробел | ||
| Утка | Левый элемент управления | ||
| Sprint | Shift влево | ||
| Огонь | ЛКМ | ||
| AltFire | ПКМ | ||
| Перезагрузить | R | ||
| Использовать | E< /td> | ||
| Инвентарь | Вкладка | ||
| Фонарик | F | ||
| Лазер | G | ||
| Голос | В | ||
| Чат | Enter (Return)/T |
Вот некоторые полезные команды чата, которые, я думаю, пригодятся в различных ситуациях:
- /msg (имя) (сообщение): отправит сообщение одному игроку. Это отображается зеленым текстом в окне чата.
- /me: размещает сообщение на сервере в фиолетовом цвете, позволяя вашему тексту выделяться.
- /do – reclock: Reclock повторно синхронизирует часы вашего клиента с часами сервера и может использоваться для устранения проблем с задержкой объектов.
- < strong>/do – отклеить: возрождает вашего персонажа в случайном месте на случай, если вы застряли в местности.
Это лучшие настройки в Rust для ПК. Мы хотели бы знать, что вы думаете об игре на данный момент. Дайте нам знать в комментариях ниже, на каких настройках вы запускаете игру и какой у вас FPS. Если вы по-прежнему сталкиваетесь с проблемами низкого FPS, сообщите нам об этом, и мы будем рады вам помочь.
Смена текстур в RUST
WoodWall => WoodBox
WoodCeiling => LootSack
MetalWall => WoodPillar
MetalCeiling => Workbench
MetalDoor => Furnace
—По умолчанию галочки стоят везде, для того, что-бы совершить замену текстуры их необходимо СНЯТЬ
—Выключаем раст, запускаем софт. Снимаем нужные галки, жмем сохранить.
-Раст запустится сам и теперь текстуры будут заменены до тех пор, пока вы не запустите прогу и не сохраните со всеми поставленными галками.
Итак, мы в расте, текстуры заменены.

Клик

A n D r O i D
отредактировано
@
КОРОВА
Вертухай
Для чего ?
SKIF72RUS
отредактировано SKIF72RUS
Дизайнер
Баян+Слива+Уже не заменяются+Консоль не откроется если много здания
A n D r O i D
отредактировано
@
КОРОВА
Вертухай
А понял я не играю ) Но спс)
Не за что.
Добавлено через 00:53 мин.
Все откроется,лол.Пробуй!
A n D r O i D
отредактировано
@
КОРОВА
Вертухай
Ок)
id29429
отредактировано
Новичок
я играю…збс игра!
КОРОВА
отредактировано
@
id29429
Агась)
Lone Wolf
отредактировано
@
КОРОВА
Бывалый
скрин бы прикрепил.
КОРОВА
отредактировано
@
Lone Wolf
Тут и дурак поймет….
Добавлено через 00:27 мин.
Запустил раст —> следом программу —> Вуаля! Все светит!
Lone Wolf
отредактировано
@
КОРОВА
Бывалый
я не это имею в виду,скрин какие текстуры станут.
КОРОВА
отредактировано
@
Lone Wolf
Сек!
Добавлено через 00:55 мин.

Добавлено через 01:11 мин.
Специально для тебя.
Aydar
отредактировано
5КК 1000Я 786Т
Кстати никому не нужен раст за 300р?
КОРОВА
отредактировано
@
Гость
Не за шта
Загружаем больше сообщений
Авторизация
Приветствую вас, друзья! Раст меняется и мы вместе с ним. Уже давно есть определённый набор команд для Rust New (известный как Experimental ранее)! Мы решили для вашего удобства использовать прежние страницы Rust Legacy с разделением их на Rust Experimental и Rust Legacy.
Чтобы использовать в Rust консольные команды, необходимо вызвать саму консоль, нажав на клавиатуре клавишу F1 (вне зависимости от версии Rust).
Значения команд можно разделить на несколько видов:
- [Boolеan] — Логический — может иметь два значения: включить и выключить. Значение true (или, что то же самое, 1) задействует параметр, значение false (или, что то же самое, 0) отключает.
- [Value] — Числовой — Значения могут быть как положительными, так и отрицательными. Учтите, что в некоторых командах диапазон возможных значений ограничен их функциональностью.
- [Player Name] — имя игрока.
- [Item ID] — Steam ID (номер профиля в Steam)
- [Text] — текстовый. Здесь можно разместить любой текст.
- [Col] — В данном параметры допускаются только цифровые значения не >1.
Некоторые команды используются только для клиента, некоторые только в консоли сервера, а третьи — в обоих случаях.
Консольные команды Rust Experimental
Общие команды (основные)
| Команда | Тип | Описание команды |
| client.connect [Server IP]:[Server Port]
connect [Server IP]:[Server Port] |
Клиент (К) | Команда подключения клиента к серверу. Обязательно нужно указывать IP-адрес и порт сервера в формате IP:порт. |
| client.disconnect
disconnect |
К | Отключение клиента от сервера. |
| chat.say [Text] | К | Выводит вашего сообщения в чат. |
| clperf
global.clperf perf global.perf |
К | Выводит данные о производительности клиента. |
| find
global.find |
К/Сервер (С) | Отображает список доступных консольных команд и их описание. Следует помнить, что некоторые из них имеют административный статус, поэтому будут недоступны. |
| quit
global.quit |
К | Закрывает игровой клиент. |
| sleep
global.sleep |
К | Укладывает игрового персонажа спать. |
| wakeup
global.wakeup |
К | Отменяет действие предыдущей команды, пробуждая персонажа ото сна. |
Команды настройки клиента
| Команда | Тип | Описание команды |
| aianimation.groundorient [Boolеan] | К | |
| aianimation.qualitydistance [Value] | К | Регулировка шага расстояния, на котором качество LOD-текстуры изменится. |
| aianimation.speedscale [Boolеan] | К | Включает или выключает анимацию перемещения животных. |
| audio.game [Value] | К | Регулирует общую громкость в игре. Примечание: Если вы хочется сделать громкость выше, пробуйте значение 5 или 10. Если нужно сделать пониже, так же выставляйте -5 или -10. |
| audio.ambience [Boolеan] | К | Включает или выключает звук окружения. |
| audio.master [Value] | К | Регулирует общую громкость в игре. |
| audio.music [Value] | К | Регулирует громкость музыки в игре. |
| audio.speakers [Value] | К | Регулирует громкость голосов других игроков. |
| audio.voice [Value] | К | Регулирует громкость микрофона. |
| chat.add | К | отправляет аргумент в чат как сообщение |
| chat.enabled [Boolеan] | К | Включает или выключает игровой чат. |
| chat.open | К | Отображает окно чата. |
| client.fps | К | Отображает FPS клиента в консоли по состоянию на момент ввода команды. |
| client.report [Value] | К | Создаёт отчет о работе клиента и сохраняет его в папке, где установлена игра. Аргумент определяет время тестирования клиента. |
| fps.graph [Value] | К | Показывает простой график с кадрами клиента внутри интерфейса игры. |
| fps.limit [Value] | К | Если не требуется большое количество кадров в секунду, к примеру, в связи с производительностью компьютера, можно задать лимит кадров. По умолчанию ограничение не установлено. Максимальное значение — 100. |
| censornudity [Boolеan] entity.nudge [Boolеan] |
К | Включение-отключение цензуры модели персонажа |
| colliders [Value] global.colliders [Value] |
К,С | Отвечает за количество коллайдеров. Значение 0 полностью отключает их. |
| effects.aa [Boolеan] | К | Включение/выключение полноэкранного сглаживания |
| effects.ao [Boolеan] | К | Включение/отключение Ambient Occlusion |
| effects.color [Boolеan] | К | Включение/отключение коррекции цвета |
| effects.footsteps [Boolеan] | К | Включает или выключает следы на земле. |
| effects.gibs [Boolеan] | К | Включение/отключение фрагментации при разрушении строений. |
| effects.maxgibs [Value] | К | Задание максимального количества фрагментов здания при разрушении, высокое значение может привести к сильным фризам. |
| effects.lensdirt [Boolеan] | К | Включение/отключение эффекта «пыльной линзы» |
| effects.motionblur [Boolеan] | К | Включение/отключение размытия движения |
| effects.shafts [Boolеan] | К | Включение/отключение объёмного света |
| effects.vignet [Boolеan] | К | Включение/отключение виньетирования |
| graphics.af [Boolеan] | К | Включение/отключение анизотропной фильтрации |
| graphics.branding [Boolеan] | К | Включение/отключение брендинга (плашки с версией игры в правом верхнем углу экрана) |
| graphics.chat [Boolеan] | К | Включение/отключение чата |
| graphics.dof [Boolеan] | К | Включение/отключение глубины резкости |
| graphics.drawdistance [Value] | К | Настройка дистанции прорисовки |
| graphics.fov [Value] | К | Настройка угол обзора от первого лица. Чем выше число, тем больше угол обзора. Чем меньше число, тем меньшую область изображения видно на экране. |
| graphics.hud [Boolеan] | К | Включение/отключение интерфейса пользователя |
| graphics.lodbias [Boolеan] | К | Настройка дальности смены LOD-моделей разного уровня |
| graphics.parallax [Value] | К | Включение/отключение параллакс-мэппинга |
| graphics.quality [Value] | К | настройка общего качества графики (от 0 до 5, 0 — самое низкое качество и большая производительность) |
| graphics.shaderlod [Value] | К | Настройка дальности отрисовки шейдерных эффектов |
| graphics.shadowdistance [Value] | К | Настройка дальности прорисовки теней, большое значение может снижать FPS |
| graphics.shadowlights [Value] | К | Настройка качества отрисовки теней |
| graphics.uiscale [Value] | К | Настройка масштаба интерфейса |
| gc.collect | К | Выгрузка «мусорных» данных из оперативной памяти |
| input.flipy | К | |
| physics_iterations global.physics_iterations |
К | |
| physics_steps global.physics_steps |
К | Количество шагов персонажа за секунду |
| terrain.pvt [Boolеan]terrain.quality [Value] | К | Включение виртуального текстурирования |
| voice.distance [Value] | К | дистанция, на которой слышен голос |
| voice.loopback [Boolеan] | К | слышать звук с собственного микрофона |
Команды для разработчиков
| Команда | Тип | Описание команды |
| developer [Boolеan] global.developer [Boolеan] |
К | Показывает некоторую информацию для разработчиков. |
| vis.attack [Boolеan] | К | Отображает траекторию полёта пуль., работает только в режиме разработчика (developer) или отладки. |
| vis.damage [Boolеan] | К | Отображает нанесённый урон, работает только в режиме разработчика (developer) или отладки. |
| vis.metab [Boolеan] | К | Отображает информацию по метаболизму, работает только в режиме разработчика (developer) или отладки. |
| vis.triggers [Boolеan] | К | Отображает триггеры, работает только в режиме разработчика (developer) или отладки. |
| debugmode [Boolеan] global.debugmode [Boolеan] |
К | |
| dev.culling [Value] | К | |
| dev.hidelayer [Value] | К | |
| dev.netgraph [Boolеan] | К | Отображает качество связи с сервером. |
| dev.sampling [Value] | К | |
| dev.shaderlod [Value] | К | Команда больше не поддерживается. |
| dev.showlayer | К | Отображает количество игроков на сервере. |
| dev.togglelayer [Value] | К | |
| cui.test | К/С | |
| data.export [Value] | К | |
| ddraw.arrow [Value] | ||
| ddraw.line [Value] | ||
| ddraw.sphere [Value] | ||
| ddraw.text [Value] | ||
| entity.debug_toggle [Value] | К | Включение отладки объектов |
Админские команды
Список команд, который доступен только администраторам серверов.
| Команда | Тип | Описание |
|---|---|---|
| ownerid [Steam ID] global.ownerid [Steam ID] |
С | Даёт заданному игроку права администратора. |
| removeowner [Steam ID] global.removeowner [Steam ID] |
С | Снимает права администратора с заданного игрока. |
| moderatorid [Steam ID] gloval.moderatorid [Steam ID] |
К,С | Даёт выбранному игроку права модератора. |
| removemoderator [Steam ID] gloval.removemoderator [Steam ID] |
К,С | Команда позволяет снять права модератора с определённого игрока. |
| god [Boolеan] dmg.godmode [Boolеan] |
К | Команда включает или выключает «God» мод для администратора. |
| readcfg | С | Загрузить конфигурацию сервера. |
| restart global.restart |
С | Перезагрузить сервер. После ввода команды, тайм-аут перед перезагрузкой сервера составляет 60 секунд. |
| save.all | К,С | Сохраняет карту мира и инвентарь игроков. |
| notice.popupall [Text] | С | Отправляет всплывающее посередине экрана сообщение всем игрокам. |
| sleepers.on [Boolеan] global.sleepers.on [Boolеan] |
С | Включает или выключает спящих игроков на сервере. |
| status global.status |
С | Показывает список игроков, которые в данный на сервере. |
| teleport [Player Name] | К | Телепортирует к указанному игроку. |
| teleport [Player Name 1] [Player Name 2] teleport.toplayer [Player Name 1] [Player Name 2] |
К | Телепортирует игрока 1 к игроку 2. |
| teleport.topos [Player Name] [X] [Y] [Z] | К | Телепортирует игрока по заданным координатам. |
| teleport2me [Player Name] | К | Телепортироует игрока к себе. |
| teleportany [Value] | К | Телепортирует к ближайшему животному. |
| players global.players |
К, С | Выводит список подключённых на данный момент игроков и всю информацию о них (ник, Steam-ID, пинг, местоположение, время в онлайне). |
| users [Player Name / Steam ID] global.users [Player Name / Steam ID] |
К, С | Просмотр детальной информации об игроке. |
| admin.mutechat [Player Name] | К, С | Блокировка чата игроку. |
| admin.mutevoice [Player Name] | К, С | Блокировка голосового чата для данного игрока. |
| admin.unmutechat [Player Name] | К, С | Разблокировка чата для игрока. |
| admin.unmutevoice [Player Name] | К, С | Разблокировать голосовой чат игроку. |
| kick [Player Name] global.kick [Player Name] |
К, С | Отключает определённого игрока от сервера. |
| kickall global.kickall |
К, С | Отключает всех игроков от сервера. |
| kill [Player Name] global.kill [Player Name] |
К, С | Убивает определённого игрока. |
| ban [Player Name / Steam ID] global.ban [Player Name / Steam ID] |
К, С | Заблокировать игрока на сервере. |
| banid [Steam ID] [Desc] global.banid [Steam ID] [Desc] |
К, С | Заблокировать игрока на сервере по Steam ID, где Desc — указание причины блокировки. |
| banlist global.banlist |
К, С | Показать список заблокированных Steam ID. |
| unban [Player Name / Steam ID] global.unban [Player Name / Steam ID] |
К, С | Разбанить определённого игрока. |
| unbanall global.unbanall |
К, С | Разбанить всех ранее заблокированных игроков. |
| listid global.listid |
К, С | Показать список заблокированных Steam ID в компактном виде. |
| banlistex global.banlistex |
К, С | Показать список заблокированных игроков. Выводит Steam ID, имя игрока и причину блокировки. |
| inv.giveall [Item ID] [Col] | К, С | Даёт всем игрокам заданный предмет. |
| inv.giveplayer [Item] [Col] [Player Name] | К, С | Даёт заданный предмет указанному игроку. |
| inventory.endloot [Value] | К | |
| inventory.give [Item] [Col] [Player Name] | К | Позволяет выбранному игроку положить в инвентарь любой предмет в любом количестве. Если параметр [Play Name] отсутствует, предмет появится в инвентаре администратора. Если инвентарь переполнен, предмет не будет получен. |
| inventory.giveall [Item] [Col] | К,С | Позволяет раздать всем игрокам определённый предмет. |
| inventory.givebp [Item] [Col] [Player Name] | К | Позволяет выбранному игроку положить в инвентарь рецепт любого предмета в любом количестве. Если параметр [Play Name] не задан, предмет появится в инвентаре администратора. Если инвентарь переполнен, предмет не будет получен. |
| inventory.giveid [Item ID] [Col] [Player Name] | К | Позволяет выбранному игроку положить в инвентарь любой предмет в любом количестве. Если параметр [Play Name] не задан, предмет появится в инвентаре администратора. Если инвентарь переполнен, предмет не будет получен. |
| craft.cancel | К,С | Отменяет процесс крафта для всех игроков на сервере. Примечание: команду рекомендуется использовать перед рестартом сервера, для предотвращения «дюпа» игровых предметов. |
| craft.complete | К,С | Завершает процесс крафта для всех игроков на сервере. Примечание: команду рекомендуется использовать перед рестартом сервера, для предотвращения «дюпа» игровых предметов. |
| craft.add | К,С | |
| craft.canceltask | К,С | |
| craft.instant_admins [Boolеan] | К,С | Инстакрафт без модификаций. Включает быстрый крафт, при котором любой предмет крафтится за 2 секунды. Работает только для администраторов сервера. |
| craft.instant [Boolеan] | К,С | Инстакрафт без модификаций. Включает быстрый крафт, при котором любой предмет крафтится за 2 секунды. |
| craft.timescale [Value] | К,С | Настраивает скорость крафта (0.5 = быстрее вдвое). |
| env.addtime [Value] | К,С | |
| env.day [Value] | К,С | |
| env.month [Value] | К,С | |
| env.year [Value] | К,С | |
| env.time [Value] | К,С | Настраивает время суток (внутриигровое) (24-часовой формат). |
| env.timescale [Value] | К,С | Настраивает скорость смены дня и ночи. |
| falldamage.enabled [Boolеan] | К,С | Включает или выключает урон от падения с большой высоты. |
| falldamage.max_vel [Value] | К,С | Настраивает максимальный урон от падения. |
| falldamage.min_vel [Value] | К,С | Настраивает минимальный урон от падения. |
| heli.call | К,С | Вызов вертолёта |
| heli.calltome | К,С | Вызов вертолёта к вашему местоположению. |
| heli.lifetimeMinutes [Value] | К,С | Указывает интервал между появлениями вертолёта. 0 — отключает вертолёт. |
| heli.bulletAccuracy [Value] | К,С | Коэффициент точности стрельбы вертолёта. По умолчанию — 2 (50%). Чем больше значение, тем меньше точность. |
| heli.bulletDamageScale [Value] | К,С | Настройка силы атаки вертолёта. Чем больше значение, тем мощнее атака. |
| heli.strafe | К,С | |
| decay.debug [Boolеan] | К,С | |
| decay.scale [Value] | К,С | |
| client.maxunack [Value] | К,С | Устанавливает планку количества рассинхронизаций с игроком, при котором сервер начинает считать себя перегруженным. |
| client.prediction [Boolеan] | К,С | |
| construct.frameminutes [Value] | К,С | Регулирует время до начала распада. |
| ai.move [Boolеan] | К,С | Включает и отключает работу животных. Примечание: При установке значения команды false, животные останавливаются на месте. Любые перемещения, реакции, анимация животных выключаются. |
| ai.sensetime [Boolеan] | К,С | |
| ai.think [Boolеan] | К,С | Включает и отключает интеллект животных. |
| chat.serverlog [Boolеan] | С | Включает и отключает логирование чата в игре. Примечание: Запись ведётся в файл chat.Log, который находится в корневой директории вашего сервера. |
| maxthreads | S | Позволяет администраторам, которые имеют более одного сервера на машине, настраивать потребление ресурсов ядра для каждого сервера. |
| nametags.enabled | С | Скрывает мета-теги сервера. |
| report global.report |
S | Создаёт файл отчета reportDATETIME.txt в корневом каталоге сервера. |
| skincol [Value] global.skincol [Value] |
С помощью этой команды администратор может изменить свой цвет кожи.
-1 = автоматический выбор. 0 = скин белого человека. 1 = чернокожий скин. |
|
| skinmesh [Value] global.skinmesh [Value] |
С помощью этой команды администратор может изменить текстуру лица. | |
| skintex [Value] global.skintex [Value] |
С помощью этой команды администратор может изменить текстуру кожи. | |
| truth.enforce | С | Сервер будет автоматически выкидывать игроков, делающих «странные вещи». |
| water.quality | S | Регулирует качество погодных явлений. |
| weather.clouds | К,С | Регулирует степень облачности. Допустимые значения — от 0 до 9. Чем выше значение, тем сильнее погодное явление. Значение 0 — отключает облака. |
| weather.fog | К,С | Регулирует степень тумана. Допустимые значения — от 0 до 9. Чем выше значение, тем сильнее погодное явление. Значение 0 — отключает туман. |
| weather.rain | К,С | Регулирует степень дождя. Допустимые значения — от 0 до 9. Чем выше значение, тем сильнее погодное явление. Значение 0- отключает дождь. |
| weather.wind | К,С | Регулирует степень ветра. Допустимые значения — от 0 до 9. Чем выше значение, тем сильнее погодное явление. Значение 0 — отключает ветер. |
| world.monuments | Включает монументы на карте. |
terrain.pvt false или true
Если выключить данный параметр, то это сильно повысит FPS. Дело в том, что PVT — это технология, смешивающая разные текстуры (например разные биомы) так, чтобы это выглядело нормально. А вообще, эта команда управляется в меню F2 под названием Pprocedural Virtual Texturing (PVT).
graphics.quality 1 — 5
Команда меняет качество графики. 1 — ничего особенного для производительности, 5 — фантастика для глаз!
Вот, пока всё с командами для Rust. Далее кусок старой статьи про старый добрый Rust, который теперь зовётся Rust Legacy.
Консольные команды старого доброго Rust Legacy
Команды для игроков
ВНИМАНИЕ! Запись вида true/false не означает, что так и надо писать, это значит у команды есть два возможных значения! Вводить надо либо true, либо false. И ещё, если ник игрока содержит пробелы, необходимо заключать его в кавычки!
- Для того, чтобы убить себя введите консольную команду suicide;
- Для того, чтобы включить/выключить траву введите grass.on false true/false (иногда срабатывает не с первого раза, пробуйте туда-сюда для достижения желаемого результата);
- Для того, чтобы включить/выключить движение травы введите grass.displacement true/false;
- Для подключения к серверу введите net.connect IP (где IP — адрес сервера в виде 192.168.1.1, команда удобна в случае, когда вам лень искать в списке нужный сервер);
- Чтобы выйти из игры Rust введите в консоли команду exit или quit;
- ВНИМАНИЕ! Для отключения/включения цензуры введите в консоли команду censor.nudity false/true (данная команда и веселит и приносит пользу, т.к. голых игроков легче различать на большом расстоянии);
- Чтобы включить/выключить интерфейс игры введите gui.show или gui.hide;
- Отключиться от текущего сервера можно командой консоли net.disconnect;
- А подключиться к последнему посещенному серверу просто введите в консоли команду net.reconnect.
Остальные консольные команды в Раст (Rust), а их не так и много, для игроков не несут особого значения, поэтому мы их подробно рассматривать не будем, а просто перечислим: terrian.idleinterval 0-100, gui.show_branding, gui.hide_branding.
Команды для чата в игре Rust:
Чат вызывается простым нажатием клавиши Enter во время игры.
- Для отправки сообщения определенному игроку пишем в чат /msg Ник игрока Ваше сообщение;
- А для выделения своего сообщения фиолетовым цветом пишем в чат /me Ваше сообщение;
Консольные команды для админа сервера Rust:
Отдельная статья о коснольных командах для админа Rust.
- Вход на сервер (в Rcon) по паролю осуществляется с помощью командыrcon.login Ваш пароль;
- Количество игроков на сервере (online) смотрим командой status;
- Всплывающее окно с сообщением всем игрокам отправляем при помощи команды notice.popupall «Текст всплывающего сообщения»;
- А всплывающее окно с сообщением от имени SERVER CONSOLE — say «Сообщение»;
- Подсмотреть все консольные команды можно, набрав в консоли find *;
- Выкидываем игрока с нашего сервера командой kick Имя игрока;
- Баним игрока командой ban Имя игрока (заметьте, что при этом игрок не выкидывается с сервера);
- Баним игрока по id игрока в Steam banid steamid «Причина»;
- Всех разбанить можно консольной командой unbanall;
- Сохранить мир с инвентарем игроков можно командой save.all;
- Телепортировать Игрока 1 к Игроку 2 можно с помощью команды teleport.toplayer Ник игрока 1 Ник игрока 2>;
- Телепортировать Игрока по координатам можно с помощью команды teleport.topos Ник игрока ;
- Чтобы дать Игроку что-либо, нужно написать inv.giveplayer Ник игрока Предмет Количество;
- А чтобы дать всем, пишем inv.giveall Предмет Количество;
- Режим Бога — dmg.godmode true/false;
- Мгновенное завершение крафтинга у всех игроков — crafting.complete;
- Отмена крафтинга у всех игроков — crafting.cancel;
- Чтобы включить/выключить мгновенный крафтинг в игре прописываем в консоли команду crafting.instant true/false;
- То же, что и предыдущий пункт, но только для админов — crafting.instant_admins true/false;
- Задать скорость крафтинга на сервере можно командой crafting.timescale Значение (1 — начальное время, 0.5 — половина);
- Зовем самолет поддержки (airdrop) — airdrop.drop;
- Устанавливаем минимальное число игроков, начиная с которого самолет будет сбрасывать «добро» — airdrop.min_players Количество;
- Вызываем к себе машину! командой vehicle.spawn (машинка в игре не ездит… багует… можно просто посидеть, ну или с горки спустить);
- Даем имя серверу — server.hostname Название;
- Устанавливаем максимальное количество игроков на сервере — server.maxplayers Значение;
- Превращаем Rust в Sims))) Оключаем PVP — server.pvp ;
- Включаем/выключаем тела «спящих» игроков (тех игроков, которые вышли из игры) командой консоли sleepers.on true/false;
- Меняем скорость смены дня и ночи — env.timescale Значение (по умолчанию равно «0,0066666667»);
- Задаем время суток — env.time Значение;
- Включаем/выключаем чат при помощи команды chat.enabled true/false;
- Задаем значение скорости распада построек — decay.decaytickrate Значение (по умолчанию 300);
- Скорость восстановления здоровья меняется командой decay.deploy_maxhealth_sec Значение (по умолчанию = 43200);
- Включить или выключить урон от падений с высоты можно командой falldamage.enabled true/false;
- Время блокировки рюкзака, упавшего с игрока — player.backpackLockTime Время в секундах (0 — выключено, по умолчанию 300);
- Задаем расстояние слышимости голосового чата — voice.distance <значение>;
- Максимальный урон от падения — falldamage.max_vel Значение (по умолчанию = 38);
- Минимальный урон от падения — falldamage.min_vel Значение; (по умолчанию = 24)
Вот, собственно, пока и все! Пользуйтесь на здоровье! Удачи вам на просторах игры Rust, выживайте и другим помогайте. Ну или что вы там ещё делаете, главное — не читерите! =)
Обновлённая информация о консольных командах взята с этого сайта.