There are a couple of ways how to mount a CIFS/Samba share on a Linux client. However some tutorials are outdated and meanwhile completely wrong. I just ran into a (stupid) case of a wrong mount.cifs syntax:
root@focal:~# mount -t cifs //server/Share /mnt -o rw,user=domainmyuser,password=secret
mount error(13): Permission denied
Refer to the mount.cifs(8) manual page (e.g. man mount.cifs) and kernel log messages (dmesg)
Unfortunately, the additional output in dmesg is not helpful to figure out the problem:
root@focal:~# dmesg
[…]
[16444886.307684] CIFS: Attempting to mount //server/Share
[16444886.307717] No dialect specified on mount. Default has changed to a more secure dialect, SMB2.1 or later (e.g. SMB3), from CIFS (SMB1). To use the less secure SMB1 dialect to access old servers which do not support SMB3 (or SMB2.1) specify vers=1.0 on mount.
[16444886.539770] Status code returned 0xc000006d STATUS_LOGON_FAILURE
[16444886.539795] CIFS VFS: \server Send error in SessSetup = -13
[16444886.539901] CIFS VFS: cifs_mount failed w/return code = -13
After additional try and errors (and looking up a recent share mount from the history), the problem turned out to be the user=domainmyuser syntax. This way of combining the domain/workgroup and the username is not working (anymore).
Note: Both user= and username= are accepted in the options.
Instead use:
root@focal:~# mount -t cifs «//server/Share» /mnt -o «user=myuser,password=secret,workgroup=DOMAIN»
root@focal:~# ll /mnt/
total 0
drwxr-xr-x 2 root root 0 Sep 1 2020 _Archiv
drwxr-xr-x 2 root root 0 Aug 9 12:10 Client
[..]
This way it worked.
Of course the password should not be used on the command line, so for the final (and automatic) mount of the share use the following entry in /etc/fstab:
root@focal:~# cat /etc/fstab
[…]
# Mount CIFS share from server
//server/Share /mnt cifs rw,relatime,vers=3.1.1,credentials=/etc/samba/servershare.conf,uid=0 0 0
Where /etc/samba/servershare.conf contains the credentials:
root@focal:~# cat /etc/samba/servershare.conf
user=myuser
password=secret
domain=DOMAIN
Add a comment
Show form to leave a comment
Comments (newest first)
Edgardo Pannunzio (KERNEL Consultores) from Uruguay wrote on Feb 9th, 2023:
Thanks very much !!
Your post was really helpful.
Ed from wrote on Jan 27th, 2023:
In my case (mounting win 2019 share in RHEL9) when using double apostrophe: «user=myuser…» was outputing:
«bash: !,workgroup=$MY_DOMAIN: event not found»
Switching to single apostrophe ‘user=mysers…’ did the trick
ck from Switzerland wrote on Nov 29th, 2022:
Keith, make sure you have the cifs-utils and smbclient packages installed on your Ubuntu. Still an error? Try to connect to the share using the smbclient command. It could also be a SMB protocol mismatch. Check out this article, describing Samba protocol configuration on the client.
Keith from United States wrote on Nov 29th, 2022:
I’ve tried for the past 3 hours, 5AM in the morning now, and I’ve tried everything from every other website and this one and still get the exact same errors. Tried it with just sudo, then root. Same thing. Host OS is ubuntu server trying to mount a network share from my Synology NAS.
AJav from wrote on Sep 19th, 2022:
very good, Thanks !
simonpunk2016 from wrote on Aug 1st, 2022:
Thank you sir, never know the mount option has changed, because I just successfully mounted the cifs last month, thought my Manjaro has come to an end.
simonpunk2016 from wrote on Jul 29th, 2022:
Thank you sir, never know the mount option has changed, because I just successfully mounted the cifs last month, thought my Manjaro has come to an end.
Jesko from wrote on Feb 10th, 2022:
I had exact the same error, but different reason. On a freshly installed (old) Ubuntu 16.04 LTS (last 32Bit version). My reason was: There was no cifs-utils installed! so «sudo apt install cifs-utils» was the solution. I just write here because I crawled through hundreds of comments.
- Печать
Страницы: [1] Вниз

Тема: Забавная проблема с монтированием шары samba (Прочитано 43118 раз)
0 Пользователей и 1 Гость просматривают эту тему.

Umren

бьюсь уже наверное с этим недугом часа 2, гугл тоже не помогает особо 
на двух компьютерах в другой подсети наотказ нехочет монтироваться samba.
подсоединение по 1) smbclient проходит на ура 2) наутилус тоже корректно открывает шару.. (но не через супер юзера!)
отличия компов в одной подсети от другой навскидку
1. которые не монтируются — не в домене
2. учетка пишется по «русски»
3. все таки другая подсеть.. но какая разница?
#smbclient как видим - работает!
umren@chaoslive:~/.scripts$ smbclient //192.168.5.3/c$ -U Администратор
Enter Администратор's password:
Domain=[****] OS=[Windows Server (R) 2008 Standard 6001 Service Pack 1] Server=[Windows Server (R) 2008 Standard 6.0]
smb: > exit
#уже хуже!
umren@chaoslive:~/.scripts$ sudo smbmount //192.168.5.3/с$ /mnt/smb/ -o credintials=/home/umren/.scripts/credintialsone
mount error(13): Permission denied
Refer to the mount.cifs(8) manual page (e.g. man mount.cifs)
#для верности, пробовал менять так же строчку domain на локальное имя компа
#разницы нет, так же пробовал делать в духе COMPNAMEАдминистратор
umren@chaoslive:~/.scripts$ cat credintialsone
username=Администратор
password=*********
#а вдруг? попробуем другие варианты
umren@chaoslive:~/.scripts$ sudo mount.cifs //192.168.5.3/c$ /mnt/smb/ -o credintials=/home/umren/.scripts/credintialsone
mount error(13): Permission denied
Refer to the mount.cifs(8) manual page (e.g. man mount.cifs)
umren@chaoslive:~/.scripts$ sudo mount -t cifs //192.168.5.3/c$ /mnt/smb/ -o credintials=/home/umren/.scripts/credintialsone
mount error(13): Permission denied
Refer to the mount.cifs(8) manual page (e.g. man mount.cifs)
#о боги..
umren@chaoslive:~/.scripts$ sudo mount -t cifs //192.168.5.3/c$ /mnt/smb/ -o username=Администратор
Password:
mount error(13): Permission denied
Refer to the mount.cifs(8) manual page (e.g. man mount.cifs)
Самое удивительное, что на всех других машинах монтируеться все ОК, которые в домене, код 1в1.
Голова аж слегка разболелась 
Как вариант можно ли узнать способ монтирования nautilusa на примере этой шары?
AnrDaemon
А тебе в голову не приходило, что монтировать шары с русскими именами чревато?
Хотите получить помощь? Потрудитесь представить запрошенную информацию в полном объёме.
Прежде чем [Отправить], нажми [Просмотр] и прочти собственное сообщение. Сам-то понял, что написал?…
Umren
А тебе в голову не приходило, что монтировать шары с русскими именами чревато?
приходило, для этого и выделил в отдельный пункт. Однако самое смешное, что это не причина, я заводил учетку отдельную…
umren@chaoslive:~$ sudo mount -t cifs //192.168.5.3/c$ /mnt/smb/ -o username=umren
Password:
mount error(13): Permission denied
Refer to the mount.cifs(8) manual page (e.g. man mount.cifs)
версия самбы если кому то это вобще интересно ))
« Последнее редактирование: 07 Марта 2010, 21:50:29 от Umren »
AnrDaemon
sudo mount -t cifs //192.168.5.3/c$ /mnt/smb/ -o username=umren
Попробуй.
Хотите получить помощь? Потрудитесь представить запрошенную информацию в полном объёме.
Прежде чем [Отправить], нажми [Просмотр] и прочти собственное сообщение. Сам-то понял, что написал?…
ArcFi
Ещё такой вариант:
sudo aptitude install smbfsЛично проверял. Работает.
sudo mount.cifs //192.168.5.3/c$ /mnt -o uid=`id -u`,gid=`id -g`,user=USERNAME%PASSWORD
Umren
sudo mount -t cifs //192.168.5.3/c$ /mnt/smb/ -o username=umren
Попробуй.
umren@chaostest:~$ sudo mount -t cifs //192.168.5.3/c$ /mnt/smb/ -o username=umren
Password:
mount error(13): Permission denied
Refer to the mount.cifs(8) manual page (e.g. man mount.cifs)
umren@chaostest:~$ 
Ещё такой вариант:
sudo aptitude install smbfsЛично проверял. Работает.
sudo mount.cifs //192.168.5.3/c$ /mnt -o uid=`id -u`,gid=`id -g`,user=USERNAME%PASSWORD
sudo mount.cifs //192.168.5.3/c$ /mnt -o uid=`id -u`,gid=`id -g`,user=umren%*********
umren@chaostest:~$ sudo mount.cifs //192.168.5.3/c$ /mnt -o uid=`id -u`,gid=`id -g`,user=Администратор
Password:
mount error(13): Permission denied
Refer to the mount.cifs(8) manual page (e.g. man mount.cifs)
((((((( черт! буду морочиться дальше) даже не знаю куда копать уже 
Хм, забавно. Товарищ по Дебиану подключил все нормально, видимо самба багнутая и некорректно работает с 2008 сервером. Интересно как это реализовано в наутилусе тогда
« Последнее редактирование: 10 Марта 2010, 15:04:15 от Umren »
Mam(O)n
Интересно как это реализовано в наутилусе тогда
Там маунтится через gvfs всё.
ArcFi
Если мой вариант не сработал, то проблема, скорее всего:
1) либо в русской учётке — лечится созданием аккаунта на латинице;
2) либо в нехватке прав доступа к шаре — лечится добавлением юзверя в соответствующие группы и корректировкой прав из винды на каталог и шару;
3) либо в некорректной авторизации.
Если говороить о домене на AD, то имя доменного юзверя будет выглядеть примерно так: DOMAINuser либо domainuser
В терминале добавляется второй обратный слеш для экранирования первого: DOMAIN\user либо domain\user
Ещё вариант: прицепить машину к домену, например, через likewise, и тогда в наутилусе под доменным юзверем не придётся логиниться для доступа к шарам.
« Последнее редактирование: 10 Марта 2010, 16:37:20 от ArcFi »
Umren
Если мой вариант не сработал, то проблема, скорее всего:
1) либо в русской учётке — лечится созданием аккаунта на латинице;
2) либо в нехватке прав доступа к шаре — лечится добавлением юзверя в соответствующие группы и корректировкой прав из винды на каталог и шару;
3) либо в некорректной авторизации.
Если говороить о домене на AD, то имя доменного юзверя будет выглядеть примерно так: DOMAINuser либо domainuser
В терминале добавляется второй обратный слеш для экранирования первого: DOMAIN\user либо domain\userЕщё вариант: прицепить машину к домену, например, через likewise, и тогда в наутилусе под доменным юзверем не придётся логиниться для доступа к шарам.
1) создавал на латинице пр. выше в постах
2) права админа у этой учетки созданной на латинице соотв.
3) набито все верно…
Компы не в домене и в нем им делать нечего, имеют специфические роли, но это все ладно.
ПРОБЛЕМУ РЕШИЛ! 


Криво, но решение нашлось… причем самое забавное курил я все это дело долго, метод тыка как всегда победил + монтирование другой машины на Debian меня очень сильно настораживало, видимо это дефект в пакете связанный с Windows 2008 R1.
Решение простое и банальное: расшарил диски для специфического юзера и теперь..
umren@chaoslive:~$ sudo mount -t cifs //192.168.5.3/c /mnt/smb -o username=umrenPassword:
umren@chaoslive:~$ df -H -t cifs
Filesystem             Size   Used  Avail Use% Mounted on
//192.168.5.3/c        105G    12G    93G  12% /mnt/smb
umren@chaoslive:~$
Обратите внимание на отсутствие $ в шарах. Возможно это что то связанное с транслитерацией и кодировками. нужно будет еще поломать над этим голову завтра..
ArcFi
Обратите внимание на отсутствие $ в шарах.
Хм… а на win2k-server как раз с $ по дефолту диски монтируются.
AnrDaemon
Обратите внимание на отсутствие $ в шарах.
Хм… а на win2k-server как раз с $ по дефолту диски монтируются.
Дело не в том, откуда, а в том, куда монтируются. Почему-то самба клиент не может административные шары примонтировать.
Хотите получить помощь? Потрудитесь представить запрошенную информацию в полном объёме.
Прежде чем [Отправить], нажми [Просмотр] и прочти собственное сообщение. Сам-то понял, что написал?…
DPACTE
Попробуй так: уменя прокатило
строка из fstab
//192.168.100.6/userdisk /mnt/userdisk cifs iocharset=utf8,username=domaimlogon,password=******* 0 0
и соответственно после загрузки системы все лежит в /mnt/userdisk (можно /media/userdisk но меня первое больше устраивает, и незабудь в /mnt или /media создать соответствующую директорию)
iocharset=utf8 — чтоб с кирилицей норм. дружил
« Последнее редактирование: 16 Марта 2010, 22:42:45 от DPACTE »
только Linux с 15.06.2009 ~г. Ярославль~
- Печать
Страницы: [1] Вверх
In this tutorial, I show you how to fix the Mount CIFS Permission Denied error on Linux.
Table of Contents
- Mount CIFS Permission Denied Error
- Step 1 – Installing CIFS Utils
- Step 2 – Creating a Mount Point
- Step 3 – Editing the fstab file
- Step 4 – Creating the .smbcredentials file
- Step 5 – Mounting the Share
- Wrapping up
⚠️Related Articles
Part 1 – How to install WSL 2 with Windows Terminal – Complete Guide
Part 2 – Windows Terminal Customization for WSL 2
Part 3 – In-Depth Windows Terminal Customization for WSL2
The error occurs mostly because you don’t provide sufficient credential information, specifically which Domain you are in. Most Tutorials out there only mention username and password when editing the .smbcredentials file. But let me take you through the process from the beginning.
Step 1 – Installing CIFS Utils
To mount a CIFS share on Linux, we first need to install cifs-utils. Let’s get started with that.
Code language: JavaScript (javascript)
sudo apt-get install cifs-utils -y
It should probably be pre-installed in most distros anyway.
Step 2 – Creating a Mount Point
Next, we need to create the directory where we want to Mount our Share in. You can later find the Share in this Directory. For this example, we will mount the imaginary “Photos” share.
sudo mkdir /media/share/Photos
Step 3 – Editing the fstab file
That we don’t have to mount our Share again after each reboot, we have to edit the fstab file to make the Share mount automatically after each reboot. But first, we make a backup of this file in case something goes wrong.
sudo cp /etc/fstab /etc/fstab.old
That done, we edit our fstab file.
sudo gedit /etc/fstab
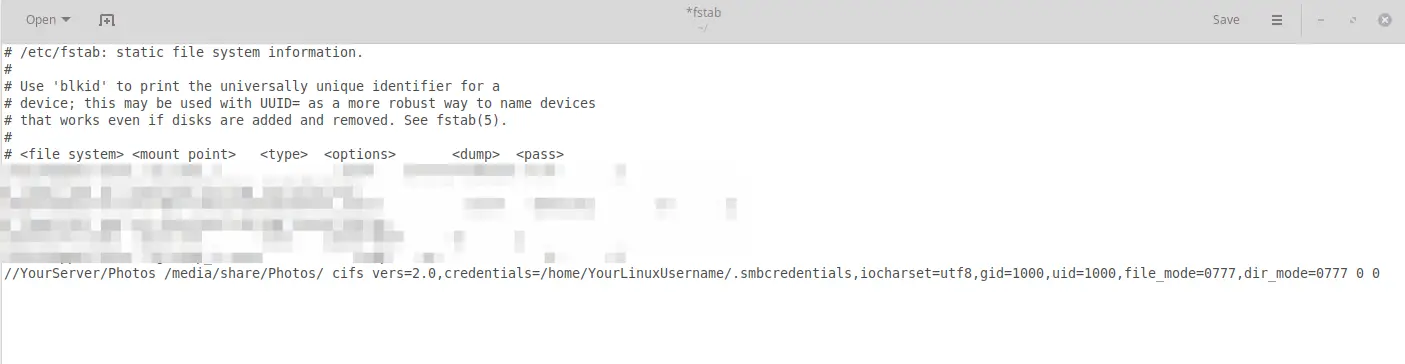
And paste this line at the end of the file (all in one line)
Code language: JSON / JSON with Comments (json)
//YourServer/Photos /media/share/Photos/ cifs vers=2.0,credentials=/home/YourLinuxUsername/.smbcredentials,iocharset=utf8,gid=1000,uid=1000,file_mode=0777,dir_mode=0777 0 0
Of course, adjust accordingly to your own Server and YourLinuxUsername! We will create the .smbcredentials file next.
By default, you will have the gid=1000 and uid=1000. That’s your Group & User ID, but to make sure that those values are the same in your system, double-check it by typing:
id

If all is correct, hit CTRL+S to Save the fstab file and close it.
Step 4 – Creating the .smbcredentials file
We could enter our username directly into our fstab file, but that would not be safe as someone could clearly read our Username and Password in this unencrypted file. Therefore, we are going to create a separate file containing this information.
Code language: CSS (css)
sudo gedit .smbcredentials
And here is the key point to fixing the Mount CIFS Permission Denied error. Most guides simply state to enter Username and Password into this file, but you also have to enter your Domain!
So paste this into your .smbcredentials file:
username=yourusername
password=yourpassword
domain=yourdomain
Save & Close the file.
Now we just make the .smbcredentials file so that only the root user can read its contents.
sudo chmod 600 ~/.smbcredentials
Now when everything is done, try to mount the share by typing
sudo mount -a
And your share should now be successfully mounted! If there are still some errors, try rebooting your system and see again if the Share was mounted. The share should be located in your media/share/Photos folder.
Wrapping up
It took me a while to figure out this error. I use a Synology NAS and had to set vers=2.0 in the fstab file. If you still encounter problems, try changing vers to 1.0 or 3.0. Let me know in the comments below if this solution worked for you!

If you recently updated your RedHat or CentOS 7.6 system, you may suddenly start getting “Permission Denied” errors when attempting to mount SMB shares via CIFS. Typical error messages in syslog look like this:
kernel: Status code returned 0xc000006d STATUS_LOGON_FAILURE
kernel: CIFS VFS: Send error in SessSetup = -13
kernel: CIFS VFS: cifs_mount failed w/return code = -13
Configuration that triggered the problem
- Synology NAS with latest operating system shares a volume via SMB
- CentOS 7 Linux server mounts SMB share using a local username and password (NOT domain credentials)
- cifs-utils version 6.2 installed in May of 2019 (this by itself worked fine)
- libsmbclient just updated to 4.9.1-6
- libmount just updated to 2.23.2-61
- CIFS mount options: vers=3.0,credentials=/root/credentials.txt,sec=ntlmsspi
- File /root/credentials.txt contained a username and password that are LOCAL to the SMB server
Troubleshooting & solution
I was able to isolate the problem to mount.cifs with the following procedure:
- Mount the SMB share from a Windows host, using the same credentials as the Linux host. This proved that the credentials were valid and there were no problems on the SMB server side.
- Access the SMB share from the Linux host using smbclient. This step ruled out any network issues between the Linux and SMB server, and verified that the version of Samba installed on the Linux host was compatible with the SMB server.
I found the solution in a post from a couple of years ago in the askubuntu forum on StackExchange. It seems that one of the recent CentOS/RedHat updates changed some default behavior in the way that mount.cifs authenticates to SMB shares. When authenticating as a local user, you now have to specify the host as the domain. I did this by adding one line to the credentials file that is referenced from /etc/fstab as shown below:
//172.1.1.1/share_name /mnt/mountpoint cifs vers=3.0,credentials=/root/credentials.txt,sec=ntlmsspi
Here are the contents of file /root/credentials.txt:
username=my_username
password=my_password
domain=172.1.1.1
I am not sure why this problem showed up now; it seems like it should have occurred months ago when we updated to latest version of cifs-utils. I’m also unsure if this problem will occur if you’re attempting to authenticate as a domain user. Let me know in the comments!
Содержание
- CentOS
- mount error(13): Permission denied mounting CIFS
- mount error(13): Permission denied mounting CIFS
- Re: mount error(13): Permission denied mounting CIFS
- Re: mount error(13): Permission denied mounting CIFS
- Re: mount error(13): Permission denied mounting CIFS
- Re: mount error(13): Permission denied mounting CIFS
- Re: mount error(13): Permission denied mounting CIFS
- mount error 13 = Permission denied
- 5 Answers 5
- Permissions on credentials file
- Verbose mount
- Check the logs
- Type of security
- Unable to mount CIFS share on Linux: mount error(13): Permission denied (cifs_mount failed w/return code = -13)
- Add a comment
- Comments (newest first)
- Blog Tags:
- Mount CIFS Permission Denied on Linux – Fixed!
- Table of Contents
- Mount CIFS Permission Denied Error
- Step 1 – Installing CIFS Utils
- Step 2 – Creating a Mount Point
- Step 3 – Editing the fstab file
- Step 4 – Creating the .smbcredentials file
- Step 5 – Mounting the Share
- Wrapping up
- mount.cifs error 13 after update (CentOS/RedHat Linux 7.6)
- Configuration that triggered the problem
- Troubleshooting & solution
CentOS
The Community ENTerprise Operating System
mount error(13): Permission denied mounting CIFS
mount error(13): Permission denied mounting CIFS
Post by dadep » 2016/07/20 13:08:48
Hello,
I’m new of this forum and have a problem mounting cifs share (shared by win2003 server) to my test CentOS 7 box.
I have already tried all tips/trick/workaround founded by google but any of these as worked.
My fstab line is the following
//veeamserver/val /winshare cifs sec=ntlm,user,rw,suid,credentials=/root/secret.txt 0 0
credential.txt is
username=MYUSER
password=MYPASSWD
Also mount.cifs //veeamserver/val /winshare not works
smbclient -L veeamserver
and smbclient //veeamserver/val /winshare
are working
I’m working as root.
«mount -a» writes following in /var/log/messages
Jul 20 15:29:44 localhost kernel: Status code returned 0xc000006d NT_STATUS_LOGON_FAILURE
Jul 20 15:29:44 localhost kernel: CIFS VFS: Send error in SessSetup = -13
Jul 20 15:29:44 localhost kernel: CIFS VFS: cifs_mount failed w/return code = -13
Does anyone can help me ?
thanks in advance
Davide
Re: mount error(13): Permission denied mounting CIFS
Post by dadep » 2016/07/20 13:51:55
Have found this https://goo.gl/4HBF1R post
and using sudo (even though I’m working as root) I’m able to manually mount my CIFS share.
sudo mount.cifs //veeamserver/val /winshare -o username=centos,sec=ntlm
Now the questionm is how to make fstab working.
Re: mount error(13): Permission denied mounting CIFS
Post by poky » 2016/07/20 18:22:19
//192.168.x.y/val /winshare cifs auto,_netdev,x-systemd.automount,sec=ntlm,user,rw,suid,credentials=/root/secret.txt 0 0
username=MYUSER
password=MYPASSWD
workgroup=MYWORKGROUPNAME
domain=MYWORKGROUPNAME
This article is a good read:
https://wiki.centos.org/TipsAndTricks/WindowsShares
Re: mount error(13): Permission denied mounting CIFS
Post by dadep » 2016/07/22 07:43:32
Poky,
is not working.
dmesg reports:
Status code returned 0xc000006d NT_STATUS_LOGON_FAILURE
[155434.173507] CIFS VFS: Send error in SessSetup = -13
[155434.173597] CIFS VFS: cifs_mount failed w/return code = -13
Re: mount error(13): Permission denied mounting CIFS
Post by poky » 2016/07/22 20:34:42
Re: mount error(13): Permission denied mounting CIFS
Post by marthyr » 2016/07/30 02:37:00
Источник
mount error 13 = Permission denied
One of my servers is set up to automatically mount a Windows directory using fstab. However, after my last reboot it stopped working. The line in fstab is:
The .Smbcredentials file is:
I do a mount -a and I receive mount error 13 = Permission denied . If I do this enough it will lock out my Windows account, so I know it’s trying. I’ve checked that my password is correct.
What am i doing wrong?
5 Answers 5
A couple of things to check out. I do something similar and you can test mount it directly using the mount command to make sure you have things setup right.
Permissions on credentials file
Make sure that this file is permissioned right.
Verbose mount
You can coax more info out of mount using the -v switch which will often times show you where things are getting tripped up.
Resulting in this output if it works:
Check the logs
After running the above mount command take a look inside your dmesg and /var/log/messages or /var/log/syslog files for any error messages that may have been generated when you attempted the mount .
Type of security
You can pass a lot of extra options via the -o .. switch to mount. These options are technology specific, so in your case they’re applicable to mount.cifs specifically. Take a look at the mount.cifs man page for more on all the options you can pass.
I would suspect you’re missing an option to sec=. . Specifically one of these options:
You may need to adjust the sec=. option so that it’s either sec=ntlm or sec=ntlmssp .
Источник
Published on January 4th 2022 — Listed in Linux Windows Samba
There are a couple of ways how to mount a CIFS/Samba share on a Linux client. However some tutorials are outdated and meanwhile completely wrong. I just ran into a (stupid) case of a wrong mount.cifs syntax:
# mount -t cifs //server/Share /mnt -o rw,user=domainmyuser,password=secret
mount error(13): Permission denied
Refer to the mount.cifs(8) manual page (e.g. man mount.cifs) and kernel log messages (dmesg)
Unfortunately, the additional output in dmesg is not helpful to figure out the problem:
# dmesg
[. ]
[16444886.307684] CIFS: Attempting to mount //server/Share
[16444886.307717] No dialect specified on mount. Default has changed to a more secure dialect, SMB2.1 or later (e.g. SMB3), from CIFS (SMB1). To use the less secure SMB1 dialect to access old servers which do not support SMB3 (or SMB2.1) specify vers=1.0 on mount.
[16444886.539770] Status code returned 0xc000006d STATUS_LOGON_FAILURE
[16444886.539795] CIFS VFS: \server Send error in SessSetup = -13
[16444886.539901] CIFS VFS: cifs_mount failed w/return code = -13
After additional try and errors (and looking up a recent share mount from the history), the problem turned out to be the user=domainmyuser syntax. This way of combining the domain/workgroup and the username is not working (anymore).
Note: Both user= and username= are accepted in the options.
# mount -t cifs «//server/Share» /mnt -o «user=myuser,password=secret,workgroup=DOMAIN»
root@focal:
# ll /mnt/
total 0
drwxr-xr-x 2 root root 0 Sep 1 2020 _Archiv
drwxr-xr-x 2 root root 0 Aug 9 12:10 Client
[..]
This way it worked.
Of course the password should not be used on the command line, so for the final (and automatic) mount of the share use the following entry in /etc/fstab:
# cat /etc/fstab
[. ]
# Mount CIFS share from server
//server/Share /mnt cifs rw,relatime,vers=3.1.1,credentials=/etc/samba/servershare.conf,uid=0 0 0
Where /etc/samba/servershare.conf contains the credentials:
# cat /etc/samba/servershare.conf
user=myuser
password=secret
domain=DOMAIN
ck from Switzerland wrote on Nov 29th, 2022:
Keith, make sure you have the cifs-utils and smbclient packages installed on your Ubuntu. Still an error? Try to connect to the share using the smbclient command. It could also be a SMB protocol mismatch. Check out this article, describing Samba protocol configuration on the client.
Keith from United States wrote on Nov 29th, 2022:
I’ve tried for the past 3 hours, 5AM in the morning now, and I’ve tried everything from every other website and this one and still get the exact same errors. Tried it with just sudo, then root. Same thing. Host OS is ubuntu server trying to mount a network share from my Synology NAS.
AJav from wrote on Sep 19th, 2022:
very good, Thanks !
simonpunk2016 from wrote on Aug 1st, 2022:
Thank you sir, never know the mount option has changed, because I just successfully mounted the cifs last month, thought my Manjaro has come to an end.
simonpunk2016 from wrote on Jul 29th, 2022:
Thank you sir, never know the mount option has changed, because I just successfully mounted the cifs last month, thought my Manjaro has come to an end.
Jesko from wrote on Feb 10th, 2022:
I had exact the same error, but different reason. On a freshly installed (old) Ubuntu 16.04 LTS (last 32Bit version). My reason was: There was no cifs-utils installed! so «sudo apt install cifs-utils» was the solution. I just write here because I crawled through hundreds of comments.

Blog Tags:
© 2008 — 2023 by Claudio Kuenzler. Powered by  .
.
Источник
Mount CIFS Permission Denied on Linux – Fixed!
In this tutorial, I show you how to fix the Mount CIFS Permission Denied error on Linux.
Table of Contents
Please enable JavaScript
Mount CIFS Permission Denied Error
The error occurs mostly because you don’t provide sufficient credential information, specifically which Domain you are in. Most Tutorials out there only mention username and password when editing the .smbcredentials file. But let me take you through the process from the beginning.
Step 1 – Installing CIFS Utils
To mount a CIFS share on Linux, we first need to install cifs-utils. Let’s get started with that.
It should probably be pre-installed in most distros anyway.
Step 2 – Creating a Mount Point
Next, we need to create the directory where we want to Mount our Share in. You can later find the Share in this Directory. For this example, we will mount the imaginary “Photos” share.
Step 3 – Editing the fstab file
That we don’t have to mount our Share again after each reboot, we have to edit the fstab file to make the Share mount automatically after each reboot. But first, we make a backup of this file in case something goes wrong.
That done, we edit our fstab file.
And paste this line at the end of the file (all in one line)
Of course, adjust accordingly to your own Server and YourLinuxUsername! We will create the .smbcredentials file next.
By default, you will have the gid=1000 and uid=1000. That’s your Group & User ID, but to make sure that those values are the same in your system, double-check it by typing:
If all is correct, hit CTRL+S to Save the fstab file and close it.
Step 4 – Creating the .smbcredentials file
We could enter our username directly into our fstab file, but that would not be safe as someone could clearly read our Username and Password in this unencrypted file. Therefore, we are going to create a separate file containing this information.
And here is the key point to fixing the Mount CIFS Permission Denied error. Most guides simply state to enter Username and Password into this file, but you also have to enter your Domain!
So paste this into your .smbcredentials file:
Save & Close the file.
Now we just make the .smbcredentials file so that only the root user can read its contents.
Now when everything is done, try to mount the share by typing
And your share should now be successfully mounted! If there are still some errors, try rebooting your system and see again if the Share was mounted. The share should be located in your media/share/Photos folder.
Wrapping up
It took me a while to figure out this error. I use a Synology NAS and had to set vers=2.0 in the fstab file. If you still encounter problems, try changing vers to 1.0 or 3.0. Let me know in the comments below if this solution worked for you!
Источник
mount.cifs error 13 after update (CentOS/RedHat Linux 7.6)
If you recently updated your RedHat or CentOS 7.6 system, you may suddenly start getting “Permission Denied” errors when attempting to mount SMB shares via CIFS. Typical error messages in syslog look like this:
Configuration that triggered the problem
- Synology NAS with latest operating system shares a volume via SMB
- CentOS 7 Linux server mounts SMB share using a local username and password (NOT domain credentials)
- cifs-utils version 6.2 installed in May of 2019 (this by itself worked fine)
- libsmbclient just updated to 4.9.1-6
- libmount just updated to 2.23.2-61
- CIFS mount options: vers=3.0,credentials=/root/credentials.txt,sec=ntlmsspi
- File /root/credentials.txt contained a username and password that are LOCAL to the SMB server
Troubleshooting & solution
I was able to isolate the problem to mount.cifs with the following procedure:
- Mount the SMB share from a Windows host, using the same credentials as the Linux host. This proved that the credentials were valid and there were no problems on the SMB server side.
- Access the SMB share from the Linux host using smbclient. This step ruled out any network issues between the Linux and SMB server, and verified that the version of Samba installed on the Linux host was compatible with the SMB server.
I found the solution in a post from a couple of years ago in the askubuntu forum on StackExchange. It seems that one of the recent CentOS/RedHat updates changed some default behavior in the way that mount.cifs authenticates to SMB shares. When authenticating as a local user, you now have to specify the host as the domain. I did this by adding one line to the credentials file that is referenced from /etc/fstab as shown below:
Here are the contents of file /root/credentials.txt :
I am not sure why this problem showed up now; it seems like it should have occurred months ago when we updated to latest version of cifs-utils. I’m also unsure if this problem will occur if you’re attempting to authenticate as a domain user. Let me know in the comments!
Источник
- Forum
- The Ubuntu Forum Community
- Ubuntu Specialised Support
- Ubuntu Servers, Cloud and Juju
- Server Platforms
- Samba mount error (13): Permission Denied despite everything seeming correct

-
Samba mount error (13): Permission Denied despite everything seeming correct
I have an issue with samba not letting me mount a share which exists on my server. I am trying to mount the share «Odin» on a VM inside Proxmox. As the title suggests the error is (13) permission denied and this seems to be whether I try to use a guest log on or a specific user. I have looked at various suggestions relating to changing the type of security, etc none of which seem to make any difference. I am slightly at a loss of what to do so any help would be appreciated.
The command I am using to mount the share is
Code:
mount -t cifs //192.168.1.200/Odin /mnt -o guest
and this works from the server but not the client (i.e. the server can mount its own share but the client can’t mount the server’s share). This makes me think Samba itself is configured correctly but something else is causing the problem.
-
Re: Samba mount error (13): Permission Denied despite everything seeming correct
Originally Posted by perrti02
I have an issue with samba not letting me mount a share which exists on my server. I am trying to mount the share «Odin» on a VM inside Proxmox. As the title suggests the error is (13) permission denied and this seems to be whether I try to use a guest log on or a specific user. I have looked at various suggestions relating to changing the type of security, etc none of which seem to make any difference. I am slightly at a loss of what to do so any help would be appreciated.
The command I am using to mount the share is
Code:
mount -t cifs //192.168.1.200/Odin /mnt -o guest
and this works from the server but not the client (i.e. the server can mount its own share but the client can’t mount the server’s share). This makes me think Samba itself is configured correctly but something else is causing the problem.
Are you issuing this command as root (via sudo)? Does the client have the package cifs-utils installed?
-BAB1
-
Re: Samba mount error (13): Permission Denied despite everything seeming correct
Add the -v option to your mount command so that we’ll see a verbose output:
Code:
sudo mount -vt //192.168.1.200/Odin /mnt -o guest
Also, try not to mount as guest ( just to make sure that the network and that samba is working properly).
Code:
sudo mount -vt //192.168.1.200/Odin /mnt -o user=admin,pass=adminpassword
-
Re: Samba mount error (13): Permission Denied despite everything seeming correct
Check to see if the system you are mounting to uses ntlm or ntlmssp in the encryption method used in the passing of credentials. This new option change happened in mount.cifs about a year ago…
For example, if one or the other, then what nerdtron suggested would change to something similar to:
Code:
sudo mount -vt //192.168.1.200/Odin /mnt -o user=admin,pass=adminpassword,sec=ntlm
Next, you didn’t say what the virtualized guest was that is hosting the share. If either Windows or a Samba share, and it works with a privileged local user and their credentials, then check the options on permissions of Guest. It could be marked as Shared, but not accessible by Guest.
Last edited by MAFoElffen; February 12th, 2016 at 02:49 PM.
-
Re: Samba mount error (13): Permission Denied despite everything seeming correct
I am logged in as root so the client does have the required privileges. I have also made sure that cifs-utils is installed and is up to date.
The client is Ubuntu 15.04 server.
I have run the command again with a specific user and the result is as follows.
Code:
root@plex:/etc/samba# mount -vt cifs //192.168.1.200/Odin /mnt -o user=odin,pass=password,sec=ntlmpss
mount.cifs kernel  mount options: ip=192.168.1.200,unc=\192.168.1.200Odin,sec=ntlmpss,user=odin,pass=********
mount error(13): Permission denied
 Refer to the mount.cifs(8) manual page (e.g. man mount.cifs)
I get the same results without specifying the security of specifying sec=ntlm.
The user «odin» can mount the share if the command is run from the server itself so I know the password is correct and the permissions are correct.
-
Re: Samba mount error (13): Permission Denied despite everything seeming correct
First, we are all fishing in the dark unless you post the global section and the share section of your smb.conf, so we can take a look at the settings.
Second, if trying to use the odin user have you added it as samba user? Can you try doing that? It would be something like:
Code:
sudo smbpasswd -a odin
Enter its password if prompted. Then try again. Is the share configured to have odin in the allowed users?
Accessing as guest should work if your settings are correct (hence I mentioned posting the smb.conf relevant parts).
Apart from the above, if this share is mostly to be used with a linux client, you can consider using something like nfs or even iscsi. Samba shares are mostly for use with windows clients. I might be wrong, but I think nfs or iscsi would give you much better performance and are more common if the client is also running linux. But that’s moving the topic to another direction…
Last edited by darkod; February 13th, 2016 at 05:35 PM.
Darko.
————————————————————————
Ubuntu 18.04 LTS 64bit
-
Re: Samba mount error (13): Permission Denied despite everything seeming correct
The smb.conf is as follows
Code:
# This is the main Samba configuration file. You should read the# smb.conf(5) manual page in order to understand the options listed
# here. Samba has a huge number of configurable options (perhaps too
# many!) most of which are not shown in this example
#
# Any line which starts with a ; (semi-colon) or a # (hash)
# is a comment and is ignored. In this example we will use a #
# for commentry and a ; for parts of the config file that you
# may wish to enable
#
# NOTE: Whenever you modify this file you should run the command "testparm"
# to check that you have not many any basic syntactic errors.
#
#======================= Global Settings =====================================
[global]


# workgroup = NT-Domain-Name or Workgroup-Name, eg: REDHAT4
   workgroup = WORKGROUP


# server string is the equivalent of the NT Description field
   server string = Samba Server


# This option is important for security. It allows you to restrict
# connections to machines which are on your local network. The
# following example restricts access to two C class networks and
# the "loopback" interface. For more examples of the syntax see
# the smb.conf man page
   hosts allow = 192.168.1. 127.


# If you want to automatically load your printer list rather
# than setting them up individually then you'll need this
   load printers = yes
   printing = cups
   rpc_server:spoolss = external
   rpc_daemon:spoolssd = fork


# you may wish to override the location of the printcap file
   printcap name = cups


# on SystemV system setting printcap name to lpstat should allow
# you to automatically obtain a printer list from the SystemV spool
# system
;   printcap name = lpstat


# It should not be necessary to specify the print system type unless
# it is non-standard. Currently supported print systems include:
# bsd, sysv, plp, lprng, aix, hpux, qnx
;   printing = bsd


# Uncomment this if you want a guest account, you must add this to /etc/passwd
# otherwise the user "nobody" is used
;  guest account = pcguest


# this tells Samba to use a separate log file for each machine
# that connects
   log file = /usr/local/samba/var/log.%m


# Put a capping on the size of the log files (in Kb).
   max log size = 50


# Security mode. Most people will want user level security. See
# security_level.txt for details.
   security = user


# Use password server option only with security = server
# The argument list may include:
#   password server = My_PDC_Name [My_BDC_Name] [My_Next_BDC_Name]
# or to auto-locate the domain controller/s
#   password server = *
;   password server = <NT-Server-Name>


# Note: Do NOT use the now deprecated option of "domain controller"
# This option is no longer implemented.


# You may wish to use password encryption. Please read
# ENCRYPTION.txt, Win95.txt and WinNT.txt in the Samba documentation.
# Do not enable this option unless you have read those documents
encrypt passwords = yes


# Using the following line enables you to customise your configuration
# on a per machine basis. The %m gets replaced with the netbios name
# of the machine that is connecting
;   include = /usr/local/samba/lib/smb.conf.%m


# Most people will find that this option gives better performance.
# See speed.txt and the manual pages for details
# You may want to add the following on a Linux system:
#         SO_RCVBUF=8192 SO_SNDBUF=8192
   socket options = TCP_NODELAY


# Configure Samba to use multiple interfaces
# If you have multiple network interfaces then you must list them
# here. See the man page for details.
;   interfaces = 192.168.12.2/24 192.168.13.2/24


# Browser Control Options:
# set local master to no if you don't want Samba to become a master
# browser on your network. Otherwise the normal election rules apply
   local master = yes


# OS Level determines the precedence of this server in master browser
# elections. The default value should be reasonable
;   os level = 33


# Domain Master specifies Samba to be the Domain Master Browser. This
# allows Samba to collate browse lists between subnets. Don't use this
# if you already have a Windows NT domain controller doing this job
;   domain master = yes


# Preferred Master causes Samba to force a local browser election on startup
# and gives it a slightly higher chance of winning the election
   preferred master = yes


# Enable this if you want Samba to be a domain logon server for
# Windows95 workstations.
;   domain logons = yes


# if you enable domain logons then you may want a per-machine or
# per user logon script
# run a specific logon batch file per workstation (machine)
;   logon script = %m.bat
# run a specific logon batch file per username
;   logon script = %U.bat


# Where to store roving profiles (only for Win95 and WinNT)
#        %L substitutes for this servers netbios name, %U is username
#        You must uncomment the [Profiles] share below
;   logon path = \%LProfiles%U


# Windows Internet Name Serving Support Section:
# WINS Support - Tells the NMBD component of Samba to enable it's WINS Server
   wins support = yes


# WINS Server - Tells the NMBD components of Samba to be a WINS Client
#	Note: Samba can be either a WINS Server, or a WINS Client, but NOT both
;   wins server = w.x.y.z


# WINS Proxy - Tells Samba to answer name resolution queries on
# behalf of a non WINS capable client, for this to work there must be
# at least one	WINS Server on the network. The default is NO.
;   wins proxy = yes


# DNS Proxy - tells Samba whether or not to try to resolve NetBIOS names
# via DNS nslookups. The built-in default for versions 1.9.17 is yes,
# this has been changed in version 1.9.18 to no.
   dns proxy = no


   map to guest = bad user


#============================ Share Definitions ==============================
[homes]
   comment = Home Directories
   browseable = no
   writable = yes


# Un-comment the following and create the netlogon directory for Domain Logons
; [netlogon]
;   comment = Network Logon Service
;   path = /usr/local/samba/lib/netlogon
;   guest ok = yes
;   writable = no
;   share modes = no


# Un-comment the following to provide a specific roving profile share
# the default is to use the user's home directory
;[Profiles]
;    path = /usr/local/samba/profiles
;    browseable = no
;    guest ok = yes


# NOTE: If you have a BSD-style print system there is no need to
# specifically define each individual printer
;[printers]
;   comment = All Printers
;   path = /usr/spool/samba
;   browseable = yes
# Set public = yes to allow user 'guest account' to print
;   guest ok = no
;   writable = no
;   printable = yes


# This one is useful for people to share files
;[tmp]
;   comment = Temporary file space
;   path = /tmp
;   read only = no
;   public = yes


# A publicly accessible directory, but read only, except for people in
# the "staff" group
;[public]
;   comment = Public Stuff
;   path = /home/samba
;   public = yes
;   writable = yes
;   printable = no
;   write list = @staff


# Other examples.
#
# A private printer, usable only by fred. Spool data will be placed in fred's
# home directory. Note that fred must have write access to the spool directory,
# wherever it is.
;[fredsprn]
;   comment = Fred's Printer
;   valid users = fred
;   path = /homes/fred
;   printer = freds_printer
;   public = no
;   writable = no
;   printable = yes


# A private directory, usable only by fred. Note that fred requires write
# access to the directory.
;[fredsdir]
;   comment = Fred's Service
;   path = /usr/somewhere/private
;   valid users = fred
;   public = no
;   writable = yes
;   printable = no


# a service which has a different directory for each machine that connects
# this allows you to tailor configurations to incoming machines. You could
# also use the %U option to tailor it by user name.
# The %m gets replaced with the machine name that is connecting.
;[pchome]
;  comment = PC Directories
;  path = /usr/pc/%m
;  public = no
;  writable = yes


# A publicly accessible directory, read/write to all users. Note that all files
# created in the directory by users will be owned by the default user, so
# any user with access can delete any other user's files. Obviously this
# directory must be writable by the default user. Another user could of course
# be specified, in which case all files would be owned by that user instead.
;[public]
;   path = /usr/somewhere/else/public
;   public = yes
;   only guest = yes
;   writable = yes
;   printable = no


# The following two entries demonstrate how to share a directory so that two
# users can place files there that will be owned by the specific users. In this
# setup, the directory should be writable by both users and should have the
# sticky bit set on it to prevent abuse. Obviously this could be extended to
# as many users as required.
;[myshare]
;   comment = Mary's and Fred's stuff
;   path = /usr/somewhere/shared
;   valid users = mary fred
;   public = no
;   writable = yes
;   printable = no
;   create mask = 0765


[printers]
  comment = All Printers
  browseable = yes
  path = /var/spool/samba
  printable = yes
  guest ok = yes
  read only = yes
  create mask = 0700


[print$]
  comment = Print Drivers
  path = /var/lib/samba/printers
  browseable = yes
  read only = yes
  guest ok = yes


[Media]
   comment = media on odin
   path = /srv/samba/Odin/Media
   valid users = odin
   writable = yes
   browseable = yes


[Downloads]
   comment = Downloads on Odin
   path = /srv/samba/Odin/Downloads
   valid users = odin
   writeable = yes
   browseable = yes


[Odin]
   comment = All files on Odin
   path = /srv/samba/Odin
   guest ok = yes
   guest account = odin
   writeable = yes
   browseable = yes


[TimeMachine]
   comment = Time Machine backup
   path = /srv/samba/Odin/TimeMachine
   valid users = odin
   writeable = yes
   browseable = yes


[test]
   comment = test
   path = /srv/samba/Odin
   guest ok = yes
   force user = odin
I have run the smbpasswd command and set the password as «password» in the past. As far as I can tell the odin user is one of the allowed users but I don’t know how to check. I can use this server from other machines running Windows or OS X but Ubuntu seems not to work. I did also try NFS which seems to give similar results. It seems to be set up correctly but fails to connect. I don’t know if this is related problem or whether I just don’t know how to set up either.
-
Re: Samba mount error (13): Permission Denied despite everything seeming correct
I see you have three shares inside the Odin folder, which makes them inside the Odin share. I am no samba expert, I guess this should work, but still I wouldn’t create the Odin share and then three more shares inside it. Either have only the Odin share and then you can browse to any subfolder as needed, or have the three shares and delete the Odin share. Not one within another.
But for a quick test, leave them be right now. Lets test with your test share (at the end of the smb.conf). From the test share definition remove the force user = odin. Also in the global section, switch the security = user option to security = share. Restart the smbd and nmbd services.
Try to mount the //192.168.1.200/test as guest. See if that works out.
Also, you should clear out your smb.conf a bit. No need to leave all those default options and comments if you are not using many of them. You can still keep an original copy of the file, but the smb.conf should be little bit cleaner so that you can spot things much more easily. But that is also not relevant right now, leave it for later…
Try the above test and let us know.
Darko.
————————————————————————
Ubuntu 18.04 LTS 64bit
-
Re: Samba mount error (13): Permission Denied despite everything seeming correct
I have made the changes as specified with no change. The output is as follows:
Code:
root@plex:/etc/samba# mount -vt cifs //192.168.1.200/test /mnt -o guest
mount.cifs kernel mount options: ip=192.168.1.200,unc=\192.168.1.200test,user=,pass=********
mount error(13): Permission denied
Refer to the mount.cifs(8) manual page (e.g. man mount.cifs)
-
Re: Samba mount error (13): Permission Denied despite everything seeming correct
It shouldn’t be the issue but just to check linux file permissions post the output of:
Code:
cd /srv/samba
ls -l
Darko.
————————————————————————
Ubuntu 18.04 LTS 64bit

