Данная статья является частью цикла статей «Ableton Live»
Если при загрузке Live сета его Live клипы или пресеты ссылаются на файлы, которые отсутствуют в месте куда происходит ссылка, то в строке состояния Live (находится в нижней части главного экрана) появится предупреждающее сообщение. Клипы и слоты сэмплов у инструментов которые ссылаются на отсутствующие сэмплы, будут отображаться как Offline (выключенные), и вместо отсутствующих сэмплов, Live будет воспроизводить тишину.
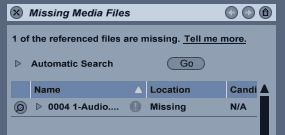
Менеджер файлов Live предоставляет инструменты для исправления этих недостающих ссылок. Чтобы получить к ним доступ нажмите по сообщению в строке состояния. (На самом деле это ярлык для выбора команды Manage Files из меню File, нажмите на кнопку Manage Set, а затем кнопку Locate расположенную в разделе Missing Files (отсутствующие файлы)). Менеджер файлов предоставит список отсутствующих файлов и соответствующие элементы для управления.
Список отсутствующих файлов в менеджере файлов
Ручное восстановление[править]
Чтобы вручную исправить сломанную ссылку на файл, найдите недостающие файлы в браузере, а затем перетащите их в менеджер файлов на соответствующие строки в списке отсутствующих файлов. Обратите внимание, что Live будет всё равно, действительно ли это тот самый отсутствующий файл.
Автоматическое восстановление[править]
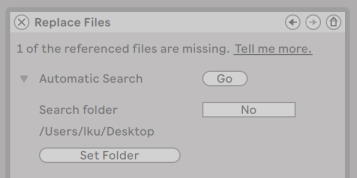
Для восстановление ссылок на файлы Live предлагает удобную функцию автоматического поиска. Чтобы Live отправился в поиск, нажмите кнопку Go в разделе Automatic Search (автоматический поиск). Для раскрытия подробных опций автоматического поиска, нажмите на соседнюю кнопку треугольной формы.
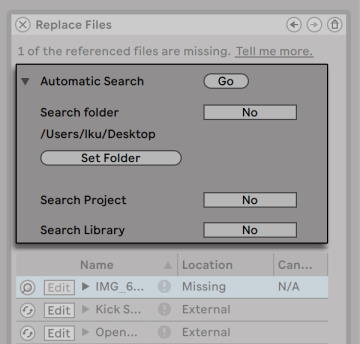
Опции автоматического восстановления в менеджере файлов
- Search Folder (поиск в папке) — включает поиск в определённой пользователем папке, а также во всех вложенных папках. Чтобы выбрать папку, нажмите на соответствующую кнопку Set Folder (установить папку).
- Search Project (поиск в проекте) — включает поиск в папке проекта этого сета.
- Search Library (поиск в библиотеке) — включает поиск в библиотеке Live.
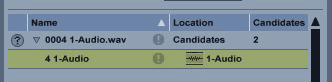
Для каждого недостающего файла, функция автоматического поиска может найти любое количество кандидатов. Давайте рассмотрим следующие случаи:
- Ни один из кандидатов не найден — вы можете выбрать другую папку, и попробовать снова, или найти сэмпл вручную.
- Найден один кандидат — Live принимает кандидата и считает, что проблема решена.
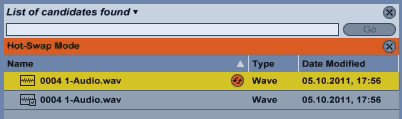
- Найдено несколько кандидатов — Live-у требуется ваша помощь: Нажмите кнопку горячей замены (т.е. левый элемент в каждой строке списка отсутствующих файлов), чтобы получить браузер предоставляющий кандидатов в режиме горячей замены. Теперь вы можете дважды щёлкнуть по кандидатам в браузере файлов, чтобы загрузить их, во время проигрывания музыки, если вам так нравится.
![]()
![]()
-
aratunes
- Posts: 76
- Joined: Thu Oct 10, 2013 7:17 pm
samples offline- any solutions?
Hi,
Say you had an acapella and put it in the arrangement view.
You chopped it all up, taking various pieces and slices with ‘split clip- command e»
When you reopen the set the little samples are missing or offline. Possibly a collect all and save failure, but not sure
Is it possible to load the original sample and have the set know what to reference?
Could you open a new set with the full sample and then copy the pieces into it?
Is there a solution using the add folder in the browser?
Thanks, Ara
-
Angstrom
- Posts: 14841
- Joined: Mon Oct 04, 2004 2:22 pm
- Contact:
Re: samples offline- any solutions?
Post
by Angstrom » Tue Jan 17, 2017 12:35 am
if you split the clip with command e , then each clip is just references to the original wave file. If did not do any destructive edit to those clips like consolidate or «crop clips» then the original wave file is wherever you last put it.
File -> Manage Files -> Manage Set -> View files
it will show the missing file
now hover over the word «external» and it will tell you where it thinks that file should be
if you deleted that file you need to get it again, and put it somewhere safe, then hit the hotswap button on the missing file
-
PG_1111
- Posts: 1
- Joined: Mon Nov 25, 2019 11:24 pm
Re: samples offline- any solutions?
Post
by PG_1111 » Mon Nov 25, 2019 11:25 pm
Where is the hot swap button?
-
Josh_Cunningham
- Posts: 1
- Joined: Mon May 25, 2020 5:58 pm
Re: samples offline- any solutions?
Post
by Josh_Cunningham » Mon May 25, 2020 6:07 pm
I had this problem when I archived a project into a zip file and then restored it. When I opened the set, all the samples showed offline. What I did to fix it is go to File>Manage Files>Manage Set>View Files. This will show all your missing files.
Next, open the file window on your computer where you keep your project saved. Drag the project folder into Ableton under the Ableton Browser on the left side of the screen under the «Places» section.
Your missing files should still be listed on the right side of the screen. Click the magnifying glass icon next to a missing file and it should now be able to find it in your Ableton Browser. Click the files in the browser and it will prompt you to automatically search for all the missing files. This should load all your offline samples. For me, there were a few that weren’t caught in the autosearch, but I was able to go one-by-one and find them.
-
Eric DeHaeseleer
- Posts: 1
- Joined: Sun Jul 05, 2020 5:43 am
Re: samples offline- any solutions?
Post
by Eric DeHaeseleer » Sun Jul 05, 2020 5:57 am
Josh_Cunningham wrote: ↑
Mon May 25, 2020 6:07 pm
I had this problem when I archived a project into a zip file and then restored it. When I opened the set, all the samples showed offline. What I did to fix it is go to File>Manage Files>Manage Set>View Files. This will show all your missing files.Next, open the file window on your computer where you keep your project saved. Drag the project folder into Ableton under the Ableton Browser on the left side of the screen under the «Places» section.
Your missing files should still be listed on the right side of the screen. Click the magnifying glass icon next to a missing file and it should now be able to find it in your Ableton Browser. Click the files in the browser and it will prompt you to automatically search for all the missing files. This should load all your offline samples. For me, there were a few that weren’t caught in the autosearch, but I was able to go one-by-one and find them.
Dude you freaking saved me. I thought my two projects that I had spent a MONTH on were gone. Thank you so much for sharing this fix
-
auddio duck
- Posts: 1
- Joined: Sun Sep 20, 2020 12:56 pm
Re: samples offline- any solutions?
Post
by auddio duck » Sun Sep 20, 2020 12:57 pm
Next, open the file window on your computer where you keep your project saved. Drag the project folder into Ableton under the Ableton Browser on the left side of the screen under the «Places» section
Can you elaborate on this please? I use a Mac. Im not sure which file window your referring to. Also im having trouble locating the places section your referring to. Thank you. Please help.
-
ozeebaby
- Posts: 1
- Joined: Sat Sep 26, 2020 11:28 am
Re: samples offline- any solutions?
Post
by ozeebaby » Sat Sep 26, 2020 11:31 am
Eric DeHaeseleer wrote: ↑
Sun Jul 05, 2020 5:57 am
Josh_Cunningham wrote: ↑
Mon May 25, 2020 6:07 pm
I had this problem when I archived a project into a zip file and then restored it. When I opened the set, all the samples showed offline. What I did to fix it is go to File>Manage Files>Manage Set>View Files. This will show all your missing files.Next, open the file window on your computer where you keep your project saved. Drag the project folder into Ableton under the Ableton Browser on the left side of the screen under the «Places» section.
Your missing files should still be listed on the right side of the screen. Click the magnifying glass icon next to a missing file and it should now be able to find it in your Ableton Browser. Click the files in the browser and it will prompt you to automatically search for all the missing files. This should load all your offline samples. For me, there were a few that weren’t caught in the autosearch, but I was able to go one-by-one and find them.
Dude you freaking saved me. I thought my two projects that I had spent a MONTH on were gone. Thank you so much for sharing this fix
This is perfect — thanks guys. I installed a plugin to add distortion onto my guitar and when I saved it, the crash occured and I lost everything. I did exactly what you said and all the «sample offline» files just came back…so happy. I have made multiple back ups now. On another note, is this normal? For plugins to cause crashes?!
-
Leemoss
- Posts: 1
- Joined: Fri Sep 03, 2021 12:15 pm
Re: samples offline- any solutions?
Post
by Leemoss » Fri Sep 03, 2021 12:16 pm
Josh_Cunningham wrote: ↑
Mon May 25, 2020 6:07 pm
I had this problem when I archived a project into a zip file and then restored it. When I opened the set, all the samples showed offline. What I did to fix it is go to File>Manage Files>Manage Set>View Files. This will show all your missing files.Next, open the file window on your computer where you keep your project saved. Drag the project folder into Ableton under the Ableton Browser on the left side of the screen under the «Places» section.
Your missing files should still be listed on the right side of the screen. Click the magnifying glass icon next to a missing file and it should now be able to find it in your Ableton Browser. Click the files in the browser and it will prompt you to automatically search for all the missing files. This should load all your offline samples. For me, there were a few that weren’t caught in the autosearch, but I was able to go one-by-one and find them.
THANK YOU SO MUCH haha absolute legend. Saved my ass
One of the great mysteries for anyone involved in music production is when samples seem to inexplicably disappear from a Live set when using Ableton.
If this happens to you, do not fear.
In this article, I explain how to activate offline samples in Ableton, so you can rest easy, knowing your samples are safe and sound.
Step 1: Identify The Offline Sample
Imagine this: you sit down at your computer and eagerly open a Live set in a moment of inspiration. You know that you’re going to finally finish the song that you have been working on for months, and it is going to be a banger!
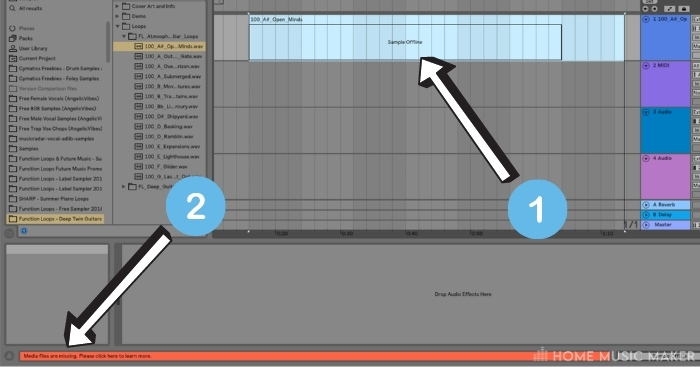
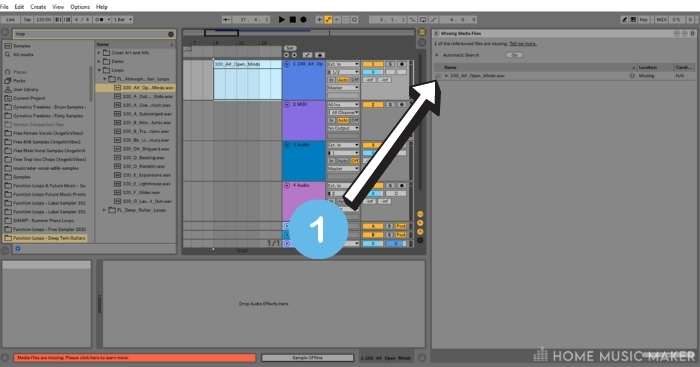
The Live set opens, and you discover on an instrument track that an audio sample of that instrument is showing as ‘Sample Offline (1).’
What does that even mean, you wonder?
Essentially, Ableton has lost track of the sound file.
If you look to the bottom of your DAW, it says that your “Media Files Are Missing (2)”.
So how do we retrieve the audio file?
Step 2: Click On The Text In That Orange Bar
Ultimately, the audio file should still be in the project folder.
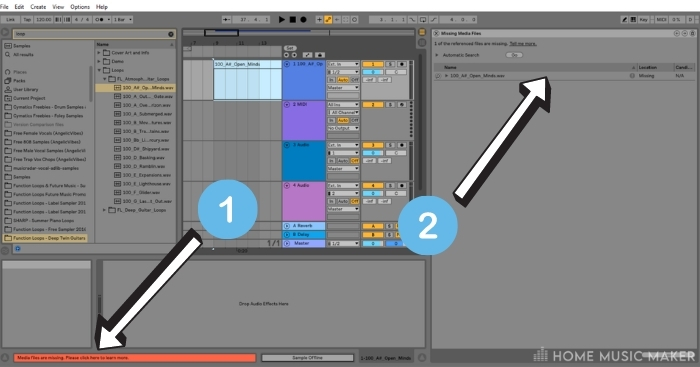
Left-click on the text (i.e., words) in the orange bar, where it says, ‘Please click here to learn more (1).’
Once you click on the text, a window will appear to the right of the screen.
Here you will find the name of the missing file and the location, which will appear as ‘Missing,’ (2) which isn’t very helpful…
Step 3: Click On The Little Magnifying Glass
See that tiny little magnifying glass icon next to the file name?
Go ahead and left-click on it (1).
Once you have clicked on the magnifying glass, you will activate the Hot-Swap mode (2), which will appear on the left of your DAW.
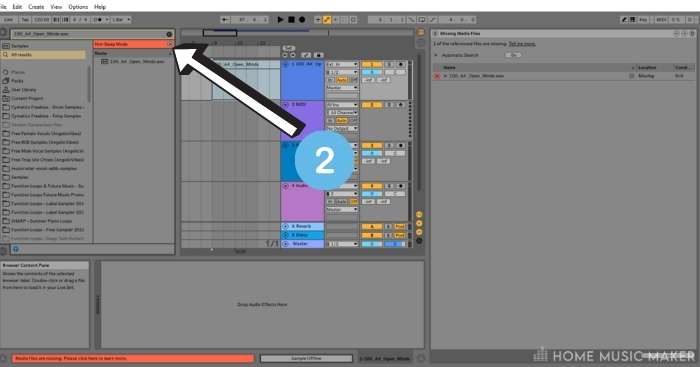
Here you should see the name of the missing file for your missing sound listed.
Step 4: Double-Click On The File In Hot-Swap Mode
Precisely as the header says, go ahead and double-left-click on the file name in the Hot Swap mode.
The next step is simple: double-left-click on the file name in the Hot Swap mode.
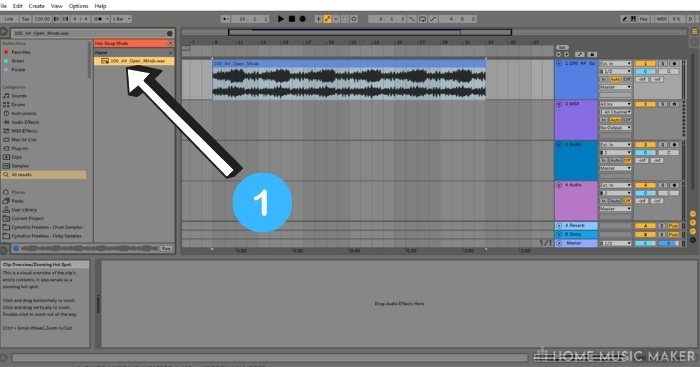
Once you have done that, the file will be uploaded to where it was initially before it mysteriously went missing.
That’s it. nice and simple!
What does it mean when a sample is offline on Ableton?
It means that the original file is missing. Follow the steps provided above to recover the missing file
How do you recover Ableton files?
Follow the steps here to recover a file in Ableton. However, if the previous actions do not help you recover the missing file, you may need to search for your sample on your hard drive. To do that, identify roughly where your sample folder is that Ableton is mapped to. That will be the folder where you copy your sample packs too. Search for the file name in that folder or its parent folder (if there is one). If that does not work, search more broadly on your computer or USB drive if attached until you find it, or download the sample again and put it somewhere you can find it. Then, in Ableton Live, scroll to the bottom of the packs’ files on the left side of the DAW to where it says ‘Add Folder’ – click on that, find the folder with your sample in it, then click Select Folder. This will migrate your sample into Ableton Live. Then, follow the steps above to recover the file or drag and drop the sample to the offline sample.
Where are your samples in Ableton?
It is wherever you download your samples to, i.e., the sample library. I find it helps to keep the sample library in the same directory as other Ableton folders, such as VSTs, etc. Make sure that it is clearly labeled as a sample library to make it easier to find.
Why do media files go missing in Ableton?
There are several possible reasons. You could have the sample stored on an external hard drive or USB dongle that has been disconnected or on a cloud platform when your internet connection has dropped out. Saving multiple Live sets in a set folder can cause this issue too.
How do you fix missing media in Ableton?
Follow the steps above or the points in the second FAQ, i.e., How do you recover Ableton files?
Ever seen the message that media files were missing?
Honestly, rarely. This is an issue that I have only really encountered when migrating files from a Live set to another computer or location, such as an external hard drive.
How do you replace missing files?
By using the Hot-Swap mode, as detailed in the steps above
If you’d like to learn some more, click here for a guide on how to trigger samples in Ableton.
-
December 4, 2012 -
February 9, 2023 -
Ableton Live Tutorials
-
tutorial
-
21 Comments
Ever seen the message that media files were missing?

When you make music you want to be sure that none of your audio samples are missing. Ableton Live – just as other DAWs – only references those audio files. This means they are not included in the als-file of the Live Set, but only linked. If you add samples from a USB stick or elsewhere on your hard drive, Live will only save the information of the file path into your Live Set. So if you delete, rename or move those files or unplug the USB stick you’ll get the following message at the bottom of Live:
![]()
This tutorial shows how to avoid the ‘Media files are missing’ message and how to locate missing samples:
- It’s best if you create a dedicated folder in which you want to save all your own musical work, e.g. ‘My own songs’.
- When saving a new song/track for the first time, make sure you choose ‘My own songs’ as the location and not another Live Project folder or even worse, the Live Library. Live will show you the project folder of the last Live Set you had saved so you’ll have to browse to ‘My own songs’.
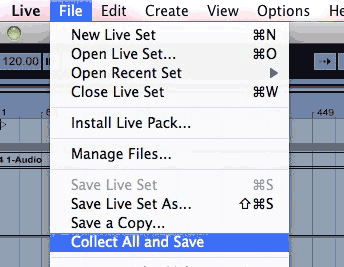
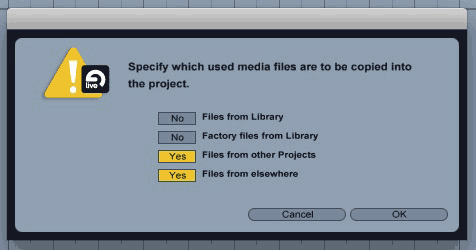
- Choose ‘Collect All and Save’ from the File Menu.

- A pop-up window opens and you can choose which files should be copied into the Samples folder of your Live Project. Generally you don’t need to copy content from the Library unless you used clips you had saved there yourself before.

Do this whenever you have added audio files from elsewhere. When recording audio within Live, the files will automatically be saved in the Samples folder of your Live Project.
Now let’s say you are collaborating on a song with a friend and therefore want to give them the Live Set to work on. All you need to do is copy the whole Live Project folder and give it to your mate. Since the Samples folder is contained in it, they will have no trouble with missing samples.
So what if you already have a Live Set displaying ‘Media files are missing?’
- Load the Live Set and click on the message shown at the bottom of Live. This will open the File Manager in a panel on the right.
- You can try the Automatic Search. Live might already be able to locate and replace the files automatically.

- You can also choose a custom folder if you already know where the files are located. Click on the little triangle left of Automatic Search. Now click on Set Folder and browse to the files’ location. Activate Search Folder and click on Go. Also choose this option if you get no results with the Automatic Search.
- Unless the files were deleted, renamed or are on a different hard or flash drive, Live should turn up results and even replace the missing files.
- If more than one candidate was found you’ll have to tell Live which one to use. Click on the little question mark next to the missing file.

- This will open the Hot-Swap Mode in the Live Browser on the left. You can prelisten and choose the correct file.

- Once all missing files are located, use the ‘Save Live Set As…’ command from the File menu to save the Set to a new location that is not in an existing Project or the Library. This will create a new Live Project folder for the Set.
- Choose ‘Collect All and Save’ from the File menu to copy the audio files used by the Live Set into the new Project folder. Follow step 3 of the first part of this tutorial for detailed instructions.
Not so difficult once you know how it works, is it? Do you have questions or suggestions? Just leave me a comment.
There are plenty more Ableton Live tutorials where this one came from.
Share this article!

Madeleine Bloom
Madeleine Bloom is an Ableton Certified Trainer, musician, producer, multi-instrumentalist and singer from Berlin. She studied Electroacoustic Music at the Franz Liszt Conservatory. For a few years she worked as a technical support for Ableton gaining in-depth knowledge of Ableton Live that even most CTs don’t ever get. In 2012 she started Sonic Bloom and has since helped countless people on all continents with their music productions and live performances.
You May Also Like:
21 Responses
-
Even though I follow this procedure – including Collect All and Save – I have occasionally experienced this message when copying sets to a backup computer using a USB stick. The “missing” sample was always in the Samples folder, but the link said it was missing. Eventually I started using Carbon Copy Cloner to clone the entire hard drive to the backup computer and I never experienced the problem again.
Have you ever experienced this?
Thank you for the excellent Live tips, I’m hooked!
-
I personally haven’t, but I encountered it during my tech support time. Generally somehow the checksums of the files were changed and thus not recognised by Live as the same file anymore. Could be the USB drive, reformatting it might help. There’s an Options.txt command to remedy it though: https://www.ableton.com/en/articles/not-replacing-candidates/
-
-
“The audio you recorded is gone, and
your DAW doesnt know where it is”
Ableton is CLUELESS.SongFolder>SongFile>AudioFolderForSong
See how easy it is with Logic,cubase,protools,
Sonar,bitwig,fruityloops,digitalPerformer?
Live’s file management seems like it was
created by five people who never met.
I’ll never use it again after what happened today.-
If you had actually read the tutorial instead of ranting you would have noticed that it works exactly like that in Ableton Live. With the added difference that imported files need to be collected (copied) manually because a lot of users don’t want to have the tracks they play out twice on their hard drive. I personally hate that Logic simply imports all my files without asking. I’m also not sure why you decided to rant under my post. I’m happy to answer questions, but neither am I working for Ableton nor am I responsible for coding their software.
-
-
“Unless the files were deleted, renamed –OR ARE ON A DIFFERENT HARD or flash drive–, Live should turn up results and even replace the missing files.”
I’ve followed all of the instructions in this tutorial, but Ableton is still coming up short on my files. I’ve saved my packs to an external drive, installed them, and though I can hear the samples play when I click on them in the browser, it still says that file is missing.
I’m stuck, and can’t seem to find an answer. Thank you!
-
If you know where they are and Live doesn’t want to replace them automatically, you can drag and drop them into the File Manager to manually replace them. IF you tried that as well, please contact Ableton’s support. They will help you figure out the problem.
-
-
Hello ,
I’ve read this article but I can’t fix my problem . I changed names of folders containing
samples and now most of my drum machines and other midi drum clips are all missing their files . I relocated and reset the library but this doesn t work . how can I get back in synch my library . also they find the audio samples but I have to add them on manually and they don’t save for the next time I open live ! what is this problem I face ;
if anyone has an idea , thank you very much …
benjamin-
The tutorial is only for missing files in Live projects, not the Library. Are you talking about the Live 8 or Live 9 Library? I can’t tell you what needs to be done without more information, but this would be a case for the Ableton support. https://www.ableton.com/en/help/contact-support/
-
-
yes I’ve contacted the ableton support , waiting for a response , thank you ;
this is a nice site I’ll be going on it to check some things out ; hopefully I resolve my problem with live 8 , also I’ll most likely upgrade to live 9 after seeing some of the advanced features they offer . I think the library is independent to the live 8 one ; ok thanks -
Hello! I’ve been following your site for a while now and finally got the courage to go ahead and give you a shout out from Atascocita Texas!
Just wanted to tell you keep up the excellent
job! -
First of all thanks for your great article
My problem is the orange message is constantly at the bottom of my ableton “Media files are missing”
And I have no single chance o bring them back
How can I get rid of this message and continue my life?!
Thanks in advance
-
There isn’t really anything you can do, but replace the files that are missing or delete the empty clips or tracks to not receive the message again. And to always make sure you don’t save a new track/song in another Live project and if you add audio samples from elsewhere to use Collect All & Save from the File Menu.
-
-
Hi!
I’ve also tried everything above. But the problem is that ALL my files are missing. I haven’t used Ableton in a while now and my hard drive is making some problems, so i wanted to make a back up of all my songs. If I load a project everything is there except for all the recorded files, in every song!
Because my hard drive is failing I thought maybe that’s the problem. But besides that it’s failing, everything on it is still there and i can do and go wherever I want on my drive, only all my recorded files are missing.
Thanks
Is there any answer to this problem? Besides my own hard drive? I’ve red that others also lost a lot of files if they hadn’t used Live in while, but that shouldn’t be possible if i think about it.
I’m still keeping a little faith, but it’s almost gone.
I’ve almost
-
After posting the message i tried 1 last thing, and i found them! all on an external hard drive i never imagened they would be on! still thanks!
-
This tutorial only helps to prevent this from happening the next time. If your files are missing and cannot be found on any hard or flash drive, there’s nothing that can be done anymore. Glad you found them and remember to Collect All & Save. 😉
-
-
I had a problem with not being able to get the majority of my audio in a project. After going slightly greyer I finally pinned it down to a corrupt VST which was on every channel. I am just a beginner and thought I might mention this and hope it helps someone.
-
This is a really big issue for longevity.
It’s normal to change computer and hard drives over the years, and the process does seem a bit too difficult.I wonder why the paths couldnt be relative, so we could just have Live’s files find samples if the file structure remains the same.
Also wouldnt it be great to have a toggle for the checksum of files expecting to be identical. That seems to happen really often and is another thing that gets in the way of being creative.
Collect all and save, if I understood correctly makes duplicates of all the sounds inside each project folder, which is fine for sharing stuff, but terrible for ongoing management of large amounts of work.
I would love to hear if there is a practical way to be able to swap to a duplicate drive, without going through the find files stuff..
-
I haven’t had the issue yet, but it appears to happen more often on Windows. Well, with Collect All & Save you can decide which samples should be copied into your project. I never copy Library files, but rather keep a backup of the Library in case of emergency. Files from elsewhere or other projects I have copied over. I tend not to use the same samples twice, so this makes sense for me.
It’s also normal for producers to make bounces of all individual tracks once a project is finished, so that no matter if plug-ins etc. are no longer working, you have all the files forever.
-
-
Thanks, that’s a good tip about bouncing to audio. I started doing that recently because sometimes I come back to a track years later.
I tend to use a large sample library and like to loop & process audio, so stuff gets reused. Oh well, if ableton are listening it would make sense to have relative paths for this reason. Next time I change hard drives is going to be a lot of work. I will make sure all my projects have been through the find files process before I start working because I cannot stand any interruption once I start working creatively on music.
-
Hi there.
I opened a project and some files are missing. They are the 808 samples of Live.
When i use automatic search it finds candidates buit doesn`t replace them. I don`t understand this. i mean i cant start replacing the samples manually for every hihat and clap,kick,open hihat etc etc….I love Live but i find lives automatic search not working properly. For years now.-
Then this means that the files are not seen as the same files. The checksum isn’t the same anymore. This generally is an issue with your computer. I’d suggest to contact Ableton’s tech support and send them a Status Report as well. They should be able to help you fix this.
-
Leave a Reply
This site uses Akismet to reduce spam. Learn how your comment data is processed.
There is no worse feeling than witnessing Ableton Live crash while working on an unsaved project. You’ve just spent hours creating a masterpiece and Live has crashed before you had a chance to click save. Whether you’re new to Ableton Live or already familiar with the software, it’s possible you have experienced an Ableton Live crash. Fortunately for Live users, there is a very simple way to recover a project after an unexpected crash.
Hi, I’m Ben from Live Aspects and in this guide, I’ll be revealing the best way to recover an Ableton Live project after a crash.
- | Step 1: Locate Ableton Live Crash Folder
- | Step 2: Locate Project Recovery Files
- | Step 3: Remove Dates From File Names
- | Step 4: Move Files To Parent Folder
- | Step 5: Reopen Ableton Live
Without further ado, let’s get started!

| How To Recover An Ableton Live Project
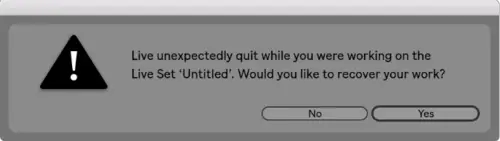
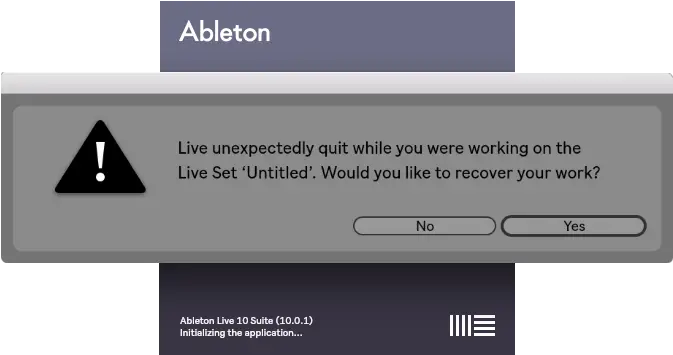
When first reopening Live after a crash, you will be faced with a window asking if you would like to recover your work. To recover an Ableton Live project, simply reopen Live and select ‘Yes’ from the restore document dialog window. All elements of your previously unsaved project should reappear.
| Manually Recover An Ableton Project
If you accidentally pressed ‘No’ from the restore document dialog window or Live failed to prompt it, there is a way to manually recover your project. Completing the following five steps will cause Ableton to re-trigger the restore document dialog window so you can recover your project. Manual project recovery needs to be completed using the same version of Ableton Live you were using when the crash occurred.
| Step 1: Locate Ableton Live Crash Folder
To manually recover an Ableton project, start by locating the Crash folder of your project. Open Finder/File Explorer and navigate to the following folder:
Windows:
Users[Username]AppDataRoamingAbletonLive x.x.xPreferencesCrash
Mac:
Users/[Username]/Library/Preferences/Ableton/Live x.x.x/Crash/
If you are having trouble finding the Crash folder, it’s possible it may be hidden. To reveal hidden folders on Mac, simply press [COMMAND + Shift +.]. For Windows devices, click ‘Options’ from the View tab, choose View, select ‘Show hidden files, folders, and drives’ and then click OK.

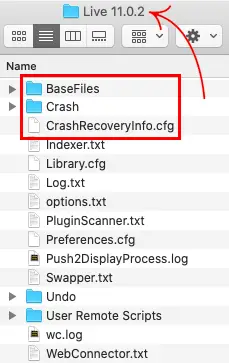
| Step 2: Locate Project Recovery Files
Locate the following three files: Base Files, Crash Recovery and Undo. If Live has crashed more than once, there may be multiple sets of these files, each named with their date and time of crash. Make sure to select the files with the date and time of the crash you wish to recover.
• Base Files
• Crash Recovery Info
• Undo

| Step 3: Remove Dates From File Names
Rename each of the three files and remove the date and time from their titles. You can do this by left-clicking each file and pressing [COMMAND + R] on Mac or [F2] on Windows.

| Step 4: Move Files To Parent Folder
Lastly, move each of the three files into the ‘Live x.x.x’ folder. Simply copy each of the three files, head back to the parent folder and paste. If a dialog box appears, select ‘Replace’ for each file.
| Step 5: Reopen Ableton Live
It’s time to reopen Ableton Live! Once open, select ‘Yes’ from the restore document dialog. Live will now restore your Ableton project.
Related Posts:
How To Authorize Ableton Live Offline
Can’t Hear Ableton Playback? Here’s How To Solve It
How To Send Ableton Live Projects
Want To Know More?
Here at Live Aspects, we have dozens of useful lessons and tutorials created to enhance your music production skills and help speed up the learning process. You can access our huge range of music theory lessons and production tips and tricks here.
Benjamin Jones
Hi, my name is Ben.
I live in Melbourne, Australia and I’m the founder of Live Aspects.
I’m a DJ and producer with a bachelor’s degree in Audio Production.
I’ve spent the last eleven or so years addicted to music production and discovering the extraordinary ways producers around the world create their music. My goal is to provide eager producers with the tools and information they need to make amazing music and experience the thrill of music production.
-
#1
Пожалуйста, помогите мне!
Ableton Live 10 не читает новые сэмплы и не позволяет добавлять звук в «коллекции».
Кроме того, сэмплы, добавленные ранее, видны и читаемы.
Кто-нибудь знает, в чем проблема?
Последняя версия Ableton(а), ОС-Windows 10
-
#2
@adfr7, ему надо время чтоб прогрузить все семплы — проверь через несколько минут, он их постепенно все подгрузит.
-
#3
@adfr7, ему надо время чтоб прогрузить все семплы — проверь через несколько минут, он их постепенно все подгрузит.
К сожалению, это всё дело происходит уже не один день. Я пробовал переустанавливать секвенсор — безуспешно…
-
#4
@adfr7, может ему что-то в названии пути не нравится, символы какие-то, или кириллица, хз.
-
#5
@adfr7, может ему что-то в названии пути не нравится, символы какие-то, или кириллица, хз.
Не думаю. Если я переустанавливаю видимые сэмплы — они уже недоступны
-
#6
@adfr7, ну это логично как бы)) чтоб после переустановки все настройки и добавленные семплы не слетали, нужно сохранять определенные файлы. Иначе все придется снова настраивать и добавлять вручную.

-
#7
Не думаю. Если я переустанавливаю видимые сэмплы — они уже недоступны
Знаю, вопросу уже год) но вы смогли найти решение для проблемы? У меня та же проблема
Добавлено: 4 Авг 2021
@adfr7, ну это логично как бы)) чтоб после переустановки все настройки и добавленные семплы не слетали, нужно сохранять определенные файлы. Иначе все придется снова настраивать и добавлять вручную.
Посмотреть вложение 187035
Вы смогли найти решение для проблемы?