ПРИНТЕР SAMSUNG ML-1661 (1660/1665). ХАРАКТЕРИСТИКИ, ОСОБЕННОСТИ РЕМОНТА И ПРОШИВКИ
Эту статью я решил написать, т.к. убедился в том, что компания Samsung с целью увеличения продаж своих изделий искусственно снижает ресурс своих принтеров Samsung ML-1661 (а также других изделий), путем сознательного внесения в их конструкцию заведомо ложных отказов, без устранения которых невозможно их эксплуатировать. О подобных уловках я уже писал в статье «ВОЙНА MICROSOFT С КОНКУРЕНТАМИ или результаты действия обновления KB915597».

И так, несколько слов о принтерах Samsung ML-1661 (1660/1665). В настоящее время среди пользователей офисной техникой широкое распространение получили лазерные монохромные принтеры Samsung ML-1661 (1660/1665), которые, к сожалению, уже сняты с производства, но по-прежнему продолжают интенсивно эксплуатироваться. Популярность этих изделий среди пользователей оргтехникой основана на их достоинствах, к которым относятся невысокая цена, простота эксплуатации и достаточно высокая надежность. Конечно, есть и недостатки, к которым можно отнести не очень высокую производительность (если они применяются в офисах), шумность и относительно небольшой ресурс, который искусственно ограничен производителем, но легко увеличивается пользователями этих устройств самостоятельно или в специализированных мастерских.

Несмотря на то, что принтеры Samsung ML-1661 (1660/1665) довольно надежны в эксплуатации, иногда они все-таки отказывают. Практически каждая мастерская по ремонту офисной техники с удовольствием берется за их ремонт, вот только этот ремонт может дорого обойтись владельцу принтера, хотя выполнить его самостоятельно, обычно, не составляет труда.
Основные характеристики
Основные характеристики принтеров Samsung ML-1661 (1660/1665) приведены в таблице 1:
Таблица 1
|
ПАРАМЕТР |
ЗНАЧЕНИЕ ПАРАМЕТРА |
ИСТОЧНИК ИНФОРМАЦИИ |
ПРИМЕЧАНИЕ |
|
Ресурс картриджа (Стартовый, поставляется в комплекте с изделием) |
700 страниц (без дозаправки) |
Интернет, дистрибьютор |
С дозаправкой – 3000 страниц |
|
Ресурс картриджа (Приобретаемый у производителя ) |
1500 страниц (без дозаправки) |
Интернет, дистрибьютор |
С дозаправкой – 3000 страниц |
|
Ресурс принтера |
5000 страниц в месяц |
Интернет |
Без дополнительной прошивки или обнуления счетчика |
|
Ресурс термоблока и других основных узлов |
30000 страниц |
Служебная информация принтера |
|
|
Интерфейс |
USB 2.0 |
||
|
Формат печатных носителей |
А4 |
интернет |
|
|
Уровень шума |
49 дБ |
интернет |
|
|
Входной лоток |
150 листов |
интернет |
|
|
Выходной лоток |
100 листов |
интернет |
|
|
Вес нетто |
4,2 Кг |
интернет |
Из таблицы видно, что эти принтеры должны обеспечивать печать не менее 30000 страниц, и это без замены основных узлов. Но для того, чтобы пользователи покупали новые изделия или, по крайней мере, обращались в специализированные мастерские, которые курирует компания Samsung, изготовители этих принтеров сознательно вносят в конструкцию своих изделий отказы, ограничивающие возможность их длительной эксплуатации. И это проявляется начиная с того, что стартовый картридж из комплекта поставки принтера позволяет печатать только 700 страниц (хотя новые картриджи от этой компании обеспечивают печать 1500 страниц без дозаправки), и заканчивая работой счетчиков напечатанных страниц, которые отключают картридж после 3000 страниц, а принтер через 5000 страниц. При этом компания Samsung старательно удаляет со своих сайтов информацию, которая позволила бы пользователям эксплуатировать принтеры Samsung ML-1661 (1660/1665) до окончания назначенного ресурса. И, мало того, что эту полезную информацию они удаляют со своих сайтов, они добиваются, чтобы эта информация не появлялась в интернете, особенно на сайтах специализированных мастерских, которые с ними сотрудничают. Как пример предлагаю взглянуть на Скриншот 1.

Краткое описание принтера Samsung ML-1661 (1660/1665) и его органов управления
Прежде чем приступить к изучению особенностей ремонта принтеров Samsung ML-1661 предлагаю вспомнить его устройство и органы управления, которые понадобятся вам в процессе этого ремонта.
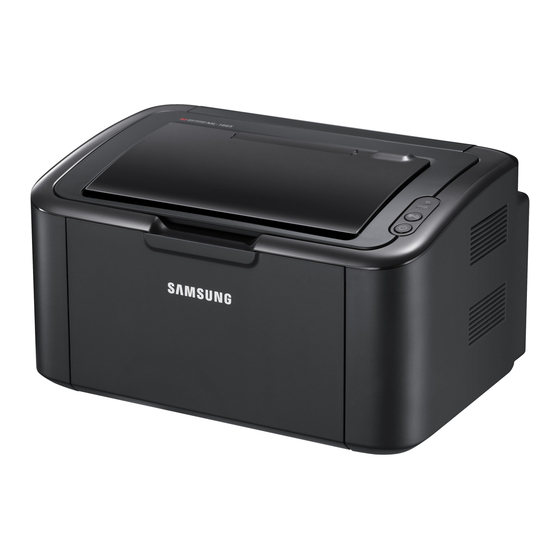
Внешний вид принтера Samsung ML-1661 представлен на Рис.1.
Примечание: В связи с тем, что принтеры Samsung ML-1661 и Samsung ML-1660/1665 практически идентичны, за исключением некоторых незначительных конструктивных особенностей и особенностей применяемых индивидуальных драйверов (универсальный драйвер подходит ко всем указанным принтерам), в дальнейшем будет упоминаться только принтер Samsung ML-1661, если предоставляемая информация относится ко всем вышеупомянутым принтерам.
Принтер Samsung ML-1661 представляет собой небольшой моноблок (см.Рис.1), на передней панели которого расположен откидной входной лоток емкостью до 150 листов бумаги (см.1 Рис.1). Сверху расположена откидная панель (см.2 Рис.1) доступа к картриджу (см. Рис.2). В откидную панель встроен откидной выходной лоток емкостью до 100 листов бумаги (см.3 Рис.1). В верхней части моноблока справа снизу расположены две кнопки управления и два индикатора (см.4 Рис.1). Официально нижняя кнопка управления (см.1 Рис.3) предназначена для включения (выключения) питания. Верхняя кнопка управления (см.2 Рис.3) предназначена для завершения печати при возникновении нештатной ситуации (недостаточно красителя в картридже) и быстрой распечатки изображения на экране монитора. Но кроме перечисленных функций, кнопки имеют и другое предназначение. К примеру, вывода на печать служебной информации принтера и ввода принтера в режим обслуживания, о которых мы поговорим чуть позже. Индикаторы тоже имеют двойное назначение. Для индикации пользовательской информации и служебной информации для технического персонала, обслуживающего принтер.

В пользовательском режиме нижний индикатор (см.3 Рис.3) горит либо зеленым цветом (принтер в рабочем состоянии), либо красным цветом (имеются проблемы – отсутствие бумаги во входном лотке, или отказ принтера). Верхний индикатор (см.4 Рис.3) в пользовательском режиме индицирует нехватку тонера в картридже. Про другие режимы индикации и применения кнопок управления поговорим чуть позже.
Получение служебной информации о принтере
Итак, откуда взялась служебная информация принтера и информация о ресурсах основных узлов принтера, приведенная в Таблице 1? Эта информация хранится на принтере и выводится она на печать путем нажатия кнопки «Печать изображения на экране монитора» (см.2 Рис.3). Для вывода служебной информации при включенном принтере и свечении индикатора работы принтера (см.3 Рис.3), независимо от цвета горения этого индикатора, необходимо зажать кнопку «Печать изображения экрана» (см.2 Рис.3) и удерживать ее. После 3-х промигиваний индикатор работы принтера (см.3 Рис.3) должен начать медленно мигать. Для вывода первого листа служебной информации необходимо отпустить кнопку «Печать изображения экрана». После этого принтер должен распечатать вам первый лист служебной информации, который выглядит, как на Рис.4.

На Рис. 4 нас интересует количество отпечатанных страниц (см.1 Рис.4), версия операционной системы (см.2 Рис.4) и остаток тонера в картридже (см.3 Рис.4). У меня это соответственно – 3269 страниц, V1.03.0035F и 100%.
Чтобы распечатать 2-й лист служебной информации, при включенном принтере вам снова нужно зажать кнопку «Печать изображения экрана» (см.2 Рис.3) и удерживать ее. После 3-х промигиваний индикатор работы принтера (см.3 Рис.3) должен начать медленно мигать, а через некоторое время он должен замигать быстрее. Для вывода второго листа служебной информации необходимо отпустить кнопку «Печать изображения экрана». После этого принтер должен распечатать вам второй лист служебной информации, который выглядит как на Рис.5.

На Рис.5 нас интересует количество отпечатанных страниц (см.1 Рис.5), заправка картриджа (см.2 Рис.5), израсходованный и установленный ресурс основных узлов принтера. У меня это соответственно – 3270 страниц (на одну больше, чем на первом листе служебной информации), 100%, израсходованный и установленный ресурсы соответственно 3270 и 30000 страниц. Теперь вам понятно, откуда в таблице 1 взялся параметр «Ресурс термоблока и других основных узлов» – 30 000 страниц. Причем, по идее, 30 000 страниц — не предел использования данного принтера, и возможна дальнейшая его эксплуатация после замены (при необходимости) некоторых его узлов.
Примечание: Как видно из первого листа служебной информации, несмотря на то, что на шильдике моего принтера написано Samsung ML-1661, он все равно относится к монохромным лазерным принтерам серии ML-1660. Отличие Samsung ML-1661от Samsung ML-1660 может заключаться в программном обеспечении и подходящем драйвере.
Внешнее проявление отказов принтера
Основные внешние проявления отказов принтера приведены в Таблице 2:
Таблица 2
|
№№ п/п |
Внешнее проявление отказа |
Поведение индикаторов и принтера |
Возможная причина |
Рекомендации по устранению неисправностей |
|
1. |
Принтер не печатает |
Индикаторы не горят |
Отсутствие подачи напряжения на принтер |
Проверить подключение принтера к сети и включить принтер. |
|
2 |
Принтер не печатает |
Горит зеленый индикатор включения принтера (см.3 Рис.3), система перемешивания тонера сработала. |
Принтер не подсоединен к компьютеру. Не установлен драйвер принтера |
Проверить соединение принтера с компьютером, переустановить драйвер принтера с официального сайта изготовителя |
|
3. |
Принтер не печатает |
Горит красный индикатор включения принтера (см.3 Рис.3), система перемешивания тонера сработала. |
Отсутствие бумаги во входном лотке. Закончился ресурс картриджа. Закончился ресурс принтера. |
Проверить наличие бумаги во входном лотке и дожать ее, так, чтобы сработал датчик наличия бумаги. Заменить картридж на новый. Перепрошить принтер, удалить или заклеить чип на картридже. |
|
4. |
Принтер не печатает |
Горит зеленый индикатор включения принтера (см.3 Рис.3), система перемешивания тонера сработала. Нет захвата бумаги |
Бумага не обеспечивает работу принтера. Разрегулировалась система подачи бумаги. |
Заменить бумагу во входном лотке. Проверить соленоид в системе подачи бумаги. |
|
5. |
Принтер печатает, но на бумаге имеются полосы и т.п. |
Горит зеленый индикатор включения принтера (см.3 Рис.3), система перемешивания тонера сработала. |
В картридже накопилось большое количество отработанного тонера. Поврежден фотобарабан. |
Удалить отработанный тонер и дозаправить картридж. Заменить фотобарабан. Заменить картридж новым. |
|
6. |
Принтер не печатает |
Горит красный индикатор включения принтера (см.3 Рис.3), система перемешивания тонера не сработала, принтер издает неприятный звук. |
Принтер подвергся механическому воздействию, вследствие чего произошел выход шестеренок из зацепления. |
Вскрыть принтер и устранить проблему с зацеплением шестеренок. |
Конечно, в Таблицу 2 вошли не все случаи возможных отказов принтеров Samsung ML-1661 (1660/1665), но наиболее частые все же указаны. Как видите, самым распространенным внешним проявлением является «Принтер не печатает». В случаях, когда необходима разборка принтера и картриджа, рекомендую посмотреть видео, которое в изобилии выложено в интернете, причем желательно посмотреть не одно, а несколько, чтобы исключить возможность ошибки от применения методов, предлагаемых не очень умелыми специалистами.
Прошивка принтера Samsung ML-1661 (1660/1665)
Особое внимание следует обратить на отказ, приведенный в п.3 Таблицы 2, для устранения которого рекомендуется прошивка принтера. Если быть точным, прошивка — не единственный способ продления ресурса принтера и его узлов. Возможно применение метода обнуления принтера. При этом сбрасываются показания счетчиков (а их два – в операционной системе принтера и в чипе картриджа), и операционная система принтера все начинает считать «с нуля». Но, во-первых, метод обнуления ОС принтера требует определенных навыков, и во-вторых, теряется реальная информация о расходе ресурса узлов принтера. Что касается обнуления счетчика картриджа, то оно выполняется либо удалением чипа картриджа, либо заменой его новым, либо заклеиванием его контактов скотчем.
Как я уже говорил, прошивка принтера нужна для удаления искусственно вводимой неисправности компанией производителем SAMSUNG в свое изделие для стимулирования пользователей к приобретению новых изделий. Но, т.к. мы люди не богатые и привыкли эксплуатировать вещи до их полного износа, предлагаю вам один из методов прошивки принтера Samsung ML-1661 и других принтеров серии ML-1660.
Для начала выясняем версию программного обеспечения нашего принтера. Ее можно посмотреть на первом листе служебной информации принтера (см.2 Рис.4). В моем случае это V1.03.00.35F. Если ваш принтер на момент прошивки уже был заблокирован (внешнее проявление – принтер не печатает, постоянно горит индикатор включения принтера красным цветом), скорее всего, вам не удастся распечатать этот лист со служебной информацией. В таком случае вам придется снять правую боковую панель принтера (см.5 Рис.1). На плате процессора принтера расположена наклейка с названием принтера и версией программного обеспечения (см.1 Рис.6). Боковые крышки принтера Samsung ML-1661 (и всех других принтеров этой серии) крепятся к корпусу принтера с помощью 8-и легкосъемных пластмассовых замков (по 2 замка на каждой стороне крышки). Чтобы замки вывести из зацепления, вставьте в щель между крышкой и корпусом лезвие столового ножа и приподнимите ручку до появления заметного зазора. Перемещайте лезвие вдоль периметра крышки до полного выхода всех замков из зацепления. Обращаю внимание на то, что не следует прилагать больших усилий. Несмотря на то, что крышки принтера сделаны из высокопрочной пластмассы, как говорится – сдуру и …. можно сломать.

После того, как вы выяснили версию операционной системы, скачиваете программу прошивки по ссылке, которая приведена ниже в Таблице 3 или ищете ее в интернете. По поводу поиска прошивки в интернете скажу, что не следует пользоваться услугами платных файлообменников и тратить время на изучение ссылок, которые ведут на них. Дело в том, что ссылки, ведущие на платные файлообменники, обычно, размещаются либо их владельцами, либо людьми, которые получают деньги за переход по таким ссылкам. А на самом файлообменнике нужного вам файла может не оказаться. Т.е. вы платите деньги (хоть и небольшие), но не имеете гарантии, что получите нужный вам файл, несмотря на то, что при переходе по ссылке на вашем экране перед регистрацией на файлообменнике красуется название файла, который вы ищите.
Ссылки для скачивания программы прошивки принтеров Samsung ML-1661 и других принтеров серии ML-1660 приведены в Таблице 3:
Таблица 3
|
№№ п/п |
Версия прошивки |
Ссылка |
Примечание |
|
1. |
V1.01.00.35 |
//turbobit.net/cr60jof2hu3f.html |
|
|
2. |
V1.01.00.35 |
//drive.google.com/drive/folders/1qryfX20i9S-Qx9WJunF6YHoSLpnNOkK9 |
|
|
3. |
V1.01.00.30 |
Здесь |
Важно: Следует отметить, что прошивка принтеров Samsung ML-1661 V1.01.00.35 подходит для аналогичных принтеров с ОС версии V1.03.00.35. Проверено.
Примечание: Хочу выразить слова благодарности авторам указанных в Таблице 3 ссылок. Я уверен, что авторы этих ссылок не являются владельцами программ, ссылки на которые они любезно предоставили в общий доступ. Также я уверен, что реальным владельцем и разработчиком этих программ является компания SAMSUNG, которая поставляет их в свои специализированные мастерские по ремонту своих принтеров. Учитывая то, что эти программы предназначены для устранения искусственно создаваемых компанией отказов принтеров Samsung ML-1661 и других принтеров серии ML-1660 путем внесения ограничений в их ПО, не считаю необходимым прятать их от общего доступа. Тем более, что введение подобных искусственных отказов компанией SAMSUNG в программное обеспечение принтеров является незаконным, т.к. эти ограничения не оговорены в документации изготавливаемых и продаваемых ими изделий, что является фактическим обманом пользователей их продукцией.
Итак, после того, как вы скачали программы, можно приступать непосредственно к прошивке изделия. Вам нужно воспользоваться ТОЛЬКО ОДНОЙ из приведенных в Таблице 3 ссылок. По первой ссылке (см.П.1 Таблица 3) вы скачаете архив (файл с расширением «.7z»), по второй ссылке вы скачаете 2-а файла (один с расширением «.fls» и второй с расширением «.exe») и по третьей ссылке вы скачаете файл с расширением «.torrent».
Для первой ссылки (см.П.1 Таблица 3) – после скачивания распакуйте архив, чтобы подготовить файлы к работе. Для второй ссылки (см.П.2 Таблица 3) – после скачивания перетащите скаченные файлы на рабочий стол. После этого переведите принтер в режим обслуживания. Для этого при подключенном принтере к сети, но не включенном питании (индикаторы не горят) зажмите кнопку «Печать с экрана» (см.2 Рис.3) и после этого зажмите кнопку «Включения питания» (см.1 Рис.3).
После того, как на вашем принтере замигают индикаторы (см.3 и 4 Рис.3), отпустите кнопки «Печать с экрана» и «Включение питания» и выполните прошивку принтера. Для этого, в случае, если вы используете первую ссылку, запустите файл «download1661.bat», который находится в папке «1661_35». В случае, если вы используете вторую ссылку, на рабочем столе перетащите файл «Samsung_ML1661_V1_01_00_35_MA .fls» в файл «usbprns2.exe»).
Если у вас принтер с операционной системой версии V1.01.00.30, то вам придется воспользоваться третьей ссылкой.
После того, как вы запустите прошивку ОДНИМ ИЗ ПЕРЕЧИСЛЕННЫХ МЕТОДОВ, на экране вашего компьютера появится командная строка с индикацией процесса прошивки. Когда процесс прошивки принтера прекратится (это вы увидите по изменению информации в окне командной строки), у вас перестанут мигать лампочки индикации – закройте окно командной строки, если оно само не закроется. Теперь вам остается подготовить ваш картридж к работе и перезапустить принтер.
Для подготовки картриджа к работе извлеките его из принтера, подняв откидную панель доступа к картриджу (см.2 Рис.1), и заклейте контакты чипа картриджа (см.1 Рис.2) скотчем или изолентой. Некоторые рекомендуют вынимать чип, но я считаю, что делать этого не следует, т.к. в процессе эксплуатации картриджа через отверстие, где ранее стоял чип, может высыпаться отработанный тонер.
И в завершение процесса прошивки принтера Samsung ML-1661, вставьте в него подготовленный картридж с заклеенными контактами, запустите принтер и распечатайте первый лист служебной информации. Теперь ваш принтер готов к работе.
Иценко Александр Иванович
Модератор: vetal

![]() ua6bmy » Ср дек 18, 2013 4:07 pm
ua6bmy » Ср дек 18, 2013 4:07 pm


 Я в статусе и не смотрел ща попробую установить его
Добавлено спустя 6 минут 13 секунд:
Пишет- Ошибка датчика А3-3112
-

ua6bmy
- Подошел к чернилам
-

- ICQ

![]()
![]() Andreyak777 » Ср дек 18, 2013 4:19 pm
Andreyak777 » Ср дек 18, 2013 4:19 pm
То, что другие люди говорят обо мне, никак не характеризует меня. Зато отлично характеризует их.
-

Andreyak777
- Избран тонером
-

![]()
![]() ua6bmy » Ср дек 18, 2013 4:21 pm
ua6bmy » Ср дек 18, 2013 4:21 pm
Спс я сообразил что это датчик печи, ща к нему пробираюсь сквозь пластик и болты.
Добавлено спустя 12 минут 10 секунд:
Подскажите какое сопротивление должно быть у термистора?
-
ua6bmy
- Подошел к чернилам
-
- ICQ
![]()
![]() Andreyak777 » Ср дек 18, 2013 4:57 pm
Andreyak777 » Ср дек 18, 2013 4:57 pm
То, что другие люди говорят обо мне, никак не характеризует меня. Зато отлично характеризует их.
-
Andreyak777
- Избран тонером
-
![]()
![]() Andreyak777 » Ср дек 18, 2013 5:41 pm
Andreyak777 » Ср дек 18, 2013 5:41 pm
То, что другие люди говорят обо мне, никак не характеризует меня. Зато отлично характеризует их.
-
Andreyak777
- Избран тонером
-
![]()
![]() kvg » Чт дек 19, 2013 7:51 am
kvg » Чт дек 19, 2013 7:51 am
По форуму работает поиск
Единственно надо учесть, что если в поиске ввести А3-3112 то есть знак ( -) то поиск откидывает, то что справа от этого знака.
-

kvg
- Администратор сайта и форума
-
- Сайт
- Персональный альбом

![]()
Вернуться в Принтеры, МФУ, факсы, копиры формата A4
Кто сейчас на форуме
Сейчас этот форум просматривают: нет зарегистрированных пользователей и гости: 45
-
Contents
-
Table of Contents
-
Troubleshooting
-
Bookmarks
Quick Links
1. Speed
• Up to 16 ppm in A4 (17 ppm in Letter)
2. Processor
• Jupiter4e 150 MHz
3. Printer Language
• GDI
Service Manual
Laser Printer
ML-1660/1665
4. Memory
• 8 MB
5. Interfaces
• Compatible with USB 2.0
6. Toner cartridge
• Initial : 0.7K
• Sales : 1.5K
Related Manuals for Samsung ML-1665
Summary of Contents for Samsung ML-1665
-
Page 1: Service Manual
Service Manual Laser Printer ML-1660/1665 4. Memory 1. Speed • Up to 16 ppm in A4 (17 ppm in Letter) • 8 MB 2. Processor 5. Interfaces • Jupiter4e 150 MHz • Compatible with USB 2.0 3. Printer Language 6. Toner cartridge •…
-
Page 2
GSPN (Global Service Partner Network) North America : service.samsungportal.com Latin America : latin.samsungportal.com CIS : cis.samsungportal.com Europe : europe.samsungportal.com ⓒ Samsung Electronics Co.,Ltd. December. 2009 China : china.samsungportal.com Printed in Korea. Asia : asia.samsungportal.com Mideast & Africa : mea.samsungportal.com VERSION NO. : 1.00… -
Page 3: Table Of Contents
Contents chapter 1 Precautions 1.1 Safety Warning …………………………………………………… 1-1 1.2 Caution for safety ………………………………………………… 1-2 1.2.1 Toxic material ………………………………………………… 1-2 1.2.2 Electric Shock and Fire Safety Precautions ……………… 1-2 1.2.3 Handling Precautions ……………………………………… 1-3 1.2.4 Assembly / Disassembly Precautions ……………………… 1-3 1.2.5 Disregarding this warning may cause bodily injury …………
-
Page 4
Contents 3.2 Screws used in the printer ……………………………………… 3-2 3.3 Cover ……………………………………………………………… 3-3 3.3.1 Left/Right cover ……………………………………………… 3-3 3.3.2 Rear bracket ………………………………………………… 3-3 3.3.3 Cover-open ………………………………………………… 3-4 3.3.4 Top/Front cover ……………………………………………… 3-4 3.4 Main PBA ………………………………………………………… 3-5 3.5 SMPS/HVPS board ……………………………………………… 3-6 3.6 Fuser unit …………………………………………………………… -
Page 5
Contents chapter 5 System Diagram 5.1 Block Diagram …………………………………………………… 5-1 5.2 Connection Diagram……………………………………………… 5-2 chapter 6 Reference Information 6.1 Tool for Troubleshooting ………………………………………… 6-1 6.2 Acronyms and Abbreviations …………………………………… 6-2 6.2.1 Acronyms …………………………………………………… 6-2 6.2.2 Service Parts ………………………………………………… 6-4 6.3 A4 ISO 19798 Standard Pattern ………………………………… 6-8 6.3.1 A4 ISO 19752 Standard Pattern ……………………………… -
Page 6: Safety Warning
High voltages and lasers inside this product are dangerous. This product should only be serviced by a factory trained service technician. (2) Use only Samsung replacement parts. There are no user serviceable parts inside the product. Do not make any unauthorized changes or additions to the product as these could cause the product to malfunctions and create an electric shocks or fire hazards.
-
Page 7: Caution For Safety
Take care not to cut or damage the power cable or plugs when moving the machine. (9) Use caution during thunder or lightning storms. Samsung recommends that this machine be disconnected from the power source when such weather conditions are expected. Do not touch the machine or the power cord if it is still connected to the wall socket in these weather conditions.
-
Page 8: Handling Precautions
1.2.4 Assembly / Disassembly precautions Replace parts carefully and always use Samsung parts. Take care to note the exact location of parts and also cable routing before dismantling any part of the machine. Ensure all parts and cables are replaced correctly.
-
Page 9: Disregarding This Warning May Cause Bodily Injury
Failure to do so could cause the printer to tip or fall possibly causing personal injury or damaging the printer. (5) Do not install the printer on a sloping or unstable surface. After installation, double check that the printer is stable. Samsung Electronics Service Manual…
-
Page 10: Esd Precautions
9. Minimize bodily motions when handling unpackaged replacement ESDs. Normal motions, such as the brushing together of clothing fabric and lifting one’s foot from a carpeted floor, can generate static electricity sufficient to damage an ESD. Samsung Electronics Service Manual…
-
Page 11: Product Specifications
2. Processor • Jupiter4e 150 MHz 3. Printer Language • GDI 4. Memory • 8 MB 5. Interfaces • Compatible with USB 2.0 ML- 1660 6. Toner cartridge • Initial : 0.7K • Sales : 1.5K Service Manual Samsung Electronics…
-
Page 12: Specifications
— Red Hat 8~9, — Fedora Core 1~4 — Mandrake 9.2~10.1 — SuSE 8.2~9.2 Mac OS 10.3~10.6 WHQL Windows 2000/XP(32/64bits)/Vista(32/64bits)/2003 Server(32/64bits)/2008 Server(32/64bits) / Win7 /2008 R2 Compatibility Win 2000/XP(32/64bits)/2003 Server/Vista(32/64bits),2008 Server(32/64bits)/ WIn7 /2008 R2 Wired Network Protocol Supporting OS Service Manual Samsung Electronics…
-
Page 13: Paper Handling
16~32lb (60 to 120g/㎡) Sensing Paper Empty Optional Capacity Cassette Tray Media sizes Media types Media weight Sensing Output Stacking Output Stacking Face-Down 100 sheets @ 75g/㎡(Base Line Paper : Samsung Premium/ Xerox4200) NN Condition Duplex Supporting Samsung Electronics Service Manual…
-
Page 14
30K pages Pick up roller 30K pages 2.1.2.6 Reliability & Service Items Specification Printing Volume (SET AMPV) 75 sheets/month MPBF 10,000 sheets MTTR 30 min. SET Life Cycle 30,000 sheets or 5 years (whichever comes first) Service Manual Samsung Electronics… -
Page 15
361 x 270 x 113 mm Weight 4.12kg Toner 0.68kg Gross 5.6kg 2.1.2.8 Packing & Accessory Items Life Driver & Network Install CD-ROM Power Cable USB Cable (CIS/China/Korea/India) In-Box Quick Install Guide Warranty Registration Card User’s Manual (PDF File) Samsung Electronics Service Manual… -
Page 16
Product spec and feature 2.1.2.9 Options Items Specification Memory Second Cassette Wired Network Wireless Network Hard Disk Duplex Unit Service Manual Samsung Electronics… -
Page 17: Model Comparison Table
Interface USB 2.0 USB 2.0 USB 2.0 Size (mm) 341 x 224 x 184 mm 353 x 298 x 213 mm 379 x 243 x 225 mm Toner Standard 0.7K / 1K Standard 1.5K Standard 2K Service Manual Samsung Electronics…
-
Page 18: System Overview
This chapter describes the functions and operating principal of the main component. 2.2.1 Front View This illustration may differ from your machine depending on its model. Control panel Paper length guide Top cover Paper width guides Toner cartridge Output support Tray Output tray (face down) Service Manual Samsung Electronics…
-
Page 19: Rear View
Product spec and feature 2.2.2 Rear View This illustration may differ from your machine depending on its model. USB port Power receptacle Service Manual Samsung Electronics…
-
Page 20: System Layout
Frame, Feeding, Developing, Driving, Transferring, Fusing, Cabinet and H/W comprising the main control board, power board, operation panel, PC Interface. NAME NAME Pressure roller Transfer roller Heat roller Deve roller Exit roller Supply roller Toner Cartridge Feed roller Friction pad Charge roller Pickup roller 2-10 Service Manual Samsung Electronics…
-
Page 21
In the front side, there is a paper level indicator. 3) Pick- up roller It has functions such as a paper pickup function, driving control function, paper feeding function, and removing electronic static function. Pick up roller is drive by solenoid. 2-11 Service Manual Samsung Electronics… -
Page 22: Transfer Roller
— In ML-1660, the driving device is consisted of OPC, Pick- up, Feed, Fuser, Gear- Train connected with Mounting member. A step motor for driving is assembled to the left frame. • Driving Frequency: Step Motor 840 PPS (1050rpm) • It is a power delivery unit by gearing: Step Motor → Pick-up/Feeder/Transfer/Fuser/Exit 2-12 Service Manual Samsung Electronics…
-
Page 23: Pressure Roller
Teflon. When a paper passes between a heat roller and a pressure roller, toner adheres to the surface of a paper permanently. 5) Halogen Lamp — Voltage 120 V : 115 ± 5 % 220 V : 230 ± 5 % — Capacity : 600 Watt ± 25 W 2-13 Service Manual Samsung Electronics…
-
Page 24
— A fuser power is cut off when a front cover is opened — Maintain a temperature of fuser cover’s surface under 80(C for user, and attach a caution label at where customer can see easily when customer open a rear cover. 2-14 Service Manual Samsung Electronics… -
Page 25
/HSYNC signal is detected, the image data is sent to the LSU to adjust the left margin on paper. The one side of the polygon mirror is one line for scanning. OPC Drum Photo Diode Polygon Mirror Polygon Motor Motor Driver LD Driver circit LD(Laser Diode) Protector panel 2-15 Service Manual Samsung Electronics… -
Page 26: Toner Cartridge
• Handling of wasted toner : Collect the wasted toner in the cleaning frame by using cleaning blade • OPC Drum Protecting Shutter : None • Classifying device for toner cartridge: ID is classified by CRUM. Max -1.4KV Cleaning Blade -100V Cleaning Roller 0.20mW -720V -150V↓ -350V +3.5kV -550V 2-16 Service Manual Samsung Electronics…
-
Page 27: Engine H/W Specifications
The signals from the paper feed jam sensor and paper empty sensor are directly inputted to the main board. CN6, Power I/F CN4, LSU I/F CN8, Pick CN2, Fuser up_clutch CN1, Hyper CN7, Main CN5, Sensor motor drive 2-17 Service Manual Samsung Electronics…
-
Page 28
— Access Time : 70 nsec 2) SDRAM When Printing, use Band Buffer, System Working Memory Area . — 8M capa : 8M Byte basic. 8M :Printing System Working Memory Area — Access Time : 60 nsec 2-18 Service Manual Samsung Electronics… -
Page 29
TR driven from the noise pulse, which is occurred when the solenoid is de-energized. ■ Motor Driving The main motor driving circuits is on the main board There is motor driver IC on the main board control the step motor. 2-19 Service Manual Samsung Electronics… -
Page 30: Main Board
It is consisted of the SMPS part, which supplies the DC power for driving the system, and the AC heater control part, which supplies the power to fuser. SMPS has two output channels. Which are +3.3V and +24V. Main board Fuser 2-20 Service Manual Samsung Electronics…
-
Page 31
— Output Voltage Rising Time : 50 ms Max — Output Voltage Falling Time : 50 ms Max — Output Loading range : 10 MΩ ~ 1000 MΩ — Output Control Signal (BIAS-PWM) : the CPU is HV output when PWM is low. 2-21 Service Manual Samsung Electronics… -
Page 32
1.8A 100ms RIPPLE NOISE Voltage 100mVp-p Under 500mVp-p Maximum output 2.64W 32.4W Peak output 3.3W 43.2W 100ms Protection for loading shortage Shut down or Fuse Shut down or Output and overflowing current Protection Voltage Drop 2-22 Service Manual Samsung Electronics… -
Page 33: Engine F/W Contol Algorithm
AD converter. The voltage value for impressing to the transfer roller is decided by the changed value. 2-23 Service Manual Samsung Electronics…
-
Page 34: Lsu
The engine mode is changed to recovery mode and the engine informs the main system of the engine mode. And the engine checks the LSU error. If the error doesn’t happen, the printing job will be proceeding. 2-24 Service Manual Samsung Electronics…
-
Page 35: S/W Descriptions
(PCL, PS, GDI, etc.) to be able to make the user to take same output as originally one what composed in Host. 2. Kernel that control and management the whole procedure include of Control flow and Printing Job before transfer to Engine system. 2-25 Service Manual Samsung Electronics…
-
Page 36: Block Diagram
4. Port Monitor that manages the network communication between spooler and Network Interface Card, or various additional application and Network Interface Card,(this is, at first, make communication logical port, manage the data, transfer them from spooler to network port, and offer the result of printing). 2-26 Service Manual Samsung Electronics…
-
Page 37
— Engine print the received data to required paper with the sequential developing process. The additional printing function are realized in (1) Web environment (2) Window environment. On addition, Kernel informs a status of printing status and printer status to user made printing job with the Status Monitor. 2-27 Service Manual Samsung Electronics… -
Page 38: Precautions When Replacing Parts
3.1.1 Precautions when assembling and disassembling * Use only approved Samsung spare parts. Ensure that part number, product name, any voltage, current or temperature rating are correct. Failure to do so could result in damage to the machine, circuit overload, fire or electric shock.
-
Page 39: Screws Used In The Printer
FRAME-PAPER PATH SCREW-TAPTYPE;PWH,+,B,M3,L10,NI PLT,SWRCH18A 6003-000282 FRAME-FEED IDLE SCREW-TAPTYPE;BH,+,-,B,M3,L8,ZPC(BLK),SWRCH18A,- 6003-000269 SCREW-TAPTYPE;BH,+,-,S,M3,L6,ZPC(WHT),SWRCH18A,- FRMAE MAIN-LEFT 6003-000282 SCREW-TAPTYPE;BH,+,-,B,M3,L8,ZPC(BLK),SWRCH18A,- 6003-000269 FRMAE MAIN-RIGHT SCREW-TAPTYPE;BH,+,-,S,M3,L6,ZPC(WHT),SWRCH18A,- 6003-000269 FRAME MAIN-MIDDLE SCREW-TAPTYPE;BH,+,-,S,M3,L6,ZPC(WHT),SWRCH18A,- 6003-000282 SCREW-TAPTYPE;BH,+,-,B,M3,L8,ZPC(BLK),SWRCH18A,- 6003-000282 COVER-TOP SCREW-TAPTYPE;BH,+,-,B,M3,L8,ZPC(BLK),SWRCH18A,- 6003-000282 CARTRIDGE-TONER SCREW-TAPTYPE;BH,+,-,B,M3,L8,ZPC(BLK),SWRCH18A,- 6003-000269 SCREW-TAPTYPE;BH,+,-,S,M3,L6,ZPC(WHT),SWRCH18A,- MAIN LINE 6003-000282 SCREW-TAPTYPE;BH,+,-,B,M3,L8,ZPC(BLK),SWRCH18A,- Service Manual Samsung Electronics…
-
Page 40: Cover
3.3.1 Left/Right cover 1. Take off the left cover by removing hooks from 2. Take off the right cover by removing hooks from its edge. its edge. 3.3.2 Rear bracket 1. Remove 4 screws. Release the rear bracket. Service Manual Samsung Electronics…
-
Page 41: Cover-Open
1. Release the cover-open from the hook of both sides. 3.3.4 Top/Front cover 1. Remove 2 screws. Hold the top and front cover and pull both of them to the direction of arrow. 2. Separate the top and front cover. Top cover Front cover Service Manual Samsung Electronics…
-
Page 42: Main Pba
Disassembly and Reassembly 3.4 Main PBA 1. To remove the main PBA, first remove the right cover. (Refer to 3.3.1) 2. Remove 4 screws. Unplug all connectors. And release the Main PBA. Service Manual Samsung Electronics…
-
Page 43: Smps/Hvps Board
1. To remove the SMPS/HVPS board, first remove the right cover and rear bracket. (Refer to 3.3) 2. Remove 4 screws. Unplug all connectors. And release the main-PBA bracket. 3. Remove 8 screws. Unplug a connector. And release the SMPS/HVPS board. Service Manual Samsung Electronics…
-
Page 44: Fuser Unit
3.6 Fuser unit 1. Remove the main PBA bracket. (Refer to 3.5) 2. Unplug the connector on SMPS/HVPS board. 3. Remove 3 screws. 4. Pull the fuser unit to the direction of arrow slightly and release it. Service Manual Samsung Electronics…
-
Page 45: Lsu
1. Remove the front/ top/ rear cover. (refer to 3.3 cover) 2. Remove 4 screw securing the COVER-LSU. Release the COVER-LSU. COVER-LSU COVER-LSU COVER-LSU Front view Top view Front view Front view Top view Top view 3. Remove 3 screws. Release the LSU. Service Manual Samsung Electronics…
-
Page 46: Drive Unit
Disassembly and Reassembly 3.8 Drive unit 1. Remove the left cover. 2. Remove 4 screws. Release the drive unit. Service Manual Samsung Electronics…
-
Page 47: Step Motor
1. Remove the drive unit. (Refer to 3.8) Caution 2. Remove 7 screws. Release the left-frame When reassembling the drive unit, put down the bracket. drive unit and assemble the left-frame bracket. 3. Remove 2 screws. Release the step motor. 3-10 Service Manual Samsung Electronics…
-
Page 48: Pick Up Roller
Disassembly and Reassembly 3.10 Pick up roller 1. Open the top cover. 2. Take out the toner cartridge. 3. Push the hinge to the direction of arrow. 3-11 Service Manual Samsung Electronics…
-
Page 49: Alignment And Troubleshooting
Shows the status of jam occurance of your machine. Online/ Error Shows the status of your machine. Print Screen Prints the displayed screen in the monitor. Power You can turn the power on and off with this button. Service Manual Samsung Electronics…
-
Page 50: Understanding The Control Panel
Prepare a new cartridge for replacement. You may temporarily increase the printing quality by redistributing the toner. • The machine is printing in manual feed mode or in manual duplex mode. • The machine is canceling a print job. Service Manual Samsung Electronics…
-
Page 51: Jam Removal
If the paper does not move when you pull, or if you do not see the paper in this area, check the fuser area around the toner cartridge. If you do not see the jammed paper, go to next step. Service Manual Samsung Electronics…
-
Page 52
If you do not see the jammed paper, go to next 8. Replace the toner cartridge. step. 6. Pull the toner cartridge out. 9. Close the fuser unit cover. 10. Close the top cover and open the output tray. Printing automatically resumes. Service Manual Samsung Electronics… -
Page 53: Printing A Report
In the ready mode, press and hold this button for about 6 seconds sheet until the green LED blinks slowly, and release. Supplies info report In the ready mode, press and hold this button for about 10 seconds until the green LED blinks rapidly, and release. Service Manual Samsung Electronics…
-
Page 54: Demo Page
Alignment and Troubleshooting ■ Demo Page Service Manual Samsung Electronics…
-
Page 55
Alignment and Troubleshooting ■ Supplies Information Report Service Manual Samsung Electronics… -
Page 56: Periodic Defective Image
Transfer Roller 39.2mm Ghost, Damaged image by abnormal transfer Transfer roller Pressure Roller 75.4mm Background Fuser Fusing Roller 77.5mm Black spot and image ghost Pressure roller Transfer roller Heat roller Deve roller Charge roller Supply roller Service Manual Samsung Electronics…
-
Page 57: Firmware Upgrade
1) Connect PC and printer with USB cable. 2) Turn on the power of printer.(Ready Status) 3) Drag the f/w file and Drop down on the usblist2.exe. And then f/w update will be started automatically. 4) Please wait until end reboot. Service Manual Samsung Electronics…
-
Page 58: Using The Smart Panel Program
Or, if you are a Windows user, you can launch it from the Start menu, select Programs or All Programs > Samsung Printers > your printer driver name > Smart Panel. • If you have already installed more than one Samsung machine, first select the correct machine model you want in order to access the corresponding Smart Panel.
-
Page 59: Opening The Troubleshooting Guide
Guide. 4.1.7.3 Changing the Smart Panel Program Settings Right-click (in Windows or Linux) or click (in Mac OS X) the Smart Panel icon and select Options. Select the settings you want from the Options window. 4-11 Service Manual Samsung Electronics…
-
Page 60: Troubleshooting
See the troubleshooting OPE LED Orange LED on? flow chart. Green OK? — Red : Yes — Orange : No Remove the Print(test pattern) jammed paper. printing Refer to «Solution Quality is of Image Problem» Nomal? 4-12 Service Manual Samsung Electronics…
-
Page 61: Basic Check List
—> Refer to section 4.2.5 6. Check consumables (toner etc.). • Using the keys print the Test Pattern. —> Expected life of various consumable parts, compare this with the figures printed and replace as required 4-13 Service Manual Samsung Electronics…
-
Page 62: Initial Inspection
1. Use only paper which is of a suitable quality, weight and size? See the user guide. 4. Check the overall condition of the printer 1. Is the printer properly maintained ? Clean the Paper Transport Passages. Any rollers with dirt surfaces should be cleaned or replaced. 4-14 Service Manual Samsung Electronics…
-
Page 63: Bad Discharge
2. Check if the separation pad in the Replace the separation pad. cassette is worn away. Clean with soft cloth dampened 3. Check the surface of the with IPA(Isopropyl Alcohol) or roller-pick up is contaminated. replace the pick up roller. 4-15 Service Manual Samsung Electronics…
-
Page 64
2. If the recording paper is stuck in the discharge Reassemble the Actuator-Feed roller and the fuser just after passing and Spring-Actuator if the returning through the Actuator-Feed, Feed is bad. Actuator may be defective. 4-16 Service Manual Samsung Electronics… -
Page 65
1. Solenoid malfunction (the solenoid does not work properly) Replace the solenoid if necessary. Clean the pad friction with soft 2. Cassette holder pad is contaminated with foreign clothe dampened with IPA matter.(oil…) (Isopropyl Alcohol). 4-17 Service Manual Samsung Electronics… -
Page 66
1. Paper is too much thin. How to remove the rolled in the OPC Drum. — Remove the paper while turning 2. The face of paper is curled. the OPC Drum against the ongoing direction. 4-18 Service Manual Samsung Electronics… -
Page 67: Malfunction
1. Bending or deformation of Replace the defective actuator. the actuator of the paper sensor. 2. Check if the Reconnect the connector. connector of the sensor PBA is If the problem persist, replace the connected properly. sensor PBA. 4-19 Service Manual Samsung Electronics…
-
Page 68
Description : The ERROR lamp does not come on even when the printer cover is open 1. Check the insertion of the Cover 1. Check the connector Open S/W Connect. and circuit of the cover switch 2. Replace the SMPS/HVPS board. department in the SMPS board. 4-20 Service Manual Samsung Electronics… -
Page 69
Description : Main motor is not driving when printing, and paper does not feed into the printer, resulting ‘Jam 0’. Check the motor harness, replace 1. Motor harness may be defective. it, if defective. Replace the Motor or Drive unit, 2. Check the motor operation. if necessary. 4-21 Service Manual Samsung Electronics… -
Page 70
Description : When system power is turned on, all lamps on the operator panel do not come on. 1. Check if the flat cable between the main board and Reconnect the flat cable. HVPS/SMPS board is connected correctly. 2. Check if the HVPS/SMPS Replace the HVPS/SMPS board. output is normal. 4-22 Service Manual Samsung Electronics… -
Page 71
5) Vertical Line Getting Curved Description : When printing, vertical line gets curved. 1. If the supply of +24v 1. Replace LSU. is unstable in the Main board 2. Replace the Main board. linking with LSU. 4-23 Service Manual Samsung Electronics… -
Page 72: Bad Image
2. Scratched surface of Replace the transfer roller if the charge roller in the toner cartridge. occurred as No. 3. 3. Partly depression or deformation on the surface of the transfer roller. 4-24 Service Manual Samsung Electronics…
-
Page 73
Remove if top of a black image. found. 5. It may occur when foreign If the problems are not solved, substances are on the OPC Drum. replace the toner cartridge. 4-25 Service Manual Samsung Electronics… -
Page 74
Charging Roller = 26.7mm in the OPC. Supply Roller = 47mm 2. If the malfunction persists, Transfer Roller = 39.2mm replace the developer. Pressure Roller = 75.4mm Fusing Roller = 77.5mm 4-26 Service Manual Samsung Electronics… -
Page 75
5. Clean the inside of the set against the paper particles and foreign matter in order not to cause the trouble. 4-27 Service Manual Samsung Electronics… -
Page 76
1. Clean up the contaminated area by the toner. 2. Replace the HVPS if the 3. Abnormal output from the HVPS. problems are not solved by the above four directions. 4-28 Service Manual Samsung Electronics… -
Page 77
HVPS. side of the Developer and charge 2. Replace the HVPS if not solved terminal of HVPS. by the above direction 1 and 2. 4-29 Service Manual Samsung Electronics… -
Page 78
Clean the bushing part of the 4. Is the movement(Up and Down) transfer roller. of the transfer roller smooth? If the problem is still not solved, 5. Is the HVPS normal? replace the developer. 4-30 Service Manual Samsung Electronics… -
Page 79
If not solved by the direction 3, 4. Transfer roller lifetime check the transfer roller lifetime (50.000 sheets) has expired. and replace it. 5. Abnormal low temperature Wait about 1 hour after power on (below 10℃). before using printer. 4-31 Service Manual Samsung Electronics… -
Page 80
Select ‘Thick Mode’ on paper type thicker than normal paper or menu from the software application transparencies such as OHP, higher and after using returning to the transfer voltage is original mode is recommended. required. 4-32 Service Manual Samsung Electronics… -
Page 81
Check the approved voltage of the 2. The abnormal voltage and supply roller and contact of the bad contact of the terminal of the terminal and adjust if necessary. supply roller 4-33 Service Manual Samsung Electronics… -
Page 82
Disassemble the fuser and The temperature of the fuser remove the contaminated toner particles on the roller and clean is maintained high. the foreign matter between Thermistor and Heat roller . ( Caution : can be deformed) 4-34 Service Manual Samsung Electronics… -
Page 83
Alignment and Troubleshooting 12) Stains on the Face of Page Description : The background on the face of the printed page is stained. 1. T oner leakage due to Replace the toner cartridge. improperly sealed developer . 4-35 Service Manual Samsung Electronics… -
Page 84
2. Disassemble the fuser and clean 2. Pressure roller is contaminated. the H/R(Heat Roller) and P/R (Pressure roller). And check the area between H/R and Thermistor . If contaminated, clean the area not to be deformed. 4-36 Service Manual Samsung Electronics… -
Page 85
Alignment and Troubleshooting 14) Blank Page Print out (1) Description : Blank page is printed. Remove contamination of the Bad ground contacts in terminals of the developer and OPC and/or developer . the unit. 4-37 Service Manual Samsung Electronics… -
Page 86: Error Messages
Code Error message A3-3112 SMART PANEL:Actuator Sensor Failure #A3-3112:Turn off then on. C1-1110 SMART PANEL:Prepare new toner cartridge C1-1120 SMART PANEL:End of life, Replace with new toner cartridge C1-1130 SMART PANEL:End of life, Replace with new toner cartridge C1-1411 SMART PANEL:Toner cartridge is not installed. Install the cartridge. C1-1512 SMART PANEL:Toner cartridge is not compatible.
-
Page 87
• Code:A3-3112 • Error message: SMART PANEL:Actuator Sensor Failure #A3-3112:Turn off then on. • Symptom/Cause: 1. The thermistor is open. 2. The thermistor harness is short. 3. The main board is defective. ED:2010-04-08 Samsung Eletronics… -
Page 88
• Trouble Shooting Method: 1. Remove the both side cover. 2. Remove the screw from the rear. 3. Remove the Cover-Top. 4. Remove the Cover-Exit. ED:2010-04-08 Samsung Eletronics… -
Page 89
5. Remove the metal plate after unplugging the fuser connector. 6. Replace the fuser unit after removing 1 screw. 7. The assembly is reverse order of disjointing. ED:2010-04-08 Samsung Eletronics… -
Page 90
• Error message: SMART PANEL:Prepare new toner cartridge • Symptom/Cause: 1. The toner cartridge has reached its estimated cartridge life. • Trouble Shooting Method: 1. Open the Cover-Exit. 2. Replace the toner cartridge. 3. Close the Cover-Exit. ED:2010-04-08 Samsung Eletronics… -
Page 91
SMART PANEL:End of life, Replace with new toner cartridge • Symptom/Cause: 1. The toner cartridge has reached its estimated cartridge life. • Trouble Shooting Method: 1. Open the Cover-Exit. 2. Replace the toner cartridge. 3. Close the Cover-Exit. ED:2010-04-08 Samsung Eletronics… -
Page 92
• Code:C1-1130 • Error message: SMART PANEL:End of life, Replace with new toner cartridge • Symptom/Cause: 1. The toner cartridge has reached its estimated cartridge life. Print the supplies information report. And check the life count. ED:2010-04-08 Samsung Eletronics… -
Page 93
• Trouble Shooting Method: 1. Open the Cover-Exit. 2. Replace the toner cartridge. 3. Close the Cover-Exit. ED:2010-04-08 Samsung Eletronics… -
Page 94
1. The toner cartridge is installed improperly, or not installed. • Trouble Shooting Method: 1. Open the Cover-Exit. 2. Reinstall the toner cartridge two or three times to confirm it is seated properly. 3. Close the Cover-Exit. ED:2010-04-08 Samsung Eletronics… -
Page 95
• Code:C1-1512 • Error message: SMART PANEL:Toner cartridge is not compatible. Check users guide • Symptom/Cause: 1. Ther toner cartridge is not suitable for your machine. 2. The print job can’t be executed. ED:2010-04-08 Samsung Eletronics… -
Page 96
• Trouble Shooting Method: 1. Prepare the Samsung-genuine toner cartridge. 2. Open the Cover-Exit. 3. Replace the toner cartridge. 4. Close the Cover-Exit. ED:2010-04-08 Samsung Eletronics… -
Page 97
1. Remove all papers on the tray. Remove the jammed paper from the machine. And reload the papers on the tray. 2. Adjust the paper guide to fix the papers. 3. Check the maximum paper capacity of the tray. Remove excess paper from the tray. ED:2010-04-08 Samsung Eletronics… -
Page 98
1. Open the top cover. Check if the paper has jammed. If there is the jammed paper, remove it. 2. If the error message in Smart Panel is not disappered, check the Regi sensor and actuator. If they are defective, replace them. ED:2010-04-08 Samsung Eletronics… -
Page 99
1. Error LED on the control pane is blinking because the main door is opened. • Trouble Shooting Method: 1. Close the cover unit it locks into place. 2. If the problem persists, check the cover open sensor that is located on the HVPS board. ED:2010-04-08 Samsung Eletronics… -
Page 100
1. The fuser unit is defective. 2. The SMPS Triac is defective. 3. The main board is defective. Using an incorrect type of paper may create a fusing error. Please use only paper that meets the specifications required by the machine. ED:2010-04-08 Samsung Eletronics… -
Page 101
• Trouble Shooting Method: 1. Remove the both side covers. 2. Remove the screw from the rear. 3. Remove the Cover-Top. 4. Remove the Cover-Exit. ED:2010-04-08 Samsung Eletronics… -
Page 102
5. Remove the matal plate after unplugging the fuser connector. 6. Replace the fuser unit after removing the screw. 7. The assembly is reverse order of disjointing. ED:2010-04-08 Samsung Eletronics… -
Page 103
1. The fuser unit is defective. 2. The SMPS Triac is defective. 3. The main board is defective. Using an incorrect type of paper may create a fusing error. Please use only paper that meets the specifications required by the machine. ED:2010-04-08 Samsung Eletronics… -
Page 104
• Trouble Shooting Method: 1. Remove the both side covers. 2. Remove the screw from the rear. 3. Remove the Cover-Top. 4. Remove the Cover-Exit. ED:2010-04-08 Samsung Eletronics… -
Page 105
5. Remove the metal plate after unplugging the fuser connector. 6. Replace the fuser unit after removing the screw. 7. The assembly is reverse order of disjointing. ED:2010-04-08 Samsung Eletronics… -
Page 106
1. An error between the LSU(Laser Scanning Unit) and the control circuit of the Main board has occurred. • Trouble Shooting Method: 1. Check the LSU connector. 2. Replace the LSU. 3. If the problem persists, replace the main board. ED:2010-04-08 Samsung Eletronics… -
Page 107
1. An error between the LSU(Laser Scanning Unit) and the control circuit of the Main board has occurred. • Trouble Shooting Method: 1. Check the LSU connector. 2. Replace the LSU. 3. If the problem persists, replace the main board. ED:2010-04-08 Samsung Eletronics… -
Page 108: System Diagram
System Diagram 5. System Diagram 5.1 Block Diagram Service Manual Samsung Electronics…
-
Page 109: Connection Diagram
System Diagram 5.2 Connection Diagram nP_FEED nP_EMPTY 3.3V_SENSOR 3.3V PICKUP_CLUTCH 24VS 3.3V_LSU nHSYNC nLD_ENABLE nLSU_SH DAC_OUT LSU_CLK nLREADY nPMOTOR 24VS OUT2B OUT2A OUT1B OUT1A HVPS & SMPS THERMISTOR DEV_CLK DEV_OUT 3.3V_CRUM NEUTRAL LIVE Service Manual Samsung Electronics…
-
Page 110: Reference Information
• Spring Hook Standard : For general use • Tweezers Standard : For general home use, small type. • Software (Driver) installation CD ROM • Cotton Swab Standard : For general home use, for medical service. Service Manual Samsung Electronics…
-
Page 111: Acronyms And Abbreviations
CRU Memory IMAP Internet Message Access Protocol Center Ware Internet Printing Protocols CWDP Center Ware Device Discovery Images Per Minutes Software(Samsung equivalent of Internetwork Packet Exchange Samsung’s SyncThru) Image Quality CWIS Center Ware Internet Services International Telecommunication Union DADF Duplex Auto Document Feeder…
-
Page 112
PS/3 PostScript Level-3 USDR Un-Shut Down Rate(=NSDR) Printing Video Controller in the XCMI Samsung’s Management Information SPGPm(Graphic Processor for Printer) Base Quality, Cost, and Delivery Warranty Action Remote Control Panel W x D x H Width x Depth x Height… -
Page 113: Service Parts
ELA=Electrical Assembly, HOU =Housing MEA UNIT-COVER PA EXIT ASS’Y MEA= Mechanical Assembly, PA=Paper PMO-TRAY EXTENTION MP NE PMO= Processing Mold MP=Multi-Purpose(Bypass) tray NE=for NEC (common as Samsung Halk printer) MEC-CASSETTE ASS’Y(LETTER) MEC = Mechanic Combined unit COVER-M-FRONT M=Mold MPR-NAME/PLATE MPR= Machinery Press,…
-
Page 114
PMO-GUIDE DP SIDE DP=Duplex RING-CS CS= Compress GEAR-MP/DUP DRV MP =Multi-Purpose (Bypass) tray DUP DRV = Duplex Driver IPR-BRKT G DUPI PR=Iron Press BRKT=BRACKET G= Ground UP=Duplex PMO-BUSHING TX(B4) TX=Transmit PMO-TRAY CASE, MP MP=Multi-Purpose tray(Bypass tray) Service Manual Samsung Electronics… -
Page 115
PBA SUB-MP-SEN =>Sub Printed circuit Board Assembly for the MP-SEN(= Multi-Purpose (Bypass) tray-Sensor) A/S MATERAL-PICKUP,MP FOOT-ML80 HOLDER CATCH CST MC2 MC2=>McKInley2 (Samsung Project code name) IPR-GROUND PLATE A(OPC) OPC=Organic Photo-Conductive ELA M/M-AUD SPEAKER ELA M/M => Electrical Assembly M/M AUD=Audio… -
Page 116
REGI=Registration PBA SUB-REGI PBA SUB-REGI => Sub Printed circuit Board Assembly for the Registration GROUND-P_SCAN ROLLER GROUND-P =Ground-Press IPR-GUARD C/O S/W C/O = Cover Open S/W= Switch MEA UNIT-TX STACKER TX =Transmit IPR-WASHER SPRING CU CU=Curve Service Manual Samsung Electronics… -
Page 117: A4 Iso 19752 Standard Pattern
The life of the toner cartridge and the printing speed are measured using the pattern shown below. (The image is 70% of the actual A4 size). 6.3.1 A4 ISO 19752 Standard Pattern This test page is reproduced at 70% of the normal A4 size Service Manual Samsung Electronics…
-
Page 118: Selecting A Location
• Front: 482.6 mm (enough space so that the paper tray can be removed) • Back: 100 mm (enough space for ventilation) • Right: 100 mm (enough space for ventilation) • Left: 100 mm (enough space for ventilation) Service Manual Samsung Electronics…
This manual is also suitable for:
Ml-1660Ml-1665
-
Contents
-
Table of Contents
-
Troubleshooting
-
Bookmarks
Quick Links
1. Speed
• Up to 16 ppm in A4 (17 ppm in Letter)
2. Processor
• Jupiter4e 150 MHz
3. Printer Language
• GDI
Service Manual
Laser Printer
ML-1660/1665
4. Memory
• 8 MB
5. Interfaces
• Compatible with USB 2.0
6. Toner cartridge
• Initial : 0.7K
• Sales : 1.5K
Related Manuals for Samsung ML-1665
Summary of Contents for Samsung ML-1665
-
Page 1: Service Manual
Service Manual Laser Printer ML-1660/1665 4. Memory 1. Speed • Up to 16 ppm in A4 (17 ppm in Letter) • 8 MB 2. Processor 5. Interfaces • Jupiter4e 150 MHz • Compatible with USB 2.0 3. Printer Language 6. Toner cartridge •…
-
Page 2
GSPN (Global Service Partner Network) North America : service.samsungportal.com Latin America : latin.samsungportal.com CIS : cis.samsungportal.com Europe : europe.samsungportal.com ⓒ Samsung Electronics Co.,Ltd. December. 2009 China : china.samsungportal.com Printed in Korea. Asia : asia.samsungportal.com Mideast & Africa : mea.samsungportal.com VERSION NO. : 1.00… -
Page 3: Table Of Contents
Contents chapter 1 Precautions 1.1 Safety Warning …………………………………………………… 1-1 1.2 Caution for safety ………………………………………………… 1-2 1.2.1 Toxic material ………………………………………………… 1-2 1.2.2 Electric Shock and Fire Safety Precautions ……………… 1-2 1.2.3 Handling Precautions ……………………………………… 1-3 1.2.4 Assembly / Disassembly Precautions ……………………… 1-3 1.2.5 Disregarding this warning may cause bodily injury …………
-
Page 4
Contents 3.2 Screws used in the printer ……………………………………… 3-2 3.3 Cover ……………………………………………………………… 3-3 3.3.1 Left/Right cover ……………………………………………… 3-3 3.3.2 Rear bracket ………………………………………………… 3-3 3.3.3 Cover-open ………………………………………………… 3-4 3.3.4 Top/Front cover ……………………………………………… 3-4 3.4 Main PBA ………………………………………………………… 3-5 3.5 SMPS/HVPS board ……………………………………………… 3-6 3.6 Fuser unit …………………………………………………………… -
Page 5
Contents chapter 5 System Diagram 5.1 Block Diagram …………………………………………………… 5-1 5.2 Connection Diagram……………………………………………… 5-2 chapter 6 Reference Information 6.1 Tool for Troubleshooting ………………………………………… 6-1 6.2 Acronyms and Abbreviations …………………………………… 6-2 6.2.1 Acronyms …………………………………………………… 6-2 6.2.2 Service Parts ………………………………………………… 6-4 6.3 A4 ISO 19798 Standard Pattern ………………………………… 6-8 6.3.1 A4 ISO 19752 Standard Pattern ……………………………… -
Page 6: Safety Warning
High voltages and lasers inside this product are dangerous. This product should only be serviced by a factory trained service technician. (2) Use only Samsung replacement parts. There are no user serviceable parts inside the product. Do not make any unauthorized changes or additions to the product as these could cause the product to malfunctions and create an electric shocks or fire hazards.
-
Page 7: Caution For Safety
Take care not to cut or damage the power cable or plugs when moving the machine. (9) Use caution during thunder or lightning storms. Samsung recommends that this machine be disconnected from the power source when such weather conditions are expected. Do not touch the machine or the power cord if it is still connected to the wall socket in these weather conditions.
-
Page 8: Handling Precautions
1.2.4 Assembly / Disassembly precautions Replace parts carefully and always use Samsung parts. Take care to note the exact location of parts and also cable routing before dismantling any part of the machine. Ensure all parts and cables are replaced correctly.
-
Page 9: Disregarding This Warning May Cause Bodily Injury
Failure to do so could cause the printer to tip or fall possibly causing personal injury or damaging the printer. (5) Do not install the printer on a sloping or unstable surface. After installation, double check that the printer is stable. Samsung Electronics Service Manual…
-
Page 10: Esd Precautions
9. Minimize bodily motions when handling unpackaged replacement ESDs. Normal motions, such as the brushing together of clothing fabric and lifting one’s foot from a carpeted floor, can generate static electricity sufficient to damage an ESD. Samsung Electronics Service Manual…
-
Page 11: Product Specifications
2. Processor • Jupiter4e 150 MHz 3. Printer Language • GDI 4. Memory • 8 MB 5. Interfaces • Compatible with USB 2.0 ML- 1660 6. Toner cartridge • Initial : 0.7K • Sales : 1.5K Service Manual Samsung Electronics…
-
Page 12: Specifications
— Red Hat 8~9, — Fedora Core 1~4 — Mandrake 9.2~10.1 — SuSE 8.2~9.2 Mac OS 10.3~10.6 WHQL Windows 2000/XP(32/64bits)/Vista(32/64bits)/2003 Server(32/64bits)/2008 Server(32/64bits) / Win7 /2008 R2 Compatibility Win 2000/XP(32/64bits)/2003 Server/Vista(32/64bits),2008 Server(32/64bits)/ WIn7 /2008 R2 Wired Network Protocol Supporting OS Service Manual Samsung Electronics…
-
Page 13: Paper Handling
16~32lb (60 to 120g/㎡) Sensing Paper Empty Optional Capacity Cassette Tray Media sizes Media types Media weight Sensing Output Stacking Output Stacking Face-Down 100 sheets @ 75g/㎡(Base Line Paper : Samsung Premium/ Xerox4200) NN Condition Duplex Supporting Samsung Electronics Service Manual…
-
Page 14
30K pages Pick up roller 30K pages 2.1.2.6 Reliability & Service Items Specification Printing Volume (SET AMPV) 75 sheets/month MPBF 10,000 sheets MTTR 30 min. SET Life Cycle 30,000 sheets or 5 years (whichever comes first) Service Manual Samsung Electronics… -
Page 15
361 x 270 x 113 mm Weight 4.12kg Toner 0.68kg Gross 5.6kg 2.1.2.8 Packing & Accessory Items Life Driver & Network Install CD-ROM Power Cable USB Cable (CIS/China/Korea/India) In-Box Quick Install Guide Warranty Registration Card User’s Manual (PDF File) Samsung Electronics Service Manual… -
Page 16
Product spec and feature 2.1.2.9 Options Items Specification Memory Second Cassette Wired Network Wireless Network Hard Disk Duplex Unit Service Manual Samsung Electronics… -
Page 17: Model Comparison Table
Interface USB 2.0 USB 2.0 USB 2.0 Size (mm) 341 x 224 x 184 mm 353 x 298 x 213 mm 379 x 243 x 225 mm Toner Standard 0.7K / 1K Standard 1.5K Standard 2K Service Manual Samsung Electronics…
-
Page 18: System Overview
This chapter describes the functions and operating principal of the main component. 2.2.1 Front View This illustration may differ from your machine depending on its model. Control panel Paper length guide Top cover Paper width guides Toner cartridge Output support Tray Output tray (face down) Service Manual Samsung Electronics…
-
Page 19: Rear View
Product spec and feature 2.2.2 Rear View This illustration may differ from your machine depending on its model. USB port Power receptacle Service Manual Samsung Electronics…
-
Page 20: System Layout
Frame, Feeding, Developing, Driving, Transferring, Fusing, Cabinet and H/W comprising the main control board, power board, operation panel, PC Interface. NAME NAME Pressure roller Transfer roller Heat roller Deve roller Exit roller Supply roller Toner Cartridge Feed roller Friction pad Charge roller Pickup roller 2-10 Service Manual Samsung Electronics…
-
Page 21
In the front side, there is a paper level indicator. 3) Pick- up roller It has functions such as a paper pickup function, driving control function, paper feeding function, and removing electronic static function. Pick up roller is drive by solenoid. 2-11 Service Manual Samsung Electronics… -
Page 22: Transfer Roller
— In ML-1660, the driving device is consisted of OPC, Pick- up, Feed, Fuser, Gear- Train connected with Mounting member. A step motor for driving is assembled to the left frame. • Driving Frequency: Step Motor 840 PPS (1050rpm) • It is a power delivery unit by gearing: Step Motor → Pick-up/Feeder/Transfer/Fuser/Exit 2-12 Service Manual Samsung Electronics…
-
Page 23: Pressure Roller
Teflon. When a paper passes between a heat roller and a pressure roller, toner adheres to the surface of a paper permanently. 5) Halogen Lamp — Voltage 120 V : 115 ± 5 % 220 V : 230 ± 5 % — Capacity : 600 Watt ± 25 W 2-13 Service Manual Samsung Electronics…
-
Page 24
— A fuser power is cut off when a front cover is opened — Maintain a temperature of fuser cover’s surface under 80(C for user, and attach a caution label at where customer can see easily when customer open a rear cover. 2-14 Service Manual Samsung Electronics… -
Page 25
/HSYNC signal is detected, the image data is sent to the LSU to adjust the left margin on paper. The one side of the polygon mirror is one line for scanning. OPC Drum Photo Diode Polygon Mirror Polygon Motor Motor Driver LD Driver circit LD(Laser Diode) Protector panel 2-15 Service Manual Samsung Electronics… -
Page 26: Toner Cartridge
• Handling of wasted toner : Collect the wasted toner in the cleaning frame by using cleaning blade • OPC Drum Protecting Shutter : None • Classifying device for toner cartridge: ID is classified by CRUM. Max -1.4KV Cleaning Blade -100V Cleaning Roller 0.20mW -720V -150V↓ -350V +3.5kV -550V 2-16 Service Manual Samsung Electronics…
-
Page 27: Engine H/W Specifications
The signals from the paper feed jam sensor and paper empty sensor are directly inputted to the main board. CN6, Power I/F CN4, LSU I/F CN8, Pick CN2, Fuser up_clutch CN1, Hyper CN7, Main CN5, Sensor motor drive 2-17 Service Manual Samsung Electronics…
-
Page 28
— Access Time : 70 nsec 2) SDRAM When Printing, use Band Buffer, System Working Memory Area . — 8M capa : 8M Byte basic. 8M :Printing System Working Memory Area — Access Time : 60 nsec 2-18 Service Manual Samsung Electronics… -
Page 29
TR driven from the noise pulse, which is occurred when the solenoid is de-energized. ■ Motor Driving The main motor driving circuits is on the main board There is motor driver IC on the main board control the step motor. 2-19 Service Manual Samsung Electronics… -
Page 30: Main Board
It is consisted of the SMPS part, which supplies the DC power for driving the system, and the AC heater control part, which supplies the power to fuser. SMPS has two output channels. Which are +3.3V and +24V. Main board Fuser 2-20 Service Manual Samsung Electronics…
-
Page 31
— Output Voltage Rising Time : 50 ms Max — Output Voltage Falling Time : 50 ms Max — Output Loading range : 10 MΩ ~ 1000 MΩ — Output Control Signal (BIAS-PWM) : the CPU is HV output when PWM is low. 2-21 Service Manual Samsung Electronics… -
Page 32
1.8A 100ms RIPPLE NOISE Voltage 100mVp-p Under 500mVp-p Maximum output 2.64W 32.4W Peak output 3.3W 43.2W 100ms Protection for loading shortage Shut down or Fuse Shut down or Output and overflowing current Protection Voltage Drop 2-22 Service Manual Samsung Electronics… -
Page 33: Engine F/W Contol Algorithm
AD converter. The voltage value for impressing to the transfer roller is decided by the changed value. 2-23 Service Manual Samsung Electronics…
-
Page 34: Lsu
The engine mode is changed to recovery mode and the engine informs the main system of the engine mode. And the engine checks the LSU error. If the error doesn’t happen, the printing job will be proceeding. 2-24 Service Manual Samsung Electronics…
-
Page 35: S/W Descriptions
(PCL, PS, GDI, etc.) to be able to make the user to take same output as originally one what composed in Host. 2. Kernel that control and management the whole procedure include of Control flow and Printing Job before transfer to Engine system. 2-25 Service Manual Samsung Electronics…
-
Page 36: Block Diagram
4. Port Monitor that manages the network communication between spooler and Network Interface Card, or various additional application and Network Interface Card,(this is, at first, make communication logical port, manage the data, transfer them from spooler to network port, and offer the result of printing). 2-26 Service Manual Samsung Electronics…
-
Page 37
— Engine print the received data to required paper with the sequential developing process. The additional printing function are realized in (1) Web environment (2) Window environment. On addition, Kernel informs a status of printing status and printer status to user made printing job with the Status Monitor. 2-27 Service Manual Samsung Electronics… -
Page 38: Precautions When Replacing Parts
3.1.1 Precautions when assembling and disassembling * Use only approved Samsung spare parts. Ensure that part number, product name, any voltage, current or temperature rating are correct. Failure to do so could result in damage to the machine, circuit overload, fire or electric shock.
-
Page 39: Screws Used In The Printer
FRAME-PAPER PATH SCREW-TAPTYPE;PWH,+,B,M3,L10,NI PLT,SWRCH18A 6003-000282 FRAME-FEED IDLE SCREW-TAPTYPE;BH,+,-,B,M3,L8,ZPC(BLK),SWRCH18A,- 6003-000269 SCREW-TAPTYPE;BH,+,-,S,M3,L6,ZPC(WHT),SWRCH18A,- FRMAE MAIN-LEFT 6003-000282 SCREW-TAPTYPE;BH,+,-,B,M3,L8,ZPC(BLK),SWRCH18A,- 6003-000269 FRMAE MAIN-RIGHT SCREW-TAPTYPE;BH,+,-,S,M3,L6,ZPC(WHT),SWRCH18A,- 6003-000269 FRAME MAIN-MIDDLE SCREW-TAPTYPE;BH,+,-,S,M3,L6,ZPC(WHT),SWRCH18A,- 6003-000282 SCREW-TAPTYPE;BH,+,-,B,M3,L8,ZPC(BLK),SWRCH18A,- 6003-000282 COVER-TOP SCREW-TAPTYPE;BH,+,-,B,M3,L8,ZPC(BLK),SWRCH18A,- 6003-000282 CARTRIDGE-TONER SCREW-TAPTYPE;BH,+,-,B,M3,L8,ZPC(BLK),SWRCH18A,- 6003-000269 SCREW-TAPTYPE;BH,+,-,S,M3,L6,ZPC(WHT),SWRCH18A,- MAIN LINE 6003-000282 SCREW-TAPTYPE;BH,+,-,B,M3,L8,ZPC(BLK),SWRCH18A,- Service Manual Samsung Electronics…
-
Page 40: Cover
3.3.1 Left/Right cover 1. Take off the left cover by removing hooks from 2. Take off the right cover by removing hooks from its edge. its edge. 3.3.2 Rear bracket 1. Remove 4 screws. Release the rear bracket. Service Manual Samsung Electronics…
-
Page 41: Cover-Open
1. Release the cover-open from the hook of both sides. 3.3.4 Top/Front cover 1. Remove 2 screws. Hold the top and front cover and pull both of them to the direction of arrow. 2. Separate the top and front cover. Top cover Front cover Service Manual Samsung Electronics…
-
Page 42: Main Pba
Disassembly and Reassembly 3.4 Main PBA 1. To remove the main PBA, first remove the right cover. (Refer to 3.3.1) 2. Remove 4 screws. Unplug all connectors. And release the Main PBA. Service Manual Samsung Electronics…
-
Page 43: Smps/Hvps Board
1. To remove the SMPS/HVPS board, first remove the right cover and rear bracket. (Refer to 3.3) 2. Remove 4 screws. Unplug all connectors. And release the main-PBA bracket. 3. Remove 8 screws. Unplug a connector. And release the SMPS/HVPS board. Service Manual Samsung Electronics…
-
Page 44: Fuser Unit
3.6 Fuser unit 1. Remove the main PBA bracket. (Refer to 3.5) 2. Unplug the connector on SMPS/HVPS board. 3. Remove 3 screws. 4. Pull the fuser unit to the direction of arrow slightly and release it. Service Manual Samsung Electronics…
-
Page 45: Lsu
1. Remove the front/ top/ rear cover. (refer to 3.3 cover) 2. Remove 4 screw securing the COVER-LSU. Release the COVER-LSU. COVER-LSU COVER-LSU COVER-LSU Front view Top view Front view Front view Top view Top view 3. Remove 3 screws. Release the LSU. Service Manual Samsung Electronics…
-
Page 46: Drive Unit
Disassembly and Reassembly 3.8 Drive unit 1. Remove the left cover. 2. Remove 4 screws. Release the drive unit. Service Manual Samsung Electronics…
-
Page 47: Step Motor
1. Remove the drive unit. (Refer to 3.8) Caution 2. Remove 7 screws. Release the left-frame When reassembling the drive unit, put down the bracket. drive unit and assemble the left-frame bracket. 3. Remove 2 screws. Release the step motor. 3-10 Service Manual Samsung Electronics…
-
Page 48: Pick Up Roller
Disassembly and Reassembly 3.10 Pick up roller 1. Open the top cover. 2. Take out the toner cartridge. 3. Push the hinge to the direction of arrow. 3-11 Service Manual Samsung Electronics…
-
Page 49: Alignment And Troubleshooting
Shows the status of jam occurance of your machine. Online/ Error Shows the status of your machine. Print Screen Prints the displayed screen in the monitor. Power You can turn the power on and off with this button. Service Manual Samsung Electronics…
-
Page 50: Understanding The Control Panel
Prepare a new cartridge for replacement. You may temporarily increase the printing quality by redistributing the toner. • The machine is printing in manual feed mode or in manual duplex mode. • The machine is canceling a print job. Service Manual Samsung Electronics…
-
Page 51: Jam Removal
If the paper does not move when you pull, or if you do not see the paper in this area, check the fuser area around the toner cartridge. If you do not see the jammed paper, go to next step. Service Manual Samsung Electronics…
-
Page 52
If you do not see the jammed paper, go to next 8. Replace the toner cartridge. step. 6. Pull the toner cartridge out. 9. Close the fuser unit cover. 10. Close the top cover and open the output tray. Printing automatically resumes. Service Manual Samsung Electronics… -
Page 53: Printing A Report
In the ready mode, press and hold this button for about 6 seconds sheet until the green LED blinks slowly, and release. Supplies info report In the ready mode, press and hold this button for about 10 seconds until the green LED blinks rapidly, and release. Service Manual Samsung Electronics…
-
Page 54: Demo Page
Alignment and Troubleshooting ■ Demo Page Service Manual Samsung Electronics…
-
Page 55
Alignment and Troubleshooting ■ Supplies Information Report Service Manual Samsung Electronics… -
Page 56: Periodic Defective Image
Transfer Roller 39.2mm Ghost, Damaged image by abnormal transfer Transfer roller Pressure Roller 75.4mm Background Fuser Fusing Roller 77.5mm Black spot and image ghost Pressure roller Transfer roller Heat roller Deve roller Charge roller Supply roller Service Manual Samsung Electronics…
-
Page 57: Firmware Upgrade
1) Connect PC and printer with USB cable. 2) Turn on the power of printer.(Ready Status) 3) Drag the f/w file and Drop down on the usblist2.exe. And then f/w update will be started automatically. 4) Please wait until end reboot. Service Manual Samsung Electronics…
-
Page 58: Using The Smart Panel Program
Or, if you are a Windows user, you can launch it from the Start menu, select Programs or All Programs > Samsung Printers > your printer driver name > Smart Panel. • If you have already installed more than one Samsung machine, first select the correct machine model you want in order to access the corresponding Smart Panel.
-
Page 59: Opening The Troubleshooting Guide
Guide. 4.1.7.3 Changing the Smart Panel Program Settings Right-click (in Windows or Linux) or click (in Mac OS X) the Smart Panel icon and select Options. Select the settings you want from the Options window. 4-11 Service Manual Samsung Electronics…
-
Page 60: Troubleshooting
See the troubleshooting OPE LED Orange LED on? flow chart. Green OK? — Red : Yes — Orange : No Remove the Print(test pattern) jammed paper. printing Refer to «Solution Quality is of Image Problem» Nomal? 4-12 Service Manual Samsung Electronics…
-
Page 61: Basic Check List
—> Refer to section 4.2.5 6. Check consumables (toner etc.). • Using the keys print the Test Pattern. —> Expected life of various consumable parts, compare this with the figures printed and replace as required 4-13 Service Manual Samsung Electronics…
-
Page 62: Initial Inspection
1. Use only paper which is of a suitable quality, weight and size? See the user guide. 4. Check the overall condition of the printer 1. Is the printer properly maintained ? Clean the Paper Transport Passages. Any rollers with dirt surfaces should be cleaned or replaced. 4-14 Service Manual Samsung Electronics…
-
Page 63: Bad Discharge
2. Check if the separation pad in the Replace the separation pad. cassette is worn away. Clean with soft cloth dampened 3. Check the surface of the with IPA(Isopropyl Alcohol) or roller-pick up is contaminated. replace the pick up roller. 4-15 Service Manual Samsung Electronics…
-
Page 64
2. If the recording paper is stuck in the discharge Reassemble the Actuator-Feed roller and the fuser just after passing and Spring-Actuator if the returning through the Actuator-Feed, Feed is bad. Actuator may be defective. 4-16 Service Manual Samsung Electronics… -
Page 65
1. Solenoid malfunction (the solenoid does not work properly) Replace the solenoid if necessary. Clean the pad friction with soft 2. Cassette holder pad is contaminated with foreign clothe dampened with IPA matter.(oil…) (Isopropyl Alcohol). 4-17 Service Manual Samsung Electronics… -
Page 66
1. Paper is too much thin. How to remove the rolled in the OPC Drum. — Remove the paper while turning 2. The face of paper is curled. the OPC Drum against the ongoing direction. 4-18 Service Manual Samsung Electronics… -
Page 67: Malfunction
1. Bending or deformation of Replace the defective actuator. the actuator of the paper sensor. 2. Check if the Reconnect the connector. connector of the sensor PBA is If the problem persist, replace the connected properly. sensor PBA. 4-19 Service Manual Samsung Electronics…
-
Page 68
Description : The ERROR lamp does not come on even when the printer cover is open 1. Check the insertion of the Cover 1. Check the connector Open S/W Connect. and circuit of the cover switch 2. Replace the SMPS/HVPS board. department in the SMPS board. 4-20 Service Manual Samsung Electronics… -
Page 69
Description : Main motor is not driving when printing, and paper does not feed into the printer, resulting ‘Jam 0’. Check the motor harness, replace 1. Motor harness may be defective. it, if defective. Replace the Motor or Drive unit, 2. Check the motor operation. if necessary. 4-21 Service Manual Samsung Electronics… -
Page 70
Description : When system power is turned on, all lamps on the operator panel do not come on. 1. Check if the flat cable between the main board and Reconnect the flat cable. HVPS/SMPS board is connected correctly. 2. Check if the HVPS/SMPS Replace the HVPS/SMPS board. output is normal. 4-22 Service Manual Samsung Electronics… -
Page 71
5) Vertical Line Getting Curved Description : When printing, vertical line gets curved. 1. If the supply of +24v 1. Replace LSU. is unstable in the Main board 2. Replace the Main board. linking with LSU. 4-23 Service Manual Samsung Electronics… -
Page 72: Bad Image
2. Scratched surface of Replace the transfer roller if the charge roller in the toner cartridge. occurred as No. 3. 3. Partly depression or deformation on the surface of the transfer roller. 4-24 Service Manual Samsung Electronics…
-
Page 73
Remove if top of a black image. found. 5. It may occur when foreign If the problems are not solved, substances are on the OPC Drum. replace the toner cartridge. 4-25 Service Manual Samsung Electronics… -
Page 74
Charging Roller = 26.7mm in the OPC. Supply Roller = 47mm 2. If the malfunction persists, Transfer Roller = 39.2mm replace the developer. Pressure Roller = 75.4mm Fusing Roller = 77.5mm 4-26 Service Manual Samsung Electronics… -
Page 75
5. Clean the inside of the set against the paper particles and foreign matter in order not to cause the trouble. 4-27 Service Manual Samsung Electronics… -
Page 76
1. Clean up the contaminated area by the toner. 2. Replace the HVPS if the 3. Abnormal output from the HVPS. problems are not solved by the above four directions. 4-28 Service Manual Samsung Electronics… -
Page 77
HVPS. side of the Developer and charge 2. Replace the HVPS if not solved terminal of HVPS. by the above direction 1 and 2. 4-29 Service Manual Samsung Electronics… -
Page 78
Clean the bushing part of the 4. Is the movement(Up and Down) transfer roller. of the transfer roller smooth? If the problem is still not solved, 5. Is the HVPS normal? replace the developer. 4-30 Service Manual Samsung Electronics… -
Page 79
If not solved by the direction 3, 4. Transfer roller lifetime check the transfer roller lifetime (50.000 sheets) has expired. and replace it. 5. Abnormal low temperature Wait about 1 hour after power on (below 10℃). before using printer. 4-31 Service Manual Samsung Electronics… -
Page 80
Select ‘Thick Mode’ on paper type thicker than normal paper or menu from the software application transparencies such as OHP, higher and after using returning to the transfer voltage is original mode is recommended. required. 4-32 Service Manual Samsung Electronics… -
Page 81
Check the approved voltage of the 2. The abnormal voltage and supply roller and contact of the bad contact of the terminal of the terminal and adjust if necessary. supply roller 4-33 Service Manual Samsung Electronics… -
Page 82
Disassemble the fuser and The temperature of the fuser remove the contaminated toner particles on the roller and clean is maintained high. the foreign matter between Thermistor and Heat roller . ( Caution : can be deformed) 4-34 Service Manual Samsung Electronics… -
Page 83
Alignment and Troubleshooting 12) Stains on the Face of Page Description : The background on the face of the printed page is stained. 1. T oner leakage due to Replace the toner cartridge. improperly sealed developer . 4-35 Service Manual Samsung Electronics… -
Page 84
2. Disassemble the fuser and clean 2. Pressure roller is contaminated. the H/R(Heat Roller) and P/R (Pressure roller). And check the area between H/R and Thermistor . If contaminated, clean the area not to be deformed. 4-36 Service Manual Samsung Electronics… -
Page 85
Alignment and Troubleshooting 14) Blank Page Print out (1) Description : Blank page is printed. Remove contamination of the Bad ground contacts in terminals of the developer and OPC and/or developer . the unit. 4-37 Service Manual Samsung Electronics… -
Page 86: Error Messages
Code Error message A3-3112 SMART PANEL:Actuator Sensor Failure #A3-3112:Turn off then on. C1-1110 SMART PANEL:Prepare new toner cartridge C1-1120 SMART PANEL:End of life, Replace with new toner cartridge C1-1130 SMART PANEL:End of life, Replace with new toner cartridge C1-1411 SMART PANEL:Toner cartridge is not installed. Install the cartridge. C1-1512 SMART PANEL:Toner cartridge is not compatible.
-
Page 87
• Code:A3-3112 • Error message: SMART PANEL:Actuator Sensor Failure #A3-3112:Turn off then on. • Symptom/Cause: 1. The thermistor is open. 2. The thermistor harness is short. 3. The main board is defective. ED:2010-04-08 Samsung Eletronics… -
Page 88
• Trouble Shooting Method: 1. Remove the both side cover. 2. Remove the screw from the rear. 3. Remove the Cover-Top. 4. Remove the Cover-Exit. ED:2010-04-08 Samsung Eletronics… -
Page 89
5. Remove the metal plate after unplugging the fuser connector. 6. Replace the fuser unit after removing 1 screw. 7. The assembly is reverse order of disjointing. ED:2010-04-08 Samsung Eletronics… -
Page 90
• Error message: SMART PANEL:Prepare new toner cartridge • Symptom/Cause: 1. The toner cartridge has reached its estimated cartridge life. • Trouble Shooting Method: 1. Open the Cover-Exit. 2. Replace the toner cartridge. 3. Close the Cover-Exit. ED:2010-04-08 Samsung Eletronics… -
Page 91
SMART PANEL:End of life, Replace with new toner cartridge • Symptom/Cause: 1. The toner cartridge has reached its estimated cartridge life. • Trouble Shooting Method: 1. Open the Cover-Exit. 2. Replace the toner cartridge. 3. Close the Cover-Exit. ED:2010-04-08 Samsung Eletronics… -
Page 92
• Code:C1-1130 • Error message: SMART PANEL:End of life, Replace with new toner cartridge • Symptom/Cause: 1. The toner cartridge has reached its estimated cartridge life. Print the supplies information report. And check the life count. ED:2010-04-08 Samsung Eletronics… -
Page 93
• Trouble Shooting Method: 1. Open the Cover-Exit. 2. Replace the toner cartridge. 3. Close the Cover-Exit. ED:2010-04-08 Samsung Eletronics… -
Page 94
1. The toner cartridge is installed improperly, or not installed. • Trouble Shooting Method: 1. Open the Cover-Exit. 2. Reinstall the toner cartridge two or three times to confirm it is seated properly. 3. Close the Cover-Exit. ED:2010-04-08 Samsung Eletronics… -
Page 95
• Code:C1-1512 • Error message: SMART PANEL:Toner cartridge is not compatible. Check users guide • Symptom/Cause: 1. Ther toner cartridge is not suitable for your machine. 2. The print job can’t be executed. ED:2010-04-08 Samsung Eletronics… -
Page 96
• Trouble Shooting Method: 1. Prepare the Samsung-genuine toner cartridge. 2. Open the Cover-Exit. 3. Replace the toner cartridge. 4. Close the Cover-Exit. ED:2010-04-08 Samsung Eletronics… -
Page 97
1. Remove all papers on the tray. Remove the jammed paper from the machine. And reload the papers on the tray. 2. Adjust the paper guide to fix the papers. 3. Check the maximum paper capacity of the tray. Remove excess paper from the tray. ED:2010-04-08 Samsung Eletronics… -
Page 98
1. Open the top cover. Check if the paper has jammed. If there is the jammed paper, remove it. 2. If the error message in Smart Panel is not disappered, check the Regi sensor and actuator. If they are defective, replace them. ED:2010-04-08 Samsung Eletronics… -
Page 99
1. Error LED on the control pane is blinking because the main door is opened. • Trouble Shooting Method: 1. Close the cover unit it locks into place. 2. If the problem persists, check the cover open sensor that is located on the HVPS board. ED:2010-04-08 Samsung Eletronics… -
Page 100
1. The fuser unit is defective. 2. The SMPS Triac is defective. 3. The main board is defective. Using an incorrect type of paper may create a fusing error. Please use only paper that meets the specifications required by the machine. ED:2010-04-08 Samsung Eletronics… -
Page 101
• Trouble Shooting Method: 1. Remove the both side covers. 2. Remove the screw from the rear. 3. Remove the Cover-Top. 4. Remove the Cover-Exit. ED:2010-04-08 Samsung Eletronics… -
Page 102
5. Remove the matal plate after unplugging the fuser connector. 6. Replace the fuser unit after removing the screw. 7. The assembly is reverse order of disjointing. ED:2010-04-08 Samsung Eletronics… -
Page 103
1. The fuser unit is defective. 2. The SMPS Triac is defective. 3. The main board is defective. Using an incorrect type of paper may create a fusing error. Please use only paper that meets the specifications required by the machine. ED:2010-04-08 Samsung Eletronics… -
Page 104
• Trouble Shooting Method: 1. Remove the both side covers. 2. Remove the screw from the rear. 3. Remove the Cover-Top. 4. Remove the Cover-Exit. ED:2010-04-08 Samsung Eletronics… -
Page 105
5. Remove the metal plate after unplugging the fuser connector. 6. Replace the fuser unit after removing the screw. 7. The assembly is reverse order of disjointing. ED:2010-04-08 Samsung Eletronics… -
Page 106
1. An error between the LSU(Laser Scanning Unit) and the control circuit of the Main board has occurred. • Trouble Shooting Method: 1. Check the LSU connector. 2. Replace the LSU. 3. If the problem persists, replace the main board. ED:2010-04-08 Samsung Eletronics… -
Page 107
1. An error between the LSU(Laser Scanning Unit) and the control circuit of the Main board has occurred. • Trouble Shooting Method: 1. Check the LSU connector. 2. Replace the LSU. 3. If the problem persists, replace the main board. ED:2010-04-08 Samsung Eletronics… -
Page 108: System Diagram
System Diagram 5. System Diagram 5.1 Block Diagram Service Manual Samsung Electronics…
-
Page 109: Connection Diagram
System Diagram 5.2 Connection Diagram nP_FEED nP_EMPTY 3.3V_SENSOR 3.3V PICKUP_CLUTCH 24VS 3.3V_LSU nHSYNC nLD_ENABLE nLSU_SH DAC_OUT LSU_CLK nLREADY nPMOTOR 24VS OUT2B OUT2A OUT1B OUT1A HVPS & SMPS THERMISTOR DEV_CLK DEV_OUT 3.3V_CRUM NEUTRAL LIVE Service Manual Samsung Electronics…
-
Page 110: Reference Information
• Spring Hook Standard : For general use • Tweezers Standard : For general home use, small type. • Software (Driver) installation CD ROM • Cotton Swab Standard : For general home use, for medical service. Service Manual Samsung Electronics…
-
Page 111: Acronyms And Abbreviations
CRU Memory IMAP Internet Message Access Protocol Center Ware Internet Printing Protocols CWDP Center Ware Device Discovery Images Per Minutes Software(Samsung equivalent of Internetwork Packet Exchange Samsung’s SyncThru) Image Quality CWIS Center Ware Internet Services International Telecommunication Union DADF Duplex Auto Document Feeder…
-
Page 112
PS/3 PostScript Level-3 USDR Un-Shut Down Rate(=NSDR) Printing Video Controller in the XCMI Samsung’s Management Information SPGPm(Graphic Processor for Printer) Base Quality, Cost, and Delivery Warranty Action Remote Control Panel W x D x H Width x Depth x Height… -
Page 113: Service Parts
ELA=Electrical Assembly, HOU =Housing MEA UNIT-COVER PA EXIT ASS’Y MEA= Mechanical Assembly, PA=Paper PMO-TRAY EXTENTION MP NE PMO= Processing Mold MP=Multi-Purpose(Bypass) tray NE=for NEC (common as Samsung Halk printer) MEC-CASSETTE ASS’Y(LETTER) MEC = Mechanic Combined unit COVER-M-FRONT M=Mold MPR-NAME/PLATE MPR= Machinery Press,…
-
Page 114
PMO-GUIDE DP SIDE DP=Duplex RING-CS CS= Compress GEAR-MP/DUP DRV MP =Multi-Purpose (Bypass) tray DUP DRV = Duplex Driver IPR-BRKT G DUPI PR=Iron Press BRKT=BRACKET G= Ground UP=Duplex PMO-BUSHING TX(B4) TX=Transmit PMO-TRAY CASE, MP MP=Multi-Purpose tray(Bypass tray) Service Manual Samsung Electronics… -
Page 115
PBA SUB-MP-SEN =>Sub Printed circuit Board Assembly for the MP-SEN(= Multi-Purpose (Bypass) tray-Sensor) A/S MATERAL-PICKUP,MP FOOT-ML80 HOLDER CATCH CST MC2 MC2=>McKInley2 (Samsung Project code name) IPR-GROUND PLATE A(OPC) OPC=Organic Photo-Conductive ELA M/M-AUD SPEAKER ELA M/M => Electrical Assembly M/M AUD=Audio… -
Page 116
REGI=Registration PBA SUB-REGI PBA SUB-REGI => Sub Printed circuit Board Assembly for the Registration GROUND-P_SCAN ROLLER GROUND-P =Ground-Press IPR-GUARD C/O S/W C/O = Cover Open S/W= Switch MEA UNIT-TX STACKER TX =Transmit IPR-WASHER SPRING CU CU=Curve Service Manual Samsung Electronics… -
Page 117: A4 Iso 19752 Standard Pattern
The life of the toner cartridge and the printing speed are measured using the pattern shown below. (The image is 70% of the actual A4 size). 6.3.1 A4 ISO 19752 Standard Pattern This test page is reproduced at 70% of the normal A4 size Service Manual Samsung Electronics…
-
Page 118: Selecting A Location
• Front: 482.6 mm (enough space so that the paper tray can be removed) • Back: 100 mm (enough space for ventilation) • Right: 100 mm (enough space for ventilation) • Left: 100 mm (enough space for ventilation) Service Manual Samsung Electronics…
This manual is also suitable for:
Ml-1660Ml-1665
Как отменить печать на принтере Samsung
Бывают случаи, когда пользователь, уже отправив документы на печать, в самый последний момент замечает в нем ошибку, которая может оказать пагубное влияния на всю работу в целом. Или же случайно (в спешке) отправляет файлы на печать, не указав при этом, нужных параметров или не откорректировав тест.
Что можно предпринять в таком случае? Единственный выход — это отменить задание на принтере. В противном случае это напрасная трата чернил и бумаги. Проблема в том, что не все пользователи электронной и печатной техники знают, как отменять уже активированный процесс печати.
Если вам не удалось самостоятельно решить эту проблему, вы можете обратиться в сервисный центр по ремонту принтеров и МФУ Samsung .
Как отменить печать на принтере Samsung через приложение для печати
Остановите процесс печати при помощи ПО к вашему печатному устройству Samsung.
Например, когда вы запускаете печать файла через специальное приложение для печати принтера Samsung, на экране вашего компьютера будет размещено окно, в котором отображается вся информация о состоянии печати.
Посмотрите в нижнюю часть этого окна, там вы увидите опцию «отменить печать». Нажмите на эту функцию, и принтер сразу прекратит процесс печати.
Внимание: Это диалоговое окно может быть свернуто в панель инструментов, которая находится в нижней левой части рабочего стола.
Просто найдите на панели значок принтера. Двукратным щелчком мыши разверните это окно и осуществите процесс отмены печати.

Как отменить печать на принтере Samsung путем отмены очереди
Нажимаете на своем компьютере или ноутбуке, к которому подключен принтер,
«
Пуск
»,
после этого выбираете пункт
«
Панель управления
».

В этом ра
зделе выбираете
«
Принтеры и факсы
».
Обратите в
нимание на то, что в зависимости от того, какая операционная система установлена на вашем ПК, этот подпункт меню может называться по-разному. Например, на Windows 7 данный пункт будет иметь название
«
Просмотр устройств и принтеров
».

Выбрав этот пункт, перед вами появится перечень принтеров, подсоединенных к ПК. Нажмите на значок нужного вам устройства правой кнопкой мыши.

Далее появится меню, в котором вы нажимаете
«
Просмотр очереди печати
».
Затем в появившемся окошке обозначьте файл (или файлы), печать которого нужно остановить. Для этого кликаете по нему правой мышкой и нажимаете
«
Отменить
».

Такими несложными действиями можно осуществить отмену процесса разными способами. Вам остается выбрать наиболее подходящий к ситуации.
Доброго времени суток, дорогие друзья! Сегодня мне принесли принтер Samsung ML-1665. Помогите, говорят, не печатает. Включаю его в розетку, и вижу, на принтере горит красная лампочка со значком «замятие бумаги». Я спросил клиента, бумага застревала в принтере, на что мне ответили – да, но мы все вытащили, а он все равно не печатает. Ну, говорю, приходите через часик – полтора, а сам вооружился фотокамерой телефона, и приступил к работе. В данном случае (горит красная лампочка) виноват датчик, а точнее может и не он, а маленький кусочек бумаги, застрявший в закутке за роликом подачи, и не позволяющий лапке датчика встать на место. Приступим к разборке принтера и по ходу увидим, в чем же причина этой ошибки.
Поднимаем крышку принтера вверх и достаем картридж.


Первыми нужно снять боковые крышки. Правую крышку нужно снять с защелок, начиная сзади, потом сверху и со стороны дна, места защелок показаны стрелочками на фото.


Левую боковину отщелкните сначала спереди, а затем сверху.

После, открутим заднюю крышку, которая держится на четырёх болтах.

Из верхней одежды у принтера остался верх – крышка и панель.

Отщелкиваем панель от крышки, прижимаем её к задней стороне принтера и убираем в сторону.


Крышку снимаем с прижимных лапок печи и также убираем в сторону.

Теперь обратим внимание на датчики, с задней стороны принтера, мы как раз можем внимательно их осмотреть.

Здесь находятся два датчика – датчик наличия и датчик прохождения бумаги. Как раз датчик прохождения и вызывает ошибку замятия в данном случае. А теперь, если приглядеться сбоку, мы видим, как лапка не перекрывает оптопару, в связи, с чем работа принтера заблокирована.

Сразу возникает вопрос, почему лапка не встает на место? Все очень просто, осмотрев лапку, мы видим маленький кусочек бумаги, в который упирается лапка.

Я мог сейчас взять пинцет и вытащить виновника, но бывают случаи, когда лучше разобрать принтер побольше и спокойно достать застрявшие куски. Так как я создаю статью, значит, мы пойдем до конца и продолжим разборку принтера.
Чтобы добраться до этого кусочка, нам нужно снять блок подхвата и протяжки бумаги, который прикручен по бокам, поэтому освободим боковые стенки от других запчастей.
С левой стороны мы снимем блок с шестернями, открутив 4 болтика.


Снимаем его аккуратно, чтобы не растерять шестерёнки. Здесь открутим 3 болта, (на фото обозначены красными кружками) два болта держат сам блок, а один мы открутим, чтобы после вытащить блок из пазов, сдвинув при этом боковину.


Отправляемся к правой стороне и снимаем все проводки и шлейфы с платы форматера, а затем снимаем её, открутив 4 болта.

Следующим, снимаем защитный пластиковый кожух с высоковольтного отдела основной платы, отцепив его с двух защелок.

Здесь нам осталось снять контакт термоэлемента и открутить 8 болтов (4 белые по краям, и 4 черные, прижимающие контакты заряда к деталям).


Перед тем, как снимать блок проявки и протяжки бумаги, со стороны плат открутим ещё 4 болта и вытащим 2 провода с пазов.


Теперь немного отодвигая боковины, вытягивайте блок на себя.

Над роликом подхвата, открутим 2 болта с металлической пластины, и снимем её.

Вот теперь, нашего виновника (кусочек бумаги) можно спокойно извлечь.


Вот такой маленький кусочек бумажки доставил столько хлопот хозяевам принтера. Хотя, с другой стороны, если бы пользователи этого Samsung(а) правильно вытаскивали застрявшую бумагу, то и хлопот таких не было.
Теперь раз уж я разобрал принтер, ради приличия надо его почистить, а затем будем собирать обратно.
Ставим на место пластину, закрутив два болта.

Теперь давайте посмотрим на датчик, как видим, лапка чудесно стоит на своем месте, перекрывая оптопару – в таком положении принтер понимает, что проход для бумаги чист, и можно печатать.


Вставляем на место два провода, и закручиваем сбоку 4 болта. Затем я установлю на место печь, которая держится на трёх болтах. Не забудьте, на одном болте вы должны закрепить проводок, соединяющий корпус печи с корпусом принтера.

Возвращаемся к правой боковине. Здесь мы установим на место основную плату, закрутив 8 болтов и установив на место защиту высоковольтного отдела. Не забываем воткнуть контакт термоэлемента.


Следующая ставится плата форматера, закручивается на 4 болтика. Аккуратно вставьте все провода и шлейфы на место.


Развернем принтер левой боковиной к себе. Здесь крепим три болта и вставляем две шестеренки, а поверх прикладываем блок с шестернями и закрепляем всё это дело на 4 болтика.


Начинаем надевать на принтер верхнюю одежду. Начнем с верха, сначала вставьте в пазы верхнюю крышку, затем верхнюю панель.


Крышку соедините с панелью сзади. Закрутите заднюю стенку на четыре болта и защелкните обе боковины.


На фото видно как принтер пришел в готовность (горит зелёная лампочка). Для проверки я вставил бумагу в лоток и распечатал страницу конфигурации, зажав кнопку Print Screen на 4 или 10 секунд (продолжительность зависит от версии прошивки).

Принтер готов к дальнейшему труду.
Разборка Samsung ML-1660/1665/1860. Замятие бумаги.
обновлено: Август 9, 2017
автором: admin
Те, кто пользуется принтерами Самсунг МЛ-1640, МЛ-2015, МЛ-1641, МЛ-2160, часто жалуются на нарушения в работе, сопровождающиеся тем, что горит красная лампочка. Иногда этому предшествует резкое снижение скорости печати, плохое качество полученных документов и фотографий или полное отсутствие результата.
Принтер SAMSUNG ML-2160
Обычный пользователь не всегда может разобраться в возникшей проблеме. Если опыта в подобных делах нет, следует обратиться в сервисный центр. Ведь одно неверное движение может стоить недавно приобретенного печатающего устройства. Ремонт по гарантии в данном случае более выгоден. Большое значение имеет правильно проведенная диагностика.
Причины неполадок
Почему принтер Самсунг не печатает, и горит красная лампочка? Вызвать подобную проблему способны:
- компьютерные листы, если они неправильно подобраны, помяты, не характеризуются необходимой плотностью;
- неверная установка картриджа;
- необходимость в прошивке прибора;
- недостаточное количество краски или отсутствием бумаги в лотке;
- ручная подача печати;
- открытая крышка принтера Самсунг;
- неправильным подбором расходных материалов.

На фирменных картриджах, которые помещены в принтеры Самсунг, имеется специальный чип. С его помощью отмечается количество чернил. Если их уровень недостаточно высок, то печати не будет, а красная лампочка просигнализирует об этом. Тогда остается лишь заправить печатающую головку.
В некоторых ситуациях краски достаточно, но лампочка все же горит. Причиной может стать ошибка, спровоцированная неправильным подключением принтера к персональному компьютеру и нарушениями в двигателе. Решить неполадки реально несколькими способами. Первый – приобретение нового резервуара, а второй – осуществление прошивки.

Заменить сгоревшие детали реально только в сервисном центре. Облегчить диагностику в домашних условиях поможет Smart Panel. Эта программа обеспечит своевременное поступление информации о причине возникшей неполадки, что существенно сократит время, затраченное на ремонт. Посредством нее можно регулировать количество краски в картриджах.
Как решить проблему
Если программа для диагностики не установлена на ПК и нет возможности воспользоваться услугами сервисного центра, то искать источник нарушений придется самостоятельно. Для начала следует прочесть инструкцию по эксплуатации и оценить состояние проводов. При отсутствии следов обгорания открывают крышку. Осмотру подвергают лоток для бумаги, резервуары для чернил и печатающую головку. Если видимых неполадок там нет, а красная лампочка все еще горит, остается сделать прошивку принтера.

Перед этой процедурой необходимо снять отчет. Для этого надо жать на «Сброс» до того момента, как красная лампочка не начнет мигать. Полученный документ содержит информацию о прошивке, точнее его версию. После нужно скачать и установить специальную программу. Ее загрузка запустит процесс прошивки, которую ни в коем случае не следует прерывать. Выключать компьютер тоже не рекомендуется.

После прошивки поступают следующим образом:
- Картридж устанавливают обратно.
- Подключают принтер Самсунг к электросети.
- Ждут окончания инициализации.
- Вынимают резервуар.
- Заклеивают чип.
- Приступают к работе.
Можно попробовать обнулить счетчик. Для этого принтер подсоединяют к электричеству, нажимают комбинацию кнопок («+», «+», «стоп», «-», «-», «стоп», «стоп»). Правильная последовательность даст результат: на дисплее появится FC. Следующим шагом станет воздействие на кнопку «Старт». Успех зафиксируется в виде обозначения 07. После потребуется еще один «Старт». Конечно, можно просто регулярно менять картридж, но этот способ считается одним из самых дорогостоящих.

Эффективным методом считают снятие блокировки. Для этого печатающее устройство нужно отключить от сети и снять заднюю крышку. Все последующее внимание уделяется платам, а точнее микросхема, которая находится на правой детали и имеет маркировку 93С66. Пример на фото. Далее следует замкнуть две ножки. В итоге происходит снятие блокировки.
Что запрещено делать при устранении нарушений
Если горит красная лампочка на принтере Самсунг МЛ-1640, МЛ-2015, МЛ-1641, МЛ-2160, ни в коем случае категорически запрещается:
- жать на кнопки просто так;
- физически воздействовать на печатающее устройство, к примеру, ударом.

Чем раньше произойдет диагностика, тем быстрее определится диагноз и начнется ремонт. Результат, полученный после обследования, напрямую зависит от стадии заболевания.
Лучшим выходом из ситуации является посещение сервисного центра. Специалисты проведут грамотную диагностику и выявят, почему горит красная лампочка. Ремонт будет произведен своевременно и без последствий.
На все виды работ предоставляется Гарантия. Причем при возникновении гарантийного случая вам не придется везти оборудование к нам в стационар, все проблемы устранят наши инженеры, выехав к вам в офис, при невозможности устранения на месте, мы за свой счет доставим оборудование в стационар, для проведения гарантийного ремонта, а после выполнения работ, доставим обратно.
Диагностика
— это работа по выявлению причин неисправности, не работающих деталей, блоков, узлов аппаратов (которые являются как правило следствием этих причин), либо определение объема работы, необходимого для устранения неисправности, в ходе которой может понадобится дополнительная диагностика на месте или в стационаре (как правило случай когда признаки неисправности налицо, а причин может быть несколько или неисправность проявляется периодически в таких случаях для проведения диагностики требуется длительное тестирование а также полная или частичная разборка аппарата). Как правило самая сложная и ответственная составляющая ремонта оргтехники.
Профилактика
— стандартная работа, объем и периодичность которой зависит от конструкции аппарата и определен в сервисной документации от производителя. Профилактика не является ремонтной процедурой, она не устраняет неисправности, вызванные изношенными либо поврежденными деталями, блоками, узлами.
Ремонт принтера
— работа по устранению неисправности аппарата с заменой деталей и разборкой одного и более узлов аппарата.
Основные неисправности лазерных принтеров
Лазерные принтеры Samsung ML-1660 имеют большое количество настроек, которые управляют процессами печати. Зачастую они сбиваются и нужно только подправить их, чтобы принтер продолжил работу в прежнем режиме. Однако есть и другие поломки, которые в целом можно разделить на две группы: неисправность картриджа (70%) и неисправность самого принтера (30%).
Принтер Samsung ML-1660 не захватывает бумагу
Основная причина – лоток для бумаги имеет некоторые повреждения. Трещина, появившаяся на кожухе реверсивной шестерни, нарушает контакт между механизмом подачи бумаги и пружиной. Вариантом удаления поломки может стать полная замена лотка или ликвидация трещины. Также могли износиться ролики подачи бумаги. Поможет их очистка специальной восстанавливающей жидкостью.
Принтер Samsung ML-1660 не включается
Главные причины – повреждены входные цепи принтера или в сети отсутствует напряжение. Иногда нулевую реакцию вызывает неисправная плата, которая отвечает за образование импульсных токов внутри устройства и их последующего распределения по ведущим механизмам. Тогда выходом станет замена платы.
Повредился фотобарабан
Говорить о данной неисправности можно, если на распечатанном листе видны тонкие линии или большие пятна серого цвета через одинаковые промежутки. Ремонт в данном случае не поможет. Придется произвести замену фотобарабана (или картриджа целиком).
Магнитный вал сильно изношен
Как следствие, на листах появляются пятна белого или темного оттенков и сбой в печати (выраженная неоднородность текста). Устранить данную неисправность можно только заменой вала.
Переполнен бункер отработки
Если на листе появляются, время от времени крупные пятна или полосы, можно попробовать почистить бункер обработки, т.к. из-за его переполнения тонер неравномерно просыпается на бумагу.
Бумага останавливается внутри лазерного принтера
Главная причина – неисправен датчик выхода бумаги, что вызвано его типичным засорением или выходом из строя шторки. Нужно прочистить датчик и отрегулировать шторку.
Принтер Samsung ML-1660 не печатает
Это может быть связано с поломками внутренних механизмов, а также возможных ошибках в ПО лазерного принтера Samsung ML-1660. Если индикатор, сообщающий о внутренних неполадках, не сообщает о возможной проблеме, то вероятнее всего произошел сбой в системе драйверов или платы, отвечающей за формирование хорошего изображения.
Вышел из строя вал предварительного заряда
Возможны две причины:
- Износ заряда, если при печати на листе виден серый фон с хаотично расположенными на нем крупными пятнами серого цвета. Поможет только замена вала.
- Загрязнение вала, если информация дублируется на листе или распечатывается не вся ее часть. В данном случае покрытие вала можно почистить. Если это не поможет, придется произвести замену детали.
Часть тонера (краски) остается на пальцах
Изображение плохо закрепляется на бумаге. Провоцирующий неисправность фактор – сбои в работе термоэлемента. Также причиной может стать неправильно подобранная для устройства термопленка (не подходящей толщины).
Принтер Samsung ML-1660 заминает бумагу
Обычно вызывается проблемами с подающим роликом, вследствие его неисправности или чрезмерного загрязнения, а также повреждением планки, которая направляет листы или всего роликового блока. Когда листы заминаются при выходе из устройства, можно говорить о поломке или перекосе роликов, расположенных в блоке выдачи бумаги, а также планке, направляющей листы при выдаче их принтером.
Засорился ракель (чистящее лезвие)
Результат – вдоль распечатанного листа появляется серая линия. Чтобы устранить поломку, ракель необходимо почистить или заменить при отсутствии положительного результата.
Характеристики Samsung ML-1660
Печать
Разрешение 1200×600тчк/дюйм
Двусторонняя печать Ручная
Speed (Mono) 16стр/мин формата А4(17стр/мин в формате Letter)
First Print Out Time (Mono) Менее 8,5сек.
Emulation SPL(Samsung Printer Language)
Емкость и тип входного лотка
Многоцелевой лоток на 150 листов
Емкость и тип выходного лотка
100 листов лицевой стороной вниз
Формат материалов для печати A4, A5, Letter, Legal, Executive, Folio, Oficio, ISO B5, JIS B5, Envelope(Monarch, No.9, DL, C5), другой
Типы печатных материалов Обычная, тонкая, плотная, бланки, переработанная, конверты, пленки, этикетки, карточки, цветная, архивная
Общие характеристики
Процессор 150МГц
Интерфейс Высокоскоростной USB 2.0
Уровень шума Менее 49дБ(печать)
Вес 4,2кг
Memory/Storage 8Mб
OS Compatibility
Windows 2000/XP/Vista/7/2003 Server/2008 Server, Mac OS X 10,3-10,6, различные Linux OS
Duty Cycle, Monthly 5 000страниц
Габариты (ШхГхВ) 341x224x184мм
Расходные материалы
Картридж Средняя емкость картриджа 1 500 страниц(поставляется с картриджем на 700 страниц)
Заявленна емкость картриджа соответствует стандарту ISO/IEC 19752
Тип однокомпонентный
Код модели MLT-D104S
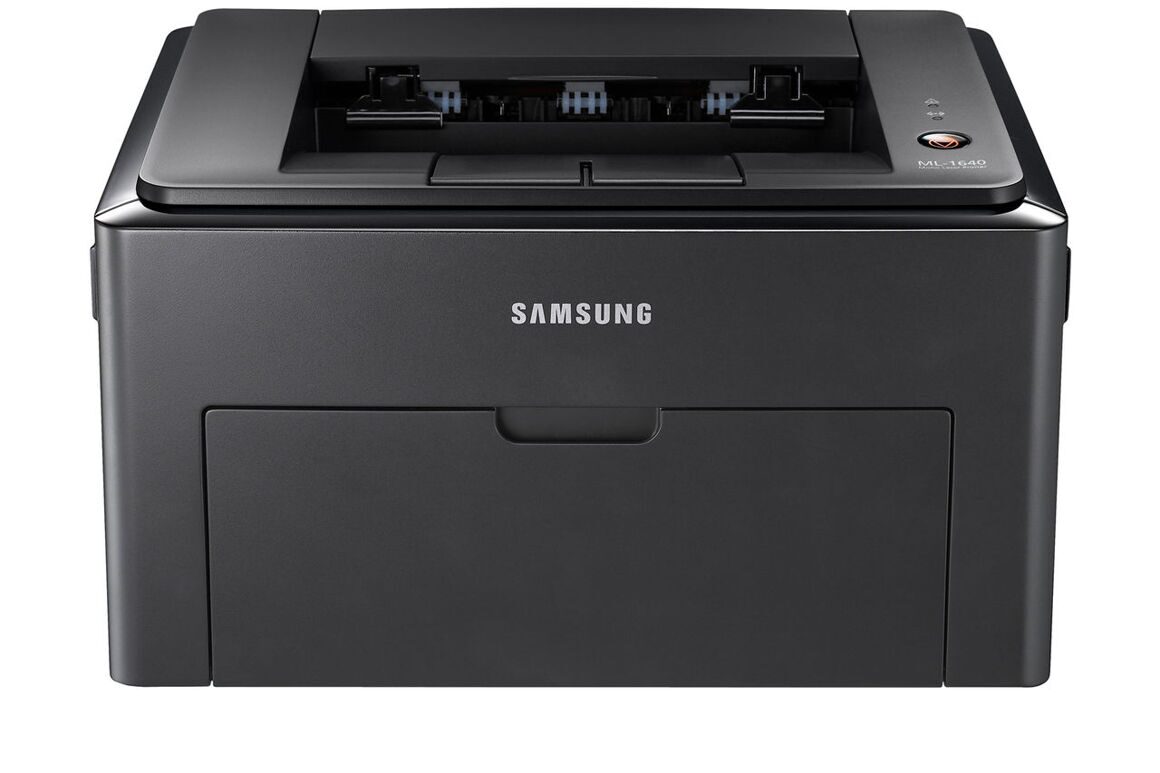
Частенько бывает, что принтер внезапно впадает в ошибку, и перестает работать, как положено. В этом случае не стоит паниковать, а стоит разобраться, есть ли резон вызывать специалистов, или можно решить проблему самостоятельно? Если у вас имеется кое-какой опыт по решению несложных проблем, связанных с оргтехникой, то эта статья для вас. Она поможет определить возможные проблемы, возникшие в ходе эксплуатации вашего печатающего устройства.
Итак, начнем с Samsung ML1640/1645, 2240/2245.
Кнопки и индикаторы, расположенные на принтере:
1. Индикатор «OnLine / Error»
2. Индикатор «Toner»
3. Кнопка «Cancel»
Возможные ошибки:
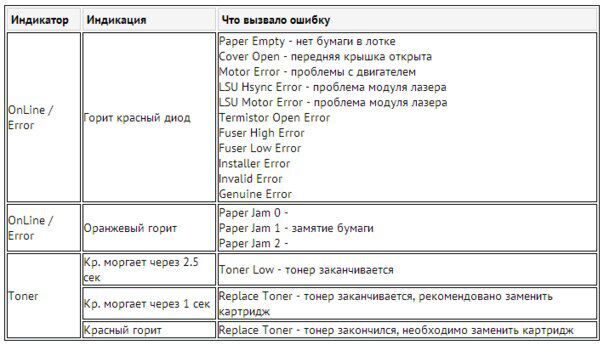
Рассмотрим индикацию ошибок в принтерах Samsung ML-1615, ML-2015 и им подобных.
Расположение кнопок и индикаторов: 
Расшифровка ошибок:
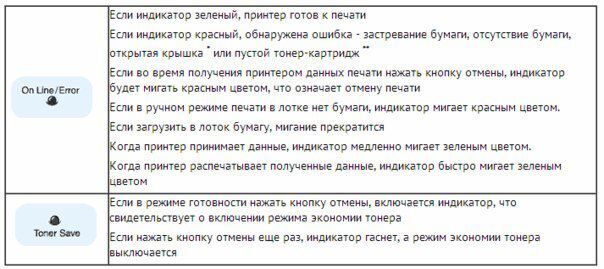
* В принтере две крышки – картриджа и печки. Обе вызывают эту индикацию
** Наличие картриджа определяется контактной площадкой на правой боковине картриджа и соответствующими контактами в принтере.
Если одновременно мигают оба индикатора, то в системе серьезная неисправность:
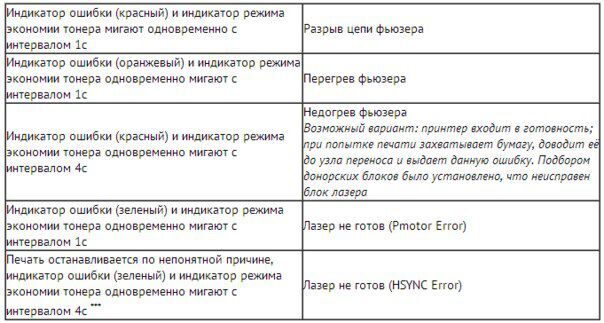
*** Эту ошибку на принтерах ML2015 и его аналогах вызывает также обломанный выступ возле левого самореза бункера отходов или неисправность соответствующего микрика.
Надеемся, эта статья поможет наставить вас на путь решения проблемы. А если это окажется для вас неподьемным, или вы захотите довериться специалистам — что ж, наша лаборатория СИТ-Мастер ждет вас с вашим поломанным печатающим другом, чтобы реанимировать его, и привести к доброму здравию. Ах и да — мы еще заправяем картриджи. Приходите к нам, и получите лучшую заправку из возможных.