Содержание
- Сброс ошибки С7990 Kyocera
- Первый вариант сброса ошибки С7990
- Внимание!
- Внимание!
- Второй вариант сброса ошибки С7990
- Очистка отработанного тонера МФУ Kyocera если нет крышек для очистки
- Заключение
Сброс ошибки С7990 на аппаратах Kyocera FS-1030MFP, FS-1130MFP, FS-1035MFP, FS-1135MFP, Kyocera Ecosys M2030dn, M2035dn, M2530dn, M2535dn, а также ECOSYS M2135dn, M2040dn, M2635dn, M2635dw, M2540dn, M2540dw, M2735dn, M2835dw.
Пользователи Kyocera сталкиваются с ошибкой С7990. Она возникает очень внезапно и в самый неподходящий момент. Ошибка С7990 не несет в себе ничего плохого. И вам не стоит переживать о больших тратах на ремонт или покупке новой МФУ.
Сброс ошибки С7990 Kyocera
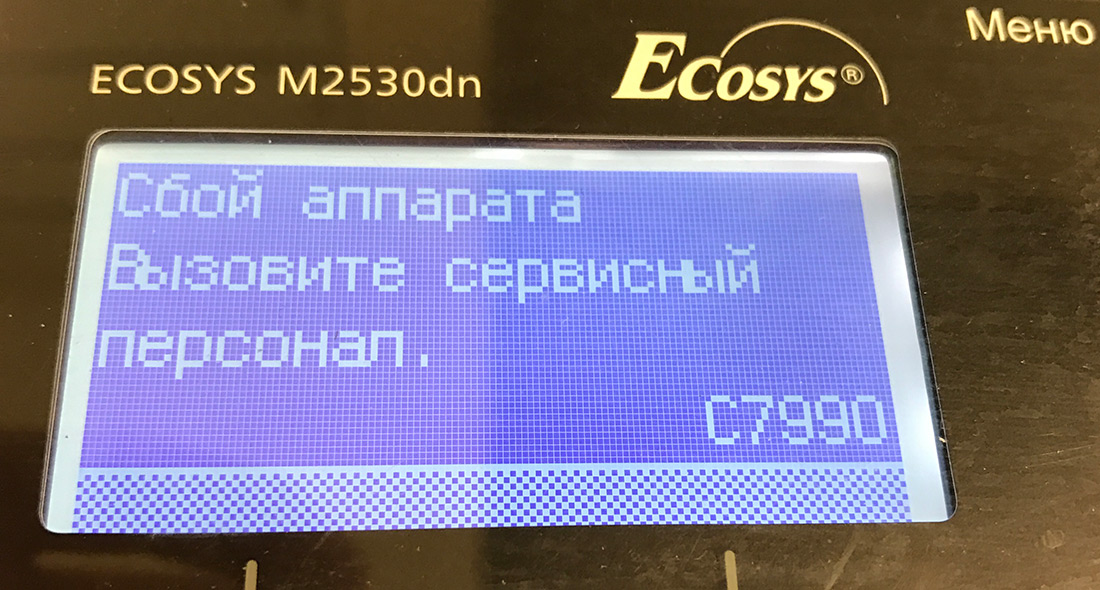
Ошибка С7990 — это сообщение говорит о том, что переполнился бункер отработанного тонера. И его требуется очистить.
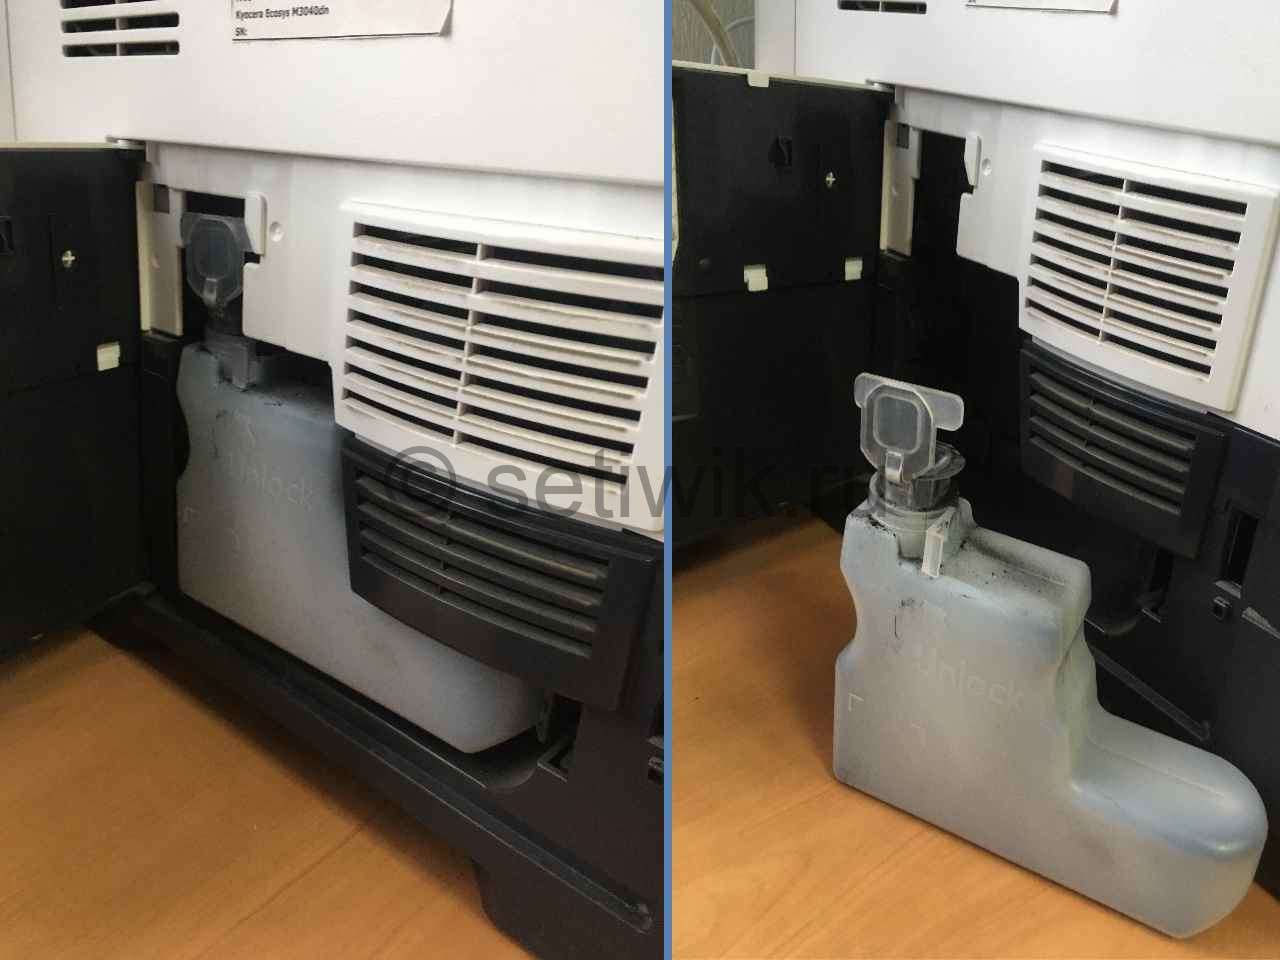
Например в аппаратах Kyocera M3040dn бункер отработанного тонера находится сбоку и его очень просто очистить. Достаточно достать контейнер и вытрусить его.
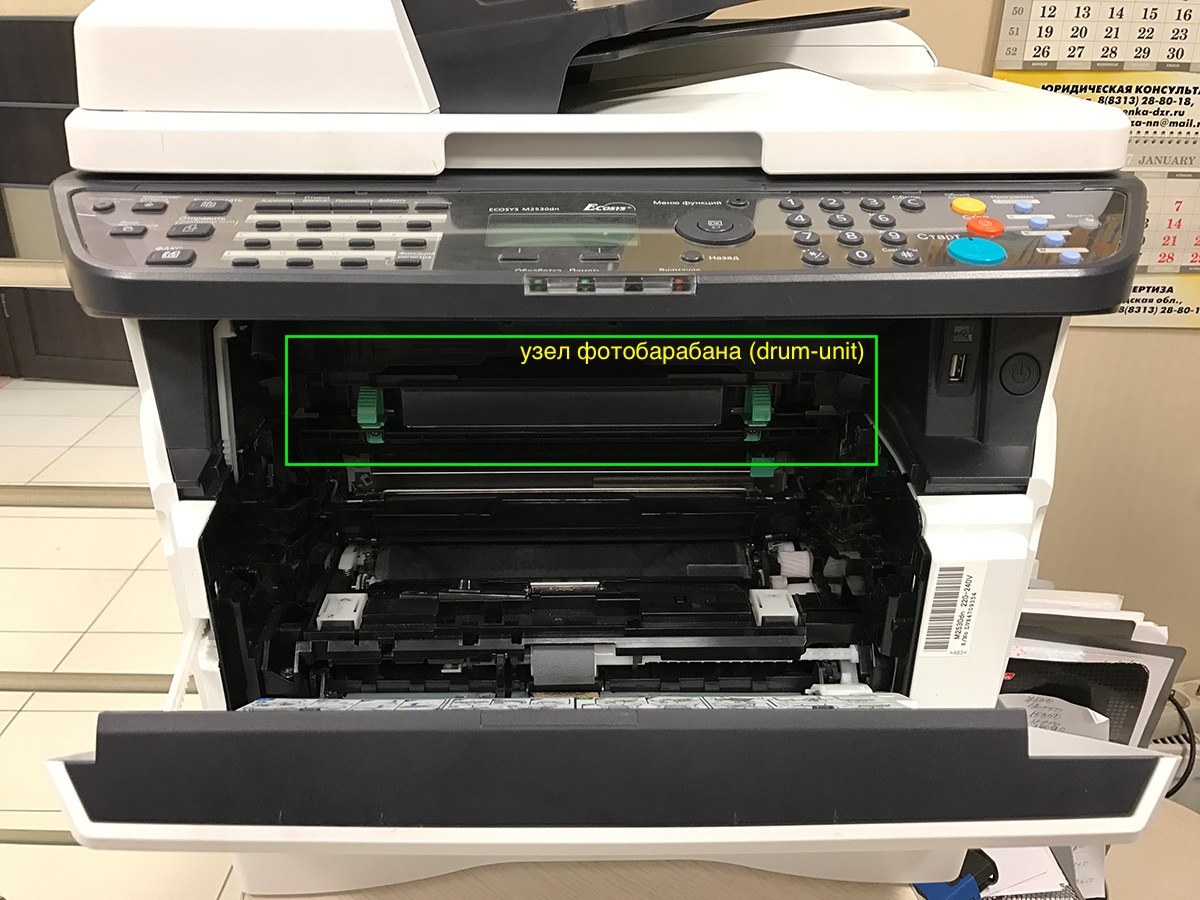
А вот бункер отработки некоторых моделей выдают ошибку С7990. И бункер отработанного тонера находится в блоке фотобарабана (Drum-Unit или барабан).
Первый вариант сброса ошибки С7990
Этот вариант подойдет для некоторых моделей Kyocera. Делается это очень просто:
- Первое что требуется сделать это открытье переднюю крышку, как показано на рисунке:

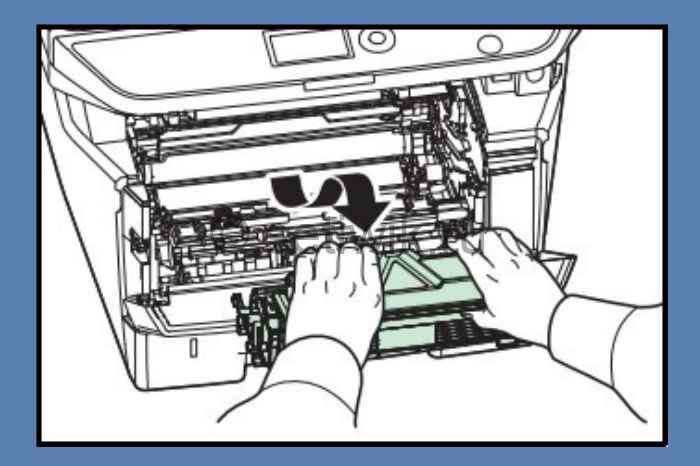
Откройте переднюю крышку - Далее вытащите картридж с блоком проявки из МФУ. Можно отдельно, а можно и вместе.
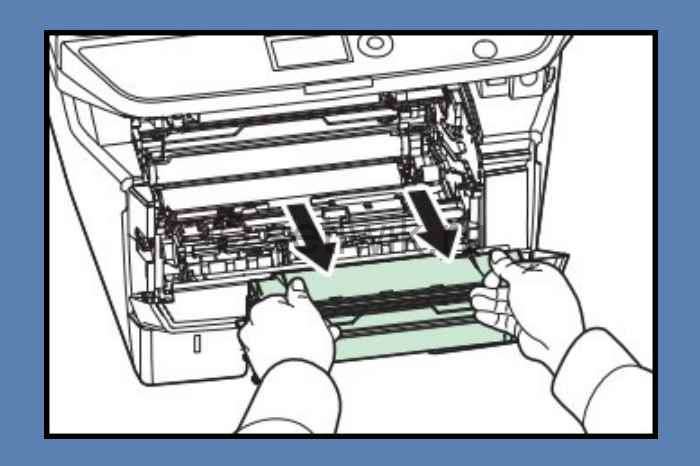
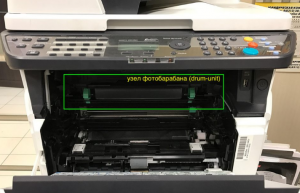
Вытащите узел проявки из МФУ - Теперь извлеките узел фотобарабана из МФУ, удерживая за зеленые или синие рычаги обеими руками.
Извлеките узел барабана из МФУ
Внимание!
Никогда не оставляйте узел барабана на свету более чем на 5 мин. Так как он очень чувствителен к свету и может выйти из строя.
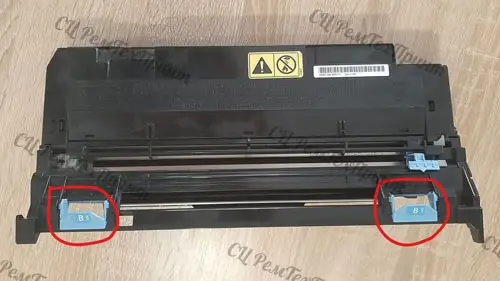
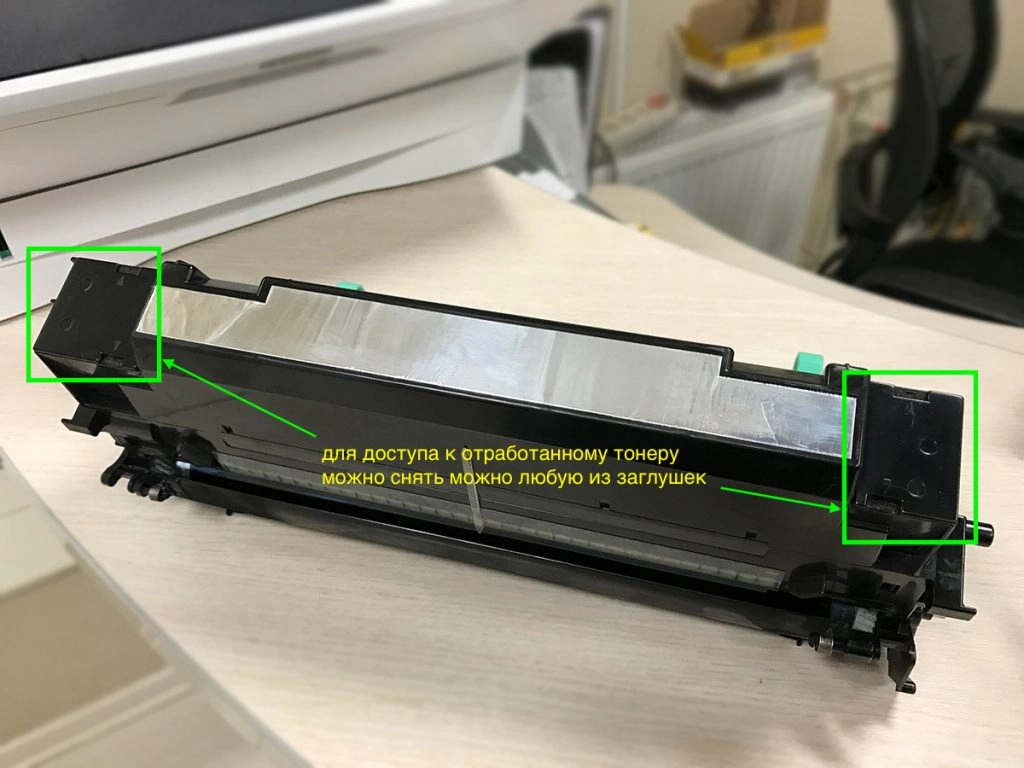
После того когда вы достали узел барабана, вам требуется найти 2 крышечки на этом блоке. На фото они отмечены красными прямоугольниками.
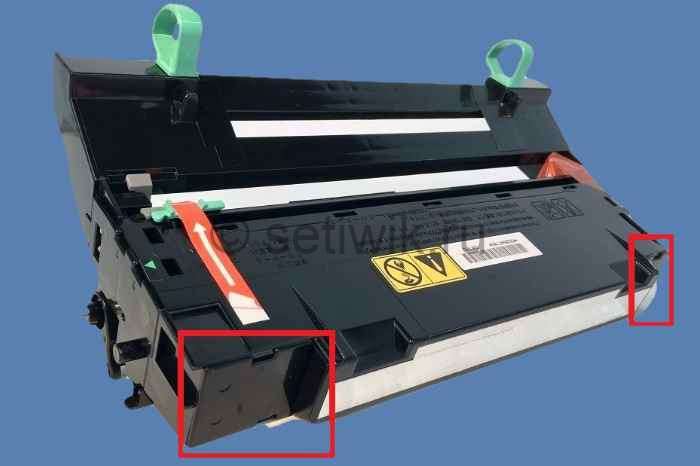
На крышках стрелками указаны защелки, которые требуется отстегнуть. Делается это маленькой отверткой или ножницами. Теперь аккуратно отстегиваем защелки и вытаскиваем крышки. Все эти манипуляции производить крышками в вверх. Так как если отстегнуть крышку которая смотрит в низ, то отработанный тонер посыпется на пол.
После того как крышки отстегнуты содержимое барабана аккуратно вытряхиваем в целый (без дырок) мусорный пакет.
Внимание!
Тонер это летучий мелкодисперсный порошок, может представлять опасность для здоровья человека, особенно при вдыхании! Все работы желательно производить в медицинской маске.
После того как вы очистили бункер от отработанного тонера. Одеваем крышки обратно, собираем все в обратной последовательности и ставим на место.
Выключаем и включаем аппарат. Ошибка С7990 сбросилась и МФУ Kyocera готов к работе!
Второй вариант сброса ошибки С7990
Очистка отработанного тонера МФУ Kyocera если нет крышек для очистки
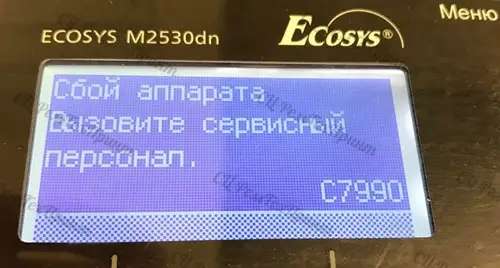
Например в таких аппаратах как Kyocera ECOSYS M2135dn, M2040dn, M2635dn, M2635dw, M2540dn, M2540dw, M2735dn, M2835dw. На этих моделях установлен блок фотобарабана нового типа. И на экране появляется надпись «Вызовите сервисный персонал с7990»
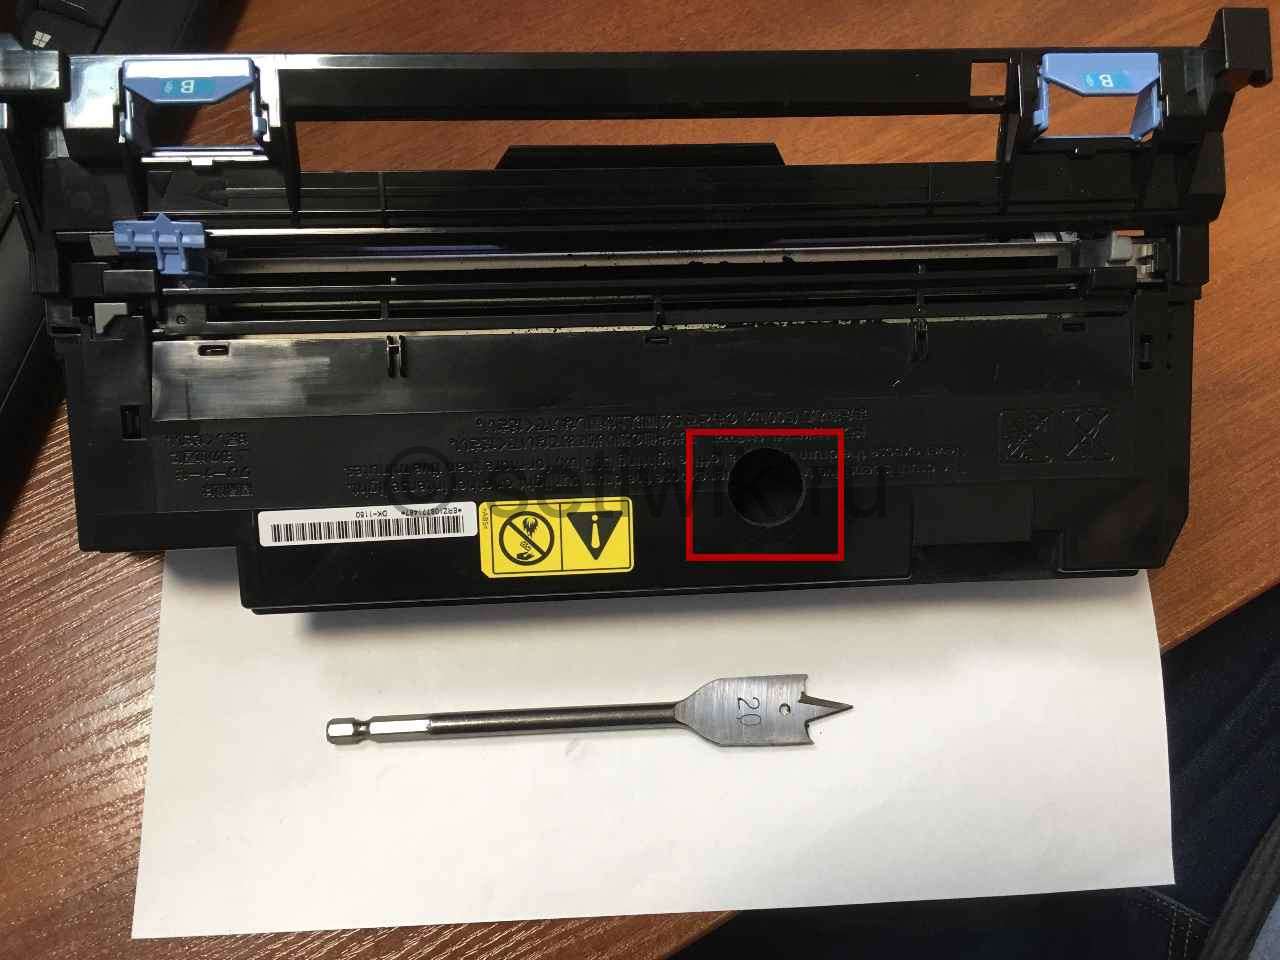
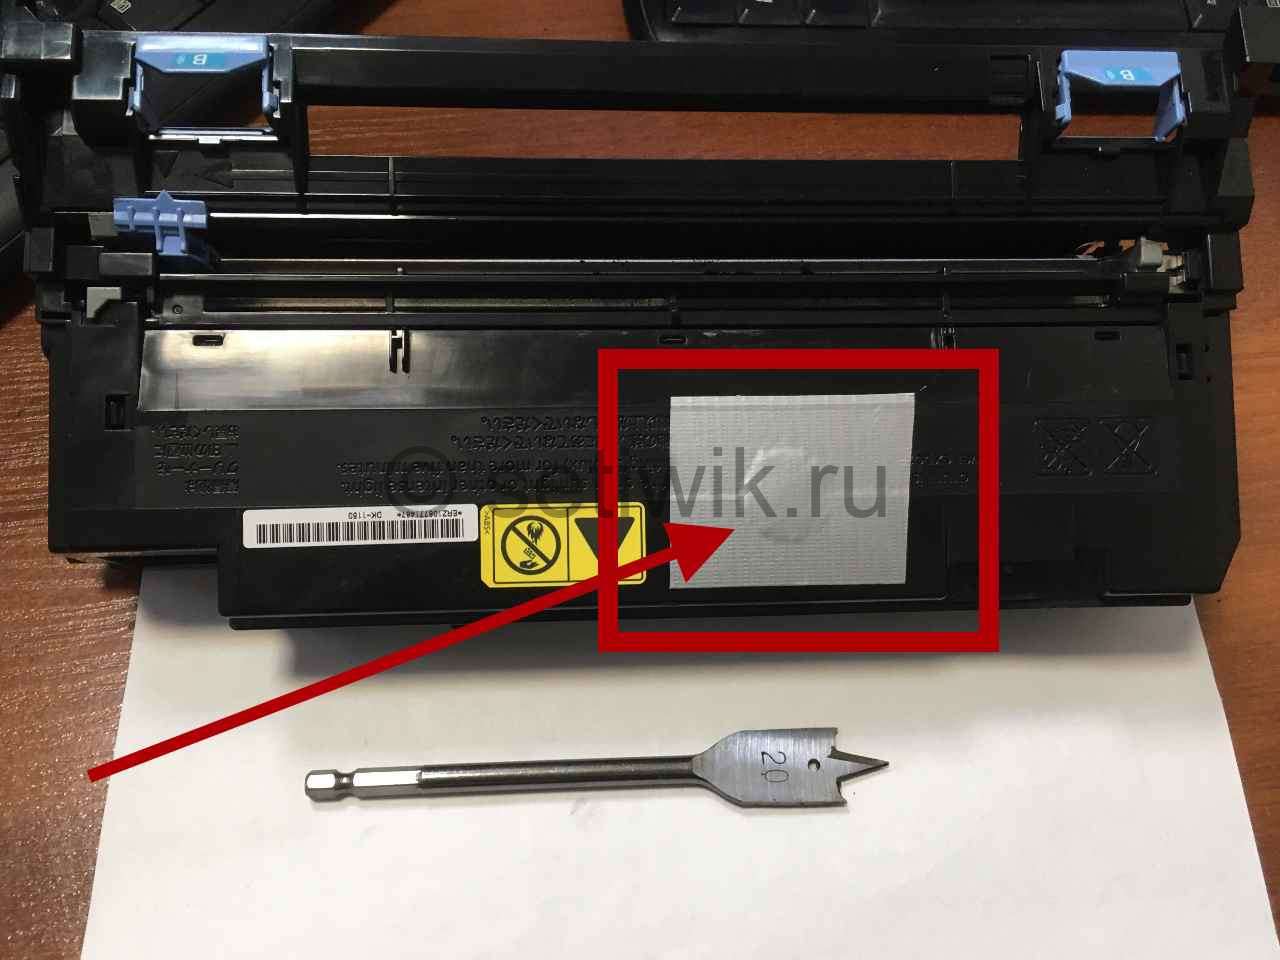
В этих барабанах нет крышки и очистки отработанного тонера. И на первый взгляд очистка практически невозможна. Но это всего лишь на первый взгляд. Принцип узла фотобарабана такой же. И вам всего лишь требуется просверлить в нем отверстие диаметром до 2 см (дырку).
После того как вы сделали отверстие и очистили тонер. Заклейте отверстие изолентой или армированным скотчем. Как показано на фото.
После очистки и заклейки фотобарабана, верните все обратно. Выключите и включите аппарат. Ошибка С7990 сбросилась и МФУ готова к работе!
Заключение
Вот и все я рассказал как легко и просто сбросить ошибку С7990 на различных МФУ Kyocera. Надеюсь эта статья поможет вам сэкономить деньги на сервисном центре. Если есть вопросы или где-то нашли ошибку оставляйте комментарии не стесняйтесь.
В статье речь пойдет о таких аппаратах Kyocera, как:
- ECOSYS M2030dn PN, M2030dn, M2035dn, M2040DN, M2040DW, M2135DN, M2530dn, M2535dn, M2540DN, M2540DW, M2635DN, M2635DW, M2640IDW, M2735DN, M2735DW, M2835DN, M2835DW, P2035d, P2035dn, P2040DN, P2040DW, P2135d, P2135dn, P2235D, P2235DN, P2235DW, P2335D, P2335DN, P2335DW;
- FS-1028MFP, FS-1028MFP/DP, FS-1030MFP, FS-1030MFP/DP, FS-1035MFP/DP, FS-1120D, FS-1120DN, FS-1128MFP, FS-1130MFP, FS-1135MFP, FS-1320D, FS-1320DN, FS-1350DN, FS-1370DN;
Ошибка 7990 на аппаратах K yocera возникает, как правило, при пробеге около 70 000 стр. (при использовании неоригинального тонер-картриджа или заправки картриджа).
Что означает «C7990»?
Первая и основная причина данной ошибки — переполнен бункер отработки драм-юнита (блок фотобарабана).
Остатки порошка с фотобарабана счищаются в данный бункер с помощью чистящего лезвия (ракеля). Постепенно резервуар заполняется отработанным тонером и при переполнении появляется ошибка 7990.
Очистить бункер можно самостоятельно. Но будьте осторожны! Тонер очень летуч и очень плохо отмывается. Никаких работающих вентиляторов рядом! Действуйте очень осторожно. В идеале проводить данную процедуру с помощью специального тонерного пылесоса. НЕЛЬЗЯ использовать бытовой пылесос для чистки бункера! Другой вариант: провести чистку бункера от отработанного тонера на улице.
Где находится бункер отработанного тонера?
Бункер расположен за блоком фотобарабана DK. Чтобы добраться до него необходимо вынуть блок проявки DV. Блок проявки — это блок, в который вставляется тонер-картридж.
Итак, устранить ошибку C7990 следующим образом:
1. Выключить принтер (МФУ) Kyocera и открыть переднюю крышку
2. Вынуть картридж и блок проявки

3. Извлечь драм-юнит потянув за ручки по бокам. Ручки бывают зеленого цвета (DK-150, DK-170), а на некоторых драм-юнитах голубого цвета (DK-1150)

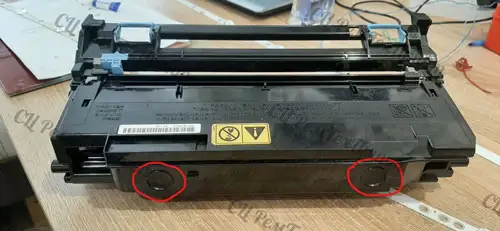
4. За задней частью фотобарабана на торце по бокам находятся 2 съемные заглушки или 2 несъемные вогнутые круги.

Вариант с заглушками: подцепить заглушки отверткой, ножницами или другим предметом и потянуть вверх. С этих отверстий АККУРАТНО высыпать отработанный тонер в пакет или в ведро. В идеале воспользоваться тонерным пылесосом (в домашних условиях не обязательно). Пользоваться бытовым пылесосом крайне не рекомендуем, это приведет к поломке Вашего домашнего пылесоса!
Без заглушек: в домашних условиях очистить фотобарабан от тонера можно просверлив дырочки в окружностях и высыпать тонер в ведро (пакет) через данные отверстия. А затем заклеить их скотчем.
Специалисты нашего сервисного центра проводят чистку бункера от отработанного тонера на выезде не нарушая целостности фотобарабана! Мы не сверлим отверстия! Чистим блок с помощью тонерного пылесоса. Стоимость услуги от 1600 руб.
5. Собрать аппарат в обратном порядке: фотобарабан → блок проявки → картридж.
6. Включить принтер (МФУ). Ошибка исчезла.
После процедуры аппарат начал печатать белые листы? Это значит, что фотобарабан вставлен не до конца. Необходимо еще раз разобрать и собрать аппарат.
7. Помним, что ресурс драм-юнита 100 000 стр. После чего аппарат выдаст сообщение «Замените MK».
Какие еще есть причины возникновения ошибки с7990?
Причиной может послужить выход из строя датчика или платы управления. В этом случае лучше вызвать специалиста сервисного центра.
P.S. При переполненном бункера некоторые аппараты не всегда выдают ошибку С7990 на дисплее. Иногда пользователь об этом может узнать, когда принтер начинает трещать. Если вовремя не провести чистку, ломается шестерёнка. В этом случае, необходим уже ремонт или замена фотобарабана (бункера WT)
- На главную
- Категории
- Сеть
- Принтеры
- Ошибка C7990 — вызовите сервисный персонал — kyocera
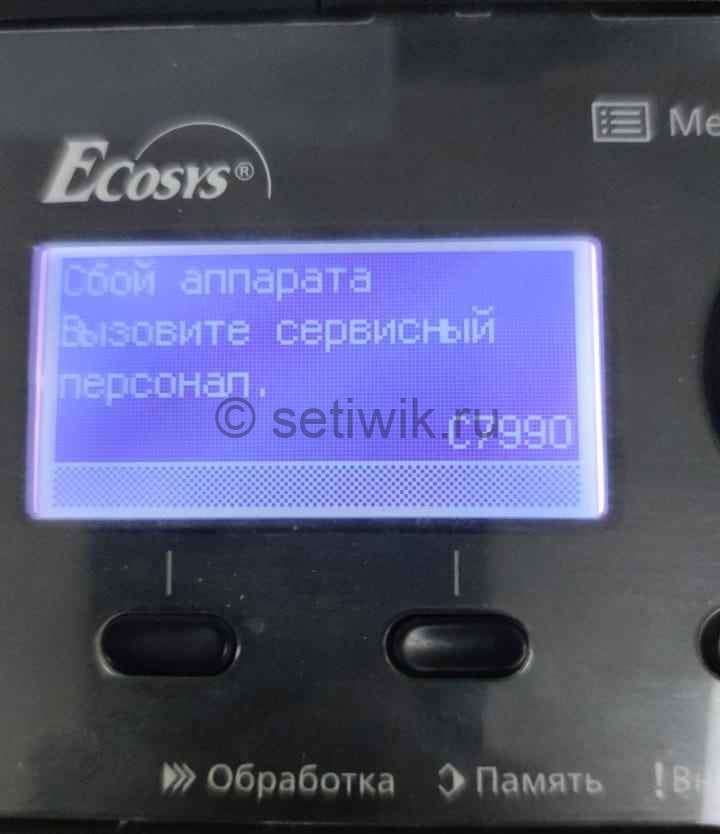
Зачастую на принтерах Kyocera 1035 или 2035 (возможно и другие, но я сталкивался только с этими) можно увидеть такую ошибку — «Сбой аппарата. Вызовите сервисный персонал, номер ошибки — С7990»
2017-04-04 19:43:22472
![]()
Данная ошибка сообщает нам, что забился бункер отработанного тонера. Не обязательно вызывать сервисников и платить им деньги. Можно сделать все самому за 5 минут (учитывая время прочтения статьи) и сэкономить деньги.
Очистка бункера отработанного тонера на принтерах Kyocera 1035/2035 (устранение ошибки С7990)
Для того, чтобы достать фотобарабан с бункером из принтера:
1. Выключите принтер
2. Откройте переднюю крышку принтера
3. Извлеките узел проявки (тот, в котором установлен картридж
4. Следом за ним стоит фотобарабан, который надо извлечь за зеленые ручки по краям от него

После извлечения переворачиваем его ручками от себя и видим по краям 2 крышки по обе стороны фотобарабана, за ними то и скрывается бункер для отработанного тонера.
Открываем заглушку и вытряхиваем АККУРАТНО! все, что внутри в пакет или мешок для мусора.
ОСТОРОЖНО: внутри находится тонер, он летуч, !не советую его вдыхать!, плохо отмывается. лучше всего данную процедуру проводить на улице (и желательно в безветренную погоду).
После чего собираем наш принтер в обратной последовательности, снова включаем — все, ошибка пропала.
Вот так просто можно обойтись в некоторых ситуациях без сервисного центра.

Ваш покорный слуга — компьютерщик широкого профиля: системный администратор, вебмастер, интернет-маркетолог и много чего кто. Вместе с Вами, если Вы конечно не против, разовьем из обычного блога крутой технический комплекс.
Содержание
- Как Сбросить ошибку С7990 на Аппаратах KYOCERA
- Сброс ошибки С7990 Kyocera
- Первый вариант сброса ошибки С7990
- Внимание!
- Внимание!
- Второй вариант сброса ошибки С7990
- Очистка отработанного тонера МФУ Kyocera если нет крышек для очистки
- Заключение
- [Решено] Ошибка C7990 на МФУ Kyocera
- Комментариев: 34
- Сброс ошибки С7990 на МФУ Kyocera
- Варианты выхода из ситуации:
- Тонер это летучий мелкодисперсный порошок, может представлять опасность для здоровья человека, особенно при вдыхании! Все работы желательно производить в медицинской маске.
- Ошибка C7990 Kyocera — Вызовите сервисный персонал.
- Что означает «C7990»?
- Где находится бункер отработанного тонера?
- Итак, устранить ошибку C7990 следующим образом:
- Какие еще есть причины возникновения ошибки с7990?
- Ошибка c7990 на принтерах kyocera
- Сброс памперса на Epson L3050
- Ошибка 0x0000011b при подключении сетевого принтера
- Драйвер HP LaserJet 1018 для Windows 10
- Сбой аппарата вызовите сервисный персонал c7990
- Что значит ошибка c7990 на kyocera?
- Как почистить бункер с отработкой и убрать ошибку c7990?
Как Сбросить ошибку С7990 на Аппаратах KYOCERA
Сброс ошибки С7990 на аппаратах Kyocera FS-1030MFP, FS-1130MFP, FS-1035MFP, FS-1135MFP, Kyocera Ecosys M2030dn, M2035dn, M2530dn, M2535dn, а также ECOSYS M2135dn, M2040dn, M2635dn, M2635dw, M2540dn, M2540dw, M2735dn, M2835dw.
Пользователи Kyocera сталкиваются с ошибкой С7990. Она возникает очень внезапно и в самый неподходящий момент. Ошибка С7990 не несет в себе ничего плохого. И вам не стоит переживать о больших тратах на ремонт или покупке новой МФУ.
Сброс ошибки С7990 Kyocera
Ошибка С7990 — это сообщение говорит о том, что переполнился бункер отработанного тонера. И его требуется очистить.
Пример ошибки 7990
Например в аппаратах Kyocera M3040dn бункер отработанного тонера находится сбоку и его очень просто очистить. Достаточно достать контейнер и вытрусить его.
Бункер отработанного тонера Kyocera 3040dn
А вот бункер отработки некоторых моделей выдают ошибку С7990. И бункер отработанного тонера находится в блоке фотобарабана (Drum-Unit или барабан).
Первый вариант сброса ошибки С7990
Этот вариант подойдет для некоторых моделей Kyocera. Делается это очень просто:
- Первое что требуется сделать это открытье переднюю крышку, как показано на рисунке:
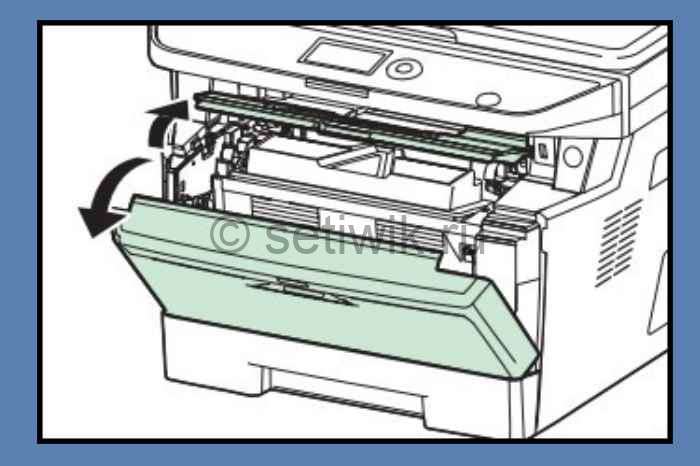 Откройте переднюю крышку
Далее вытащите картридж с блоком проявки из МФУ. Можно отдельно, а можно и вместе.
 Вытащите узел проявки из МФУ
Теперь извлеките узел фотобарабана из МФУ, удерживая за зеленые или синие рычаги обеими руками.
 Извлеките узел барабана из МФУ
Внимание!
Никогда не оставляйте узел барабана на свету более чем на 5 мин. Так как он очень чувствителен к свету и может выйти из строя.
После того когда вы достали узел барабана, вам требуется найти 2 крышечки на этом блоке. На фото они отмечены красными прямоугольниками.
Крышки на узле барабана Kyocera
На крышках стрелками указаны защелки, которые требуется отстегнуть. Делается это маленькой отверткой или ножницами. Теперь аккуратно отстегиваем защелки и вытаскиваем крышки. Все эти манипуляции производить крышками в вверх. Так как если отстегнуть крышку которая смотрит в низ, то отработанный тонер посыпется на пол.
После того как крышки отстегнуты содержимое барабана аккуратно вытряхиваем в целый (без дырок) мусорный пакет.
Внимание!
Тонер это летучий мелкодисперсный порошок, может представлять опасность для здоровья человека, особенно при вдыхании! Все работы желательно производить в медицинской маске.
После того как вы очистили бункер от отработанного тонера. Одеваем крышки обратно, собираем все в обратной последовательности и ставим на место.
Выключаем и включаем аппарат. Ошибка С7990 сбросилась и МФУ Kyocera готов к работе!
Второй вариант сброса ошибки С7990
Очистка отработанного тонера МФУ Kyocera если нет крышек для очистки
Например в таких аппаратах как Kyocera ECOSYS M2135dn, M2040dn, M2635dn, M2635dw, M2540dn, M2540dw, M2735dn, M2835dw. На этих моделях установлен блок фотобарабана нового типа. И на экране появляется надпись «Вызовите сервисный персонал с7990»
В этих барабанах нет крышки и очистки отработанного тонера. И на первый взгляд очистка практически невозможна. Но это всего лишь на первый взгляд. Принцип узла фотобарабана такой же. И вам всего лишь требуется просверлить в нем отверстие диаметром до 2 см (дырку).
Сверление отверстия для удаления отработанного тонера Kyocera
После того как вы сделали отверстие и очистили тонер. Заклейте отверстие изолентой или армированным скотчем. Как показано на фото.
заклеенное отверстие для удаления отработанного тонера МФУ Kyocera
После очистки и заклейки фотобарабана, верните все обратно. Выключите и включите аппарат. Ошибка С7990 сбросилась и МФУ готова к работе!
Заключение
Вот и все я рассказал как легко и просто сбросить ошибку С7990 на различных МФУ Kyocera. Надеюсь эта статья поможет вам сэкономить деньги на сервисном центре. Если есть вопросы или где-то нашли ошибку оставляйте комментарии не стесняйтесь.
Источник
[Решено] Ошибка C7990 на МФУ Kyocera
Ошибка с7990 на МФУ Kyocera (в моем случае Kyocera 2530dn) указывает на переполнение резервуара отработанного тонера. Иногда, может быть вызвана выходом из строя датчика или платы управления, но электроника там весьма надежная. Данную проблему легко устранить самостоятельно, без обращения в авторизованный сервисный центр.
Картридж в этом аппарате состоит из трёх частей — тубы с тонером, узла проявки и узла фотобарабана (drum-unit, такая фигня с зелеными ручками по бокам).
В общем, нам понадобится вынуть узел фотобарабана и извлечь из него отработанный тонер. Всё это хозяйство извлекается довольно легко без каких-либо инструментов. По бокам узла фотобарабана видим крышечки-заглучки, со стрелками на них. Крышечки легко поддеваются плоской отверткой или ножом (при отсутствии отвертки), в результате получаем доступ к бункеру с отработанным тонером (открыть достаточно и одну заглушку).

ОСТОРОЖНО, пыль очень летучая и плохо отмывается!
Осталось аккуратно вытряхнуть содержимое в мусорный контейнер. Желательно проводить данную операцию на улице.
Если считаете статью полезной,
не ленитесь ставить лайки и делиться с друзьями.
Комментариев: 34
для защиты от тонера, можно прикупить пылесос со съемными фильтрами. Морока с пылью уйдет на второй план. Вот только мало кто согласится покупать за n-рублей такой пылесос)
Большое спасибо Вам!
Супер! спасибо! помогло.
Спасибо огромное за совет. почистил и всё работает как новенькая.
Огромное спасибо! Помогло.
Спасибо огромное, помогло на 100%
Спасибо, помогло! Тонер аккуратно ссыпается на разложенные черновики, потом заворачивается в них и выкидывается. Главное чтоб не было сквозняков. И не чихать. )))
Оказывается как легко. Спасибо вам, а то не знали куда в сервис нести.
СПАСИБО. Все просто.
Благодарю, проблема с вашей помощью решалась
Все получилось после первого забития контейнера отработкой. НО! Повторная очистка привела к тому, что заглушки контейнера стали держаться менее плотно, и отработка пошла внутрь аппарата, что привело к выходу его из строя и вызову сервисного инженера. Так что будьте осторожны с самостоятельной очисткой контейнера!
Спасибо, очень помогло!
Спасибо. Просто и легко, самое главное, это делать по дальше от вентиляторов и кондиционеров.
Источник
Сброс ошибки С7990 на МФУ Kyocera
Бесплатно при заказе от 5000руб.
И так. Мы запустили новый сайт. Процесс обновления прошел успешно. Но есть некоторые нюансы.
Как бы устрашающе не выглядела данная ошибка на дисплее аппарата, в большинстве случаев она не так уж и опасна.
Ошибкой С7990 аппараты Kyocera сообщают, что забился бункер отработанного тонера. Бункер отработки находится в блоке барабана (drum-unit). В нашем случае это будет блок DK-150/170 или DK-1150.
Варианты выхода из ситуации:
1. Если вы опытный пользователь, решить проблему самостоятельно (об этом ниже).
Для самостоятельного решения проблемы необходимо:

Если все получилось, то далее вам необходимо найти на блоке 2 крышки.

На крышках маленькими стрелочками указаны защелки.
Тонкой отверткой, ножницами или. аккуратно отжимаем защелки и вытаскиваем крышки. При этом, желательно держать блок крышками вверх.
После извлечения крышек, все содержимое аккуратно вытряхиваем в целый (без дырок) мусорный пакет.
Внимание!
Тонер это летучий мелкодисперсный порошок, может представлять опасность для здоровья человека, особенно при вдыхании! Все работы желательно производить в медицинской маске.
Освободив бункер от отработанного тонера, собираем все в обратной последовательности.
Выключаем и включаем аппарат. Ошибка сбросилась, аппарат готов к работе!
Внимание!
В аппаратах Kyocera ECOSYS M2135dn, M2040dn, M2635dn, M2635dw, M2540dn, M2540dw, M2735dn, M2835dw установлен блок барабана нового типа (DK-1150).
В нем нет крышек для очистки бункера отработанного тонера.

Выход из ситуации:
- Сверлить отверстия в блоке барабана для ссыпания отработанного тонера.
Источник
Ошибка C7990 Kyocera — Вызовите сервисный персонал.
В статье речь пойдет о таких аппаратах Kyocera, как:
- ECOSYS M2030dn PN, M2030dn, M2035dn, M2040DN, M2040DW, M2135DN, M2530dn, M2535dn, M2540DN, M2540DW, M2635DN, M2635DW, M2640IDW, M2735DN, M2735DW, M2835DN, M2835DW, P2035d, P2035dn, P2040DN, P2040DW, P2135d, P2135dn, P2235D, P2235DN, P2235DW, P2335D, P2335DN, P2335DW;
- FS-1028MFP, FS-1028MFP/DP, FS-1030MFP, FS-1030MFP/DP, FS-1035MFP/DP, FS-1120D, FS-1120DN, FS-1128MFP, FS-1130MFP, FS-1135MFP, FS-1320D, FS-1320DN, FS-1350DN, FS-1370DN;
Ошибка 7990 на аппаратах K yocera возникает, как правило, при пробеге около 70 000 стр. (при использовании неоригинального тонер-картриджа или заправки картриджа).
Что означает «C7990»?
Первая и основная причина данной ошибки — переполнен бункер отработки драм-юнита (блок фотобарабана).
Остатки порошка с фотобарабана счищаются в данный бункер с помощью чистящего лезвия (ракеля). Постепенно резервуар заполняется отработанным тонером и при переполнении появляется ошибка 7990.
Очистить бункер можно самостоятельно. Но будьте осторожны! Тонер очень летуч и очень плохо отмывается. Никаких работающих вентиляторов рядом! Действуйте очень осторожно. В идеале проводить данную процедуру с помощью специального тонерного пылесоса. НЕЛЬЗЯ использовать бытовой пылесос для чистки бункера! Другой вариант: провести чистку бункера от отработанного тонера на улице.
Где находится бункер отработанного тонера?
Бункер расположен за блоком фотобарабана DK. Чтобы добраться до него необходимо вынуть блок проявки DV. Блок проявки — это блок, в который вставляется тонер-картридж.
Итак, устранить ошибку C7990 следующим образом:
1. Выключить принтер (МФУ) Kyocera и открыть переднюю крышку
2. Вынуть картридж и блок проявки
3. Извлечь драм-юнит потянув за ручки по бокам. Ручки бывают зеленого цвета (DK-150, DK-170), а на некоторых драм-юнитах голубого цвета (DK-1150)
4. За задней частью фотобарабана на торце по бокам находятся 2 съемные заглушки или 2 несъемные вогнутые круги.
Вариант с заглушками: подцепить заглушки отверткой, ножницами или другим предметом и потянуть вверх. С этих отверстий АККУРАТНО высыпать отработанный тонер в пакет или в ведро. В идеале воспользоваться тонерным пылесосом (в домашних условиях не обязательно). Пользоваться бытовым пылесосом крайне не рекомендуем, это приведет к поломке Вашего домашнего пылесоса!
Без заглушек: в домашних условиях очистить фотобарабан от тонера можно просверлив дырочки в окружностях и высыпать тонер в ведро (пакет) через данные отверстия. А затем заклеить их скотчем.
5. Собрать аппарат в обратном порядке: фотобарабан → блок проявки → картридж.
6. Включить принтер (МФУ). Ошибка исчезла.
После процедуры аппарат начал печатать белые листы? Это значит, что фотобарабан вставлен не до конца. Необходимо еще раз разобрать и собрать аппарат.
7. Помним, что ресурс драм-юнита 100 000 стр. После чего аппарат выдаст сообщение «Замените MK».
Какие еще есть причины возникновения ошибки с7990?
Причиной может послужить выход из строя датчика или платы управления. В этом случае лучше вызвать специалиста сервисного центра.
Источник
Ошибка c7990 на принтерах kyocera
Убираем ошибку c7990 на принтере kyocera
Принтеры и сканеры
Сброс памперса на Epson L3050
Принтеры и сканеры
Ошибка 0x0000011b при подключении сетевого принтера
Принтеры и сканеры
Драйвер HP LaserJet 1018 для Windows 10
Сбой аппарата вызовите сервисный персонал c7990
Данная ошибка возникает на некоторых моделях принтеров и копировальных аппаратов фирмы Kyocera. Появляется она. как правило, спустя продолжительное время после последней заправки аппарата. В этой статье вы узнаете что означает ошибка под номером c7990 на принтерах kyocera и как ее можно устранить самостоятельно, не вызывая сервисный персонал.
Что значит ошибка c7990 на kyocera?
Она означает что переполнен бункер с отработанным тонером. Дело в том, что технология лазерной печати построена таким образом, что в процессе печати принтера неизбежно появляется “лишний” отработанный тонер. Он не подходит для повторного использования и поэтому складируется в отдельный бункер, который присутствует либо на самом печатающем картридже, либо стоит как отдельный элемент принтера.
Чтобы не допустить полное его заполнение и выход отработанного тонера наружу (а он является летучим и весьма вредным веществом, крайне не рекомендуемым для вдыхания) в большинстве лазерных принтеров реализована система слежения за его наполнением. И ошибка c7990 на принтерах kyocera как раз и есть тот самый сигнал, который говорит, что пора почистить бункер отработанного тонера.
Как почистить бункер с отработкой и убрать ошибку c7990?
Здесь все довольно просто. Мы будем показывать на примере принтера kyocera 1035/2035. Вам нужно для начала полностью выключить сам аппарат. Из розетки в том числе.
Далее откройте переднюю крышку принтера, в которую вставляется печатающий картридж.
В верхней части будет установлен проявляющий узел. Его нужно извлечь.
Извлекаем узел проявки и фотобарабан
Сразу за ним находится блок с фотобарабаном, который также нужно извлечь, взявшись за зеленые ручки по его краям.
Далее переворачиваем его ручками от себя и обращаем внимание на две пластиковые заглушки, находящиеся на каждом из краев картриджа.

Отверстия для ссыпания отработанного тонера
Это и есть те самые отверстия, через которые нужно ссыпать отработанный тонер в мусорный пакет.
Внимание! Это нужно делать очень осторожно. Желательно на улице или в грязном безветренном и безлюдном помещении. Тонер очень летуч и крайне не рекомендуем для вдыхания.
Открываете одну из заглушек, поддеванием в соответствующие отверстия и ссыпаете весь отработанный тонер в мусорный пакет.
После этого все собираете в обратной последовательности, включаете принтер и убеждаетесь, что ошибки “Сбой аппарата вызовите сервисный персонал c7990” больше нет и принтер снова готов к работе.
Обычно, бункер с отработкой чистится одновременно с заправкой картриджа. Поэтому в большинстве случаев, если у вас заполнился бункер с отработкой и появилась ошибка “Сбой аппарата вызовите сервисный персонал c7990” это значит что в скором времени потребуется и заправка самого печатающего картриджа.
Лучшая благодарность автору — репост к себе на страничку:
Источник
Убираем ошибку c7990 на принтере kyocera
Данная ошибка возникает на некоторых моделях принтеров и копировальных аппаратов фирмы Kyocera. Появляется она. как правило, спустя продолжительное время после последней заправки аппарата. В этой статье вы узнаете что означает ошибка под номером c7990 на принтерах kyocera и как ее можно устранить самостоятельно, не вызывая сервисный персонал.
Что значит ошибка c7990 на kyocera?
Она означает что переполнен бункер с отработанным тонером. Дело в том, что технология лазерной печати построена таким образом, что в процессе печати принтера неизбежно появляется “лишний” отработанный тонер. Он не подходит для повторного использования и поэтому складируется в отдельный бункер, который присутствует либо на самом печатающем картридже, либо стоит как отдельный элемент принтера.
Чтобы не допустить полное его заполнение и выход отработанного тонера наружу (а он является летучим и весьма вредным веществом, крайне не рекомендуемым для вдыхания) в большинстве лазерных принтеров реализована система слежения за его наполнением. И ошибка c7990 на принтерах kyocera как раз и есть тот самый сигнал, который говорит, что пора почистить бункер отработанного тонера.
Как почистить бункер с отработкой и убрать ошибку c7990?
Здесь все довольно просто. Мы будем показывать на примере принтера kyocera 1035/2035. Вам нужно для начала полностью выключить сам аппарат. Из розетки в том числе.
Далее откройте переднюю крышку принтера, в которую вставляется печатающий картридж.
В верхней части будет установлен проявляющий узел. Его нужно извлечь.
Извлекаем узел проявки и фотобарабан
Сразу за ним находится блок с фотобарабаном, который также нужно извлечь, взявшись за зеленые ручки по его краям.
Далее переворачиваем его ручками от себя и обращаем внимание на две пластиковые заглушки, находящиеся на каждом из краев картриджа.
Отверстия для ссыпания отработанного тонера
Это и есть те самые отверстия, через которые нужно ссыпать отработанный тонер в мусорный пакет.
Внимание! Это нужно делать очень осторожно. Желательно на улице или в грязном безветренном и безлюдном помещении. Тонер очень летуч и крайне не рекомендуем для вдыхания.
Открываете одну из заглушек, поддеванием в соответствующие отверстия и ссыпаете весь отработанный тонер в мусорный пакет.
После этого все собираете в обратной последовательности, включаете принтер и убеждаетесь, что ошибки “Сбой аппарата вызовите сервисный персонал c7990” больше нет и принтер снова готов к работе.
Обычно, бункер с отработкой чистится одновременно с заправкой картриджа. Поэтому в большинстве случаев, если у вас заполнился бункер с отработкой и появилась ошибка “Сбой аппарата вызовите сервисный персонал c7990” это значит что в скором времени потребуется и заправка самого печатающего картриджа.
Лучшая благодарность автору — репост к себе на страничку:
Данная ошибка возникает из-за того, что переполняется бункер или контейнера отработанного тонера.
Ошибка c7990
Часто на МФУ fs-1035 и ECOSYS m2035 можно наблюдать ошибку c7990, которая полностью звучит «сбой аппарата вызовите сервисный персонал c7990«. Пугаться не нужно — это ошибка, просто необходимо очистить бункер отработки, вставить обратно, выключить и включить аппарат и ошибка исчезнет.
У Kyocera, практически на всех моделях блоки печати отделены друг от друга. Если в HP все компоненты , кроме печки, умещены в один картридж, включая камеру для отработанного тонера, то в Kyocera отработанный тонер «складывается в отдельную «коробочку, либо в камеру, расположенную в блоке с фотобарабаном (драм-юнитом).
Иногда, может быть вызвана выходом из строя датчика или платы управления, но электроника там весьма надежная. Данную проблему легко устранить самостоятельно, без обращения в авторизованный сервисный центр.
Очистка бункера отработанного тонера на принтерах Kyocera 1035/2035 (устранение ошибки С7990)
Делается это просто — на большинстве моделях Kyocera, как, например, на Kyocera FS-2020 или FS-2100. На этих моделях контейнер отработки находится за дверцей, в отсеке с левой стороны принтера. Там есть специальная дверца, открыв которую мы увидим пластиковую «бутылку. Далее у нас есть два варианта — достать её и выбросить, заменив на новую (новые контейнеры идут обычно в комплекте с новыми картриджами), либо высыпать в раковину или ведро. Лучше в раковину, попутно пустив в нее воду, а еще лучше — прочистить пылесосом с тонкой насадкой, дабы тонер не летал в воздухе.
Ну других моделях, например на МФУ FS-1035/1135, ECOSYS m2015 или принтерах FS-1370 бункер отработки находится в блоке с фотобарабаном (drum unit). Здесь без вариантов, либо полностью заменять драм юнит (что довольно дорого и бессмысленно), либо очистить бункер.
Для того, чтобы достать фотобарабан с бункером из принтера:
1. Выключите принтер
2. Откройте переднюю крышку принтера
3. Извлеките узел проявки (тот, в котором установлен картридж
4. Следом за ним стоит фотобарабан, который надо извлечь за зеленые ручки по краям от него
После извлечения переворачиваем его ручками от себя и видим по краям 2 крышки по обе стороны фотобарабана, за ними то и скрывается бункер для отработанного тонера.
Открываем заглушку и аккуратно вытряхиваем все, что внутри в пакет или мешок для мусора.
ОСТОРОЖНО: внутри находится тонер, он летуч, не советуем его вдыхать. Тонер плохо отмывается и лучше всего данную процедуру проводить на улице (и желательно в безветренную погоду).
После чего собираем наш принтер в обратной последовательности, снова включаем — всё, ошибка пропала.
Она означает что переполнен бункер с отработанным тонером. Дело в том, что технология лазерной печати построена таким образом, что в процессе печати принтера неизбежно появляется “лишний” отработанный тонер. Он не подходит для повторного использования и поэтому складируется в отдельный бункер, который присутствует либо на самом печатающем картридже, либо стоит как отдельный элемент принтера.
Чтобы не допустить полное его заполнение и выход отработанного тонера наружу (а он является летучим и весьма вредным веществом, крайне не рекомендуемым для вдыхания) в большинстве лазерных принтеров реализована система слежения за его наполнением. И ошибка c7990 на принтерах kyocera как раз и есть тот самый сигнал, который говорит, что пора почистить бункер отработанного тонера.
Почему возникает
Суть лазерной печати заключается в нанесении тонера на поверхность фотовала, заряженного противоположенным током. Порошок накладывается на всю поверхность, но остается только на определенных участках. Весь лишний удаляется в специальную емкость, а оставшейся запекается на бумаге в печке.
В этом случае, нас интересует судьба только оставшегося в принтере тонера. Он автоматически помещается в бункер отходов. В дальнейшем не используется для печати. Легко догадаться, что эта емкость имеет свой ресурс. Когда он заканчивается, устройство должно предупредить пользователя, что следует предпринять определенные действия. Разные марки принтеров делают это по-своему, а Киосера выдает ошибку с7990.
Решение
Способы решения напрашиваются сами. Необходимо почистить отработанный тонер.
- Отключите принтер от электропитания. Вытяните шнур питания из розетки.
- Откройте переднюю крышку.
- Сейчас Вы увидите проявочный узел. Его вынимаем.
- Дальше идет фотобарабан, который вытягиваем за зеленные ручки, чтобы не повредить поверхность.
- Кладем его на стол, который предварительно нужно застелить старой газетой или бумагой.
- Осматриваем картридж и находим места, через которые извлекаются остатки тонера.
- Через эти отверстия нужно высыпать порошок.
Делайте это на улице или помещении, где нет сквозняка. Помните, что вещество очень вредно для человека и окружающей среды, так как изготовлено из нефти. Используйте резиновые перчатки, а если есть бытовой респиратор, его тоже можно применить, чтобы защититься от вредной пыли.
В целях профилактики дальнейшего возникновения ошибки c7990 на принтерах Kyocera следует проводить чистку отработки при каждой заправке новой порции порошка. Если пополнение не производите самостоятельно, то в сервисном центре это должны сделать, но напомнить не будет лишним.
Первый вариант сброса ошибки С7990
Этот вариант подойдет для некоторых моделей Kyocera. Делается это очень просто:
- Первое что требуется сделать это открытье переднюю крышку, как показано на рисунке:
Откройте переднюю крышку - Далее вытащите картридж с блоком проявки из МФУ. Можно отдельно, а можно и вместе.
Вытащите узел проявки из МФУ - Теперь извлеките узел фотобарабана из МФУ, удерживая за зеленые или синие рычаги обеими руками.
Извлеките узел барабана из МФУ


Инструкция: чистка бункера отработки на примере Kyocera P2235d / M2135dn / M2635dn / M2735dw
Для начала следует вынуть совместимый с МФУ Kyocera P2235d / M2135dn / M2635dn / M2735dw драм картридж DK-1150:
- откройте крышку с обратной стороны устройства;
- достаньте вал проявки;
- выньте драм-картридж.

Если у вас старая комплектация драм-картриджа DK-1150, тогда достаточно будет подковырнуть технологическое отверстие плоской отверткой и вытрясти отработку в герметичный пакет.

Новые драм-картриджи DK-1150 лишены технологического отверстия.
Проблему с чисткой можно решить полной разборкой детали (см. следующий раздел) или аккуратным сверлением бункера отработки. Получившееся отверстие затем стоит заклеить плотным скотчем, а уже при необходимости открывать.
Устранение ошибки C7990 – Шаг №1
Первое, что необходимо сделать, чтобы ошибка C7990 больше не беспокоила, это выключить печатающее устройство. Затем открыть переднюю крышку. Аккуратно, не торопясь, извлечь блок проявки. Извлекать нужно вместе с тонер-картриджем. Просто потяните его на себя, он выйдет.

Выключаем МФУ кнопкой включения/выключения питания. Открываем крышку и извлекаем блок проявки.
Шаг №2
После того как блок проявки извлечён, отложите его в сторону. Второе, что делаем, это извлекаем драм-юнит. Именно по его вине появилась на дисплее устройства ошибка C7990. Вытаскиваем драм также, как и блок проявки, потянув на себя. Тянуть нужно за специально предназначенные для этого зелёные вставки по бокам.

Извлекаем драм-юнит за специальные полукольца. Ошибка C7990 вызвана именно проблемами с драм-юнитом печатающего устройства Kyocera.
Шаг №3
Третье, на демонтированном драм-юните необходимо отщелкнуть небольшую крышку, закрывающую отверстие для чистки отсека отработки. Чтобы это сделать, поворачиваем драм зелёными вставками назад. По бокам находятся крышки. Отщелкнуть нужно одну из них, без разницы какую. Убрав закрывающую крышку высыпаем отработку.

При помощи плоской отвёртки отгибаем защёлки и снимаем крышку закрывающую бункер отработанного тонера.
После того как сняли крышку закрывающую бункер отработанного тонера в драме, высыпаем отработку через открывшуюся полость. Можно воспользоваться специальным пылесосом.
Шаг №4
Итак, отсек для отработанного тонера после проделанных манипуляций пуст. Причину вызвавшую ошибку C7990 на печатающем устройстве Kyocera устранили. Ставим крышечку на своё место. Вставляем драм-юнит, а затем блок проявки с тонер-картриджем в аппарат. Закрываем переднюю крышку устройства. Включаем МФУ и радуемся устранением проблемы.
Где находится бункер отработанного тонера?
Бункер расположен за блоком фотобарабана DK. Чтобы добраться до него необходимо вынуть блок проявки DV. Блок проявки — это блок, в который вставляется тонер-картридж.
При попытке использования картриджа – чип блокирует систему
Производители все время усложняют уровень защиты чипов в картриджах, теперь задача чипа заключается не в анализе оставшегося ресурса печати, а в блокировании возможности заправки картриджа.
Производителей можно разделить на две группы:
1. Производители, чья техника продолжает работу, когда счетчик отсчитал положенное количество копий, чип не блокирует работу заправленного картриджа.
К ним относятся: HP, Canon, Kyocera, Brother (у последнего применяются механические флажки).
В таких картриджах чип можно не менять, картридж продолжит работу и после заправки. В цветных картриджах чипы иногда требуется заменять, кроме счетчика они дополнительно хранят информацию о согласовании цветов.
2. Компании, которые устанавливают блокирующиеся чипы, которые препятствуют заправке картриджей.
К ним относятся: Lexmark, Samsung, Xerox, Pantum.
Чтобы картридж этих производителей продолжил свою работу после заправки, требуется обязательная установка нового чипа, даже полный картридж без чипа работать не будет. Либо, можно воспользоваться альтернативным путем – прошить принтер.
Прошивка принтера – это внесение изменений во внутреннее программное обеспечение самого аппарата так, чтобы принтер «забыл» о чипе и всегда думал, что картридж полный.
Какие еще есть причины возникновения ошибки с7990?
Причиной может послужить выход из строя датчика или платы управления. В этом случае лучше вызвать специалиста сервисного центра.
P.S. При переполненном бункера некоторые аппараты не всегда выдают ошибку С7990 на дисплее. Иногда пользователь об этом может узнать, когда принтер начинает трещать. Если вовремя не провести чистку, ломается шестерёнка. В этом случае, необходим уже ремонт или замена фотобарабана (бункера WT)
Дополнительная информация, касающаяся ошибки C7990
Если вы извлекли драм-юнит и на нём нет крышек закрывающих доступ для очистки отработки, то Вам нужно проделать отверстие самостоятельно. В некоторых моделях печатающих устройств Kyocera, отверстия на драм-юните для очистки отработки отсутствуют. После того как проделали отверстие и высыпали отработанный тонер обязательно заклейте отверстие скотчем! Далее установите драм и блок проявки на своё место, включите устройство. Ошибка C7990 больше Вас не побеспокоит, до следующего переполнения отработанным тонером.


Сброс сообщения «Замените МК» на МФУ kyocera 1035/2035/2535
Итак, делается это очень просто:
- Набираем на клавиатуре код: 10871087 и попадаем в сервисное меню
- Открываем программу u251
- Выбираете стрелочками «clear«
- Для выхода выполняете программу u001 (Не все модели поддерживают такой метод выхода из инженерного меню)
Если у Вас не получилось выйти из инженерного меню по программе u001, то просто выключите и включите Ваш аппарат.
Данным действием мы выполняем сброс счетчика обслуживания!
На этом все, надоедливая просьба исчезла. Мой совет — если МФУ начало просить заменить ему детали (по пробегу) и Вы еще ни разу в нем ничего не меняли, советую заранее прикупить новый Drum Unit DK-170 (проверьте, какой стоит у Вас!), так как это обычно первое, что выходит из строя и печать начинается с черными полосами.
Мы надеемся, что данная статья была полезна для Вас.
Расшифровка кода ошибки по индикаторам
Как расшифровать код ошибки по миганиям индикаторов?
Поле индикаторов в принтере Kyosera P2035D разделено на 8 секторов.

Информационных всего пять: пустые сектора, 1, 2, 3, 4.
Начало передачи кода – это мигание всех четырех секторов одновременно. Далее передается четырехзначный код последовательно. Каждое мигание – это цифра от 1 до 9 в двоичном формате.
Вес каждого сектора:
пустые сектора – 0
1 сектор – единица
2 сектор – двойка
3 сектор – четверка
4 сектор – восьмерка.
Например, код 7990 передается так. Мигают 1, 2, 3, 4 сектора одновременно (разделитель). Затем мигают 1, 2, 3 (1+2+4=7). После мигают 1, 4 (1+8=9). Потом повторяется 1, 4 (1+8=9). Завершает цикл миганием пустых секторов 0. Итого, 7990
Источник: http://complace.ru/remont-printerov-mfu/kyosera/remont-kyosera-p2035d/
Обновленные коды ошибок для популярной серии принтеров Kyocera
Коды ошибок для популярной серии принтеров Kyocera FS-2100DN, FS-4100DN, FS-4200DN, FS-4300DN, а также для пришедших им на смену ECOSYS P3045dn, ECOSYS P3050dn, ECOSYS P3055dn, ECOSYS P3060dn.
1.Self-diagnostic function — Функция самодиагностики
Принтеры оснащены функцией самодиагностики. Когда проблема обнаружена, устройство прекращает печать и на панели управления отображается сообщение об ошибке. Сообщение об ошибке состоит из четырехзначного кода, указывающего на тип ошибки.
| Code | Contents | Causes | Check procedures/ corrective measures |
| 0100 | Backup memory device error | Defective flash memory. | Replace the main PWB and check for correct operation (see page 1-5-22). |
| Defective main PWB. | |||
| 0120 | MAC address data error For data in which the MAC address is invalid. | Defective flash memory. | Replace the main PWB and check for correct operation (see page 1-5-22). |
| Defective main PWB. | Replace the main PWB and check for correct operation (see page 1-5-22). | ||
| 0130 | Backup memory read/write error (main PWB) | Defective flash memory. | Replace the main PWB and check for correct operation (see page 1-5-22). |
| Defective main PWB. | |||
| 0140 | Backup memory data error (main PWB) | Defective flash memory. | Replace the main PWB and check for correct operation (see page 1-5-22). |
| Defective main PWB. | |||
| 0150 | Backup memory read/write error (engine PWB) Detecting engine PWB EEPROM communication error. | Improper installation engine PWB EEPROM. | Check the installation of the EEPROM and remedy if necessary. |
| Defective engine PWB. | Replace the engine PWB and check for correct operation (see page 1-5-22). | ||
| Device damage of EEPROM. | Contact the Service Administrative Division. | ||
| 0160 | Backup memory data error (engine PWB) | Defective EEPROM. | Replace the engine PWB and check for correct operation (see page 1-5-22). |
| Defective engine PWB. | |||
| 0170 | Billing counting error A checksum error is detected in the main and engine backup memories for the billing counters. | Data damage of EEPROM. | Contact the Service Administrative Division. |
| Defective PWB. | Replace the main PWB or the engine PWB and check for correct operation (see page 15-22, 1-5-22). | ||
| 0190 | Backup memory device error (engine PWB) | Defective engine PWB. | Replace the engine PWB and check for correct operation (see page 1-5-22). |
| 0800 | Image processing error JAM010x is detected twice. | Defective connector cable or poor contact in the connector. | Reinsert the connector. Also check for continuity within the connector cable. If none, replace the cable. Fuser thermistor 1/2 and fuser thermistor connect PWB(YC1/2) Fuser thermistor connect PWB(YC3) and engine PWB (YC21) |
| Defective fuser thermistor. | Replace the fuser thermistor connect PWB . | ||
| Replace the fuser unit (see page 1-5-19). | |||
| Defective engine PWB. | Replace the engine PWB and check for correct operation (see page 1-5-22). | ||
| Defective main PWB. | Replace the main PWB and check for correct operations page 1-5-22). | ||
| 0840 | Faults of RTC Unable to communicate with the RTC device normally. The RTC data is mismatched due to dead battery or short-circuit with the metal part. | Other RTC device failure due to dead battery or short-circuit with the metal part. | Restart the main unit and set the correct time from the operation panel. Repair it if the battery comes off from the main PWB. |
| Defective main PWB. | Replace the main PWB and check for correct operation (see page 1-5-22). | ||
| 1010 | Lift motor error (60/55/50 ppm model only) After cassette 1 is inserted, lift sensor does not turn on within 10 s. This error is detected five times successively. | Defective bottom plate elevation mechanism in the cassette. | Check to see if the bottom plate can move smoothly and repair it if any problem is found. |
| Defective connector cable or poor contact in the connector. | Reinsert the connector. Also check for continuity within the connector cable. If none, replace the cable. Lift motor and engine PWB (YC13) | ||
| Defective drive transmission system of the lift motor. | Check if the gears rotate smoothly. If not, grease the bushes and gears. Check for broken gears and replace if any. | ||
| Defective lift motor. | Replace the lift motor. | ||
| Defective engine PWB. | Replace the engine PWB and check for correct operation (see page 1-5-22). | ||
| 1020 | PF lift motor 1 error (paper feeder) After cassette 2 is inserted, PF lift sensor 1 does not turn on. This error is detected four times successively. | Defective bottom plate elevation mechanism in the cassette. | Check to see if the bottom plate can move smoothly and repair it if any problem is found. |
| Defective connector cable or poor contact in the connector. | Reinsert the connector. Also check for continuity within the connector cable. If none, replace the cable. PF lift motor 1 and PF main PWB (YC7) | ||
| Defective drive transmission system of the PF lift motor. | Check if the gears rotate smoothly. If not, grease the bushes and gears. Check for broken gears and replace if any. | ||
| Defective PF lift motor. | Replace the PF lift motor 1. | ||
| Defective PF main PWB. | Replace the PF main PWB (Refer to the service manual for the paper feeder). | ||
| 1030 | PF lift motor 2 error (paper feeder) After cassette 3 is inserted, PF lift sensor 2 does not turn on. This error is detected four times successively. | Defective bottom plate elevation mechanism in the cassette. | Check to see if the bottom plate can move smoothly and repair it if any problem is found. |
| Defective connector cable or poor contact in the connector. | Reinsert the connector. Also check for continuity within the connector cable. If none, replace the cable. PF lift motor 2 and PF main PWB (YC7) | ||
| Defective drive transmission system of the PF lift motor. | Check if the gears rotate smoothly. If not, grease the bushes and gears. Check for broken gears and replace if any. | ||
| Defective PF lift motor. | Replace the PF lift motor 2. | ||
| Defective PF main PWB. | Replace the PF main PWB (Refer to the service manual for the paper feeder). | ||
| 1040 | PF lift motor 3 error (paper feeder) After cassette 4 is inserted, PF lift sensor 3 does not turn on. This error is detected four times successively. | Defective bottom plate elevation mechanism in the cassette. | Check to see if the bottom plate can move smoothly and repair it if any problem is found. |
| Defective connector cable or poor contact in the connector. | Reinsert the connector. Also check for continuity within the connector cable. If none, replace the cable. PF lift motor 3 and PF main PWB (YC7) | ||
| Defective drive transmission system of the PF lift motor. | Check if the gears rotate smoothly. If not, grease the bushes and gears. Check for broken gears and replace if any. | ||
| Defective PF lift motor. | Replace the PF lift motor 3. | ||
| Defective PF main PWB. | Replace the PF main PWB (Refer to the service manual for the paper feeder). | ||
| 1050 | PF lift motor 4 error (paper feeder) After cassette 5 is inserted, PF lift sensor 4 does not turn on. This error is detected four times successively. | Defective bottom plate elevation mechanism in the cassette. | Check to see if the bottom plate can move smoothly and repair it if any problem is found. |
| Defective connector cable or poor contact in the connector. | Reinsert the connector. Also check for continuity within the connector cable. If none, replace the cable. PF lift motor 4 and PF main PWB (YC7) | ||
| Defective drive transmission system of the PF lift motor. | Check if the gears rotate smoothly. If not, grease the bushes and gears. Check for broken gears and replace if any. | ||
| Defective PF lift motor. | Replace the PF lift motor 4. | ||
| Defective PF main PWB. | Replace the PF main PWB (Refer to the service manual for the paper feeder). | ||
| 1140 | BPF lift motor upward error (Bulk paper feeder) BPF lift maximum sensor does not turn on. The lock signal of the motor is detected continuously three times. | Defective connector cable or poor contact in the connector. | Reinsert the connector. Also check for continuity within the connector cable. If none, replace the cable. BPF lift motor and BPF main PWB (YC4) |
| Defective drive transmission system of the motor. | Check if the gears rotate smoothly. If not, grease the bushes and gears. Check for broken gears and replace if any. | ||
| Defective BPF lift motor. | Replace the BPF lift motor. | ||
| Defective BPF main PWB. | Replace the BPF main PWB (Refer to the service manual for the paper feeder). | ||
| 1150 | BPF lift motor downward error (Bulk paper feeder) BPF lift minimum sensor does not turn on. The lock signal of the motor is detected continuously three times. When detecting an overcurrent detection signal. | Defective connector cable or poor contact in the connector. | Reinsert the connector. Also check for continuity within the connector cable. If none, replace the cable. BPF lift motor and BPF main PWB (YC4) |
| Defective drive transmission system of the motor. | Check if the gears rotate smoothly. If not, grease the bushes and gears. Check for broken gears and replace if any. | ||
| Defective BPF lift motor. | Replace the BPF lift motor. | ||
| Defective BPF main PWB. | Replace the BPF main PWB (Refer to the service manual for the paper feeder). | ||
| 1800 | Paper feeder 1 communication error A communication error is detected 10 times in succession. | Improper installation paper feeder. | Follow installation instruction carefully again. |
| Defective connector cable or poor contact in the connector. | Reinsert the connector. Also check for continuity within the connector cable. If none, replace the cable. PF main PWB (YC3) and engine PWB (YC22) | ||
| Defective engine PWB. | Replace the engine PWB and check for correct operation (see page 1-5-22). | ||
| Defective PF main PWB. | Replace the PF main PWB (Refer to the service manual for the paper feeder). | ||
| 1810 | Paper feeder 2 communication error A communication error is detected 10 times in succession. | Improper installation paper feeder. | Follow installation instruction carefully again. |
| Defective connector cable or poor contact in the connector. | Reinsert the connector. Also check for continuity within the connector cable. If none, replace the cable. PF main PWB (YC3) and engine PWB (YC22) | ||
| Defective PF main PWB. | Replace the PF main PWB (Refer to the service manual for the paper feeder). | ||
| 1820 | Paper feeder 3 communication error A communication error is detected 10 times in succession. | Improper installation paper feeder. | Follow installation instruction carefully again. |
| Defective connector cable or poor contact in the connector. | Reinsert the connector. Also check for continuity within the connector cable. If none, replace the cable. PF main PWB (YC3) and engine PWB (YC22) | ||
| Defective PF main PWB. | Replace the PF main PWB (Refer to the service manual for the paper feeder). | ||
| 1830 | Paper feeder 4 communication error A communication error is detected 10 times in succession. | Improper installation paper feeder. | Follow installation instruction carefully again. |
| Defective connector cable or poor contact in the connector. | Reinsert the connector. Also check for continuity within the connector cable. If none, replace the cable. PF main PWB (YC3) and engine PWB (YC22) | ||
| Defective PF main PWB. | Replace the PF main PWB (Refer to the service manual for the paper feeder). | ||
| 1900 | Paper feeder 1/BPF paper feeder EEPROM error When writing the data, the write data and the read data is not in agreement. | Defective PF main PWB. | Replace the PF main PWB or the BPF main PWB (Refer to the service manual for the paper feeder). |
| Device damage of EEPROM. | |||
| 1910 | Paper feeder 2 EEPROM error When writing the data, the write data and the read data is not in agreement. | Defective PF main PWB. | Replace the PF main PWB (Refer to the service manual for the paper feeder). |
| Device damage of EEPROM. | |||
| 1920 | Paper feeder 3 EEPROM error When writing the data, the write data and the read data is not in agreement. | Defective PF main PWB. | Replace the PF main PWB (Refer to the service manual for the paper feeder). |
| Device damage of EEPROM. | |||
| 1930 | Paper feeder 4 EEPROM error When writing the data, the write data and the read data is not in agreement. | Defective PF main PWB. | Replace the PF main PWB (Refer to the service manual for the paper feeder). |
| Device damage of EEPROM. | |||
| 2000 | Main motor drive error The main motor is not stabilized within 2 s after driving starts. | Defective connector cable or poor contact in the connector. | Reinsert the connector. Also check for continuity within the connector cable. If none, replace the cable. Main motor and engine PWB (YC4) |
| Defective drive transmission system of the main motor. | Check if the rollers and gears rotate smoothly. If not, grease the bushes and gears. Check for broken gears and replace if any. | ||
| Defective main motor. | Replace the main motor. | ||
| Defective engine PWB. | Replace the engine PWB and check for correct operation (see page 1-5-22). | ||
| 2010 | Main motor steady-state error Stable OFF is detected for 2 s continuously after main motor stabilized. | Defective connector cable or poor contact in the connector. | Reinsert the connector. Also check for continuity within the connector cable. If none, replace the cable. Main motor and engine PWB (YC4) |
| Defective drive transmission system of the main motor. | Check if the rollers and gears rotate smoothly. If not, grease the bushes and gears. Check for broken gears and replace if any. | ||
| Defective main motor. | Replace the main motor. | ||
| Defective engine PWB. | Replace the engine PWB and check for correct operation (see page 1-5-22). | ||
| 2200 | Drum motor drive error (60/55/50 ppm model only) The drum motor is not stabilized within 2 s after driving starts. | Defective connector cable or poor contact in the connector. | Reinsert the connector. Also check for continuity within the connector cable. If none, replace the cable. Drum motor and engine PWB (YC4) |
| Defective drive transmission system of the drum motor. | Check if the rollers and gears rotate smoothly. If not, grease the bushes and gears. Check for broken gears and replace if any. | ||
| Defective drum motor. | Replace the drum motor. | ||
| Defective engine PWB. | Replace the engine PWB and check for correct operation (see page 1-5-22). | ||
| 2210 | Drum motor steady-state error (60/55/50 ppm model only) Stable OFF is detected for 2 s continuously after drum motor stabilized. | Defective connector cable or poor contact in the connector. | Reinsert the connector. Also check for continuity within the connector cable. If none, replace the cable. Drum motor and engine PWB (YC4) |
| Defective drive transmission system of the drum motor. | Check if the rollers and gears rotate smoothly. If not, grease the bushes and gears. Check for broken gears and replace if any. | ||
| Defective drum motor. | Replace the drum motor. | ||
| Defective engine PWB. | Replace the engine PWB and check for correct operation (see page 1-5-22). | ||
| 2330 | Fuser pressure release motor error (Over-current) The over-current detection signal of the motor is detected continuously twenty times. | Defective connector cable or poor contact in the connector. | Reinsert the connector. Also check for continuity within the connector cable. If none, replace the cable. Fuser pressure release motor and relay-L PWB(YC11) Relay-L PWB(YC3) and engine PWB(YC2) |
| Defective drive transmission system of the fuser pressure release motor. | Check if the gears rotate smoothly. If not, grease the bushes and gears. Check for broken gears and replace if any. | ||
| Defective fuser pressure release motor. | Replace the fuser pressure release motor. | ||
| Defective PWB. | Replace the relay-L PWB or engine PWB. (See Page 1-5-24,1-5-22) | ||
| 2340 | Fuser pressure release motor error (Timeout) The position detection sensor is not detected continuously for 30 s. | Defective connector cable or poor contact in the connector. | Reinsert the connector. Also check for continuity within the connector cable. If none, replace the cable. Fuser pressure release motor and relay-L PWB(YC11) Relay-L PWB(YC1) and engine PWB(YC2) |
| Defective drive transmission system of the fuser pressure release motor. | Check if the gears rotate smoothly. If not, grease the bushes and gears. Check for broken gears and replace if any. | ||
| Defective fuser pressure release motor. | Replace the fuser pressure release motor. | ||
| Defective PWB. | Replace the relay-L PWB or engine PWB. (See Page 1-5-24,1-5-22) | ||
| 2600 | PF drive motor 1 error (paper feeder 1) When the PF drive motor is driven, error signal is detected continuously for 2 s. | Defective connector cable or poor contact in the connector. | Reinsert the connector. Also check for continuity within the connector cable. If none, replace the cable. PF drive motor 1 and PF main PWB (YC6) |
| Defective drive transmission system of the PF drive motor. | Check if the rollers and gears rotate smoothly. If not, grease the bushes and gears. Check for broken gears and replace if any. | ||
| Defective PF drive motor. | Replace the PF drive motor 1. | ||
| Defective PF main PWB. | Replace the PF main PWB (Refer to the service manual for the paper feeder). | ||
| 2610 | PF drive motor 2 error (paper feeder 2) When the PF drive motor is driven, error signal is detected continuously for 2 s. | Defective connector cable or poor contact in the connector. | Reinsert the connector. Also check for continuity within the connector cable. If none, replace the cable. PF drive motor 2 and PF main PWB (YC6) |
| Defective drive transmission system of the PF drive motor. | Check if the rollers and gears rotate smoothly. If not, grease the bushes and gears. Check for broken gears and replace if any. | ||
| Defective PF drive motor. | Replace the PF drive motor 2. | ||
| Defective PF main PWB. | Replace the PF main PWB (Refer to the service manual for the paper feeder). | ||
| 2620 | PF drive motor 3 error (paper feeder 3) When the PF drive motor is driven, error signal is detected continuously for 2 s. | Defective connector cable or poor contact in the connector. | Reinsert the connector. Also check for continuity within the connector cable. If none, replace the cable. PF drive motor 3 and PF main PWB (YC6) |
| Defective drive transmission system of the PF drive motor. | Check if the rollers and gears rotate smoothly. If not, grease the bushes and gears. Check for broken gears and replace if any. | ||
| Defective PF drive motor. | Replace the PF drive motor 3. | ||
| Defective PF main PWB. | Replace the PF main PWB (Refer to the service manual for the paper feeder). | ||
| 2630 | PF drive motor 4 error (paper feeder 4) When the PF drive motor is driven, error signal is detected continuously for 2 s. | Defective connector cable or poor contact in the connector. | Reinsert the connector. Also check for continuity within the connector cable. If none, replace the cable. PF drive motor 4 and PF main PWB (YC6) |
| Defective drive transmission system of the PF drive motor. | Check if the rollers and gears rotate smoothly. If not, grease the bushes and gears. Check for broken gears and replace if any. | ||
| Defective PF drive motor. | Replace the PF drive motor 4. | ||
| Defective PF main PWB. | Replace the PF main PWB (Refer to the service manual for the paper feeder). | ||
| 4000 | Polygon motor synchronization error The polygon motor is not stabilized within 20 s after driving starts. | Defective connector cable or poor contact in the connector. | Reinsert the connector. Also check for continuity within the connector cable. If none, replace the cable. Polygon motor and engine PWB (YC15) |
| Defective polygon motor. | Replace the laser scanner unit (see page 15-18). | ||
| Defective engine PWB. | Replace the engine PWB and check for correct operation (see page 1-5-22). | ||
| 4201 | BD steady-state error When the value of Register BDSET is 1 after setting Register BDSET as one and pass- | Defective connector cable or poor contact in the connector. | Reinsert the connector. Also check for continuity within the connector cable. If none, replace the cable. APC PWB(YC1) and engine PWB (YC16) APC PWB(YC2) and PD PWB(YC1) |
| ing by BD1 cycle. | Defective PD PWB. | Replace the laser scanner unit (see page 15-18). | |
| Defective engine PWB. | Replace the engine PWB and check for correct operation (see page 1-5-22). | ||
| 5100 | Chager current error When the current value measured at the time of potential adjustment is less than 20 ^A. | Defective connector cable or poor contact in the connector. | Reinsert the connector. Also check for continuity within the connector cable. If none, replace the cable. Chager unit and high voltage PWB High voltage PWB (YC101) and engine PWB (YC19) |
| Defective high voltage PWB. | Replace the high voltage PWB and check for correct operation (see page 1-5-26). | ||
| Defective engine PWB. | Replace the engine PWB and check for correct operation (see page 1-5-22). | ||
| 6000 | Broken fuser heater wire The detection temperature of fuser thermistor 2 is 100 °C/ 212°F or less after the fuser heater lamp has been turned on continuously for 30 s. | Defective connector cable or poor contact in the connector. | Reinsert the connector. Also check for continuity within the connector cable. If none, replace the cable. Fuser heater and power source PWB (YC2) Fuser thermistor and Fuser thermistor connect PWB(YC1 and YC2) Fuser thermistor connect PWB(YC3) and engine PWB (YC21) |
| Deformed connector pin. | See page 1-4-19. | ||
| Defective triac. | See page 1-4-19. | ||
| Fuser thermostat triggered. | Reinsert the fuser unit (see page 1-5-19). | ||
| Broken fuser heater wire. | |||
| Defective engine PWB. | Replace the engine PWB and check for correct operation (see page 1-5-22). | ||
| 6020 | Abnormally high fuser thermistor 2 temperature | Deformed connector pin. | See page 1-4-19. |
| The detection temperature of fuser thermistor 2 is higher than 235°C/455°F. | Defective triac. | See page 1-4-19. | |
| Shorted fuser thermistor. | Replace the fuser unit (see page 1-5-19). | ||
| In a heater-off state, the detection temperature of fuser thermistor 2 is higher than 195°C/383°F after the detection temperature of fuser thermistor 2 was 155°C/311 °F or less. | Defective engine PWB. | Replace the engine PWB and check for correct operation (see page 1-5-22). | |
| 6030 | Broken fuser thermistor 2 wire A/D value of the fuser thermistor 2 exceeds 1019 bit continuously for 4 s during warming up. | Defective connector cable or poor contact in the connector. | Reinsert the connector. Also check for continuity within the connector cable. If none, replace the cable. Fuser thermistor and fuser thermistor connect PWB(YC2) Fuser thermistor connect PWB(YC3) and engine PWB (YC21) |
| Deformed connector pin. | See page 1-4-19. | ||
| Defective triac. | See page 1-4-19. | ||
| Defective fuser thermistor. | Replace the fuser unit (see page 1-5-19). | ||
| Defective engine PWB. | Replace the engine PWB and check for correct operation (see page 1-5-22). | ||
| 6000/ | Broken fuser heater wire | Deformed connec- | If the I/F connector pins of the fuser unit and |
| 6020/ | Abnormally high fuser | tor pin. | the main unit are deformed owing to foreign |
| thermistor 2 temperature | matters, replace the connectors or the units | ||
| 6030/ | Broken fuser thermistor 2 | including the connectors. | |
| 6120/ 6130/ Com- bined | wire Abnormally high fuser thermistor 1 temperature Broken fuser thermistor 1 wire | Defective triac. | Remove the power cord and check that the resistance between terminals T1 and T2 of the triac TRA31 and triac TRA41 are of several Mega-Ohms and not shorted (see figure 1-4-3). If failed, replace the power source PWB (see page 1-5-25). |
| 6120 | Abnormally high fuser thermistor 1 temperature | Deformed connector pin. | See page 1-4-19. |
| The detection temperature of fuser thermistor 1 is higher than 245°C/473°F. | Defective triac. | See page 1-4-19. | |
| Shorted fuser thermistor. | Replace the fuser unit (see page 1-5-19). | ||
| In a heater-off state, the detection temperature of fuser thermistor 1 is higher than 195°C/383°F after the detection temperature of fuser thermistor 1 was 155°C/311 °F or less. | Defective engine PWB. | Replace the engine PWB and check for correct operation (see page 1-5-22). | |
| 6130 | Broken fuser thermistor 1 wire A/D value of the fuser thermistor 1 exceeds 1019 bit continuously for 4 s during warming up. | Defective connector cable or poor contact in the connector. | Reinsert the connector. Also check for continuity within the connector cable. If none, replace the cable. Fuser thermistor and fuser thermistor connect PWB(YC1) Fuser thermistor connect PWB(YC3) and engine PWB (YC21) |
| Deformed connector pin. | See page 1-4-19. | ||
| Defective triac. | See page 1-4-19. | ||
| Defective fuser thermistor. | Replace the fuser unit (see page 1-5-19). | ||
| Defective engine PWB. | Replace the engine PWB and check for correct operation (see page 1-5-22). | ||
| 6400 | Zero-cross signal error While fuser heater control is performed, the zero-cross signal is not input within 2 s. | Defective connector cable or poor contact in the connector. | Reinsert the connector. Also check for continuity within the connector cable. If none, replace the cable. Power source PWB (YC3) and engine PWB (YC1) |
| Defective power source PWB or engine PWB. | Replace the power source PWB or the engine PWB and check for correct operation (see page 1-5-22). | ||
| 7100 | Toner sensor error Sensor output value of 930 or more continuously for 5 s. | Defective connector cable or poor contact in the connector. | Reinsert the connector. Also check for continuity within the connector cable. If none, replace the cable. Toner sensor and drum PWB (YC3) Drum connect PWB(YC2) and relay-L PWB (YC3) Relay-L PWB(YC1) and engine PWB (YC2) |
| Defective toner sensor. | Replace the developer unit. (See Page 1-5-13) | ||
| Defective engine PWB. | Replace the engine PWB and check for correct operation (see page 1-5-22). | ||
| 7400 | Developer unit non-installing error Sensor output value of 31 or less continuously for 5 s. | Defective connector cable or poor contact in the connector. | Reinsert the connector. Also check for continuity within the connector cable. If none, replace the cable. Toner sensor and drum PWB (YC3) Drum connect PWB(YC2) and relay-L PWB (YC3) Relay-L PWB(YC1) and engine PWB (YC2) |
| Defective toner sensor. | Replace the developer unit. (See Page 1-5-13) | ||
| Defective engine PWB. | Replace the engine PWB and check for correct operation (see page 1-5-22). | ||
| 7410 | Drum unit type mismatch error The drum PWB EEPROM does not communicate normally. Absence of the drum unit | Defective connector cable or poor contact in the connector. | Reinsert the connector. Also check for continuity within the connector cable. If none, replace the cable. Drum unit and drum connect PWB (YC1) Drum connect PWB(YC2) and relay-L PWB (YC3) Relay-L PWB(YC1) and engine PWB (YC2) |
| is detected. | Defective toner sensor. | Replace the drum unit. (See Page 1-5-13) | |
| Defective engine PWB. | Replace the engine PWB and check for correct operation (see page 1-5-22). | ||
| 7800 | Broken external thermistor wire The average of thermistor output value of 93 or less. | Defective connector cable or poor contact in the connector. | Reinsert the connector. Also check for continuity within the connector cable. If none, replace the cable. Operation PWB (YC1) and engine PWB (YC17) |
| Defective temperature sensor. | Replace the operation PWB. | ||
| 7810 | Short-circuited external thermistor wire The average of thermistor output value of 930 or more. | Defective connector cable or poor contact in the connector. | Reinsert the connector. Also check for continuity within the connector cable. If none, replace the cable. Operation PWB (YC1) and engine PWB (YC17) |
| Defective temperature sensor. | Replace the operation PWB. | ||
| 7900 | Drum unit EEPROM error No response is issued from the device in reading/writing for 5 ms or more and this problem is repeated five times successively. | Defective connector cable or poor contact in the connector. | Reinsert the connector. Also check for continuity within the connector cable. If none, replace the cable. Drum unit and drum connect PWB (YC1) Drum connect PWB(YC2) and relay-L PWB (YC3) Relay-L PWB(YC1) and engine PWB (YC2) |
| Mismatch of reading data from two locations occurs eight times successively. Mismatch between writing data and reading data occurs eight times successively. | Defective drum unit. | Replace the drum unit (see 1-5-15). | |
| F000 | Main PWB — operation PWB communication error | Defective connector cable or poor contact in the connector. | Reinsert the connector. Also check for continuity within the connector cable. If none, replace the cable. Operation PWB(YC1) and engine PWB (YC17) |
| Defective main PWB. | Turn the main power switch off/on to restart the machine. If the error is not resolved, replace main PWB (see page 1-5-22). | ||
| Defective operation PWB. | Replace the operation PWB and check for correct operation. | ||
| F010 | Main PWB checksum error | Defective main PWB. | Turn the main power switch off/on to restart the machine. If the error is not resolved, replace main PWB (see page 1-5-22). |
| F020 | Main PWB RAM checksum error | Defective main memory (RAM) in main PWB | Turn the main power switch off/on to restart the machine. If the error is not resolved, replace main PWB (see page 1-5-22). |
| Defective expended memory (DIMM) | Replace the expansion memory (DIMM). (See Page 1-2-12) Also in the case of the capacity besides specification, it displays. | ||
| F040 | Main PWB — print engine communication error | Defective main PWB. | Turn the main power switch off/on to restart the machine. If the error is not resolved, replace main PWB (see page 1-5-22). |
| Defective engine PWB. | Replace the engine PWB and check for correct operation (see page 1-5-22). | ||
| F050 | Print engine ROM checksum error | Defective engine PWB. | Turn the main power switch off/on to restart the machine. If the error is not resolved, replace engine PWB (see page 1-5-22). |
2. System Error (Fxxxx) Outline — Системная ошибка (Fxxxx)
| It locks on a Welcome screen.It locks on a starting logo (Taskalfa/Ecosys) screen.(Even if time passes for a definite period of time in more than * notes, a screen does not change) | (1) Check the harness, and the connection state of a connector between Panel<=>Main boards, and perform an operation check. (2) Check contact of a DDR memory (extracting) and perform an operation check. If exchangeable, it will exchange and will perform an operation check. (3) U021 Controller backup initialization is carried out and an operation check is performed. (4) Exchange a PanelMain board and perform an operation check. (5) Exchange a Main board and perform an operation check. (6) It will get, if USBLOG is obtainable, and contact service headquarters. | 1. Panel <=> Main IF (Engine PWB Relay) Main PWB: YC2 Engine PWB: YC20,YC30 Panel PWB: YC1 2. DDR memory Main PWB: YS1 | * note: 60[s] | |
| F000 | CF000 will be displayed if * notes progress is carried out for a definite period of time with a Welcome screen.The communication fault between Panel-Main boardsCommunication fault between Panel Core-Main Core Notes 2 | (1) Check the harness, and the connection state of a connector between Panel<=>Main boards, and perform an operation check. (2) Check contact of a DDR memory (extracting) and perform an operation check. If exchangeable, it will exchange and will perform an operation check. (3) U021 Controller backup initialization is carried out and an operation check is performed. (4) Exchange a Main board and perform an operation check. (5) Exchange a PanelMain board and perform an operation check. (6) It will get, if USBLOG is obtainable, and contact service headquarters. | 1. Panel <=> Main IF (Engine PWB Relay) Main PWB: YC2 Engine PWB: YC20,YC30 Panel PWB: YC1 2. DDR memory Main PWB: YS1 | * note: 60[s] |
| F15X | Abnormality detecting in an authentication device control section | (1) Check the harness between authentication device <=>Main boards, and the connection situation of a connector, and perform an operation check. (2) Carry out U021 Main backup initialization and perform an operation check. (3) Exchange a Main board and perform an operation check. (4) Get USBLOG and contact service headquarters. | ^Authentication device <=> Main IF Main PWB: YC6 Authentication device: IC card reader etc. | [Main body <=> authentication device] USB-HOST connector [Main boad <=> USB connector] Main boad: YC510 |
| F17X | Abnormality detecting in a printer data control part | (1) U021 Controller backup initialization is carried out and an operation check is performed. (2) Exchange a Main board and perform an operation check. (3) Get USBLOG and contact service headquarters. | ||
| F18X | Abnormality detecting in a Video control section | (1) Check the harness between Engine<=>Main boards, and the connection state of a connector, and perform an operation check. (2) U021 Controller backup initialization is carried out and an operation check is performed. (3) Exchange an Engine board and perform an operation check. (4) Exchange a Main board and perform an operation check. (5) Get USBLOG and contact service headquarters. | ||
| F1DX | Abnormality detecting of the image memory Management Department | (1) U021 Controller backup initialization is carried out and an operation check is performed. (2) Exchange a Main board and perform an operation check. (3) Get USBLOG and contact service headquarters. | * Poor arrangement of F1 D4:Random Access Memory(1) Confirmation of U340(2) Initialization of a set point (U021) | |
| F21X | Abnormality detecting in an image-processing part | (1) Check contact of a DDR memory and perform an operation check. (2) Carry out U021 Main backup initialization and perform an operation check. (3) Exchange a Main board and perform an operation check. (4) Get USBLOG and contact service headquarters. | ||
| F22X | ||||
| F23X | ||||
| F24X | Abnormality detecting in the system Management Department | (1) Check contact of a DDR memory and perform an operation check. (2) Carry out U021 Main backup initialization and perform an operation check. (3) Exchange a Main board and perform an operation check. (4) Get USBLOG and contact service headquarters. | * F248 is the abnormalities of a printer process.In recurring by specific printer data, please give me cooperation at acquisition of capture data and USBLOG. | [Controller failure] Turn power on and off to clear. USB log is required for investigation. [Main PWB] There is no hard components that can be checked in the field. |
| F25X | Abnormality detecting in a network management department | (1) U021 Controller backup initialization is carried out and an operation check is performed. (2) Exchange a Main board and perform an operation check. (3) Get USBLOG and contact service headquarters. | * It may occur according to a visitor’s network environment. | [Main body <=> External network] Ethernet network |
| F26X | Abnormality detecting in the system Management Department | (1) U021 Controller backup initialization is carried out and an operation check is performed. (2) Exchange a Main board and perform an operation check. (3) Get USBLOG and contact service headquarters. | ||
| F27X | ||||
| F28X | ||||
| F29X | ||||
| F2AX | ||||
| F2BX | Abnormality detecting in a network control part | (1) Carry out U021 Main backup initialization and perform an operation check. (2) Exchange a Main board and perform an operation check. (3) Get USBLOG and contact service headquarters. (Depending on an analysis result, it is packet capture acquisition) | [Main body <=> External network] Ethernet network | |
| F2CX | ||||
| F2DX | ||||
| F2EX | ||||
| F2FX | ||||
| F30X | ||||
| F31X | ||||
| F32X | ||||
| F35X | Abnormality detecting in the printing controlling Management Department | (1) U021 Controller backup initialization is carried out and an operation check is performed. (2) Exchange a Main board and perform an operation check. (3) Get USBLOG and contact service headquarters. | ||
| F38X | Abnormality detecting in the authentication authorized Management Department | (1) U021 Controller backup initialization is carried out and an operation check is performed. (2) Exchange a Main board and perform an operation check. (3) Get USBLOG and contact service headquarters. | [Main body <=> authentication device] USB-HOST connector [Main boad <=> USB connector] Main boad: YC510 | |
| F3AX | Abnormality detecting in the Entity Management Department | (1) U021 Controller backup initialization is carried out and an operation check is performed. (2) Exchange a Main board and perform an operation check. (3) Get USBLOG and contact service headquarters. | ||
| F3BX | ||||
| F3CX | ||||
| F3DX | ||||
| F3EX | ||||
| F3FX | ||||
| F40X | ||||
| F41X | ||||
| F43X | ||||
| F44X | ||||
| F45X | ||||
| F46X | Abnormality detecting of a printer rendering part | (1) Exchange boards and perform an operation check. (2) the acquisition wish of USBLOG — carry out (Depending on the (2) case, it is print capture data acquisition) | * F46F is the abnormalities of a printer process.In recurring by specific printer data, please give me cooperation at acquisition of capture data and USBLOG. | |
| F4DX F4EX | Abnormality detecting in the Entity Management Department | (1) U021 Controller backup initialization is carried out and an operation check is performed. (2) Exchange a Main board and perform an operation check. (3) Get USBLOG and contact service headquarters. | [Main PWB] There is no hard components that can be checked in the field. | |
| F4FX | Abnormality detecting in the JOB Management Department | (1) U021 Controller backup initialization is carried out and an operation check is performed. (2) Exchange a Main board and perform an operation check. (3) Get USBLOG and contact service headquarters. | Since the USB log immediately after occurrence is needed for analysis, please give me cooperation of acquisition. | |
| F52X F53X F55X F56X F57X | Abnormality detecting in a JOB execution part | «(1) U021 Controller backup initialization is carried out and an operation check is performed. (2) Exchange a Main board and perform an operation check. (3) Get USBLOG and contact service headquarters. | Since the USB log immediately after occurrence is needed for analysis, please give me cooperation of acquisition. | |
| F61X | Abnormality detecting in a report creation part | (1) U021 Controller backup initialization is carried out and an operation check is performed. (2) Exchange a Main board and perform an operation check. (3) Get USBLOG and contact service headquarters. | Since the USB log immediately after occurrence is needed for analysis, please give me cooperation of acquisition. | [Controller failure] Turn power on and off to clear. USB log is required for investigation. |
| F63X | Abnormality detecting in a device control section | (1) U021 Controller backup initialization is carried out and an operation check is performed. (2) Exchange a Main board and perform an operation check. (3) Get USBLOG and contact service headquarters. | ||
| F68X | Abnormality detecting in a storage device control section | (1) U021 Controller backup initialization is carried out and an operation check is performed. (2) Exchange a Main board and perform an operation check. (3) Get USBLOG and contact service headquarters. | * F684 is the overwrite error at the time of an HDD security kit. | |
| F90X | Abnormality detecting in the extension application service part | (1) U021 Controller backup initialization is carried out and an operation check is performed. (2) Exchange a Main board and perform an operation check. (3) Get USBLOG and contact service headquarters. | Since the USB log at the time of occurrence is needed for analysis, please give me cooperation of acquisition. | |
| F93X | Abnormality detecting in the extension application management part | (1) U021 Controller backup initialization is carried out and an operation check is performed. (2) Exchange a Main board and perform an operation check. (3) Get USBLOG and contact service headquarters. | Since the USB log at the time of occurrence is needed for analysis, please give me cooperation of acquisition. |
3.System Error (Fxxxx) Outline — Системная ошибка (Fxxxx)
| It locks on a Welcome screen.It locks on a starting logo (Taskalfa/Ecosys) screen.(Even if time passes for a definite period of time in more than * notes, a screen does not change) | (1) Check the harness, and the connection state of a connector between Panel<=>Main boards, and perform an operation check. (2) Check contact of a DDR memory (extracting) and perform an operation check. If exchangeable, it will exchange and will perform an operation check. (3) U021 Controller backup initialization is carried out and an operation check is performed. (4) Exchange a PanelMain board and perform an operation check. (5) Exchange a Main board and perform an operation check. (6) It will get, if USBLOG is obtainable, and contact service headquarters. | 1. Panel <=> Main IF (Engine PWB Relay) Main PWB: YC2 Engine PWB: YC20,YC30 Panel PWB: YC1 2. DDR memory Main PWB: YS1 | * note: 60[s] | |
| F000 | CF000 will be displayed if * notes progress is carried out for a definite period of time with a Welcome screen.The communication fault between Panel-Main boardsCommunication fault between Panel Core-Main Core Notes 2 | (1) Check the harness, and the connection state of a connector between Panel<=>Main boards, and perform an operation check. (2) Check contact of a DDR memory (extracting) and perform an operation check. If exchangeable, it will exchange and will perform an operation check. (3) U021 Controller backup initialization is carried out and an operation check is performed. (4) Exchange a Main board and perform an operation check. (5) Exchange a PanelMain board and perform an operation check. (6) It will get, if USBLOG is obtainable, and contact service headquarters. | 1. Panel <=> Main IF (Engine PWB Relay) Main PWB: YC2 Engine PWB: YC20,YC30 Panel PWB: YC1 2. DDR memory Main PWB: YS1 | * note: 60[s] |
| F15X | Abnormality detecting in an authentication device control section | (1) Check the harness between authentication device <=>Main boards, and the connection situation of a connector, and perform an operation check. (2) Carry out U021 Main backup initialization and perform an operation check. (3) Exchange a Main board and perform an operation check. (4) Get USBLOG and contact service headquarters. | ^Authentication device <=> Main IF Main PWB: YC6 Authentication device: IC card reader etc. | [Main body <=> authentication device] USB-HOST connector [Main boad <=> USB connector] Main boad: YC510 |
| F17X | Abnormality detecting in a printer data control part | (1) U021 Controller backup initialization is carried out and an operation check is performed. (2) Exchange a Main board and perform an operation check. (3) Get USBLOG and contact service headquarters. | ||
| F18X | Abnormality detecting in a Video control section | (1) Check the harness between Engine<=>Main boards, and the connection state of a connector, and perform an operation check. (2) U021 Controller backup initialization is carried out and an operation check is performed. (3) Exchange an Engine board and perform an operation check. (4) Exchange a Main board and perform an operation check. (5) Get USBLOG and contact service headquarters. | ||
| F1DX | Abnormality detecting of the image memory Management Department | (1) U021 Controller backup initialization is carried out and an operation check is performed. (2) Exchange a Main board and perform an operation check. (3) Get USBLOG and contact service headquarters. | * Poor arrangement of F1 D4:Random Access Memory(1) Confirmation of U340(2) Initialization of a set point (U021) | |
| F21X | Abnormality detecting in an image-processing part | (1) Check contact of a DDR memory and perform an operation check. (2) Carry out U021 Main backup initialization and perform an operation check. (3) Exchange a Main board and perform an operation check. (4) Get USBLOG and contact service headquarters. | ||
| F22X | ||||
| F23X | ||||
| F24X | Abnormality detecting in the system Management Department | (1) Check contact of a DDR memory and perform an operation check. (2) Carry out U021 Main backup initialization and perform an operation check. (3) Exchange a Main board and perform an operation check. (4) Get USBLOG and contact service headquarters. | * F248 is the abnormalities of a printer process.In recurring by specific printer data, please give me cooperation at acquisition of capture data and USBLOG. | [Controller failure] Turn power on and off to clear. USB log is required for investigation. [Main PWB] There is no hard components that can be checked in the field. |
| F25X | Abnormality detecting in a network management department | (1) U021 Controller backup initialization is carried out and an operation check is performed. (2) Exchange a Main board and perform an operation check. (3) Get USBLOG and contact service headquarters. | * It may occur according to a visitor’s network environment. | [Main body <=> External network] Ethernet network |
| F26X | Abnormality detecting in the system Management Department | (1) U021 Controller backup initialization is carried out and an operation check is performed. (2) Exchange a Main board and perform an operation check. (3) Get USBLOG and contact service headquarters. | ||
| F27X | ||||
| F28X | ||||
| F29X | ||||
| F2AX | ||||
| F2BX | Abnormality detecting in a network control part | (1) Carry out U021 Main backup initialization and perform an operation check. (2) Exchange a Main board and perform an operation check. (3) Get USBLOG and contact service headquarters. (Depending on an analysis result, it is packet capture acquisition) | [Main body <=> External network] Ethernet network | |
| F2CX | ||||
| F2DX | ||||
| F2EX | ||||
| F2FX | ||||
| F30X | ||||
| F31X | ||||
| F32X | ||||
| F35X | Abnormality detecting in the printing controlling Management Department | (1) U021 Controller backup initialization is carried out and an operation check is performed. (2) Exchange a Main board and perform an operation check. (3) Get USBLOG and contact service headquarters. | ||
| F38X | Abnormality detecting in the authentication authorized Management Department | (1) U021 Controller backup initialization is carried out and an operation check is performed. (2) Exchange a Main board and perform an operation check. (3) Get USBLOG and contact service headquarters. | [Main body <=> authentication device] USB-HOST connector [Main boad <=> USB connector] Main boad: YC510 | |
| F3AX | Abnormality detecting in the Entity Management Department | (1) U021 Controller backup initialization is carried out and an operation check is performed. (2) Exchange a Main board and perform an operation check. (3) Get USBLOG and contact service headquarters. | ||
| F3BX | ||||
| F3CX | ||||
| F3DX | ||||
| F3EX | ||||
| F3FX | ||||
| F40X | ||||
| F41X | ||||
| F43X | ||||
| F44X | ||||
| F45X | ||||
| F46X | Abnormality detecting of a printer rendering part | (1) Exchange boards and perform an operation check. (2) the acquisition wish of USBLOG — carry out (Depending on the (2) case, it is print capture data acquisition) | * F46F is the abnormalities of a printer process.In recurring by specific printer data, please give me cooperation at acquisition of capture data and USBLOG. | |
| F4DX F4EX | Abnormality detecting in the Entity Management Department | (1) U021 Controller backup initialization is carried out and an operation check is performed. (2) Exchange a Main board and perform an operation check. (3) Get USBLOG and contact service headquarters. | [Main PWB] There is no hard components that can be checked in the field. | |
| F4FX | Abnormality detecting in the JOB Management Department | (1) U021 Controller backup initialization is carried out and an operation check is performed. (2) Exchange a Main board and perform an operation check. (3) Get USBLOG and contact service headquarters. | Since the USB log immediately after occurrence is needed for analysis, please give me cooperation of acquisition. | |
| F52X F53X F55X F56X F57X | Abnormality detecting in a JOB execution part | «(1) U021 Controller backup initialization is carried out and an operation check is performed. (2) Exchange a Main board and perform an operation check. (3) Get USBLOG and contact service headquarters. | Since the USB log immediately after occurrence is needed for analysis, please give me cooperation of acquisition. | |
| F61X | Abnormality detecting in a report creation part | (1) U021 Controller backup initialization is carried out and an operation check is performed. (2) Exchange a Main board and perform an operation check. (3) Get USBLOG and contact service headquarters. | Since the USB log immediately after occurrence is needed for analysis, please give me cooperation of acquisition. | [Controller failure] Turn power on and off to clear. USB log is required for investigation. |
| F63X | Abnormality detecting in a device control section | (1) U021 Controller backup initialization is carried out and an operation check is performed. (2) Exchange a Main board and perform an operation check. (3) Get USBLOG and contact service headquarters. | ||
| F68X | Abnormality detecting in a storage device control section | (1) U021 Controller backup initialization is carried out and an operation check is performed. (2) Exchange a Main board and perform an operation check. (3) Get USBLOG and contact service headquarters. | * F684 is the overwrite error at the time of an HDD security kit. | |
| F90X | Abnormality detecting in the extension application service part | (1) U021 Controller backup initialization is carried out and an operation check is performed. (2) Exchange a Main board and perform an operation check. (3) Get USBLOG and contact service headquarters. | Since the USB log at the time of occurrence is needed for analysis, please give me cooperation of acquisition. | |
| F93X | Abnormality detecting in the extension application management part | (1) U021 Controller backup initialization is carried out and an operation check is performed. (2) Exchange a Main board and perform an operation check. (3) Get USBLOG and contact service headquarters. | Since the USB log at the time of occurrence is needed for analysis, please give me cooperation of acquisition. |
4.Electric problems
| Problem | Causes | Check procedures/corrective measures |
| (1) The machine does not operate when the power switch is turned on. | 1. No electricity at the power outlet. | Measure the input voltage. |
| 2. The power cord is not plugged in properly. | Check the contact between the power plug and the outlet. | |
| 3. Broken power cord. | Check for continuity. If none, replace the cord. | |
| 4. Defective power switch. | Check for continuity across the contacts. If none, replace the power switch. | |
| 5. Defective interlock switch. | Check for continuity across the contacts of interlock switch. If none, replace the power source PWB (see page 1-5-25). | |
| 6. Defective power source PWB. | Replace the power source PWB or engine PWB (see page 1-5-25,1-5-22). | |
| (2) Eject motor does not operate. | 1. Defective connector cable or poor contact in the connector. | Reinsert the connector. Also check for continuity within the connector cable. If none, replace the cable. Eject motor and relay-L PWB (YC12) Relay-L PWB and engine PWB (YC2/YC31) |
| 2. Defective drive transmission system. | Check if the rollers and gears rotate smoothly. If not, grease the bushes and gears. Check for broken gears and replace if any. | |
| 3. Defective motor. | Replace the eject motor. | |
| 4. Defective PWB. | Replace the engine PWB or the relay-L PWB and check for correct operation (see page 1-5-22, 1-5-24). | |
| (3) Power source fan motor does not operate. | 1. Defective connector cable or poor contact in the connector. | Reinsert the connector. Also check for continuity within the connector cable. If none, replace the cable. Power source fan motor and engine PWB (YC10) |
| 2. Defective motor. | Replace the power source fan motor. | |
| 3. Defective PWB. | Replace the engine PWB and check for correct operation (see page 1-5-22). | |
| (4) LSU fan motor does not operate. | 1. Defective connector cable or poor contact in the connector. | Reinsert the connector. Also check for continuity within the connector cable. If none, replace the cable. LSU fan motor and relay-L PWB (YC4) Relay-L PWB and engine PWB (YC2/YC31) |
| 2. Defective motor. | Replace the LSU fan motor. | |
| 3. Defective PWB. | Replace the engine PWB or the relay-L PWB and check for correct operation (see page 1-5-22, 1-5-24). | |
| (5) Developer fan motor does not operate. | 1. Defective connector cable or poor contact in the connector. | Reinsert the connector. Also check for continuity within the connector cable. If none, replace the cable. Developer fan motor and engine PWB (YC27) |
| 2. Defective motor. | Replace the developer fan motor. | |
| 3. Defective PWB. | Replace the engine PWB and check for correct operation (see page 1-5-22). | |
| (6) Paper feed clutch does not operate. | 1. Defective connector cable or poor contact in the connector. | Reinsert the connector. Also check for continuity within the connector cable. If none, replace the cable. Paper feed clutch and engine PWB (YC5) |
| 2. Defective clutch. | Replace the paper feed clutch. | |
| 3. Defective PWB. | Replace the engine PWB and check for correct operation (see page 1-5-22). | |
| (7) Registration clutch does not operate. | 1. Defective connector cable or poor contact in the connector. | Reinsert the connector. Also check for continuity within the connector cable. If none, replace the cable. Registration clutch and engine PWB (YC5) |
| 2. Defective clutch. | Replace the registration clutch. | |
| 3. Defective PWB. | Replace the engine PWB and check for correct operation (see page 1-5-22). | |
| (8) Duplex clutch does not operate. | 1. Defective connector cable or poor contact in the connector. | Reinsert the connector. Also check for continuity within the connector cable. If none, replace the cable. Duplex clutch and engine PWB (YC5) |
| 2. Defective clutch. | Replace the duplex clutch. | |
| 3. Defective PWB. | Replace the engine PWB and check for correct operation (see page 1-5-22). | |
| (9) Developer clutch does not operate. | 1. Defective connector cable or poor contact in the connector. | Reinsert the connector. Also check for continuity within the connector cable. If none, replace the cable. Developer clutch and engine PWB (YC5) |
| 2. Defective clutch. | Replace the developer clutch. | |
| 3. Defective PWB. | Replace the engine PWB and check for correct operation (see page 1-5-22). | |
| (10) Conveying clutch does not operate. | 1. Defective connector cable or poor contact in the connector. | Reinsert the connector. Also check for continuity within the connector cable. If none, replace the cable. Conveying clutch and engine PWB (YC5) |
| 2. Defective clutch. | Replace the Conveying clutch. | |
| 3. Defective PWB. | Replace the engine PWB and check for correct operation (see page 1-5-22). | |
| (11) MP solenoid does not operate. | 1. Defective connector cable or poor contact in the connector. | Reinsert the connector. Also check for continuity within the connector cable. If none, replace the cable. MP solenoid and engine PWB (YC8) |
| 2. Defective solenoid. | Replace the MP solenoid. | |
| 3. Defective PWB. | Replace the engine PWB and check for correct operation (see page 1-5-22). | |
| (12) Feedshift solenoid does not operate. (60/55/50 ppm model only) | 1. Defective connector cable or poor contact in the connector. | Reinsert the connector. Also check for continuity within the connector cable. If none, replace the cable. Feedshift solenoid and relay-L PWB (YC13) Relay-L PWB and engine PWB (YC2/YC31) |
| 2. Defective solenoid. | Replace the Feedshift solenoid. | |
| 3. Defective PWB. | Replace the engine PWB or the relay-L PWB and check for correct operation (see page 1-5-22, 1-5-24). | |
| (13) The message requesting paper to be loaded is shown when paper is present on the cassette. | 1. Defective connector cable or poor contact in the connector. | Reinsert the connector. Also check for continuity within the connector cable. If none, replace the cable. High voltage PWB and engine PWB (YC19) |
| 2. Deformed actuator of the paper sensor. | Check visually and replace if necessary. | |
| 3. Defective paper sensor. | Replace the engine PWB or the high voltage PWB and check for correct operation (see page 1-5-22,1-5-26). | |
| 4. Defective PWB. | ||
| (14) The message requesting paper to be loaded is shown when paper is present on the MP tray. | 1. Defective connector cable or poor contact in the connector. | Reinsert the connector. Also check for continuity within the connector cable. If none, replace the cable. MP paper sensor and relay-L PWB (YC8) Relay-L PWB and engine PWB (YC2) |
| 2. Deformed actuator of the MP paper sensor. | Check visually and replace if necessary. | |
| 3. Defective MP paper sensor. | Replace the MP paper sensor. | |
| 4. Defective PWB. | Replace the engine PWB or the relay-L PWB and check for correct operation (see page 1-5-22, 1-5-24). | |
| (15) The size of paper on the cassette is not displayed correctly. | 1. Defective connector cable or poor contact in the connector. | Reinsert the connector. Also check for continuity within the connector cable. If none, replace the cable. Cassette size switch and engine PWB (YC7) |
| 2. Defective cassette size switch. | Replace the cassette size switch. | |
| 3. Defective PWB. | Replace the engine PWB and check for correct operation (see page 1-5-22). | |
| (16) A paper jam in the paper feed, paper conveying or eject section is indicated when the main power switch is turned on. | 1. Defective connector cable or poor contact in the connector. | Reinsert the connector. Also check for continuity within the connector cable. If none, replace the cable. Regist sensor 2 and Drum PWB (YC6) DU sensor 1 and Relay-L PWB (YC9) PF feed sensor and PF main PWB Eject full sensor and engine PWB (YC12) Eject sensor and Engine PWB (YC26) |
| 2. A piece of paper torn from paper is caught around registration sensor, duplex sensor, PF feed sensor, eject full sensor or eject sensor. | Check visually and remove it, if any. | |
| 3. Defective sensor. | Replace the registration sensor, duplex sensor, PF feed sensor, eject full sensor or eject sensor. | |
| 4. Defective PWB. | Replace the engine PWB and check for correct operation (see page 1-5-22). | |
| (17) A message indicating cover open is displayed when the top cover is closed. | 1. Defective connector cable or poor contact in the connector. | Reinsert the connector. Also check for continuity within the connector cable. If none, replace the cable. Interlock switch and engine PWB (YC6) |
| 2. Defective interlock switch. | Check and replace if necessary. | |
| 3. Defective PWB. | Replace the engine PWB and check for correct operation (see page 1-5-22). | |
| (18) A message indicating cover open is displayed when the rear cover is closed. | 1. Defective connector cable or poor contact in the connector. | Reinsert the connector. Also check for continuity within the connector cable. If none, replace the cable. Rear cover switch and relay-L PWB (YC10) Relay-L PWB and engine PWB (YC2/YC31) |
| 2. Defective rear cover switch. | Check and replace if necessary. | |
| 3. Defective PWB. | Replace the engine PWB or the relay-L PWB and check for correct operation (see page 1-5-22, 1-5-24). |
5.Mechanical problems
| Problem | Causes/check procedures | Corrective measures |
| (1) No primary paper feed. | Check if the surfaces of the following rollers are dirty with paper powder. Pickup roller Paper feed roller MP paper feed pulley | Clean with isopropyl alcohol. |
| Check if the following rollers is deformed. Pickup roller Paper feed roller MP paper feed pulley | Check visually and replace any deformed (see page 1-5-8, 1-5-10). | |
| Defective paper feed clutch installation. | Check visually and remedy if necessary. | |
| (2) No secondary paper feed. | Check if the surfaces of the following rollers are dirty with paper powder. Upper registration roller Lower registration roller | Clean with isopropyl alcohol. |
| Defective registration clutch installation. | Check visually and remedy if necessary. | |
| (3) Skewed paper feed. | Paper width guide in a cassette installed incorrectly. | Check the paper width guide visually and remedy or replace if necessary. |
| (4) Multiple sheets of paper are fed. | Check if the paper is excessively curled. | Change the paper. |
| Paper is loaded incorrectly. | Load the paper correctly. | |
| Check if the retard roller is worn. | Replace the retard roller if it is worn (see page 1-5-8). | |
| (5) Paper jams. | Check if the paper is excessively curled. | Change the paper. |
| Check if the contact between the upper and lower registration rollers is correct. | Check visually and remedy if necessary. | |
| Check if the heat roller or press roller is extremely dirty or deformed. | Check visually and replace the fuser unit (see page 1-5-19). | |
| (6) Toner drops on the paper conveying path. | Check if the drum unit or developer unit is extremely dirty. | Clean the drum unit or developer unit. |
| (7) Abnormal noise is heard. | Check if the rollers, pulleys and gears operate smoothly. | Grease the bushes and gears. |
| Check if the following clutches are installed correctly. Paper feed clutch Registration clutch Duplex clutch | Check visually and remedy if necessary. |
Источники
- https://helpadmins.ru/oshibka-c7990-na-printerakh-kyocera/
- https://printeru.info/oshibki-i-problemy/c7990-kiosera
- https://kodyoshibok03.ru/kod-oshibki-c7990-kyocera-kak-ispravit/
- https://setiwik.ru/sbros-oshibki-s7990-na-apparatah-kyocera/
- https://moscowtoner.ru/oshibka-kyocera-c7990-kak-ochistit-dram-kartridzh-ot-otrabotannogo-tonera/
- https://zipzip03.ru/oshibka-c7990-na-kyocera/
- https://remtehprint.ru/oshibka-c7990-kyocera-sboj-apparata-vyzovite-servisnyj-personal
- https://univer-irk.ru/czvet/oshibka-kyocera-c7990-s-soobshheniem-sboj-apparata-vyzovite-servisnyj-personal
- https://vkspy.info/pc/oshibka-kyocera-c7990-chistka-dram-kartridzha-ot-otrabotki
- https://skolkogramm.ru/info/oshibka-kyocera-c7990-s-soobshheniem-sboj-apparata-vyzovite-servisnyj-personal
- https://kyo.com.ua/biblioteka/poleznye-stati/kody-oshibok-dlya-populyarnoy-serii-printerov-kyocera-fs-2100dn-fs-4100dn-fs-4200dn-fs-4300dn-a-takzhe-dlya-prishedshih-im-na-smenu-ecosys-p3045dn-ecosys-p3050dn-ecosys-p3055dn-ecosys-p3060dn./
[свернуть]
Компания Kyocera выпускает самые качественные и надежные печатающие устройства, но не смотря на это в рейтинги производителей она занимает всего 4 место. Это связанно в первую очередь со стоимость, если например, взять МФУ с одинаковыми характеристиками от разных производителей, то модель от Kyocera будет одна из самых дорогих. Но тут стоить сказать что стоимость обоснована на 100%, ведь печатающие устройства Kyocera это премиум класс, который окупиться с вероятностью 99%, в первую очередь за счет надежности и экономичности. Но какой бы надежной данная техника не была, во время её использования так же появляются различные проблемы, в первую очередь это ошибки, которые блокируют работу. Их достаточно много и как правило прочитав ошибку можно сразу понять в чем проблема, но есть исключения. Например, сегодня рассмотрим одну из них «Ошибка C7990 сбой аппарата Kyocera вызовите сервисный персонал».
Ошибка C7990 сбой аппарата Kyocera вызовите сервисный персонал
В моем случае данная ошибка появилась на модели МФУ M2040dn, на дисплее устройства отображалось следующие сообщение.
Ошибка C7990 сбой аппарата Kyocera вызовите сервисный персонал
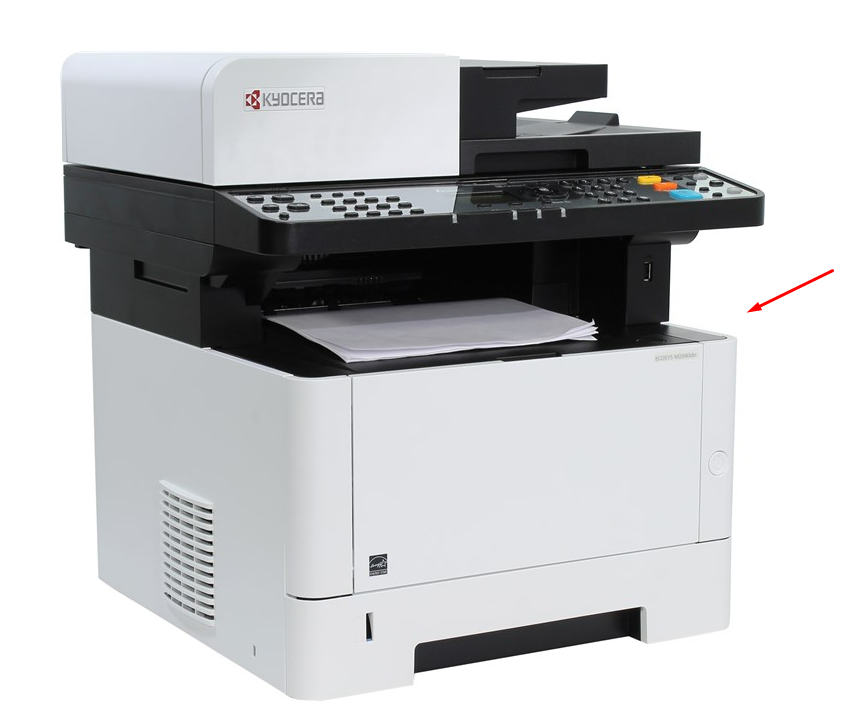
В веб интерфейсе точно такая же ситуация.
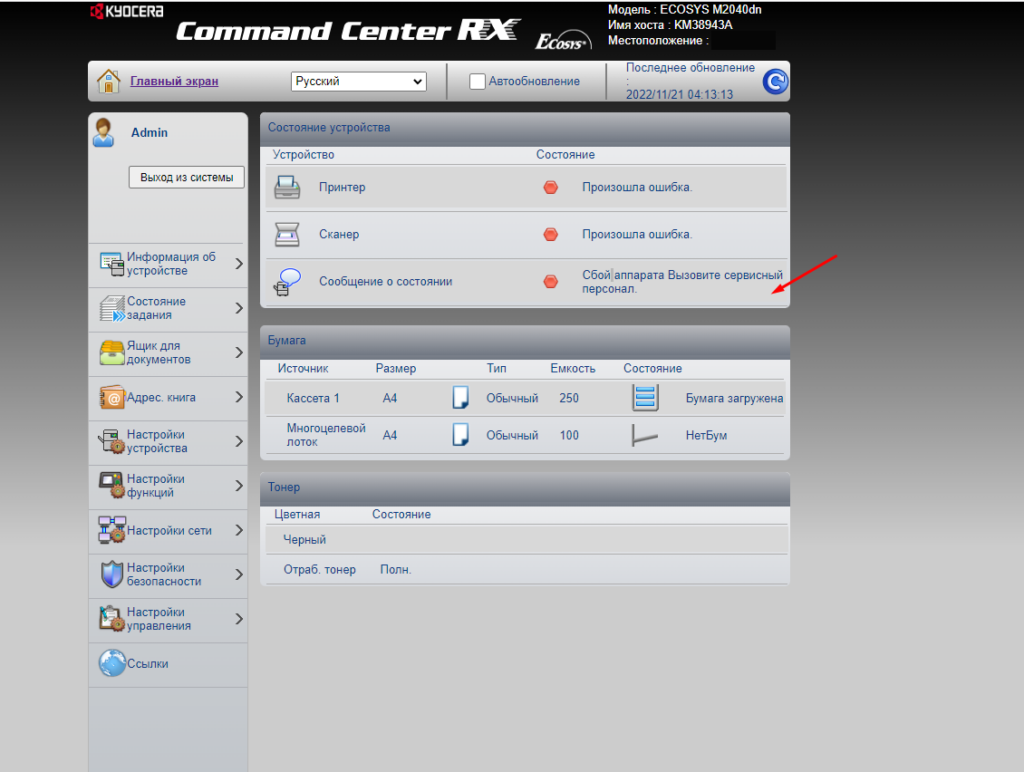
Данная ошибка говорит о том что бункер в котором скапливается отработавший тонер заполнен и его необходимо заменить (почистить). У данной модели бункер расположен в блоке с фотобарабаном. Для того чтобы высыпать отработку его придется полностью разобрать, но делать это нужно очень осторожно и аккуратно, так как можно повредить сам фотобарабан. Есть вариант намного проще, с обратной стороны проделываем отверстие, например, вот в этих местах (Указаны на скриншоте ниже) , высыпаем отработку и заклеиваем их.
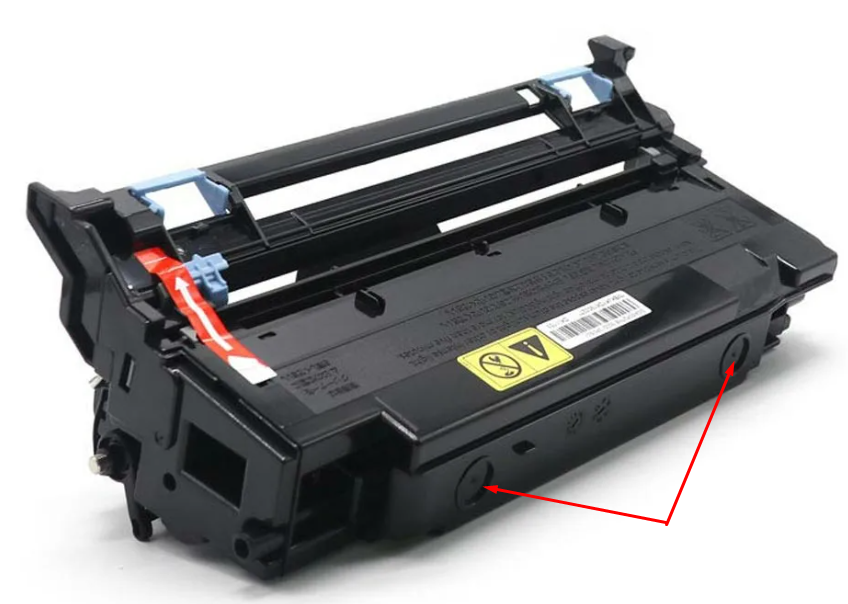
После этого собираем все обратно, перезагружаем устройство и оно должно заработать. Вот таким простым образом можно избавиться от ошибки «C7990 сбой аппарата вызовите сервисный персонал» на устройствах Kyocera. Если у Вас что-то не получилось или появляется другая ошибка обязательно напишите об этом!