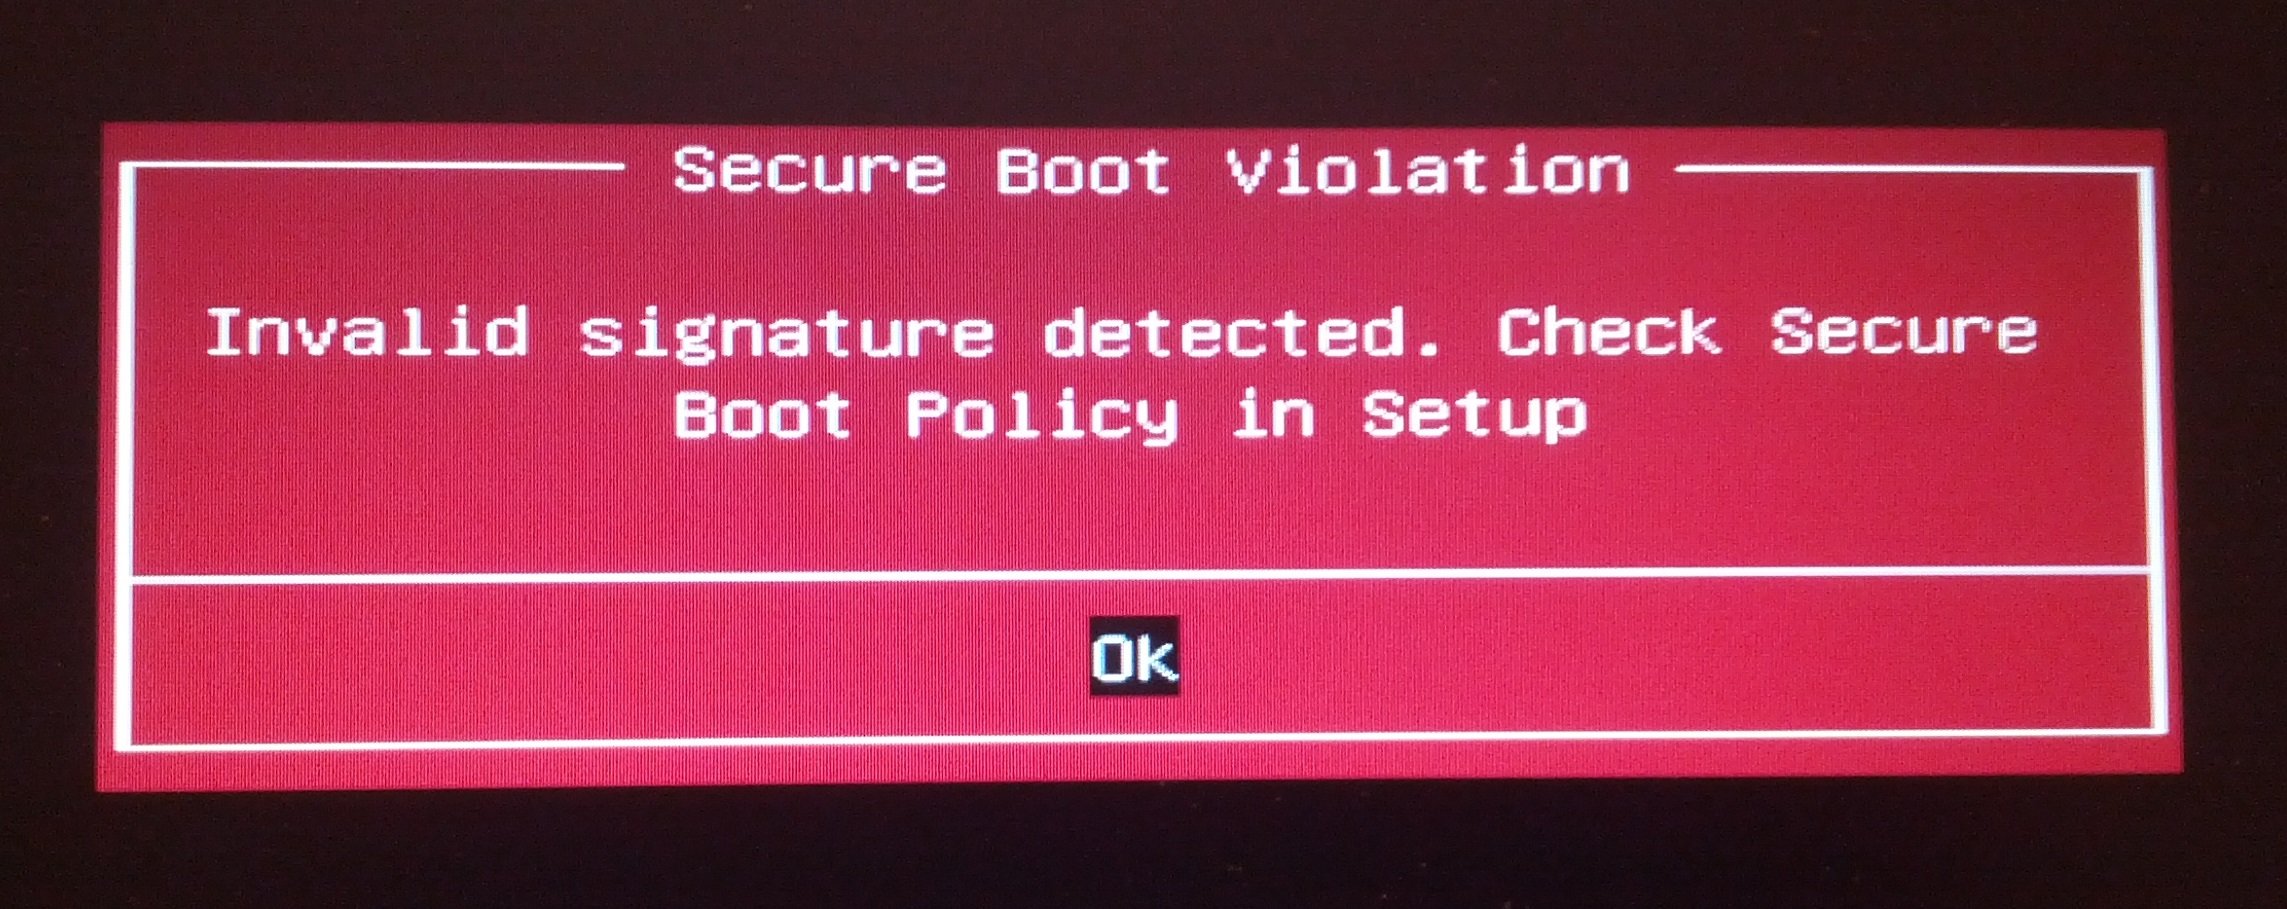
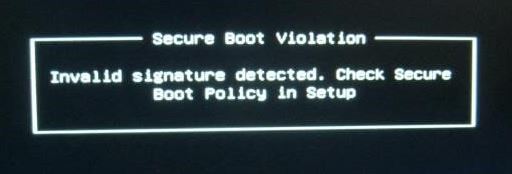
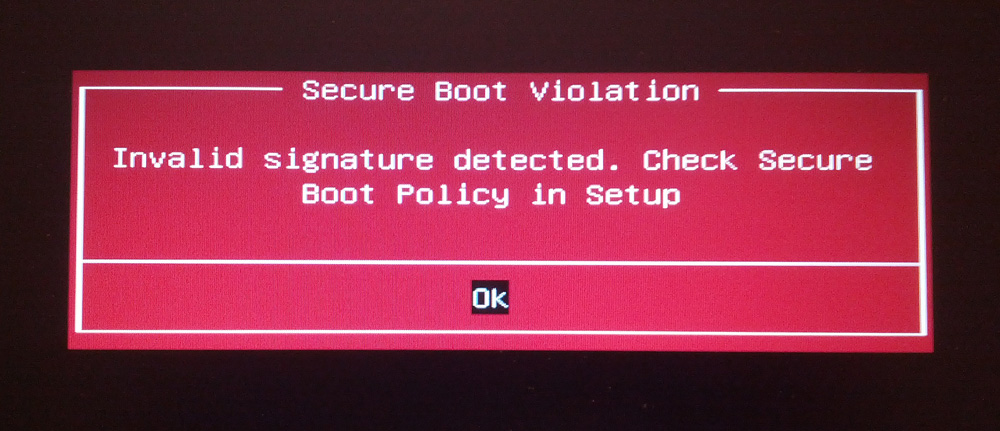
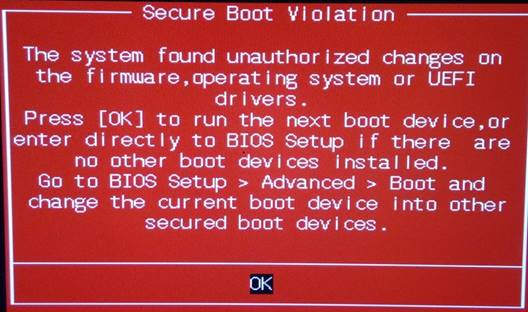
Ошибка «Secure Boot Violation – Invalid Signature Detected» появляется при запуске компьютера под управлением Windows. Вы можете нажать Enter при ее появлении, чтобы войти в систему, но она будет возникать каждый раз при загрузке ПК.
Содержание
- Что вызывает «Secure Boot Violation»?
- Решение «Secure Boot Violation»
- Решение №1 Отключение протокола
- Решение №2 Удаление обновления KB3084905
- Решение №3 Отключение проверки цифровых подписей
Что вызывает «Secure Boot Violation»?
Как правило, причину за появлением этого сообщение невероятно трудно определить. Посудите сами: короткое сообщение на красном фоне, которое предоставляет минимальное количество информации, причем непонятной для многих пользователей. Однако первая часть сообщения все же дает намек о том, как можно избавиться от данной проблемы.
Secure Boot (безопасная загрузка) — особый протокол для BIOS, который запрещает запуск не авторизованных операционных систем на устройстве. Благодаря этому протоколу в BIOS «запоминается» подписи загрузочного кода первоначальной системы и если эти подписи не совпадают — Secure Boot блокирует загрузку другой системы.
Решение «Secure Boot Violation»
Решение №1 Отключение протокола
Верно, чтобы избавиться от ошибки «Secure Boot Violation» зачастую достаточно просто отключить в BIOS соответствующий протокол. Возможно, вы пытались загрузиться в какую-то иную, дополнительную ОС, что не понравилось Secure Boot.
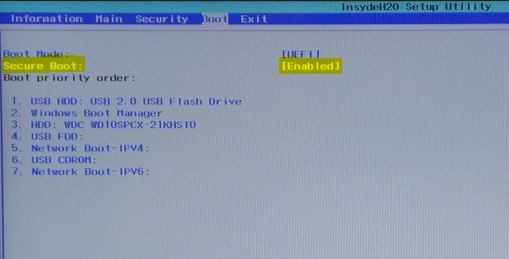
Так или иначе войдите BIOS, нажатием выделенной для этого кнопки (у каждого она разная — гуглим) при загрузке компьютера. Например, часто этими кнопками являются DEL, F1, F2 и так далее. Как только войдете в BIOS, начинаем искать пункт Secure Boot. Опять-таки, в каждом BIOS он может располагаться в разных вкладках.
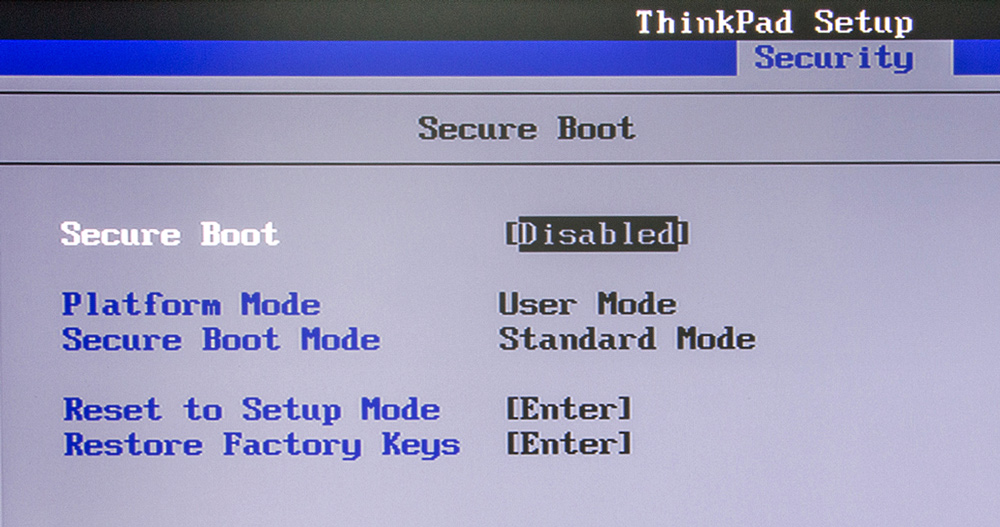
Найдя необходимый параметр, выставьте для него значение «Disabled». Сохраните внесенные изменения в BIOS и перезагрузите компьютер. Ошибка «Secure Boot Violation» должна исчезнуть.
Решение №2 Удаление обновления KB3084905
Оказывается, обновление KB3084905, выпущенное для Windows Server 2012 и Windows 8.1, может вызывать некоторые проблемы с Secure Boot на компьютерах, которые подключены к одному и тому же контроллеру доменов. Решение — удалить указанное выше обновление из системы. Для этого нужно сделать следующее:
- нажмите Windows+R;
- пропишите значение «control.exe» и нажмите Enter;
- выберите «Удаление программ» в категориях;
- нажмите на строчку «Просмотр установленных обновлений»;
- найдите в списке обновление KB3084905, нажмите на него ПКМ и выберите «Удалить»;
- следуйте инструкциям на экране для удаления обновления;
- перезагрузите компьютер.
Проверяем, появится ли ошибка «Secure Boot Violation» или нет.
Решение №3 Отключение проверки цифровых подписей
Давайте попробуем отключить обязательную проверку цифровой подписи драйверов. Некоторые пользователи утверждают, что им удалось избавиться от проблемы с Secure Boot после отключения этой функции. Так или иначе попробовать не помешает. Сделайте следующее:
- откройте Параметры системы;
- выберите раздел «Обновление и безопасность»;
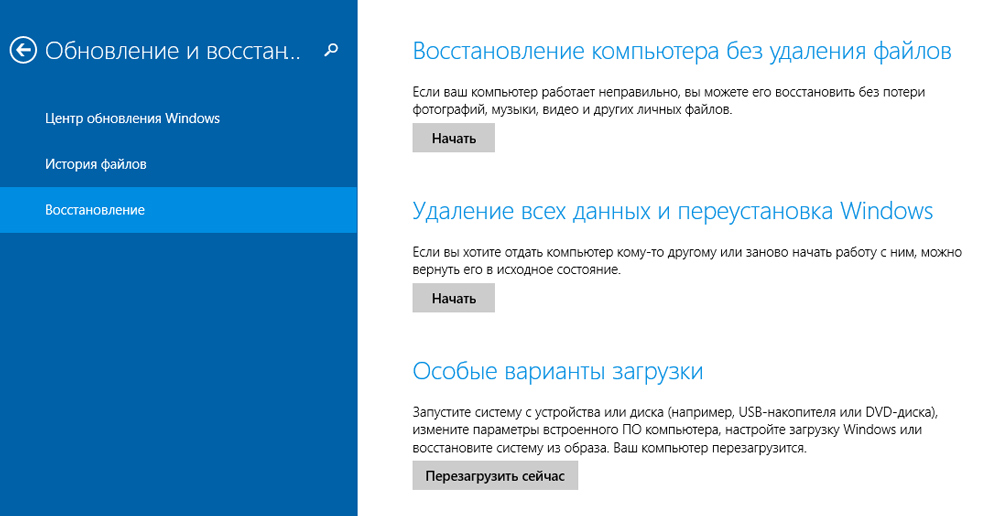
- перейдите во вкладку «Восстановление»;
- нажмите на кнопку «Перезагрузить сейчас»;
- на экране выбора действий выберите пункт «Диагностика»;
- откройте «Дополнительные параметры»;
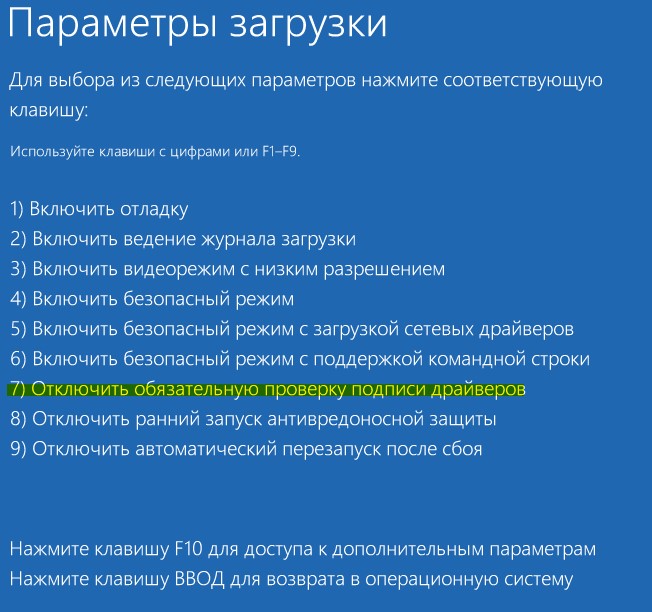
- выберите пункт «Параметры загрузки» и нажмите кнопку «Перезагрузить»;
- теперь нажмите на кнопку F7 для отключения обязательной проверки подписей драйверов.
Если вы нормально войдете в систему, то сообщение «Secure Boot Violation» действительно появлялось из-за проверки цифровых подписей. Мы надеемся, что данная статья была полезна для вас.
При загрузке ПК или ноутбука у вас может появится сообщение с предупреждением «Secure Boot Violation Invalid Signature Detected. Check Secure Boot Policy in Setup«. В этой ситуации можно продолжить загрузку системы Windows, но при следующей загрузке это предупреждение появится вновь. Эта проблема возникает, когда вы устанавливаете загрузочную программу без подписи OEM, которая запускается во время загрузке. Это может быть неподписанный драйвер, загруженный левый DLL файл, установлена пиратская версия программы. Во многих случаях это случается, когда включена функция Secure Boot (безопасная загрузка), которая при каждой загрузке ПК, проверяет цифровую подпись драйверов. Она видит, что нет подписи у драйвера и выдает такое предупреждение «Secure Boot Violation«. Давайте разберем, как исправить эту ошибку.
Отключить Secure Boot
Нужно войти в BIOS. Для этого, при загрузке ПК нажмите кнопку F1, F2, Del. Если у вас не получается или вы не знаете какую кнопку жать, то перейдите «Кнопки для входа в bios от производителей ноутбуков и компов». Когда мы вошли в BIOS, то найдите Secure Boot и выберите значение Disabled (отключено). В разных BIOS эта функция может находиться где угодно, но обычно ищите в графе Boot. Перезагрузите свой ноутбук и предупреждение должно исчезнуть.
Отключить принудительное использование драйверов
Если выше способ не помог, то нужно отключить принудительную проверку подписи драйверов. Для этого вам нужно попасть в «Дополнительные параметры загрузки«. Эта функция находится точно там же, где и безопасный режим. Просто нажмите клавишу F7, чтобы отключить «обязательную проверку подписи драйверов«. После отключения ошибка «Secure Boot Violation Invalid Signature Detected. Check Secure Boot Policy in Setup» больше не появится.
Это руководство поможет вас сориентировать, как зайти в эти параметры.
Дополнительные рекомендации
1. Microsoft заявила, что ошибка подписи драйверов может быть вызвана патчем KB3084905 в сиcтемах Windows Server 2012 и Windows 8.1. просто удалите этот патч.
2. Откройте командную строку от имени администратора и введите по порядку команды, чтобы отключить подпись драйверов:
bcdedit.exe /set loadoptions DDISABLE_INTEGRITY_CHECKSbcdedit.exe /set TESTSIGNING ON
Если нужно включить обратно, то:
bcdedit.exe /set TESTSIGNING OFFbcdedit.exe /set loadoptions ENABLE_INTEGRITY_CHECKS
Смотрите еще:
- Исправить ошибку DPC Watchdog Violation в Windows 10
- Исправьте ошибку KERNEL DATA INPAGE в Windows 10
- Как исправить ошибку SYSTEM_SERVICE_EXCEPTION в Windows 10
- Исправить ошибку UNEXPECTED STORE EXCEPTION в Windows 10
- Исправить ошибку NTFS_FILE_SYSTEM в Windows 10
[ Telegram | Поддержать ]
- A secure boot violation is an annoying error that prevents your computer from booting into Windows.
- The error indicates that the system cannot boot due to an invalid signature related to the security policy.
- The “Secure Boot” function must be disabled in your computer’s BIOS settings if you want to get rid of this problem.
- The original “Invalid signature detected” problem occurred in Windows 7 when Asus users applied update KB3133977.
UEFI secure boot violations are annoying errors which make your machine fail to boot into Windows. MicroTool Solution provides top two methods for resolving this vexing problem.
A secure boot violation is an annoying error that prevents your computer from booting into Windows. Usually, you are stuck in the UEFI Windows screen. To solve this annoying problem, Techquack offers the best methods to fix the security violation error. It is reported that the “Secure Boot Violation Invalid Signature Detected” error often occurs the first time you start Windows. The error remains on the startup screen even when you press the Enter key to continue the startup process.
Secure Boot Failure
The security boot fail message appears when I boot my laptop, and I press enter to see “Ubuntu has been blocked by the current security policy.” Can you tell me how to turn off secure boot and why it is blocked? What does it normally do? I also didn’t have it work with my previous version of Linux Mint.
“Invalid Signature Detected” isn’t a unique error for Asus computers and isn’t new. It is the result of a security policy-related invalid signature that prevents the system from booting. A user who isn’t a technology expert panics when Windows won’t start as usual and even thinks their computer is down. Instead of the usual Windows screen, he or she sees a UEFI or BIOS screen which says:
Check the security policy and security settings. An invalid signature has been detected.
Invalid Signature Detected Check Secure Boot Policy In Setup
This problem has been reported to be solved easily by disabling secure boot. This method involves entering BIOS and making changes to settings. Please take the time to read the details carefully.
Pop Os Invalid Signature
In my MSI GS65 laptop, I installed Pop OS on my second internal NVME drive. The installation went smoothly and no errors occurred. Windows 10 is installed on my first internal NVME drive. It does not appear in the boot menu when booting the laptop, but if I press F11, I am able to manually select it. An error message states: Invalid signature detected when manually booting Pop OS.
However, you don’t need to go to tech support or visit a repair shop – these services can be quite costly – to fix the invalid signature detection error. We will show you how to fix the error “Secure boot violation – invalid signature detected” with a simple step-by-step guide in this article.
Asus and other computers have the Secure boot violation – invalid signature detected error. Learn how to fix it
When Asus users applied update KB3133977 to Windows 7, they experienced the original “Invalid signature detected” problem. Originally aimed at preventing disk encryption, the patch caused Asus computers to show an error saying “Invalid signature detected.” Even though it fixed the problem, it caused another problem for Asus computers, which led to an error message. Despite Microsoft’s fix for the new problem, later versions of Windows continue to encounter the error.
What is the cause of the “Security breach on boot – invalid signature detected” problem in Windows?
Install Windows on the USB drive you created with the media creation tool (insert the USB drive with Windows).
Since this problem is obscure and very characteristic of ASUS and Dell, it can be difficult to identify its root cause. A major cause of this problem is boot-safety. If you want to get rid of this problem, you need to disable the “Secure Boot” feature in your BIOS.
Moreover, if you are experiencing problems booting, you may want to disable the Digital Driver Signature Enforcement.
How to solve the “Secure Boot Violation – Invalid Signature Detection” problem in Windows?
Set the boot priority or disconnect the external drive
Go to the BIOS/UEFI settings and set the boot priority (boot order) when you connect an external drive (either a hard disk or a USB flash drive) to your computer before booting if you receive the error “Secure Boot Violation.” It is important that you boot from your internal hard drive or Windows Boot Manager first, and not from removable media.
You can make the process easier by shutting down your computer, disconnecting the external drive, and rebooting it. Otherwise, follow these steps:
- Security checks at boot time can be disabled
- Fast boot should be deactivated and CSM should be activated.
- Key Management should be configured to identify all keys as uninstalled.
- Drivers with disabilities should have their signatures checked
Disable security download verification
The “Invalid Signature Detected” error can often be corrected with this step.
- Go to the BIOS.
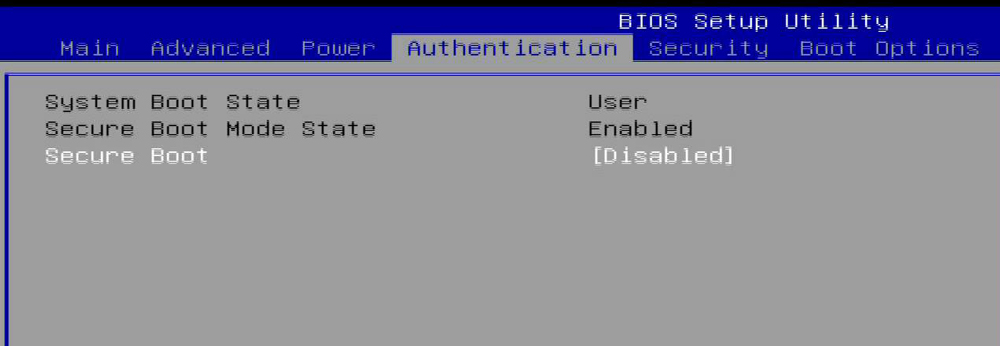
- Select Security, Authentication, or Startup from the main tab. From either of these (depending on your BIOS/UEFI setup program), select the “Secure Boot” menu.
- Check the boot security.
- Disable the option.
Note: There is another way to disable the security system. If menu number 2 above has an item labeled “Operating System Type,” go to it and select “Other Operating System.” That should work. It doesn’t matter if your PC has a Windows operating system.
Enable CSM and disable fast boot
Step 2: Once the previous steps have been completed:
- Depending on your BIOS, you’ll find Quick Boot under Security, Authentication or Boot.
- Press Enter when you have selected the option.
- To disable, select the “Disable” option.
- Make sure CSM is on by scrolling down and selecting it.
- Back up and exit by selecting the tab.
- You can now save your changes and exit.
- To confirm, select Yes.
Note: You can also save changes made in the BIOS by pressing the F10 key on your keyboard. However, this also depends on your device. If you have made the above fixes, the error discussed should now be fixed.
The following solutions may help if the error persists.
Under Key Management, set all keys to “Uninstalled”.
An update to UIE/BIOS may cause this error.
If the operating system and keys are not matched, the bootloader will detect the mismatch. To fix it, reload the keys and restart the machine.
The steps are as follows:
- The Security tab can be found in your BIOS.
- Select key management from the list.
- “Not set” should be set for all keys.
Disable driver signature control.
You may need to disable drivers digital signature verification to fix this issue if the problem persists. Here’s how:
- Windows 10’s installation media can be used to boot into the recovery environment.
- In order to proceed with the installation, press Shift + F10.
- Press Enter after typing each line to permanently disable driver signature verification:
- By using bcdedit.exe, you can disable integrity checks from booting.
- The configuration test is set using bcdedit.exe
In the lower right corner of the PC screen you will see a “test mode” watermark. This indicates that unsigned or untested drivers are no longer restricted from being installed. The “Invalid signature detected” error was caused by unsigned drivers that must be identified and removed.
Here are the steps you need to take:
- The Run dialog box is opened by pressing Windows + R on your keyboard.
- Click on OK or Enter after typing sigverif to launch the utility to verify the signatures of files.
- Go to Start and click it.
- Your computer will start scanning for unsigned drivers.
- A list of problematic drivers will be displayed after the scan is completed. Uninstall them using the Device Manager, then install an updated version that has been signed by Microsoft.
Frequently Asked Questions
Disable the secure boot process. Reboot your computer; press and hold the boot menu options key to enter the boot menu. Disable the secure boot option and check.
- With the computer on, quickly and consecutively press a specific key (F2, LED, F12, ESC, etc.) to enter the UEFI BIOS.
- Go to the Boot (or Security) tab, select the Secure Boot option and turn it off.
- Press F10 to save your changes and restart.
ASUS computer technology may be responsible for the boot security violation. Another possible reason is that forcing a digital driver signature prevents Windows from starting smoothly.
Can’t I disable safe boot on Acer or any other PC? One reason could be that you don’t have the correct supervisor password. Second, the BIOS version might be outdated. So you need to update it.

Mark Ginter
Mark Ginter is a tech blogger with a passion for all things gadgets and gizmos. A self-proclaimed «geek», Mark has been blogging about technology for over 15 years. His blog, techquack.com, covers a wide range of topics including new product releases, industry news, and tips and tricks for getting the most out of your devices. If you’re looking for someone who can keep you up-to-date with all the latest tech news and developments, then be sure to follow him over at Microsoft.
Содержание
- Ошибка «Secure Boot Violation»: как исправить
- Что вызывает «Secure Boot Violation»?
- Решение «Secure Boot Violation»
- Решение №1 Отключение протокола
- Решение №2 Удаление обновления KB3084905
- Решение №3 Отключение проверки цифровых подписей
- ERROR: Verification failed:(0x1A)Security Violation & #175
- Comments
- qixuchang commented Nov 29, 2019
- qixuchang commented Nov 29, 2019
- hakuna-m commented Nov 29, 2019 •
- qixuchang commented Dec 8, 2019
- oodorii commented Dec 11, 2019
- hakuna-m commented Dec 12, 2019
- anonmanx commented Dec 26, 2019 •
- hakuna-m commented Dec 28, 2019
- Wubiuefi: ОШИБКА: Ошибка проверки: (0x1A) Нарушение безопасности &
- Все 7 Комментарий
- «Error verification failed» booting RHEL 9 Beta for install
- Как исправить Secure Boot Violation в Windows 10
- Отключить Secure Boot
- Отключить принудительное использование драйверов
- Дополнительные рекомендации
Ошибка «Secure Boot Violation»: как исправить
Ошибка «Secure Boot Violation – Invalid Signature Detected» появляется при запуске компьютера под управлением Windows. Вы можете нажать Enter при ее появлении, чтобы войти в систему, но она будет возникать каждый раз при загрузке ПК.
Что вызывает «Secure Boot Violation»?
Как правило, причину за появлением этого сообщение невероятно трудно определить. Посудите сами: короткое сообщение на красном фоне, которое предоставляет минимальное количество информации, причем непонятной для многих пользователей. Однако первая часть сообщения все же дает намек о том, как можно избавиться от данной проблемы.
Secure Boot (безопасная загрузка) — особый протокол для BIOS, который запрещает запуск не авторизованных операционных систем на устройстве. Благодаря этому протоколу в BIOS «запоминается» подписи загрузочного кода первоначальной системы и если эти подписи не совпадают — Secure Boot блокирует загрузку другой системы.
Решение «Secure Boot Violation»
Решение №1 Отключение протокола
Верно, чтобы избавиться от ошибки «Secure Boot Violation» зачастую достаточно просто отключить в BIOS соответствующий протокол. Возможно, вы пытались загрузиться в какую-то иную, дополнительную ОС, что не понравилось Secure Boot.
Так или иначе войдите BIOS, нажатием выделенной для этого кнопки (у каждого она разная — гуглим) при загрузке компьютера. Например, часто этими кнопками являются DEL, F1, F2 и так далее. Как только войдете в BIOS, начинаем искать пункт Secure Boot. Опять-таки, в каждом BIOS он может располагаться в разных вкладках.
Найдя необходимый параметр, выставьте для него значение «Disabled». Сохраните внесенные изменения в BIOS и перезагрузите компьютер. Ошибка «Secure Boot Violation» должна исчезнуть.
Решение №2 Удаление обновления KB3084905
Оказывается, обновление KB3084905, выпущенное для Windows Server 2012 и Windows 8.1, может вызывать некоторые проблемы с Secure Boot на компьютерах, которые подключены к одному и тому же контроллеру доменов. Решение — удалить указанное выше обновление из системы. Для этого нужно сделать следующее:
- нажмите Windows+R;
- пропишите значение «control.exe» и нажмите Enter;
- выберите «Удаление программ» в категориях;
- нажмите на строчку «Просмотр установленных обновлений»;
- найдите в списке обновление KB3084905, нажмите на него ПКМ и выберите «Удалить»;
- следуйте инструкциям на экране для удаления обновления;
- перезагрузите компьютер.
Проверяем, появится ли ошибка «Secure Boot Violation» или нет.
Решение №3 Отключение проверки цифровых подписей
Давайте попробуем отключить обязательную проверку цифровой подписи драйверов. Некоторые пользователи утверждают, что им удалось избавиться от проблемы с Secure Boot после отключения этой функции. Так или иначе попробовать не помешает. Сделайте следующее:
- откройте Параметры системы;
- выберите раздел «Обновление и безопасность»;
- перейдите во вкладку «Восстановление»;
- нажмите на кнопку «Перезагрузить сейчас»;
- на экране выбора действий выберите пункт «Диагностика»;
- откройте «Дополнительные параметры»;
- выберите пункт «Параметры загрузки» и нажмите кнопку «Перезагрузить»;
- теперь нажмите на кнопку F7 для отключения обязательной проверки подписей драйверов.
Если вы нормально войдете в систему, то сообщение «Secure Boot Violation» действительно появлялось из-за проверки цифровых подписей. Мы надеемся, что данная статья была полезна для вас.
Источник
ERROR: Verification failed:(0x1A)Security Violation & #175
Five PCs in my team use wubi to automatically install xubuntu and get error warnings:
1.ERROR: Verification failed: (0x1A) Security Violation.
2,
Go back to the menu and resume partitioning?
No EFI System Partition was found. This system will likely not be able to boot successfully, and the installation process may fail.
Please go back and add an EFI System Partition, or continue at your own risk.
what is the reason? How to solve these problems?
Wubi version: Wubi for Ubuntu 19.04 (rev. 336)
xubuntu version: xubuntu-18.04.2-desktop-amd64.iso
The text was updated successfully, but these errors were encountered:
Very important, please author reply, thank you!
Five PCs in my team use wubi to automatically install xubuntu and get error warnings:
1.ERROR: Verification failed: (0x1A) Security Violation.
What kind of PCs do you use (model, UEFI firmware/BIOS version) ? Is Secure Boot enabled ?
2,
Go back to the menu and resume partitioning?
No EFI System Partition was found. This system will likely not be able to boot successfully, and the installation process may fail.
Please go back and add an EFI System Partition, or continue at your own risk.
see release notes(known issues)
But issue should not affect Xubuntu 18.04.2 from xubuntu-18.04.2-desktop-amd64.iso. Are you sure that you install Xubuntu 18.04.2 with Wubi for Ubuntu 19.04 (rev. 336) ? Automatic download is Xubuntu 19.04 for wubi1904r336.exe .
Wubi1904r336.exe automatically downloads xubuntu 19.04, and the use result is the same as the fault prompt.
I just had this issue with Zorin OS onto an HP Stream. I solved my mystery with no help of the internet so I thought I’d post my solution somewhere.
I turned Secure Boot off. Disable it. It loaded with no issues after that.
@oodorii Thank you for sharing your solution.
It is a general solution if a boot loader does not support Secure Boot. If a boot loader supports Secure Boot, you can also try to import the key which was used to sign the boot loader for Secure Boot. For Wubiuefi, see MoKManager
So that issue should be already solved for Wubiuefi.
@qixuchang If it is not solved, I need more information. Besides the Secure Boot issue, you also reported an issue which has been known since 18.10. That issue depends on the used ISO only. Currently, there are reports for the Ubuntu ISO of 18.10, 19.04 and 19.10. Maybe, some other ISOs are also affected e.g. Xubuntu ISO for 18.04.2. But there has ever been a workaround. Does the workaround e.g. from here (user confirmation («Continue») is necessary for new questions) solves the issue ?
@hakuna-m My bios mode is uefi and secure boot state is off. But I am getting this error number 2 mentioned in the main question. What should I do?
Do I need to create some kind of efi partition or like that? Like in the hdd I am installing ubuntu into, I need to create a small partition for EFI? mentioning that already created a partition of 30 gbs for installing ubuntu which is just a primary partition. And so do I need to create another EFI partition?
Using Windows 10 and trying to install ubuntu 18.04.3 LTS with your WUBI ubuntu 18.04.2
And this is one of the known problems. But can’t seem to find the solutions of the known problems in the release notes. Can you please help?
And this is one of the known problems. But can’t seem to find the solutions of the known problems in the release notes. Can you please help?
As I wrote above the workaround for the known issue is to skip user confirmations by selecting «Continue».
Источник
Wubiuefi: ОШИБКА: Ошибка проверки: (0x1A) Нарушение безопасности &
Пять компьютеров в моей команде используют wubi для автоматической установки xubuntu и получения предупреждений об ошибках:
1.ОШИБКА: Ошибка проверки: (0x1A) Нарушение безопасности.
2,
Вернуться в меню и возобновить разбиение на разделы?
Системный раздел EFI не найден. Эта система, скорее всего, не сможет успешно загрузиться, и процесс установки может завершиться ошибкой.
Вернитесь и добавьте системный раздел EFI или продолжайте на свой страх и риск.
какова причина? Как решить эти проблемы?
Версия Wubi: Wubi для Ubuntu 19.04 (версия 336)
версия xubuntu: xubuntu-18.04.2-desktop-amd64.iso
У меня только что была эта проблема с Zorin OS на HP Stream. Я решил свою загадку без помощи Интернета, поэтому решил опубликовать где-нибудь свое решение.
Я отключил безопасную загрузку. Отключите это. После этого он загрузился без проблем.
Все 7 Комментарий
Очень важно, пожалуйста, ответьте автору, спасибо!
Пять компьютеров в моей команде используют wubi для автоматической установки xubuntu и получения предупреждений об ошибках:
1.ОШИБКА: Ошибка проверки: (0x1A) Нарушение безопасности.
Какие компьютеры вы используете (модель, прошивка UEFI / версия BIOS)? Включена ли
2,
Вернуться в меню и возобновить разбиение на разделы?
Системный раздел EFI не найден. Эта система, скорее всего, не сможет успешно загрузиться, и процесс установки может завершиться ошибкой.
Вернитесь и добавьте системный раздел EFI или продолжайте на свой страх и риск.
см. примечания к выпуску (известные проблемы)
Но проблема не должна влиять на Xubuntu 18.04.2 из xubuntu-18.04.2-desktop-amd64.iso. Вы уверены, что устанавливаете Xubuntu 18.04.2 с Wubi для Ubuntu 19.04 (вер. 336)? Автоматическая загрузка — Xubuntu 19.04 для wubi1904r336.exe.
Wubi1904r336.exe автоматически загружает xubuntu 19.04, и результат использования такой же, как и сообщение об ошибке.
У меня только что была эта проблема с Zorin OS на HP Stream. Я решил свою загадку без помощи Интернета, поэтому решил опубликовать где-нибудь свое решение.
Я отключил безопасную загрузку. Отключите это. После этого он загрузился без проблем.
@oodorii Спасибо, что поделились своим решением.
Это общее решение, если загрузчик не поддерживает безопасную загрузку. Если загрузчик поддерживает безопасную загрузку, вы также можете попробовать импортировать ключ, который использовался для подписи загрузчика для безопасной загрузки. Для Wubiuefi см. MoKManager.
Так что для Вубиуэфи этот вопрос уже должен быть решен.
@qixuchang Если 18.10 . Эта проблема зависит только от используемого ISO. В настоящее время есть отчеты для Ubuntu ISO 18.10, 19.04 и 19.10. Возможно, затронуты и некоторые другие ISO, например Xubuntu ISO для 18.04.2. Но когда-либо был обходной путь. Решает ли проблему обходной путь, например, отсюда (подтверждение пользователя («Продолжить») для новых вопросов)?
@ hakuna-m Мой режим BIOS — uefi, а безопасная загрузка отключена. Но я получаю эту ошибку номер 2, упомянутую в основном вопросе. Что я должен делать?
Мне нужно создать какой-то раздел efi или что-то подобное? Как и в случае с жестким диском, на который я устанавливаю Ubuntu, мне нужно создать небольшой раздел для EFI? упомянув, что уже создан раздел размером 30 ГБ для установки ubuntu, который является просто основным разделом. Итак, мне нужно создать еще один раздел EFI?
Использование Windows 10 и попытка установить ubuntu 18.04.3 LTS с вашим WUBI ubuntu 18.04.2
И это одна из известных проблем. Но, похоже, не могу найти решения известных проблем в примечаниях к выпуску. Не могли бы вы помочь?
И это одна из известных проблем. Но, похоже, не могу найти решения известных проблем в примечаниях к выпуску. Не могли бы вы помочь?
Как я уже писал выше, обходное решение известной проблемы состоит в том, чтобы пропустить подтверждение пользователя, выбрав «Продолжить».
Решает ли проблему обходной путь, например, отсюда ( подтверждение пользователя («Продолжить») для новых вопросов )?
Источник
«Error verification failed» booting RHEL 9 Beta for install
I am getting the error «verification failed: (0x1A) Security Violation» booting RHEL 9 beta from an install disc. I found the following.
UEFI Secure Boot: system fails to boot with «Verification failed: (0x1A) Security Violation — Red Hat Customer Portal
https://access.redhat.com/solutions/5395851
1878773 – System doesn’t boot and prints «Verification failed: 0x1A Security Violation»
https://bugzilla.redhat.com/show_bug.cgi?id=1878773
I have multiple GRUBs (see below) and I suspect that is the cause.
I created the installation disc by downloading the file:
rhel-baseos-9.0-beta-1-x86_64-dvd.iso
And then burning it to Blu-Ray using Windows.
I could not find where in my BIOS to disable Secure Boot. I did change the OS Type from «Windows UEFI mode» to «Other OS» and then when I perform the diagnostics in the knowledgebase article I get:
root@Sams-ASUS sam]# rpm -qa shim-x64 grub2-efi-x64
shim-x64-15.4-2.el8_1.x86_64
grub2-efi-x64-2.02-106.el8.x86_64
[root@Sams-ASUS sam]# yum check-update grub2-efi-x64
Updating Subscription Management repositories.
Last metadata expiration check: 0:42:40 ago on Wed 22 Dec 2021 03:19:14 AM PST.
Also when OS Type is «Other OS» I can boot the RHEL 9 disc. I assume I do not want to use «Other OS» normally. Am I correct that it would be less secure?
I think the problem is that I have multiple GRUBs. I have the following physical drives:
- 1 hard disk
- 2 SSDs
- 2 portable USB drives
- 2 thumb drives
I have Ubuntu installed in a portable USB drive and RHEL 8 in another. I intend to replace the RHEL 8 with RHEL 9 eventually; I will eventually install RHEL 9 in a new SSD that is probably still out at sea awaiting delivery. I have a Puppy Linux installed in a tiny partition in a SSD. So my UEFI Boot menu includes GRUB(?) entries for Ubuntu and Lick.
Could the other GRUBs be causing a problem? I want to keep them if possible but all Linux installations are disposable if necessary.
Источник
Как исправить Secure Boot Violation в Windows 10
При загрузке ПК или ноутбука у вас может появится сообщение с предупреждением «Secure Boot Violation Invalid Signature Detected. Check Secure Boot Policy in Setup«. В этой ситуации можно продолжить загрузку системы Windows, но при следующей загрузке это предупреждение появится вновь. Эта проблема возникает, когда вы устанавливаете загрузочную программу без подписи OEM, которая запускается во время загрузке. Это может быть неподписанный драйвер, загруженный левый DLL файл, установлена пиратская версия программы. Во многих случаях это случается, когда включена функция Secure Boot (безопасная загрузка), которая при каждой загрузке ПК, проверяет цифровую подпись драйверов. Она видит, что нет подписи у драйвера и выдает такое предупреждение «Secure Boot Violation«. Давайте разберем, как исправить эту ошибку.
Отключить Secure Boot
Нужно войти в BIOS. Для этого, при загрузке ПК нажмите кнопку F1, F2, Del. Если у вас не получается или вы не знаете какую кнопку жать, то перейдите «Кнопки для входа в bios от производителей ноутбуков и компов». Когда мы вошли в BIOS, то найдите Secure Boot и выберите значение Disabled (отключено). В разных BIOS эта функция может находиться где угодно, но обычно ищите в графе Boot. Перезагрузите свой ноутбук и предупреждение должно исчезнуть.
Отключить принудительное использование драйверов
Если выше способ не помог, то нужно отключить принудительную проверку подписи драйверов. Для этого вам нужно попасть в «Дополнительные параметры загрузки«. Эта функция находится точно там же, где и безопасный режим. Просто нажмите клавишу F7, чтобы отключить «обязательную проверку подписи драйверов«. После отключения ошибка «Secure Boot Violation Invalid Signature Detected. Check Secure Boot Policy in Setup» больше не появится.
Это руководство поможет вас сориентировать, как зайти в эти параметры.
Дополнительные рекомендации
1. Microsoft заявила, что ошибка подписи драйверов может быть вызвана патчем KB3084905 в сиcтемах Windows Server 2012 и Windows 8.1. просто удалите этот патч.
2. Откройте командную строку от имени администратора и введите по порядку команды, чтобы отключить подпись драйверов:
Источник
Некоторые пользователи устройств под управлением операционной системы Windows 8 и 8.1 после установки обновлений столкнулись с ошибками системы, которые связаны с так называемой «безопасной загрузкой». Что же это такое? Это функция, которая препятствует запуску неавторизованных ОС и ПО при включении ПК. Нужна она для дополнительной защиты вашего компьютера от вирусов и руткитов, которые могут нанести вред системе в тот момент, когда она загружается. Но что же делать, если указанная функция становится причиной постоянных ошибок? Всё дело в заданных параметрах. В этой статье подробно рассмотрим, как правильно настроить Secure Boot. Давайте разбираться. Поехали!
Если есть такая проблема, данная статья для вас.
Существует ряд проблем, связанных с режимом безопасной загрузки. Чаще всего это сообщение об ошибке «Безопасная загрузка Secure Boot настроена неправильно» или «Secure Boot Violation Invalid signature detected». Что же делать в таком случае? Часто бывает достаточно просто включить указанную функцию через BIOS. Но у некоторых пользователей такой пункт в BIOS отсутствует вовсе. Тогда следует попробовать отключить его. О том, как это сделать, далее в статье.
Нарушение Secure Boot
Первым делом зайдите в BIOS. Для этого необходимо нажать определённую клавишу (зависит от девелопера вашего ПК) в процессе включения компьютера.
Обратите внимание, что если вы пользуетесь Windows 8.1 или 8, можно просто перейти к меню параметров, открыть раздел «Изменение параметров компьютера», а затем выбрать пункт «Обновление и восстановление». Далее, необходимо зайти в «Восстановление» и кликнуть по кнопке «Перезагрузить». Затем выберите дополнительные параметры «Настройки ПО UEFI». После перезагрузки ПК получит нужные параметры.
Диалоговое окно Windows 8 (8.1)
Другой способ касается юзеров всех остальных версий ОС Windows. Откройте BIOS или UEFI (более современный аналог). Далее, для каждой марки ноутбука процесс настройки может незначительно отличаться, поэтому рассмотрим каждый случай отдельно.
ASUS
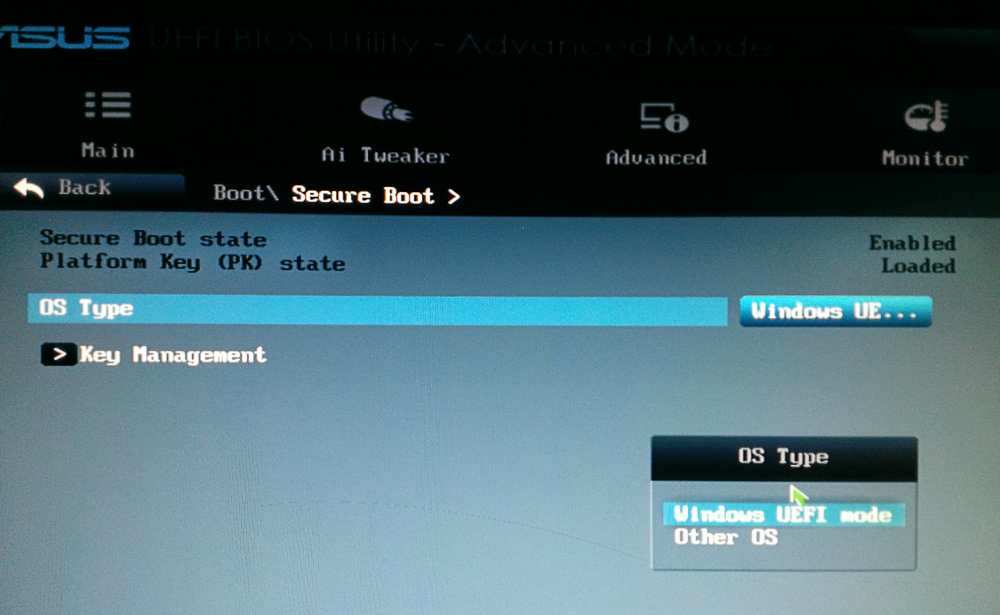
Зайдите во вкладку «Boot». Затем откройте раздел «Secure Boot». Выберите «Other OS» в пункте «OS Type». В более старых версиях просто поставьте «Disabled» в нужном пункте. Сохраните настройки, нажав на клавиатуре клавишу F10.
Проверяем состояние и настраиваем параметры
HP
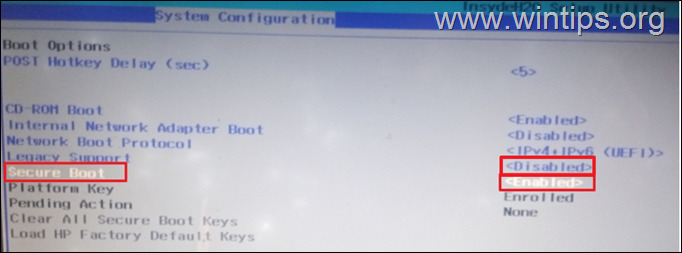
Откройте раздел «System Configuration», а затем нажмите «Boot Options». Найдите там соответствующую строку и выберите режим «Disabled». Сохраните параметры перед выходом.
Lenovo, Toshiba
Запустив BIOS, откройте раздел «Security». Найдите соответствующий пункт и выберите для него состояние «Disabled».
В зависимости от версии БИОСа, параметры могут немного отличаться
Для ноутбуков Dell и Acer всё выполняется аналогичным образом, с той разницей, что нужный пункт находится во вкладке «Boot» (для Dell) и «Authentication» или «System Configuration» (для Acer).
Алгоритм действий похож
Если ваш компьютер с материнской платой от компоновщика Gigabyte, то нужный раздел следует искать во вкладке «BIOS Features». Дальнейшие действия такие же, как в выше рассмотренных случаях.
В ОС Windows 8 и более новых версиях можно узнать, включена или отключена на компьютере безопасная загрузка. Для этого воспользуйтесь комбинацией клавиш Win+R, чтобы открыть окно «Выполнить», а затем пропишите в поле для ввода (без кавычек) «msinfo32». В разделе «Сведения о системе» вы найдёте необходимую информацию. Так вы можете узнать о состоянии функции безопасной загрузки на вашем ПК.
В общем, в случае возникновения каких-либо неисправностей с режимом безопасной загрузки, попробуйте включить или отключить его, перейдя в BIOS или UEFI. Это поможет вам решить проблемы с системой и комфортно пользоваться компьютером.
Теперь вы точно будете знать, что делать, если на вашем компьютере неправильно заданы параметры безопасной загрузки. Как видите, эту ситуацию несложно исправить. Каких-то несколько минут, и ваша система снова работает как надо. Пишите в комментариях, помогла ли вам статья разобраться с ошибкой, и делитесь с другими пользователями своим опытом в решении указанной проблемы.
FAQ
При загрузке ноутбука может появиться уведомление «Secure Boot Violation», после чего система не сможет загрузиться в операционную систему. Система нашла изменения авторизации в прошивке, операционной системе или драйверах UEFI.
Для защиты пользовательских систем от вредоносных атак в ноутбуках ASUS по умолчанию реализована функция безопасной загрузки Microsoft. Эта функция выполняет легальную проверку загрузчика для загрузки в ОС.
Как Windows 7 не поддерживает Secure Boot (ссылка), с обновлением KB3133977 система может обнаружить несогласованные ключи загрузчика ОС, что приведет к сбою загрузки.
В ПК с Windows 8/10 система может обнаружить несогласованные ключи загрузчика ОС и привести к сбою загрузки, поскольку вы переустановили ОС, на отличную от предустановленной версии.
Пожалуйста, измените параметры Secure Boot в конфигурации BIOS, следуя шагам ниже, что позволит системе загружаться в операционную среду.
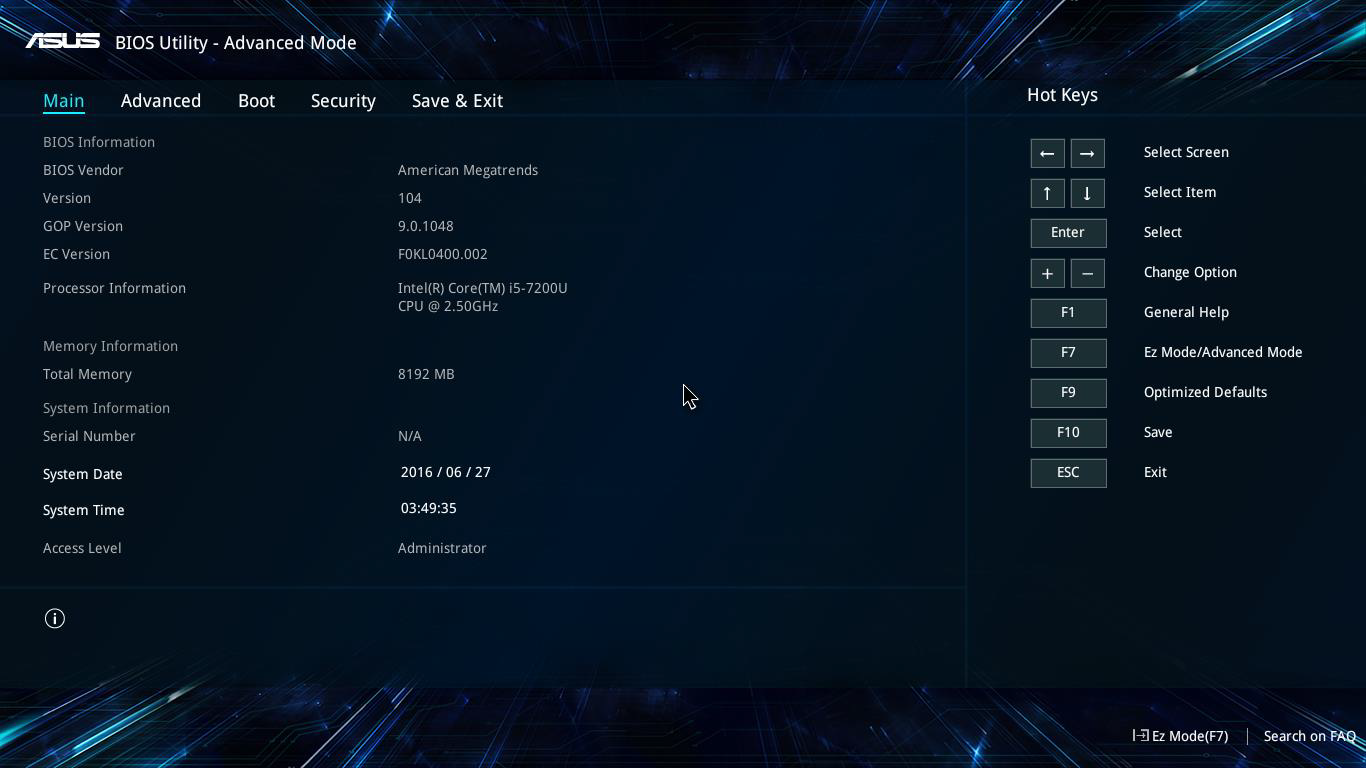
Войдите в BIOS. До включения ноутбука зажмите кнопку [F2] и потом нажмите на кнопку включения. (не отпускайте F2, пока не увидите меню BIOS) Вы можете просмотреть видео для ознакомления Как войти в BIOS
● Режим Legacy
**Совет: В конфигурации BIOS Legacy режима вы можете выбирать только элементы, используя клавиши стрелок и Enter.**

1. Войдите в BIOS.
2. Выберите [Security] (1), затем [Secure Boot] (2).
3. Чтобы отключить Secure Boot, выберите [Secure Boot Control] (3), затем [Отключить](4).
Некоторые модели могут отображать только [Secure Boot] (пункта Secure Boot Control не будет), пожалуйста, используйте [Secure Boot] вместо [Secure Boot Control] в настройках и отключите его.
4. Сохраните и выйдите из настроек. Выберите [Save & Exit] (5), затем [Save Changes and Exit] (6) и нажмите [Yes](7).
5. ПК автоматически перезагрузится и войдет в систему.
● UEFI режим (вы можете использовать клавиатуру, тачпад или мышку.)
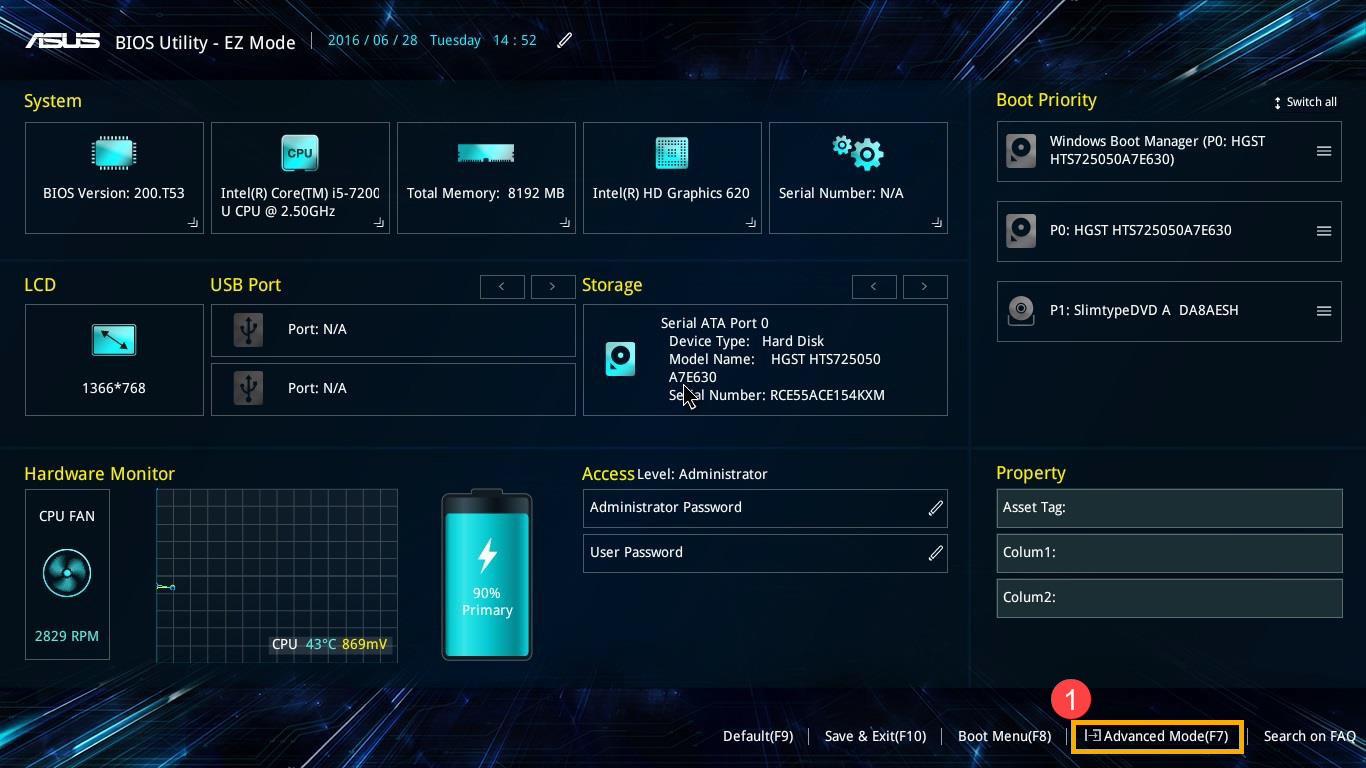
1. После входа в BIOS перейдите в Advanced Mode используя клавишу [F7] или курсор(1).
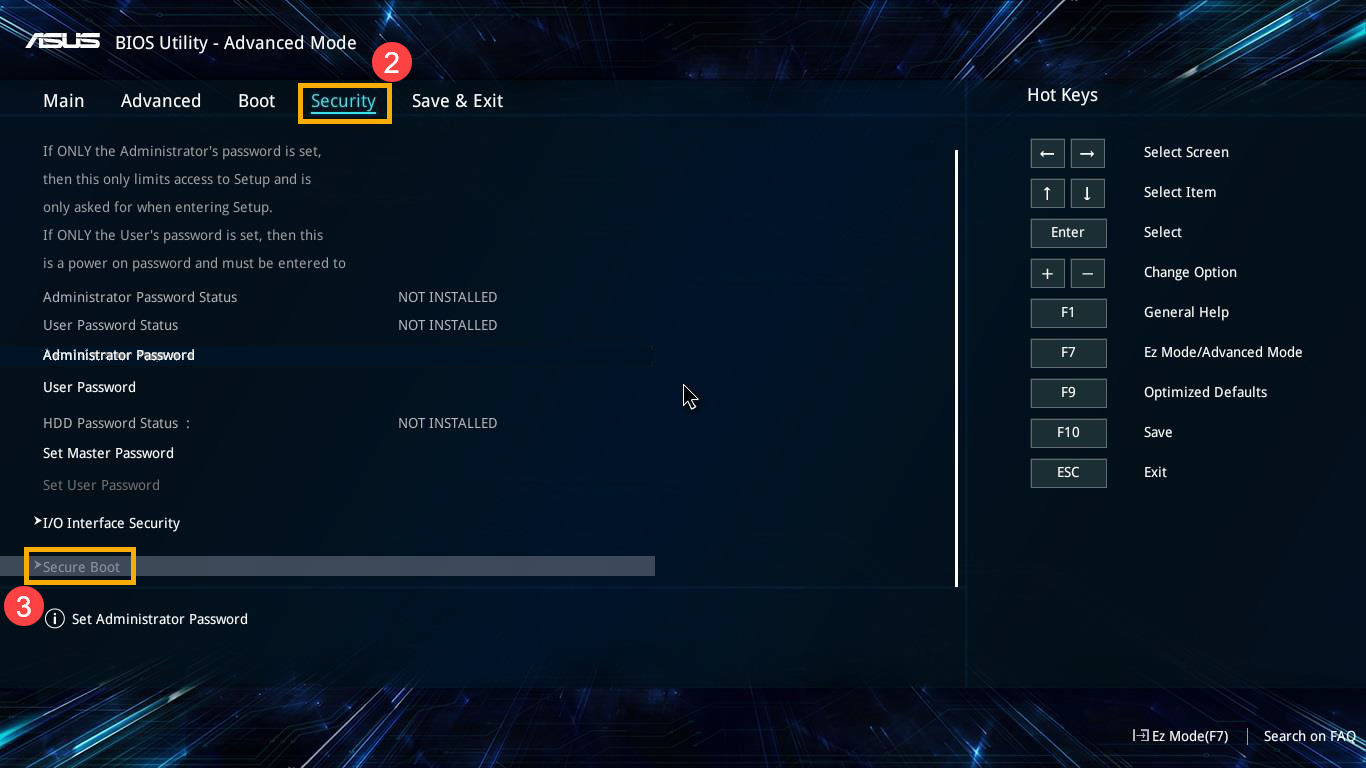
2. Выберите [Security] (2), затем [Secure Boot] (3).
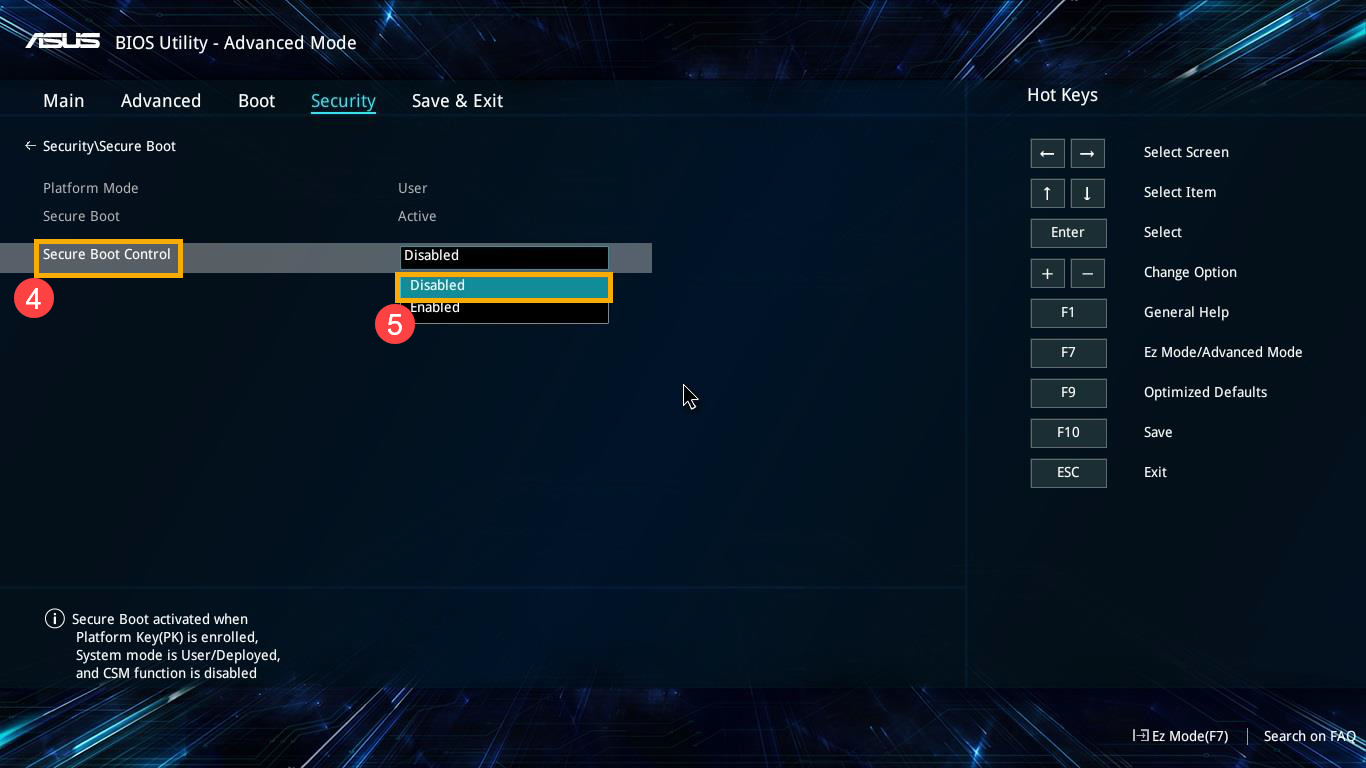
3. Чтобы отключить Secure Boot, выберите [Secure Boot Control] (4), затем [Отключить](5).
Некоторые модели могут отображать только [Secure Boot] (пункта Secure Boot Control не будет), пожалуйста, используйте [Secure Boot] вместо [Secure Boot Control] в настройках и отключите его.
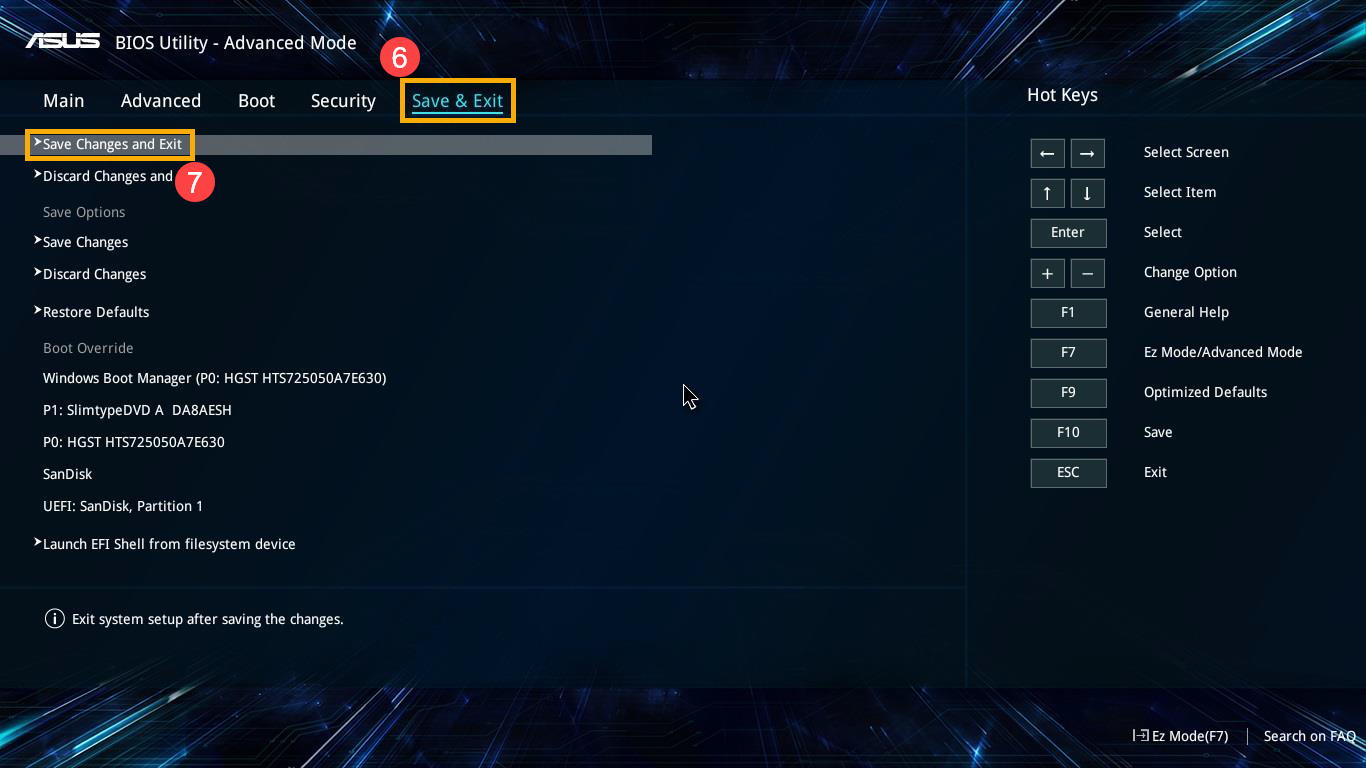
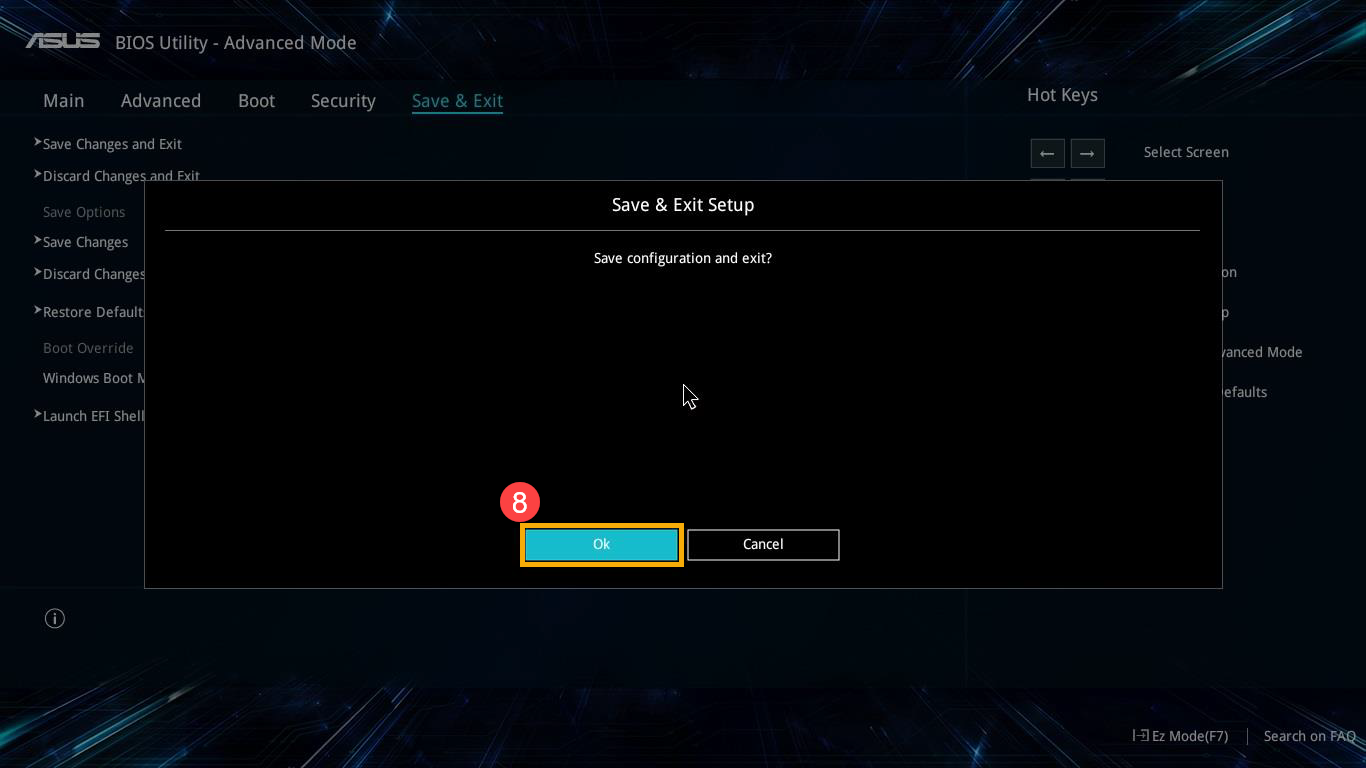
4. Сохраните и выйдите из настроек. Выберите [Save & Exit] (6), затем [Save Changes and Exit] (7) и нажмите [Yes](8).
5. ПК автоматически перезагрузится и войдет в систему.
Если проблема не была устранена с помощью шагов выше, пожалуйста, обратитесь в сервисные центры Asus
-
Категория
BIOS/ Прошивка -
Тип
Troubleshooting
Эта информация была полезной?
Yes
No
- Приведенная выше информация может быть частично или полностью процитирована с внешних веб-сайтов или источников. Пожалуйста, обратитесь к информации на основе источника, который мы отметили. Пожалуйста, свяжитесь напрямую или спросите у источников, если есть какие-либо дополнительные вопросы, и обратите внимание, что ASUS не имеет отношения к данному контенту / услуге и не несет ответственности за него.
- Эта информация может не подходить для всех продуктов из той же категории / серии. Некоторые снимки экрана и операции могут отличаться от версий программного обеспечения.
- ASUS предоставляет вышеуказанную информацию только для справки. Если у вас есть какие-либо вопросы о содержании, пожалуйста, свяжитесь напрямую с поставщиком вышеуказанного продукта. Обратите внимание, что ASUS не несет ответственности за контент или услуги, предоставляемые вышеуказанным поставщиком продукта.

Ошибка Invalid signature detected возникает после обновления или переустановки Windows 10 и 8.1, установке второй ОС, при установке некоторых антивирусов (или при работе некоторых вирусов, особенно если вы не меняли предустановленную ОС), отключения проверки цифровой подписи драйверов. В этой инструкции — простые способы исправить проблему и вернуть загрузку системы в нормальное состояние.
Примечание: если ошибка возникла после сброса БИОС (UEFI), подключения второго диска или флешки, с которой не нужно загружаться, убедитесь в том, что выставлена загрузка с нужного накопителя (с жесткого диска или Windows Boot Manager), или отключите подключенный накопитель — возможно, этого окажется достаточным, чтобы устранить проблему.
Исправление ошибки Invalid Signature Detected
Как следует из сообщения об ошибке, в первую очередь следует проверить параметры Secure Boot в БИОС/UEFI (вход в настройки осуществляется либо сразу после нажатия Ок в сообщение об ошибке, либо стандартными способами входа в BIOS, как правило — по клавише F2 или Fn+F2, Delete).
В большинстве случаев, достаточно просто отключить Secure Boot (поставить Disabled), если же в UEFI присутствует пункт выбора ОС, то попробовать поставить Other OS (даже если у вас Windows). При наличии пункта Enable CSM может помочь его включение.
Ниже — несколько скриншотов для ноутбуков Asus, владельцы которых чаще других встречают сообщение об ошибке «Invalid signature detected. Check Secure Boot Policy in Setup». Подробнее на тему — Как отключить Secure Boot.
В некоторых случаях ошибка может быть вызвана неподписанными драйверами устройств (либо неподписанными драйверами, которое использует стороннее ПО для работы). В этом случае можно попробовать отключить проверку цифровой подписи драйверов.
При этом, если Windows не загружается, отключение проверки цифровой подписи можно произвести в среде восстановления, запущенной с диска восстановления или загрузочной флешки с системой (см. диск восстановления Windows 10, актуально и для предыдущих версий ОС).
Если же ни один из перечисленных способов не смог помочь в исправлении проблемы, можете описать в комментариях, что предшествовало появлению проблемы: возможно, я смогу подсказать варианты решения.
If you try to install Windows 11 and you can’t because Secure Boot is Unsupported or Not Available, continue reading below. Microsoft, starting with Windows 8, supports a new security feature called Secure Boot. Secure boot is available on almost all modern computers and is built into the UEFI (Unified Extensible Firmware Interface), to prevent malware from taking over the computer during the boot process.
Windows 7, Vista and XP used to operate in Legacy boot mode (also known as «CSM» Mode), which uses the Master Boot Record (MBR) Partition table.
Windows 8, 8.1 & 10 are designed to operate also in UEFI boot mode, which uses the GUID Partition Table (GPT), in order to take advantage of the advanced features offered by the UEFI, such as the «Secure Boot» security feature.
Microsoft has made secure boot a prerequisite for users who want to upgrade to Windows 11. So, if you get the error «Secure boot is not supported» or «Secure boot is not available», then one of the following is probably happening:
-
- Your computer is set to UEFI boot mode but Secure Boot is OFF (Disabled).
- Your computer is set to Legacy boot mode, which does not support either Secure Boot or GPT partition style.
- Your computer is not UEFI & Secure Boot capable.
In this tutorial you’ll find step-by-step instructions to fix the following problems when you try to install Windows 11:
- Secure Boot is unsupported
- Secure Boot is not available
- Secure Boot is Off
- Related article: How to Install Windows 11 without TPM on Unsupported CPUs.
How to FIX: Secure Boot Unsupported or Off (Disabled) & Cannot Install Windows 11.
Step 1. Check the state of Secure Boot & BIOS Mode.
To know if Secure Boot is On, OFF or Unsupported on your device, follow the instructions below:
1. Press Windows + R keys to open the run command box.
2. Type msinfo32 and click OK to open System Information.
3. On the System Information page, check the BIOS Mode and the Secure Boot Status.
4. Now according your case, proceed as follows:
- CASE A: If the BIOS Mode is UEFI & the Security Boot State is Off, means that your PC boot mode is set to UEFI, but the Secure Boot feature is disabled on your system. At this case skip to Part-1, to enable Secure Boot in BIOS/UEFI firmware settings.
- CASE B: If the BIOS mode is Legacy and the Secure Boot State is Unsupported or Unavailable, go to step-2 below because it means one of the following: *
-
- Your computer supports UEFI boot mode, but it is disabled because it is running in Legacy Boot mode, which does not support Secure Boot and GPT, or…
- …your computer does not support UEFI boot mode, and therefore does not support secure boot (and TPM 2.0, which is required for Windows 11 installation).
Step 2. Find Out if your Computer Supports UEFI.
At this point and before continuing further, you must ensure that your device supports UEFI & Secure Boot by doing one the following:
-
Navigate to the support website of your computer or motherboard manufacturer and check the specifications to see if it supports UEFI boot mode. If yes, proceed to Part-2.
-
Check if the UEFI boot mode is available in BIOS/UEFI settings. To do that:
-
-
Shutdown your PC.
-
Power On your PC and immediately press the DEL or F2, F10, F12 keys to get into the BIOS/UEFI Firmware Settings. (For more specific details on how to get into BIOS settings, visit your computer’s/motherboard’s manufacturer support website).
-
In the BIOS settings, check in Boot Options if you can enable the UEFI boot mode or if you can disable the Legacy support. If you can, then your computer supports UEFI. At this case exit from BIOS settings without saving and proceed to Part-2. If you cannot, then your computer/motherboard does not support UEFI and needs to be replaced. *
-
* Note: The safest way to check if your device supports UEFI is from the manufacturer’s website. Especially for users who want to upgrade their system to Windows 11 the computer must support also TPM version 2.0.
Part 1. Enable Secure Boot in BIOS/UEFI.
If your computer is running in UEFI boot mode but Secure boot is disabled/OFF (Case A), proceed and activate Secure Boot in BIOS/UEFI settings, by using one of following methods:
Method 1: Change Secure Boot State in UEFI/BIOS Settings.
1. As soon as you turn ON the PC, press the DEL or F2, F10, F12 keys to get into the BIOS/UEFI Firmware Settings. (For more specific details on how to get into BIOS settings, visit your computer’s manufacturer support website).
2. Go to Security Options or to Boot Options & Change the Secure Boot to Enabled. *
* Note: If you want to install/upgrade to Windows 11, you must enable also the TPM in BIOS Settings. The TPM can be called (depending on the manufacturer) as: Intel Platform Trusted Module, Intel TPM, Intel Platform Trust Technology, Intel PTT, Security Device, Security Device Support, TPM State, AMD fTPM switch, AMD PSP fTPM.
3. Save and Exit from BIOS settings.
Method 2. Activate Secure Boot in UEFI Firmware settings from Windows RE.
To second way to get into the BIOS/UEFI settings, is by using the Windows Recovery Environment (WinRE) options:
1. Hold down the Shift key and from the Power icon select Restart to boot your system in Windows Recovery Environment (WinRE).
2. Then select Troubleshoot -> Advanced options -> UEFI Firmware Settings and select Restart.
3. Navigate to the System Configuration tab, select Boot Options.
4. In Boot options, Change Secure Boot and select Enabled. *
* Note: If you can’t find the Secure Boot option here, go to the manufacturer’s support website for guidance. (The BIOS/UEFI firmware settings varies among difference computer manufacturers)
5. Save and Exit from BIOS Settings.
6. Restart the PC and open System Information (msinfo.exe), to verify that Secure Boot is On now.
Part 2. Convert DISK to GPT & Enable UEFI and Secure Boot.
As mentioned at the beginning of this article, secure boot is only supported on modern computers where the boot mode of the computer is set to UEFI and the partition table is GPT.
So, if your computer’s boot mode is set to Legacy and the partition table is MBR (Case B), then to enable secure boot, you must first convert the partition schema from MBR to GPT, and then switch from Legacy boot mode to UEFI boot mode.*
* Warning: Before you continue to the steps below, backup your data, to avoid data loss if something goes wrong, and ensure that your device supports UEFI (see step-2 above).
Step 1. Ensure that the current Partition Style is MBR.
Before you convert the partition scheme, first ensure that the partition style on your main disk is MBR and NOT GPT.
1. Press the Windows + R keys to load the Run dialog box.
2. Type diskmgmt.msc and press Enter.
3. Right-click the drive with Windows OS and select Properties.
4. Select the Volumes tab.
5. Now look at the «Partition style» and make sure it is Master Boot Record (MBR). *
* Note: If the Partition style states GUID Partition Table (GPT), you don’t need to proceed to further. Just follow the instructions on Part-1 above to enable the Secure Boot in BIOS.
6. Once you confirm that the partition style is «MBR», proceed to step-2 below to convert the partition style to GPT.
Step 2. Convert MBR partition style to GPT.
Windows Creator Update (1703) or later allows you to convert the partition scheme without losing data. Microsoft designed the MBR2GPT.exe tool for easy conversion and data retention. However, it is safer to convert the partition scheme when Windows is Offline (not running). To do that:
1. Hold down the Shift key and from the Power icon select Restart to boot your system in Windows Recovery Environment (WinRE).
2. Then go to Troubleshoot -> Advanced options -> Command Prompt. (If asked choose an administrator account and type its password to proceed).
3. Type the command below to convert the disk from MBR to GPT and hit Enter:
- mbr2gpt /convert
4. When the process completes, close command prompt and shut down the PC.
5. Proceed to step-3 below.
Step 3. Enable UEFI and Secure Boot in BIOS/UEFI firmware settings.
After converting the partition style from MBR to GPT, the computer will not be able to boot normally until the PC boot mode is changed from Legacy to UEFI. So, proceed as follows before booting to Windows.
1. As soon as you turn ON the PC, press the DEL or F2, F10, F12 keys to get into the BIOS/UEFI Firmware Settings. (For more specific details on how to get into BIOS settings, visit your computer’s manufacturer support website).
2. Navigate to the System Configuration tab and select Boot Options.
3. In Boot options, apply the follow actions:
a. Set the Legacy Support to UEFI or Disabled (This will automatically enable UEFI)
b. Change the Secure Boot to Enabled. *
* Note: If you can’t find the Secure Boot option here, go to the manufacturer’s support website for guidance. (The BIOS/UEFI firmware settings varies among difference computer manufacturers)
4. Save and Exit from BIOS Settings.
5. Boot to Windows and check in System Information to be sure that secure boot is ON. You will also notice that BIOS Mode is UEFI.
6. At this point you can proceed to upgrade your device to Windows 11, if that was the goal you wanted to achieve with these changes.
That’s it! Let me know if this guide has helped you by leaving your comment about your experience. Please like and share this guide to help others.
If this article was useful for you, please consider supporting us by making a donation. Even $1 can a make a huge difference for us in our effort to continue to help others while keeping this site free:

If you want to stay constantly protected from malware threats, existing and future ones, we recommend that you install Malwarebytes Anti-Malware PRO by clicking below (we
do earn a commision from sales generated from this link, but at no additional cost to you. We have experience with this software and we recommend it because it is helpful and useful):
Full household PC Protection — Protect up to 3 PCs with NEW Malwarebytes Anti-Malware Premium!
Здравствуйте. Данная публикация должна помочь владельцам ноутбуков ASUS справиться с довольно распространенной ошибкой, возникающей во время запуска ПК – «Invalid signature detected check secure boot policy». Другим пользователям статья тоже будет полезна, поскольку проблема может возникать не только на технике Асус.
Причины появления
Чаще всего данный «дефект» всплывает:
- после установки обновлений ОС Виндовс 10 / 8 или в результате инсталляции второй операционной системы;
- в результате сканирования дисков с помощью антивирусов после серьезной вирусной атаки;
- если Вы в параметрах Windows разрешили использовать драйвера из непроверенных источников (без цифровой подписи);
- когда подключаете дополнительный накопитель HDD;
- как следствие неудачного обновления / сброса настроек BIOS.
Решение
Сейчас узнаете, как устранить ошибку «Secure boot violation invalid signature detected». Делается это предельно просто. Но советую проявить особую внимательность при прочтении данной инструкции, поскольку мы будем работать с БИОС.
- Сначала нужно зайти в SETUP до загрузки. Обычно для этого достаточно после включения ноутбука нажать одну из клавиш: Del или F Может быть и другая кнопка (или их сочетание), которая указывается на экране в первые секунды запуска.
- Теперь предстоит найти среди опций пункт «SecureBoot» и задать ему значение «Отключено» (Disabled).
- Для UEFI предстоит дополнительно указать другой тип ОС (OS Type). Пользователи Windows, выберите из списка другой вариант «Other…».
- Также, рекомендую включить CSM (Enable CSM), при наличие подобного варианта в перечне параметров.
Вот парочка скринов, которые помогут сориентироваться в ситуации:
Теперь проверяем, устранена ли проблема «Invalid signature detected» Виндовс 10.
Еще несколько советов
Довольно редко встречается ситуация, когда причиной ошибки являются неподписанные драйвера, которые вступают в конфликт с защитой системы. Как вариант решения, Вы можете выполнить отключение проверки подлинности. Сделать это можно быстро с помощью консоли CMD:
- Запускаем командную строку с правами админа (для этого вызываем меню нажатием Win + X и там выбираем нужный пункт):
- Вводим по очереди следующие команды, отправляя их на выполнение клавишей Enter :
bcdedit.exe -set loadoptions DISABLE_INTEGRITY_CHECKS
bcdedit.exe -set TESTSIGNING ON
Для того, чтобы изменения вступили в силу, предварительно стоит выполнить отключение SecureBoot в BIOS / UEFI (об этом я рассказывал выше).
Если же операционная система не запускается вообще, то деактивацию проверки драйверов реально выполнить, загрузившись с восстановительной флешки.
Увы, не во всех ситуациях предложенные рекомендации срабатывают. Напишите в комментариях, если не удалось избавиться от указанной беды. Я постараюсь помочь в решении.
С уважением, Виктор!
Вам помогло? Поделитесь с друзьями — помогите и нам!
The Secure Boot feature in Windows 11/10/8.1/8, assures a user that his PC boots using only firmware that is trusted by the manufacturer and no one else. So, if there are any incorrect configurations, end users might be presented with SecureBoot isn’t Configured Correctly watermark in the bottom right corner of your desktop.
Why does this feature assume importance? Well, when the Secure Boot is activated on a PC, the PC checks each piece of software, including the option ROMs, UEFI drivers, UEFI apps, and the operating system, against databases of known-good signatures maintained in the firmware. If each piece of software is valid, the firmware runs the software and the operating system. Unauthorized software such as rootkit viruses is prevented from running.
So if you see the Secure Boot isn’t configured watermark correctly on the desktop, it probably indicates that the Windows Secure Boot feature has either been disabled or hasn’t been set up on your PC. The problem wasn’t known much until early Windows adopters started switching to the latest Windows 8.1 update available for free from the Windows Store.
Read: What is Secure Boot, Trusted Boot, Measured Boot.
A handful of users started getting Secure Boot Isn’t Configured Correctly message after upgrading to the new Windows 8.1. Even though no workaround has been made available right now, Microsoft offers a few instructions to get the problem fixed.
First, you need to check to see if Secure Boot has been disabled in the BIOS, and in case it is, re-enable it. Then, you should try resetting the BIOS back to factory settings, and in case this doesn’t work, you could try resetting your PC back to factory state and then re-enable Secure Boot.
Read: How to Secure the Windows 10 Boot Process.
Disable or Enable Secure Boot in Windows
While I do not recommend that you disable Secure Boot, if the option is present on your system, should you wish to, you can disable Secure Boot, by tweaking your BIOS. Using Advanced Options in Windows 10.8, click on UEFI Firmware Settings and restart your PC. Now in your BIOS settings screen, in your motherboards UEFI settings, you will see the option to enable or disable Secure Boot, somewhere under the Security section.
View and Check the Event Viewer
To find out the possible reasons, you could check out the Windows Logs. The Windows Event Viewer shows a log of application and system messages – errors, information messages, and warnings.
- Go to View Event Logs > Applications and Services Logs
- Next, choose Microsoft from the Right-pane and then Windows.
- Now, under Microsoft select the Windows folder and search for Verify HardwareSecurity > Admin.
Then, look for either of these logged events:
- Secure Boot is currently disabled. Please enable Secure Boot through the system firmware. (The PC is in UEFI mode, and Secure Boot is disabled.) or
- A non-production Secure Boot Policy was detected. Remove Debug/PreRelease policy through the system firmware. (The PC has a non-production policy.)
You can also use PowerShell commands to check the status.
To see if Secure Boot is disabled, use the PowerShell command: Confirm-SecureBootUEFI. You’ll get one of these responses:
- True: Secure Boot is enabled, and the watermark won’t appear.
- False: Secure Boot is disabled, and a watermark will appear.
- Cmdlet not supported on this platform: The PC may not support Secure Boot, or the PC may be configured in legacy BIOS mode. The watermark won’t appear.
To see if you have a non-production policy installed, use the PowerShell command: Get-SecureBootPolicy. You’ll get one of these responses:
- {77FA9ABD-0359-4D32-BD60-28F4E78F784B}: The correct Secure Boot policy is in place.
- Anything other GUID: A non-production Secure Boot policy is in place.
- Secure Boot policy is not enabled on this machine: The PC may not support Secure Boot, or the PC may be configured in legacy BIOS mode. The watermark won’t appear.
Source: TechNet.
How do I fix Secure Boot isn’t configured correctly?
To fix Secure Boot isn’t configured correctly error, you need to enable Secure Boot from BIOS. Depending upon the motherboard, you can find this setting in different locations. However, almost all modern-day motherboards come with the Secure Boot switch so that users can enable or disable the setting when needed.
How do you fix Secure Boot isn’t configured correctly Insider Build?
To fix Secure Boot isn’t configured correctly on Build 9600 error, you must enable the Secure Boot setting from the BIOS. If it is already enabled on your computer, you need to verify whether your PC detects the change or not. For that, you can open Event Viewer and go to Applications and Services Logs. Here you can find the Windows folder under Microsoft. Then, expand the VerifyHardwareSecurity section and click on the Admin option. Here it shows whether Secure Boot is turned on or off.
NOTE: Microsoft has now released an Update – KB2902864, which removes the “Windows Secure Boot isn’t configured correctly” watermark in Windows 8.1 and Windows Server 2012 R2.

