Introduction
Sentry is an open source error tracking tool, that helps developers monitor and fix crashes in real time. It’s really fast to set up, and supports many platforms and programming languages.
On the Web UI of sentry, you can see all errors that your code captured, a stack trace, context and breadcrumbs (if you implement it).
Setting up your Sentry project
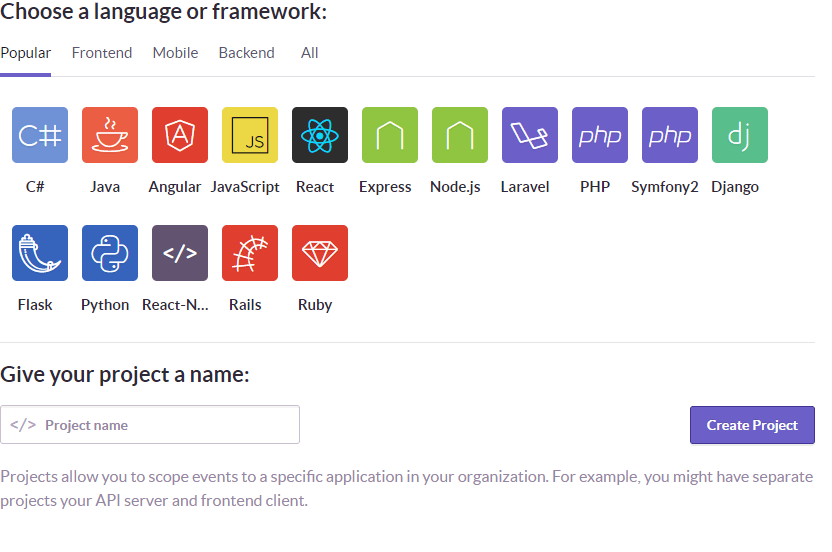
After you’ve registered on Sentry and logged in, press New Project in the top-right corner.
In this tutorial, we’re covering the generic Node.js usage of Sentry, so make sure to choose Node.js instead of Express.
After giving your project a name and clicking on the shiny Create button, a documention page should pop up.
Below the «Configuring the Client» headline, there should be a codeblock containing your Sentry DSN. Save that code somewhere, because we’ll need it later, so we can communicate with Sentry via our client module, Raven.
Setting up Raven
After creating your project on the Sentry website, it’s time to spin up your editor and start coding.
First, you’ll need to add the Raven module to your project.
npm install raven --save
Enter fullscreen mode
Exit fullscreen mode
Open the code you’ve saved earlier from the Sentry website, and paste it along the other require statements in your file. To make the code ready for public Git providers, don’t forget to remove the hardcoded Sentry DSN, and move it to an external gitignored config file, or to environment variables.
Capturing errors
Let’s present the different methods of capturing errors with a sample code.
function doSomething(data) {
  if (data) { // Check if our data is defined or not
    return data; // Return data
  } else {
    throw new Error("Missing required data parameter."); // Throw error
  }
}

doSomething(); // Call doSomething without defining data -> error thrown
Enter fullscreen mode
Exit fullscreen mode
Our function doSomething will check if it’s parameter data is defined: if it is, it just returns it, but if it isn’t, it throws an error. Just after defining doSomething, our code calls it, without supplying the data parameter, therefore throwing an error.
There are two main methods for capturing issues with the Raven client:
- Wrapping code into a context, or
- Manually capturing errors.
Method 1 — Wrapping code into a context
There are two methods of wrapping code into a context: Raven.context, and Raven.wrap. There aren’t many differences, except that Raven.wrap returns a function, while Raven.context doesn’t, meaning that you’d want to use Raven.wrap for code like callbacks, and Raven.context for just generic code wrapping.
var Raven = require('raven');

Raven.config('https://13c3c4f3c6094d749436722b3031f787:6fe68b76c7e34d2cb69831355d6e3beb@sentry.io/301629').install();

function doSomething(data) {
  if (data) { // Check if our data is defined or not
    return data; // Return data
  } else {
    throw new Error("Missing required data parameter."); // Throw error
  }
}

Raven.context(function() { // Wrap the following code with Raven.context
  doSomething(); // Call doSomething without defining data -> error thrown
});

setTimeout(Raven.wrap(function() {
  doSomething(); // Call doSomething without defining data -> error thrown
}, 1000); // Run doSomething delayed with setTimeout and Raven.wrap
Enter fullscreen mode
Exit fullscreen mode
There’s a major advantage for using this method instead of manually capturing errors: code inside a context (a.k.a. code inside Raven.wrap or Raven.context) has access to methods that enable associating data with the context, which can be useful for debugging.
var Raven = require('raven');

Raven.config('https://13c3c4f3c6094d749436722b3031f787:6fe68b76c7e34d2cb69831355d6e3beb@sentry.io/301629').install();

function doSomething(data) {
  if (data) { // Check if our data is defined or not
    return data; // Return data
  } else {
    throw new Error("Missing required data parameter."); // Throw error
  }
}

Raven.context(function() { // Wrap the following code with Raven.context
  Raven.setContext({ // Set context data with the specified object
    tags: {
      component: 'main'
    }
  });
  Raven.mergeContext({ // Extend context data with the specified object
    tags: {
      method: 'doSomething'
    }
  });
  console.log(Raven.getContext());

  doSomething(); // Call doSomething without defining data -> error thrown
});
Enter fullscreen mode
Exit fullscreen mode
Keep in mind that setContext, mergeContext and getContext only work in code inside a context.
You can store anything inside your context data, for example, you could associate errors with user data, like this:
Raven.setContext({
  user: {
    email: 'matt@example.com',
    id: 123
  }
});
Enter fullscreen mode
Exit fullscreen mode
Method 2 — Manually capturing errors
With Raven’s caputreException, you can capture non-thrown exceptions, or you can capture thrown exceptions using a try-catch block.
var Raven = require('raven');

Raven.config('https://13c3c4f3c6094d749436722b3031f787:6fe68b76c7e34d2cb69831355d6e3beb@sentry.io/301629').install();

function doSomething(data) {
  if (data) { // Check if our data is defined or not
    return data; // Return data
  } else {
    throw new Error("Missing required data parameter."); // Throw error
  }
}

try {
  doSomething(); // Call doSomething without defining data -> error thrown
} catch (e) {
  Raven.captureException(e, function(sendErr) { // Capture exception
    if (sendErr) { // Check if send failed
      console.error("Failed to send exception to Sentry.");
    } else {
      console.log("Exception sent to Sentry.");
    }
  });
}
Enter fullscreen mode
Exit fullscreen mode
You can use captureMessage to send non-exception error messages to Sentry.
var Raven = require('raven');

Raven.config('https://13c3c4f3c6094d749436722b3031f787:6fe68b76c7e34d2cb69831355d6e3beb@sentry.io/301629').install();

function doSomething(data) {
  if (data) { // Check if our data is defined or not
    return; // Return nothing
  } else {
    return "Missing required data parameter."; // Return error
  }
}

var err = doSomething(); // Call doSomething without defining data -> error returned
if (err) {
  Raven.captureMessage(err, function(err) {
    // Sent!
  });
}
Enter fullscreen mode
Exit fullscreen mode
Although you do not have access to setContext and other context-only functions, you can supply additional data to captureException and captureMessage that should be captured.
Raven.captureException(err, {
  user: { id: 123 }, // User-related info
  req: req, // Request object from HTTP web server (handled by Raven Express)
  tags: { component: 'main', method: 'doSomething' }, // Tags
  extra: { catType: cat.type }, // Any other data you'd specify with setContext
  level: 'error' // Event level
});
Enter fullscreen mode
Exit fullscreen mode
For more additional information you can provide, visit the Raven Node docs.
Breadcrumbs, breadcrumbs everywhere!
For additional info on data before the exception happened, Breadcrumbs are the solution. Breadcrumbs are a trail of events that occurred in your application leading up to a captured error. They can be as simple as a log message, or they can contain rich metadata about the state of your appliction, like network requests, database queries, or even earlier occurring errors.
Raven for Node supports a feature called autoBreadcrumbs, which automatically records useful breadcrumbs, like HTTP(S) requests, log statements (with console.log, .warn, etc.), and PostgreSQL queries via the pg module.
To enable it, add this setting to Raven.config, and you’re good to go!
Raven.config('https://13c3c4f3c6094d749436722b3031f787:6fe68b76c7e34d2cb69831355d6e3beb@sentry.io/301629', {
  autoBreadcrumbs: true // Enable autoBreadcrumbs
}).install();
Enter fullscreen mode
Exit fullscreen mode
This may be just enough for you, but if it isn’t, fear not! There’s an easy way of capturing breadcrumbs manually.
var Raven = require('raven');

Raven.config('https://13c3c4f3c6094d749436722b3031f787:6fe68b76c7e34d2cb69831355d6e3beb@sentry.io/301629').install();

function doSomething(data) {
  if (data) { // Check if our data is defined or not
    return data; // Return data
  } else {
    throw new Error("Missing required data parameter."); // Throw error
  }
}

var ourJson = "{}"; // Blank JSON object, not containing needed data.

Raven.context(function() { // Wrap the following code with Raven.context
  var parsedJson = JSON.parse(ourJson); // Parse JSON
  Raven.captureBreadcrumb({ // Capture breadcrumb
    message: 'Parsed JSON',
    category: 'log',
    data: {
      raw: ourJson,
      parsedJson: parsedJson
    }
  });
  doSomething(parsedJson.data); // Call doSomething with non-existing data -> error thrown
});
Enter fullscreen mode
Exit fullscreen mode
If we view the error on the Web UI, we can see our breadcrumb containing our raw JSON and our parsed JSON, this way we can see if the JSON doesn’t have the needed data (which is the case here), or if we parsed the JSON wrong.
This can be really useful for debugging info that is coming from an outside source, so you can see if your code is wrong, or if the users’ input is wrong.
Время прочтения
6 мин
Просмотры 6.7K
Сегодня я расскажу вам об отслеживании ошибок в реальном времени в приложении React. Приложение внешнего интерфейса обычно не используется для отслеживания ошибок. Некоторые компании часто откладывают отслеживание ошибок, возвращаясь к нему после документации, тестов и прочего. Однако, если вы можете изменить свой продукт в лучшую сторону, то просто сделайте это!
1. Зачем вам нужен Sentry?
Я предполагаю, что вы заинтересованы в отслеживании ошибок в процессе производства
Вы думаете, что этого недостаточно?
Хорошо, давайте посмотрим на детали.
Основные причины использования Sentry для разработчиков:
- Позволяет избавляться от рисков при развертывании кода с ошибками
- Помощь QA в тестировании кода
- Получение быстрых уведомлений о проблемах
- Возможность быстрого исправления ошибок
- Получение удобного отображения ошибок в админ-панели
- Сортировка ошибок по сегментам пользователя / браузера
Основные причины для CEO / Lead проекта
- Экономия денег (Sentry можно установить на ваших серверах)
- Получение отзывов пользователей
- Понимание того, что не так с вашим проектом в режиме реального времени
- Понимание количества проблем, возникающих у людей с вашим приложением
- Помощь в поиске мест, где ваши разработчики допустили оплошность
Я думаю, что разработчики были бы заинтересованы в этой статье в первую очередь. Вы также можете использовать этот список причин, чтобы убедить начальство интегрировать Sentry.
Будьте осторожны с последним пунктом в списке для бизнеса.
Вы уже заинтересованы?
Что такое Sentry?
Sentry – это приложения для отслеживания ошибок с открытым исходным кодом, которое помогает разработчикам отслеживать, исправлять сбои в режиме реального времени. Не забывайте и о том, что приложение позволяет повышать эффективности и улучшать пользовательское использование. Sentry поддерживает JavaScript, Node, Python, PHP, Ruby, Java и другие языки программирования.
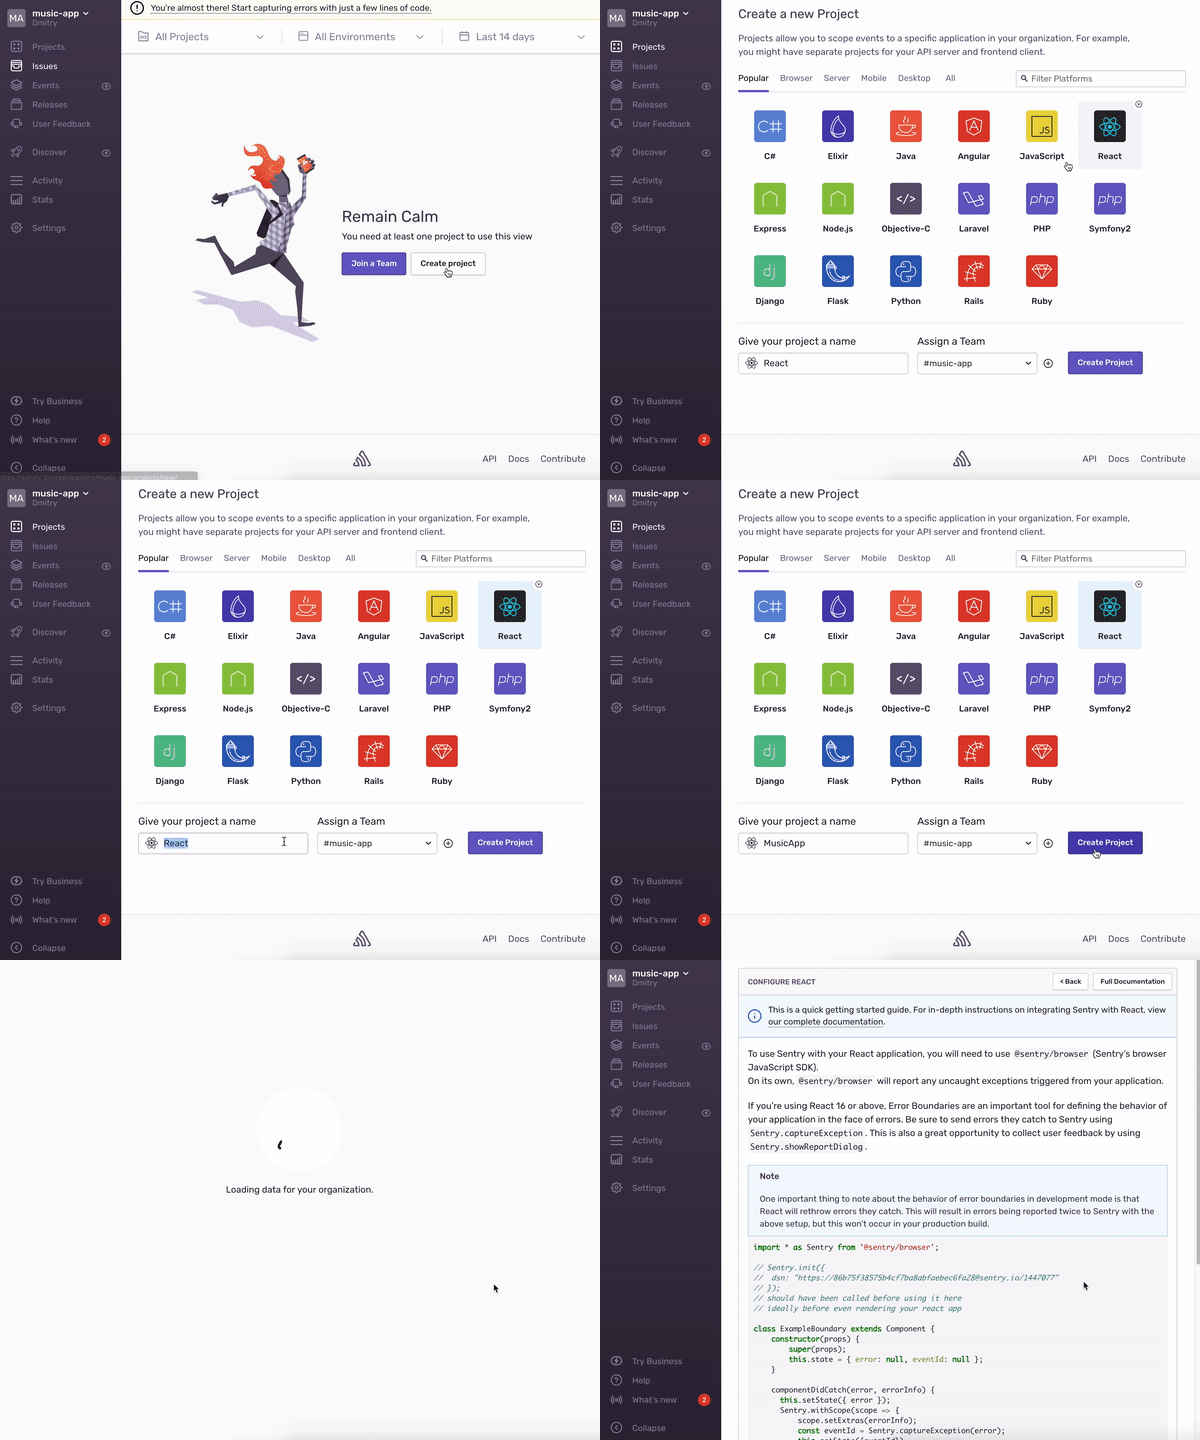
2. Войдите и создайте проект
- Откройте ваш Sentry аккаунт. Возможно, вам придется войти в систему. (Обращаю внимаю что Sentry можно установить на ваших серверах)
- Следующий шаг создать проект
- Выберите ваш язык из списка. (Мы собираемся выбрать React. Нажмите «Создать проект»)
Настройте ваше приложение. Базовый пример, как интегрировать Sentry в контейнер, вы можете увидеть ниже:
import * as Sentry from '@sentry/browser';
// Sentry.init({
//  dsn: "<https://63bbb258ca4346139ee533576e17ac46@sentry.io/1432138>"
// });
// should have been called before using it here
// ideally before even rendering your react app

class ExampleBoundary extends Component {
    constructor(props) {
        super(props);
        this.state = { error: null };
    }

    componentDidCatch(error, errorInfo) {
      this.setState({ error });
      Sentry.withScope(scope => {
        Object.keys(errorInfo).forEach(key => {
          scope.setExtra(key, errorInfo[key]);
        });
        Sentry.captureException(error);
      });
    }

    render() {
        if (this.state.error) {
            //render fallback UI
            return (
              <a onClick={() => Sentry.showReportDialog()}>Report feedback</a>
            );
        } else {
            //when there's not an error, render children untouched
            return this.props.children;
        }
    }
}
В Sentry есть полезный Мастер, который поможет вам понять, что вы должны делать дальше. Вы можете выполнить следующие шаги. Я хочу показать вам, как создать первый обработчик ошибок. Отлично, мы создали проект! Перейдем к следующему шагу
3. Интеграция React и Sentry
Вы должны установить npm пакет в ваш проект.
npm i @sentry/browserИнициализируйте Sentry в вашем контейнере:
Sentry.init({
 // dsn: #dsnUrl,
});
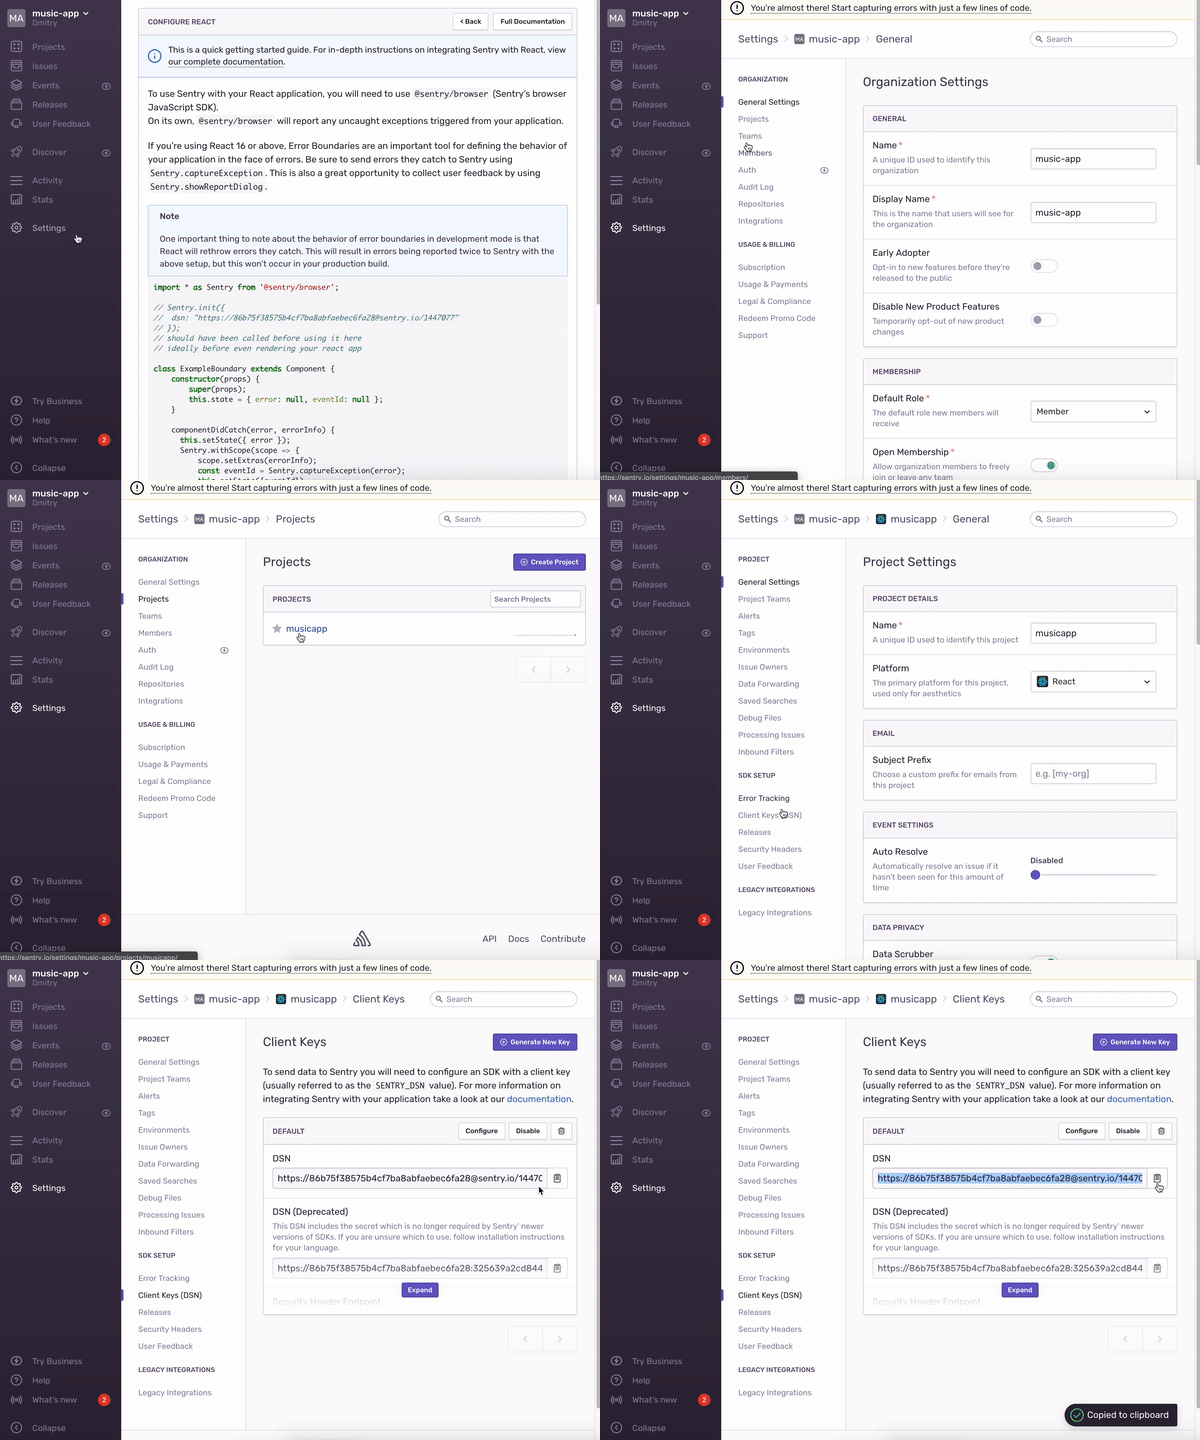
DSN находится в Projects -> Settings -> Client Keys. Вы можете найти клиентские ключи в строке поиска.
componentDidCatch(error, errorInfo) {
  Sentry.withScope(scope => {
    Object.keys(errorInfo).forEach(key => {
      scope.setExtra(key, errorInfo[key]);
    });
    Sentry.captureException(error);
 });
}
4. Отслеживание первой ошибки
Я например использовал простое музыкально приложение с API Deezer. Вы можете видеть это здесь. Нам нужно создать ошибку. Одним из способов является обращение к свойству «undefined»
Мы должны создать кнопку, которая вызывает console.log с user.email. После этого действия мы должны получить сообщение об ошибке: Uncaught TypeError (не удается прочитать свойство из неопределенного email) из-за отсутствия объекта пользователя. Вы также можете использовать исключение Javascript.
<button type="button" onClick={() => console.log(user.email)}>
  Test Error button
</button>
Весь контейнер выглядит так:
import React, { Component } from "react";
import { connect } from "react-redux";
import { Input, List, Skeleton, Avatar } from "antd";
import * as Sentry from "@sentry/browser";
import getList from "../store/actions/getList";

const Search = Input.Search;

const mapState = state => ({
  list: state.root.list,
  loading: state.root.loading
});

const mapDispatch = {
  getList
};

class Container extends Component {
  constructor(props) {
    super(props);

    Sentry.init({
      dsn: "https://fc0edcf6927a4397855797a033f04085@sentry.io/1417586",
    });
  }

  componentDidCatch(error, errorInfo) {
    Sentry.withScope(scope => {
      Object.keys(errorInfo).forEach(key => {
        scope.setExtra(key, errorInfo[key]);
      });
      Sentry.captureException(error);
    });
  }
  render() {
    const { list, loading, getList } = this.props;
    const user = undefined;
    return (
      <div className="App">
        <button
          type="button"
          onClick={() => console.log(user.email)}
        >
          test error1
        </button>
        <div onClick={() => Sentry.showReportDialog()}>Report feedback1</div>
        <h1>Music Finder</h1>
        <br />
        <Search onSearch={value => getList(value)} enterButton />
        {loading && <Skeleton avatar title={false} loading={true} active />}
        {!loading && (
          <List
            itemLayout="horizontal"
            dataSource={list}
            locale={{ emptyText: <div /> }}
            renderItem={item => (
              <List.Item>
                <List.Item.Meta
                  avatar={<Avatar src={item.artist.picture} />}
                  title={item.title}
                  description={item.artist.name}
                />
              </List.Item>
            )}
          />
        )}
      </div>
    );
  }
}

export default connect(
  mapState,
  mapDispatch
)(Container);
После интеграции этой кнопки вы должны протестировать ее в браузере.
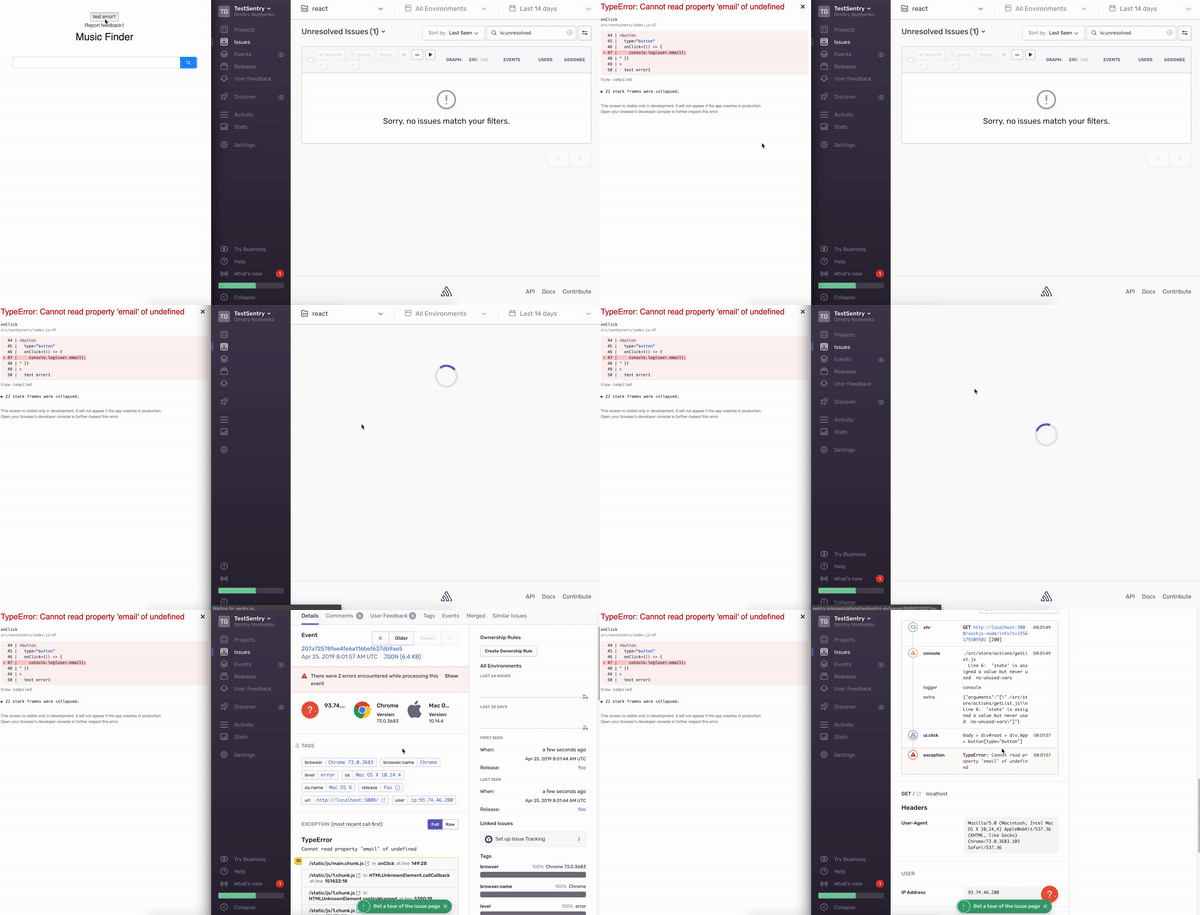
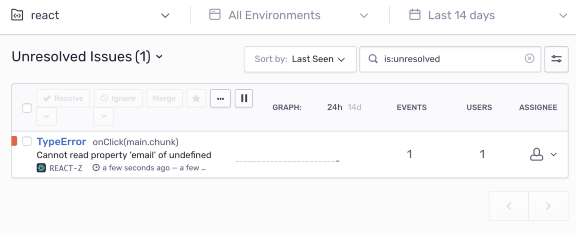
У нас есть первая ошибка
Whoo-hoo!
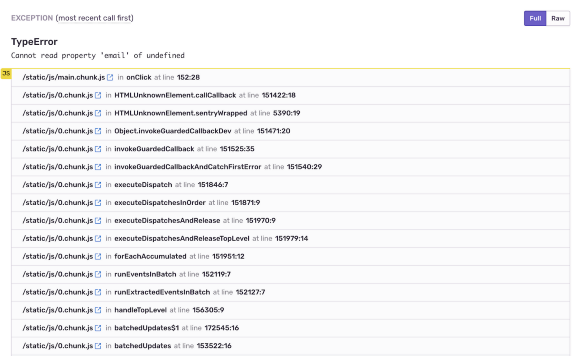
Если вы нажмете на ошибку заголовка, вы увидите трассировку стека.
Сообщения выглядят плохо. Конечно, мы видели сообщения об ошибках, не понимая, где этот код. По умолчанию речь идет об исходной карте в ReactJS, потому что они не настроены.
Я также хотел бы предоставить инструкции по настройке исходной карты, но это сделало бы эту статью намного длиннее, чем я планировал.
Вы можете изучить эту тему здесь. Если вы заинтересованы в этой статье, Dmitry Nozhenko опубликует вторую часть об интеграции source map. Итак, нажимайте больше лайков и подписывайтесь на Dmitry Nozhenko, чтобы не пропустить вторую часть.
5. Использование Sentry с конечной точкой API
Окей. Мы рассмотрели исключение javascript в предыдущих пунктах. Однако, что мы будем делать с ошибками XHR?
Sentry также имеет пользовательскую обработку ошибок. Я использовал его для отслеживания ошибок api.
Sentry.captureException(err)Вы можете настроить имя ошибки, уровень, добавить данные, уникальные пользовательские данные с помощью вашего приложения, электронной почты и т. д.
superagent
  .get(`https://deezerdevs-deezer.p.rapidapi.com/search?q=${query}`)
  .set("X-RapidAPI-Key", #id_key)
  .end((err, response) => {
    if (err) {
      Sentry.configureScope(
        scope => scope
          .setUser({"email": "john.doe@example.com"})
          .setLevel("Error")
      );
      return Sentry.captureException(err);
    }

    if (response) {
      return dispatch(setList(response.body.data));
    }
  });
Я хотел бы использовать общую функцию для API catch.
import * as Sentry from "@sentry/browser";

export const apiCatch = (error, getState) => {
  const store = getState();
  const storeStringify = JSON.stringify(store);
  const { root: { user: { email } } } = store;

  Sentry.configureScope(
    scope => scope
      .setLevel("Error")
      .setUser({ email })
      .setExtra("store", storeStringify)
  );
    // Sentry.showReportDialog(); - If you want get users feedback on error
  return Sentry.captureException(error);
};
Импортируйте эту функцию в вызов api.
export default query => (dispatch, getState) => {
  superagent
    .get(`https://deezerdevs-deezer.p.rapidapi.com/search?q=${query}`)
    .set("X-RapidAPI-Key", #id_key)
    .end((error, response) => {
      if (error) {
        return apiCatch(error, getState)
      }

      if (response) {
        return dispatch(setList(response.body.data));
      }
    });
};
Давайте проверим методы:
- setLevel позволяет вставить ошибку уровня в панель мониторинга sentry. Он имеет свойства — ‘fatal’, ‘error’, ‘warning’, ‘log’, ‘info, ‘debug’, ‘critical’).
- setUser помогает сохранить любые пользовательские данные (id, адрес электронной почты, план оплаты и т. д.).
- setExtra позволяет задать любые данные, которые вам нужны, например, магазин.
Если вы хотите получить отзывы пользователей об ошибке, вам следует использовать функцию showReportDialog.
Sentry.showReportDialog();Вывод:
Сегодня мы описали один из способов интеграции Sentry в приложение React.
→ Телеграм-чат по Sentry
In today’s tutorial, we’re going to focus on a real-world application of extending the Error prototype with ES6 classes and how we can use this for effective error tracing.
This tutorial expects that you have a Sentry account set up and are somewhat self-sufficient in getting your project up and going.
It also expects you are running a version of Node that supports ES6 classes. I am running 12.16.1 in this project.
Getting started
Let’s set up a new Nodejs project and install some deps.
mkdir custom-error
cd custom-error
yarn init -y
yarn add dotenv @sentry/node
touch index.js SentryError.js .gitignore
We are going to use dotenv to hide away our Sentry endpoint.
.gitignore
Throw in the files we don’t wish to store in Git.
Setting up Sentry
While this won’t go into details, we want to set up a new Nodejs project in our Sentry account.
New Sentry Nodejs project
Once it is set up, it will give you a dsn URL that we are going to add to our .env file:
SENTRY_ENDPOINT=<replace-with-your-url-here>
We are now ready to set up our custom error!
SentryError.js
Add the following to Sentry.js:
require("dotenv").config();
const Sentry = require("@sentry/node");

// initialises Sentry
Sentry.init({
  dsn: process.env.SENTRY_ENDPOINT,
});

class SentryError extends Error {
  constructor(errMessage, data, type = "error") {
    // Passes errMessage to the Error super class,
    // similar to call new Error(errMessage).
    super(errMessage);

    // Maintains proper stack trace for where our error was thrown (only available on V8)
    if (Error.captureStackTrace) {
      Error.captureStackTrace(this, SentryError);
    }

    this.name = "SentryError";

    Sentry.addBreadcrumb({
      category: "data",
      message: errMessage,
      data: data,
      type: type,
      level: Sentry.Severity.Debug,
    });

    Sentry.captureException(errMessage);
  }
}

module.exports = { SentryError };
In the code, we are doing to following:
- Requiring
dotenvto read in our.envfile toprocess.env. - Initialising Sentry.
- Create a class that «extends» error. In layperson JavaScript terms, «extends» with mean that our new
SentryErrorextends from theErrorprototype. We can use the constructor to initialise all the properties we are inheriting from Error. - Initialising a new instance with a
constructor.
The constructor itself is a method called whenever we call new SentryError() for a new SentryError instance.
We are telling it we take an error message (similar to new Error('error message')), data (which we will use to set breadcrumbs to help us debug) and an breadcrumb type that we use within the constructor (which defaults to error).
The first thing we do in the constructor is call super(errMessage), which is us calling up the chain to the Error prototype. This will set properties on this object that we expect to get from Error like name, message and stack (which we will see later).
Afterwards, we are essentially setting a breadcrumb and telling Sentry to capture an exception. You can read more about these on the Sentry docs but the tl;dr is that these calls will populate our telemetry data on Sentry.
With this alone, we are ready to roll!
Testing out our new error
In index.js, add the following:
const { SentryError } = require("./SentryError");

const main = (data) => {
  try {
    if (!data.nonExistentValue) {
      throw new SentryError("nonExistentValue required", data);
    }
  } catch (err) {
    console.error(err.name);
    console.error(err.message);
    console.error(err.stack);
  }
};

// no data passed
main({
  existentValue: 123,
  name: "Hello, world!",
});
Here, we are simply doing to following:
- Requiring our new error.
- We have a
mainfunction that simply throws our newSentryErrorifdata.nonExistentValuedoes not exist (which it won’t). - Finally we are call
mainwith an object of information that will be assigned todata.
Running the following will give us this:
> node index.js
SentryError
nonExistentValue required
SentryError: nonExistentValue required
    at main (/Users/dennis.okeeffe/Project-Imposter/blog-repos/custom-error/index.js:6:13)
    at Object.<anonymous> (/Users/dennis.okeeffe/Project-Imposter/blog-repos/custom-error/index.js:16:1)
    at Module._compile (internal/modules/cjs/loader.js:1158:30)
    at Object.Module._extensions..js (internal/modules/cjs/loader.js:1178:10)
    at Module.load (internal/modules/cjs/loader.js:1002:32)
    at Function.Module._load (internal/modules/cjs/loader.js:901:14)
    at Function.executeUserEntryPoint [as runMain] (internal/modules/run_main.js:74:12)
    at internal/main/run_main_module.js:18:47
From the catch block, you can see our new error has access to name, message and stack properties, which we mentioned will be the case from above thanks to use call super(errMessage) in our class to inherit the properties of the Error prototype.
If we head to Sentry, we can see our error has been logged!
New error
If we look at the basic settings, we can see that our breadcrumb was logged under data, the console logs are also tracked (this is configurable).
App error view
Those logs came from our catch block. If we change from «App only» to «Raw» you can see our stack trace also shows up in the exception:
Exception error
Handling sensitive information
As a company, we do not want Personally Identifiable Data from our customers being shared with the third-party.
These tools for us are a way to help debug and trace back through a user journey to improve our product, and they trust us not to share this information.
There are a few ways that we can go about protecting ourselves, but one example I will give today is how we can implement our own «deny» or «block» list.
Let’s make some small updates to our SentryError.js and index.js files.
For index.js, let’s update the info passed into main to include some dummy user data (and my public email):
const { SentryError } = require("./SentryError");

const main = (data) => {
  try {
    if (!data.nonExistentValue) {
      throw new SentryError("nonExistentValue required", data);
    }
  } catch (err) {
    console.error(err.name);
    console.error(err.message);
    console.error(err.stack);
  }
};

// no data passed
main({
  existentValue: 123,
  name: "Hello, world!",
  user: {
    email: "hello@dennisokeeffe.com",
    managerEmail: "hello@sensitiveinfo.com",
    id: "abc123",
    meta: {
      address: "123 Fake St",
    },
  },
});
Let’s say that we do not wish to share the name, user email, user’s manager email or their address, but we DO want to keep the ID for debugging issues. We can add a helper method to our class and set up a denyList that we can use in this method to recursively alter our breadcrumb data.
Why keep
denyListoutside or the class? There is no particular reason, but I find it makes it easier to write unit regex tests if this is abstracted and it can be used for other 3rd-party block lists you may want to set up.redactSensitiveInformationcould also have been pulled out of the class for the same reason if it was re-useable elsewhere.
Update SentryError.js:
require("dotenv").config();
const Sentry = require("@sentry/node");

Sentry.init({
  dsn: process.env.SENTRY_ENDPOINT,
});

// create a simple deny list
const denyList = [/email/gi, /name/gi, /address/gi];

class SentryError extends Error {
  constructor(errMessage, data, type = "error") {
    // Passes errMessage to the Error super class,
    // similar to call new Error(errMessage).
    super(errMessage);

    // Maintains proper stack trace for where our error was thrown (only available on V8)
    if (Error.captureStackTrace) {
      Error.captureStackTrace(this, SentryError);
    }

    this.name = "SentryError";

    Sentry.addBreadcrumb({
      category: "data",
      message: errMessage,
      // update our data
      data: this.redactSensitiveInformation(data),
      type: type,
      level: Sentry.Severity.Debug,
    });

    Sentry.captureException(errMessage);
  }

  // add in this new method
  redactSensitiveInformation(data) {
    const keys = Object.keys(data);
    const safeData = {};

    for (const key of keys) {
      if (!Array.isArray(data[key]) && typeof data[key] === "object") {
        // recursively check deep nested children
        safeData[key] = this.redactSensitiveInformation(data[key]);
      } else if (denyList.some((regex) => regex.test(key))) {
        // redacted the data
        safeData[key] = "[REDACTED]";
      } else {
        // assign data to object to send to Sentry
        safeData[key] = data[key];
      }
    }
    return safeData;
  }
}

module.exports = { SentryError };
redactSensitiveInformation uses the power of recursion. We basically want it to recursively check through an object to redact information that match a regex.
This means that the following:
{
  existentValue: 123,
  name: "Hello, world!",
  user: {
    email: "hello@dennisokeeffe.com",
    managerEmail: "hello@sensitiveinfo.com",
    id: "abc123",
    meta: {
      address: "123 Fake St",
    },
  },
}
…will become redacted to the following with our current deny list:
{
  existentValue: 123,
  name: "[REDACTED]",
  user: {
    email: "[REDACTED]",
    managerEmail: "[REDACTED]",
    id: "abc123",
    meta: {
      address: "[REDACTED]",
    },
  },
}
denyList.some iterates through our Regex array and if any regex matches, it will return «true» — this helps us identify from our list which data to redact.
Let’s run node index.js again and confirm this in Sentry.
Redacted info
Victory!
Conclusion
Today, we used ES6 classes to extend error. If anyone wants the «Why would you do that vs just extending the prototype?», my answer is that it is mainly preference.
I find classes in this case to be more readable and a better developer experience, but note that there is a cost if doing this in the web for transpiling back to ES5.
Today, we went with the idea of a «block» list. If you want a stronger alternative, go with the idea of an «allow» list where a property must be allowed before it will show up on Sentry.
Resources and Further Reading
- Completed example
- Sentry
- Sentry — Capturing Events
- Sentry — Breadcrumbs
- Super and Extends in JavaScript — Medium
Image credit: Ali Saadat
3 ответа
Нашел немного хакерское решение:
const consoleError = console.error;
console.error = function(firstParam) {
  const response = consoleError.apply(console, arguments);
  Raven.captureException(firstParam, { level: 'error' });
  return response;
};
Он просто оборачивает console.error и сообщает Raven (Sentry) о каждом из журналов ошибок в консоли.
Если у кого-то есть более приятный подход (возможно, какая-то скрытая особенность Sentry), пожалуйста, не стесняйтесь делиться!
Jurosh
08 июнь 2018, в 11:15
Поделиться
Здесь более надежное решение для переопределения
// creating function declarations for better stacktraces (otherwise they'd be anonymous function expressions)
var oldConsoleError = console.error;
console.error = reportingConsoleError; // defined via function hoisting
function reportingConsoleError() {
  var args = Array.prototype.slice.call(arguments);
  Sentry.captureException(reduceConsoleArgs(args), { level: 'error' });
  return oldConsoleError.apply(console, args);
};

var oldConsoleWarn = console.warn;
console.warn = reportingConsoleWarn; // defined via function hoisting
function reportingConsoleWarn() {
  var args = Array.prototype.slice.call(arguments);
  Sentry.captureMessage(reduceConsoleArgs(args), { level: 'warning' });
  return oldConsoleWarn.apply(console, args);
}

function reduceConsoleArgs(argsArray) {
  let errorMsg = args[0];
  // Make sure errorMsg is either an error or string.
  // It therefore best to pass in new Error('msg') instead of just 'msg' since
  // that'll give you a stack trace leading up to the creation of that new Error
  // whereas if you just pass in a plain string 'msg', the stack trace will include
  // reportingConsoleError and reportingConsoleCall
  if (!(errorMsg instanceof Error)) {
    // stringify all args as a new Error (which creates a stack trace)
    errorMsg = new Error(
      args.reduce(function(accumulator, currentValue) {
        return accumulator.toString() + ' ' + currentValue.toString();
      }, '')
    );
  }
  return errorMsg;
}
Devin G Rhode
08 нояб. 2018, в 17:56
Поделиться
Как пользователь @kumar303 упомянул в своем комментарии к вопросу… вы можете использовать консоль JS интеграции Sentry.Integrations.CaptureConsole.
См. Https://docs.sentry.io/platforms/javascript/?platform=browsernpm#captureconsole для документации.
В конце ваш JS-код для настройки Sentry выглядит следующим образом:
Sentry.init({
  dsn: 'https://your-sentry-server-dsn',
  integrations: [
    new Integrations.CaptureConsole({
      levels: ['error']
    })
  ],
  release: '1.0.0',
  environment: 'prod',
  maxBreadcrumbs: 50
})
Если затем кто-то вызывает console.error новое событие будет отправлено часовому.
Marc Schmid
24 июнь 2019, в 10:44
Поделиться
Ещё вопросы
- 0Как заполнить $ scope на начальной странице GET-запроса
- 0AngularStrap — загрузить файл шаблона в модальный шаблон как внутренний контент
- 0Получить значения галочек в php
- 0Как мне создать интервал между этими элементами списка? [Дубликат]
- 0JQuery FadeTo — как использовать
- 0Перезагрузить родительское окно Javascript возникла
- 0JavaScript IF ELSE оператор в строке
- 0значения переменных, добавляемых в массив после нажатия кнопки «Отправить»
- 1Android DatagramSocket не работает правильно
- 0C ++ глобальная функция против функции-члена данных в соответствии с памятью
- 1Android: повторяющийся рабочий процесс Android. Огонь и забыть?
- 1Модальные диалоги «Загрузка…» не являются хорошим решением для интерфейса?
- 1Как преобразовать dataframe в многослойный Json в Python?
- 1Порядок Linq по десятичному полю сортируется как строка?
- 0Проверка Jquery на содержание div
- 1Python Imp не находит модули
- 1Java с плавающей точкой в IEEE-754 шестнадцатеричной?
- 1Как запустить программы из диспетчера задач другого компьютера
- 0Ссылка Fancybox на все изображения в div
- 0AngularJS вызывает другую функцию директив
- 0Слайдшоу href не работает
- 0повторить не будет работать в столице
- 0как правильно создать класс
- 1Почему приложение C # не создает файл при запуске из планировщика задач Windows?
- 1Добавить элемент в свойство документа PouchDB из массива типов
- 0Событие фокуса текстового поля jquery в бесконечном цикле
- 0Применение CSS к отдельным словам в поле ввода текста
- 1Как установить компоненты платформы Android в автономном режиме?
- 0Ошибка компоновщика при использовании кода C ++ в приложении iPad
- 0C ++ Linked List: узел внутри другого узла
- 0Возврат нескольких значений в одном столбце из другой таблицы
- 1Почему я не могу включить символ «£» в мою психопию.TualStim?
- 0JQuery переключатель раскрывающегося меню
- 1Запрос Oracle внутри Java
- 1Возвращение логических значений в методе C #
- 0Как проверить, существует ли значение в столбце с помощью Microsoft Visual Studio 2010
- 0Попытка сохранить изображение, содержащееся слева
- 0Когда div появляется в окне просмотра, прокрутите вверх
- 1Номер уведомления отображается не на всех телефонах
- 1DNS.GethostEntry Невозможно получить адрес удаленной машины ipv6
- 1java.lang.invoke.MethodHandleStatics.newInternalError (MethodHandleStatics.java:97)
- 0Разработка темы Magento из файлов базовой темы?
- 0аутентификация пользователя с использованием сеансов вызывает цикл перенаправления
- 1firebase.auth.currentUser возвращает ноль, пока не введете что-либо в форму
- 1MultipartConfig аннотация / сервлет конфигурации
- 0Angular-strap: HTML-элемент отображается как текст, почему?
- 0не понимаю разницу между плагином и скриптом
- 0Отзывчивое наложение пустого изображения на изображение
- 0Разбор значения из фрагмента HTML с использованием PHP
- 1Как добавить заголовок в Multicolumn ListView

