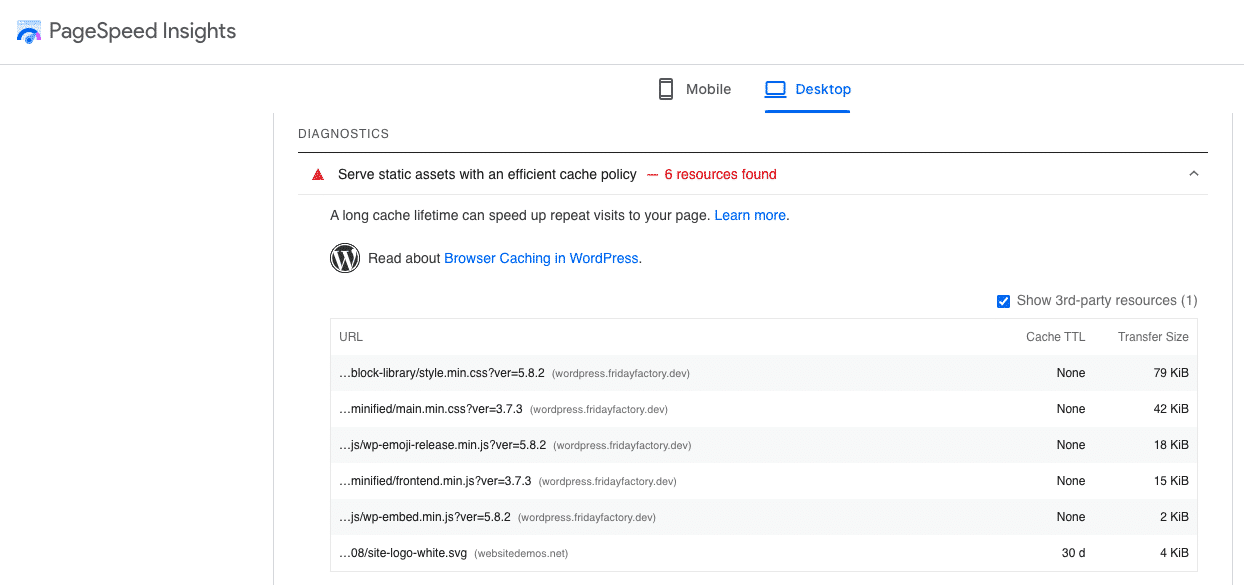
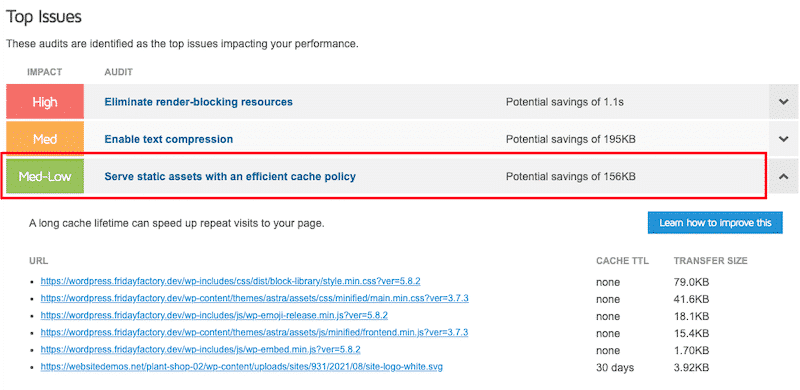
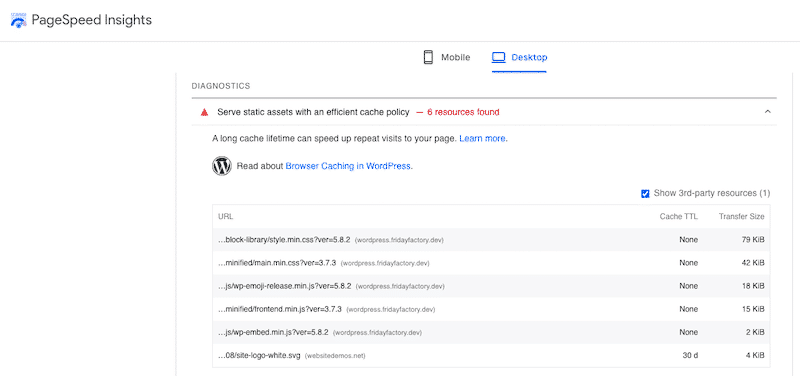
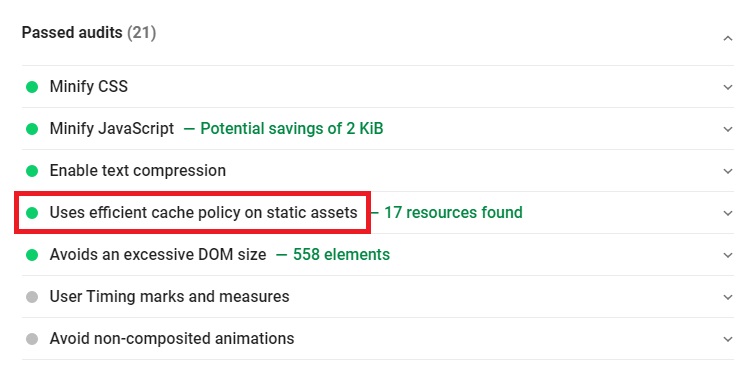
Google will flag your assets with the “Serve static assets with an efficient cache policy” warning when they have a cache length that’s too short. Google requires that your assets (images, fonts, JS, CSS) have a cache expiry time, also referred to as cache TTL, of at least 30 days or more. Follow the steps and tips below to fix the warning.
Fix the “Serve static assets with an efficient cache policy” warning
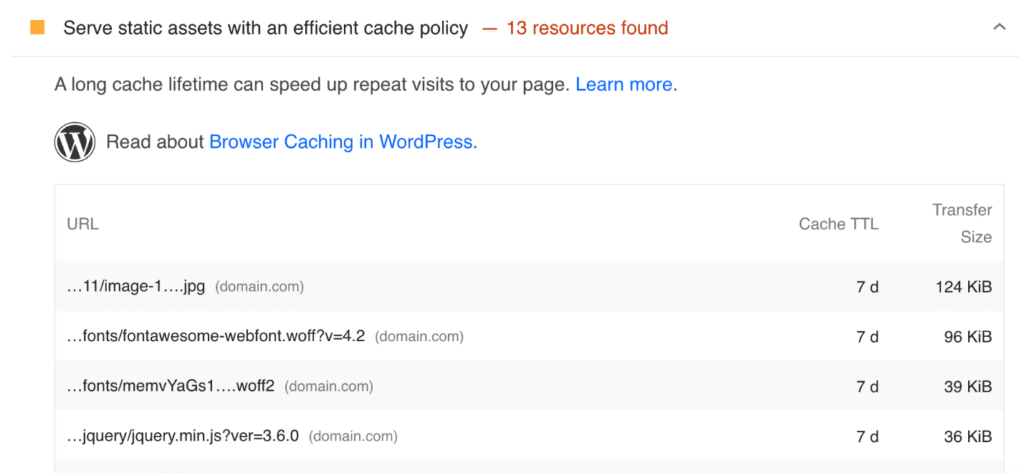
A brand new site (not optimized) will typically have a cache TTL of 7 days on its assets, immediately triggering the cache warning in Google PageSpeed Insights. Caching is set on each asset with an HTTP header. There are different types, but the most commonly used HTTP header for caching is Cache-Control.
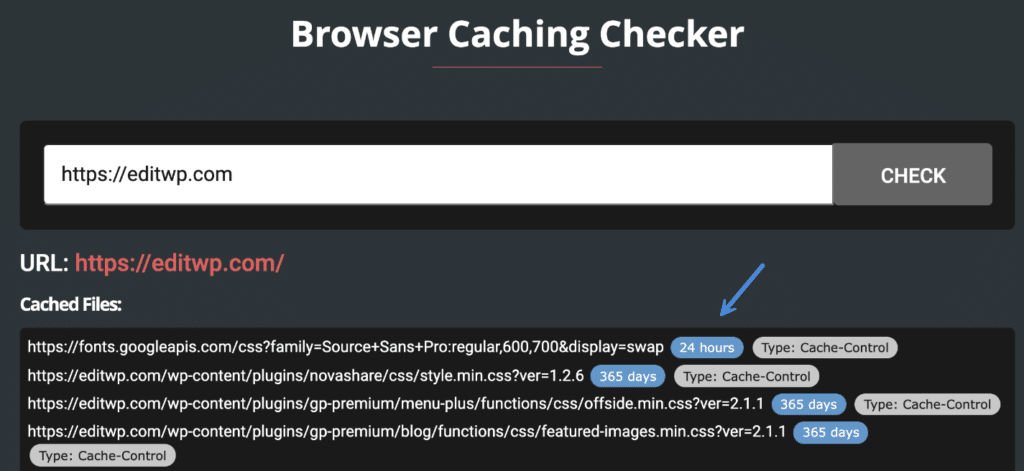
You can check the current value of the caching headers on your assets by using a free tool like GiftOfSpeed’s Browser Caching Checker. Google PageSpeed Insights will also tell you, but they usually only show you the top or worse offenders. Sometimes using another tool can be helpful to check all of your assets at once.
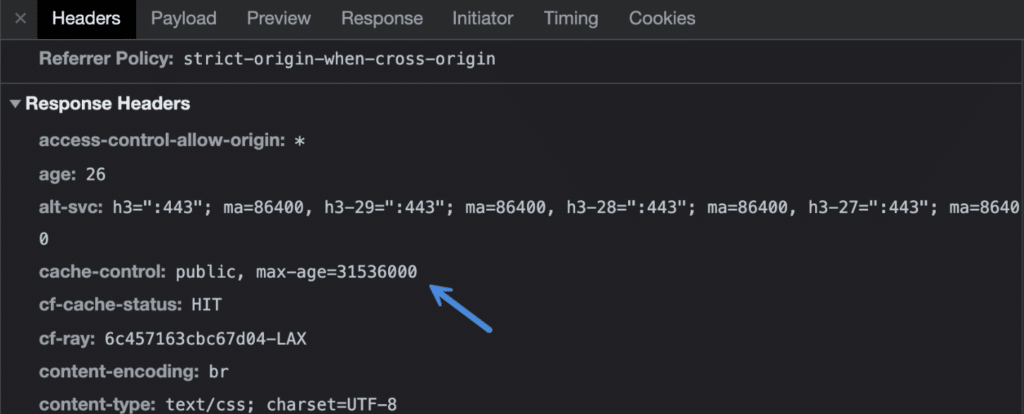
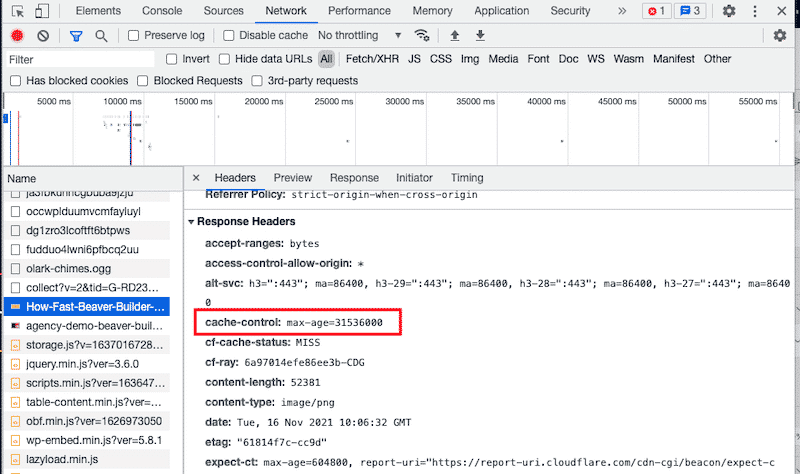
You can also use Chrome DevTools to look at your site’s headers.
cache-control header in ChromeDev Tools
Caching headers are typically placed on your site’s assets by a WordPress hosting provider, a CDN, or a caching plugin.
1. WordPress host
Think of your WordPress host as the base layer of caching. Typically they will have some sort of default cache or expiry time set on your assets. This is especially true if you’re using a managed hosting provider like Kinsta that has server-level caching out of the box.
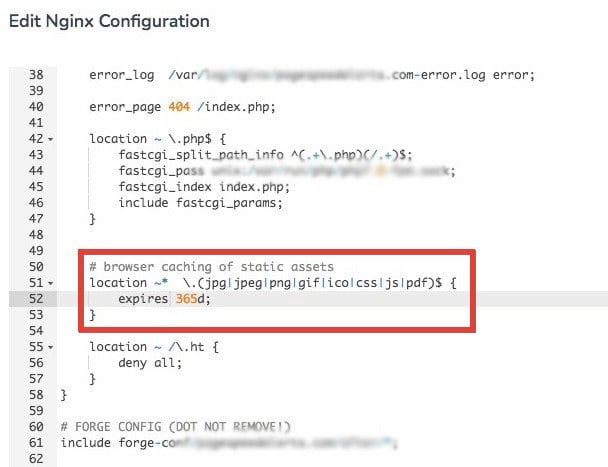
If you need to change your caching headers, you can reach out to your hosting provider. Otherwise, if you’re using a VPS or non-managed hosting provider, you can set the expires headers manually:
- How to add expires headers on Nginx server
- How to add expires headers on Apache server
With hosting providers, there are typically two different cache types. There is cache on your pages and cache on your assets. The “Serve static assets with an efficient cache policy” warning only applies to assets, not your page cache. Therefore, it’s OK to have a shorter page cache time.
2. CDN
The most common approach these days is for the caching headers to be set by your content delivery network (CDN). Your hosting provider might still be setting caching headers at the base layer, but a CDN will typically be the one visitors are getting. For example, if you’re using Cloudflare, they set your caching headers. And you can easily change the cache expiry time.
Under the “Caching” tab, click on the “Configuration” tab. Set your “Browser Cache TTL” to 1 month or higher. This will resolve any warnings from Core Web Vitals complaining that you need to serve static assets with an efficient cache policy.
The same goes for other traditional CDNs like KeyCDN, BunnyCDN, etc. They all provide easy options in their dashboards to change the caching length.
3. Caching plugin
If you aren’t using a managed WordPress host with caching at the server-level, or a CDN, you might need a WordPress caching plugin. A caching plugin will usually set the appropriate caching headers for you automatically.
We recommend the following caching plugins (both of these work great alongside Perfmatters):
- WP Fastest Cache (free)
- WP Rocket (premium)
Additional tips
Here are some additional tips to ensure you don’t get the warning from PageSpeed Insights.
Third-party assets (scripts)
You might see the “Serve static assets with an efficient cache policy” warning on third-party assets or scripts. Since you don’t control their servers, you can’t change the cache length time. However, there are a few ways to fix the warnings still.
For example, the Google Analytics script has a short cache length by design. But you could host Google Analytics locally with Perfmatters. This means your local caching headers would automatically get applied and fix the warning.
Another example would be when using third-party pixels, like Facebook or Bing. You could delay the JavaScript on user interaction (scrolling, moving mouse, etc.) with Perfmatters. This would also resolve the warning.
Another example would be that perhaps that scripts shouldn’t be loading on the page or post you’re testing at all. In this case, you could disable it with the Script Manager in Perfmatters.
Longer is better
Longer cache times lead to improved site performance, and better cache HIT ratios. Therefore, an easy way to boost performance is simply making your cache expiry times longer. For ecommerce sites, we typically recommend 1 month. For blogs, we recommend much longer. We actually use 1 year on our blogs.

PageSpeed Insights wants you to serve static assets with a cache policy of 31536000 seconds (equivalent to 1 year).
The first step is to learn which files need to be fixed which you can see in PSI or a browser caching checker. If the files are served by a third-party domain like Google Analytics or Tag Manager, you should host them locally (so you can control the cache policy) or delay them. Perfmatters, Flying Scripts, and some cache plugins can host files locally and delay JavaScript.
If files are already hosted locally but you still get errors, you’ll need to find settings in your hosting account or .htaccess to edit cache expirations. Do a Google search for “static cache expiration [your host]” to look for instructions (for example, see instructions for Cloudways and Kinsta). Some hosts will require you to change the cache expiration by editing .htaccess.
CDNs and some cache plugins do this too. Cloudflare has a setting to increase browser cache TTL to 1 year. LiteSpeed Cache and W3 Total Cache have a setting to change the browser cache TTL. Otherwise, you’ll need to change it in your server settings or .htaccess to fix this item in PSI. If everything else fails, contact your host since cache expirations are usually set at a server level.
1. Learn Which Files Need Longer Cache Expirations
Browser caching checker shows a list of assets with their expiration time.
You can immediately see whether short cache expiration times are caused by assets served from your domain, your CDN, or third-party domains like Google Fonts and Google Analytics.

2. Increase Browser Cache TTL In Cloudflare
Assuming you’re using Cloudflare’s CDN by activating the orange cloud to proxy traffic, you can set browser cache TTL to “1 year” in the Cloudflare dashboard under Caching → Configuration.
Other CDNs usually have a similar option. For example, BunnyCDN can change browser cache expiration time to 1 year under Pullzone → Your Website → Cache → Browser Cache Expiration.
3. Increase Browser Cache TTL In WP Rocket
WP Rocket doesn’t have a browser cache TTL setting. Instead, they add cache expirations to your .htaccess file automatically, which looks like this:
# Expires headers (for better cache control)

ExpiresActive on
    ExpiresDefault                              "access plus 1 month"
    # cache.appcache needs re-requests in FF 3.6 (~Introducing HTML5)
    ExpiresByType text/cache-manifest           "access plus 0 seconds"
    # Your document html
    ExpiresByType text/html                     "access plus 0 seconds"
    # Data
    ExpiresByType text/xml                      "access plus 0 seconds"
    ExpiresByType application/xml               "access plus 0 seconds"
    ExpiresByType application/json              "access plus 0 seconds"
    # Feed
    ExpiresByType application/rss+xml           "access plus 1 hour"
    ExpiresByType application/atom+xml          "access plus 1 hour"
    # Favicon (cannot be renamed)
    ExpiresByType image/x-icon                  "access plus 1 week"
    # Media: images, video, audio
    ExpiresByType image/gif                     "access plus 4 months"
    ExpiresByType image/png                     "access plus 4 months"
    ExpiresByType image/jpeg                    "access plus 4 months"
    ExpiresByType image/webp                    "access plus 4 months"
    ExpiresByType video/ogg                     "access plus 4 months"
    ExpiresByType audio/ogg                     "access plus 4 months"
    ExpiresByType video/mp4                     "access plus 4 months"
    ExpiresByType video/webm                    "access plus 4 months"
    # HTC files  (css3pie)
    ExpiresByType text/x-component              "access plus 1 month"
    # Webfonts
    ExpiresByType font/ttf    "access plus 4 months"
    ExpiresByType font/otf    "access plus 4 months"
    ExpiresByType font/woff   "access plus 4 months"
    ExpiresByType font/woff2  "access plus 4 months"
    ExpiresByType image/svg+xml                 "access plus 1 month"
    ExpiresByType application/vnd.ms-fontobject "access plus 1 month"
    # CSS and JavaScript
    ExpiresByType text/css                      "access plus 1 year"
    ExpiresByType application/javascript        "access plus 1 year"
The problem is that even when you change the expiration values to 1 year, WP Rocket automatically regenerates the .htaccess file once you save changes. Which means, it won’t save.
You can try adding custom rules to your .htaccess file or WP Rocket also recommends checking with your host to make sure they don’t block WP Rocket rules and that Mod_expires is enabled.
If you don’t know how to edit .htaccess, use the Htaccess File Editor plugin.
4. Increase Browser Cache TTL In Other Cache Plugins
LiteSpeed Cache and W3 Total Cache let you change browser cache TTL in the settings. You’ll see it in LiteSpeed Cache in Cache → Browser → Browser Cache TTL. In W3 Total Cache, it’s found in Browser Cache → Expires Header Lifetime (do this for CSS, JS, fonts, and media files).
5. Search “Static Cache Expiration Instructions” For Your Host
This step is important because the cache expiration in your server usually overrides that of CDNs. (i.e. Cloudflare’s browser cache TTL respects those in your server unless they’re higher).
Instructions
- Cloudways instructions
- Kinsta instructions
Follow KeyCDN’s tutorial when using Apache or Nginx which explains why you need both cache-control and expires headers, and how to add them to Apache (.htaccess) or Nginx (server block).
Nginx Cache-Control Headers
location ~* .(png|jpg|jpeg|gif)$ {
    expires 365d;
    add_header Cache-Control "public, no-transform";
}

location ~* .(js|css|pdf|html|swf)$ {
    expires 30d;
    add_header Cache-Control "public, no-transform";
}
Nginx Expires Headers
location ~* .(jpg|jpeg|gif|png)$ {
    expires 365d;
}

location ~* .(pdf|css|html|js|swf)$ {
    expires 30d;
}
Apache Cache-Control Headers
<filesMatch ".(ico|pdf|flv|jpg|jpeg|png|gif|js|css|swf)$">
    Header set Cache-Control "max-age=2592000, public"
Apache Expires Headers
## EXPIRES CACHING ##

    ExpiresActive On
    ExpiresByType image/jpg "access 1 year"
    ExpiresByType image/jpeg "access 1 year"
    ExpiresByType image/gif "access 1 year"
    ExpiresByType image/png "access 1 year"
    ExpiresByType text/css "access 1 month"
    ExpiresByType text/html "access 1 month"
    ExpiresByType application/pdf "access 1 month"
    ExpiresByType text/x-javascript "access 1 month"
    ExpiresByType application/x-shockwave-flash "access 1 month"
    ExpiresByType image/x-icon "access 1 year"
    ExpiresDefault "access 1 month"

## EXPIRES CACHING ##
6. Delay Third-Party Code
Delaying JavaScript can fix cache policy errors caused by third-party code.
If your PageSpeed or Browser Caching Checker report includes external domains (Google Analytics, Tag Manager, FB Pixel, etc), delaying JavaScript will improve core web vital scores.
While WP Rocket and LiteSpeed Cache do this automatically, you have to manually do it in Perfmatters, FlyingPress, and Flying Scripts (free). Check their documentation or see this list of common JavaScript files to delay. You can also try delaying plugins loading below the viewport.
Common JavaScript Files To Delay
ga( '
ga('
google-analytics.com/analytics.js
analytics.js
gtagv4.js
analytics-minimal.js
/gtm.js
/gtag/js
gtag(
/gtm-
adsbygoogle.js
grecaptcha.execute
fbevents.js
fbq(
/busting/facebook-tracking/
wp-content/plugins/plugin-name
7. Host Fonts/Analytics Locally (So You Can Control Them)
Google Fonts and Google Analytics create external requests to third-party domains like fonts.gstatic.com and www.google-analytics.com. Hosting each of these locally is faster because not only does it prevent external requests, but you can control their cache expiration.
Perfmatters has settings to host fonts and analytics locally. It even has settings to reduce the size of your Google Analytics tracking code by using a smaller a script type (like analytics-minimal.js) and disabling remarketing features to prevent a second request to Doubleclick.
Some cache plugins also do it (WP Rocket hosts analytics locally but not fonts… FlyingPress hosts fonts locally but not analytics). There are also free plugins like OMGF and Flying Analytics.
8. Disable Cloudflare Email Obfuscation + Rocket Loader
Email Obfuscation adds a small piece of JavaScript (email-decode.min.js) as well as Rocket Loader (rocket-loader.min.js). Since they’re loaded from external domains, you might get errors.
I don’t recommend Rocket Loader since it’s notorious for breaking sites, and there are other ways to hide your email than using Rocket Loader, so disable them in your Cloudflare settings.
9. Purge Files And Retest Your Site
Once you’re done changing the cache expiration, purge files and retest your site. Remember that Lighthouse can take 28 days to update, so you may want to try SpeedVitals or GTmetrix.
How do I serve static assets with an efficient cache policy in WordPress?
Change browser cache expiration to 1 year (31536000 seconds). This is typically done in your hosting account, cache plugin, or CDN settings, or by editing these values in your .htaccess file. Hosting fonts/analytics locally and delaying third-party code can also help.
How do I serve static assets with an efficient cache policy in WP Rocket?
Since WP Rocket adds cache expirations to .htaccess (but regenerates it when you save settings), errors for serving static assets with an efficient cache policy are common. You might have better luck changing the cache expirations in your hosting and CDN settings.
How do I serve static assets with an efficient cache policy in Cloudflare?
Login to your Cloudflare dashboard and go to Caching → Configuration → Browser Cache TTL where you’ll change it to 1 year.
Cheers,
Tom
Do you want to know how to easily fix the leverage browser caching warning in your WordPress site? You are at the right place. Google PageSpeed Insights is a useful tool for measuring website performance, but it’s possible to be intimidated by some of its suggestions. The “Leverage browser caching” recommendation has recently been changed to “Serve static assets with an efficient cache policy”.
How to fix this warning for your WordPress site?
In this article, we will share several optimization techniques you can follow, and we’ll also explain what “Leverage Browser Caching” is. Finally, a performance test will also be conducted before and after using WP Rocket to see how easy it is to improve your Google PageSpeed score and address the browser caching issue.
What Browser Caching is and How it Works
Browser Caching Explained in Plain English
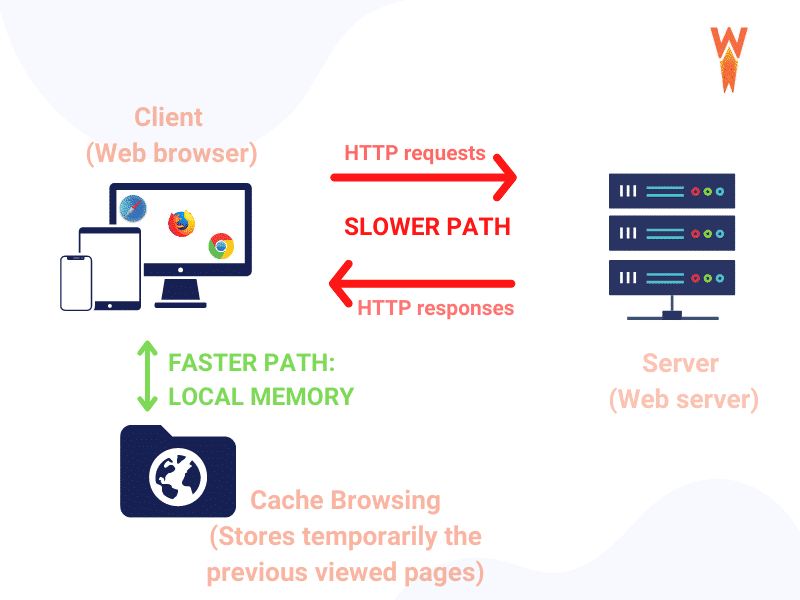
Implementing browser caching will help to reduce the server load by reducing the number of requests per page. Caching allows recent web pages to be stored temporarily in the web browser of your visitors.
Speeding up your web page loading can be accomplished with browser caching, which stores the frequently accessed resources on local memory for faster access. All the requests are running locally rather than being sent over a network connection. As a result, your HTML pages and images are rendered faster, reducing bandwidth usage and server load.
To activate caching in the browser, we will be looking at both “Expires” and “Cache-Control” headers:
“Cache-Control” header: it’s more detailed and gives fine-grained options to control the caching behavior of the browser.
How to Check if Browser Caching is Enabled on Your Site
To check if browser caching is enabled on your WordPress site, go to Google PageSpeed Insights and run the audit with the URL of your site. If you see the “Serve static assets with an efficient cache policy” warning, then that means you are not using a cache.
Similarly, you can use GTmetrix to check if the browser caching is activated:
Finally, you can also use the “Network” tab in Chrome’s developer tools. Simply select the page that you want to analyze and check the “Headers” tab:
What Does Serve Assets With an Efficient Cache Policy Mean on PageSpeed Insights?
“Leverage Browser Caching” was a recommendation in version 4 of the PageSpeed Insights API, which was shut down in May 2019. Since Version 5, real-world data from the Chrome User Experience Report and lab data are coming from Lighthouse, which replaced the diagnostic with the “Serve assets with an efficient cache policy” warning.
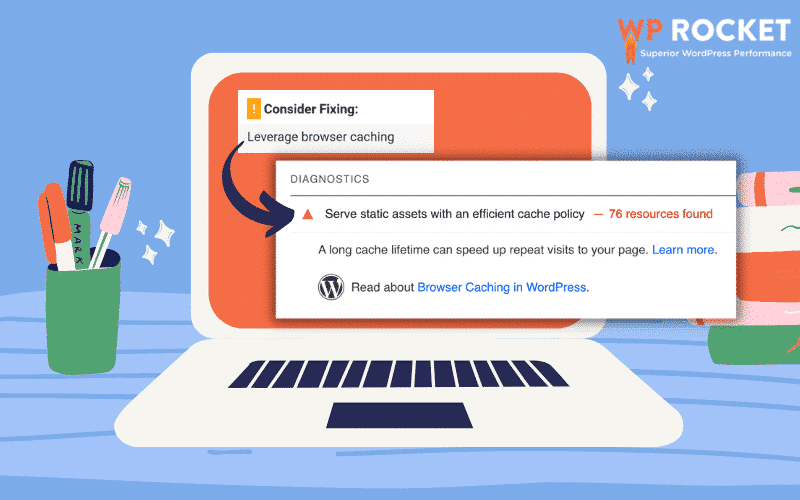
“Leverage Browser Caching” (2019) → “Serve assets with an efficient cache policy” (2021)
Why Do You See the “Serve Static Assets With An Efficient Cache Policy” Issue?
Leverage browser caching means that you should specify how long web browsers should keep your files stored locally – on the visitor’s browser. There are two headers involved in browser caching, namely “Cache-Control” and “Expires”. If you see the Lighthouse’s issue, that means that both headers are missing or that their expiration period is too short.
– The resource is a font, image, media file, script, or stylesheet
– The resource has a 200, 203, or 206 HTTP status code
– The resource doesn’t have an explicit no-cache policy
There are three main reasons why Lighthouse flags your WordPress site with that issue, namely:
1. Leverage Browser Caching for Google Analytics and Tag Manager
Google Analytics is the most popular tool when it comes to statistics of your WordPress site. However, the code in the “analytics.js” file goes back and forth to Google’s server, so the browser treats it every time as a new external resource. Google has set a 2 hours cache policy that is too short for Lighthouse, which triggers the warning.
2. Leverage Browser Caching for Other Third-Party and External Scripts
Sometimes, you may use plugins that require adding some additional scripts from another server, such as a YouTube video or your Instagram feed. Some plugin authors have set up a cache policy on their scripts.
3. Nginx Servers Where The Expiry Headers Are Not Properly Set
Nginx is the king of the servers to deliver content quickly. The thing is, Nginx does not use a .htaccess file, so you need to add the configuration for both headers in the main server block if you want Nginx to read them. If you don’t do that, Nginx (and Lighthouse) will not detect the expiry data properly.
To leverage browser caching on WordPress also means an improvement in the loading speed of your website because the files don’t need to be “re-downloaded”. To make things easier, we have put together a list of techniques you can use to fix leverage browser caching warnings (with and without a WordPress plugin).
How to Serve Assets With an Efficient Cache Policy with a Plugin
The easiest way to leverage browser caching is to do it with a WordPress plugin such as:
- WP Rocket is one of the best caching plugins for WordPress, allowing you to leverage browser caching in WordPress.
WP Rocket sets the optimal expiration lengths for certain files by adding some rules via the .htaccess file.
Note: WP Rocket will work automatically on Nginx servers, but you can add some extra configuration from Github. It will add headers to cache CSS, JS, and images to leverage the browser’s cache by reducing requests to your web server.
🚀 WP Rocket automatically applies the necessary “Expires” header rules in the .htaccess file
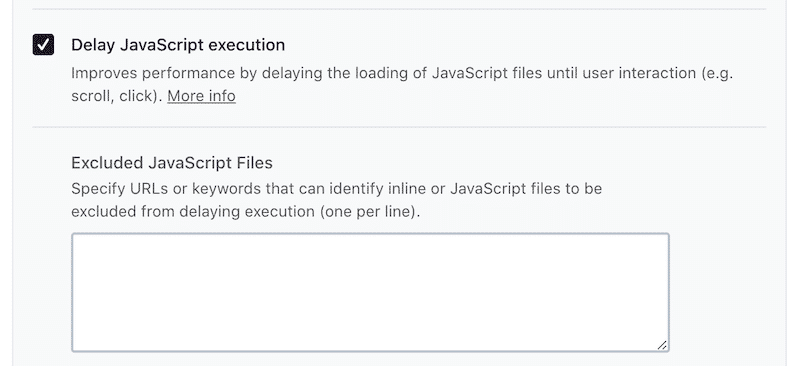
WP Rocket also comes with the Delay JavaScript option that optimizes the loading of 3rd party scripts. We can compare it as Lazy Loading but for JavaScript. WP Rocket will delay any JS scripts until there is user interaction with the web page:
Another benefit of WP Rocket is the list of compatibility exclusions to spare you the hassle of figuring out what should or shouldn’t be hosted.
- The Leverage Browser Caching plugin – limited to Apache/LiteSpeed servers where the browser cache can be controlled by using the .htaccess file (it does not work with Nginx servers). There are no options that need to be activated. It works immediately upon the activation of the plugin. It simply adds the browser caching code inside the .htaccess file.
- Complete Analysis Optimization Suite (CAOS) – fixes GA leverage browser caching warning in WordPress by hosting the analytics.js/gtag.js file locally. By default, Google sets the expiration at 2 hours, and the plugin simply overrides this setting. Note that CAOS won’t work with any other GA’s related plugin.
How to Serve Assets With an Efficient Cache Policy Without a Plugin
There are a few techniques you can use to set up your static asset cache manually. The first thing you need to do is figure out which web server is used for serving files on the website, then follow these instructions accordingly:
1. Add “Cache-Control” and “Expires” Headers in Nginx
First, find your server block usually located at /etc/nginx/site-enabled/default.
Then, add the following code snippets with the number of days until expiration next to the “expires” line:
“Cache-Control” header in Nginx:
location ~* .(png|jpg|jpeg|gif)$ {
    expires 365d;
    add_header Cache-Control "public, no-transform";
}

location ~* .(js|css|pdf|html|swf)$ {
    expires 30d;
    add_header Cache-Control "public, no-transform";
}
“Expire” header in Nginx:
location ~* .(jpg|jpeg|gif|png)$ {
    expires 365d;
}

location ~* .(pdf|css|html|js|swf)$ {
    expires 30d;
}
2. Add Cache-Control Header in Apache
For Apache servers, simply put the following code in your .htaccess file:
<IfModule mod_expires.c>
  ExpiresActive On

 # Images
  ExpiresByType image/jpeg "access plus 1 year"
  ExpiresByType image/gif "access plus 1 year"
  ExpiresByType image/png "access plus 1 year"
  ExpiresByType image/webp "access plus 1 year"
  ExpiresByType image/svg+xml "access plus 1 year"
  ExpiresByType image/x-icon "access plus 1 year"

  # Video
  ExpiresByType video/webm "access plus 1 year"
  ExpiresByType video/mp4 "access plus 1 year"
  ExpiresByType video/mpeg "access plus 1 year"

  # Fonts
  ExpiresByType font/ttf "access plus 1 year"
  ExpiresByType font/otf "access plus 1 year"
  ExpiresByType font/woff "access plus 1 year"
  ExpiresByType font/woff2 "access plus 1 year"
  ExpiresByType application/font-woff "access plus 1 year"

  # CSS, JavaScript
  ExpiresByType text/css "access plus 1 year"
  ExpiresByType text/javascript "access plus 1 year"
  ExpiresByType application/javascript "access plus 1 year"

  # Others
  ExpiresByType application/pdf "access plus 1 year"
  ExpiresByType image/vnd.microsoft.icon "access plus 1 year"
</IfModule>
You can find those code snippets directly on Github or GTMetrix.
3. Self-host 3rd Party Scripts When Possible
Third-party scripts are the calls made on an external server instead of yours. The most common external scripts include advertising tags, YouTube videos, Google Maps, and web fonts.
You can increase the performance of your website by hosting third-party scripts on your server. Hosting them helps you reduce DNS lookups, round trip times and improves HTTP caching headers with advanced features like HTTP/2 server push.
Important note: Not all 3rd party scripts can be self-hosted, and some might even break if they are. Self-hosted is recommended only if any critical scripts depend upon it (e.g., jQuery). It’s acceptable not to have all 3rd party scripts with a proper browser cache policy; the performance gain is negligible when it’s just a few of them.
4. Reduce Third-Party Scripts
You may be in control of your Google PageSpeed Insights score, but third-party scripts on the page can cause problems as we don’t know what their caching policies are like. Also, all these elements have to be downloaded from different servers, which can cause performance issues, as your server needs to connect to multiple servers to download them.
While you can’t have full control over those scripts, you can still minimize their effects on your WordPress site by applying those four optimization techniques:
- Minify/Combine CSS and Minify/Combine JS – the files hosted on external domains will be processed and hosted on your own domain. Use a tool like minifycode.com to minify your code.
- Delay the execution of external JavaScript – to reduce its negative performance impact. Use the defer and async attribute to delay JS.
- Optimize Google Fonts – it does improve the performance (but does not host fonts locally).
- LazyLoad your images and videos – this will improve the performance of externally hosted images and videos. You can find more about the lazy loading script in our dedicated guide.
Do you want to apply those four techniques in a couple of clicks instead?
Let WP Rocket do the job for you!
5. Use Cloudflare browser cache Time To Live (TTL)
Cloudflare offers a CDN with 250 servers distributed internationally. The free service caches content for its users, while paid customers can customize how long their data is served up in the global cache. By default, Cloudflare honors the expiration date set in an Expires header and Cache-Control settings, but you can also specify a different time range if desired. When the TTL expires, the browser will request the asset again.
How to Easily Serve Assets With an Efficient Cache Policy With WP Rocket
Thanks to WP Rocket, it’s very easy to get rid of the browser caching warning on Google PageSpeed Insights. The plugin sets the best expiration lengths for each file by adding automatic rules via the .htaccess file.
Let’s see it in action.
I’ve created a web page on WordPress containing some text modules, images, and third-party content (a YouTube video and my Instagram feed).
We will run the two following scenarios:
Scenario #1 – Performance score and analysis of the diagnostics and opportunities sections (no WP Rocket).
Scenario #2 – Performance score and analysis of the diagnostics sections (🚀 with WP Rocket).
Performance tool used – I will use Google PageSpeed Insights (Lighthouse) to measure our speed and performance.
Device – I’ll present results on mobile.
Let’s dive in!
Scenario #1 – Performance score and analysis of the diagnostics and opportunities sections (no WP Rocket)
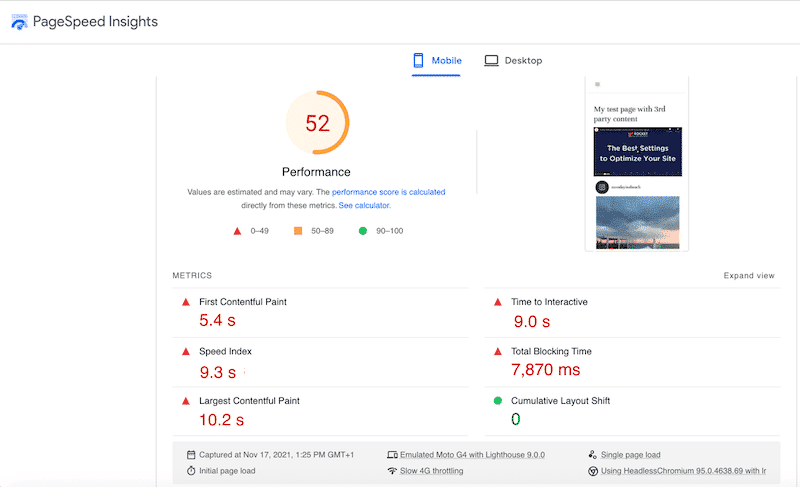
My overall performance score is 52/100 on mobile, and one of my Core Web Vitals is red (Largest Contentful Paint). Other metrics such as Speed Index, Time to Interactive, First Contentful Paint, and Total Blocking Time are red.
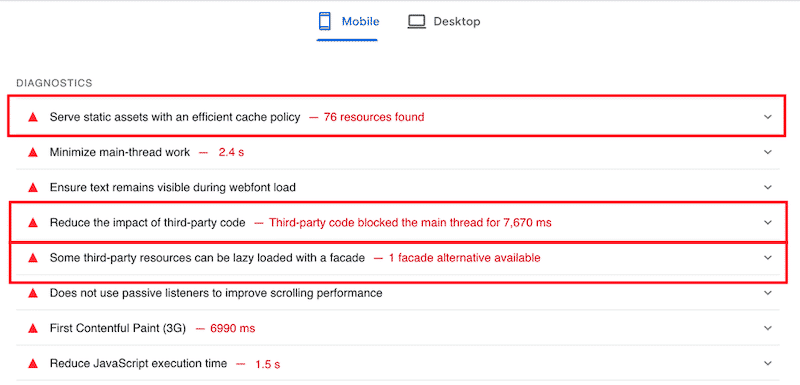
In the diagnostics section below, we can see that Lighthouse is making a few recommendations to improve my performance score:
I can see three familiar recommendations:
- Serve static assets with an efficient cache policy (previously knowns as “Leverage Browser Caching” )
- Reduce the impact of third-party code
- Some third-party resources can be lazy-loaded with a facade
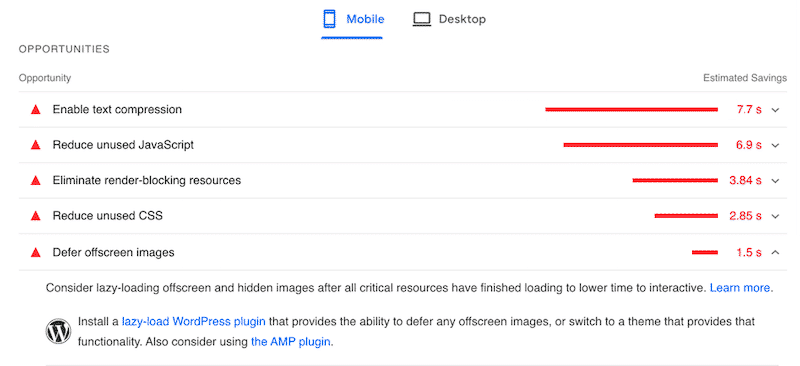
In the opportunities section, Lighthouse also tells me to enable text compression, optimize my JS/CSS code, and defer offscreen images to optimize my performance.
Now let’s activate WP Rocket to see if those performance-related warnings disappear.
Scenario #2 – Performance score and analysis of the diagnostics section (🚀 with WP Rocket)
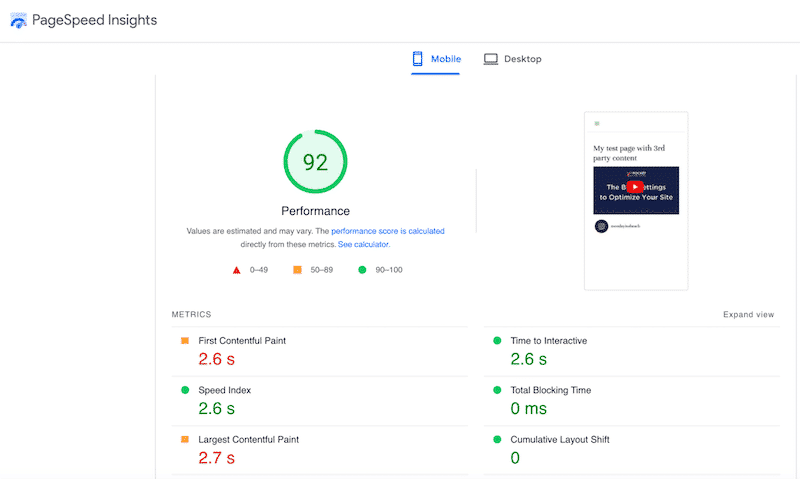
My performance is much better when WP Rocket is activated. My score on mobile went from 52/100 to 92/100, and none of my metrics are in the red anymore:
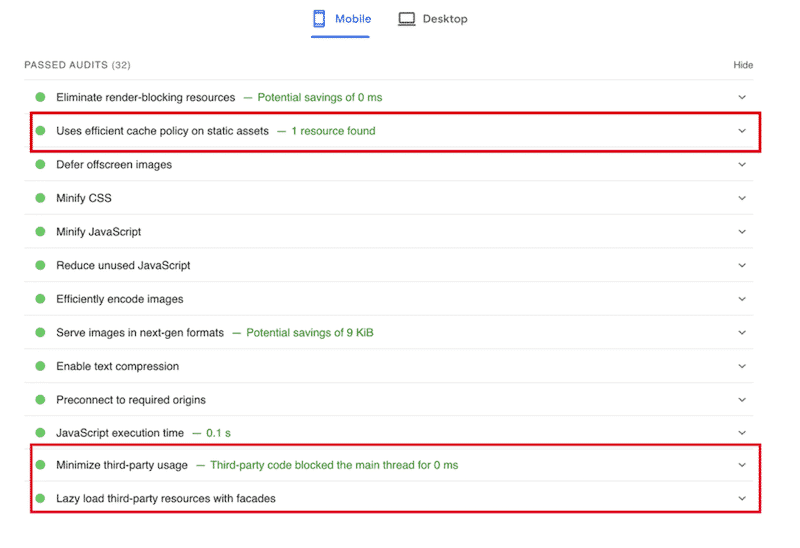
And last but not least: all my PSI issues got solved just by enabling WP Rocket! The following warnings, “uses an efficient cache policy” (previously known as leverage browser caching) “Minimize third-party usage” and “Lazy load third-party resources with facade” are now in the passed audits section:
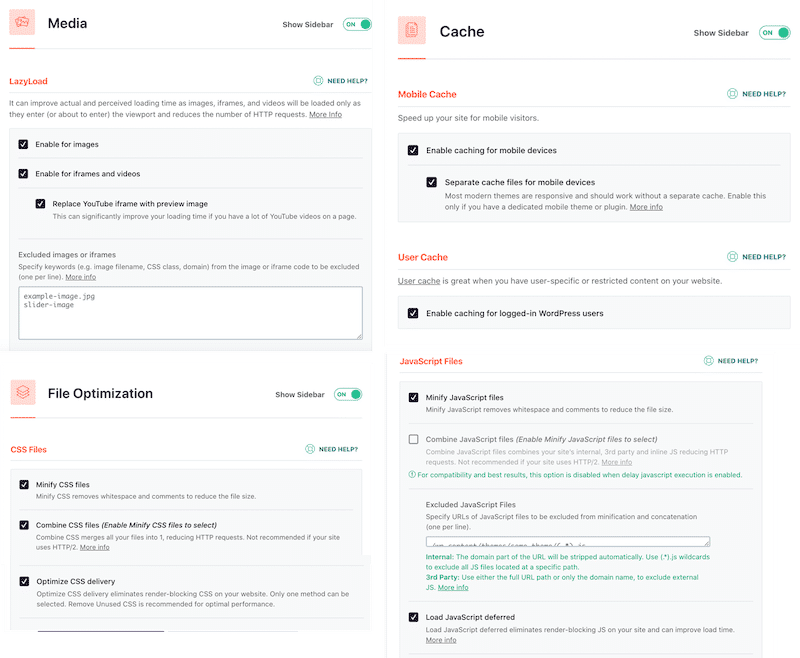
As a side note, WP Rocket also fixed other performance issues. Upon activation, I managed to minify my CSS/JS, lazy load my images, reduce my unused CSS and JS files, delay the non-critical JS and enable text compression.
Wrapping Up
Caching is crucial to ensure that your webpage loads fast for returning users. We’ve seen some manual techniques you can use to fix the leverage browser caching issue on WordPress, mainly by adding lines of code to your .htaccess file. But if you want to save time, let WP Rocket complete all the optimization process for you.
So you can automatically go from this:
To this:
WP Rocket will apply 80% of web performance best practices upon its activation, as seen in our previous section’s performance audit.
Give it a try today, and if you don’t see any improvements, you get a refund within 14 days of your purchase. See? You don’t take any risk! Simply activate WP Rocket and speed up your site right away!
The “Serve static assets with an efficient cache policy” or “Leverage browser caching” is one of the metrics used by Google PageSpeed Insights and similar website performance testing tools as a suggestion to improve page loading times. In short, leverage browser storage to speed up your website!
The warning indicates that the website doesn’t have an efficient cache policy, which means it’s not using the browser storage to cache static resources like images, CSS, JS, etc. You need to fix the warning to improve page load times on repeat visits by storing these files locally in the user’s browser.
By setting browser caching rules, you can specify how long web browsers should keep your website’s static assets (images, CSS, JS, etc.) stored locally. And the user’s browser will download less data while navigating through pages, which will improve the page loading speed of your website.
Browser caching will surely help your website to reduce bandwidth consumption and the number of server requests. And that’s why it’ll improve the user experience and SEO (Search Engine Optimization) rankings of your site as loading speed is one of the ranking factors for search rankings.
In this tutorial, we’ll learn to fix the browser caching warning by setting up an efficient cache policy in the Apache (through .htaccess file) and Nginx (through nginx.conf file) servers.
Fix Leverage Browser Caching Warning in Apache
You can easily fix the leverage browser caching warning in Apache servers by putting custom rules to the .htaccess file. You can find the .htaccess file in your website’s root folder.
Here are the custom rules for the .htaccess file to fix the browser caching issue for the static files or serve static assets with an efficient cache policy for your website:
## Different Content Types
<IfModule mod_mime.c>
    AddType text/css .css
    AddType application/x-javascript .js
    AddType application/json .json
    AddType text/xml .xml
    AddType image/gif .gif
    AddType image/jpeg .jpe .jpg .jpeg
    AddType image/png .png
    AddType image/svg+xml .svg
    AddType image/x-icon .ico
    AddType image/webp .webp
    AddType audio/ogg .ogg
    AddType audio/mpeg .mp3 .m4a
    AddType video/mp4 .mp4 .m4v
    AddType video/webm .webm
    AddType application/pdf .pdf
    AddType application/font-woff .woff
    AddType application/font-woff2 .woff2
    AddType application/vnd.ms-fontobject .eot
    AddType application/x-font-ttf .ttf
</IfModule>
## Set Browser Caching Expires Rules
<IfModule mod_expires.c>
    ExpiresActive On
    # Web files
    ExpiresByType text/css "access plus 1 year"
    ExpiresByType application/javascript "access plus 1 year"
    ExpiresByType application/x-javascript "access plus 1 year"
    ExpiresByType application/x-web-app-manifest+json "access plus 0 seconds"
    ExpiresByType application/xml "access plus 0 seconds"
    ExpiresByType application/atom+xml "access plus 1 hour"
    ExpiresByType application/rss+xml "access plus 1 hour"
    ExpiresByType text/cache-manifest "access plus 0 seconds"
    ExpiresByType text/xml "access plus 0 seconds"
    # Media files
    ExpiresByType image/gif "access plus 1 year"
    ExpiresByType image/jpg "access plus 1 year"
    ExpiresByType image/jpeg "access plus 1 year"
    ExpiresByType image/png "access plus 1 year"
    ExpiresByType image/svg "access plus 1 year"
    ExpiresByType image/svg+xml "access plus 1 year"
    ExpiresByType image/x-icon "access plus 1 year"
    ExpiresByType audio/ogg "access plus 1 year"
    ExpiresByType video/mp4 "access plus 1 year"
    ExpiresByType video/ogg "access plus 1 year"
    ExpiresByType video/webm "access plus 1 year"
    ExpiresByType application/pdf "access plus 6 months"
    ExpiresByType application/x-shockwave-flash "access plus 1 year"
    # Font files
    ExpiresByType application/font-woff "access plus 1 year"
    ExpiresByType application/font-woff2 "access plus 1 year"
    ExpiresByType application/vnd.ms-fontobject "access plus 1 year"
    ExpiresByType application/x-font-ttf "access plus 1 year"
    ExpiresByType font/opentype "access plus 1 year"
    # Other files
    ExpiresDefault "access plus 7 days"
</IfModule>
## Set Cache Control Header
<IfModule mod_headers.c>
    <FilesMatch ".(gif|jpeg|png|ico|css|js|swf)$">
        Header set Cache-Control "public"
    </FilesMatch>
</IfModule>
Add the lines in your .htaccess file and save the file after this. That’s it! This change will add an efficient cache policy for the static assets of your site. For example, the user’s browser will store the JavaScript files of your site for 1 year, and it’ll store PDF files for 6 months.
You can change the expiry times according to your needs. However, make sure that it’s not too long because your recurring visitors might not get the latest version of your site. You should not exceed 1 year cache expiration time period as most web browsers ignore them anyway!
If you retest the website with the Google PageSpeed Insights, GTmetrix, etc. after this, you’ll no longer see the “Serve static assets with an efficient cache policy” suggestion to fix!
From now on, your website visitors will get a better speed for repeat visits to your page since the browser has stored some of the content in the web cache as your direction! As a result, your website’s search rankings will improve as page speed is one of the search ranking factors.
Your website is hosted on an Nginx server? There are custom rules for the Nginx servers as well!
Fix Leverage Browser Caching Warning in Nginx
You can add expires header or efficient cache policy for the static assets in Nginx servers by adding these rules in the nginx.conf configuration file in the “/etc/nginx/sites-enabled/default” location:
location ~* .(html|css|js|xml|json|txt)$ {
   expires 1d;
   add_header Cache-Control "public";
}

location ~* .(png|jpg|jpeg|gif|svg|ico|woff|woff2)$ {
   expires 365d;
   add_header Cache-Control "public";
}
You can adjust the expiry date to whatever you wish in this code. If you change the “365d” to the “30d” value, the user’s browser will store .jpeg files for 30 days instead of 365 days.
And that’s it! The Nginx hosted site will no longer be asked to fix the leverage browser caching warning. The site will be much faster after this, and this will result in better search rankings.
Final Thoughts
Using browser storage is one of the best techniques to improve the page speed of your website. It’s applied to store static content like images, CSS, JavaScript, etc. to the user’s browser.
And as a result, users enjoy faster loading times as it cuts the HTTP requests by a lot. That’s why serving static assets with an efficient cache policy improves the search rankings.
You can fix the leverage browser caching warning in the Apache servers by putting custom rules to the .htaccess file and in the Nginx servers, it can be solved through nginx.conf file.
Liked this tutorial? Please share this tutorial far and wide! Have any other tips or questions about fixing the leverage browser caching? Let us know in the comments section below!
Caching is becoming the backbone of every website. Without caching your site will struggle to load faster, however, when a tool like Google PageSpeed Insight or GTmetrix suggests a warning “Serve Static Assets With An Efficient Cache Policy” you need to fix it quickly in order to load your site even faster.
In this post, we gonna go through some of the most effective tips to resolve this issue. Make sure you follow everything mentioned in this post to get a complete info.
Let’s jump right into it!
Contents
- 1 What Exactly Serve Static Assets With An Efficient Cache Policy Means
- 2 How To Fix Serve Static Assets With An Efficient Cache Policy
- 2.1 Solution 1: Adding Cache-Control And Expires Headers
- 3 Solution 2. CDN’s
- 4 Solution 3. Use Plugins
- 5 Solution 4. Fixing Google Analytics
- 6 Some Extra Tips
What Exactly Serve Static Assets With An Efficient Cache Policy Means
A few years back this issue was known as the Leverage Browser Caching Warning issue, so, don’t get confused between the “Serve Static Assets With An Efficient Cache Policy” and “Leverage Browser Caching Warning” issue because they both mean the same.
This issue is one of the many issues flagged by Google’s Pagespeed insight. Google suggests the things you need to fix to get a perfect score.
If your site has a short cache expiration for images, fonts, media, scripts, and stylesheets then this issue may appear.
Google fails the report if the cache expiration is under 259200 minutes or 180 days. This means you need to modify your cache expiration for those files to 180 days or more than that.
Caching, in a nutshell, means a software or hardware component directed at saving data so that later requests for the same data can be served quicker.
The central reason why caching was born is that accessing data from persistent memories takes a significant amount of time. So, whenever data is recovered or processed, it should be saved in more active memory.
We call such a memory cache, which can be considered as a high-speed data storage layer whose main goal is to decrease the need to access slower data storage layers. To be cost-effective and productive, caches must be comparatively small, especially if compared to regular memories.
This is why they are normally performed by using fast access hardware like RAM (Random-Access Memory) plus a software component.
However, every cached resource requires a specified expiration period. This instructs browsers when content on your site has become old, so it can substitute its cached copy with an updated version.
If you’re noticing this warning in speed tools results, it possible means one of two things:
- The Cache-Control or Expires headers are missing from your website’s server or that of a third party.
- The required headers are present, but the expiration period is too short and therefore doesn’t have a significant impact on performance.
This issue can be fixed in several ways, but here I’m only gonna show the most effective ways. Also, I’ll suggest some plugins as well so that beginners can also fix it this issue effectively.
Solution 1: Adding Cache-Control And Expires Headers
According to heroku.com, There are two primary cache headers: Cache-Control and Expires, and one of them must be present to enable browser caching on your website because it helps browsers decide for how long they should retain resources before refreshing them.
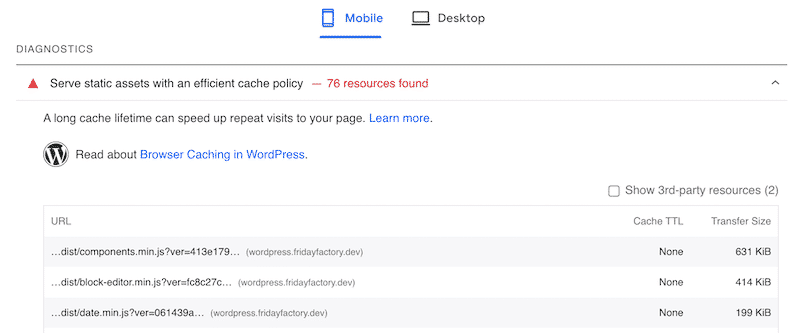
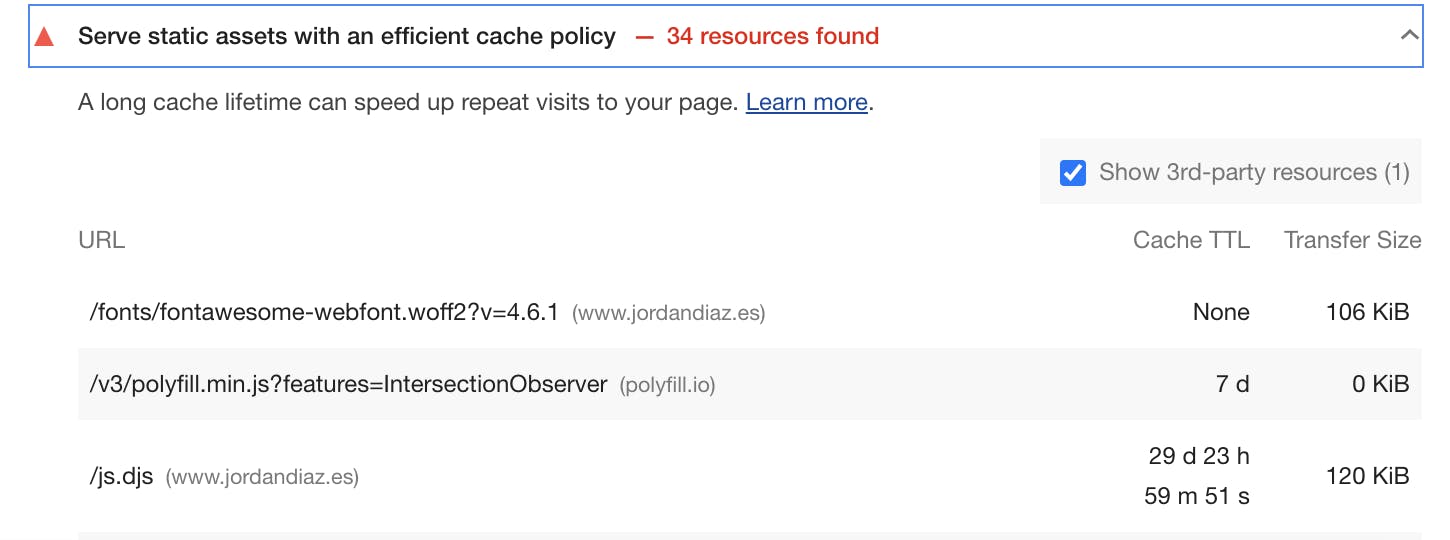
To find out whether this is causing this issue or not, you need to check Google’s Pagespeed result. Once the report is presented to you, you’ll see “None” listed under Cache TTL (If none of them is working).
Cache-control means an HTTP header used to define browser caching policies in both client requests and server responses. Policies cover how a resource is cached, where it’s cached and its maximum age before terminating (i.e., time to live).
While Expire headers Expires simply introduces a date from which the cached resource should no longer be counted/valid. From this date onward the browser will demand a fresh copy of the resource.
You don’t need to add both as this could be unnecessary. cache-Control is a better choice as it is more advanced and recommended by most webmasters.
If you’re using a premium hosting service, you may not need to worry about setting these headers as most premium web host uses NGNIX server and already include them.
Also, before proceeding be sure to back up your site before following the steps below, as editing .htaccess could break your site if you’re not careful.
NGNIX (Cache-Control Headers)
NGINX is open-source software for website serving, reverse proxying, caching, media streaming, load balancing, and more.
Adding Cache-Control headers in NGNIX is pretty simple, add the following code to your server’s configuration file:
location ~* .(js|css|png|jpg|jpeg|gif|svg|ico)$ {
 expires 30d;
 add_header Cache-Control "public, no-transform";
}
Once you save/update the file, it will tell the browsers that the files aren’t going to change for at least 30 days. The relevant files will be saved for that period of time before renewing them.
Apache (Cache-Control Headers)
If your host is using Apache serve then use the following code below to your .htaccess file.
Note: The code must be added before “#BEGIN WordPress” or after “#END WordPress”.
<filesMatch ".(ico|pdf|flv|jpg|jpeg|png|gif|svg|js|css|swf)$">
        Header set Cache-Control "max-age=84600, public"
</filesMatch>
According to Kinsta, the max-age should be 84,600 seconds, but yours could be different. In the above line of code, the max-age is set to 84,600 seconds.
NGNIX (Expires Headers)
To add expired headers to your NGNIX server, use the below code. You can notice that the time is set as per the file type. For images, it is 365 days and for CSS, JV, and HTML it is 2 days.
    location ~*  .(jpg|jpeg|gif|png|svg)$ {
        expires 365d;
    }

    location ~*  .(pdf|css|html|js|swf)$ {
        expires 2d;
    }
Apache (Expires Headers)
Visit your Apache servers .htaccess file and the code below:
## EXPIRES HEADER CACHING ##
<IfModule mod_expires.c>
ExpiresActive On
ExpiresByType image/jpg "access 1 year"
ExpiresByType image/jpeg "access 1 year"
ExpiresByType image/gif "access 1 year"
ExpiresByType image/png "access 1 year"
ExpiresByType image/svg "access 1 year"
ExpiresByType text/css "access 1 month"
ExpiresByType application/pdf "access 1 month"
ExpiresByType application/javascript "access 1 month"
ExpiresByType application/x-javascript "access 1 month"
ExpiresByType application/x-shockwave-flash "access 1 month"
ExpiresByType image/x-icon "access 1 year"
ExpiresDefault "access 2 days"
</IfModule>
## EXPIRES HEADER CACHING ##
Now, check your site in Google’s PageSpeed insight. See whether the issue is still there or not. Under Cache TTL you may see cache expiry/renewal days.
Solution 2. CDN’s
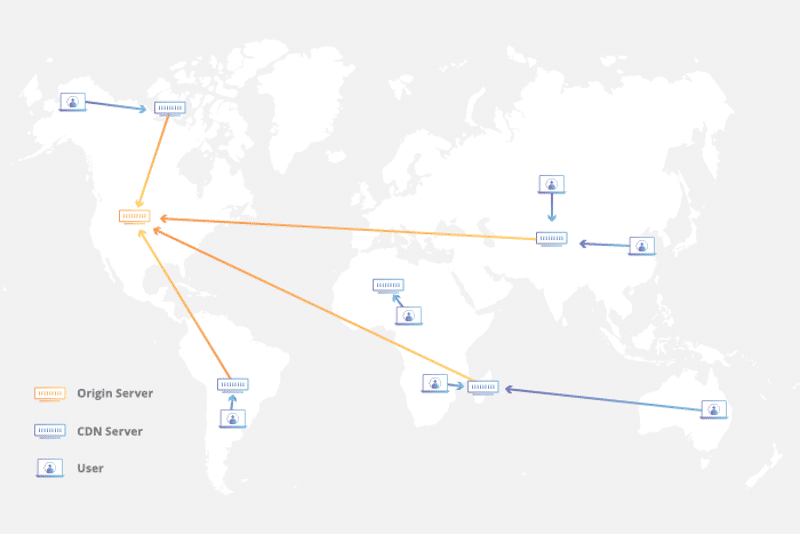
A content delivery network (CDN) is a combination of geographically distributed servers that speed up the performance of web content by bringing it closer to where visitors are. Data centers over the globe use caching, a process that temporarily saves copies of files so that you can reach internet content from a web-enabled gadget or browser more swiftly through a server near you. CDNs cache content such as web pages, images, and video in proxy servers near your physical location.
Did you know? You can change the browser cache expiry date in CDN’s. One of the most popular CDN Cloudflare lets you set the Browser Cache TTL as per your need.
Cloudflare
Connecting your site with Cloudflare is really easy, if you don’t how to do it, then read this tutorial.
- Step 1: Login to Cloudflare
- Step 2: Go to Caching Section
- Step 3: Click On Configuration
- Step 4: Adjust the Cache TTL time
Now, set the time to 6 months as it is considered to be ideal.
BunnyCDN
BunnyCDN is the fastest CDN available. I recommend it, but there is a slight problem and that is, it’s not free, BunnyCDN is paid service, however, it will charge you as per your usage.
You can change the Browser Cache Expiration Time from their cache section. Login>Pull Zone>Cache.
From the drop-down, select the cache expiration time, the recommended time is 6 months, however, BunnyCDN doesn’t give the 6-month option, either set it for 1 year or “match server cache expiration.”
Solution 3. Use Plugins
Plugins save our time and make everything easy for us. However, I don’t normally recommend installing plugins until or unless it’s too important.
I know plugins save our time and reduce our work, but they also increase the server pressure which may slow down our site and impact search engine performances. That’s why I have found some really good lightweight plugins that can help us fix this issue with ease.
W3 Total Cache
W3 Total Cache is one of the most popular speed optimization plugins. I really love this plugin because it offers tons of features for free, and one of them is “set expires headers”, with this feature, we can set up the cache expiry time.
- Step 1: Install And Activate
Just search “W3 Total cache in the plugin section and you’ll find it.
- Step 2: Go To Browser Cache
Once the installation has been done, the plugin will ask you to accept the policies, accept it! After that, click on browser cache from the menu.
- Step 3: Set Up The Expires Header Lifetime
Under the Media & Other Files section, the option Expires Header Lifetime is visible. Put 15780000 (6 months) in that.
Please be sure that cache expiration in your hosting and CDN settings are not overriding this.
LiteSpeed Cache
LiteSpeed cache is another powerful plugin that offers a variety of features. It is possible to set the browser cache expiration date with this plugin and that is why it is here in this list.
Setting up this plugin may be a bit difficult for beginners as it has too many features, however, believe me, this plugin can certainly boost your site speed significantly. Now let’s set up the browser cache expiration date in the LiteSpeed cache.
- Step 1: Install And Activate
This plugin is easily available and free to use. Just search LiteSpeed Cache in the plugin section of your WordPress.
- Step 2: Go To The Cache Section
Once you installed the plugin, click on “Cache” from the plugin menu.
- Step 3: Click On “Browser” And Adjust The Browser Cache TTL
Turn on the browser cache and Put 15780000 seconds in the Browser Cache TTL.
Click on Save Changes.
Solution 4. Fixing Google Analytics
Google Analytics sometimes causes this issue and the problem is that you can’t fix it through CDN’s, adding codes in the server, or using plugins like W3 Total Cache and LiteSpeed cache because the resource isn’t on your server.
Google Analytics has a low cache expiration time normally two hours and it looks something like this:
However, there is a way to fix this. We have to install a plugin called “Host Google Analytics Locally” or CAOS (Complete Analytics Optimization Suite ).
You can download this plugin from the WordPress Plugin Directory or by searching for it under Plugins > Add New in your WordPress.
Some extra benefits to hosting your analytics script locally is that it reduces your external HTTP requests to Google from two to one and it allows you to get full control over the caching of the file.
Now let’s see how to use CAOS to fix this issue.
- Step 1: Install And Activate
As I said, this plugin is free to use and easily available. Search it in the plugins area of your WordPress.
- Step 2: Go to Settings And Click On Advanced Settings
In the Advanced Settings, you’ll be able to change the Cookie Expiration days.
- Step 3: Change The Expiration Date From 30 To 180 Days
The default expiration date would be 30 days, you need to change it to 180 days because according to Google the recommended expiration date should be 180.
There is always room for improvement and that’s why you should implement these extra tips mentioned below. The below tips are very effective in improving your site speed.
A. Host Google Fonts Locally
Google Fonts load a lot of additional CSS that you won’t require. If you self-host, you can bundle and minify your font-related CSS files/rules too (which also ends in fewer HTTP requests).
There is a wonderful plugin that can help you host Google Fonts Locally and the plugin is called OMGF.
In order to efficiently host Google Fonts in WordPress, you have to install and activate the OMGF plugin.
Once OMGF has been installed and activated, go to Settings > Optimize Webfonts. This will take you to the plugin settings page where you can then set it up and begin hosting Google Fonts locally. This plugin is actually pretty straightforward.
B. Minimize Third-party Requests
Like Google Analytics, Adsense, Youtube, Facebook pixels, and many other third parties are hosted on a different server, thus, you aren’t in control of cache.
However, you can minimize the effect by setting up a powerful speed optimization plugin. The most amazing plugin that you can have today is definitely WP-Rocket. It provides tons of options to the users and helps to reduce the loading time.
But the problem is that this plugin isn’t free. If you are a beginner, you must save money and that’s why I’ve published tutorials of free plugins that can help you optimize your website.
How To Reduce Server Response Time (TTFB) 14 Terrific Ways
How To Detect Plugins Which Are Slowing Down Your WordPress Site (Ultimate Guide)
How To Setup EWWW Image Optimizer (Compress Upto 80%)
How To Serve Scaled Images (Properly Sized Images) In WordPress
WP Super Cache Ideal Settings With Screenshots (Updated Version)
How To Set Up Hummingbird Plugin Step By Step: Quick Tutorial
Autoptimize Plugin Ideal Settings – Step By Step (CDN Tutorial)
I hope this post was helpful. Thanks for reading!
HTTP caching can speed up your page load time on repeat visits.
When a browser requests a resource, the server providing the resource can tell the browser how long it should temporarily store or cache the resource. For any subsequent request for that resource, the browser uses its local copy rather than getting it from the network.
How the Lighthouse cache policy audit fails
Lighthouse flags all static resources that aren’t cached:
Lighthouse considers a resource cacheable if all the following conditions are met:
- The resource is a font, image, media file, script, or stylesheet.
- The resource has a
200,203, or206HTTP status code. - The resource doesn’t have an explicit no-cache policy.
When a page fails the audit, Lighthouse lists the results in a table with three columns:
| URL | The location of the cacheable resource |
| Cache TTL | The current cache duration of the resource |
| Size | An estimate of the data your users would save if the flagged resource had been cached |
How to cache static resources using HTTP caching
Configure your server to return the Cache-Control HTTP response header:
Cache-Control: max-age=31536000The max-age directive tells the browser how long it should cache the resource in seconds. This example sets the duration to 31536000, which corresponds to 1 year: 60 seconds × 60 minutes × 24 hours × 365 days = 31536000 seconds.
You should cache immutable static assets for a long time, such as a year or longer.
One risk of long cache durations is that your users won’t see updates to static files. You can avoid this issue by configuring your build tool to embed a hash in your static asset filenames so that each version is unique, prompting the browser to fetch the new version from the server. (To learn how to embed hashes using webpack, see webpack’s Caching guide.)
Use no-cache if the resource changes and freshness matters, but you still want to get some of the speed benefits of caching. The browser still caches a resource that’s set to no-cache but checks with the server first to make sure that the resource is still current.
A longer cache duration isn’t always better. Ultimately, it’s up to you to decide what the optimal cache duration is for your resources.
There are many directives for customizing how the browser caches different resources. Learn more about caching resources in The HTTP cache: your first line of defense guide and Configuring HTTP caching behavior codelab.
To see which resources the browser is getting from its cache, open the Network tab in Chrome DevTools:
- Press
Control+Shift+J(orCommand+Option+Jon Mac) to open DevTools. - Click the Network tab.
The Size column in Chrome DevTools can help you verify that a resource has been cached:
Chrome serves the most requested resources from the memory cache, which is very fast, but is cleared when the browser is closed.
To verify a resource’s Cache-Control header is set as expected, check its HTTP header data:
- Click the URL of the request, under the Name column of the Requests table.
- Click the Headers tab.
Cache-Control header via the Headers tab.
Stack-specific guidance
Drupal
Set the Browser and proxy cache maximum age in the Administration > Configuration > Development page. See Drupal performance resources.
Joomla
See Cache.
WordPress
See Browser Caching.
Resources
- Source code for Serve static assets with an efficient cache policy audit
- Cache-Control specification
- Cache-Control (MDN)
Updated on Friday, October 4, 2019 • Improve article
Table of contents
- How the Lighthouse cache policy audit fails
- How to cache static resources using HTTP caching
- How to verify cached responses in Chrome DevTools
- Stack-specific guidance
- Drupal
- Joomla
- WordPress
- Resources
![Serve Static Assets With An Efficient Cache Policy [Guide]](https://technogezgin.com/en/wp-content/uploads/sites/4/2021/02/Serve-Static-Assets-With-An-Efficient-Cache-Policy-Guide.png)
What Is Browser Cache: It is a temporarily storage technology for documents such as HTML pages and images for reducing bandwidth, server response time and latency. In this type of system, requests to the source are cached under certain conditions. In the next entries of websites, the files are loaded from the local memory instead of the web server where the files are kept.
Common benefits of enabling the browser caching feature are these:
• The website loads faster for subsequent entries of users.
• The amount of requests sent to the servers decreases for subsequent entries.
• For this reason, the server response time is significantly shortens.
Information: Using a browser caching feature makes the website load faster only for returning users, not new users. If your returning visitor rate is high, it is strongly recommended to enable the browser cache feature. The web cache can be a physical device such as a computer or software. The working principle of the browser caching feature is as follows:

With using this feature, static files on the web servers such as images, videos, CSS, JavaScript, PDF, HTML can be saved to users’ devices some for a while. Website owners can check whether the browser cache is activated or not activated with speed test tools. Enabling the browser cache is important to the improving the user experience.
For example, if you see “serve static assets with an efficient cache policy” or “leverage browser caching” problems in speed test tools such as Google Pagespeed Insights or GTMetrix, it means the browser caching feature is not activated. So how to enable the browser cache? Let’s focus on this subject.
-Advertisement-
Step-1: Activation of Browser Caching
✅ Access the website’s files on the server through management panels such as cPanel, Plesk etc. or by establishing a directly FTP connection.
✅ Find the “.htaccess” file, which is one of the most important files on the server. This file is usually located in the “public_html” folder. If that file does not exist, you can create a file with that name in the main directory. Then, add the following code to the “.htaccess” file:
## EXPIRES CACHING ##
# Code Of Activating Browser Caching
<IfModule mod_expires.c>
ExpiresActive On

# Images
ExpiresByType image/jpeg "access plus 1 year"
ExpiresByType image/jpg "access plus 1 year"
ExpiresByType image/gif "access plus 1 year"
ExpiresByType image/png "access plus 1 year"
ExpiresByType image/webp "access plus 1 year"
ExpiresByType image/svg+xml "access plus 1 year"
ExpiresByType image/x-icon "access plus 1 year"

# Videos
ExpiresByType video/mp4 "access plus 1 year"
ExpiresByType video/mpeg "access plus 1 year"

# CSS ve JavaScript Files
ExpiresByType text/css "access plus 1 month"
ExpiresByType text/javascript "access plus 1 month"
ExpiresByType application/javascript "access plus 1 month"

# Other File Types
ExpiresByType application/pdf "access plus 1 month"
ExpiresByType application/x-shockwave-flash "access plus 1 month"
ExpiresByType text/html "access plus 600 seconds"

# Fonts
ExpiresByType application/vnd.ms-fontobject "access plus 1 year"
ExpiresByType application/x-font-ttf "access plus 1 year"
ExpiresByType application/x-font-opentype "access plus 1 year"
ExpiresByType application/x-font-woff "access plus 1 year"
</IfModule>
## EXPIRES CACHING ##
The codes at the above shows both of which file types will be cached and how long they will be cached. Of course you can edit the code (but you must be careful, if you will edit code!), for example you can change file types and caching times. But caching some file types longer or shorter than necessary may cause various problems such as making caching policy unefficient. For this reason, we don’t recommend to edit code.

Warning: Browser caching is compatible with files such as images, videos, CSS, JavaScript, fonts on the web servers. However, files which are downloaded from other sources (they are also known as 3rd party code) cannot be cached in the web browsers.
Step-2: Adding Caching Control Command
In order to making browser cache application work properly, timing of caching process also needs to be controlled. This is important for making the caching process efficent. For controlling caching process one of the following code blocks must be added to the “.htaccess” file:
# Option-1: 1 Month Cache Control For Static Resources
<filesMatch ".(css|jpg|jpeg|png|gif|js|ico)$">
Header set Cache-Control "max-age=31536000, public"
</filesMatch>

# Option-2: Optimizing Code For Different File Types
<IfModule mod_headers.c>
<filesmatch ".(ico|flv|jpg|jpeg|png|gif|css|swf)$">
Header set Cache-Control "max-age=2678400, public"
</filesmatch>
<filesmatch ".(html|htm)$">
Header set Cache-Control "max-age=7200, private, must-revalidate"
</filesmatch>
<filesmatch ".(pdf)$">
Header set Cache-Control "max-age=86400, public"
</filesmatch>
<filesmatch ".(js)$">
Header set Cache-Control "max-age=2678400, private"
</filesmatch>
</IfModule>

Note: Server-based cache systems and browser-based cache systems are different from each other. In server-based caching process, the cache files are generated in the web servers but in the browser-based caching process, the cache files are generated in the users’ web browsers. For this reason, these two processes should not be confused.
Step-3: Removing Versions of Style & Script Files (Only for WordPress)
The version numbers of style and script resources are added to the url addresses in some of WordPress based websites. This situation prevents enabling of browser caching. If you have WordPress-based website and even though you added the above codes, if the problem of “serve static assets with an efficient cache policy” is not solved, you need to do an additional action.
-Advertisement-
![Serve Static Assets With An Efficient Cache Policy [Fix Guide]](https://technogezgin.com/en/wp-content/uploads/sites/4/2021/02/Serve-Static-Assets-With-An-Efficient-Cache-Policy-Fix-Guide.png)
Serve Static Assets With an Efficent Cache Policy: A long cache lifetime can speed up repeat visits to your page. (Google)
Leverage Browser Caching: Setting an expiry date or a maximum age in the HTTP headers for static resources instructs the browser to load previously downloaded resources from local disk rather than other network. (Other Resources)
In order to remove these version numbers that preventing the enabling of browser cache feature, you need to add the following lines of code to the “functions.php” file of the your website’s theme files (But this step is only for WordPress-based websites):
function remove_version_scripts_styles($src) {
if (strpos($src, 'ver=')) {
$src = remove_query_arg('ver', $src);
}
return $src;
}
add_filter('style_loader_src', 'remove_version_scripts_styles', 9999);
add_filter('script_loader_src', 'remove_version_scripts_styles', 9999);
Sponsored Links:
Techno Gezgin’in kurucusu ve idari sorumlusu. Hacettepe Üniversitesi bilgisayar mühendisliği bölümünde okuyor. Yazılım & programlama, tasarım, çeviri ve içerik üreticiliği gibi alanlar ile uğraşıyor.
When you serve static assets with an efficient cache policy, the user’s browser will store these files locally and less time will be needed to load the page. Normally as soon as a page is loaded, all the resources of that page, such as HTML, CSS, JavaScript, and images, must be downloaded.
Browser caching allows the browser to retrieve static assets like CSS, JavaScript, and images from its local cache. As a result, the pages load more quickly. Cached content means subsequent visits to a page will be faster than a user’s first visit, but not on the first visit.
What is cache?
A cache is a high-speed data storage layer in computing that saves a portion of data that is often temporary in nature so that subsequent requests for that data can be served up faster than accessing the data’s primary storage location. Caching allows you to quickly reuse data that has been previously retrieved or computed.
How does caching actually works?
The data in a cache is usually kept in rapid access hardware like RAM (random-access memory), but it can also be utilized in conjunction with a software component. The basic goal of a cache is to speed up data retrieval by eliminating the need to contact the slower storage layer behind it.
In contrast to databases, which store entire and long-lasting data, a cache often stores a part of the data transiently.
Advantages of caching
Let go through some advantages of caching.
Enhance the performance of your application
Reading data from an in-memory cache is incredibly quick because memory is orders of magnitude faster than disc (magnetic or SSD) (sub-millisecond). This substantially faster data access enhances the application’s overall performance.
Backend Load Should Be Reduced
By shifting a portion of the read load from the backend database to the in-memory layer, caching reduces the stress on your database, keeping it from suffering weak performance under heavy load or even crashing under spikes.
Hotspots in the database should be eliminated
Many applications tend to retrieve a subset of data more frequently than the rest. As a result, hot spots may occur in the database, and you may need to overprovision its resources based on the throughput requirements for the most frequently used data. For frequently accessed data, an in-memory cache reduces overprovisioning requirements while delivering fast, predictable performance.
Reduce the cost of your database
Input/output operations per second (IOPS) can be performed by a single cache instance, allowing it to replace multiple database instances and reduce costs significantly. That is crucial if the primary database charges by the amount of data. There could be a large price difference under certain conditions.
Performance that can be predicted
Dealing with surges in application utilization is a prevalent problem in modern systems. Increased database load causes longer data retrieval times, making overall application performance unpredictable. This problem can be solved by using a high-throughput in-memory cache.
Increase the number of people who read (IOPS)
In-memory systems have substantially higher request rates (IOPS) than a comparable disk-based database, in addition to having reduced latency. When utilized as a distributed side-cache, a single instance can fulfil hundreds or even thousands of requests per second.
What is asset caching?
Caching is a straightforward notion. When a browser downloads an asset, it uses the server’s policy to determine whether or not it should download it again on subsequent visits. If the server doesn’t provide a policy, the browser defaults, which usually means caching files for that session.
What is static asset caching?
specify how long the browser should temporarily retain or cache the resource. Any subsequent requests for that resource are served from the browser’s local copy rather than from the network.
Any time you have a visitor of your site fetch a fresh version of something that isn’t already cached within the browser or server, you’re using an inefficient cache policy. When, in actuality, you may be serving them cached and ready-to-use saved content.
Also read: How To Fix Broken Permalinks in WordPress
What is efficient cache policy?
If your static files do not change (or you have an acceptable cache busting mechanism), we suggest setting your cache policy to 6 months or 1 year.
Elements like global CSS/JS files, logos, graphics, and so on rarely change on finished websites, so 6 months or a year is a fair cache expiry to work with.
Of course, if you frequently alter the above static files, you can choose a shorter cache expiry time as long as it is greater than 3 months.
Serve static assets with an efficient cache policy
There are multiple ways we can servce static files using efficient cache policy, we will discuss 3 methods
- Using .htaccess file if you are using LiteSpeed Enterprise or Apache
- Using LiteSpeed Cache
- Using W3 Total Cache plugin
Serve Static Assets using .htaccess file on Apache and LiteSpeed Enterprise
Note: If you are using OpenLiteSpeed or NGINX, this method will not work.
Login to your WordPress Dashboard
Click on Plugins -> Add new from the left hand side menu
Search for «File manager». Install and activate the plugin
Click on «File Manager» from the left hand side menu
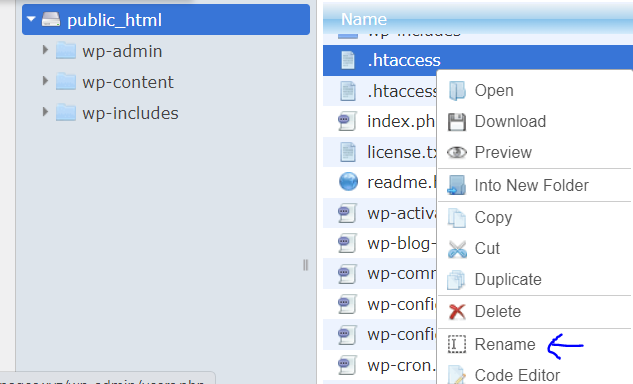
In public_html folder, right click on .htaccess and click on rename
Change the file name (.htaccess-error)
Click on «new file» icon from top
Name the file «.htacess»
Paste the following code and save and close
<IfModule mod_expires.c>
  ExpiresActive On

 # CSS, JavaScript
  ExpiresByType text/css "access plus 1 year"
  ExpiresByType text/javascript "access plus 1 year"
  ExpiresByType application/javascript "access plus 1 year"

 # Fonts
  ExpiresByType font/ttf "access plus 1 year"
  ExpiresByType font/otf "access plus 1 year"
  ExpiresByType font/woff "access plus 1 year"
  ExpiresByType font/woff2 "access plus 1 year"
  ExpiresByType application/font-woff "access plus 1 year"

 # Images
  ExpiresByType image/jpeg "access plus 1 year"
  ExpiresByType image/gif "access plus 1 year"
  ExpiresByType image/png "access plus 1 year"
  ExpiresByType image/webp "access plus 1 year"
  ExpiresByType image/svg+xml "access plus 1 year"
  ExpiresByType image/x-icon "access plus 1 year"

  # Video
  ExpiresByType video/webm "access plus 1 year"
  ExpiresByType video/mp4 "access plus 1 year"
  ExpiresByType video/mpeg "access plus 1 year"

  # Others
  ExpiresByType application/pdf "access plus 1 year"
  ExpiresByType image/vnd.microsoft.icon "access plus 1 year"
</IfModule>
Serve Static Assets using LiteSpeed Cache
You need to install and activate LiteSpeed Cache plugin, once installed, follow the guide below:
- Go to your WordPress Dashboard
- Click on LiteSpeed Cache -> Cache from the left hand side menu
- Click on the «Browser» tab from the top
- Turn on the «Browser Cache» toggle
- Click «Save Changes»
Serve Static Assets using W3 Total Cache
Install and activate W3 Total Cache plugin first and then follow the guide below.
- Go to your WordPress Dashboard
- Click on Performance -> Browser Cache from the left hand side menu
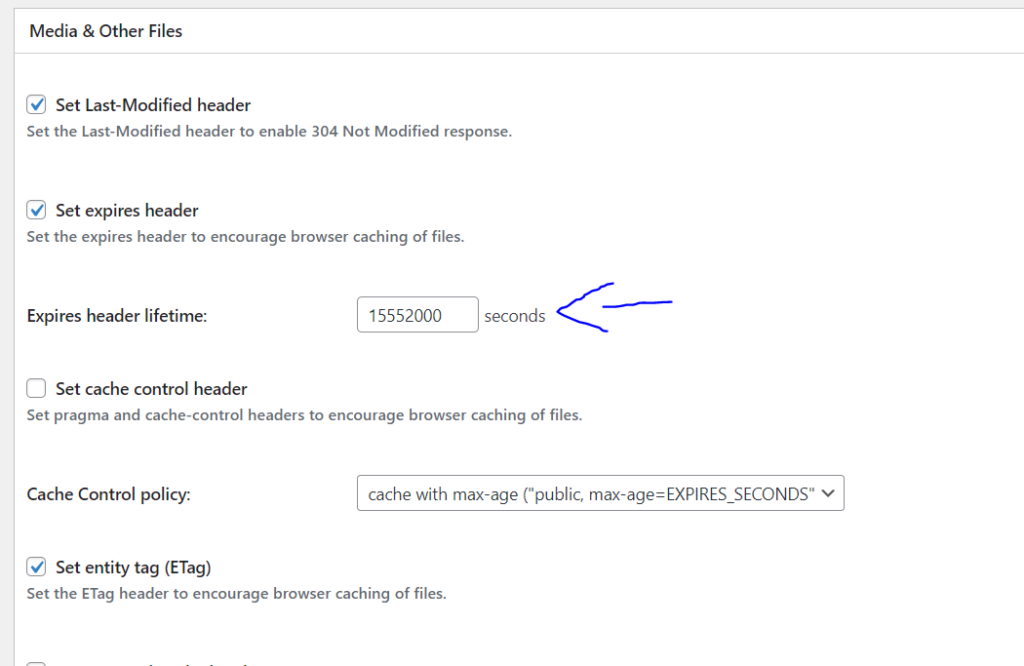
- Scroll down to «Media and Other Files». Change the «Expires Header Lifetime» to at least 15552000s (180 days).
- Click on «Save all settings»
Conclusion
When you provide static assets with an efficient cache strategy, the user’s browser will save these files locally, reducing the amount of time it takes for the page to load. All of a page’s resources, like as HTML, CSS, JavaScript, and pictures, must be downloaded as soon as it is loaded.
If you’ve ever run a Google Lighthouse analysis of your website, you’ve probably encountered an error like «Serve static assets with an efficient cache policy» or «Leverage browser caching».
What’s a static asset?
Static assets are files or resources you send to the user that the server does not change. Resources that do not change between different requests. Images, fonts, CSS, or JS files are good candidates to be considered as static assets in your website.
What’s a cache policy?
Imagine we enter a new website. Our browser will (probably) download some CSS and JS files, as well as some images. When we click on a link, our browser would start a new request and download the files and images again. Does this make sense? Isn’t it smarter to just download what we didn’t download one minute ago?
You, as a developer, can set a cache policy, which means that you can tell the browser which kind of files should it store in the cache memory, and after how much time should these files be deleted from the cache.
This way, we could tell browsers to keep, for example, the logo of our company cached for a long time, so users only have to download it once.
How does static asset caching affect my page speed?
Caching ensures that your page loads faster for returning users. Although it won’t affect the first-page load, it will surely make further page loads much faster, even after shutting the computer off and entering back after a few days.
How can we leverage browser caching?
The main idea is that we have to tell the browser how long we want to store each file. This «how long» is called Time To Live (TTL). Each file will have an additional header Expires.
This header specifies a fixed date/time for the expiration of the cached version of the resource.
Creating an efficient cache policy for our static assets
Although it has great advantages, asset caching can also bring problems to your website. The most important problem is that, if not done properly, returning users may use an outdated version of a resource. This means that, for example, if we set a TTL of 1 month for our logo image, and we change it, returning users will still be seeing our old logo.
Please, refer to the Overwriting files section to see how we can easily solve this problem and take full advantage of the browser cache system.
We should have a minimum TTL of 1 month for static assets, although it’s highly recommended to use 1 year as our Expires header in many cases.
Implementing an efficient cache policy with .htaccess
We can implement our cache policy just by adding the following snippet to our .htaccess file.
<IfModule mod_expires.c>
    ExpiresActive On
    ExpiresByType image/jpg "access 1 year"
    ExpiresByType image/jpeg "access 1 year"
    ExpiresByType image/gif "access 1 year"
    ExpiresByType image/png "access 1 year"
    ExpiresByType image/webp "access 1 year"
    ExpiresByType image/svg+xml "access 1 year"
    ExpiresByType font/opentype "access 1 year"
    ExpiresByType font/ttf "access 1 year"
    ExpiresByType text/css "access 1 year"
    ExpiresByType application/pdf "access 1 month"
    ExpiresByType application/javascript "access 1 year"
    ExpiresByType application/x-javascript "access 1 year"
    ExpiresByType application/x-shockwave-flash "access 1 year"
    ExpiresByType image/x-icon "access 1 year"
    ExpiresDefault "access 2 days"
</IfModule>
For this to work, we will need to have mod_expires.c installed in our Apache system.
With this snippet, we are telling our server to add a 1 year TTL to each of the mime types displayed there. If our server finds a file with an unlisted mime type, it will set the TTL to 2 days by default.
Implementing an efficient cache policy with .nginx
NGINX solution is pretty similar to our .htaccess solution. Here’s the snippet of code we would use in NGINX to handle our cache policy:
map $sent_http_content_type $expires {
    default 2d;
    image/jpg 1y;
    image/jpeg 1y;
    image/gif 1y;
    image/png 1y;
    image/webp 1y;
    image/svg+xml 1y;
    font/opentype 1y;
    font/ttf 1y;
    text/css 1y;
    application/pdf 1M;
    application/javascript 1y;
    application/x-javascript 1y;
    application/x-shockwave-flash 1y;
    image/x-icon 1y;
}
server {
    server_name example.com;
    expires $expires;
}
The idea is the same. We tell our server to cache every listed mime type for a year and use 2 days for unlisted mimes. Simple, right?
Overwriting files
Although the caching policy is pretty simple to implement, we will need a solution for cases where we change our files.
For example, suppose you’ve cached your CSS files for a whole year, and you update your main CSS file after just a few days. Returning users would be using your outdated CSS until it reaches its TTL.
To overcome this problem, we need to know how does the browser know if some resource is cached or not. If you open your DevTools, this is how it would look to download a resource for the first time:
After the first time, subsequent downloads of static assets would appear as cached (see the Size column):
This means that our resources have been correctly cached by the browser! But, how?
Well, the browser has something like an internal mapping of URL → Cached Resource. In this case:
{
    "https://raullg.com/css/tailwind.css": {
        "contents": "file contents",
        "expires": "expiry date"
    },
    // ...
}
When the browser needs to download a resource, it will check if the resource URL exists in this internal mapping. If it does exist, it will check if it has not expired yet and, in that case, proceed to display the cached resource. If it’s expired, then it will download it again and update the expiry date.
A very simple way to burst the cache of a certain file is to append a query parameter to the URL. If we change https://raullg.com/css/tailwind.css to https://raullg.com/css/tailwind.css?v=2, the URL won’t match the internal mapping and the file would be downloaded and added to the map:
{
    "https://raullg.com/css/tailwind.css": {
        "contents": "file contents",
        "expires": "expiry date"
    },
    "https://raullg.com/css/tailwind.css?v=2": {
        "contents": "file contents",
        "expires": "expiry date"
    },
    // ...
}
This way, you don’t need to change the file name to burst the browser cache and users will see the latest version of your file. But, how can we do this automatically?
Please, note that many projects may not need to implement cache bursting in images or fonts: they are less likely to change than a CSS or JS source code file. This is why the following sections are focused on cache bursting for CSS and JS files, although it should be possible to extend this behavior to every kind of static file.
Optimizing static assets cache using PHP
Bursting a file cache with PHP is pretty simple. We could easily create a function that reads a file and appends a query string to the URL.
We just need to make sure that this query string does not change until the file changes. There are two straightforward ways to do this:
Bursting static assets cache appending a hash to the URL
A hash is a mathematical function that will always return the same output for the same input, and it’s unique. If you have a hash for a file and its contents change, even slightly, the hash will be completely different.
Let’s look at an example of hashing using MD5 (test it yourself):
Contents: "Hi! My name is Raúl"
MD5 Hash: "25eb375b17970db528a0bb531d27ed32"
Contents: "Hi! My name is Raul"
MD5 Hash: "23c8782f4848214ceecaec6e78f2b777"
Note how, just by changing one character, the resulting hash is completely different.
Now, let’s write our PHP function to append this hash to our file:
<?php

function mix($url) {
    // Prepend a slash to the URL if needed and if it's a relative URL
    if (strpos($url, '/') !== 0 && !strpos($url, 'http')) {
        $url = '/' . $url;
    }

    $localFilePath = __DIR__ . $url; // Change this line to match your file system

    // Only append hash if file exists
    if (file_exists($localFilePath)) {
        $hash = md5_file($localFilePath); // You can also use sha1_file()
        // Check if URL already has a query string
        if (strpos($url, '?') !== false) {
            $url .= '&h=' . $hash;
        } else {
            $url .= '?h=' . $hash;
        }
    }

    return $url;
}
With this function, you just need to call it from your template with your resource URL and it will handle the hashing 
<link rel="stylesheet" rel="{{ mix('/css/tailwind.css') }}" />
Bursting static assets cache appending a timestamp to the URL
Generating a hash from a file may be a long process which may delay our page load. Instead, we could also use the last time our file was modified to burst the file cache.
The main drawback of this approach is that if we revert the file to a previous state, it would return a different timestamp (because we modified the file), and the browser would download it again, even if it’s exactly the same as a previous version.
Now, let’s write our PHP function to append this hash to our file:
<?php

function timemix($url) {
    // Prepend a slash to the URL if needed and if it's a relative URL
    if (strpos($url, '/') !== 0 && !strpos($url, 'http')) {
        $url = '/' . $url;
    }

    $localFilePath = __DIR__ . $url; // Change this line to match your file system

    // Only append hash if file exists
    if (file_exists($localFilePath)) {
        $time = filemtime($localFilePath);
        // Optional: Convert the timestamp (integer) from base10 to base36 to generate a shorter query string
        $time = base_convert($time, 10, 36);
        // Check if URL already has a query string
        if (strpos($url, '?') !== false) {
            $url .= '&t=' . $time;
        } else {
            $url .= '?t=' . $time;
        }
    }

    return $url;
}
Then, within our template:
<link rel="stylesheet" rel="{{ timemix('/css/tailwind.css') }}" />
Optimizing static assets cache with Laravel Mix using PHP
Luckily, Laravel has this already handled for us. It’s called Laravel Mix. Apart from compiling our JS and CSS assets, it can also handle file versioning.
Just by adding the following snippet at the end of our webpack.mix.js file:
if (mix.inProduction()) {
    mix.version();
}
Additionally, we would need to use the global mix() function in our blade template:
<link rel="stylesheet" rel="{{ mix('/css/tailwind.css') }}" />
And Laravel automatically will append the file hash to the URL when compiled for production!
Optimizing static assets cache with Express using NodeJS
ExpressJS does not have (yet) a native way to perform this hashing, so we need to use a third-party library to handle this for us: Staticify. You can install it by running the following command:
$ npm install staticify
To use it:
const path = require('path');
const staticify = require('staticify')(path.join(__dirname, 'public'));

// ...
app.use(staticify.middleware);

app.helpers({getVersionedPath: staticify.getVersionedPath});
And, in your template:
<link href="${getVersionedPath('/home.css')}" rel="stylesheet">
Optimizing static assets cache with Django using Python
Cache busting in Django is pretty easy. You just need to use the ManifestStaticFilesStorage, and it will automatically append the MD5 hash to file paths.
To enable the ManifestStaticFilesStorage, you have to meet the following requirements:
- the
STATICFILES_STORAGEsetting is set to'django.contrib.staticfiles.storage.ManifestStaticFilesStorage' - the
DEBUGsetting is set toFalse. - you’ve collected all your static files by using the
collectstaticmanagement command.
In your settings.py file:
DEBUG = False
STATICFILES_STORAGE = 'django.contrib.staticfiles.storage.ManifestStaticFilesStorage'
Then, in your template:
{% load static from staticfiles %}
<link rel="stylesheet" href="{% static 'css/base.css' %}" />
Summary
We’ve seen how we can leverage browser caching by setting up a long-term caching strategy and updating our pipeline to include asset versioning.
Also, I think it’s really important to have the right caching strategy. Not only to improve your Search Engine Optimization but to improve the User Experience while using your website. There’s no user that doesn’t want a website to be slower! I hope this article helps you improve your site speed
Bibliography
- Cache busting in Django
- How the HTTP Cache works on web.dev
- Laravel Mix Documentation
- Use long cache TTL on web.dev
If you are managing a VPS with Laravel Forge and trying to optimize the PageSpeed Insights score, one task you will need to do is Serve static assets with an efficient cache policy.
There is a quick and easy fix for this problem that only takes a five minutes to complete and immediately removes the warning from PageSpeed Insights results. To prove this actually works, we are going to optimize one of our own domains so you can see How To Serve static assets with an efficient cache policy first hand.
Try PageSpeedPlus Now
Contents
- Measure initial page speed
- Serve files with an efficient cache policy on Laravel Forge Explained
- Restarting NGINX
- Finished
- Measure the improvement
- How It Works
- Benefits
- Third Party Scripts
- Conclusion
Measure initial page speed
Before you make the fix you should get the current score by running your site through the PageSpeed Insights tool. Our domain leaderapps.xyz scores 99 on desktop* and one of the things that Google suggests we do is to Serve static assets with an efficient cache policy.
*leaderapps.xyz is just a demo website. It doesn’t have many Javascript tags or assets that can slow down page load so that is why it already scores 99.
Serve static assets with an efficient cache policy on Laravel Forge Explained
The only action required is to make a simple edit in the nginx.conf file for your domain.
Go to sites > your site
Scroll to the bottom and go to Edit Files > Edit Nginx Configuration
Inside the server block paste the following snippet:
# browser caching of static assets
location ~*  .(jpg|jpeg|png|gif|ico|css|js|pdf)$ {
    expires 365d;
}
Click Save
Restarting NGINX
On a regular VPS you would have to restart NGINX by running a terminal command but forge allows you to do this from the GUI. At the top of the page click the dropdown for:
Servers > Your Server
Scroll to the bottom of the page and select:
Restart > Restart Nginx.
Finished
Task Complete! That’s everything needed to successfully Serve static assets with an efficient cache policy on your website. You should reload the front end to check everything is ok and make sure you haven’t left a syntax error in the config file.
Measure the improvement
The change is instant so you can immediately run your site through Pagespeed Insights to see what difference it made to the score.
As you can see we have moved up one page speed point to 100 on desktop and the Leverage Browser Caching warning is no longer there.
How It Works
These few lines of code will tell a users browser to store assets in the browser cache for a period of one year. Any visits during that time will load files from the cache. If a user returns after one year, the browser will realize the cache has expired and request the latest version of the files.
There is downside however. If you release updates to your static assets, users will not receive the new version unless they clear their browser cache or start an incognito session. Realistically that won’t happen so you need to control this on your end by busting the cache which means adding a parameter to the asset url. This tricks the browser into thinking that it’s a new file and downloads a fresh version.
Customize For Your Use Case
Caching all assets for one year may not be suitable or necessary for all files. For example, CSS files might need a shorted cache lifetime than PDFs.
You can create a separate directive that only handles PDFs and applies a longer cache window:
# browser caching of static assets
location ~*  .(jpg|jpeg|png|gif|ico)$ {
    expires 182d;
}

# browser caching of pdfs
location ~*  .(pdf)$ {
    expires 365d;
}
Place this directly after the current directive and make sure that ‘pdf‘ is removed from the first snippet.
Everyone will have a different use case so feel free to customize and play around with variations as needed.
Benefits
Implementing this simple change will immediately boost the performance of your website and reduce the load time for users on all devices. More importantly, it demonstrates that you care about the technical quality of your website which means Google will view it in a more positive way. It’s impossible to predict what difference that will make to your ranking but PageSpeed Really Matters to Google so if you’re satisfying one of their suggestions it can only be good for your domain.
Third Party Scripts
It has to be noted that this only works for assets hosted on your domain. If you are loading resources from 3rd parties, there is very little that can be done about those because they are out of your control. Google Analytics and web fonts are the most common example.
The only viable option is to host the scripts yourself. This will allow your cache control headers to apply but it also means you have to manage all aspects of the scripts from there on such as updates, deployment, minifification.
Personally, we don’t recommend inlining. Your PageSpeed score won’t be perfect as a result but these scripts do have benefits that far outweigh a positive PageSpeed score. Google Analytics is an immense powerful library that provides rich insights into user activity on a site. It is constantly updating so it’s better to leave management in the hands of Google and focus on PageSpeed improvements elsewhere.
Conclusion
In this post you learned How To Serve static assets with an efficient cache policy on Laravel Forge using a few lines of code. This will increase your site speed and may raise your position in the SERPs. If you want to keep your score high, you need to monitor it. Consider using PageSpeedPlus to get daily alerts when your scores fall.
Try PageSpeedPlus Now
You might also like
- How To Serve Images In Next-Gen Formats
- How To Monitor Core Web Vitals Scores
- Automating PageSpeed Insights tests
- How To Reduce the impact of third-party code
- Enable GZIP Compression On Laravel Forge
- Ensure Text Remains Visible During Load

