Обновлено 10.07.2020
Добрый день! Уважаемые читатели и гости одного из крупнейших IT порталов России Pyatilistnik.org. В прошлый раз мы с вами научились восстанавливать библиотеку vcruntime140_1.dll в Windows и тем самым восстановили работу ряда приложений. В сегодняшней публикации я рассмотрю ситуацию, когда у вас не отвечает и не работает сайт RDWeb на вашей терминальной ферме. Думаю это будет интересный момент для начинающих системных администраторов.
Описание ситуации
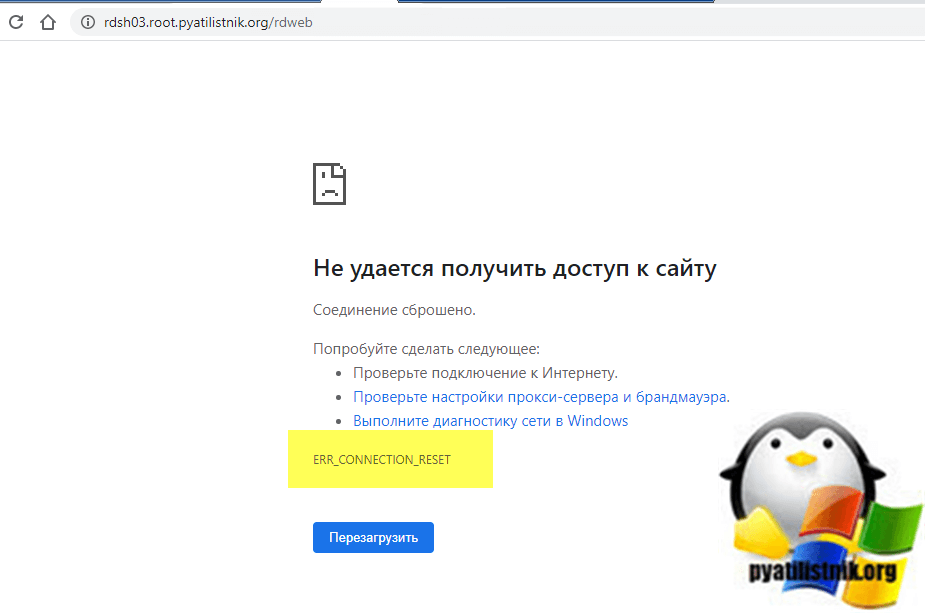
И так обо всем по порядку. Не так давно я установил отказоустойчивую службу Remote Desktop Services High Availability на Windows Server 2019. Сама RDS ферма работала корректно, но вот при попытке войти на сайт RDWeb, где были опубликованы приложения RemoteApp я получил ошибку:
Не удалось получить доступ к сайту ERROR_CONNECTION_RESET
Если я пытался локально открыть сайт с самого IIS, то ошибка звучала уже вот так:
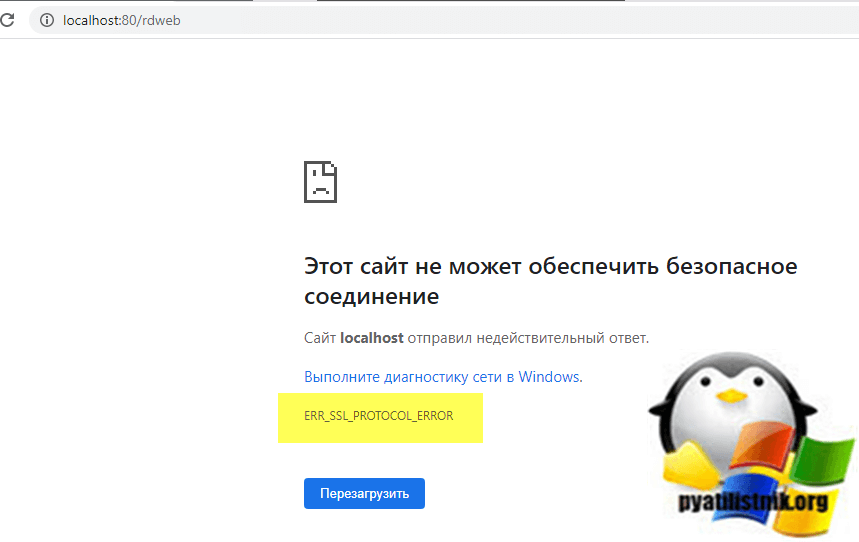
Этот сайт не может обеспечить безопасное соединение: ERR_SSL_PROTOCOL_ERROR
Решение проблемы
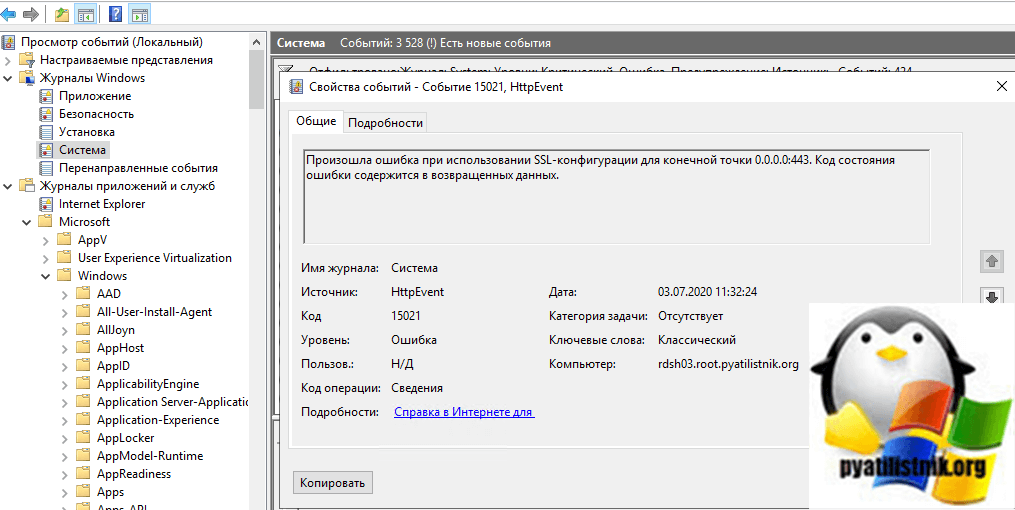
Первое, что нужно всегда делать, это просматривать ошибки связанные с данной службой. Посмотреть логи можно в просмотре событий или же через веб-службу Windows Admin Center, при ее наличии в сети. Мои журналы были забиты ошибками:
Код события ID 15021: Произошла ошибка при использовании SSL-конфигурации для конечной точки 0.0.0.0:443. Код состояния ошибки содержится в возвращенных данных.
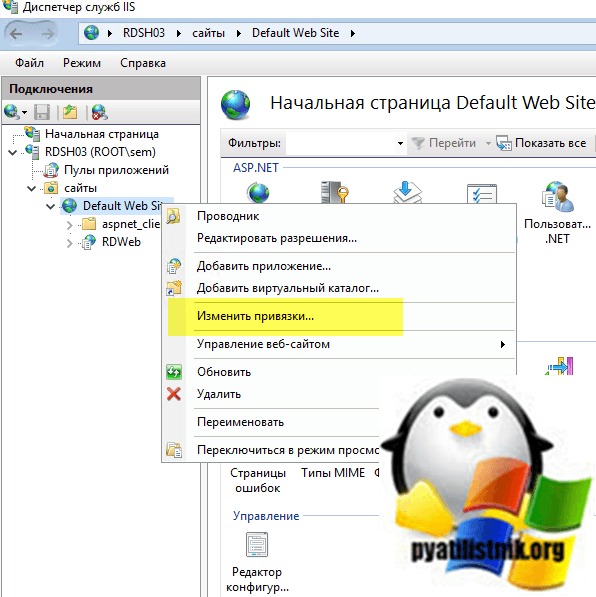
Видя такое безобразие нужно пойти посмотреть, что у нас творится на веб-сервере. Откройте оснастку IIS и щелкните правым кликом по вашему сайту. Из контекстного меню выберите пункт «Изменить Привязки».
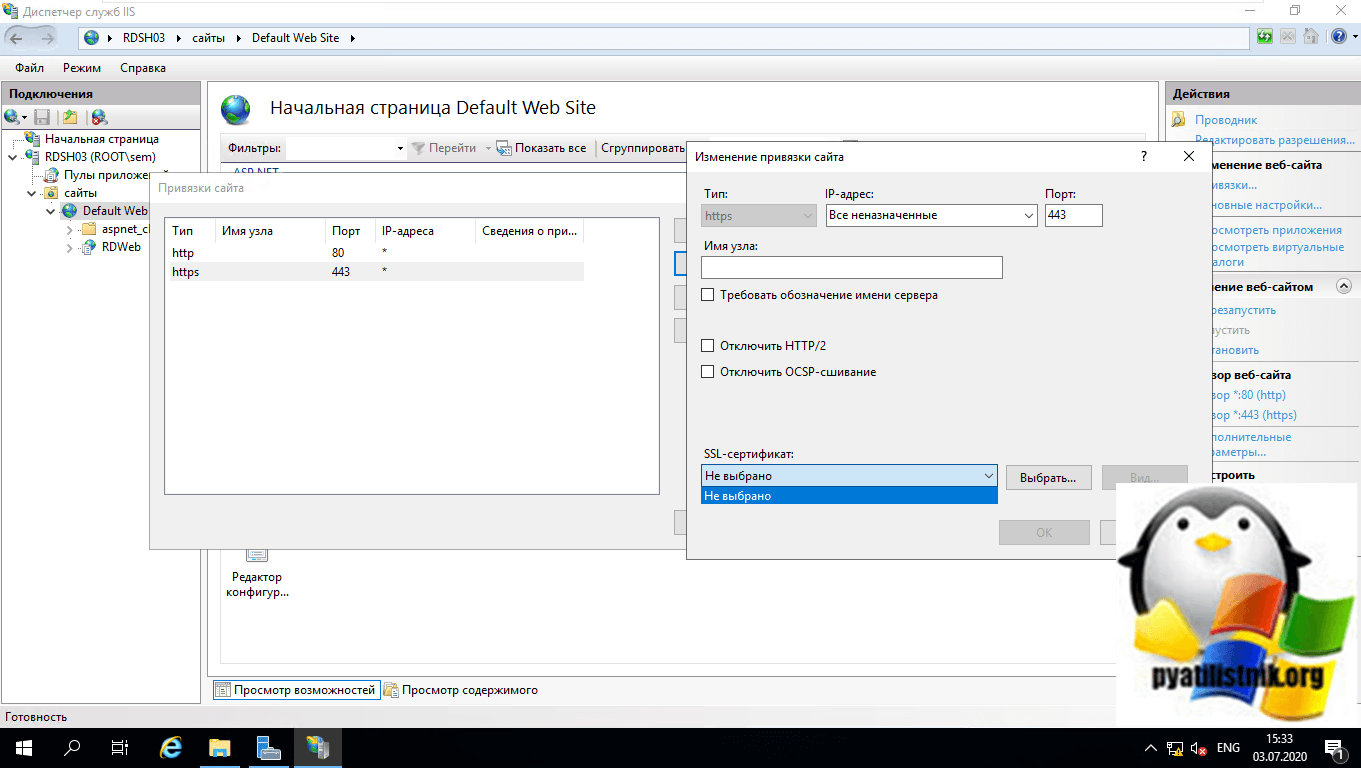
Далее откройте раздел с 443 портом и посмотрите, присутствует ли у вас тут сертификат безопасности. Как видите его нет, поэтому вы и видите ошибки при доступе к странице RDWeb.
Тут у вас есть ряд вариантов для выхода из данной ситуации:
- Если у вас есть домен Active Directory, то с большой вероятностью у вас должен быть центр сертификации, если нет, то нужно завести. Он выпустит сертификат для IIS
- Второй вариант, это сформировать CSR запрос и отправить его на покупку публичного сертификата для сайта
- Третий вариант, это выпустить публичный, бесплатный сертификат от Lets’Encrypt
- Последний вариант, это самим сформировать самоподписный сертификат. Он в принципе уже должен быть, но по какой-то причине при установке IIS он не был сформирован.
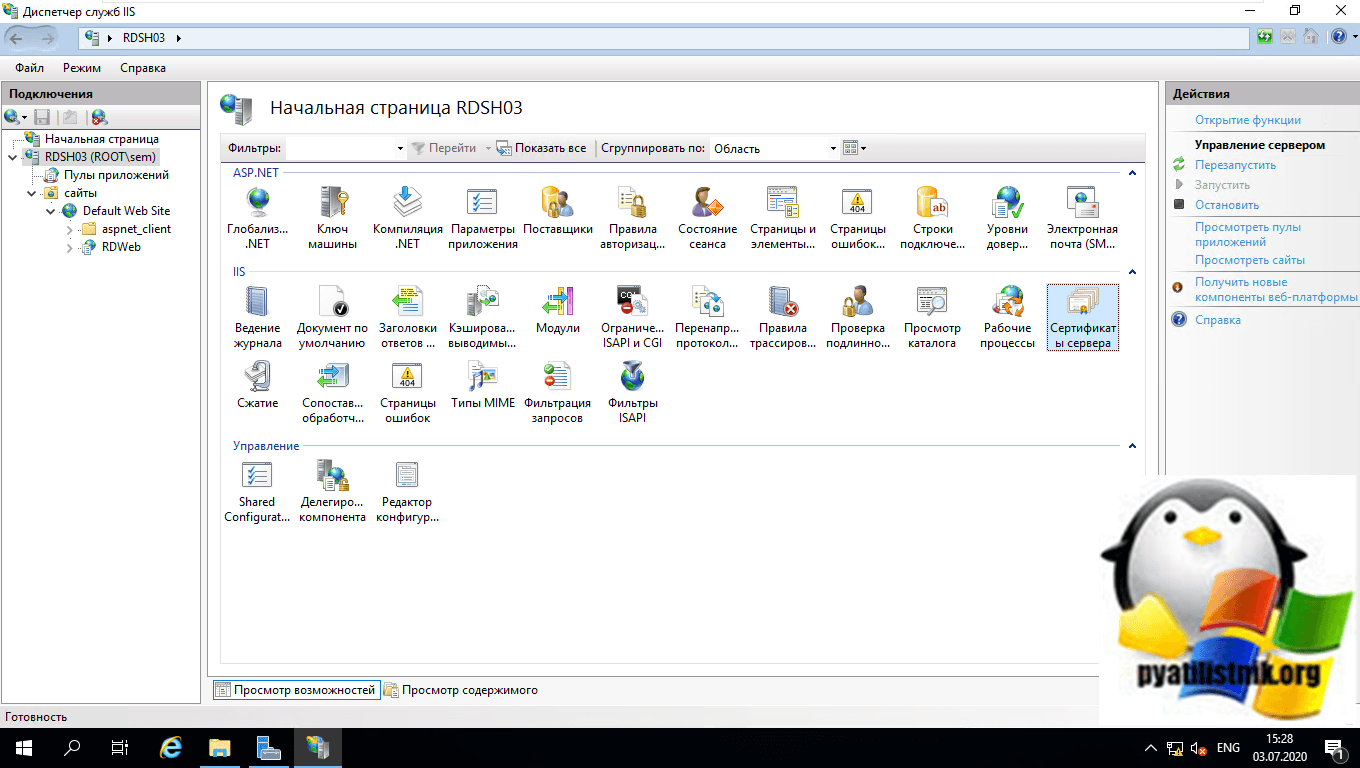
Я для своего тестового окружения выберу пока четвертый вариант, я потом установлю Wildcard SSL сертификат. Выберите корень в IIS и найдите пункт «Сертификаты сервера»
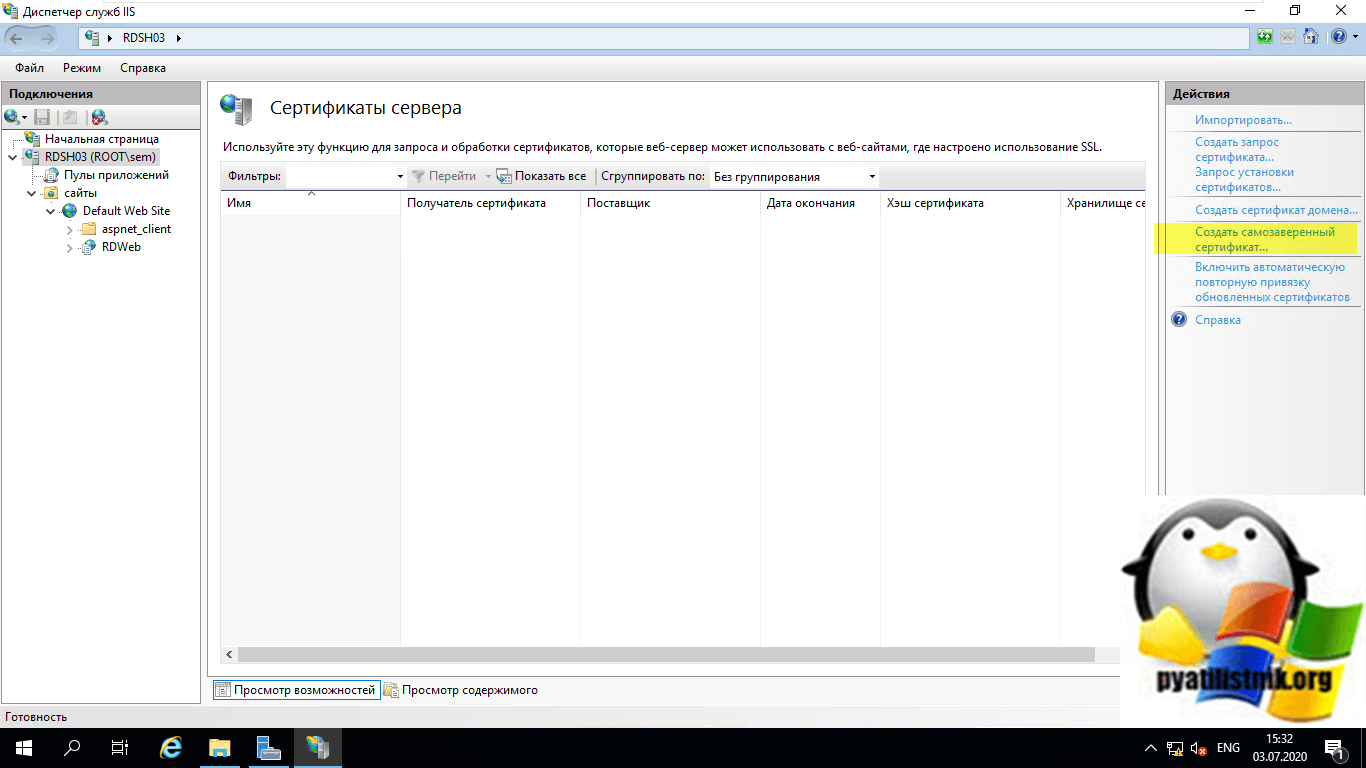
Выберите пункт «Создать самозаверенный сертификат».
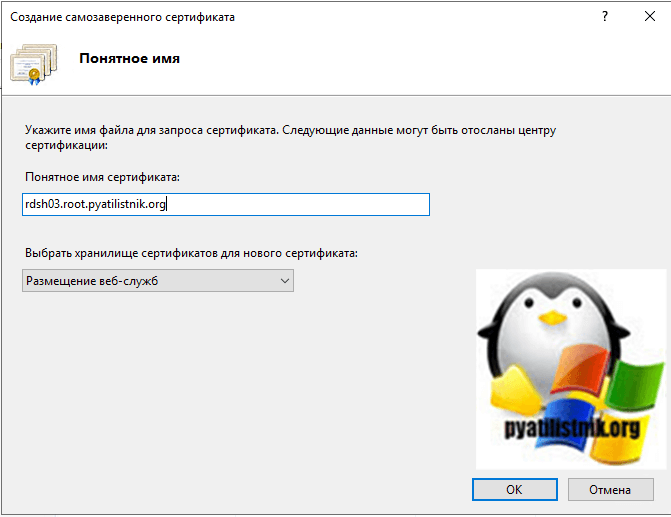
Задаем ему любое имя нужное для вас, я сделаю rdsh03.root.pyatilistnik.org и поместим его в нужное вам хранилище.
В итоге ваш новый сертификат будет в списке.
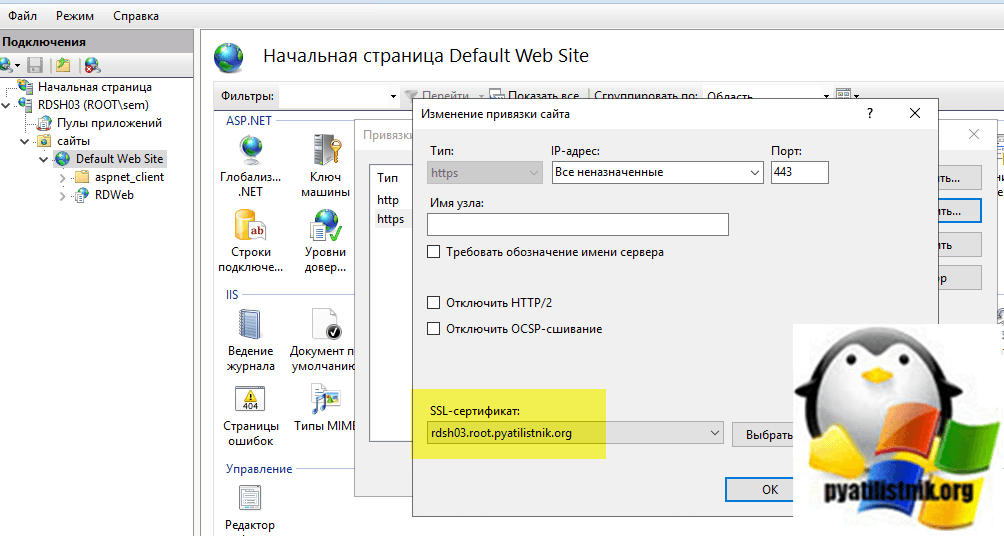
Производим привязку нового сертификата к вашему сайту RDWeb.
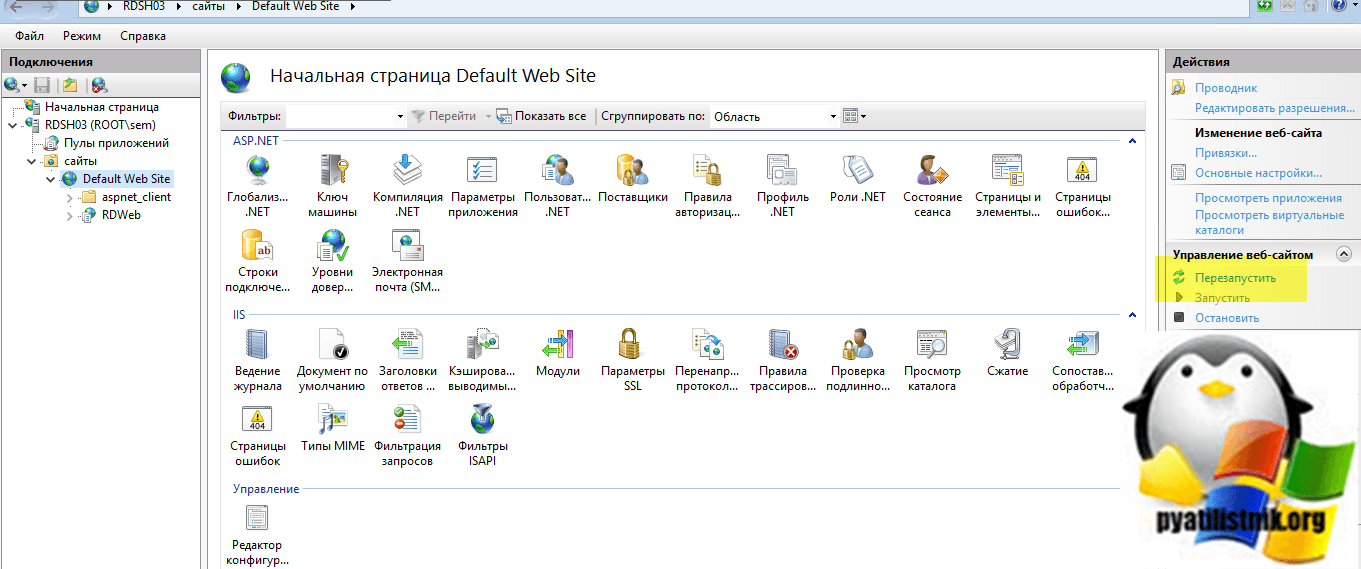
Рекомендую произвести перезапуск сайта на котором вы установили сертификат.
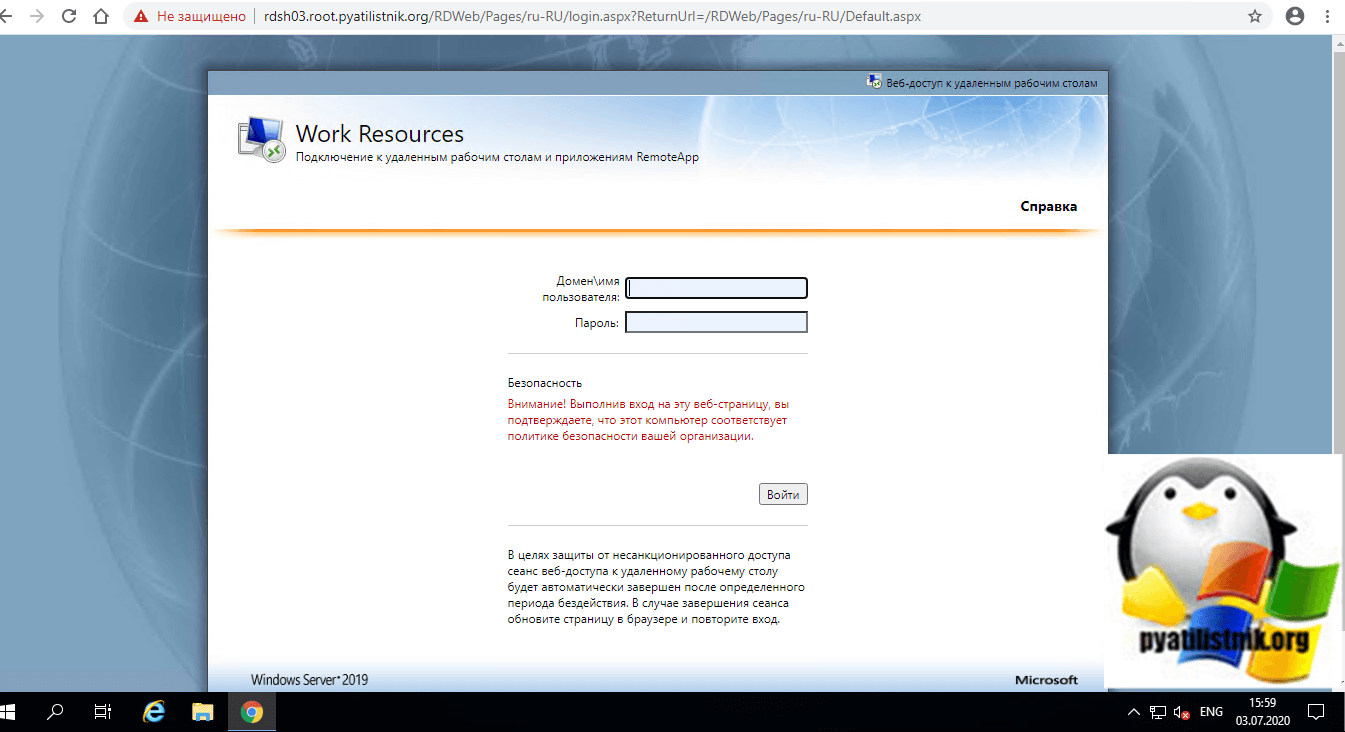
В результате все прекрасно открылось и заработало, можно запускать RemoteApp.
На этом у меня все, мы устранили ошибку «Код события ID 15021: Произошла ошибка при использовании SSL-конфигурации для конечной точки 0.0.0.0:443. Код состояния ошибки содержится в возвращенных данных». С вами был Иван Семин, автор и создатель IT портала Pyatilistnik.org.
I recently encountered the following errors the event logs of our load balanced RD GW farm:
-
* Source: ASP.NET 2.0.50727.0
* Event Log: Application
* Type: Warning
* Event ID: 1309
* Event User: N/A
* Event code: 3005 -
Event message: An unhandled exception has occurred.
-
Stack trace: at System.Web.Configuration.MachineKeySection.EncryptOrDecryptData(Boolean fEncrypt, Byte[] buf, Byte[] modifier, Int32 start, Int32 length, IVType ivType, Boolean useValidationSymAlgo, Boolean signData)
-
at System.Web.Security.FormsAuthentication.Decrypt(String encryptedTicket)
-
at Microsoft.TerminalServices.Publishing.Portal.FormAuthentication. TSFormsAuthentication.ExtractInfoFromCookies(HttpContext objHttpContext)
-
at Microsoft.TerminalServices.Publishing.Portal.FormAuthentication. TSFormsAuthentication.OnAuthenticateRequest(Object source, EventArgs e)
-
at System.Web.HttpApplication.SyncEventExecutionStep.System.Web. HttpApplication.IExecutionStep.Execute()
-
at System.Web.HttpApplication.ExecuteStep(IExecutionStep step, Boolean& completedSynchronously)
On the client side we saw the following error:
This error occurs when a active and authenticated session on the web portal gets failed over or load balanced to another RD web portal server. IIS uses an encryption key to encrypt the data, and a validation key to check if the encrypted data is valid (session id, etc). Since the standard setting in IIS is to automatically generate these keys at runtime. The keys are different each time and are different on each members server of the farm. Because of this the web server which gets the session is unable to decrypt and validate the session because it has different keys.
To be able to use the authentication across all member computers in a farm, all the member servers must use the same validation and encryption keys. (Don’t change these settings on a live production environment). The first step is to generate the keys. Open IIS manager and navigate to the server or application, double click on machine key.
Clear all the check boxes “Generate a unique key for each application” and “Automatically generate at runtime” for both validation and decryption keys.
And then click Generate Keys in the Actions pane, and apply.
Copy and paste these keys to the other members of the farm. All new sessions should use these new keys enabling load balancing or fail over between the members of the farm.
Funny thing is, that after I changed this on our servers, I encountered an error on the Microsoft forefront mail site https://sts.messaging.microsoft.com. I was logged on and didn’t do anything for a while. After clicking on a link I saw the following:
Could this be the same issue? It looks an awful lot like it.
This is a step by step guide on how to set up SSO for Microsoft Remote Desktop Web Access (RD Web) on Okta.
How to set up SSO to Microsoft Remote Desktop Web Access (RD Web) with Okta
to set up Single Sign On (SSO) to Microsoft Remote Desktop Web Access (RD Web) with Okta we need to configure RD Web Access with Okta.
What is Microsoft Remote Desktop Web Access (RD Web)?
Remote Desktop web client (also known as RD Web or now Remote Desktop Services), allows users to access an organisation’s Remote Desktop infrastructure through a compatible web browser. They will be able to access remote apps and/or virtual desktops (VDIs) as they would if they were on the local PC.
The key steps we will be going through will be:
- Prerequisites
- Add Microsoft Remote Desktop Web Access (RD Web) app to your Okta instance
- Set up SSO settings on Microsoft Remote Desktop Web Access (RD Web)
- Test and confirm that it is working
Prerequisites
Before you can start setting up Single Sign On (SSO) for Microsoft Remote Desktop Web Access (RD Web) and Okta, we need to check the following:
- Access to Windows Server — Confirm that you have administrator access to your Windows Server
- Access to Okta Admin Console — Confirm that you have administrator access to Okta’s Admin Console. If you do not have an Okta account, you can create a free Okta Trial account or Okta Developer account.
1. Add Microsoft Remote Desktop Web Access (RD Web) app to your Okta instance
To configure the Microsoft Remote Desktop Web Access (RD Web) application in Okta we will set up the application in Okta.
Log in to your Okta account as an administrator (with administrator access).
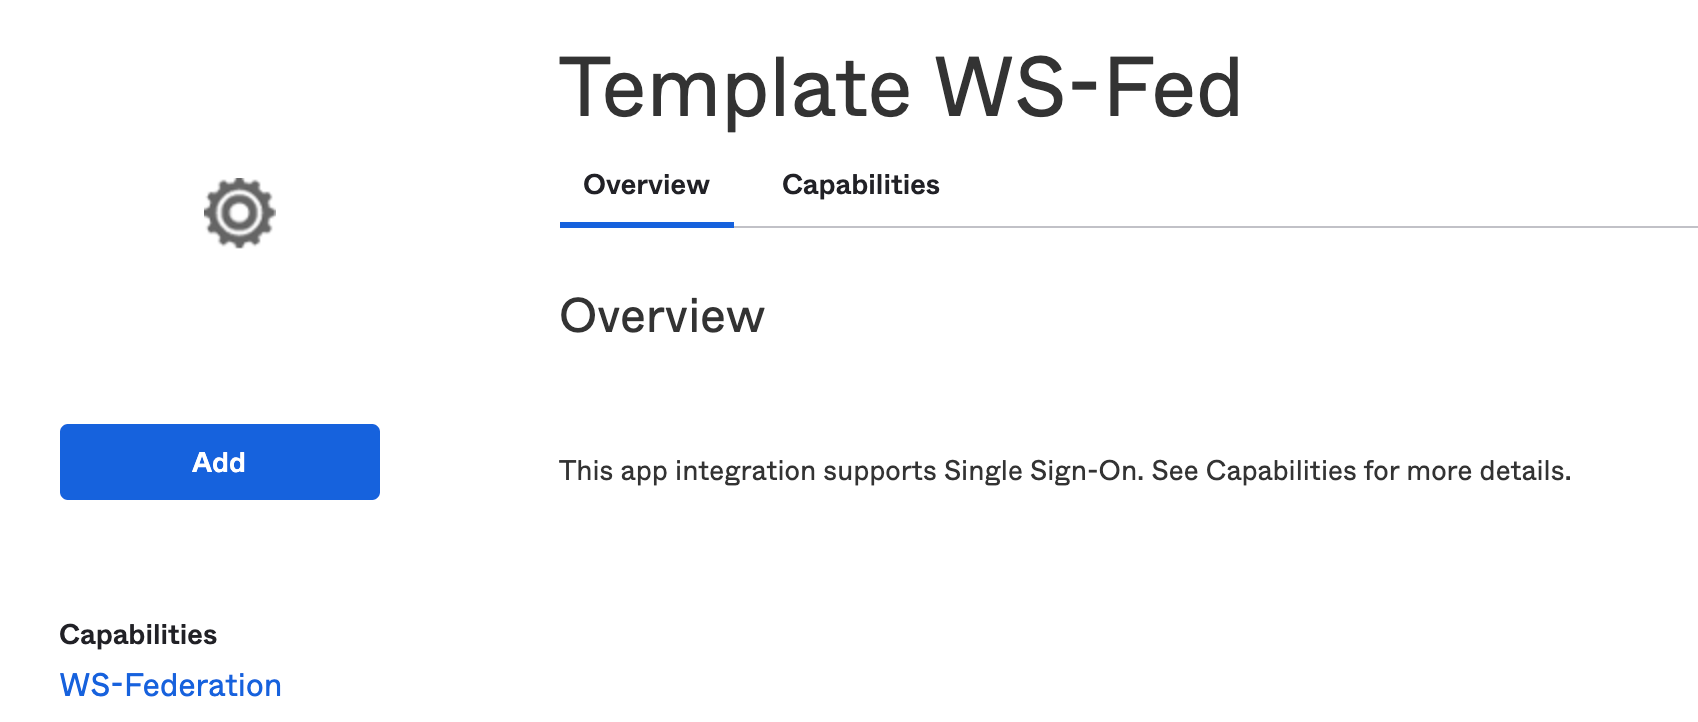
Under Applications> Applications, search for the Template WS-Fed (WS-Federation Template) app in the Okta Integration Network (App Integration Catalog).
Add Template WS-Fed app in.
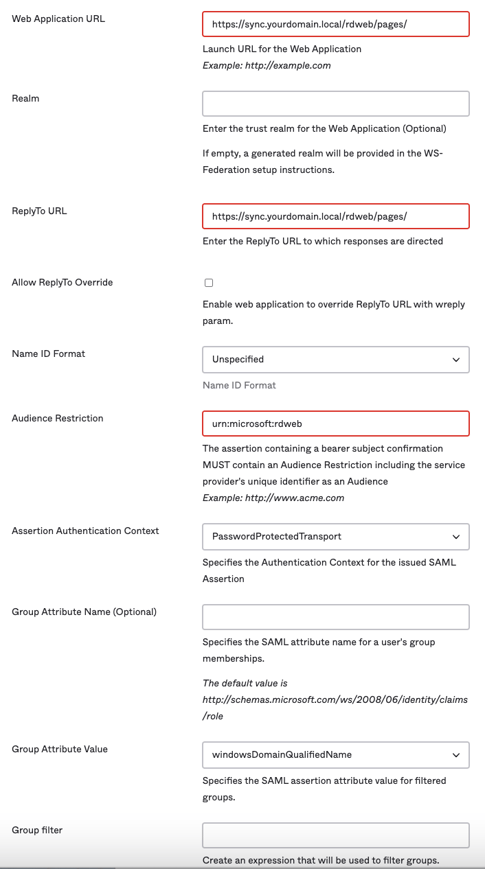
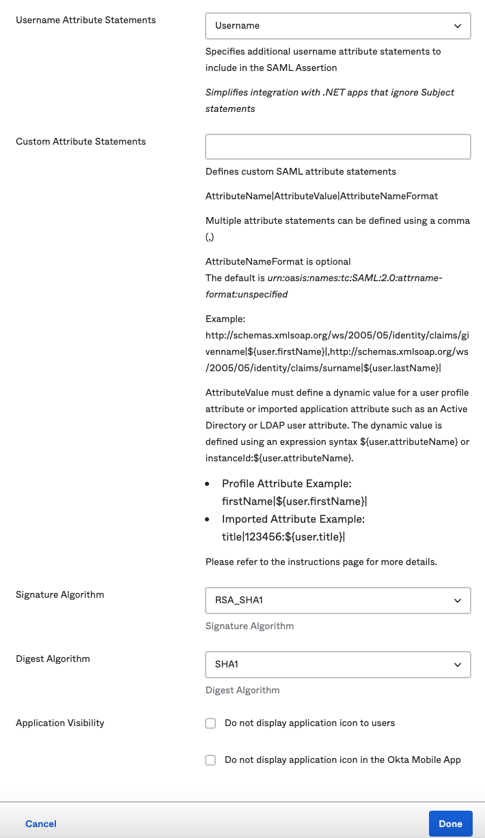
Fill in the Template WS-Fed > Add Template WS-Fed options and click Done.
- Application label — Name your Template WS-Fed app. Let’s call it «Remote Desktop Web (RD Web)».
- Web Application URL — https://<your RD Web domain>/rdweb/pages/. For example https://sync.vulongtran.local/rdweb/pages/. This is the launch URL for the Web Application.
- (Optional) Realm — Leave blank. If we leave it blank, a generated realm will be provided in the WS-Federation setup instructions which we will use later.
- ReplyTo URL — https://<your RD Web domain>/rdweb/pages/. For example https://sync.vulongtran.local/rdweb/pages/
- Enter the ReplyTo URL to which responses are directed.
- Allow ReplyTo Override — Unchecked
- Name ID Format — Unspecified
- Audience Restriction — urn:microsoft:rdweb. The assertion containing a bearer subject confirmation must contain an Audience Restriction including the service provider’s unique identifier as an Audience
- Assertion Authentication Context — PasswordProtected Transport
- Group Attribute Value — windowsDomainQualifiedName
- (Optional) Group Attribute Name — Leave blank
- Username Attribute Statements — UPN. Make sure this matches the User Attribute setting type that you have for your users in Active Directory (AD).
- Custom Attribute Statements — Leave blank
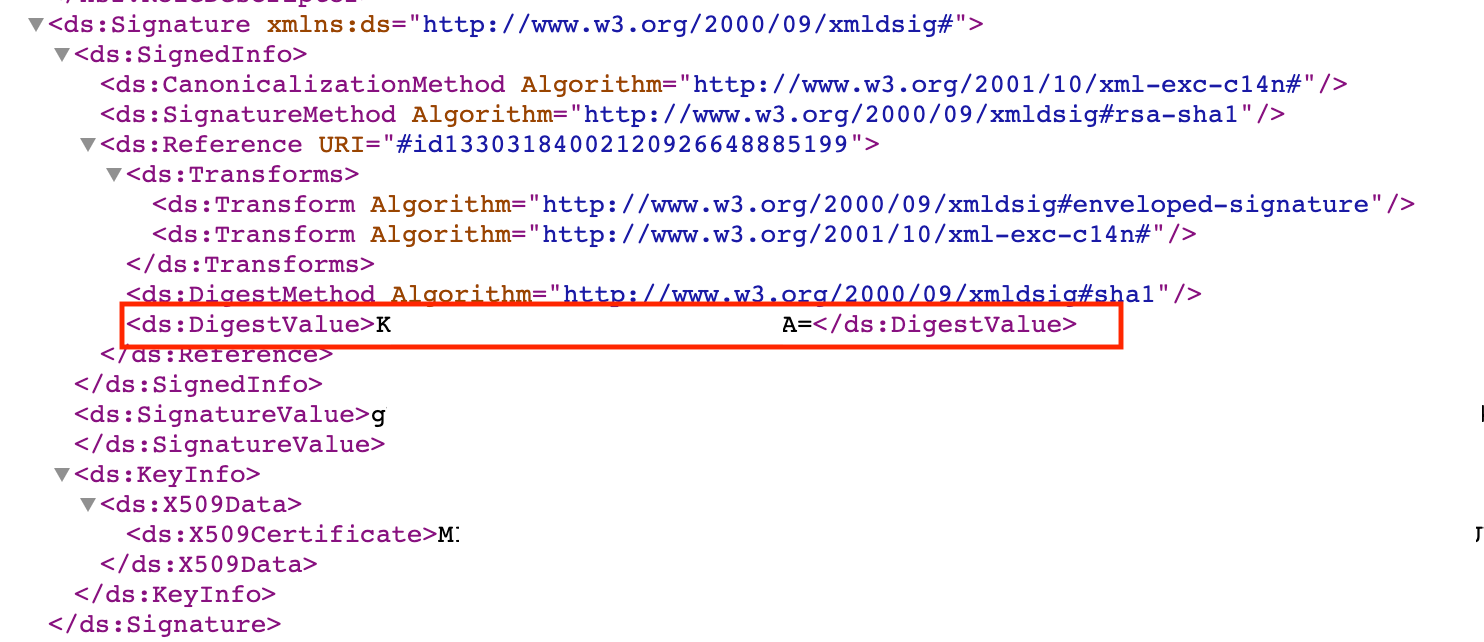
- Signature Algorithm — RSA_SHA1
- Digest Algorithm — SHA1
Click Done.
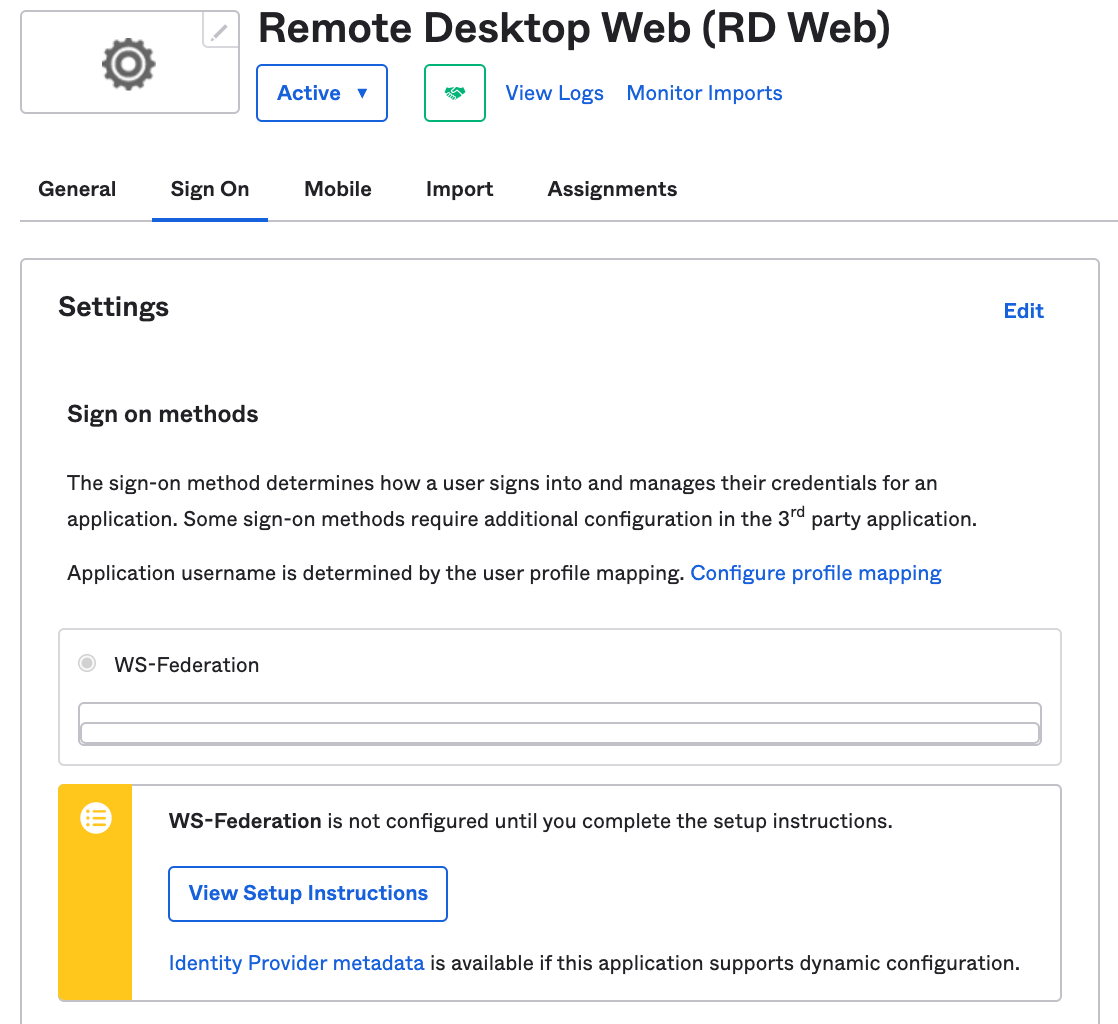
Click on the «Sign On» tab.
Scroll down on the page and click on «View Setup Instructions«.
Click on «View Setup Instructions«.
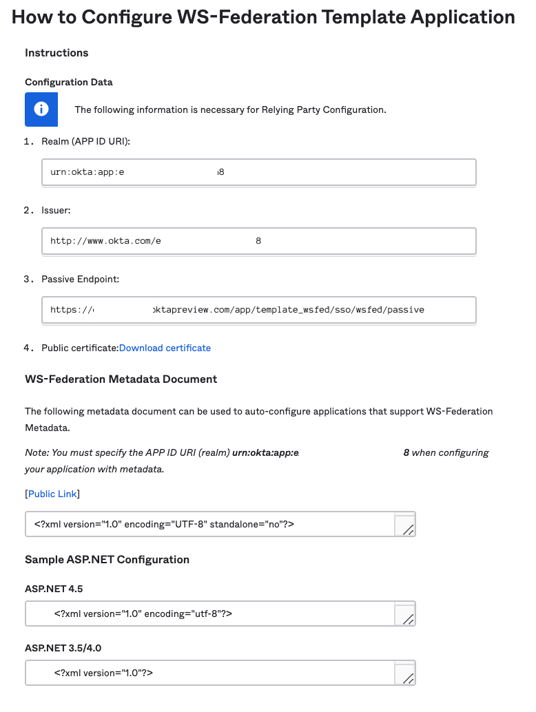
Please take note of the details on this «View Setup Instructions«, we will need this later on.
Copy or Download WS-Federation Certificate details
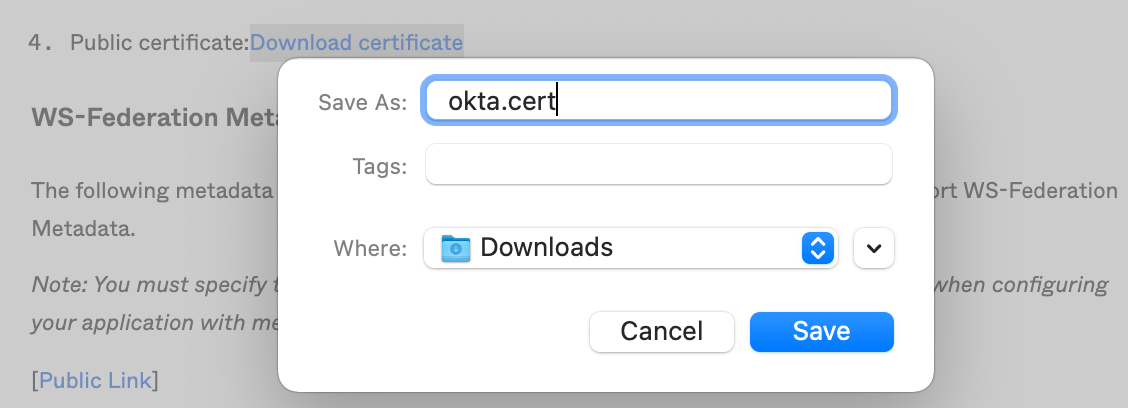
We will need our «Public certificate: Download certificate» details. As this is our x509 certificate.
You can save a copy of this certificate temporarily on your computer by right clicking the link and using the «Save Link As…» option.
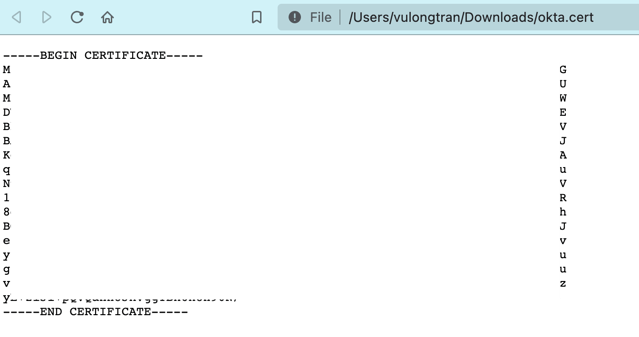
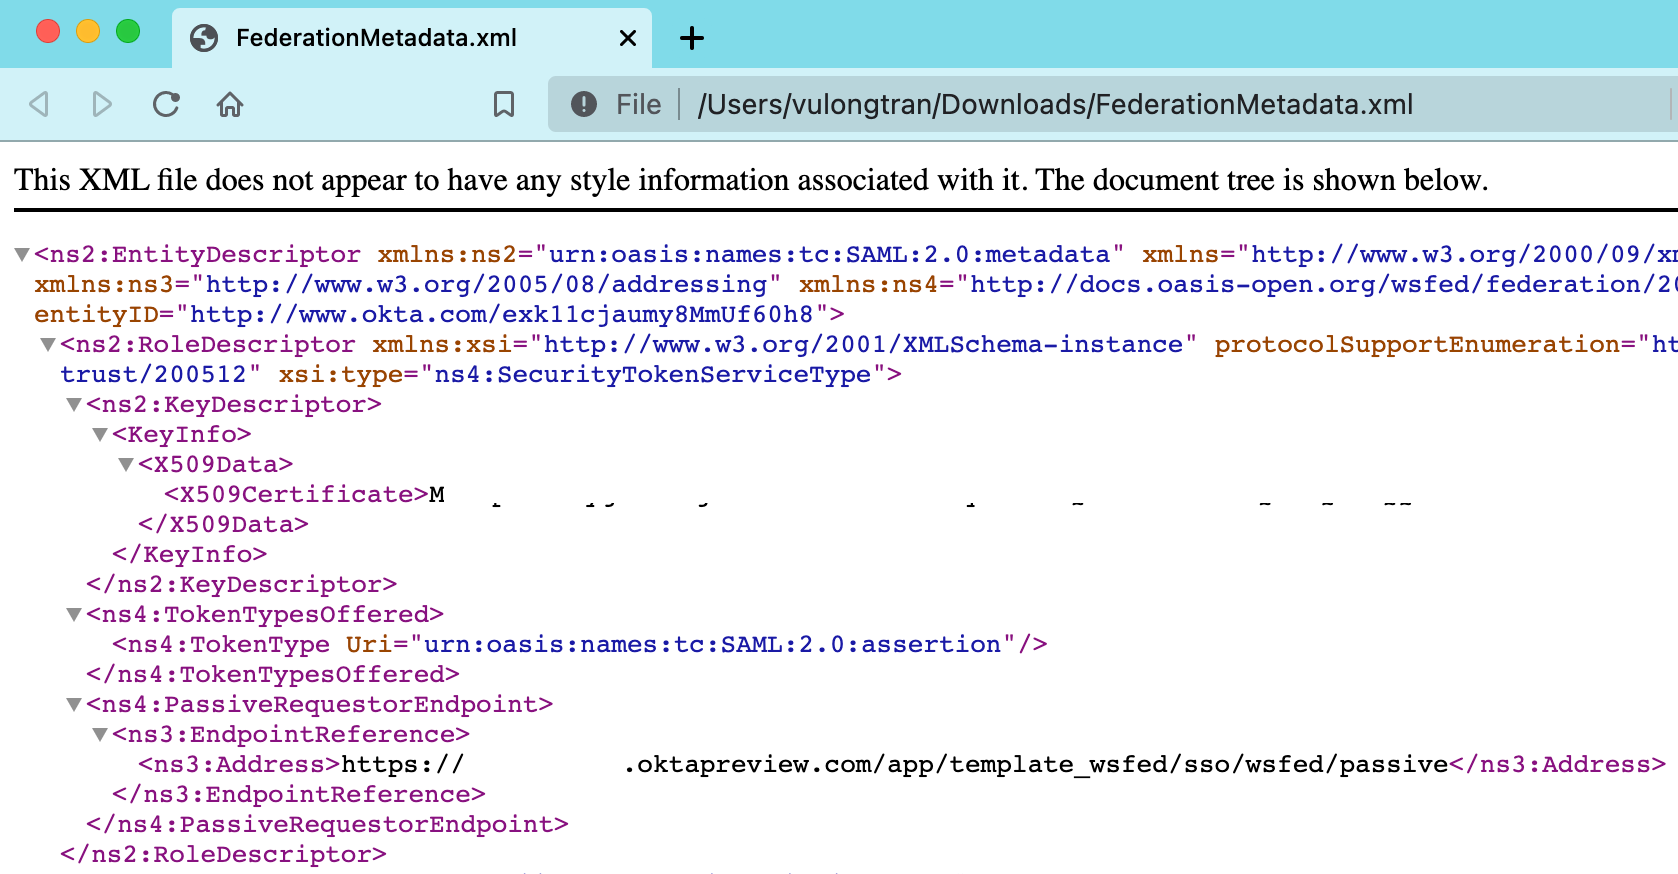
You can drag and drop into your web browser if you want to see what is inside the document. Later we will need this X509 certificate details.
(Optional) Download WS-Federation Metadata Document file
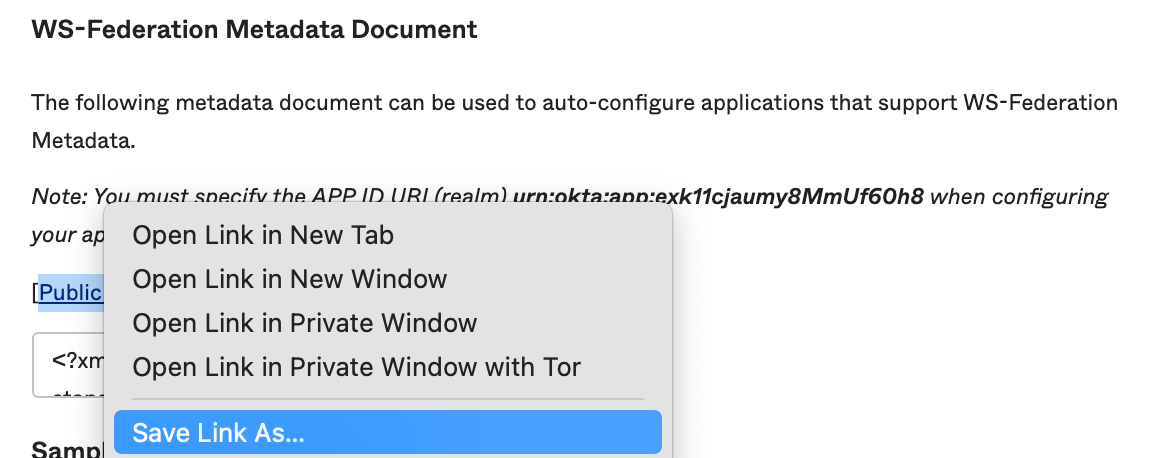
We can do the same with the «WS-Federation Metadata Document» which is our FederationMetadata.xml if we want to get our raw WS-Fed metadata xml file.
Save a copy by right clicking the link and using the «Save Link As…» option.
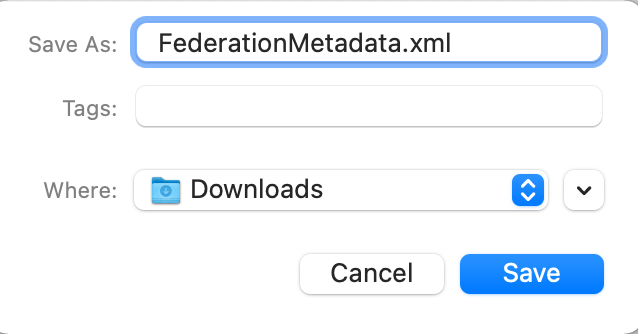
Save the file as your preferred file name, I will just leave it as «FederationMetadata.xml».
You can drag and drop the «FederationMetadata.xml» file into your web browser if you want to see what is inside the document. It is presenting the same details we saw earlier, so just showing you the other way of seeing these details in a more raw way if you prefer working with the raw metadata xml files.
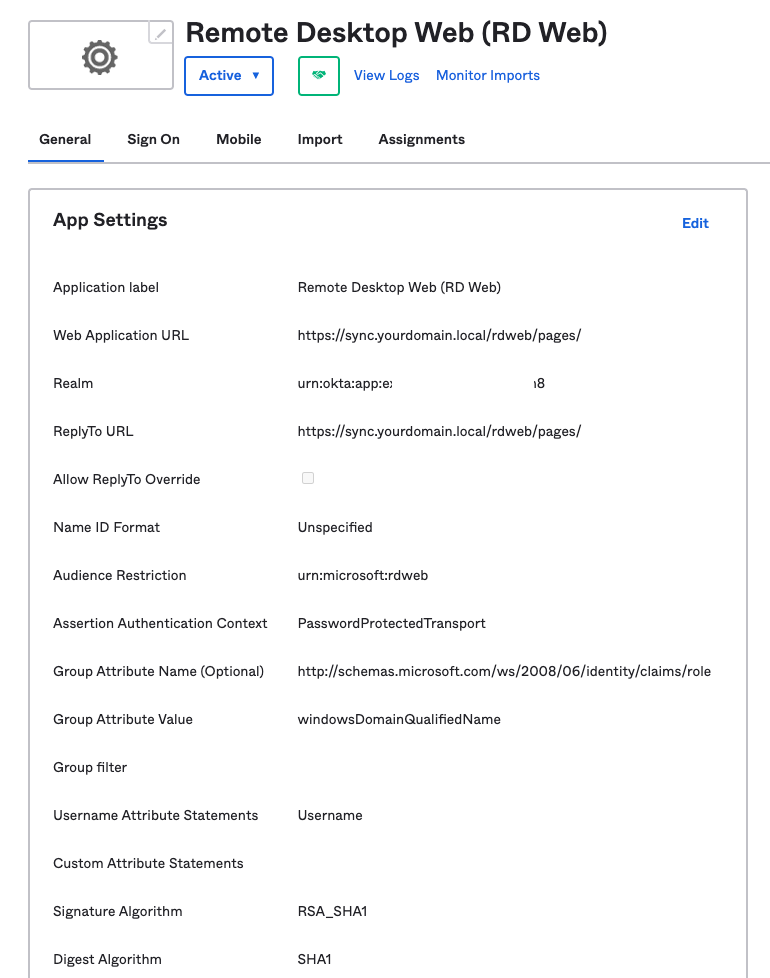
At any point of time we need to update our Remote Desktop Web (RD Web) app details in Okta. We can find it when we go to:
Okta> Applications > Applications > Remote Desktop Web (RD Web) > General tab.
There you will be able to see the settings that you have configured that you can update.
2. Set up SSO settings on Windows Server
Log into your Windows Server as administrator, we will install and configure components required for Single Sign On (SSO) to operate.
Steps:
Step A — Check your current settings
Step B — Install «Remote Desktop Services»
Step C — Install «Windows Identity Federation (WIF)»
Step D — Configure Remote Desktop Services
Step A — Check your current settings
On a server that running Windows Server 2012, open and to go:
Server Manager > Add Roles and Features
We will be looking to enable each of the features (if not enabled already):
- Remote Desktop Services (RDS)
- Windows Identity Federation (WIF)
- Internet Information Services (IIS)
Check that the checkbox for each is checked.
We will walkthrough installing Remote Desktop Services (RDS) and Windows Identity Federation (WIF), as the required Internet Information Services (IIS) will be installed as part of the process of installing RDS and WIF.
Step 1 — Install «Remote Desktop Services»
Let’s install Remote Desktop Services (RD Services) if we have not already. As part the steps, we will be installing Remote Desktop Services subcomponents such as RD Web, etc.
On a server that running Windows Server 2012, open and to go:
Server Manager > Add Roles and Features
Click on «Add Roles and Features»
Click Next.
Make sure «Role-based or feature-based installation» is selected. Click Next.
Select your preferred Windows server. Click Next.
Tick the «Remote Desktop Services» checkbox and make sure it is selected. Click Next.
Leave thee
Click Next.
Click Next.
Select the following as a minimum and then click Next.
- Remote Desktop Gateway
- Remote Desktop Web Access
Click Add Features.
Click Add Features.
You will then see the key services you have selected ticked. Click Next.
Click Next.
Click Next.
Click Next.
Click Next.
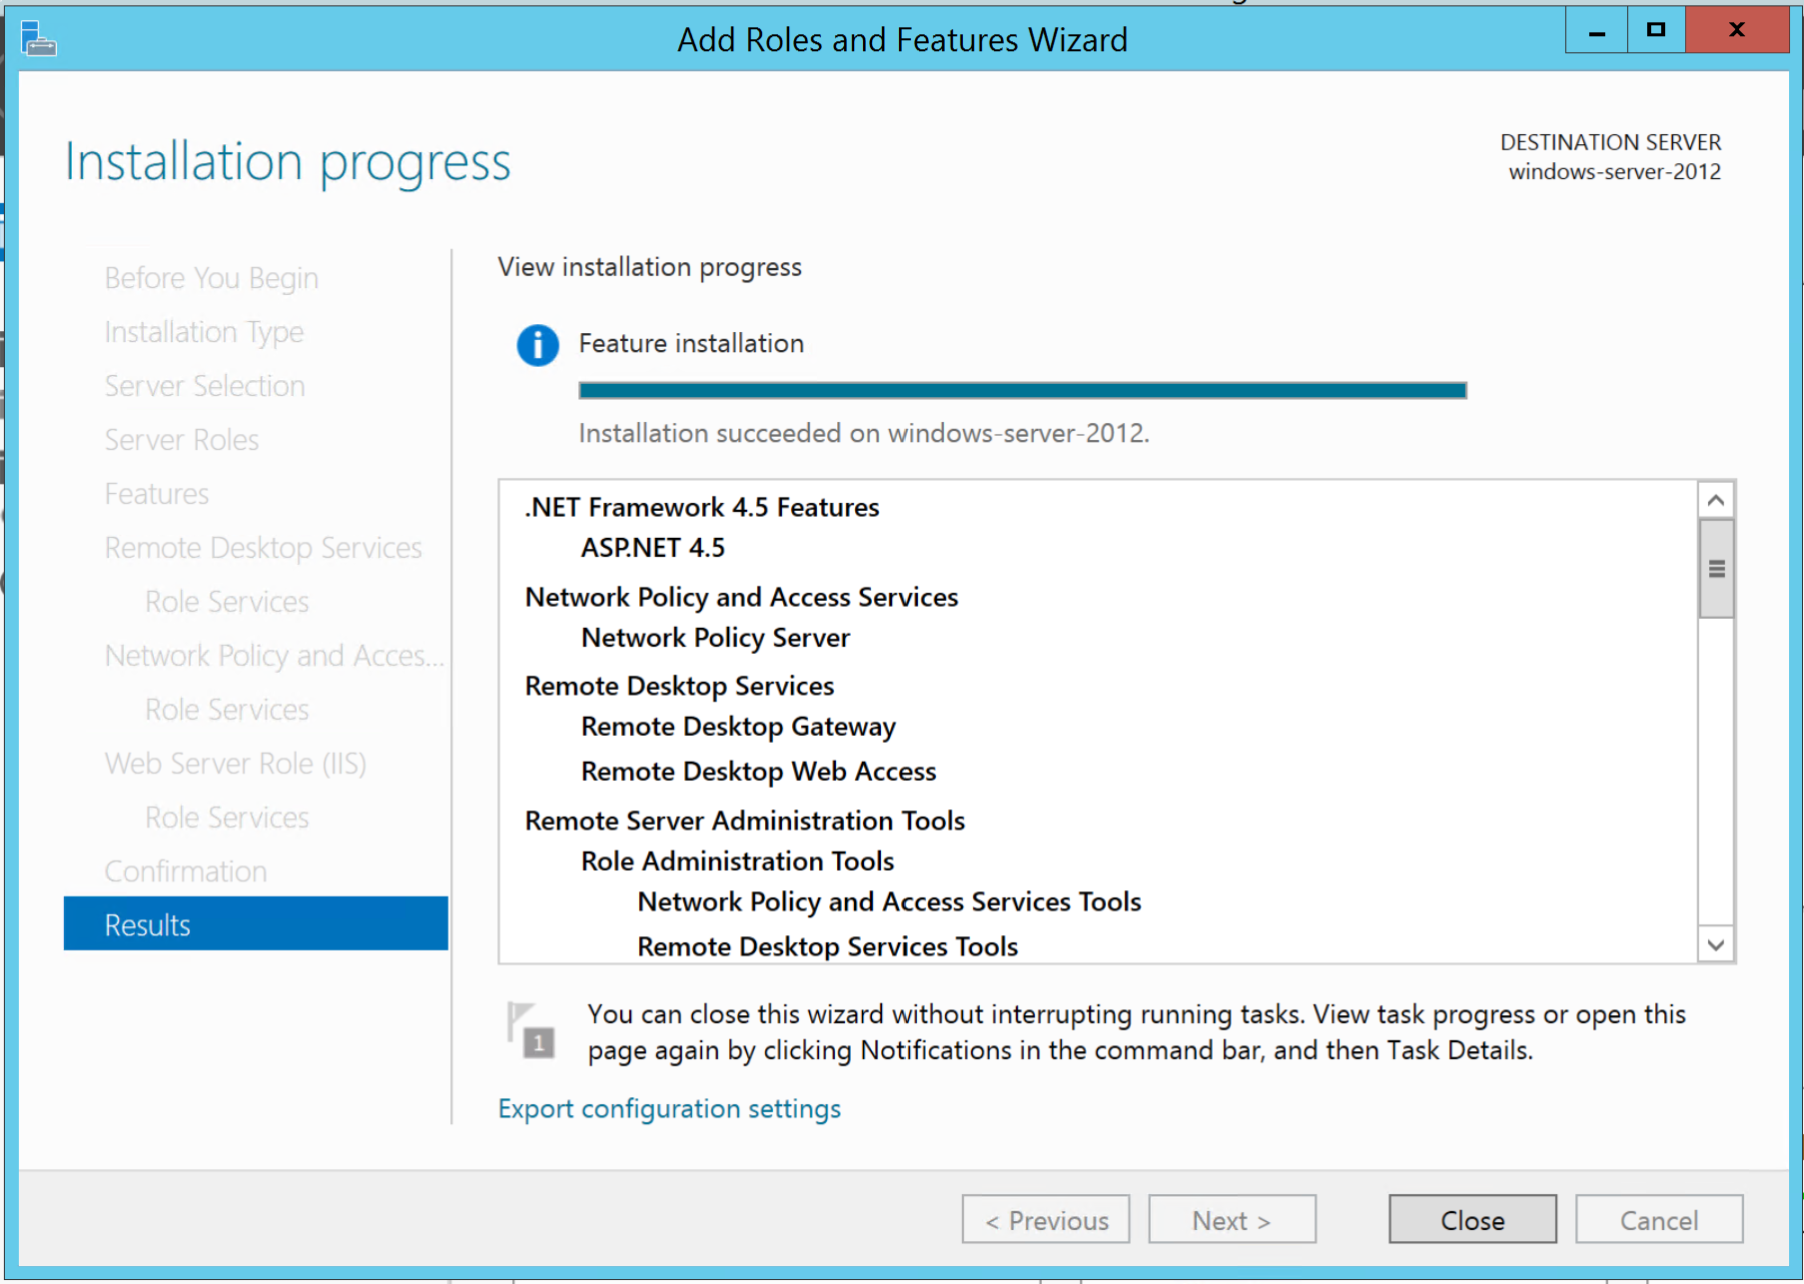
Click Install.
Wait for it to install.
Step C — Install Windows Identity Foundation 3.5
Windows Identity Foundation (WIF) is a new extension to the Microsoft .NET Framework that makes it easy for developers to enable advanced identity capabilities in the .NET Framework applications. It is a core component in configuring RD Web for Single Sign On.
The Windows Identity Foundation uses a claims-based identity model and can be used to enable single sign-on (SSO), personalization, federation, strong authentication, identity delegation, and other identity capabilities in ASP.NET and Windows Communication Foundation (WCF) applications that run on-premises or in the cloud.
Open Server Manager > Add Role> Features
Check that the checkbox for «Windows Identity Foundation 3.5» is checked.
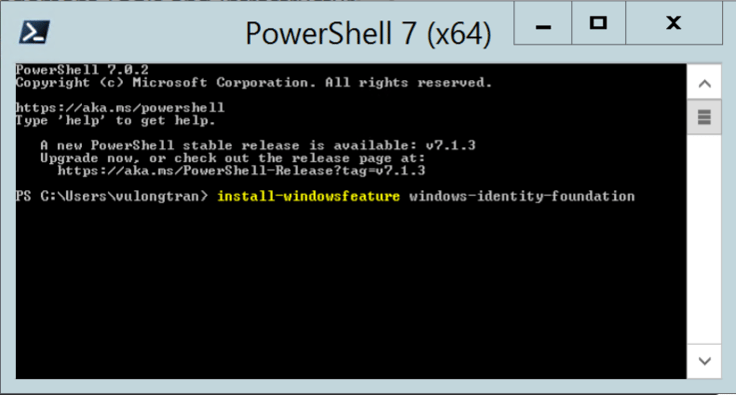
If the «Windows Identity Foundation 3.5» option is not there, you may need to install Windows Identity Foundation manually for what Microsoft refers to as your «Windows Core». The easiest way to install this is to run a PowerShell/ cmd command with Administrator permissions on your Windows Core on your Windows 2012 R2 server:
install-windowsfeature windows-identity-foundation
Here are some step by steps:
Open PowerShell with «Run as Administrator».
Copy and paste the command (or type the command).
install-windowsfeature windows-identity-foundation
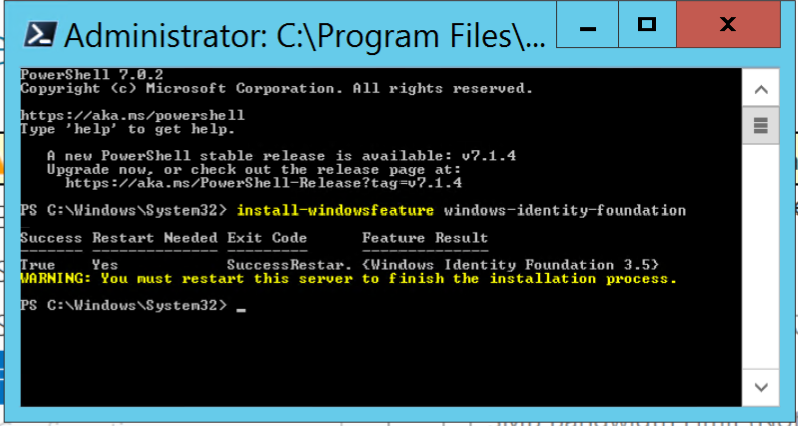
Watch it run.
When it is done, it will tell you to restart your Windows Server 2012 R2.
Step C — Configure Microsoft Remote Desktop Services
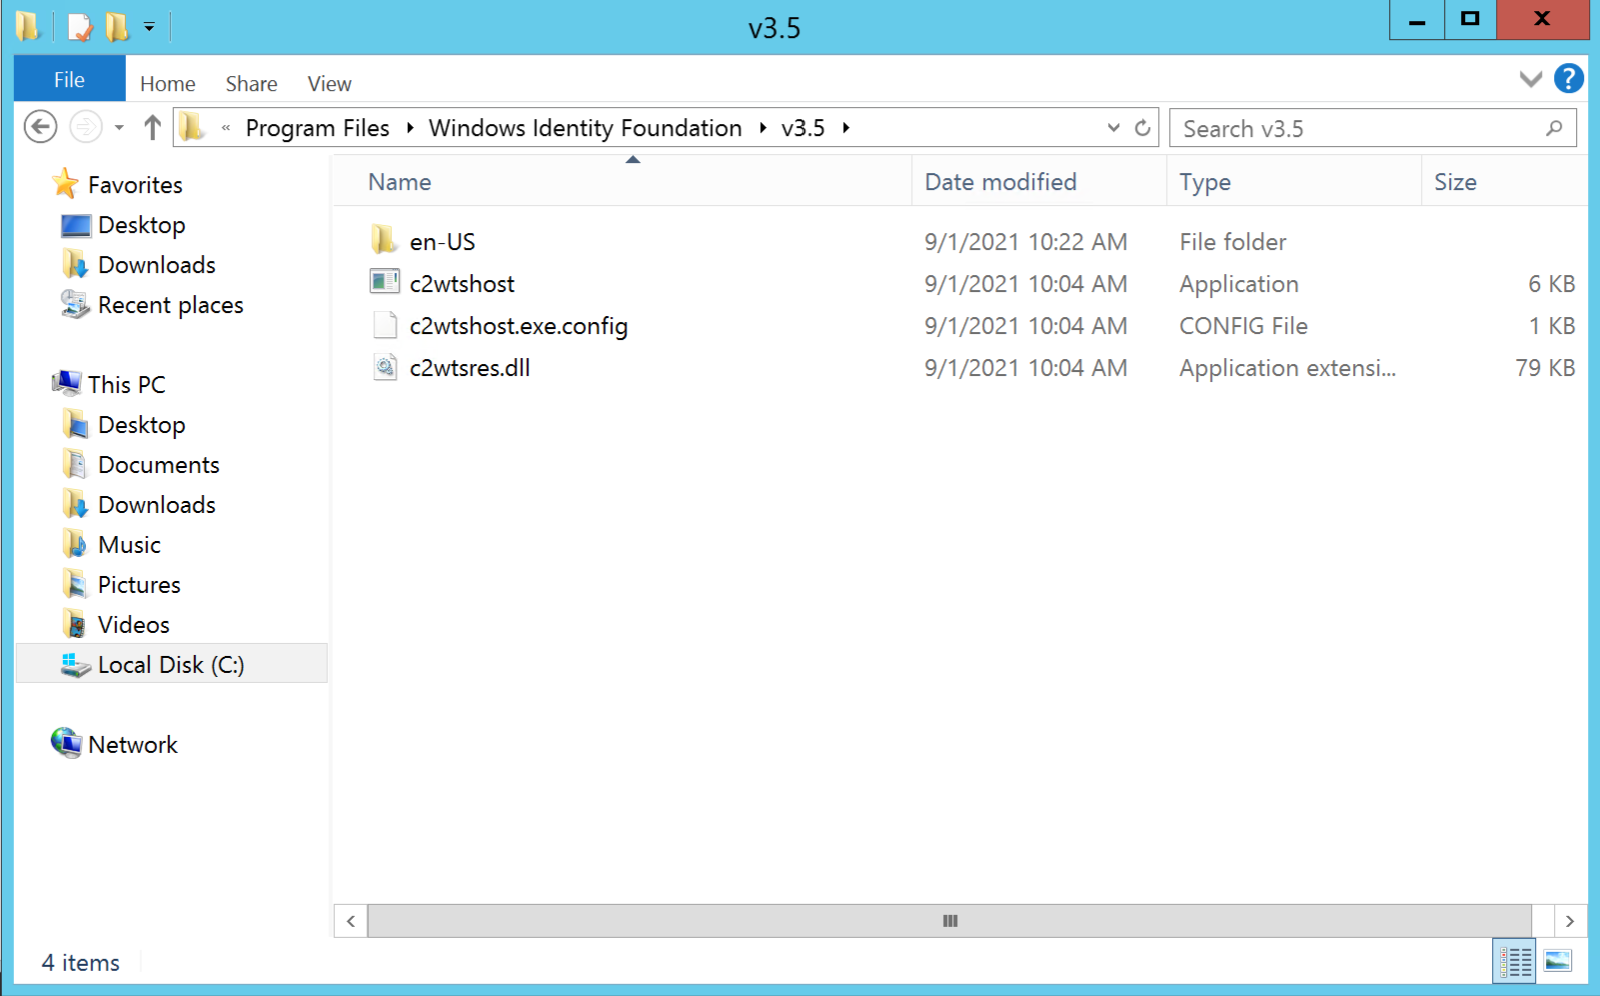
Modify the C2WTShost.exe.config File for Windows Identity Foundation 3.5
Go to:
C:Program FilesWindows Identity Foundationv3.5c2wtshost.exe.config
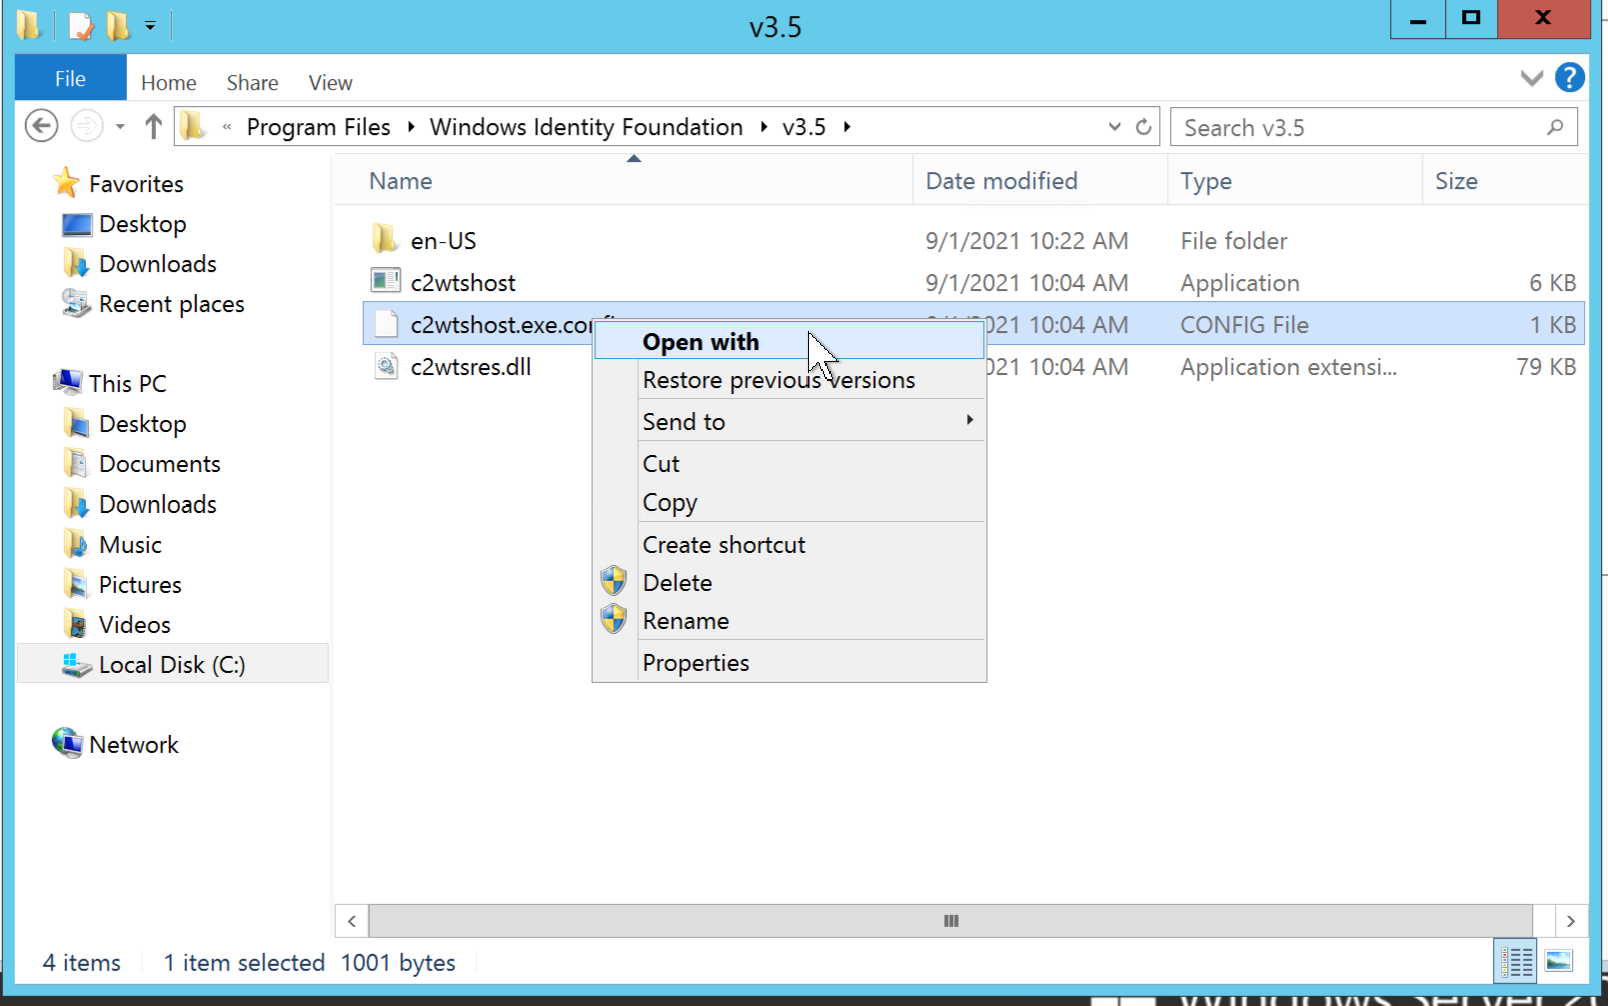
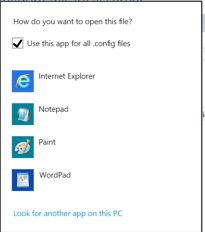
Open a text editor such as Notepad with elevated permissions (Run as Administrator) and open the c2wtshost.exe.config file.
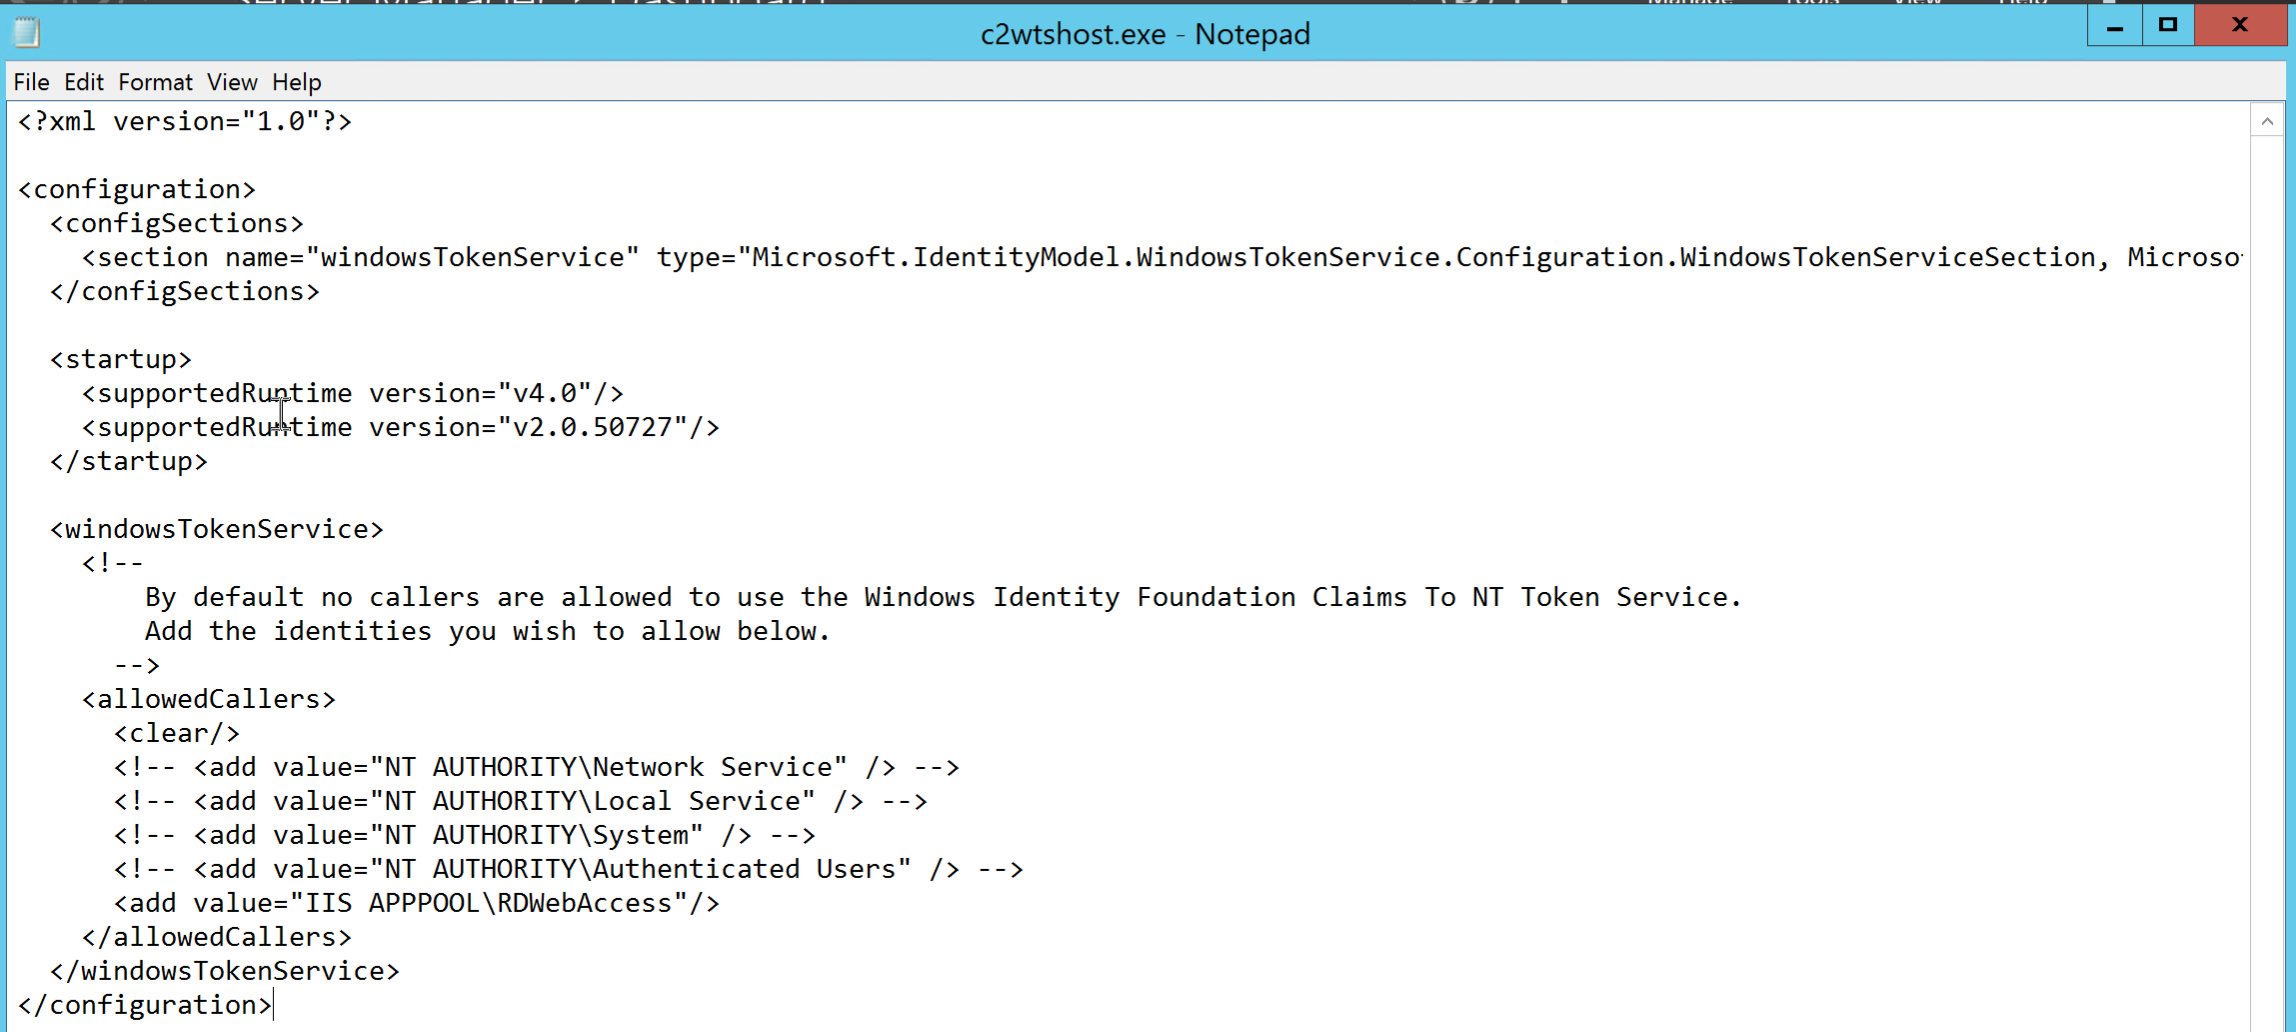
Add this Application Pools to your config file, as it will set RD Web application pool access as an allowed caller:
<add value="IIS APPPOOLRDWebAccess"/>
The full c2wtshost.exe.config file looks like the following with this line included in it:
<?xml version="1.0"?>
<configuration><configSections><section name="windowsTokenService" type="Microsoft.IdentityModel.WindowsTokenService.Configuration.WindowsTokenServiceSection, Microsoft.IdentityModel.WindowsTokenService, Version=3.5.0.0, Culture=neutral, PublicKeyToken=31bf3856ad364e35"/></configSections>
<startup><supportedRuntime version="v4.0"/><supportedRuntime version="v2.0.50727"/></startup>
<windowsTokenService><!--By default no callers are allowed to use the Windows Identity Foundation Claims To NT Token Service.Add the identities you wish to allow below.--><allowedCallers><clear/><!-- <add value="NT AUTHORITYNetwork Service" /> --> <!-- <add value="NT AUTHORITYLocal Service" /> --><!-- <add value="NT AUTHORITYSystem" /> --><!-- <add value="NT AUTHORITYAuthenticated Users" /> -->
<add value="IIS APPPOOLRDWebAccess"/></allowedCallers></windowsTokenService></configuration>
Enable and set Claims to Windows Token Service (C2WTS)
We will now need to enable and set the Claims to Windows Token Service (C2WTS).
Search and open services.msc.
In the list of services, locate Claims to Windows Token Service.
Right-click it, then click Properties.
Set the Startup type is set to Automatic.
Click Start to begin the service.
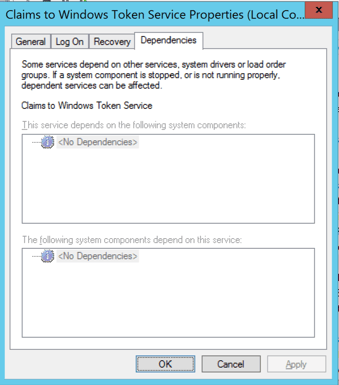
(Optional) Click on Dependencies tab and take note that there is no dependencies listed. We will change that in the next step.
When you are ready, click Done.
Configure the Claims to Windows Token Service (C2WTS) to start after the Cryptographic Services Service
Claims To Windows Token Service (c2WTS) has a dependency on Cryptographic Services service. So we want to make sure that Cryptographic Services Service will start before C2WTS, by explicitly adding the following dependency in the service definition:
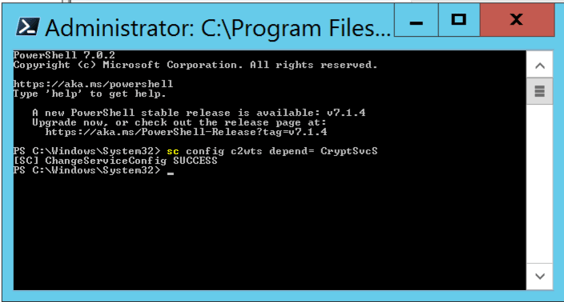
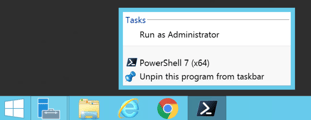
Open PowerShell 7 with «Run as Administrator».
Copy and paste the command (or type the command) and press Enter.
sc config c2wts depend= CryptSvc
Now let’s go back to the «Claims to Windows Token Service» service settings.
Search and open services.msc.
In the list of services, locate Claims to Windows Token Service.
Right-click it, then click Properties.
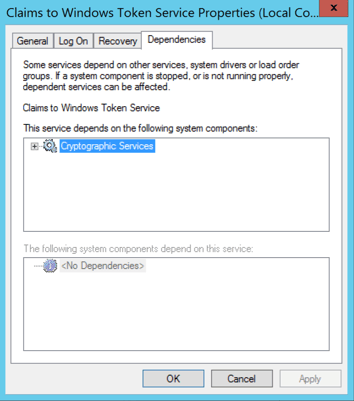
Click on the Dependencies tab, ensure that «Cryptographic Services» (also known as CryptSvc) is listed.
Click OK.
Step D — Configure Microsoft Remote Desktop Services RDWeb access
Update the RD Web AccessApplication Pool
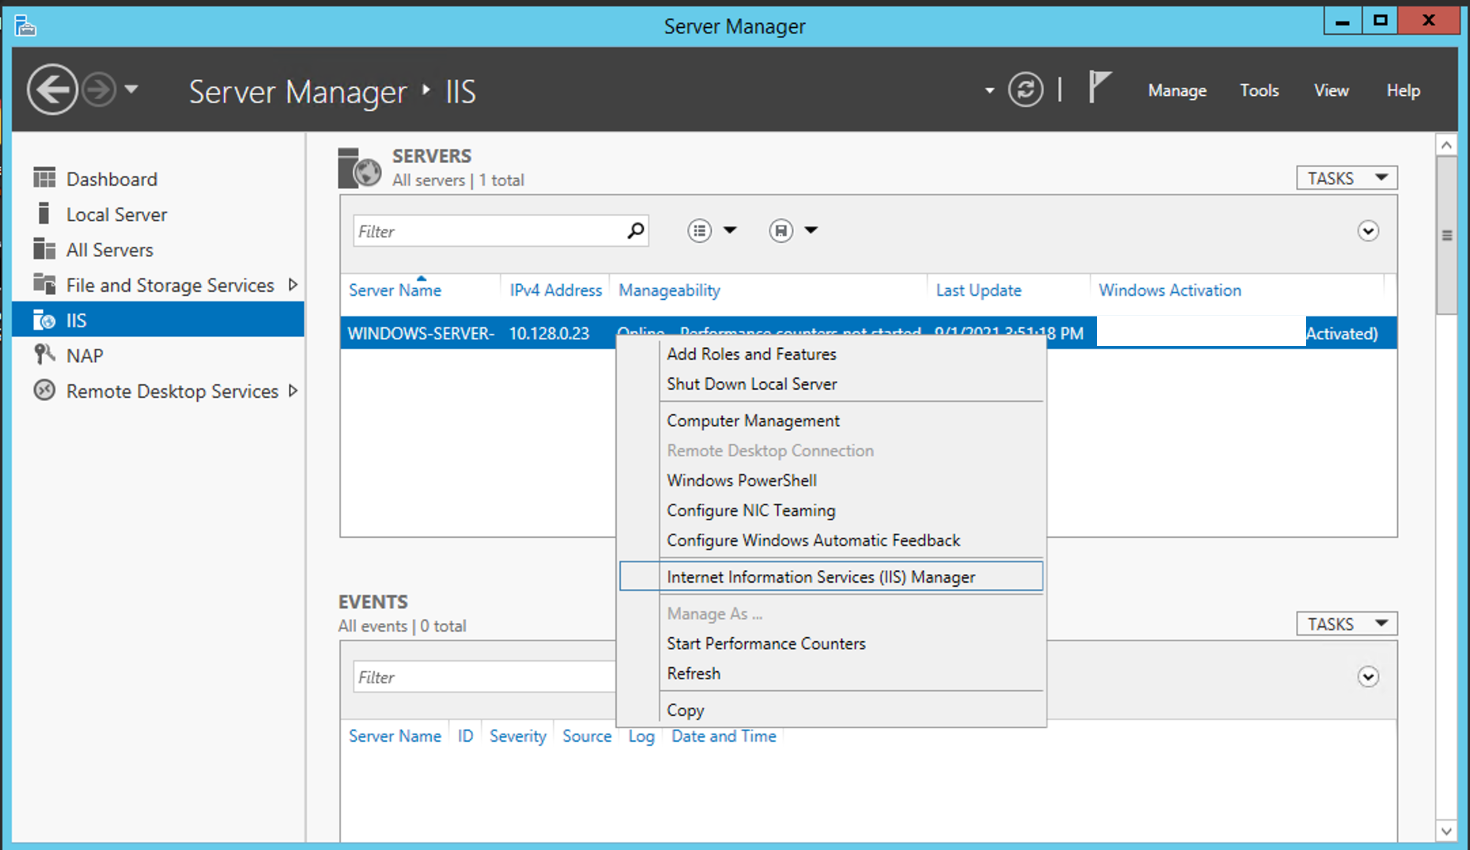
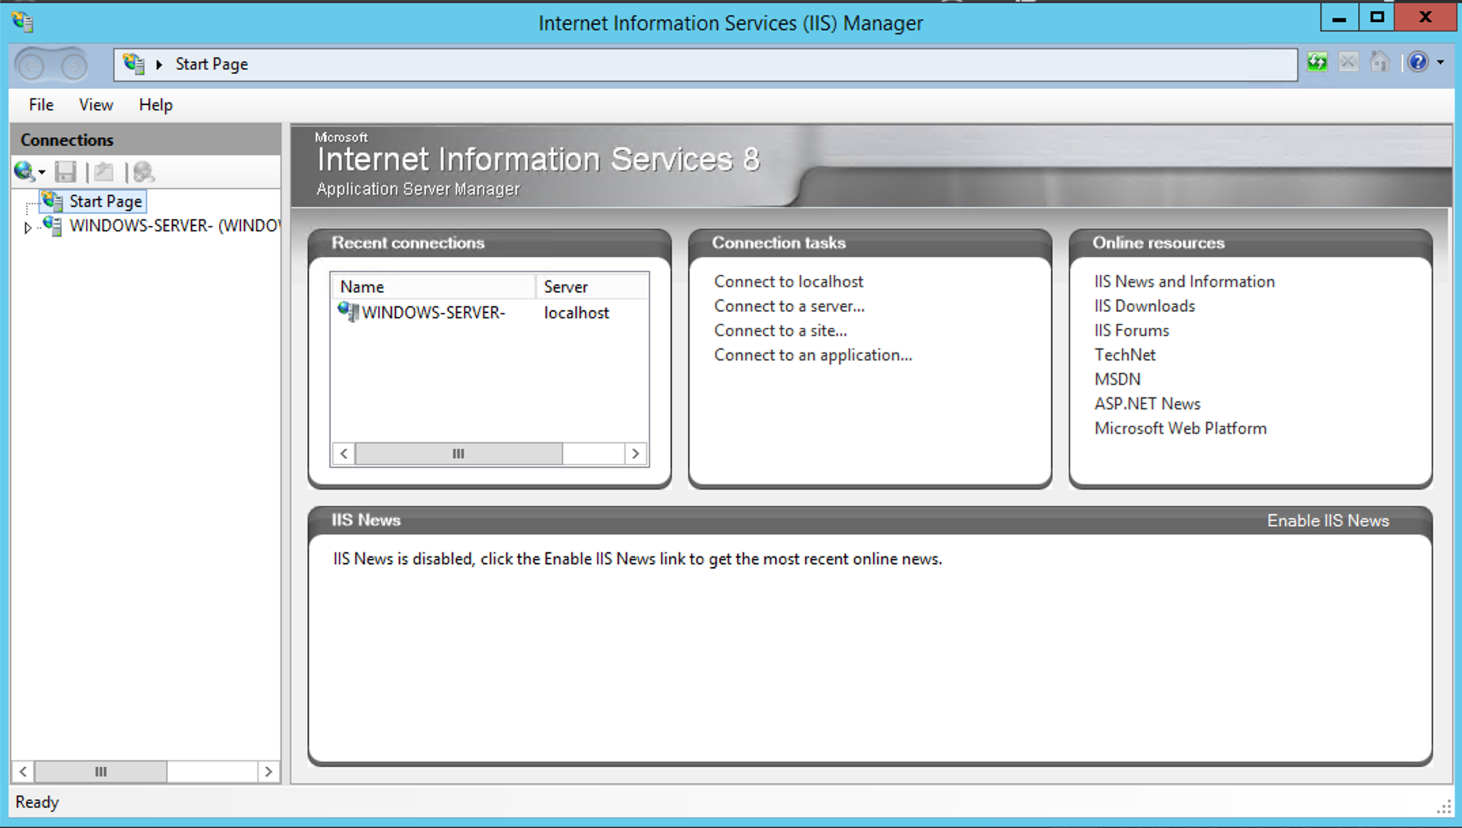
In Server Manager > IIS > Internet Information Services (IIS) Manager.
You should then see the Internet Information Services (IIS) Manager.
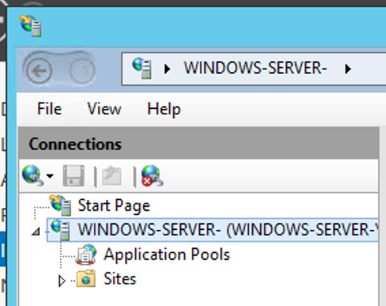
Click on your Windows Server (where you have installed Remote Desktop Web) and it expand out.
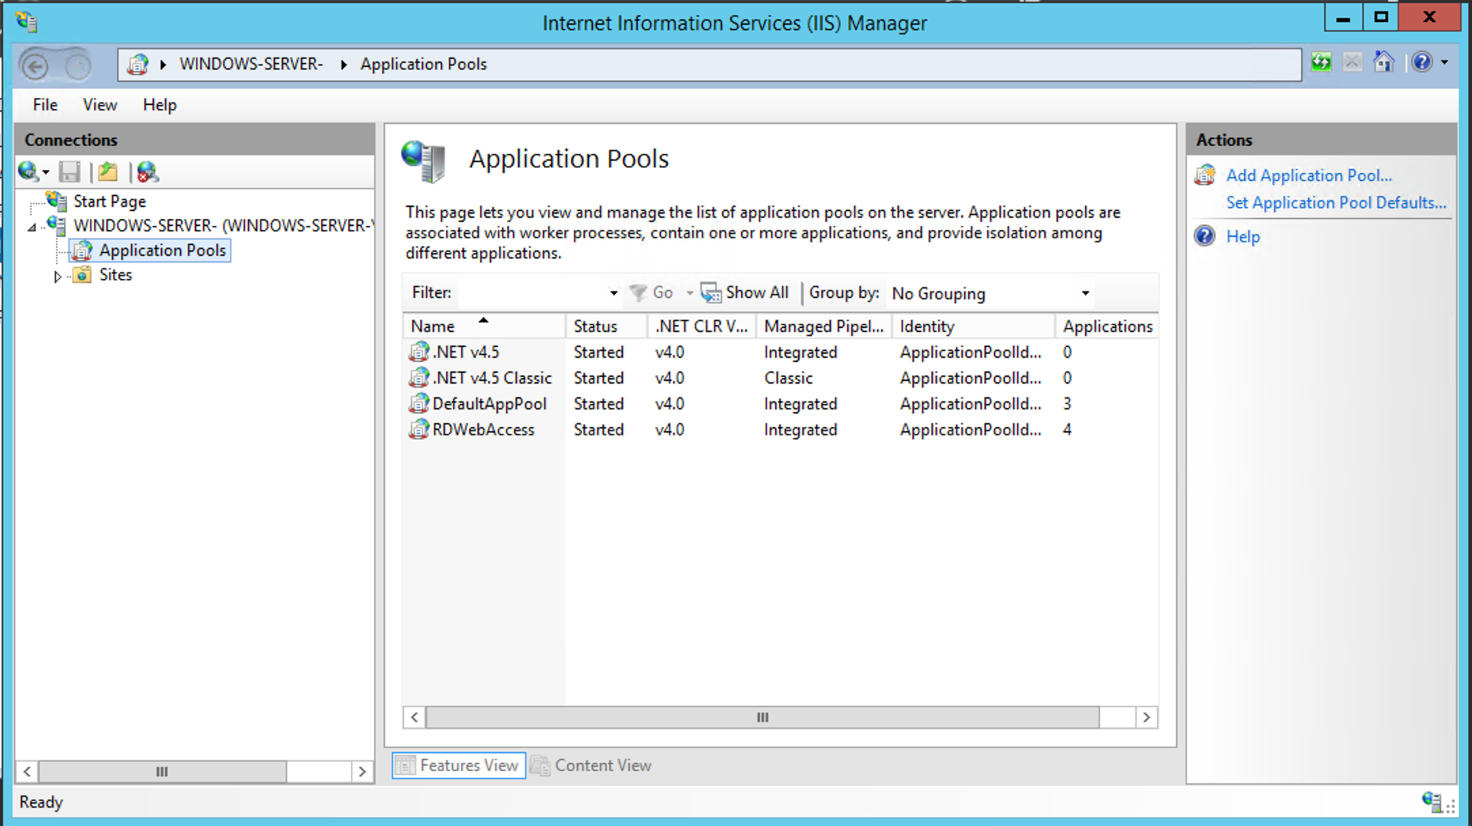
Click on «Application Pools«.
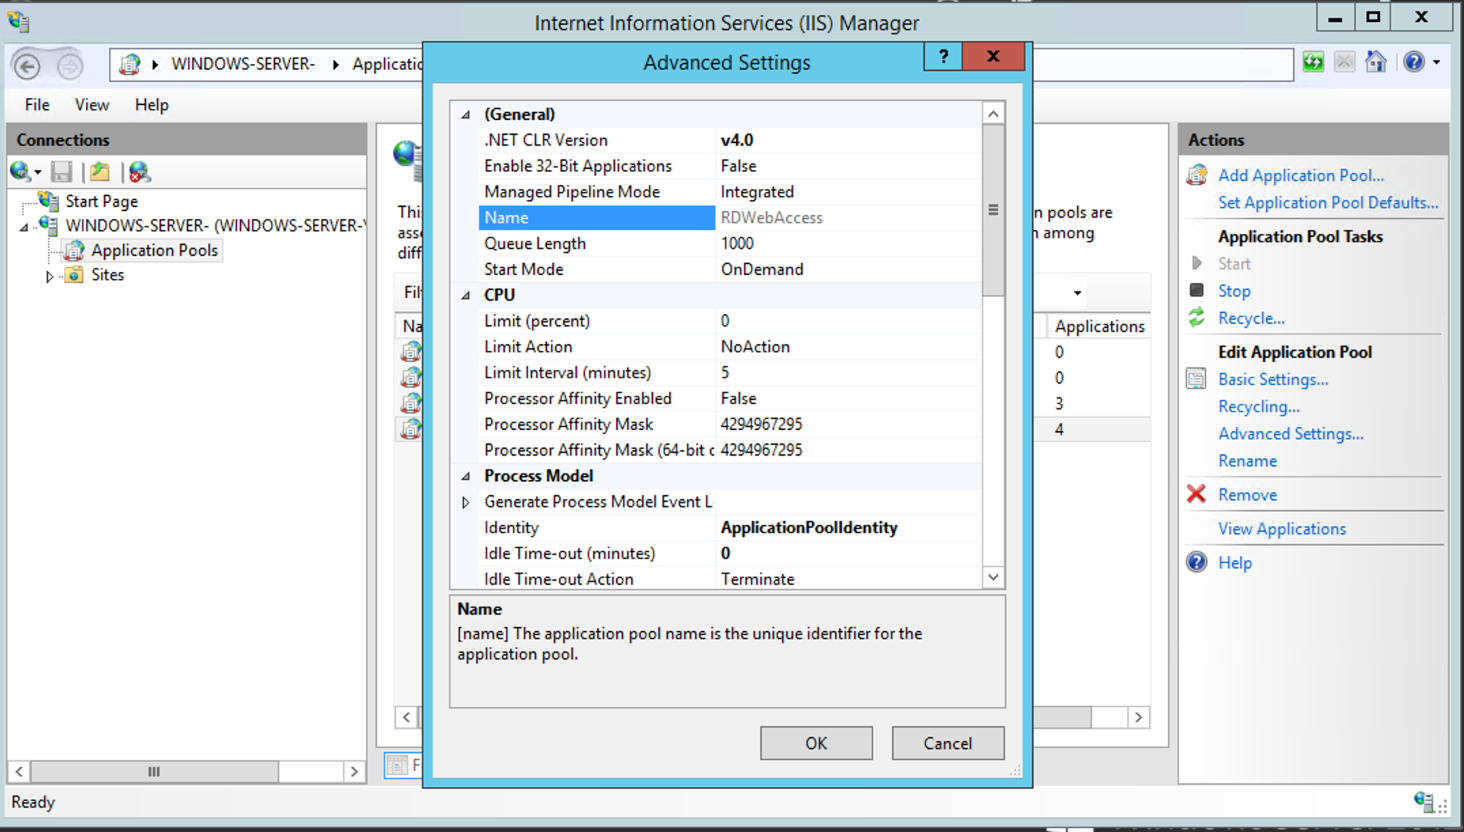
Click on «RDWebAccess» application pool.
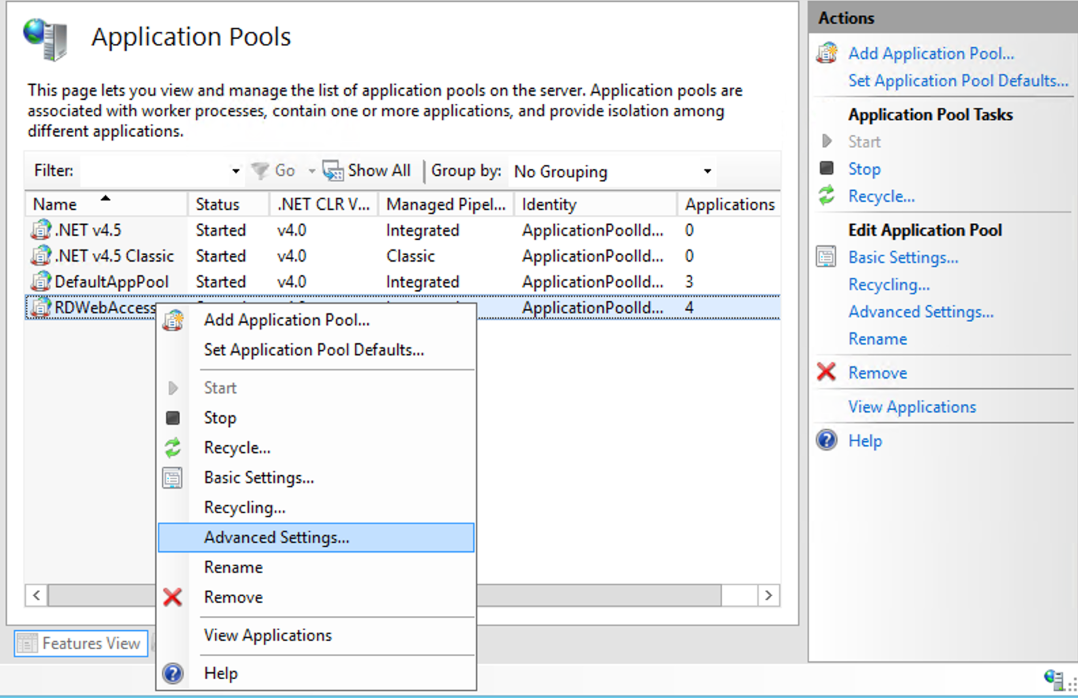
Right-click the «RDWebAccess» application pool, then select Advanced Settings.
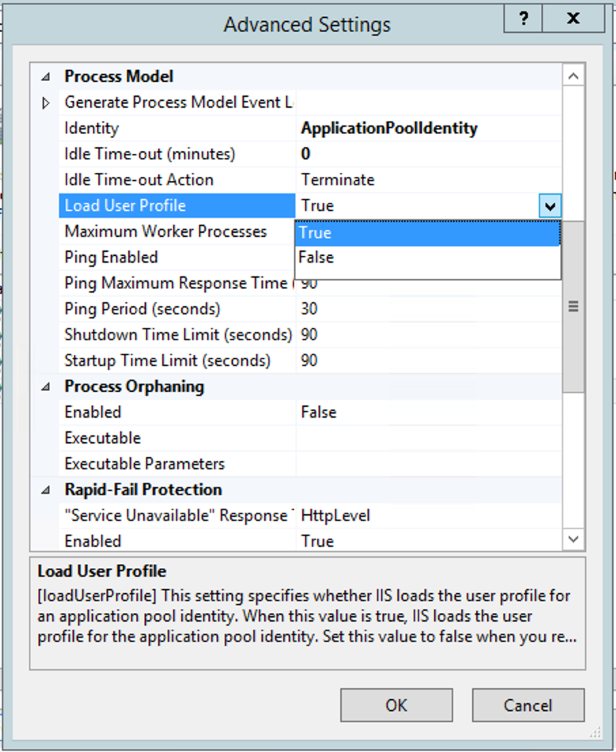
Scroll down on the «Advanced Settings«.
Select True from the Load User Profile options, then click OK.
In your Internet Information Services (IIS) Manager (Server Manager > IIS > Internet Information Services (IIS) Manager).
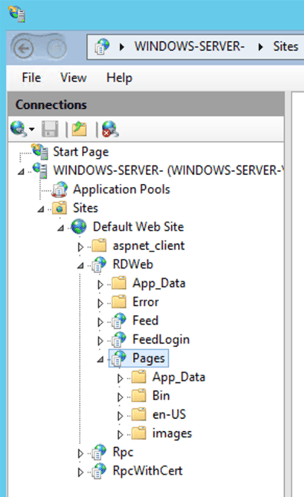
Go to:
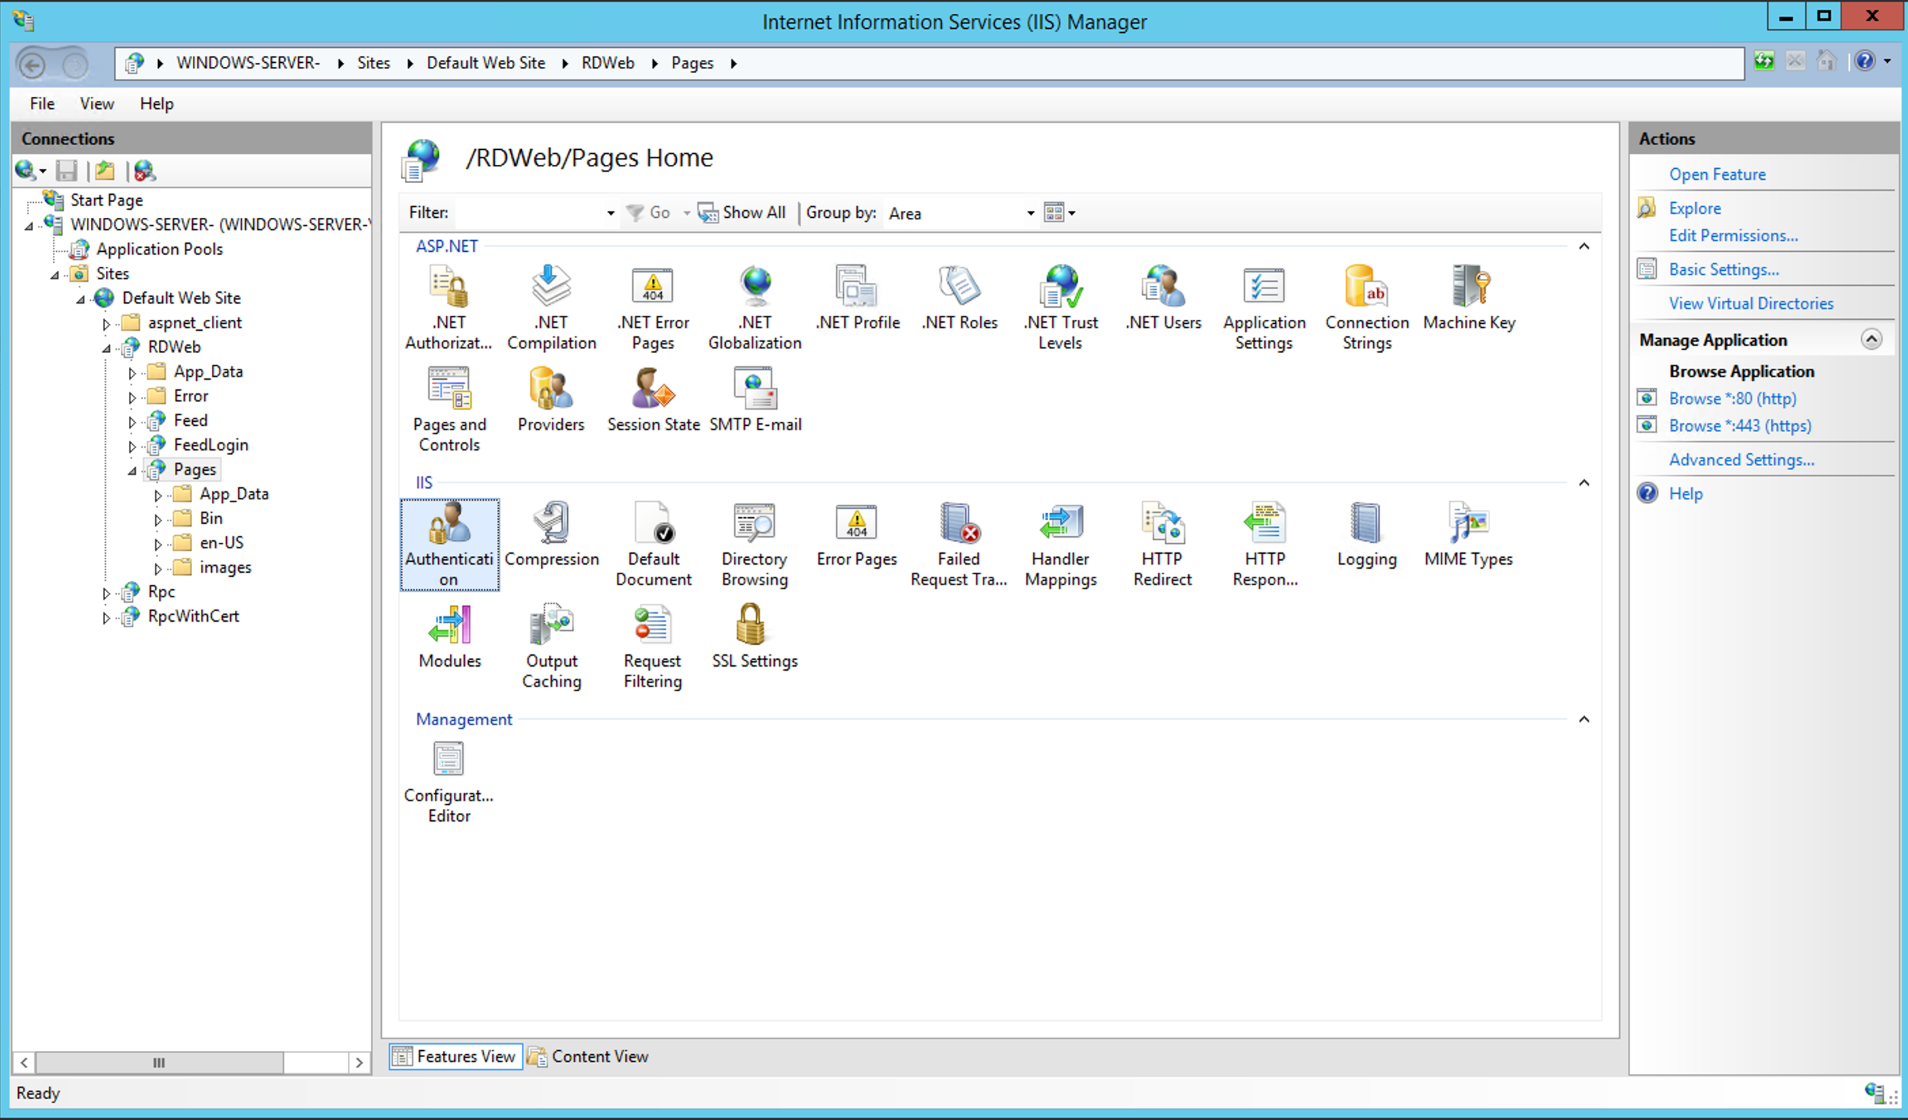
RDWeb Server > Sites > Default Web Site > RDWeb > Pages
Essentially it will be along this path: WINDOWS-SERVER-SitesDefault Web SiteRDWebPages
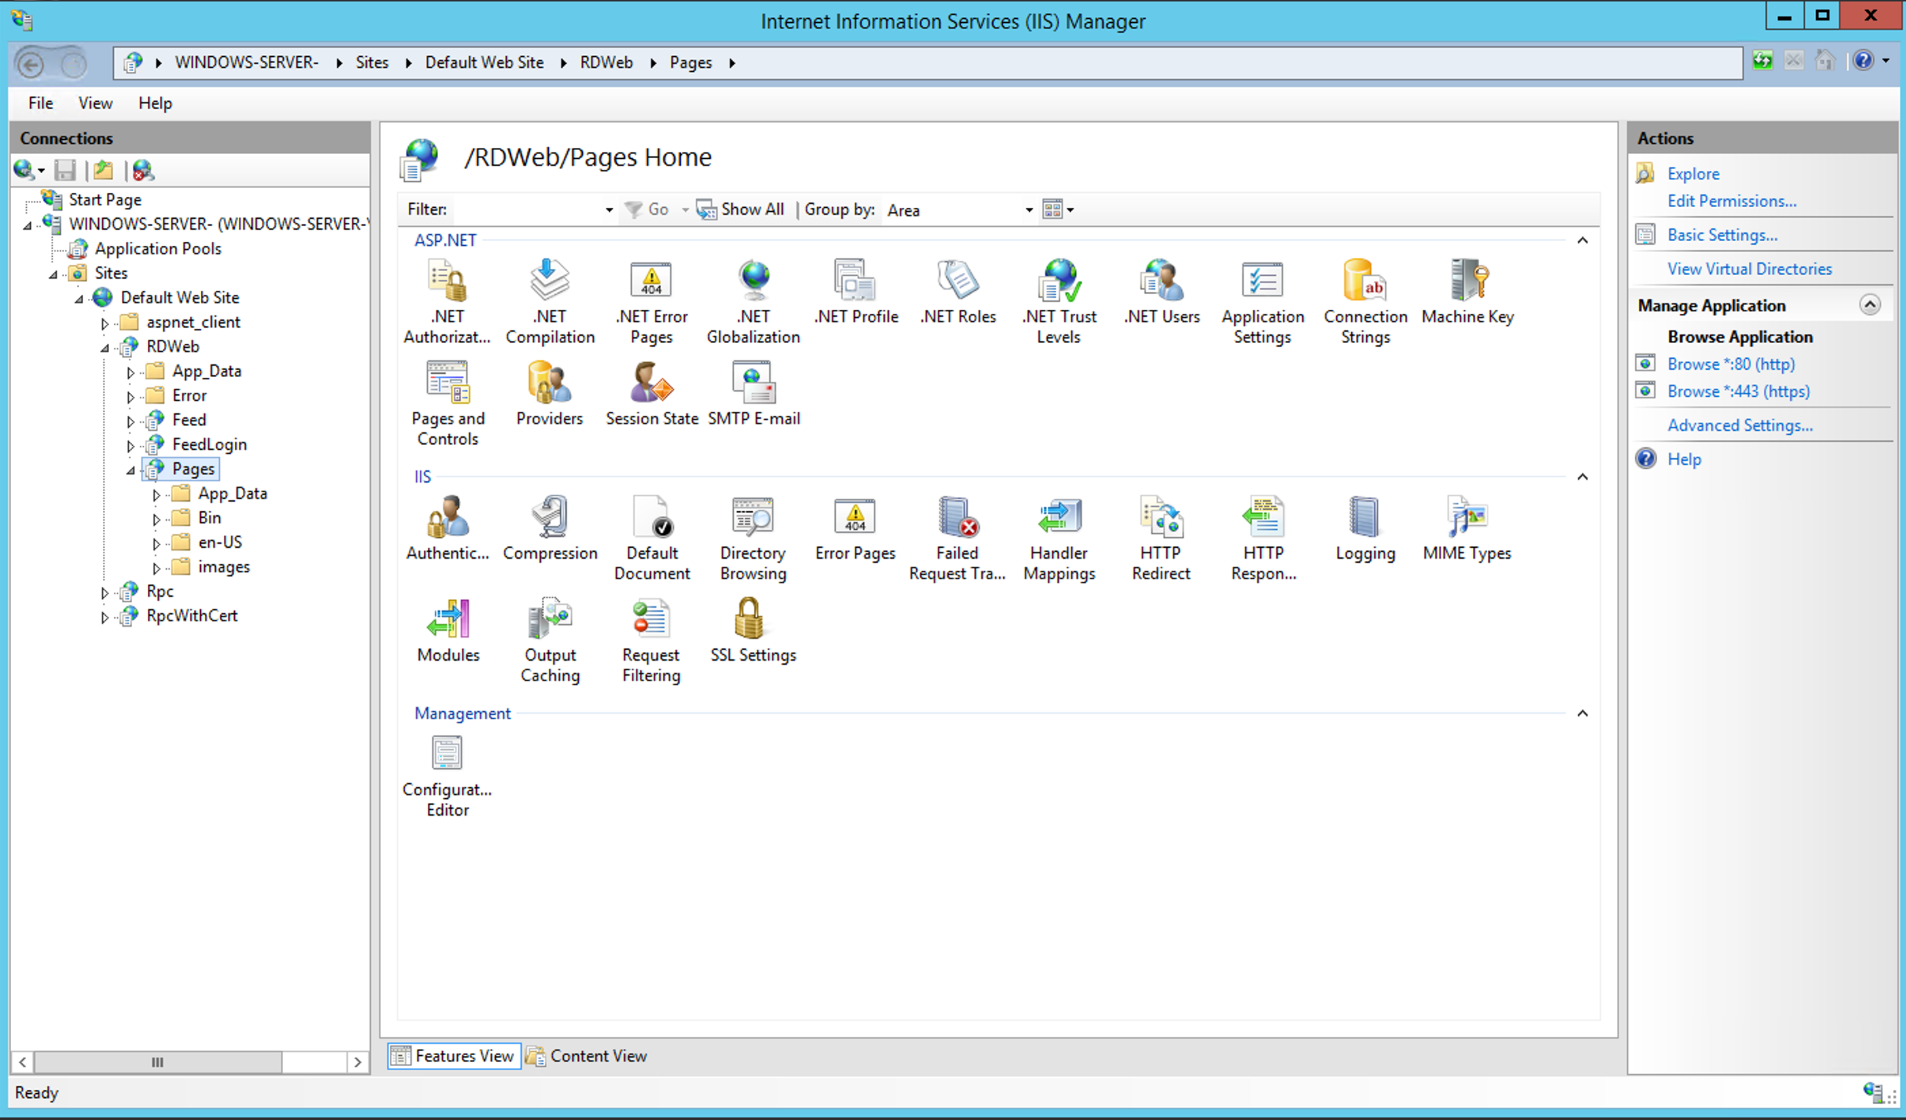
Look for «Configuration Editor«. Under the «Management» section.
Open the «Configuration Editor«.
You are then presented with the «Configuration Editor«.
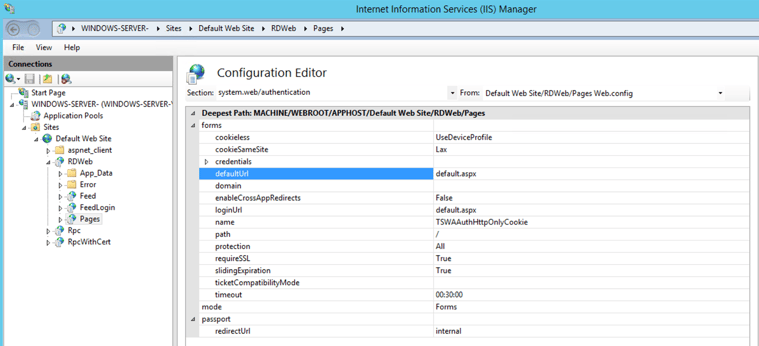
Now click on the dropdown box at the top of the screen and navigate to system.web > authentication.
You are then presented with the system.web > authentication options.
Let’s expand the system.web > authentication options.
Confirm that both defaultUrl and loginUrl are set to default.aspx, and as required, click «Apply».
That is:
- defaultUrl — default.aspx
- loginUrl — default.aspx
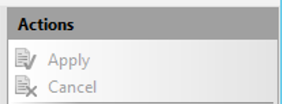
As required, click «Apply«. It will be greyed out if there are no changes to Apply.
Backup and modify the web.config File for RDWeb
We will now modify the web.config File for RDWeb.
We will also make a backup of the existing web.config file before making any modifications in case we need it in the future.
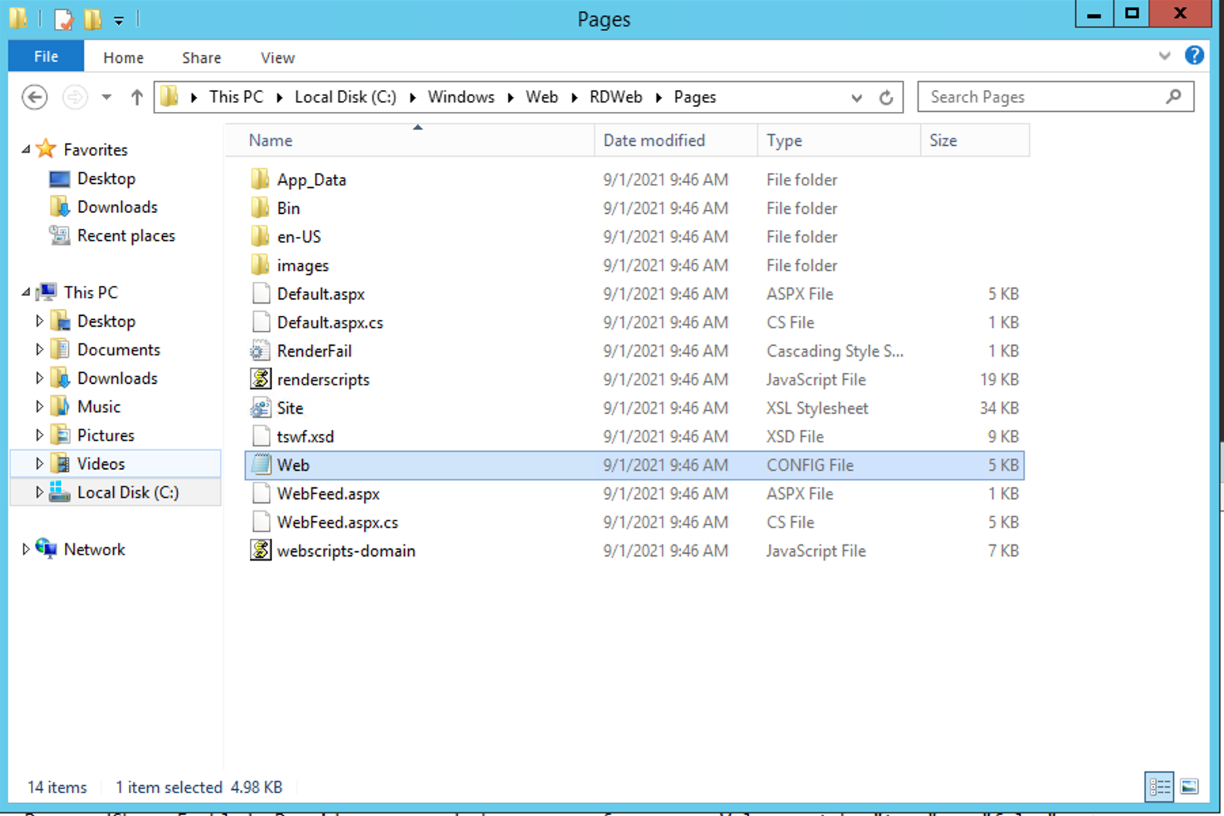
Go to:
C:WindowsWebRDWebPages
Open a text editor such as Notepad with elevated permissions (Run as Administrator) and open the web.config file.
C:WindowsWebRDWebPagesweb.config
Here is a default web.config file.
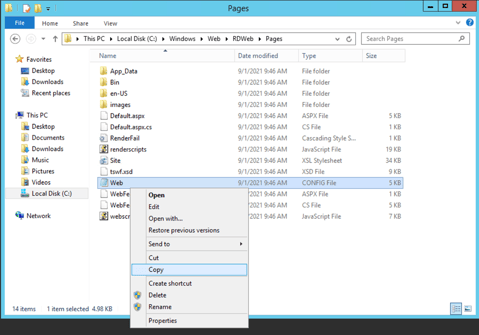
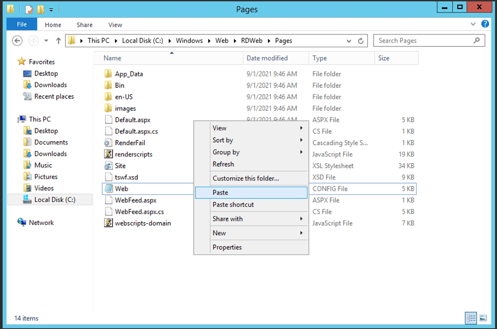
Let’s make a copy of the web.config file.
We can do that easily by right clicking the web.config file, selecting «Copy» and «Paste».
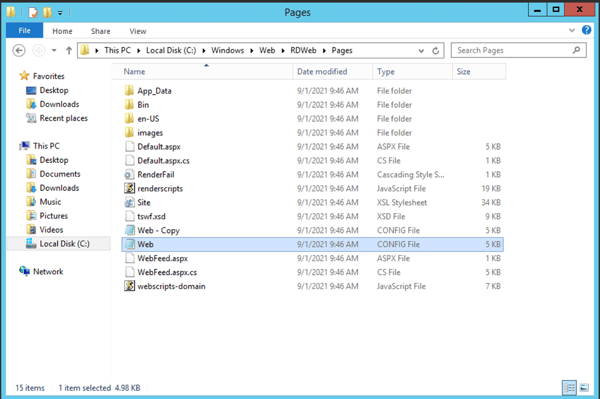
Now we have two web.config files.
Let’s make changes to our web.config file now.
For our web.config file edit, we will be updating the following sections:
- <configuration>
- <system.web>
- <authentication> and <authorization>
- <modules>
- Under the </runtime>
<configuration>
At the top of the file, after <configuration> add the following lines:<configSections><section name="microsoft.identityModel" type="Microsoft.IdentityModel.Configuration.MicrosoftIdentityModelSection, Microsoft.IdentityModel, Version=3.5.0.0, Culture=neutral, PublicKeyToken=31bf3856ad364e35" /></configSections>
<system.web>
Add the following lines immediately after the <system.web> tag:
<httpRuntime targetFramework= "4.5" requestValidationMode="2.0"/> <pages validateRequest="false"/>
Before the <system.web> tag we also need to remove the httpruntime reference.
<httpRuntime targetFramework= "4.5"/>
<authentication> and <authorization>
Modify the <authorization> and <authentication> tags below the <system.web> tag to reflect the following lines:
<authorization><deny users="?" /></authorization><authentication mode="None" />
<authorization><deny users="?" /></authorization><authentication mode="Windows" />
<modules>
In the <system.webServer> section, add the following lines immediately after the <modules runAllManagedModulesForAllRequests=”true”> tag.
<modules runAllManagedModulesForAllRequests="true"><add name="WSFederationAuthenticationModule"type="Microsoft.IdentityModel.Web.WSFederationAuthenticationModule, Microsoft.IdentityModel, Version=3.5.0.0, Culture=neutral, PublicKeyToken=31bf3856ad364e35"preCondition="managedHandler"/><add name="SessionAuthenticationModule"type="Microsoft.IdentityModel.Web.SessionAuthenticationModule, Microsoft.IdentityModel, Version=3.5.0.0, Culture=neutral, PublicKeyToken=31bf3856ad364e35"preCondition="managedHandler"/>
Note — If you only see <modules>, you will need update it to have «<modules runAllManagedModulesForAllRequests=”true”> config code, and then end with </modules>.
Under the </runtime>
In this section we will need to leverage the details that we have from our Okta Template WS-Fed configuration details in Okta. That is leveraging:
- Settings displayed in our General tab (via Okta> Applications > Applications > Remote Desktop Web (RD Web) app> General tab).
- View Setup Instructions and/or FederationMetadata.xml metadata file.
As we will need to add in four of our customer specific configurations here.
- Audience Restriction/ audienceUris value — urn:microsoft:rdweb
- TrustedIssuers Thumbprint — thumbprint-here
- WS-Fed Issuer/Passive Endpoint/ wsFederation passiveRedirectEnabled issuer — https://youroktadomain.okta.com/app/template_wsfed/sso/wsfed/passive
- Realm (App ID URI) — urn:okta:app:entityid-in-okta-here
To help you visualise where these details are, here is an easy reference of where you could find the details to here.
Audience Restriction/ audienceUris value
Audience Restriction/ audienceUris value from our General tab (via Okta> Applications > Applications > Remote Desktop Web (RD Web) app> General tab)
View Setup Instructions and/or FederationMetadata.xml
From our FederationMetadata.xml metadata file and/or View Setup Instructions. (via Okta> Applications > Applications > Remote Desktop Web (RD Web) app> Sign On tab> View Setup Instructions).
Once you have these details, we can go to the web.config file and add these lines «after/ under» the </runtime> section.
<microsoft.identityModel><service><certificateValidation certificateValidationMode="None"/><audienceUris><add value="urn:microsoft:rdweb"/><add value="urn:okta:app:oktaentityid"/></audienceUris> <securityTokenHandlers><add type="Microsoft.IdentityModel.Tokens.Saml2.Saml2SecurityTokenHandler, Microsoft.IdentityModel, Version=3.5.0.0, Culture=neutral, PublicKeyToken=31bf3856ad364e35"><samlSecurityTokenRequirement mapToWindows="true" useWindowsTokenService="true" /></add></securityTokenHandlers><applicationService><claimTypeRequired><claimType type="http://schemas.xmlsoap.org/ws/2005/05/identity/claims/upn" optional="true" /></claimTypeRequired></applicationService><issuerNameRegistry type="Microsoft.IdentityModel.Tokens.ConfigurationBasedIssuerNameRegistry, Microsoft.IdentityModel, Version=3.5.0.0, Culture=neutral, PublicKeyToken=31bf3856ad364e35"><trustedIssuers><add thumbprint="thumbprint-here" name="urn:okta:app:oktaentityid"/></trustedIssuers></issuerNameRegistry><federatedAuthentication><wsFederation passiveRedirectEnabled="true" issuer="https://youroktadomain.okta.com/app/template_wsfed/sso/wsfed/passive" realm="urn:okta:app:oktaentityid" requireHttps="false" /><!-- The requireSsl="false" setting is insecure and used for testing. This setting should not be used in production deployments. --><cookieHandler requireSsl="false" /></federatedAuthentication></service></microsoft.identityModel>
Here is an example:
Save the web.config file.
Change the RDWeb/Pages Application to use Kerberos
In your Internet Information Services (IIS) Manager (Server Manager > IIS > Internet Information Services (IIS) Manager).
Go to:
RDWeb Server > Sites > Default Web Site > RDWeb > Pages
Essentially it will be along this path: WINDOWS-SERVER-SitesDefault Web SiteRDWebPages
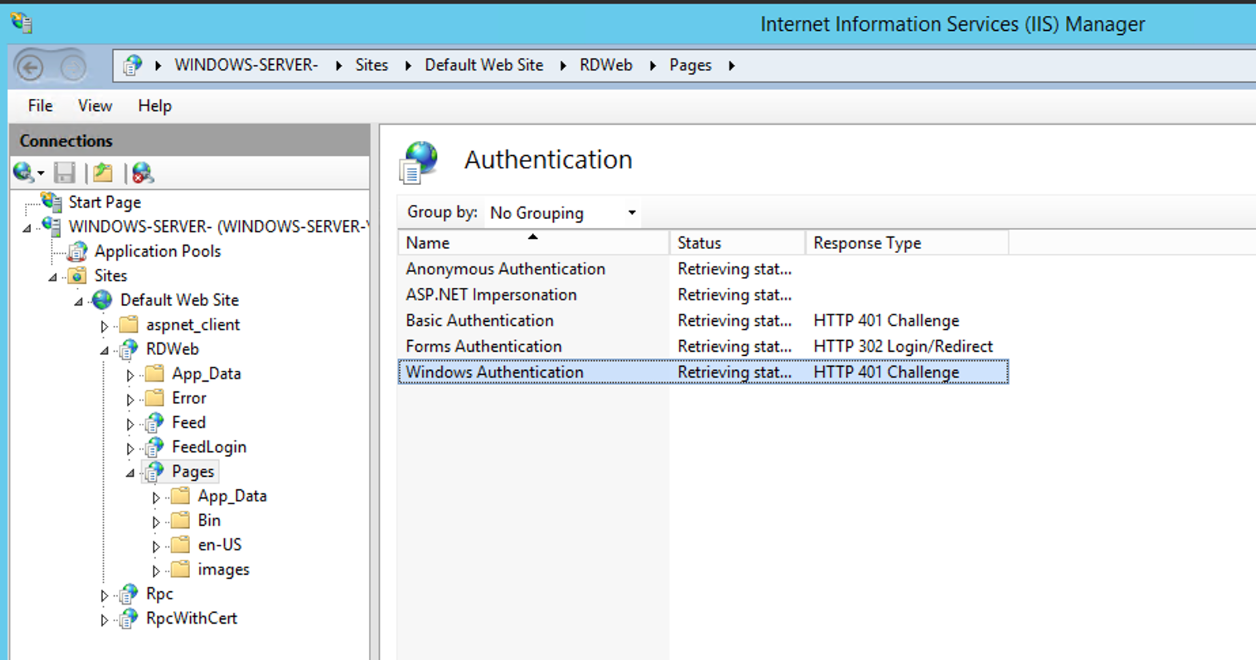
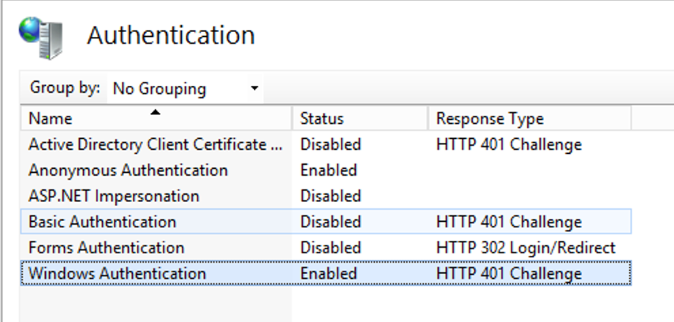
Look for «Authentication«. Under the «IIS» section.
Double click on Authentication to open it.
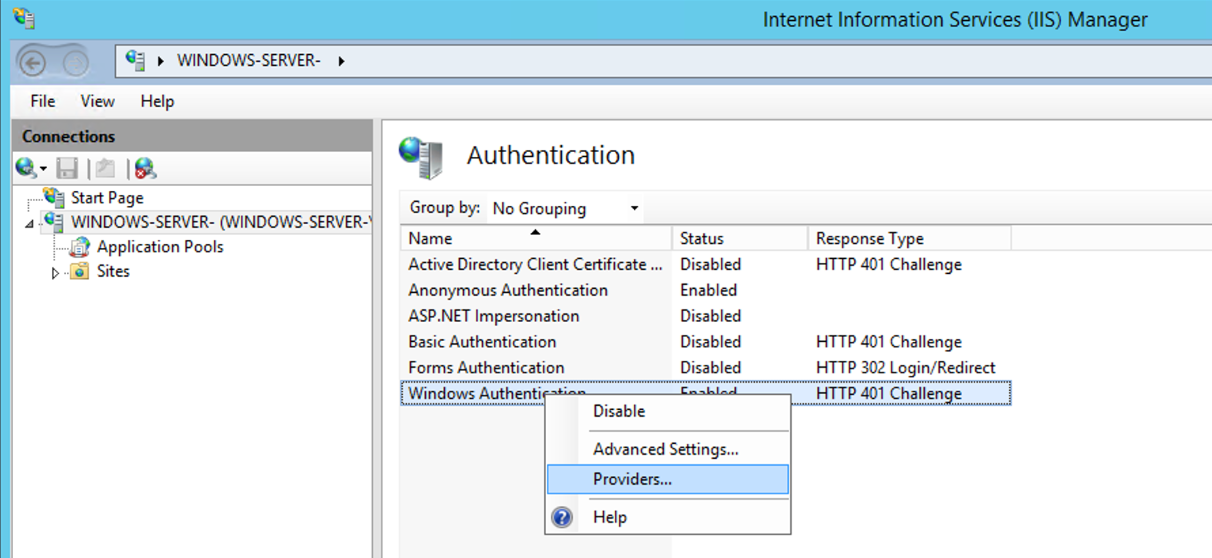
Right-click on «Windows Authentication«, then «Providers«.
Click Providers.
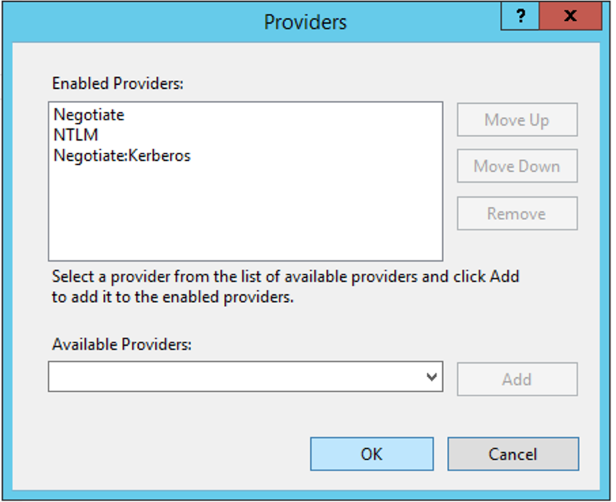
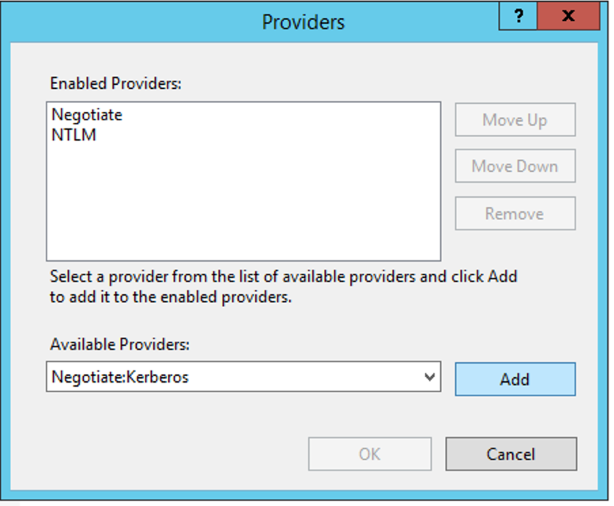
From the drop down menu of «Available Providers«, select Negotiate: Kerberos.
Click Add and click OK.
You will see see the «Windows Authentication» status as «Enabled».
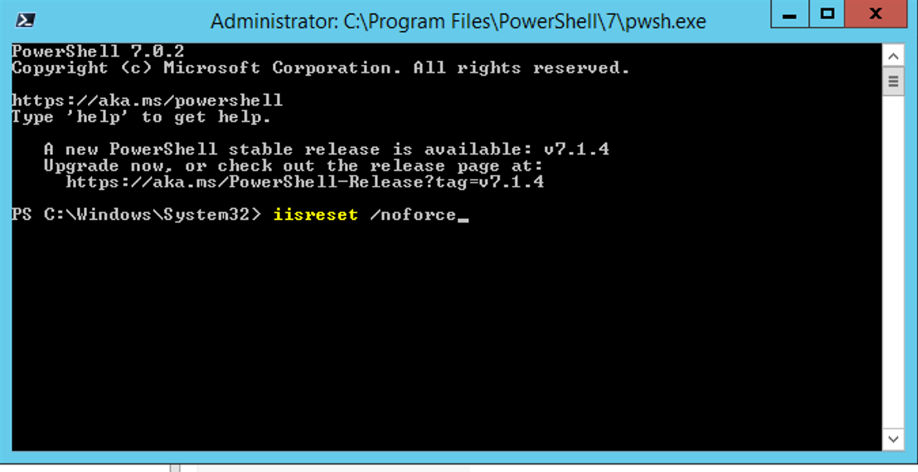
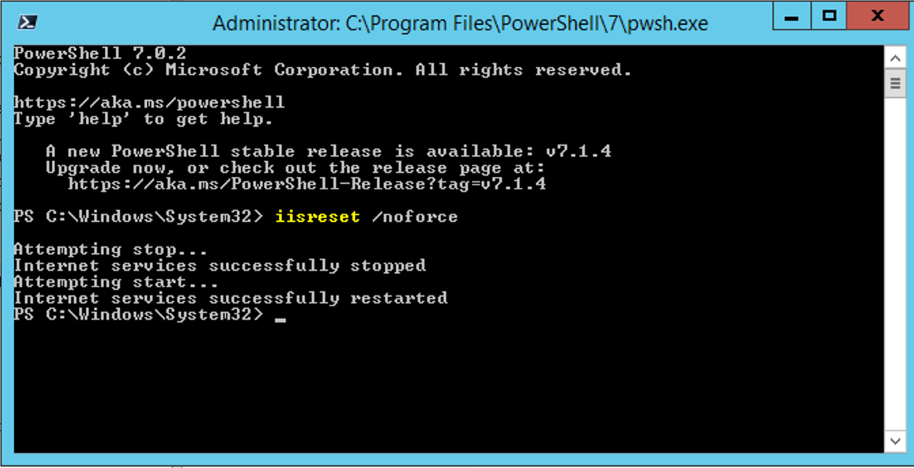
We will now load a PowerShell («Run as Administrator») and run a iisreset.
iisreset /noforce
4. Test that SSO is working with Microsoft Remote Desktop Web (RD Web)
When you are ready, let’s test that it works.
In Okta Admin Console, let’s assign a user to the application. (Applications> Applications>Microsoft Remote Desktop Web (RD Web) app)
Go to «Assignments» tab. (Applications> Applications> Microsoft Remote Desktop Web (RD Web) app> «Assignments)
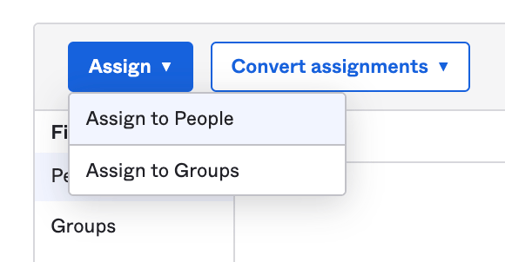
Select «Assign» and «Assign to People».
Select our test user, click «Assign» and then «Done».
We can now test the configuration, by either by:
1. Testing by accessing the RD Web Access Server page URL directly OR
2. Testing by accessing the RD Web Access Server page URL via Okta.
Testing by accessing the RD Web Access Server page URL directly
Go to your RD Web Access Server page URL. In my example it is https://sync.vulongtran.local/rdweb/pages/.
You are redirected to Okta for authenticate.
This includes a multifactor authentication (MFA) check if you have created a policy to challenge the user for MFA.
Once authenticated, the user should automatically be redirected to your RD Web Access dashboard, which displays your application icons. The the user will then be able to view and launch available applications as per usual.This indicates a successful access into the RD Web Access application.
Testing by accessing the RD Web Access Server page URL via Okta
For testing via Okta, let’s log into our Okta instance as a test user. You may need to refresh your browser if you had the browser window already open.
- Log into Okta instance as a test user.
- Click on «Microsoft Remote Desktop Web (RD Web)» application icon (chiclet).
- Once authenticated, the user should automatically be redirected to your RD Web Access dashboard, which displays your application icons. The the user will then be able to view and launch available applications as per usual.This indicates a successful access into the RD Web Access application.
Success, you will be logged in successfully to your Microsoft Remote Desktop Web (RD Web) account!
Tips and troubleshooting
Web Application Proxy not supported for Microsoft Remote Desktop Services (after Windows 2016)
Please note that Remote Desktop Services does not support using Web Application Proxy, which is included in Windows Server 2016 and earlier versions.
https://docs.microsoft.com/en-gb/windows-server/remote/remote-access/web-application-proxy/web-application-proxy-windows-server
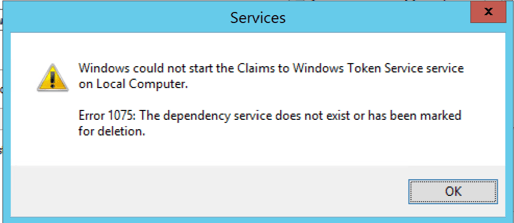
Error 1075 — Claims to Windows Token service service
Windows could not start the Claims to Windows Token Service service on Local Computer.
Error 1075: The dependency service does not exist or has been marked for deletion.
Solution:
Try re-running the command to add «Cryptographic Services» (also known as CryptSvc) as a dependency for your «Claims to Windows Token Service».
Open PowerShell 7 with «Run as Administrator».
Copy and paste the command (or type the command) and press Enter.
sc config c2wts depend= CryptSvc
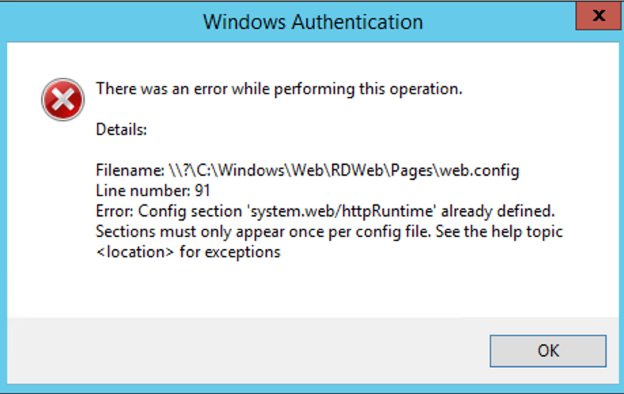
Make sure you remove the extra httpruntime reference
Make sure you remove the extra httpruntime reference, as we have added a new httpruntime reference.
Solution:
In the web.config file, before the <system.web> tag we also need to remove the httpruntime reference.
<httpRuntime targetFramework= "4.5"/>
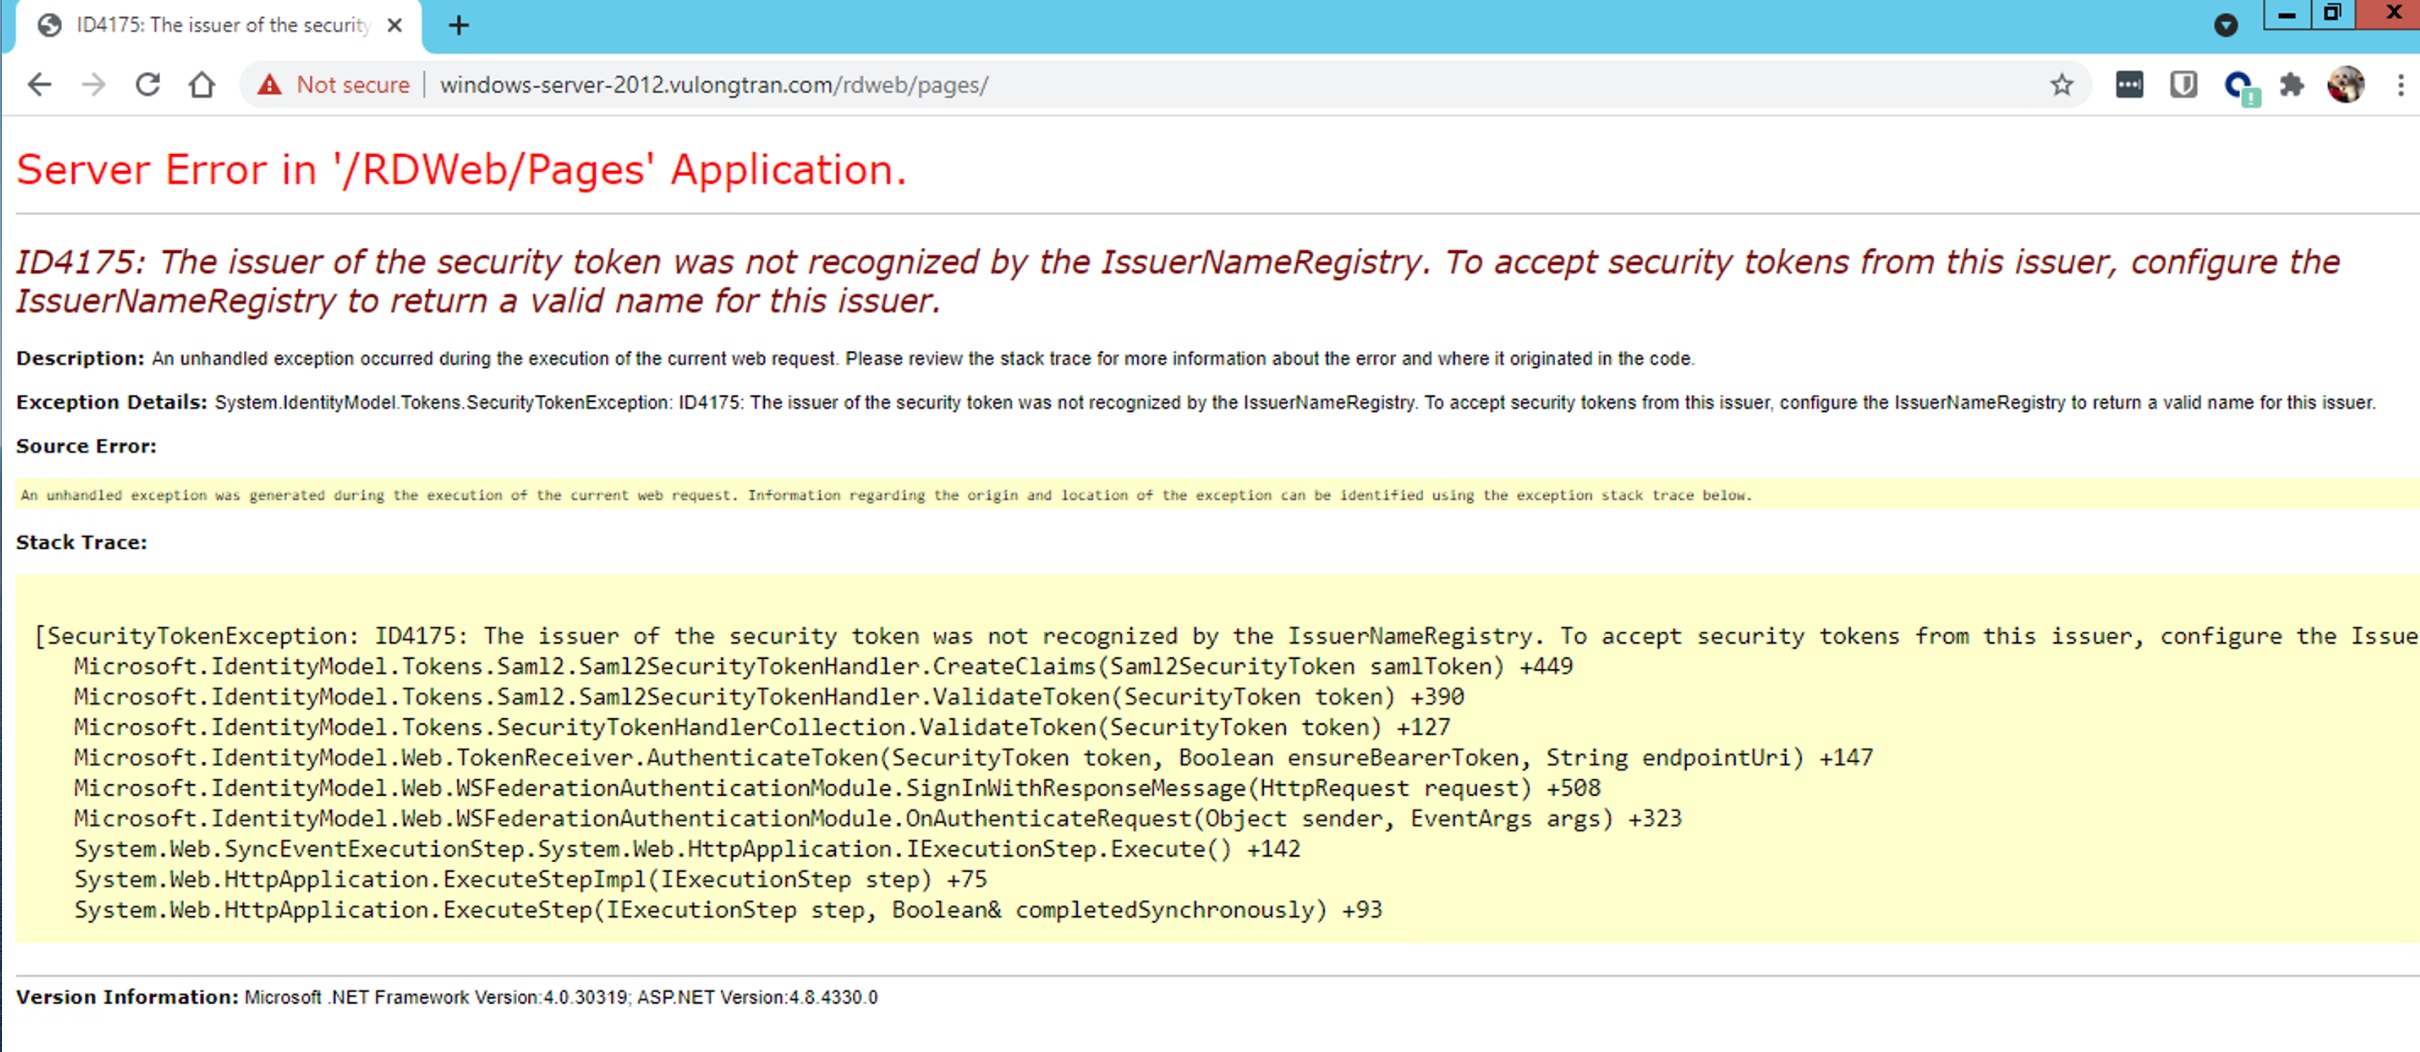
ID4175 Error message
«Server Error in ‘/RDWeb/Pages’ Application.
ID4175: The issuer of the security token was not recognized by the IssuerNameRegistry. To accept security tokens from this issuer, configure the IssuerNameRegistry to return a valid name for this issuer.»
Solution:
- Re-enter thumbprint — Check your RD Web Access web.config(C:WindowsWebRDWebPagesWeb.config) and make sure the thumbprint is correct. Try manually typing the certificate thumbprint rather of copying and pasting this certificate thumbprint.
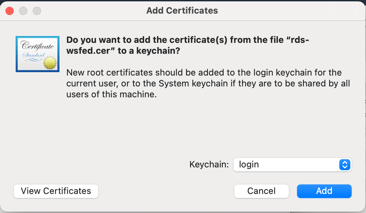
- Re-generate your thumbprint — You can do this, by copying and pasting the X509Data details into a new text file and save it as a .cer file, let’s say «rds-wsfed.cer» as the file name.
For example,
Go to FederationMetadata.xml. Copy the X509Data details.
In your «rds-wsfed.cer» text file using Notepad or in my example Visual Studio Code editor, enter the following details and save it.
——BEGIN CERTIFICATE——
EnteryourX509Datahere
——END CERTIFICATE——
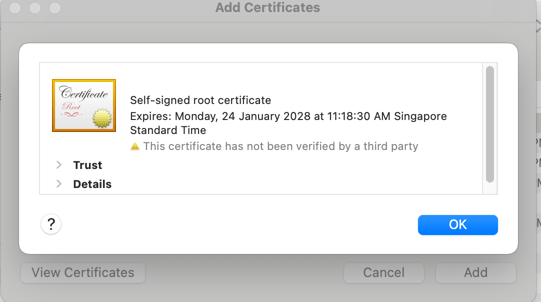
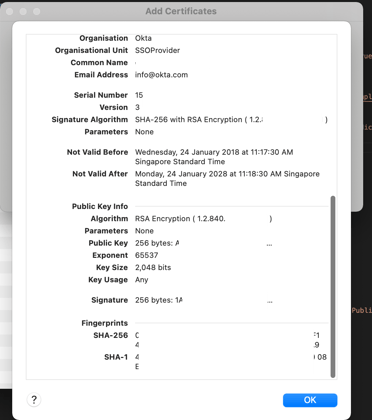
On your computer, then doubleclick it to open the View Thumbprint details.
Then you will see options, click on «View Certificates«.
Click on «Details» to expand it.
Scroll down until you see these details. (Please note that I have blurred out my certificate details).
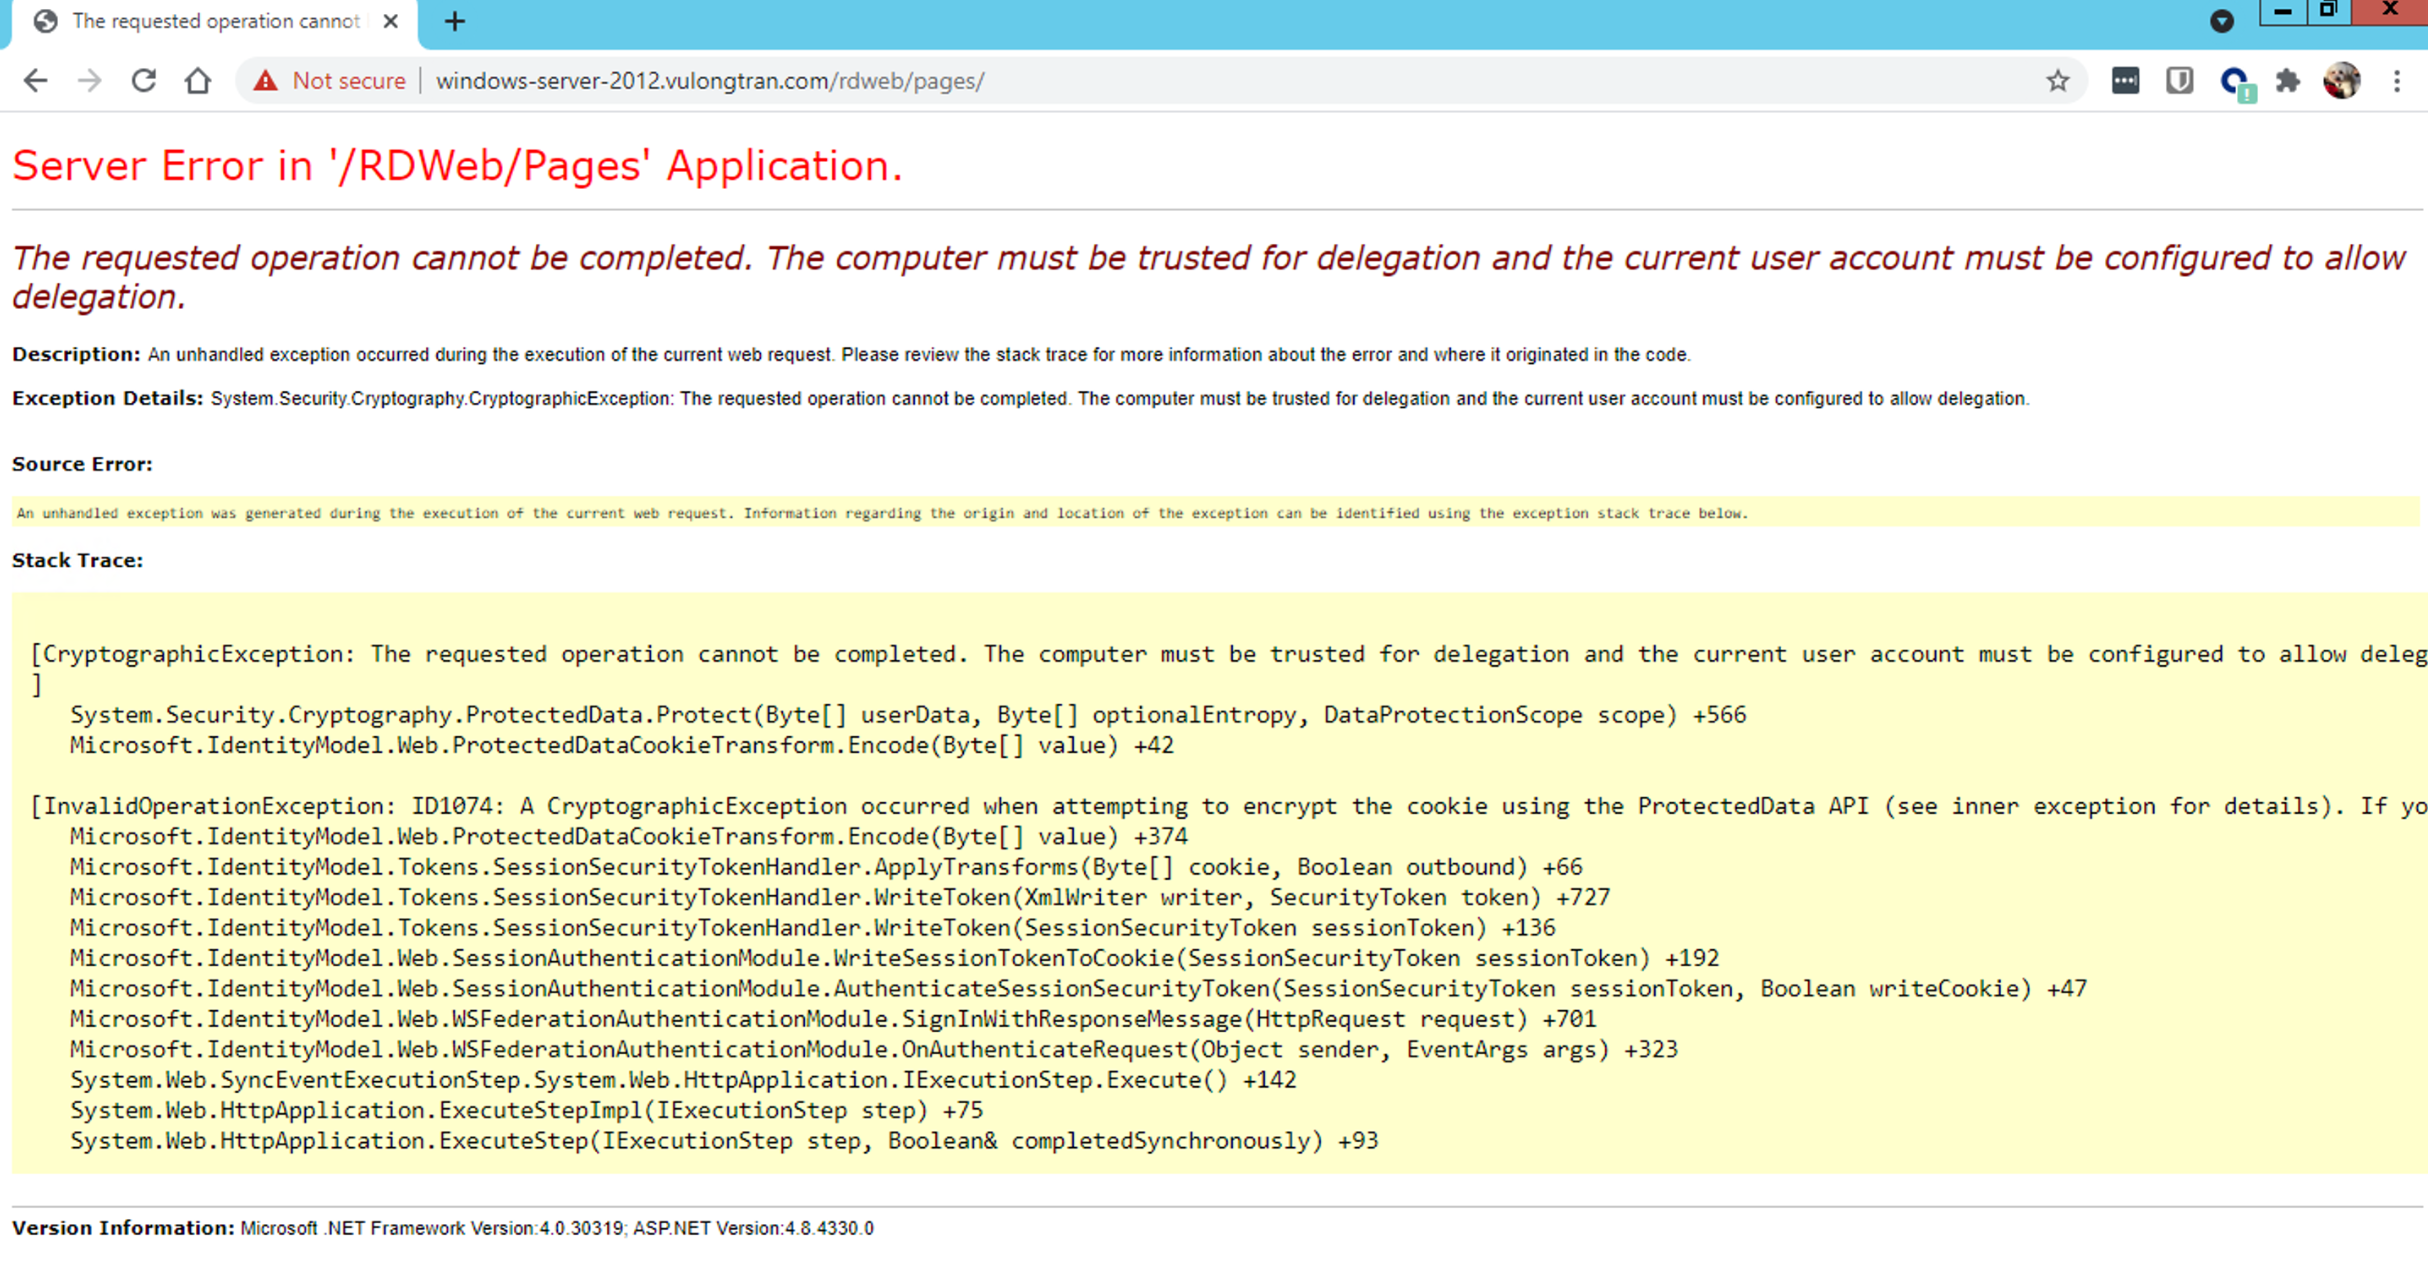
Trusted delegation for current account user error
The computer must be trusted for delegation and the current user account must be configured to allow delegation.
«Server Error in ‘/RDWeb/Pages’ Application
The requested operation cannot be completed. The computer must be trusted for delegation and the current user account must be configured to allow delegation.
Description: An unhandled exception occurred during the execution of the current web request. Please review the stack trace for more information about the error and where it originated in the code.
Exception Details: System.Security.Cryptography.CryptographicException: The requested operation cannot be completed. The computer must be trusted for delegation and the current user account must be configured to allow delegation.»
Solution:
You have tried setting delegation access on the computer and/or user account and it seems to make no difference.
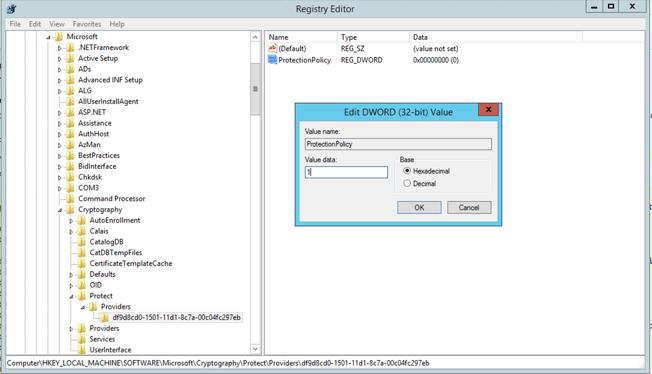
To resolve this issue we can create the following registry key on the Windows 10 computer:
HKEY_LOCAL_MACHINESoftwareMicrosoftCryptographyProtectProvidersdf9d8cd0-1501-11d1-8c7a-00c04fc297eb
That is:
Right Click, create new Dword (32bit) Value, name it ‘ProtectionPolicy’
Edit it to the value of 1.
This should then solve the issue immediately, no restart is required.
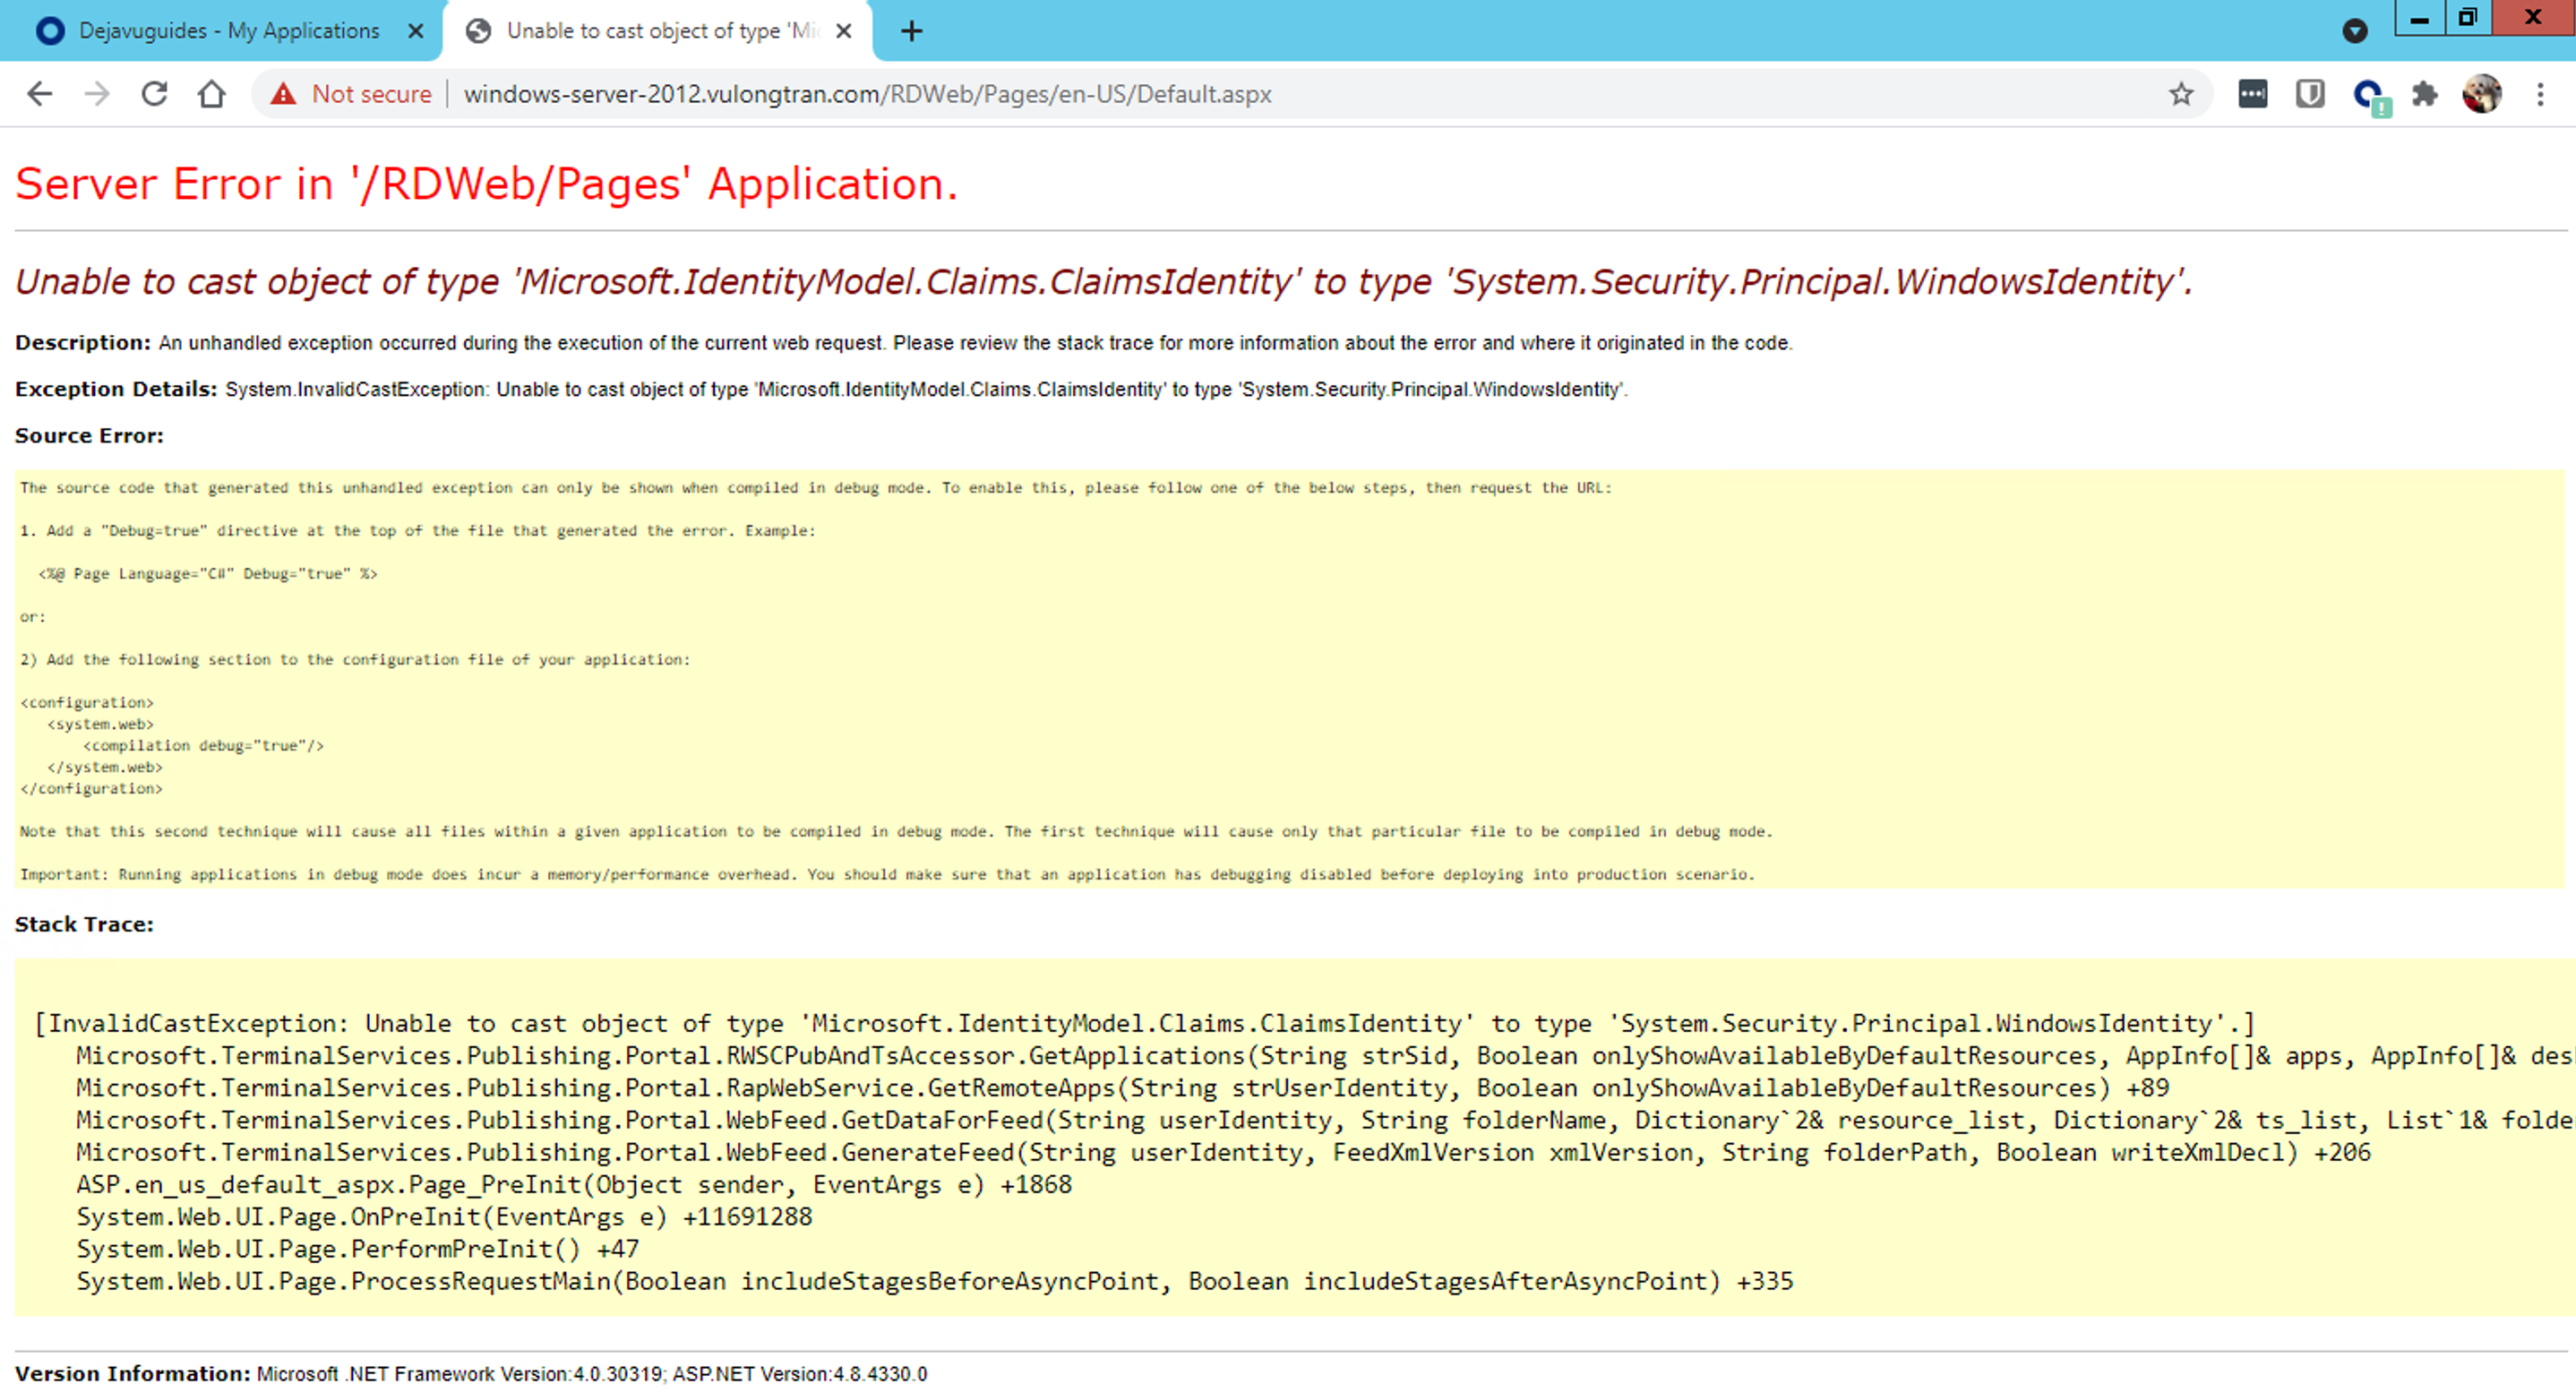
Unable to cast object type of Microsoft Claims Identity
Server Error in ‘/RDWeb/Pages’ Application.
Unable to cast object of type ‘Microsoft.IdentityModel.Claims.ClaimsIdentity’ to type ‘System.Security.Principal.WindowsIdentity’.
Description: An unhandled exception occurred during the execution of the current web request. Please review the stack trace for more information about the error and where it originated in the code.
Exception Details: System.InvalidCastException: Unable to cast object of type ‘Microsoft.IdentityModel.Claims.ClaimsIdentity’ to type ‘System.Security.Principal.WindowsIdentity’.
Solution:
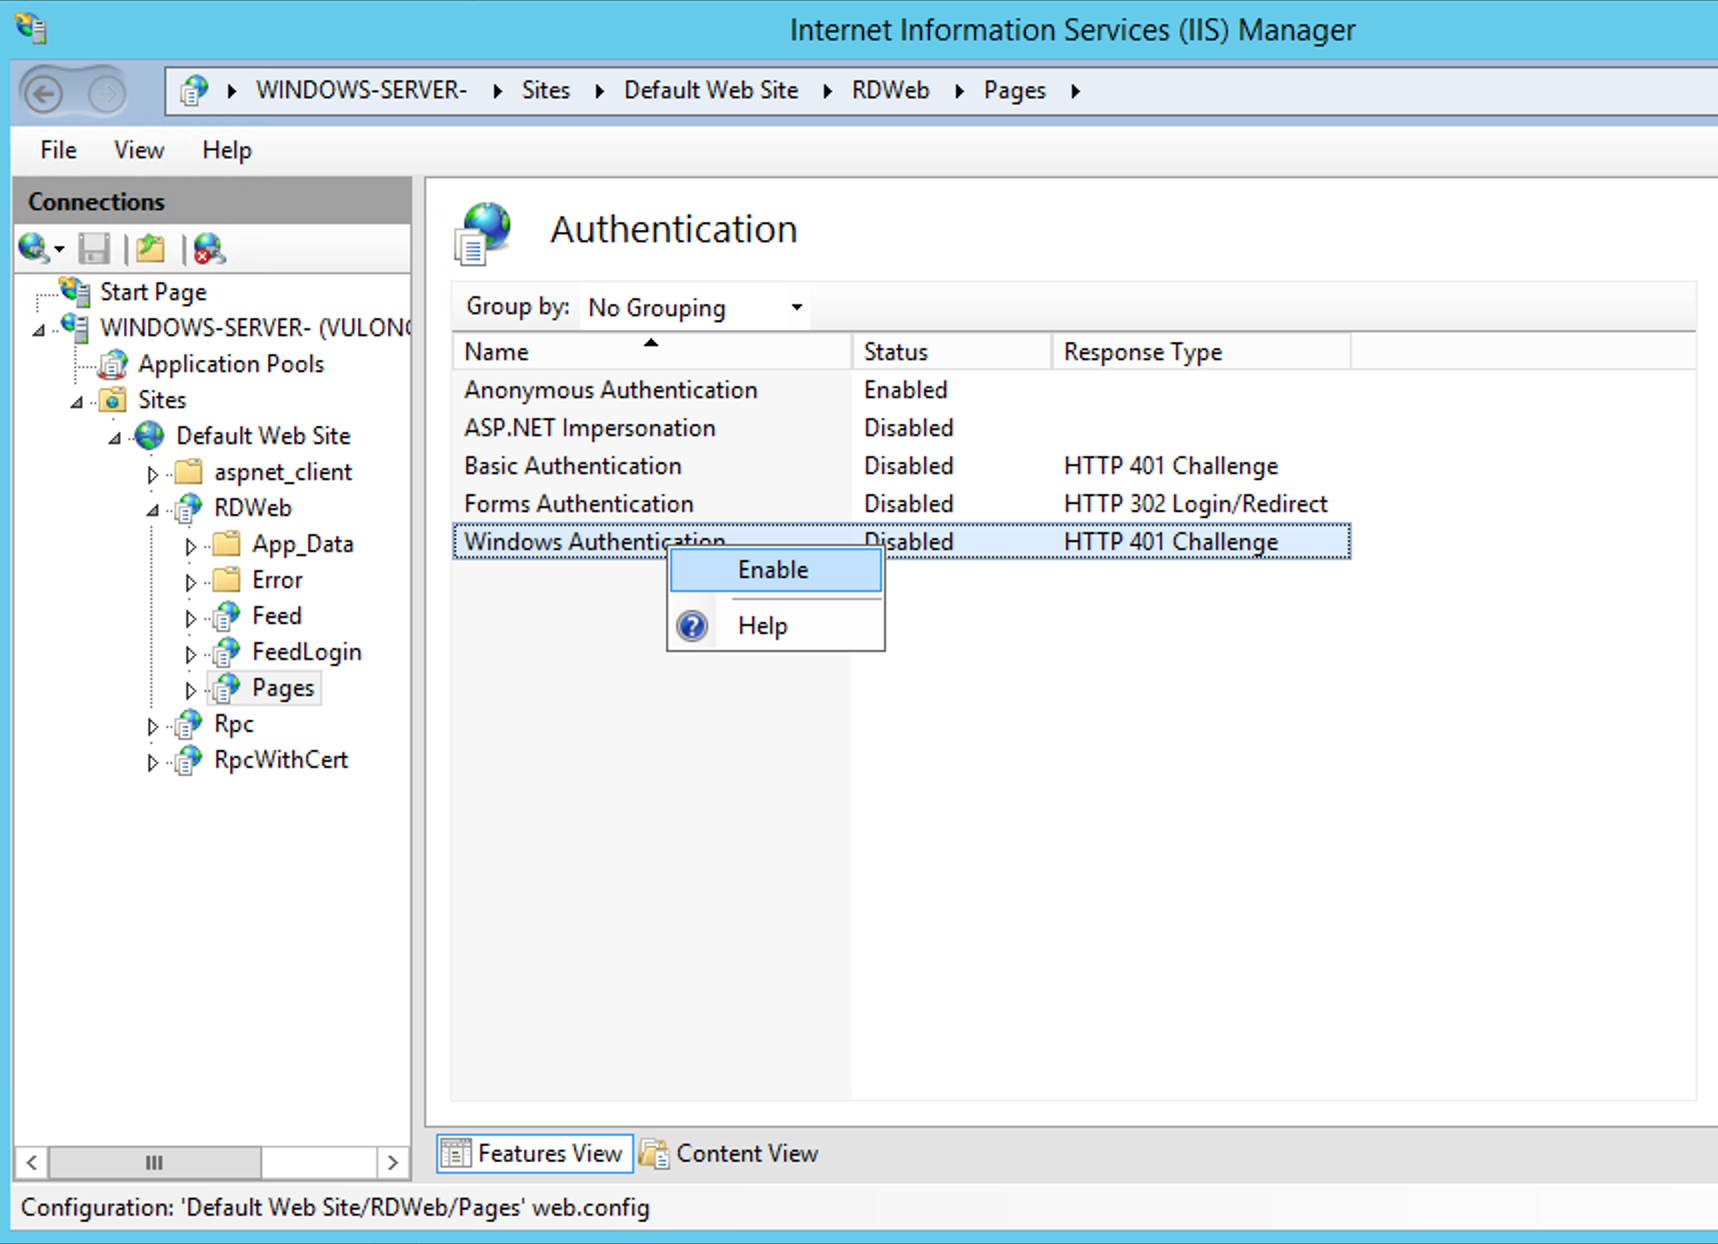
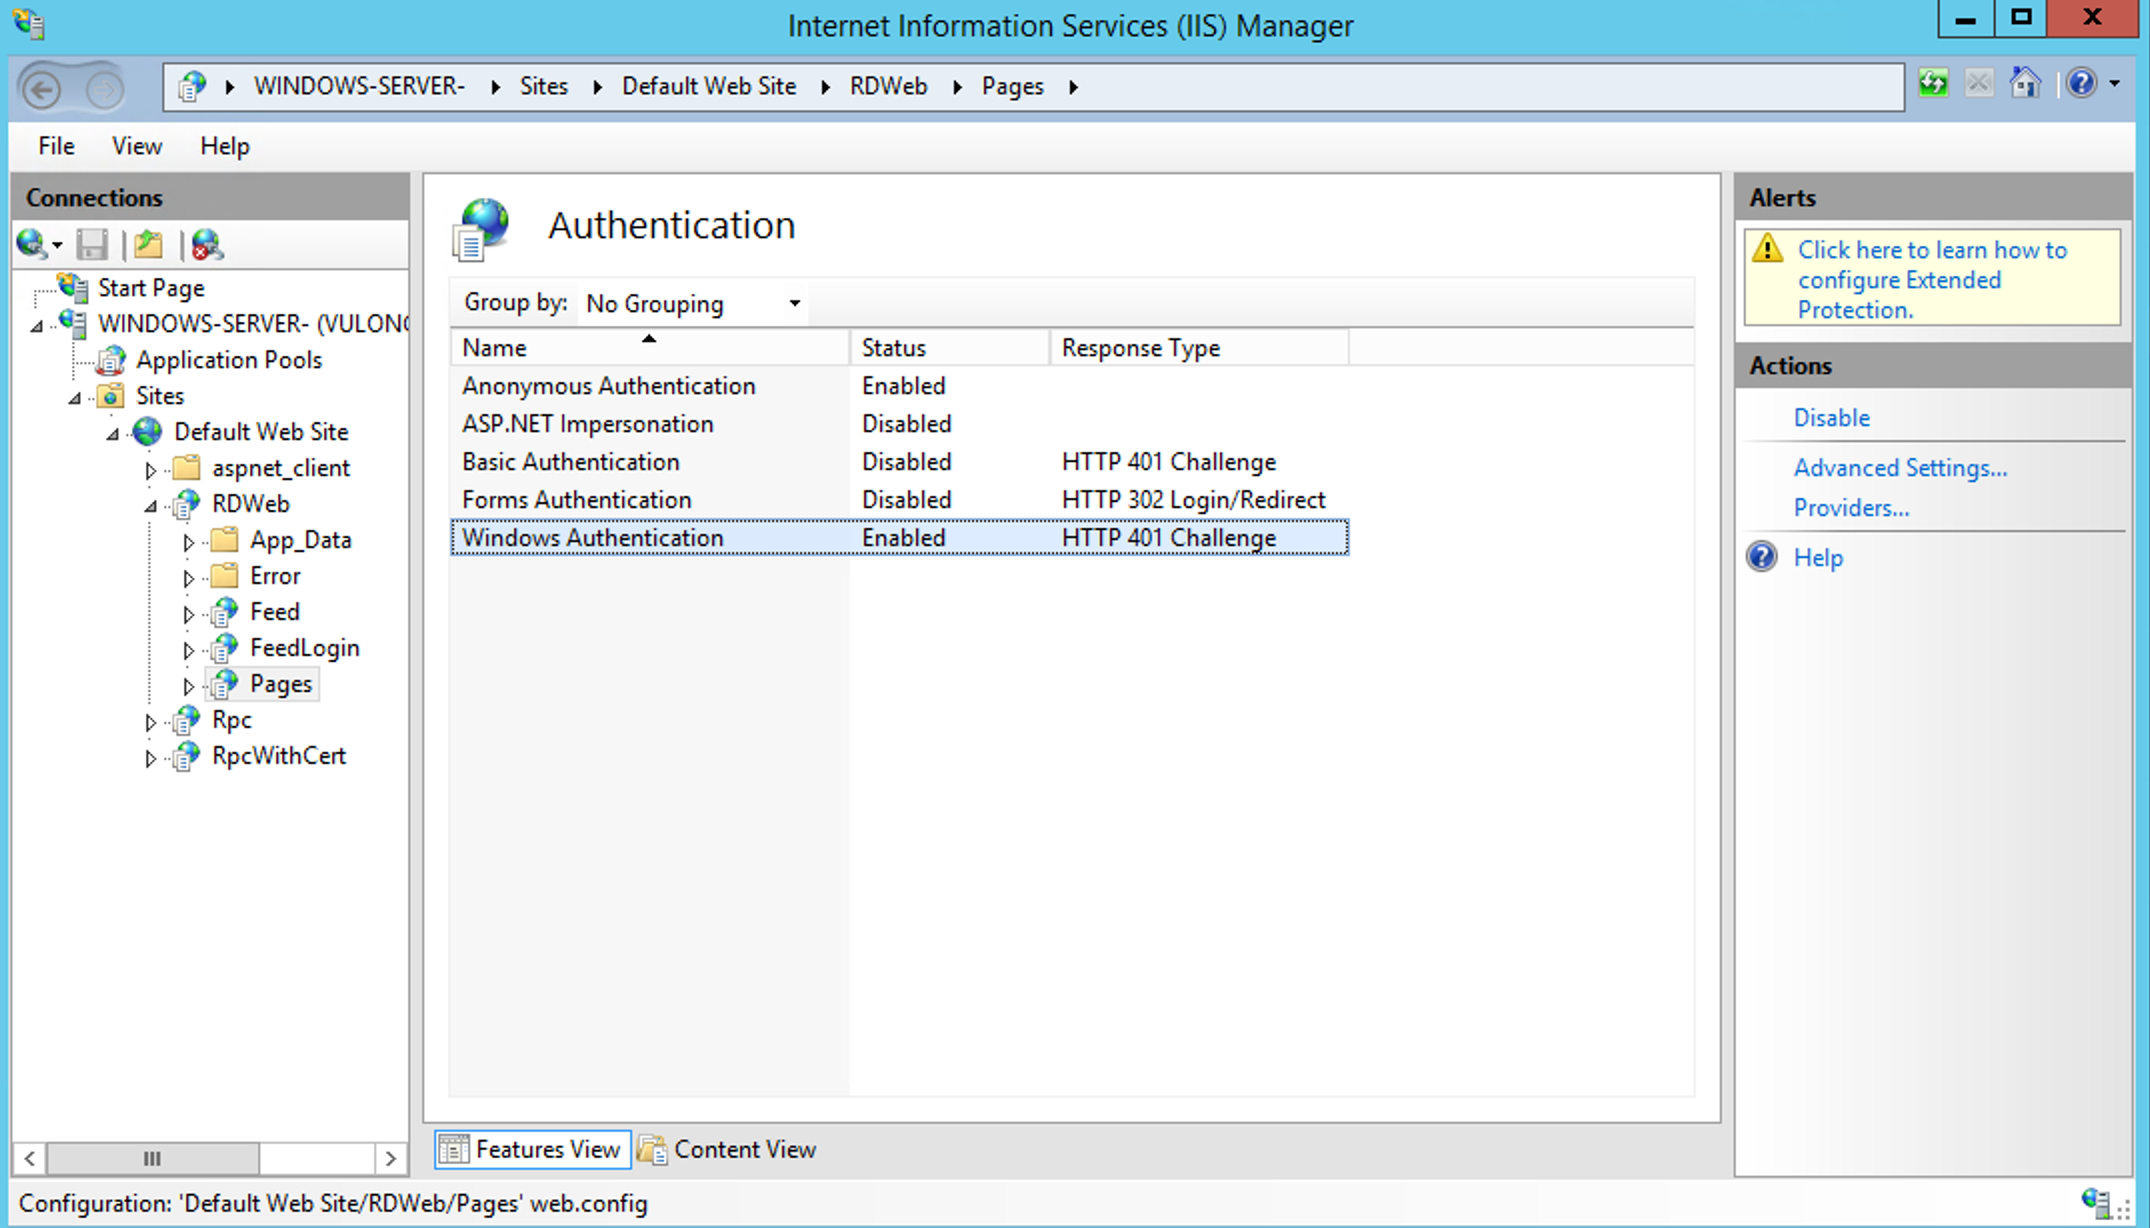
Check in your IIS manager that the services has authentication enabled, else user will not be prompted for authentication.
We then need to reset our IIS Manager. So we will load a PowerShell («Run as Administrator») and run a iisreset.
iisreset /noforce
Resources
- Microsoft — Welcome to Remote Desktop Services
- Microsoft — You can’t install Windows Identity Foundation in Windows Core
- Microsoft — Claims to Windows Token Service (C2WTS) and Reporting Services
- Microsoft — Claims to Windows Token Service (C2WTS) not starting after rebooting server
- Microsoft — Configure Remote Desktop Web Connection Behavior (web.config)
- Microsoft — Kernel-mode authentication
The other day one of this blog’s visitors, Ryan Davis, posted a comment regarding possibilities for using Active Directory security group membership for hiding or showing the different tabs in Windows Server 2012 R2 RDS Web Access.
This post describes a method to do just that.
If a user successfully logs in to the Web Access environment the user will see all tabs by default.
In previous posts I describe how to hide the “Connect to a remote PC” tab, or create extra tabs.
Ryan’s question was about hiding the “Connect to a remote PC” tab for regular users, but showing it if the user is a member of a specific Active Directory security group.
So in this post I will focus on the default “Connect to a remote PC” tab.
The preparations
Again, the files that make up RD Web Access are in C:WindowsWebRDWebPages and we’re going to be modifying some of them, so make a copy of that folder structure just to make sure we have a backup should we break something.
The Web Access pages will need to be able to use code that is needed to communicate with Active Directory. To be able to execute that code we need to tell the RD Web Access application that it can use an assembly to execute that code.
This assembly is present on the Windows Server 2012 R2 operating system by default.
So let’s tell Web Access that it is allowed to use these binaries.
Open web.config from C:WindowsWebRDWebPages in an editor.
Find line 52:
And add the following code right after that:
<compilation defaultLanguage="c#" debug="true">
 <assemblies>
  <add assembly="System.DirectoryServices.AccountManagement, Version=3.5.0.0, Culture=neutral, PublicKeyToken=b77a5c561934e089"/>
 </assemblies>
</compilation>
The result must look like this:
This tells the RD Web Access application that we need extra code. The extra code is in the .NET Assembly, and specifically in System.DirectoryServices.AccountManagement.dll.
Save and close web.config, we don’t need it anymore.
Adding code and logic to the Default.aspx web page
Open Default.aspx from C:WindowsWebRDWebPagesen-USDefault.aspx in an editor.
Find line 8:
And add the following line of code right before that:
<% @Import Namespace="System.DirectoryServices.AccountManagement" %>
The result must look like this:
Now find line 41:
Add the following code below that:
public string strShowDesktopsGroup = "Domain Admins";
public string strDomainName = "ITW";
public string[] arrGroupNames;

private static string[] GetGroupNames(string domainName, string userName)
{
 List<string> result = new List<string>();
 using (PrincipalContext principalContext = new PrincipalContext(ContextType.Domain, domainName))
 {
  using (PrincipalSearchResult<Principal> src = UserPrincipal.FindByIdentity(principalContext, userName).GetGroups(principalContext))
  {
   src.ToList().ForEach(sr => result.Add(sr.SamAccountName));
  }
 }
 return result.ToArray();
}
The result will look like this:
Notice that the first line of code here determines which Active Directory group the user needs to be a member of, in order to be able to see the “Connect to a remote PC” tab. In this case it will be “Domain Admins”, which is a built-in group in Active Directory, but this could also be a custom group you or an admin created in Active Directory.
Also notice that I’ve hardcoded the Active Directory Domain Name in the second line of code here:
public string strDomainName = "ITW";
Make sure you replace “ITW” with your own Domain Name ofcourse.
Find line 290:
Change that line into:
if (ConfigurationManager.AppSettings["ShowDesktops"].ToString() == "true" && arrGroupNames.Contains(strShowDesktopsGroup))
And add the following code before that line after you changed it:
arrGroupNames = GetGroupNames(strDomainName, strDomainUserName);
If done correctly, the result looks like this:
Testing the modifications
I will use my test user “Jan Klaassen” to test a regular Active Directory user.
The user is not a member of the Domain Admins group:
After logging in to the RD Web Access pages:
The tab is hidden.
Next test is to log in with a user who is a member of the Domain Admins group. I will use the Domain Admin account for that:
After logging in to the RD Web Access pages:
Voila, Active Directory group based access to the “Connect to a remote PC” tab.
What if a user manually points the browser to /RDWeb/Pages/en-US/Desktops.aspx? The user will be able to open that page if opened this way.
This flaw can be very easily solved by renaming Desktops.aspx to for example AdminDesktops.aspx and also changing that on line 294:
A more elegant solution would be to do a Group Membership check in that page as well and redirect the user to Default.aspx if necessary, but I’ll leave that solution to your own imagination.
Until next time,
Arjan
ps: thanks to Ryan Davis for the idea 
В Windows Server 2022/2019/2016 с развёрнутыми службами Remote Desktop Services вы можете установить и настроить новый Remote Desktop Web Client HTML5. Этот веб клиент позволит любым устройствам (iOS, macOS, Android, Linux) получать доступ к вашим RemoteApp приложениям на RDS хостах прямо из любого браузера (не нужно устанавливать отдельный RDP клиент).
Содержание:
- Установка RD Web HTML5 клиента на Windows Server RDS
- Доступ к RDWeb серверу через браузер с HTML5
- Возможные проблемы с веб клиентом Remote Desktop
[contents h2]
Remote Desktop Web Client доступен в виде расширения роли RD Web Access на RDS серверах под управлением Windows Server 2022/2019/2016.
Перед внедрением RD Web Client нужно убедится, что ваша RDS инфраструктура соответствует следующим требованиям:
- Наличие развернутой инфраструктуры RDS (фермы Remote Desktop Services), включающей: шлюз Remote Desktop Gateway, RD Connection Broker и RD Web Access на Windows Server 2022/2019/2016;
- Используются терминальные лицензии (RDS CAL) в режиме Per User;
- На серверах RDS Gateway и Web Access должны использоваться SSL сертификаты, выданные доверенным CA. Поддерживаются бесплатные Let’s Encrypt сертификаты на RDS. Самоподписанные SSL сертификаты можно использовать в ограниченном режиме;
Установка RD Web HTML5 клиента на Windows Server RDS
HTML5 RD Web Client не входит в дистрибутив Windows Server. Вам нужно вручную установить модуль RD Web Client Management из галереи скриптов PowerShell.
Для этого установите модуль PowerShellGet на сервере с ролью RD Web Access:
Install-Module -Name PowerShellGet -Force
Перезапустите консоль PowerShell.exe и установите модуль RD Web Client Management:
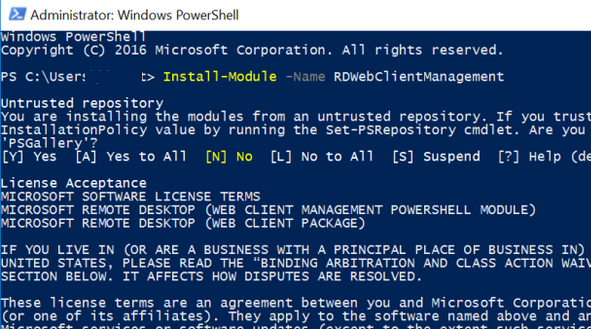
Install-Module -Name RDWebClientManagement
Чтобы принять лицензионное соглашение Microsoft, введите A.
Теперь нужно установить последнюю версию пакета Web Remote Desktop:
Install-RDWebClientPackage
После установки пакета, проверьте его свойства командой:
Get-RDWebClientPackage
Как вы видите, у вас появился пакет rd-html 5.0 версия 1.0.0.
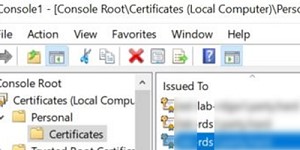
Далее вам нужно экспортировать SSL сертификат с сервера с ролью RDS Connection Broker, использующийся для SSO (Enable Single Sign On) в .cer файл (формат BASE64).
- Запустите консоль управления сертификатами компьютера
certlm.msc
: - Разверните раздел Personal -> Certificates;
- Найдите ваш сертификат, который используется в вашей RDS ферме, щелкните по нему правой кнопкой и выберите select All Tasks -> Export;
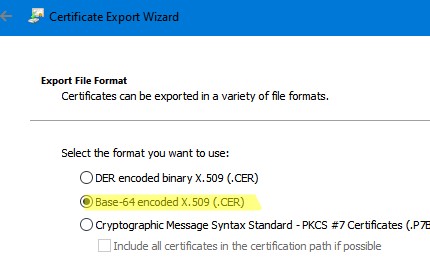
- Выберите формат экспорта Base-64 encoded X.509 (.cer) и укажите имя файла.
Импортируйте сертификат на сервере RD Web Access:
Import-RDWebClientBrokerCert C:RDBroker.cer
Теперь можно опубликовать клиент RD Web:
Publish-RDWebClientPackage -Type Production -Latest
Для тестирования клиента RD Web, можно развернуть клиент с помощью команды:
Publish-RDWebClientPackage -Type Test -Latest
Клиент RD Web позволяет запускать RemoteApps в браузере или через локальный RDP клиент (в этом случае пользователь скачает *.rdp файл). Пользователь может сам выбрать нужные ему режим. Чтобы запуск разрешить RemoteApp только в браузере, выполните команду:
Set-RDWebClientDeploymentSetting -Name "LaunchResourceInBrowser" $true
Доступ к RDWeb серверу через браузер с HTML5
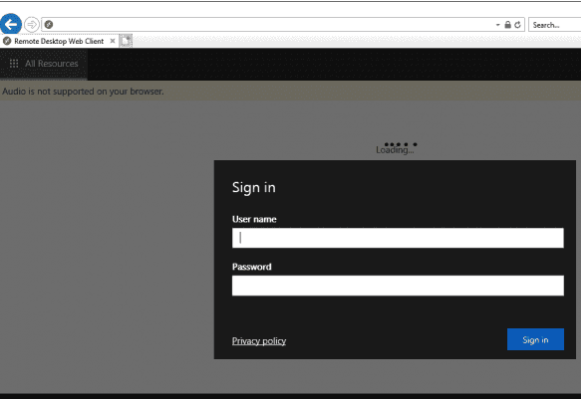
После того, как вы развернули пакет Web Client на RDS сервере, вы можете запустить браузер на клиентском компьютере. Поддерживаются все последние версии браузеров Microsoft Edge, Google Chrome, Safari, Mozilla Firefox. Для доступа к RDS серверам из браузера вам достаточно передать пользователям ссылку на сервер RDWeb.
Обязательно используйте FQDN имя сервера RD для подключения. Обратите внимание, что данное FQDN имя должно содержаться в вашем сертификате RDS развёртывания (проверьте поля Common Name/CN и Subject Alternative Names /SAN).
Откройте URL адрес:
_https://FQDN.server.name/RDWeb/webclient/index.html
Для доступа к тестовой среде используйте адрес:
_https://FQDN.server.name /RDWeb/WebClient-Test/index.html
Имя сервера должно соответствовать имени сервера RD Web Access в сертификате.
Авторизуйтесь на RDWeb сервере под своей учетной записью.
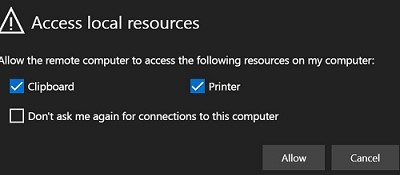
При входе у вас будет запрошено какие локальные ресурсы должны быть доступны в RD сессии. Пока доступно только перенаправление буфера обмена и принтеров (локальные диск и USB устройства через веб-клиент RDP не пробрасываются, нужно использовать полноценный клиент mstsc.exe, RDCMan или аналоги).
После успешного входа вы увидите все RemoteApp опубликованные в коллекциях. Вы можете переключаться между ними с помощью иконок в верхней части окна.
При запуске RemoteApp оно будет отображаться в браузере с возможностью развернуть окно на весь экран.
Печать из RD Web клиента осуществляется через виртуальный PDF принтер (Microsoft Print to PDF). Когда вы отправляете документ на печать в окне веб клиента, браузер предлагает скачать сформированный pdf файл. Вы можете открыть PDF файл а (PDF просмотрщик встроен в браузер Microsoft Edge) и распечатать на локальном принтере.
В HTML5 клиенте доступно динамическое изменение окна удаленного рабочего стола и возможность запуска в полноэкранном режиме. Через буфер обмена можно копировать только текст (файлы, графика через буфер веб клиента не копируются).
Возможные проблемы с веб клиентом Remote Desktop
При входе на RD Web Access вы видите список опубликованных приложений Remote App, но при попытке запуска любого из них появляется ошибка:
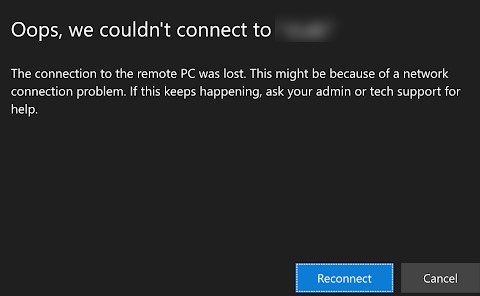
Oops, we could not connect to Calculator.
The connection to the remote PC was lost. This might be because of a network connection problem. If this keeps happening, ask your administrator or tech support for help.
Не удалось подключиться к Calculator
Потеряно подключение к удаленному компьютеру. Возможно, есть проблема с сетевым подключением. Если это будет повторяться, обратитесь за помощью к своему администратору или специалисту службы технической поддержки.
Также может быть ошибка:
The web client needs a Remote Desktop Gateway to connect to desktops and apps.
Эти ошибки возникают, если вы развернули ферму RDS без шлюза RD Web Gateway. Если у вас развернут только RD Connection Broker, нужно привязать ваш сертификат RDS на порт 3392. (см описание в разделе Connecting to RD Broker without RD Gateway in Windows Server 2019 — https://learn.microsoft.com/en-us/windows-server/remote/remote-desktop-services/clients/remote-desktop-web-client-admin).
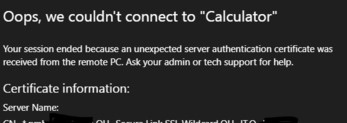
Ошибка:
Your session ended because an unexpected server authentication certificate was received from the remote PC. Ask your admin or tech support for help.
Ваш сеанс завершен, так как от удаленного компьютера получен непредвиденный сертификат проверки подлинности сервера. Обратитесь за помощью к своему администратору или специалисту службы технической поддержки.
Проверьте корректность вашего RD сертификата (FQDN сервера, которые используется для запуска RD веб клиента должен содержаться в сертификате). Проверьте, что этот сертификат назначен на все роли в вашем развертывании RDS. Отдельно проверьте что этот сертификат задан в настройка сервера RDGW (вкладка SSL Certificates). Если возможно, используйте wildcard сертификат.









.png?width=2918&name=install-remote-desktop-services%20(1).png)
.png?width=2408&name=install-remote-desktop-services%20(2).png)
.png?width=1854&name=install-remote-desktop-services%20(3).png)
.png?width=1852&name=install-remote-desktop-services%20(4).png)
.png?width=1842&name=install-remote-desktop-services%20(5).png)
.png?width=1844&name=install-remote-desktop-services%20(6).png)
-png.png)
-png.png)
-png.png)
-png.png)
-png.png)
-png.png)
-png.png)
-png.png)
-png.png)
-png.png)
-png.png)

-png.png?width=211&name=update-windows-token-service%20(5)-png.png)
-png.png?width=478&name=update-windows-token-service%20(4)-png.png)
-png.png?width=513&name=update-windows-token-service%20(6)-png.png)
-png.png?width=506&name=update-windows-token-service%20(1)-png.png)
-png.png?width=358&name=update-windows-token-service%20(3)-png.png)
-png.png?width=327&name=update-windows-token-service%20(2)-png.png)
