Read this article on how to fix it.
Проблема обычно возникает при загрузке или доступе только к некоторым конкретным сайтам, что может соответственно помешать работе.
Now, this article deals with the step-by-step guide on fixing “Server IP Address could not be found” error.
Различные способы решения проблемы IP-адреса сервера
Вот некоторые из немногих исправлений, которые могут помочь устранить вышеуказанные проблемы, а именно:
Метод 1: Удаление целых файлов, присутствующих в папке ‘etc’:
Это один из самых простых способов устранить ошибки, описанные выше, поскольку некоторые из файлов etc могут затруднить обработку. Таким образом, пользователи должны следовать этим шагам для достижения успеха.
(a) Перейдите в C: Windows System32 drivers etc
Откройте My Computer и там нажмите на диск C. После этого выберите «Windows», а затем выберите папку «System32».
После этого выберите папку «драйверы», а затем «и т. Д.»
(б) удалить все ненужные файлы
После того, как вы достигнете ориентира, вам нужно будет удалить все ненужные файлы, присутствующие в определенной папке ‘etc’
(c) Попробуйте подключить его с Chrome
После выполнения обоих шагов пользователи должны попытаться повторно получить доступ к Интернету с помощью Google Chrome.

Способ 2. Обновите драйвер сетевого адаптера:
Со временем есть вероятность, что пользователи могут установить неверный, устаревший или поврежденный драйвер сетевого адаптера. Это приводит к нескольким существенным проблемам, включая всплывающее IP-сообщение. Имея это в виду, пользователи должны обновить драйвер сетевого адаптера, выполнив следующие шаги:
(а) Откройте панель управления
Пользователи должны выбрать панель управления, нажав на поиск и затем введя «Панель управления» в поле поиска.

(b) Выберите «Устройство и принтеры», а затем «Диспетчер устройств».
Пользователи должны затем нажать на устройство и принтеры, а затем на диспетчере устройств. Там они должны соответствующим образом настроить драйвер сетевого адаптера, щелкнув Сетевой адаптер, а затем выбрав подходящие подключения сетевого адаптера.

Способ 3: очистка кэша хоста Chrome
Это основная проблема, которая возникает, когда пользователь не обращает внимания на очистку Host Cache.
Если кэш заполнен или поврежден, пользователи столкнутся с трудностями при доступе к своим любимым веб-сайтам. Для этого они могут быстро решить проблемы, как указано ниже:
(a) Откройте Chrome, а затем введите Chrome: // net-internals / # dns
Пользователи должны сначала выбрать Chrome на рабочем столе, а затем набрать Chrome: // net-internals / # dns в указанной адресной строке.
(б) Очистить кэш хоста
Затем пользователи должны выбрать Очистить кэш хоста, указанный на веб-странице после нажатия клавиши Enter на клавиатуре.

Способ 4: изменить настройки DNS-сервера
Устаревшие настройки DNS-сервера — одна из наиболее заметных причин возникновения этой проблемы. Из-за неправильной конфигурации в настройках DNS-сервера проблема может возникнуть в целом. Таким образом, пользователи должны выполнить следующие простые шаги:
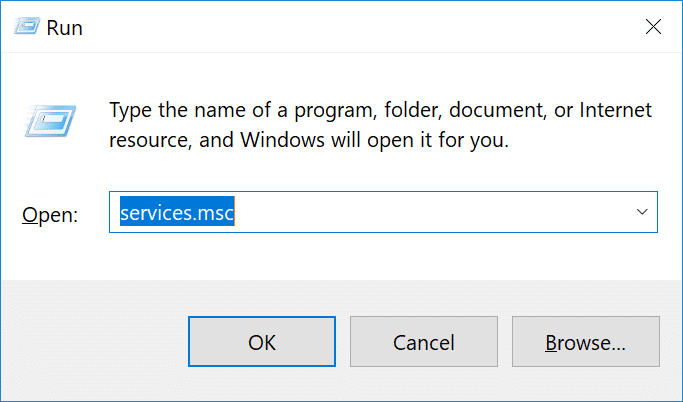
(а) Окно с логотипом и ключ R
Пользователи должны одновременно нажать клавишу с логотипом окна и клавишу R, чтобы открыть окно запуска.

(б) Панель управления
Затем пользователи должны ввести на панели управления в данном окне «Выполнить» и нажать ОК.

(c) Центр управления сетями и общим доступом
Затем пользователи должны нажать на Центр управления сетями и общим доступом в данной панели управления.

(d) Выберите «Изменить настройки адаптера».
Затем пользователи должны нажать на «Изменить настройки адаптера» в Центре управления сетями и общим доступом, указанном на панели управления. Затем они должны щелкнуть правой кнопкой мыши значок «Значок подключения» в разделе «Беспроводное сетевое подключение» или «Подключение по локальной сети».

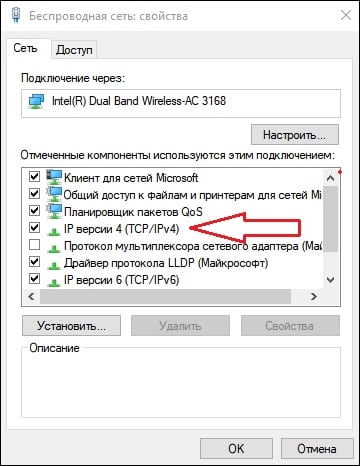
(e) Интернет-протокол версии 4 (TCP / IPv4)
After selecting Properties, users must click on Internet Protocol Version 4 (TCP / IPv4) to check whether ‘Obtain DNS servers address automatically’ is already opted or not. If no, then users must click on OK, and if yes, then they must select ‘Use the following DNS server address’ to enter the suitable server address to click OK.
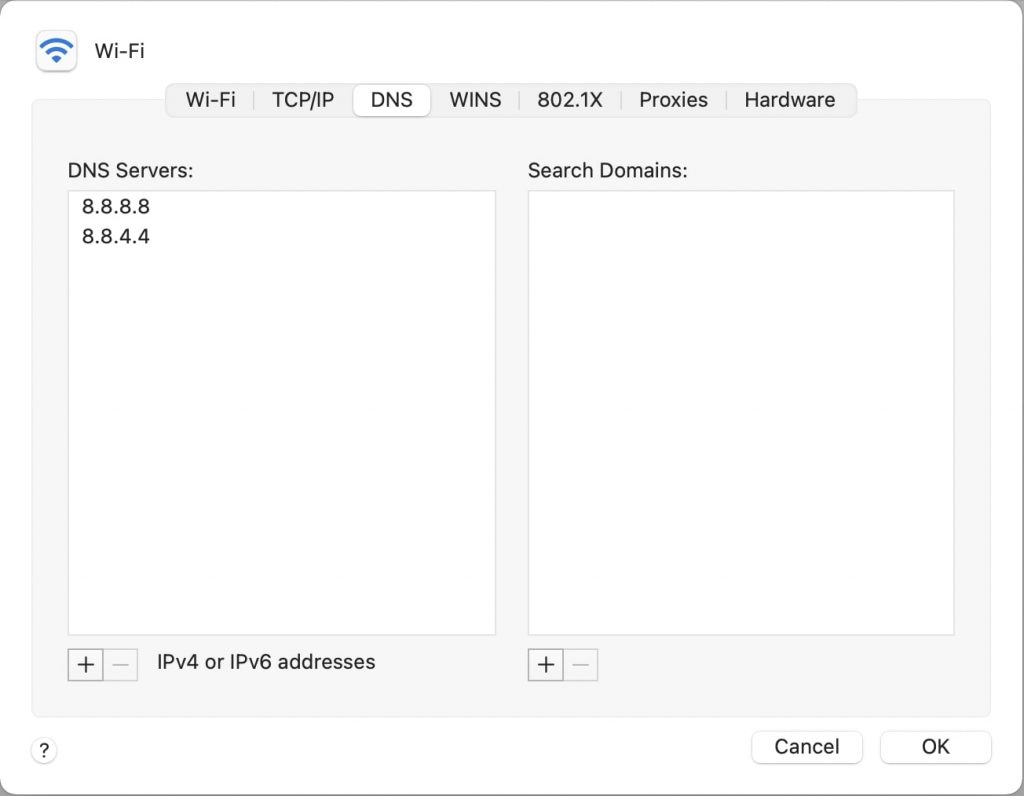
Вот варианты, где пользователи могут ввести подходящий DNS-сервер для совместимости с IP-сервером, т.е.
Предпочтительный DNS-сервер: 8.8.8.8
Альтернативный DNS-сервер: 8.8.4.4
После этого пользователи должны проверить исправленную проблему решения.

Способ 5: обновить и очистить 

В Windows есть функция хранения IP-адресов веб-сайтов, чтобы пользователи могли легко получить к ним доступ при следующем посещении.
Но когда кеш становится поврежденным или устаревшим, это может остановить доступ к конкретному веб-сайту. Для этого необходимо обновить и затем очистить DNS, выполнив следующие простые шаги:
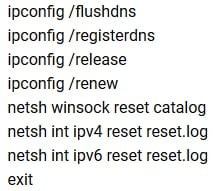
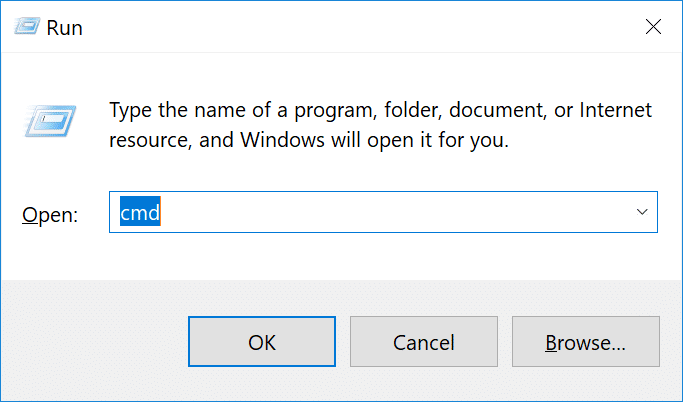
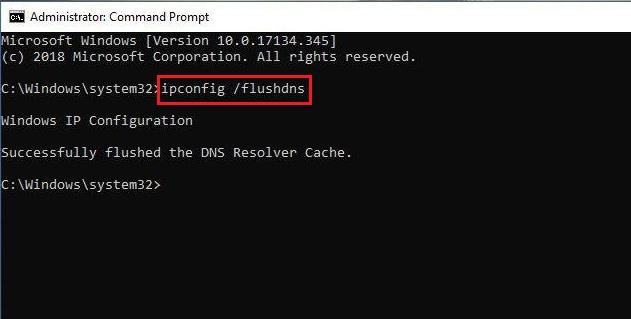
(а) Открыть командную строку
Чтобы открыть командную строку, пользователи должны нажать Windows + R для поля запуска и затем ввести cmd, нажав Ctrl + Shift + Enter, чтобы открыть командную строку администратора.

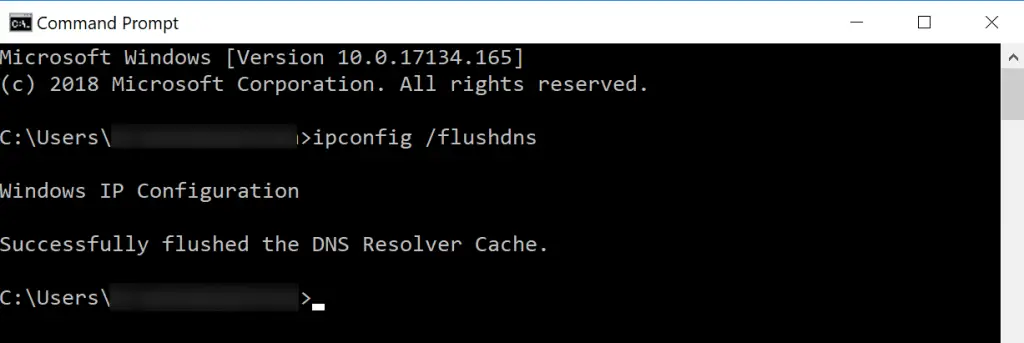
(b) Ipconfig / flushdns, ipconfig / renew, а затем Ipconfig / registerdns
Затем пользователи должны ввести ipconfig / flushdns и нажать Enter. Он успешно очистит ненужный кеш DNS Resolver.
После этого пользователи должны затем набрать ipconfig / renew и нажать Enter для обновления конфигурации IP.
Затем пользователи должны ввести ipconfig / registerdns и нажать кнопку Enter.


(c) Перезагрузка системы
После вышеупомянутого процесса пользователи должны перезагрузить свой компьютер для проверки оптимальной производительности на сайте.
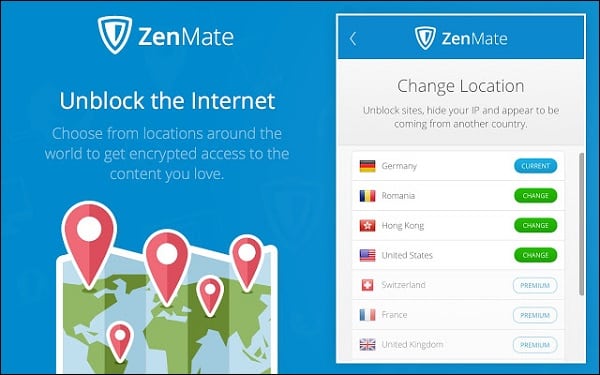
Способ 6: VPN
VPN (виртуальная частная сеть) может помочь преодолеть проблемы, связанные с IP-адресом не найденных сообщений. Пользователи должны использовать хорошее VPN-соединение (например, NordVPN, ExpressVPNи многое другое), чтобы не было проблем, связанных с кражей данных или добавлением вредоносных файлов в систему, что может помешать процессу.

Заключение
With these above steps, users can easily fix the “Server IP Address could not be found” error message.
Пользователи должны заранее решить проблему с IP-адресом, чтобы она могла стать серьезной в будущем.
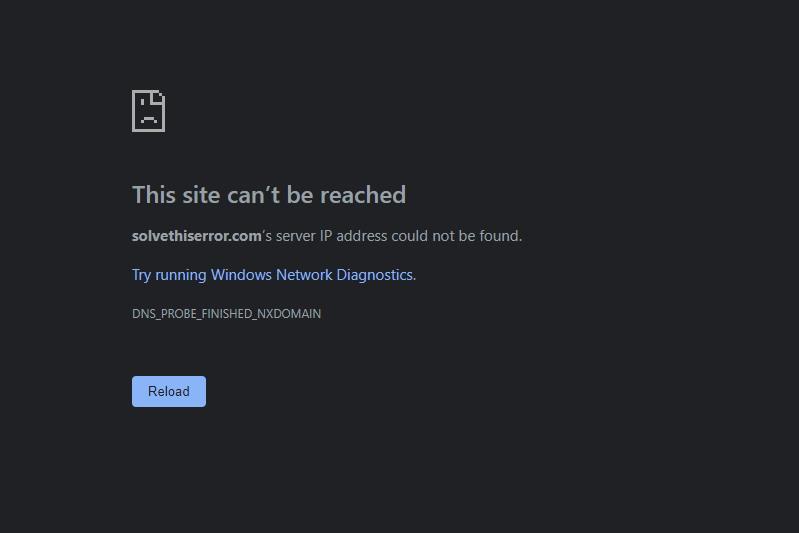
При переходе на какую-либо веб-страницу вы можете столкнуться с ошибкой адреса хоста. Обычно к указанному сообщению прилагается код какой-либо из двух ошибок, звучащих по-английски как «ERR_NAME_NOT_RESOLVED» или «DNS_PROBE_FINISHED_NXDOMAIN». Данная дисфункция может быть вызвана разнообразными причинами, лежащими как на стороне нужного сервера (сайта), так и на стороне сетевых настроек пользователя. Давайте разберём суть этой дисфункции, а также рассмотрим, как можно исправить ошибку «Не удалось найти IP-адрес сервера» на вашем PC.
- Что означает ошибка нахождения IP-адрес сервера
- Проверка настройки интернет-подключения и правильность ввода адреса
- Использование адреса публичных ДНС-серверов от компании Google
- Проверка работы ДНС и сброс настроек
- Временное отключение антивируса и брандмауэра PC
- Удаление файлов в папке etc.
- Отключение расширений для вашего навигатора
- Проверка PC на наличие зловредов при ошибке об отсутствии IP-адреса сервера
- Использование VPN для перехода на нужный IP-адрес
- Использование другого браузере для исправления ошибки
- Заключение
Что означает ошибка нахождения IP-адрес сервера
Обычно указанное сообщение появляется в ситуации, когда пользовательский браузер не может открыть страницу нужного веб-сайта. При вводе адреса веб-ресурса в адресной строке навигатора и нажатии на Enter вместо нужной страницы навигатор выводит сообщение о том, что невозможно определить адрес.

Can’t find IP
Причинами появления данного сообщения может быть следующее:
- Адрес сайта был введён неверно;
- Нужный сервер работает нестабильно, или на нём ведутся какие-либо работы;
- На PC пользователя имеются проблемы с настройками сетевого подключения (в частности, некорректно работает роутер);
- Антивирус или брандмауэр PC блокирует доступ к нужному веб-ресурсу;
- Некорректно работают ДНС-сервера или служба ДНС на пользовательском PC;
- На компьютере пользователя действует вирусный зловред, изменивший сетевое подключение под себя;
- На браузере установлены сетевые плагины (расширения), влияющие на его работу;
- Имеются какие-либо неполадки у интернет-провайдера.
При идентификации причин очень важно удостовериться, имеется ли данная проблема на других ПК и у других пользователей. Попросите кого-либо из ваших друзей или знакомых перейти на проблемную интернет-страницу. Если ошибка с IP-адресом возникает и у них, тогда, скорее всего, это проблема на стороне сервера (сайта), и вашей вины в этом нет. Если же у них нужная страница открывается без проблем, тогда это проблема именно пользовательского PC.
Давайте разберёмся, как устранить ошибку «Не удалось найти IP-адрес сервера» на вашем PC.
Будет полезно знать: что делать если сеть есть, а страницы в веб-навигаторе не открываются.
Проверка настройки интернет-подключения и правильность ввода адреса
Первым делом рекомендуем убедиться, что с вашим сетевым подключением нет никаких проблем. Рекомендуем перейти на ряд популярных сайтов, и убедиться, что они загружаются исправно. Также стоит перезагрузить имеющийся у вас роутер, для чего выключите его на пару минут, после чего включите обратно.
Также убедитесь, что вы правильно ввели адрес нужной страницы. Ошибка даже на один символ может привести к возникновению проблемы подобно рассматриваемой в статье.
Использование адреса публичных ДНС-серверов от компании Google
Наиболее эффективным методом избавиться от проблемы отсутствия АйПи-адреса сервера является использование адресов публичных серверов, любезно предложенных компанией Гугл.
Рекомендуем выполнить следующее:
- Нажмите Win+R, в появившейся табличке введите ncpa.cpl, после чего нажмите на Enter;
- Перед вами откроется перечень сетевых подключений. Наведите курсор мышки на интернет-подключения, и щёлкните правой клавишей мышки. В появившемся меню выберите «Свойства»;

- Откроется перечень сетевых компонентов. Среди всего списка найдите IPv4 и дважды кликните мышкой на нём;

Дважды кликните на указанном компоненте
- Активируйте опцию «Использовать следующие адреса ДНС серверов» и пропишите адреса предпочитаемого и альтернативного ДНС-сервера так, как указано на изображении чуть ниже;

- После этого нажмите внизу на «ОК», и перезагрузите PC.


Данное решение является наиболее эффективным способом решить ошибку, которая звучит как «Не удалось найти IP-адрес сервера».
Читайте также наш материал: DNS_PROBE_FINISHED_NO_INTERNET — что делать?.
Проверка работы ДНС и сброс настроек
Запустите командную строку от админа. В ней последовательно наберите нижеизложенные команды:
Перезагрузите ваш PC.
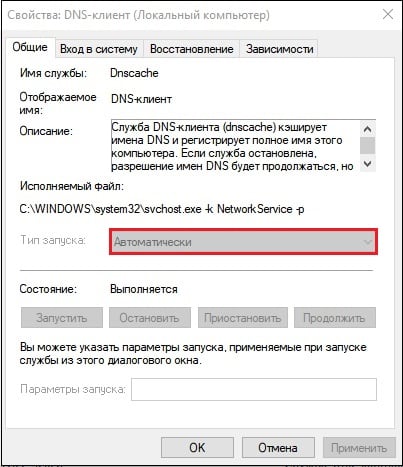
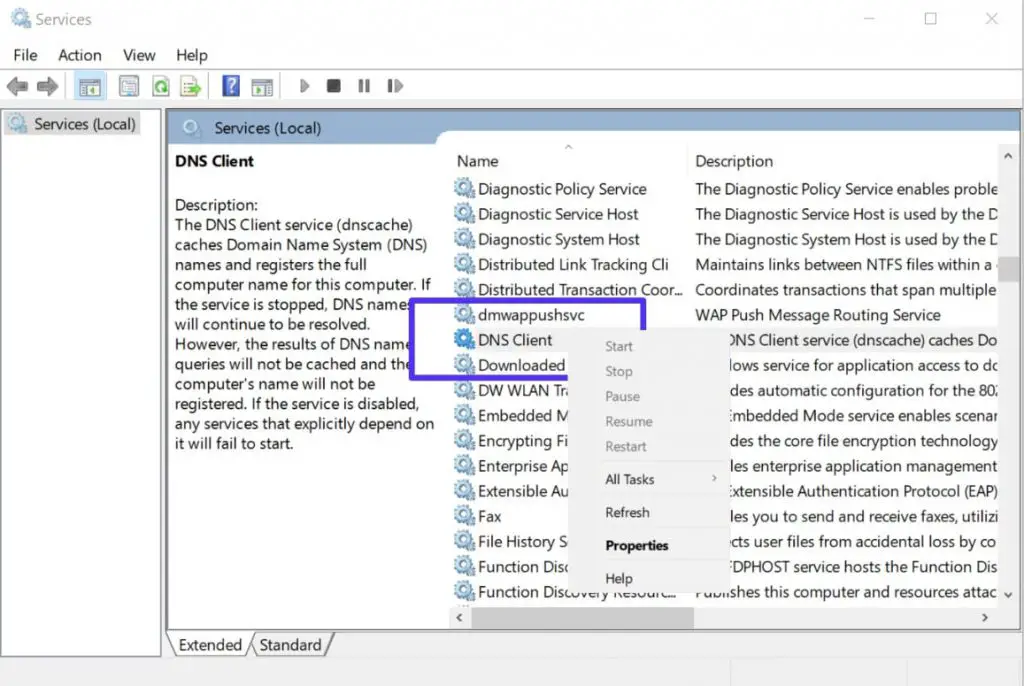
Если это не помогло, рекомендуем также проверить работоспособность службы, отвечающей за работу с ДНС. Нажмите на Win+R, в появившемся окне введите services.msc и нажмите Enter. В перечне служб найдите «DNS-клиент», щёлкните ПКМ, после чего выберите «Перезапустить». Также дважды кликните на данной службе, и убедитесь, что тип её запуска установлен на «Автоматически».
Временное отключение антивируса и брандмауэра PC
В некоторых случаях антивирус и брандмауэр могут блокировать работу PC. Рекомендуем временно отключить (деактивировать) их с целью проверить, что они не являются причиной возникшей проблемы с IP-адресом сайта.
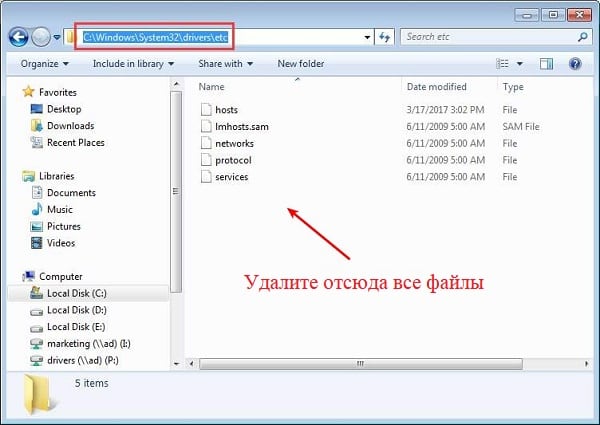
Удаление файлов в папке etc.
Другим способом исправить ошибку отсутствия подключения к серверу является удаление папки etc. на жёстком диске. Данная папка расположена по пути:![]() После нахождения данной папки удалите все файлы, которые вы там обнаружите. Затем перезапустите ваш веб-навигатор и вновь попытайтесь зайти на нужный веб-ресурс.
После нахождения данной папки удалите все файлы, которые вы там обнаружите. Затем перезапустите ваш веб-навигатор и вновь попытайтесь зайти на нужный веб-ресурс.
Отключение расширений для вашего навигатора
В некоторых случаях установленные на веб-навигатор расширения могут препятствовать корректной работе программы. Рекомендуем временно отключить (или вовсе удалить) данные расширения. К примеру, в браузера Mozilla они находятся по пути «Настройки» — «Дополнения».
Проверка PC на наличие зловредов при ошибке об отсутствии IP-адреса сервера
Поскольку вирусы могут препятствовать доступу на нужный IP-сервер, рекомендуем избавиться от них. Помогут программы уровня «AdwCleaner» и «ДокторВеб Кюрейт», зарекомендовавшие себя в борьбе со зловредами, рекламными программами, шпионами и прочими аналогами.

Использование VPN для перехода на нужный IP-адрес
В некоторых случаях требуемый ресурс может быть заблокирован вашим провайдером. Или вы может быть заблокированы на таком ресурсе по вашему IP-адресу. В обоих случаях рекомендуем использовать ВПН-программу для обхода блокировок (например для Гугл Хрома и Яндекс браузера). Установите одну из таких программ на ваш PC, запустите, выберите одну из альтернативных стран, и обойдите существующую блокировку.
Это будет интересно: ВПН для Яндекс.Браузер.
Использование другого браузере для исправления ошибки
Довольно частой причиной проблемы является какой-либо конкретный браузер (например, Google Chrome). Очистите куки и кэш в данном браузере, а также сбросьте его настройки по умолчанию.
Если это не помогло, попробуйте также другой браузер. Возможно, на нём нужная страница запустится без каких-либо неполадок.
Заключение
Распространённой причиной рассматриваемой дисфункции являются некорректные настройки ДНС-серверов. Из-за них система не может соединиться с нужным сайтом, и выдаёт рассматриваемую в статье ошибку. Рекомендуем применить перечисленные в статье советы (обратив особое внимание на изменение адресов ДНС-серверов), что поможет исправить распространенную ошибку «Не удалось найти IP-адрес сервера» на вашем PC.
Google Chrome is one of the very reliable browsers in the market. However, at times, it may show errors that may annoy you. One of the most common errors in Chrome is ‘Server IP Address Could Not Be Found,’ often accompanied by error code DNS_PROBE_FINISHED_NXDOMAIN. If you’re facing any such issue while browsing in your Chrome, do not worry. Here, I’ve explained everything about the “Server IP Address Could Not Be Found” error, including what it is, what are reasons behind the error, and how one can fix it on their Chrome browser.
What is the ‘Server IP Address Could Not Be Found’ Error?
To understand what is the server IP address could not be found error, we first need to understand how the Internet works. For starters, every website on the Internet hosts its files on a web server, and every web server has an IP address. We can access the website’s content by typing the IP address of the server in our address bar.
However, the problem is we humans use names in our day-to-day life. We can not remember the IP addresses for each website we want to visit. Unlike humans, computers work differently- they understand only numbers and codes. There is a direct conflict between humans are computers. To solve this problem, DNS (Domain Name System) was introduced in the early 90s.
What DNS does is, propagates a domain name request to an IP address. When we type a domain name in our address bar, we tell our browser to load the content of that website. Once we type the domain name and hit enter, DNS works in the backend to send the request to the actual server, and then our browser loads the content.
In this process, whenever a DNS request is not successfully processed either on the server-side or client-side, we see the error server could not be found. The error code DNS_PROBE_FINISHED_NXDOMAIN indicates the non-existence of the domain. Now that you have a brief idea about the Server IP Address not found error, let’s take a quick look at the possible reasons why this error occurs.
Reasons For Server IP Address Could Not Be Found in Chrome
As mentioned, this error occurs either on the server-side or client-side. Here server-side errors mean the request is not processed from the web server itself. There are high chances that the admin of the website you are trying to open has recently changed their IP address. The DNS takes 24-48 hours as a propagation time, and within this time period, DNS requests might not reach the newly allocated IP address.
Other server-side errors include the server itself is having an outage or downtime. You can’t do much if a specific website has server-side errors. All you can do is contact the admin of the website and wait until they fix the issue. If you are an admin of a web server, I would like to add here we will not be focusing on server-side errors, but we will be mainly focusing on client-side errors as our site is mainly focused on end consumers.
There are two possibilities for client-side errors: either browser settings are causing the error, or there is an issue in Network. The network errors might be caused due to outrage from your ISP or badly configured network settings. We will be providing the fix for both the browser level problems as well as different network-related problems.
Fix Server IP Address Could Not Be Found (DNS_PROBE_FINISHED_NXDOMAIN) in Chrome
Now, there are several fixes available for the error. Some of them are very easy and common while a few of them are advanced related to browser and network.
In my opinion, It is always better to start with basic fixes. I have provided five common fixes, followed by five browser-level fixes and five network-level fixes. If you have already tried some common fixes, you can head over to the more advanced fixes.
Common Fixes
1. Check Your Internet Connection
The very fix you should try is to check your Internet connection. It might sound pretty common for a geek, but it will be very helpful for a non-techy user. Your next question will be how can I check my Internet connection.
You can try to open pages of a different website or do a simple Google search. You can also try to use the Internet on your other devices. There are other ways like checking Internet speed or using Terminal or Command line to see whether the website is getting pinged or resulting in error.
If you find that your Internet connection is unavailable, then you have already find the culprit. Now you can try a different Wi-Fi network, either use your Mobile Hotspot or connect to a different Wi-Fi network(of your neighbors). But in case the Internet connection is working flawlessly, try out the next fix.
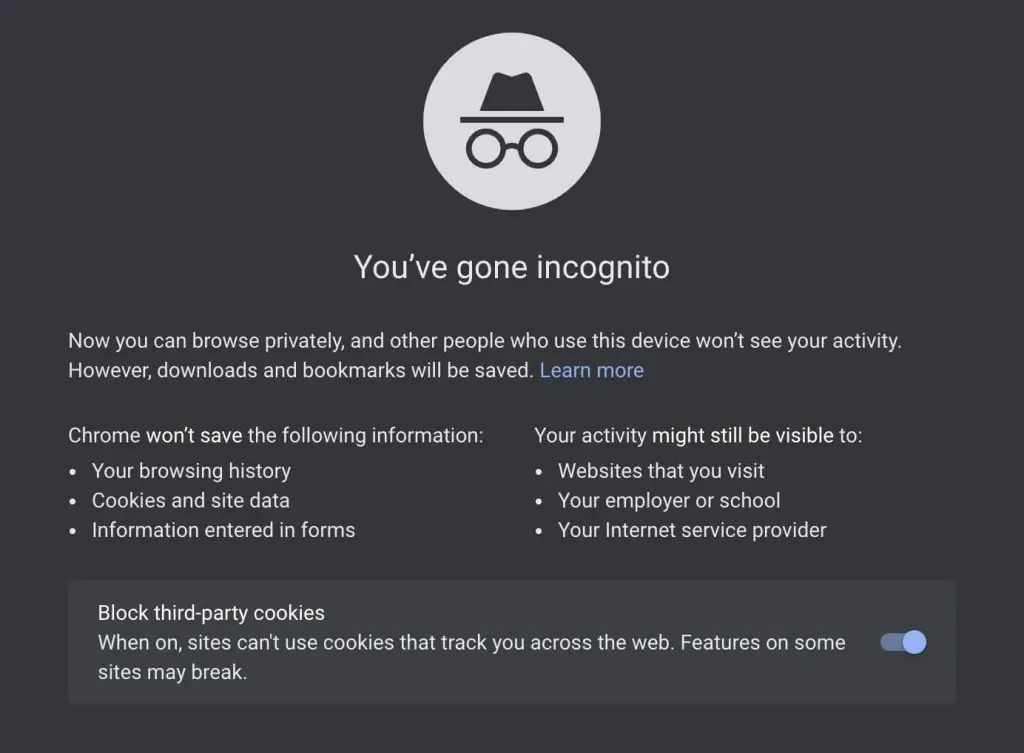
2. Open The Page In An Incognito Window
If a specific website is not opening and giving DNS_PROBE_FINISHED_NXDOMAIN error, it might be a caching issue. It’s always advisable to try to open the page in a new Incognito window.
You can easily launch a new incognito window by pressing Shift+Control+N on Windows and Shift+Command+N on Mac. Alternatively, you can tap on the three-dot menu in the top right corner and then tap on the new incognito window.
3. Clear Browsing Data
If the page opens in the incognito window, then it’s confirmed that you are facing the issue because of caching. To clear all cache and cookies stored on your computer, type or paste chrome://settings/clearBrowserData in the Chrome search bar and clear your browsing data.
4. Restart Your Computer
Minor bugs or glitches in your system can create issues like DNS_PROBE_FINISHED_NXDOMAIN. So, restart your computer to see if it resolves the issue. I know it might be difficult to close your computer right in the middle of your work when dozens of tab and multiple windows are open, but yet, it could be worth it.
5. Disable VPN & Antivirus
Most of us use VPN and Antivirus to protecting ourselves on the Internet. It is a good practice, and we should definitely do it. But on a few occasions, VPN or Antivirus might block a website from opening. There might be an issue in VPN, or your Antivirus software may think the website you are trying to open might be harmful(even if it’s not).
In such scenarios disabling VPN and Antivirus temporarily can be helpful. Just disconnect your VPN and disconnect Antivirus and then open the webpage you were trying to open to see whether it fixes the issue.
Browser Level Fixes
6. Use Different Browser
Chrome is the most popular browser right now. Over 65% of total Internet users it as their default browser. The server IP address could not be found(DNS_PROBE_FINISHED_NXDOMAIN) error occurs in Chrome, but It is not limited to just Chrome. There are different variations of the same issue for different browsers.
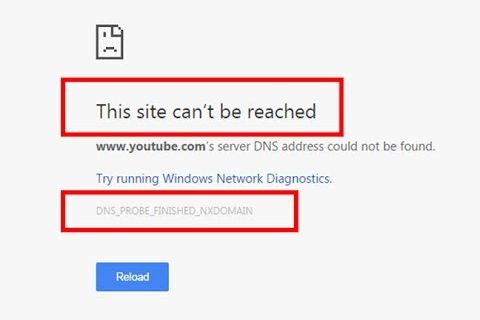
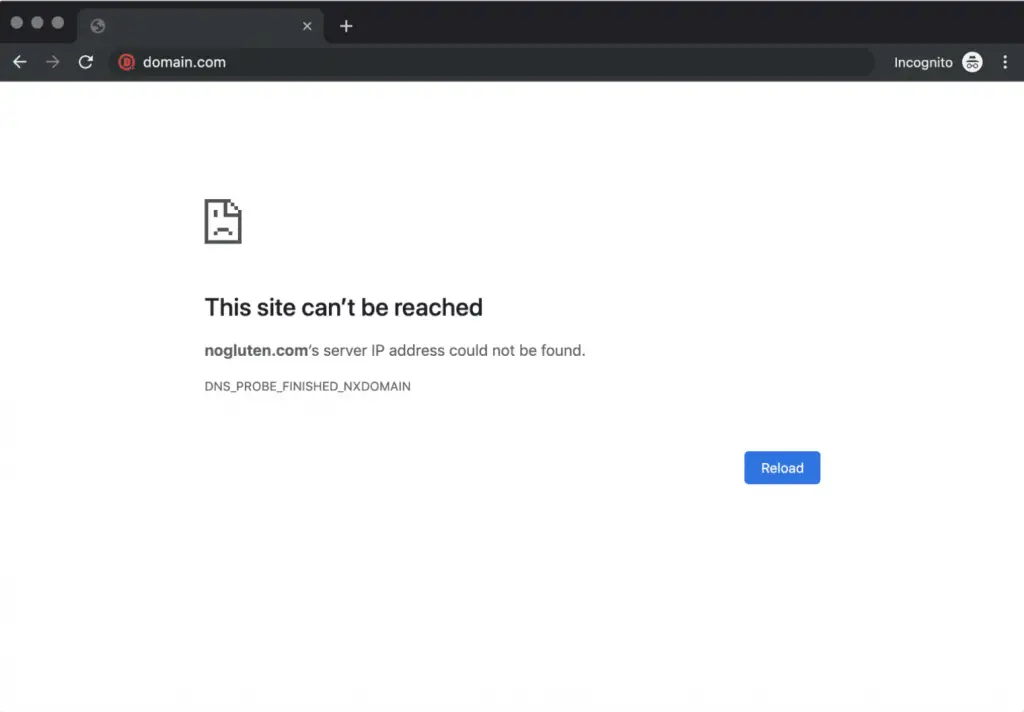
On Google Chrome
The error looks like this on Google Chrome. You will see a message “This site can’t be reached,” followed by the domain name’s server IP address could not be found. The error code is DNS_PROBE_FINISHED_NXDOMAIN.
If you have faced the error on Google Chrome, Use a different browser to make sure whether the issue is with Chrome only or you are facing it on other browsers as well. If you are not having any issue on other browsers, then it is a confirmation that the error somewhere in Chrome. But if other browsers are also not able to open web pages, then the issue might be more complex and related to your computer’s network settings.
On Firefox
The server IP address not found error looks completely different on Mozilla Firefox. It says Hmm. We’re having trouble finding that site. We can’t connect to the server.

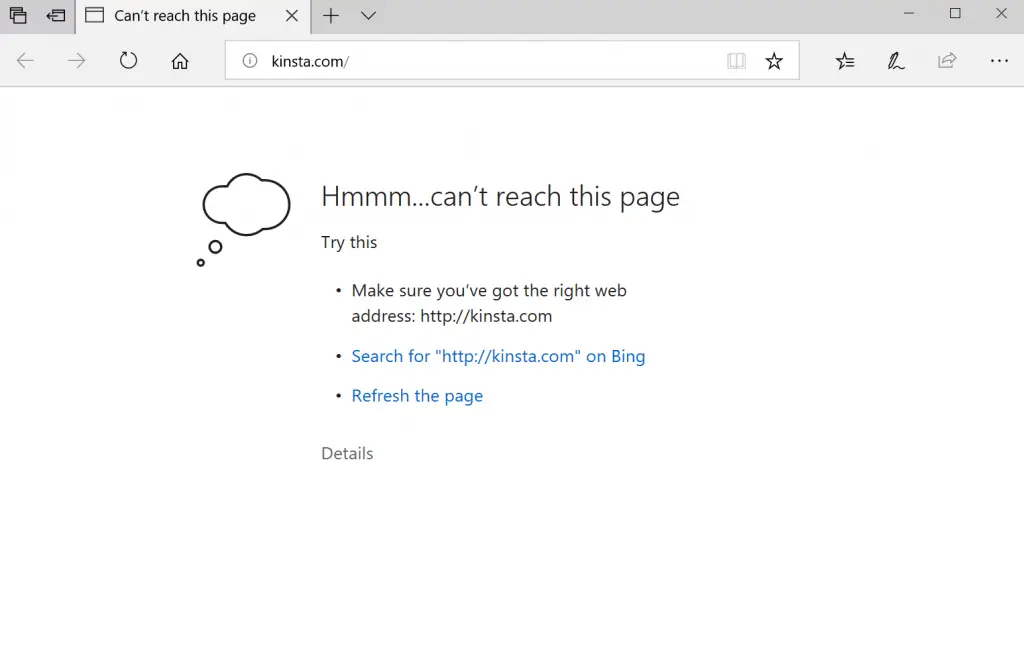
On Microsoft Edge
If you are a Microsoft user the error will look like this Hmmm… can’t reach this page with a cloud icon.
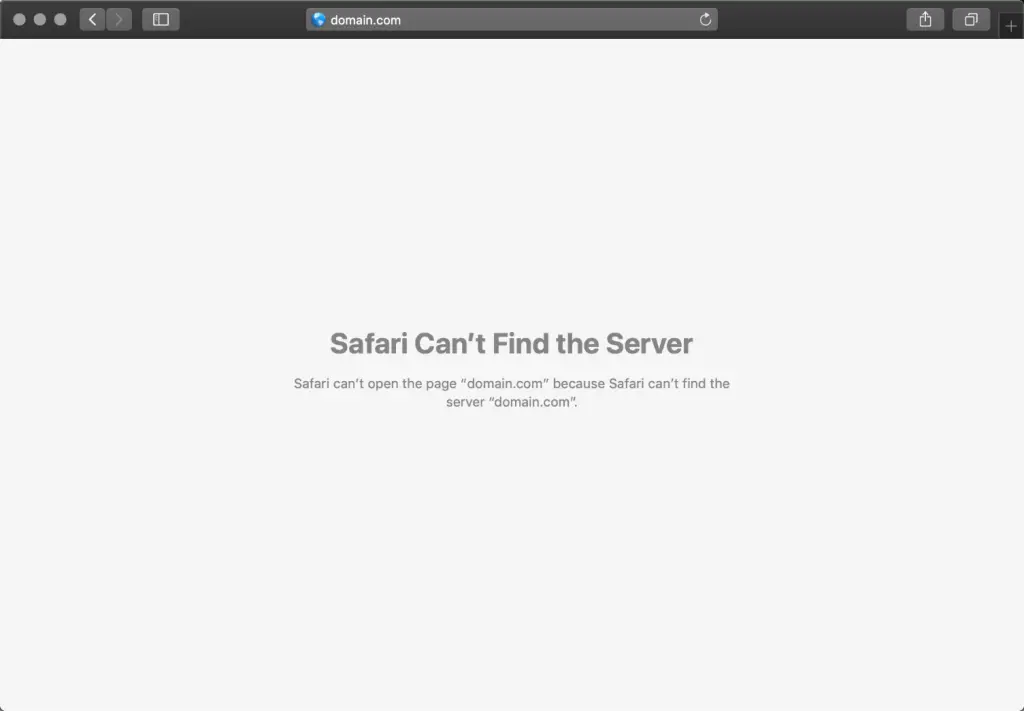
On Safari
On Apple’s Safari browser, the server IP address could not be found error will appear simply as “Safari Can’t Find the Server.”
I will first provide fixes assuming other browsers are working fine and the issue is just in Chrome. But in case the issue is there in other browsers as well scroll down to find our fixes for network-related issues.
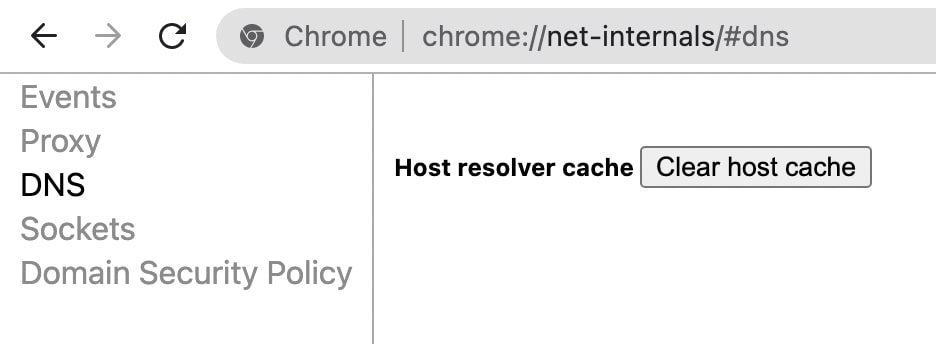
7. Clear Chrome Host Cache
Every operating system stores cache, and so does Chrome. It stores a DNS cache of its own. If you use Chrome as your default browser, then It might be useful. To clear the Chrome host cache, type or paste chrome://net-internals/#dns in the address bar. On the resulting page, you will see an option to clear the host cache. Go ahead and clear it.
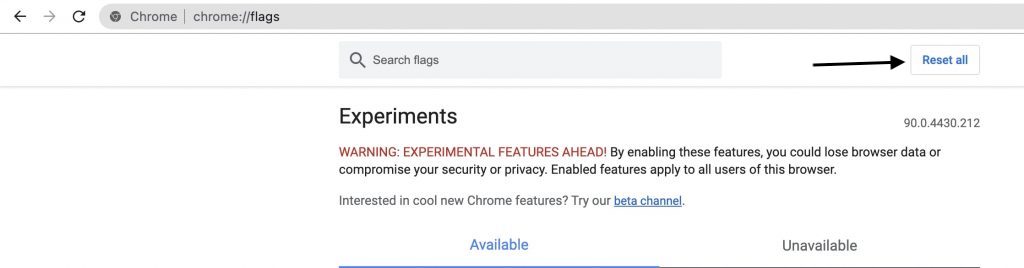
8. Reset Chrome Flags
No one can deny that Chrome flags allow us to enable experimental features. But as it is always the case with experimental features, they might cause errors. I would suggest resetting Chrome flags. Doing so will bring Chrome flags to default settings.
To reset Chrome flags, type Chrome://flags in the address bar. On the top right corner, you will see an option to reset Chrome flags. Tap on it. It will bring back all experimental settings to default.
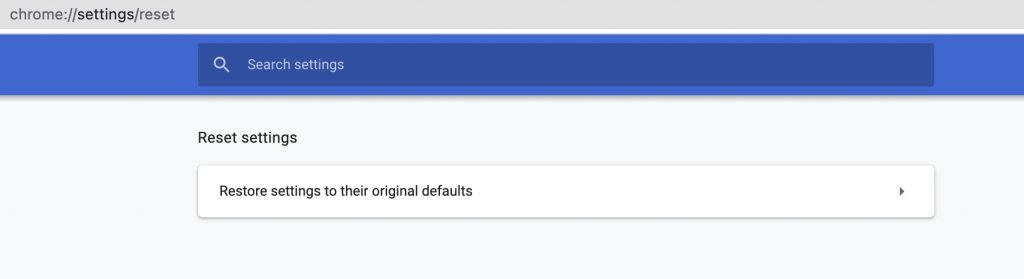
9. Reset Chrome Settings
It’s not just Chrome flags, but a wrong Chrome setting can also break things for you. When trying different fixes resetting Chrome settings can be a working fix. Type or paste chrome://settings/reset in your Chrome’s address bar and complete the reset process. It will bring back all the Chrome settings at the default.
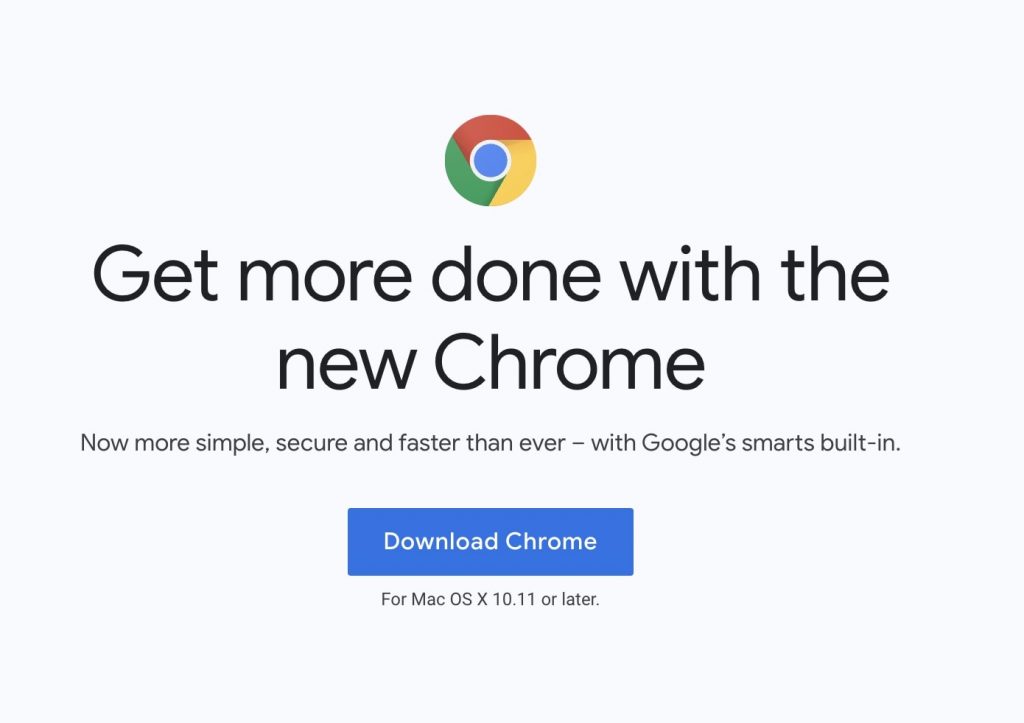
10. Re-Install Chrome
Even resetting Chrome settings didn’t help you, the next thing you can try is re-install Chrome. First, uninstall Chrome from your computer and then download the installation file from Chrome’s official website. Complete the installation process, and once done, try to open websites.
Network Level Fixes
11. Change DNS Servers
Most computers use the default IP address of the Internet Service provider. If you are not aware that you can change DNS Servers of your computer to a DNS server of Google, Cloudflare, you are already missing a huge advantage.
The DNS servers of your ISP might be fine but using Google or Cloudflare DNS server will take your experience to the next level. Changing DNS servers can also help fix the server IP address not found error if it is caused by a fault in your ISP DNS Server.
On Windows
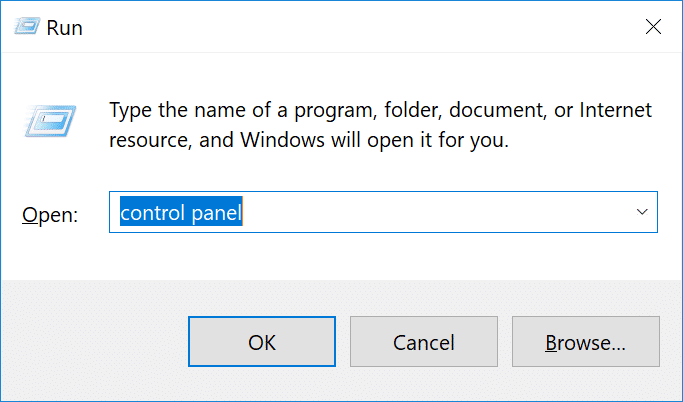
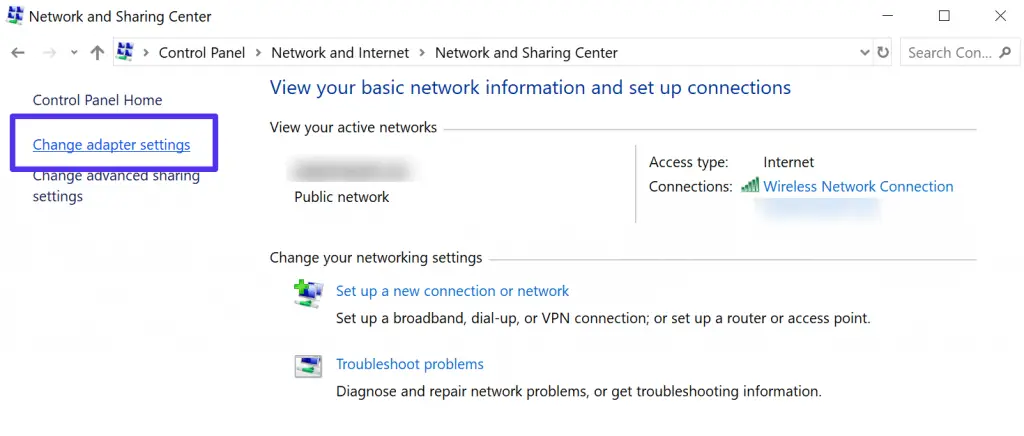
Step 1: To change DNS server on Windows Press Windows Logo key and R then type control panel and hit enter.
Step 2: In the Control panel click and network and Internet and then network and sharing center. On the left side of your screen, you will see an option named “Change adapter settings”. Click on it. Now you will see the active networks on your computer. It will show whether the connection is Wireless or local.
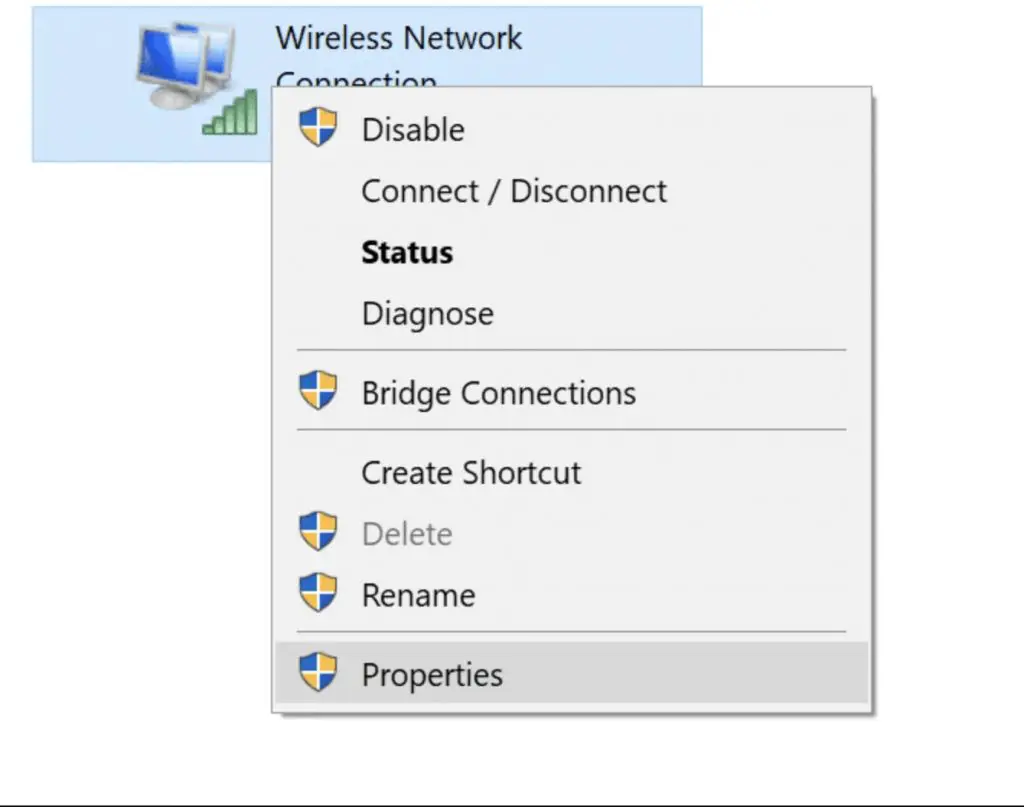
Step 3: In the next step right click on your active network and you will see an option Properties. Select it.
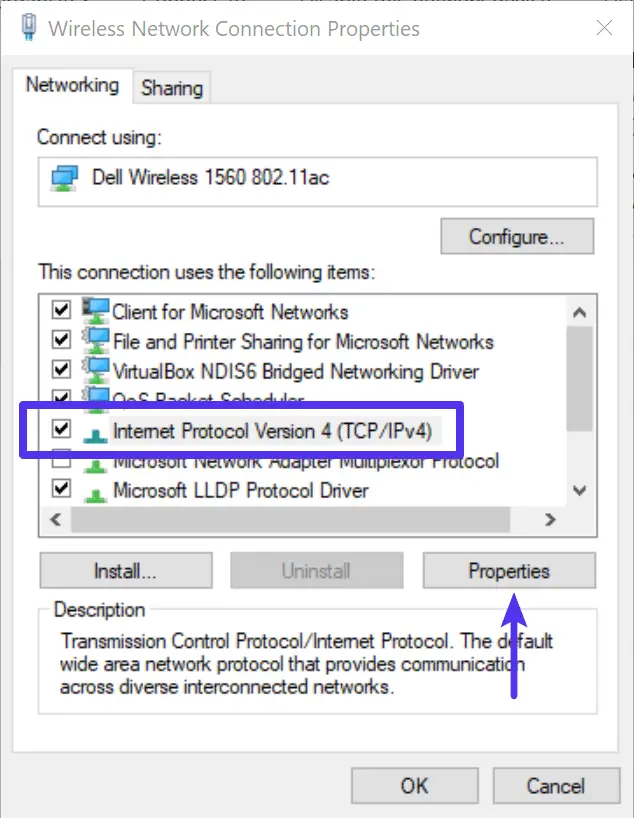
Step 4: In the properties settings you will see different items find Internet Protocol Version 4(TCP/IPv4) or Version 6 whichever you want. After selecting either IPV4 or IPV6 click properties.
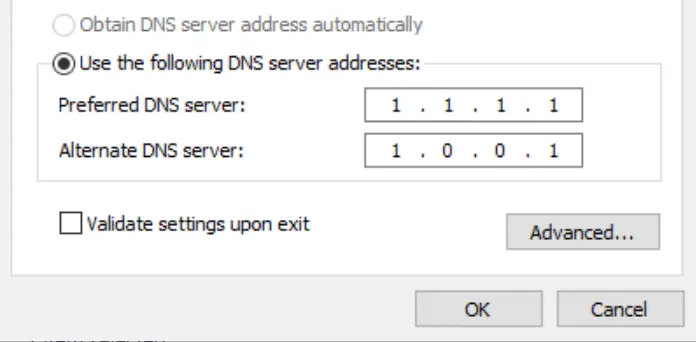
Step 5: You’ll now see a box where you can enter the IP address. You will need to enter a preferred DNS server and an Alternate DNS server. Enter 8.8.8.8 as the preferred DNS server and 8.8.4.4. as an alternate DNS server if you want to use the Google DNS server.
If you have selected IPV6, then enter 2001:4860:4860::8888 as preferred and 2001:4860:4860::8844 as an alternate DNS server. Lastly, after entering the DNS server, click Ok.
On Mac
Step 1: Go to System Preferences and select Network.
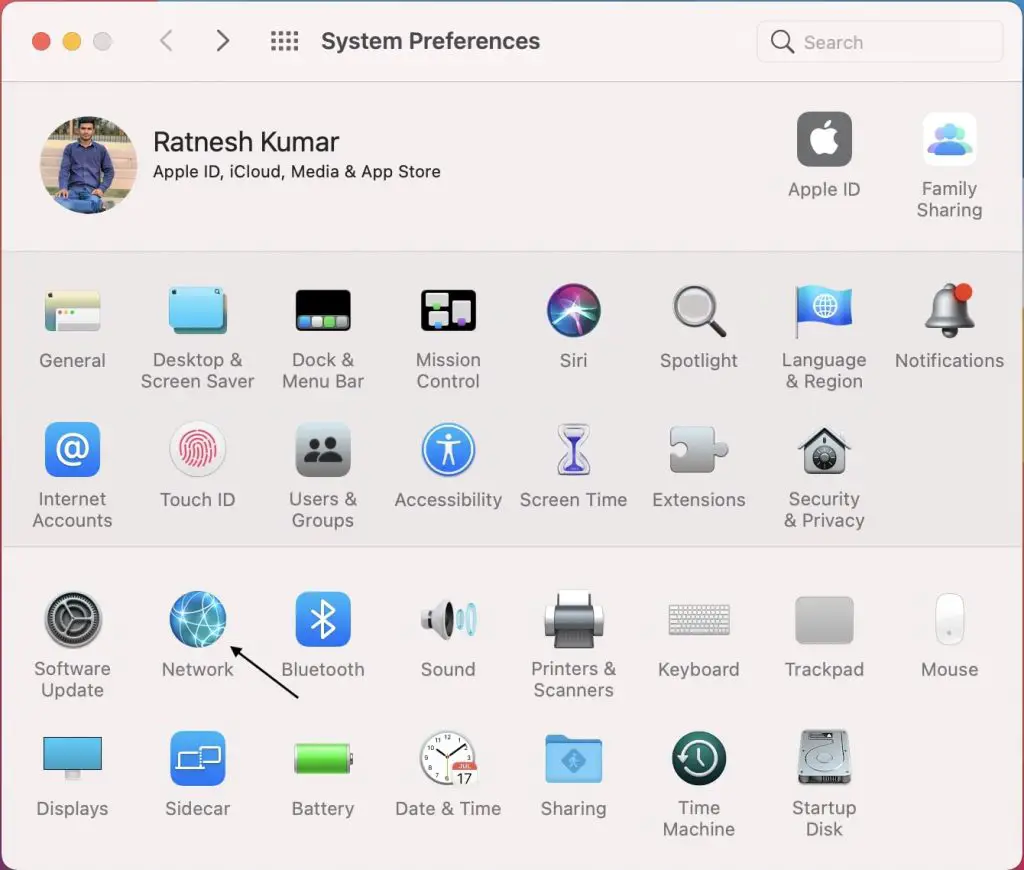
Step 2: In Network settings click Advanced.
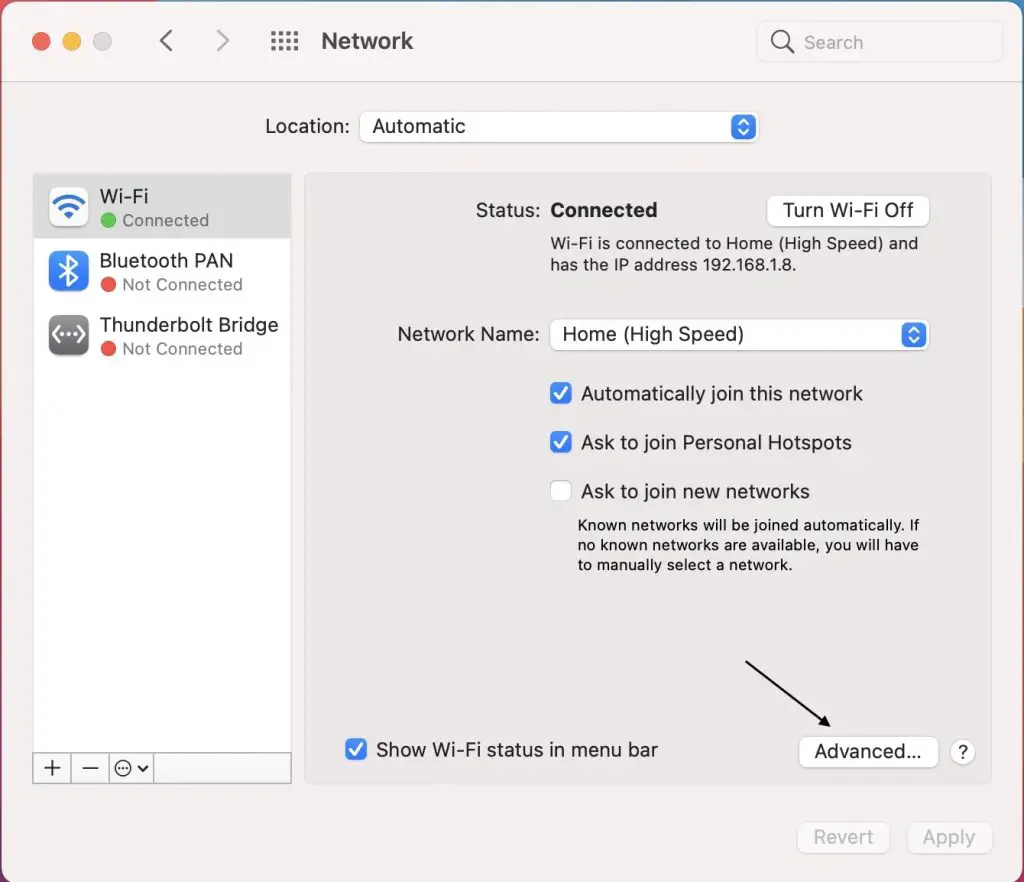
Step 3: Go to DNS settings.
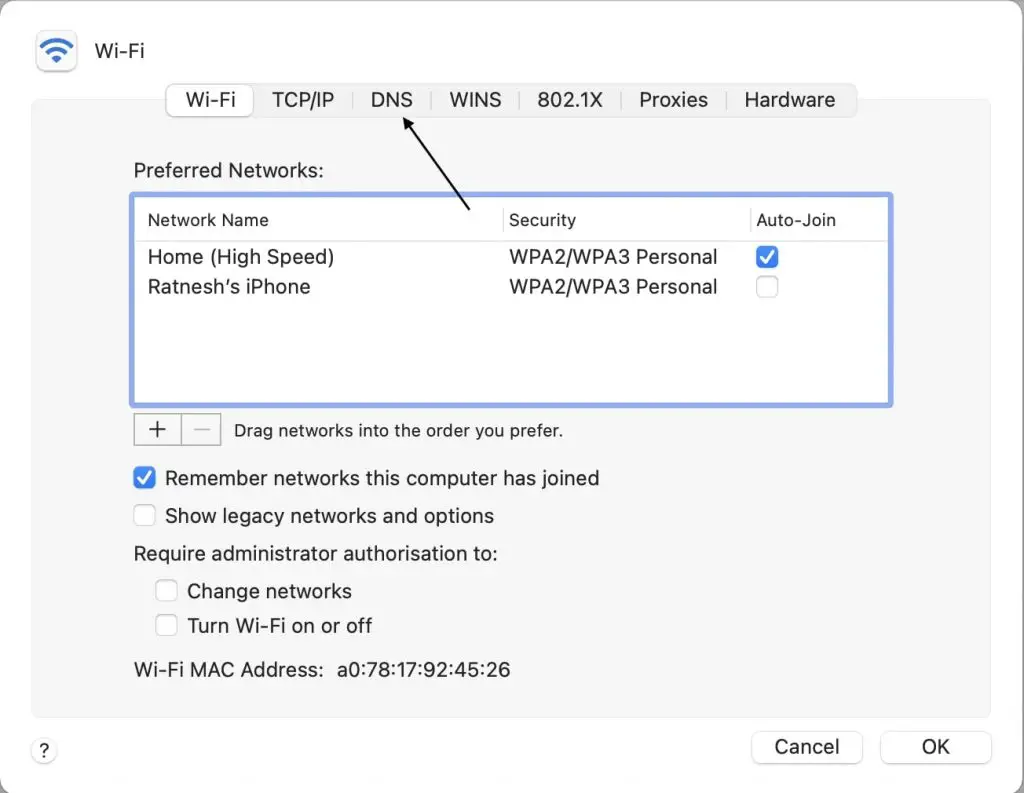
Step 4: In DNS settings you will see DNS servers. It will be your current DNS servers provided by the ISP. Click + sign at the bottom and add the DNS server of Google.
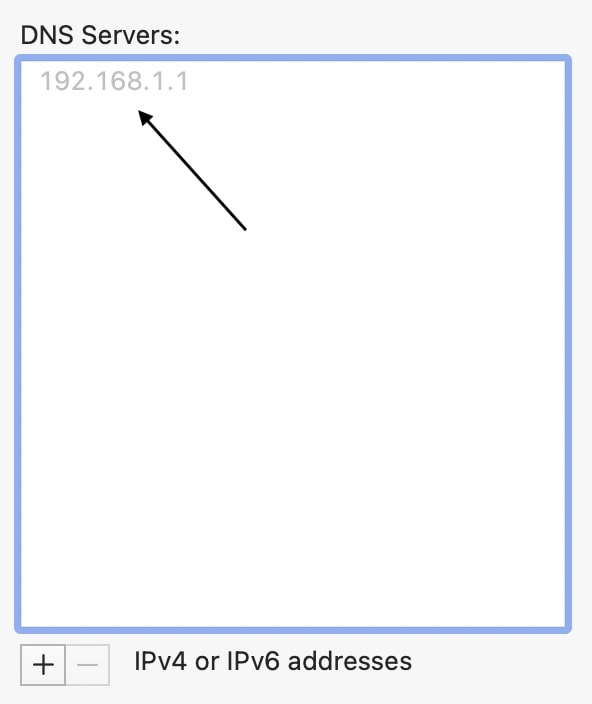
Step 5: As mentioned above in the Windows part, the DNS Server of Google has 8.8.8.8 has preferred IP address and 8.8.4.4 as an alternate IP address.
12. Flush DNS Resolver Cache
Similar to browser cache operating system also stores DNS resolver cache. In the process of fixing the network level issues we will need to flush DNS resolver cache.
On Windows
Step 1: Press Windows Logo key and R and type cmd to open command prompt.
Step 2: In the command prompt enter ipconfig /flushdns and press enter. If the process is successful you will see a message “Successfully flushed the DNS Resolver Cache.
On Mac
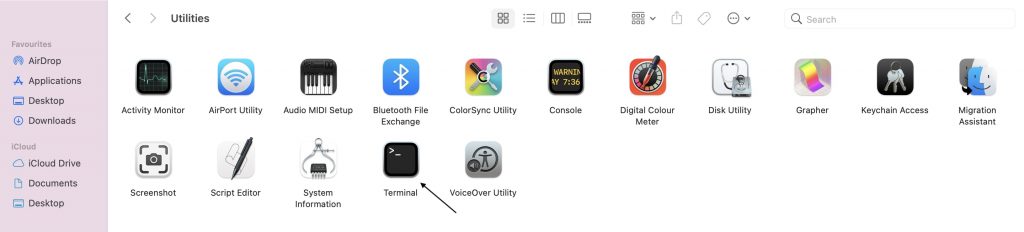
Step 1: Go To Finder and then Utilities. Under utilities find Terminal. Open it.
Step 2: In terminal type dscacheutil -flushcache and hit enter.
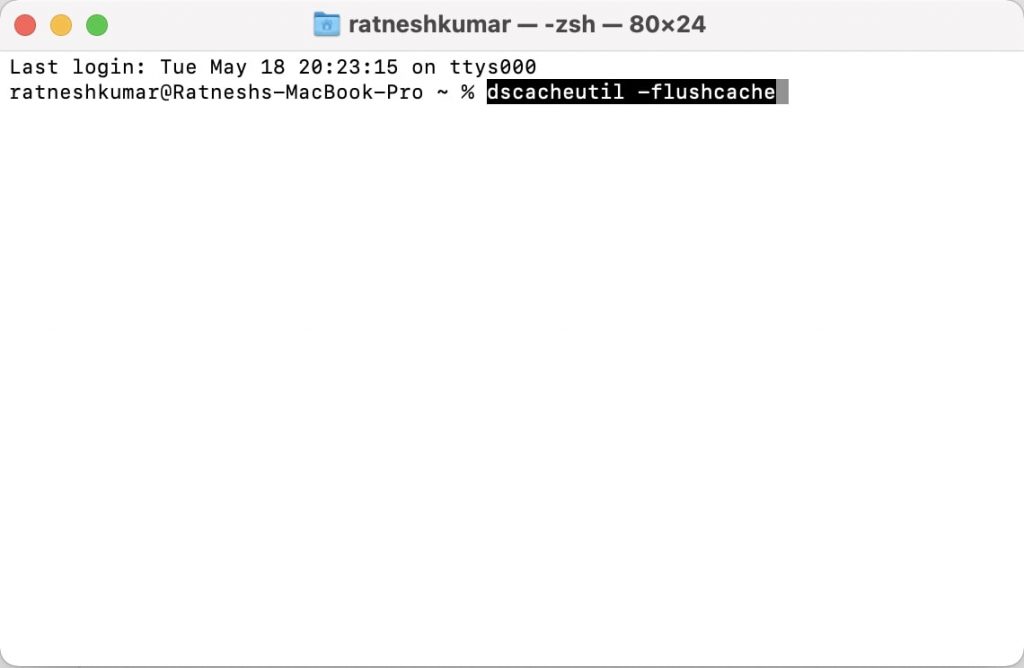
Note: Unlike Windows, you will not see a successful message after successfully flushing the DNS resolver cache on Mac.
13. Release and Renew IP Address
If you remember I had mentioned every web server has an IP address. On a similar note, every computer has an IP address. As we are facing an issue on our computer we will need to try to fix it by releasing and renewing the IP address of our computer. Follow the below steps to release and renew the IP addresses on Windows and Mac.
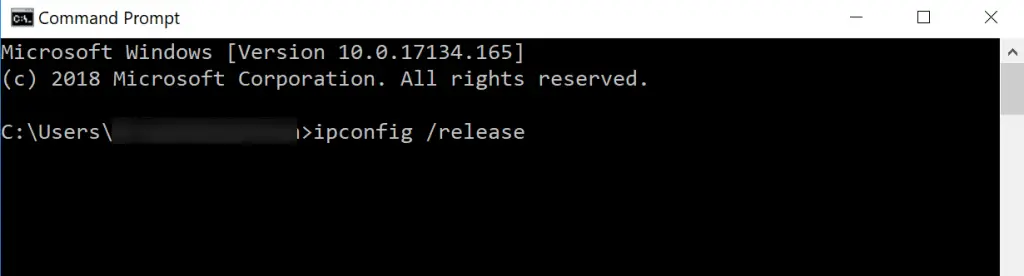
On Windows
Step 1: To open the command prompt press the Windows logo key and R on your computer and search for CMD.
Step 2: Type ipconfig /release and hit enter. It will release the current IP address of your computer.
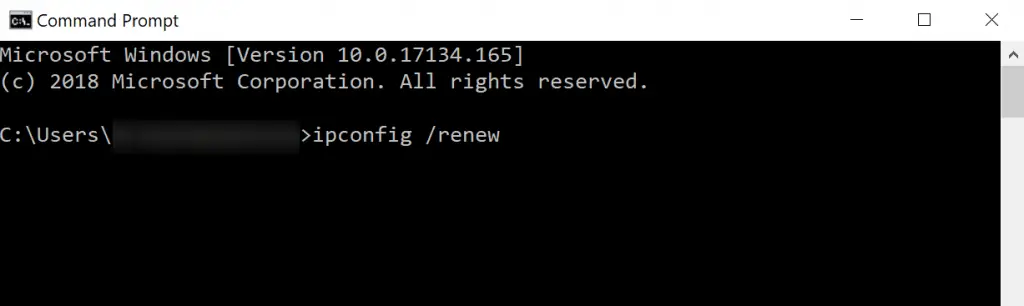
Step 3: After releasing the IP address you will need to renew it. Type ipconfig /renew and press enter. Doing it will renew the IP address.
On Mac
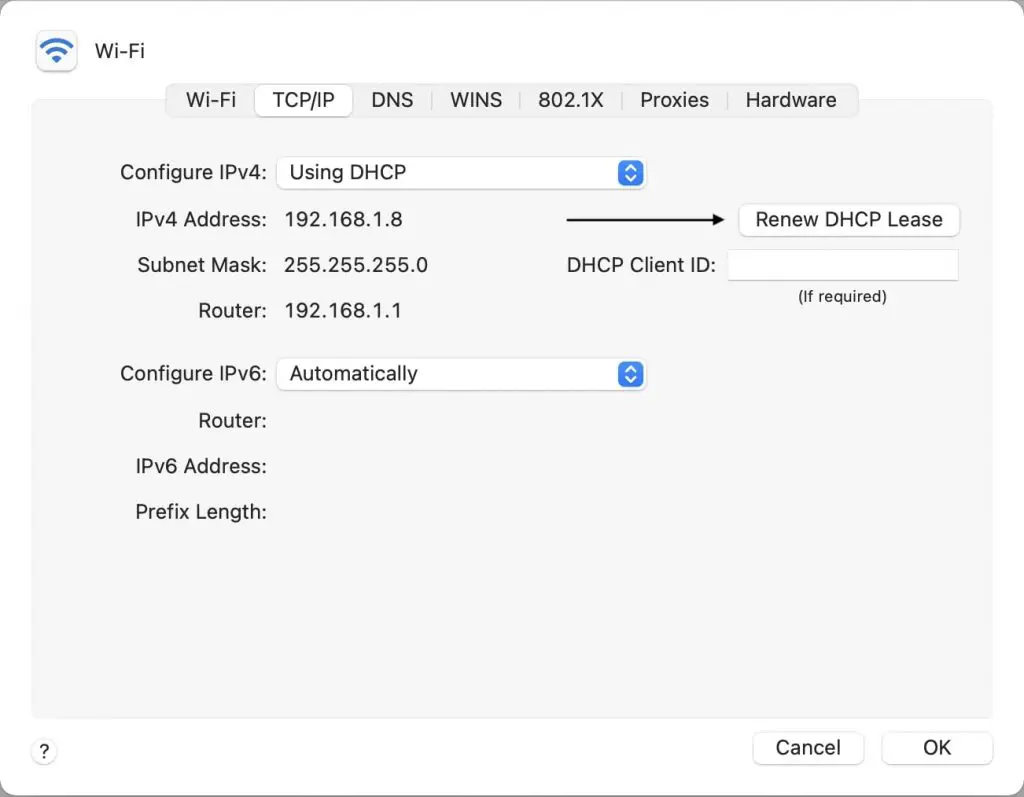
Step 1: Open System Preferences and go to Network settings.
Step 2: Go to Advanced network settings.
Step 3: Then go to TCP/IP and on the right side you will see Renew DHCP Lease. Select it and It will automatically release and renew your IP address on Mac.
14. Restart DNS Client Service
This fix is exclusive to Windows. Microsoft added DNS Client Service lately in Windows. It is a built-in DNS client service on Windows-powered machines. The DNS client service aids DNS-related issues when a user browses the web. So to fix the server IP address could not be found issue restarting the DNS client service is a great idea.
Step 1: Press Windows Logo Key and R and then type services.msc and hit enter.
Step 2: In services, look for the DNS client. Right-click on it and then press restart. If you do not see the restart option as clickable, you can do it using the command prompt.
Restart DNS Client Service Using Commands
Step 1: Press Windows Logo key and R and then enter cmd to open command prompt.
Step 2: Enter these commands “net stop dnscache” “net start dnscache” and run them.
Note: Depending on the Windows version you are using, you might see an error message saying, “The requested pause, continue, or stop is not valid for this service.” It happens most likely due to your need to run CMD as a network service. If you encounter the error, leave this fix and try all the other fixes we have mentioned in this article.
15. Check Your Local Host File
Each computer contains a local host file. The lost host file is used to store manual DNS entries that are for specific IP addresses. If you change the local host file regularly, the chances are that the site you are trying to open is in your local host file. Follow the below steps to go through your local host file and remove if you find any entries.
On Windows
Step 1: To open the host file on your computer, you will need additional access. That’s why the very thing you will need to do is to open a text editor on your computer. You can open any text editor as per your choice.
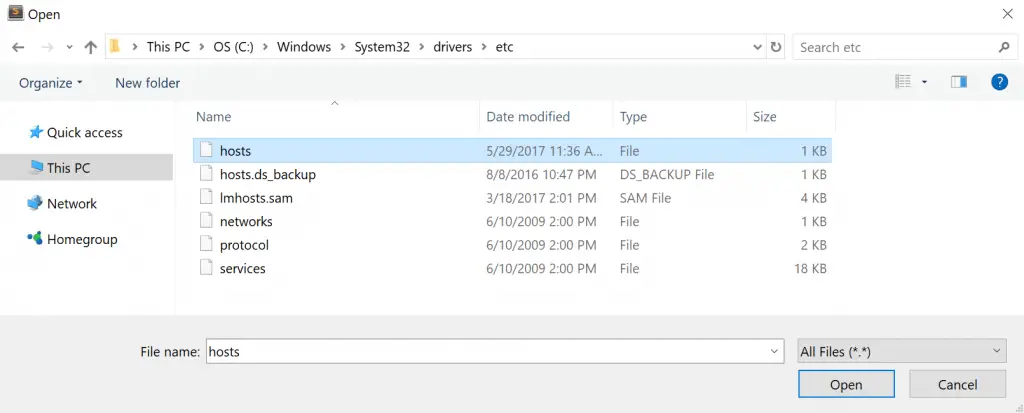
Step 2: In your note editor, click open file and go to “C:WindowsSystem32driversetc” location of your Local disk. Open the host file and see whether the site you are trying to open is not there. If it is, then remove it.
On Mac
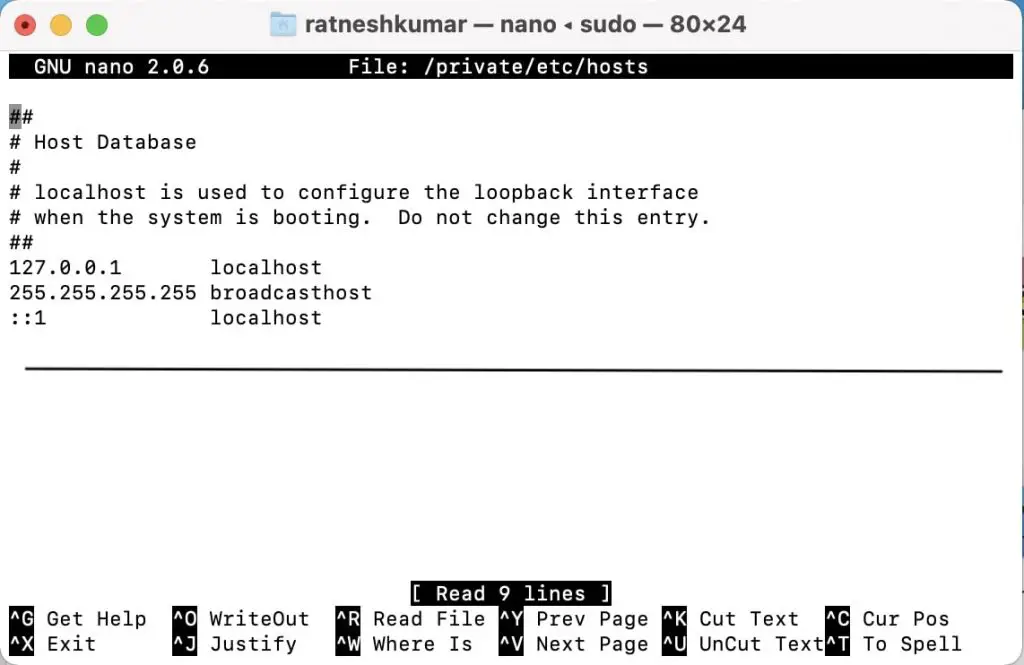
Step 1: To check hosts file on Mac open Terminal.
Step 2: In Terminal enter this command “sudo nano /private/etc/hosts” and press enter.
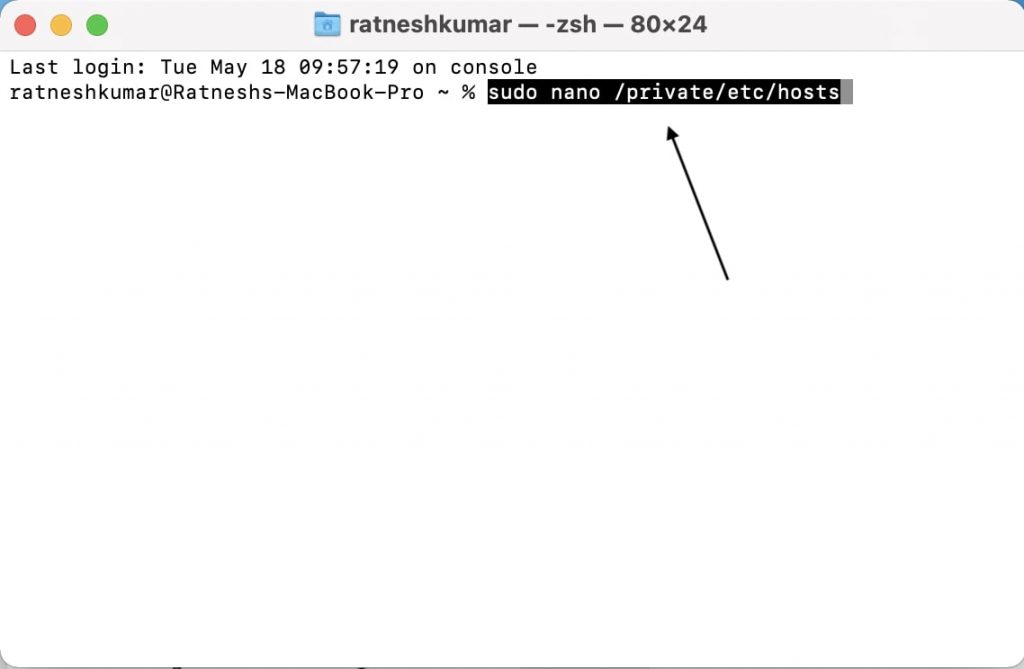
Step 3: You might need to enter your system password.
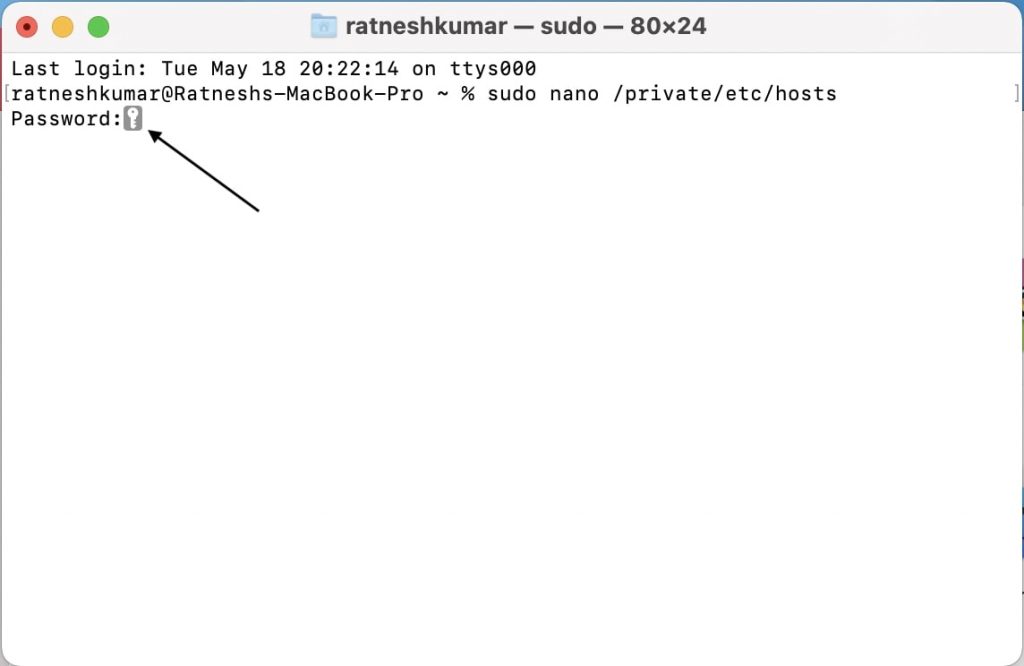
Step 4: Now you can access your host file. Check all the enteries and make sure there is no such entry related to the site you are trying to open.
Final Words
After explaining almost everything related to the server IP address could not be found error, it’s now time to conclude the article. The error is very common. It can happen either on the server-side or client-side. The fixes I have provided apply to the client-side errors. I have provided five fixes, each as common fixes, browser level, and network level.
You can try them and fix the issue. I can comfortably say if the issue is from your side then the guide will help you for sure. Anyways, which fix worked for you? Do let me know in the comments below.
Given how complex the inner workings of the internet are, it’s not surprising that errors can be commonplace. There are lots of points along the chain where an issue could occur.
However, there are fewer errors more clear than the “Server IP address could not be found” message.
The message itself tells you that the issue lies with a server’s internet protocol (IP) address, but doesn’t specify which end of the chain it applies to. As such, you’ll need to confirm that your machine isn’t to blame before you dismiss the issue as a specific site.
Check Out Our Video Guide to Fixing The “Server IP Address Could Not Be Found” Error
In this tutorial, we’re going to show you how to resolve the “Server IP address could not be found” error. However, the first section will talk more about why the error appears, and some of the reasons behind it.
What Does “Server IP Address Could Not Be Found” Mean?
While the focus of this article isn’t to discuss how the web gets you from one site to another, we should give you the CliffsNotes on what that process is:
- You’ll type a domain name into your web browser.
- The internet will attempt to translate that domain name into an IP address for the server the site lives on. It does this through the domain name system (DNS), which is a complex lookup procedure — much like a gigantic database across thousands of other servers.
- If there is any doubt as to what a website is or where it lives on the web at any point in this chain, you’ll see an error.
The “Server IP address could not be found” error indicates that the DNS lookup process couldn’t find an IP address for a specific domain name. You might also see the “DNS_PROBE_FINISHED_NXDOMAIN” error code too.
There are a few reasons why this error occurs:
- A site is down. This makes sense because the DNS lookup process will realize the domain is live, but the server isn’t.
- There’s a caching issue. Sometimes, old caching records will display the error, but this is a simple fix (more of which shortly).
- The DNS server is down. This is the reason why you’ll sometimes see a reference to “DNS” within this error message.
The common theme here is that the issue isn’t always the fault of your machine. However, there’s a lot you can do to solve the error on your end before you dismiss the fault as a server-side problem. Next, we’ll go deep into it.
Seeing this error? 🚨 The solution is at hand! ✅Click to Tweet
How To Fix the “Server IP Address Could Not Be Found” Error
We’re going to offer 10 different ways to resolve the “Server IP address could not be found” error. These fixes will all take place on your computer and should be straightforward. However, we’ll note where you need to employ a different tool or skill set.
First, though, let’s make sure your computer and browser are both working as they should be.
1. Check the Basics
Your first task is to make sure you don’t pull a computer equivalent of not plugging in the kettle before you attempt to boil water. In other words, you’ll want to make sure your basic fundamental tools for browsing the internet are in place and working as you’d expect.
We’d recommend doing so in the following order:
- Check your internet connection and router.
- Restart your computer.
- Use an Incognito or private browsing window to navigate to the site.
- Set the browser to open pages in a new tab or window.
- Disable your virtual private network (VPN) and antivirus software.
- Reinstall your browser.
If you still get the error after checking all of these, you’ll at least know that your computer and connection are both in optimal states. From here, you can look into the more advanced fixes below.
2. Clear Your Browsing Data
It’s a good idea to clear your browsing data as a second step because it could get rid of any older cookies, settings, and other cached data that could impact your browsing experience.
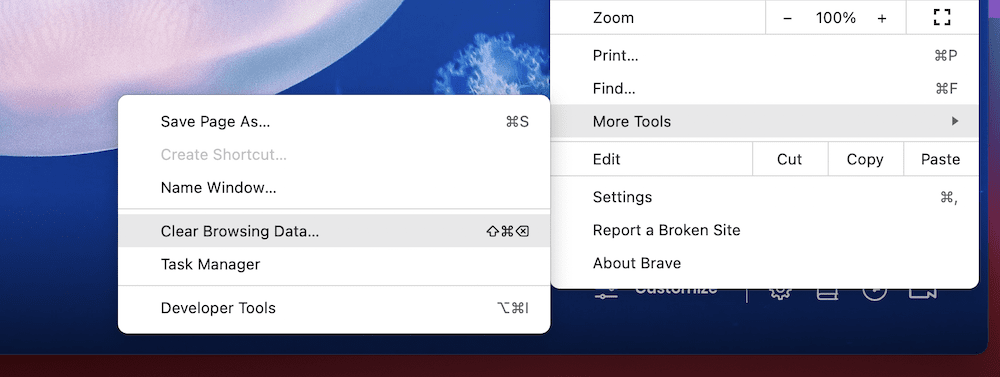
Throughout this article, we’re going to show you fixes in both Windows and macOS, where the processes may differ. For Windows, we’ll use Microsoft Edge, and for macOS, we’ll use the fantastic Brave browser.
Starting with Brave, you’ll head to the “hamburger” menu in the toolbar, then to More Tools > Clear Browsing Data:
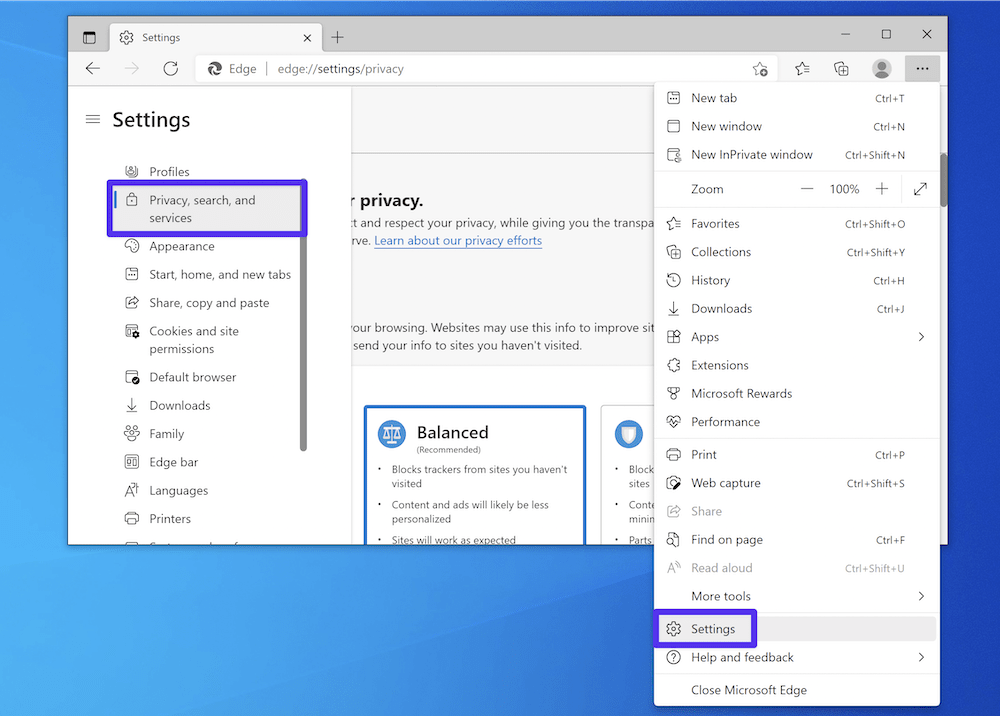
For Edge, you’ll need to open the hamburger menu and navigate to the Settings screen. Then, you’ll want to open the left-hand hamburger menu and choose Privacy, Search, and Services:
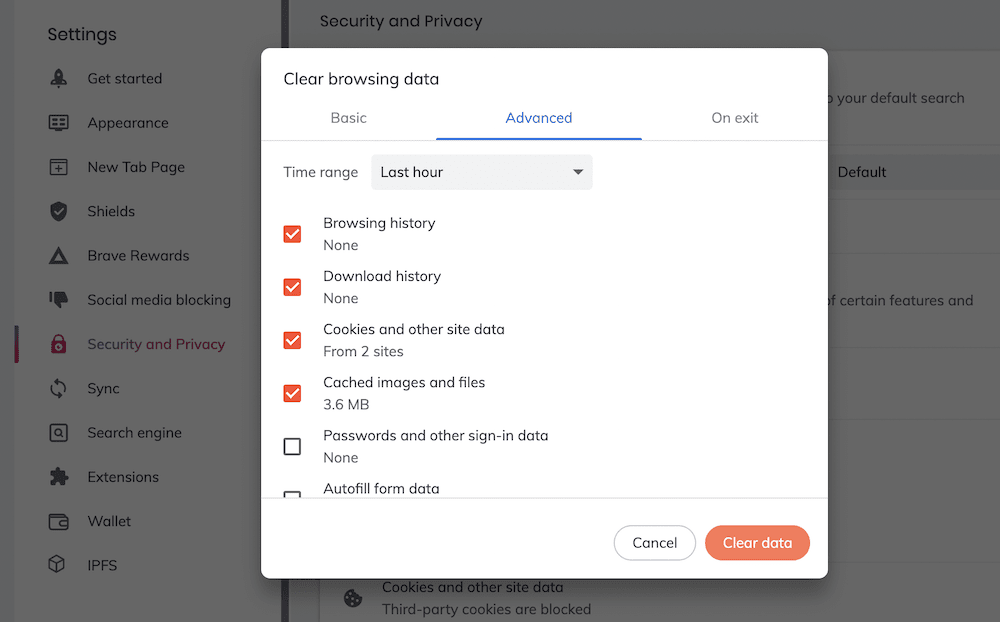
Brave will pop up a familiar screen, where you’ll select the data you’d like to clear and click the Clear data button:
However, for Edge, you’ll need to scroll down to the Clear browsing data section, then click the Choose what to clear button. This will pop up the same type of menu as Brave:
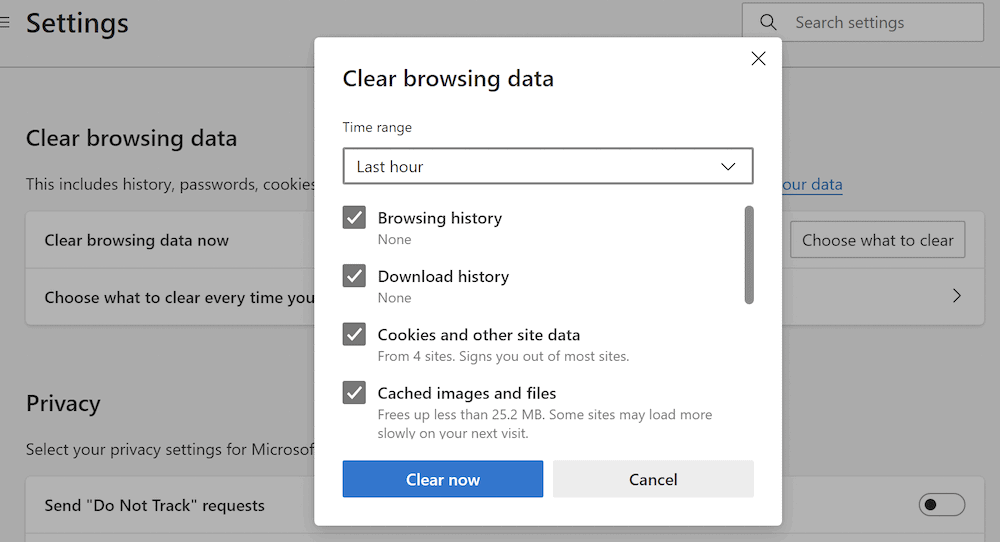
Regardless of the browser you use, you’ll want to clear out your browsing history, cached images and files, and cookie information. However, feel free to delete more here as there will be no harm in doing so.
Once you confirm, your browser will clear out the data you specify. From here, check for the error, and take a look at some of the other methods below if this doesn’t work.
3. Flush Your DNS Cache
Given that there’s a potential issue with the DNS lookup service finding a relevant IP address, it makes sense that you also flush out your own DNS cache. This will refresh it — and remove the “Server IP address could not be found” error to boot.
The good news is that we cover this method in full for Windows, macOS, and Linux (Ubuntu) systems elsewhere. Note that you’ll need to use either the Terminal on macOS or the Command Prompt on Windows in order to do this. However, that article will give you the information you need to use these apps to flush out your cache.
From here, you can begin to look at specific settings for your proxy server, IP address itself, and more.
4. Check Your Proxy Settings
This is another method we cover elsewhere in numerous places on our blog. However, it’s an easy fix, and it might not be relevant to your specific setup.
For macOS, head to the System Preferences > Network screen, then click the Advanced button in the lower right-hand corner:
Here, navigate to the Proxies tab, then untick everything in the left-hand list. You’ll then want to confirm with the OK button:

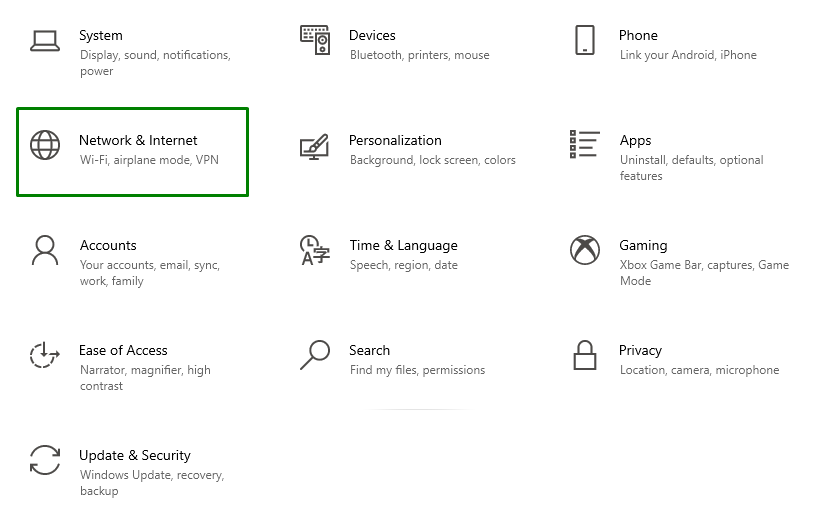
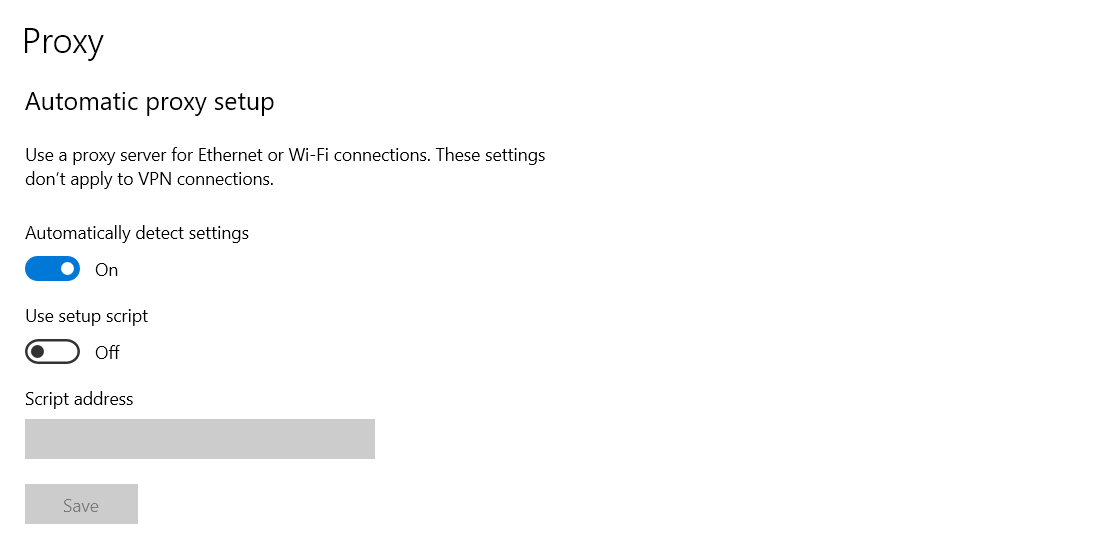
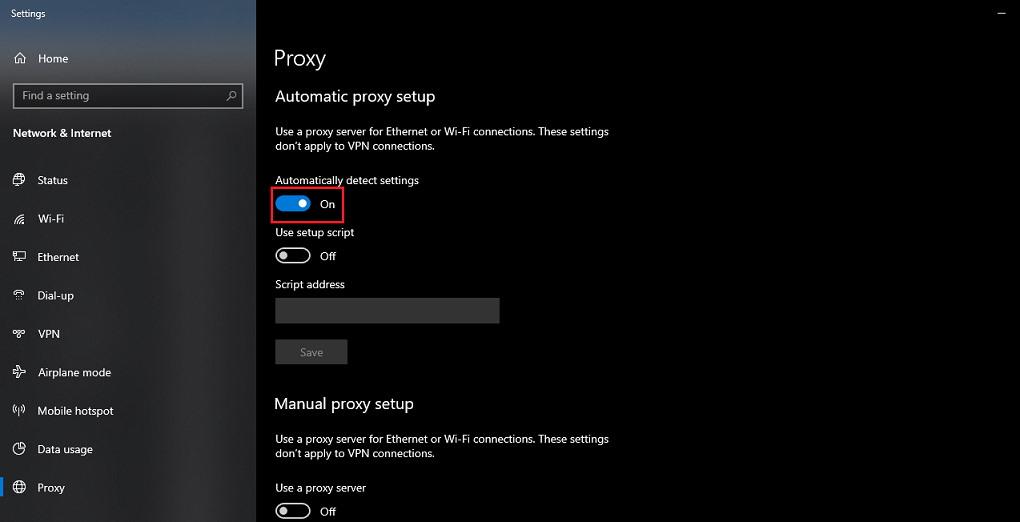
For Windows, navigate to the Network & Internet screen using the Windows Search Bar. Then click Proxy from the left-hand sidebar. Next, scroll down to the Manual Proxy setup section and toggle the Use a proxy server button to Off:
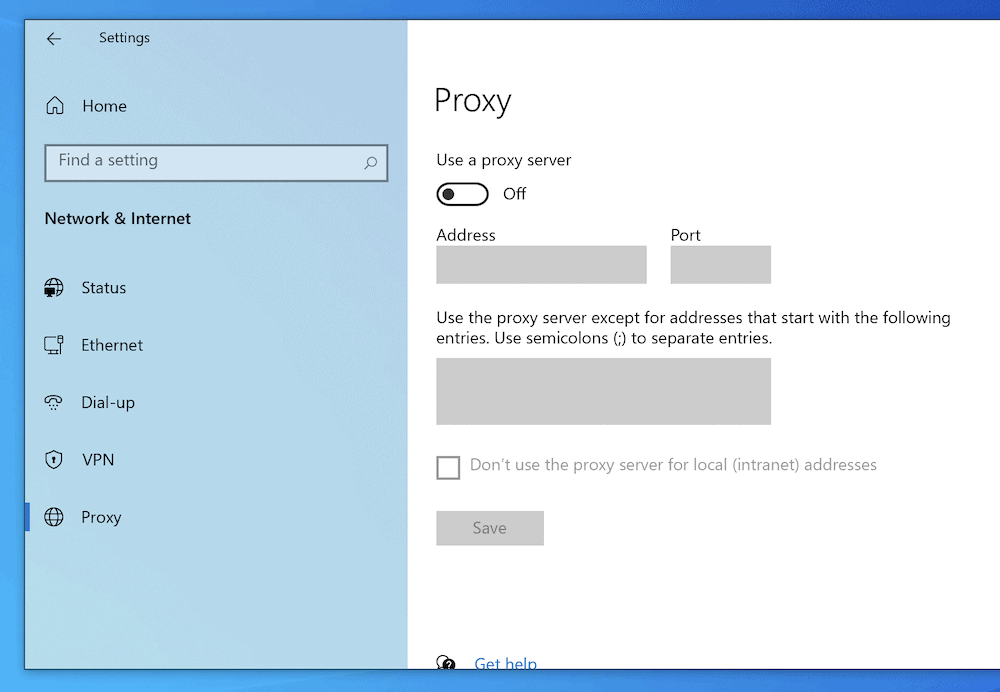
While you might want to restart your computer for extra confirmation, this should turn off your proxy settings and let you test for the “Server IP address could not be found.”
5. Release and Renew Your IP Address
Sometimes, you’ll want to refresh your IP address altogether. This is called a “Release and Renew” and doesn’t take much effort on either Windows or macOS.
For Windows, it’s an extension of the approach to flush your DNS. This time, you’ll use the Command Prompt to enter three commands, one at a time:
ipconfig /release

ipconfig /flushdns

ipconfig /renew
For the Mac, you’ll head back to the System Preferences > Network > Advanced screen. This time, you’ll select the TCP/IP panel. Within this screen, click the Renew DHCP Lease button:
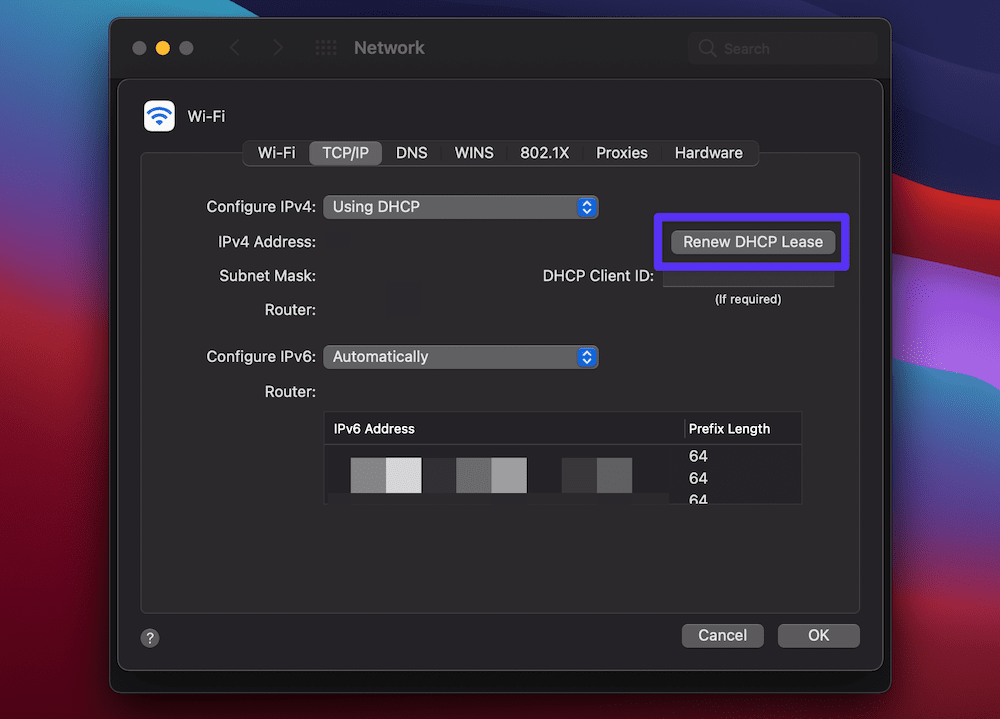
You might not see a success message on macOS, but the button will carry out the action you want. After this, if you still see the “Server IP address could not be found,” you can also update your DNS address and server.
6. Update Your DNS Address and Change the Server
Although our blog has already covered everything you need to know about DNS, this is from the viewpoint of web hosting. However, you can update the DNS address for your local computer too.
Some like to use a solution such as Google’s public DNS or Cloudflare’s offering. Regardless of which DNS address you want to use, there are different approaches for Windows and macOS.
For Mac, you’ll once again head to the System Preferences > Network > Advanced screen — you’ll want the DNS tab here:
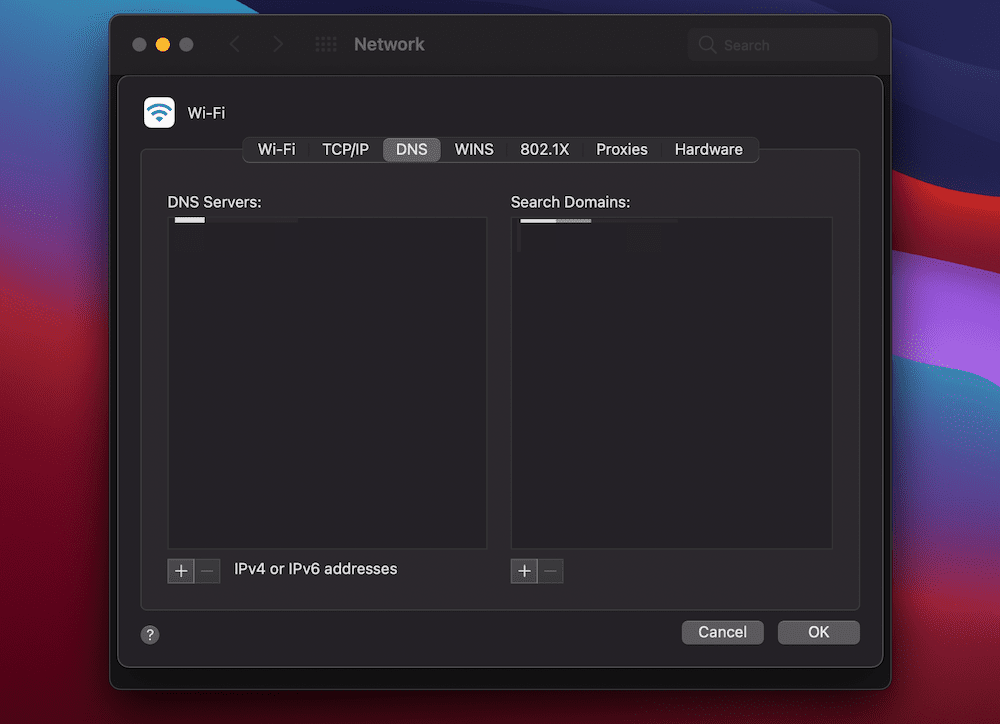
You’ll use the Plus button for the DNS Servers section to add your public DNS address. Once you do this, confirm your changes.
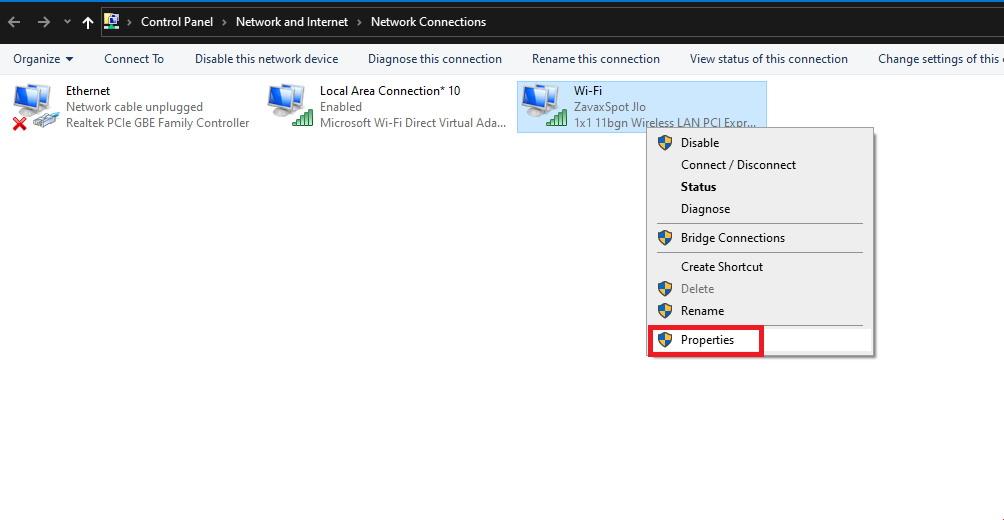
For Windows, go to the Network & Internet screen again, and choose the Ethernet link from the sidebar. Here, you’ll want to choose the Change adapter options link:
Next, right-click on your connection and choose Properties. Within the pop-up window, choose the Networking tab, then either the Internet Protocol Version 4 or Internet Protocol Version 6 entries and click the Properties button here:

On this next screen, you’ll enter your public DNS address under the Use the following DNS server addresses radio button:
Once you enter and confirm your changes, check for the “Server IP address could not be found” error and move on if you have no success.
7. Add the Site’s IP Address to Your Hosts File
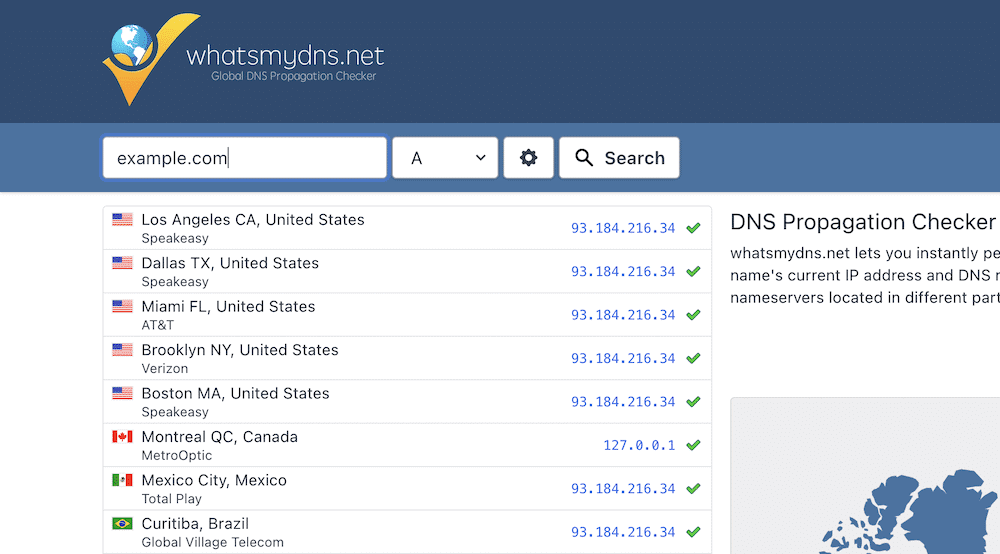
This method to fix the “Server IP address could not be found” problem is likely the most complex on this list. You’ll use a command line editor called Nano to alter your hosts file and either add or remove the IP address for the site in question.
The first part of this approach involves finding the IP address for the site. To do this, head to a DNS lookup site, such as WhatsMyDNS? Here, search for your site’s “A” record and note the IP address that’s most common from the list of propagated addresses:
Next, you’ll want to access and edit the hosts file. However, Windows and Mac both have different ways to do this. We cover both in our article on general editing for this file, and a Mac-specific tutorial, as well as a Window’s specific tutorial for this as well.
The goal is to either remove the IP for the site if you find it within that file or add it if it isn’t there. Either one could both cause and fix the “Server IP address could not be found” error, so try them out.
However, once you confirm that this step doesn’t work, make sure you revert the file back to how you found it. This will stop errors from cropping up in the future.
8. Delete Files From the “etc” Folder
Windows users have an etc folder that will sometimes contain unnecessary files within. As such, you’ll want to remove them to see if this resolves the “Server IP address could not be found” error.
Within a Windows File Explorer, head to C:WindowsSystem32driversetc:

Make sure you back this folder up before you select everything within and delete — a quick solution to the “Server IP address could not be found” error.
However, you might also want to try putting the files within the etc folder back one at a time. Once the error reappears, you can discard that particular file and get back to browsing the web.
9. Restart Your DNS Service
We have another Windows-specific resolution to the “Server IP address could not be found” error. This time, you’ll restart the DNS Client Services — crucial for domain name resolution and caching.
To do this, search for “Services” (without quotes) using the Windows Search Bar:
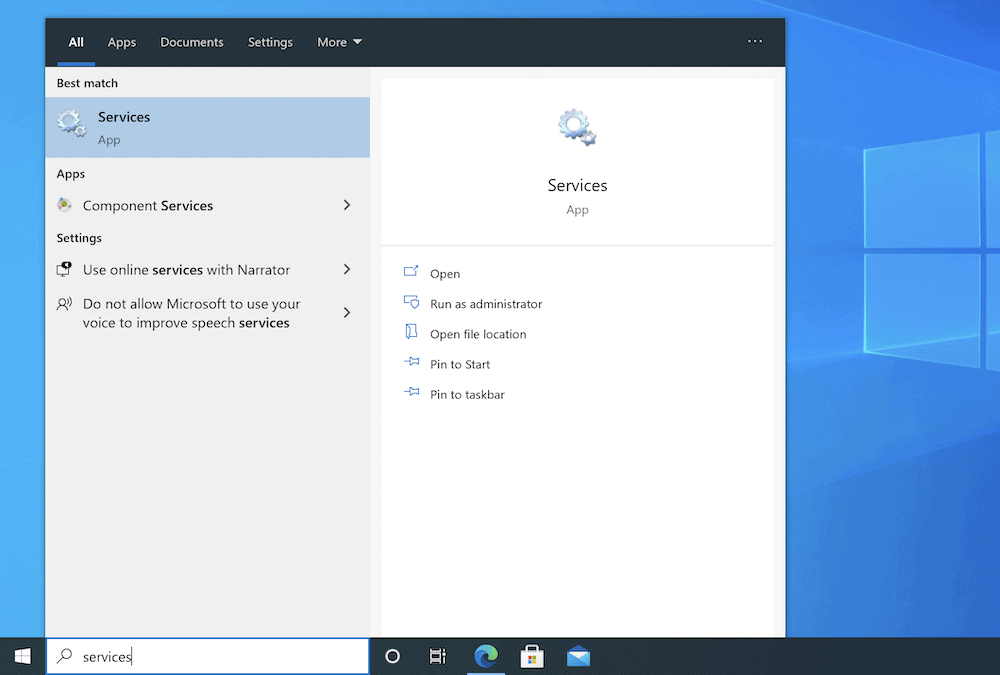
Within the list that shows up, you’ll see the DNS Client service, and you’ll right-click it and select Restart. However, in some cases, you’ll see an error when you try to do this.
An alternative approach is to open a Command Prompt window and run the following commands one at a time:
net stop dnscache

net start dnscache
You might even see restricted access here too, in which case you’ll need to skip over this solution and try the others on this list.
10. Update Your Network Adapter Driver
The final step is to update the drivers for your network adapter. Mac machines don’t let you update the drivers from their interface, so there’s a different approach.
Within the System Preferences > Network screen, highlight your network within the left-hand column, then click the Minus icon to remove the network in its entirety:
Once you remove the network, restart your machine, head back into the Network panel, and this time click the Plus icon to add the network again.
For Windows, you’ll want to head to the Device Manager (devmgmt.msc) screen using the Windows Search Bar and carry out the following:
- Within the Network adapters section, expand the list.
- Right-click your adapter, and choose the Update driver option.
You’ll want to carry out an automated search for the driver. Once this process completes, restart your computer and check for the “Server IP address could not be found” error.
Learn how to resolve the “Server IP address could not be found” (and why it appears!) in this guide 🚀Click to Tweet
Summary
While some error messages have abstractions that make it difficult to resolve them, the “Server IP address could not be found” error is different. With this, you get a clear pinpoint for where the error lies, but you won’t immediately know whether it’s a client- or server-side issue.
Across this post, we’ve looked at how to solve the “Server IP address could not be found” error based on troubleshooting the client (i.e. your computer). However, if you exhaust all of the methods here and still see the error, you’ll want to contact the site in question so they can start to look for a fix on their end.
Is the “Server IP address could not be found” error one you’ve come across in the past, and if so, how did you fix it? Let us know in the comments section below!
Get all your applications, databases and WordPress sites online and under one roof. Our feature-packed, high-performance cloud platform includes:
- Easy setup and management in the MyKinsta dashboard
- 24/7 expert support
- The best Google Cloud Platform hardware and network, powered by Kubernetes for maximum scalability
- An enterprise-level Cloudflare integration for speed and security
- Global audience reach with up to 35 data centers and 275 PoPs worldwide
Test it yourself with $20 off your first month of Application Hosting or Database Hosting. Explore our plans or talk to sales to find your best fit.
Ошибка «Не удалось найти адрес интернет-протокола сервера (IP)» возникает, когда имя домена не соответствует адресу интернет-протокола или в системе неправильно настроены параметры прокси-сервера. С этой конкретной ошибкой сталкиваются многие пользователи браузеров Google Chrome. Он ограничивает доступ пользователей к различным веб-сайтам и отображает ошибку «404».
В этом блоге обсуждаются подходы к исправлению/устранению ошибки «Не удалось найти адрес IP-протокола сервера» в Windows.
Чтобы исправить/устранить ошибку «Не удалось найти адрес IP-протокола сервера» в Windows, примените следующие исправления:
- Проверьте стабильность Интернета.
- Очистите данные просмотра.
- Перезапустите Google Chrome.
- Проверьте настройки прокси.
- Выключите VPN.
- Обновите службу DNS-клиента.
- Используйте сетевую диагностику Windows.
Исправление 1: проверьте стабильность Интернета
Одной из причин возникшей ошибки может быть медленное или нестабильное интернет-соединение, вызывающее сбои при открытии сайтов. Стабильность Интернета можно проверить, запустив другое приложение или открыв веб-сайт.
Исправление 2: очистите данные просмотра
Очистка данных просмотра также может помочь избавиться от старых файлов cookie и других кэшированных данных, которые могут повлиять на работу в Интернете. Для этого нажмите на три точки в правом верхнем углу браузера, как указано:

Теперь выберите «Дополнительные инструменты->Очистить данные просмотра»:

После подтверждения ваш браузер удалит выбранные данные.
Исправление 3: перезапустите Google Chrome
Перезапуск браузера, особенно Chrome, может творить чудеса при устранении большинства проблем в Chrome. После этого Chrome восстанавливает все подключения вашего браузера и позволяет вам подключаться к сайтам.
Исправление 4: проверьте настройки прокси-сервера
Указанную ошибку IP-адреса сервера можно исправить, настроив/настроив прокси-сервер. Таким образом, проверка настроек прокси-сервера, используемых вашим ПК, гарантирует, что они не мешают работе браузера Chrome.
Шаг 1. Перейдите к разделу «Сеть и Интернет
». Сначала откройте «Настройки» в меню «Автозагрузка»:

Теперь перейдите к опции «Сеть и Интернет»:
Шаг 3: Настройте параметры прокси
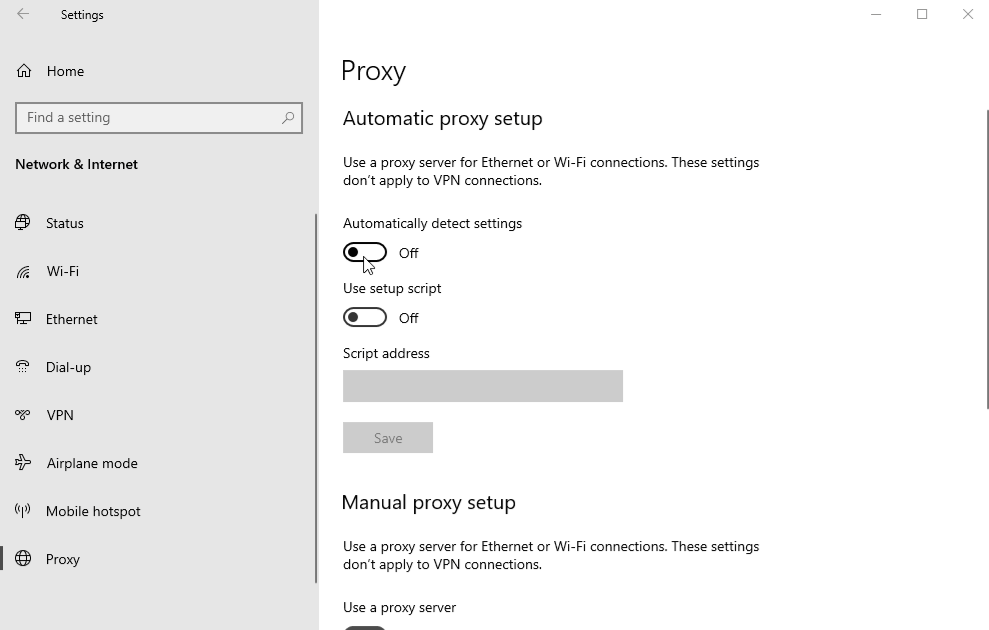
После этого нажмите «Прокси» в разделе «Сеть и Интернет». Здесь включите «Автоматическую настройку прокси». Кроме того, прокрутите вниз и переключите «Ручная настройка прокси», чтобы он стал «Выкл.»:
Исправление 5: отключите VPN
VPN обычно приводят к различным проблемам с сетью. Если вы используете VPN на своем ПК, отключите службу VPN и посмотрите, решит ли это проблему.
Исправление 6. Обновите службу DNS-клиента.
Обновление службы DNS-клиента также помогает устранить возникшую ошибку. Для этого рассмотрите приведенные ниже шаги.
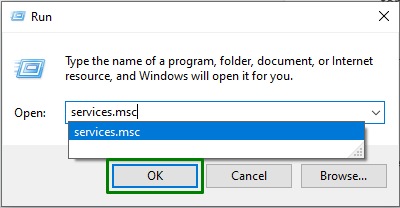
Шаг 1. Перейдите к службам.
Откройте «Службы», введя «services.msc» в поле «Выполнить»:
Шаг 2. Найдите и обновите службу DNS-клиента
Теперь найдите «DNS-клиент» в открытых службах. Щелкните его правой кнопкой мыши и нажмите кнопку «Обновить»:
Исправление 7: используйте сетевую диагностику Windows
Google Chrome не может работать должным образом, если сеть настроена неправильно. Инструмент устранения неполадок Windows находит и устраняет проблемы, связанные с конфигурацией. Чтобы оптимизировать сеть, ознакомьтесь с предложенными инструкциями.
Шаг 1. Откройте «Настройки устранения неполадок
» В меню «Автозагрузка» откройте «Настройки устранения неполадок»:
Теперь в следующем окне нажмите «Дополнительные средства устранения неполадок» в настройках «Устранение неполадок»:
Шаг 3: Запустите средство устранения неполадок
Наконец, появится указанное ниже окно. Здесь нажмите кнопку «Запустить средство устранения неполадок» в блоке «Подключения к Интернету» следующим образом:
После этого наблюдайте, решена ли заявленная проблема или нет.
Заключение
Чтобы устранить ошибку «IP-адрес сервера не найден» в Windows, проверьте стабильность Интернета, очистите данные браузера, перезапустите Google Chrome, проверьте настройки прокси-сервера, отключите VPN, обновите службу клиента DNS или используйте сеть Windows. Диагностика. В этом блоге изложены исправления для исправления/устранения ошибки «Не удалось найти адрес интернет-протокола сервера (IP)» в Windows.
Google Chrome is one of the most popular web browsers, and with good reason. With so many features that let you enjoy browsing the internet while saving data, Chrome is one of the best browsers out there.
One notorious error that you may encounter while using Chrome, is Server IP Address Could Not Be Found. This error doesn’t have a single cause, so there are a couple of things you’ll have to investigate to resolve this issue on Windows devices.
1. Check Your Internet Connection
Yes, yes, you have probably already checked this. But just because you’re connected to your router through Wi-Fi or a LAN connection, doesn’t mean that you’re connected to the internet!
The first thing you should check when you encounter this error is your internet connection. You might not even be connected to the internet, and if that’s the case, then Chrome isn’t guilty. No browser can browse the internet without the internet.
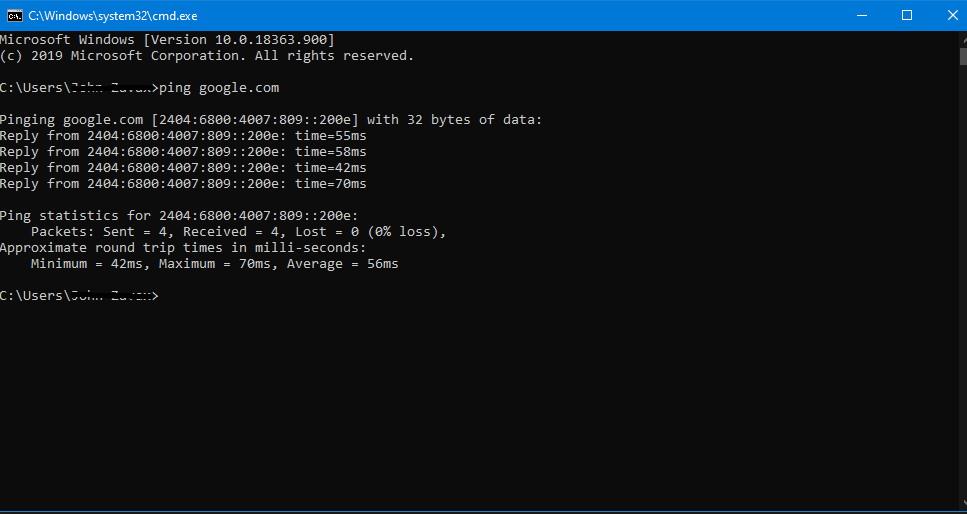
A quick way of checking for a working internet connection is using the ping command in the Command Prompt.
- In the Start menu, search for Command Prompt and open it. This will bring up the black plank known as the Command Prompt.
- In the Command Prompt, type the following line and press Enter. This command is going to ping google.com four times and return the results.
ping google.com - Investigate the results.

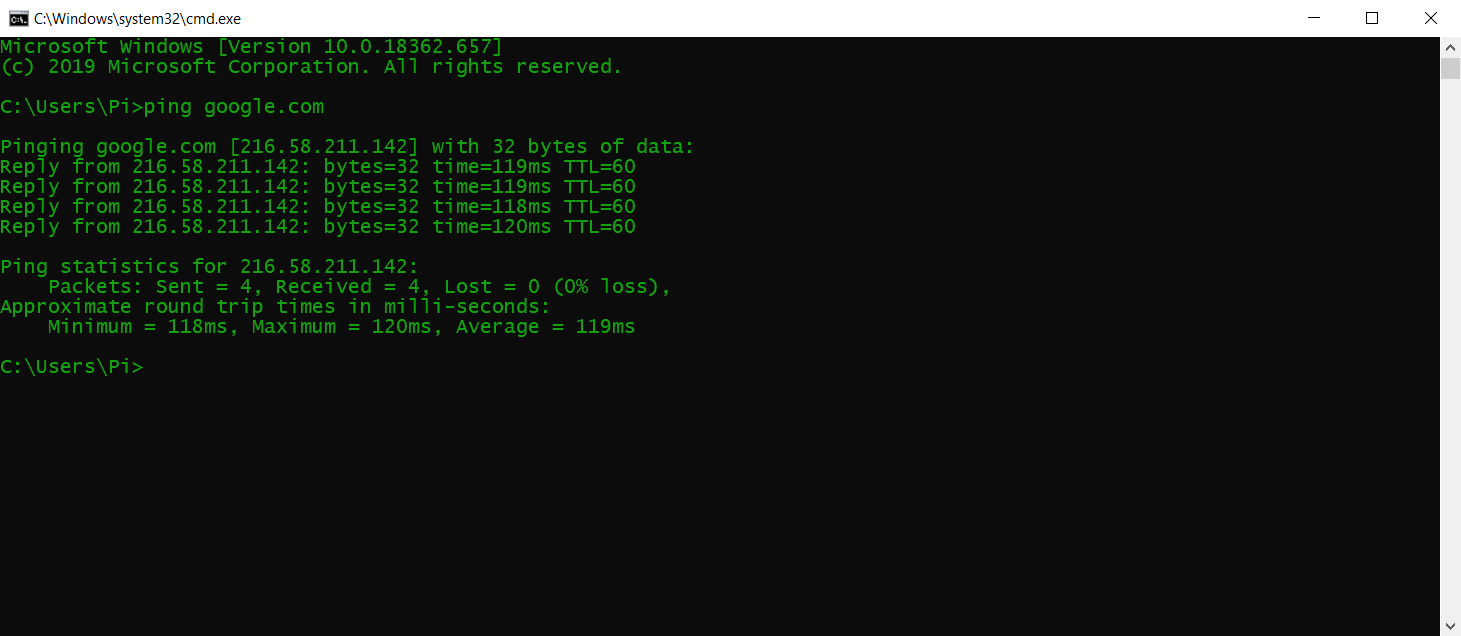
If you’re getting replies within reasonable times, then your connection is fine. However, if you’re getting Request Timed Out or other errors, then you need to further check your connection.
2. Check Your Proxy Settings
One other possible cause of the error is a bad or offline proxy server. You (or an app on your computer) could have set up a proxy which doesn’t work now. You can set up a new proxy or disable proxies altogether in the Proxy settings.
Here’s how to do this:
- In the Start menu search for Proxy, and then select Proxy settings.
- In the Proxy settings window, disable Automatically detect settings.

- Scroll down to Manual proxy setup and disable that as well.
- Open Chrome and check if your problem has been solved.
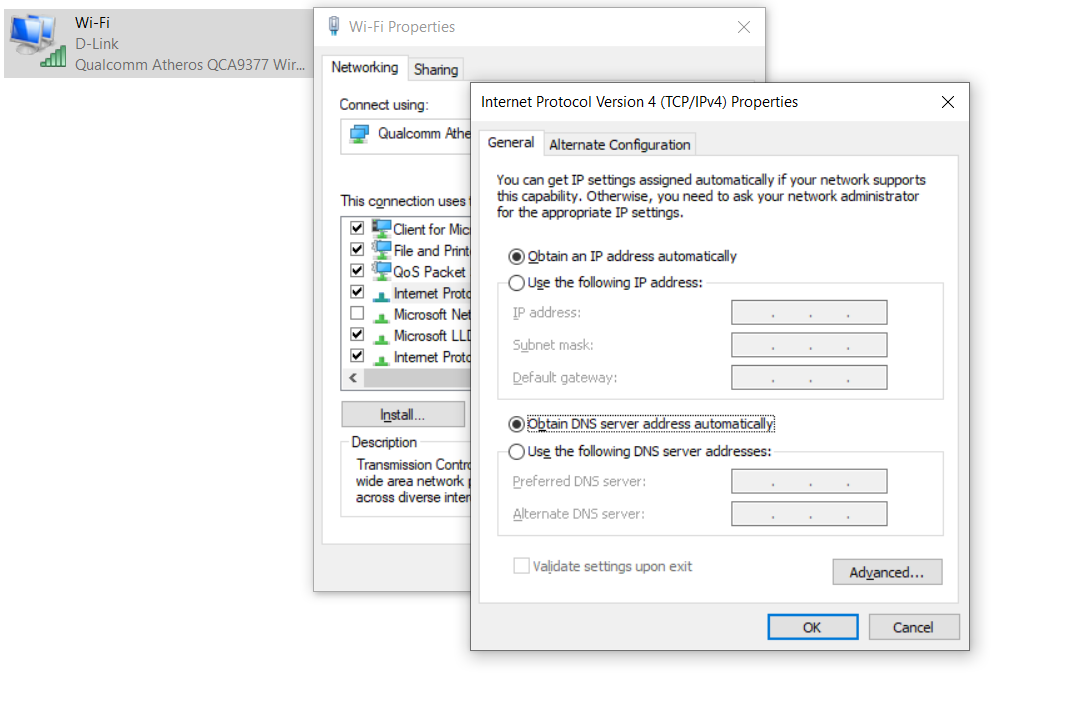
3. Change Your Network Adapter Settings
By default, your network adapter is set to use DHCP which allows it to automatically obtain an IP address. However, if you’ve tweaked this setting, then IP and DNS will need to be manually configured for your adapter.
You can revert the settings to DHCP from the Control Panel. Follow these steps to do that:
- Open the Control Panel, and choose Network and Internet.
- From here, select Network and Sharing Center.
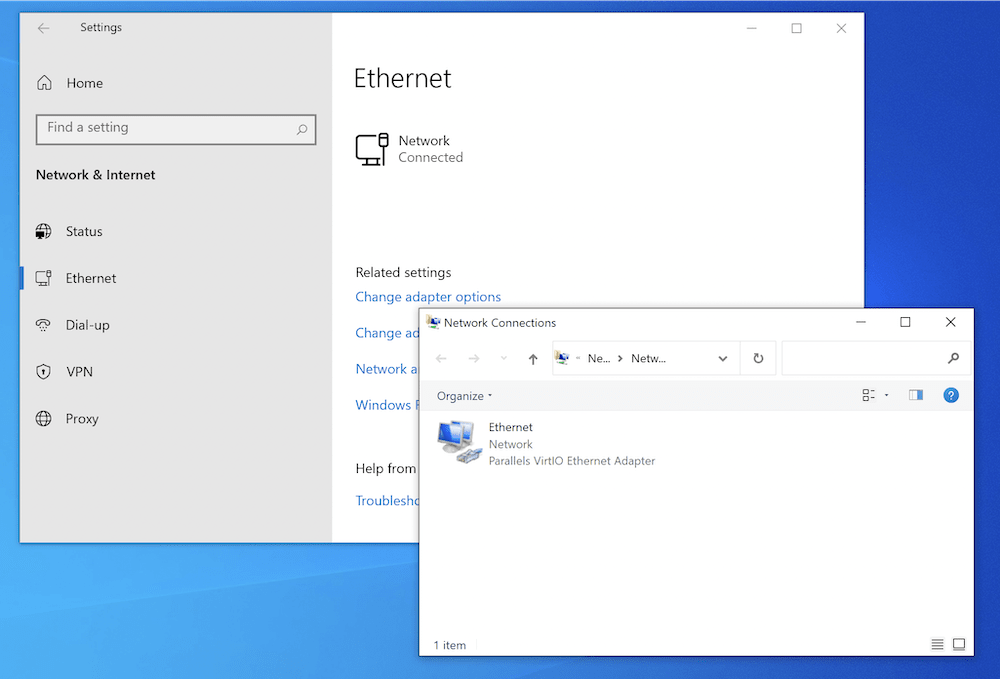
- In the Network and Sharing Center, click on Change adapter settings from the left menu bar. This will open a window that shows all your network adapters.
- Right-click on the network adapter you’re using, and then select Properties. The network adapter is either called Ethernet or Wi-Fi.
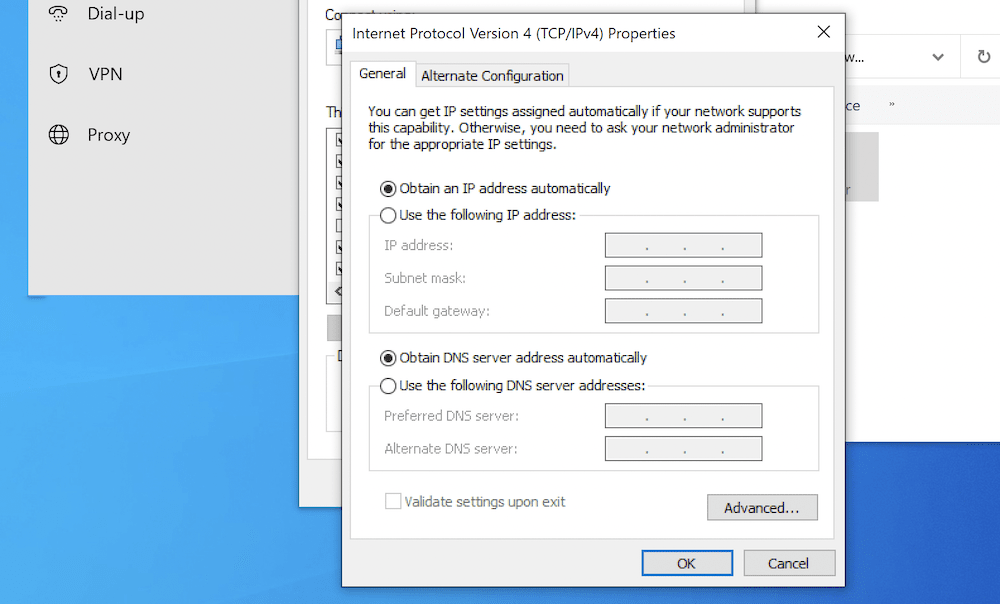
- Double-click on Internet Protocol Version 4 (TCP/IPv4) to open its properties.

- Select Obtain an IP address automatically and Obtain DNS server addresses automatically.
- Click OK to save the settings.
- Open Chrome and check if your issue has been resolved.
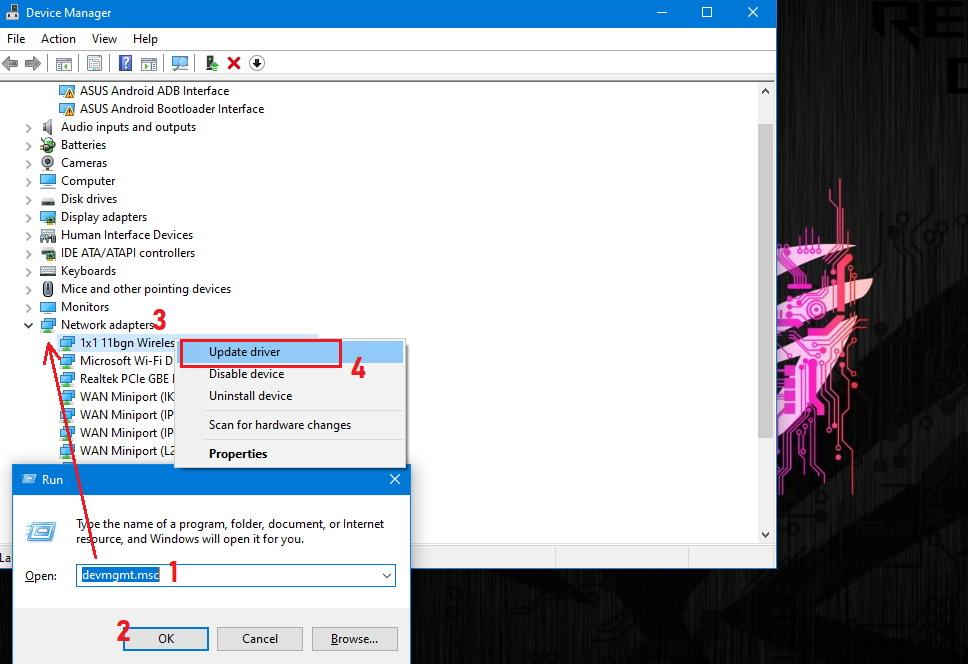
4. Update Your Network Driver
Another cause of network problems is the lack of proper drivers for your hardware. This could happen if your network drivers are outdated, or you haven’t installed the correct ones. Windows 10 does a good job at automatically finding and installing drivers, but you can’t ever be too sure.
Here’s how to update your network drivers:
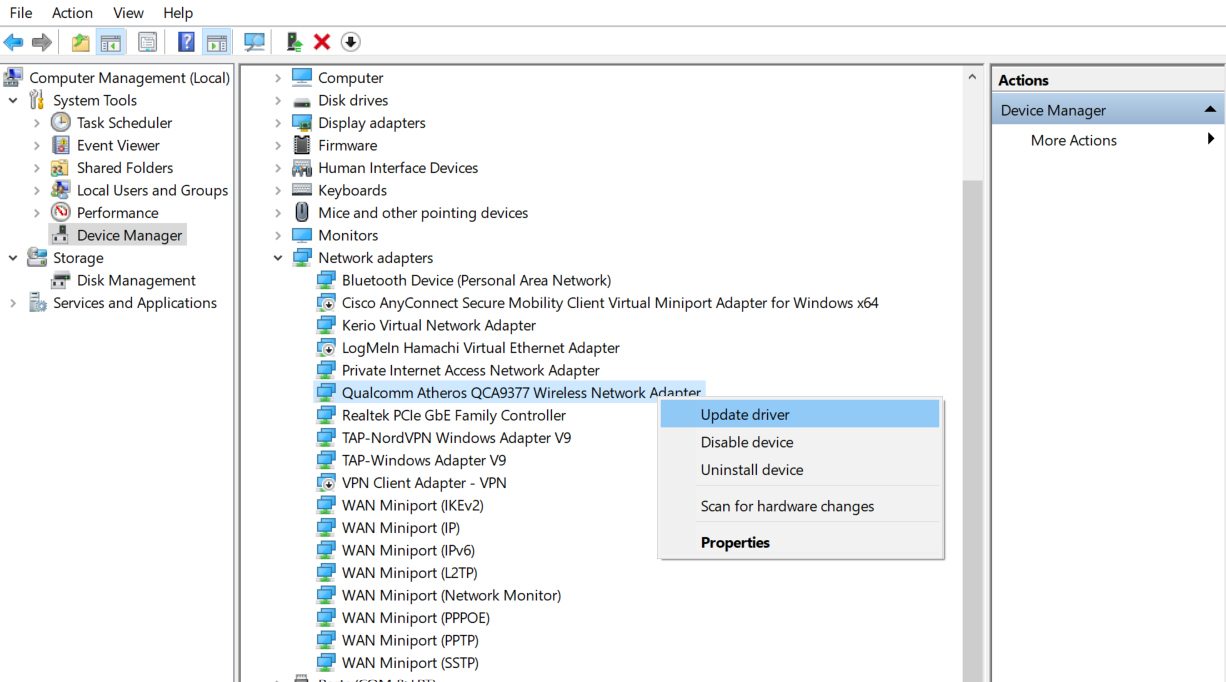
- Open File Explorer.
- Right-click on This PC. From the menu, select Manage. This will bring up the Computer Management window.
- From the left bar, under System Tools, click on Device Manager.
- In the Network adapters category, right-click on your adapter and select Update driver.

- Windows will then look for new drivers and install them if it finds any.You can also manually install the drivers provided by the manufacturer of your hardware (e.g. Qualcomm or Realtek).
The absolute method for making sure you’ve got the right drivers installed is by downloading the appropriate drivers from your network card manufacturer, such as Qualcomm or Realtek. This way, the doubt of Windows downloading the wrong drivers is dispelled.
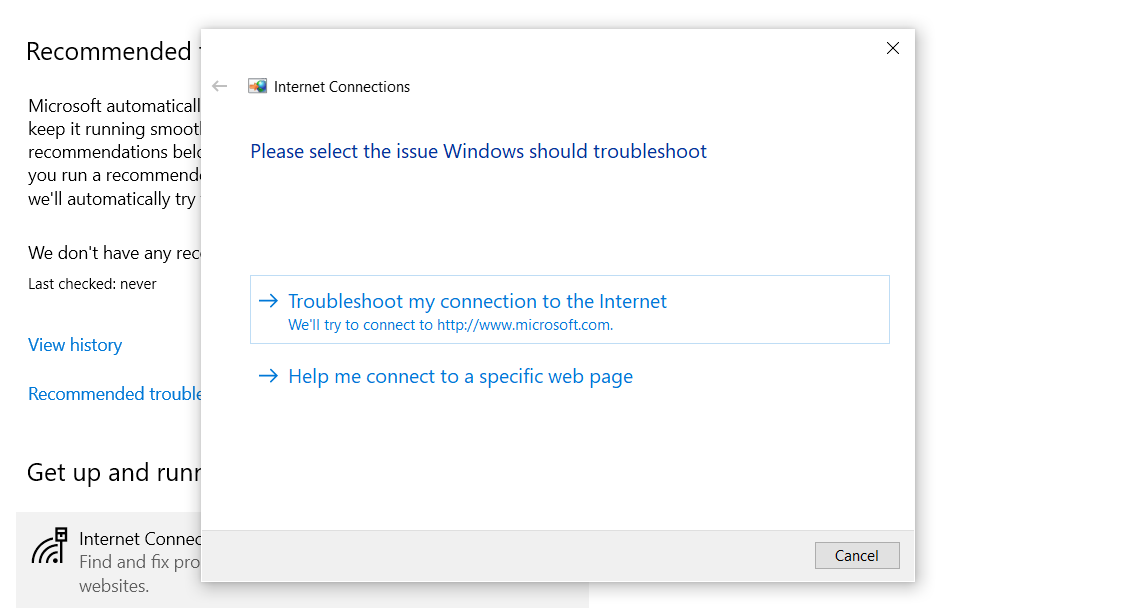
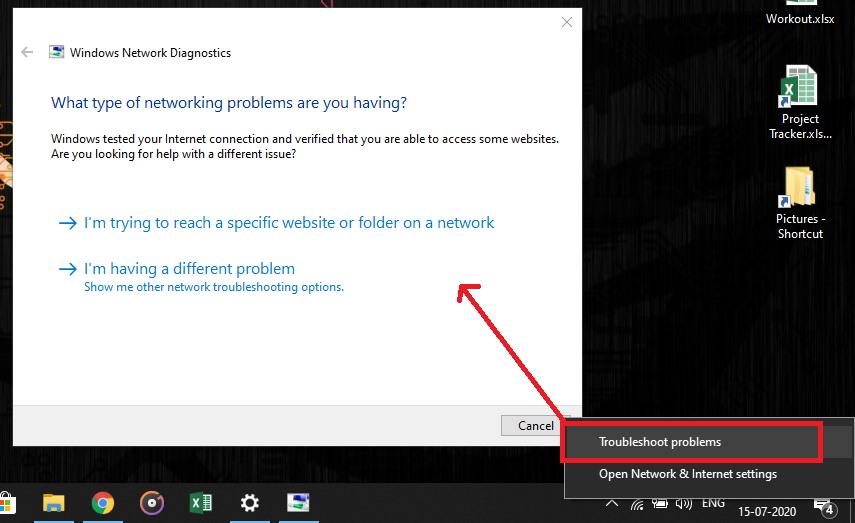
5. Use Windows Network Diagnostics
Google Chrome won’t be able to function properly if your network has been poorly configured. Luckily, Windows’ troubleshooter tool does a good job at finding and fixing config-related issues.
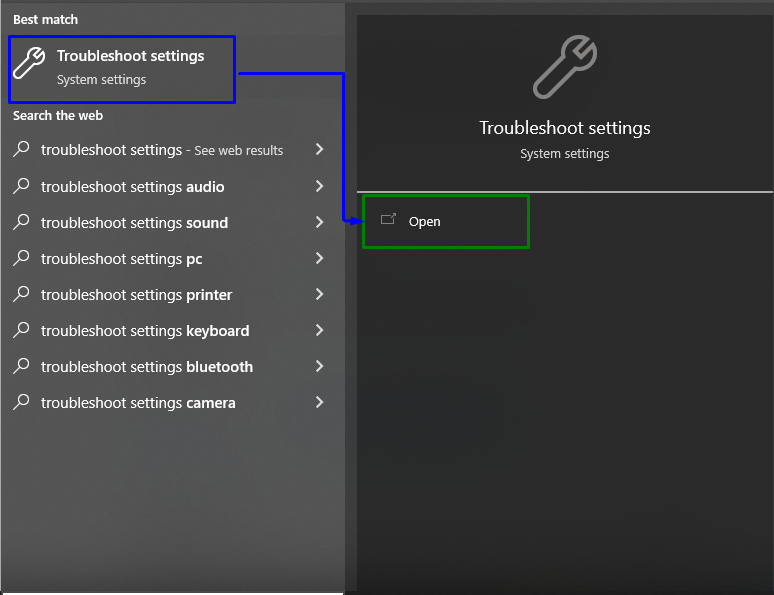
- In the Start menu, search for Troubleshoot settings and open it.
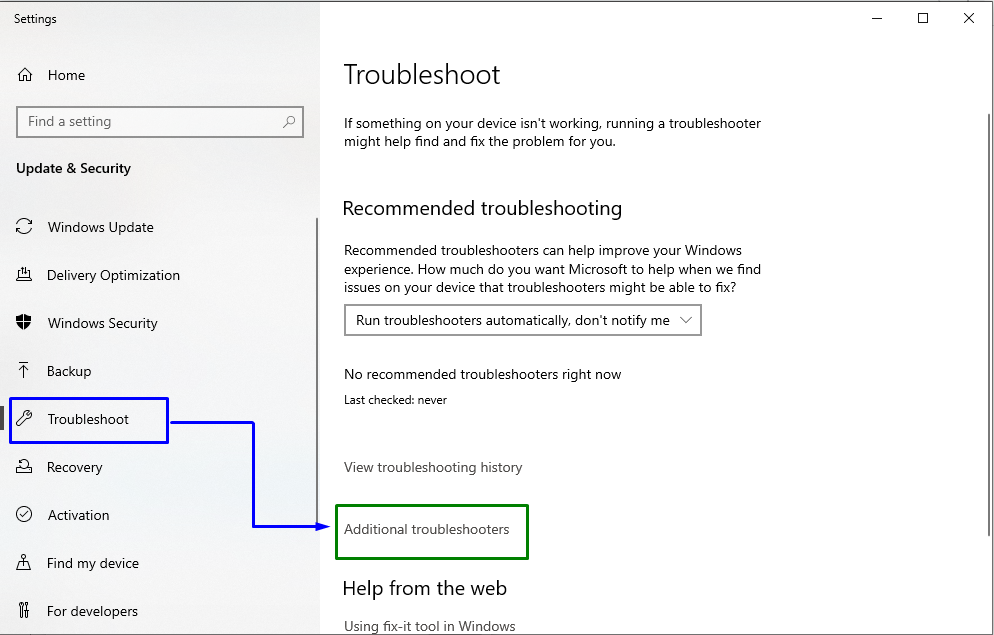
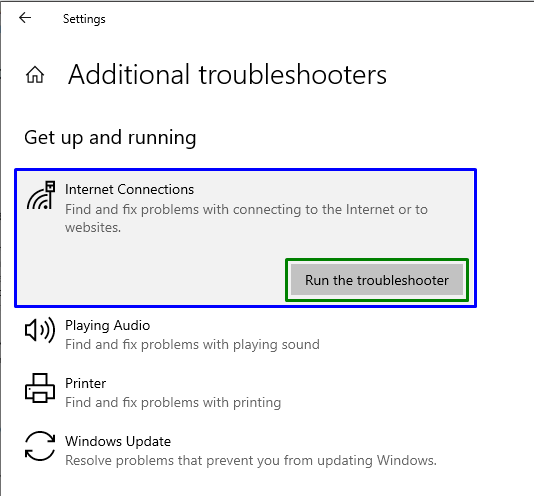
- Under Get up and running, click on Internet Connections.
- Click Run the troubleshooter.

- Follow the instructions provided by the troubleshooter. In most cases, the troubleshooter can take care of the detected issues by itself. However, it might give you instructions to fix the issue on your own if it doesn’t have the required privileges.
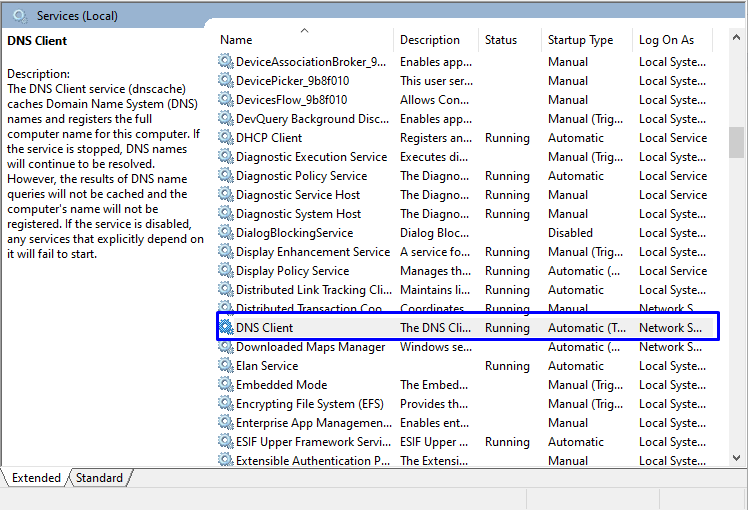
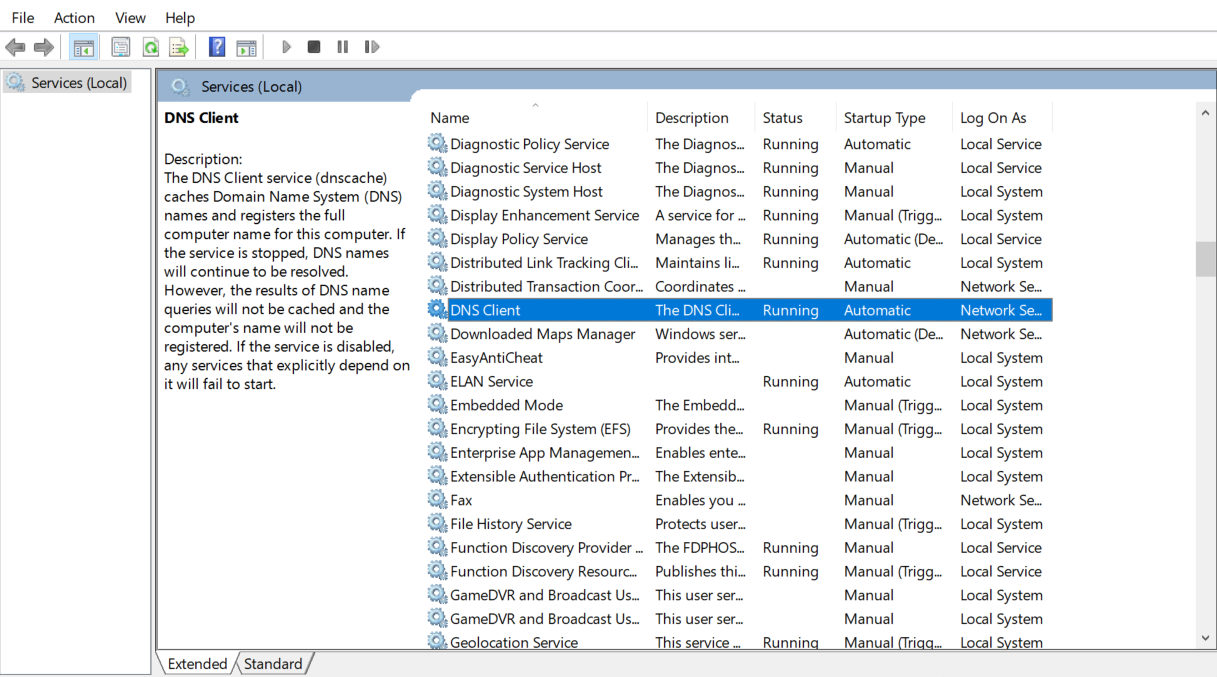
6. Restart the Windows DNS Client Service
Windows uses a service called DNS Client to cache DNS and register the computer name. There’s a chance that your DNS Client service may be malfunctioning and is in need of a restart.
- Press Win + R on your keyboard to bring up the Run dialog.
- Type services.msc in the text box and press Enter. This will bring up a window containing all the Windows services.
- Scroll down to find DNS Client.

- Right-click the DNS Client service and select Stop. Wait a couple of seconds so that the service completely stops.
- After that, right-click the DNS Client service and select Start to get the service started again.
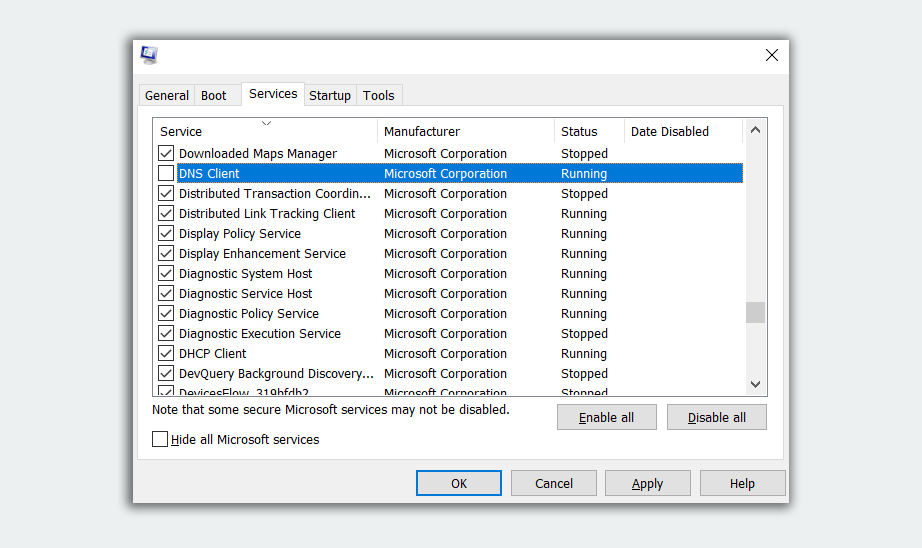
If the DNS Client service options are grayed out and unclickable for you, you can disable the service through Windows config.
- Press Win + R on your keyboard to bring up the Run dialog.
- Type msconfig in the text box and then press Enter.
- In the opened window, go to the Services tab and find DNS Client. Sort the services by name to make this search easier.
- Uncheck the DNS Client service, and then click OK to stop the service.

- Wait for a minute and then check the DNS Client service box. Click OK to get the service started again.
7. Reset Winsock and IPv4 Settings
If none of the solutions above worked for you, you can try resetting Winsock and IPv4 settings to their defaults. This will revert a great portion of network settings to their defaults and has the potential to fix conflicting configurations.
- In the Start menu search for Command Prompt.
- Right-click Command Prompt and select Run as administrator.
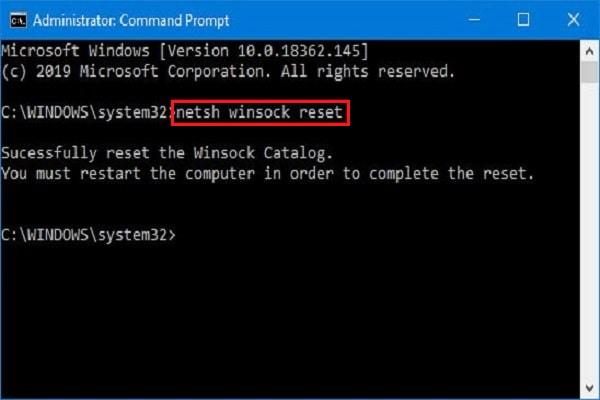
- In the Command Prompt, type the command below and press Enter. This will reset the Winsock.
netsh winsock reset - Once the command is executed, restart your computer.
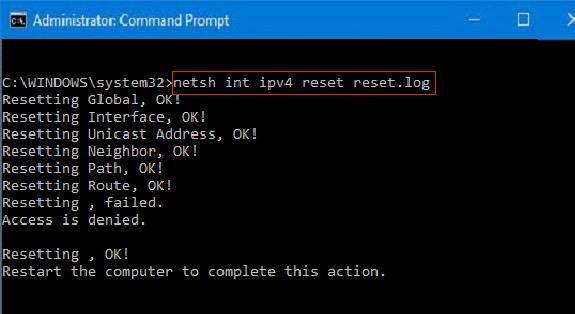
- Launch the Command Prompt as administrator and type the command below:
netsh int ipv4 reset reset.log - Restart your computer and then check if your issue has been resolved.
Quickly Get Back Online
Unexpected malfunctions and errors are potent ingredients of a total day-ruiner tonic, especially if It’s regarding your default web browser.
Luckily, you now have a good idea of what to do if Chrome encounters the Server IP Address Could Not Be Found error. If you’re currently experiencing this issue, trying the above solutions should have you back online in no time!
Google Chrome is one of the most popular web browsers, and with good reason. With so many features that let you enjoy browsing the internet while saving data, Chrome is one of the best browsers out there.
One notorious error that you may encounter while using Chrome, is Server IP Address Could Not Be Found. This error doesn’t have a single cause, so there are a couple of things you’ll have to investigate to resolve this issue on Windows devices.
1. Check Your Internet Connection
Yes, yes, you have probably already checked this. But just because you’re connected to your router through Wi-Fi or a LAN connection, doesn’t mean that you’re connected to the internet!
The first thing you should check when you encounter this error is your internet connection. You might not even be connected to the internet, and if that’s the case, then Chrome isn’t guilty. No browser can browse the internet without the internet.
A quick way of checking for a working internet connection is using the ping command in the Command Prompt.
- In the Start menu, search for Command Prompt and open it. This will bring up the black plank known as the Command Prompt.
- In the Command Prompt, type the following line and press Enter. This command is going to ping google.com four times and return the results.
ping google.com - Investigate the results.
If you’re getting replies within reasonable times, then your connection is fine. However, if you’re getting Request Timed Out or other errors, then you need to further check your connection.
2. Check Your Proxy Settings
One other possible cause of the error is a bad or offline proxy server. You (or an app on your computer) could have set up a proxy which doesn’t work now. You can set up a new proxy or disable proxies altogether in the Proxy settings.
Here’s how to do this:
- In the Start menu search for Proxy, and then select Proxy settings.
- In the Proxy settings window, disable Automatically detect settings.
- Scroll down to Manual proxy setup and disable that as well.
- Open Chrome and check if your problem has been solved.
3. Change Your Network Adapter Settings
By default, your network adapter is set to use DHCP which allows it to automatically obtain an IP address. However, if you’ve tweaked this setting, then IP and DNS will need to be manually configured for your adapter.
You can revert the settings to DHCP from the Control Panel. Follow these steps to do that:
- Open the Control Panel, and choose Network and Internet.
- From here, select Network and Sharing Center.
- In the Network and Sharing Center, click on Change adapter settings from the left menu bar. This will open a window that shows all your network adapters.
- Right-click on the network adapter you’re using, and then select Properties. The network adapter is either called Ethernet or Wi-Fi.
- Double-click on Internet Protocol Version 4 (TCP/IPv4) to open its properties.
- Select Obtain an IP address automatically and Obtain DNS server addresses automatically.
- Click OK to save the settings.
- Open Chrome and check if your issue has been resolved.
4. Update Your Network Driver
Another cause of network problems is the lack of proper drivers for your hardware. This could happen if your network drivers are outdated, or you haven’t installed the correct ones. Windows 10 does a good job at automatically finding and installing drivers, but you can’t ever be too sure.
Here’s how to update your network drivers:
- Open File Explorer.
- Right-click on This PC. From the menu, select Manage. This will bring up the Computer Management window.
- From the left bar, under System Tools, click on Device Manager.
- In the Network adapters category, right-click on your adapter and select Update driver.
- Windows will then look for new drivers and install them if it finds any.You can also manually install the drivers provided by the manufacturer of your hardware (e.g. Qualcomm or Realtek).
The absolute method for making sure you’ve got the right drivers installed is by downloading the appropriate drivers from your network card manufacturer, such as Qualcomm or Realtek. This way, the doubt of Windows downloading the wrong drivers is dispelled.
5. Use Windows Network Diagnostics
Google Chrome won’t be able to function properly if your network has been poorly configured. Luckily, Windows’ troubleshooter tool does a good job at finding and fixing config-related issues.
- In the Start menu, search for Troubleshoot settings and open it.
- Under Get up and running, click on Internet Connections.
- Click Run the troubleshooter.
- Follow the instructions provided by the troubleshooter. In most cases, the troubleshooter can take care of the detected issues by itself. However, it might give you instructions to fix the issue on your own if it doesn’t have the required privileges.
6. Restart the Windows DNS Client Service
Windows uses a service called DNS Client to cache DNS and register the computer name. There’s a chance that your DNS Client service may be malfunctioning and is in need of a restart.
- Press Win + R on your keyboard to bring up the Run dialog.
- Type services.msc in the text box and press Enter. This will bring up a window containing all the Windows services.
- Scroll down to find DNS Client.
- Right-click the DNS Client service and select Stop. Wait a couple of seconds so that the service completely stops.
- After that, right-click the DNS Client service and select Start to get the service started again.
If the DNS Client service options are grayed out and unclickable for you, you can disable the service through Windows config.
- Press Win + R on your keyboard to bring up the Run dialog.
- Type msconfig in the text box and then press Enter.
- In the opened window, go to the Services tab and find DNS Client. Sort the services by name to make this search easier.
- Uncheck the DNS Client service, and then click OK to stop the service.
- Wait for a minute and then check the DNS Client service box. Click OK to get the service started again.
7. Reset Winsock and IPv4 Settings
If none of the solutions above worked for you, you can try resetting Winsock and IPv4 settings to their defaults. This will revert a great portion of network settings to their defaults and has the potential to fix conflicting configurations.
- In the Start menu search for Command Prompt.
- Right-click Command Prompt and select Run as administrator.
- In the Command Prompt, type the command below and press Enter. This will reset the Winsock.
netsh winsock reset - Once the command is executed, restart your computer.
- Launch the Command Prompt as administrator and type the command below:
netsh int ipv4 reset reset.log - Restart your computer and then check if your issue has been resolved.
Quickly Get Back Online
Unexpected malfunctions and errors are potent ingredients of a total day-ruiner tonic, especially if It’s regarding your default web browser.
Luckily, you now have a good idea of what to do if Chrome encounters the Server IP Address Could Not Be Found error. If you’re currently experiencing this issue, trying the above solutions should have you back online in no time!
So you finally settle down and fire up your browser to gather notes for your project, but you end up seeing the Site can’t be reached, the Server IP address could not be found, and an error on the screen instead of the webpage. Yeah, I know the feeling, as I used to get those errors all the time.
After some research, I’ve found some solutions to my specific problem. But if you have hit this page, you probably got with the problem and want to solve it permanently. Hence in this article, I’m about to provide all possible solutions that we can use to resolve the issue with the Server IP address that could not be found.
My friend had the same problem once, but his reason was different. So this error doesn’t happen due to some specific issue but for various reasons; it can be hardware to the network. Hence, it’s wise to consider all points to rectify the issue.
Please note that there might also be an issue with the website server, which is not in our control. However, if you can access the page on other devices but not on your device, it’s a real issue.
Here we are about to break down each issue and provide the solution. These are the exact steps I have taken to resolve the error message at my end. Let’s get started —
Check for a working internet connection
The first of your network is out. You cannot access any website. Hence you’ve to make sure that you have a working internet connection. Use different browsers like Microsoft Edge or Mozilla Firefox to check if you can access the web from them.
Also, you can use the ping command from cmd (in Windows) or terminal (in Mac or Linux), by
- Open cmd from the Start menu or using the Run command cmd OR, press Ctrl + r and on the dialogue box, type cmd and hit Enter.
- When the command prompt opens, type ping google.com and check for results.
If the result shows statistics instead of an error, you have a working connection, and you can proceed with step #3, or you’ve to go through step #2 to fix network issues.
Windows Network Diagnostics
Network issues may occur due to poor configuration of network settings and Network drivers. And such network issues can give rise to Site can’t be reached, Server IP address could not be found errors.
First, run the troubleshooter available with Windows to run diagnostics and fix.
Here are the steps to troubleshoot network issues on Windows:
- Right-click on the ethernet or wifi symbol from the taskbar and click on Troubleshoot problems.
- Wait for the troubleshooter to check errors in the background and fix them for you.
The troubleshooter will automatically apply the best network settings and make the changes. It might ask to make some adjustments if things are out of its control (something that needs administrative access).
Update Network Drivers
There could be issues with network drivers that aren’t supporting the network hardware within the computer. The best thing you can do is to update the network drivers.
Reinstall or update drivers for your Network devices by following the below steps:
- Open Device Manager using the Run command devmgmt.msc in the run dialogue box.
- Right-click on the Network adapter and click the Update driver command.

- You can also use drivers provided by the manufacturer from their website—for example, Realtek or Atheros.
It will automatically look up driver and hardware changes and repairs to rectify the network issues.
Check Proxy Settings
Proxy settings, when misconfigured, will cause errors. Allowing a proxy to detect automatically will solve the problem.
Here are the steps to check the proxy setting in the Chrome browser:
- Click on Menu
 at the top-right corner.
 - Select the Settings menu.
- On the Settings page, scroll down until you see Advanced, and click to open it.
- Now scroll down until you see Open your computer’s proxy settings.

- Click to launch the Proxy settings within the operating system.
- Set the proxy setting to Automatically detect settings.
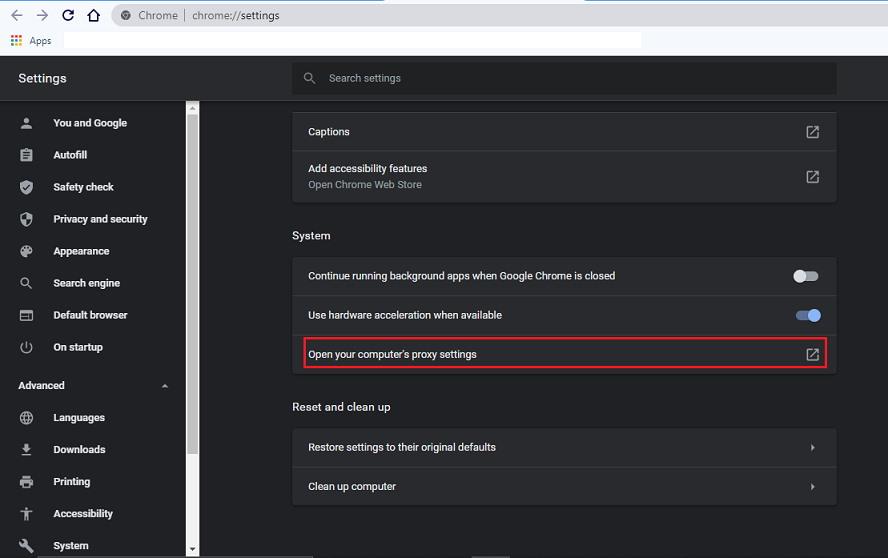
It automatically chooses the best proxy setup and ensures your internet works without issues.
Change IP and DNS settings
IP and DNS are vital for connecting to the internet; hence, they must be appropriately configured. IP will be automatically obtained using the DHCP protocol. So, here we can enable DHCP to configure IP automatically.
In most cases, the options are set to default. However, you can revert the changes if you’ve made any changes or if any antivirus software has deliberately misconfigured it.
Here are the steps to change IP and DNS settings on Windows:
- Right-click on the network icon on the taskbar and click on Network and internet settings. OR
You can also lookup up Network and Internet settings in Windows Search. - From the Status menu, click on Change adapter settings.
- When the control panel is launched, right-click on the network adapter through which you’ve connected to the internet.
- Select the Properties sub-menu.

- From the properties tab, click on Internet protocol version 4 (TCP/IPv4) and click on Properties.
- In the properties tab, select Obtain an IP automatically and Obtain DNS server address automatically.

- Hit Ok to save the changes and reconnect to check if the problem persists.

Note: If your PC belongs to a private DNS service or you use proxy-based connections, you can contact your network admins to get those configuration settings.
Resetting the IPv4 settings and flushing the DNS resolver cache are the last steps that can fix all the issues within your computer.
Reset IPv4 settings
If nothing works, you can reset every setting to avoid conflicts. Using cmd, we can issue netsh commands to reset IPv4 settings.
Here are the steps to reset IPv4 settings on Windows:
- Launch the CMD prompt as administrator, and type netsh winsock reset and hit Enter.

- Now restart your PC.
- Open CMD again and type netsh int ipv4 reset reset.log and keypress Enter.

- Again restart your PC and check if you can connect to the internet.
It will completely reset all the IP configurations and changes we made in our system to the default one for automatic resolution.
Flush DNS Cache
You can also flush the Domain Name Server (DNS) information cached on your system.
Here are the steps to flush the DNS cache on Windows:
- Open cmd as administrator and type ipconfig /flushdns

- If everything is running right, you should get this as output — Successfully flushed the DNS Resolver Cache.
Finally, check if this solves your issue and you are no longer receiving the error — The site can’t be reached; the Server IP address could not be found.
Bottom Line: Server IP could not be found
The site cannot be reached; the Server IP could not be found is a tragic error many people face daily. Such errors can drastically degrade one’s internet experience. Also, you won’t be able to do online transactions if you keep getting such errors.
And if your problem hasn’t been solved yet, then make sure you have paid for your Wi-Fi or cellular connections. Sometimes we don’t realize it, but our internet data is empty. In such cases, you are prone to encounter such error messages.
And once the error is solved, don’t do any online transactions for 2-3 hours. Monitor if everything is working fine, and if yes, you can start doing sensitive tasks such as website logins and online transactions with ease without worrying about any error codes.
Also, as mentioned, the Server IP address error could be genuine. The website is down, and the DNS resolver cannot map a domain name with an IP address. In such a case, we have no option but to wait until the website admin fixes the mapping between the domain address and the masked IP address.
F.A.Qs: Solve Server IP could not be found
Now, let us go through several frequently asked questions regarding how to fix the server IP that could not be found in case the Site cannot be reached.
How to fix the Server IP that cannot be found or the site cannot be reached?
The significant fixes you can use to solve Server IP that we could not find are: check your internet connection, fix network issues, check proxy settings, change IP and DNS settings, and Reset IPv4 settings.
How to Reset IPv4 settings and flush the DNS cache?
Launch the CMD prompt as administrator, type netsh Winsock reset, and hit the enter button. Now, restart your PC and again open CMD and type ‘netsh int ipv4 reset reset.log’ and keypress Enter. Now, restart your PC and check whether the internet is connected or not.
How do Proxy settings resolve the IP server, not a founding problem?
Open your browser, click on the three dots in the top right corner, and open Settings. Please scroll down and under the advanced section, open your computer’s proxy settings, and set it to detect settings automatically.
Lastly, here are the recommended web browsers for computer and mobile phone that you should give a try.
If you’ve any thoughts on How to Fix: Site can’t be reached, Server IP could not be found?, then feel free to drop in below comment box.
Disclosure: This page may contain affiliate links, which means we may receive compensation for your purchases using our links; of course at no extra cost to you (indeed, you may get special discounts).