Server-side rendering (SSR) is an application’s ability to preload a website in the server before sending it to the client to be hydrated by your JavaScript bundle. Hydration refers to the process in which JS takes over the static HTML sent by the server and turns it into a dynamic DOM, which can then react to client-side data changes.
SSR adds a whole new layer to web apps, and despite its many benefits, it may cause problems for developers. SSR means that some work is done on the server, which can be a source for bugs; therefore, these errors need to be handled appropriately as they would be in any normal web application.
Because multiple tools exist to help developers build SSR web apps, in this article we are going to focus on the best practices for gracefully handling errors. I’ll also present some examples showcasing how it may be done in Next.js or Nuxt.js.
Best practices for handling errors in SSR apps
An app that handles errors gracefully will enable the flow of known or unknown errors in a controlled manner, which will help the user and developers know that something went wrong without completely blocking the app’s process.
SSR applications have both a client and server side, so we need to know what to do on both in order to have a complete end-to-end error handling system.
Handing SSR errors on the client side
Our client side will deal mostly with the frontend as we know it. The following is a list of ways in which you can handle errors gracefully on your SSR app’s frontend.
Try…catch blocks
Try…catch blocks help catch errors in asynchronous calls. These errors are output in the catch block, and my be used to notify the user of a potential error and even send it up via an error service:
const handleSignUp = async (email) => {
  try {
    await backend.emailVerificationLink(email)
  } catch(error) {
    console.error(error) // you may also
    setHasErrors(true)
  }
}
Interceptors for network errors
If you are using an HTTP client like Axios, you can easily handle errors in your app using an interceptor, which will perform a particular action based on the error received from a request or during a response:
axios.interceptors.request.use(function (config) {
    // Do something before request is sent
    return config;
  }, function (error) {
    // Do something with request error
    return Promise.reject(error);
  });

// Add a response interceptor
axios.interceptors.response.use(function (response) {
    // Do something with response data
    return response;
  }, function (error) {
    // Do something with response error
    return Promise.reject(error);
  });
More tools for handling client-side errors
Client-side error handling is easy with help of tools like react-error-boundary in React. It helps by providing a wrapper that you can use around your components to gracefully handle any errors that occur in that context:
function ErrorFallback({error, resetErrorBoundary}) {
  return (
    <div role="alert">
      <p>Something went wrong:</p>
      <pre>{error.message}</pre>
    </div>
  )
}

const ui = (
  <ErrorBoundary
    FallbackComponent={ErrorFallback}
    onReset={() => // reset the state of your app so the error doesn't happen again }}
  >
    <ComponentThatMayError />
  </ErrorBoundary>
)
Vue.js also provides an errorCaptured hook that will work like a charm whenever any component in its hierarchy catches an error. These errors will be channeled to a global error handler, onto which you may attach a logger:
// in component.vue
errorCaptured(err, instance, info) {
  // handle inside component (/! caution component state still editable)
}

// in main.ts
Vue.config.errorHandler = function (err, vm, info) {
  // handle error
  // `info` is a Vue-specific error info, e.g. which lifecycle hook
  // the error was found in. Only available in 2.2.0+
}
LogRocket: The ultimate solution for handling client-side errors
While using an option like react-error-boundary will surface an error, it won’t give you any insight into why the issue occurred. If you’re interested in automatically surfacing client-side errors, monitoring and tracking Redux state, and tracking slow network requests and component load time, try LogRocket. 

LogRocket is like a DVR for web apps, recording literally everything that happens on your React app. Instead of guessing why problems happen, you can aggregate and report on what state your application was in when an issue occurred. LogRocket also monitors your app’s performance, reporting with metrics like client CPU load, client memory usage, and more.
The LogRocket Redux middleware package adds an extra layer of visibility into your user sessions. LogRocket logs all actions and state from your Redux stores.
Modernize how you debug your React apps — start monitoring for free.
Handling SSR errors on the server side
Catching errors in data fetchers
The early return pattern refers to returning values as early as possible to help end a function and get a result.
For example, in Next, you would write your getInitialProps function this way:
import Error from "next/error"

function Page({ stars, statusCode}) {
  if (statusCode !== 200) {
    <Error statusCode={statusCode} />
  }
  return <div>Next stars: {stars}</div>
}

Page.getInitialProps = async (ctx) => {
  try{
    const res = await fetch('https://api.github.com/repos/vercel/next.js')
    const json = await res.json()

    if (res.status >= 400) {
      return { stars: json.stargazers_count, statusCode: res.status }
    }
    return { stars: json.stargazers_count, statusCode: 200 }
  } catch(error) {
    return {stars: null, statusCode: 503}
  }
}
This will ensure that you are able to render Page correctly if the result is correct. If there’s an error during the request, it will be gracefully handled and shown to the user using Next’s Error component.
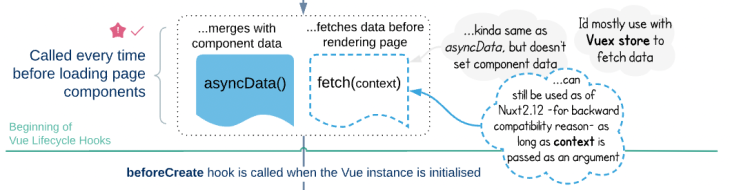
In Nuxt, there are the fetch and asyncData hooks, which are able to handle errors by themselves. These hooks are all used to fetch data, however, they do not handle the process in a similar manner.
Handling the errors at the fetching point of the app is definitely one of the most important error management tasks in an SSR application.
Error status codes
There are many recognizable HTTP error codes. Usually, the codes you may want to display to the user are client errors (400-500). Otherwise, every error code should still be caught and logged.
In case your SSR app uses server or API middleware, you need to return the appropriate errors too, because they operate exactly as a backend to your app.
Redirect to error pages
In case an error causes your page to get messy (loading or not found), you always want to have a fallback page or component that will help describe the error to the user and hide any unnecessary technical details that may not help the user fix it.
Next already provides a static 404 page that will pop up anytime a user tries to access a nonexistent page. However, you may need a custom 404 page in case you need to add information, or to suit your branding needs.
This is done by creating a pages/404.js file, which is able to fetch data at build time if required. Note that you can do the same with the status code 500 referring to server errors:
// pages/404.js
export default function Custom404() {
  return <h1>404 - Page Not Found</h1>
}

// pages/500.js
export default function Custom500() {
  return <h1>500 - Server-side error occurred</h1>
}
If ever you need to have a different error description page based on the the error caught, you can resort to more advanced error page customizations, which work using Next’s error component. You can override it by customizing pages/_error.js
In Nuxt, you are gifted with a special layout defined in a layouts/error.vue file. This layout is basically a Vue component with the ability to catch errors along with their status codes. This gives developers a great amount of flexibility:
<!-- layouts/error.vue -->
<template>
  <div>
    <h1 v-if="error.statusCode === 404">Page not found</h1>
    <h1 v-else>An error occurred</h1>
    <NuxtLink to="/">Home page</NuxtLink>
  </div>
</template>

<script>
  export default {
    props: ['error'],
    layout: 'error' // you can set a custom layout for the error page
  }
</script>
Handle and log everything
Because you are in an SSR environment, there’s much more involved than just the user interfaces. Sometimes you deal with middleware and serverMiddlewares in Nuxt or Next.js, which may perform some work on your pages before, during, or after render. These should return appropriate errors, because they act as part of your code.
In certain SSR websites, the server or API middleware act as a full-fledged backend. They may handle API calls like an Express server would. These can easily connect to your logging engine and handle API request errors as they would in Node.
Having your errors handled from end to end will grant you the ability to drill through errors, and find their origin and root cause.
Reporting and logging tips
Once your application gets into a user’s hands, it will be beneficial for you start handling and extracting logs via a log engine. These logs will come with information on almost every interaction on your app, provided you have the correct setup.
Because you can analyze them in real time, you are also able to pull out errors, anomalies, or any other issue that may come from your applications usage.
Today, there are a plethora of log analysis and management tools. For example, you can see here how Next is used with Sentry to catch and handle errors.
Most of these existing log management tools integrate seamlessly with LogRocket to provide you with well-detailed session information during error reporting.
Wrapping up
Error handling is one of the most important parts of development. Doing it gracefully requires developers to have a good planning and a solid understanding of how errors flow in their web apps.
SSR apps are no less than web apps with a further server step. These server additions increase the work required to have an elegant end-to-end error handling process in your app. However, modern frameworks give us the ability to handle errors following simple steps that scale effortlessly.
Generally, on the client side, you’d wrap your asynchronous calls in try…catch blocks to stop the browser from trying to handle the error itself. This way, you’ll transform it to something understandable and let it flow to the user and to your log engine. On the server side, you can catch and return errors using conventional codes so your client side has no problem trying to understand what went wrong.
LogRocket: Full visibility into production Next.js apps
Debugging Next applications can be difficult, especially when users experience issues that are difficult to reproduce. If you’re interested in monitoring and tracking state, automatically surfacing JavaScript errors, and tracking slow network requests and component load time, try LogRocket.
LogRocket is like a DVR for web and mobile apps, recording literally everything that happens on your Next.js app. Instead of guessing why problems happen, you can aggregate and report on what state your application was in when an issue occurred. LogRocket also monitors your app’s performance, reporting with metrics like client CPU load, client memory usage, and more.
The LogRocket Redux middleware package adds an extra layer of visibility into your user sessions. LogRocket logs all actions and state from your Redux stores.
Modernize how you debug your Next.js apps — start monitoring for free.
First published on MSDN on Apr 03, 2006
Each error in the server has two parts — an error message that describes the error that happened in the server and an error action that determines the effect of the error on the statement, level, batch, transaction, connection and/or server.
Server has instances of different combinations of errors and error messages. The major ones are:
-
One error, one error message
— This is the most common case and most intuitive. -
One error, two or more error messages
— When an error is raised in a some special context, the first message has information about the error, while subsequent messages provides information about the context. This becomes an issue inside tsql try-catch. In the absence of any notion about error collection, the catch block is activated with one of the error messages. As sql server 2000 would have set @@error to the last error message, we decided to set error intrinsics (error_message(), etc.) to the last error message inside the catch block. In other words sql server 2005 would ignore all but the last error message inside tsql try-catch. Many systems would merge these error messages into one. One way to merge two error messages would be to provide the first message as a payload of the context message. Backward compatibility prevents us from mergeing old error messages. Care would be taken to not have multiple error messages for one error in future releases. -
Multiple errors, multiple error messages
— In this situation the server displays as many information as possible before stopping execution. This is mostly useful in development when one wants to see all compile errors or permission failures before the execution is terminated. Inside tsql try-catch the ideal behavior would be to stop execution on first error and handle it in the catch block. This is what we have tried in sql server 2005. Note this is different from @@error behavior where it would be set to the last error. -
No error, one or more error messages
— This happens when server recovers from non-severe errors and continues with exectuion. In reality these are informational or warning messages. They should have been sent with lower severity (10 to be precise), but can not be done because of backward compatibility. As clients do not expect to see any error messages inside tsql try-catch, they are silently ignored inside a try-block. The execution happens as if nothing has happened.
Once an error happens, server determines the action to take. Statement abort will abort the current statement. Level abort will terminate an executing proc, and will be visible as a statement abort in the scope of the caller. Batch aborts will terminate the batch. Transaction abort will abort the batch and rollback the transaction. Severe errors would kill the connection, while extremely severe error will shutdown the server.
Currently, the error action depends on the error message, the severity with which it is raised and the context in which it is raised. For tsql developer, it is very difficult to determine the error action for any error during development. Going forward we may enforce a rule where the error action just depends on the error message. To ensure that the error handling does not break on upgrades, this can only be done for new error messages.
In next post I will continue the discussion on certain error messages that are still relayed to clients from inside tsql tr-catch.
Thanks

on
April 29, 2021
A Guide to Error Handling in Express.js
Error handling often doesn’t get the attention and prioritization it deserves. Especially for newbie developers, there is more focus on setting up routing, route handlers, business logic, optimizing performance, etc. As a result, the equally (if not more) crucial error-handling part will likely be overlooked. Striving for the most optimized code and squeezing out every last ounce of performance is all well and good; yet, it’s important to remember all it takes is one unhandled error leak into your user interface to override all the seconds you helped your users save.
Because there are so many components involved in a successful, functioning web application, it is vital to foolproof your application by preparing for all possible errors and exceptions. If left mishandled, these errors can lead to a bad user experience and end up affecting your business. At the same time, errors provide critical information about potential errors in your application that could bring the whole thing down. Therefore, you must be thoughtful and intelligent about error handling in your application.
This post will c, Node.js’s most popular server-side framework (even though most of these concepts apply to other frameworks too). Express does a great job taking care of several unhandled errors and provides an easy-to-use, flexible API that developers can utilize to build error handling middleware.
Here’s an outline of what we’ll be covering so you can easily navigate or skip ahead in the guide:
- How does Error Handling Work in Express.js?
- Express Middleware Functions
- Default Error Handling in Express.js
- Handling Custom Errors
- Custom Handling for Each Route
- Writing your own Error Handling Middleware Functions
- Adding Multiple Middleware Handlers
- Basic Quick Tutorial: Setting up Error Handling in Express.js
How Does Error Handling Work in Express.js?
Express.js is the most popular Javascript server-side framework, perhaps, primarily because of its ease of usage and getting started. One of the many ways it makes things easier is by automatically catching all errors in route handlers, and allowing developers to extend route handling functionalities by leveraging useful middleware functions.
Before we see how all of this works, let’s briefly visit the concept of middleware functions in Express – most error handling functionality is achieved through these functions.
Express Middleware Functions
Middleware functions in Express are essentially functions that come into play after the server receives the request and before the response fires to the client. They have access to the request and the response objects. They can be used for any data processing, database querying, making API calls, sending the response, or calling the next middleware function (using the next() function).
Two aspects of middleware functions to keep in mind are:
- They are triggered sequentially (top to bottom) based on their sequence in code.
- They operate until the process exits, or the response has been sent back to the client.
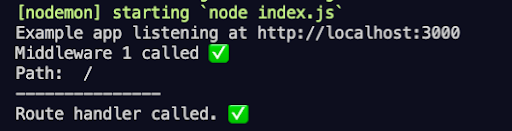
Let’s understand this through a small example. Below we define two middleware functions using the .use() function and one route handler (skipping the boilerplate code for the sake of simplicity):
app.use((req, res, next) => {
  console.log("Middleware 1 called.")
  console.log(req.path)
  next() // calling next middleware function or handler
})

app.get('/', (req, res) => {
  console.log("Route handler called.")
  res.send("Hello world!") // response sent back – no more middleware called
})

app.use((req, res, next) => {
  console.log("Last middleware called❓") // not called
})
Here, each time the server receives a request, the first middleware is fired, followed by the corresponding route handler (using the next() function). However, because the response returns in this handler, the last middleware function is not called. Here’s the output:
 |
| Server output |
Several native as well as third-party middleware functions have been made available by the Express community and are widely for adding functionalities like session management, authentication, logging, redirecting, and so much more. This was a basic example of how middleware functions work. We will come back to them when discussing how to utilize them for error handling in our applications.
Default Error Handling in Express.js
Express implicitly takes care of catching your errors to prevent your application from crashing when it comes to error handling. This is especially true for synchronous route handler code. Let’s see how:
Synchronous Code
Synchronous code refers to statements of code that execute sequentially and one at a time. When an error encounters synchronous code, Express catches it automatically. Here’s an example of a route handler function where we simulate an error condition by throwing an error:
app.get('/', (req, res) => {
  throw new Error("Hello error!")
})
Express catches this error for us and responds to the client with the error’s status code, message, and even the stack trace (for non-production environments).
All of this is taken care of thanks to Express’s default built-in error handler middleware function inserted at the end of your code’s middleware stack. This automatic handling saves you from bulky try/catch blocks and explicit calls to the in-built middleware (shown below) while also providing some fundamental default error handling functionality.
app.get('/', (req, res, next) => {
  try {
      throw new Error("Hello error!")
  }
  catch (error) {
      next(error)
  }
})
You can also choose to create your own middleware function to specify your error handling logic.
Asynchronous Code
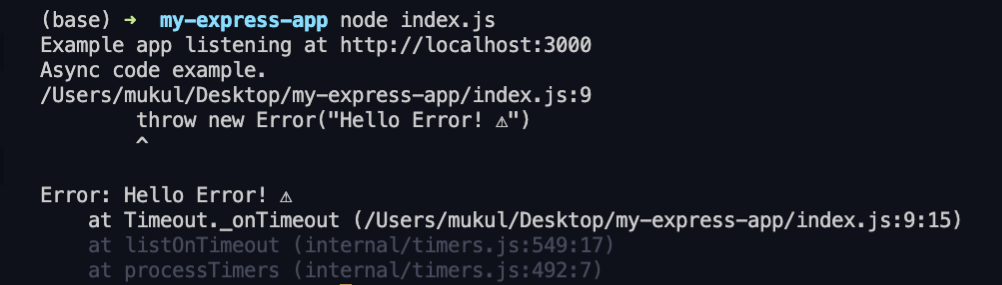
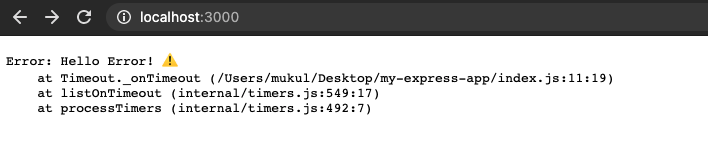
When writing server-side code, most of your route handlers are likely using asynchronous Javascript logic to read and write files on the server, query databases, and make external API requests. Let’s see whether Express can catch errors raised from asynchronous code as well. We’ll throw an error from inside the asynchronous setTimeout() function and see what happens:
app.get('/', (req, res) => {
  setTimeout(() => {
      console.log("Async code example.")
      throw new Error("Hello Error!")
  }, 1000)
})
As you can see, our server crashed because Express didn’t handle the error for us.
 |
| Server output |
For handling errors raised during asynchronous code execution in Express (versions < 5.x), developers need to themselves catch their errors and invoke the in-built error handler middleware using the next() function. Here’s how:
app.get('/', (req, res, next) => {
  setTimeout(() => {
      try {
          console.log("Async code example.")
          throw new Error("Hello Error!")
      } catch (error) { // manually catching
          next(error) // passing to default middleware error handler
      }
  }, 1000)
}) |
| Browser output |
This is much better – we caught the error, and our server didn’t crash. This does look a little bulky because we used the setTimeout() function to demonstrate async behavior. This function does not return a promise and, therefore, can’t be chained with a quick .catch() function. However, most libraries that help with async operations return promises these days (e.g., the file system API). Below is an example of a more convenient and common way of catching errors from promises:
const fsPromises = require('fs').promises
app.get('/', (req, res, next) => {
  fsPromises.readFile('./no-such-file.txt')

     .then(data => res.send(data))

     .catch(err => next(err))
})
Note: Express 5.0 (currently in alpha) can automatically catch errors (and rejections) thrown by returned Promises.
Handling Custom Errors
Express’s default error-handling middleware is super helpful for beginners to take care of unexpected, unhandled errors. However, different developers and organizations would want their errors handled in their own way – some might want to write these to log files, others might want to alert the user or redirect them to another page, or all of the above.
Custom Handling for Each Route
An obvious, naive way of going about this would be to define your custom error handling logic for each route handler as so:
const express = require('express')
const fsPromises = require('fs').promises;

const app = express()
const port = 3000

app.get('/one', (req, res) => {
  fsPromises.readFile('./one.txt')
    .then(data => res.send(data))
    .catch(err => { // error handling logic 1
        console.error(err) // logging error
        res.status(500).send(err)
    })
})

app.get('/two', (req, res) => {
  fsPromises.readFile('./two.txt')
    .then(data => res.send(data))
    .catch(err => { // error handling logic 2
        console.error(err)
        res.redirect('/error') // redirecting user
    })
})

app.get('/error', (req, res) => {
  res.send("Custom error landing page.")
})

app.listen(port, () => {
  console.log(`Example app listening at http://localhost:${port}`)
})
Here, we specified two different handling logics – one for each route that attempts to read arbitrary files on the server. As you can imagine, this would get too redundant quickly and wouldn’t scale well as you add more and more routes.
Writing your Error Handling Middleware Functions
A much better option would be to leverage Express’s middleware functions here. You could write one or more middleware functions for handling errors in your application that all of your routes could utilize by making simple next() calls.
Middleware functions are much more convenient to work with than conventional functions because they automatically have access to the error, request, and response objects and can be invoked (or invoke others) based on their ordering using just the next() function.
You can create your own error handling middleware functions by adding the error argument to the function, apart from request, response, and next. Here is an example:
app.use((error, req, res, next) => {
  console.log("Error Handling Middleware called")
  console.log('Path: ', req.path)
  next() // (optional) invoking next middleware
})
Another thing to keep in mind is the ordering of the middleware. The error handler needs to specify middleware functions after the route handlers for the next(error) calls to be directed towards them.
Now let’s recreate the previous example, but this time with an error-handling middleware in place.
const express = require('express')
const fsPromises = require('fs').promises

const app = express()
const port = 3000

app.get('/one', (req, res, next) => {
  fsPromises.readFile('./one.txt') // arbitrary file
    .then(data => res.send(data))
    .catch(err => next(err)) // passing error to custom middleware
})

app.get('/two', (req, res, next) => {
  fsPromises.readFile('./two.txt')
    .then(data => res.send(data))
    .catch(err => {
        err.type = 'redirect' // custom prop to specify handling behaviour
        next(err)
    })
})

app.get('/error', (req, res) => {
  res.send("Custom error landing page.")
})

app.use((error, req, res, next) => {
  console.log("Error Handling Middleware called")
  console.log('Path: ', req.path)
  console.error('Error: ', error)

  if (error.type == 'redirect')
      res.redirect('/error')

   else if (error.type == 'time-out') // arbitrary condition check
      res.status(408).send(error)
  else
      res.status(500).send(error)
})


app.listen(port, () => {
  console.log(`Example app listening at http://localhost:${port}`)
})
Instead of defining the handling behavior inside each route, we place all our logic inside the middleware. Then, based on the kind of error, we can modify the error object (or throw a custom error) and accordingly deal with it in the middleware.
This allows us to achieve the same functionality as before, but more efficiently. Assuming these files are not present on the server, if we go to /one, the server logs the error and sends back a 500 (internal server error) response. We are redirected to the /error page after the error logs if we open /two. Below are the corresponding client and server outputs:
As you can imagine, this was a fairly basic example just to give you a sense of how you can decouple your error handling logic from the route handling into a middleware function. This extends to larger applications with hundreds of routes for increased modularity, reduced redundancy, easier maintenance, and more efficient exception handling.
Adding Multiple Middleware Handlers
In the previous section, we worked with just one middleware to handle all our errors. However, in practice, multiple middleware functions are usually employed for different aspects of error handling to have further abstractions. For example, one middleware for logging errors, another for responding to the client, perhaps another as a fail-safe catch-all handler, etc. Here’s a preview of the same based on our previous example:
// route handlers
app.get('/one')
app.get('/two')

app.get('/error')
// middleware

app.use(errorLogger)
app.use(errorResponder)
app.use(failSafeHandler)
Let’s write the code for this.
const express = require('express')
const fsPromises = require('fs').promises

const app = express()
const port = 3000

app.get('/one', (req, res, next) => {
  fsPromises.readFile('./one.txt')
  .then(data => res.send(data))
  .catch(err => next(err)) // passing error to custom middleware
})

app.get('/two', (req, res, next) => {
  fsPromises.readFile('./two.txt')
  .then(data => res.send(data))
  .catch(err => {
      err.type = 'redirect' // adding custom property to specify handling behaviour
      next(err)
  })
})

app.get('/error', (req, res) => {
  res.send("Custom error landing page.")
})

function errorLogger(error, req, res, next) { // for logging errors
  console.error(error) // or using any fancy logging library
  next(error) // forward to next middleware
}

function errorResponder(error, req, res, next) { // responding to client
  if (error.type == 'redirect')
      res.redirect('/error')
  else if (error.type == 'time-out') // arbitrary condition check
      res.status(408).send(error)
  else
      next(error) // forwarding exceptional case to fail-safe middleware
}

function failSafeHandler(error, req, res, next) { // generic handler
  res.status(500).send(error)
}

app.use(errorLogger)
app.use(errorResponder)
app.use(failSafeHandler)

app.listen(port, () => {
console.log(`Example app listening at http://localhost:${port}`)
})
This allows us to achieve the same functionality as in the previous code example, but in a more modular way that would scale better as you add more routes and handle more error conditions.
However, as previously discussed, when working with multiple middleware functions, one must keep an eye on their sequence and remember that each middleware should either respond to the client or invoke the subsequent one in the stack. If the server is just left to hang, the client continues to wait. For example, if we missed using next() in the first middleware (errorLogger), the subsequent middleware functions are not invoked, and therefore, no response fires.
Basic Quick Tutorial: Setting up Error Handling in Express.js
Now that we’ve covered almost all aspects of error handling in Express, theory-wise, let’s solidify our understanding of these concepts by creating a prototype Express application that handles errors using middleware methods in a relatively more realistic setting.
We’ll create an API that serves user posts data fetched from a dummy API (jsonplaceholder.typicode.com). We will then validate some of the posts’ properties based on some arbitrary criteria (e.g., the content length), raise custom errors if validation fails, capture these using our custom middleware, and process them accordingly.
Step 1: Create and Setup Project
First, create an empty folder, cd into it, generate an npm project, and install the dependencies.
mkdir my-express-app && cd my-express-app
npm init -y
npm i --save express node-fetch
Then, create files – index.js, routes.js, errors.js, and middleware.js. It is considered good practice to keep your routes, main file, and other utilities in separate files. Ideally, developers prefer different folders for better organization, but for our small prototype, just files would suffice.
 |
| Project files |
Step 2: Setup the Server
Now let’s write the code that will start our server in index.js.
// index.js
const express = require('express')
const app = express()
const port = 3000

app.listen(port, () => {
console.log(`Example app listening at http://localhost:${port}`)
})
We’ll start the server and make sure everything is working fine by running the node index.js command from inside the folder.
 |
| Console output |
Step 3: Create Some Routes
Now let’s create some routes in the routes.js file, and for now, just fetch some dummy JSON posts data from the dummy API (jsonplaceholder.typicode.com/posts), and serve it through our route. We will use Express’s Router module and export our routes – to import into our main index.js server file.
// routes.js
const express = require('express')
const fetch = require('node-fetch') // for making external API requests
const router = express.Router()
router.get('/', (req, res) => {
res.send("Hello World!")
})
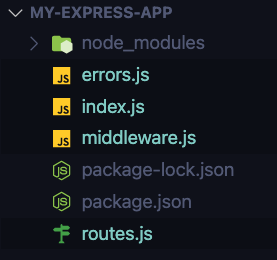
router.get('/user-posts', (req, res, next) => {
fetch('https://jsonplaceholder.typicode.com/posts')
.then(res => res.json())
.then(data => {
console.log(data)
res.header("Content-Type",'application/json');
res.send(JSON.stringify(data, null, 4)) // pretty print
})
.catch(err => next(err)) // pass to default error handler middleware
})
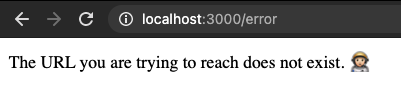
router.get('/error', (req, res) => {
res.send("The URL you are trying to reach does not exist.")
})
module.exports = router // export routesNow let’s import these routes into our server file.
// index.js
const express = require('express')
const routes = require('./routes') // importing routes

const app = express()
const port = 3000

app.use(routes) // initializing routes

app.listen(port, () => {
console.log(`Example app listening at http://localhost:${port}`)
})
Let’s fire up our browser and check whether the route is working.
 |
| Browser output |
Our server seems to be working fine here. Let’s do some error handling now.
Step 4: Creating and Handling Custom Errors
It is pretty helpful to create custom error classes for your applications by extending Node’s Error class in practice. These errors can raise issues specific to the application, for example – unauthorized access, unsuccessful payment, incorrect user input, etc. This allows developers to have more detailed information about the error conditions (through custom error messages and other properties), and therefore handle them better.
In our use case, let’s say we want to ensure that all the posts have a title of fewer than 100 characters and a body character count of fewer than 220 characters. If we don’t meet this condition, we want to raise a custom error message that alerts the developer about the same time.
Now that we have the error condition in mind, let’s create our custom error classes in the errors.js file.
// errors.js
class CharacterCountExceeded extends Error { // parent error
  constructor(post_id, content) {
      super();
      this.name = this.constructor.name // good practice

      if (this instanceof LongTitleError) // checking if title or body
          this.type = 'title'
      else if (this instanceof LongBodyError)
          this.type = 'body'

    this.message = `The character count of post (id: ${post_id}) ${this.type} is too long. (${content.length} characters)` // detailed error message
    this.statusCode = 500 // error code for responding to client
  }
}

// extending to child error classes
class LongTitleError extends CharacterCountExceeded { }
class LongBodyError extends CharacterCountExceeded { }

module.exports = {
    CharacterCountExceeded,
    LongTitleError,
    LongBodyError
}
First, we create one parent error class (CharacterCountExceeded) for all errors that involve an exceeded character count. The constructor for this class accepts the post’s ID and the content (of the title or body) to generate the required error message and specify an error code. Then we extend this class to create two more specific children classes (LongTitleError and LongBodyError) that refer to the particular error condition.
Now we will import these into our routes.js file, check for erroneous conditions inside our route handler, and throw these custom errors wherever required.
// routes.js
const express = require('express')
const fetch = require('node-fetch')
const router = express.Router()
const { LongTitleError, LongBodyError } = require('./errors');
router.get('/', (req, res) => {
res.send("Hello World!")
})
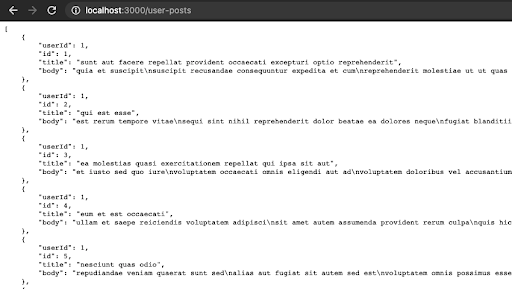
router.get('/user-posts', (req, res, next) => {
fetch('https://jsonplaceholder.typicode.com/posts')
.then(res => res.json())
.then(posts => {
for (post of posts) {
if (post.title.length > 100)
throw new LongTitleError(post.id, post.body)
if (post.body.length > 220)
throw new LongBodyError(post.id, post.body)
}
console.log(posts)
res.header("Content-Type", 'application/json')
res.send(JSON.stringify(posts, null, 4)) // pretty print
})
.catch(err => next(err))
})
router.get('/error', (req, res) => {
res.send("The URL you are trying to reach does not exist.")
})
module.exports = routerAs you can see here, we traverse through all the posts, check for their title and body’s character count, and throw our custom errors accordingly. Here’s the output:

It turns out there was one post that had a body size of more than 220 characters, and we successfully captured it. At the moment, we are forwarding all our errors through the catch block to Express’s default error handler middleware. But what’s the fun in that?
Let’s create our own middleware functions and use them as we like.
Step 5: Adding Custom Error Handler Middleware
We’ll use the middleware.js file that we created before.
// middleware.js
const errorLogger = (err, req, res, next) => {
  console.error('x1b[31m', err) // adding some color to our logs
  next(err) // calling next middleware
}

const errorResponder = (err, req, res, next) => {
  res.header("Content-Type", 'application/json')
  res.status(err.statusCode).send(JSON.stringify(err, null, 4)) // pretty print
}
const invalidPathHandler = (req, res, next) => {
  res.redirect('/error')
}

module.exports = { errorLogger, errorResponder, invalidPathHandler }
Here, we add three middleware functions – one for logging errors, one for sending the error to the client, and one for redirecting a user from an invalid route to an error landing page. Now let’s import these into our main file and use them in our application.
// index.js
const express = require('express')
const routes = require('./routes')
const { errorLogger, errorResponder, invalidPathHandler } = require('./middleware')

const app = express()
const port = 3000

app.use(routes)

// middleware
app.use(errorLogger)
app.use(errorResponder)
app.use(invalidPathHandler)

app.listen(port, () => {
console.log(`Example app listening at http://localhost:${port}`)
})
Now let’s open our browser and see whether the middleware handles our LongBody error the way it’s supposed to.
 |
| Console output: Error object logged in red using the errorLogger middleware. |
 |
| Server’s error response using the errorResponder middleware. |
 |
| Redirecting to the error landing page upon encountering an invalid path |
As you can see all our middleware functions are working as expected – in logging, responding to the client, and redirecting to the error landing page.
Wrapping it Up
We covered everything about error handling in Express.js – from default error handling of synchronous and asynchronous code to creating your own error classes and writing your own error-handling middleware functions.
Now go ahead and make sure to handle all your errors in your Express application in a clean, non-redundant, efficient, and easy to maintain way. And if you haven’t already, write your own middleware functions and play around with native and third-party ones to explore how they can be helpful for your applications. If you are serious about your application’s performance and want to spend less time debugging issues and more time building new features, consider checking out ScoutAPM for monitoring your Node.js app’s performance and get started with a 14-day free trial.
Don’t you hate it when you see an uncaughtException error pop up and crash your Node.js app?
Yeah… I feel you. Can anything be worse? Oh yeah, sorry, unhandledRejection I didn’t see you there. What a nightmare you are. 😬
I maintain all Node.js open-source repos at Sematext. A few of them can help you out with error handling, but more about that further down.
Here at Sematext, we take error handling seriously! I want to share a bit of that today.
I want to guide you through what I’ve learned so far about error handling in Node.js while working on open-source projects. Hopefully, it’ll help you improve your code, make it more robust, and ultimately help you step up your bug hunting, and help improve your general developer experience.
I don’t want you to have to stay up late and burn the midnight oil troubleshooting bugs. Ah! About that, here’s an epic song I really like!
What Is Error Handling in Node.js
I’ve heard a ton of my fellow developers say error handling in Node.js is way too hard. Well, I can’t lie. It’s not easy. But, I have to be fair and say it’s not that hard either once you set up centralized error handling.
What is an error anyhow? It’s a way to see bugs in your code. Following this logic, error handling is a way to find these bugs and solve them as quickly as humanly possible.
From this explanation, it’s obvious the hard part is setting up a good base for your error handling. It’s all about keeping you sane at the end of the day. Handling errors properly means developing a robust codebase and reducing development time by finding bugs and errors easily.
Why Do You Need Error Handling
Why? For your own sanity. You want to make bug fixing less painful. It helps you write cleaner code. It centralizes all errors and lets you enable alerting and notifications so you know when and how your code breaks.
Types of Errors: Operational vs. Programmer Errors
Would you believe me when I said not all errors are caused by humans? Don’t get me wrong, most still are, but not all of them! Errors can be Operational and Programmer errors.
Operational Errors
Operational errors represent runtime problems. These errors are expected in the Node.js runtime and should be dealt with in a proper way. This does not mean the application itself has bugs. It means they need to be handled properly. Here’s a list of common operational errors:
- failed to connect to server
- failed to resolve hostname
- invalid user input
- request timeout
- server returned a 500 response
- socket hang-up
- system is out of memory
Programmer Errors
Programmer errors are what we call bugs. They represent issues in the code itself. Here’s a common one for Node.js, when you try reading a property of an undefined object. It’s a classic case of programmer error. Here are a few more:
- called an asynchronous function without a callback
- did not resolve a promise
- did not catch a rejected promise
- passed a string where an object was expected
- passed an object where a string was expected
- passed incorrect parameters in a function
Now you understand what types of errors you’ll be facing, and how they are different. Operational errors are part of the runtime and application while programmer errors are bugs you introduce in your codebase.
Now you’re thinking, why do we divide them into two categories? It’s simple really.
Do you want to restart your app if there’s a user not found error? Absolutely not. Other users are still enjoying your app. This is an example of an operational error.
What about failing to catch a rejected promise? Does it make sense to keep the app running even when a bug threatens your app? No! Restart it.
What Is an Error Object?
The error object is a built-in object in the Node.js runtime. It gives you a set of info about an error when it happens. The Node.js docs have a more in-depth explanation.
A basic error looks like this:
const error = new Error("An error message")
console.log(error.stack)
It has an error.stack field that gives you a stack trace showing where the error came from. It also lists all functions that were called before the error occurred. The error.stack field is optimal to use while debugging as it prints the error.message as well.
How Do You Handle Errors in Node.js: Best Practices You Should Follow
From my experience, there are a few best practices that will make it easier to handle errors in Node.js.
You can handle errors in callbacks. There are some serious drawbacks to using callbacks because it creates a nested “callback hell”. It’s notoriously hard to debug and fix errors if you need to look for them in nested functions.
A better way is to use async/await and try-catch statements, or .catch() errors in promises.
Let me show you what I mean.
1. Use Custom Errors to Handle Operational Errors
With the async/await pattern you can write code that looks synchronous, but actually is asynchronous.
const anAsyncTask = async () => {
 try {
 const user = await getUser()
 const cart = await getCart(user)

 return cart
 } catch (error) {
 console.error(error)
 } finally {
 await cleanUp()
 }
}
This pattern will clean up your code and avoid the dreaded callback hell.
You can use the built-in Error object in Node.js as I mentioned above, as it gives you detailed info about stack traces.
However, I also want to show you how to create custom Error objects with more meaningful properties like HTTP status codes and more detailed descriptions.
Here’s a file called baseError.js where you set the base for every custom error you’ll use.
// baseError.js

class BaseError extends Error {
 constructor (name, statusCode, isOperational, description) {
 super(description)

 Object.setPrototypeOf(this, new.target.prototype)
 this.name = name
 this.statusCode = statusCode
 this.isOperational = isOperational
 Error.captureStackTrace(this)
 }
}

module.exports = BaseError
Also create an httpStatusCodes.js file to keep a map of all status codes you want to handle.
// httpStatusCodes.js

const httpStatusCodes = {
 OK: 200,
 BAD_REQUEST: 400,
 NOT_FOUND: 404,
 INTERNAL_SERVER: 500
}

module.exports = httpStatusCodes
Then, you can create an api404Error.js file, and extend the BaseError with a custom error for handling 404s.
// api404Error.js

const httpStatusCodes = require('./httpStatusCodes')
const BaseError = require('./baseError')

class Api404Error extends BaseError {
 constructor (
 name,
 statusCode = httpStatusCodes.NOT_FOUND,
 description = 'Not found.',
 isOperational = true
 ) {
 super(name, statusCode, isOperational, description)
 }
}

module.exports = Api404Error
How do you use it? Throw it in your code when you want to handle 404 errors.
const Api404Error = require('./api404Error')

...
const user = await User.getUserById(req.params.id)
if (user === null) {
 throw new Api404Error(`User with id: ${req.params.id} not found.`)
}
...
You can duplicate this code for any custom error, 500, 400, and any other you want to handle.
2. Use a Middleware
Once you have a set of custom errors, you can configure centralized error handling. You want to have a middleware that catches all errors. There you can decide what to do with them and where to send them if they need to notify you via an alert notification.
In your API routes you’ll end up using the next() function to forward errors to the error handler middleware.
Let me show you.
...
app.post('/user', async (req, res, next) => {
 try {
const newUser = User.create(req.body)
 } catch (error) {
 next(error)
 }
})
...
The next() function is a special function in Express.js middlewares that sends values down the middleware chain. At the bottom of your routes files you should have a .use() method that uses the error handler middleware function.
const { logError, returnError } = require('./errorHandler')

app.use(logError)
app.use(returnError)
The error handler middleware should have a few key parts. You should check if the error is operational, and decide which errors to send as alert notifications so you can debug them in more detail. Here’s what I suggest you add to your error handler.
function logError (err) {
 console.error(err)
}

function logErrorMiddleware (err, req, res, next) {
 logError(err)
 next(err)
}

function returnError (err, req, res, next) {
 res.status(err.statusCode || 500).send(err.message)
}

function isOperationalError(error) {
 if (error instanceof BaseError) {
 return error.isOperational
 }
 return false
}

module.exports = {
 logError,
 logErrorMiddleware,
 returnError,
 isOperationalError
}
3. Restart Your App Gracefully to Handle Programmer Errors
Everything I’ve explained so far has been related to operational errors. I’ve shown how to gracefully handle expected errors and how to send them down the middleware chain to a custom error handling middleware.
Let’s jump into programmer errors now. These errors can often cause issues in your apps like memory leaks and high CPU usage. The best thing to do is to crash the app and restart it gracefully by using the Node.js cluster mode or a tool like PM2. I wrote another article where I describe in detail how to detect Node.js memory leaks using various solutions.
4. Catch All Uncaught Exceptions
When unexpected errors like these happen, you want to handle it immediately by sending a notification and restarting the app to avoid unexpected behavior.
const { logError, isOperationalError } = require('./errorHandler')

...
process.on('uncaughtException', error => {
 logError(error)

 if (!isOperationalError(error)) {
 process.exit(1)
 }
})
...
5. Catch All Unhandled Promise Rejections
Promise rejections in Node.js only cause warnings. You want them to throw errors, so you can handle them properly.
It’s good practice to use fallback and subscribe to:
process.on('unhandledRejection', callback)
This lets you throw an error properly.
Here’s what the error handling flow should look like.
...
const user = User.getUserById(req.params.id)
 .then(user => user)
 // missing a .catch() block
...

// if the Promise is rejected this will catch it
process.on('unhandledRejection', error => {
 throw error
})

process.on('uncaughtException', error => {
 logError(error)

 if (!isOperationalError(error)) {
 process.exit(1)
 }
})
6. Use a Centralized Location for Logs and Error Alerting
I recently wrote a detailed tutorial about Node.js logging best practices you should check out.
The gist of it is to use structured logging to print errors in a formatted way and send them for safekeeping to a central location, like Sematext Logs, our log management tool.
It’ll help with your sanity and persist the logs over time, so you can go back and troubleshoot issues whenever things break.
To do this, you should use loggers like winston and morgan. Additionally, you can add winston-logsene to send the logs to Sematext right away.
First, create a setup for winston and winston-logsene. Create a loggers directory and a logger.js file. Paste this into the file.
// logger.js

const winston = require('winston')
const Logsene = require('winston-logsene')

const options = {
 console: {
 level: 'debug',
 handleExceptions: true,
 json: false,
 colorize: true
 },
 logsene: {
 token: process.env.LOGS_TOKEN,
 level: 'debug',
 type: 'app_logs',
 url: 'https://logsene-receiver.sematext.com/_bulk'
 }
}

const logger = winston.createLogger({
 levels: winston.config.npm.levels,
 transports: [
 new winston.transports.Console(options.console),
 new Logsene(options.logsene)
 ],
 exitOnError: false
})

module.exports = logger
The good thing with this is that you get JSON formatted logs you can analyze to get more useful information about your app. You’ll also get all logs forwarded to Sematext. This will alert you whenever errors occur. That’s pretty awesome!
Furthermore, you should add an httpLogger.js file in the loggers directory and add morgan and morgan-json to print out access logs. Paste this into the httpLogger.js:
const morgan = require('morgan')
const json = require('morgan-json')
const format = json({
 method: ':method',
 url: ':url',
 status: ':status',
 contentLength: ':res[content-length]',
 responseTime: ':response-time'
})

const logger = require('./logger')
const httpLogger = morgan(format, {
 stream: {
 write: (message) => {
 const {
 method,
 url,
 status,
 contentLength,
 responseTime
 } = JSON.parse(message)

 logger.info('HTTP Access Log', {
 timestamp: new Date().toString(),
 method,
 url,
 status: Number(status),
 contentLength,
 responseTime: Number(responseTime)
 })
 }
 }
})

module.exports = httpLogger
In your app.js file you can now require both the logger.js and httpLogger.js, and use the logger instead of console.log().
// app.js

const logger = require('./loggers/logger')
const httpLogger = require('./loggers/httpLogger')
...

app.use(httpLogger)
...
In your errorHandler.js you can now replace all console.error() statements with logger.error() to persist the logs in Sematext.
// errorHandler.js

const logger = require('../loggers/logger')
const BaseError = require('./baseError')

function logError (err) {
 logger.error(err)
}

function logErrorMiddleware (err, req, res, next) {
 logError(err)
 next(err)
}

function returnError (err, req, res, next) {
 res.status(err.statusCode || 500).send(err.message)
}

function isOperationalError(error) {
 if (error instanceof BaseError) {
 return error.isOperational
 }
 return false
}

module.exports = {
 logError,
 logErrorMiddleware,
 returnError,
 isOperationalError
}
That’s it. You now know how to properly handle errors!
However, I do want to cover how to deliver errors. Should you be throwing them, passing errors in callback functions or promise rejections, or emit an “error” event via an EventEmitter.
How to Deliver Errors: Function Patterns
Let’s go over the four main ways to deliver an error in Node.js:
- throw the error (making it an exception).
- pass the error to a callback, a function provided specifically for handling errors and the results of asynchronous operations
- pass the error to a reject Promise function
- emit an “error” event on an EventEmitter
We’ve talked about how to handle errors, but when you’re writing a new function, how do you deliver errors to the code that called your function?
Throwing Errors
When you throw an error it unwinds the entire function call stack ignoring any functions you have on the stack. It gets delivered synchronously, in the same context where the function was called.
If you use a try-catch block you can handle the error gracefully. Otherwise, the app usually crashes, unless you have a fallback for catching Uncaught Exceptions as I explained above.
Here’s an example of throwing an error and handling it in a try-catch block:
const getUserWithAsyncAwait = async (id) => {
 try {
 const user = await getUser(id)
 if (!user) {
 throw new 404ApiError('No user found.')
 }

 return user
 } catch (error) {
 // handle the error
 logError(error)
 }
}

const user = await getUserWithAsyncAwait(1)

...
Using Callback
Callbacks are the most basic way of delivering an error asynchronously. The user passes you a function – the callback, and you invoke it sometime later when the asynchronous operation completes. The usual pattern is that the callback is invoked as callback(err, result), where only one of err and result is non-null, depending on whether the operation succeeded or failed.
Callbacks have been around for ages. It’s the oldest way of writing asynchronous JavaScript code. It’s also the oldest way of delivering errors asynchronously.
You pass a callback function as a parameter to the calling function, which you later invoke when the asynchronous function completes executing.
The usual pattern looks like this:
callback(err, result)
The first parameter in the callback is always the error.
Inside the callback function, you’ll then first check if the error exists and only if it’s a non-null value you continue executing the callback function.
function getUserWithCallback(id, callback) {
 getUser(id, function(user) {
 if (!user) {
 return callback(new 404ApiError('No user found.'))
 }

 callback(null, user)
 })
}

getUserWithCallback(1, function(err, user) {
 if (err) {
 // handle the error
 logError(error)
 }

 const user = user
 ...
})
Using Promises
Promises have replaced callbacks as the new and improved way of writing asynchronous code.
This pattern has become the new norm since Node.js version 8 that included async/await out of the box. Asynchronous code can be written to look like synchronous code. Catch errors can be done by using try-catch.
function getUserWithPromise(id) {
 return new Promise((resolve, reject) => {
 getUser(id, function(user) {
 if (!user) {
 return reject(new 404ApiError('No user found.'))
 }

 resolve(user)
 })
 })
}

getUserWithPromise(1)
 .then(user => {
 const user = user
 ...
 })
 .catch(err => {
 logError(error)
 })
Using EventEmitter
Ready for some more complicated use cases?
In some cases, you can’t rely on promise rejection or callbacks. What if you’re reading files from a stream. Or, fetching rows from a database and reading them as they arrive. A use case I see on a daily basis is streaming log lines and handling them as they’re coming in.
You can’t rely on one error because you need to listen for error events on the EventEmitter object.
In this case, instead of returning a Promise, your function would return an EventEmitter and emit row events for each result, an end event when all results have been reported, and an error event if any error is encountered.
Here’s a code sample from Logagent, an open-source log shipper I maintain. The socket value is an EventEmitter object.
net.createServer(socket => {
...

 socket
 .on('data', data => {
 ...

 })
 .on('end', result => {
 …

 })
 .on('error', console.error) // handle multiple errors
}
Throw, Callback, Promises, or EventEmitter: Which Pattern Is the Best?
Now, we’ve finally come to the verdict, when should you throw errors, and when do you use promise rejections or EventEmitters?
For operational errors, you should use Promise rejections or a try-catch block with async/await. You want to handle these errors asynchronously. It works well and is widely used.
If you have a more complicated case like I explained above, you should use an event emitter instead.
You want to explicitly throw errors if unwinding the whole call stack is needed. This can mean when handling programmer errors and you want the app to restart.
How to Write Functions for Efficient Error Handling
Whatever you do, choose one way to deliver operational errors. You can throw errors and deliver them synchronously, or asynchronously by using Promise rejections, passing them in callbacks, or emitting errors on an EventEmitter.
After setting up centralized error handling, the next logical step is to use a central location for your logs that also gives you error alerting.
Sematext Logs provides log management and error alerting to help analyze logs and debug and fix errors and exceptions. Definitely check it out and try it yourself. But you can also take a look at the lists where we compare the best log management tools, log analysis software, and cloud logging services available today.
Closing Thoughts
In this tutorial, I wanted to give you a way to handle the dreaded unhandledException and unhandledRejection errors in Node.js apps. I hope it was useful to you and that you’ll use what you learned today in your own apps.
Alongside this, I also explained a few best practices about error handling, like how to set up centralized error handling with middlewares and use a central location for your error logs. Don’t forget that logging frameworks like winston and morgan are crucial for this to work.
Lastly, I explained a few different ways of delivering errors, either with throw or with Promise .reject(), callback functions or the .on(‘error’) event on an EventEmitter.
I’ve tried to share all the knowledge I’ve gained over the last few years while maintaining open-source repos to keep you from making the same mistakes I’ve made in the past. Best of luck!
If you ever need alerting, error handling, and log management for your production apps, check us out.
Developers building Blazor applications should be aware of how the framework deals with exceptions, and what steps to take in order to maximize reliability and to detect and diagnose errors.
To recap, server-side Blazor is a stateful framework. For as long as users are interacting with your application, they maintain a connection to the server known as a circuit. The circuit holds all the active component instances, plus many other aspects of state such as the components’ most recent render output and the current set of event-handling delegates that could be triggered by client-side events. If a user opens your application in multiple browser tabs, then they have multiple independent circuits.
As a high-level principle, Blazor treats most unhandled exceptions as fatal to that circuit. If a circuit is terminated due to an unhandled exception, the user can only continue by reloading the page to create a new circuit and starting again, although other circuits (e.g., those for other users, or other browser tabs) would not be affected. This is very similar to a desktop application crashing: that application must be restarted, but other applications would not be affected.
The reason for treating most unhandled exceptions as fatal to the circuit is that they could leave the circuit in an undefined state. If the framework attempted to continue regardless, the application’s normal operations could not be guaranteed and it may even lead to security issues.
So, if you want your users to be able to continue after errors occur (for example, when loading or saving data), you need to add suitable error handling logic (for example, using try/catch). This document describes the places where you should consider doing that.
Logging errors
If an unhandled exception does occur, it will be logged to the ILogger configured in your dependency injection system. By default this is only logged to the console output, so you may wish to consider directing the logs to a more permanent location. For more information about this, see documentation about logging in ASP.NET Core.
During development, Blazor will send full details of exceptions to your browser console to aid debugging when possible. In production, detailed errors are disabled by default, which means they are not sent to clients but their full details will still be logged. For more information, see the general error handling documentation for ASP.NET Core.
Places where errors may occur
Depending on your application logic, your code may trigger unhandled exceptions in any of the following places.
Component instantiation
When Blazor creates instances of your components, it invokes their constructors, as well as constructors for any DI services being supplied to them via @inject or the [Inject] attribute. If any of these constructors throws an exception, or if the setters for [Inject] properties throw exceptions, this is fatal to the circuit because it’s impossible for the framework to carry out the intentions of the developer.
Lifecycle methods
During the lifetime of components, Blazor invokes lifecycle methods on components such as OnInitialized, OnParametersSet, ShouldRender, OnAfterRender, and the ...Async versions of these. If any of these lifecycle methods throws an exception, synchronously or asynchronously, this is fatal to the circuit because the framework no longer knows whether or how to render that component.
If you want your components to deal with errors, be sure to add suitable error handling logic. For example, in a component file called ProductDetails.razor,
@page "/product-details/{ProductId:int}"
@using Microsoft.Extensions.Logging
@inject IProductRepository ProductRepository
@inject ILogger<ProductDetails> Logger

@if (details != null)
{
    <h1>@details.ProductName</h1>
    <p>@details.Description</p>
}
else if (loadFailed)
{
    <h1>Sorry, we could not load this product due to an error.</h1>
}
else
{
    <h1>Loading...</h1>
}

@functions {
    [Parameter] public int ProductId { get; set; }

    ProductDetails details;
    bool loadFailed;

    protected override async Task OnParametersSetAsync()
    {
        try
        {
            loadFailed = false;
            details = await ProductRepository.GetProductByIdAsync(ProductId);
        }
        catch (Exception ex)
        {
            loadFailed = true;
            Logger.LogWarning(ex, "Failed to load product {ProductId}", ProductId);
        }
    }
}
It’s up to you to decide whether to log such incidents, and with what level of severity. Bear in mind that hostile users might be able to trigger these errors deliberately (e.g., by supplying an unknown ProductId in the URL), so you should not necessarily treat them all as high-severity incidents.
Be careful not to disclose sensitive information to end users. For example, you should not normally render exception messages or stack traces in the UI when your application is running in production, as doing so may help a malicious user discover how better to harm you.
Rendering logic
The declarative markup in a .razor file is compiled into a C# method called BuildRenderTree. Whenever your component renders, that method executes and builds up a data structure describing the elements, text, and child components being output by your component.
It’s possible for your rendering logic to throw exceptions, for example if you try to evaluate an expression such as @someObject.PropertyName when @someObject is null. Unhandled exceptions thrown by rendering logic are fatal to the circuit, so be careful not to let this happen in production. This is just the same as in any other C# code. For example, to avoid a null reference exception you could use logic similar to the following:
@if (person.Address != null)
{
    <div>@person.Address.Line1</div>
    <div>@person.Address.Line2</div>
    <div>@person.Address.City</div>
    <div>@person.Address.Country</div>
}
This code still assumes that @person will not be null. Often you will know whether or not certain data will necessarily already be populated at the time you are rendering it.
Event handlers
When you set up event handlers using @onclick, @onchange, etc., or when you use @bind, you create the ability for client-side code to trigger invocations of your C# code. Your event handler code might throw an unhandled exception.
If an event handler throws an unhandled exception, it is fatal to the circuit because the framework cannot carry out the developer’s intentions. As such, if you know you are calling code that could fail for external reasons (e.g., database queries) then you need to add suitable try/catch logic and whatever error handling and logging you want. Otherwise by default, the framework will log the exception and terminate the circuit.
Component disposal
When a component that implements System.IDisposable is removed from the UI, for example because the user has navigated to another page, the framework will call its Dispose method.
If the component’s Dispose method throws an unhandled exception, this is treated as fatal to the circuit. If you know that your disposal logic may throw exceptions, then be sure to add suitable try/catch logic and whatever error handling and logging you want.
JavaScript interop
Blazor supplies a DI service, IJSRuntime, with a method InvokeAsync<T> that allows .NET code to make asynchronous calls to the JavaScript runtime in the user’s browser. For more details, see documentation about JavaScript interop. Here are some details about error handling in InvokeAsync<T>:
-
If a call to
InvokeAsync<T>fails synchronously, for example because the supplied arguments cannot be serialized, this results in a .NET exception. It’s up to your code to catch that exception if you wish to handle it. If you don’t handle it, it will result in an unhandled exception on whichever event handler or component lifecycle method made the call, which may be fatal to the circuit. -
If a call to
InvokeAsync<T>fails asynchronously, for example because the JavaScript-side code threw an exception or returned a promise that completed as rejected, this results in the .NETTaskfailing. It’s up to your code to handle this however you wish: if you’re usingawait, then you should consider wrapping it intry/catchlogic otherwise it will result in an unhandled exception. -
By default, calls to
InvokeAsync<T>must complete within a certain period or will time out. The default timeout period is one minute. This is to protect your code against network connectivity loss, or misbehaving JavaScript code that might choose never to send back a completion message. If the call times out, the resultingTaskwill fail with anOperationCanceledException.
Similarly, it’s possible for JavaScript code to initiate calls to .NET methods indicated by the [JSInvokable] attribute. If those .NET methods throw an unhandled exception, it is not treated as fatal to the circuit, but instead simply causes the JavaScript-side Promise to be rejected. This gives you the option to put error handling code on either the .NET side or the JavaScript side.
Circuit handlers
Blazor allows your code to define a circuit handler, which receives notifications when the state of a user’s circuit changes between initialized, connected, disconnected, and disposed. This is achieved by registering a DI service that inherits from the CircuitHandler abstract base class.
If a custom circuit handler’s methods throw an unhandled exception, this is treated as fatal to the circuit, so if you need to tolerate failures in whatever code you are invoking, you should use try/catch and implement whatever error handling and logging you want.
Circuit disposal
When a circuit finally ends because a user has disconnected and the circuit state is being cleaned up be the framework, the framework will dispose the circuit’s DI scope, which in turn will dispose any circuit-scoped DI services that implement IDisposable. If any of the DI services throws an unhandled exception during disposal, this will be logged.
Prerendering
You can prerender Blazor components using the API Html.RenderComponentAsync so that their rendered HTML markup is returned as part of the user’s initial HTTP request. This works by creating a new circuit containing all the components being prerendered as part of the same page, generating the initial HTML, then treating that circuit as «disconnected» until the user’s browser establishes a SignalR connection back to the same server to resume interactivity on that circuit.
If any of your components throw an unhandled exception while being prerendered (e.g., during their lifecycle methods or rendering logic), this is treated as fatal to the circuit. Additionally, the exception will be thrown up the call stack from the Html.RenderComponentAsync call, so the entire HTTP request will fail unless you specificially catch this exception.
It doesn’t normally make sense to try to continue if prerendering fails, since you cannot produce any working UI for the user. If you need to tolerate certain errors that may occur during prerendering, you must place error handling logic inside the components that may throw these exceptions (for example, use try/catch and implement suitable logic to log errors and display an error state to the user).
Caveats for advanced scenarios
Recursive rendering
Components may be nested recursively. This is useful, for example, to represent recursive data structures such as trees — you might have a <TreeNode> component that also renders more <TreeNode> components for each of the node’s children.
However, you must take care not to create infinite recursion. This would happen if you recursively render a data structure that contains a cycle (e.g., a tree node whose children includes itself), or if you have a chain of layouts that contains a cycle (e.g., a layout whose layout is itself).
Infinite loops during rendering will cause the rendering process to continue forever. It’s equivalent to having an unterminated loop. The affected circuit will hang, and the thread will consume as much CPU time as possible, indefinitely. It may also consume an unlimited amount of server memory, equivalent to the scenario where an unterminated loop adds entries to a collection on every iteration.
Be careful not to create this situation. To avoid it, ensure that any recursive rendering contains suitable stopping conditions or enforces invariants, for example that a tree structure does not contain cycles. Do not allow an end user to violate invariants such as these through malicious data entry or JavaScript interop calls.
Custom render tree logic
Most Blazor components are implemented as .razor files, which are then compiled to produce logic that operates on a RenderTreeBuilder to render their output. However it’s also possible to implement RenderTreeBuilder logic manually using procedural C# code.
Manual render tree builder logic is considered an advanced and unsafe scenario. If you choose to write such low-level code, the responsibility is on you to guarantee the correctness of your code. For example, you must ensure that calls to OpenElement and CloseElement are correctly balanced, and that attributes are added only in the correct places. Incorrect manual render tree builder logic can cause arbitrary undefined behavior, including crashes, server hangs, or security issues. You should think of it as being like writing assembly code or MSIL instructions by hand.
This documentation explains how you can handle development, server-side, and client-side errors.
Handling Errors in Development
When there is a runtime error during the development phase of your Next.js application, you will encounter an overlay. It is a modal that covers the webpage. It is only visible when the development server runs using next dev, npm run dev, or yarn dev and not in production. Fixing the error will automatically dismiss the overlay.
Here is an example of an overlay:
Handling Server Errors
Next.js provides a static 500 page by default to handle server-side errors that occur in your application. You can also customize this page by creating a pages/500.js file.
Having a 500 page in your application does not show specific errors to the app user.
You can also use 404 page to handle specific runtime error like file not found.
Handling Client Errors
React Error Boundaries is a graceful way to handle a JavaScript error on the client so that the other parts of the application continue working. In addition to preventing the page from crashing, it allows you to provide a custom fallback component and even log error information.
To use Error Boundaries for your Next.js application, you must create a class component ErrorBoundary and wrap the Component prop in the pages/_app.js file. This component will be responsible to:
- Render a fallback UI after an error is thrown
- Provide a way to reset the Application’s state
- Log error information
You can create an ErrorBoundary class component by extending React.Component. For example:
class ErrorBoundary extends React.Component {
  constructor(props) {
    super(props)

    // Define a state variable to track whether is an error or not
    this.state = { hasError: false }
  }
  static getDerivedStateFromError(error) {
    // Update state so the next render will show the fallback UI

    return { hasError: true }
  }
  componentDidCatch(error, errorInfo) {
    // You can use your own error logging service here
    console.log({ error, errorInfo })
  }
  render() {
    // Check if the error is thrown
    if (this.state.hasError) {
      // You can render any custom fallback UI
      return (
        <div>
          <h2>Oops, there is an error!</h2>
          <button
            type="button"
            onClick={() => this.setState({ hasError: false })}
          >
            Try again?
          </button>
        </div>
      )
    }

    // Return children components in case of no error

    return this.props.children
  }
}

export default ErrorBoundary
The ErrorBoundary component keeps track of an hasError state. The value of this state variable is a boolean. When the value of hasError is true, then the ErrorBoundary component will render a fallback UI. Otherwise, it will render the children components.
After creating an ErrorBoundary component, import it in the pages/_app.js file to wrap the Component prop in your Next.js application.
// Import the ErrorBoundary component
import ErrorBoundary from '../components/ErrorBoundary'

function MyApp({ Component, pageProps }) {
  return (
    // Wrap the Component prop with ErrorBoundary component
    <ErrorBoundary>
      <Component {...pageProps} />
    </ErrorBoundary>
  )
}

export default MyApp
You can learn more about Error Boundaries in React’s documentation.
Reporting Errors
To monitor client errors, use a service like Sentry, Bugsnag or Datadog.
It is not hard to see that some people are struggling to handle errors, and some are even totally missing it. Handling errors properly means not only reducing the development time by finding bugs and errors easily but also developing a robust codebase for large-scale applications.
In particular, Node.js developers sometimes find themselves working with not-so-clean code while handling various kinds of errors, incorrectly applying the same logic everywhere to deal with them. They just keep asking themselves “Is Node.js bad at handling errors?” or If not, how to handle them?” My answer to them is “No, Node.js is not bad at all. That depends on us developers.”
Here is one of my favorite solutions for that.
Types of Errors in Node.js
First of all, it is necessary to have a clear understanding of errors in Node.js. In general, Node.js errors are divided into two distinct categories: operational errors and programmer errors.
- Operational errors represent runtime problems whose results are expected and should be dealt with in a proper way. Operational errors don’t mean the application itself has bugs, but developers need to handle them thoughtfully. Examples of operational errors include “out of memory,” “an invalid input for an API endpoint,” and so on.
- Programmer errors represent unexpected bugs in poorly written code. They mean the code itself has some issues to solve and was coded wrong. A good example is to try to read a property of “undefined.” To fix the issue, the code has to be changed. That is a bug a developer made, not an operational error.
With that in mind, you should have no problem distinguishing between these two categories of errors: Operational errors are a natural part of an application, and programmer errors are bugs caused by developers. A logical question that follows is: “Why is it useful to divide them into two categories and deal with them?”
Without a clear understanding of errors, you might feel like restarting an application whenever an error occurs. Does it make sense to restart an application due to “File Not Found” errors when thousands of users are enjoying the application? Absolutely not.
But what about programmer errors? Does it make sense to keep an application running when an unknown bug appears that could result in an unexpected snowball effect in the application? Again, definitely not!
It’s Time to Handle Errors Properly
Assuming you have some experience with async JavaScript and Node.js, you might have experienced drawbacks when using callbacks for dealing with errors. They force you to check errors all the way down to nested ones, causing notorious “callback hell” issues that make it hard to follow the code flow.
Using promises or async/await is a good replacement for callbacks. The typical code flow of async/await looks like the following:
const doAsyncJobs = async () => {
 try {
   const result1 = await job1();
   const result2 = await job2(result1);
   const result3 = await job3(result2);
   return await job4(result3);
 } catch (error) {
   console.error(error);
 } finally {
   await anywayDoThisJob();
 }
}
Using Node.js built-in Error object is a good practice because it includes intuitive and clear information about errors like StackTrace, which most developers depend on to keep track of the root of an error. And additional meaningful properties like HTTP status code and a description by extending the Error class will make it more informative.
class BaseError extends Error {
 public readonly name: string;
 public readonly httpCode: HttpStatusCode;
 public readonly isOperational: boolean;

 constructor(name: string, httpCode: HttpStatusCode, description: string, isOperational: boolean) {
   super(description);
   Object.setPrototypeOf(this, new.target.prototype);

   this.name = name;
   this.httpCode = httpCode;
   this.isOperational = isOperational;

   Error.captureStackTrace(this);
 }
}

//free to extend the BaseError
class APIError extends BaseError {
 constructor(name, httpCode = HttpStatusCode.INTERNAL_SERVER, isOperational = true, description = 'internal server error') {
   super(name, httpCode, isOperational, description);
 }
}
I only implemented some HTTP status codes for the sake of simplicity, but you are free to add more later.
export enum HttpStatusCode {
 OK = 200,
 BAD_REQUEST = 400,
 NOT_FOUND = 404,
 INTERNAL_SERVER = 500,
}
There is no need to extend BaseError or APIError, but it is okay to extend it for common errors according to your needs and personal preferences.
class HTTP400Error extends BaseError {
 constructor(description = 'bad request') {
   super('NOT FOUND', HttpStatusCode.BAD_REQUEST, true, description);
 }
}
So how do you use it? Just throw this in:
...
const user = await User.getUserById(1);
if (user === null)
 throw new APIError(
   'NOT FOUND',
   HttpStatusCode.NOT_FOUND,
   true,
   'detailed explanation'
 );
Centralized Node.js Error-handling
Now, we are ready to build the main component of our Node.js error-handling system: the centralized error-handling component.
It is usually a good idea to build a centralized error-handling component in order to avoid possible code duplications when handling errors. The error-handling component is in charge of making the caught errors understandable by, for example, sending notifications to system admins (if necessary), transferring events to a monitoring service like Sentry.io, and logging them.
Here is a basic workflow for dealing with errors:

In some parts of the code, errors are caught to transfer to an error-handling middleware.
...
try {
 userService.addNewUser(req.body).then((newUser: User) => {
   res.status(200).json(newUser);
 }).catch((error: Error) => {
   next(error)
 });
} catch (error) {
 next(error);
}
...
The error-handling middleware is a good place to distinguish between error types and send them to the centralized error-handling component. Knowing the basics about handling errors in Express.js middleware would certainly help.
app.use(async (err: Error, req: Request, res: Response, next: NextFunction) => {
 if (!errorHandler.isTrustedError(err)) {
   next(err);
 }
 await errorHandler.handleError(err);
});
By now, one can imagine what the centralized component should look like because we have already used some of its functions. Bear in mind that it is totally up to you how to implement it, but it might look like the following:
class ErrorHandler {
 public async handleError(err: Error): Promise<void> {
   await logger.error(
     'Error message from the centralized error-handling component',
     err,
   );
   await sendMailToAdminIfCritical();
   await sendEventsToSentry();
 }

 public isTrustedError(error: Error) {
   if (error instanceof BaseError) {
     return error.isOperational;
   }
   return false;
 }
}
export const errorHandler = new ErrorHandler();
Sometimes, the output of the default “console.log” makes it difficult to keep track of errors. Rather, it could be much better to print errors in a formatted way so that developers can quickly understand the issues and make sure they are fixed.
Overall, this will save developers time making it easy to keep track of errors and handle them by increasing their visibility. It is a good decision to employ a customizable logger like winston or morgan.
Here is a customized winston logger:
const customLevels = {
 levels: {
   trace: 5,
   debug: 4,
   info: 3,
   warn: 2,
   error: 1,
   fatal: 0,
 },
 colors: {
   trace: 'white',
   debug: 'green',
   info: 'green',
   warn: 'yellow',
   error: 'red',
   fatal: 'red',
 },
};

const formatter = winston.format.combine(
 winston.format.colorize(),
 winston.format.timestamp({ format: 'YYYY-MM-DD HH:mm:ss' }),
 winston.format.splat(),
 winston.format.printf((info) => {
   const { timestamp, level, message, ...meta } = info;

   return `${timestamp} [${level}]: ${message} ${
     Object.keys(meta).length ? JSON.stringify(meta, null, 2) : ''
   }`;
 }),
);

class Logger {
 private logger: winston.Logger;

 constructor() {
   const prodTransport = new winston.transports.File({
     filename: 'logs/error.log',
     level: 'error',
   });
   const transport = new winston.transports.Console({
     format: formatter,
   });
   this.logger = winston.createLogger({
     level: isDevEnvironment() ? 'trace' : 'error',
     levels: customLevels.levels,
     transports: [isDevEnvironment() ? transport : prodTransport],
   });
   winston.addColors(customLevels.colors);
 }

 trace(msg: any, meta?: any) {
   this.logger.log('trace', msg, meta);
 }

 debug(msg: any, meta?: any) {
   this.logger.debug(msg, meta);
 }

 info(msg: any, meta?: any) {
   this.logger.info(msg, meta);
 }

 warn(msg: any, meta?: any) {
   this.logger.warn(msg, meta);
 }

 error(msg: any, meta?: any) {
   this.logger.error(msg, meta);
 }

 fatal(msg: any, meta?: any) {
   this.logger.log('fatal', msg, meta);
 }
}

export const logger = new Logger();
What it basically provides is logging at multiple different levels in a formatted way, with clear colors, and logging into different output media according to the runtime environment. The good thing with this is you can watch and query logs by using winston’s built-in APIs. Furthermore, you can use a log analysis tool to analyze the formatted log files to get more useful information about the application. It’s awesome, isn’t it?
Up to this point, we mostly discussed dealing with operational errors. How about programmer errors? The best way to deal with these errors is to crash immediately and restart gracefully with an automatic restarter like PM2—the reason being that programmer errors are unexpected, as they are actual bugs that might cause the application to end up in a wrong state and behave in an unexpected way.
process.on('uncaughtException', (error: Error) => {
 errorHandler.handleError(error);
 if (!errorHandler.isTrustedError(error)) {
   process.exit(1);
 }
});
Last but not least, I am going to mention dealing with unhandled promise rejections and exceptions.
You might find yourself spending a lot of time dealing with promises when working on Node.js/Express applications. It is not hard to see warning messages about unhandled promise rejections when you forget to handle rejections.
The warning messages don’t do much except logging, but it is a good practice to use a decent fallback and subscribe to process.on(‘unhandledRejection’, callback).
The typical error-handling flow might look like the following:
// somewhere in the code
...
User.getUserById(1).then((firstUser) => {
  if (firstUser.isSleeping === false) throw new Error('He is not sleeping!');
});
...

// get the unhandled rejection and throw it to another fallback handler we already have.
process.on('unhandledRejection', (reason: Error, promise: Promise<any>) => {
 throw reason;
});

process.on('uncaughtException', (error: Error) => {
 errorHandler.handleError(error);
 if (!errorHandler.isTrustedError(error)) {
   process.exit(1);
 }
});
Wrapping Up
When all is said and done, you should realize that error-handling is not an optional extra but rather an essential part of an application, both in the development stage and in production.
The strategy of handling errors in a single component in Node.js will ensure developers save valuable time and write clean and maintainable code by avoiding code duplication and missing error context.
I hope you enjoyed reading this article and found the discussed error-handling workflow and implementation helpful for building a robust codebase in Node.js.
Further Reading on the Toptal Engineering Blog:
- Using Express.js Routes for Promise-based Error Handling
Understanding the basics
-
Why is error-handling important?
Proper error-handling makes apps robust resulting in superior user experience and improved productivity.
-
What are the strategies or techniques used for error-handling?
Using promises or async/await, handling errors in a centralized component, handling uncaught exceptions.
-
Why do we need error-handling?
Error-handling is a must-have part of all apps. It prevents apps from being error-prone and saves valuable development time.
-
How do you handle unchecked exceptions?
By subscribing to process.on(‘unhandledRejection’), process.on(‘uncaughtException’)
-
Is Node.js bad at handling errors?
No, it is not. That depends on developers and the way they choose to handle them.

Located in Thunder Bay, ON, Canada
Member since March 20, 2020
About the author
Jay is a full-stack developer with extensive experience in computer science. He specializes in JavaScript but is also proficient in Django, RoR, GraphQL, and SQL.
 authors are vetted experts in their fields and write on topics in which they have demonstrated experience. All of our content is peer reviewed and validated by Toptal experts in the same field.
Expertise
Hire Jay
![]()
Avoid bad user experience by exploring different ways to manage runtime errors with Next.js
Intro
If you are working with Next.js, there is quite a good chance to bump into internal server errors (5xx) when on production. If not handled correctly, a single error can bring down the complete page. Imagine a user shopping online for their favourite gadget and they end up seeing this page resulting in a bad UX.
Nextjs shipped SSG support with version 9.3 and brought in a lot of positives. For instance: getting errors at build time rather than runtime. Switching from SSR to SSG, ended up in an amazing user experience as everything was statically generated before the site was deployed.
However, in some cases, we still require our website pages to use server side rendering (SSR) instead of static site generation (SSG). Example: checking if the user is logged in or not?
Plot
In this article, let’s take a look at a typical error, the “TypeError“
Consider our web-application consuming data from a CMS. At some point the marketing team tries to change a property and they accidentally end up removing one. Or, for the sake of this article let’s consider the CMS backend server goes offline. We fail fetching the data from the CMS and the TypeError is born.

This example considers a scenario when your webpage uses Server side rendering.
The source code is spun out of a simple next.js boilerplate, Deployed on https://ssr-error-handling-git-main.meetdave3.vercel.app and available on Github: https://github.com/meetdave3/ssr-error-handling
Let’s take a look of ways how can we avoid a webpage from crashing in production?
1. Error boundary
function Tile(props) {
return (
<ErrorBoundary FallbackComponent={ErrorFallback} key={props.id}>
<a key={props.id} href={props.link} className={styles.card}>
<h3>{props.error.title} →</h3>
<p>{props.para.para.para}</p>
</a>
</ErrorBoundary>
);
}
Enter fullscreen mode
Exit fullscreen mode
Since we’re using React, we are aware of using error boundaries as React exposes getDerivedStateFromError or componentDidCatch lifecycle methods so we can handle the runtime errors.
These lifecycle method won’t run in Next.js as componentDidCatch does not work when using SSR
If an error occurs in the Error Boundary, the webpage will simply throw a internal server error (500) and result in an errored page.
So if you are using error boundaries to handle runtime errors & if an error occurs on production, the page will render like so: https://ssr-error-handling-git-main.meetdave3.vercel.app/error-boundary
You will see a 500 internal server error. Yes, it’s annoying and we don’t want our end users to see it either.
2. Try … catch
When server side rendering, Our old friend Try … catch is a good replacement to the error boundary as it works expectedly on server side, helps us avoiding the annoying 500 internal server error.
You can wrap your risky component with a try catch like so
function Tile(props) {
try {
return (
<a key={props.id} href={props.link} className={styles.card}>
<h3>{props.title} →</h3>
<p>{props.para.para.para}</p>
</a>
);
} catch (e) {
// Send to an error monitoring solution or log it.
return null;
}
}
Enter fullscreen mode
Exit fullscreen mode
Check: https://ssr-error-handling-git-main.meetdave3.vercel.app/try-catch
and you can see how the complete page doesn’t crash any more
3. Optional Chaining
function Tile(props) {
return (
<a href={props?.link} className={styles.card}>
<h3>{props?.error?.title} →</h3>
<p>{props?.para?.para?.para}</p>
</a>
);
}
Enter fullscreen mode
Exit fullscreen mode
This method is the best case from all the options when we want to solve a TypeError. It’s minimal, it’s fast, still it can only help us in accessing chained properties without throwing any error.
Conclusion
It’s not necessary to use any of these methods if you are statically generating the site (SSG)
Why? Because we will get the TypeError at build time when running next build and a production build won’t be created.
When using SSR, we need to fallback to the try .. catch solution when we are trying to do something more error prone like calculating the total tax of the shopping basket when rendering the checkout page.
It’s best to use a mix of optional chaining and try catch to avoid server side errors. Avoid falling into the trap of using React error boundaries when creating a server side rendered page.