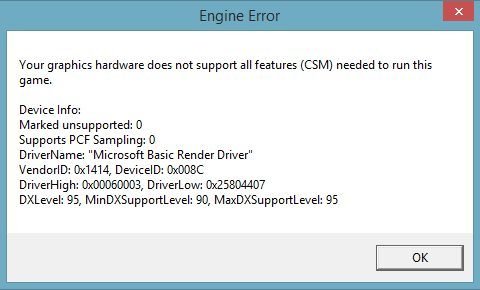
Несмотря на наличие риска появления ENGINE ERROR во всех играх, ошибка обычно появляется в CS: Go и Left4Dead. В первоначальном виде текст ошибки следующий: «Engine Error. Your graphics hardware does not support all features (CSM) needed to run this game». Сбой часто появляется на этапе загрузки игры, на этом всё и заканчивается. На начальный экран после сбоя уже не вернуться. У некоторых пользователей ошибка появляется прямо во время игры, тогда она моментально крашится. В большей части случаев источником неисправности становится драйвер видеоадаптера.
Содержание
- Как исправить вылеты?
- Как установить актуальную версию DirectX?
- Как обновить Visual C++?
- Установка .NET Framework
- Обновление VCredist
Как исправить вылеты?
Для удобства пользователя рассмотрим основные решения в виде пошаговой инструкции:
- Проверка кэша. С неё лучше начать, ведь метод простой и часто помогает. Для этого нужно открыть Steam и нажать ПКМ по названию игры, а затем – перейти в «Свойства». Дальше следует открыть «Локальные файлы» кликнуть на кнопку «Проверить целостность кэша».
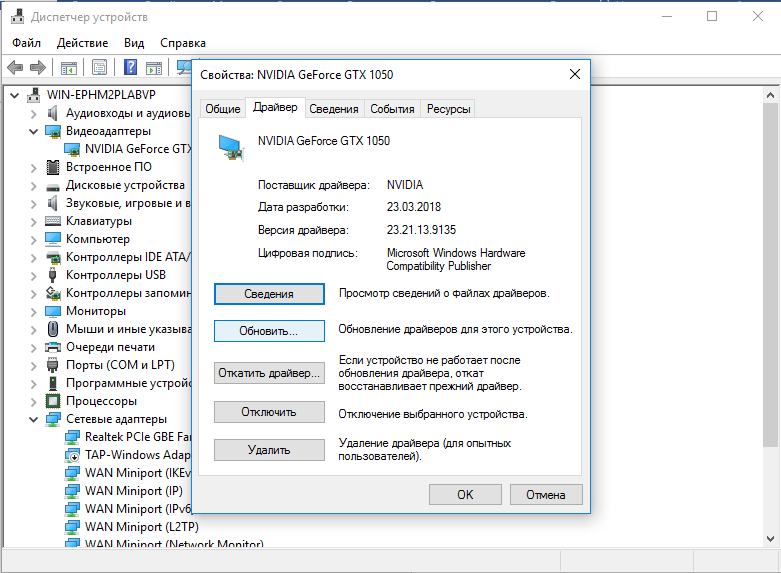
- Обновить видеодрайвера. Важно устанавливать драйвера с официального сайта производителя. Драйверпаки часто ставят в систему неактуальные версии. Альтернативный вариант – сделать ПКМ по «Пуску», открыть «Диспетчер устройств» и перейти в «Свойства» видеоадаптера. Нужная кнопка «Обновить» расположена на странице «Драйвера». После обновления ошибки появляться не должно, но лучше заранее всё же перезагрузить компьютер.
- Проверить правильность указания каталогов для установки игры. Сбой может появляться из-за того, что путь к директории содержит русские символы.
- Изменить настройки графики. Это имеет смысл делать, если проблема появилась после редактирования параметров графики. Установка меньшего качества картинки должна помочь исправить проблему.
- Обновить драйвера видеокарты – действие полезно для владельцев ноутбуков со встроенной видеокартой. Суть способа аналогична обновлению видеодрайвера, но в силу конструкционных особенностей адаптера, нужно обновлять драйвера материнской платы.
Если всё выше перечисленное не помогло, значит причиной проблемы является устаревшая версия некоторых платформ. Для работы CS и Left4Dead нужно иметь новую версию DirectX, .NET Framework, VCredist и Visual C++. Все программные продукты бесплатны.
Как установить актуальную версию DirectX?
Это ПО разрабатывает Microsoft и распространяет его абсолютно бесплатно. Достаточно всего лишь скачать DirectX. На странице, куда попадаете после клика на ссылку, нужно выбрать русский язык и загрузить веб-установщик. Если появится окно с предложением установить дополнительное ПО, лучше выбрать «Отказаться и продолжить». Как только установочный файл окажется на компьютере, остаётся его только запустить.
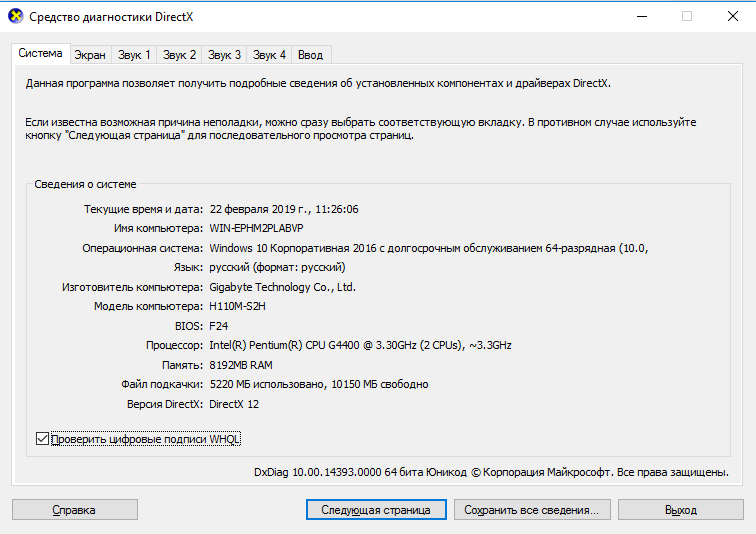
Чтобы убедиться, что DX обновился, стоит зажать Win + R, ввести dxdiag и нажать Enter. На вкладке «Система» последняя строка – «Версия DirectX». Остаётся только сопоставить версию с минимальными требованиями игры.
Как обновить Visual C++?
Нужное ПО находится также на сайте Microsoft, его можно скачать по ссылке. Здесь появится окно, в котором нужно выбрать язык и компоненты для загрузки. Подходящий компонент зависит от разрядности Windows. После запуска и непродолжительной процедуры установки всё должно заработать.
Установка .NET Framework
Вот ссылка, по которой можно загрузить данное ПО. Здесь всё аналогично, нужно загрузить программу и установить фреймворк.
Важно! Чтобы .NET Framework работал исправно, нужно проверить обновления Windows. В противном случае даже новая версия платформы может выдавать сбои. Запустить проверку обновления позволяет «Центр обновления», его легко найти через поиск панели «Пуск». Если на компьютере стоит старая версия (Windows XP или 2003), для запуска игры придётся инсталлировать Windows Imaging Component. Он доступный по ссылке.
Во время установки пользователю может показаться окно «Мы рекомендуем». Лучше не устанавливать лишние пакеты, ведь в них нет особой необходимости.
Обновление VCredist
ПО находится здесь. Для нормальной его работы нужно заранее установить актуальную версию Visual C++.
После обновления всех ключевых компонентов ошибка ENGINE ERROR больше не появится.
Overview
CUtlRBTree Overflow Errors, CheckSum Errors, Wrong Models being loaded, Wrong Materials being loaded, Invisible Model, Missing Textures, ERROR model in a session. All these things tie themselves back to a lack of understanding how the Valve file structure works. This guide will try to explain how the Valve Hierarchy works and why you’re having these problems.
The Valve Hierarchy System
The way Valve games work is based on a folder hierarchy system and the way this hierarchy work is in tiers, First Found Loaded, If found again, Ignored.
The Steamapps folder under the steam main folder contains the manifests for the games you buy.
The Common folder under the Steamapps folder is where the games install and this is where you’ll find the Sourcefilmmaker folder.
Now under the Sourcefilmmaker folder you find the Game folder and this is the install folder for SFM
Under the Game folder your going to find a few folders and the SFM executable (SFM.exe)
Some of these folders contain the stuff required for SFM to run, like the bin, platform and sdktools folders.
The others are asset folders. Like HL2, left4dead_movie, tf, tf_movies, USERMOD and Workshop.
However, these 6 folders are KEY folders that also contain files required by SFM to run and should not be modified. The Workshop Folder is the folder your subscribed workshop assets are going to download to.
I also refer to these asset folders as ModFolders. (Yes, USERMOD is a ModFolder)
ModFolders are the folders that contain assets we use in SFM like models, materials, particles, sounds, etc. In fact, if you look inside an asset/ModFolder you are going for find folders at least one folder called Models, Materials, Particles, or Sound. They can be named whatever you want and can be used to organize your assets so you can minimize what you’re actually loading into a SFM Session and prevent the CUtlRBTree Overflow Error.
The ModFolder is the base folder required for creating a custom mod folder and how SFM determines they should be shown in the SDK Edit Search Path function.
What is This Hierarchy Thing and How Does it Work?
The Hierarchy is control through the Gameinfo.txt files found in the Usermod folder and it tells SFM which ModFolder has a higher priority than the others. It can be edited using the SFM SDK “Edit Search Path” function
Sample of the Gameinfo.txt file.
“GameInfo” { “game” “Source Filmmaker [Beta]” “gamelogo” “1” “type” “multiplayer_only” “nomodels” “1” “nohimodel” “1” “nocrosshair” “0” “hidden_maps” { “test_speakers” “1” “test_hardware” “1” } “nodegraph” “0” “SupportsDX8” “0” “FileSystem” { “SteamAppId” “1840” “ToolsAppId” “1840” “SearchPaths” { “Game” “|gameinfo_path|.” “Game” “Custom” “Game” “tf_movies” “Game” “TF2Extract” “Game” “tf” “Game” “left4dead2_movies” “Game” “hl2” “Game” “workshop” } } “ToolsEnvironment” { “Engine” “SFM” “ToolsDir” “../sdktools” } }
When we launch the Search Path tool in the SDK we’re presented with a list of folders that contain at least one of the asset folders (Models, Maps, Materials, Particles, Sound.)
When we launch the Search Path tool in the SDK we’re presented with a list of folders that contain asset folders.
These folders can be dragged around in the tool allowing you to prioritize what ModFolder is seen first.
You will not find the Usermod folder in the list, it is locked and this ModFolder that has the highest priority.
The HL2 and TF folders are greyed out, these are essential folders required by SFM and can’t be renamed, but they can be given higher or lower priorities.
If you look at the Search paths in the sample of the Gameinfo.txt file and the list stack in the image of the Edit Search Path tool above, you’ll find that the code in the .txt file matches the order of the stack that have the check boxes turned on.
When we launch SFM and start searching for assets, assets are loaded into a SFM cache file based on what is found first.
If a ModFolder is Checked On in the Edit Path tool, it will be appended to the Gameinfo.txt file and the path will be changed to match the stack automatically. Assets in the active ModFolders will be made available to SFM for caching.
If you UNCheck a ModFolder in the Tool the folder will be removed from the gameinfo.txt file and asset will not be loaded when SFM caches assets.
Base on the order of the search, anything found after an item is first found and cached in a different Modfolder that has the same {pathfilename.ext}, that asset will be ignored, only the first found asset that was cached will be made available to our session. We’ll look at an example of this in a minute.
DON’T use USERMOD as a Custom ModFolder
A lot of SFM users use USERMOD as a Custom Asset folder. As the USERMOD folder is the main game ModFolder and has the highest priority in the stack, any asset found in there will be cached first. All other instances in other ModFolders that have the exact same path and filenames WILL BE IGNORED.
This one of the main reasons why we should not be using USERMOD for any custom asset and is usually the main reason of the “WHY does SFM load the wrong models/materials” questions in the discussion area.
Also, because users usually have thousands (exaggerated) of various assets buried in USERMOD, every asset in in the folder gets loaded. SFM is only a 32bit program and even when standing alone, it is a resource hog. Having everything cache can cause an overload, which can lead to the dreaded CUtlRBTree Overflow Error. This error is usually caused by SFM trying to cache more than it can chew.
If you have assets in USERMOD, you should create a Custom ModFolder with asset folders and move the stuff under the assets folder from USERMOD to them.
Also because you can have as many Custom ModFolders as you want and can name them anything you want, you can organized your Custom assets based on type, name, game, whatever and only turn on the ModFolders you require for your project. This will minimize the cache, prevent the CUtlRBTree Overflow Error and maybe free up some resources so your FPS rate doesn’t drop to low.
More on Hierarchy and How it Works
When a modelers creates a model, they identify model paths and texture paths in the QC that is used to compile it. In other words these paths are stomped in stone and the associated files must be found in a ModFolder that SFM knows about in the specified paths.
If I write a QC for a model and use a $modelname statement like..
$modelname ptejackcharactersmyProfilepteJack.mdl
NOTE: The path in the statement is relative to ModFolderModels. The models folder doesn’t have to be in the path statement and is usually the problem with some models being invisible in SFM if the author added it. If the modeler includes models in the $modelname statement like
$modelname modelsptejackcharactersmyProfilepteJack.mdl
then the actual path to the model files will have to be {ModFoldermodels}modelsptejackcharactersmyProfile
or the model will be invisible in SFM and throw the Can’t find pteJack.mdl Error.
My code tells the model that it can be in any ModFolder that SFM knows about but it must be a folder path modelsptejackcharactersmyProfile. On compile the the process will create 3 model files, pteJack.mdl pteJack.dx90.vmt and pteJack.vvd and it will place these files in USERMODmodelsptejackcharactersmyProfile.
Also in the QC, the modeler identifies where the Material VMT files will be found with the $CDMaterials statement like
$cdmaterials ptejackcharactersmyProfile
which means my VMTs must be in the
{ModFoldermaterials}ptejackcharactersmyProfile
The $CDMaterials statement is relative to a ModFolderMaterials folder and the same rules apply for materials as the do for the $modelname Statement except it applies to the ModFoldermaterials folder rather than the ModFolderModels folder.
As I stated before, USERMOD is a system folder and should not be modified, but the compiler uses it as the default folder for custom models that are compiled. This is not a problem, I can move the files to ANY ModFolder that SFM knows about.
So I could create a Custom folder, add a Models and Materials folder to it, turn it on using the SDK and move the files into it as long as the models files end up in a path
CustommodelsptejackcharactersmyProfile (for the model files)
and the materials in
CustommaterialsptejackcharactersmyProfile (for the VMTs the model uses)
The models will work.
Now for models that occur in more than one place. Only the first found will be available to our SFM Session. For example, lets use the TF2 HWM Characters.
Did you know that the TF Game has HWM Player Characters? It’s true. Have a look, they are in the
gametfmodelsplayerhwm
folder. However, these are not the HWM models that we see when we use an unmodified version of SFM when we call for a HWMHeavy.
The HWM models we usually see are the ones found in the TF_movies folder.
gametf_moviesmodelsplayerhwm
There are major differences between the 2 HWM variants. The TF_Movies variants are the ones designed for cinematography work.
Look at the model paths above, they are exactly the same except for the ModFolders and if we look at the Model file names, we’ll find they are exactly the same as well.
It’s the hierarchy we identified in the search paths that determine which model we get.
The default setting has TF_Movies as having a higher priority in the stack of ModFolders if we look at the search paths tool of the SDK. Therefore, the TF_Movies models are loaded and used, the TF models are ignored. If I wanted to use the TF HWM models, I would have to change the order of the stack and place TF over top of the TF_Movies listing in the search paths.
Now let’s take this one step further. Let’s say I download a HWM version of the Heavy from somewhere and I stick into USERMOD. It uses the same path and uses the same filenames as the other 2. When I load SFM and search for the HWM Heavy, the one in USERMOD is always going to be presented and I won’t have a way to turn it off if I don’t want to use it. USERMOD is the folder that has the highest priority and because it is the SYSTEM main folder it is not displayed in the Search Paths tool and cannot be over written.
To fix this I would move the files I put into USERMOD to a Custom ModFolder and change the priority as required.
What are Custom ModFolders Good For
One of the best uses for a Custom ModFolder is for porting other Game Assets to SFM. One common mistake is a user will try to port the newest items available for the TF into SFM. Instead of creating a Custom ModFolder they will paste the new files into the SFM TF folder.
The TF folder is a required folder and it should not be tampered with. SFM pulls on this folder because it is based on the Valve Game engine that the files in that TF folder were made for. If you overwrite the information in that TF with the newer stuff from the TF2 Game Cache file, SFM is not going to run, or if it does, is not going to perform or look like it’s supposed to.
If you happen to make this mistake, the only way to fix is to validate your application cache files, have SFM find the overwritten files and replace them.
Next is organization, if you look at the Folder List image I provided earlier, you see I have a custom folder for my TF game cache extract, one for Custom models, one for my CS:GO game extracts, One for EP2.
And the one called HidderHole, well I have so many Custom ModFolders that had I took a screenshot of them all, the image would go in for—–ever! I buried them in there and can pull them back to the games folder and turn them on when I need them.
A Custom folder like this let’s you keep only the ModFolders you need visible in Explorer, the unused stuff is hidden. If you run into a problem, the folders are right there and your not chasing it though the ones that aren’t being used.
I hid one that I should have left out, it’s called Tex_Fixes. ALL my repaired paintable textures go in that one and I give it a higher than TF and TF_movies so the repaired VTMs and VTFs are used instead of the ones from those folders.
Then there’s troubleshooting, every GarryMod model I port into SFM, because there are usually problems associated with the port, I initially create a Custom ModFolder for every one, this allows me to contain and fix the problems with it and not have to go chasing through tons of models to find the problem. I can also move the GMod Folder down the list in priority and find out if it is going to collide with any of the other models I plan to use in a session.
Same goes for models I get from mods.TF, they go into a Custom ModFolder because they need repair out of the box.
Common Errors Related to Hierarchy
1. SFM won’t Start or just does load and look like it’s supposed to?
Fix:
a) Did you port the any of the TF2 Game cache and overwrite the TF folder in SFM?
Yes: You’ve pooched SFM, Validate the Game cache and let the process finish
Create a Custom ModFolder and only port the Material, Models, Particles, Maps and Sound folders into it
Change the hierarchy order placing the new ModFolder above TF and TF_Movies
b) Did you Extract ALL the folders from the TF2 Game Cache and put them into the TF or Custom ModFolders
Yes: I did the the first one, See the the fix above.
Yes: they’re in a ModFolder
Delete everything from the Modfolder except the Material, Models, Particles, Maps and Sound folders
SFM should now start normally.
c) Did you extract the HL2 Game Cache Files and do either of the above?
Fix:
Same as above depending on what you did.
2. I get a CUtlRBTree Overflow Error when I try to start SFM.
Fix:
You are most likely trying to load too many assets into your SFM Session.
a) If you have hundreds of Workshop subscriptions, Kill some of your subscriptions. If you’re afraid the workshop item will be deleted by the author, move them into Custom ModFolders and turn off your subscription. This way you won’t lose stuff if it’s deleted from the workshop.
b) If you have a ton of stuff located in USERMOD, move it to Custom ModFolders and turn the ones you don’t need off.
c) Turn off the ModFolders not required for the project you’re working on.
3. I’m getting a CheckSum error on a model.
Fix:
Your model is most likely trying to read a model file that it wasn’t compiled with or one of the 3 required model files is missing and the model is reading one from a different location.
a) Go to the model folder, make sure the 3 required files (.mdl, .DX90.VTX and .VVD) are there.
If the DX90.vtx is missing but there is a sw.vtx and/or a dtx80.vtx there, change the name of one of them to DX90.VTX. SFM needs this file. The model may work when this is done. If not, then decompile the model and recompile it using the SFM StudioMDL compiler, this should fix the model.
b) If only the .mdl file is there and the other 2 are missing, the model may be a Goldscr model. It will have to be decompiled and recompile to Source standards.
c) If a) and b) fail and you can’t decompile the model, scrap it and find another model.
3. My model has Black and Purple Textures or I’m getting Can’t find VMT or Can’t Find VTF Errors
Fix:
Your Materials or Textures aren’t where they’re supposed to be. Use this guide.
[link]
4. My model is invisible… or I’m getting Can’t find .mdl or .vvd or .DT90.vtx Errors
Fix:
Your Model files aren’t where they need to be. Use this guide.
[link]
5. The wrong model is loading and I can see the right one in the Model Browser.
Fix:
You have a model in a higher priority folder that is being called. This could be a model that you put into UserMod. You’ll have to research where the model is coming from, get it into a different ModFolder or change the priority of the folder it is in so that the correct model is being called.
6. I’ve downloaded models from Mod.TF and can’t get them into SFM.
Fix:
Mods.TF require manipulation of location and files names. Use this guide.
[link]
7. My map is full of error models and missing textures.
Fix:
You ported the map incorrectly or you haven’t ported assets it requires to SFM. You’re going to have to research the map and find out what game(s) or custom assets it pulls from and get those ported into SFM.
8. Load a map that I’ve used before now crashes SFM.
Fix:
a) If the map that you used before was a stock SFM map and you’ve ported the Map folder from the TF2 or another Game cache, the map may have been updated and is now a compressed map. The map may need to be decompressed. See this Video
[link]
b) Find and delete the new map then use the old one.
Уже не одно поколение геймеров пытается стать лучшими на разных локациях Counter Strike. Но главным противником оказывается в большей степени не игрок с чужой команды, а постоянные ошибки, баги и сбои. Легендарный шутер получил довольно хорошее продолжение в лице CS:GO, однако, проблемы во многом так и остались. Одной из самых распространенных ошибок стала «Engine Error: Your graphics hardware does not support all features», возникающая при запуске игры через Steam. Мы постараемся дать советы по исправлению сбоя.
Содержание
- Причины ошибки «Engine Error»
- Что делать при сбое
- Проверка игры
- Откат драйверов до стабильной версии
- Другие советы
- Проверяем Windows
- Заключение
Именно при запуске CS:GO многие ловят ошибку «Engine Error». Это, в основном, связанно с графической составляющей ПК, которая не может исполнить все функции CMS, требуемые для игры. Некоторые параметры видео, по разным причинам, перестают отвечать необходимым требованиям для слаженной работы с ПК.
Ошибка «Engine Error» в CS:GO
Такой сбой очень характерен для тех, кто совершил недавний переход на Windows 10, а она использует стандартные драйвера. Сюда стоит добавить разные менее глобальные внесенные изменения, к примеру, когда инсталлировались новые обновления для вашей системы. Также часто ловят этот баг те, кто пытался разгонять видеокарту.
Что делать при сбое
Все решения проблемы выглядят довольно просто, поэтому не пытайтесь усложнять процесс. В первую очередь возьмем для рассмотрения наиболее действенные варианты. Сразу отбросим различные псевдорешения с загрузкой dll-библиотек — такие советы часто предлагают в сети. Пробуйте следовать списку по порядку.
Проверка игры
- Сделайте рестарт системы. Это поможет в том случае, если компьютер долгое время не перезагружался, а сбой является единичным случаем.
- Проверьте кеш вашей игры. Для этого перейдите в соответствующее меню: откройте STEAM и перейдите в «Свойства». Оттуда в локальные файлы и самым нижним вариантом будет проверка кеша.
Проверка целостности кэша игры
Откат драйверов до стабильной версии
Не помогло, тогда пробуем откатить драйвера к той версии, которая работала с КС:ГО:
- Для этого проходим также в Диспетчер, кликаем по видеокарте, после чего откроются Свойства.
- Там переходим во вкладку Драйвера и жмем по опции Обновить.
- Далее в меню выбираем второй пункт — «Поиск драйверов на компьютере», а дальше кликаем по «Выбор из уже установленных». В открывшемся списке выделяем старую версию (ориентируйтесь по дате) и жмем далее для установки.
Устанавливаем совместимый с игрой драйвер
Вот наглядная видео-инструкция по этому решению.
Другие советы
- Понизьте графические требования в настройках игры.
- Также можете применить сторонний софт для обновления видеоадаптеров — Driver Pack Solution, Driver Booster и др.
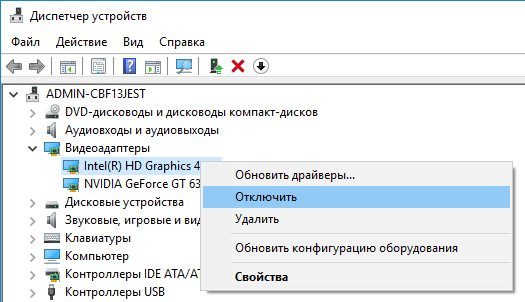
- Часто в материнской плате имеется встроенная видеокарта — отключите её в том же Диспетчере.
Отключение встроенной видеокарты
- Перейдите на использование последних версий DirectX 11 или 12. Его нужно скачивать только с официального сайта — microsoft.com/ru-ru/download/details.aspx?id=35.
- Иногда «Engine Error» может проявляться из-за слабой видеокарты, так как CS:GO уже довольно требовательная игра. Тут ничего другого не остается, как заменить видеокарту или смириться с тем, что поиграть так и не удастся.
Проверяем Windows
- Попробуйте отключить ваш антивирус. Если не помогло, удалите его. Аналогичную деинсталляцию проведите для игры, а затем для STEAM. Переустановите все заново после перезагрузки ПК.
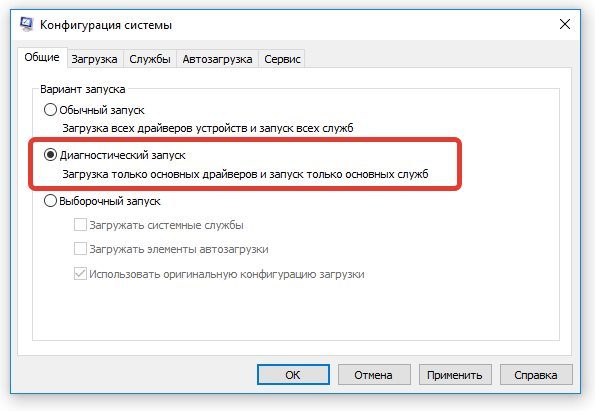
- Зайдите в компьютер с отключенными дополнительными программами. Иногда некоторые приложения вроде Skype могут блокировать соединение к интернету. Попробуйте воспользоваться командой «msconfig». Альтернативой станет удаление всего установленного софта за несколько предыдущих дней. Отследите, что вы устанавливали перед появлением ошибки «Engine Error».
Выполните проверку CS:GO диагностическим запуском
Заключение
Переход на Windows 10 принес много разочарований, а КС:ГО входит в их число. Именно данное обновление массово создало ошибку. Есть два выхода из ситуации: играть с видеонастройками Windows 10 или вернуться к 7, 8 версии. Надеюсь наши советы помогли исправить ошибку Engine Error в CS:GO, если да, тогда просьба указать в комментариях, какие именно.



 Проверка целостности кэша игры
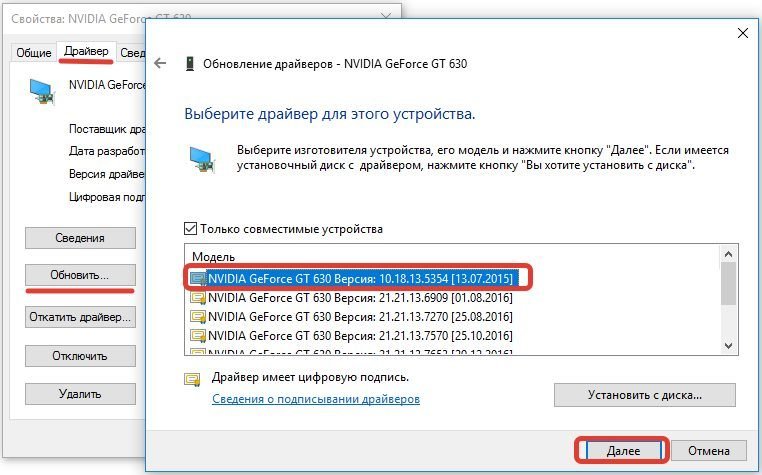 Устанавливаем совместимый с игрой драйвер
 Отключение встроенной видеокарты
 Выполните проверку CS:GO диагностическим запуском