![]()
Download Article
![]()
Download Article
Wrap dresses are versatile garments that look great on many different body shapes. A common issue with them, though, is the neckline—they tend to sit too low or gape open. If this is the case with your dress, don’t worry! There are lots of ways you can fix it quickly with things you likely already have at home. There are even a few different ways to alter the dress to fix the neckline.
Things You Should Know
- Hold your neckline in the correct place with a safety pin, snap button, or double-sided tape.
- Add layers if you’re worried that your neckline is too low. A quick cami, lacy bra, or ribbon can help you add just the right amount of coverage.
- Alter your dress if necessary. For instance, adjusting the shoulder seam can stop your neckline from gaping.
-

1
Use a safety pin to hold your wrap dress in place on-the-go. Put on your wrap dress and pin it where the dress crisscrosses at the waist. Push the safety pin through the under-layer of fabric instead of all the way through, if possible, so the safety pin isn’t visible.[1]
- Pinning the dress where it crisscrosses near your waist will hold the neckline in place without causing it to pull.
- Use safety pins to fix a gaping neckline.
-
2
Hold your neckline exactly where you’d like it using double-sided tape. Purchase double-sided tape made specifically for clothing so that it sticks to your skin properly without causing irritation. Put on your dress and cut a strip of the tape. Place the tape along the inside edge of your dress’s neckline before pressing it down on your skin to keep it in place.[2]
- Double-sided tape for clothing can be found at a big box store or online.
- The tape will attach right at the neckline’s hem in a V-shape.
- This is a great option if your neckline is too low.
Advertisement
-
3
Attach a snap button to the neckline to hold it together. Put on the wrap dress and decide where you’d like the snap button to go so it holds your neckline together without pulling too much. This is usually where the bottom of the V-shape is in your dress’s neckline. Mark this with a safety pin and sew the bottom of the snap button on the bottom layer and the top of the button on the top layer by pulling a needle and thread through the holes of the snap button parts.[3]
- If your neckline is way too low, move the snap button up about 1 in (2.5 cm) from the bottom of the V-shape.
- Snap the button into place and enjoy your dress’s new neckline.
- Snap buttons can be found at a local craft or big box store.
- Use a snap button to fix a neckline that’s too low or gaping.
-
4
Sew a hook-and-eye clasp onto the neckline for a permanent solution. These clasps are a little more noticeable but will hold your neckline together similar to a snap button. Position the clasp where the fabric gapes or put it higher than the V if the neckline is too low. Sew each piece onto one side of the wrap dress’s neckline by looping a needle and thread through the holes in the clasp pieces. Once it’s sewed on, put on your dress and hook the clasp to show off your new neckline.[4]
- Look for hook-and-eye clasps at a craft or big box store, along with a needle and thread to attach them to the dress.
- Hook-and-eye clasps will fix gaping necklines as well as necklines that are too low.


Advertisement
-
1
Wear the wrap dress over a camisole or slip for a quick fix. Pick out a camisole or slip that matches your wrap dress and wear it underneath so you don’t have to worry about your neckline. Wearing a modest layer of clothing under your wrap dress is a great way to fix a neckline that’s gaping or too low.[5]
- Choose a cami or slip that’s the same color as your dress so it blends in seamlessly.
- Slips or camisoles with V-necks are best since your wrap dress has a V-shape too.
-
2
Let a lacy bra peek out from your dress to add texture. If your neckline is just a little too low, letting a little bit of lace show can be a nice way to cover up more skin while still creating a stylish look. Pick out a lacy bra or bralette that matches your wrap dress and wear it under the dress to show off some contrasting textures.[6]
- For example, you might wear a black lace bralette under a black, blue, and white floral wrap dress.
-
3
Add lace or ribbon to the neckline to make it more modest. Purchase strands of lace or ribbon that match your wrap dress. Measure the neckline’s length and cut the lace or ribbon so it’s long enough to go around the entire neckline. Use a needle and thread to attach the ribbon or lace to the edge of the neckline, making the neckline taller. Sew the ribbon or lace onto the inside of the dress so the stitching isn’t super visible.[7]
- Choose wide ribbon or lace for more coverage.
- If you have a sewing machine, you can use this to attach the ribbon or lace instead.


Advertisement
-
1
Take in the shoulder seam to fix a big neckline gape. Undo the sewed seams in each shoulder of your wrap dress using a seam ripper or scissors. Pull up the fabric so that the neckline is slightly shorter and sew the shoulder seams back together at the new fabric points. Use sewing pins to hold the seams in place as you sew them.[8]
- Try your dress on to see how much fabric you should take in at each shoulder seam before pinning it, if you’d like.
-
2
Create a drawstring gathering to make your neckline smaller. If you don’t mind part of your neckline looking scrunched up, this is an easy way to bring the neckline in so it fits you better. Sew a straight stitch along the area you’d like gathered, such as near the shoulders or at the base of the ‘V’ shape. Tug on the fabric to scrunch it up before knotting your thread so the fabric stays in place.[9]
- Use thread that matches the color of your wrap dress neckline so it blends in well.
-
3
Use stay tape along your neckline to keep it from stretching out. Take out the stitches in your neckline’s hem and cut strands of stay tape that fit along each edge of your neckline. Secure the stay tape using steam or its sticky coating in a straight line along the fabric’s edge before folding it over into the neckline. Stitch the fold together so your wrap dress looks just as it did before, but it now has stay tape to keep it from stretching.[10]
- Use a straight stitch or zig-zag stitch to hold the folded neckline hem in place.
- Some types of stay tape need steam for them to adhere to the fabric while others already have a fabric glue on them.
-
4
Make darts in the fabric to remove excess fabric so the neckline fits. Take out the stitching of the entire bodice of your wrap dress so that you can lay the front flat. Mark the fabric where you’d like to create the darts and cut a slim triangle on either side of the chest area to form them. Pinch the fabric together to gather the material and sew the triangle together so there isn’t any empty space anymore.[11]
- Put your wrap dress on and create two darts on either side of your chest by pulling the fabric into an overlapping triangle with your fingers to see how big the darts need to be.
- Sew the wrap dress bodice back onto the dress once you’re finished making the darts.


Advertisement
Add New Question
-
Question
Is it better to leave a longer dress neckline or tighten it up?

Kathi Burns is a board certified Professional Organizer (CPO) and Founder of Organized and Energized!, her consulting business with a mission to empower people to master their environment and personal image by assisting them in taking control, making change and organizing their lives. Kathi has over 17 years of organizing experience and her work has been featured on Better Homes and Gardens, NBC News, Good Morning America, and Entrepreneur. She has a BS in Communication from Ohio University.
Board Certified Professional Organizer
Expert Answer
It really depends on your style on body shape. So, first think about what you’re trying to achieve visually. If your outfit calls for a longer neckline, it’s fine the way it is! The other thing to keep in mind is your neck’s shape. If you have a longer neck, you may not want to overaccentuate it. Then again, if you’re on the shorter side and you have a shorter neck, the longer neckline may make you appear taller. It really depends!

Ask a Question
200 characters left
Include your email address to get a message when this question is answered.
Submit
Advertisement
-
If you bring your wrap dress to a tailor, they can fix your neckline for you.
Thanks for submitting a tip for review!
Advertisement
About This Article
Thanks to all authors for creating a page that has been read 138,524 times.
Did this article help you?
![]()
Download Article
![]()
Download Article
Wrap dresses are versatile garments that look great on many different body shapes. A common issue with them, though, is the neckline—they tend to sit too low or gape open. If this is the case with your dress, don’t worry! There are lots of ways you can fix it quickly with things you likely already have at home. There are even a few different ways to alter the dress to fix the neckline.
Things You Should Know
- Hold your neckline in the correct place with a safety pin, snap button, or double-sided tape.
- Add layers if you’re worried that your neckline is too low. A quick cami, lacy bra, or ribbon can help you add just the right amount of coverage.
- Alter your dress if necessary. For instance, adjusting the shoulder seam can stop your neckline from gaping.
-
1
Use a safety pin to hold your wrap dress in place on-the-go. Put on your wrap dress and pin it where the dress crisscrosses at the waist. Push the safety pin through the under-layer of fabric instead of all the way through, if possible, so the safety pin isn’t visible.[1]
- Pinning the dress where it crisscrosses near your waist will hold the neckline in place without causing it to pull.
- Use safety pins to fix a gaping neckline.
-
2
Hold your neckline exactly where you’d like it using double-sided tape. Purchase double-sided tape made specifically for clothing so that it sticks to your skin properly without causing irritation. Put on your dress and cut a strip of the tape. Place the tape along the inside edge of your dress’s neckline before pressing it down on your skin to keep it in place.[2]
- Double-sided tape for clothing can be found at a big box store or online.
- The tape will attach right at the neckline’s hem in a V-shape.
- This is a great option if your neckline is too low.
Advertisement
-
3
Attach a snap button to the neckline to hold it together. Put on the wrap dress and decide where you’d like the snap button to go so it holds your neckline together without pulling too much. This is usually where the bottom of the V-shape is in your dress’s neckline. Mark this with a safety pin and sew the bottom of the snap button on the bottom layer and the top of the button on the top layer by pulling a needle and thread through the holes of the snap button parts.[3]
- If your neckline is way too low, move the snap button up about 1 in (2.5 cm) from the bottom of the V-shape.
- Snap the button into place and enjoy your dress’s new neckline.
- Snap buttons can be found at a local craft or big box store.
- Use a snap button to fix a neckline that’s too low or gaping.
-
4
Sew a hook-and-eye clasp onto the neckline for a permanent solution. These clasps are a little more noticeable but will hold your neckline together similar to a snap button. Position the clasp where the fabric gapes or put it higher than the V if the neckline is too low. Sew each piece onto one side of the wrap dress’s neckline by looping a needle and thread through the holes in the clasp pieces. Once it’s sewed on, put on your dress and hook the clasp to show off your new neckline.[4]
- Look for hook-and-eye clasps at a craft or big box store, along with a needle and thread to attach them to the dress.
- Hook-and-eye clasps will fix gaping necklines as well as necklines that are too low.
Advertisement
-
1
Wear the wrap dress over a camisole or slip for a quick fix. Pick out a camisole or slip that matches your wrap dress and wear it underneath so you don’t have to worry about your neckline. Wearing a modest layer of clothing under your wrap dress is a great way to fix a neckline that’s gaping or too low.[5]
- Choose a cami or slip that’s the same color as your dress so it blends in seamlessly.
- Slips or camisoles with V-necks are best since your wrap dress has a V-shape too.
-
2
Let a lacy bra peek out from your dress to add texture. If your neckline is just a little too low, letting a little bit of lace show can be a nice way to cover up more skin while still creating a stylish look. Pick out a lacy bra or bralette that matches your wrap dress and wear it under the dress to show off some contrasting textures.[6]
- For example, you might wear a black lace bralette under a black, blue, and white floral wrap dress.
-
3
Add lace or ribbon to the neckline to make it more modest. Purchase strands of lace or ribbon that match your wrap dress. Measure the neckline’s length and cut the lace or ribbon so it’s long enough to go around the entire neckline. Use a needle and thread to attach the ribbon or lace to the edge of the neckline, making the neckline taller. Sew the ribbon or lace onto the inside of the dress so the stitching isn’t super visible.[7]
- Choose wide ribbon or lace for more coverage.
- If you have a sewing machine, you can use this to attach the ribbon or lace instead.
Advertisement
-
1
Take in the shoulder seam to fix a big neckline gape. Undo the sewed seams in each shoulder of your wrap dress using a seam ripper or scissors. Pull up the fabric so that the neckline is slightly shorter and sew the shoulder seams back together at the new fabric points. Use sewing pins to hold the seams in place as you sew them.[8]
- Try your dress on to see how much fabric you should take in at each shoulder seam before pinning it, if you’d like.
-
2
Create a drawstring gathering to make your neckline smaller. If you don’t mind part of your neckline looking scrunched up, this is an easy way to bring the neckline in so it fits you better. Sew a straight stitch along the area you’d like gathered, such as near the shoulders or at the base of the ‘V’ shape. Tug on the fabric to scrunch it up before knotting your thread so the fabric stays in place.[9]
- Use thread that matches the color of your wrap dress neckline so it blends in well.
-
3
Use stay tape along your neckline to keep it from stretching out. Take out the stitches in your neckline’s hem and cut strands of stay tape that fit along each edge of your neckline. Secure the stay tape using steam or its sticky coating in a straight line along the fabric’s edge before folding it over into the neckline. Stitch the fold together so your wrap dress looks just as it did before, but it now has stay tape to keep it from stretching.[10]
- Use a straight stitch or zig-zag stitch to hold the folded neckline hem in place.
- Some types of stay tape need steam for them to adhere to the fabric while others already have a fabric glue on them.
-
4
Make darts in the fabric to remove excess fabric so the neckline fits. Take out the stitching of the entire bodice of your wrap dress so that you can lay the front flat. Mark the fabric where you’d like to create the darts and cut a slim triangle on either side of the chest area to form them. Pinch the fabric together to gather the material and sew the triangle together so there isn’t any empty space anymore.[11]
- Put your wrap dress on and create two darts on either side of your chest by pulling the fabric into an overlapping triangle with your fingers to see how big the darts need to be.
- Sew the wrap dress bodice back onto the dress once you’re finished making the darts.
Advertisement
Add New Question
-
Question
Is it better to leave a longer dress neckline or tighten it up?
Kathi Burns is a board certified Professional Organizer (CPO) and Founder of Organized and Energized!, her consulting business with a mission to empower people to master their environment and personal image by assisting them in taking control, making change and organizing their lives. Kathi has over 17 years of organizing experience and her work has been featured on Better Homes and Gardens, NBC News, Good Morning America, and Entrepreneur. She has a BS in Communication from Ohio University.
Board Certified Professional Organizer
Expert Answer
It really depends on your style on body shape. So, first think about what you’re trying to achieve visually. If your outfit calls for a longer neckline, it’s fine the way it is! The other thing to keep in mind is your neck’s shape. If you have a longer neck, you may not want to overaccentuate it. Then again, if you’re on the shorter side and you have a shorter neck, the longer neckline may make you appear taller. It really depends!
Ask a Question
200 characters left
Include your email address to get a message when this question is answered.
Submit
Advertisement
-
If you bring your wrap dress to a tailor, they can fix your neckline for you.
Thanks for submitting a tip for review!
Advertisement
About This Article
Thanks to all authors for creating a page that has been read 138,524 times.
Did this article help you?
У моделей 112 и 113 из журнала Burda 6/2012 отрезные детали лифа, образующие глубокий вырез платья-сарафана, требуют корректировки на маленькую грудь.

- 1
- 2
- 3
- 4
Размеры:
72, 76, 80, 84, 88
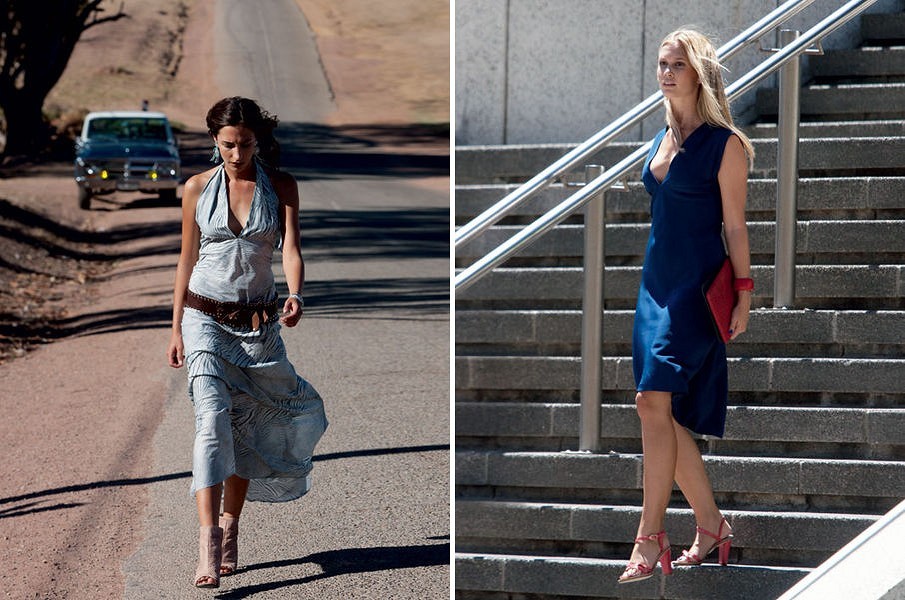
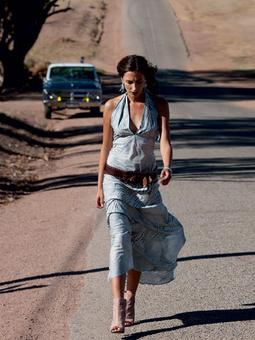
Длинное платье с глубоким декольте и открытой спиной выглядит весьма эффектно. Детали из воздушно…
Длинное платье с глубоким декольте и открытой спиной выглядит весьма эффектно. Детали из воздушно…


- 1
- 2
- 3
- 4
Размеры:
72, 76, 80, 84, 88
Вы будете всюду ловить на себе восхищенные взгляды, ведь не каждый день встретишь девушку в таком…
Вы будете всюду ловить на себе восхищенные взгляды, ведь не каждый день встретишь девушку в таком…
Когда я сшила платье-сарафан по этой выкройке, я столкнулась со следующей проблемой — лиф, выкроенный точно по журналу, в области выреза слишком откровенно открывает грудь.
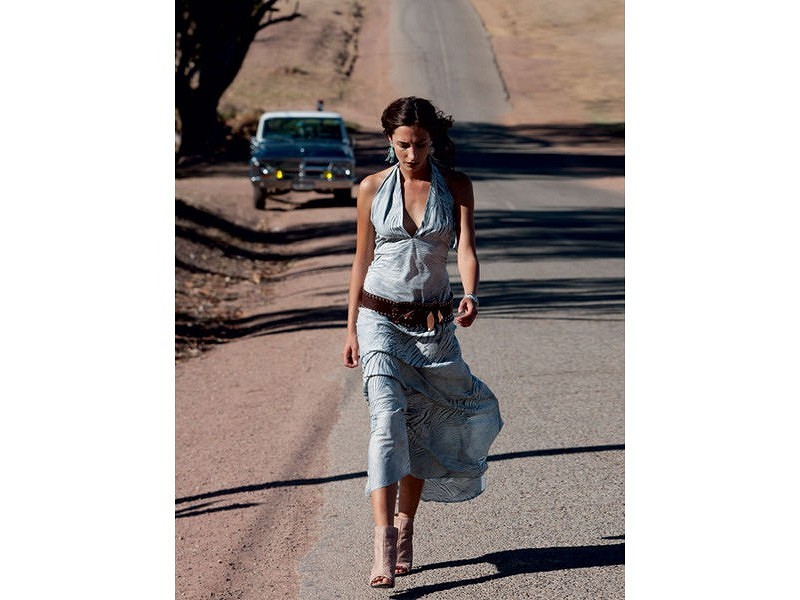
Даже в оригинальной модели на фото хорошо видно, что и правая, и левая детали лифа топорщатся.

Вариант с перекрученными бретелями временно спас положение.
Также поступили и некоторые форумчанки нашего сайта, кто шил это платье.
Но так как перекрученные бретели создавали дискомфот, их постоянно приходилось поправлять и контролировать область выреза, я отпорола детали лифа платья, скорректировала и снова пришила их.
В настоящем мастер-классе я поделюсь личным опытом и расскажу, как скорректировать детали лифа у этого платья-сарафана.
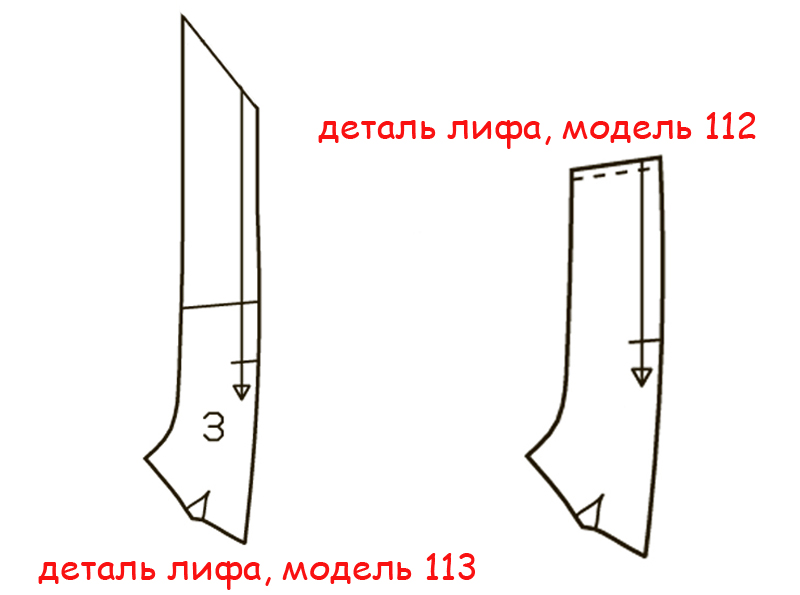
Соответствующие изменения необходимо внести в бумажную деталь лифа, в нижней её части.
Также можно сшить макет и на нём скорректировать детали лифа.
Тогда впоследствии вам не придётся прибегать к разного рода хитростям, чтобы добиться лучшего прилегания лифа или полностью перешивать лиф платья, как это пришлось сделать мне.
Вам потребуется:
✂ Ножницы для бумаги;
✂ Карандаш или фломастер;
✂ Линейка
Шаг 1
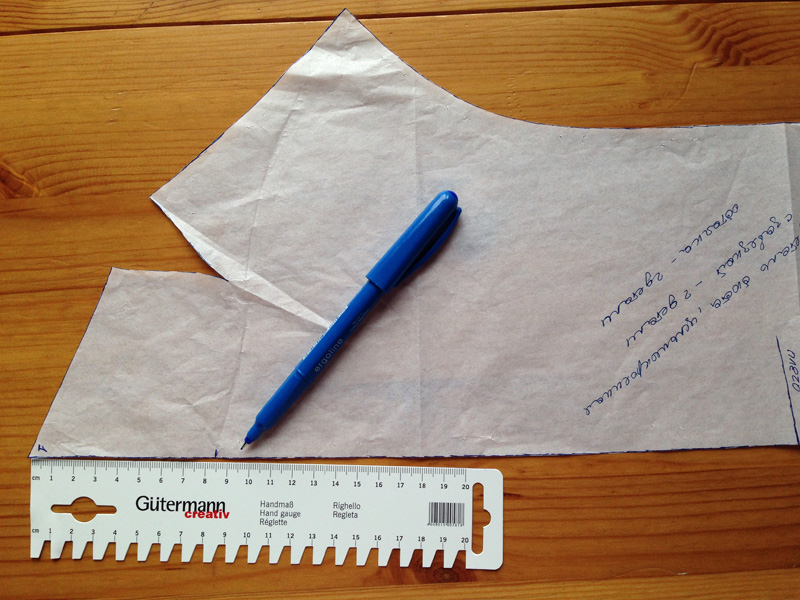
От контрольной метки «1» отступите вверх 8,5 см.
Важно:
Данная величина будет меньше, если у вас пышная грудь.
В таком случае, выкроите детали лифа точно по выкройке. Приметайте их к юбке платья и скорректируйте линию низа деталей лифа на себе во время примерки.
Шаг 2
От новой контрольной метки проведите линию до вершины вытачки.
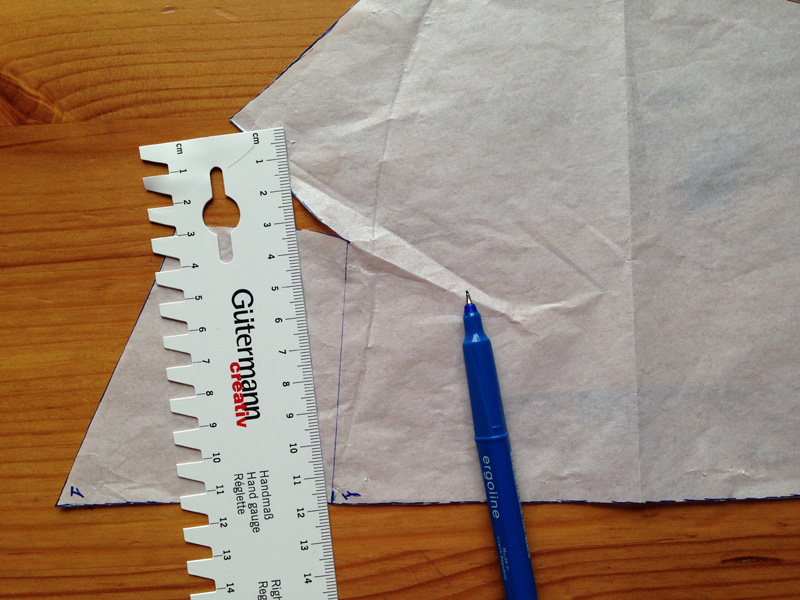
Шаг 3
От вершины вытачки проведите линию до точки внешнего края детали лифа.
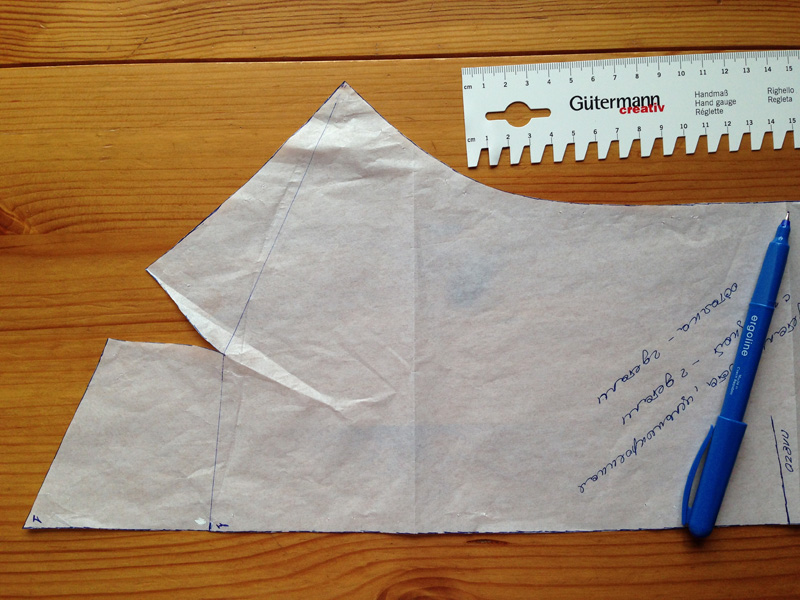
Шаг 4
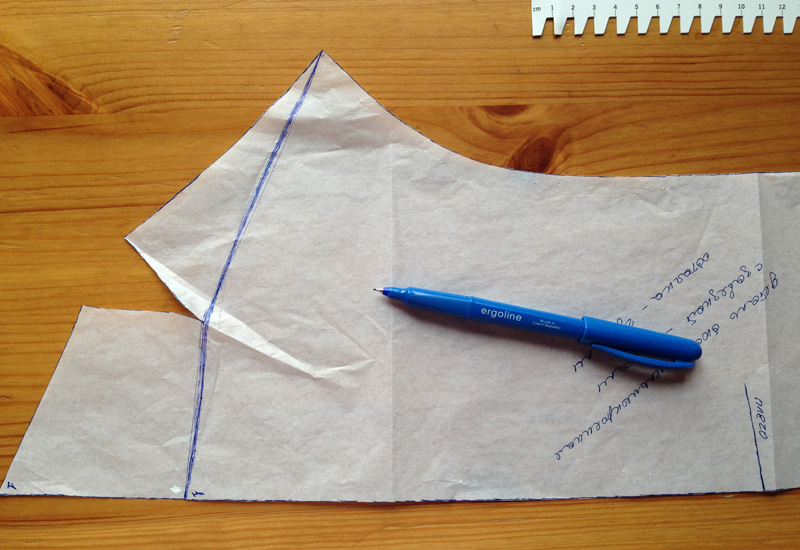
Скорректируйте линию, сделайте её более плавной.
Шаг 5

Отрежьте лишнее по новой размеченной линии.
Шаг 6
Теперь можно переносить выкройку на ткань.
Вытачку переносить не нужно.
Во время шитья лучше слегка присборите лиф по линии низа до нужной длины или заложите маленькую складочку.
Шаг 7
Прежде, чем притачивать детали лифа к юбке, приметайте их и примеряйте платье, чтобы при необходимости дополнительно скорректировать линию низа лифа.

Теперь лиф ведёт себя очень прилично.
Как добиться прилегания выреза декольте – конструктивные приемы
Дата публикации: 28.01.2017
Если вы уже хоть сколько-нибудь шьете, то могли столкнуться с такой ситуацией. Задумав интересное платье или блузку с довольно глубоким декольте вместо высокого выреза «под горлышко», вы просто расширяете горловину на несколько сантиметров, срезая на готовой или построенной самостоятельно выкройке излишек. Шьете – и получаете вещь, в которой совершенно нельзя наклониться без того, чтобы не продемонстрировать окружающим белье или его отсутствие. Ткань не прилегает к груди и топорщится, а при наклоне просто свисает вниз. Навряд ли вы задумывали получить такой эффект.

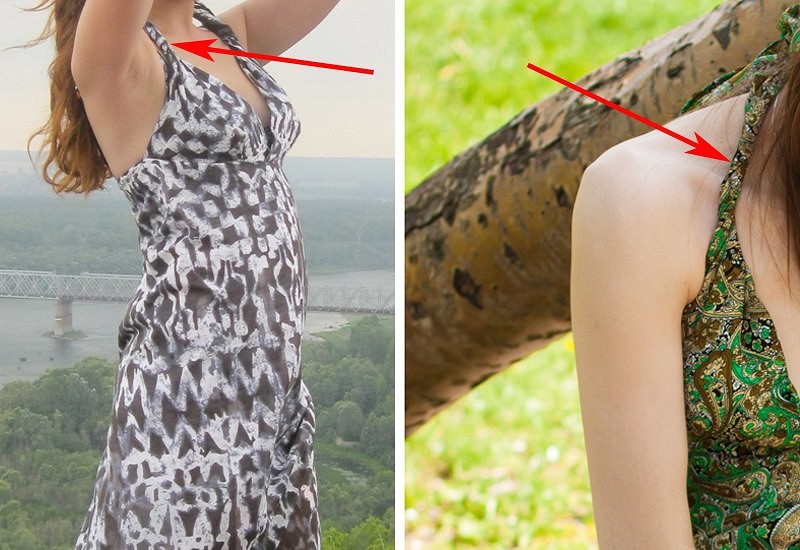
Отстающее декольте – как это выглядит
Почему платье с низким вырезом отстает от тела?
Эта проблема называется «отстающее декольте». Почему так получилось? Потому что при построении выкройки не были учтены особенности анатомии. У женщин, независимо от степени полноты, типа фигуры и размера груди, на участке от ключиц до самой выступающей точки груди всегда есть небольшая вогнутость.
Если платье предполагается довольно закрытым, то учитывать в выкройке эту впадинку нет необходимости – она все равно находятся под тканью. Но если линия выреза, неважно, сплошного или запашного, проходит по ней, то уменьшить длину этой линии все-таки нужно.

Где находится надгрудная впадинка
Бюст представляет собой полусферу, поэтому идеально обогнуть его с помощью двух обычных прямых вытачек, нагрудной и от линии талии, не удастся. Чтобы лучше это понять, представьте, что платье сделано не из пластичной ткани, а из тонкой жести или картона. Величина и форма грудной впадины индивидуальны, а выкройки, предназначенные для массового пошива, стандартизированы и не могут безупречно подходить для каждой фигуры.
Как скорректировать отстающее декольте?
Для начала снять дополнительные мерки с фигуры. В идеале надо надеть тот бюстгальтер, с которым вы собираетесь носить эту вещь. Почему? Разная форма белья, наличие/отсутствие уплотнителей, поролона, пуш-апа немного изменяют естественный рельеф тела, что выражается в совершенно реальных измерениях. Плюс-минус пара сантиметров заметно меняют посадку. Вообще, это одно из главных правил портновского ремесла: снимать мерки для построения выкройки изделия нужно именно в том белье, которое планируется надевать под эту одежду. Лучше всего, если измерения проводит второй человек, но можно справиться и самостоятельно. Главное – не принимайте «правильную» позу с отличной осанкой, не вытягивайтесь, не прогибайтесь, не втягивайте живот. Стойте естественно, так же, как живете. Если у вас в жизни не идеальная осанка, она не изменится и в новом платье. Иначе рискуете получите вещь, которая на вашей конкретной фигуре будет плохо сидеть. Чтобы четко обозначить линию талии, повяжите по ней шнурок, узкий пояс или тонкую резинку.

Новая линия вытачки с учетом надгрудной впадинки
- Измерьте:
- Ширину переда (ШП) – горизонтально от одной подмышки до другой НАД ГРУДЬЮ.
- Высоту груди (ВГ) – от шнурка на талии до самой выступающей точки груди.
- Ширину груди (ШГ) – горизонтально между двумя наиболее выступающими точками груди.
- К каждой из своих мерок добавьте по 0,5 см – это прибавка на СО (свободное облегание).
- На используемую выкройку лифа нанесите полученные мерки, отмечая ширину переда и высшую точку груди (ВТГ).
- Проведите прямую линию – как будет выглядеть закрытая вытачка – и на этой линии отметьте планируемую глубину выреза, поставьте точку Е.
- Померяйте расстояние на уровне желаемого выреза между вогнутыми сторонами вытачки (точно на своем макете-основе, примерно непосредственно по телу или по готовой вещи с нужной степенью прилегания). Допустим, это расстояние равно 1,5 см.
- Нарисуйте на лифе вытачку шириной 1,5 см, направленную к ВТГ, с вершиной в точке Е.
- Перенесите (закройте) полученную вытачку в уже имеющиеся (например, от бокового шва, от линии талии, от шва по середине переда, или в пройму) или в подходящее по модели место.
- Через точку Е нарисуйте глубокий вырез.

Излишек ткани по линии выреза
В результате раствор готовых вытачек (от бока, от талии) станет больше, изменится форма верха лифа, уйдет излишек по линии декольте. Останется лишь небольшая слабина над нагрудной впадинкой, но она значительно меньше, чем был бы излишек ткани без коррекции лифа и эстетически приемлема.

Как закрыть вытачку для прилегающего декольте
Впадинку над бюстом необходимо учитывать и при проведении любых модельных линий, например, кокетки, на прилегающих вещах из неэластичных тканей.
Коррекция «раскрывающегося» декольте на изделиях с запахом
Сильно отстающие от тела в районе середины груди полы платьев и блузок с запахом – вторая часто встречающаяся проблема, имеющая ту же природу. Линия запаха пересекает область срединной грудной впадины и всегда имеет излишнюю длину, которая отстает, фалдит. В данном случае уместно ввести дополнительную вытачку (раствором 1,5 см в рассматриваемом примере, у вас ее глубина может отличаться) в линию запаха.
В результате край полы на выкройке приобретет большую кривизну, уменьшившись на эти же 1,5 см, а в готовой вещи не будет топорщиться.
Для более точной посадки платья по фигуре желательно сшить пробный макет из дешевой ткани, на котором проверить глубину и расположение добавленных вытачек. При необходимости бумажная выкройка корректируется, и только затем приступают к крою из дорогого материала.