ERROR HANDLING
By default LABVIEW automatically handles any error that occurs when a VI runs by suspending execution, highlighting the subVI or function where the error occurred, and displaying a dialog box. You can choose other error handling methods. For example, if an I/O VI on the BLOCK DIAGRAM times out, you might not want the entire application to stop. You also might want the VI to retry for a certain period of time. In LabVIEW, you can make these error handling decisions on the block diagram of the VI.
VIs and functions return errors in one of two ways—with numeric error codes or with an error cluster. Typically, functions use numeric error codes, and VIs use an error cluster, usually with error inputs and outputs. Error handling in LABVIEW follows the data flow model. Just as data flow through a VI, we get an error information. Wire the error information from the beginning of the VI to the end. Include an error handler VI at the end of the VI to determine if the VI ran without errors. Use the error in and error out clusters in each VI you use or build to pass error information through the VI.
If you would like to Enrich your career with an Android certified professional, then visit Mindmajix — A Global online training platform: “LabVIEW training” Course.This course will help you to achieve excellence in this domain.
As the VI runs, LabVIEW tests for errors at each execution node. If LabVIEW does not find any errors, the node executes normally. If LabVIEW detects an error, the node passes the error to the next node without executing. The next node does the same thing and so on. Use the simple error handler VI, shown below Figure, to handle the error at the end of the execution flow. The simple error handler VI is located on the Functions» All Functions» Time & Dialog palette. Wire the error cluster to the error in input.
ERROR CLUSTER
Error clusters tell you why and where errors occur. When you perform any kind of I/O, consider the possibility that errors will occur. Almost all I/O functions return error information. Include error checking in VIs, especially for I/O operations such as file, serial, instrumentation, data acquisition, and communication operations, and provide a mechanism to handle errors appropriately. No matter how confident you are in the VI you create, you cannot predict every problem a user might encounter. Without a mechanism to check for errors, you know only that the VI does not work properly. Checking for errors in VIs can help you identify the following problems:
- You initialized communications incorrectly or wrote improper data to an external device.
- An external device lost power, is broken, or is not working properly.
- You upgraded the operating system software which changed the path to a file or the functionality of a VI or library. You might notice a problem in a VI or a system program.
Frequently Asked LabVIEW Interview Questions & Answers
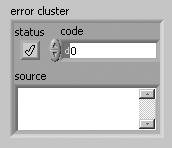
The error clusters located on the Functions» All Functions» Array & Cluster palette include the following components of information which are also shown below Figure.
- status is a Boolean value that reports True if an error occurred. Most VIs, functions, and structures that accept Boolean data also recognize this parameter. For example, you can wire an error cluster to the Boolean inputs of the Stop, Quit LabVIEW, or Select If an error occurs, the error cluster passes a True value to the function.
- code is a 32-bit signed integer that identifies the error numerically. A non-zero error code coupled with a status of False signals a warning rather than a fatal error.
- the source is a string that identifies where the error occurred. Use the error cluster controls and indicators to create error inputs and outputs in subVIs.
When an error occurs, right-click within the cluster border and select Explain Error from the shortcut menu to open the Explain Error dialog box. The Explain Error dialog box contains information about the error. The shortcut menu includes an Explain Warning option if the VI contains warnings but no errors. You can also access the Explain Error dialog box from the Help» Explain Error menu.
Explore LabVIEW Sample Resumes! Download & Edit, Get Noticed by Top Employers!Download Now!
About Author
Ruchitha Geebu
I am Ruchitha, working as a content writer for MindMajix technologies. My writings focus on the latest technical software, tutorials, and innovations. I am also into research about AI and Neuromarketing. I am a media post-graduate from BCU – Birmingham, UK. Before, my writings focused on business articles on digital marketing and social media. You can connect with me on LinkedIn.

Урок 9 Строки и файловый ввод-вывод
объединяют весь процесс работы с файлами в один ВП, переделать их под определенную задачу бывает трудно. Для специфических задач следует использовать функции файлового ввода/вывода низкого уровня.
Функции файлового ввода/вывода низкого уровня
Функции файлового ввода/вывода низкого уровня расположены в средней строке палитры Functions»Programming»File I/O.
Дополнительные функции работы с файлами (Advanced File I/O)
расположены в палитре Functions»Programming»File I/O»Advanced File Functions и предназначены для управления отдельными операциями над файлами.
Функции файлового ввода/вывода низкого уровня используются для создания нового или обращения к ранее созданному файлу, записи и считывания данных и закрытия файла. Функции низкого уровня работы с файлами поддерживают все операции, необходимые при работе с файлами. Информация о дополнительных возможностях функций работы с файлами изложена в учебном курсе LabVIEW Основы II.
Основы файлового ввода/вывода
Стандартные операции ввода/вывода данных в/из файла состоят из следующей последовательности действий:
1.Создание или открытие файла. Указание месторасположения существующего файла или пути для создания нового файла с помощью диалогового окна LabVIEW. После открытия файл LabVIEW создает ссылку на него. Более подробную информацию о ссылке на файл можно найти в разделе Сохранение данных в новом или уже существующем файле.
2.Произведение операций считывания или записи данных в/из фал(а).
3.Закрытие файла.
4.Обработка ошибок.
Для осуществления основных операций файлового ввода/вывода используются следующие ВП и функции:
•Open/Create/Replace File – открывает, перезаписывает существующий файл, или создает новый. Если file path (путь размещения файла) не указан, ВП выводит на экран диалоговое окно, в котором можно создать новый или выбрать уже существующий файл.
•Read File – считывает данные из файла, определяемого по ссылке refnum, и выдает данные на поле вывода data, на поле count подается значение количества считываемых данных. Считывание данных начинается с места, определяемого элементами pos mode и pos offset, и зависит от формата файла.
•Write File – записывает данные в файл, определяемый по ссылке refnum. Запись начинается с места, определяемого полями ввода
данных pos mode и pos offset для файла потока байтовых данных, и
|
© National Instruments Corporation |
9-12 |
Учебный курс LabVIEW Основы I |

Урок 9 Строки и файловый ввод-вывод
указателем конца файла для файла протоколированных данных.
• Close File – закрывает указанный в ссылке refnum файл.
Обработка ошибок
Подпрограммы ВП и функции низкого уровня содержат информацию об ошибках. Для их обработки используются подпрограммы обработки ошибок, такие как Simple Error Handler VI (ВП Простой обработчик ошибок), расположенный в палитре Functions»Programming»Dialog & User Interface. Поля ввода error in и вывода error out информации об ошибках используются в каждом ВП для обмена информацией об ошибках между ВП.
Во время работы ВП LabVIEW проверяет наличие ошибок в каждом узле. Если LabVIEW не находит ошибок, то узел выполняется нормально. Если LabVIEW обнаруживает ошибку в одном узле, то его выполнение прерывается, а информация об ошибке передается следующему узлу. Следующий узел поступает так же, и в конце выполнения LabVIEW сообщает об ошибках.
Сохранение данных в новом или уже существующем файле
В файл, созданный (или открытый) с помощью функций файлового ввода/вывода, можно записать данные любого типа. При необходимости доступа к файлу со стороны других приложений или пользователей, следует записывать данные в виде строки ASCII символов. Более полную информацию о записи бинарных файлов и файлов регистрации данных можно найти в учебном курсе LabVIEW Основы II.
Доступ к файлу можно осуществить программным путем или с использованием диалогового окна. Для доступа к файлу с помощью диалогового окна на поле ввода file path подпрограммы ВП Open/Create/Replace File VI не следует подавать данные. Программный доступ к файлу экономит время. Приведенная ниже таблица демонстрирует организацию путей к файлам.
|
Платформа |
Путь к файлу |
||
|
Windows |
Состоит из имени дисковода, двоеточия, обратного слэша, |
||
|
разделяющего директории, и имени файла. Например, |
|||
|
c:testdatatest1.dat — путь к файлу test1.dat в |
|||
|
папке testdata |
|||
|
UNIX |
Состоит из прямого слэша, разделяющего директории, и |
||
|
имени файла. Например, /home/testdata/test1.dat – |
|||
|
путь к файлу test1.dat в папке testdata в каталоге |
|||
|
home. Имя фала и имя директории чувствительны к |
|||
|
регистру символов. |
|||
|
MacOS |
Состоит из имени диска, двоеточия, имен папок, |
||
|
разделенных двоеточиями, и имени файла. Например, |
|||
|
Hard Disk:testdata:test1.dat — путь к файлу |
|||
|
© National Instruments Corporation |
9-13 |
Учебный курс LabVIEW Основы I |
Урок 9 Строки и файловый ввод-вывод
test1.dat в папке testdata на диске Hard Disk
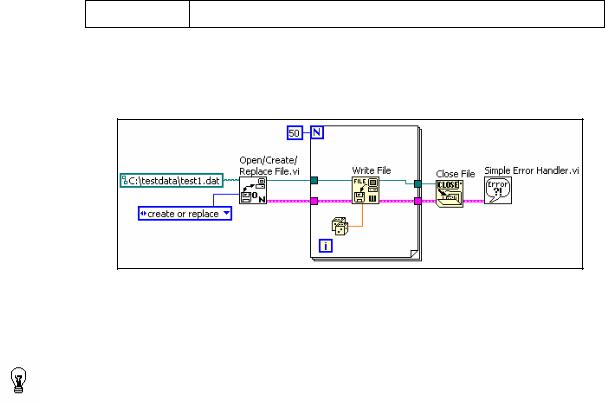
В приведенном ниже примере показано, как записать строку данных в файл при программном указании пути и имени файла. Если файл уже существует, то он перезаписывается, если нет — то создается новый файл.
Подпрограмма ВП Open/Create/Replace File VI открывает файл test1.dat. ВП также создает ссылку на файл и кластер ошибок.
Совет Ссылка (refnum) является уникальным идентификатором для таких объектов как файл, прибор и сетевое соединение.
При открытии файла, устройства или сетевого соединения LabVIEW создает ссылку на объект. Все операции с открытыми объектами выполняются с использованием ссылок.
Кластер ошибок и ссылка на файл последовательно передаются от узла к узлу. Поскольку узел не может выполниться, пока не определены все его входные поля данных, эти два параметра заставляют узлы работать в определенном порядке. Подпрограмма ВП Open/Create/Replace File VI передает ссылку на файл и кластер ошибок функции Write File, которая производит запись файла на диск. Функция Close File закрывает файл после получения кластера ошибок и ссылки на файл из функции Write
File.
Подпрограмма ВП Simple Error Handler VI проверяет наличие ошибок и выводит информацию о них в диалоговом окне. Если в одном из узлов допущена ошибка, последующие узлы не выполняются, и кластер ошибок передается в подпрограмму ВП Simple Error Handler VI.
|
© National Instruments Corporation |
9-14 |
Учебный курс LabVIEW Основы I |

Урок 9 Строки и файловый ввод-вывод
Упражнение 9-2 ВП Запись файла
Цель: Записать данные в файл.
Ниже приведена последовательность действий для создания ВП, который объединяет строку, числовые данные и модуль строки в файл. В упражнении 9-3 будет создан ВП, который считывает и отображает его содержимое.
Лицевая панель
1.Откройте новый ВП и оформите лицевую панель, как показано ниже:
a.В палитре Controls»Modern»String & Path выберите элемент отображения пути. Этот элемент отобразит путь к созданному файлу данных.
b.Щелкните правой кнопкой мыши по элементу Строка для записи и в контекстном меню выберите пункт Visible Items»Scrollbar.
Блок-диаграмма
2.Постройте следующую блок-диаграмму:
Выберите в разделе Functions»Select a VI ВП Компоновка строки.vi, созданный в упражнении 9-1, и поместите его на блокдиаграмму. Этот ВП объединяет три строки в одну.
|
© National Instruments Corporation |
9-15 |
Учебный курс LabVIEW Основы I |

Урок 9 Строки и файловый ввод-вывод
Поместите на блок-диаграмму подпрограмму ВП
Open/Create/Replace File VI, расположенную в палитре Functions»Programming»File I/O. Этот ВП выводит на экран диалоговое окно для создания файла.
a.Щелкните правой кнопкой мыши по полю prompt и в контекстном меню выберите пункт Create»Constant для создания константы Введите имя файла. При запуске ВП появится окно выбора файла, которое будет называться
Введите имя файла.
b.Щелкните правой кнопкой мыши по входному полю function и в контекстном меню выберите пункт Create»Constant. Для выбора пункта выпадающего меню create or replace следует использовать инструмент УПРАВЛЕНИЕ.
Выберите функцию Write File, расположенную в палитре
Functions»Programming»File I/O. Эта функция записывает объединенную строку в файл.
Выберите функцию Close File, расположенную в палитре
Functions»Programming»File I/O. Эта функция закрывает файл.
Выберите подпрограмму ВП Simple Error Handler VI,
расположенную в палитре Functions»Programming»Dialog & User Interface. Этот ВП проверяет кластер ошибок и выводит диалоговое окно при возникновении ошибки.
3.Сохраните ВП под именем Запись файла.vi.
Запуск ВП
4.Поменяйте значения элементов управления на лицевой панели и запустите ВП. Появится диалоговое окно Введите имя файла.
5.Введите в диалоговое окно название файла демофайл.txt и нажмите на кнопку Save или OK.
ВП запишет в файл данные из элементов Строка для записи,
Число для записи и Единица измерения для записи.
6.Закройте ВП.
Конец упражнения 9-2
|
© National Instruments Corporation |
9-16 |
Учебный курс LabVIEW Основы I |
Урок 9 Строки и файловый ввод-вывод
Упражнение 9-3 ВП Чтение файла
Цель: Считать данные из файла.
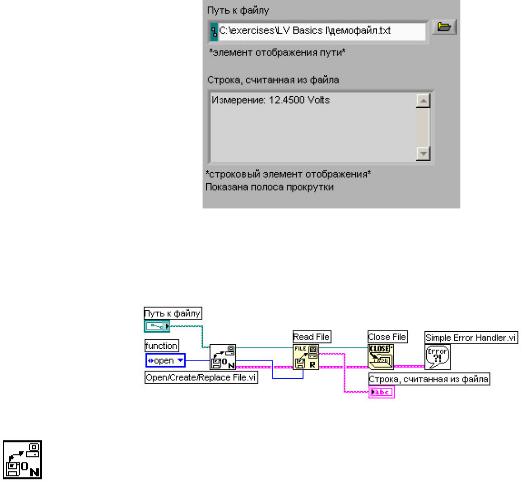
Ниже приведена последовательность действий для создания ВП, который читает файл, созданный в упражнении 9-2, и выводит данные в строковом элементе отображения.
Лицевая панель
7.Откройте новый ВП и создайте лицевую панель, используя элемент управления путем к файлу и строковый элемент отображения в палитре Controls»Modern»String & Path.
Блок-диаграмма
8.Постройте следующую блок-диаграмму:
В палитре Functions»Programming»File I/O выберите подпрограмму Open/Create/Replace File VI. Этот ВП выведет на экран диалоговое окно, которое используется для создания и открытия файла.
a.Щелкните правой кнопкой мыши по входному полю prompt и из контекстного меню выберите Create»Constant для создания константы Выбрать имя файла.
b.Щелкните правой кнопкой мыши по полю function и выберите в контекстном меню пункт Create»Constant для создания константы. С помощью инструмента УПРАВЛЕНИЕ выберите пункт выпадающего меню open.
|
© National Instruments Corporation |
9-17 |
Учебный курс LabVIEW Основы I |

Урок 9 Строки и файловый ввод-вывод
Впалитре Functions»Programming»File I/O выберите функцию
Read File. Эта функция читает количество байт данных с начала файла, определяемое значением поля count.
Впалитре Functions»Programming»File I/O выберите функцию
Close File. Эта функция закроет файл.
Впалитре Functions»Programming»Dialog & User Interface
выберите подпрограмму Simple Error Handler VI. Этот ВП проверяет кластер ошибок и, в случае появления ошибки, выводит на экран диалоговое окно.
9.Сохраните ВП под именем Чтение файла.vi.
Запуск ВП
10.Перейдите на лицевую панель и с помощью инструмента УПРАВЛЕНИЕ выберите кнопку Browse (обзор) в элементе управления Путь к файлу.
11.Выберите файл демофайл.txt и нажмите на кнопку Open или OK.
12.Запустите ВП. Строка, считанная из файла, отобразится на лицевой панели ВП.
13.При желании выполните часть упражнения повышенной сложности. В противном случае сохраните и закройте ВП.
14.Измените ВП таким образом, чтобы числовые данные распознавались в строке и отображались в цифровом элементе отображения. По окончании сохраните и закройте ВП.
Совет Для поиска первого числового символа используйте функцию
Match Pattern.
Конец упражнения 9-3
|
© National Instruments Corporation |
9-18 |
Учебный курс LabVIEW Основы I |
Урок 9 Строки и файловый ввод-вывод
D. Форматирование строк таблицы символов
Для того чтобы записать данные в файл формата электронной таблицы, необходимо переформатировать строковые данные в строку таблицы, содержащую разделители, такие как символ табуляции. Во многих приложениях символ табуляции разделяет столбцы, а символ end of line (конец строки) разделяет строки.
Примечание Для обеспечения совместимости между различными платформами следует использовать константу end of line constant,
расположенную в палитре Functions»Programming»String. (Windows)
Константа осуществляет перевод каретки и перевод строки. (MacOS) Константа осуществляет перевод каретки. (UNIX) Константа осуществляет перевод строки.
Функция Format Into File предназначена для форматирования строк, путей к файлам, числовых и логических данных в текст, а также для записи текста в файл. Часто эта функция используется вместо двух операций – форматирования строки с помощью функции Format Into String или ВП Build Text Express VI и записи результата с помощью функций Write Characters To File или Write File.
Функция Format Into File предназначена для определения порядка, в котором данные записываются в тестовый файл. Однако ее нельзя применять для добавления данных в файл или перезаписи существующего файла. Для этих операций используется функция Format Into String совместно с функцией Write File. Путь к файлу или ссылку на него можно подать на поле input file или оставить это поле без соединения, чтобы указать имя файла в диалоговом окне.
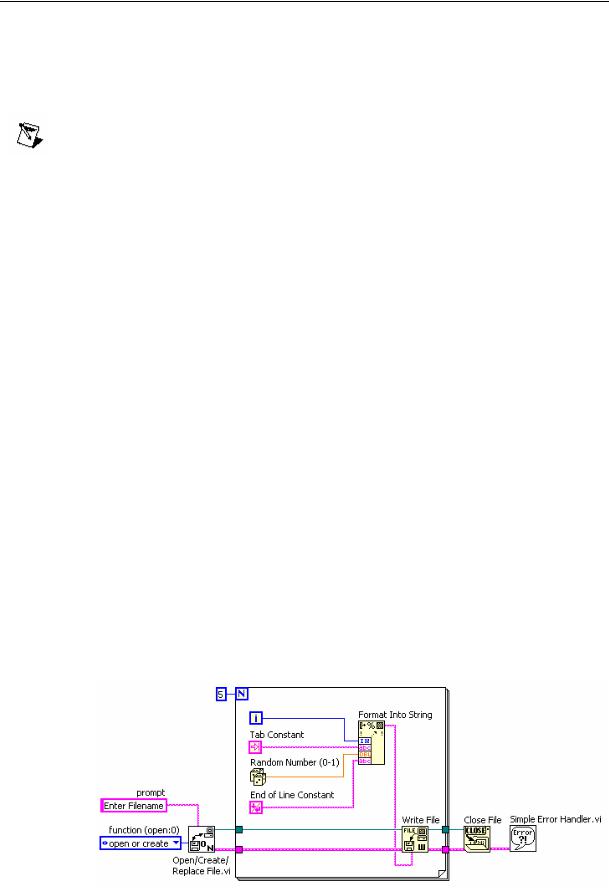
Ниже представлена блок-диаграмма, на которой подпрограмма ВП Open/Create/Replace File VI открывает файл. Цикл For выполняется пять раз. Функция Format Into String преобразует значения счетчика итераций и случайное число в строку. Также указываются символы Tab constant (табуляции) и End of Line Constant (конца строки) для создания двух столбцов и одной строки таблицы символов. По окончании пяти итераций цикла файл закрывается и ВП проверяет наличие ошибок.
|
© National Instruments Corporation |
9-19 |
Учебный курс LabVIEW Основы I |

Урок 9 Строки и файловый ввод-вывод
Этот ВП создает следующий текстовый файл, в котором стрелка (→) указывает символ табуляции, а символ параграфа (¶) указывает конец строки:
0→0.798141
1→0.659364
2→0.581409
3→0.526433
4→0.171062
Можно открыть данный текстовый файл в любом редакторе электронных таблиц для отображения на экране следующей таблицы.
|
© National Instruments Corporation |
9-20 |
Учебный курс LabVIEW Основы I |

Урок 9 Строки и файловый ввод-вывод
Упражнение 9-4 ВП Регистратор температуры
Цель: Сохранить данные в файл в форме, доступной для редактора электронных таблиц или текстового редактора.
Выполните следующие шаги для сохранения времени и текущего значения температуры в файл.
Блок-диаграмма
1.Откройте ВП Контроль температуры.vi, созданный в упражнении 8-2, и сохраните его под именем Регистратор температуры.vi. Изменять лицевую панель нет необходимости.
2.Измените блок-диаграмму, как показано ниже:
Впалитре Functions»Programming»File I/O выберите
Open/Create/Replace File VI. Этот ВП выводит диалоговое окно для открытия или создания файла.
Впалитре Functions»Programming»Timing выберите функцию
Get Date/Time String. Эта функция выдает время проведения измерения температуры в строковом формате.
Щелкните правой кнопкой мыши по терминалу want seconds? (нужны секунды?) и в контекстном меню выберите Create»Constant. С помощью инструмента УПРАВЛЕНИЕ измените значение логической константы с FALSE на значение TRUE. Это значение константы заставит функцию включить секунды в строку.
Поместите на блок-диаграмму экспресс-ВП Build Text Express VI, расположенный в палитре Functions»Express»Output. Этот экспресс-ВП преобразует несколько входных строк в одну.
|
© National Instruments Corporation |
9-21 |
Учебный курс LabVIEW Основы I |
Соседние файлы в папке Теория управления
- #
- #
- #
- #
- #
You might have already noticed the error cluster datatype, which is found on the Modern>>Array, Matrix & Cluster palette (Error In and Error Out, shown in Figure 7.64) and can also be found used in the inputs and outputs of many VIs and functions. The error cluster is a special datatype in LabVIEW (a cluster consisting of a status Boolean, code I32, and source string) that is used for propagating information about errors that occur during the execution of LabVIEW code. Errors and error handling are very naturalthere is no reason to be afraid of errors. Rather, we should understand how errors can occur, how to communicate errors, and how to handle errors.
Figure 7.64. Error In and Error Out controls found on the Array, Matrix & Cluster palette
So, what is an error? In simple terms, an error is an event where a function or subVI cannot complete a request because resources are not available or the information (arguments) passed to it are not valid.
In LabVIEW, we use dataflow to propagate information about errors inside of an error cluster datatype.
Error Cluster Datatype
The error cluster (shown in Figure 7.65) contains three elements, as follows:
-
status BooleanSignifies whether there is an error (TRUE) or no error (FALSE).
-
code I32Is an error code signed integer that identifies the error.
-
Positive codes are errors.
-
Negative codes are warnings.
-
Zero is no error.
-
-
source stringIs a string that contains descriptive information about the source of the error. This commonly also contains a call chain, a list of VIs starting at the subVI (or function) where the error occurred and then listing up the call hierarchy, all the way up to the top-level VI.
Figure 7.65. Error cluster
Propagating Errors: Error Dataflow
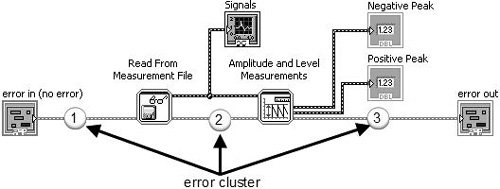
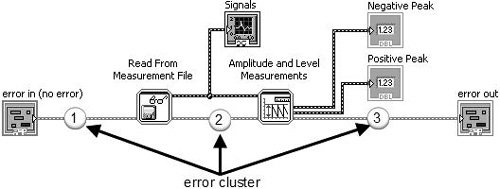
You use the error cluster datatype to store information about an error, and you use dataflow to propagate the error cluster through your block diagram. As you can see the example shown in Figure 7.66, an error cluster passes through the block diagram, connecting the following, in sequence:
-
error in control terminal to the Read From Measurement File subVI.
-
Read From Measurement File subVI to Amplitude and Level Measurements subVI.
-
Amplitude and Level Measurements subVI to the error out indicator terminal.
Figure 7.66. Block diagram showing how the error cluster is used to propagate errors using dataflow
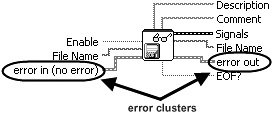
Many of LabVIEW’s functions and VIs have error in and error out terminals. These are almost always found (if present on the function or VI) on the lower-left and lower-right terminals of the connector pane (respectively). Figures 7.67 and 7.68 show the inputs and outputs of Read From Measurement File and Amplitude and Level Measurements with error in and error out highlighted.
Figure 7.67. Read From Measurement File
Figure 7.68. Amplitude and Level Measurements
Generating and Reacting to Errors in SubVIs
The expected behaviors of functions and VIs, with respect to generating and reacting to errors, are the following:
-
If error in contains an error (status = TRUE), do not do any work unless it is «clean up» work, such as
-
closing file references.
-
closing instrument or other communication references.
-
putting the system back into an idle/safe state (powering off motors, etc.).
-
-
If an error occurs inside of a function or VI, the function should pass out the error information via its error out indicator terminal unless it was passed in an error via its error in input terminal. In this case, just pass the incoming error from error in to error out, unchanged.
Error Case Structure
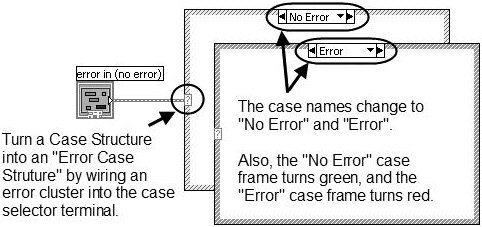
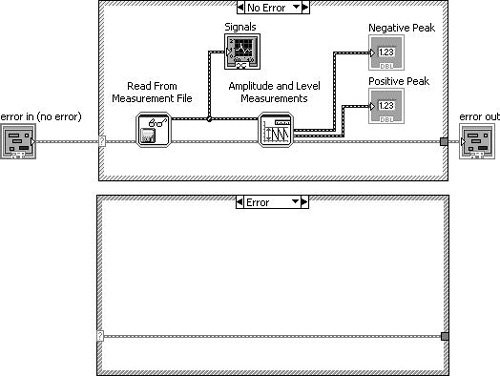
A subVI can fulfill expected behavior #1, by «wrapping» all of its functional code (its «work») inside of an Error Case Structure, which is simply a case structure that has an error cluster wired to its case selector terminal. As you can see in Figure 7.69, the Case Structure allows the error cluster datatype to be wired to its case selector terminal. When wired in this way, the Case Structure frame names change to «No Error» and «Error.» At run-time, if the error cluster does not contain an error, then the «No Error» frame will execute. Conversely, if the error cluster does contain an error, then the «Error» frame will execute.
Figure 7.69. An «Error Case Structure» containing an «Error» and «No Error» cases
Figure 7.70 shows how we can use a case structure to conditionally execute our functional code only when there is no «upstream error» (using the dataflow vernacular).
Figure 7.70. An «Error Case Structure» used to execute code only when there is no «upstream error»
Merge Errors
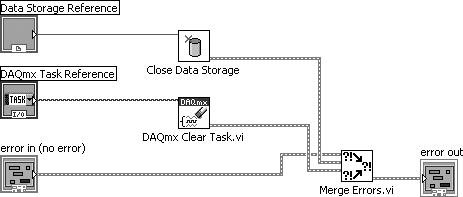
But, what about the situation where you want to do some clean-up work, even if an upstream error has occurred? In this case, you should not wrap your functional code in an Error Case Structure, but rather, merge the error cluster flowing out of your work with the upstream error cluster using Merge Errors.vi, as shown in Figure 7.71.
Figure 7.71. Using Merge Errors.vi to combine several error clusters into a single error cluster
An error cluster can contain information about one, and only one, error. (This is a limitation in the data structure that carries a long legacy.) Merge Errors.vi merges several errors cluster inputs into a single error output. However, if there are errors in more than one input, it must choose which of these errors will take top priority and be passed to error out. It uses a top-to-bottom priority scheme, giving error in 1 top priority, then error in 2, and so on.
In the example shown in Figure 7.72, it is critical that the upstream error be wired to error in 1 (the top-most error input terminal) to ensure that the upstream error takes priority over any errors that occur inside our subVI.
Figure 7.72. Merge Errors.vi
(Programming>>Dialog & User Interface palette). Merges error I/O clusters from different functions. This VI first looks for errors among error in 1, error in 2, and error in 3; then error array in and reports the first error found. If the VI finds no errors, it looks for warnings and returns the first warning found. If the VI finds no warnings, it returns no error.
Use merge errors to combine the error clusters of parallel tasks, or tasks that must each execute regardless of upstream errors.
Handling Errors in SubVIs
It is a good practice for a subVI to make a reasonable attempt to fulfill its contract (its stated job, per the software design requirements) in every way it can before passing an error up.
For example, imagine you are writing a routine that initializes an XY motion stage. (This might actually be the case, for some of our readers.) In order to find the home position (X = 0, Y = 0), the stage is moved at a low velocity toward a position sensor that outputs a digital signal of 1 (TRUE) when the stage reaches the home position. However, because there is a lot of electrical noise coming from the stage motors, the position sensor sometimes fails to report when the stage is at the home position (it sometimes jumps to 0, momentarily). This causes the initialization routine to fail at a rate of about one (1) out of twenty (20) tries, or 5% of the time. When it does fail, it always outputs the same error code. The noisy home position sensor signal has no other effect on the system, except for the occasional error during the homing operation.
Knowing what you know about the rate of failure and the type of failure, why not adapt your homing routine to retry (up to a certain number of times) before actually outputting an error message to the calling VI? This would make your code robust: fault tolerant and able to get the job done in spite of minor errors. Wouldn’t your end users be much happier if you made this change? Think of all those times they’ve started an experiment and came back to the lab an hour later expecting to find their experiment completed but, instead, they find that the system has generated that blankity-blank error while trying to home the stage… again!
OK, you agree that handling errors in subVIs is a great idea. Because the error cluster is just that, a cluster, you can use the cluster functions such as Unbundle By Name and Bundle By Name to access and modify the error data. For example, you can unbundle the error code.
Generating Errors in SubVIs
When you call a subVI or function and it generates an error, you can either try again (or perhaps try something else) or you can give up and propagate error (passing it downstream or up to the calling VI). But what happens when you want to generate a new error, perhaps because of an invalid input passed down from the calling VI? For this situation, you should use Error Cluster From Error Code.vi to generate a new error (see Figure 7.73).
Figure 7.73. Error Cluster From Error Code.vi
Error Cluster From Error Code.vi (Programming>>Dialog & User Interface palette) converts an error or warning code to an error cluster. This VI is useful when you receive a return value from a DLL call or when you return user-defined error codes.
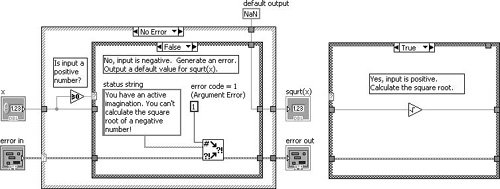
For example, Figure 7.74 shows how we might generate an error in a subVI when an invalid argument is passed into the subVI (the TRUE case of the inner Case Structure is shown only for illustration purposes). In this example (which is located on the CD at EVERYONE/CH07/Calculate Square Root with Error.vi), we are calculating the square root of a number x. If x is negative, we will output an error (error code 1, which signifies an argument error) and default output data.
Figure 7.74. Calculate Square Root with Error.vi block diagram
Giving Up: Displaying Error Messages to the User
If error conditions cannot be handled by subVIs or in your top-level application, you can «give up» (but, please don’t accept defeat too easily) and display an error message to the user. This is the «last resort» of error handling. Figure 7.75 shows an error being passed to Simple Error Handler.vi (found on the Programming>>Dialog & User Interface palette) to display a dialog containing the error information. In this case, we passed a negative number to the subVI shown in Figure 7.74, which is an invalid input.
Figure 7.75. Calling Calculate Square Root with Error.vi as a subVI
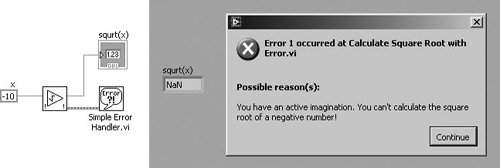
Figure 7.76. Simple Error Handler.vi
Simple Error Handler.vi (Programming>>Dialog & User Interface palette) indicates whether an error occurred. If an error occurred, this VI returns a description of the error and optionally displays a dialog box. This VI calls the General Error Handler VI and has the same basic functionality as General Error Handler but with fewer options.
Extra Tips for Error Handling
Use the following tips for successful error handling.
Use the Explain Error Dialog
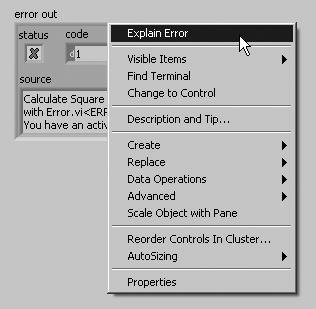
When an error cluster control or indicator contains an error or warning, you can learn more about an error by selecting Explain Error from the cluster’s pop-up menu, as shown in Figure 7.77.
Figure 7.77. Selecting Explain Error from the pop-up menu of an error cluster to open the Explain Error dialog (shown in Figure 7.78)
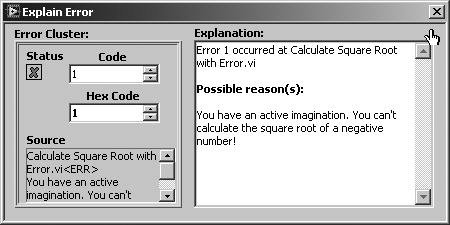
This will display the Explain Error dialog, as shown in Figure 7.78.
Figure 7.78. Explain Error dialog, which shows a detailed error explanation
Go with the Dataflow: Use Error In and Error Out Terminals
When you add error in and error out I/O terminals to your VIs, you allow calling VIs the opportunity to chain the error cluster wire to create dataflow dependencies between subVIs. Also, you are enabling applications to perform error handling, which is a good programming practice. Even if your subVI might not ever generate an error itself, put error I/O terminals on the front panel, and put an Error Case Structure on the block diagram (as you just learned) to allow errors to propagate through the software.
Make sure to wire error in to the lower-left terminal and error out to the lower-right terminal of the VI connector panethis is a best practice.
Define Your Own Errors: User-Defined Error Codes
For large applications, you might want to explore user-defined error codes, which are specific to your application. The LabVIEW Help documentation describes the process for defining and using this feature.
Don’t Get Stuck in a Loop: Test Error Status in Loops
It is almost always a good idea to check for errors inside of loops, so that you can exit the loop if an error occurs. Figure 7.79 shows how this is done. Note that the loop will stop if either the stop button is pressed or an error occurs.
Figure 7.79. Checking for errors in a While Loop to exit the loop when there is an error

Use Shift Registers to Pass Errors Through Loops
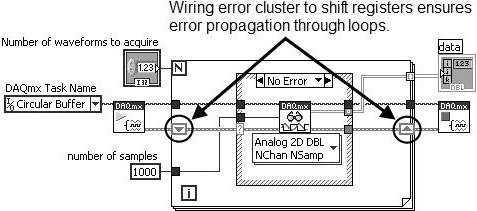
Always use shift registers (not tunnels) for passing error clusters through the wall of a loop. This is especially important for a For Loop, as shown in Figure 7.80. Remember, if a For Loop executes zero times, data still passes from the input shift register to the output shift register. Wiring error clusters to shift registers on a For Loop ensures that errors propagate through the For Loop if it executes zero times.
Figure 7.80. Using shift registers to pass errors through loops
Error Handling refers to the anticipation, response, and recovery from error conditions. Writing VIs and subVIs that incorporate error handling is considered good form, not only to allow the user indication of abnormal software execution, but also to allow the software to make decisions based on the status of previous operations. Including error handling in your code assists in troubleshooting (debugging), modularity, and user friendliness.
LV R&D architect Stephen Loftus-Mercer divides the topic of «error handling» into five (5) separate aspects in order to keep discussions on topic — error handling is too broad for most conversations. The divisions below were introduced by Stephen Loftus-Mercer in several informal settings; LV R&D architect Darren Nattinger was the first to present them formally.[1]
| Aspect | Details |
|---|---|
| Error Generation is the creation of an error cluster value at the point that something goes wrong in your LabVIEW code. Feature requests in this area cover readability of the error generation code on the diagram, simplicity of selecting the right error, and packaging valuable metadata with the error (such as the call chain, timestamp, or situation details). | Errors may be emitted by both VIs and built-in nodes. When writing a VI that will emit a new error, there are two options:
|
| Error Propagation is the act of moving an error value through your LabVIEW code. When an error has been created it should be propagated or responded to (next section). Feature requests in this area include ways of aggregating multiple errors together, extending case structure behaviors, stopping loops/systems when errors occur, merging errors from parallel code, hiding error wires and creating some sort of automatic error propagation rules, etc. | Propagation is accomplished using the error cluster and wiring from error inputs through the various code paths and out an error output. When propagating an error to a subVI, it is considered good practice to place error cluster input and output in the lower quadrants (error in on the left, and error out on the right). Multiple code/error paths can exist depending on data flow and parallelization.
The number one rule of error propagation is Don’t Break the Error Chain! An error chain is the code path of the error from the point of generation through the VI hierarchy to the point of being handled by an Error Response, Error Display, and/or Error Logging. A break in the error chain occurs if even one VI in the hierarchy fails to propagate the error correctly. This causes an error from an upstream node to be lost and makes debugging difficult. An error chain can be broken in three ways:
To attempt to avoid breaking the error chain, the following VI Analyzer test can be run:
|
Error Response is what you do in your LabVIEW code when an error occurs and you analyze the error value within the code to respond in a certain way. Feature requests include ways to simplify coding the following behaviors:
|
See Stephen Loftus-Mercer’s poster on Error Responses. Also, the developer could choose to enable Automatic Error Handling. However, automatic error handling assumes all error conditions are tested during development and requires special tooling (VI Scripting) to enable or disable the entire code base unless every output is wired by the time development is complete. The experts have strong opinions on whether automatic error handling should be used during development, although all agree that it should never occur in well-written released libraries and applications.[1] |
| Error Display is the act of displaying error information to the end user and/or code developer. Feature requests here include error localization (i.e., generating errors on French system but displaying them on an English system), meaningful translation for error codes, and rendering of the error metadata in a user-friendly form (color, pictures, tables, etc). Display also includes ways of providing advice on common causes of the error and how to fix the error. | As of LabVIEW 2019, this is almost always accomplished with Simple Error Handler.vi or General Error Handler.vi.
The General Error Handler.vi includes an input parameter for the type of dialog, one option is «no dialog.» It is recommended to use it instead of calling Error Code Database.vi. The primary reason for the recommendation is that the translation of error code cluster into human readable strings involves much more than just looking up text in the database. The source string itself may include information to override or extend the database, and the text in either the source string or the database may include formatting commands, such as HTML tags for bold face. Encoding information in the source string is a technique that will become more common in the future. You may desire to display the text, fully formatted, in a string indicator of your own instead of in any dialog. Use the function of General Error Handler CORE.vi (found on the block diagram of General Error Handler.vi) to do this. |
| Error Logging involves taking errors generated by LabVIEW code and logging them to file for later analysis. Error logging is similar to error display (above), but logging has some more interesting variations – recording in a human-readable form or is machine parseable, recording as localized or non-localized. Most importantly, whereas “no error” is not typically displayed to the user, it is critical that we be able to log “no error” so a log file can distinguish a successful run (“no error”) from an aborted/crashed run (one where the log file is empty). Feature requests in this area include mechanisms for making recorded errors readable and assistance debugging errors after the application finishes. | LabVIEW has no formal error log API because typically logging of errors needs to be folded into the general event logs of an API, which vary radically between applications. The error cluster can be translated into a loggable string by using the General Error Handler.vi, wiring «no dialog» to its input, and writing its string outputs to a log.
For more insight on why it is important to log «no error», please contemplate the 48th koan of Codeless Code: «The Protocols tell us of no fewer than Four Silences: the Silence Before Words, the Silence Between Words, the Silence of the Broken Pipe, and the Silence of Fallen Parcels. To the initiate they are as different as the characters for “end” 末 and “not yet” 未, although the outsider cannot tell one from the other.» |
External Links
- Error Handling Basics by NI.
- David Maidman’s Blog Post.
- SOLID Error Handling by Dmitry.
- Structured Error Handler Express VI by NI
- The Codeless Code, Koan 48
References
- ↑ 1.0 1.1 Nattinger, Darren. «What to Expect When You’re Expecting an Error» (NIWeek 2018)

.png)

.png)

