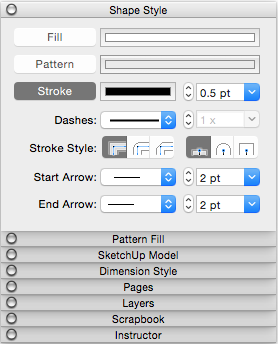
In LayOut, you can customize the color, width, style, and end points for lines, arcs, and freehand lines as well as strokes on shapes, text boxes, dimensions, labels, inserted images, and SketchUp model entities. You find all these options in the Stroke settings on the Shape Style panel.
Note: In graphics applications, the line around a shape or along a path is commonly called a stroke. That’s why LayOut uses the term Stroke settings for the settings that you use to customize lines as well as borders around shapes, images, and so on.
The following figure shows LayOut’s Stroke settings for your current operating system.

To modify a stroke in LayOut, follow these steps:
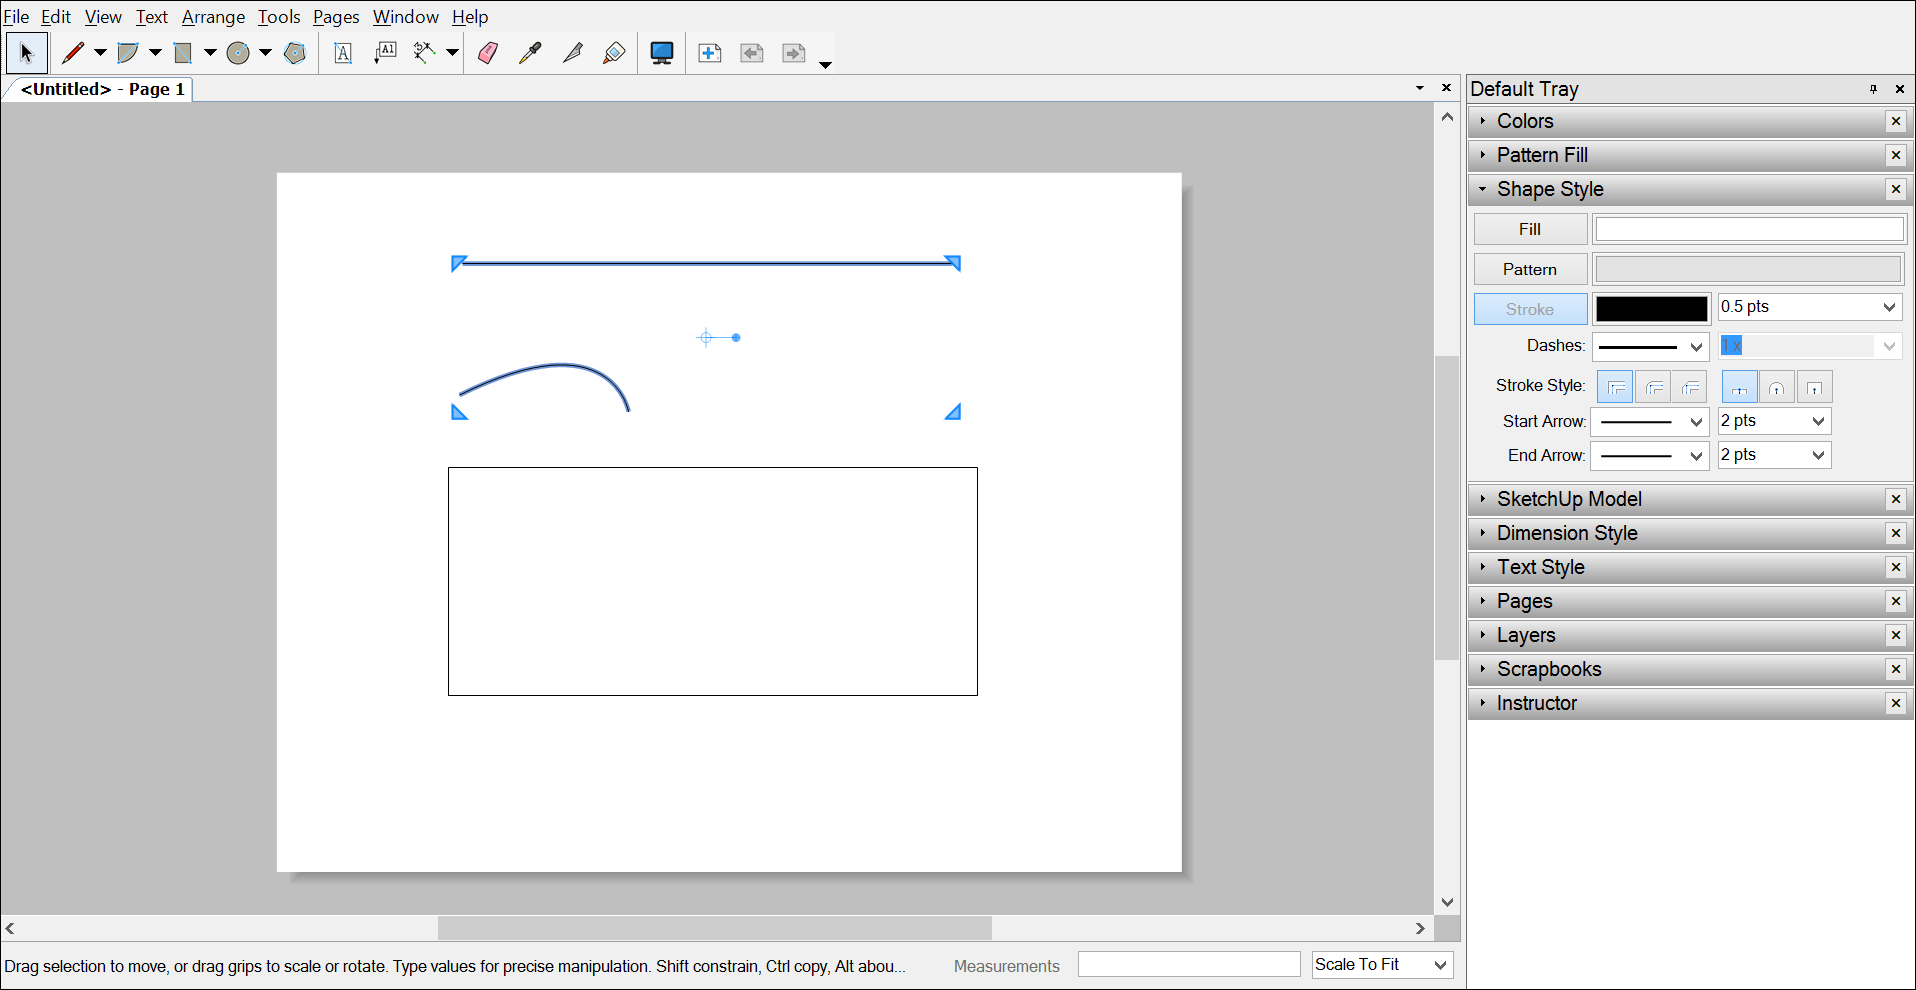
- Click the Shape Style panel to open it. If the Shape Style panel doesn’t appear in the tray or stack, select Window > Shape Style, and the Shape Style panel appears onscreen.
- Select the entity whose stroke you want to modify. You can select more than one entity by holding down the Shift key as you click. In this example, both the line and arc are selected. (See Selecting Things for more selection tips.)
Tip: You can change a document’s default Shape Style settings at anytime. Simply select a tool and make the Shape Style changes. Or if you’ve already created an entity, change its Shape Style settings and then use the Style tool (
 ) to sample that entity.
 - Click the Stroke option to select it. If the option is already selected, it’s highlighted, as shown in the following figure.
- Select your desired stroke settings, which are explained in detail in the upcoming list.
As mentioned earlier, LayOut enables you to change the color or width, transform solid lines into dashed ones, select a predefined style, and choose from a selection of start and end points. Here are the details on selecting all your options:
- Color: By default, your stroke is black. Click the color well to open a color picker and select a different color. You can select your color by using the color wheel, choosing specific RGB or HSB codes, and several other methods, all of which are explained in Choosing Colors.
- Width: Strokes have a default width of 0.5 points. In the box next to the color well, you can type a new value in points or a unit of measure (which LayOut automatically converts to points). Or, click the drop-down arrow and select a preset width.
- Dashes: LayOut is set to draw solid strokes. To make a dashed stroke instead, select a dash pattern from the first Dashes drop-down menu. After you select a dash pattern, you can select a dashes scale from the second Dashes menu: Either select a preset from the menu or type a value and press Enter (Microsoft Windows) or Return (Mac OS X).
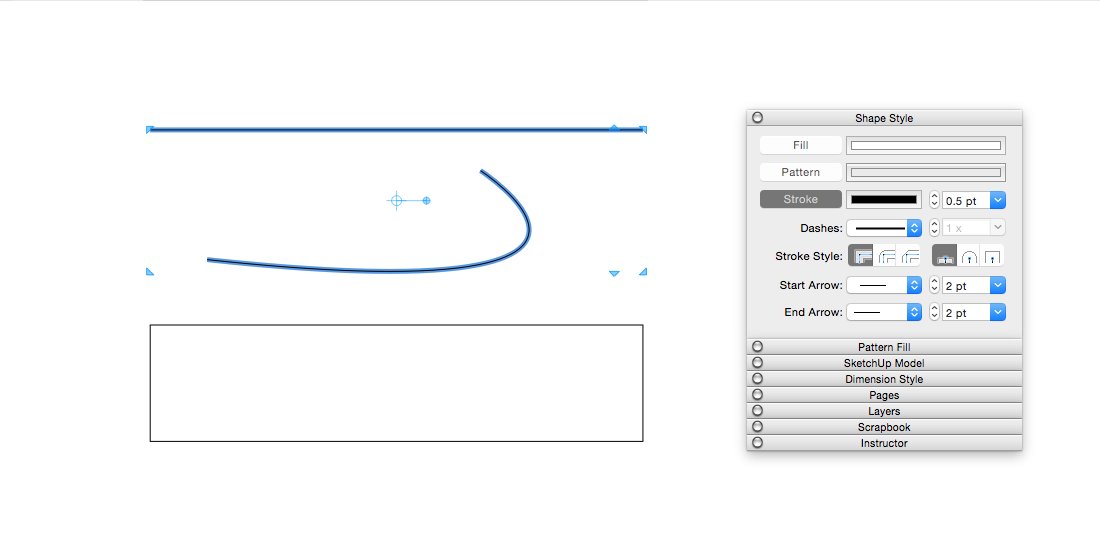
- Stroke Style: You can choose one of three Stroke Style corner options: Miter corners (the default), Round corners, or Bevel corners. If you select a line or arc with endpoints, you can select one of three Stroke Style end options: Flat ends (the default), Round ends, or Square ends. In the following figure, the straight line has Flat ends, and the arc has Round ends. Hover your cursor over each Stroke Style icon to see a ScreenTip displaying the icon’s name.
Tip: The corner stroke styles are subtle, so you may need to zoom in to see the corner effects.
- Start Arrow: You can add an arrow or end point to the start point of a line, arc, or dimension. Simply choose a Start Arrow style from the first drop-down list. To adjust how long or short the arrow is, relative to the line, select a Start Arrow scale from the second drop-down list.
- End Arrow: These options work just like the Start Arrow options, but add and style an arrow or end point on the last point of a line, arc, or dimension.
In the following figure, you see a few different combinations of the Stroke settings, and the straight line is selected so you can see the Stroke settings in the Shape Styles pane. The following table outlines the specific settings applied to each item.
Tip: To quickly and easily apply an entity’s fill and stroke settings to another entity, use the Style tool ( ). See Applying Styles for details.
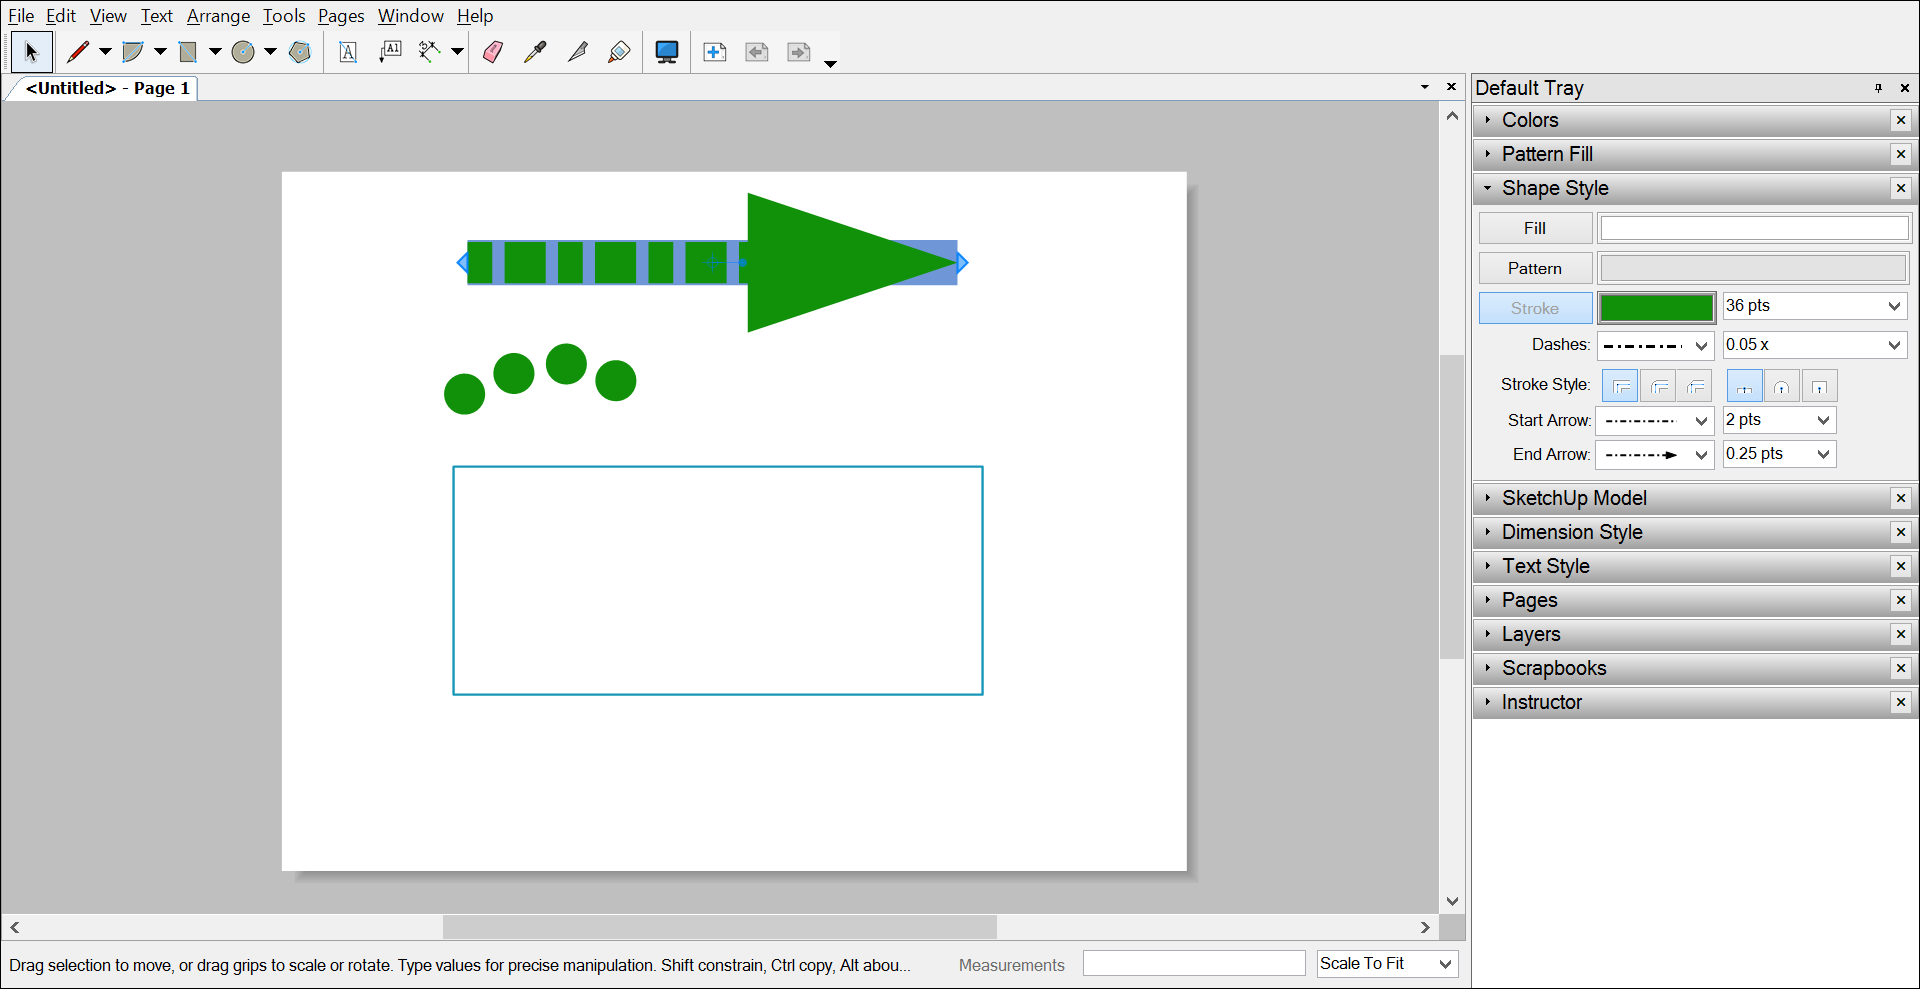
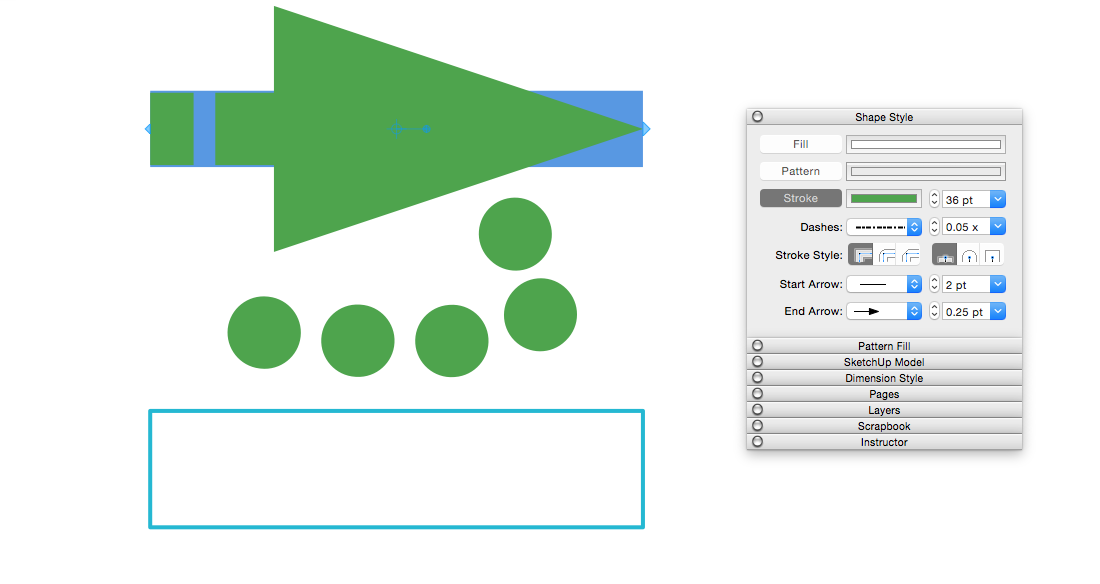
| Straight Line | Arc | Rectangle | |
|---|---|---|---|
| Color | Green | Green | Turquoise |
| Width | 36 points | 36 points | 2 points |
| Dash pattern | Dashed | Dashed | Solid |
| Dash scale | 0.25 points | 0.25 points | n/a |
| Stroke Style | Flat ends | Round ends | Round corners |
| Start Arrow | No | No | n/a |
| End Arrow style | Yes | No | n/a |
| End Arrow scale | 0.25 points | n/a | n/a |
How do you edit lines in Sketchup?
1. Select the Move tool ( ).
2. Hover the Move tool cursor over one of the line’s end points.
3. Click and drag the end point to change the line’s length.
How do you change lineart color?
1. Select the line art layer you want to change the color of.
2. On the color palette, select the desired color for the line art.
3. Select [Edit] menu > [Convert to drawing color].
4. The line art color will change to the color selected.
How do you change the color of your pencil in Sketchup?
1. Choose “color by material”
2. Open the group or component on witch you want to change edges colors.
3. Turn style on “wireframe”
4. Select all edges (ctrl A) Apply the color you want on edges.
5. Turn your style to Hidden Faces.
Can you import textures into SketchUp free?
Currently that feature isn’t available in SketchUp Free. You can import a SketchUp file that already contains the material and then apply it to your model. Or you can work on your SketchUp model in the desktop client version of SketchUp to add a custom material.19 jan. 2018
How do I change the color of my fabric in VRAY?
1. click on ‘Extentions’ menu on top of the SU window;
2. click on ‘V-Ray’;
3. click on ‘Tools’;
4. click on ‘Colorize Textures (Experimental)’ to enable this feature;
Can you make dashed lines in SketchUp?
How do I draw a line in a SketchUp face?
How do I change line weight in LayOut?
1. Click the layout tab for which you want to scale lineweights.
2. Click Output tab Plot panel Page Setup Manager.
3. In the Page Setup Manager, Page Setups area, select the page setup that you want to modify.
4. Click Modify.
5. In the Page Setup dialog box, under Plot Scale, select Scale Lineweights.
6. Click OK.
How do you color without lines?
How do I recolor in CSP?
You can change the color of a drawing (non-transparent areas) to another color. On the [Layer] palette, select the layer that you want to change the color of. Use a color palette to select the color you want to change to, then use the [Edit] menu > [Change color of line to drawing] to change the color.
What is a 8 bit layer?
What is LayOut SketchUp?
Sketchup Layout is designed to take the solid model from Google Sketchup Pro and convert it into orthographic views, presentation views and other working drawings. The user will use Google Sketchup Pro to create “Scenes” that will be equal to the orthographic views of a design (Front, Right Side, Left Side, Rear, etc.)
What are the 3 basic navigation tools in SketchUp make?
1. Using the SketchUp Orbit Tool.
2. The nice thing about this third option (clicking your scroll wheel) is that it keeps whatever tool you were using at the time active.
3. Using the SketchUp Pan Tool.
How do I use styles in SketchUp?
1. Select Window > Styles.
2. Click the Select tab (if it’s not already selected).
3. From the Styles Collections drop-down list, select a collection, such as Default Styles, Color Sets, or Sketchy Edges.
4. Click a style thumbnail.
Описание
Это базовый инструмент программы SketchUp для построения геометрии. Всё, что он делает — рисует прямую линию (ребро) от одной точки до другой. Казалось бы — проще некуда, но и здесь есть дополнительный функционал, который облегчает и значительно ускоряет моделирование. Впрочем, в этом весь SketchUp.
Итак, этот инструмент можно выбрать на основной панели инструментов или с помощью клавиши «L», в английской раскладке клавиатуры.
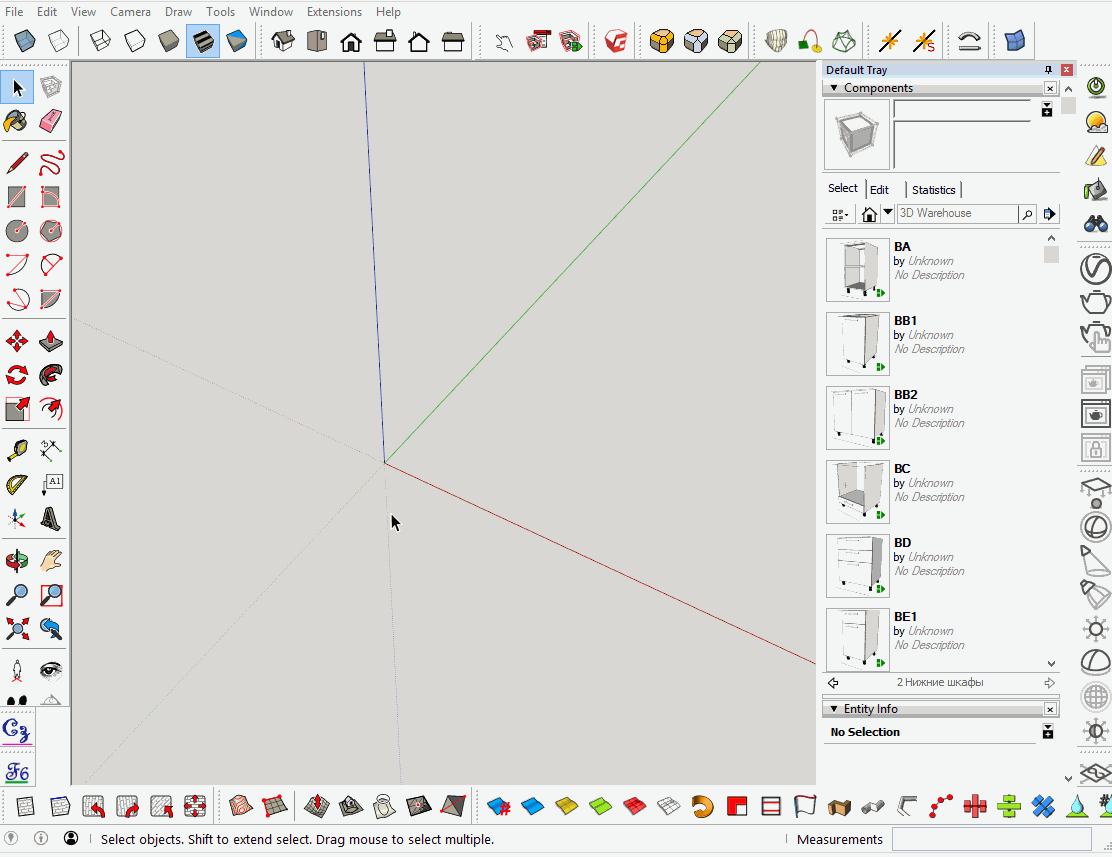
Принцип работы
Инструмент «Линия» работает в два простых действия:
- Первый клик мышью — стартовая точка линии;
- Второй клик мышью — конечная точка линии.
Всё, линия построена. Но, так как вся рабочая область программы — это трёхмерное пространство, нужно научится правильно позиционировать линии, задавать им направление и размер. Поэтому сразу переходим к фишкам этого инструмента.

Привязка к осям координат
На рабочей области программы SketchUp по умолчанию есть оси координат, которые мы обозначим для общего понимания так:
- Красная ось (X) — горизонтальная длина;
- Зелёная ось (Y) — горизонтальная ширина (глубина);
- Синяя ось (Z) — вертикаль (высота).
При рисовании инструментом «Линия», программа SketchUp будет стремиться привязать направление к одной из осей координат, в зависимости от направления движения мыши. Чем ближе параллельность линии к одной из осей координат, тем больше вероятность примагничивания к её направлению. Это видно сразу: линия выравнивается и подсвечивается цветом, который соответствует параллельной оси координат. Это значит, что сейчас линия рисуется строго параллельно этой оси. Чтобы продолжить растягивать линию параллельно этой оси, не нужно аккуратно вести мышь. Достаточно поймать это примагничивание и зажать клавишу Shift на клавиатуре. После этого, растягиваться линия будет строго параллельно выбранной оси, вне зависимости от положения курсора мыши.
Длина линии
После указания стартовой точки линии, отдаление от неё отображается в нижнем правом угла программы SketchUp, в маленьком окне измерений (Measurements). Это и есть длина линии. Чтобы задать нужную длину, введите с клавиатуры нужное значение и нажмите Enter. При этом не нужно никуда кликать. Просто берём инструмент «Линия», ставим стартовую точку первым кликом мыши, затем отводим мышь в нужную сторону, после чего набираем на клавиатуре цифрами нужный размер (например 256) и жмём Enter. Построении линии автоматически завершится. Её размер будет именно таким, который был набран на клавиатуре.
Построение плоскости
Если замкнуть между собой минимум три линии, то образуется грань (плоскость). При большим количестве линий важно помнить о том, что грани образуются только в том случае, если все её образующие её линии находятся в одной плоскости. Иначе грань просто не образуется и придётся либо рисовать заново, либо триангулировать (разбивать на треугольники) модель, чтобы создать несколько плоскостей.
Помните также о том, что грани могут иметь лицевую и изнаночную сторону. Правильная модель — когда вся видимая часть — это лицевые стороны граней. Особенно это актуально при визуализации (рендере). В этом случае изнаночные стороны граней могут отображаться неправильно.
Белый цвет — это лицевая сторона, серый — изнаночная. Если при замыкании линий образовалась изнаночная сторона, кликните по ней правой кнопкой мыши и выберите пункт «Перевернуть грани» (Reverse Faces). После этого грань перевернётся.
- Статус темы:
-
Закрыта.
Страница 2 из 211
-
- Регистрация:
- 27.05.09
- Сообщения:
-
10.444
- Благодарности:
- 11.625
Serj
Живу здесь
- Регистрация:
- 27.05.09
- Сообщения:
- 10.444
- Благодарности:
- 11.625
- Адрес:
- Пенза
Вы не такую картинку постите, а где настройки устанавливаются!
-
- Регистрация:
- 16.06.10
- Сообщения:
-
1.949
- Благодарности:
- 1.206
Владимир113
Живу здесь
- Регистрация:
- 16.06.10
- Сообщения:
- 1.949
- Благодарности:
- 1.206
- Адрес:
- Москва
Вот:
-
- Регистрация:
- 16.03.09
- Сообщения:
-
14.048
- Благодарности:
- 17.188
spacewalker
Архитектор
- Регистрация:
- 16.03.09
- Сообщения:
- 14.048
- Благодарности:
- 17.188
- Адрес:
- Россия, Москва; Беларусь, Минск
Мне кажется это проблемы русификации — некорректно шрифты отображаются
-
- Регистрация:
- 27.05.09
- Сообщения:
-
10.444
- Благодарности:
- 11.625
Serj
Живу здесь
- Регистрация:
- 27.05.09
- Сообщения:
- 10.444
- Благодарности:
- 11.625
- Адрес:
- Пенза
Еще скрины выложи «Справка-О программе …», «Инструменты-Параметры-шаблон» и региональные установки Windows.
Странно у вас вместо значка метры «m» показывает какой-то значок «n». Может какой косяк с установленными шрифтами по умолчанию? Проверь чтобы Arial стоял.
-
- Регистрация:
- 05.01.11
- Сообщения:
-
3.568
- Благодарности:
- 10.515
moning
Михаил
- Регистрация:
- 05.01.11
- Сообщения:
- 3.568
- Благодарности:
- 10.515
- Адрес:
- Бельцы
Извините за такой глупый вопрос
Как сделать стекло прозрачным? -
- Регистрация:
- 30.08.11
- Сообщения:
-
1.288
- Благодарности:
- 1.058
Deonisus
… я только учусь
- Регистрация:
- 30.08.11
- Сообщения:
- 1.288
- Благодарности:
- 1.058
- Адрес:
- Орел
Окно — Материалы — Светопроницаемые
В этом разделе все прозрачное, так-же прозрачным можно сделать любую заливку.
После выполнения заливки — в окне «Материалы» переходим на закладку «Правка» — в самом низу окна замечаем движок с заголовком «Непрозрачность»
100% — Непрозрачный совсем.
0% — Прозрачнее не бывает.Вложения:
-
- Регистрация:
- 05.01.11
- Сообщения:
-
3.568
- Благодарности:
- 10.515
moning
Михаил
- Регистрация:
- 05.01.11
- Сообщения:
- 3.568
- Благодарности:
- 10.515
- Адрес:
- Бельцы
Вот спасибо большое всё получилось
-
- Регистрация:
- 05.01.11
- Сообщения:
-
3.568
- Благодарности:
- 10.515
moning
Михаил
- Регистрация:
- 05.01.11
- Сообщения:
- 3.568
- Благодарности:
- 10.515
- Адрес:
- Бельцы
Вопрос
Как прокрасить линию в нужный цвет и сделать нужной толщины проведённую карандашом? -
- Регистрация:
- 16.03.09
- Сообщения:
-
14.048
- Благодарности:
- 17.188
spacewalker
Архитектор
- Регистрация:
- 16.03.09
- Сообщения:
- 14.048
- Благодарности:
- 17.188
- Адрес:
- Россия, Москва; Беларусь, Минск
В скетчапе такое не возможно, только при изменении стиля. Для 2D оформления есть есть приложение Layout. Скетч — это объемное проектирование.
-
- Регистрация:
- 27.05.09
- Сообщения:
-
10.444
- Благодарности:
- 11.625
Serj
Живу здесь
- Регистрация:
- 27.05.09
- Сообщения:
- 10.444
- Благодарности:
- 11.625
- Адрес:
- Пенза
-
- Регистрация:
- 05.01.11
- Сообщения:
-
3.568
- Благодарности:
- 10.515
moning
Михаил
- Регистрация:
- 05.01.11
- Сообщения:
- 3.568
- Благодарности:
- 10.515
- Адрес:
- Бельцы
Спасибо за ответ
Да я так и понял что нужно делать как Serj предлогаетЖаль что это не возможно
-
- Регистрация:
- 27.05.09
- Сообщения:
-
10.444
- Благодарности:
- 11.625
Serj
Живу здесь
- Регистрация:
- 27.05.09
- Сообщения:
- 10.444
- Благодарности:
- 11.625
- Адрес:
- Пенза
-
- Регистрация:
- 05.01.11
- Сообщения:
-
3.568
- Благодарности:
- 10.515
moning
Михаил
- Регистрация:
- 05.01.11
- Сообщения:
- 3.568
- Благодарности:
- 10.515
- Адрес:
- Бельцы
Вроде для начала получилось вот что (вложенный фаил)
Нарисовал первый этаж своего дома для того чтоб сделать разводку труб
Единственное не могу докумекать как отобразить трубы по трём плоскостям диаметром на Ф20
Нужна подсказака как это сделать?Вложения:
-
- Регистрация:
- 30.08.11
- Сообщения:
-
1.288
- Благодарности:
- 1.058
Deonisus
… я только учусь
- Регистрация:
- 30.08.11
- Сообщения:
- 1.288
- Благодарности:
- 1.058
- Адрес:
- Орел
Простите но у Вас получился действительно рисунок, не пробовали стены рисовать той толщины которой они будут в действительности, ступени, окна, да вообще все.
Просто встает вопрос: если все здание нарисовано эскизом, то для чего Вам рисовать именно круглые трубы, да наверняка еще и с закруглениями, загибами, фитингами? Просто многие стены съедят площади от Ваших эскизов — возможно придется переместить окна, двери, переместить унитаз, ванную — соответственно возможно будут другие загибы и т. д. и т. п. -
- Регистрация:
- 05.01.11
- Сообщения:
-
3.568
- Благодарности:
- 10.515
moning
Михаил
- Регистрация:
- 05.01.11
- Сообщения:
- 3.568
- Благодарности:
- 10.515
- Адрес:
- Бельцы
Да мне нет необходимости рисовать стены той толщины которые в реальности
Я всё нарисовал с внутренними размерамиДля чего круглые
Да лиш для того чтоб при вращении самого рисунка плоские трубы не сливались с вертикальными стенами, а круглые как ни поворачивай они серавно будут видны и фитинги мне нет необходимости рисоватьЯ все эти вещи рисовать не буду, а то что съедят площядь то в этом ничего страшного нет
Для чего мне свё это надо
Хочу попросить совета по отоплению
А мне ответили чтоб для них было всё понятнее надо нарисовать всё в аксонометрии
Вы уж меня простите я не сталкивался так в плотную с этой программой только вот щас пытаюсь что-то в ней рисовать


")

Страница 2 из 211
- Статус темы:
-
Закрыта.