1. With the Select tool ( ), select the geometry you want to scale.
2. Select the Scale tool ( ) or press the S key.
3. Click an edge or face grip (not a corner grip).
4. Move the cursor to scale the entity.
5. Click to set your selection’s new scale.
What is the scale tool in SketchUp?
The scale tool is a great function in Sketchup, allowing quick resizing of objects while retaining proportions. Most of us use the scale tool on groups and components, but you can also scale anything in Sketchup, including any number of entities in a selection.4 mai 2013
How do I scale 2d in SketchUp?
The scale tool makes this very easy. Go ahead and draw a triangle in your model (more info on this in my tutorial on drawing shapes in SketchUp). Select your triangle by drawing a selection box around it. Once you’ve done this, select the scale tool by clicking on the scale icon or by using the keyboard shortcut “s”.17 août 2014
How do you change the size of an object in SketchUp?
You can’t change the dimensions because that’s not how it works in SketchUp. If you know the dimensions you want for the rectangle, click and release to set the first corner. Move the mouse to drag out the rectangle in the general direction you want it. Let go of the mouse and type the dimensions.26 oct. 2018
How do you scale down a model?
1. Draw a rough sketch of your object that needs scaled down in order to build the model.
2. Write the original dimensions of the height and width next to the appropriate sides.
3. Multiply the height by 12, because 12 inches equals one foot.
4. Divide 480 by 10.
How do you scale a floor plan?
It should tell you what the scale is for a particular paper size. The scale for floor plans can be shown in two different ways: As equivalent measurements, eg 1/8″ = 1′ or 1cm = 1m, “an eighth of an inch represents 1 foot” or “1cm represents 1m” As a ratio eg 1:96 or 1:100, “one to forty eight” or “one to one hundred”
How do you scale something?
To scale an object to a larger size, you simply multiple each dimension by the required scale factor. For example, if you would like to apply a scale factor of 1:6 and the length of the item is 5 cm, you simply multiple 5 × 6 = 30 cm to get the new dimension.
How do you use a scale tool?
The Scale Tool is under the Free Transform Tool on the Toolbar . Click, hold, and select to bring it to the top level. Select an object to scale, then go to the Reference Point Selector in the Control Panel and select the point that you want the object to resize from.
How do you use a scaling tool?
How do you do scale drawings?
What is a scale of 1 100?
A 1:100 scale is the representation of an object and/or subject that is 100 times smaller that it’s real world size of 1. So when reading this scale, 1 unit is the equivalent and equal to 100 units.23 jan. 2020
Which key do you press and hold to scale the height and width of a selection at the same time?
Shift
How do I reduce the size of a SketchUp file?
You can also reduce the file size within the Sketchup Web App. With the app open, click on the “components” icon in the righthand toolbar to open the “components” tab. There is a button at the top of the tab with a recycling icon on it. Click on this button to purge any unused components in your model.28 mai 2019
How do I draw a rectangle with specific dimensions in SketchUp?
How do I resize a box in SketchUp?
In SketchUp, you can resize and reshape your model based on the relative sizes of your edges and faces. Here’s a quick overview of the available options:
- Scale your entire model with the Tape Measure tool.
- Resize entities while maintaining their proportions with either the Tape Measure tool or the Scale tool.
- Stretch or squish an entity to scale with the Scale tool. For example, stretch a cabinet so it’s twice its current width or narrow a car by 5 percent.
- Scale a single component or every component in your model.
The following video shows how the Scale tool can scale geometry proportionally or stretch its dimensions.
If you’re looking for details about scaling your entire model or detailed steps that walk you through SketchUp’s scaling features, check out the sections later in this article.
Table of Contents
- Scaling your entire model
- Scaling a selection proportionally
- Stretching or squishing geometry to scale
- Scaling components
Scaling your entire model
When you want to scale your entire model, use the Tape Measure tool.
Tip: The Tape Measure tool enables you to scale precisely by specifying the desired dimension between two points. This line is referred to as the reference line.
To scale an entire model, such as the floor plan in this example, follow these steps:
- Select the Tape Measure tool (
 ) or press the T key. The cursor changes to a tape measure.
 - Measure the distance between two points on your model. In this example, say you know the width of the stairs needs to be 48 inches. Here’s how to measure that distance:
- Click one end of a line segment to set the starting point of a measurement. Use the SketchUp inference engine to make sure you click the exact point.
- Move the mouse to the end point of the same line segment. As you move the mouse, a temporary measuring tape line, with arrows at each end, stretches out from your starting point.
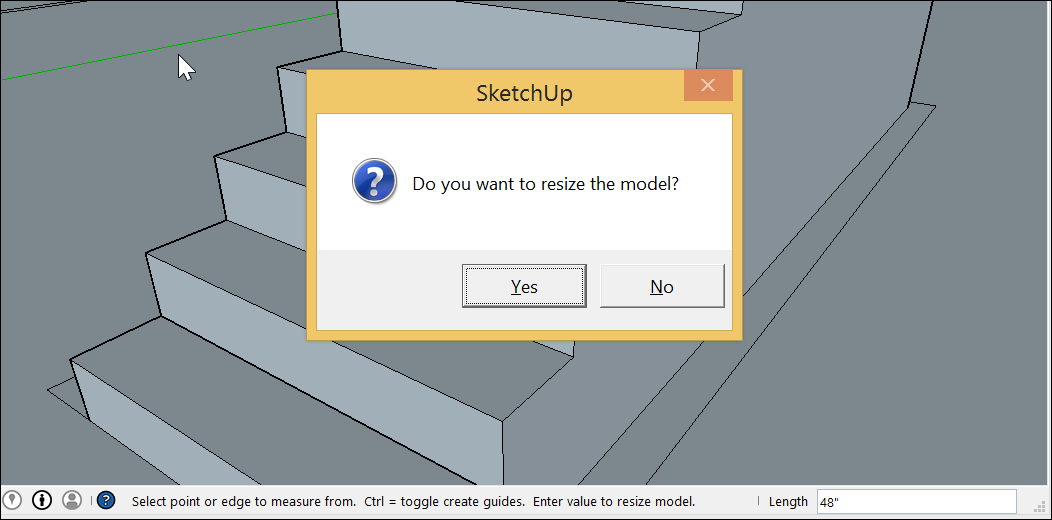
- Click at the other end of the line segment, as shown in the figure. The final distance appears in the Measurements box.
- Type a new size for the line, which appears in the Measurements box, and press Enter. This size is the basis for a proportional rescale of your model. In this example, the reference line is scaled to 48”.
Tip: You can use imperial or metric units. SketchUp understands both. Just be sure to specify your desired unit if it’s not your template’s default unit of measurement.
- When the following dialog box asks whether you want to resize your model, click the Yes button, and the model is rescaled proportionally.
 ) or press the T key. The cursor changes to a tape measure.
Scaling a selection proportionally
When you want to resize geometry within your model and maintain its proportions, you can use either the Tape Measure tool or the Scale tool. Your choice depends on how you want to set the scale:
- To base the scale on the size of a specific line, use the Tape Measure. For example, you find out one room in your floor plan can only be 10 feet wide, but the rest of the floor plan can stay the same. Or you know a statue must be 3 meters tall.
- To resize your selection based on a percentage of your original size, use the Scale tool. For example, choose this method if you want to increase your selection’s size by 200% or decrease it to 50%.
To scale part of your model with the Tape Measure, follow these steps:
- With the Select tool (), select the entities you want to scale.
- Context-click your selection and, from the context menu that appears, select Make Group.
- Double-click the group. A box of dashed lines appears around the group, indicating that you’ve opened the group, as shown in the figure.
- Select the Tape Measure tool () or press the T key.
- Click one end point of your reference line. Use the SketchUp inference engine to make sure you click the exact end point.
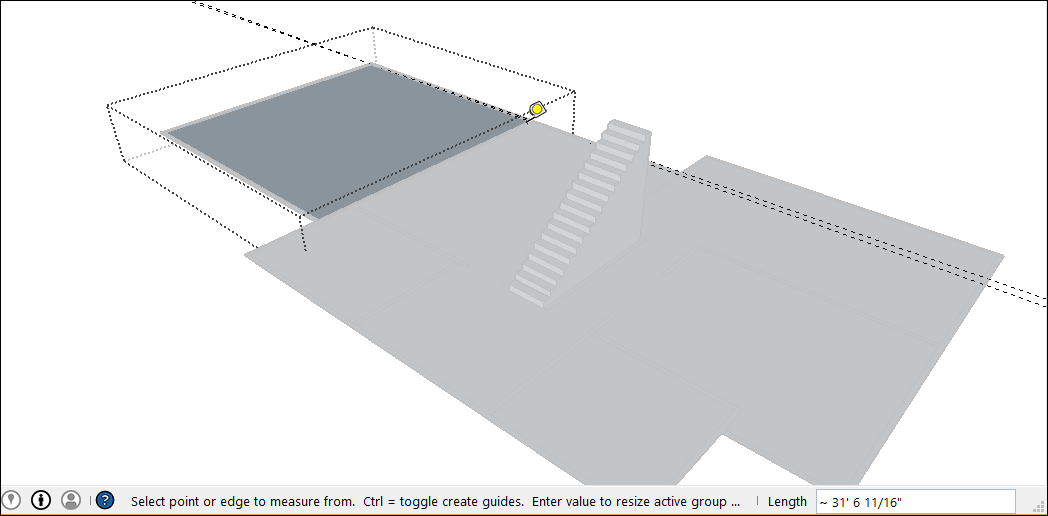
- Click the other end point of your reference line. The current distance appears in the Measurements box, as shown in the figure. In the example, say you need to decrease this width to 10 feet, due to issues on the site where the floor plan will be built.
- Type a new size for the line (in this example, you type 10′) and press the Enter key. This size will be used as the basis for a proportional rescale of your model. SketchUp asks whether you want to resize your group or component.
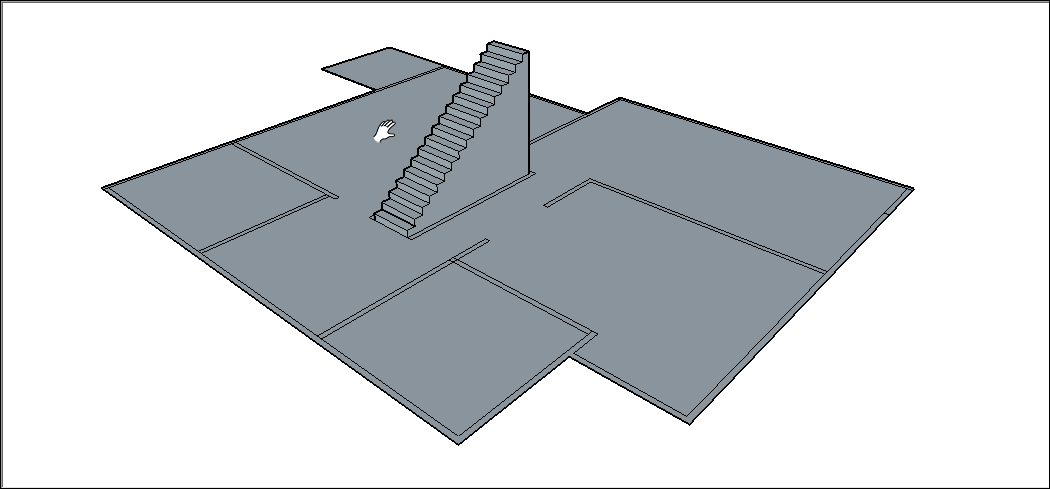
- Click the Yes button, and your selection rescaled proportionally. Check out the result in the following figure. That’s a much smaller room.
 ), select the entities you want to scale.
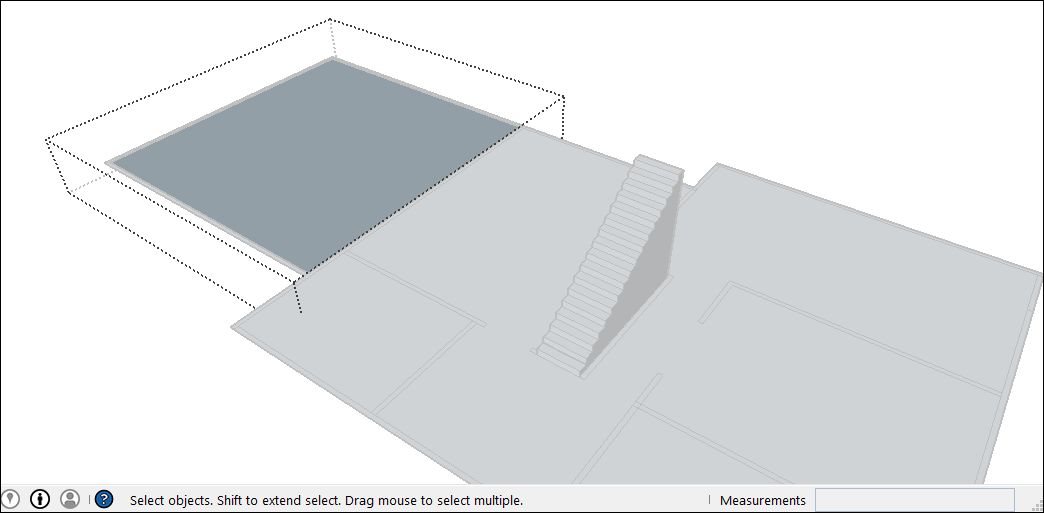
Note: This process also works with components. See Adding Premade Components and Dynamic Components for an introduction to components. The Scaling components section later in this article explains how scaling only affects a single component or all component instances in a model.
When you want to scale your model proportionally by a percentage, the Scale tool can do the job easily. Imagine you’re not sure how to talk to your client about decreasing a room in their floor plan to 10 feet wide, so you model an elephant in the room while you think it over. Here’s how to scale that elephant, or any other selection in your model, by a percentage:
- With the Select tool (), select the geometry you want to scale. This step is important if you want to scale a complex 3D selection. If you have an easy selection, like a 2D shape or a surface entity, you can skip this step.
- Select the Scale tool () or press the S key. A yellow box with green grips appears around your selection, as shown in the figure. If you skipped Step 1, click the geometry with the Scale tool cursor.
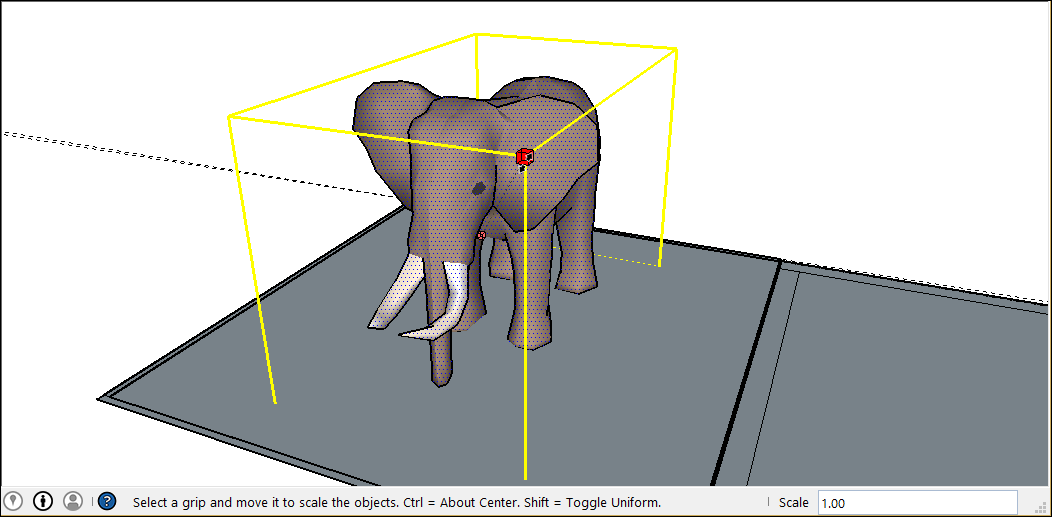
- For a uniform scaling, or one that keeps your selection proportional, click a corner scaling grip. The selected grip and the opposite scaling grip turn red, as shown in the following figure, and in the Measurements box, you see a scale of 1.00, which means your geometry is at its original size, or scaled to 100%.
Alternatively, you can tap Shift to toggle Scale Uniformly which will prevent the Scale operation from deforming the geometry.
- Move the cursor to scale the entity. The Measurements box displays the scale dynamically. Press the Esc key at any point to start over. To set the scale from the center instead of the opposite corner, tap the Ctrl key (Windows) or the Option key (macOS) to toggle this functionality while you move the red corner grip.
- Click to set your selection’s new scale. Or type the desired scale dimensions and press Enter.
Note: Technically, in Step 5, you can type a dimension, such as 2m or 3″, instead of a scale dimension. However, scaling based on a dimension with the Tape Measure is generally more intuitive.
 ) or press the S key. A yellow box with green grips appears around your selection, as shown in the figure. If you skipped Step 1, click the geometry with the Scale tool cursor.
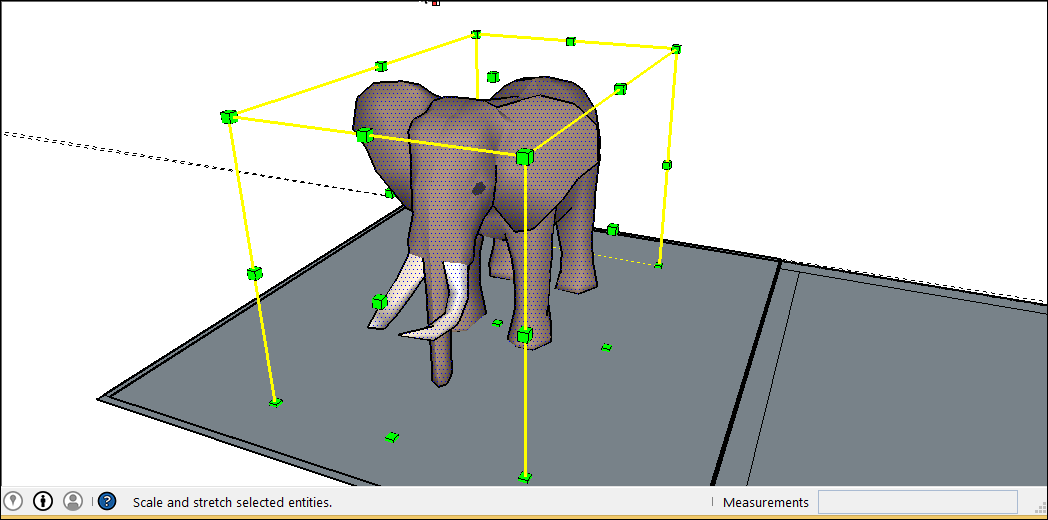
Stretching or squishing geometry to scale
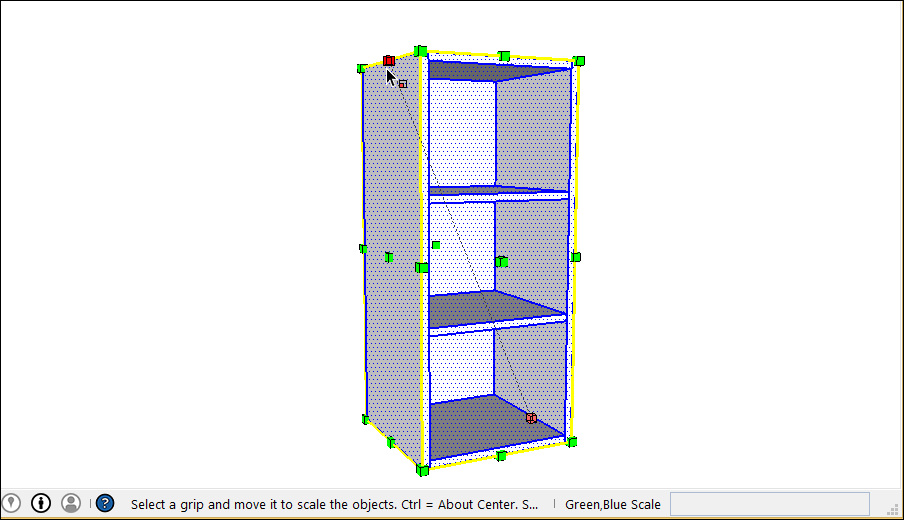
Sometimes, you need to scale only one dimension of a model (or maybe two). To do so, use the Scale tool’s edge or face grips. Here’s how the process works, using a cabinet as an example:
- With the Select tool (), select the geometry you want to scale. This step is important for a complex a 3D selection. Skip this step for an easy selection, like a 2D shape or a surface entity.
- Select the Scale tool () or press the S key. A yellow box with green grips appears around your selection. If you skipped Step 1, click the geometry with the Scale tool cursor.
- Click an edge or face grip (not a corner grip). The selected grip and the opposite scaling grip turn red, as shown in the figure, and in the Measurements box, you see a scale of 1.00, which means your geometry is at its original size, or scaled to 100%. The Measurements box also displays the axis direction for your scale, such as Blue Scale or Red Scale. If you select an edge grip, you see two axes, such as Red, Green Scale.
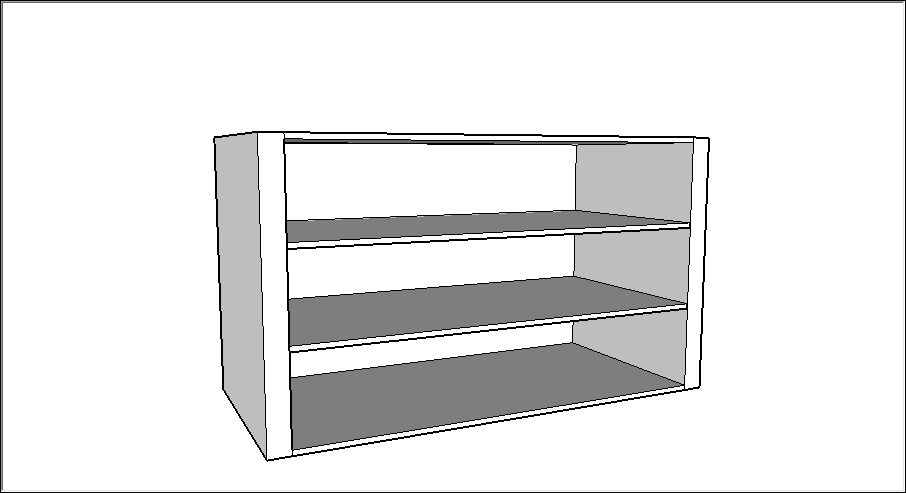
- Move the cursor to scale the entity. The Measurements box displays the scale dynamically. Press the Esc key at any point to start over. To set the scale from the center instead of the opposite edge or face, tap the Ctrl key (Windows) or the Option key (macOS) to toggle this functionality while you move the red corner grip.
- Click to set your selection’s new scale. Or type the desired scale dimensions, and press Enter. To set the scale on two or even three axes, type two or three numbers, each separated by a comma, such as 3,2. In this example, you see the original cabinet was scaled to be twice as wide but half the height.
Tip: If you have trouble controlling the scale direction, try repositioning the drawing axes to your selection. To do so, select Tools > Axes from the menu bar. With the Axes tool cursor, click corner you want to use to align the drawing axes. Then move the cursor so that it snaps the edge to which you want to align your inferred axis and click to confirm the change. (The inference is red, green, or blue depending on the direction you move your cursor.) See Adjusting the Drawing Axes for details about working with the drawing axes.
Scaling components
You can use these scale techniques on components as well as everyday geometry. (See Adding Premade Components and Dynamic Components for an introduction to components.) When you scale a component, however, you can resize a single instance of the component or all component instances in your model:
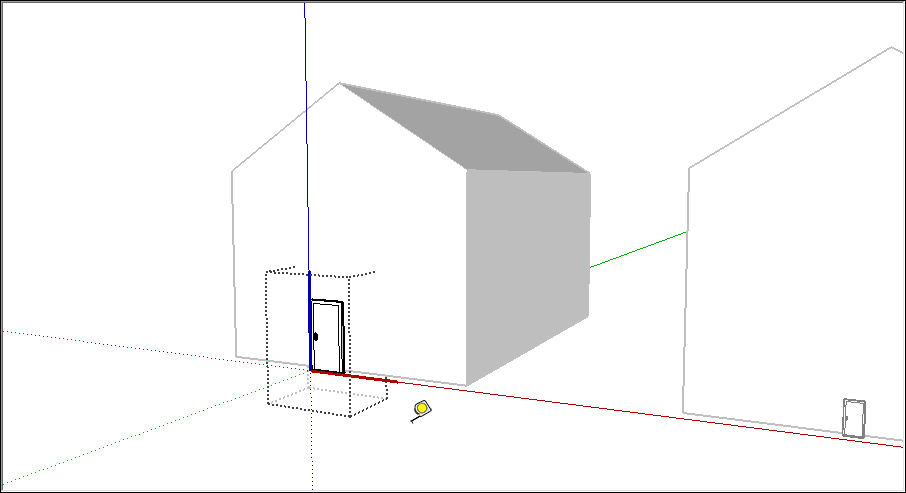
- Scaling a component changes only the individual instance. This feature allows you to have differently scaled versions of the same component in your model. To scale a single instance, click the component instance with the Scale tool and use the grips to set the new scale, using any Scale tool technique explained earlier in this article. The following figure shows scaling a door component downloaded from the 3D Warehouse.
- Scaling an entity within a component scales every component instance. To scale an entity in a component, you need to open the component by double-clicking it. Dashed lines appear around the component, and the lines and faces within the component become editable, as shown in the following figure. With the component open, you can, for example, scale a line entity. This action affects the component definition and, therefore, all instances of the component are scaled to match. With the component open, you can select a line, and therefore can scale with either the Scale tool or the Tape Measure tool, as explained earlier in this article. Note, however, that a uniform scale using the Tape Measure tool is often the easiest way to scale all components in a model.

Быстрое выделение
В зависимости от количества кликов по левой кнопке мыши один и тот же инструмент «Выделение» (Select) работает по-разному:
a. выбрать поверхность или ребро — один клик;
b. выбрать поверхность вместе с прилегающими рёбрами — двойной клик;
c. выбрать объект целиком — тройной клик.
Перемещение по осям

В SketchUp есть много преднастроенных привязок: к вершинам, линиям и плоскостям. А есть и такие, которыми можно управлять с клавиатуры — например, во время перемещения или копирования объекта:
a. переместить объект строго вверх (по синей оси Z) — с зажатой на клавиатуре стрелкой «вверх»;
b. переместить вправо или влево (по красной оси Y) — с зажатой стрелкой «вправо»;
c. переместить назад или вперёд (по зелёной оси X) — с зажатой стрелкой «влево».
Точное перемещение и поворот
При перемещении, повороте и копировании объектов в SketchUp можно задать точную дистанцию или угол — для этого нужно ввести значение в окне Measurements, расположенном в нижней панели интерфейса:
→ выбрать инструмент «Перемещение или копирование» (Move/Copy) или «Поворот» (Rotate) → начать выполнять действие (при копировании зажать клавишу Ctrl) → ввести с клавиатуры дистанцию или градус поворота → нажать Enter, чтобы завершить действие.
Указать точную дистанцию или угол поворота можно с клавиатуры прямо во время выполнения операции, не устанавливая курсор в окно Measurements.
Множественное копирование
Массив в SketchUp — это набор одинаковых объектов в модели (объектов с одинаковыми параметрами). Массив может быть линейным (копии объекта распределяются по прямой линии) и круговым (объект копируется с поворотом).
a. Чтобы создать сразу несколько копий объекта и расположить их на равном расстоянии друг от друга, нужно:
→ скопировать объект один раз на нужное расстояние → ввести с клавиатуры «х» (или «*») и прописать точное количество объектов, например: «х5» (или «*5») → нажать Enter, чтобы завершить действие.
b. Чтобы скопировать объект несколько раз и расположить копии в рамках точно заданного расстояния, нужно:
→ скопировать объект один раз, указав в окне Measurements точную дистанцию; → ввести с клавиатуры «/» и прописать точное количество объектов → нажать Enter, чтобы завершить действие.
Работа с компонентами

Компоненты в SketchUp — это созависимые копии одного объекта или группы объектов: при изменении содержимого в одном из компонентов изменения отобразятся и в других.
Если все повторяющиеся элементы модели создавать как компоненты, можно значительно облегчить вес файла SketchUp и избежать рутинной работы по редактированию и копированию одинаковых объектов. Для этого нужно:
→ создать объект → кликнуть правой кнопкой мыши → выбрать опцию «Создать компонент» (Make Component).
Компоненты можно также:
a. Редактировать «снаружи», независимо от других копий — например, масштабирование (Scale), вращение (Rotate) или перемещение (Move), не повлияет на другие копии.
b. Отсоединять от общего семейства и редактировать «внутри» независимо от других копий — для этого:
→ выбрать компонент → кликнуть правой кнопкой мыши → выбрать опцию «Сделать уникальным» (Make Unique).
Повторное выдавливание и офсет
При выдавливании (или экструдировании) поверхностей инструмент Push/Pull запоминает значение, которое использовалось для предыдущего действия.
Чтобы выдавить несколько плоскостей на одинаковое расстояние, нужно:
→ выдавить первую поверхность, указав нужную дистанцию с клавиатуры → навести курсор на следующую плоскость → кликнуть 2 раза левой кнопкой мыши.
То же самое применимо к инструментум Offset.
Точное масштабирование

При масштабировании объектов в SketchUp можно вручную задать пропорцию увеличения или уменьшения или указать точное значение нового размера — для этого необходимо ввести значение в окне Measurements, расположенном в нижней панели интерфейса:
a. Чтобы изменить размер объекта в точное число раз, нужно:
→ выбрать объект и начать и масштабирование → ввести с клавиатуры нужную пропорцию (например «0,7» или «1,3») → нажать Enter, чтобы завершить действие.
b. Чтобы приравнять размер объекта или какой-либо из его сторон к конкретному числу, нужно:
→ выбрать объект → выбрать инструмент «Масштабирование» (Scale) → выбрать бегунок c той стороны, которую необходимо увеличить/уменьшить → ввести с клавиатуры новое значение и единицы измерения
c. Чтобы изменить размер всех объектов в группе в соответствии с известным новым размером одного из объектов, нужно:
→ зайти в группу и выбрать объект → выбрать инструмент «Рулетка» (Tape Measure Tool) → измерить одну из сторон объекта в группе → ввести новое значение длины в окне Measurements → нажать Enter → в диалоговом окне выбрать «да» (Yes).
Переопределение осей в группе
Иногда оси отдельных групп или компонентов в модели отличаются от осей рабочего пространства SketchUp. Так бывает, например, если сгруппировать обьект после поворота — или при работе со скачанными компонентами. Несоответствие осей объекта и рабочего пространства программы мешает корректно масштабировать объекты и пользоваться привязками к осям внутри групп.
Чтобы переопределить систему координат внутри группы, нужно:
→ зайти в группу → выбрать инструмент «Оси» (Axes) → подвести курсор к одной из вершин любого из объектов → «примагнитить» новые оси к граням с нужным направлением.
После переопределения осей можно корректно масштабировать и изменять объекты без привязки к основной системе координат SketchUp.
Создание дуг и окружностей
При черчении арок и окружностей в SketchUp можно контролировать плавность дуги — для этого нужно задать точное число сегментов в окне Measurements, расположенном в нижней панели интерфейса:
→ выбрать инструмент «Арка» (Arc) или «Круг» (Circle) → ввести с клавиатуры число сегментов → приступить к созданию дуги или окружности.
Видео YouTube
Видео YouTube
Инструмент Scale (Масштабировать)
Инструмент Scale (Масштабировать)

Инструмент используется для изменения размеров и пропорций объектов целиком и их отдельных элементов для искажения. Для указания объекта будущего масштабирования возможны два варианта выбора (как и для других ранее рассмотренных инструментов редактирования): можно или предварительно выбрать его инструментом Select, а затем выбрать (включить) инструмент кликом на кнопке (стандартный курсор изменяется на изображение инструмента), или сначала включить инструмент, а затем кликнуть его курсором на объекте (элементе).
Прежде всего запомним принципиальное ограничение механизма масштабирования SketchUp – он работает только и всегда по направлениям осей сцены (красной, зеленой синей)! Что это значит? Посмотрим, что происходит при работе инструмента на примере кубика, «правильно» ориентированного по осям, т.е. такого, в котором каждая из граней (поверхностей) параллельна одному из планов осей, а ребра, соответственно, параллельны осям. Сначала выберем для масштабирования одну из граней, например – верхнюю, т.е. фактически рассмотрим работу инструмента на плоской форме. Появляется габарит грани из желтых линий с зелеными кубиками – grip (зажимами) в углах и в серединах ребер – всего 8 шт. на поверхность. Каждая пара зажимов «отвечает» за возможное направление масштабирования в одну и другую сторону. В этом «плоском» примере, понятно, будут задействованы только две оси – зеленая и красная.

Разобраться с тем, что происходит при перемещении зажимов в середине ребер, достаточно просто – грань будет масштабироваться вдоль оси в направлении перетягивания зажима. Аналогично инструмент работает с зажимами, расположенными в углах грани, только теперь уже происходит пропорциональное (uniform) масштабирование, т.е. одновременно по двум осям (в примере на третьем рисунке выше – красной и зеленой), поскольку направление масштабирования находится под углом к планам осей сцены.
Варианты действия:
– с нажатой клавишей Ctrl происходит двунаправленное масштабирование (в обе стороны) по линии, соединяющей зажимы от центра выбранного элемента;
– попеременное нажатие клавиши Shift работает как переключатель пропорционального /не пропорционального масштабирование по задействованным осям.
– при одновременном удержании Ctrl + Shift, получим масштабирование от центра: за угловые «зажимы» – непропорциональное, за все остальные «зажимы» – пропорциональное.
Не очень очевидно, не правда ли? Инструмент, безусловно, непрост для освоения, и требует хорошо развитого пространственного мышления.
Еще сложней ситуация с трехмерным объектом, поскольку любая опция масштабирования, в т.ч. с клавишами Ctrl и Shift будет влиять на геометрию уже по всем трем осям сцены одновременно. Посмотрим, что при этом происходит – выберем весь кубик целиком и включим инструмент. Здесь, прежде всего, видим появление еще одного «зажима» по центру каждой грани – это и понятно, поскольку появляется возможность масштабирования еще по одной оси, нормальной к плоскости грани.

Заметим в завершении еще одну особенность инструмента – масштабирование исходно работает в относительных, а не абсолютных величинах на всех элементах трехмерного объекта. Что это значит? Это значит, что один и тот же коэффициент масштабирования (скажем, увеличения в 1,5 раза) будет применен одновременно для всех ребер, независимо от абсолютной величины длины каждого, что приведет к искажению геометрии объекта в целом! Таким образом, простым вроде бы масштабированием при подходящей исходной геометрии можно получать уникальные результаты – совершенно новые формы… Впрочем, здесь все не так однозначно – есть нюансы числового управления инструментом, которые будут рассмотрены отдельно позже…