Содержание
- Smart hard drive detects error sony vaio что это
- Исправляем ошибки S.M.A.R.T. на SSD и жестких дисках
- Содержание
- Что такое SMART и что он показывает?
- Ошибки S.M.A.R.T.
- Примеры ошибок SMART
- Ошибка «SMART failure predicted»
- Ошибка «S.M.A.R.T. status BAD»
- Ошибка «the smart hard disk check has detected»
- Как исправить SMART ошибку?
- Как отключить проверку SMART?
- Что делать если данные были утеряны?
- SMART Failure Predicted, Status Bad, SMART Hard Drive detects imminent failure при загрузке — что делать?
- Первые действия при ошибках SMART Failure, SMART Status Bad и аналогичных
- Что делать после сохранения важных данных с HDD или SSD
Smart hard drive detects error sony vaio что это
 Профиль | Отправить PM | Цитировать
Помогите разобраться, ноутбук SONY VAIO, не загружается Windows 8. В место этого на черном экране такое сообщение:
S.M.A.R.T. Hard Drive detects Error.
Please consider to back up the hard drive.
Press any key to continue.
Пробовал восстановить систему через ASSIST, не помогло, что дальше делать не знаю.
| Конфигурация компьютера | |
| Материнская плата: Dell | |
| HDD: SSD — 512 Gb — SATA III | |
| Звук: RealTek ALC3235 | |
| CD/DVD: Отсутствует | |
| Ноутбук/нетбук: Dell Latitude E5450 | |
| Индекс производительности Windows: 6.7 |
Если же вы забыли свой пароль на форуме, то воспользуйтесь данной ссылкой для восстановления пароля.

Сообщения: 8626
Благодарности: 2127
» width=»100%» style=»BORDER-RIGHT: #719bd9 1px solid; BORDER-LEFT: #719bd9 1px solid; BORDER-BOTTOM: #719bd9 1px solid» cellpadding=»6″ cellspacing=»0″ border=»0″>
Посмотрим что получится, завтра отпишусь »
Исправляем ошибки S.M.A.R.T. на SSD и жестких дисках
Что такое S.M.A.R.T.? Почему возникают SMART ошибки и о чем это говорит? Ниже мы детально расскажем про причины и методы устранения подобных проблем.
Содержание
Средство S.M.A.R.T., показывающее ошибки жесткого диска (HDD или SSD) является сигналом того, что с накопителем случились какие-то неполадки, влияющие на стабильность и работу компьютера.
Помимо этого, такая ошибка – серьезный повод задуматься о сохранности своих важных данных, поскольку из-за проблемного накопителя можно попросту лишиться всей информации, которую практически невозможно восстановить.
Что такое SMART и что он показывает?
«S.M.A.R.T.» расшифровывается как «self-monitoring, analysis and reporting technology», что в переводе означает «технология самодиагностики, анализа и отчетности».
Каждый жесткий диск, подключённый через интерфейс SATA или ATA, имеет встроенную систему S.M.A.R.T., которая позволяет выполнять следующие функции:
- Проводить анализ накопителя.
- Исправлять программные проблемы с HDD.
- Сканировать поверхность жесткого диска.
- Проводить программное исправление, очистку или замену поврежденных блоков.
- Выставлять оценки жизненноважным характеристикам диска.
- Вести отчётность о всех параметрах жесткого диска.
Система S.M.A.R.T. позволяет давать пользователю полную информацию о физическом состоянии жесткого диска методом выставления оценок, при помощи которых можно рассчитать примерное время выхода HDD из строя. С данной системой можно лично ознакомиться, воспользовавшись программой Victoria или другими аналогами.
С тем, как работать, проверять и исправлять ошибки жесткого диска в программе Victoria, Вы можете ознакомиться в статье «Как протестировать и исправить жесткий диск используя бесплатную программу Victoria».
Ошибки S.M.A.R.T.
Как правило, в нормально работающем накопителе система S.M.A.R.T. не выдает никаких ошибок даже при невысоких оценках. Это обусловлено тем, что появление ошибок является сигналом возможной скорой поломки диска.
Ошибки S.M.A.R.T. всегда свидетельствуют о какой-либо неисправности или о том, что некоторые элементы диска практически исчерпали свой ресурс. Если пользователю стали демонстрироваться подобные сообщения, следует задуматься о сохранности своих данных, поскольку теперь они могут исчезнуть в любой момент!
Примеры ошибок SMART
Ошибка «SMART failure predicted»
В данном случае S.M.A.R.T. оповещает пользователя о скором выходе диска из строя. Важно: если Вы увидели такое сообщение на своем компьютере, срочно скопируйте всю важную информацию и файлы на другой носитель, поскольку данный жесткий диск может прийти в негодность в любой момент!
Ошибка «S.M.A.R.T. status BAD»

Данная ошибка говорит о том, что некоторые параметры жесткого диска находятся в плохом состоянии (практически выработали свой ресурс). Как и в первом случае, следует сразу сделать бекап важных данных.
Ошибка «the smart hard disk check has detected»

Как и в двух предыдущих ошибках, система S.M.A.R.T. говорит о скорой поломке HDD.
Коды и названия ошибок могут различаться в разных жестких дисках, материнских платах или версиях BIOS, тем не менее, каждая из них является сигналом для того, чтобы сделать резервную копию своих файлов.
Как исправить SMART ошибку?
Ошибки S.M.A.R.T. свидетельствуют о скорой поломке жесткого диска, поэтому исправление ошибок, как правило, не приносит должного результата, и ошибка остается. Помимо критических ошибок, существуют еще и другие проблемы, которые могут вызывать сообщения такого рода. Одной из таких проблем является повышенная температура носителя.
Ее можно посмотреть в программе Victoria во вкладке SMART под пунктом 190 «Airflow temperature» для HDD. Или под пунктом 194 «Controller temperature» для SDD.
Если данный показатель будет завышен, следует принять меры по охлаждению системного блока:
- Проверить работоспособность кулеров.
- Очистить пыль.
- Поставить дополнительный кулер для лучшей вентиляции.
Другим способом исправления ошибок SMART является проверка накопителя на наличие ошибок.
Это можно сделать, зайдя в папку «Мой компьютер», кликнув правой клавишей мыши по диску или его разделу, выбрав пункт «Сервис» и запустив проверку.
Если ошибка не была исправлена в ходе проверки, следует прибегнуть к дефрагментации диска.
Чтобы это сделать, находясь в свойствах диска, следует нажать на кнопку «Оптимизировать», выбрать необходимый диск и нажать «Оптимизировать».
Если ошибка не пропадет после этого, скорее всего, диск просто исчерпал свой ресурс, и в скором времени он станет нечитаемым, а пользователю останется только приобрести новый HDD или SSD.
Как отключить проверку SMART?
Диск с ошибкой S.M.A.R.T. может выйти из строя в любой момент, но это не означает, что им нельзя продолжать пользоваться.
Стоит понимать, что использование такого диска не должно подразумевать в себе хранение на нем сколько-либо стоящей информации. Зная это, можно провести сброс smart настроек, которые помогут замаскировать надоедливые ошибки.
Шаг 1. Заходим в BIOS или UEFI (кнопка F2 или Delete во время загрузки), переходим в пункт «Advanced», выбираем строку «IDE Configuration» и нажимаем Enter. Для навигации следует использовать стрелочки на клавиатуре.
Шаг 2. На открывшемся экране следует найти свой диск и нажать Enter (жесткие диски подписаны «Hard Disc»).
Шаг 3. Опускаемся вниз списка и выбираем параметр SMART, нажимаем Enter и выбираем пункт «Disabled».
Шаг 4. Выходим из BIOS, применяя и сохраняя настройки.
Стоит отметить, на некоторых системах данная процедура может выполняться немного по-другому, но сам принцип отключения остается прежним.
После отключения SMART ошибки перестанут появляться, и система будет загружаться в штатном порядке до тех пор, пока HDD окончательно не выйдет из строя. В некоторых ситуациях ошибки могут показываться в самой ОС, тогда достаточно несколько раз отклонить их, после чего появится кнопка «Больше не показывать».
Что делать если данные были утеряны?
При случайном форматировании, удалении вирусами или утере любых важных данных следует быстро вернуть утерянную информацию самым эффективным методом.
Шаг 1. Установите и запустите программу RS Partition Recovery.

Универсальное решение для восстановления данных
Шаг 2. Выберите носитель или раздел диска, с которого необходимо восстановить данные.
Шаг 3. Выберите тип анализа.
Быстрый анализ стоит использовать, если файлы были удалены недавно. Программа проведет анализ и отобразит данные доступные для восстановления.
Полный анализ позволяет найти утерянные данные после форматирования, перераспределения диска или повреждения файловой структуры (RAW).
Шаг 4. Просмотр и выбор файлов для восстановления.
Шаг 5. Добавление файлов для сохранения в «Список Восстановления» или выбор всего раздела для восстановления.
Стоит отметить, что в качестве места для записи восстановленного файла лучше всего выбрать другой диск или раздел чтобы избежать перезаписи файла.
Источник
SMART Failure Predicted, Status Bad, SMART Hard Drive detects imminent failure при загрузке — что делать?
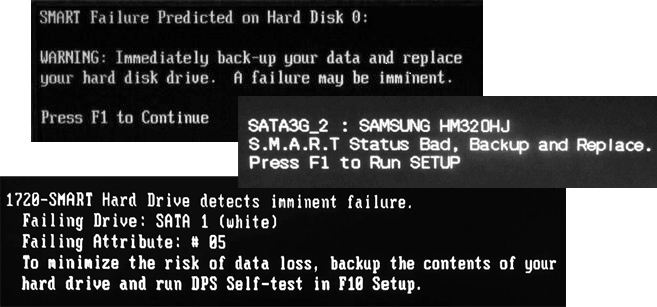
 При загрузке компьютера или ноутбука некоторые пользователи могут столкнуться с сообщениями наподобие: SMART Failure Predicted on Hard Disk с указанием диска, SMART Hard Drive detects imminent failure, S.M.A.R.T. Status Bad и другие: конкретный текст сообщения будет зависеть от БИОС/UEFI материнской платы.
В этой инструкции о том, что делать, если вы столкнулись с сообщениями об ошибках SMART при загрузке и о том, можно ли исправить ситуацию.
Первые действия при ошибках SMART Failure, SMART Status Bad и аналогичных
Многие инструкции на рассматриваемую тему предлагают выполнить проверку диска с помощью chkdsk, Victoria и с помощью других инструментов проверки жестких дисков и SSD, однако, это нельзя назвать самым разумным вариантом действий, в случае если на диске есть важные данные.
Все приведённые сообщения говорят о том, что самодиагностика (SMART) HDD или SSD сообщает о скором выходе накопителя из строя. Более того, в сообщении обычно предлагается создать резервную копию данных и заменить накопитель (Backup and replace). И это именно то, что следует сделать в первую очередь — создайте резервную копию важных данных на диске, состояние которого в порядке, в облаке или на внешнем накопителе.
Если же до копирования важных данных начать сканировать диск Викторией, существует шанс оказаться без доступа к данным на диске: если его состояние действительно критическое, дополнительные операции над накопителем, выполняемые программами проверки, могут привести к тому, что от состояния «SMART Failure Predicted» (предсказан выход из строя) диск перейдет к фактическому выходу из строя.
Что делать после сохранения важных данных с HDD или SSD
После того, как важные файлы были сохранены, можно попробовать что-то сделать, хотя для рассматриваемой ситуации это не всегда возможно и в большинстве случаев оптимальное решение — замена диска.
- Редко, но для некоторых SSD ошибка может быть вызвана ошибкой работы прошивки: проверьте — нет ли новой прошивки для вашего диска на сайте производителя (а лучше — в фирменной программе для SSD диска) и изменяет ли ситуацию её установка.
- Проверьте, какие именно атрибуты SMART выше пороговых (например, в программе CrystalDiskInfo) и изучите, за что они отвечают. В случае SSD можно также использовать анализ состояния диска в фирменной утилите (официальные утилиты могут дать более точный прогноз), подробнее — программы для SSD дисков.
- Иногда в БИОС/UEFI можно отключить самодиагностику SMART (SMART Self Test) — в этом случае вы не будете получать сообщений об ошибках SMART при включении компьютера, но сама проблема от этого никуда не исчезнет и с большой вероятностью рано или поздно диск выйдет из строя.
- Для HDD можно попробовать выполнить проверку/исправление в Victoria, но нет гарантий, что это не сделает ситуацию хуже. Для SSD выполнять такое сканирование не стоит.
- По некоторым сообщениям, может помочь очистка контактных площадок диска, исправление проблем с питанием при наличии таковых, проверка работы диска на другом компьютере.
Источник
Adblock
detector
Что такое S.M.A.R.T.? Почему возникают SMART ошибки и о чем это говорит? Ниже мы детально расскажем про причины и методы устранения подобных проблем.
Содержание
- Что такое SMART и что он показывает?
- Ошибки S.M.A.R.T.
- Примеры ошибок SMART
- Ошибка «SMART failure predicted»
- Ошибка «S.M.A.R.T. status BAD»
- Ошибка «the smart hard disk check has detected»
- Как исправить SMART ошибку?
- Как отключить проверку SMART?
- Что делать если данные были утеряны?
Средство S.M.A.R.T., показывающее ошибки жесткого диска (HDD или SSD) является сигналом того, что с накопителем случились какие-то неполадки, влияющие на стабильность и работу компьютера.
Помимо этого, такая ошибка – серьезный повод задуматься о сохранности своих важных данных, поскольку из-за проблемного накопителя можно попросту лишиться всей информации, которую практически невозможно восстановить.
Что такое SMART и что он показывает?
«S.M.A.R.T.» расшифровывается как «self-monitoring, analysis and reporting technology», что в переводе означает «технология самодиагностики, анализа и отчетности».
Каждый жесткий диск, подключённый через интерфейс SATA или ATA, имеет встроенную систему S.M.A.R.T., которая позволяет выполнять следующие функции:
- Проводить анализ накопителя.
- Исправлять программные проблемы с HDD.
- Сканировать поверхность жесткого диска.
- Проводить программное исправление, очистку или замену поврежденных блоков.
- Выставлять оценки жизненноважным характеристикам диска.
- Вести отчётность о всех параметрах жесткого диска.
Система S.M.A.R.T. позволяет давать пользователю полную информацию о физическом состоянии жесткого диска методом выставления оценок, при помощи которых можно рассчитать примерное время выхода HDD из строя. С данной системой можно лично ознакомиться, воспользовавшись программой Victoria или другими аналогами.
С тем, как работать, проверять и исправлять ошибки жесткого диска в программе Victoria, Вы можете ознакомиться в статье «Как протестировать и исправить жесткий диск используя бесплатную программу Victoria».
Ошибки S.M.A.R.T.
Как правило, в нормально работающем накопителе система S.M.A.R.T. не выдает никаких ошибок даже при невысоких оценках. Это обусловлено тем, что появление ошибок является сигналом возможной скорой поломки диска.
Ошибки S.M.A.R.T. всегда свидетельствуют о какой-либо неисправности или о том, что некоторые элементы диска практически исчерпали свой ресурс. Если пользователю стали демонстрироваться подобные сообщения, следует задуматься о сохранности своих данных, поскольку теперь они могут исчезнуть в любой момент!
Примеры ошибок SMART
Ошибка «SMART failure predicted»
В данном случае S.M.A.R.T. оповещает пользователя о скором выходе диска из строя. Важно: если Вы увидели такое сообщение на своем компьютере, срочно скопируйте всю важную информацию и файлы на другой носитель, поскольку данный жесткий диск может прийти в негодность в любой момент!
Ошибка «S.M.A.R.T. status BAD»
Данная ошибка говорит о том, что некоторые параметры жесткого диска находятся в плохом состоянии (практически выработали свой ресурс). Как и в первом случае, следует сразу сделать бекап важных данных.
Ошибка «the smart hard disk check has detected»
Как и в двух предыдущих ошибках, система S.M.A.R.T. говорит о скорой поломке HDD.
Коды и названия ошибок могут различаться в разных жестких дисках, материнских платах или версиях BIOS, тем не менее, каждая из них является сигналом для того, чтобы сделать резервную копию своих файлов.
Как исправить SMART ошибку?
Ошибки S.M.A.R.T. свидетельствуют о скорой поломке жесткого диска, поэтому исправление ошибок, как правило, не приносит должного результата, и ошибка остается. Помимо критических ошибок, существуют еще и другие проблемы, которые могут вызывать сообщения такого рода. Одной из таких проблем является повышенная температура носителя.
Ее можно посмотреть в программе Victoria во вкладке SMART под пунктом 190 «Airflow temperature» для HDD. Или под пунктом 194 «Controller temperature» для SDD.
Если данный показатель будет завышен, следует принять меры по охлаждению системного блока:
- Проверить работоспособность кулеров.
- Очистить пыль.
- Поставить дополнительный кулер для лучшей вентиляции.
Другим способом исправления ошибок SMART является проверка накопителя на наличие ошибок.
Это можно сделать, зайдя в папку «Мой компьютер», кликнув правой клавишей мыши по диску или его разделу, выбрав пункт «Сервис» и запустив проверку.
Если ошибка не была исправлена в ходе проверки, следует прибегнуть к дефрагментации диска.
Чтобы это сделать, находясь в свойствах диска, следует нажать на кнопку «Оптимизировать», выбрать необходимый диск и нажать «Оптимизировать».
Если ошибка не пропадет после этого, скорее всего, диск просто исчерпал свой ресурс, и в скором времени он станет нечитаемым, а пользователю останется только приобрести новый HDD или SSD.
Как отключить проверку SMART?
Диск с ошибкой S.M.A.R.T. может выйти из строя в любой момент, но это не означает, что им нельзя продолжать пользоваться.
Стоит понимать, что использование такого диска не должно подразумевать в себе хранение на нем сколько-либо стоящей информации. Зная это, можно провести сброс smart настроек, которые помогут замаскировать надоедливые ошибки.
Для этого:
Шаг 1. Заходим в BIOS или UEFI (кнопка F2 или Delete во время загрузки), переходим в пункт «Advanced», выбираем строку «IDE Configuration» и нажимаем Enter. Для навигации следует использовать стрелочки на клавиатуре.
Шаг 2. На открывшемся экране следует найти свой диск и нажать Enter (жесткие диски подписаны «Hard Disc»).
Шаг 3. Опускаемся вниз списка и выбираем параметр SMART, нажимаем Enter и выбираем пункт «Disabled».
Шаг 4. Выходим из BIOS, применяя и сохраняя настройки.
Стоит отметить, на некоторых системах данная процедура может выполняться немного по-другому, но сам принцип отключения остается прежним.
После отключения SMART ошибки перестанут появляться, и система будет загружаться в штатном порядке до тех пор, пока HDD окончательно не выйдет из строя. В некоторых ситуациях ошибки могут показываться в самой ОС, тогда достаточно несколько раз отклонить их, после чего появится кнопка «Больше не показывать».
Что делать если данные были утеряны?
При случайном форматировании, удалении вирусами или утере любых важных данных следует быстро вернуть утерянную информацию самым эффективным методом.
Шаг 1. Установите и запустите программу RS Partition Recovery.
Шаг 2. Выберите носитель или раздел диска, с которого необходимо восстановить данные.
Шаг 3. Выберите тип анализа.
Быстрый анализ стоит использовать, если файлы были удалены недавно. Программа проведет анализ и отобразит данные доступные для восстановления.
Полный анализ позволяет найти утерянные данные после форматирования, перераспределения диска или повреждения файловой структуры (RAW).
Шаг 4. Просмотр и выбор файлов для восстановления.
Шаг 5. Добавление файлов для сохранения в «Список Восстановления» или выбор всего раздела для восстановления.
Стоит отметить, что в качестве места для записи восстановленного файла лучше всего выбрать другой диск или раздел чтобы избежать перезаписи файла.
Часто задаваемые вопросы
S.M.A.R.T (Self-Monitoring, Analysis and Reporting Technology) – это специальная технология, разработанная для дисков, подключённых через SATA интерфейс, которая позволяет проводить анализ накопителя, исправлять программные проблемы HDD дисков, сканировать поверхность накопителя и автоматически исправлять поврежденные блоки информации, следить за состоянием накопителя и многое другое.
Эта ошибка предупреждает пользователя о скорой поломке накопителя. Если вы увидели эту ошибку – НЕМЕДЛЕННО скопируйте важные данные на другой накопитель, в противном случае важная информация может быть безвозвратно утеряна.
Воспользуйтесь программой RS Partition Recovery. Программа проста в использовании и позволяет восстановить утерянные данные после случайного удаления, форматирования диска, повреждений файловой структуры накопителя и во многих других случаях.
Исправлять SMART ошибки не имеет смысла, так как обычно они сигнализируют о ближайшем выходе накопителя из строя. Конечно вы можете отключить SMART технологию, но это только уберет сообщение об ошибке. Проблема же останется. Поэтому вместо отключения SMART – лучше заняться переносом данных в безопасное место.
Чтобы отключить SMART технологию войдите в настройки BIOS, затем откройте пункт «Advanced» —> «IDE Configuration». Выберите нужный диск из списка и нажмите «Enter». После этого, возле пункта «SMART» установите значение «Disabled».
What causes SMART hard disk error? How do I fix a SMART error on my hard drive? These questions may be asked by you when meeting the SMART failure predicted on hard disk error. This post from MiniTool shows you how to quickly back up your computer as well as possible hard drive imminent failure fixes.
Help! SMART Failure Predicted on Hard Disk 0, 2, 4
“Hi, At first boot my computer I got this error: SMART Failure Predicted on Hard Disk 0: SAMSUNG HM64JJ-(S1). What does it mean? And how can I fix it?” tomshardware
What Is SMART?
Self-Monitoring, Analysis and Reporting Technology, is often written as SMART.
It refers to a self-diagnostic utility that is included in a computer hard drive (HDD) and solid-state drive (SSD), detecting and reporting various indicators of drive reliability like performance and error rate to enable the anticipation of hardware failures.
Overview of SMART Failure Predicted Error
Let’s see the detailed error message: “SMART Failure Predicted on Hard Disk… WARNING: Immediately back-up your data and replace your hard disk drive. A failure may be imminent. Press F2 to Continue”.
Sometimes perhaps your computer shows another error “hard disk failure is imminent”. Sometimes the error is “SMART Failure Predicted on SATA6G_1/SATA6G_2/SATA6G_3/ SATA6G_4…”
The SMART hard drive error is very common and often happens to Sony Vaio, Dell laptop, Lenovo ThinkPad, Toshiba laptop and many other devices in Windows 10/8/7.
Usually, hard drive SMART failure may be caused by excessive bad sectors or shock, not defragmenting when the disk is almost full, the wrong shutdown, overheating, etc.
When SMART status indicates there is an error, actually your hard drive is not yet dead but it is in the process of failing. Namely, a complete failure may come in a day, a week, a month, even a year.
No matter how long it takes, the most important thing should be to immediately back up your computer data when hard drive SMART failure occurs by following Windows advice.
Back up Computer in Case of SMART Failure
When receiving SMART hard disk error, take it easy. And you still have some time to keep your disk data safe. Next, we will walk you through detailed backup operations by using MiniTool backup programs.
Data Backup Software – MiniTool ShadowMaker
MiniTool ShadowMaker, reliable and professional backup software, can help you to back up your files, system, partition, and disk by its Backup feature.
During the backup process, the selected partition data will be compressed to an image, saving much disk space. But here, we don’t suggest using this feature since recovery is a little troublesome when your hard disk failure happens.
Additionally, another backup method – disk cloning is also supported by this backup software. Its Clone Disk feature can transfer all contents from one disk to another.
Once your disk fails, the target disk can be used to directly replace it without reinstalling OS.
What are you waiting for? Now, download its Trial Edition and install it on your computer running Windows 10/8/7 for a 30-day free trial. Or directly get the Pro Edition to use all the time.
Free Download
Tip: When SMART failure predicted on hard disk F1 not working issue happens, your PC may boot normally. The following steps are based on this situation. If Windows fails to boot, create a bootable disc to boot the PC and start the backup.
Here is how to make a disk backup via disk-cloning:
Step 1: Run the Backup Software
- Open MiniTool ShadowMaker.
- Wait for a few seconds to enter its main interface.
Step 2: Navigate to Tools Tab
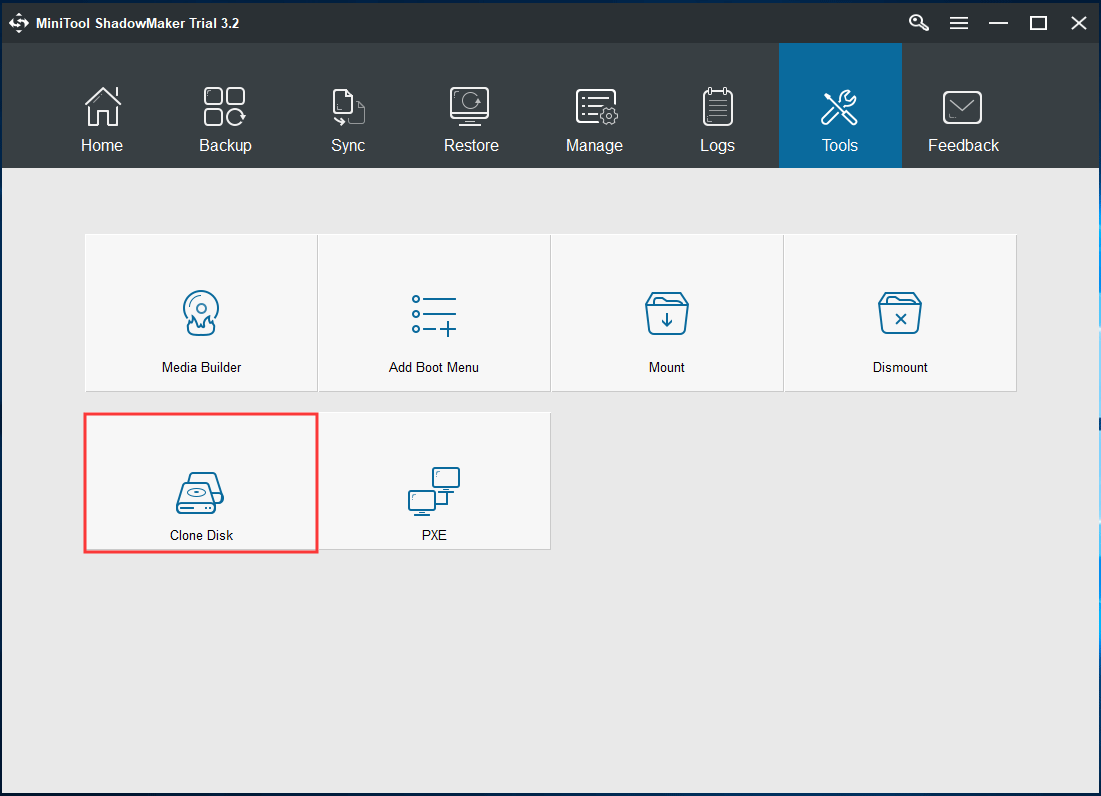
- Navigate to Tools located in the toolbar.
- Click the Clone Disk feature to begin your backup.
Step 3: Choose Clone Source Disk and Target Disk
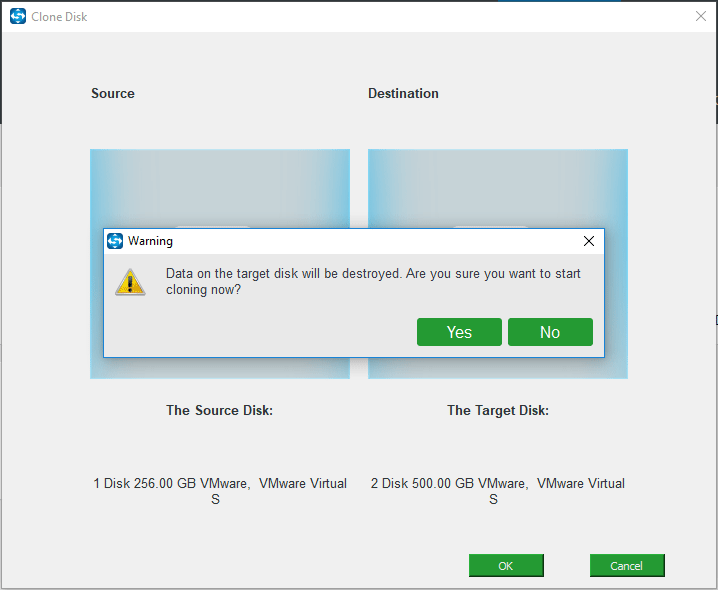
- In the following interface, you see two sections are shown.
- Please click the corresponding section to choose a source disk and destination disk.
Tip:
1. MiniTool ShadowMaker brings you much convenience, letting you easily clone a hard drive which can be a system disk or a data disk.
2. Ensure there are no important files saved to your target disk since the cloning process will delete all the contents of that hard disk. On the contrary, you can choose to back up your vital data to another location.
Step 4: Perform Disk Cloning Operation.
- MiniTool ShadowMaker is performing the copy progress.
- In the following interface, some information about the disk cloning is listed including source disk, destination disk, elapsed time, remaining time and cloning progress bar.
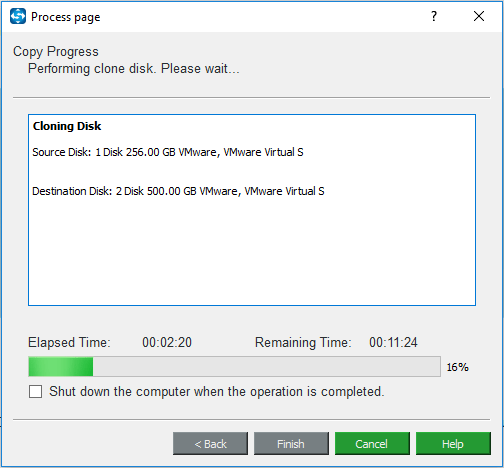
- One option called Shut down the computer when the operation is completed is also offered by MiniTool ShadowMaker. Just click it when you have a need.
- If you don’t check this feature, after the cloning operation is finished, one small window will pop out and inform you of some information, as shown below:
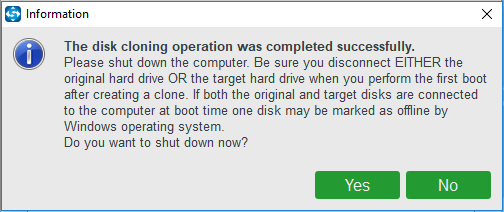
Tip: What should you do based on your situation? When SMART failure predicted on hard disk 0/1/2/4 error happens, a hard disk failure is imminent. In this case, you can shut down the computer, remove the source drive and put the target disk containing disk copy into the original place.
“I met the SMART failure predicted on hard disk error yesterday. For data protection, I easily cloned my disk with MiniTool ShadowMaker at once.”Click to Tweet
Have a need to back up your hard drive with SMART failure predicted error? Just get MiniTool ShadowMaker for a free trial.
Free Download
Tip: Some of you don’t want to clone disk for backup but want to create a disk image backup when hard drive SMART failure occurs. Here, MiniTool ShadowMaker enables you to create such a backup with its Backup feature. Read this post — Hard Drive Image Software — Best Way to Image a Hard Drive Win10/8/7 to know the detailed backup operations.
Disk Cloning Software – MiniTool Partition Wizard
MiniTool Partition Wizard, another hard drive cloning software, enables you to transfer all the contents from a source disk to a target disk. It puts forward two cloning features:
Migrate OS to SSD/HD: It is suitable for the system disk only. And it offers you two migration methods, for instance, only migrate the system-related partitions to another disk or copy the entire system disk to another hard drive.
Copy Disk: This is used to deal with a system disk, as well as a data disk. All the data of your source disk will be moved to a target disk.
Here take the second feature as an example since it is more comprehensive.
MiniTool Partition Wizard Free Edition don’t support system disk cloning. Here, you need to use its Pro or above edition if the PC can run normally when the SMART hard disk error occurs. If you encounter this case — SMART failure predicted on hard disk won’t boot after pressing F1 or F2, you need to create a bootable disc for a successful backup.
Free Download
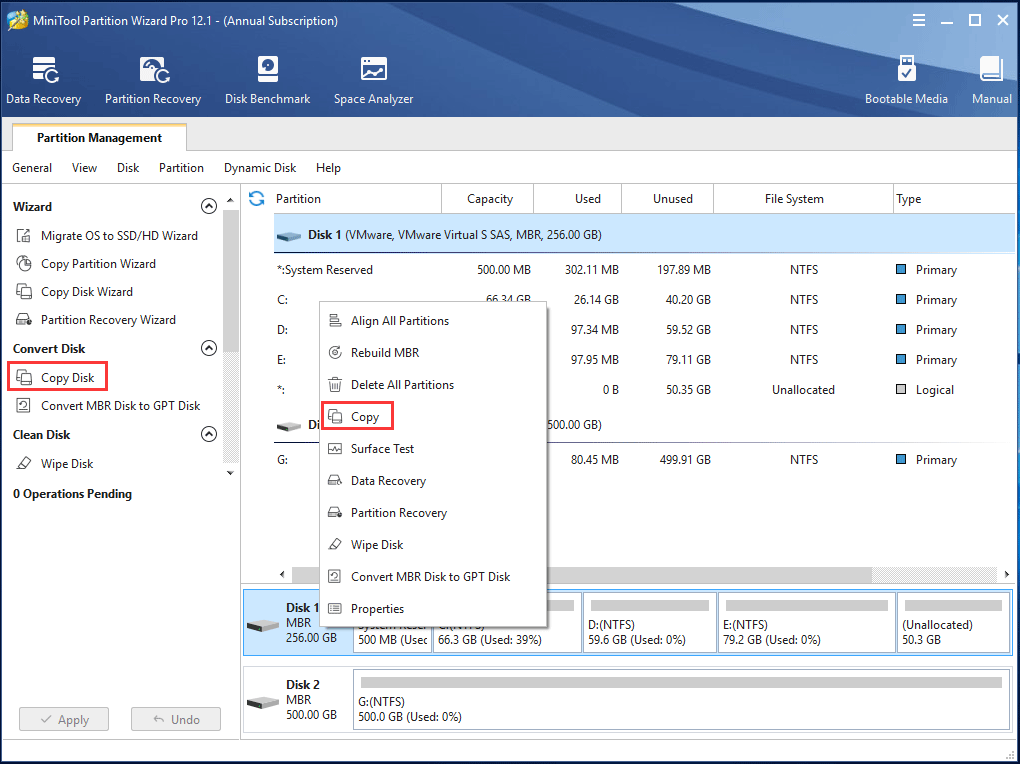
Step 1: Select Copy Disk
- Enter MiniTool Partition Wizard’s main interface to choose the hard disk that has the SMART failure predicted on hard disk 0, 2, 4 error.
- Click Copy Disk from the Convert Disk menu.
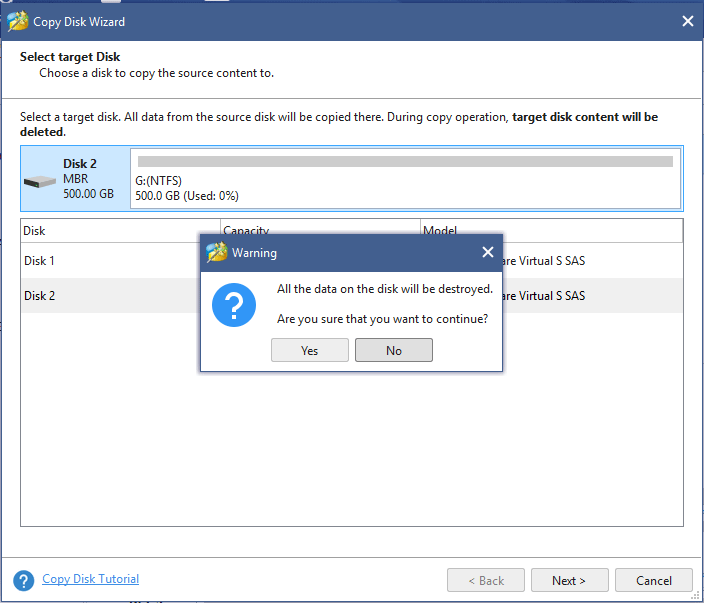
Step 2: Choose a Destination Disk
- In the pop-out window, select a hard drive to save the source content.
- All the data on the target disk will be destroyed. Therefore, ensure no vital files are stored on it.
Note: The target disk should have enough disk space so as to hold all source data.
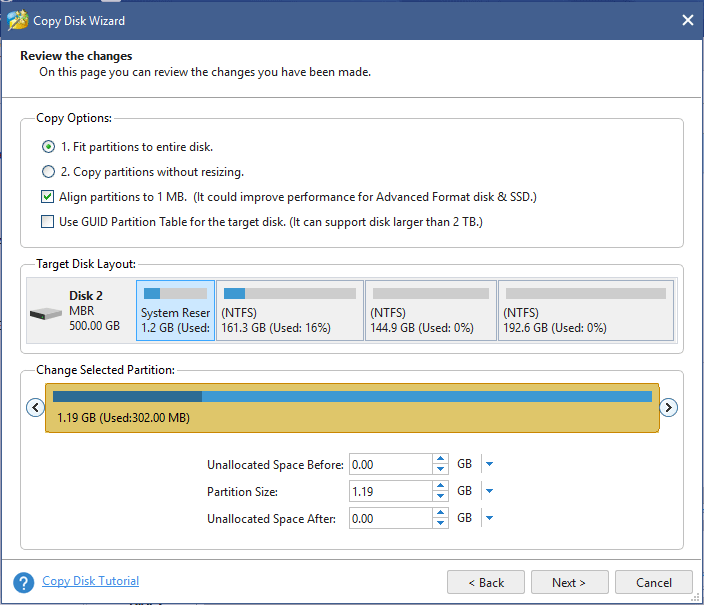
Step 3: Decide Copy Option
Two copy options are offered. Please choose one based on actual needs.
Note:
1. For Advanced Format disk & SSD, we suggest choosing Align partitions to 1MB so as to improve performance.
2. If you want to clone system disk from MBR to GPT, check Use GUID Partition Table for the target disk.
Step 4: See a Warning
- A window pops up to tell you how to boot your computer from the target disk.
- After finishing the cloning, configure the BIOS setting to boot your PC from the target disk.
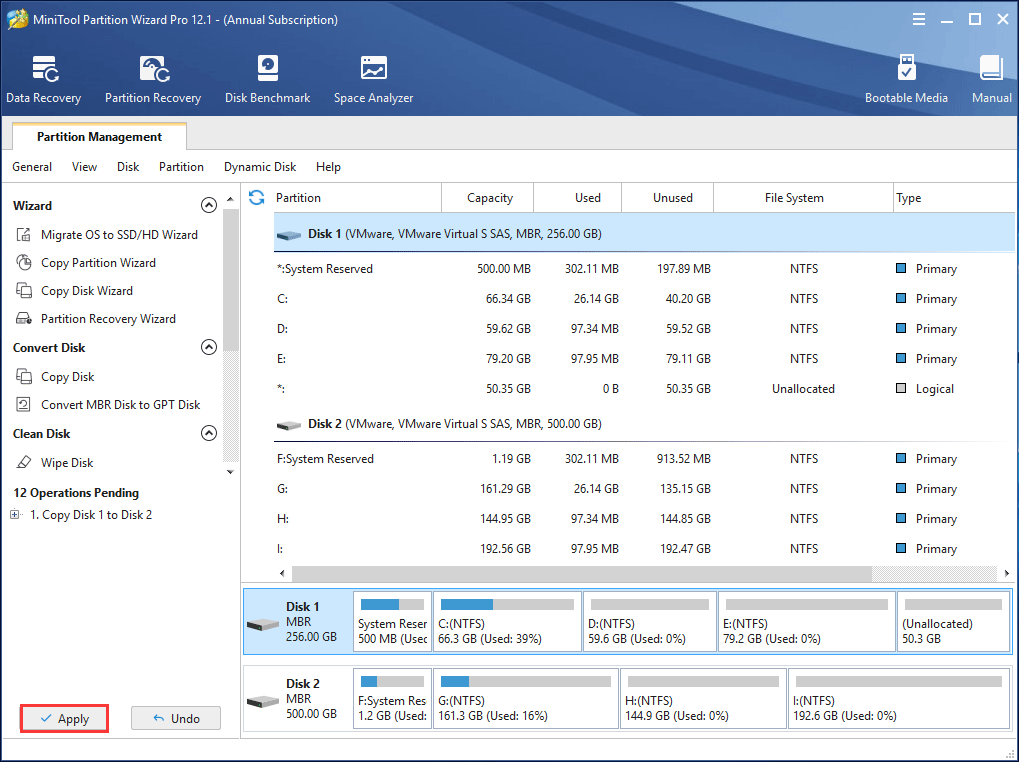
Step 5: Bring All Operations into Effect
Hit the Apply button to execute all the changes.
“MiniTool Partition Wizard is really helpful for me to do disk cloning so as to replace my hard drive having the SMART failure error. Also, share it with you.”Click to Tweet
Now, two hard drive cloning software is told to you. Both of them are excellent and just choose one for disk backup.
How to Repair SMART Hard Drive Failure
After finishing disk backup, some of you still want to fix SMART failure predicted on hard disk error. Here are two possible solutions.
Check and Fix Bad Sectors
Bad sectors are the main factor of SMART failure error on your hard drive. So, checking and fixing the found bad sectors should be done.
1. Enter Windows Explorer.
2. Then, right-click the drive you want to check and choose Properties.
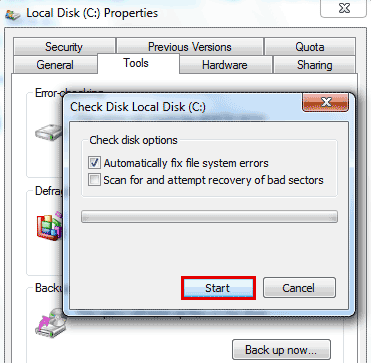
3. Under the Tools tab, click the Check now (Win 7) or Check (Win 10) button.

4. For Win 7, check Automatically fix file system errors and Scan for and attempt recovery or bad sectors Next, click the Start option to begin the operation.
For Win 10, directly click Scan drive to perform the drive checking.
Tip: In addition, you can run Command Prompt as administrator and use the command line chkdsk /f /r to scan your disk and fix the errors or shield bad sectors.
Perform Disk Defragment
Sometimes SMART hard disk error can be fixed by disk defragment. How to do this job?
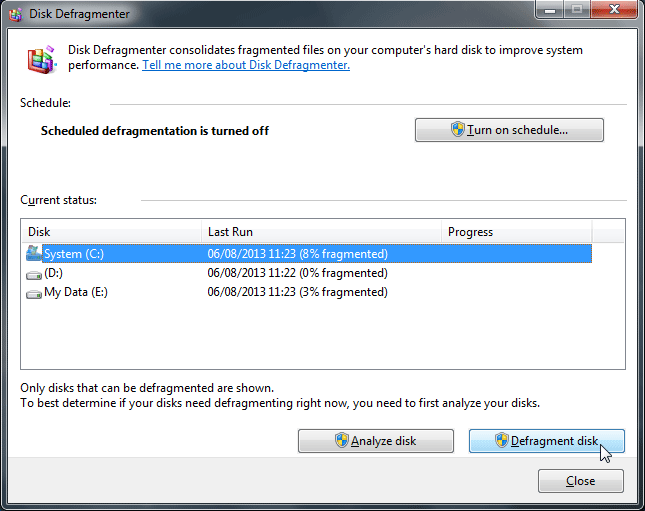
In Windows 7, click the Start button and type Disk Defragmenter to run this utility. Then, choose the target drive and click the Defragment disk option.
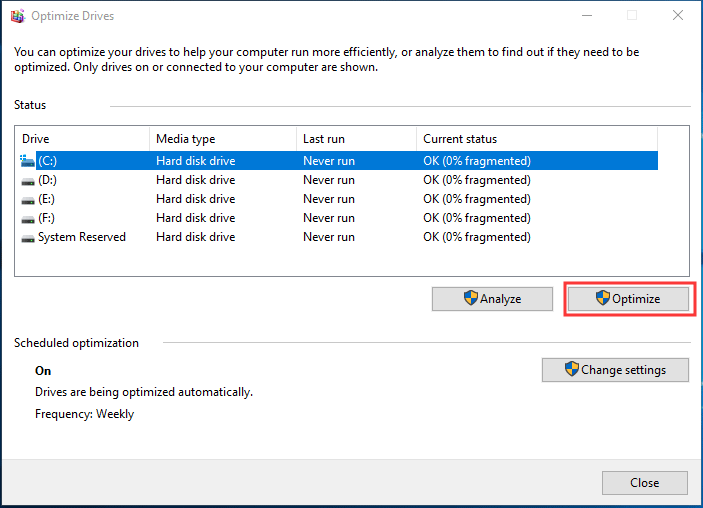
In Windows 10, input defragment in the Search box, then click Defragment and Optimize Drives tool. Select the target drive and click the Optimize button to perform a disk defragment operation.
What if these ways are not working to fix or disable SMART failure predicted on hard disk 0/1/2/4 error?
The only way is to replace the failing hard drive with another hard drive containing the disk copy made by the MiniTool program – MiniTool ShadowMaker or MiniTool Partition Wizard. If the SMART failure error happens on your system disk, you can directly boot your PC from the target disk without reinstalling OS.
Bottom Line
In this post, we walk you through what SMART is, what SMART failure predicted on hard disk error is, how to back up your computer with MiniTool ShadowMaker & MiniTool Partition Wizard and two possible solutions to fix the SMART error.
If you are facing the same error message, immediately back up your data by the disk-cloning method with MiniTool software.
When using our software to perform disk cloning, if you have any questions, please tell us by the two ways below: leave your ideas in the comment box or write an email and send it to us via [email protected]. In addition, any suggestions are welcome.
What causes SMART hard disk error? How do I fix a SMART error on my hard drive? These questions may be asked by you when meeting the SMART failure predicted on hard disk error. This post from MiniTool shows you how to quickly back up your computer as well as possible hard drive imminent failure fixes.
Help! SMART Failure Predicted on Hard Disk 0, 2, 4
“Hi, At first boot my computer I got this error: SMART Failure Predicted on Hard Disk 0: SAMSUNG HM64JJ-(S1). What does it mean? And how can I fix it?” tomshardware
What Is SMART?
Self-Monitoring, Analysis and Reporting Technology, is often written as SMART.
It refers to a self-diagnostic utility that is included in a computer hard drive (HDD) and solid-state drive (SSD), detecting and reporting various indicators of drive reliability like performance and error rate to enable the anticipation of hardware failures.
Overview of SMART Failure Predicted Error
Let’s see the detailed error message: “SMART Failure Predicted on Hard Disk… WARNING: Immediately back-up your data and replace your hard disk drive. A failure may be imminent. Press F2 to Continue”.
Sometimes perhaps your computer shows another error “hard disk failure is imminent”. Sometimes the error is “SMART Failure Predicted on SATA6G_1/SATA6G_2/SATA6G_3/ SATA6G_4…”
The SMART hard drive error is very common and often happens to Sony Vaio, Dell laptop, Lenovo ThinkPad, Toshiba laptop and many other devices in Windows 10/8/7.
Usually, hard drive SMART failure may be caused by excessive bad sectors or shock, not defragmenting when the disk is almost full, the wrong shutdown, overheating, etc.
When SMART status indicates there is an error, actually your hard drive is not yet dead but it is in the process of failing. Namely, a complete failure may come in a day, a week, a month, even a year.
No matter how long it takes, the most important thing should be to immediately back up your computer data when hard drive SMART failure occurs by following Windows advice.
Back up Computer in Case of SMART Failure
When receiving SMART hard disk error, take it easy. And you still have some time to keep your disk data safe. Next, we will walk you through detailed backup operations by using MiniTool backup programs.
Data Backup Software – MiniTool ShadowMaker
MiniTool ShadowMaker, reliable and professional backup software, can help you to back up your files, system, partition, and disk by its Backup feature.
During the backup process, the selected partition data will be compressed to an image, saving much disk space. But here, we don’t suggest using this feature since recovery is a little troublesome when your hard disk failure happens.
Additionally, another backup method – disk cloning is also supported by this backup software. Its Clone Disk feature can transfer all contents from one disk to another.
Once your disk fails, the target disk can be used to directly replace it without reinstalling OS.
What are you waiting for? Now, download its Trial Edition and install it on your computer running Windows 10/8/7 for a 30-day free trial. Or directly get the Pro Edition to use all the time.
Free Download
Tip: When SMART failure predicted on hard disk F1 not working issue happens, your PC may boot normally. The following steps are based on this situation. If Windows fails to boot, create a bootable disc to boot the PC and start the backup.
Here is how to make a disk backup via disk-cloning:
Step 1: Run the Backup Software
- Open MiniTool ShadowMaker.
- Wait for a few seconds to enter its main interface.
Step 2: Navigate to Tools Tab
- Navigate to Tools located in the toolbar.
- Click the Clone Disk feature to begin your backup.
Step 3: Choose Clone Source Disk and Target Disk
- In the following interface, you see two sections are shown.
- Please click the corresponding section to choose a source disk and destination disk.
Tip:
1. MiniTool ShadowMaker brings you much convenience, letting you easily clone a hard drive which can be a system disk or a data disk.
2. Ensure there are no important files saved to your target disk since the cloning process will delete all the contents of that hard disk. On the contrary, you can choose to back up your vital data to another location.
Step 4: Perform Disk Cloning Operation.
- MiniTool ShadowMaker is performing the copy progress.
- In the following interface, some information about the disk cloning is listed including source disk, destination disk, elapsed time, remaining time and cloning progress bar.
- One option called Shut down the computer when the operation is completed is also offered by MiniTool ShadowMaker. Just click it when you have a need.
- If you don’t check this feature, after the cloning operation is finished, one small window will pop out and inform you of some information, as shown below:
Tip: What should you do based on your situation? When SMART failure predicted on hard disk 0/1/2/4 error happens, a hard disk failure is imminent. In this case, you can shut down the computer, remove the source drive and put the target disk containing disk copy into the original place.
“I met the SMART failure predicted on hard disk error yesterday. For data protection, I easily cloned my disk with MiniTool ShadowMaker at once.”Click to Tweet
Have a need to back up your hard drive with SMART failure predicted error? Just get MiniTool ShadowMaker for a free trial.
Free Download
Tip: Some of you don’t want to clone disk for backup but want to create a disk image backup when hard drive SMART failure occurs. Here, MiniTool ShadowMaker enables you to create such a backup with its Backup feature. Read this post — Hard Drive Image Software — Best Way to Image a Hard Drive Win10/8/7 to know the detailed backup operations.
Disk Cloning Software – MiniTool Partition Wizard
MiniTool Partition Wizard, another hard drive cloning software, enables you to transfer all the contents from a source disk to a target disk. It puts forward two cloning features:
Migrate OS to SSD/HD: It is suitable for the system disk only. And it offers you two migration methods, for instance, only migrate the system-related partitions to another disk or copy the entire system disk to another hard drive.
Copy Disk: This is used to deal with a system disk, as well as a data disk. All the data of your source disk will be moved to a target disk.
Here take the second feature as an example since it is more comprehensive.
MiniTool Partition Wizard Free Edition don’t support system disk cloning. Here, you need to use its Pro or above edition if the PC can run normally when the SMART hard disk error occurs. If you encounter this case — SMART failure predicted on hard disk won’t boot after pressing F1 or F2, you need to create a bootable disc for a successful backup.
Free Download
Step 1: Select Copy Disk
- Enter MiniTool Partition Wizard’s main interface to choose the hard disk that has the SMART failure predicted on hard disk 0, 2, 4 error.
- Click Copy Disk from the Convert Disk menu.
Step 2: Choose a Destination Disk
- In the pop-out window, select a hard drive to save the source content.
- All the data on the target disk will be destroyed. Therefore, ensure no vital files are stored on it.
Note: The target disk should have enough disk space so as to hold all source data.
Step 3: Decide Copy Option
Two copy options are offered. Please choose one based on actual needs.
Note:
1. For Advanced Format disk & SSD, we suggest choosing Align partitions to 1MB so as to improve performance.
2. If you want to clone system disk from MBR to GPT, check Use GUID Partition Table for the target disk.
Step 4: See a Warning
- A window pops up to tell you how to boot your computer from the target disk.
- After finishing the cloning, configure the BIOS setting to boot your PC from the target disk.
Step 5: Bring All Operations into Effect
Hit the Apply button to execute all the changes.
“MiniTool Partition Wizard is really helpful for me to do disk cloning so as to replace my hard drive having the SMART failure error. Also, share it with you.”Click to Tweet
Now, two hard drive cloning software is told to you. Both of them are excellent and just choose one for disk backup.
How to Repair SMART Hard Drive Failure
After finishing disk backup, some of you still want to fix SMART failure predicted on hard disk error. Here are two possible solutions.
Check and Fix Bad Sectors
Bad sectors are the main factor of SMART failure error on your hard drive. So, checking and fixing the found bad sectors should be done.
1. Enter Windows Explorer.
2. Then, right-click the drive you want to check and choose Properties.
3. Under the Tools tab, click the Check now (Win 7) or Check (Win 10) button.
4. For Win 7, check Automatically fix file system errors and Scan for and attempt recovery or bad sectors Next, click the Start option to begin the operation.
For Win 10, directly click Scan drive to perform the drive checking.
Tip: In addition, you can run Command Prompt as administrator and use the command line chkdsk /f /r to scan your disk and fix the errors or shield bad sectors.
Perform Disk Defragment
Sometimes SMART hard disk error can be fixed by disk defragment. How to do this job?
In Windows 7, click the Start button and type Disk Defragmenter to run this utility. Then, choose the target drive and click the Defragment disk option.
In Windows 10, input defragment in the Search box, then click Defragment and Optimize Drives tool. Select the target drive and click the Optimize button to perform a disk defragment operation.
What if these ways are not working to fix or disable SMART failure predicted on hard disk 0/1/2/4 error?
The only way is to replace the failing hard drive with another hard drive containing the disk copy made by the MiniTool program – MiniTool ShadowMaker or MiniTool Partition Wizard. If the SMART failure error happens on your system disk, you can directly boot your PC from the target disk without reinstalling OS.
Bottom Line
In this post, we walk you through what SMART is, what SMART failure predicted on hard disk error is, how to back up your computer with MiniTool ShadowMaker & MiniTool Partition Wizard and two possible solutions to fix the SMART error.
If you are facing the same error message, immediately back up your data by the disk-cloning method with MiniTool software.
When using our software to perform disk cloning, if you have any questions, please tell us by the two ways below: leave your ideas in the comment box or write an email and send it to us via [email protected]. In addition, any suggestions are welcome.
Recently many users have been facing the smart hard disk error. The error is related to your system’s internal storage. The error is a potential sign of failures in your hard drive. No matter whether it is a hard disk drive or solid-state drive. Irrespective of what windows version you are using the error may occur in any version from XP to 10. Users have reported that the error occurs while the system start that is during the boot process. The purpose of this troubleshooting guide is to give you all the information along with some methods to fix this completely.
Causes of SMART Hard Disk Error Problem Issue
If we talk about the causes of SMART hard disk error 301. The error is actually a kind of warning that in the near future your hard disk drive or solid-state drive is going to face issues. It means that your hard drive might be working properly at the moment but soon it can be surrounded by errors and failures. If you are experiencing any sort of hiccups, lag, or seeing errors while performing read-write operations than its the time you take measures to fix the issue.
Similar Types of SMART Hard Disk Error Problem Issue
- 309
- 302
- How to fix mac
- 313
- The smart hard drive detects imminent failure fix
- The smart hard drive detects an error
- WWW.hp.com/go/techcenter/startup hard disk error
- Hard drive smart check failed
In this section, we will try to cover all the possible methods and tips that you can use to eliminate the SMART Hard Disk Error 301. Since the error is just a warning that means if you go fix it now the error will not appear and you can expect for life from it. Moving on let’s get to the methods.
1. Performing Test in BIOS
The first that you can do is perform a test using the BIOS to check for possible failures on the Hard drive. The test is very helpful in getting information about health potential errors. Follow the smart hard disk error 301 steps.
- STEP 1. Open up Start menu click on, Power button and Click ShutDown
- STEP 2. Alternatively, you can ALT+F4 and click Shutdown
- STEP 3. Now boot into the BIOS menu
- STEP 4. Once you get into the BIOS, go to Advanced/Diagnostic or similar tab
- STEP 5. Here you will find the option to Run a Test on Hard drive

- STEP 6. After scanning you will see the possible errors
- STEP 7. To fix theses issue follow the next how to fix smart hard disk error hp method
2. Using CHKDSK Command
CHKDSK is one of the best ways to fix issues like corrupted hard drive sectors and is a useful tool in restoring the hard drive health, we highly recommend this smart hard disk error hp method. Follow the step to perform this.
- STEP 1. In the Start menu type CMD
- STEP 2. From the results, right-click on CMD and Run as administrator
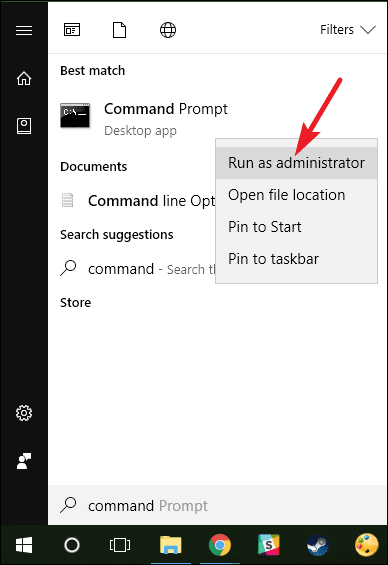
- STEP 3. Once you are in the command window, enter the below command
**NOTE: The below command will scan and fix errors on the entire hard disk.
We highly recommend this. But if you want to perform the scan on a particular drive.
Go to STEP 4.
CHKDSK /F
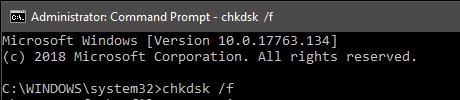
- STEP 4. In case you want to perform scan onto a particular drive enter the below command
CHKDSK /F X:
**NOTE: In the above command X: is the drive letter.
Use the drive letter on which you want to perform the scan.
- STEP 5. Once you enter the command, nothing will happen. All the scanning and preparing will be done automatically once you Reboot system
- STEP 6. After the scan is fully completed, you can see that the lags and how to fix smart hard disk error errors aren’t appearing anymore
3. Repairing without Command
In case you still want to make sure the hp smart hard disk error doesn’t appear. Although it is not necessary if you have already performed the above method.
- STEP 1. Open up My computer, go to the problematic drive and right-click on it
- STEP 2. From the menu list, go to Properties
- STEP 3. Go the Tools Tab
- STEP 4. Under Error-checking, click on Check Now button
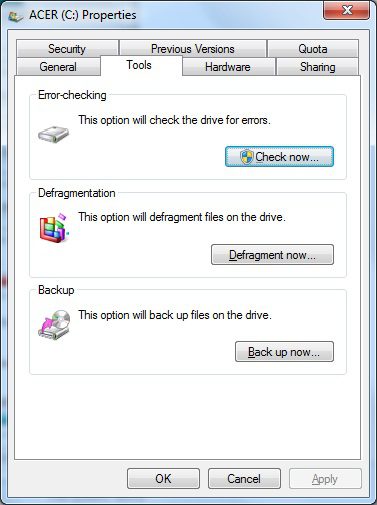
- STEP 5. Select Automatically fix file system errors
- STEP 6. Finally, click on Scan for and attempt recovery of bad sectors > Click Start
- STEP 7. Once the process is completed, restart your system to get rid of the smart hard disk error 301 fixes.
3. Fixing the Issue using Format
This is another way to resolve this smart hard disk error fix. In this method, we will use the command prompt and format the problematic hard drive. We suggest that you should take a backup of your data before performing the operation.
- STEP 1. Open the command window with administrator rights
- STEP 2. Now enter the below command to enter into DISKPART
diskpart
- STEP 3. Now to list all the disk enter the below command
list disk
- STEP 4. Select the disk now by the following command
select disk x
- STEP 5. Now to all the partitions on the Hrad disk, enter below command
list partition
- STEP 6. Select the partition that has to be formatted
select partition x
- STEP 7. Now format the partition by entering,
format
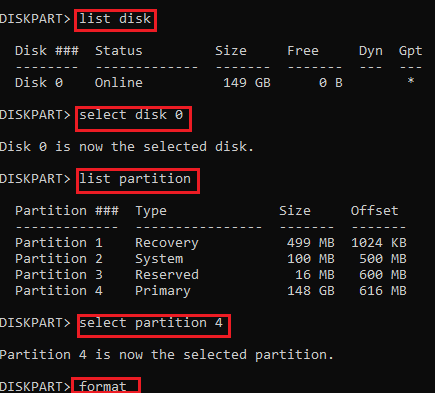
- STEP 8. Once done, restart your system to fix this how to disable smart hard disk error 301 issues.
Conclusion:
With this being the end of the troubleshooting guide on fixing SMART Hard Disk Error. We can conclude that by following the above methods you can surely get rid of this error. We have also talked about the possible causes of this issue.
For more troubleshooting guides and tips follow us. Thank you!
-
#1
Добрый день всем.
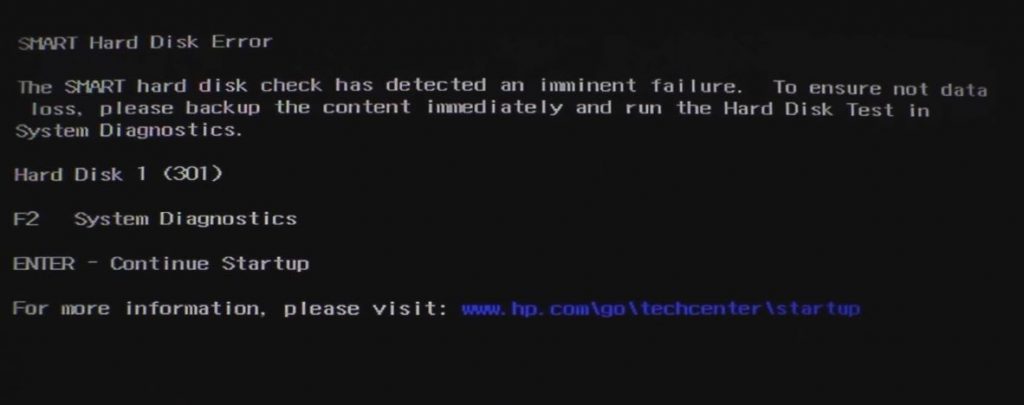
the SMART hard disk check has detected an imminent failure. to ensure not data loss, pleas backup the content immediately and run the hard disk test in system diagnostics.
hard disk 1 (301)
f2 system diagnostics
enter- continue startup
Вот такая беда у меня на ноутбуке( HP G62) выскакивает при включении, хочу ее отключить. У меня стоит Windows 7, версия Biosa F14(В биосе не могу отключить SMART, сам биос выглядит так: Main, Security, Diagnostics, System Configuration, Exit). если мало инфы, спрашивайте. заранее благодарен
-
#2
SMART Hard disk error как ошибку при запуске?
Alex88888888
Необходимо увидеть SMART данного диска. Сделайте как ТУТ написано. Нужен СМАРТ из Виктории.
————
Скорее всего диску всё. Если он еще как-то дышит, то скорейшим образом копируйте важные данныедокументы на другой физический носитель.
-
#3
да да я в курсе что диску все и думаю Victoria мне не поможет да и не надо, мне необходимо просто убрать это уведомление при запуске, чтоб запуск был обычный без показа ошибки, думаю вы меня правильно поняли
-
#4
Alex88888888
Отключите в биос проверку SMART, если есть такая опция. Если нет, то это сообщение никак не убрать.
-
#5
я пробовал найти, как отключить эту проверку в Biose, но не получается, здесь все на англ. и не как найти не могу, как выглядит Bios я описал сверху, может быть вы мне сможете помочь, спасибо
-
#6
Alex88888888
в БИОС вы можете только запустить тест самодиагности ЖД
если бук на гарантии — то прямая дорога туда.
правда с данными вероятней всего придется прощаться (хотя как договоритесь, за отдельную денюшку)
если гарантия ёк — вынимаете винт и цепляете к стационарнику (там контроль SMART моно отключить), снимаете данные и идете за новым винтом (можно сразу за новым)
если нет возможности подключить к стационарнику — покупаете коробочку-box для внешних винтов и цепляете по USB
Alex88888888 написал(а):
мануал
-
#7
Воспользуйтесь этим Ремонт HDD в домашних условиях. после проведите ремап викторией. На ноутах перед разборкой надо снять кожух.
-
#8
Alex88888888
DDX777 написал(а):
На ноутах перед разборкой надо снять кожух.
На всякий случай уточняю — уважаемый DDX777 имел ввиду кожух ноута, а не HDD. А то мало ли… :biggrin:
-
#9
Столкнулся с такой же проблемой после разборки и сборки ноутбкуа при чистке пыли, ответ оказался прост, там есть 2 шлейфа саташных, один на дивидюк а второй на винт, проходят рядом и легко могут быть воткнуты неправильно, всмысле шлейф от двд воткнут в винт и наоборот винтовый шлейф вштырен в двд, поменял местами и все нормализовалось, ошибки все ушли и бук залетал, самое интересное что шлейфы дотягиваются и туда и туда, ненавижу фирму HP в обслуживании!!! регнулся специально чтоб знали люди….

-
#10
superflint написал(а):
один на дивидюк а второй на винт, проходят рядом и легко могут быть воткнуты неправильно
Странно как-то.. Вообще-то Sata — система самоопределяющаяся (в оличие от достаточно капризной ide). Хотя к капризам НР уже начинаю привыкать..
-
#11
та же проблема
Тот же комп и та же проблема. Алекс,удалось ли тeбе отключить SMART? спасибо.
-
#12
michaelk, проверка SMART отключается в биос. Это не сложно.
В биос есть функция smart on(off) или enable(disable)
-
#13
спасибо за быстрый ответ.Как писал Алекс выше ее там нет,или я допускаю,я ее не нашел также как и он.
в сообщении 6 есть мануал,я посмотрел,нет там отключения smart. Но читал где-то,что если отключить вентилятор,то сообщение о неполадке хард диска исчезнет. Но не вызовет ли это перегрева?
-
#14
michaelk написал(а):
Но читал где-то,что если отключить вентилятор,то сообщение о неполадке хард диска исчезнет.
Полнейшая глупость. Вентилятор ни как не связан с жёстким диском. Тем более, что в ноутбуке он один, и если вы его отключите, то получите кучку неработающей электроники. Выскакивающее предупреждение SMART, говорит вам о том, что с диском что-то не в порядке и пора озаботится сохранением важных данных и его заменой.
-
#15
Quick test в биос хард проходит,HDDscan-одна ошибка…
[upd=1398616074][/upd]
Прoxoжий написал(а):
Вентилятор ни как не связан с жёстким диском
я это и сам понимаю…
-
#16
michaelk, покажите SMART этого диска.
-
#18
michaelk, покажите с помощью этой программы, а то ваша самого интересного не показывает — значения атрибутов
-
#20
michaelk, у вас диск начинает сыпаться, почти две тысячи переназначенных секторов. И ещё один кандидат на переназначение имеется. Так что:
Прoxoжий написал(а):
пора озаботится сохранением важных данных и его заменой.