Содержание
- Mock-сервис SoapUI REST выдает ошибки при имитации для обработки динамических ответов в зависимости от значений запроса (но тот же метод работает для SOAP-mock)
- ole lensmar’s blog
- Monday, May 27, 2013
- SoapUI + Swagger = true!
- REST APIs in SoapUI
- Exporting Swagger Definitions
- Usage Scenarios
- Hosting Swagger definitions with SoapUI
- Changes to the Import Swagger feature
- A bonus under the hood: swagger4j
- Installation
- Next Steps
- 45 comments:
Mock-сервис SoapUI REST выдает ошибки при имитации для обработки динамических ответов в зависимости от значений запроса (но тот же метод работает для SOAP-mock)
Я пытался издеваться над следующей веб-службой REST с помощью soapUI
Обычно я использую такой отличный скрипт для оценки запроса и выдачи динамического ответа. (При использовании soapUI для имитации веб-сервисов SOAP)
К сожалению, когда я пытаюсь выполнить запрос к этой конечной точке фиктивной службы REST, он возвращает ошибку. Ошибка:
com.eviware.soapui.impl.wsdl.mock.DispatchException: Failed to dispatch using script; java.lang.NullPointerException: Cannot invoke method getRequestContent() on null object
Я понимаю, что в сообщении об ошибке говорится, что getRequestContent () вернул нулевое значение, и поэтому я получаю это исключение. Но то же самое работает с mock-сервисами SOAP, не возвращая нулевые значения или вызывая исключения. Благодарим за любые обходные пути для решения этой проблемы.

Я просто подумал, что mockRequest.getRequestContent () возвращает null для всех запросов POST, PUT, DELETE, отправленных веб-службам REST, имитируемым с помощью soapUI (версия 5.2.1)
Поскольку приведенный выше (RequestContent) возвращает значение null, пользовательский интерфейс мыла не может оценить значение следующего тега.
SoapUIOfficial References for this bug in soapUI(version 5.2.1):
Я только что нашел обходной путь, чтобы преодолеть вышеупомянутую ошибку в soapUI (версия 5.2.1).
К этому моменту мне стало ясно, что я могу использовать скрипт mockRequest.getRequest (). GetReader (). ReadLine () для чтения одной строки в теле запроса. (хотя mockRequest.getRequestContent () вернул нулевой объект)
Я бы просто получил доступ к телу запроса, используя следующий отличный скрипт.
Согласно приведенному выше сценарию, он должен будет прочитать тело запроса построчно, а затем объединить все строки, чтобы получить все тело запроса .
Поскольку тело запроса больше не является нулевым, следующий скрипт может оценить значение внутри ссылочного тега.
в конце концов я смог издеваться над своим макетным сервисом REST с динамическими ответами в соответствии со следующими условиями.
Надеюсь, вы сможете сэкономить много времени, следуя этому методу.
Источник
ole lensmar’s blog
Monday, May 27, 2013
SoapUI + Swagger = true!
Since I published the original version of the soapui-swagger-plugin in late 2012, Swagger has continued to gain traction within the API community. For those of you not familiar with Swagger, it’s a metadata format for describing the ins and outs of a REST API — much like WSDL is for SOAP APIs — have a look at the Swagger website to learn more.
The initial version of the plugin allowed you to import Swagger definitions into SoapUI — making it extremely easy to send ad-hoc requests, create functional tests, load tests and API monitors for the Swagger-described API (and all for free!). When discussing the plugin with some users at APIStrat earlier this year, they requested the possibility to be able to export Swagger definitions as well, i.e. if you have a REST API defined in SoapUI — they wanted to be able to generate a corresponding Swagger definition that they (for example) could use with swagger-ui to provide your customers an online tool for trying out your API.
Obviously I couldn’t resist the challenge, and although its taken me some time I’m happy to finally announce version 0.2 of the plugin that does exactly that; exports Swagger definitions for any REST API defined in SoapUI — which has some cool usage scenarios. Let’s dive in.
REST APIs in SoapUI
Despite its contextually unfortunate name — SoapUI has had good support for testing REST APIs since 2008 (!). REST support was initially modeled around the WADL specification (an initial attempt at providing metadata for REST APIs) — fortunately the object model in Swagger plays pretty well with WADL, which makes the Swagger import/export feature in the plugin play seamlessly with SoapUIs REST support.
Exporting Swagger Definitions
Exporting Swagger definitions using the plugin is straightforward; make sure you have at least one REST API defined in your SoapUI project and right-click the project node in the SoapUI navigator; the popup menu now has an «Export Swagger» menu option:
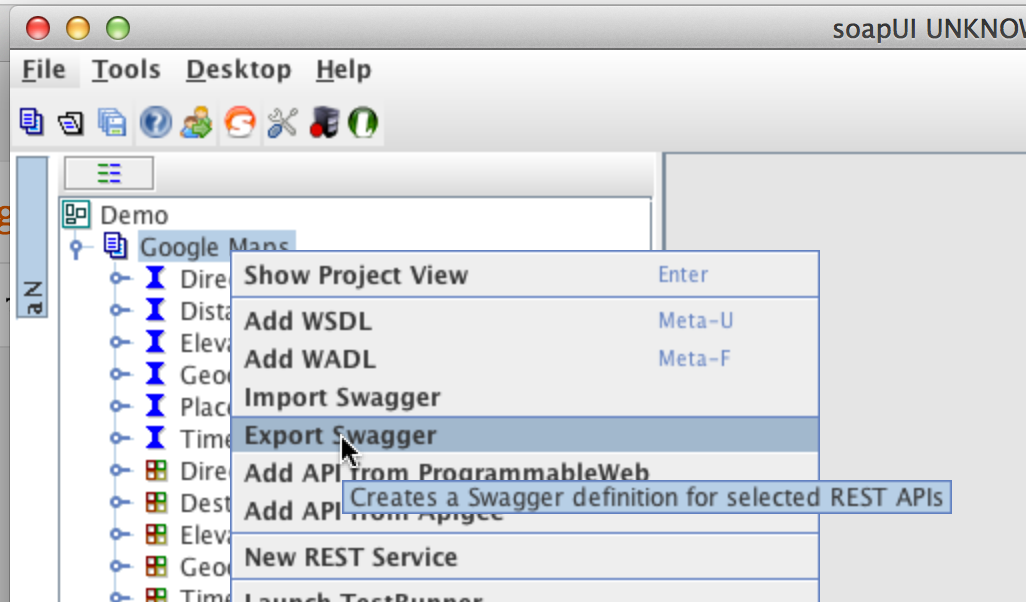
Select it to bring up the following dialog:
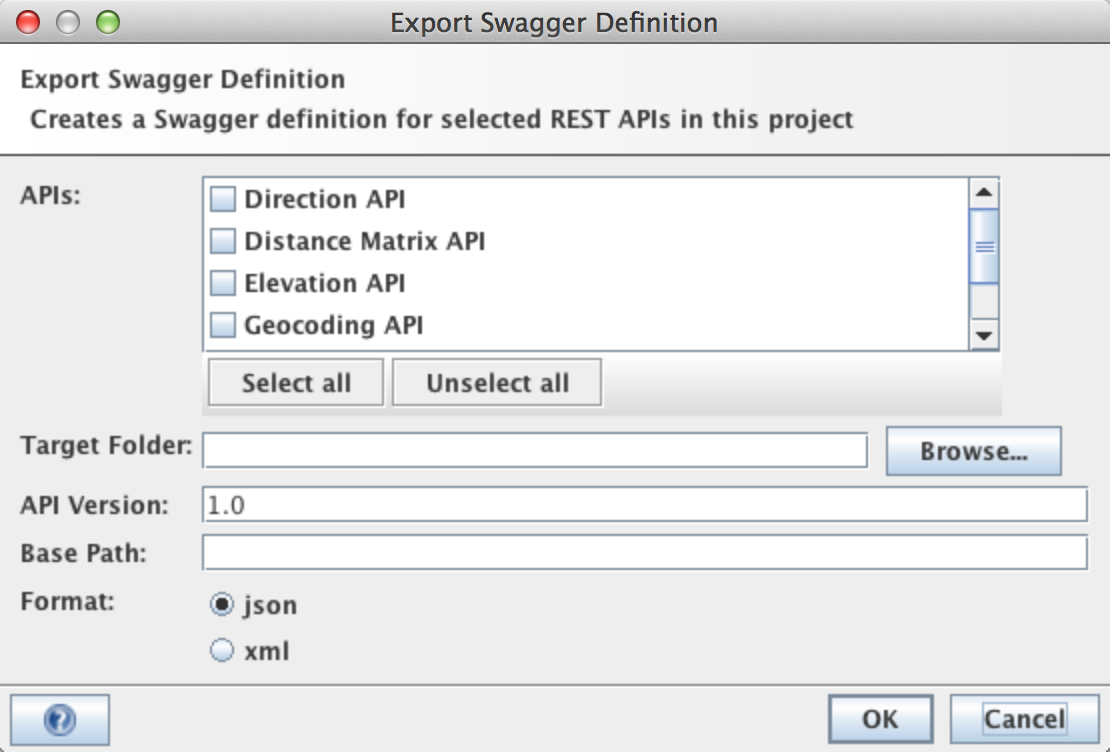
The settings are as follows:
- APIs : select which REST APIs in your project that you want to include in the generated Swagger definition
- Target Folder : where to generate the files
- API Version : the value for the api-version property in the generated definitions
- Base Path: the base path that the generated resource listing will be hosted on. This is important to get right as API declarations are resolved relative to this (see example below)
- Format : which format to use; Swagger technically supports both json and xml, although I would guess 99% of its users are using json at this time 🙂
Press the OK button when you’ve set the options as desired; SoapUI will work a little and prompt you with the path of the generated Swagger resource listing. This is ready to go; feed it into any other tool that supports Swagger — for example you can use swagger-ui to provide a nice online UI for exploring the described API (see example below).
Usage Scenarios
Although the primary usage scenario may be the one described further down in this post — generating Swagger definitions for hosting them with swagger-ui — you could of course use the export feature of the plugin for things like:
- WADL to Swagger conversion; if you have API definitions in WADL format you can simply import them into SoapUI (using the regular Add WADL functionality) and then export them as Swagger definitions with this Plugin
- Swagger-creation; if you need a visual tool to build Swagger definitions «from scratch» you can use SoapUI to define your REST API which you can then export.
Hosting Swagger definitions with SoapUI
One thing you might want to do is provide your API users with a nice browser-based UI for trying out your API — which is precisely what the swagger-ui project is for (also from the Swagger folks). You can download swagger-ui from GitHub and just open it from your local file system in your browser — which will start you with something like:

(by default it displays the sample petstore Swagger definition)
Now how do you get swagger-ui to read the resource-listing generated by SoapUI? Unfortunately swagger-ui doesn’t support file-based URLs so we need to do a bit of trickery with SoapUI to expose our Swagger for swagger-ui; the MockService functionality in SoapUI can be used as a miniature web-server, which is just what we need here (if you have a local web server running you can of course use that instead).
Start by creating a MockService in your SoapUI project via the Project menus «New MockService» option. Once created — double-click it to open the MockService window and select the «Options» button — which will bring up the following dialog:
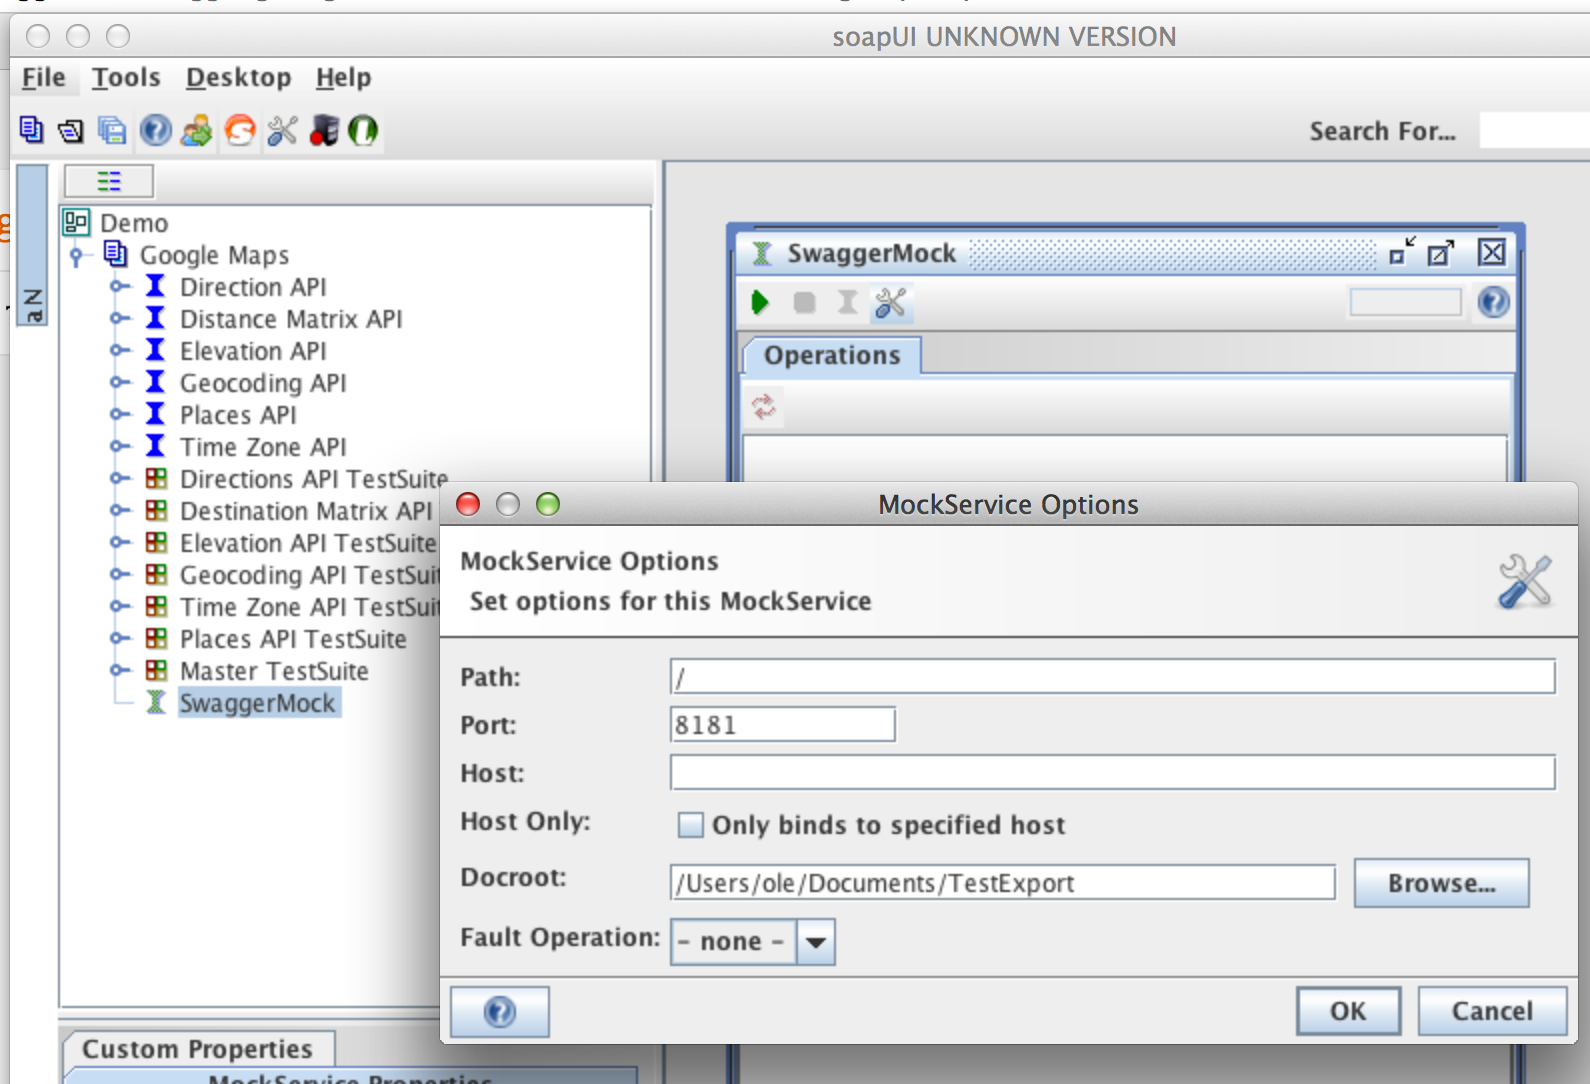
Set the docroot to point at the folder where you generated the Swagger definition, configure the port as desired (so it doesn’t collide with anything else you might be hosting on your machine), press OK and start the MockService with the «Run» button in the top-left corner of the MockService window. You now have a mini webserver running, ready to serve any documents you have in the specified docroot folder, but before we can use swagger-ui with it we need to make sure the MockService adds some HTTP Headers that swagger-ui expects. Select the «OnRequest Script» tab in the MockService window and enter the following:
mockRequest.httpResponse.addHeader( «Access-Control-Allow-Origin», «*» )
mockRequest.httpResponse.addHeader( «Access-Control-Allow-Methods», «GET, POST, DELETE, PUT» )
mockRequest.httpResponse.addHeader( «Access-Control-Allow-Headers», «Content-Type, api_key, Authorization» )
In SoapUI, this looks as follows;

Let’s go back to the dialog for Exporting Swagger definitions and configure it accordingly:
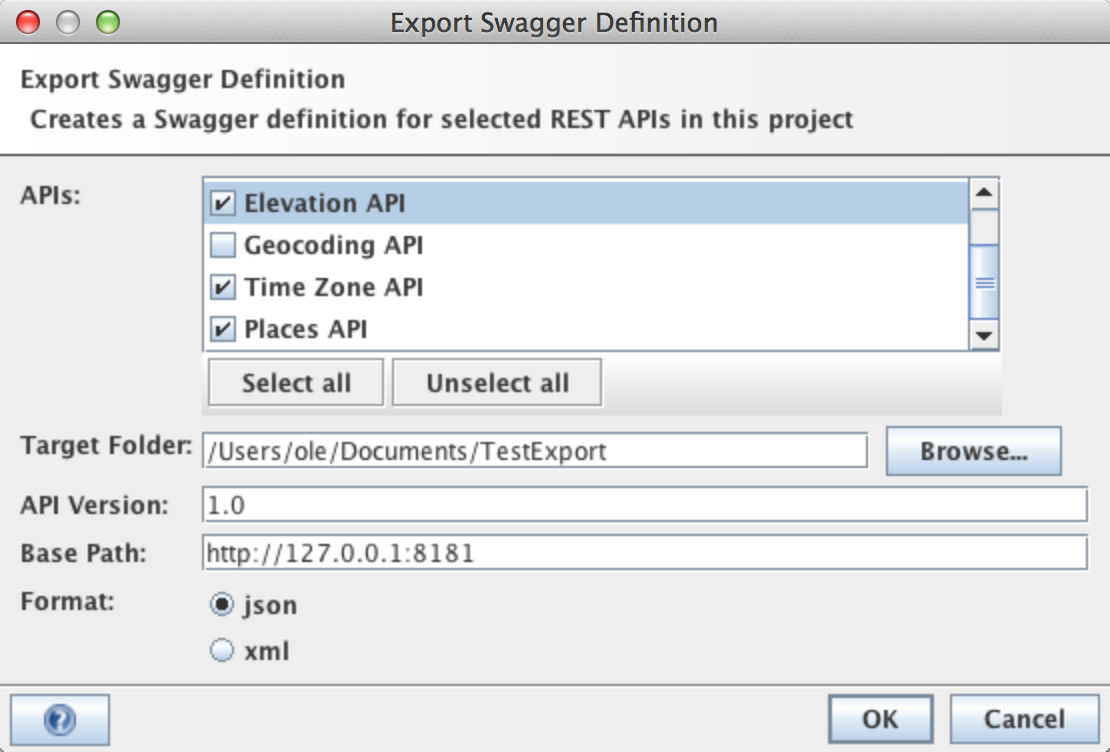
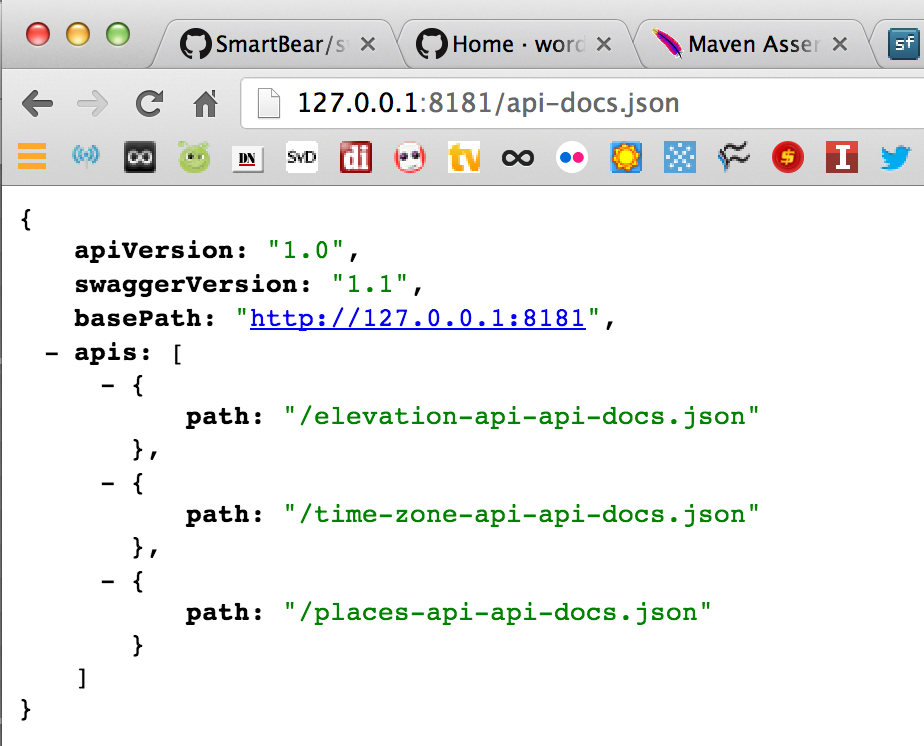
Please note that Base Path configuration above matches the local ip that the MockService is running on (so the path can be resolved) and the Target Folder is the same as the docroot for the MockService configured above. Once exported we’re all set; open a web-browser and enter «http://127.0.0.1:8181/api-docs.json» (change the port accordingly) — which should bring up the Swagger resource listing we generated above;
Now back to swagger-ui; paste the same endpoint in the URL field and press the «Explore»; swagger-ui will work a bit and presto, you should get something like the following;

Awesome — we’ve created Swagger definitions for some of the Google Maps APIs and can now do some simple API invocation from within swagger-ui!
Changes to the Import Swagger feature
The «Import Swagger» feature has been improved a little since last; the dialog invoked by the corresponding menu item now looks as follows:
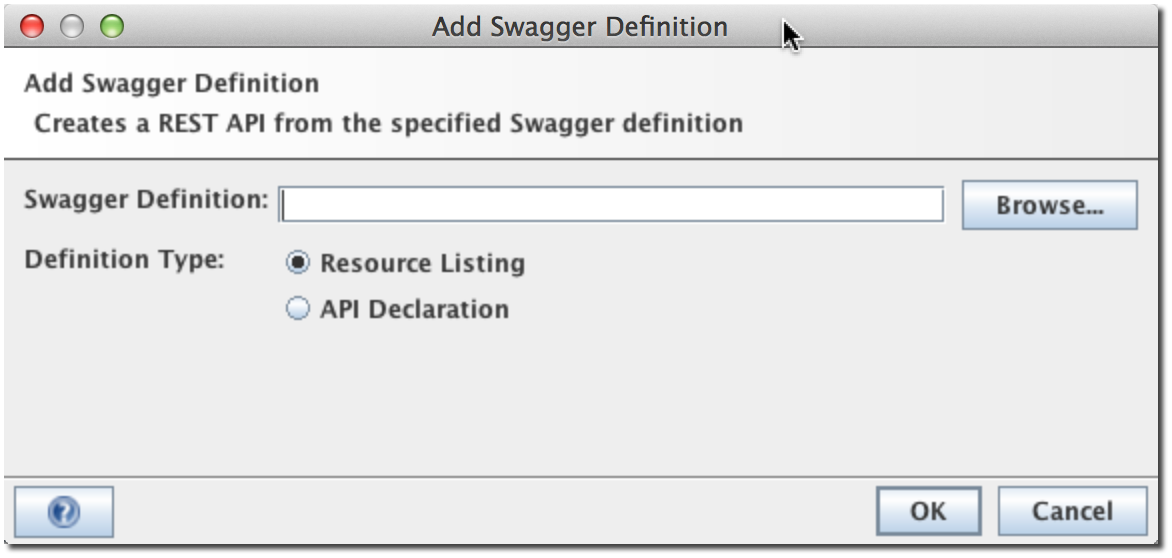
Here you can now specify to import Swagger API Declarations directly (instead of always having to provide a Resource Listing) — which can come in handy for some of the API-mgmt platforms out there that provide API Declarations directly (APIHub for example).
A bonus under the hood: swagger4j
Version 0.2 of this plugin needed a more robust way to read and write Swagger definitions than the groovy scripts that were used in version 0.1 to just read them. I’ve separated this into a separate java library — swagger4j — which has no dependencies on SoapUI whatsoever and can as such used within any Java program that needs to read or write Swagger definitions. It’s open-source (Apache licensed) and available over at GitHub — check it out, and don’t hesitate to give me feedback so I can improve that as well.
Installation
Installing the plugin is straight forward; download it from sourceforge or build it yourself with maven (it’s on GitHub). The download from sourceforge contains the required dependencies — all you have to do is unzip it into your SoapUI/bin folder.If you build it manually you will have to add these dependencies yourself to the SoapUI/bin/ext folder:
Next Steps
So what’s next? You tell me! Please get in touch if you want to see any specific fixes, improvements, etc — I’d love to hear from you.
![]()
Thanks, It helps a lot.
It will be good if we have maven plugin for WADL to Swagger json.
Cool idea — please add it to the issue tracker at GitHub: https://github.com/olensmar/soapui-swagger-plugin
![]()
Well — I downloaded it and unzipped into Soapuibin directory and now how do I use it to automate my SWAGGER REST API, plus how I can get it to work with request input using this as an example:
<
«name»:»DONNAS Test»,
«description»:»DONNAS Test»
>
It will not work — I exported REST API using SWAGGER and Imported it back in. I tried to execute the test, but to no avail I get HTTP 404. Do you have any examples of POST, PUT, DELETE, etc using SOAPUI PRO?
hmm. is the plugin perhaps extracting the wrong URL endpoint from the swagger definition? Could you attach the swagger def here and let me know how the generated request differs from one that works?!
thanks in advance!
![]()
Hi!
Is it possible to get a body included in the swagger def? Both from the request body of POST/PATCH/PUT, and from response body in all methods? (Given that the bodies are json)
Hi
I am trying to export rest rervice definition to swagger format and get the following error:
Thu Oct 31 16:46:49 CET 2013:ERROR:java.lang.NoClassDefFoundError: com/smartbear/swagger4j/Constants$Format
java.lang.NoClassDefFoundError: com/smartbear/swagger4j/Constants$Format
thanks is advance.
hmm. do you have the swagger4j jar file in the soapui/bin/ext folder?
No i don’t!!
Where can i download it?
Hi Ole,
after copying javax.json-1.0-b06.jar and swagger jar it works correctly.
Great! Please don’t hesitate to comment ideas for improvements, etc!
![]()
# Installation on OS X
I am using the soapui-swagger-plugin with the OS X version of soapui. I copied the content of the zip file into /Applications/SoapUI-4.6.3.app/Contents/java/app/bin and this seems to work, although I could not find documentation about this anywhere.
When importing from swagger spec into soapui, can I only do this from a json file, or also from a URL that points to a swagger spec? I only got it to work from file. This probably has to do with the following issue though.
My API uses HTTP Basic Auth, so even to retrieve the swagger spec, one needs to authenticate. URL in my case is
http://localhost:3000/api/v1/swagger_doc.json
I tried to add username/password in the URL directly but that didn’t work.
I get errors like «java.io.IOException: Server returned HTTP response code: 401 for URL: http://localhost:3000/api/v1/abc»
sorry for the late response — please add a feature request for HTTP authentication support at https://github.com/olensmar/soapui-swagger-plugin/issues and I’ll try to get this fixed.
Sebastian — are you using soap ui pro? I can not sem to get the swagger menu items
Hi. I used Spring ‘swagger-springmvc’ to generate the Swagger URLs from a Spring project. These files work fine with ‘swagger-ui’. However, when I try to import into SoapUI (Import Swagger) then I get a ClassCastException:
Sun Jan 12 21:34:57 GMT 2014:ERROR:java.lang.ClassCastException: javax.json.JsonValue$1 cannot be cast to javax.json.JsonArray
java.lang.ClassCastException: javax.json.JsonValue$1 cannot be cast to javax.json.JsonArray
at org.glassfish.json.JsonObjectBuilderImpl$JsonObjectImpl.getJsonArray(JsonObjectBuilderImpl.java:161)
at com.smartbear.swagger4j.impl.SwaggerParser$SwaggerJsonParser.getChildren(SwaggerParser.java:211)
at com.smartbear.swagger4j.impl.SwaggerReaderImpl.readOperation(SwaggerReaderImpl.java:251)
at com.smartbear.swagger4j.impl.SwaggerReaderImpl.readApiDeclaration(SwaggerReaderImpl.java:224)
at com.smartbear.swagger4j.impl.SwaggerReaderImpl.readApiDeclaration(SwaggerReaderImpl.java:176)
at com.smartbear.swagger4j.SwaggerReader$readApiDeclaration.call(Unknown Source)
hmm. can you send me the Swagger file so I can try importing it!? (olensmar a t gmail.com)
SoapUI doesn’t seem to manage some Swagger attributes like models, authorizations, type or items (to refer to the models and show response data model in swagger), etc.
Are these some extra info to add by hand once Swagger description file generated ?
you’re right — unfortunately SoapUI doesn’t support models/types and JSON Schemas at this point — the authorizations metadata will be supported by an updated version of the plugin once SoapUI 5.0 is released.
![]()
Doesn’t work with SoapUI 5.0 on OSX.
Yes can not get it work on Mac using SoapUI 5.0 — does this only work on SoapUI pro or only
Hi,
I’m having some troubles generating the swagger json file from inside soapui 5.0. All the jars are in the right folder, when I click the ok button of the generation dialog I obtain the following trace in the error.log file. Any advice? Downgrade soapui ? Thanks in advance.
Rob
Fri May 02 12:45:55 CEST 2014:ERROR:java.lang.NoClassDefFoundError: com.eviware.soapui.impl.rest.RestRequestInterface$RequestMethod
java.lang.NoClassDefFoundError: com.eviware.soapui.impl.rest.RestRequestInterface$RequestMethod
at com.smartbear.restplugin.SwaggerExporter$_generateResourceListing_closure2_closure3_closure4.class$(SwaggerExporter.groovy)
at com.smartbear.restplugin.SwaggerExporter$_generateResourceListing_closure2_closure3_closure4.$get$$class$com$eviware$soapui$impl$rest$RestRequestInterface$RequestMethod(SwaggerExporter.groovy)
at com.smartbear.restplugin.SwaggerExporter$_generateResourceListing_closure2_closure3_closure4.doCall(SwaggerExporter.groovy:107)
at sun.reflect.NativeMethodAccessorImpl.invoke0(Native Method)
at sun.reflect.NativeMethodAccessorImpl.invoke(NativeMethodAccessorImpl.java:57)
at sun.reflect.DelegatingMethodAccessorImpl.invoke(DelegatingMethodAccessorImpl.java:43)
at java.lang.reflect.Method.invoke(Method.java:606)
at org.codehaus.groovy.reflection.CachedMethod.invoke(CachedMethod.java:90)
at groovy.lang.MetaMethod.doMethodInvoke(MetaMethod.java:233)
at org.codehaus.groovy.runtime.metaclass.ClosureMetaClass.invokeMethod(ClosureMetaClass.java:272)
at groovy.lang.MetaClassImpl.invokeMethod(MetaClassImpl.java:909)
at groovy.lang.Closure.call(Closure.java:411)
at groovy.lang.Closure.call(Closure.java:427)
at org.codehaus.groovy.runtime.DefaultGroovyMethods.each(DefaultGroovyMethods.java:1325)
at org.codehaus.groovy.runtime.DefaultGroovyMethods.each(DefaultGroovyMethods.java:1297)
at org.codehaus.groovy.runtime.dgm$148.invoke(Unknown Source)
at org.codehaus.groovy.runtime.callsite.PojoMetaMethodSite$PojoMetaMethodSiteNoUnwrapNoCoerce.invoke(PojoMetaMethodSite.java:271)
at org.codehaus.groovy.runtime.callsite.PojoMetaMethodSite.call(PojoMetaMethodSite.java:53)
at org.codehaus.groovy.runtime.callsite.CallSiteArray.defaultCall(CallSiteArray.java:45)
at org.codehaus.groovy.runtime.callsite.AbstractCallSite.call(AbstractCallSite.java:108)
at org.codehaus.groovy.runtime.callsite.AbstractCallSite.call(AbstractCallSite.java:116)
at com.smartbear.restplugin.SwaggerExporter$_generateResourceListing_closure2_closure3.doCall(SwaggerExporter.groovy:85)
.
Guys — sorry to keep you waiting on this — I’ll publish a fixed version over the weekend!
Hi Ole,
I am just starting to use SoapUI 5.0, I have added your plugin.
My actual goal is to import a definition(s) from a site that uses an Access-Token in the header even for the definitions. It also uses models and items . as mentioned above. I can create a resource by hand and first get the access token, then insert it into a header and I will get back the swagger json for the resources, but I don’t see how to do this all and get it into SoapUI as forms (pardon my terminology, im new to swagger and SoapUI REST, though I have use SoapUI Soap)
to try and debug i then tried the petstore project, but I am getting errors here also:
Generic project and Add Swagger Definition, either type I get file not found for the http://petstore.swagger.wordnik.com/api/api-docs.json.
I get a file not found error for this. I got the link from your 2012/12 tutorial. I then tried without the .json extension. This gives me
java.lang.ClassCastException org.glassfish.json.JsonObjectBuilderImpl$JsonObjectImpl cannont be cast to javax.json.JsonString
I then put the Url http://petstore.swagger.wordnik.com/api/api-docs (no .json) into firefox and got back would appears to be the valid swagger json definition. it indicates apiVersion 1.0.0 and swaggerVersion 1.2
i see you are planning on making a fix this weekend, so if there is something you would like me to try let me know
I’ve updated the swagger4j library that was causing these issues (for me at least) — please grab the latest version from https://sourceforge.net/projects/swagger4j/files/1.0-beta3/ and replace the beta2 version of swagger4j in your SoapUI/bin/ext folder with it.
Let me know if that helps — thanks!
![]()
Error after copying beta3 jar to SoapUI/bin/ext. Please help.
Directory of C:viewsinstallationSmartBearSoapUI-5.0.0binext
..
05/16/2013 12:04 AM 78,456 javax.json-1.0-b06.jar
04/09/2014 10:44 AM 150 readme.txt
05/05/2014 03:47 PM 73,857 swagger4j-1.0-beta3.jar
Mon May 05 15:52:44 EDT 2014:ERROR:java.lang.NoClassDefFoundError: com.eviware.soapui.impl.rest.RestRequestInterface$RequestMethod
java.lang.NoClassDefFoundError: com.eviware.soapui.impl.rest.RestRequestInterface$RequestMethod
at com.smartbear.restplugin.SwaggerExporter$_generateResourceListing_closure2_closure3_closure4.class$(SwaggerExporter.groovy)
at com.smartbear.restplugin.SwaggerExporter$_generateResourceListing_closure2_closure3_closure4.$get$$class$com$eviware$soapui$impl$rest$RestRequestInterface$RequestMethod(SwaggerExporter.groovy)
at com.smartbear.restplugin.SwaggerExporter$_generateResourceListing_closure2_closure3_closure4.doCall(SwaggerExporter.groovy:107)
at sun.reflect.NativeMethodAccessorImpl.invoke0(Native Method)
at sun.reflect.NativeMethodAccessorImpl.invoke(Unknown Source)
at sun.reflect.DelegatingMethodAccessorImpl.invoke(Unknown Source)
at java.lang.reflect.Method.invoke(Unknown Source)
Darn — I’ll update the RAML plugin instead. gimme a day or two — sorry to keep you waiting!
![]()
what is RAML plugin ? i am not sure about what you mean.
in around end of 2013, i had pre soap 5.0 installed and i recall was able to generate swagger output from my imported wadl restapi. worked perfect then.
now with soap ui 5.0 trying to do the same, fails with the error i reported above even after using the beta-3 jar.
Let me know if you need some debug output or anything else.
thanks.
Источник
My code was earlier working with soapUi2.5.
but when I started working with soapUI2.5.1, I started getting this error.
com.eviware.soapui.impl.wsdl.mock.DispatchException: Missing operation for soapAction [http://SEWSI.ServiceContracts/2008/09/ReceiveSubscription] and body element [{http://SEWSI.ServiceContracts/2008/09}ReceiveSubscriptionRequest] with SOAP Version [SOAP 1.1]
I would appreciate if some can explain me what this signifies.
![]()
Cœur
36.4k25 gold badges191 silver badges259 bronze badges
asked Aug 12, 2009 at 16:42
I think I’ve found your solution — albeit a year later!
Your mock service may have problems in requiring a Soap Action
- In SoapUI select your mock service
- In it’s property window change ‘Require SOAP Action’ to false
answered Apr 7, 2011 at 3:15
![]()
KCDKCD
9,7155 gold badges65 silver badges75 bronze badges
I don’t know for sure, but I bet it means that soapUI thinks it’s telling the truth. It thinks there should be an operation for that combination, but it can’t find one. Did you maybe update the WSDL but not the MockService? In this case, the difference in soapUI version would be a coincidence.
answered Aug 16, 2009 at 1:20
![]()
John SaundersJohn Saunders
160k26 gold badges240 silver badges393 bronze badges
I was getting the same error with soapUI, with the response coming 1st time and then for a subsequent request, it was getting blank.
It seems like a library issue.
Use https://github.com/eveoh/weblogic-soapui-mock-ear to wrap the war into the ear.
This has resolved an issue for me. I have used Weblogic 12c.
![]()
SAVe
8166 silver badges22 bronze badges
answered Jun 28, 2019 at 9:42
![]()
Once your API is defined, client developers want to start using it. What if you’re not done coding it though? How can you test it and give your consumers the ability to start work on their apps before the endpoint is up and running? How often do you find yourself trying to launch a REST API under tight deadlines? How can you find bugs in your client code by running automated builds as a part of your Continuous Integration (CI) process without having your API up and running at all times? These can be challenging questions — ones that must be answered if you’re going to deliver a high quality API with top notch client SDKs.
Developers have been expressing a desire for better tooling support that helps them with these problems. SmartBear has been listening, and has recently launched a new product called Ready! API. It is designed to help you solve these problems quickly and easily. Largely an evolution of their existing product, SOAP UI, this new tool includes a simpler interface and tool chain.
Although Ready! API has lots of cool, new features, in this this step-by-step tutorial, we will focus on one called ServiceV. This feature allows you to create new virtual services or so called “Virt.” With it, you can mock the endpoint of a REST API. By doing so, you can start developing applications before the actual endpoint is up and running. This can potentially reduce the time between an API being released and an API being used. You can also launch it from a CI server to ensure that integration test cases continually pass. With this feature, SmartBear has made it a lot easier to test APIs.
To see this for yourself first hand, follow this walkthrough to learn how to:
- Combine Ready! API’s ServiceV with the more commonly known SOAP UI Pro
- Setup a virtual service to mock a REST API
- Setup a REST client to mock calls to the REST API
Creating a New Virtual Services
Start with a New Virtual Service Project
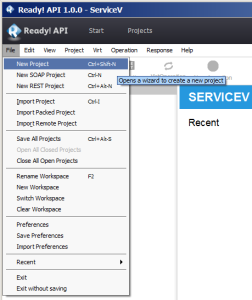
The first thing you need to do is create the Virt project. To do this in Ready! API, follow these steps:
-
Go to the
Service Vtab and selectNew projectfrom theFilemenu.

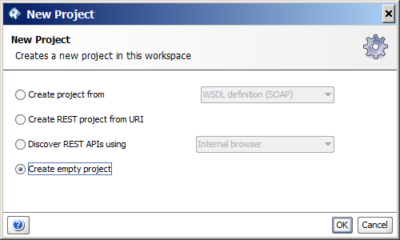
This will open theNew Projectdialog. -
In this dialog, select
Create empty projectand clickOK.

This will create a new project in ServiceV [Projects]
. Now that you have a project, let’s add a virtual API to it!
Adding a New Virt
With the new project in hand, you can now add a virtual service to it. This will be used by the client later on. To add a Virt, do the following:
-
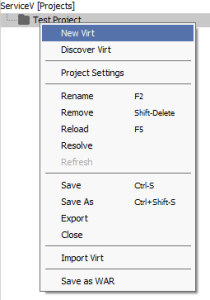
Right-click on
ServiceV [Projects]and selectNew Virt.

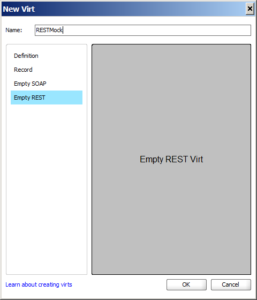
-
On the left hand side of the
New Virtdialog box, chooseEmpty RESTas the type of Virt you’d like to create. Then, give it a name (I named mineRESTMock), and clickOK.

Now you have a project and a virtual service. Not hard, but also not too useful yet. Let’s put it to work by creating some actions to simulate the behavior of our fictitious API.
Emulating Behavior with VirtActions
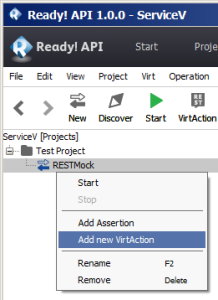
We now we have a project and a virtual service that does nothing. The next step is to add a virtual action. To do this, follow these steps:
-
Right-click on the name you gave to your Virt, and select
Add new VirtActionfrom the context menu.

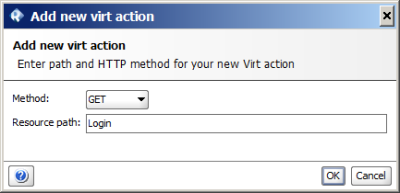
This will bring up theAdd new virt actiondialog box. -
In this window, select the
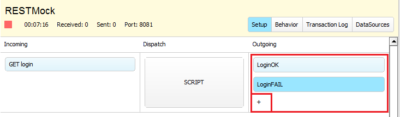
Methodand type in aResource path(i.e., the URI of your virtual API). For the sake of this walkthrough, selectGETas the HTTP method andLoginasResource path.

-
Ready! API has different ways of simulating the behavior. In this walkthrough, we’ll demonstrate the use of a script to simulate mock behavior. To do this, change the
Dispatch StylefromSEQUENCEtoSCRIPTin the resulting VirtAction that you created in the previous step.

-
Now, you need to define the outgoing response. To do this, press the
+button under theOutgoingcolumn. Add the responses that you’d like to simulate. For this tutorial, addLoginOKandLoginFAILoutputs. (You can name them with or without spaces, but it’s important that the name describes the different response types that will be returned.)

-
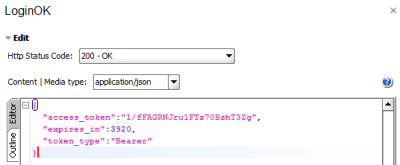
Define the response by selecting each output. Do this, for example, by selecting
LoginOK. In thisEditarea, verify that theHTTP Status Codeis200 - OK. Then, changeContent | Media typetoapplication/json. Add the following snippet of JSON as the result that will be returned for theLoginOKcase:
{
    "access_token" : "1/fFAGRNJru1FTz708zhT3Zg"
    "expires_in" : 3920,
    "token_type" : "Bearer"
}
If you’re following along, you should now have something that looks like this:
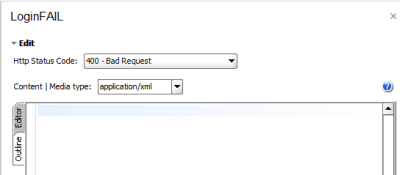
Do the same for the LoginFAIL
, but change the HTTP Status Code to 400 – Bad Request.
We can potentially add more things here like a redirect URL. You may also want to add an error message, so you’re client knows what went wrong. Experiment. Keep following along with this guide, but play around too!
Now that you’ve defined the VirtAction, you’re almost done. Just a little bit of coding, and you’re all set.
Coding and Returning Information
Now that we have defined outputs for our two simulated actions, LoginOK and LoginFail, we need to add some logic for deciding which of the two responses to send back in different scenarios. To do this, follow these steps:
- Firstly, we need to get the request parameters. I have copied the first few rows of code from another example that SmartBear has provided. This code picks up the request query string and splits it into an array of variables.
    def queryString = mockRequest.getRequest().getQueryString();

    String[] fields = queryString.split("&");
    String[] kv;

    HashMap params = new HashMap();

    for (int i = 0; i < fields.length; ++i){
        kv = fields[i].split("=");
        if (2 == kv.length)
         params.put(kv[0], kv[1]);
    }
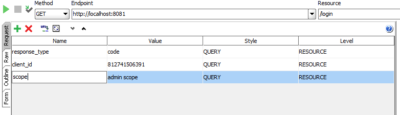
If we have an parameter called scope, for example, we can simply say params.get("scope"), and we will get the value of that parameter. It’s a nice and clean way to solve the problem. There might be other ways to do this as well, so feel free to experiment 
2. The next step is to define and populate all the variables. The result will then be validated. We will return the output of our different VirtActions depending on whether the result was successfully validated or not. There is an error in the code which I left in there intentionally; I’ll covered this in next step, so stick with me.
    def response_type = params.get("response_type");
    def client_id = params.get("client_id");
    def scope = params.get("scope");

    if (response_type == "code") && client_id == "812741506391"  &&
       (scope == "admin scope" || scope == "admin%20scope")){
        return "LoginOK"
    }

    return "LoginFAIL"
If you run the code above, you’ll get the following error when you call the virtual service:
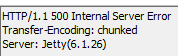
In the Transaction Log of the Virt, you’ll see this error: Dispatch error; Missing response
. ![]() The error was an extra
The error was an extra ) character in the code.
How can we validate the code and get debug messages about the code?
It’s quite easy actually. Let me show you:
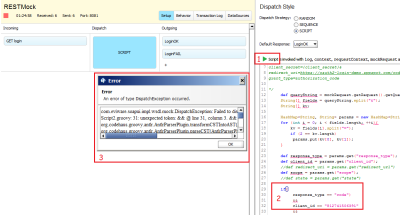
In the image above, you see I outlined three important areas of the UI: the green arrow button, the error in the code, and the error message received after pressing the green arrow button. These three together will allow you to debug your virtual service with relative ease.
3. To fix the error (if you have not done it already), remove the extra ) character.
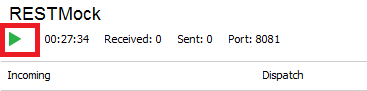
4. Start your server by pressing the Green arrow (run server).
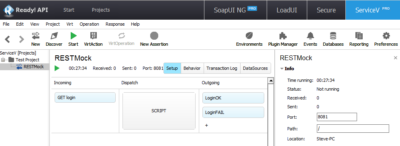
NOTE You might need to configure your Virt to use another port than the default. You can change the port by selecting the service’s name (e.g.,
RESTMock) in the explorer. This will give you an option to define the port and default path.
Hosting the Mock API
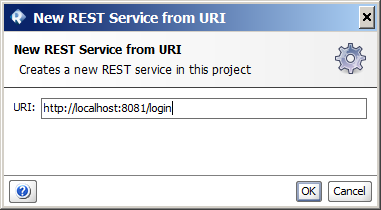
You’ve created a virtual service, added some behavior, and even written a little code to dispatch to the different responses that should be output under different circumstances. This is really helpful — once you host it somewhere. You need to run the Virt on some address, port, etc. To create a host for the make-believe API, do the following:
- Navigate to the
Projectstab in the upper left corner.

- Right-click your Virt, and select
New REST Services from URI.

- Add a URI where you want to run the virtual endpoint. In my case, I used
localhostand port8081. My full URI washttps://localhost:8081/login.

- Go to the
Requesttab. This is where we define the parameters for our REST service.

- Press the
+button, and add your request parameters. You can see in the screenshot above that I added two and a default value as well.


Now our service is up and running! Great job!
Test the Mock API
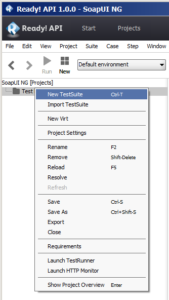
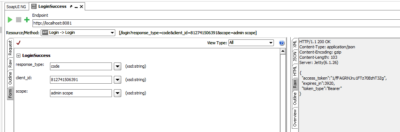
Lastly, we just need a client to test our virtual API. Of course, you’ll probably write these yourself from scratch, as that’s the point of mocking the service. Before getting to that though, it’s helpful to ensure that the Virt is working as expected. To do this, switch to the Soap UI NG PRO tab and follow these steps:
- Right-click and select
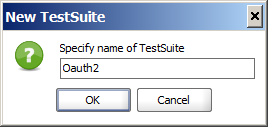
New TestSuite.

- Type in a suitable name for this test suite (e.g.,
Oauth2).

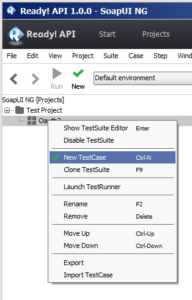
-
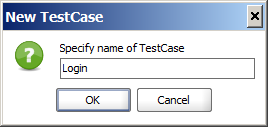
Right-click the test suite, and press
New TestCase. Type in a suitable name for the test (e.g.,TestCase).

-
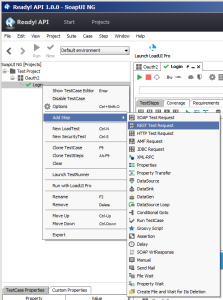
Right-click the test case, and select
Add Step, and thenREST Test Request.

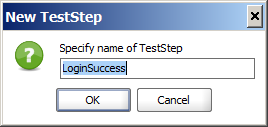
- In the
New TestStepdialog, addLogin Success.
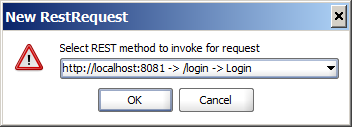
- Then, select the REST method called
Login.

- Finally, add the parameter values, and press the green arrow to run the test.

Congratulations you’ve done it!
Conclusion
In this walkthrough, you have:
- Created a virtual service
- Started the virtual service
- Handled errors in your virtual service’s code
- Scripted both an error and success outputs
- Created a REST client to test your Virt
That’s pretty good. With the basics down, you can now setup all sorts of test services. This API-centric approach to Test Drive Development (TDD) will make your development process more agile and decouple your client and service developers. It will also help you ensure that your APIs are of the highest quality.
If you get stuck going through this guide or have feedback, leave a comment below or tweet to us on Twitter.
[Editor’s note: Nordic APIs is an independent publication. Unlike most of our posts, however, this one was sponsored by SmartBear, the makers of Ready! API and SOAP UI.]
I want to mock a Webservice for development environment.
I have SOAPUI version 5.2.1 and the following WSDL:
<wsdl:definitions xmlns:wsdl="http://schemas.xmlsoap.org/wsdl/"
xmlns:http="http://schemas.xmlsoap.org/wsdl/http/"
xmlns:mime="http://schemas.xmlsoap.org/wsdl/mime/"
xmlns:s="http://www.w3.org/2001/XMLSchema"
xmlns:soap="http://schemas.xmlsoap.org/wsdl/soap/"
xmlns:soap12="http://schemas.xmlsoap.org/wsdl/soap12/"
xmlns:soapenc="http://schemas.xmlsoap.org/soap/encoding/"
xmlns:tm="http://microsoft.com/wsdl/mime/textMatching/"
xmlns:tns="http://server.com/SSO"
targetNamespace="http://server.com/SSO">
    <wsdl:documentation>Web service</wsdl:documentation>
    <wsdl:types>
        <s:schema elementFormDefault="qualified" targetNamespace="http://server.com/SSO">
            <s:element name="GetProfile2">
                <s:complexType>
                    <s:sequence>
                        <s:element maxOccurs="1" minOccurs="0" name="Token" nillable="true" type="s:string"/>
                        <s:element maxOccurs="1" minOccurs="0" name="SiteName" nillable="true" type="s:string"/>
                        <s:element maxOccurs="1" minOccurs="0" name="TimeStamp" nillable="true" type="s:string"/>
                        <s:element maxOccurs="1" minOccurs="0" name="EncodedPwd" nillable="true" type="s:string"/>
                        <s:element maxOccurs="1" minOccurs="0" name="EncodedType" nillable="true" type="s:string"/>
                        <s:element maxOccurs="1" minOccurs="0" name="Filter" nillable="true" type="s:string"/>
                    </s:sequence>
                </s:complexType>
            </s:element>
            <s:element name="GetProfile2Response">
                <s:complexType>
                    <s:sequence>
                        <s:element maxOccurs="1" minOccurs="0" name="GetProfile2Result" type="s:string"/>
                    </s:sequence>
                </s:complexType>
            </s:element>
            <s:element name="GetCache">
                <s:complexType/>
            </s:element>
            <s:element name="GetCacheResponse">
                <s:complexType>
                    <s:sequence>
                        <s:element maxOccurs="1" minOccurs="0" name="GetCacheResult" type="s:string"/>
                    </s:sequence>
                </s:complexType>
            </s:element>
            <s:element name="string" nillable="true" type="s:string"/>
        </s:schema>
    </wsdl:types>
    <wsdl:message name="GetProfile2SoapOut">
        <wsdl:part element="tns:GetProfile2Response" name="parameters">
        </wsdl:part>
    </wsdl:message>
    <wsdl:message name="GetProfile2SoapIn">
        <wsdl:part element="tns:GetProfile2" name="parameters">
        </wsdl:part>
    </wsdl:message>
    <wsdl:portType name="ServiceSoap">
        <wsdl:operation name="GetProfile2">
            <wsdl:documentation>Returns a user</wsdl:documentation>
            <wsdl:input message="tns:GetProfile2SoapIn">
            </wsdl:input>
            <wsdl:output message="tns:GetProfile2SoapOut">
            </wsdl:output>
        </wsdl:operation>
        <wsdl:operation name="GetCache">
            <wsdl:documentation>Returns the cached abilitations.</wsdl:documentation>
            <wsdl:input message="tns:GetCacheSoapIn">
            </wsdl:input>
            <wsdl:output message="tns:GetCacheSoapOut">
            </wsdl:output>
        </wsdl:operation>
    </wsdl:portType>
    <wsdl:binding name="ServiceSoap" type="tns:ServiceSoap">
        <soap:binding transport="http://schemas.xmlsoap.org/soap/http"/>
        <wsdl:operation name="GetProfile2">
            <soap:operation soapAction="http://server.com/SSO/GetProfile2" style="document"/>
            <wsdl:input>
                <soap:body use="literal"/>
            </wsdl:input>
            <wsdl:output>
                <soap:body use="literal"/>
            </wsdl:output>
        </wsdl:operation>
        <wsdl:operation name="GetCache">
            <soap:operation soapAction="http://server.com/SSO/GetCache" style="document"/>
            <wsdl:input>
                <soap:body use="literal"/>
            </wsdl:input>
            <wsdl:output>
                <soap:body use="literal"/>
            </wsdl:output>
        </wsdl:operation>
    </wsdl:binding>
    <wsdl:service name="Service">
        <wsdl:documentation>Web service</wsdl:documentation>
        <wsdl:port binding="tns:ServiceSoap" name="ServiceSoap">
            <soap:address location="http://server.com:7001/services/Service.ServiceSoap/"/>
        </wsdl:port>
    </wsdl:service>
</wsdl:definitions>
I’ve created in SOAPUI a new soap project, with mock service, I’ve set the host and the port of the Weblogic server 12c where I have to install the war.
In SOAPUI preferences I have unchecked Logs wire content of all…», in MockService Properties I have set «Require SAOP Action» to false, and I’ve export as WAR the project and install into Weblogic 12c.
Ok, the problem is that, the first call to the webservice is ok, and I get the expected response.
From the second call I get the following error:
com.eviware.soapui.impl.wsdl.mock.DispatchException: Missing operation for soapAction [http://server.com/SSO/GetProfile2] and body element [{http://server.com/SSO}GetProfile2] with SOAP Version [SOAP 1.1]
at com.eviware.soapui.impl.wsdl.support.soap.SoapUtils.findOperationForRequest(SoapUtils.java:330)
at com.eviware.soapui.impl.wsdl.mock.WsdlMockDispatcher.dispatchPostRequest(WsdlMockDispatcher.java:191)
at com.eviware.soapui.impl.wsdl.mock.WsdlMockDispatcher.dispatchRequest(WsdlMockDispatcher.java:113)
at com.eviware.soapui.impl.wsdl.mock.WsdlMockRunner.dispatchRequest(WsdlMockRunner.java:142)
at com.eviware.soapui.mockaswar.MockAsWarServlet$MockServletSoapUICore.dispatchRequest(MockAsWarServlet.java:247)
at com.eviware.soapui.mockaswar.MockAsWarServlet.service(MockAsWarServlet.java:182)
at javax.servlet.http.HttpServlet.service(HttpServlet.java:790)
at weblogic.servlet.internal.StubSecurityHelper$ServletServiceAction.run(StubSecurityHelper.java:286)
at weblogic.servlet.internal.StubSecurityHelper$ServletServiceAction.run(StubSecurityHelper.java:260)
at weblogic.servlet.internal.StubSecurityHelper.invokeServlet(StubSecurityHelper.java:137)
at weblogic.servlet.internal.ServletStubImpl.execute(ServletStubImpl.java:350)
at weblogic.servlet.internal.ServletStubImpl.execute(ServletStubImpl.java:247)
at weblogic.servlet.internal.WebAppServletContext$ServletInvocationAction.wrapRun(WebAppServletContext.java:3650)
at weblogic.servlet.internal.WebAppServletContext$ServletInvocationAction.run(WebAppServletContext.java:3620)
at weblogic.security.acl.internal.AuthenticatedSubject.doAs(AuthenticatedSubject.java:326)
at weblogic.security.service.SecurityManager.runAsForUserCode(SecurityManager.java:196)
at weblogic.servlet.provider.WlsSecurityProvider.runAsForUserCode(WlsSecurityProvider.java:203)
at weblogic.servlet.provider.WlsSubjectHandle.run(WlsSubjectHandle.java:71)
at weblogic.servlet.internal.WebAppServletContext.doSecuredExecute(WebAppServletContext.java:2423)
at weblogic.servlet.internal.WebAppServletContext.securedExecute(WebAppServletContext.java:2280)
at weblogic.servlet.internal.WebAppServletContext.execute(WebAppServletContext.java:2258)
at weblogic.servlet.internal.ServletRequestImpl.runInternal(ServletRequestImpl.java:1626)
at weblogic.servlet.internal.ServletRequestImpl.run(ServletRequestImpl.java:1586)
at weblogic.servlet.provider.ContainerSupportProviderImpl$WlsRequestExecutor.run(ContainerSupportProviderImpl.java:270)
at weblogic.invocation.ComponentInvocationContextManager._runAs(ComponentInvocationContextManager.java:348)
at weblogic.invocation.ComponentInvocationContextManager.runAs(ComponentInvocationContextManager.java:333)
at weblogic.work.LivePartitionUtility.doRunWorkUnderContext(LivePartitionUtility.java:54)
at weblogic.work.PartitionUtility.runWorkUnderContext(PartitionUtility.java:41)
at weblogic.work.SelfTuningWorkManagerImpl.runWorkUnderContext(SelfTuningWorkManagerImpl.java:617)
at weblogic.work.ExecuteThread.execute(ExecuteThread.java:397)
at weblogic.work.ExecuteThread.run(ExecuteThread.java:346)
If i remove the message tags from wsdl everything is ok. Help me Please!!!
Soap UI for simulating a Rest API??? Well, it wasn’t even the last thing that came to my mind when one of my former colleagues asked me if I could quickly create a mock up for a REST API for the application he was testing because the API was down at the moment.
By the way, here’s why you should mock a REST API,
- It enables you to stay productive while the API is being implemented.
- Mocks could be used for testing and developing the front end even when the back end is not available.
I thought it could be done in no time with Postman. I had quite a bit of experience with Postman, testing REST APIs, but soon realized it wasn’t quite as straightforward as I thought.
Then I had a quick look at some other tools available for the purpose, some were way too complicated to be bothered for such a temporary quick fix and others were mostly hosted online. Couldn’t find much luck with any thing so far for my purpose and that’s when a simple google search directed me to soap ui. I already had it installed and am quite good at it, testing and mocking soap web services, so I decided to give it a go. To my surprise, it’s not only easy and fast but also quite powerful in simulating REST APIs.
Following are some of the things I tried and step by step instructions on how to.
- How to create a simple mock.
- How to mock resource paths with variables.
- How to set up multiple mock responses depending on request.
Install Soap UI if you don’t have already, and following are the steps after that.
How to create a simple mock.
1. Create a new REST project in Soap UI following the screens below.
Click the REST button on the tool bar (circled in red).

Give an appropriate URL. I have provided http://localhost:8080/test. You can change these later.

Following is the new project that was just created (REST Project 2)

2. Create a Mock for the REST project
Right click on the project and select New REST MockService from the menu.

Give an appropriate name for the MockService

Right click on the Mock Service and select Add new mock action from the menu.

Select the HTTP method and give the resource path, it can be anything. I have selected GET method and my resource path is test.


3. Add a mock response
Right click on the action and select New MockResponse from the menu.

Give an appropriate name to the mock response.

Select the response content type (i.e. xml, json, text, etc…) and type in the mock response

4. Start the mock service
Right click on the MockService and select Show REST MockService Editor.

Click the green play button on the MockService Editor (circled in red), and the Mock service will start.


5. Test it out!
Send a request using the REST Project by clicking the green play button on the request.

The mock service can also be called using a browser


Mocking for resource path with variables.
Most REST URLs contain variables in the resource path, like https://example.com/users/679822 which are basically ids or names which change depending on the request. If you are wondering how to handle these, the good news is, it is already taken care of. If we just use up to users in the resource path of the mock, whatever comes after it in the request url doesn’t really matter. This behavior is demonstrated in REST Project 3 (You can grab these project files by clicking here, and import in to Soap UI)

How to set up multiple mock responses
Want to work with multiple responses for a single path? There are two options available in Soap UI.
1. Sequence
This is easy, create as many responses as you like for the mock action. The default dispatch method is sequence.
Open up the mock action editor by double clicking on the mock action or by right click on the mock action and selecting Show Mock Action Editor. Add as many responses as you want.

The HTTP status code can also be set to preferred value in the responses. In the example below (REST Project 4) I have created 3 mock responses and one of them is an error response which returns http status 500.

See it in action
2. Script
When you want different responses depending on the request (request path or a value in the request) script option can be used.
- Create multiple responses.
- Select the script option from the dispatch drop-down for the mock action.
- Then provide the script, following is the script I’ve used.
//Following script grabs the number in the request url and appends it to the name of the response.

def requestPath = mockRequest.getPath()
log.info "Path: "+ requestPath

def id = requestPath.tokenize('/')[-1] //the id of the user comes last in the request url (eg: http://localhost:8080/user/1)

return "user"+id //this will return the response with the name 'user{id}' eg: user1
- Set a default response in case no matches found for the incoming request.

See it in action
That’s all I have come across so far with Mocking REST APIs using Soap UI.
Which tools have you used for simulating REST APIs? Any suggestions?
3 ответы
Думаю, я нашел ваше решение — правда, через год!
У вашей макетной службы могут быть проблемы с требованием Soap Action
- В SoapUI выберите свой фиктивный сервис
- В окне свойств измените «Требовать действие SOAP» на false.
ответ дан 07 апр.
![]()
Я не знаю точно, но держу пари, это означает, что soapUI думает, что говорит правду. Он думает, что для этой комбинации должна быть операция, но не может ее найти. Возможно, вы обновили WSDL, но не MockService? В этом случае разница в версии soapUI была бы случайностью.
ответ дан 16 авг.
![]()
Я получал ту же ошибку с soapUI, ответ приходил в первый раз, а затем для последующего запроса он становился пустым. Похоже на библиотечную проблему.
Используйте https://github.com/eveoh/weblogic-soapui-mock-ear обернуть войну в ухо. Это решило для меня проблему. Я использовал Weblogic 12c.
Создан 28 июн.
![]()
Не тот ответ, который вы ищете? Просмотрите другие вопросы с метками
soap
soapui
or задайте свой вопрос.