Whenever I sent an email from my Outlook client, it bounces with this ‘socket error 10060 connection timed out’ SMTP error. What’s wrong?
That was a recent support ticket received at our Server Support department where we resolve support queries for web hosts.
Website owners often face this error when they send emails from email clients like Outlook, Thunderbird, etc.
There’s an error code 10060, what’s that?
And, the message shows connection timed out, but why?
Today, we’ll see the answers to all these questions.
‘socket error 10060 connection timed out’ SMTP error – What’s this?
Before we move on to the reasons for this error, let’s first get an idea of this error.
In a normal mail delivery, mail goes from the sender, to the sending MX, and to the recipient’s MX, and then to the recipient.

How Email Works?
The Socket Error 10060 indicates that the connection to the recipient server times out.
In other words, the sending server doesn’t receive a response from the recipient server.
For instance, website owners see the complete error message like this:
Error Message: "There was an error connecting to the email server. Email could not be sent. Socket Error #10060. Connection Timed Out."
But, this error only stops the user from sending emails, and receiving will work fine.
Now, let’s discuss the top 5 reasons for this error and how our Server Support Engineers fix it.
‘socket error 10060 connection timed out’ SMTP error – Causes and Fixes
A number of reasons can lead to this ‘socket error 10060 connection timed out’ SMTP error.
Let’s see the main causes identified in our debugging process and how we fix them.
1) Wrong SMTP host and port
This error occurs mainly when the outgoing mail server settings are wrongly setup in the email clients like Outlook, Windows Mail, etc.
Sometimes, a typo in the hostname or an inactive mail server leads to this error.
Similarly, the default SMTP port is 25, but some email providers use custom ports, like 587, to avoid spam.
In addition to that, some email servers are configured to allow emails only via SSL port 465.
So, incorrect hostname or incorrect port entry in the email client settings may cause email delivery errors.
Solution
Firstly, our Hosting Engineers, ensure the DNS connectivity of the SMTP host with the below command.
dig mail.domain.comFurther, we use the below command to identify the correct SMTP port and its connectivity.
telnet mail.domain.com 25After that, we cross-check and correct the SMTP settings in the email client.
[We know that emails are critical for your business. Are you not sure about your email client settings? Our Support Experts are here for your help.]
2) Improper SMTP authentication
Similarly, this error may occur due to authentication problems at the sender end.
All SMTP servers implement authentication process to protect against spamming and email abuse.
In other words, users are only allowed to connect to the SMTP server, and send emails after successful authentication.
And, this authentication is integrated with email clients as well.
So, if a sender tries to connect to the SMTP server without authentication, the connection will be refused with ‘socket error 10060 connection timed out ‘ SMTP error.
Solution
Our Support Engineers check the email client settings, and ensure that SMTP authentication is enabled in the sender’s email client.
For example, in Outlook 2007, we verify these settings from Tools > Account Settings > More settings > Outgoing server tab > My Outgoing server (SMTP) requires authentication.

How to enable My SMTP authentication in Outlook?
3) ISP firewall issues
Many ISPs now block traffic through port 25 to minimize spam, and this is one of the most common reasons for this error.
Solution
Our Support Engineers always ask the users to get back with the traceroute results to the email server from their PCs.
This helps us to identify if there are connectivity issues in any of the intermediate networks between the mail server and user PC.
If we find issues at ISP level, the user must contact the ISP end to remove the block on that port.
But, the ideal solution we recommend is to use the SMTP server recommended by the ISP.
4) PC firewall issues
Third party firewall or antivirus installed on the user’s PC can block the connection from certain applications.
In other words, it blocks connections to certain IP ranges and can sometimes blocks the mail server IP as well.
So, customer’s won’t be able to connect to the mail server from their email client and see ‘socket error 10060 connection timed out’ SMTP error.
Solution
In such cases, we get the telnet results from the user’s PC to the mail server.
For example, we use the below command to check the connectivity to the mail server “mail.domain.com” on port 25.
telnet mail.domain.com 25And, if the firewall hinders the connection, we recommend the customer to disable the firewall and give a try.
If it works, users must tweak their PC firewall settings.
5) Infected PC
This is not a common reason but can happen at times.
‘socket error 10060 connection timed out’ SMTP error can pop up when your local PC is infected with malware.
Solution
In this case, our Support Engineers advise users to perform a full scan on their PC with a standard anti-virus.
And, remove any spyware, trojan or viruses detected in the system.
This list is not complete. There could be many more reasons for this error.
But a detailed log analysis is required to identify the exact reason behind this error.
So, if you need help, click here to get a Support Expert to look into your email issue.
Conclusion
In short, ‘socket error 10060 connection timed out‘ SMTP error may occur due to incorrect email client settings, firewall restrictions, and more. Today, we’ve discussed the top 5 reasons for this error and how our Server Support Engineers fix them.
PREVENT YOUR SERVER FROM CRASHING!
Never again lose customers to poor server speed! Let us help you.
Our server experts will monitor & maintain your server 24/7 so that it remains lightning fast and secure.
SEE SERVER ADMIN PLANS
var google_conversion_label = «owonCMyG5nEQ0aD71QM»;
Содержание
- Решено Не приходит внешняя почта. Очередь на edge
- kvvk908
- NanoSuit
- Engineer
- kvvk908
- kvvk908
- Apossum
- Razer
- Lehhaa
- Lehhaa
Решено Не приходит внешняя почта. Очередь на edge
kvvk908
Почетный гость
Коллеги, прошу помочь в сложившейся ситуации. Смигрировали 2010 на 2016, все было хорошо, до момента переключения транспорта на новый пограничный сервер. Почта уходит без проблем, а вот со входящей проблема, все письма висят в очереди и ни в какую не переправляются получателям. подписку пересоздавал, службы перезапускал, коннекторы создаются test-EdgeSynchronization показывает что все хорошо, соответственно старая подписка была удалена.
Теперь по логам:

NanoSuit
Специалист

Engineer
Активный участник
We were getting the following error after a migration to Exchange 2010 from 2003 which indicated that Exchange was still looking for the old server.
The problem is during the migration the old server didn’t get pulled from Active Directory correctly so there were still settings that caused Exchange to believe that there was another MTA available.
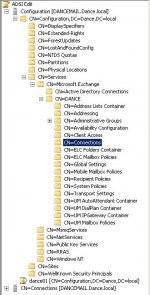
To resolve we opened up ADSI Edit on the AD server and navigated to the following container:
Inside this container you may find entries that reference your old server. Just delete them and you should be good.

kvvk908
Почетный гость
kvvk908
Почетный гость
We were getting the following error after a migration to Exchange 2010 from 2003 which indicated that Exchange was still looking for the old server.
The problem is during the migration the old server didn’t get pulled from Active Directory correctly so there were still settings that caused Exchange to believe that there was another MTA available.
To resolve we opened up ADSI Edit on the AD server and navigated to the following container:
Inside this container you may find entries that reference your old server. Just delete them and you should be good.

Модератор
Модератор

Apossum
Активный участник

Razer
Участник
При миграции с 2010 на 2016 подразумевается «со-существование» Exchange 2010 и 2016 одновременно в домене. Такие вещи детально планируются до мелочей. Я думаю мы имеем дело с не совсем корректным выводом 2010 после обновления. Как более менее правильно выводить десятку — по ссылке выше.
Вот несколько командлетов для просмотра / диагностики — пробегитесь, возможно где то остались следы некорректно удаленной 2010
Командлеты для диагностики виртуальных директорий ну и вообще посмотреть как что настроено

Lehhaa
Участник
Попробуйте перевыпустить сертификаты exchange
Error:
Failed to connect to the Edge Transport server ADAM instance with exception The supplied credential is invalid.. This could be caused by a failure to resolve the Edge Transport server name EXCH-EDGE.intra.net in DNS, a failure trying to connect to port 50636 on EXCH-EDGE.intra.net, network connectivity issues, an invalid certificate, or an expired subscription. Verify your network and server configuration.
Process to Resolve:
Preliminary steps to rule out easy to fix problems:
# Verify connectivity from Hub to Edge
ran check-netconnection function to verify connectivity between exch-hub to EXCH-EDGE port 50636 with success = $true
# Check to see whether there are any error messages in the queue:
Get-queue
Restart some services on Hub and Edge servers
1. Restart the following services on MBX Server
Microsoft Exchange EdgeSync
Microsoft Exchange Transport
2. Restart the following services on Edge Server
Microsoft Exchange ADAM
Microsoft Exchange Credential service
Microsoft exchange Transport
# Confirm if the certificate meets the FQDN of Edge Server if it has been enabled for SMTP service
get-exchangecertificate | FL
Intermediate Level steps to address connector issues:
Mail flow:
Outlook client Hub Exchange Edge Exchange Barracuda (smart host) Internet Destination email systems
Generalization:
— Hub uses EdgeSync to connect to the edge server via ADAM credentials and those are periodically changed by the «Edge Credential Service»
— Only the Client Access Role server requires public certs. The rest of the other roles does not require such.
— Connectors between Edge and Hub servers require SSL, and those can be private certs.
— If the Edge server cert is updated, New-EdgeSubscription command needs to be ran to generate a newEdgeSubcription.xml file
— The newEdgeSubscription.xml needs to also be ran on the Hub server to import new Edge connector information
— Make sure the credential service is up and running on the edge.
— Call start-edgesynchronization is required to synchronize between Edge and Hub is a new subscription has been created
— Send connectors and Receive connectors can be automatically generated
[PS] C:ProgramDataMicrosoftWindowsStart MenuProgramsMicrosoft Exchange Server 2010>Start-EdgeSynchronization
RunspaceId : f9a541a8-51db-4b87-a392-b727eeae6c42
Result : CouldNotConnect
Type : Recipients
Name : EXCH-EDGE
FailureDetails : The supplied credential is invalid.
StartUTC : 8/9/2019 6:45:46 PM
EndUTC : 8/9/2019 6:45:46 PM
Added : 0
Deleted : 0
Updated : 0
Scanned : 0
TargetScanned : 0
RunspaceId : f9a541a8-51db-4b87-a392-b727eeae6c42
Result : CouldNotConnect
Type : Configuration
Name : EXCH-EDGE
FailureDetails : The supplied credential is invalid.
StartUTC : 8/9/2019 6:45:46 PM
EndUTC : 8/9/2019 6:45:46 PM
Added : 0
Deleted : 0
Updated : 0
Scanned : 0
TargetScanned : 0
[PS] C:ProgramDataMicrosoftWindowsStart MenuProgramsMicrosoft Exchange Server 2010>Get-EdgeSubscription
Name Site Domain
—- —- ——
EXCH-EDGE intra.net/Co. intra.net
Lehhaa
Участник
Recreate Edge Subscription:
# Generate new private Exchange certificate
$domain=»exch-hub»
$fqdn=»exch-hub.intra.net»
New-ExchangeCertficate -DomainName $domain, $fqdn -PrivateKeyExportable $true -KeySize 2048
# Check certs
get-ExchangeCertificate
# Get more details about cert
# $newcert = get-ExchangeCertificate | ? < $_.certdate -like «blah blah»>| select name
$newcert=»#######»
get-exchangecertificate $number | fl
# set iis to bind to new cert
# perform iisreset
# backup old cert and remove it
# New-SendConnector -Custom -Name Baracudda -AddressSpaces * -smarthost 10.10.11.1 -ForceHELO $true -SmartHostAuthMechanism None -Source $edgeServer
# Remove Edge Subscription
Get-EdgeSubscription | Remove-EdgeSubscription
# Clean up old certs
lmcert.msc > remove Microsoft Exchange ADAM from Personal Certs folder
# Remove Edge Subscription
Get-EdgeSubscription | Remove-EdgeSubscription
# Generate new subscription file
New-EdgeSubscription -Filename c:newEdgeSubscription.xml
Re-start the Microsoft Exchange ADAM
On Hub server
# New-EdgeSubscription -FileData ([byte[]]$(Get-Content -Path «\EXCH-EDGEc$newEdgeSubscription.xml» -Encoding Byte -ReadCount 0)) #Experimental command
New-EdgeSubscription -Filename c:newEdgeSubscription.xml
Start-EdgeSynchronization
Test-EdgeSynchronization
[PS] C:Windowssystem32>New-EdgeSubscription -Filename c:newEdgeSubscription.xml
Confirm
If you create an Edge Subscription, this Edge Transport server will be managed via EdgeSync replication. As a result,
any of the following objects that were created manually will be deleted: accepted domains, message classifications,
remote domains, and Send connectors. After creating the Edge Subscription, you must manage these objects from inside
the organization and allow EdgeSync to update the Edge Transport server. Also, the InternalSMTPServers list of the
TransportConfig object will be overwritten during the synchronization process.
EdgeSync requires that this Edge Transport server is able to resolve the FQDN of the Hub Transport servers in the
Active Directory site to which the Edge Transport server is being subscribed, and those Hub Transport servers be able
to resolve the FQDN of this Edge Transport server. You should complete the Edge Subscription inside the organization in
the next «1440» minutes before the bootstrap account expires.
[Y] Yes [A] Yes to All [N] No [L] No to All Suspend [?] Help (default is «Y»): y
New-EdgeSubscription : Microsoft Exchange couldn’t create or update the Edge Subscription account on the Edge Transport
server for the following reason: The LDAP server is unavailable.. Stack is at System.DirectoryServices.Protocols.LdapConnection.Connect()
at system.DirectoryServices.Protocols.LdapConnection.BindHelper(NetworkCredential newCredential, Boolean needSetCredential)
at Microsoft.Exchange.MessageSecurity.EdgeSync.AdamUserManagement.CreateOrUpdateADAMPrincipal(String user, String password, Boolean bootStrapAccount, TimeSpan expiry)
at Microsoft.Exchange.Management.SystemConfigurationTasks.NewEdgeSubscription.InitiateSubscriptionOnEdge()
At line:1 char:21
+ New-EdgeSubscription Get-ExchangeCertificate | fl
AccessRules : ule>
CertificateDomains :
HasPrivateKey : True
IsSelfSigned : False
Issuer : CN=280b6975-b30a-4f5b-b2c3-7864e37f1c05
NotAfter : 8/9/2119 1:36:53 PM
NotBefore : 8/9/2019 12:36:53 PM
PublicKeySize : 2048
RootCAType : Unknown
SerialNumber : 73AC7DDB217BA7AF44847CC68A8B9CC9
Services : None
Status : Invalid
Subject : CN=ab0ee702-f37f-4dff-bfb2-66698a441d9a
Thumbprint : CFD78D7F9DFAA0BD537B3755C24089CE3ED0EC55
AccessRules :
CertificateDomains :
HasPrivateKey : True
IsSelfSigned : True
Issuer : CN=EXCH-EDGE
NotAfter : 10/11/2017 11:09:54 PM
NotBefore : 10/11/2012 11:09:54 PM
PublicKeySize : 2048
RootCAType : Registry
SerialNumber : 5DC03A0D09D1C594468C11CE9EC919D4
Services : SMTP
Status : DateInvalid
Subject : CN=EXCH-EDGE
Thumbprint : 4157434692710986BAC026FD2DFE32D4352DE9B3
AccessRules :
CertificateDomains : over.intra.net, autodiscover.inglewood.kimconnect.com, pop.inglewood.kimconnect.com, imap.inglewood.kimconnect.com, inglewood.kimconnect.com, legacy.intra.net, legacy.inglewood.kimconnect.com>
HasPrivateKey : True
IsSelfSigned : False
Issuer : SERIALNUMBER=07969287, CN=Go Daddy Secure Certification Authority, OU=http://certificates.godaddy.
com/repository, O=»GoDaddy.com, Inc.», L=Scottsdale, S=Arizona, C=US
NotAfter : 5/16/2016 11:18:35 AM
NotBefore : 5/16/2011 11:18:35 AM
PublicKeySize : 2048
RootCAType : ThirdParty
SerialNumber : 2B94032E16C980
Services : SMTP
Status : DateInvalid
Subject : CN=intra.net, OU=Domain Control Validated, O=intra.net
Thumbprint : A05FBA0E72AD3D3E666973C9AFDE378535E24393
# Create New Cert
$domain=»EXCH-EDGE»
$fqdn=»exch-hub.intra.net»
$friendlyName=»Exchange Certificate»
New-ExchangeCertificate -FriendlyName $friendlyName -SubjectName CN=$domain -DomainName $domain,$fqdn -PrivateKeyExportable $true #Optional:-Services SMTP -KeySize 2048
# Check for self-signed certs
Get-ExchangeCertificate | where <$_.Status -eq «Valid» -and $_.IsSelfSigned -eq $true>| Format-List FriendlyName,Subject,CertificateDomains,Thumbprint,NotBefore,NotAfter
# Restart Exchange Transport
Stop-Service MSExchangeTransport
Start-Service MSExchangeTransport
# Create new Subscription on Edge servers:
New-EdgeSubscription -Filename c:newEdgeSubscription.xml
# Import subscription on Hub server
New-EdgeSubscription -Filename c:newEdgeSubscription.xml
# On Hub, trigger New Edge Susbcription via Exchange Management Console GUI
$site=’intra.net/Configuration/Sites/DistrictOffice’
New-EdgeSubscription -FileData ‘ ‘ -Site $site -CreateInternetSendConnector $true -CreateInboundSendConnector $true
# Trigger sync
start-edgesynchronization -forcefullsync
# Restart Exchange Transport
Stop-Service MSExchangeTransport
Start-Service MSExchangeTransport
# Check mail queue
Get-Queue
# Check logs, navigate to:
%exchangeinstallpath%TransportRolesLogsProtocolLogSmtpReceive
# Create new connector to point to the smart host (Barracuda spam filter). Make sure that the Source of Send Connector is Edge Server (not Hub Server)
# Disable the automatically generated connector that does not use the smart host
# Example of mail flow issue when the smart host does not accept connections from the Hub server. Resolution was to change the connector Source to the Edge transport
Identity DeliveryType Status MessageCount NextHopDomain
——— ———— —— ———— ————-
exch-hub1639048 MapiDelivery Active 17 school-mailboxdb3
exch-hub1639053 SmartHost. Retry 5675 [10.10.1.11]
exch-hub1639058 MapiDelivery Active 10 do-mailboxdb
exch-hub1639059 MapiDelivery Active 12 school-mailboxdb4
exch-hub1639060 MapiDelivery Active 14 school-mailboxdb2
exch-hubSubmission Undefined Ready 103 Submission
exch-hubShadow1591071 ShadowRed. Ready 62 EXCH-EDGE.intra.net
exch-hubShadow1639036 ShadowRed. Ready 166 EXCH-EDGE.intra.net
[PS] C:Windowssystem32>Get-Queue -Identity exch-hub1639053 | fl #where 1639053 is Identity of the smart host
RunspaceId : b2e3dae0-ecb1-4508-b307-31da04271141
DeliveryType : SmartHostConnectorDelivery
NextHopDomain : [10.10.1.11]
TlsDomain :
NextHopConnector : 77215356-bf27-49bc-bd41-4603375ac561
Status : Retry
MessageCount : 5656
LastError : 451 4.4.0 Primary target IP address responded with: «421 4.4.2 Connection dropped due to SocketE
rror.» Attempted failover to alternate host, but that did not succeed. Either there are no alter
nate hosts, or delivery failed to all alternate hosts.
LastRetryTime : 8/9/2019 5:45:39 PM
NextRetryTime : 8/9/2019 5:50:39 PM
DeferredMessageCount : 0
QueueIdentity : exch-hub1639053
Identity : exch-hub1639053
IsValid : True
Источник
Recreate Edge Subscription:
On Hub server
# Generate new private Exchange certificate
$domain=»exch-hub»
$fqdn=»exch-hub.intra.net»
New-ExchangeCertficate -DomainName $domain, $fqdn -PrivateKeyExportable $true -KeySize 2048
# Check certs
get-ExchangeCertificate
# Get more details about cert
# $newcert = get-ExchangeCertificate | ? { $_.certdate -like «blah blah»} | select name
$newcert=»#######»
get-exchangecertificate $number | fl
# set iis to bind to new cert
# perform iisreset
# backup old cert and remove it
# New-SendConnector -Custom -Name Baracudda -AddressSpaces * -smarthost 10.10.11.1 -ForceHELO $true -SmartHostAuthMechanism None -Source $edgeServer
# Remove Edge Subscription
Get-EdgeSubscription | Remove-EdgeSubscription
On Edge
# Clean up old certs
lmcert.msc > remove Microsoft Exchange ADAM from Personal Certs folder
# Remove Edge Subscription
Get-EdgeSubscription | Remove-EdgeSubscription
# Generate new subscription file
New-EdgeSubscription -Filename c:newEdgeSubscription.xml
Re-start the Microsoft Exchange ADAM
On Hub server
# New-EdgeSubscription -FileData ([byte[]]$(Get-Content -Path «\EXCH-EDGEc$newEdgeSubscription.xml» -Encoding Byte -ReadCount 0)) #Experimental command
New-EdgeSubscription -Filename c:newEdgeSubscription.xml
Start-EdgeSynchronization
Test-EdgeSynchronization
[PS] C:Windowssystem32>New-EdgeSubscription -Filename c:newEdgeSubscription.xml
Confirm
If you create an Edge Subscription, this Edge Transport server will be managed via EdgeSync replication. As a result,
any of the following objects that were created manually will be deleted: accepted domains, message classifications,
remote domains, and Send connectors. After creating the Edge Subscription, you must manage these objects from inside
the organization and allow EdgeSync to update the Edge Transport server. Also, the InternalSMTPServers list of the
TransportConfig object will be overwritten during the synchronization process.
EdgeSync requires that this Edge Transport server is able to resolve the FQDN of the Hub Transport servers in the
Active Directory site to which the Edge Transport server is being subscribed, and those Hub Transport servers be able
to resolve the FQDN of this Edge Transport server. You should complete the Edge Subscription inside the organization in
the next «1440» minutes before the bootstrap account expires.
[Y] Yes [A] Yes to All [N] No [L] No to All Suspend [?] Help (default is «Y»): y
New-EdgeSubscription : Microsoft Exchange couldn’t create or update the Edge Subscription account on the Edge Transport
server for the following reason: The LDAP server is unavailable.. Stack is at System.DirectoryServices.Protocols.LdapConnection.Connect()
at system.DirectoryServices.Protocols.LdapConnection.BindHelper(NetworkCredential newCredential, Boolean needSetCredential)
at Microsoft.Exchange.MessageSecurity.EdgeSync.AdamUserManagement.CreateOrUpdateADAMPrincipal(String user, String password, Boolean bootStrapAccount, TimeSpan expiry)
at Microsoft.Exchange.Management.SystemConfigurationTasks.NewEdgeSubscription.InitiateSubscriptionOnEdge()
At line:1 char:21
+ New-EdgeSubscription <<<< -Filename c:newEdgeSubscription.xml
+ CategoryInfo : InvalidOperation: ) [New-EdgeSubscription], InvalidOperationException
+ FullyQualifiedErrorId : 780DB3C3,Microsoft.Exchange.Management.SystemConfigurationTasks.NewEdgeSubscription
# Check status of Exchange ADAM Services
Get-Service *ADAM* | ft Di*,St*
# Check Exchange certificates
[PS] C:Windowssystem32>Get-ExchangeCertificate | fl
AccessRules : {System.Security.AccessControl.CryptoKeyAccessRule, System.Security.AccessControl.CryptoKeyAccessR
ule}
CertificateDomains : {ab0ee702-f37f-4dff-bfb2-66698a441d9a}
HasPrivateKey : True
IsSelfSigned : False
Issuer : CN=280b6975-b30a-4f5b-b2c3-7864e37f1c05
NotAfter : 8/9/2119 1:36:53 PM
NotBefore : 8/9/2019 12:36:53 PM
PublicKeySize : 2048
RootCAType : Unknown
SerialNumber : 73AC7DDB217BA7AF44847CC68A8B9CC9
Services : None
Status : Invalid
Subject : CN=ab0ee702-f37f-4dff-bfb2-66698a441d9a
Thumbprint : CFD78D7F9DFAA0BD537B3755C24089CE3ED0EC55
AccessRules :
CertificateDomains : {EXCH-EDGE, EXCH-EDGE.intra.net}
HasPrivateKey : True
IsSelfSigned : True
Issuer : CN=EXCH-EDGE
NotAfter : 10/11/2017 11:09:54 PM
NotBefore : 10/11/2012 11:09:54 PM
PublicKeySize : 2048
RootCAType : Registry
SerialNumber : 5DC03A0D09D1C594468C11CE9EC919D4
Services : SMTP
Status : DateInvalid
Subject : CN=EXCH-EDGE
Thumbprint : 4157434692710986BAC026FD2DFE32D4352DE9B3
AccessRules :
CertificateDomains : {intra.net, www.intra.net, exch-cas.intra.net, apollo.inglewood.kimconnect.com, autodisc
over.intra.net, autodiscover.inglewood.kimconnect.com, pop.inglewood.kimconnect.com, imap.inglewood.kimconnect.com, inglewood.kimconnect.com, legacy.intra.net, legacy.inglewood.kimconnect.com}
HasPrivateKey : True
IsSelfSigned : False
Issuer : SERIALNUMBER=07969287, CN=Go Daddy Secure Certification Authority, OU=http://certificates.godaddy.
com/repository, O=»GoDaddy.com, Inc.», L=Scottsdale, S=Arizona, C=US
NotAfter : 5/16/2016 11:18:35 AM
NotBefore : 5/16/2011 11:18:35 AM
PublicKeySize : 2048
RootCAType : ThirdParty
SerialNumber : 2B94032E16C980
Services : SMTP
Status : DateInvalid
Subject : CN=intra.net, OU=Domain Control Validated, O=intra.net
Thumbprint : A05FBA0E72AD3D3E666973C9AFDE378535E24393
=============================================================================================
# Create New Cert
$domain=»EXCH-EDGE»
$fqdn=»exch-hub.intra.net»
$friendlyName=»Exchange Certificate»
New-ExchangeCertificate -FriendlyName $friendlyName -SubjectName CN=$domain -DomainName $domain,$fqdn -PrivateKeyExportable $true #Optional:-Services SMTP -KeySize 2048
# Check for self-signed certs
Get-ExchangeCertificate | where {$_.Status -eq «Valid» -and $_.IsSelfSigned -eq $true} | Format-List FriendlyName,Subject,CertificateDomains,Thumbprint,NotBefore,NotAfter
# Restart Exchange Transport
Stop-Service MSExchangeTransport
Start-Service MSExchangeTransport
# Create new Subscription on Edge servers:
New-EdgeSubscription -Filename c:newEdgeSubscription.xml
# Import subscription on Hub server
New-EdgeSubscription -Filename c:newEdgeSubscription.xml
# On Hub, trigger New Edge Susbcription via Exchange Management Console GUI
$site=’intra.net/Configuration/Sites/DistrictOffice’
New-EdgeSubscription -FileData ‘<Binary Data>’ -Site $site -CreateInternetSendConnector $true -CreateInboundSendConnector $true
# Trigger sync
start-edgesynchronization -forcefullsync
# Restart Exchange Transport
Stop-Service MSExchangeTransport
Start-Service MSExchangeTransport
# Check mail queue
Get-Queue
# Check logs, navigate to:
%exchangeinstallpath%TransportRolesLogsProtocolLogSmtpReceive
# Create new connector to point to the smart host (Barracuda spam filter). Make sure that the Source of Send Connector is Edge Server (not Hub Server)
# Disable the automatically generated connector that does not use the smart host
# Example of mail flow issue when the smart host does not accept connections from the Hub server. Resolution was to change the connector Source to the Edge transport
[PS] C:Windowssystem32>Get-Queue
Identity DeliveryType Status MessageCount NextHopDomain
——— ———— —— ———— ————-
exch-hub1639048 MapiDelivery Active 17 school-mailboxdb3
exch-hub1639053 SmartHost… Retry 5675 [10.10.1.11]
exch-hub1639058 MapiDelivery Active 10 do-mailboxdb
exch-hub1639059 MapiDelivery Active 12 school-mailboxdb4
exch-hub1639060 MapiDelivery Active 14 school-mailboxdb2
exch-hubSubmission Undefined Ready 103 Submission
exch-hubShadow1591071 ShadowRed… Ready 62 EXCH-EDGE.intra.net
exch-hubShadow1639036 ShadowRed… Ready 166 EXCH-EDGE.intra.net
[PS] C:Windowssystem32>Get-Queue -Identity exch-hub1639053 | fl #where 1639053 is Identity of the smart host
RunspaceId : b2e3dae0-ecb1-4508-b307-31da04271141
DeliveryType : SmartHostConnectorDelivery
NextHopDomain : [10.10.1.11]
TlsDomain :
NextHopConnector : 77215356-bf27-49bc-bd41-4603375ac561
Status : Retry
MessageCount : 5656
LastError : 451 4.4.0 Primary target IP address responded with: «421 4.4.2 Connection dropped due to SocketE
rror.» Attempted failover to alternate host, but that did not succeed. Either there are no alter
nate hosts, or delivery failed to all alternate hosts.
LastRetryTime : 8/9/2019 5:45:39 PM
NextRetryTime : 8/9/2019 5:50:39 PM
DeferredMessageCount : 0
QueueIdentity : exch-hub1639053
Identity : exch-hub1639053
IsValid : True
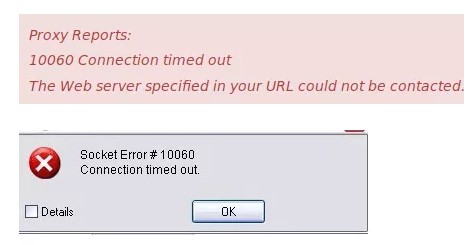
Socket Error 10060 is basically a connection time-out error. This error occurs while connecting to the Internet and the client using the proxy system or on your e-mail. The error message is displayed in the following format:
‘Connection timed out. A connection attempt failed because the connected party did not properly respond after a period of time, or established connection failed because connected host failed to respond.’
There are different methods how to fix and that we are covering them during this article.
Socket Error 10060
What causes connection error 10060 ?
The problem occurs while using proxy servers and when the time to load the online web page is isn’t enough. In such situations, the connection times out and the error occurs. Socket Error 10060 may occur due to multiple reasons including:
- Blocked port
- Data connection incorrect settings
- When the web proxy connection setting does not allow enough time to receive a response from the destination website and therefore the connection is timed-out.
- Registry issues
- Virus
How to fix error 10060 ?
As we have previously mentioned Socket Error 10060 is basically a connection time-out error. This error occurs while connecting to the Internet and the client using the proxy system. There are different methods how to fix and that we are covering them below:
Fix 1: Verify web proxy connection
1. Start your computer with administrative rights.
2. Open Run app from the Start, and type inetcpl.cpl. Click OK.
3. When Internet Properties window appears, go to the Connections tab. There go to the Lan settings.
4. The Local Area Network (LAN) Settings window shows up. Find the Use a proxy for your Lan box, and deselect this option. Click OK.
Connection errror 10060 should be fixed. Try to open the website that you were not able before. If this error still shows up, try the second method.
Fix 2: Increase Web Proxy Time out settings
If the first method doesn’t work, then try increasing time-out settings. In order to do it, you will also have to modify the registry.
Note: Serious problems may occur if you modify the registry incorrectly so we do reccomand performing a backup of before changing anything.
- Click Start, Run and then type Regedit in the dialogue box.
- Navigate to the following registry subkey: HKEY_LOCAL_MACHINESYSTEMCurrentControlSetServicesW3ProxyParameters.
- On the Right side of the Registry Editor, right-click Request TimeoutSecs and then click Modify.
- Click Decimal, they type the number of seconds that you want the proxy service to wait until the session times out.
- To confirm changes, click OK.
- Restart WWW publishing service by going to start, run and type cmd. Click OK to continue.
- Type net stop iisadmin/y and then press enter.
- Type net start iisadmin /y and then press enter.
- Test the new settings by going to the website that displayed the Socket Error 10060 message.
Fix 3: Disable Firewall
Firewall security may sometimes be the reason for error 10060 too. As a third fix you need to check the firewall configuration to allow FTP protocol or disable the firewall for a temporary time period. Test the new settings by going to the website that displayed the Socket Error 10060 message and see if the error is still present.
Fix 4: Check you antivirus
Make sure that you are only running one anti-virus software, and not two. If there are two, then uninstall one because you do not need two, as they mean that two programs could be scanning a single connection/file which will result in it blocking; hence the time out error.
Fix 5: Check for sending a very large directory
If you are still receiving a connection error 10060, another possible cause is the server is trying to send a listing for a very large directory (with many thousands of files) causing the client to time-out while waiting. Try increasing the time-out value under Tools > Global Options > Transfer > Reconnect and resume in [n] seconds if nothing received, to a higher value, such as 45 or 60 seconds.
Fix 6: Check for PASV mode
Most often this occurs when you try to connect in PASV mode to a server that prefers PORT for data connections. If you see an error log similar to the one following, right click the problem site and choose Site Properties, click the TYPE tab and change the Data Connection Type to Use PORT.
Fix 7: Error 10060 using email
- When a Socket Error 10060 happens, you need to check the names of the POP3 and SMTP servers to make sure that they’re correct. The next step is to check the outgoing SMTP port. Email suppliers change the port number and let you setup even specific one. If authentication is needed, your need to click the option “Server needs Authentication” box and provide all the information required. All email client application should have the option avaiable.
- If the email settings are correct and the Socket Error 10060 is still occurring, the cause might be firewall software. You need to check the firewall configuration or disable the firewall for a temporary time period. Test the new settings. If this resolves the error, you need to create an exception for the email program.
- If the step mentioned above does not resolve the error you need to follow this steps:
- Ppen a command prompt
- Ping the SMTP server address obtained from the email provider.
- If the ping is unsuccessful and the computer is connected to a router, you need connect it directly to the cable modem to test whether the router hardware firewall is blocking the SMTP traffic.
- If this is the case, you need to create exceptions for the SMTP port your email provider uses.
- Alternatively, the cause might be the SMTP server being blocked by your ISP. In this scenario you need to contact the ISP for possible workarounds or to request unblocking.
- There is the possibility that a virus or malware is blocking SMTP communication. Try to update any anti-virus or anti-malware programs and run a complete scan.
If a Socket Error 10060 is still occurring, the issue might be caused on the email provider’s end. You need to contact the email provider and see whether there are any issues on their side.
Conclusion
The error occurs while connecting to the Internet and the client using the proxy system. Socket error 10060 on windows indicate the connection problem. In our step-by-step tutorial, we have provided all the possible solutions for you to fix it. We hope you will find this method helpful. Have you managed to solve it? Please let us know in the comments below.
Socket Error 10060 — What is it?
Socket Error 10060 is a typical Outlook Express error. This error often occurs when the connection to the server fails. It specifically refers to a timeout while communicating with the email providers servers.
The vast majority of all emails use SMTP for outgoing mail. Socket error 10060 in most instances is related to the SMTP settings for the user’s email.
The error message is sometimes displayed in the following format:
Outlook Express Socket Error10060 — The connection to the server failed Account:’ your account’
Another thing you must know about this error is that it only stops the user from sending emails. This means that you can only receive emails, not send them.
Solution
 Error Causes
 Error Causes
The cause of this error code is hard to narrow down typically because there are many causes that can trigger the socket error code 10060. Some of the most common causes of this error code are:
- Issues in email settings
- Authentication settings
- Firewall settings
- Malware
Though this is not a critical error code it is advisable to fix it immediately without any delays.
This error can hamper your communication via email and slow down your work productivity especially if you use Outlook for communication across the organization.
Further Information and Manual Repair
Here are some of the many methods to fix and resolve this error code. To help you resolve this issue, we have selected and listed down the best, quick, and easy do-it-yourself methods. Try them and repair Socket error code 10060 all by yourself without any professional assistance.
Method 1 — Check the Names of POP3 and SMTP Servers
To begin with, first check the names of the POP3 and SMTP servers to ensure that they are correct. Then check the outgoing SMTP port. Contact your email provider to determine the correct settings.
Sometimes email providers change this value more than any other in their individual settings. Get it verified. Change the settings if needed.
Method 2 — Outgoing SMTP Server Requires Authentication
Sometimes the error code may occur due to authentication issues. If this is the reason then, don’t worry it is easy to fix. Simply go to the settings options and check the box ‘My server requires authentication’.
Once you check the box, try sending the email again. This is most likely to resolve the socket error 10060 on your PC.
Method 3 — Disable Firewall
Your Firewall security may sometimes be the reason for socket error 10060 too. Therefore if after trying method 1 and 2, the error still persists, then it is advisable to disable firewall.
Once you disable it, try sending an email using your Outlook account. If it works, the error is resolved.
Method 4 — Scan for Malware
There is a possibility that the Socket error 10060 is popping on your PC due to malware infection. If so, then it is advisable to download Restoro.
This is a highly functional and a user-friendly PC fixer deployed with a powerful antivirus and several other scanners. Run it on your PC to scan for malware. It detects and removes all types of malware including Trojans, viruses, adware, spyware, and more in seconds.
Click here to download Restoro to resolve socket error 10060 on your system today.
Advanced System Repair Pro
One-click automated PC repair solution
![]()
With Advanced System Repair Pro you can easily
DOWNLOAD
Advanced System Repair Pro is compatible with all versions of Microsoft Windows including Windows 11
Share this article:
You might also like
High Efficiency Image File Format (HEIF) is a container format for individual images and image sequences. The standard covers multimedia files that can also include other media streams, such as timed text, audio, and video. A HEIF image using High-Efficiency Video Coding, HEVC, requires only about half the storage space as the equivalent quality JPEG. HEIF also supports animation and is capable of storing more information than an animated GIF or APNG at a small fraction of the size.
HEIF files are a special case of the ISO Base Media File Format (ISOBMFF, ISO/IEC 14496-12), first defined in 2001 as a shared part of MP4 and JPEG 2000. Introduced in 2015, it was developed by the Moving Picture Experts Group (MPEG) and is defined as Part 12 within the MPEG-H media suite (ISO/IEC 23008-12).
HEIF was adopted by Apple in 2017 with the introduction of iOS 11, and support on other platforms is growing.
HEIF files can store the following types of data:
- Image items
- Storage of individual images, image properties, and thumbnails.
- Image derivations
- Derived images enable non-destructive image editing and are created on the fly by the rendering software using editing instructions stored separately in the HEIF file. These instructions (rectangular cropping, rotation by one, two or three quarter-turns, timed graphic overlays, etc.) and images are stored separately in the HEIF file, and describe specific transformations to be applied to the input images. The storage overhead of derived images is small.
- Image sequences
- Storage of multiple time-related and/or temporally predicted images (like a burst-photo shot or cinemagraph animation), their properties, and thumbnails. Different prediction options can be used in order to exploit the temporal and spatial similarities between the images. Hence, file sizes can be drastically reduced when many images are stored in the same HEIF file.
- Auxiliary image items
- Storage of image data, such as an alpha plane or a depth map, which complements another image item. These data are not displayed as such but used in various forms to complement another image item.
- Image metadata
- Storage of EXIF, XMP and similar metadata which accompany the images stored in the HEIF file.
Read More
One of the most useful and powerful built-in utility in Windows 10 is the DISM tool. This tool can be used with the Command Prompt command line as well as for other purposes. However, it is not without flaws and there are times when you may encounter some issues while using it.
One of the problems you can get while using the DISM tool is the following error:
“The scratch directory size might be insufficient to perform this operation”
This kind of error in DISM occurs when the DISM command is executed from the Windows Recovery Environment due to the limited size permissions of a delivery where the operating is being performed. To fix this DISM error, you need to follow the instructions laid out below.
Step 1: First, tap the Win + R keys to open the Run utility and then type “cmd” in the field and tap Enter to open Command Prompt.
Step 2: Next, you have to specify a scratch directory that contains the Windows folder and to do that, you can either use the DIR command or the BCEDIT command. So in the elevated command prompt type and enter “dir” or “bcedit”.
Step 3: After that, you will see a list of folders inside the C: partition. Now you have to create a folder named “scratch” inside the partition. To do so, execute the following command:
mkdir C:Scratch
Note: The command you just entered will create a directory inside the root of the C: partition named Scratch.
Step 4: Now that you’ve created the Scratch folder, note that each time you run any of the DISM commands, you have to enter the following code snippet in them:
/ScratchDir:C:Scratch
Note: For instance, if you are using the DISM tool to repair the offline Windows image, instead of executing the “Dism /Online /Cleanup-Image /RestoreHealth” command, you now have to execute the “DISM /Image:C: /ScratchDir:C: Scratch /Cleanup-Image /Restorehealth” command. And if you want to remove a selected installed update package, you can use the “DISM /image:C: /ScratchDir:C:Scratch /Remove-Package /PackageName:Package_for_RollupFix~31bf3856ad364e75~amd64~~16299.196.4.9” command. Keep in mind that the mentioned package is only an example. And lastly, you also have to replace the drive letter in the new code snippet when you execute the commands given above.
Read More
What is Drwtsn32.exe Application Error?
Drwtsn32.exe (DrWatson Postmortem Debugger) is a process file from Microsoft Corporation that runs on Microsoft Windows Operating System. This file is digitally signed from Microsoft Windows Component Publisher- Microsoft Timestamping Service.
This file is a type of executable file. It is useful to debug and creates log files when an error occurs during running or program execution.
The information logged by DrWatson is used by technical support personnel to diagnose a program error for a computer running Windows. It creates log files in the following location C:Documents and SettingsAll UsersApplication DataMicrosoftDr Watson.
However, when using Internet Explorer, MS Outlook or any other application on Windows, you can experience drwtsn32.exe application error. This error occurs when the drwtsn32.exe file crashes. The error is displayed as:
“DrWatson Postmortem Debugger has encountered a problem and needs to close”
«drwtsn32.exe — DLL Initialization Failed» when shutting down
Solution
Error Causes
The ultimate reason behind ‘drwtsn32.exe application error’ is malware and viral infection.
Malicious software can enter your PC through downloaded files , browsing on unsafe websites and phishing emails. These viruses can disguise themselves as DrWatson utility. Plus theymay have the same name as this process.
However, the best way to detect if it is a virus is to track its location. Malicious software will usually hide in some other location instead of its standard location.
However, other reasons for this error also include incompatible software and damaged system files.
Further Information and Manual Repair
a) Scan PC with an Anti-Virus
It is advisable to repair this issue right away especially if the underlying cause is a viral infection typically because viruses can expose you to privacy errors and risks such as cybercrime, identity theft, and data security issues.
To resolve it, download a powerful antivirus. Scan your PC with it and remove all the viruses immediately. However, when doing so, you may have to compromise PC performance and halt other PC activities. Anti-viruses are notorious for slowing down PC speed.
In addition to this, sometimes you may have to stop other activities on your PC for the antivirus to scan for viruses.
b) Repair Registry Errors with Restoro
Nonetheless, if the drwtsn32.exe application error is related to system file corruption, then this indicates registry issues where all the system data is stored.
Registry issues occur if you don’t maintain your PC properly and let invalid, wasted and obsolete files accumulate on your PC. This damages and corrupts the system files and generates such error messages. To repair it, download a registry cleaner.
However, the best alternative to resolve drwtsn32.exe application error in seconds whether the error is linked to registry issues or viral infection is to download Restoro.
This is a multi functional PC fixer embedded with multiple utilities including a powerful antivirus, a registry cleaner and a system optimizer.
It wipes out all the unnecessary files stored in the registry, repairs the damaged and corrupt system files and restores the registry. With the help of the antivirus, all privacy errors and viruses are scanned on your PC and removed immediately.
And to ensure your system’s speed is not compromised, it also functions as a system optimizer and increases your PC’s speed significantly.
The software is safe and efficient. It has simple navigations and a user-friendly interface which makes it very easy for all levels of users to work around. It is compatible with all Windows versions.
Click here to download Restoro and resolve drwtsn32.exe application error today!
Read More
Hello and welcome to our software series review. Weel this time we could say this is more of a service review since the application we are going through today is online and you can use it freely without ever needing to install it.
When we choose software that we are going to review and recommend we really try to recommend something that is worth your time and money, Cartoonize fits in both categories in my opinion.
First of all basic plan of this graphic software is completely free and as mentioned it is working online, also as one more feature basic plan does not even require you to have an account of any kind, all you need to do is go to the website of the application and you can start using it right away. There is also paid plan for extra features if you need them billed monthly or annually.

Features
First things first, this is not Photoshop or GIMP and it does not aim nor want to be. This is something else, directed and pointed at the different types of users. This application is aimed at people that want to make some quick graphics and post them on social media and it does that very well. Even without knowledge to use graphic software this one is so well designed and straightforward that even a complete newcomer can do something right away.
So as the application that wants to be used by people that want to place some cool pictures or ads on their social media what it offers. For starters simplicity and ease of use, every option that you can use is on the left side of the screen nicely packed into the vertical toolbox. Inside the toolbox, you have access to various tools, effects, and filters that you can apply to your image.
Tools explained
Image manager
The first section on the tool panel is the image manager, here you can upload your images, delete them, search stock images, and so forth. nothing more to say about this one as it is only a basic file manager.
Edit
In this tool panel, there are a lot of basic settings for your image manipulations divided into 3 sections: Basics, Enhance, and Creative. In the basic section, you can crop, resize and rotate your image. Enhance panel will let you set exposure, color, vibrance, tint, and details (sharpen). Finally, the Creative part will let you remove the background with AI in a single click, replace colors in the image, and add a vignette and round image.
Effects
In the effects panel, you will be given 4 options to choose from Cartoonizer, Digital art, Sketcher, and painting. Each option once clicked will open another set of options tied to chosen preset where you will be able to choose a different style from chosen template. Once you click on the desired template it will be applied to your image and in the upright corner, you will have edit options to tweak it to your liking. You can play around as much as you want because only once you click on the apply button, the effect will be applied to your image.
Filters
Same as in the effects tool panel here you will also get a series of different filters that you can apply to your image. As in the previous tool once clicked on the chosen filter, you will be given options for its variations and details edits. How there is really plenty of filters options and combined with its own presets I will not focus on explaining what each one is doing since picture thumbnails are pretty accurate and just one look at them will explain to you everything you need to know.
Overlays
In the overlays panel, you can as the name says overlay different kinds of effects on your image. You can add snow, fog, sun flares rain, and many more. Presets work identically to previous effects and filters.
Masks
If you want to place your image in a certain shape or in-text this is the section for you. You will be presented with sections as custom text, shapes, brushes, floral, animals, and patterns. Each section will once again lead to plenty of variations on the chosen subject where you can pick one that you like the most and tweak its options.
Text
As the name suggests, this section is to add text to your picture or design. If you are making some cool ad for Facebook, Instagram, or other social media I believe that you will spend most of your time in this section adding text and tweaking it so it looks best. You have all the tools that you will need to make a catchy title or smaller block of text and you can add multiple texts to your picture tweaking their own visual appearance, the font used, color, and some effects like a drop shadow.
Draw
In the draw section, you will be able to freely draw whatever you like with your mouse or pen if you have one. you have basic options for a brush and eraser so you can erase stuff. Pretty basic tool but it gives a nice touch to underline something, circle it, etc.
Graphics
This panel will let you place various already made graphic assets into a picture. You have hearts, hats, glasses, etc. There really are tons of premade graphics along with thematic ones like new year, st. Patric day and more.
Frames
As the name suggests this section will place a frame of your choice around your picture. You can choose the style of frame, position, color, and many more. There are various styles and each style has its own options.
Conclusion
Cartoonize is a great online application that will let you quickly and easily do cool and nice image edits. As mentioned you can also add various effects, text, and graphics and use this app to make some quick and nice ads for social media. You have the option to publish to your social media right from the app in the save dialog but you can also of course download your image or design to your local computer.
Please note that for this review we used the pro, paid version so all of the features were unlocked. We wanted to give you a full overview of the full potential of the app. In my opinion, the small monthly fee that they charge is well worth it when you see all things that you can do with it.
Go to the cartoonize website and check it out, basic option is completely free and it does not even require making an account. Have fun, be creative and take care, I hope to see you again tomorrow.
Read More
Error Code 7 — What is it?
This is a typical system error that occurs during Windows setup. To be precise, this error may pop on your computer screen during the text mode portion of Windows setup.
The setup hangs and stops responding and the error message is displayed in either one of the following formats:
‘The file I386Ntkrnlmp.exe could not be loaded. The error code is 7.’
or
‘The file I386L_intl.nlf could not be loaded. The error code is 7.’
Solution
Error Causes
Error 7 may be triggered due to several reasons but the 2 most common causes for this error code are:
- Incorrect settings of the BIOS
- Faulty RAM modules
- Registry corruption
Further Information and Manual Repair
To resolve this error on your system, here are some easy and effective DIY methods that you can try.
Method 1 — Change Back the BIOS to its Default Settings
If the underlying cause of error code 7 is related to incorrect BIOS settings, then it is recommended to restore default settings to resolve.
You can reset your computer’s BIOS (basic input and output system) settings to factory defaults by selecting the restore defaults option within BIOS or by removing CMOS ( Complementary Metal Oxide Semi-Conductor) battery from your unplugged computer for about five minutes.
The battery removal method requires opening the computer case, so only attempt it if you are unable to access BIOS.
To reset BIOS follow these steps, reboot your PC and then press the key assigned to loading BIOS during your computer boot splash screen.
The key assigned to load and access BIOS varies from manufacturer to manufacturer but usually, it’s F1, F2, or F12. Once you enter the BIOS, select the ‘Restore Defaults’ option listed in the menu. I
t may be a keyboard shortcut or be under the Advanced settings menu. Confirm settings and then exit BIOS. Hopefully, this will resolve Error 7.
Method 2 — Remove the Faulty RAM
When error code 7 is triggered by faulty RAM modules, then to resolve it simply remove the memory modules that are installed in the computer.
If the error code is displayed again after you remove the memory module, remove a different memory module. This procedure requires you to reboot your PC several times to identify the specific memory module that is not working properly.
Method 3 — Repair the Corrupted Registry
Error code 7 is sometimes also linked with registry issues. If the reason for the error occurrence is a damaged or corrupted registry, then simply download Restoro.
This is a powerful PC Fixer embedded with a registry cleaner. It is easy to operate and user-friendly. The registry cleaner detects and removes all errors in seconds. It cleans the registry and repairs the damages in no time.
Click here to download Restoro.
Read More
There are some new generation motherboards for laptops and PCs that bring in support for both the Unified Extensible Firmware Interface or UEFI as well as the Basic Input Output System or BIOS. The main advantage of UEFI over the traditional BIOS is the fact that UEFI supports a hard drive that has a capacity of more than 2 terabytes. However, the disadvantage of UEFI is that it only supports the x64 Windows operating system versions and that the hard drive is supposed to use the GPT structure. So if your PC is compatible with and supports UEFI and you want to change from Legacy to UEFI, then you’ve come to the right place as this post will guide you on how you can exactly do that without having to reinstall it.
There are two ways to change Legacy to UEFI. You can convert MBR to GPT using either the built-in utilities in Windows or using the Recovery Environment. Before you proceed, make sure that your computer fulfills the following prerequisites:
- Your PC’s motherboard should support both Legacy and UEFI.
- Your PC should be running at least the 1703 Windows 10 version or newer on an MBR partition.
Once you’ve made sure that your computer covers the aforementioned prerequisites, refer to the given options below.
Option 1 – Convert MBR to GPT via Windows built-in utilities
- In the Windows Search box, type “command prompt” and from the search results that appear, right-click on Command Prompt and select the “Run as administrator” option.
- After that, execute this command: exe /convert /allowfullOS
- Now, wait until the process is completed since you can track its process on your screen.
- Once it’s done, go to Settings > Update & Security > Advanced Startup options and from there, click on Restart Now. This will restart your computer and give you advanced options.
- Next, select Troubleshoot > Advanced Options where you will see further options including System Restore, Startup Repair, Go back to the previous version, Command Prompt, System Image Recovery, and UEFI Firmware Settings.
- Now select the UEFI Firmware Settings. This will take you to the BIOS. Boot Mode is typically available under Boot > Boot Configuration. Once you’re there, set it to UEFI and then save the changes you’ve made. After that, your computer will restart.
Option 2 – Convert MBR to GPT via the Recovery Environment
- When the message appears on your screen while running Windows Setup, you need to tap the Shift + F10 keys to open Command Prompt.
- Make sure to run Command Prompt as admin and then execute this command: exe /convert
- After that, wait until the process is completed. When it’s done, you have to go to the BIOS just like in the first given option above.
- As mentioned, you can usually find the Boot Mode under Boot > Boot Configuration. Once you’re there, set it to UEFI.
- Now save the changes made and exit as your computer will restart.
Read More
 So far we probably all know what are good new and exciting features that W11 is bringing to the table, let’s talk now about features that will be removed and are not there but we had them in W10
- Taskbar, do not worry, it is still there but it will be locked hard only to the bottom, people is removed, applications cannot customize areas and some icons will not appear in the system tray.
- Start Menu, No more named groups, cannot be resized, live tiles are history and pinned apps and sites will not migrate
- Tablet mode is completely removed
- Touch keyboard will not dock or undock on screen sizes bigger than 18 inches
- The timeline feature is no more
- The wallet is also removed
- Cortana is not active on first boot experience and it is no longer pinned to the taskbar
- Desktop wallpapers are not synched anymore when using an MS account
- IE is disabled, IE mode in edge here to fill the gap
- Math panel is removed with math recognizer as separate install on demand
- News and interests are now Windows Widgets
- Quick status is no longer on the lock screen nor in the settings
- S Mode exclusive only to Windows 11 home edition
- Snipping Tool continues to be available but functionality has been replaced with the Snip & Sketch tool functionality.3D Viewer, OneNote for Windows 10, Paint 3D, and Skype won’t be installed anymore on new systems. They remain available when systems are upgraded.
Read More
When we purchase a computer, usually it is meant to be used by one person. Sometimes we would like to share our computer with other people, with friends and family members but we would also like to keep some privacy for ourselves in the process. Lucky for us Windows 10 will let us create multiple user accounts which then can be used by other persons with their own settings, documents, etc. The only requirement is to already have one user account which is automatically created when Windows is installed.
This guide will lead you step by step in the creation of a new user account within Windows 10, so grab your favorite drink, and let’s begin.
Creating new account
First thing is to click on the windows icon on the bottom left and open start menu, from start menu click once on settings.
![]() When the settings window opens, choose ACCOUNTS on it.
When the settings window opens, choose ACCOUNTS on it.
 Windows will then go to the accounts settings page. Within that page, click on the Family & other users to open the setting for the chosen section on right. On the right settings, screen navigate to the lower section and click once with the left button on add someone else to this PC
 When add someone else to this PC is clicked, pop up window will appear which will ask you to provide the persons email address and later on the password of his/her Microsoft account, after the required information is provided you are done, a new user has been added and he can use his Microsoft credentials on the login screen to use this computer.
Setting up a user without Microsoft ID
However, if you do not wish to add a new user via his Microsoft login credentials or the person does not have them, on the pop-up window click on I don’t have this person’s sign-in information.
 This will open yet another pop-up giving you the option to create a Microsoft account for this person, to use a phone number instead of a Microsoft account, or to create a new email address for the user. Any of these options will create a new user for this computer with provided credentials but there is the last option at bottom of the pop-up which will allow you to create a local user only without a Microsoft account. This user will be able to use this computer, will not be able to transfer his document through various devices like he/she would if using a valid Microsoft account but it could use the computer and personalize it fully to his/her liking.
 Once the link is clicked, you will be presented with a floating window requiring you to input needed information in order for the account to be created. You will need to provide username, password, and answers to 3 security questions.
 Once all information has been provided, click on next and your new non-Microsoft local user has been created. Now when you click on Family & other users you will see that Windows has added a new user with the provided name to this computer. If you wish, you can add another user in the same manner, following the previous steps. Microsoft Windows does not have a limit for how many users can be on one computer so feel free to create as many as you like.
User account options
Now, clicking on the existing created user will open user options. From there you will have options to remove the user, therefore removing him/her from this computer, note that removing the local user will remove permanently his/her settings and they would not be able to be restored, or you can change the user account type.
 Click on Change account type.
 Under account type, you will have the option to promote this user to an administrator if you wish or you can leave it as a standard user.
Read More
Connecting to Microsoft’s Windows Update servers does not always go smoothly since you could run into a number of errors. One of these errors is the error code 0x8024402c. You can see this error code when you check for Windows Updates. This kind of Windows Update error occurs when the proxy or the firewall settings are incorrectly configured. As a result, the client’s connection to the Windows Update servers fails.
There are two things you can do to resolve error code 0x8024402c. First, you can try to fix the Proxy Settings. Second, you can set up Automatically Detect the connection settings. In addition, you can also try to perform System Restore as it could also help in fixing the problem. Performing System Restore might help you in fixing the error code 0x8024402C. Refer to the steps below to use System Restore.
- Tap the Win + R keys to open the Run dialog box.
- After that, type in “sysdm.cpl” in the field and tap Enter.
- Next, go to the System Protection tab then click the System Restore button. This will open a new window where you have to select your preferred System Restore point.
- After that, follow the on-screen instructions to finish the process and then restart your computer and check if the problem is fixed or not.
If performing System Restore didn’t help in fixing the problem, then try the two given options below.
Option 1 – Try fixing the Proxy Settings
- In the Cortana search box, search for Internet Explorer and then click on the related search result.
- After that, tap the Win + T keys on your keyboard and click on Internet Options.
- Next, navigate to the Connections tab and click on LAN Settings.
- Then click on the Advanced button and delete all the entries in the list generated in the Exceptions section. And if the Advanced button is disabled because the “Use a proxy server for your LAN (These settings will not apply to dial-up or VPN connections)” option is disabled then you are good to go. Now proceed to the next step.
- Tap the Win + X keys or right-click on the Start button and select Command Prompt (Admin) or you could also search for “cmd” in the Cortana search box and right-click on Command Prompt from the search results and select the “Run as administrator” option.
- If a User Account Control appears, click on Yes to proceed. After that, type each one of the commands listed below, and don’t forget to hit Enter after you type each one of them.
- netsh winhttp reset proxy
- net stop wuauserv
- net start wuauserv
- Now restart your computer and check if the problem is fixed or not by checking for Windows Updates again.
Option 2 – Try setting up Automatically Detect the connection settings
- Type in “internet options” in the Cortana search box and then click on the related search result.
- After that, navigate to the Connections tab.
- Next, click on the LAN Settings button located under the Local Area Network (LAN) settings section.
- Then uncheck the “Use a proxy server for your LAN (These settings will not apply to dial-up or VPN connections)” option under the Proxy Server section and click OK.
- Now restart your computer to apply the changes made successfully.
Read More
Windows 11 is a good-looking operating system but people love to make things personal and to their liking so we decided to help you in this mission with small customization of changing default system fonts inside Windows 11.
Since there is no really easy way to just switch the font windows is using for itself we will have to tweak a registry a little so before we start please do make a backup of the registry file and follow the steps as they are presented in order to avoid any errors and break the system.

So, if all precautions are made and you are ready to change your Windows appearance let’s dive right into it:
Find and/or install the font that you wish to use
There are vast free font sites on the internet where you can find fonts that you like and wish to use but be very careful with your desired font selection. The font that you choose needs to be a complete typeface, meaning that it has to contain all glyphs, large and small font sizes, all special characters, etc or you will experience that in certain areas nothing will be displayed.
Once you have found the font that you like and made sure it is a complete font, install it on your system (you can skip this step if you just want to change the system font with one already installed on your system)
Create REG file
Open notepad or a similar plain text editor in order to create a file that will apply changes directly into the registry and create a new file. Inside the file paste this text:
Windows Registry Editor Version 5.00

[HKEY_LOCAL_MACHINESOFTWAREMicrosoftWindows NTCurrentVersionFonts]
"Segoe UI (TrueType)"=""
"Segoe UI Bold (TrueType)"=""
"Segoe UI Bold Italic (TrueType)"=""
"Segoe UI Italic (TrueType)"=""
"Segoe UI Light (TrueType)"=""
"Segoe UI Semibold (TrueType)"=""
"Segoe UI Symbol (TrueType)"=""

[HKEY_LOCAL_MACHINESOFTWAREMicrosoftWindows NTCurrentVersionFontSubstitutes]

"Segoe UI"="NEW-FONT"
All the way to the bottom where it says: «Segoe UI»=»NEW-FONT», change NEW-FONT with the font name that you have chosen or installed in the previous step. For example: «Segoe UI»=»Ubuntu».
Now go to File > Save As and name your file however you want but give it REG extension so it looks like: my_new_windows_font.REG
Apply changes
Now that you have your registry entry saved, locate it and double-click on it, at this stage Windows warning will probably pop up, you can just ignore it and click on YES since you wrote the file and know what it is. After registry entry is applied reboot your PC in order for changes to take effect.
Rolling back
If you want to change the font to another one, just repeat this procedure again. If you want to roll back to using the default Windows font, repeat the process but with this code instead of the one provided in the REG file:
Windows Registry Editor Version 5.00

[HKEY_LOCAL_MACHINESOFTWAREMicrosoftWindows NTCurrentVersionFonts]
"Segoe UI (TrueType)"="segoeui.ttf"
"Segoe UI Black (TrueType)"="seguibl.ttf"
"Segoe UI Black Italic (TrueType)"="seguibli.ttf"
"Segoe UI Bold (TrueType)"="segoeuib.ttf"
"Segoe UI Bold Italic (TrueType)"="segoeuiz.ttf"
"Segoe UI Emoji (TrueType)"="seguiemj.ttf"
"Segoe UI Historic (TrueType)"="seguihis.ttf"
"Segoe UI Italic (TrueType)"="segoeuii.ttf"
"Segoe UI Light (TrueType)"="segoeuil.ttf"
"Segoe UI Light Italic (TrueType)"="seguili.ttf"
"Segoe UI Semibold (TrueType)"="seguisb.ttf"
"Segoe UI Semibold Italic (TrueType)"="seguisbi.ttf"
"Segoe UI Semilight (TrueType)"="segoeuisl.ttf"
"Segoe UI Semilight Italic (TrueType)"="seguisli.ttf"
"Segoe UI Symbol (TrueType)"="seguisym.ttf"
"Segoe MDL2 Assets (TrueType)"="segmdl2.ttf"
"Segoe Print (TrueType)"="segoepr.ttf"
"Segoe Print Bold (TrueType)"="segoeprb.ttf"
"Segoe Script (TrueType)"="segoesc.ttf"
"Segoe Script Bold (TrueType)"="segoescb.ttf"

[HKEY_LOCAL_MACHINESOFTWAREMicrosoftWindows NTCurrentVersionFontSubstitutes]
"Segoe UI"=-Read More
![]()
Copyright © 2022, ErrorTools. All Rights Reserved
Trademarks: Microsoft Windows logos are registered trademarks of Microsoft. Disclaimer: ErrorTools.com is not affiliated with Microsoft, nor claim direct affiliation.
The information on this page is provided for information purposes only.
![]()
Repair your PC with one click
Please be aware that our software needs to be installed on a PC system with Windows on it, Open this website on a desktop PC and download the software for easy and quick elimination of your issues.