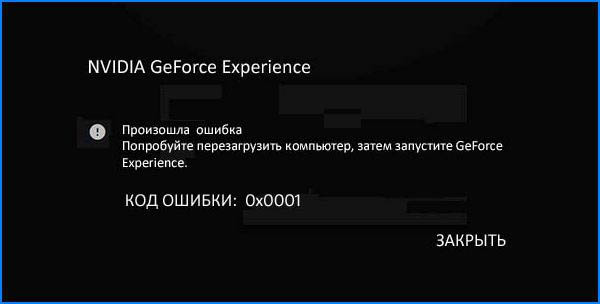
При попытке открыть приложение GeForce Experience можно столкнуться с ошибкой 0x0001. Узнаем подробнее причины возникновения и способы ее исправить.
Содержание
- 1 Что вызывает ошибку 0x0001 при запуске приложения Nvidia?
- 2 Способ 1: Установка бета-версии GeForce Experience
- 3 Способ 2: Разрешение службам NVIDIA взаимодействовать с локальной учетной записью
- 4 Способ 3: Принадлежность папок Nvidia к группе Система
- 5 Способ 4: Утилита для удаления драйвера GeForce Experience
Что вызывает ошибку 0x0001 при запуске приложения Nvidia?
Есть несколько причин, при которых возникает уведомление в Nvidia Geforce Experience с кодом ошибки 0x0001:
- Баг GeForce Experience. Неполадка может возникнуть из-за внутренней ошибки, которая в настоящее время проявляется в последней «стабильной» версии. Ее можно решить после установки бета-версии GeForce Experience.
- Службы контейнеров NVIDIA не имеют разрешения для взаимодействия с локальной учетной записью. В основном служба контейнеров Nvidia Telemetry и ряд других процессов вызывают ошибку 0x0001, если им не разрешено взаимодействовать с локальной учетной записью пользователя. В этом случае проблема быстро решается настройкой дополнительных параметров службы.
- Папки Nvidia не принадлежат группе «Система». Ошибка может появиться, если папки приложения не входят в группу SYSTEM. Решить проблему можно путем изменения принадлежности каждой папки Nvidia к группе «Система».
- Поврежденные файлы. Как оказалось, поврежденные файлы внутри папки Nvidia или драйвер видеокарты могут нести ответственность за отображение уведомления об ошибке 0x0001. Поскольку их непросто удалить обычным способом, можно использовать специальную утилиту, способную полностью деинсталлировать GeForce Experience вместе с соответствующими драйверами, прежде чем устанавливать заново в чистой среде.
В статье представлено несколько шагов по устранению неполадки. Поскольку потенциальные решения упорядочены по эффективности, рекомендуем следовать их в том порядке, в котором они представлены.
Способ 1: Установка бета-версии GeForce Experience
Можно избавится от проблемы после удаления текущей версии Nvidia Experience и установки последней бета-версии. Многие предполагают, что эта версия включает исправление, которое еще не интегрировано с основным установщиком.
Поскольку этот способ подтвержден многими пользователями, рекомендуем начать с него.
Пошаговая инструкция по удалению текущей программы GeForce Experience и установке последней бета-версии:
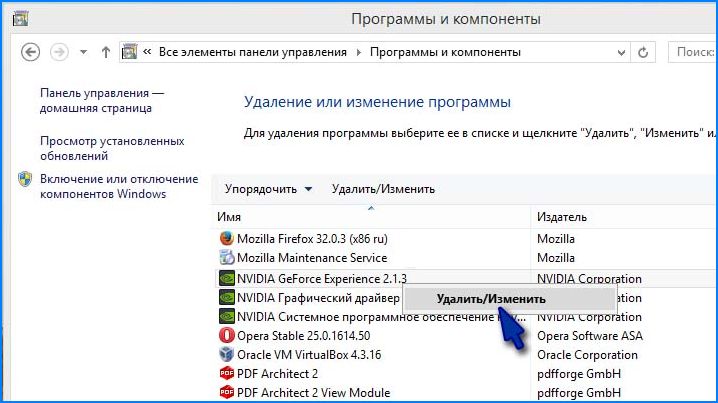
- Нажмите сочетание Windows + R для вывода диалогового окна «Выполнить». Наберите команду «appwiz.cpl» и кликните на Enter для входа в раздел Программы и компоненты.
- В списке программ найдите Nvidia Experience. Кликните по ней правой кнопкой мыши и выберите Удалить/Изменить.

- Следуйте инструкциям на экране до завершения процесса удаления Nvidia GeForce Experience.
- После удаления приложения перезагрузите компьютер.
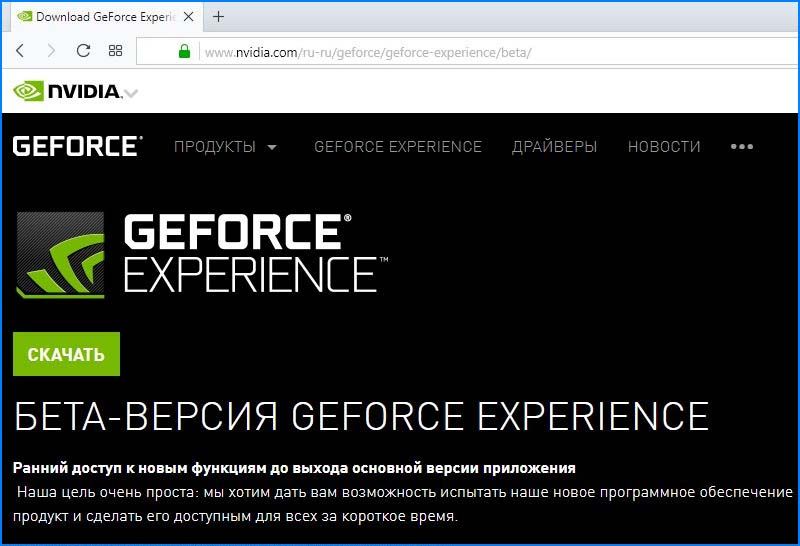
- После перезагрузки откройте сайт производителя и скачайте последнюю бета-версию Nvidia Experience.

- Запустите загруженный файл и следуйте инструкциям установщика программы.
- После установки не запускайте приложение. Вместо этого перезагрузите компьютер еще раз.
После перезапуска запустите бета-версию GeForce Experience и проверьте, отображается ли ошибка с кодом 0x0001. Если не удалось ее исправить, перейдите к следующему шагу.
Способ 2: Разрешение службам NVIDIA взаимодействовать с локальной учетной записью
Как оказалось, еще одна возможная причина возникновения ошибки заключается в том, что служба контейнеров телеметрии (NvTelemetryContainer), не имеет необходимых разрешений для правильного взаимодействия с локальной учетной записью.
В основном виновником является телеметрия, но есть другие случаи, когда проблема была решена только после изменения настроек всех контейнеров NVIDIA.
- Совместным нажатием на клавиши Windows + R откройте диалоговое окно «Выполнить». Наберите команду «services.msc» для входа на экран «Службы». При появлении уведомления контроля учетных записей пользователей (UAC) нажмите «Да», чтобы предоставить права администратора.
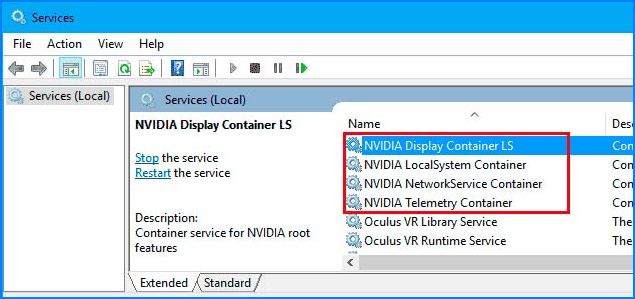
- Прокрутите список служб пока не найдете четыре контейнера, используемых NVIDIA.

- Кликните на каждом по очереди правой кнопкой мыши и выберите Свойства.
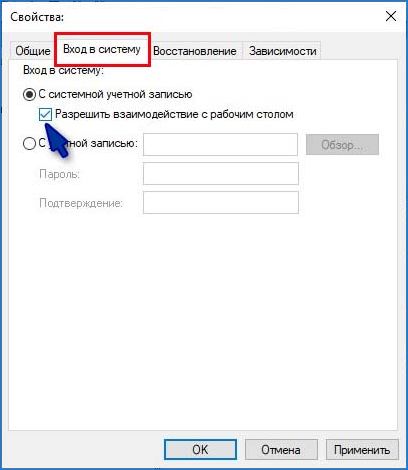
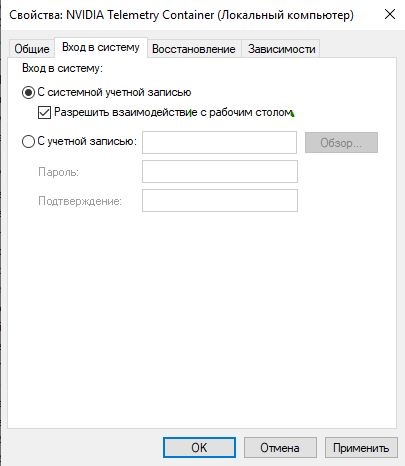
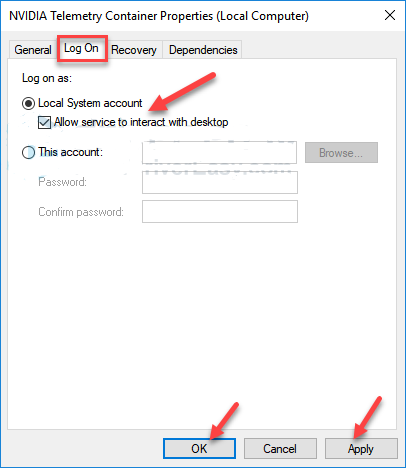
- Перейдите на вкладку «Вход в систему» и убедитесь, что установлен переключатель, связанный с системной учетной записью. Установите флажок «Разрешить взаимодействие с рабочим столом», затем нажмите «Применить» для сохранения изменений.

Когда все службы контейнеров будут настроены на взаимодействие с рабочим столом, перезагрузите компьютер.
После проверьте, отображается ли уведомление с кодом ошибки 0x0001 в Geforce Experience. Если с помощью этого способа не удалось ее исправить, перейдите к следующему шагу.
Способ 3: Принадлежность папок Nvidia к группе Система
В большинстве случаев уведомление об ошибке 0x0001 возникает, если папки, используемые NVIDIA, не имеют необходимых разрешений. Для ее решения измените принадлежность всех папок приложения к группе «Система».
Пошаговая инструкция:
- Откройте Проводник и перейдите по пути:
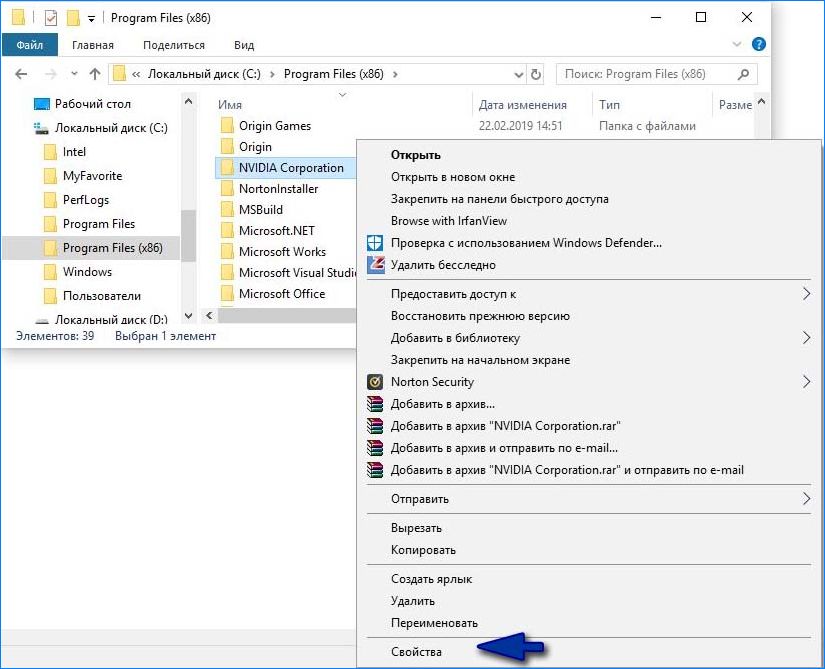
C:Program Files (x86) - Правым кликом мыши на NVIDIA Corporation откройте меню и выберите Свойства.

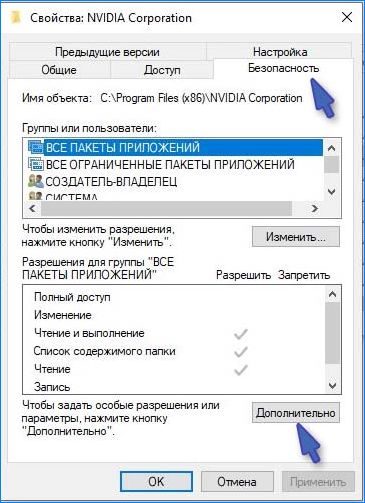
- Перейдите на вкладку Безопасность и кликните «Дополнительно».

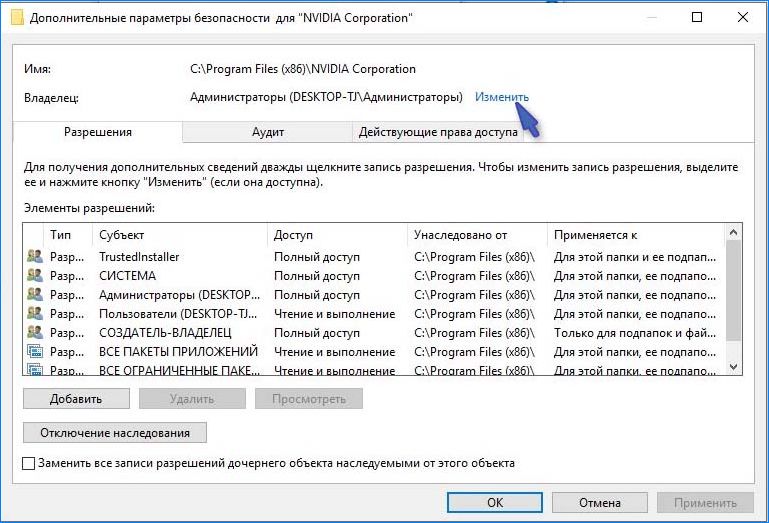
- Убедитесь, что в дополнительных параметрах владелец установлен как «Система». В противном случае кликните «Изменить».

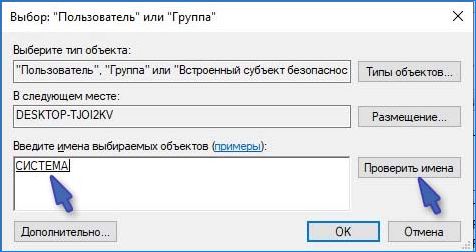
- В поле «Выберите имена выбираемых объектов» введите «Система», нажмите «Проверить имена» и кликните ОК.

- Нажмите кнопку «Применить», чтобы сохранить текущую конфигурацию разрешений. Затем перезапустите компьютер.

После проверьте, возникает ли ошибка с кодом 0x0001 при запуске приложения Nvidia.
Способ 4: Утилита для удаления драйвера GeForce Experience
Есть несколько утилит, которые позволяют полностью удалить текущую версию GeForce Experience и драйвер видеокарты. Воспользуемся программой Display Driver Uninstaller.
Скачайте последнюю версию утилиты. Программа будет загружена на компьютер в архиве, и для ее распаковки потребуется архиватор 7Zip или WinZip.

Дважды щелкните на файле DDU, выберите удобное расположение и кликните «Извлечь», чтобы распаковать содержимое утилиты.
После распаковки запустите исполняемый файл. При появлении уведомления контроля учетных записей.
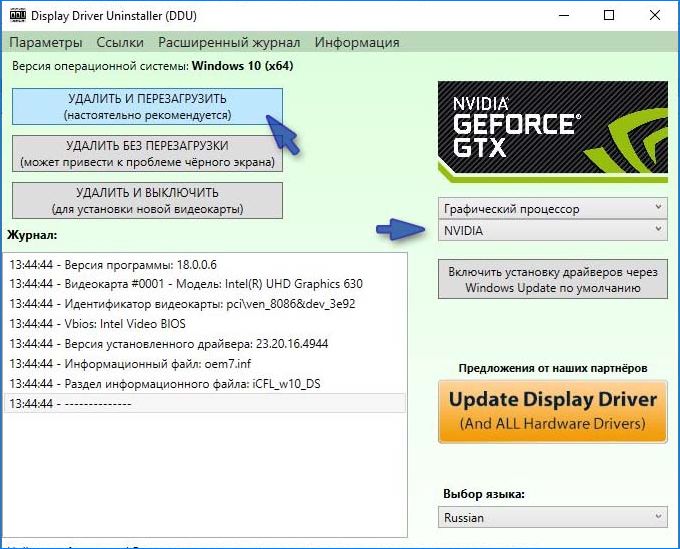
В интерфейсе выберите GPU в раскрывающемся меню «Выбор видеодрайвера». Затем нажмите «Удалить и перезапустить», чтобы начать процедуру очистки.
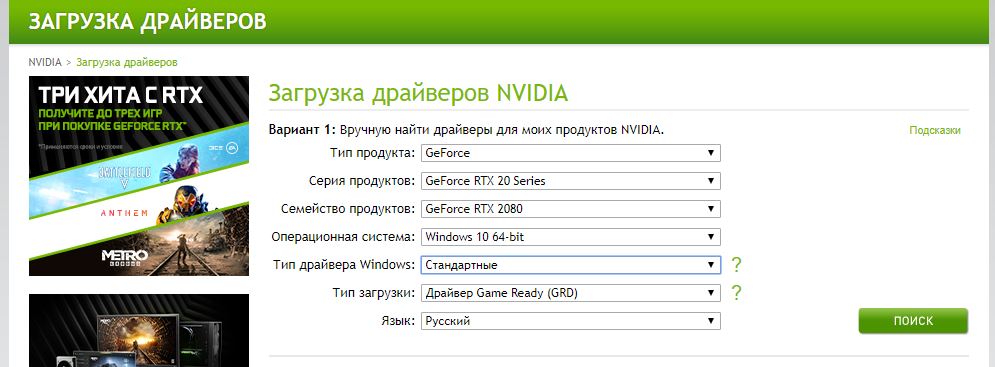
После завершения процесса перезапустите ПК. Откройте официальный сайт NVIDIA и перейдите в раздел Драйверы. Выберите графический процессор, операционную систему и язык, нажмите кнопку «Поиск». Следуйте подсказкам на экране, чтобы установить последний драйвер Game Ready.
После загрузите последнюю версию сборки GeForce Experience и установите ее на компьютере.
После уведомление с ошибкой «Nvidia Geforce Experience error code 0x0001» уже не должно препятствовать запуску приложения.
Содержание
- Ошибка с кодом 0x0001 в GeForce Experience — что делать?
- Решение ошибки 0x0001 в GeForce Experience
- Решение №1 Обновление видеодрайвера
- Решение №2 Выставление нужных параметров для служб GFE
- Решение №3 Переустановка видеодрайвера и GeForce Experience
- Код ошибки 0x0001 и 0x0003 в NVIDIA GeForce Experience
- Как исправить код ошибки 0x0001 или 0x0003 NVIDIA GeForce Experience
- 1. Проверить службы Nvidia
- 2. Обновите драйвер видеокарты NVIDIA или перейдите на бета-версию
- 3. Полное удаление и чистая установка
- Не запускается Nvidia GeForce Experience код ошибки 0x0001: как исправить?
- Что вызывает ошибку 0x0001 при запуске приложения Nvidia?
- Способ 1: Установка бета-версии GeForce Experience
- Способ 2: Разрешение службам NVIDIA взаимодействовать с локальной учетной записью
- Способ 3: Принадлежность папок Nvidia к группе Система
- Способ 4: Утилита для удаления драйвера GeForce Experience
- Исправляем Something went wrong. Try restarting GeForce Experience
- Ошибка geforce experience something went wrong try restarting
- Решение ошибки
- Ошибка error code 0x0001 geforce experience
- Обновите драйвера видеокарты
- Ошибка error code: 0x0001
- Решение ошибки путем обновления Windows
Ошибка с кодом 0x0001 в GeForce Experience — что делать?
При открытии программы GeForce Experience пользователи Windows могут столкнуться с ошибкой 0x0001. Никакой полезной информации в сообщении нет, однако на данный момент известен ряд решений для этой неполадки.
Решение ошибки 0x0001 в GeForce Experience

Решение №1 Обновление видеодрайвера
Самое банальное решение — это обновление драйвера для видеокарты. Перейдите на официальный сайт Nvidia (в раздел загрузок), скачайте установщик и запустите его, а после следуйте инструкциям на экране. Как только видеодрайвер будет обновлен, перезагрузите свой ПК и проверьте наличие ошибки 0x0001 в GeForce Experience.
Решение №2 Выставление нужных параметров для служб GFE
Нормальная работа GeForce Experience гарантирована только в том случае, если параметры относящихся к этой программе служб заданы корректно. Нажмите Win+R, а затем выполните services.msc. Далее открываем свойства нижеуказанных служб и разделе типа запуска выставляем следующее:
- Display Container LS – Автоматически
- NetworkService Container – Вручную
- LocalSystem Container – Автоматический
- Telemetry Container – Автоматически
Как только закончите возиться с параметрами служб, перезагрузите ПК. Ошибка 0x0001 в GeForce Experience была решена? Если нет, то снова откройте свойства NVIDIA Telemetry Container и поставьте галочку возле опции «Разрешить взаимодействие с рабочим столом» во вкладке «Вход в систему». Еще раз перезагрузите компьютер и проверьте наличие проблемы.
Решение №3 Переустановка видеодрайвера и GeForce Experience
Ничего из вышеуказанного не помогает? Тогда мы предлагаем вам заняться полной переустановкой видеодрайвера и программы GeForce Experience. Сделать это можно с помощью такой небольшой утилиты, как Display Driver Uninstaller (DDU). Запустите DDU и следуйте всем рекомендациям, которая утилита вам предоставит.
После удаления всего ПО от Nvidia со своего ПК перейдите по этой ссылке, чтобы скачать и установить актуальные версии видеодрайвера и GeForce Experience. Ошибка 0x0001 больше не должна вас беспокоить.
Источник
Код ошибки 0x0001 и 0x0003 в NVIDIA GeForce Experience
GeForce Experience — это очень полезная программа для игр на графических картах от NVIDIA. Некоторые пользователи могут столкнуться с ошибкой 0x0001 или 0x0003 при открытии NVIDIA GeForce Experience. Ошибка звучит следующим образом:
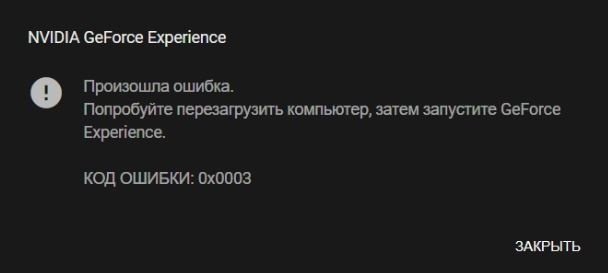
Произошла ошибка. Попробуйте перезагрузить компьютер, затем запустите GeForce Experience. Код ошибки 0x0001 или 0x0003.
Как исправить код ошибки 0x0001 или 0x0003 NVIDIA GeForce Experience
Давайте рассмотрим некоторые исправления, чтобы избавиться от этой проблемы в Windows 10. Прежде чем начать, попробуйте перезагрузить компьютер, а затем запустите GeForce Experience и посмотрите, работает ли он. Также, если вы обычно создаете точку восстановления системы , то вы можете откатить систему назад в рабочее состояние.
1. Проверить службы Nvidia
Нажмите комбинацию кнопок Win + R и введите в диалоговое окно services.msc, чтобы открыть службы. Теперь обратите внимание на следующие службы и убедитесь, что их типы запуска следующие:
- NVIDIA Display Container LS — Автоматически
- NVIDIA NetworkService Container — Ручной
- NVIDIA LocalSystem Container — Автоматический
- NVIDIA Telemetry Container — Автоматически
Дважды щелкните по службе, чтобы открыть окно свойств. Если служба еще не запущена, просто выберите «Запустить«. А лучше нажмите на каждой «Остановить», а потом «Запустить», таким образом они перезапустятся.
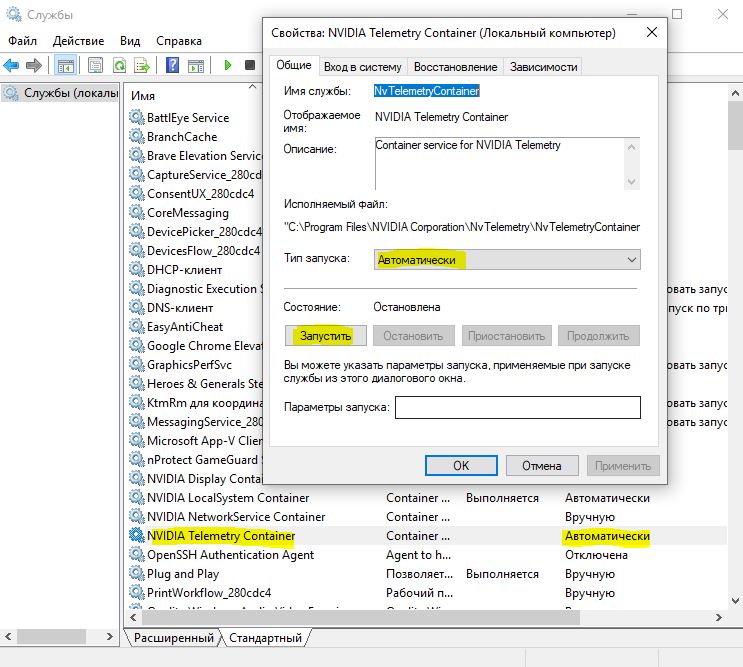
Если выше не сработало, то хочу обратить внимание на службу NVIDIA Telemetry Container. Нажмите по ней два раза, чтобы открыть свойства. Далее перейдите во вкладку «Вход в систему«, выберите пункт «С системной учетной записью» и поставьте галочку напротив «Разрешить взаимодействие с рабочим столом«. Перезагрузите ПК.
2. Обновите драйвер видеокарты NVIDIA или перейдите на бета-версию
Одной из основных задач, которую вы должны сделать, является обновление драйверов видеокарты NVIDIA. Для этого вам просто нужно зайти на их сайт загрузки драйверов видеокарт и скачайте последнюю версию драйвера. Перезагрузите компьютер, чтобы изменения вступили в силу.
Если вы хотите попробовать бета-версию, вы можете найти ее здесь . Вы должны понимать, что бета-версия программного обеспечения содержит ошибки и нестабильна, вызывая ряд различных ошибок, но в то же время будет содержать некоторые исправления для некоторых ошибок в стабильном выпуске.

3. Полное удаление и чистая установка
Вы можете использовать программу для удаления драйвера видеокарты, которая полностью удаляет остаточные файлы в системе. После этого вы можете загрузить и установить последнюю версию графических драйверов NVIDIA. Обратитесь к руководству ниже, как:
Источник
Не запускается Nvidia GeForce Experience код ошибки 0x0001: как исправить?
При попытке открыть приложение GeForce Experience можно столкнуться с ошибкой 0x0001. Узнаем подробнее причины возникновения и способы ее исправить.
Что вызывает ошибку 0x0001 при запуске приложения Nvidia?
Есть несколько причин, при которых возникает уведомление в Nvidia Geforce Experience с кодом ошибки 0x0001:
- Баг GeForce Experience. Неполадка может возникнуть из-за внутренней ошибки, которая в настоящее время проявляется в последней «стабильной» версии. Ее можно решить после установки бета-версии GeForce Experience.
- Службы контейнеров NVIDIA не имеют разрешения для взаимодействия с локальной учетной записью. В основном служба контейнеров Nvidia Telemetry и ряд других процессов вызывают ошибку 0x0001, если им не разрешено взаимодействовать с локальной учетной записью пользователя. В этом случае проблема быстро решается настройкой дополнительных параметров службы.
- Папки Nvidia не принадлежат группе «Система». Ошибка может появиться, если папки приложения не входят в группу SYSTEM. Решить проблему можно путем изменения принадлежности каждой папки Nvidia к группе «Система».
- Поврежденные файлы. Как оказалось, поврежденные файлы внутри папки Nvidia или драйвер видеокарты могут нести ответственность за отображение уведомления об ошибке 0x0001. Поскольку их непросто удалить обычным способом, можно использовать специальную утилиту, способную полностью деинсталлировать GeForce Experience вместе с соответствующими драйверами, прежде чем устанавливать заново в чистой среде.
В статье представлено несколько шагов по устранению неполадки. Поскольку потенциальные решения упорядочены по эффективности, рекомендуем следовать их в том порядке, в котором они представлены.
Способ 1: Установка бета-версии GeForce Experience
Можно избавится от проблемы после удаления текущей версии Nvidia Experience и установки последней бета-версии. Многие предполагают, что эта версия включает исправление, которое еще не интегрировано с основным установщиком.
Поскольку этот способ подтвержден многими пользователями, рекомендуем начать с него.
Пошаговая инструкция по удалению текущей программы GeForce Experience и установке последней бета-версии:
- Нажмите сочетание Windows + R для вывода диалогового окна «Выполнить». Наберите команду «appwiz.cpl» и кликните на Enter для входа в раздел Программы и компоненты.
- В списке программ найдите Nvidia Experience. Кликните по ней правой кнопкой мыши и выберите Удалить/Изменить.

- Следуйте инструкциям на экране до завершения процесса удаления Nvidia GeForce Experience.
- После удаления приложения перезагрузите компьютер.
- После перезагрузки откройте сайт производителя и скачайте последнюю бета-версию Nvidia Experience.
- Запустите загруженный файл и следуйте инструкциям установщика программы.
- После установки не запускайте приложение. Вместо этого перезагрузите компьютер еще раз.
После перезапуска запустите бета-версию GeForce Experience и проверьте, отображается ли ошибка с кодом 0x0001. Если не удалось ее исправить, перейдите к следующему шагу.
Способ 2: Разрешение службам NVIDIA взаимодействовать с локальной учетной записью
Как оказалось, еще одна возможная причина возникновения ошибки заключается в том, что служба контейнеров телеметрии (NvTelemetryContainer), не имеет необходимых разрешений для правильного взаимодействия с локальной учетной записью.
В основном виновником является телеметрия, но есть другие случаи, когда проблема была решена только после изменения настроек всех контейнеров NVIDIA.
- Совместным нажатием на клавиши Windows + R откройте диалоговое окно «Выполнить». Наберите команду «services.msc» для входа на экран «Службы». При появлении уведомления контроля учетных записей пользователей (UAC) нажмите «Да», чтобы предоставить права администратора.
- Прокрутите список служб пока не найдете четыре контейнера, используемых NVIDIA.
- Кликните на каждом по очереди правой кнопкой мыши и выберите Свойства.
- Перейдите на вкладку «Вход в систему» и убедитесь, что установлен переключатель, связанный с системной учетной записью. Установите флажок «Разрешить взаимодействие с рабочим столом», затем нажмите «Применить» для сохранения изменений.
Когда все службы контейнеров будут настроены на взаимодействие с рабочим столом, перезагрузите компьютер.
После проверьте, отображается ли уведомление с кодом ошибки 0x0001 в Geforce Experience. Если с помощью этого способа не удалось ее исправить, перейдите к следующему шагу.
Способ 3: Принадлежность папок Nvidia к группе Система
В большинстве случаев уведомление об ошибке 0x0001 возникает, если папки, используемые NVIDIA, не имеют необходимых разрешений. Для ее решения измените принадлежность всех папок приложения к группе «Система».
- Откройте Проводник и перейдите по пути:
C:Program Files (x86) - Правым кликом мыши на NVIDIA Corporation откройте меню и выберите Свойства.
- Перейдите на вкладку Безопасность и кликните «Дополнительно».
- Убедитесь, что в дополнительных параметрах владелец установлен как «Система». В противном случае кликните «Изменить».
- В поле «Выберите имена выбираемых объектов» введите «Система», нажмите «Проверить имена» и кликните ОК.
- Нажмите кнопку «Применить», чтобы сохранить текущую конфигурацию разрешений. Затем перезапустите компьютер.
После проверьте, возникает ли ошибка с кодом 0x0001 при запуске приложения Nvidia.
Способ 4: Утилита для удаления драйвера GeForce Experience
Есть несколько утилит, которые позволяют полностью удалить текущую версию GeForce Experience и драйвер видеокарты. Воспользуемся программой Display Driver Uninstaller.
Скачайте последнюю версию утилиты. Программа будет загружена на компьютер в архиве, и для ее распаковки потребуется архиватор 7Zip или WinZip.
Дважды щелкните на файле DDU, выберите удобное расположение и кликните «Извлечь», чтобы распаковать содержимое утилиты.
После распаковки запустите исполняемый файл. При появлении уведомления контроля учетных записей.
В интерфейсе выберите GPU в раскрывающемся меню «Выбор видеодрайвера». Затем нажмите «Удалить и перезапустить», чтобы начать процедуру очистки.
После завершения процесса перезапустите ПК. Откройте официальный сайт NVIDIA и перейдите в раздел Драйверы. Выберите графический процессор, операционную систему и язык, нажмите кнопку «Поиск». Следуйте подсказкам на экране, чтобы установить последний драйвер Game Ready.
После загрузите последнюю версию сборки GeForce Experience и установите ее на компьютере.
После уведомление с ошибкой «Nvidia Geforce Experience error code 0x0001» уже не должно препятствовать запуску приложения.
Источник
Исправляем Something went wrong. Try restarting GeForce Experience
Если во время открытия программы GeForce Experience на компьютере произошла одна из следующих ошибок «Something went wrong. Try restarting GeForce Experience», не стоит паниковать, пользователи по всему миру регулярно сталкиваются с подобного рода проблемами и существует ряд методов по их решению. Что более важно, варианты простые и можно воспользоваться одним из них самостоятельно.
О разрешении указанной проблемы далее:
Ошибка geforce experience something went wrong try restarting
Решение ошибки
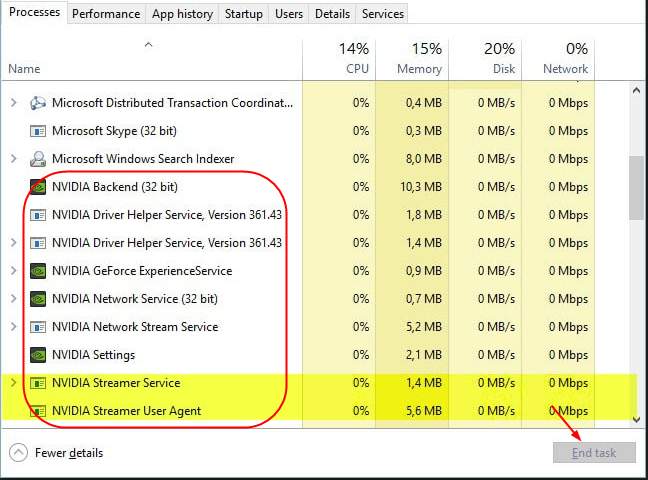
Необходимо выключить все задачи GeForce и перезапустить программу. Следуйте инструкции:
- Открываем панель задач
- Выберите все задачи NVIDIA и нажмите «Завершить задачу»
- После проделанного, нажимаете по программе правой кнопкой мыши и выбираете «Запустить от имени администратора«. Проверяете работоспособность.
Второй способ включает в себя проверку на работоспособность и отсутствие сбоев задач видеокарты.
Для осуществления вышеуказанного проделайте следующие шаги:
- На клавиатуре, удерживая нажатой клавишу с логотипом Windows, нажмите R, чтобы вызвать окно «Выполнить»
- Вводим команду services.msc.
- Находим и щелкаем правой кнопкой мыши по NVIDIA контейнер, что бы выбрать вкладку «свойства»
- Убеждаемся, что служба «Разрешить взаимодействие с рабочим столом» отмечена во вкладке «Вход в систему». Если галочки не стоит — ставим, жмем «Применить», далее «Ок».
- Посмотрите, запущен ли телеметрический контейнер в панели задач. Если он отключен. просто нажимаем правой кнопкой мыши и включаем.
Теперь запускаем наше приложение что бы узнать работает ли оно корректно. Если нет — не стоит расстраиваться, есть еще определенные способы избавиться от обозначенной проблемы.
Ошибка error code 0x0001 geforce experience
Обновите драйвера видеокарты
Третий способ состоит в том. что бы поставить более новые драйвера видеокарты.
Проблема может быть вызвана устаревшими или поломанными, забагованными драйвера видеокарты. Простейший способ — перейти по ссылке на официальный сайт, скачать и установить. Либо же скачайте и установите программу по ссылке, которая автоматически поставит новейшие
Приложение автоматически распознает тип вашей видеокарты, а также систему, на которую необходимо установить драйвера, после чего сделает все за вас
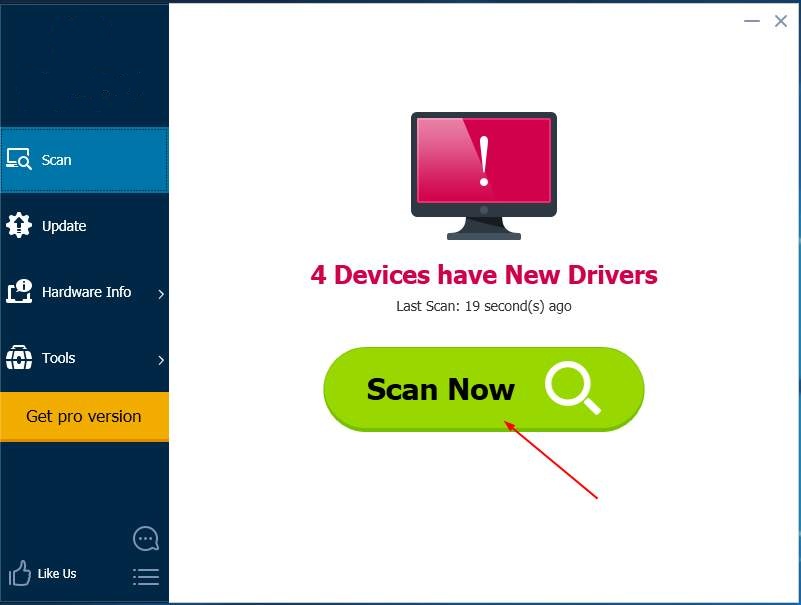
- Скачиваем приложение
- Жмем «Просканировать сейчас». Приложение найдет все проблемные драйвера компьютера и обновит их.
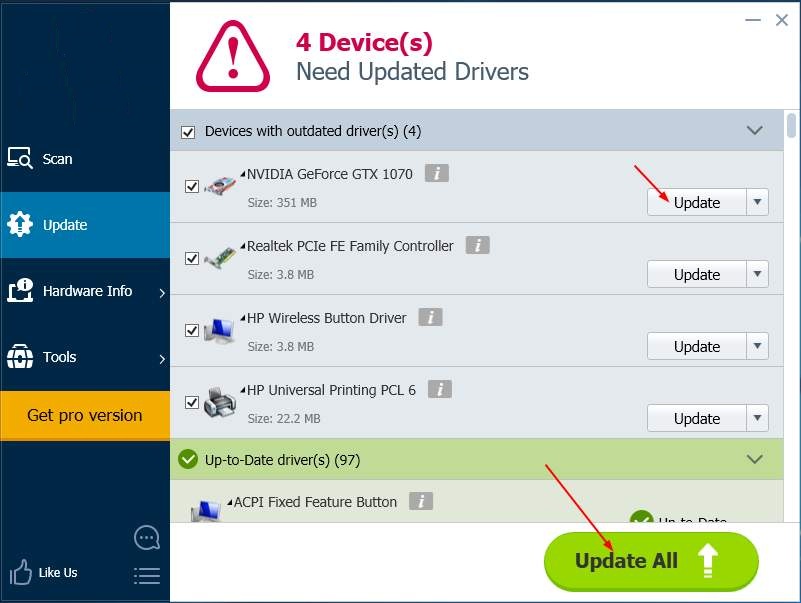
- Нажимаем «Обновить все», что бы автоматически скачать и обновить устаревшие или забагованные драйвера.
- После проделанных шагов перезагрузите компьютер и протестируйте работает ли теперь обозначенный драйвер
Ошибка error code: 0x0001
Четвертый метод заключается в переустановке проблемной программы.
- Введите команду «feature» как указано на картинке снизу:
- Выберите «джифорс» и удалите
- Скачайте на официальном сайте и установите заново
- Смотрим работает или нет

Решение ошибки путем обновления Windows
В случае, если ни один из вышеперечисленных методов не помог — попробуйте обновить виндоус до последней версии.
Устаревшее программное обеспечение может приводить к конфликтам и различным багам.
Если используется Windows 10:
- Нажмите на клавиатуре кнопку Windows и R одновременно что бы открыть настройки Windows
- Нажмите по «Обновление и безопасность»
- Жмем «Обновления»
- Обновляем
- Перезагружаем компьютер что бы увидеть как работает нужный драйвер

Если используется любая другая версия Windows:
- Переходим в панель управления
- Выбираем «Обновления Виндоус«
- Далее «Проверить наличие обновлений«
- Обновляем
- Проверяем
Источник
Видеокарты Nvidia могут выдавать различные сбои. Одна из распространенных, это ошибка «Nvidia Geforce Experience код ошибки: 0x0001 и 0x0003». Данная ошибка может появиться из-за сбоя в программном обеспечении Windows. Ниже мы расскажем, как исправить данную проблему.

Код ошибки: 0x0001, 0x0003
NVIDIA Telemetry Container отключение
NTC — собирает данные пользователей для стабильной работы приложений; сюда входят отчеты о сбоях и проблемах, а также информация о системе, необходимая для предоставления правильных драйверов и оптимальных настроек. Не бойтесь программа не передает вашу личную информацию.
Существует несколько способов как исправить код ошибки: 0x0001, 0x0003 при запуске. Мы перечислим два из этих методов, включая скриншоты:
Первый вариант:
- Нажмите на клавишу Windows на клавиатуре, введите services.msc и нажмите клавишу Enter. Это должно открыть список установленных Сервисов локального ПК.
- Найдите сервис Nvidia Telemetry Container нажмите правой кнопкой.
- Выберите «свойства».
- Открываем вкладку «Вход в систему»
- Перейдите на вкладку убедитесь, что все сеансы переключаются на учетную запись локальной системы.
Если данный способ вам не помог, читайте следующий.
Второй вариант:
Прочитав на различных формах, пользователи рекомендовали отключить NTC:
- Откройте диспетчер задач «ctrl + alt + delete».
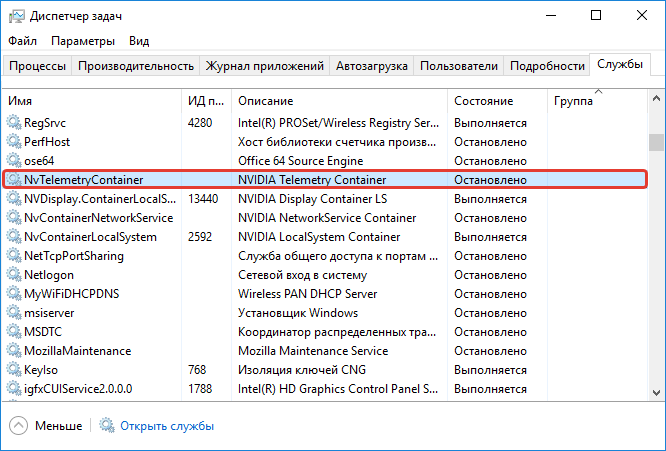
- Открываем последнюю вкладку «Службы».
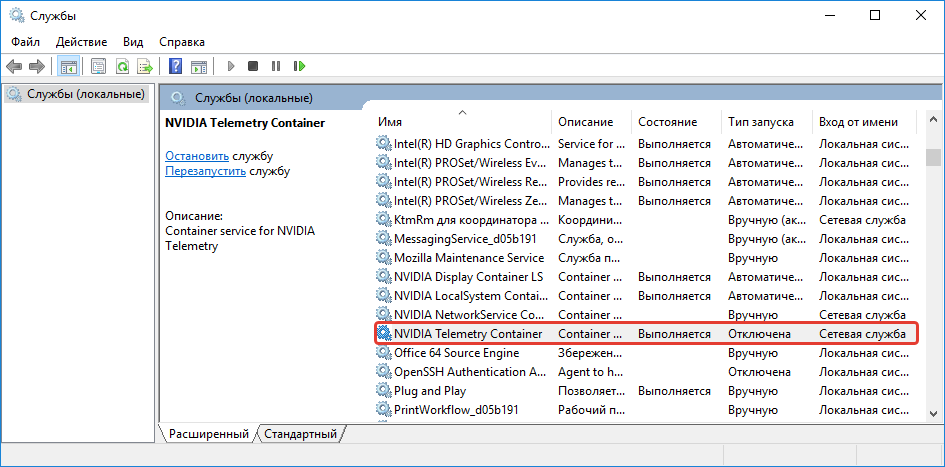
- Находим в списке «NVIDIA Telemetry Container».
- Нажимаем правой кнопкой «Остановить».
Запомните эти действия, вам придется проделывать их снова в будущем, если вы обновите драйвера.
Читайте также: Launched application does not respond при установке игры
Эта проблема также может быть связана с самой GeForce Experience. Следующее, что вам нужно сделать, это удалить все программы Nvidia и установить последнюю версию.
- Введите название приложения в поле поиск.
- Нажмите правой кнопкой, затем удалите.
- Скачайте новую версию GeForce Experience с официального сайта NVIDIA .
- Запустите установщик.
После этого вы должны снова запустить программу и посмотреть, работает ли она.
Если это не работает, перейдите к следующему шагу.
Обновление ПО
Если вы давно не обновляли программное обеспечение, проделываем следующие:
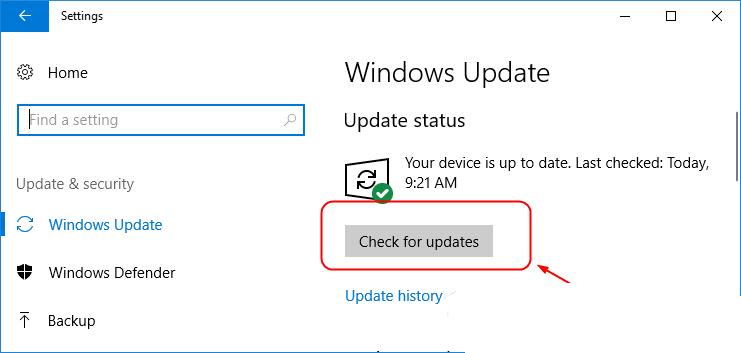
- В поле поиска пишем «Проверить наличие обновления»
- Нажмите «Проверка наличия обновления».
- Установите доступные обновления.
- Перезагрузите Windows 10 и запустите GeForce Experience, чтобы посмотреть, работает ли он.
Проверьте корректные названия папок в «C:Program Files» не должно быть русских символов и чисел.
Nvidia Network Service включение
Последний способ запустить Сервис Нвидиа. Следуйте простым шагам ниже.
- Откройте окно «Службы», как мы делали выше.
- Найдите сетевой сервис NVIDIA.
- Щелкните правой кнопкой мыши и запустите сервис.
- Вы должны заметить, что статус службы теперь изменился с «запускается» на «запущен»
Заключение
Наши советы должны помочь в решении не только этой проблемы, но и похожих в Nvidia. Не забудьте отписаться какой из вариантов вам помог.
Оценка статьи:
![]() Загрузка…
Загрузка…
Содержание:
- 1 Приложение не запускается и выдает ошибку
- 2 Старые драйвера
- 3 Некорректная работа службы Nvidia Telemetry Container
- 4 Другой владелец каталогов Nvidia
- 5 Повреждение файлов установки
Известная компания NVIDIA Corporation не только производит видеокарты, но также разрабатывает программное обеспечение, например, драйвера и различные утилиты, предназначенные для обслуживания графических систем. Одной из таких утилит является Nvidia Geforce Experience – комплексный инструмент для поиска и обновления драйверов, записи видео и оптимизации игрового контента. Также программа способна оказать помощь при настройке LED-подсветки и передаче игр с ПК на портативные геймерские устройства Nvidia Shield. Обычно приложение работает стабильно и не вызывает нареканий, но в ряде случаев в нем могут возникать сбои.
Приложение не запускается и выдает ошибку
Речь в данном примере пойдет об ошибке GeForce Experience Error 0x0001, возникающей при запуске приложения. В результате интерфейс не открывается, а вместо него на экране появляется окошко с кодом ошибки и предложением перезагрузить компьютер. Причиной неполадки часто становятся временные программные сбои, устраняемые перезагрузкой, но как быть, если этого оказывается недостаточно?

Старые драйвера
Если ошибка 0x0001 в Nvidia Geforce Experience дала о себе знать сразу после установки программы, проверьте актуальность драйверов видеокарты. Возможно, вам стоит посетить сайт компании и скачать более новую версию ПО. Хотя устаревшие драйвера, по идее, не должны вызывать неполадку, поскольку программа сама предназначена для их обновления. В любом случае апдейт не помешает, в крайнем случае, можете откатиться к старой, но более стабильной версии. Альтернативным решением является переход на бета-версию драйвера.
Некорректная работа службы Nvidia Telemetry Container
Если при запуске Nvidia Geforce Experience произошла ошибка с кодом 0x0001 или 0x0003, это может указывать на некорректную работу некоторых связанных служб, а именно Display Container LS, NetworkService Container, LocalSystem Container и особенно Telemetry Container. Откройте оснастку управления службами (команда services.msc в строке Выполнить) и проверьте тип запуска каждой из перечисленных служб: все они, кроме NetworkService Container, должны иметь тип запуска «Автоматически».

Ошибка Geforce Experience 0x0001 иногда появляется и в том случае, когда одна из указанных служб не имеет соответствующих разрешений, позволяющих взаимодействовать с учетной записью владельца компьютера. Исправляется неполадка изменением дополнительных параметров. Откройте свойства службы Nvidia, переключитесь на вкладку «Вход в систему» и установите галочку в чекбоксе «Разрешить взаимодействие с рабочим столом». Сохраните настройки и перезагрузите ПК.

В некоторых случаях помогает отключение службы телеметрии. Деактивируем ее либо через оснастку управления службами, либо через Диспетчер задач.

То, что не запускается Nvidia Geforce Experience, выдавая error code 0x0001, может указывать на некорректность владельца папок приложения. Перейдите в расположение C:/Program Files и найдите там директорию NVIDIA Corporation. Далее откройте ее свойства, на вкладке «Безопасность» нажмите «Дополнительно» и убедитесь, что владельцем папки является СИСТЕМА. Если имя владельца отличается, нажмите «Изменить» и введите в поле открывшегося окошка «СИСТЕМА». Сохраните настройки и перезагрузитесь.


Повреждение файлов установки
Наконец, код ошибки 0x0001 в Geforce Experience зачастую свидетельствует о нарушении целостности файлов самой программы. В этом случае устранить ошибку получится только путем переустановки приложения. Удалив программу через соответствующий апплет Панели управления, скачайте с официальной страницы разработчика ее последнюю версию и установите повторно.
К слову, повреждение драйверов NVIDIA также может вызвать ошибку 0x0001 в Geforce Experience. Чтобы ее исправить, на этот раз придется переустановить также и пакет драйверов, предварительно удалив его утилитой Display Driver Uninstaller.

GeForce Experience — это очень полезная программа для игр на графических картах от NVIDIA. Некоторые пользователи могут столкнуться с ошибкой 0x0001 или 0x0003 при открытии NVIDIA GeForce Experience. Ошибка звучит следующим образом:
Произошла ошибка. Попробуйте перезагрузить компьютер, затем запустите GeForce Experience. Код ошибки 0x0001 или 0x0003.
Как исправить код ошибки 0x0001 или 0x0003 NVIDIA GeForce Experience
Давайте рассмотрим некоторые исправления, чтобы избавиться от этой проблемы в Windows 10. Прежде чем начать, попробуйте перезагрузить компьютер, а затем запустите GeForce Experience и посмотрите, работает ли он. Также, если вы обычно создаете точку восстановления системы, то вы можете откатить систему назад в рабочее состояние.
1. Проверить службы Nvidia
Нажмите комбинацию кнопок Win + R и введите в диалоговое окно services.msc, чтобы открыть службы. Теперь обратите внимание на следующие службы и убедитесь, что их типы запуска следующие:
- NVIDIA Display Container LS — Автоматически
- NVIDIA NetworkService Container — Ручной
- NVIDIA LocalSystem Container — Автоматический
- NVIDIA Telemetry Container — Автоматически
Дважды щелкните по службе, чтобы открыть окно свойств. Если служба еще не запущена, просто выберите «Запустить«. А лучше нажмите на каждой «Остановить», а потом «Запустить», таким образом они перезапустятся.
Если выше не сработало, то хочу обратить внимание на службу NVIDIA Telemetry Container. Нажмите по ней два раза, чтобы открыть свойства. Далее перейдите во вкладку «Вход в систему«, выберите пункт «С системной учетной записью» и поставьте галочку напротив «Разрешить взаимодействие с рабочим столом«. Перезагрузите ПК.
2. Обновите драйвер видеокарты NVIDIA или перейдите на бета-версию
Одной из основных задач, которую вы должны сделать, является обновление драйверов видеокарты NVIDIA. Для этого вам просто нужно зайти на их сайт загрузки драйверов видеокарт и скачайте последнюю версию драйвера. Перезагрузите компьютер, чтобы изменения вступили в силу.
Если вы хотите попробовать бета-версию, вы можете найти ее здесь. Вы должны понимать, что бета-версия программного обеспечения содержит ошибки и нестабильна, вызывая ряд различных ошибок, но в то же время будет содержать некоторые исправления для некоторых ошибок в стабильном выпуске.
3. Полное удаление и чистая установка
Вы можете использовать программу для удаления драйвера видеокарты, которая полностью удаляет остаточные файлы в системе. После этого вы можете загрузить и установить последнюю версию графических драйверов NVIDIA. Обратитесь к руководству ниже, как:
- Полностью удалить драйвера видеокарты Nvidia, AMD, Intel
Смотрите еще:
- Как обновить драйвер Nvidia не устанавливая GeForce Experience
- Видеодрайвер Nvidia перестал отвечать и был успешно восстановлен
- Драйверы NVIDIA, AMD, Realtek не устанавливаются в Windows 10
- Не удалось инициализировать драйвер этого устройства (Код 37)
- Как удалить старые ненужные драйвера в Windows
[ Telegram | Поддержать ]
The GeForce Experience on graphics card manufactured by NVIDIA is an advantage for users who loves gaming as it makes enhances users’ gaming experience. However, there are times when it may also encounter some problems. One of the problems users may encounter is the error code 0x0001. This kind of error occurs when users open the NVIDIA GeForce Experience utility. Here’s the full content of the error message:
“Something went wrong, try rebooting your PC and then launch GeForce Experience, ERROR CODE: 0x0001.”
Errors like this one diminish the overall experience of users due to the fact that when this error occurs, the NVIDIA GeForce experience wouldn’t even start which renders its features useless. There are several potential fixes you can check out to resolve this error but before you check them out, you can try to restart your computer first and then open the NVIDIA GeForce Experience once again, if you still encounter the error, then you need to check the NVIDIA Display Driver Services or update your NVIDIA display drivers or switch to the BETA release. You could also try to install and reinstall the NVIDIA display drivers or perform System Restore and see if it helps. For detailed instructions, follow the given options below.
Option 1 – Try to check the NVIDIA Display driver services
- Tap the Win + R keys to open Run and then type “services.msc” in the field and hit Enter to open the Services Manager.
- From there, look for the following NVIDIA services and make sure that their Startup types are as follows:
- NVIDIA Display Container LS – Automatic
- NVIDIA NetworkService Container – Manual
- NVIDIA LocalSystem Container – Automatic
- NVIDIA LocalSystem Container – Automatic
- NVIDIA GeForce Experience Service – Automatic (Delayed Start)
- NVIDIA Geforce Experience Backend Service – Automatic (Delayed Start)
- NVIDIA Telemetry Container service – Automatic
- Next, double click on each one of the services and go to Properties. Here, check if the service is running. If it’s not, just click on the Start button. On the other hand, if they’re already running, just click on Stop and then click on Start again.
Option 2 – Try to update the NVIDIA Display drivers
You can also try updating the NVIDIA display drivers as it might help in fixing the error. To update them, follow the steps below.
- Tap the Win + R keys to open the Run dialog box.
- Next type in “dxdiag” in the field and click OK or hit Enter to open the DirectX Diagnostic Tool.
- From there, you can see what type of NVIDIA graphics card that your system is on.
- Take note of your graphics card information and then look for the best drivers for your operating system. Once you’ve downloaded and installed the file, restart your PC.
Note: If you want to try out the beta release of the NVIDIA display drivers, click on this link. Beware though that the beta software is unstable and buggy and may cause some different bugs.
Option 3 – Try to roll back the driver to the previous version
If updating the NVIDIA display drivers didn’t work for you, then it’s time to roll back the device drivers. It is most likely that after you updated your Windows computer that your driver also needs a refresh.
- Tap the Win + R keys to launch the Run window and then type in the “msc” command and hit Enter to open the Device Manager window.
- Under the Device Manager, you will see a list of drivers. From there, look for the NVIDIA Drivers and expand it.
- Next, select the driver entries that are labeled appropriately.
- Then select each one of them and double click to open a new mini window.
- After that, make sure that you’re on the Driver tab and if you are not, just navigate to it then click the Roll Back Driver button to switch back to the previous version of the NVIDIA Drivers.
- Now restart your computer to successfully apply the changes made.
Option 4 – Try to run System Restore
You could also run System Restore as it might help fix the error code 0x0001 in NVIDIA GeForce Experience.
- Tap the Win + R keys to open the Run dialog box.
- After that, type in “sysdm.cpl” in the field and tap Enter.
- Next, go to the System Protection tab then click the System Restore button. This will open a new window where you have to select your preferred System Restore point.
- After that, follow the on-screen instructions to finish the process and then restart your computer and then check if the error code 0x0001 in GeForce Experience is now fixed.
Option 5 – Do a clean install on the NVIDIA driver
- Before you do a clean install on the NVIDIA driver, you have to download the latest version of the Display Driver first.
- Boot your Windows 10 PC into Safe Mode.
- After that, double click on the executable file of the Display Driver Uninstaller to run and install it.
- After the installation, open the program. Once you do, you should see the following window on your screen:
- In the program window, click on the “Clean and restart” button.
- After your PC has rebooted, download the NVIDIA drivers.
- Then select your Product Type, Product Series, Product, Operating System, and Language appropriate for your hardware specifications as well as personal requirements.
- Next, click on Search to display the latest available driver as per the information you entered.
- And click on Agree and Download to start downloading the latest driver executable file.
- Run the executable file after you finished downloading the latest driver executable file and then select Custom and click on Next.
- Afterward, select “Clean Install” and proceed. Doing so would install the latest driver on your PC.
- Restart your PC and check if the error’s now fixed. If not, you can try installing an older version of the driver instead.
Advanced System Repair Pro
One-click automated PC repair solution
![]()
With Advanced System Repair Pro you can easily
DOWNLOAD
Advanced System Repair Pro is compatible with all versions of Microsoft Windows including Windows 11
Share this article:
You might also like
Stop 0x00000050 is an error code that is popularly known as the Blue Screen of Death (BSoD) error. This error occurs when
Windows crashes on your system. Stop 0x00000050 error is displayed in a blue screen which is why it is called the BSoD error.
The error message appears in the following form:
Stop 0X00000050 (parameter1, 0, parameter3, parameter4)
PAGE_FAULT_IN_NONPAGED_AREA”
However, the parameters within the Stop 0x0000005 error message sometimes vary depending on your PC configuration.
Solution
 Error Causes
 Error Causes
The most common causes of the Stop 0x0000005 error are:
- Hardware malfunctioning
- Overheating of the components
- Installation of a faulty device driver
- Incompatible DLL files
- Corrupt Registry
- Spyware and Virus Infection
Whatever the cause may be, the Stop 0x00000050 error message is alarming and should be fixed at the earliest as it indicates major system stability problems that can often lead to data loss and system corruption.
Further Information and Manual Repair
To fix and repair the Stop 0x0000005 error you don’t always have to hire an IT professional. In fact, fixing this error is quite easy and you can do it yourself regardless of whether you have a good know-how of computers or not.
So, let’s get started! Here are some the easy DIY solutions to fix the Stop 0x0000005 error:
Sometimes this error may occur due to a temporary issue like overheating of the computer components. When this happens all you need to do is switch off the computer and allow the components to cool down. Try starting up your computer after a couple of hours. If the blue screen of death does not occur again, then this means there is nothing to worry about and the problem is resolved.
However, if the error appears again on your screen, then you need to try something else to solve and fix this error on your PC. If the cause of the error is a faulty device driver, then it is advisable to disable and remove it. Try updating the latest version of the faulty device driver. Using updated software helps ensure your PC keeps running smoothly.
If the cause of the Stop 0x0000005 error code is your system’s exposure to viruses and spyware, then you must immediately download a powerful antivirus program. After you download it, scan for viruses on your system. Once the scanning is complete, you will see a scan report showing viruses on your PC. Delete all of them and click on repair.
Furthermore, you can also add more RAM to prevent and fix the Stop 0x0000005 error message on your computer. This solution is suitable when you try to run a program on your PC and you get this error message.
Read More
The GeForce Experience on graphics card manufactured by NVIDIA is an advantage for users who loves gaming as it makes enhances users’ gaming experience. However, there are times when it may also encounter some problems. One of the problems users may encounter is the error code 0x0001. This kind of error occurs when users open the NVIDIA GeForce Experience utility. Here’s the full content of the error message:
“Something went wrong, try rebooting your PC and then launch GeForce Experience, ERROR CODE: 0x0001.”
Errors like this one diminish the overall experience of users due to the fact that when this error occurs, the NVIDIA GeForce experience wouldn’t even start which renders its features useless. There are several potential fixes you can check out to resolve this error but before you check them out, you can try to restart your computer first and then open the NVIDIA GeForce Experience once again, if you still encounter the error, then you need to check the NVIDIA Display Driver Services or update your NVIDIA display drivers or switch to the BETA release. You could also try to install and reinstall the NVIDIA display drivers or perform System Restore and see if it helps. For detailed instructions, follow the given options below.
Option 1 – Try to check the NVIDIA Display driver services
- Tap the Win + R keys to open Run and then type “services.msc” in the field and hit Enter to open the Services Manager.
- From there, look for the following NVIDIA services and make sure that their Startup types are as follows:
- NVIDIA Display Container LS – Automatic
- NVIDIA NetworkService Container – Manual
- NVIDIA LocalSystem Container – Automatic
- NVIDIA LocalSystem Container – Automatic
- NVIDIA GeForce Experience Service – Automatic (Delayed Start)
- NVIDIA Geforce Experience Backend Service – Automatic (Delayed Start)
- NVIDIA Telemetry Container service – Automatic
- Next, double click on each one of the services and go to Properties. Here, check if the service is running. If it’s not, just click on the Start button. On the other hand, if they’re already running, just click on Stop and then click on Start again.
Option 2 – Try to update the NVIDIA Display drivers
You can also try updating the NVIDIA display drivers as it might help in fixing the error. To update them, follow the steps below.
- Tap the Win + R keys to open the Run dialog box.
- Next type in “dxdiag” in the field and click OK or hit Enter to open the DirectX Diagnostic Tool.
- From there, you can see what type of NVIDIA graphics card that your system is on.
- Take note of your graphics card information and then look for the best drivers for your operating system. Once you’ve downloaded and installed the file, restart your PC.
Note: If you want to try out the beta release of the NVIDIA display drivers, click on this link. Beware though that the beta software is unstable and buggy and may cause some different bugs.
Option 3 – Try to roll back the driver to the previous version
If updating the NVIDIA display drivers didn’t work for you, then it’s time to roll back the device drivers. It is most likely that after you updated your Windows computer that your driver also needs a refresh.
- Tap the Win + R keys to launch the Run window and then type in the “msc” command and hit Enter to open the Device Manager window.
- Under the Device Manager, you will see a list of drivers. From there, look for the NVIDIA Drivers and expand it.
- Next, select the driver entries that are labeled appropriately.
- Then select each one of them and double click to open a new mini window.
- After that, make sure that you’re on the Driver tab and if you are not, just navigate to it then click the Roll Back Driver button to switch back to the previous version of the NVIDIA Drivers.
- Now restart your computer to successfully apply the changes made.
Option 4 – Try to run System Restore
You could also run System Restore as it might help fix the error code 0x0001 in NVIDIA GeForce Experience.
- Tap the Win + R keys to open the Run dialog box.
- After that, type in “sysdm.cpl” in the field and tap Enter.
- Next, go to the System Protection tab then click the System Restore button. This will open a new window where you have to select your preferred System Restore point.
- After that, follow the on-screen instructions to finish the process and then restart your computer and then check if the error code 0x0001 in GeForce Experience is now fixed.
Option 5 – Do a clean install on the NVIDIA driver
- Before you do a clean install on the NVIDIA driver, you have to download the latest version of the Display Driver first.
- Boot your Windows 10 PC into Safe Mode.
- After that, double click on the executable file of the Display Driver Uninstaller to run and install it.
- After the installation, open the program. Once you do, you should see the following window on your screen:
- In the program window, click on the “Clean and restart” button.
- After your PC has rebooted, download the NVIDIA drivers.
- Then select your Product Type, Product Series, Product, Operating System, and Language appropriate for your hardware specifications as well as personal requirements.
- Next, click on Search to display the latest available driver as per the information you entered.
- And click on Agree and Download to start downloading the latest driver executable file.
- Run the executable file after you finished downloading the latest driver executable file and then select Custom and click on Next.
- Afterward, select “Clean Install” and proceed. Doing so would install the latest driver on your PC.
- Restart your PC and check if the error’s now fixed. If not, you can try installing an older version of the driver instead.
Read More
In 27 European countries for some time it has been considered for introducing a law that would force phones, tablets, laptops, and other mobile devices to use a single USB Type-C connector.

The European Parlament announced that a provisional agreement has been reached and that it was voted that a single charging solution is USB Type-C. The current agreement applies and covers the next devices: phones, tablets, Readers, earbuds, digital cameras, headphones, headsets, handheld consoles, and portable speakers. All currently existing devices can still be sold without issues but starting in the fall of 2024 all-new products must support USB Type-C charging.
The agreement will also hit Laptops but not on the same date, How is USB Type-C currently not enough for charging laptops, all new laptops that will have to use it are scheduled for fall of 2025.
Although the agreement is reached the EU Parliament and Council still have to formally approve everything.
Apple targeted the most
Apple has been targeted as the main target for rules since their iPhones are still using Apple’s proprietary Lightning charging port. Apple sells a lot of iPhones in Europe and even though iPad Pro and iPad Air along with all MacBooks have moved to USB Type-C, iPhones are still struggling with the Lightning port.
Apple criticized the EU’s charger rules when they were first proposed in 2021, telling the BBC, “We remain concerned that strict regulation mandating just one type of connector stifles innovation rather than encouraging it, which in turn will harm consumers in Europe and around the world.” The European Union has said in response that it will update its rules as new technology arrives.
Why was this proposed?
The main problem in Europe that led to this proposition was electronic waste which reached 11 000 metric tons in 2018. European union is afraid that this will keep rising as chargers become larger and heavier in order to accommodate faster-charging speeds. More electronic waste means more hardware slowly decomposing in landfills that will contribute to climate change affecting everyone on the planet, not just the people living in Europe.
Read More
 Valve has officially announced that Steam Deck will be compatible with Windows 11 despite TPM 2.0 Microsoft requirements.
From the beginning, Deck was announced like a mini handheld PC device. Powered with new Steam OS 3.0 based on Linux. However, besides out-of-the-box OS it was also stated that Deck will be a personal device meaning that other PC-based operating systems could be installed on it and even run your typical applications in it.
Since Microsoft announced Windows 11 hardware requirements, specifically the TPM 2.0 requirement many users voiced concern that Steam Deck will not be able to connect to Windows 11
TPM 2.0 is something that Microsoft requires for every internal and hardware component that is to connect on a Windows 11 device. This is to ensure that only trusted devices would be included in the array of a PC setup and avoid any problems like malicious hardware injecting software into a system.
This would also minimize the compromise Windows would have, as unverified or untrusted devices connect to a Windows PC.
However, Valve and AMD are ensuring us that Deck will not have any issue connecting to a PC running Windows 11 or even if you wish to transform Deck itself into a Device running Windows 11.
Read More
Mousepads are a common thing among computer users, everyone is using them and know what are they good for. Recently in the past few years, there are a lot of gaming mousepads on the rise, do you really need them, and do they back up their price? Short answer: YES, long answer: keep reading below.

Size advantage
One of the first things that one can see is the great difference in sizes between a regular mouse pad and a gaming one. Gaming pads have much more variety in size spawning all the way to really judge ones that you can use on your whole desk and place both keyboard and mouse on them. This will, of course, let you move your mouse more freely and have a much larger surface to use without the need to always lift the mouse up and center it on the regular pad.
Material advantage
Material on what are gaming pads built upon is extremely high in quality and usually even water phobic or water-resistant and it will allow great mouse movements on it. The backside is usually made of high-quality fabric that will stop slipping on the desk so the pad will stay at its pace during long sessions of work or gaming. Usually, standard mousepads are made with plastic or some other cheap material whereas gaming pads are made from fiber, high-quality fiber.
Other advantages
Among other great stuff that gaming pads have are wrist gel for hand resting and RBG light that looks cool, although RGB light is just a vanity that looks good gel for the wrist is a really good feature that will place less stress on your hands during long sessions of time spent in front of the computer.
Read More
Interrupts are designed so that the resource requests don’t get into a headlock when it comes to the hardware level. To simply put it, it is used to break a loop that never ends. Aside from that, developers also designed levels in order to prioritize interrupts. It is also known as “Interrupt Request Level” or IRQL. And if you suddenly encounter a “Bugcode 0xA –IRQL_NOT_LESS_OR_EQUAL” error, this means that a driver has accessed a memory location illegally while NT is operating at a specific IRQL.
The Bugcode 0xA –IRQL_NOT_LESS_OR_EQUAL is a fatal driver coding error and as an end-user, there isn’t much that you can do to resolve it but if you’re a developer, then this means that your code is trying to access an invalid memory location. You could check on different parameters such as memory location that was referenced and code addressed which referenced memory. The technical parameters are:
- a memory location that was referenced
- IRQL at time of reference
- 0 = read, 1 = write
- code addressed which referenced memory
As mentioned earlier, if you are an end-user, there is nothing much that you can do to resolve this problem, but worry not for there are still possible solutions that could help you in fixing it. Refer to the suggestions laid out below to fix Bugcode 0xA –IRQL_NOT_LESS_OR_EQUAL error.
Option 1 – Try running the Hardware and Devices Troubleshooter
The first thing you can do to fix the problem is by running the Hardware Troubleshooter. Although it won’t make much of a difference, there’s still a possibility that it could automatically fix the problem. To use it, refer to these steps:
- The first thing you need to do is click on Start and then on the gear-like icon to pull up the window for Settings.
- After opening Settings, look for the Update and Security option and select it.
- From there, go to the Troubleshoot option located on the left-hand side of the list.
- Next, select Hardware and Devices from the list and open the Troubleshooter and run it. Once it is doing its job, wait for it to complete the process and then restart the system.
- After the system restarts, check if the problem’s now fixed. If not, refer to the next option given below.
Option 2 – Try to update or rollback your device drivers
If the first option didn’t work for you, then it’s time to either update or roll back the device drivers. It is most likely that after you updated your Windows computer that your driver also needs a refresh. On the other hand, if you have just updated your device drivers then you need to roll back the drivers to their previous versions. Whichever applies to you, refer to the steps below.
- Open the Devices Manager from the Win X Menu.
- Then locate the device drivers and right-click on them to open the Properties.
- After that, switch to the Driver tab and click on the Uninstall Device button.
- Follow the screen option to completely uninstall it.
- Finally, restart your computer. It will just reinstall the device drivers automatically.
Note: You can install a dedicated driver on your computer in case you have it or you could also look for it directly from the website of the manufacturer.
Option 3 – Run the Memory Diagnostic Tool to check for Memory leaks
- Tap the Win + R keys to open Run and type exe and hit Enter to open the Windows Memory Diagnostic Tool.
- After that, it will give two options such as:
- Restart now and check for problems (Recommended)
- Check for problems the next time I start my computer
- Once your computer has restarted, perform a basic scan or you could also go for the “Advanced” options such as “Test mix” or “Pass count”. Simply tap the F10 key to start the test.
Note: After you select the option, your PC will restart and check for memory-based issues. If it finds any issues, it will automatically fix them and if there’s no issue found, then it’s most likely not a memory-based issue so you should try the other options given below.
Read More
jZip is a software utility published by Bandoo Media and is classified as a Potentially Unwanted Program. The software is an archive tool that used to compress and extract files in the rar, zip, and other formats. The program is typically bundled upon installation with other unwanted applications and is itself often installed in co-bundles. As of publication time, over 40 AntiViruses have flagged jZip as malicious or potentially unwanted.
It injects itself in Windows shell, providing quick access to the program by right-clicking on any file. jZip displays it’s advertising in your browser, instead of the default search results, to better do this, it collects information about your browsing history and your current browsing session, so it can better target ads.
This software, upon install, defines an auto-start registry key in your system, this allows the software to launch every time your computer is rebooted, no matter what Windows account you log in to, it also adds Windows Tasks, to allow it to launch by itself at random times, even when closed.
About Potentially Unwanted Applications
If you have ever downloaded software programs from the internet (shareware, freeware, etc,), odds are high you’ve unintentionally installed unwanted programs on your personal computer. Potentially Unwanted Programs (PUP), also referred to as Potentially Unwanted Applications (PUA), are applications that you never wanted in the first place and quite often come bundled with freeware software. Once installed, most of these applications can be hard to remove and become more of a nuisance rather than a necessity.
The idea of PUP was actually coined to define this crapware as something other than malware. The primary reason for this is that most PUPs get into users’ computers not because they exploit security vulnerabilities, for instance, but because the users grant consent to install it – unwittingly in many instances. Nevertheless, there isn’t any doubt that PUPs are still bad news for PC users as they could be incredibly damaging to the computer in lots of ways.
What do PUPs do on your computer, precisely?
The unwanted programs after installation display a lot of annoying pop-up advertisements create fake alerts, and quite often it even pushes the end-user to buy the software. PUPs which come as browser add-ons and toolbars are widely identifiable. Not just they needlessly take up space on your computer screen, toolbars could also manipulate search results, monitor your browsing activities, decrease your internet browser’s overall performance, and slow your net connection to a crawl.
They might seem innocent but PUPs tend to be spyware. The worst part of setting up a PUP is the spyware, adware, and keystroke loggers that might lurk inside. Even if the PUPs aren’t inherently malicious, these programs still do absolutely nothing good on your PC – they will take valuable system resources, slow down your computer or laptop, weaken your device’s security, and make your PC more susceptible to trojans.
Some tips on protecting yourself from unwanted software
• Read the EULA meticulously. Look for clauses that say that you have to accept advertisements and pop-ups or bundled programs from the company.
• Typically, when setting up a program you will get two options, ‘Standard Installation (recommended)’ and ‘Custom Installation’. Don’t pick ‘Standard’ as unwanted programs will automatically be installed that way!
• Have a solid anti-virus program such as Safebytes Anti-Malware that will protect your personal machine from PUPs. Once you install this software, the defense against viruses and PUPs is already switched on.
• Avoid installing freeware software you will not utilize. Turn off or get rid of toolbars and internet browser extensions you don’t really need.
• Only download programs from the original providers’ websites. Avoid download portals since they use their own download manager to bundle extra programs along with the initial download.
Can’t Install Safebytes Anti-malware because of a Virus? Do This!
Malware may cause several kinds of damage to computers, networks, and data. Some malware types alter browser settings by including a proxy server or change the computer’s DNS configuration settings. In such cases, you will be unable to visit some or all of the websites, and therefore unable to download or install the required security software to clear out the infection. So what to do if malicious software keeps you from downloading or installing Safebytes Anti-Malware? Follow the instructions below to eliminate malware in alternate ways.
Make use of Safe Mode to fix the issue
In Safe Mode, you are able to modify Windows settings, un-install or install some software, and eliminate hard-to-delete viruses. In case the virus is set to load immediately when the computer starts, switching to this particular mode may well prevent it from doing so. In order to get into Safe Mode or Safe Mode with Networking, press the F8 key while the system is booting up or run MSConfig and find the “Safe Boot” options in the “Boot” tab. After you restart the PC into Safe Mode with Networking, you may download, install, and update the anti-malware program from there. After installation, run the malware scanner to remove most standard infections.
Download the security program using an alternate internet browser
Web-based viruses can be environment-specific, aiming for a particular web browser or attacking particular versions of the browser. The most effective solution to avoid this issue is to opt for an internet browser that is known for its security measures. Firefox contains built-in Phishing and Malware Protection to help keep you safe online.
Create a portable USB antivirus for eliminating viruses
Another solution is to save and run an anti-malware software tool completely from a USB drive. Adopt these measures to employ a USB drive to clean your corrupted system.
1) Download Safebytes Anti-Malware or MS Windows Defender Offline onto a clean computer.
2) Plug the Flash drive into the uninfected computer.
3) Double-click the exe file to open the installation wizard.
4) When asked, choose the location of the USB drive as the place in which you want to store the software files. Follow the activation instructions.
5) Now, plug the thumb drive into the corrupted PC.
6) Run the Safebytes Anti-malware directly from the pen drive by double-clicking the icon.
7) Run Full System Scan to detect and clean-up up all kinds of malware.
SafeBytes Anti-Malware Features
These days, anti-malware software can protect your laptop or computer from different kinds of internet threats. But how to select the right one among several malware protection application that is available in the market? Perhaps you might be aware, there are many anti-malware companies and tools for you to consider. Some of them are good, some are decent, while some will ruin your computer themselves! You must pick one that is dependable, practical, and has a good reputation for its malware source protection. On the list of recommended software programs is SafeBytes Anti-Malware. SafeBytes carries a superb track record of top-quality service, and customers seem to be happy with it.
Safebytes is one of the well-established PC solutions companies, which offer this comprehensive anti-malware program. Once you’ve got installed this software program, SafeByte’s state-of-the-art protection system will ensure that absolutely no viruses or malicious software can seep through your computer.
SafeBytes anti-malware comes with a myriad of enhanced features which sets it aside from all others. Here are a few typical features found in this application:
Active Protection: SafeBytes provides real-time active monitoring service and protection against all known computer viruses and malware. This software will constantly monitor your PC for any suspicious activity and updates itself continuously to keep current with the newest threats.
Most effective AntiMalware Protection: By using a critically acclaimed malware engine, SafeBytes offers multilayered protection that is designed to catch and remove viruses and malware which are concealed deep in your computer system.
Safe Browsing: SafeBytes gives an instant safety rating about the web pages you are about to check out, automatically blocking harmful sites and make sure that you’re certain of your safety while browsing the world wide web.
Fast Multithreaded Scanning: Safebytes Anti-Malware, using its enhanced scanning engine, gives super-fast scanning which can promptly target any active internet threat.
Minimal CPU Usage: SafeBytes is a lightweight tool. It consumes a really small amount of processing power as it works in the background which means you won’t observe any computer performance issues.
24/7 Customer Support: You will get 24/7 technical support to quickly resolve any issue with your security application.
Technical Details and Manual Removal (Advanced Users)
If you wish to manually remove Jzip without the use of an automated tool, it may be possible to do so by removing the program from the Windows Add/Remove Programs menu, or in cases of browser extensions, going to the browsers AddOn/Extension manager and removing it. You will likely also want to reset your browser.
To ensure the complete removal, manually check your hard drive and registry for all of the following and remove or reset the values accordingly. Please note that this is for advanced users only and may be difficult, with incorrect file removal causing additional PC errors. In addition, some malware is capable of replicating or preventing deletion. Doing this in Safe Mode is advised.
The following files, folders, and registry entries are created or modified by Jzip
Files:
File APPDATAjziptoolbaruninstallIE.dat.
File APPDATAMozillaExtensions1FD91A9C-410C-4090-BBCC-55D3450EF433.
File COMMONDESKTOPEmoticons for your messenger!.url.
File LOCALSETTINGSTempinstallhelper.dll.
File LOCALSETTINGSTempnsb2.tmp.exe.
File LOCALSETTINGSTempSetupDataMngr_jZip.exe.
File PROGRAMFILESMozilla Firefoxextensions1FD91A9C-410C-4090-BBCC-55D3450EF433.
File PROGRAMFILESMozilla FirefoxsearchpluginsjZipWebSearch.xml.
Directory APPDATAjzipband.
Directory APPDATAjziptoolbar.
Directory APPDATAMozillaFirefoxProfilesENV(jZip_ff_profile)extensions1e48c56f-08cd-43aa-a6ef-c1ec891551ab.
Directory APPDATAMozillaFirefoxProfilesENV(jZip_ff_profile)jziptoolbar.
Directory PROGRAMFILESWindows jZip ToolbarDatamngr.
Directory PROGRAMFILESWindows jZip ToolbarToolBar.
Registry:
Key in HKEY_CLASSES_ROOT named JzipIEHelper.DNSGuard.*, plus associated values.
Key in HKEY_CLASSES_ROOT named JzipIEHelper.DNSGuard, plus associated values.
Key 1e48c56f-08cd-43aa-a6ef-c1ec891551ab at HKEY_CLASSES_ROOTCLSID.
Key 1e48c56f-08cd-43aa-a6ef-c1ec891551ab at HKEY_LOCAL_MACHINESOFTWAREMicrosoftWindowsCurrentVersionExplorerBrowser Helper Objects.
Key 41C4AA37-1DDD-4345-B8DC-734E4B38414D at HKEY_CLASSES_ROOTCLSID.
Key 41C4AA37-1DDD-4345-B8DC-734E4B38414D at HKEY_LOCAL_MACHINESOFTWAREMicrosoftWindowsCurrentVersionExplorerBrowser Helper Objects.
Key 99D9640D-7DD9-4AB1-946C-AD779E1EABE0 at HKEY_CLASSES_ROOTTypeLib.
Key jZipMediabarTb at HKEY_LOCAL_MACHINESOFTWARE.
Key jziptoolbar at HKEY_CURRENT_USERSoftware.
Value 1e48c56f-08cd-43aa-a6ef-c1ec891551ab at HKEY_LOCAL_MACHINESOFTWAREMicrosoftInternet ExplorerToolbar.
Value <$PROGRAMFILES>Windows jZip ToolbarToolBardtUser.exe at HKEY_LOCAL_MACHINESYSTEMControlSet001ServicesSharedAccessParametersFirewallPolicyStandardProfileAuthorizedApplicationsList.
Value <$PROGRAMFILES>Windows jZip ToolbarToolBardtUser.exe at HKEY_LOCAL_MACHINESYSTEMControlSet002ServicesSharedAccessParametersFirewallPolicyStandardProfileAuthorizedApplicationsList.
Value <$PROGRAMFILES>Windows jZip ToolbarToolBardtUser.exe at HKEY_LOCAL_MACHINESYSTEMControlSet003ServicesSharedAccessParametersFirewallPolicyStandardProfileAuthorizedApplicationsList.
Value <$PROGRAMFILES>Windows jZip ToolbarToolBardtUser.exe at HKEY_LOCAL_MACHINESYSTEMCurrentControlSetServicesSharedAccessParametersFirewallPolicyStandardProfileAuthorizedApplicationsList.
Remove <$PROGRAMFILES>WINDOW~4Datamngrdatamngr.dll <$PROGRAMFILES>WINDOW~4DatamngrIEBHO.dll from registry value AppInit_DLLs at HKEY_LOCAL_MACHINESOFTWAREMicrosoftWindows NTCurrentVersionWindows.
Read More
Windows defender error 0x800700AA, service can not be started comes when the user is trying to run Windows defender scan on their system.
This kind of behavior happens for two reasons mostly, third-party application conflict or corrupted system files.
In this article, we will tackle both scenarios and provide you with solutions in both cases.
Use third party automatic solution
If you are not tech-savvy or you do not wish to manually tackle with Windows system you can use RESTORO (guide and download link below) to automatically repair this error. RESTORO will automatically scan your system and fix all errors with just a single click of a mouse.
If you wish to fix the error manually keep on reading.
Third-party application conflict
In this rare scenario when Windows defender can not start scan due to conflict with installed service or application in the system solution is quite simple. Restart your PC into safe mode and run the scan from there. In a safe mode environment, minimum drivers and services are only loaded eliminating any conflicts that might occur when everything is booted. If Windows defender can not run the scan in safe mode and you get the same 0x800700AA error then you can eliminate application conflict as a reason and move to the next solution which will tackle corrupted system files. If you, however, managed to run a scan then you have a rare third-party application conflict, you can boot normally into windows and try to eliminate one by one to see which one is causing the issue. The safest bet would be to start with security software because most of the time that is what causes conflicts in running services and applications.
Corrupted system files
If the previous solution has not provided you with results then you have system file corruption that needs to be fixed. Move from one solution to another as presented below:
-
Run SFC scan
SFC scan is a built-in Windows tool for solving corrupted system files issues, it is fully automated and does not require from the user any kind of knowledge or information. To run it and scan the system do the following:
Press ⊞ WINDOWS + X to open the secret menu
Left-click on the command prompt (admin)
In command prompt type SFC /SCANNOW and press ENTER
Wait for the process to finish, do not interrupt it and once it is done, restart your computer -
Run DISM scan
DISM scan is similar to SFC scan but it tackles different types of system file corruption and it is recommended to run it also after SFC has been completed. Please note that for DISM scan to be successful you will need a stable internet connection since DISM will replace corrupted files with new ones downloaded from Microsoft. To run it do the following:
Press ⊞ WINDOWS + X to open the secret menu
Left-click on the command prompt (admin)
inside command prompt type: exe /online /cleanup-image /scanhealth followed by ENTER, then type: Dism.exe /online /cleanup-image /restorehealth also followed with ENTER.
Leave scan to finish and reboot your PC
Read More
This post will guide you through fixing the INTERNAL_POWER_ERROR Blue Screen Error on your Windows 10 computer. If you encounter this kind of Blue Screen of Death error, this means that the policy manager experienced a fatal error which in turn means that it can happen because of Drivers or Software or even due to external hardware. And so to resolve the issue, here are some suggestions that might be of help.
Option 1 – Update the Device drivers
As mentioned, the INTERNAL_POWER_ERROR BSOD error might have something to do with the drivers. It could be that the drivers are outdated so you need to update them in order to resolve the issue.
- Tap the Win + R keys to launch Run.
- Type in devmgmt.msc into the box and tap Enter or click OK to open the Device Manager.
- After that, a list of device drivers will be displayed. If you see a red or yellow sign that shows up against the driver, right-click on the driver’s name and select “Update Driver Software” or “Uninstall”. And if you find any drivers with a label saying, “Unknown device”, you need to update them as well.
- Select the “Search automatically for updated driver software” option and then follow the instructions to complete the process.
- Restart your PC.
Option 2 – Check the Device performance and health
You can also try checking the device’s performance and health in the Windows Defender Security Center.
- Open the Windows Defender Security Center.
- From there, check if there is a yellow exclamation icon in the Device performance and health section.
- After that, click on the View report option and you might see Health Report that points towards Storage Capacity, Device Drivers, or Apps and Software which should give you an idea of what the root cause of the problem really is.
Option 3 – Try to run the Chkdsk utility
Running the CHKDSK utility might also help you resolve the INTERNAL_POWER_ERROR Blue Screen error. If your hard drive has issues with integrity, the update will really fail as the system will think that it’s not healthy and that’s where the CHKDSK utility comes in. The CHKDSK utility repairs hard drive errors that might be causing the problem.
- Open Command Prompt with admin privileges.
- After opening Command Prompt, execute the following command and hit Enter:
chkdsk /f /r
- Wait for the process to be completed and then restart your computer.
Option 4 – Try increasing the size of the Hibernation file
- In the Cortana search box, type “command prompt” in the field, and from the search results that appear, right-click on Command Prompt and select “Run as administrator”.
- Next, type in the following command and hit Enter to execute it:
powercfg /hibernate /size 100
- Note that the default size of the Hibernation file is 75% and after executing the command, it should increase to 100%. Now exit Command Prompt and check if the problem’s now fixed or not.
Option 5 – Try to run the troubleshooters
Blue Screen Troubleshooter:
- Tap the Win + I keys to open the Settings panel.
- Then go to Update & Security > Troubleshoot.
- From there, look for the option called “Blue Screen” on your right-hand side and then click the “Run the troubleshooter” button to run the Blue Screen Troubleshooter and then follow the next on-screen options. Note that you might have to boot your PC into Safe Mode.
Performance Troubleshooter:
- Tap the Win + R keys to open the Run dialog box.
- Type “msdt.exe /id PerformanceDiagnostic” in the field and hit Enter to open the Performance troubleshooter.
- Then click on Next to get started. Wait until the process is completed.
System Maintenance Troubleshooter:
- Tap the Win + R keys to open the Run dialog box.
- Type “msdt.exe /id MaintenanceDiagnostic” in the field and hit Enter to open the System Maintenance Troubleshooter.
- After that, click on Next to start troubleshooting the problem and wait until it’s done then check if it fixes the problem or not.
Option 6 – Uninstall the programs you installed recently
Chances are, some programs that you just installed might be the one that’s causing the BSOD error. Thus, you need to uninstall the program to resolve the problem.
- In the search box, type in “control” and then click on Control Panel (desktop app) among the search results.
- After that, select Programs and Features from the list which will give you a list of all the programs installed on your computer.
- From there, look for the concerned program and select it and then uninstall it.
Note: If you have downloaded the app from the Windows Store, you can simply right-click on it from the application list and then uninstall it.
Option 7 – Run Windows Defender offline
You also have the option to run Windows Defender offline and scan your computer to see if any malware has infected the computer and the one that’s causing the INTERNAL_POWER_ERROR Blue Screen Error.
Read More
A newfound bug in Google docs is causing it to crush and upon reopening it will crush again making it very difficult to re-access your document. The bug is manifested when a series of the same word is typed into a document and Show grammar suggestion is turned on.

How was it found
A Google Docs user, Pat Needham brought up the issue on Google Docs Editors Help forum.
«I’ve only tried in Google Chrome, with documents from three separate Google accounts (personal, G Suite Basic, and work one which might be enterprise). All three experience this same issue».
«It’s case-sensitive. So trying with ‘and. and. And. and. And.’ doesn’t cause it to crash.»
While Needham publicly reported the bug, it appears that the issue was discovered by Eliza Callahan who was writing a poem novel for her novel using Google Docs.
Needham’s findings have also been confirmed by other users running Firefox 99.0.1
Another user, Sergii Dymchenko, said strings like «But. But. But. But. But.» triggered the same response. Some also noticed putting any of the terms like «Also, Therefore, And, Anyway, But, Who, Why, Besides, However,» in the same format achieved the outcome.
A YCombinator HackerNews reader suspected the cause to be the «Show grammar suggestion» option in Google Docs.
A Google spokesperson confirmed the presence of the issue adding, «we’re aware of this issue and the team is working on a fix.»
How to recover your document
First thing first, turn off Show grammar suggestions so you do not run into issue by accident. In order to turn it off go to Tools and then into Spelling and grammar and untick Show grammar suggestions.
Now, if you already have a document that has been crushed, fear not because there is a workaround to access it. For some strange reason this bug does not manifest on Google Docs mobile app, so you can open the crushed document in the mobile app, delete words that have caused the bug and reopen the document on your desktop.
Until Google comes up with the solution this is currently the only way to address the issue.
Read More
![]()
Copyright © 2022, ErrorTools. All Rights Reserved
Trademarks: Microsoft Windows logos are registered trademarks of Microsoft. Disclaimer: ErrorTools.com is not affiliated with Microsoft, nor claim direct affiliation.
The information on this page is provided for information purposes only.
![]()
Repair your PC with one click
Please be aware that our software needs to be installed on a PC system with Windows on it, Open this website on a desktop PC and download the software for easy and quick elimination of your issues.
Если во время открытия программы GeForce Experience на компьютере произошла одна из следующих ошибок «Something went wrong. Try restarting GeForce Experience», не стоит паниковать, пользователи по всему миру регулярно сталкиваются с подобного рода проблемами и существует ряд методов по их решению. Что более важно, варианты простые и можно воспользоваться одним из них самостоятельно.
О разрешении указанной проблемы далее:
Решение ошибки
Необходимо выключить все задачи GeForce и перезапустить программу. Следуйте инструкции:
- Открываем панель задач
- Выберите все задачи NVIDIA и нажмите «Завершить задачу»
- После проделанного, нажимаете по программе правой кнопкой мыши и выбираете «Запустить от имени администратора«. Проверяете работоспособность.
Второй способ включает в себя проверку на работоспособность и отсутствие сбоев задач видеокарты.
Для осуществления вышеуказанного проделайте следующие шаги:
- На клавиатуре, удерживая нажатой клавишу с логотипом Windows, нажмите R, чтобы вызвать окно «Выполнить»
- Вводим команду services.msc.
- Находим и щелкаем правой кнопкой мыши по NVIDIA контейнер, что бы выбрать вкладку «свойства»
- Убеждаемся, что служба «Разрешить взаимодействие с рабочим столом» отмечена во вкладке «Вход в систему». Если галочки не стоит — ставим, жмем «Применить», далее «Ок».
- Посмотрите, запущен ли телеметрический контейнер в панели задач. Если он отключен. просто нажимаем правой кнопкой мыши и включаем.
Теперь запускаем наше приложение что бы узнать работает ли оно корректно. Если нет — не стоит расстраиваться, есть еще определенные способы избавиться от обозначенной проблемы.
Ошибка error code 0x0001 geforce experience
Обновите драйвера видеокарты
Третий способ состоит в том. что бы поставить более новые драйвера видеокарты.
Проблема может быть вызвана устаревшими или поломанными, забагованными драйвера видеокарты. Простейший способ — перейти по ссылке на официальный сайт, скачать и установить. Либо же скачайте и установите программу по ссылке, которая автоматически поставит новейшие
Приложение автоматически распознает тип вашей видеокарты, а также систему, на которую необходимо установить драйвера, после чего сделает все за вас
- Скачиваем приложение
- Жмем «Просканировать сейчас». Приложение найдет все проблемные драйвера компьютера и обновит их.
- Нажимаем «Обновить все», что бы автоматически скачать и обновить устаревшие или забагованные драйвера.
- После проделанных шагов перезагрузите компьютер и протестируйте работает ли теперь обозначенный драйвер
Ошибка error code: 0x0001
Четвертый метод заключается в переустановке проблемной программы.
- Введите команду «feature» как указано на картинке снизу:
- Выберите «джифорс» и удалите
- Скачайте на официальном сайте и установите заново
- Смотрим работает или нет
Решение ошибки путем обновления Windows
В случае, если ни один из вышеперечисленных методов не помог — попробуйте обновить виндоус до последней версии.
Устаревшее программное обеспечение может приводить к конфликтам и различным багам.
Если используется Windows 10:
- Нажмите на клавиатуре кнопку Windows и R одновременно что бы открыть настройки Windows
- Нажмите по «Обновление и безопасность»
- Жмем «Обновления»
- Обновляем
- Перезагружаем компьютер что бы увидеть как работает нужный драйвер
Если используется любая другая версия Windows:
- Переходим в панель управления
- Выбираем «Обновления Виндоус«
- Далее «Проверить наличие обновлений«
- Обновляем
- Проверяем