Я импортировал файл jar в рабочую область, и это ошибка, которую я получаю:
Описание Resource Path Location Type
В Project ‘Interpreter1’ отсутствует требуемая исходная папка: ‘src’ Interpreter1 Построение пути Ошибка пути сборки
Как я могу избавиться от этой ошибки?
Ответ 1
Проект правой кнопки мыши → Путь сборки → Настроить путь сборки; отмените выбор SRC, сохраните, выберите еще раз.
Это решило мою проблему.
Ответ 2
Перейдите в диалог Build Path (right-click project > Build Path > Configure Build Path) и убедитесь, что указана правильная папка источника, и убедитесь, что она существует.
Исходная папка — это та, которая содержит ваши источники, usuglaly в форме: project/src/com/yourpackage/...
Ответ 3
Щелкните правой кнопкой мыши Project → New → Folder → Имя папки: src → Finish
Ответ 4
Отредактируйте файл .classpath. (Или через путь построения проекта).
Ответ 5
Вот что сработало для меня: щелкните правой кнопкой мыши файл project- > source → После этого просто перетащите исходную папку в eclipse в проект и выберите ссылку.
Удачи!
Ответ 6
Создайте папку src в проекте.
Ответ 7
Я был смущен этим часами.
Щелкните правой кнопкой мыши по проекту → Путь сборки → Настроить путь сборки → Добавить папку
Ответ 8
Одной из проблем пути сборки является невозможность найти правильную исходную папку /src/conf. Щелкните правой кнопкой мыши по каждому проекту, Build Path> Configure Build Path. На вкладке «Источник» удалите папку с красным крестиком в правом нижнем углу. Это сработает для ситуации, когда есть маленький красный восклицательный знак «!» бедоре название вашего проекта!
Ответ 9
В eclipse вы должны быть осторожны, чтобы создать «исходную папку» (File- > New- > Source Folder). Таким образом, это автоматически на пути к классу, и, что более важно, Eclipse знает, что это компилируемые файлы. Это придирчиво.
Ответ 10
Если вы столкнулись с ошибкой в папке, такой как src/test/java или src/test/resources, просто щелкните правой кнопкой мыши на папке и затем создайте новую папку с именем src/test/java. Это должно решить вашу проблему.
Ответ 11
Я только недавно установил Java для затмения. Когда я создаю проект Java, он не поставляется с файлами SRC, пожалуйста, помогите.
Ответ 12
Я думаю, это из-за того, что .classpath сохраняется с конфигурацией удаленной исходной папки
-
Создайте отсутствующую папку [‘
src‘ в вашем случае] вручную в корне проекта. Когда я говорю вручную, я имел в виду вне Eclipse, используя файловый менеджер. -
Затем вернитесь, чтобы затмить и обновить проект. Теперь ошибка, говорящая об этом, уже исчезнет.
-
Теперь щелкните правой кнопкой мыши проект > Путь сборки > Настроить путь сборки. Это должно привести нас к боковому меню пути сборки Java.
-
Убедитесь, что мы находимся на вкладке » Источник «. Удалите исходную папку, вызвавшую проблему. Теперь, возможно, папка может отображаться в структуре проекта, и вы можете удалить это тоже.
In this post, We will learn How to Fix missing src/main/java & src/test/java folders in the Eclipse Maven web Project?
How to fixing src/main/java and src/test/java folders in Eclipse Maven Project – 2 build path entries are missing:
Sometimes, when you create a maven web application project, you will not see src/main/java and src/test/java as a source folder. When you try to create it manually you will get an error like “The folder is already a source folder”. In this tutorial, let’s see how to fix the missing src/main/java folder in the Eclipse Maven project
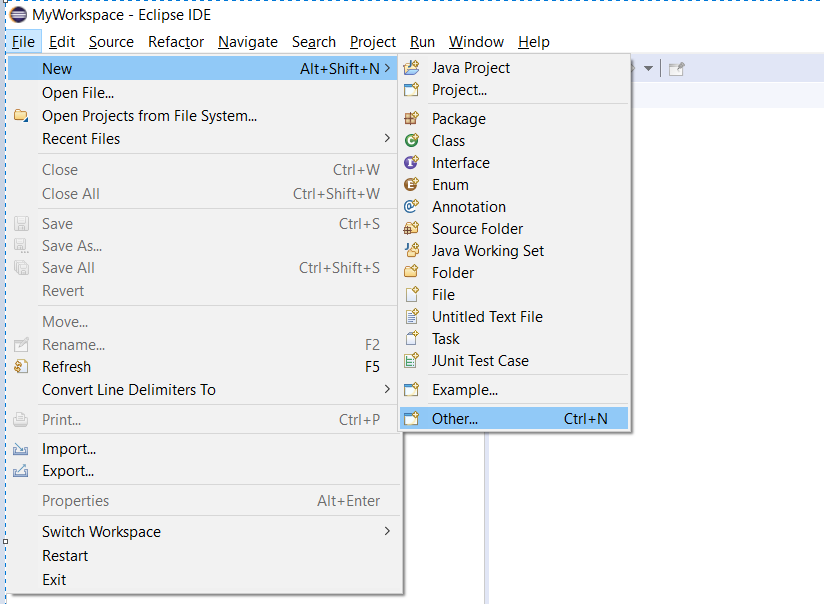
Step 1: Open the Eclipse and Go to File -> New -> Others.
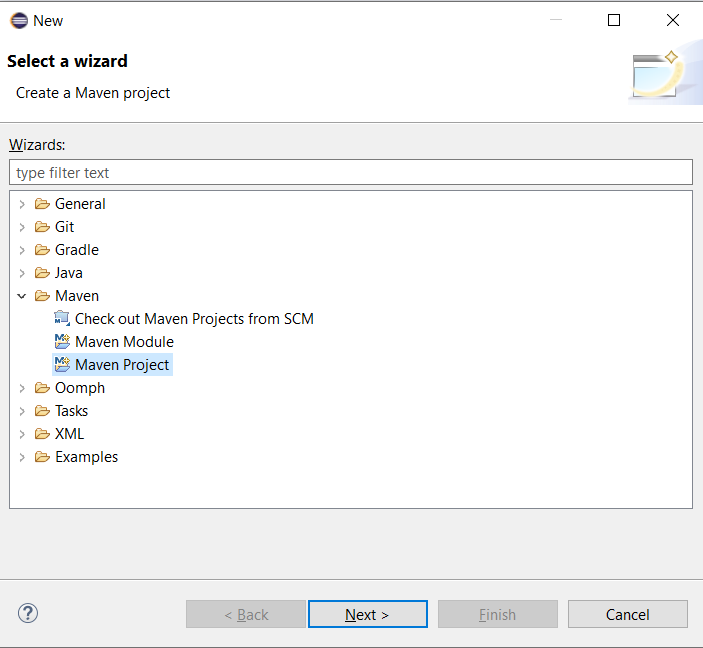
Step 2: In the opened New wizard, scroll down and select Maven->Maven Project, click Next
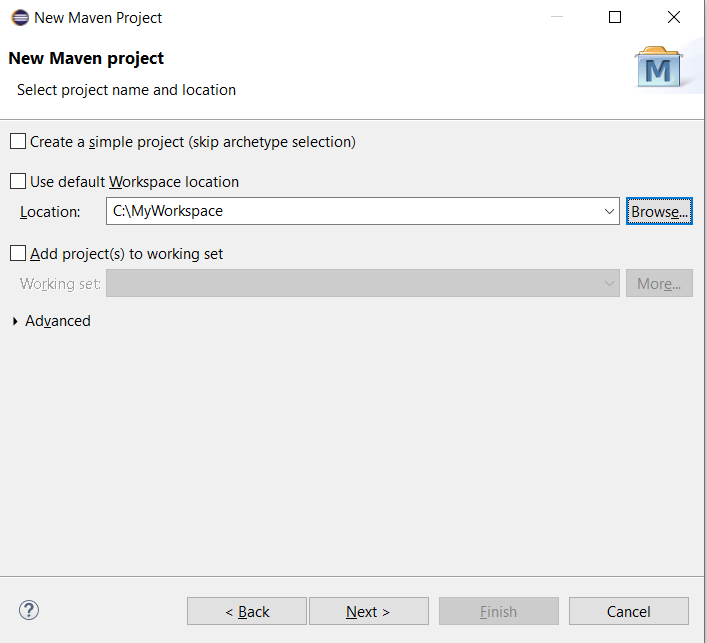
3: In the below screen, If you do not want to create your maven project on the default Workspace location then Uncheck the “Use default Workspace location” checkbox option and with the help of the Browse button choose your workspace where you would want to create your Maven project. Click on Next.
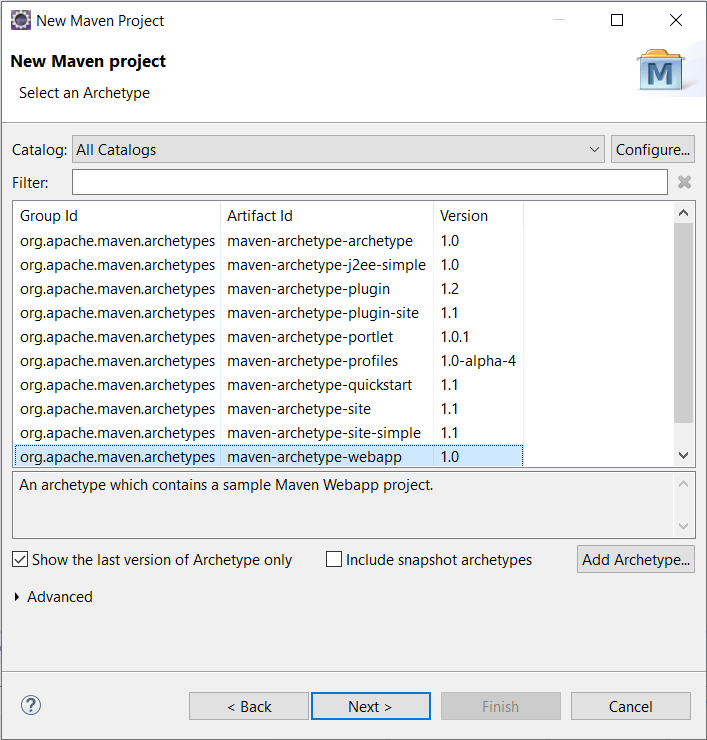
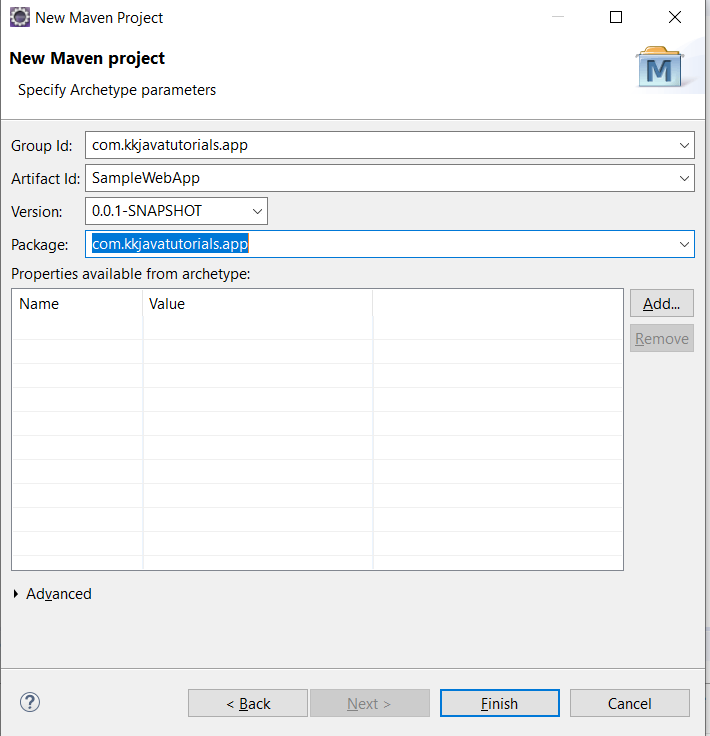
4: Just scroll down and select option with Artifact Id as maven-archetype-webapp and Click on Next
5: Now You have to provide Group Id, Artifact Id & version. These attributes basically give your project deliverable(jar/war/ear etc.. ) a unique identity in the repository. Click Finish
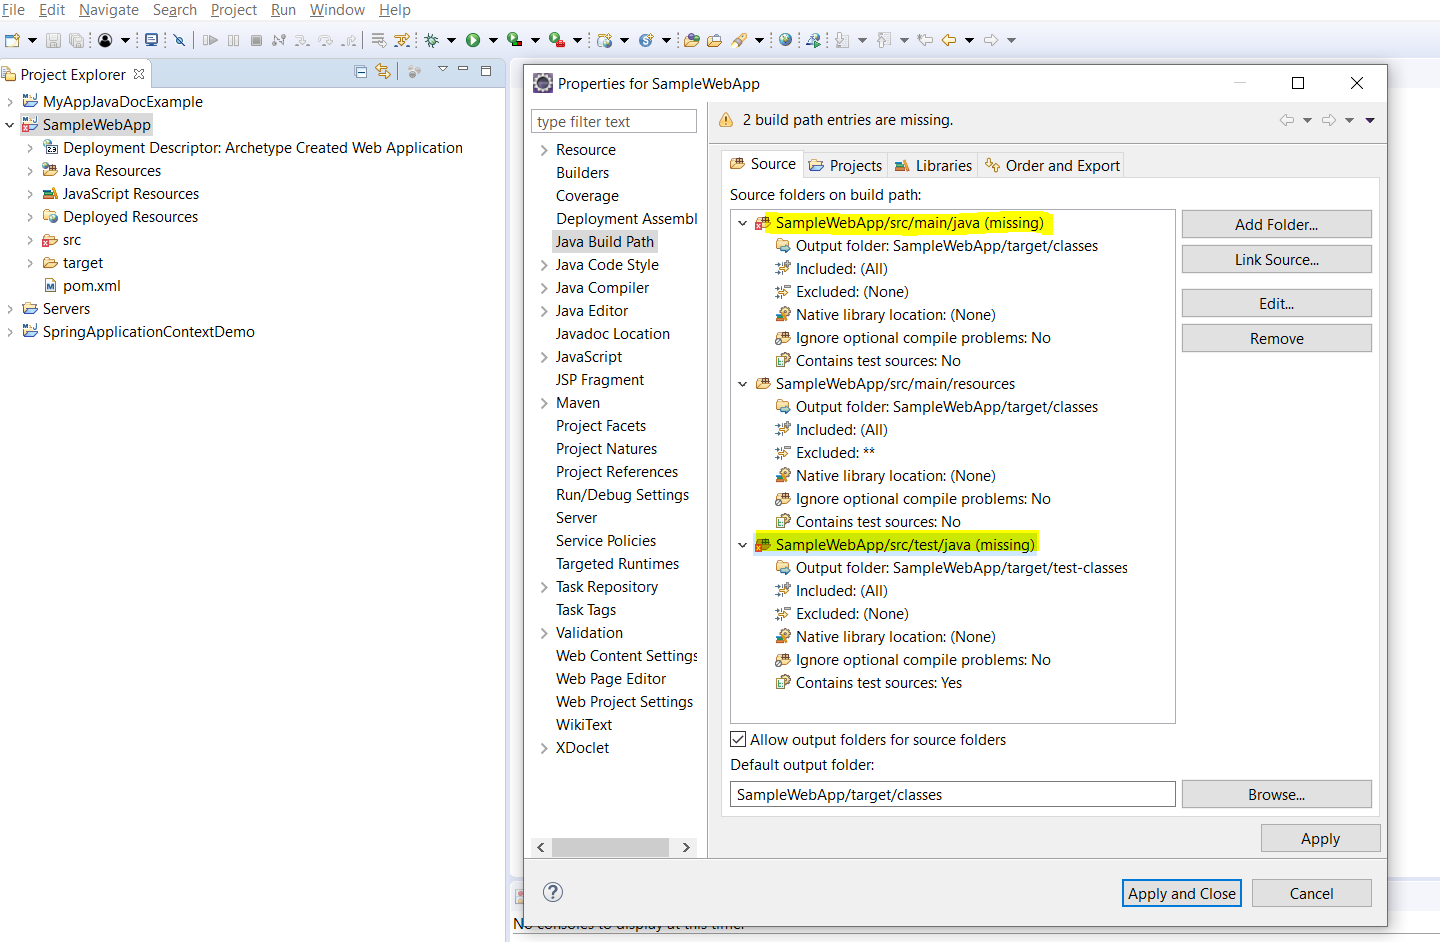
Step 3: After you create a maven web application, you will see the Web project created like below. Now we can that the SampleWebApp Project doesn’t have src/main/java and src/test/java folders in it. It has only the src/main/resource folder.
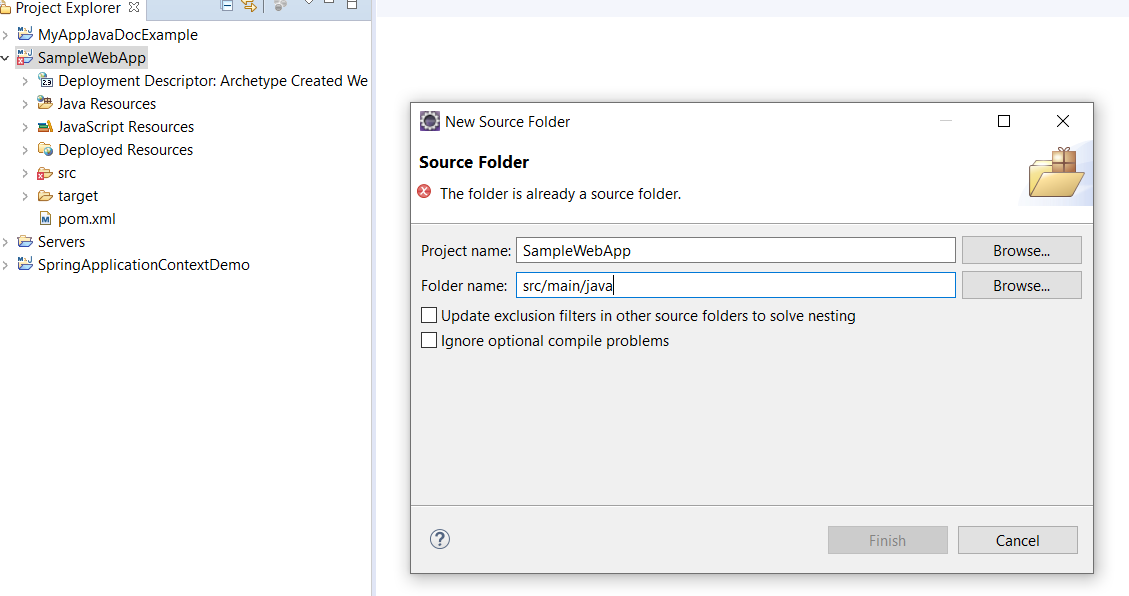
Step 4: Even when We try to create a new Source folder We will an error like ” The Folder is already a source folder “.
Right-click on your project then go to Source Folder and try to create src/main/java then it will show an error that is depicted in the below screen shots

Step 5: Fixing this issue is really very simple, Just Right Click on the project go to Properties. After that go to Build Path, You see an error like ” 2 build path entries are missing “

Step 6: This error usually comes when the JRE System Library is wrongly pointed. Now go to the Libraries tab and change the JRE System Library to the correct version by clicking on Edit.
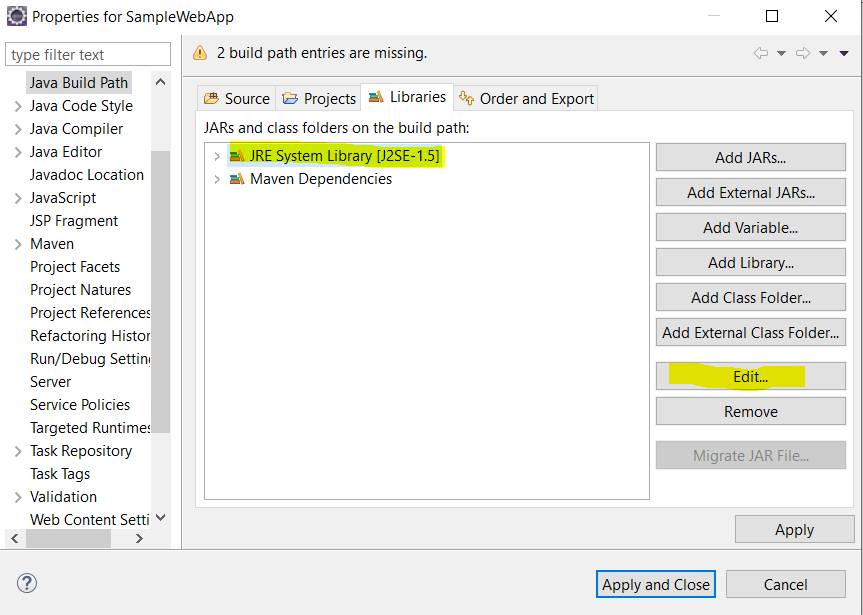
Note: In case if you do not see the src/main/java and src/test/java directories in your project structure then you will have to go to Project ->Properties ->Java BuildPath ->Libraries after that select JRE System Library and click on Edit and Select or configure correct JRE System Library click on Finish and then click on Apply. You should see those( src/main/java and src/test/java) folders/directories now. You may also right-click on your project then maven -> Update Project->Ok to perform a maven-update on your project.
Note: You should keep in mind that in recent Eclipse versions you don’t need to use mvn eclise:eclipse anymore because this functionality is now built-in with the recent m2e eclipse plugin
Step 7: Once the JRE System Library is changed/updated the issue should be resolved, You may also do Maven Update Project (Right on the Project –> Maven –> Update Project). Now you must have the src/main/java and src/test/java folders in your project.

That’s Yet!!
That’s all about How to Fix missing src/main/java & src/test/java folders in the Eclipse Maven web Project?
You May Also Like:
What is Maven?
How to install and setup Maven Environment on windows?
Create a maven project using the command line
How to import the maven project in Eclipse?
How to Create a New Maven Project in Eclipse
How to create a maven web application project in Eclipse
How to create a multi-module project using maven?
How to create user-defined properties in Maven?
What is the maven local repository location & how to change it?
How to add or update the maven settings.xml file in eclipse?
Importing maven remote Archetype Catalogs in eclipse ?
What is POM in the maven Project?
What is Super POM in Maven Project?
Understanding the purpose of Maven Plugin
Compiling the Maven project with different JDK versions?
Understanding of settings.xml in maven
How to enable a proxy setting in Maven?
Maven Dependency Scopes
How to generate javadoc in the maven Project
How to create a runnable JAR file with Maven?
How to add local jar files to a Maven project?
How to convert an existing Java Project to Maven in Eclipse?
How to exclude dependency in maven?
Managing External Dependencies in maven
Understanding of Maven Repositories
What is an archetype in Maven?
Snapshot Vs Version in maven
Apache Maven – Profiles
If you have any feedback or suggestion please feel free to drop in below comment box.
Development issue/problem:
I don’t have much experience with Maven in combination with Android, so I followed these instructions to create a new project for Android. After making a project I get the following error message:
When I try to add a new source directory via New->Other->Java source directory with src/test/java, I get another error message :
But I don’t have the src/test/java file in the project. How do you do that? What a great way to set up a project, because I think there’s something missing from these instructions. So, what time does Maven src/test/java appear?
I use Eclipse Juno, m2e 1.1.0, Android configuration for m2e 0.4.2.
How can I solve this problem?
Solution 1:
I understand this too, because the latest update of the m2e-android plugin (version 0.4.2) happens both when you create a new project and when you import an existing project (unless you use src/test/java).
It seems that m2e-android (or maybe m2e) is now always trying to add src/test/java as the source directory in the .classpath file, whether or not it exists in your project directory :
Because it has already been added to the project metadata file, Eclipse complains that the classpathentry is already there when you try to add the source directory via Eclipse:
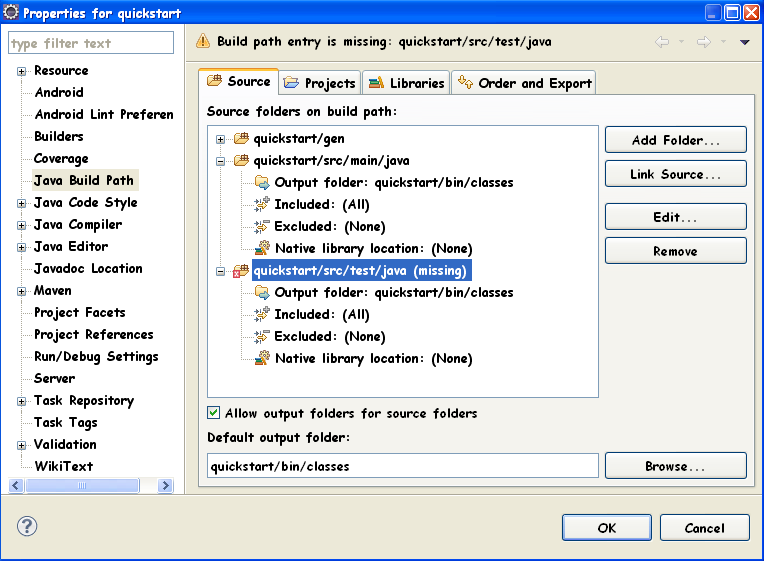
There are several ways to solve this, the simplest is to manually create the src/test/java directory in the file system and then update the project by pressing F5 and running Maven -> Update Project (right click on the project, Maven -> Update Project…), this should fix the missing source directory: the ‘src/test/java’ error.
Solution 2:
We can change the java file from
- Construction Path -> Source.
- Click on the Add folder button.
- Select the main unit as the container.
- Click on the Create folder button.
- Enter the folder name as java.
- Click on Ready
I’m fine. I’m fine.
Solution 3:
First I solve the problem by creating a folder named src/test/resources, then I rename the folder to src/test/java, then I recreate the folder src/test/resources, it works.
Solution 4:
This may have been caused by the loss of the home directory.
Right click on the src folder -> Change source folder
Solution No 5:
I had the same problem, I solved it.
Create the missing folder directly in the file system (e.g. with Windows Explorer).
And then update your project under the Eclipse.
Solution No 6:
This is a bug in the Android connector for M2E (m2e-android) that has recently been repaired:
https://github.com/rgladwell/m2e-android/commit/2b49 00153cd34fff1cec47fe5aeffabe44d87
This fix has been merged and will be available at the next release. In the meantime, you can test the new patch by installing it from the nearest update site:
http://rgladwell.github.com/m2e-android/updates/master/
Solution No 7:
Remove the m2 plugin from the launch plugin list and launch Maven->Update projects on all projects that worked for me.
Note** You do not need to create additional folders to prevent merging when using SVN/Git-based branches.
Solution No 8:
In the case of the Maven project
Try right-clicking on the project and then select Maven -> Update Project….. (Refreshes the project) and then Ok.
Solution No 9:
Select the project -> New -> folder (not the source folder) -> select the project again -> enter the folder name as (src/test/java) -> finished. Here’s how.
If no test source is present, it will be linked automatically. If not, you’ll have to pair it up manually.
Good luck!
maven source folder eclipse,maven src/main/java package,src/main/resources missing,do not see the src main java and src test java folder in your project structure,cannot nest src/test/java’ inside src maven,how to create src/test/resources in eclipse with maven,how to add source folder in eclipse java,test source folder ‘src/test/java’ in project must have a separate output folder,missing required source folder: ‘src main java,eclipse project is missing required source folder: ‘src main java,source folder is not a java project error in sts,src/main/java missing intellij,how to create src/test/resources folder,src/main/java missing intellij maven project