Translation(s): English — Français — Italiano — Portugês Brasileiro — Русский
Apt > sources.list
Contents
-
/etc/apt/sources.list
- Тип архива
- URL Репозитория
- Дистрибутив
- Компонент
- Пример sources.list
- Используем Tor вместе с Apt
- CD-ROM
- Проблемы с разрешением доменных имен
- Debug Symbol Packages
- Подробнее
/etc/apt/sources.list
Как часть своей работы, Apt использует файл содержащий список ‘источников’ из которых могут быть скачаны пакеты. Этот файл /etc/apt/sources.list.
Содержимое этого файла обычно имеет следующий формат (приведенные ниже данные являются вымышленными и не должны использоваться):
deb http://site.example.com/debian distribution component1 component2 component3
deb-src http://site.example.com/debian distribution component1 component2 component3
Тип архива
Первое слово в каждой строке, deb или deb-src, указывает тип архива. Deb указывает что архив содержит бинарные пакеты (deb), пре-компилированные пакеты для нормального использования. Deb-src указывает что это архив пакетов с иходным кодом, который содержит оригинальные исходные коды программ плюс контрольный файл Debian (.dsc) и diff.gz содержащий изменения и необходимый для пакетирования программы.
URL Репозитория
Следующая запись в строке это адрес (URL) репозитория с которого вы хотите скачивать пакеты. Основной список зеркал репозитория Debian находитсяздесь.
Дистрибутив
‘distribution’ может быть либо кодовое имя / псевдоним релиза (jessie, stretch, buster, sid), либо класс релиза (stable, oldstable, testing, unstable). Если вы имеете в виду отслеживание класса релиза, а затем хотите использовать название релиза, или же если вы просто хотите отслеживать цикл релизов Debian, то используйте кодовое имя.
Например, если у вас есть система работающая на Debian 11.6 «bullseye» и вы не хотите обновляться когда выйдет Debian «bookworm», в таком случае нужно использовать «bullseye» вместо «bookworm». Если вы всегда хотите помогать с тестированием дистрибутива, то используйте «testing». Если вы отслеживаете цикл «bookworm» и хотите оставаться на нём от тестирования и до конца его жизни, используйте «bookworm».
Компонент
main состоит из DFSG-compliant пакетов, которым не требуется другое ПО из других зон. Эти пакеты считаются частью дистрибуции Debian
contrib пакеты содержат DFSG-compliant ПО, но у них зависимостей из зоны main (возможно упакованы в non-free).
non-free содержит ПО, которое не соответствует DFSG.
Пример sources.list
Ниже приведен пример файла sources.list для Debian 9/Stretch.
deb http://deb.debian.org/debian/ stretch main
deb-src  http://deb.debian.org/debian/ stretch main

deb http://deb.debian.org/debian/ stretch-updates main
deb-src  http://deb.debian.org/debian/ stretch-updates main

deb http://security.debian.org/debian-security/ stretch/updates main
deb-src http://security.debian.org/debian-security/ stretch/updates main
Если вы хотите подключить репозиторий с несвободными компонентами системы, то добавьте contrib non-free после main:
deb http://deb.debian.org/debian/ stretch main contrib non-free
deb-src http://deb.debian.org/debian/ stretch main contrib non-free

deb http://deb.debian.org/debian/ stretch-updates main contrib non-free
deb-src http://deb.debian.org/debian/ stretch-updates main contrib non-free

deb http://security.debian.org/debian-security/ stretch/updates main contrib non-free
deb-src http://security.debian.org/debian-security/ stretch/updates main contrib non-free
Для редактирования вашего файла sources.list, вы можете воспользоваться утилитой software-properties-gtk. Расположенной в Menu → System → Administration → Software Sources.
gksu --desktop /usr/share/applications/software-properties.desktop /usr/bin/software-properties-gtk
Используем Tor вместе с Apt
Apt может получать и загружать обновления через Tor. Для этого вам нужно установить пакеты tor и apt-transport-tor. Затем вы можете использовать официальные onion-ресурсы в Debian.
Ниже приведен пример файла sources.list использующий onion-ресурсы в Debian 9/Stretch:
deb tor+http://vwakviie2ienjx6t.onion/debian stretch main
deb-src tor+http://vwakviie2ienjx6t.onion/debian stretch main

deb tor+http://vwakviie2ienjx6t.onion/debian stretch-updates main
deb-src tor+http://vwakviie2ienjx6t.onion/debian stretch-updates main

deb tor+http://sgvtcaew4bxjd7ln.onion/debian-security stretch/updates main
deb-src tor+http://sgvtcaew4bxjd7ln.onion/debian-security stretch/updates main
CD-ROM
Если вы хотите использовать CD-ROM для установки пакетов или автоматического обновления системы через APT, то можно записать его в /etc/apt/sources.list. Для этого можно использовать программу apt-cdrom, например:
# apt-cdrom add
Можно использовать -d для каталога точки монтирования CD-ROM или добавить точку монтирования не-CD (т.е. USB накопитель).
Проблемы с разрешением доменных имен
Если у вас сломалось/не работает разрешение имён. Например, ниже запущен порт S/390x в QEMU Chroot:
# apt-get update
0% [Working]Unsupported socketcall: 20
Unsupported socketcall: 20
Unsupported socketcall: 20
Unsupported socketcall: 20
Unsupported socketcall: 20
Unsupported socketcall: 20
Unsupported socketcall: 20
Unsupported socketcall: 20
Err:1 http://ftp.us.debian.org/debian testing InRelease
  Temporary failure resolving 'ftp.us.debian.org'
Reading package lists... Done
W: Failed to fetch http://ftp.us.debian.org/debian/dists/testing/InRelease  Temporary failure resolving 'ftp.us.debian.org'
W: Some index files failed to download. They have been ignored, or old ones used instead.
Вы можете временно обойти эту проблему, указав IP адрес репозитория (получив его с другой машны):
echo "deb http://128.30.2.26/debian testing main contrib" > /etc/apt/sources.list

apt-get update
Get:1 http://128.30.2.26/debian testing InRelease [232 kB]
Get:2 http://128.30.2.26/debian testing/main s390x Packages [7583 kB]
Get:3 http://128.30.2.26/debian testing/main Translation-en [5134 kB]
Get:4 http://128.30.2.26/debian testing/contrib s390x Packages [42.7 kB]
Get:5 http://128.30.2.26/debian testing/contrib Translation-en [44.7 kB]
Fetched 13.0 MB in 32s (403 kB/s)
Reading package lists... Done
Debug Symbol Packages
Для отладки аварийных остановок работы программ часто требуются соответствующие файлы символов отладки. Для большинства пакетов Debian они находятся в пакетах dbgsym. Они доступны из отдельного архива.
Ниже приведен пример файла sources.list для dbgsym-пакетов Debian 9/Stretch:
deb http://deb.debian.org/debian-debug/ stretch-debug main
Подробнее
-
sources.list(5) man page
-
Список неофициальных репозиториев, что-бы получить дополнительные программы ( Skype, Opera, Google )
-
AptCLI
-
AptPreferences
-
APT HOWTO
-
поиск по неофициальным репозиториям (восновном очень старые пакеты)
-
Debian на CD/DVD
-
Добавление списка источников, в том числе cd, используя apt-setup
-
deb.debian.org
ru/PackageManagement
Translation(s): English — Français — Italiano — Português (Brasil) — Русский
Contents
-
Configuring Apt Sources
- Commonly used package sources
-
Editing software sources
- Precautions
- Using a graphical program
- Using a text editor
-
sources.list format
- Archive type
- Repository URL
- Distribution
- Component
- Example sources.list
- Using Tor with Apt
- CD-ROM
- Name Resolution
- Debug Symbol Packages
- More information
Configuring Apt Sources
Apt downloads packages from one or more software repositories (sources) and installs them onto your computer.
A repository is generally a network server, such as the official DebianStable repository. Local directories or CD/DVD are also accepted.
The specific repositories (package sources) configured on your machine affect:
- What software packages are available for download
- What versions of packages are available
- Who packages the software
Commonly used package sources
-
DebianStable: official Debian repository for the current release
-
StableProposedUpdates: official Debian repository for upcoming point releases (security and important bug fixes every ~2 months)
-
StableUpdates: official Debian repository for changes that cannot wait for the next point release, packages are also added to StableProposedUpdates for inclusion in the next point release
-
DebianSecurity: official Debian repository for frequent security updates
-
DebianBackports: more recent versions of some packages, compatible with DebianStable.
-
DebianTesting: current development state of the next stable Debian distribution
-
DebianUnstable: rolling development version containing the latest packages
-
DebianExperimental: development version containing the experimental/alpha/beta/untested packages
Editing software sources
Precautions
Being able to change the repositories used by your package management system is a powerful feature but this power comes with some responsibility. Users are cautioned that it is possible to break your system (in a way that could be difficult or impossible to cleanly fix) by adding third-party repositories, or repositories for a Debian version that does not match your current version — these repository create a risk of conflicting package versions, creating what’s sometimes called a «Franken-Debian» system. The whole concept behind a Debian stable release is that the Debian developers have picked a set of software and their versions that function nicely together. While this software is patched to fix security issues, the software is frequently not the latest version. It takes some experience to know how the repos may be changed without risk of breaking your system. Users of all levels are advised to change repos cautiously.
Using a graphical program
Some programs allow configuring Apt sources through a graphical interface. For example:
-
Applications menu > Settings > Software and updates (software-properties-gtk package)
Using a text editor
The main Apt sources configuration file is at /etc/apt/sources.list. You can edit this files (as root) using your favorite text editor.
To add custom sources, creating separate files under /etc/apt/sources.list.d/ is preferred.
See man 5 sources.list
sources.list format
The entries in this file normally follow this format:
deb http://site.example.com/debian distribution component1 component2 component3
deb-src http://site.example.com/debian distribution component1 component2 component3
Archive type
The first word on each line, deb or deb-src, indicates the type of archive. Deb indicates that the archive contains binary packages (deb), the pre-compiled packages that we normally use. Deb-src indicates source packages, which are the original program sources plus the Debian control file (.dsc) and the diff.gz containing the changes needed for packaging the program.
Repository URL
The next entry on the line is a URL to the repository that you want to download the packages from. The main list of Debian repository mirrors is located here.
Distribution
The ‘distribution’ can be either the release code name / alias ( stretch, buster, bullseye, bookworm, sid) or the release class (oldoldstable, oldstable, stable, testing, unstable) respectively. If you mean to be tracking a release class then use the class name, if you want to track a Debian point release, use the code name. Avoid using stable in your sources.list as that results in nasty surprises and broken systems when the next release is made; upgrading to a new release should be a deliberate, careful action and editing a file once every two years is not a burden.
For example, if you always want to help test the testing release, use ‘testing’. If you are tracking bookworm and want to stay with it from testing to end of life, use ‘bookworm’.
Component
main consists of DFSG-compliant packages, which do not rely on software outside this area to operate. These are the only packages considered part of the Debian distribution.
contrib packages contain DFSG-compliant software, but have dependencies not in main (possibly packaged for Debian in non-free).
non-free contains software that does not comply with the DFSG.
Example sources.list
Below is an example of a sources.list for Debian 11/Bullseye.
deb http://deb.debian.org/debian bullseye main
deb-src http://deb.debian.org/debian bullseye main

deb http://deb.debian.org/debian-security/ bullseye-security main
deb-src http://deb.debian.org/debian-security/ bullseye-security main

deb http://deb.debian.org/debian bullseye-updates main
deb-src http://deb.debian.org/debian bullseye-updates main
If you need the contrib and non-free components, add contrib non-free after main. For example, for Debian 11/Bullseye:
deb http://deb.debian.org/debian bullseye main contrib non-free
deb-src http://deb.debian.org/debian bullseye main contrib non-free

deb http://deb.debian.org/debian-security/ bullseye-security main contrib non-free
deb-src http://deb.debian.org/debian-security/ bullseye-security main contrib non-free

deb http://deb.debian.org/debian bullseye-updates main contrib non-free
deb-src http://deb.debian.org/debian bullseye-updates main contrib non-free
If you need the Backports, contrib, and non-free components, add bullseye-backports lines. For example, for Debian 11/Bullseye:
deb http://deb.debian.org/debian bullseye-backports main contrib non-free
deb-src http://deb.debian.org/debian bullseye-backports main contrib non-free
If you need Unstable, then change the distribution to unstable. Note that Updates and Security is not used since Unstable is a rolling release consisting of the latest packages. That is, unstable main will be the only entry in sources.list.
deb http://deb.debian.org/debian/ unstable main
deb-src http://deb.debian.org/debian/ unstable main
You can instead use https://… in all of the above lines to use the repositories over encrypted HTTPS connections if the according mirror supports HTTPS. (Users of Debian 9/Stretch or older releases will need to install the apt-transport-https package first.)
You can use a GNOME tool to edit your sources.list file. Access it through Menu → System → Administration → Software Sources.
Using Tor with Apt
Apt can retrieve and download updates through Tor. For this to work you need to install the tor and apt-transport-tor packages. You can then use the official onion services provided by Debian.
Here is an example sources.list using the onion services for Debian 11/Bullseye:
deb tor+http://vwakviie2ienjx6t.onion/debian bullseye main
deb-src tor+http://vwakviie2ienjx6t.onion/debian bullseye main

deb tor+http://sgvtcaew4bxjd7ln.onion/debian-security bullseye-security main
deb-src tor+http://sgvtcaew4bxjd7ln.onion/debian-security bullseye-security main

deb tor+http://vwakviie2ienjx6t.onion/debian bullseye-updates main
deb-src tor+http://vwakviie2ienjx6t.onion/debian bullseye-updates main
CD-ROM
If you’d rather use your CD-ROM for installing packages or updating your system automatically with APT, you can put it in your /etc/apt/sources.list. To do so, you can use the apt-cdrom program like this:
# apt-cdrom add
with the Debian CD-ROM in the drive.
You can use -d for the directory of the CD-ROM mount point or add a non-CD mount point (i.e. a USB keydrive).
Name Resolution
On occasion name resolution can break. For example, below is from a S/390x Port running in a QEMU Chroot:
# apt update
0% [Working]Unsupported socketcall: 20
Unsupported socketcall: 20
Unsupported socketcall: 20
Unsupported socketcall: 20
Unsupported socketcall: 20
Unsupported socketcall: 20
Unsupported socketcall: 20
Unsupported socketcall: 20
Err:1 http://ftp.us.debian.org/debian testing InRelease
  Temporary failure resolving 'ftp.us.debian.org'
Reading package lists... Done
W: Failed to fetch http://ftp.us.debian.org/debian/dists/testing/InRelease  Temporary failure resolving 'ftp.us.debian.org'
W: Some index files failed to download. They have been ignored, or old ones used instead.
You can temporarily work around it by obtaining the IP address from another machine, and then using the IP address rather than the URI:
echo "deb http://128.30.2.26/debian testing main" > /etc/apt/sources.list

apt update
Get:1 http://128.30.2.26/debian testing InRelease [232 kB]
Get:2 http://128.30.2.26/debian testing/main s390x Packages [7583 kB]
Get:3 http://128.30.2.26/debian testing/main Translation-en [5134 kB]
Fetched 13.0 MB in 32s (403 kB/s)
Reading package lists... Done
Debug Symbol Packages
To debug a crash you often need the related debug symbol files. For most Debian packages these are in dbgsym packages. These are available from a separate archive.
Here is an example entry for your sources.list for Debian 11/Bullseye dbgsym packages:
deb http://deb.debian.org/debian-debug/ bullseye-debug main
The same if you running testing.
deb http://deb.debian.org/debian-debug/ testing-debug main
And one more example if you are using the unstable distribution.
deb http://deb.debian.org/debian-debug/ unstable-debug main
More information
-
A list of UnofficialRepositories to get extra software ( Skype, Opera, Google )
-
About deb.debian.org, a service that aims to solve the problem of choosing a Debian mirror.
-
Adding source lists, including cds, using apt-setup
-
APT HOWTO
-
AptCLI
-
AptPreferences
-
Backports
-
Debian on CDs
-
Look for a package in an unofficial repository (links to very old packages mostly)
-
DebianRepository/UseThirdParty — Instructions to use to a third-party repository
-
sources.list(5) manual page
CategoryPackageManagement
Debian является одним из самых популярных дистрибутивов Linux всех времен, и теперь он получил новую версию Debian 10 Buster.
В Debian появилось много производных, наиболее популярным из которых является Ubuntu.
Дистрибутив Debian Linux широко используется из-за его основного управления пакетами – APT и формата пакетов .deb.
Каждое приложение, системная утилита или игра в Debian распространяется в виде пакета.
Вы можете установить эти пакеты в вашу систему, используя APT (автоматически или вручную).
В этом руководстве мы кратко рассмотрим новые возможности Debian 10, познакомимся с менеджером пакетов APT и узнаем, как настроить его файл sources.list на Debian 10 Buster.
Давайте посмотрим, каковы новые функции и самые важные изменения.
Новые возможности Debian 10 Buster
Наиболее важные функции нового Debian 10 Buster:
- GNOME Desktop 3.30
- Linux Kernel 4.19.0-5
- OpenJDK 11.0
- AppArmor Enabled by Default
- Nodejs 10.15.2
- NFtables заменяет iptables
- Поддержка множества плат ARM 64 и ARMHF SBC
- Mailman 3
- Bash 5.0
- Debian implementing /usr/merge
- Secure-boot поддержка
- Calameres Live-установщик образов Debian-Live
Что такое APT-менеджер и его sources.list
APT – менеджер пакетов, используемый в Debian и его производных.
APT расшифровывается как Advanced Package Tool и представляет собой набор инструментов для управления пакетами Debian и, следовательно, всеми приложениями, установленными в вашей системе Debian.
APT используется для установки, обновления или удаления приложений и пакетов.
APT способен разрешать проблемы с зависимостями и извлекать запрошенные пакеты из репозиториев пакетов.
Он делегирует фактическую установку и удаление пакетов dpkg – низкоуровневому инструменту Debian Package.
APT в основном используется инструментами командной строки, но есть и инструменты с графическим интерфейсом.
Файл /etc/apt/sources.list в Debian содержит список «источников», из которых можно получить пакеты.
Файл sources.list может отличаться в зависимости от различных факторов (с какой среды был установлен Debian, был ли он обновлен с предыдущего выпуска и т. д.)
Это список, который мы имеем в нашей системе:
$ cat /etc/apt/sources.list

deb http://httpredir.debian.org/debian buster main non-free contrib
deb-src http://httpredir.debian.org/debian buster main non-free contrib

deb http://security.debian.org/debian-security buster/updates main contrib non-free
deb-src http://security.debian.org/debian-security buster/updates main contrib non-free
Теперь мы обсудим содержимое этого файла и его различных разделов.
Содержимое и разделы файла Debian sources.list
Разделы файла sources.list следующие:
- Тип архива
- URL репозитория
- распределение
- Составная часть
Теперь мы подробно рассмотрим каждый из этих разделов.
Тип архива
Первая запись в каждой строке – deb или deb-src представляет тип архивов репозитория.
deb означает, что репозиторий в указанном URL-адресе содержит предварительно скомпилированные пакеты.
Это пакеты, установленные по умолчанию при использовании менеджеров пакетов, таких как apt-get, aptitude, synaptic и т. д.
deb-src указывает исходные пакеты с управляющим файлом Debian (.dsc) и diff.gz, содержащий изменения, необходимые для упаковки программы.
URL репозитория
Следующий раздел в строке ввода – это URL-адрес хранилища, из которого будут загружаться пакеты.
Вы можете найти основной список репозиториев Debian из зеркал исходников Debian Worldwide.
Распределение
Дистрибутивом может быть либо кодовое имя релиза / псевдоним (jessie, stretch, buster, sid) или класс релиза (old stable, stable, testing, unstable) соответственно.
Если вы собираетесь отслеживать класс выпуска, используйте имя класса, если вы хотите отслеживать выпуск версии Debian, используйте кодовое имя.
Составная часть
Обычно в Debian можно использовать три компонента, а именно:
- main – содержит пакеты, которые являются частью дистрибутива Debian. Эти пакеты соответствуют DFSG.
- contrib – Пакеты здесь совместимы с DFSG, но содержат пакеты, которых нет в основном хранилище.
- non-free – содержит пакеты программного обеспечения, которые не соответствуют требованиям DFSG.
Как мы видим в следующем файле sources.list на Debian 10 Buster, что в строках были перечислены все три типа компонентов:
deb http://httpredir.debian.org/debian buster main non-free contrib
deb-src http://httpredir.debian.org/debian buster main non-free contrib

deb http://security.debian.org/debian-security buster/updates main contrib non-free
deb-src http://security.debian.org/debian-security buster/updates main contrib non-free
Если ваш файл sources.list отличается, вы должны будете добавить разделы contrib и non-free после main, чтобы все пакеты были перечислены.
Если это так в вашей системе, вы можете отредактировать файл /etc/apt/sources.list с помощью nano, vim или любого другого редактора, чтобы внести изменения.
Мы рассмотрим это в следующем разделе статьи.
Если вам также нужны компоненты Backports, contrib и non-free, добавьте строки buster-backports.
Например, для Debian 10 Buster:
deb http://deb.debian.org/debian buster-backports main contrib non-free
deb-src http://deb.debian.org/debian buster-backports main contrib non-free
Вместо этого вы можете использовать https:// … во всех приведенных выше URL-адресах, чтобы использовать репозитории через зашифрованные соединения HTTPS.
(Пользователи Debian 9 Stretch или более ранних выпусков должны сначала установить пакет apt-transport-https.)
Если ваш sources.list содержит все разделы, мы можем запустить обновление пакета, используя apt-get.
Это обеспечит синхронизацию вашего индекса apt.
Затем вы можете установить новые пакеты из репозитория.
$ sudo apt-get update
Hit:1 http://security.debian.org/debian-security buster/updates InRelease
Hit:2 http://cdn-fastly.deb.debian.org/debian buster InRelease
Reading package lists... Done
В некоторых случаях вы можете получить ошибки в репозиториях при обновлении списков пакетов.
В этом случае используйте apt, а не apt-get. apt предпочтительнее apt-get для интерактивного использования.
$ sudo apt update
$ sudo apt upgrade -y
Если это не решает проблему, тогда второй вариант – использовать –allow-releaseinfo-change
$ sudo apt-get --allow-releaseinfo-change update
Добавление пользовательских репозиториев
Не всегда рекомендуется добавлять пользовательские и сторонние репозитории в файл /etc/apt/sources.list.
Вместо этого вы можете создать файл в каталоге /etc/apt/sources.list.d.
Например, чтобы установить docker-ce на Debian 10 Buster из его репозитория upstream, вы должны сделать следующее:
$ sudo vim /etc/apt/sources.list
Добавьте содержание:
deb [arch=amd64] https://download.docker.com/linux/debian buster stable
Вы можете использовать инструмент GNOME для редактирования вашего файла sources.list.
Доступ к нему осуществляется через Меню → Система → Администрирование → Источники программного обеспечения.
gksu --desktop /usr/share/applications/software-properties.desktop /usr/bin/software-properties-gtk
Другой способ – использовать команду apt, используемую для добавления сторонних репозиториев:
$ sudo apt-get install software-properties-common

$ sudo add-apt-repository
   "deb [arch=amd64] https://download.docker.com/linux/debian
   $(lsb_release -cs)
   stable"
Затем вы можете перейти к обновлению apt-cache и установить пакет docker-ce с помощью apt-get.
Это рекомендуемый способ добавления любого другого стороннего репозитория.
Вы заметите, что это не сработает, потому что в вашей системе нет ключа GPG репозитория Docker.
Мы рассмотрим это далее.
Импорт ключей apt
При работе с репозиториями apt и sources.list в какой-то момент вам необходимо импортировать ключи GPG.
Обычно это делается с помощью команды apt-key с синтаксисом:
# apt-key adv --keyserver [server-address] --recv-keys [key-id]
Или вы можете загрузить ключ GPG напрямую и установить его из текущего каталога.
В качестве примера, чтобы загрузить ключи GPG репозитория Docker, вы должны запустить:
$ curl -fsSL https://download.docker.com/linux/debian/gpg | sudo apt-key add -
OK
Для проверки правильности установки ключа выполните следующее:
$ sudo apt-key fingerprint 0EBFCD88
pub   rsa4096 2017-02-22 [SCEA]
      9DC8 5822 9FC7 DD38 854A  E2D8 8D81 803C 0EBF CD88
uid           [ unknown] Docker Release (CE deb)
sub   rsa4096 2017-02-22 [S]
После этого вы запустите:
$ sudo apt-get update
$ sudo apt-get install docker-ce
Использование Apt с Tor
Если вы обеспокоены вопросами конфиденциальности или небезопасной передачи данных, вы можете использовать Tor с репозиториями Debian в вашем файле sources.list.
Apt может получать и загружать обновления через Tor.
Чтобы это сработало, вам нужно установить пакеты tor и apt-transport-tor.
Затем вы можете использовать официальные onion сервисы, предоставляемые Debian.
deb tor+http://vwakviie2ienjx6t.onion/debian buster main
deb-src tor+http://vwakviie2ienjx6t.onion/debian buster main

deb tor+http://sgvtcaew4bxjd7ln.onion/debian-security buster/updates main
deb-src tor+http://sgvtcaew4bxjd7ln.onion/debian-security buster/updates main

deb tor+http://vwakviie2ienjx6t.onion/debian buster-updates main
deb-src tor+http://vwakviie2ienjx6t.onion/debian buster-updates main
Заключение
Мы видите, как мы можем манипулировать репозиториями файлов и пакетов sources.list в Debian Linux.
Это обновленная статья для нового выпуска Debian – Debian 10 Buster.
Вы должны использовать эту информацию безопасно, потому что манипулирование файлом sources.list может привести к тому, что ваша система будет заполнена нестабильными пакетами, и вы можете столкнуться со многими неразрешенными зависимостями или даже сломать вашу систему.
Debian is one of the most popular Linux distributions of all time, and now it got a new version release Debian 11 Bullseye. There is a lot of derivatives that came out of Debian, of which the most popular is Ubuntu.
Debian Linux distribution is widely used because of it’s core package management — APT, and it’s package format .deb. Every application, system utility or game in Debian, is distributed as a package. You can install those packages onto your system using APT (automatically or manually).
In this guide, we will briefly see new features of Debian 11, get familiar with the APT package manager, and learn how to configure it’s sources.list file on Debian 11 Bullseye.
Let’s see what are the new features and the most important changes.
New features of Debian 11 Bullseye
The most important features of new Debian 11 Bullseye are:
- GNOME Desktop 3.38
- Linux Kernel 5.10 series
- LibreOffice 7.0
- OpenJDK 11.0
- Driverless scanning
- Improved man pages
- Kernel support for exFAT
- Support for more hardware architectures
- 11294 new packages
- PHP 7.4
- Python 3.9
- Alternative init systems are supported
- Persistent journal functionality by default
What is APT manager and it’s sources.list
APT is the package manager used in Debian and its derivatives. APT stands for Advanced Package Tool and it is a set of tools for managing Debian packages, and therefore all of the applications installed on your Debian system.
APT is used to install, update or remove applications and packages.
APT is capable of resolving dependency problems and retrieving requested packages from package repositories. It delegates the actual installation and removal of packages to dpkg — low level core Debian Package tool. APT is mainly used by its command-line tools, but there are also GUI tools available.
The file ‘/etc/apt/sources.list’ in Debian contains the list of the ‘sources’ from which the packages can be obtained. sources.list file can vary depending on various factors (from which medium the Debian was installed, was it updated from previous release, etc…)
This is the list we want on our system:
$ cat /etc/apt/sources.list deb http://httpredir.debian.org/debian bullseye main non-free contribdeb-src http://httpredir.debian.org/debian bullseye main non-free contribdeb http://deb.debian.org/debian-security/ bullseye-security main contrib non-freedeb-src http://deb.debian.org/debian-security/ bullseye-security main contrib non-free
We will now discuss the contents of this file and it’s different sections.
Contents and sections of Debian sources.list file
The sections of ‘sources.list’ file are as follows:
- Archive type
- Repository URL
- Distribution
- Component
We will now go into detail about each of these sections.
Archive type
The first entry on each line — deb or deb-src represents the type of repository archives.
deb means the repository in the URL provided contains pre-compiled packages. These are the packages installed by default when using package managers like apt-get, aptitude, synaptic, etc…
deb-src indicates source packages with Debian control file (.dsc) and the diff.gz containing the changes needed for packaging the program.
Repository URL
The next section on the entry line is an URL of the repository from where the packages will be downloaded from. You can find the main list of Debian repositories from Debian Worldwide sources.list mirrors.
Distribution
The distribution can be either the release code name / alias (jessie, stretch, buster, bullseye, sid) or the release class (old stable, stable, testing, unstable) respectively. If you intend to track a release class then use the class name, if you want to track a Debian point release, use the code name.
Component
There are normally three components which can be used on Debian, namely:
- main — This contains packages that are part of Debian distribution. These packages are DFSG compliant.
- contrib -The packages here are DFSG compliant, but contains packages which are not in the main repository.
- non-free — This contains software packages which do not comply with the DFSG.
As we can see in the following sources.list file on Debian 11 Bullseye, we want entries to have all three component types listed:
deb http://httpredir.debian.org/debian bullseye main non-free contrib
deb-src http://httpredir.debian.org/debian bullseye main non-free contrib

deb http://deb.debian.org/debian-security/ bullseye-security main contrib non-free
deb-src http://deb.debian.org/debian-security/ bullseye-security main contrib non-free
If your sources.list file differs, you will have to add contrib and non-free sections after main to have all of the packages listed. If this is the case on your system, you can edit the file /etc/apt/sources.list with nano, vim or any other editor to make changes. We will go through that in the next section of the article.
If you also need the Backports, contrib, and non-free components, add bullseye-backports lines. For example, for Debian 11 Bullseye:
deb http://deb.debian.org/debian bullseye-backports main contrib non-free
deb-src http://deb.debian.org/debian bullseye-backports main contrib non-free
You can instead use ‘https://…’ in all of the above URLs to use the repositories over encrypted HTTPS connections. (Users of Debian 9 Stretch or older releases will need to install the apt-transport-https package first.)
If your sources.list contains all of the sections we can run package update using apt. This will ensure your apt index is synchronized. Then you can install new packages from the repository.
$ sudo apt update
Hit:1 http://security.debian.org/debian-security bullseye-security InRelease
Hit:2 http://cdn-fastly.deb.debian.org/debian bullseye InRelease
Reading package lists... Done
In some cases you can get errors with repositories while updating the package lists. In that case use apt rather than apt-get. apt is preferred over apt-get for interactive use.
$ sudo apt update
$ sudo apt upgrade -y
If that doesn’t fix the issue then second option is to use —allow-releaseinfo-change
$ sudo apt-get --allow-releaseinfo-change updateAdding custom repositories
It is not always advisable to add custom and third-party repositories in the ‘/etc/apt/sources.list’ file. Instead you can create a file under the ‘/etc/apt/sources.list.d’ directory. For example, to install docker-ce on Debian 11 Bullseye from it’s upstream repository, you’ll do the following:
$ sudo vim /etc/apt/sources.listAdd the content:
deb [arch=amd64] https://download.docker.com/linux/debian bullseye stableYou can use a GNOME tool to edit your sources.list file. Access it through Menu → System → Administration → Software Sources.
gksu --desktop /usr/share/applications/software-properties.desktop /usr/bin/software-properties-gtkAnother way is to use the apt command used for adding third-party repositories:
$ sudo apt-get install software-properties-common

$ sudo add-apt-repository
   "deb [arch=amd64] https://download.docker.com/linux/debian
   $(lsb_release -cs)
   stable"
You can then proceed to update apt-cache and install docker-ce package with apt-get. This is the recommended way to add any other third party repository.
You’ll notice this wont work because you don’t have the GPG key of the docker repository on your system. We’ll cover that next.
Importing apt keys
When working with apt and sources.list repositories, at some point you are required to import GPG keys. This is usually done using the command apt-key, with syntax:
# apt-key adv --keyserver [server-address] --recv-keys [key-id]
Or you can download the GPG key directly and install it from the current directory.
As an example, to download docker repository GPG keys, you’ll run:
$ curl -fsSL https://download.docker.com/linux/debian/gpg | sudo apt-key add -
OK
To test if the key was correctly installed run the following:
$ sudo apt-key fingerprint 0EBFCD88
pub   rsa4096 2017-02-22 [SCEA]
      9DC8 5822 9FC7 DD38 854A  E2D8 8D81 803C 0EBF CD88
uid           [ unknown] Docker Release (CE deb)
sub   rsa4096 2017-02-22 [S]
After that you’ll run:
$ sudo apt-get update
$ sudo apt-get install docker-ce
Using Apt with Tor
If you’re concerned with privacy issues, or unsecure data transfer, you can use Tor with Debian repositories in your sources.list file. Apt can retrieve and download updates through Tor. For this to work you need to install the tor and apt-transport-tor packages. You can then use the official onion services provided by Debian.
deb tor+http://vwakviie2ienjx6t.onion/debian bullseye main deb-src tor+http://vwakviie2ienjx6t.onion/debian bullseye maindeb tor+http://sgvtcaew4bxjd7ln.onion/debian-security bullseye-security main deb-src tor+http://sgvtcaew4bxjd7ln.onion/debian-security bullseye-security maindeb tor+http://vwakviie2ienjx6t.onion/debian bullseye-updates main deb-src tor+http://vwakviie2ienjx6t.onion/debian bullseye-updates main
Note: Debian less support https due to the fact that Debian package distribution has a mechanism to verify packages using GPG. The package signature scheme helps better than https in this case. You can use https mirror but make sure you have installed apt-transport-https package installed.
Conclusion
We have seen how we can manipulate sources.list file and package repositories in Debian Linux. This is the updated article for the new Debian release — Debian 11 Bullseye. You should use this info safely because of manipulating sources.list file can make your system full of unstable packages and you may end up encountering many unresolved dependencies or even breaking your system.
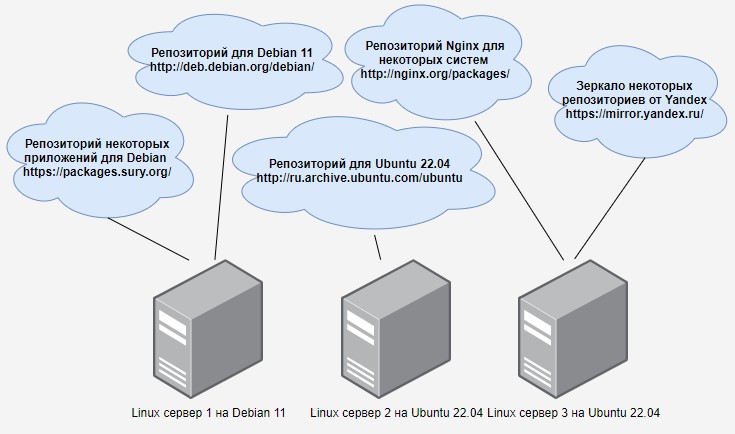
Из этой статьи вы узнаете что такое репозитории в Linux. Мы научимся их настраивать на примере Debian 11 и Ubuntu 22.04.
Что такое репозиторий
Репозиторий – это своеобразное хранилище приложений. У многих GNU/Linux дистрибутивов есть свои репозитории. А также разработчики какого-нибудь отдельного программного обеспечения могут создать свой репозиторий. Но в этом случае такой репозиторий нужно разделить на ветки, одна ветка будет подходить для одной Linux системы, а другая для другой.
В репозиториях, которые подходят для Debian и Ubuntu приложения хранятся в виде архивов. Такие архивы называются пакетами. Эти пакеты имеют особый формат – deb. Есть ещё другой, популярный, формат пакетов – rpm, но системы полагающиеся на такие пакеты я не рассматриваю.
Репозитории могут быть доступны с использованием различных протоколов, но самым распространённым является http. Такие репозитории могут быть открыты с помощью обычного браузера. И от туда можно скачать необходимый пакет для установки. Но правильнее устанавливать пакеты в систему из репозиториев с помощью специальных утилит – пакетных менеджеров.
На этом уроке мы познакомимся с подключением системных и сторонних репозиториев. А пакетные менеджеры рассмотрим позже.
Конфиги со списком репозиториев
Пакетные менеджеры, которые умеют устанавливать пакеты из репозиториев, должны знать адреса репозиториев. И эти адреса записываются в конфиг – /etc/apt/sources.list. А также можно создавать дополнительные конфиги с расширением .list в каталоге /etc/apt/sources.list.d/. Всё это справедливо и для Debian и для Ubuntu.
Если помните, в процессе установки систем мы выбирали репозиторий:
- для Debian – deb.debian.org;
- для Ubuntu – ru.archive.ubuntu.com.
Давайте теперь посмотрим какие репозитории прописались на наших Linux системах (с помощью egrep -v '^#|^$' я убрал комментарии, а с помощью cat -n добавил нумерацию строк):
alex@ubu:~$ egrep -v '^#|^$' /etc/apt/sources.list | cat -n
    1 deb http://ru.archive.ubuntu.com/ubuntu jammy main restricted
    2 deb http://ru.archive.ubuntu.com/ubuntu jammy-updates main restricted
    3 deb http://ru.archive.ubuntu.com/ubuntu jammy universe
    4 deb http://ru.archive.ubuntu.com/ubuntu jammy-updates universe
    5 deb http://ru.archive.ubuntu.com/ubuntu jammy multiverse
    6 deb http://ru.archive.ubuntu.com/ubuntu jammy-updates multiverse
    7 deb http://ru.archive.ubuntu.com/ubuntu jammy-backports main restricted universe multiverse
    8 deb http://ru.archive.ubuntu.com/ubuntu jammy-security main restricted
    9 deb http://ru.archive.ubuntu.com/ubuntu jammy-security universe
    10 deb http://ru.archive.ubuntu.com/ubuntu jammy-security multiverse

alex@deb:~$ egrep -v '^#|^$' /etc/apt/sources.list | cat -n
     1  deb http://deb.debian.org/debian/ bullseye main
     2  deb-src http://deb.debian.org/debian/ bullseye main
     3  deb http://security.debian.org/debian-security bullseye-security main
     4  deb-src http://security.debian.org/debian-security bullseye-security main
     5  deb http://deb.debian.org/debian/ bullseye-updates main
     6  deb-src http://deb.debian.org/debian/ bullseye-updates main
Разбираем конфиг
Этот файл состоит из строк, а строки состоят из следующих столбцов:
- Тип пакетов:
- deb — архив с уже откомпилированной и готовой к установке программой;
- deb-src — архив с исходным кодом программы, который перед установкой нужно будет откомпилировать.
- Адрес репозитория:
- http://ru.archive.ubuntu.com/ubuntu – для Ubuntu;
- http://deb.debian.org/debian/ – для Debian;
- http://security.debian.org/debian-security – обновления безопасности для Debian.
- Ветки репозитория:
- для Ubuntu:
- jammy – приложения для этой версии Ubuntu;
- jammy-updates – рекомендуемые обновления;
- jammy-backports – обновления из более новой системы. Допустим для Ubuntu 20.04 определённый пакет уже не обновляется, но из этой ветки можно попробовать его обновить (конечно есть вероятность повредить систему);
- jammy-security – важные обновления безопасности, без которых ваш сервер легче будет взломать.
- для Debian:
- bullseye – приложения для этой версии Debian;
- bullseye-updates – рекомендуемые обновления;
- bullseye-security – важные обновления безопасности, без которых ваш сервер легче будет взломать.
- для Ubuntu:
- И в самом конце компоненты, их можно записывать через пробел в одной строке:
- Для Ubuntu:
- main – здесь находятся пакеты, которые официально поддерживаются компанией Canonical;
- restricted – содержит поддерживаемое ПО с закрытым исходным кодом, например MP3 или Flash;
- universe – содержит ПО, которое поддерживается сообществом пользователей и разработчиков Ubuntu;
- multiverse – содержит ПО, которое каким-либо образом ограничено либо условиями лицензии, либо юрисдикцией.
- Для Debian компоненты делятся по критериям свободного ПО (DFSG)
- main – пакеты полностью соответствуют критериям DFSG. Эти пакеты считаются частью дистрибуции Debian;
- contrib – пакеты тоже соответствуют критериям DFSG, но зависят от других пакетов, которые не соответствуют этим критериям;
- non-free – содержит всё остальное ПО, которое не соответствует DFSG.
- Для Ubuntu:
Классы релизов в Debian
Рассматривая выше ветки репозиториев Debian мы увидели следующее:
- bullseye;
- bullseye-updates;
- bullseye-security.
Но, помимо кодовых имён версий системы, в названиях веток, можно использовать специальные классы релизов:
- stable – ссылается на текущей стабильный репозиторий Debian, сейчас это bullseye. Как только выйдет новая версия Debian, то stable будет ссылаться на более новую версию;
- oldstable – ссылается на предыдущий стабильный репозиторий;
- testing – ссылается на специальную ветку репозитория для разработки нового стабильного релиза;
- unstable – ссылается на самые свежие, но не протестированные пакеты;
- experimental – здесь хранятся пакеты, которые только начали разрабатывать;
- backports – ссылается на testing и unstable, но только для обновлений безопасности.
То есть вы можете изменить свои репозитории на testing, и быть на острие прогресса:
### Это только пример, существует большая вероятность что система очень скоро повредится из за непроверенных обновлений ###
deb http://deb.debian.org/debian/ testing main
deb-src http://deb.debian.org/debian/ testing main
deb http://security.debian.org/debian-security testing-security main
deb-src http://security.debian.org/debian-security testing-security main
deb http://deb.debian.org/debian/ testing-updates main
deb-src http://deb.debian.org/debian/ testing-updates main
Файл Release
Каждый репозиторий, для каждой ветки содержит текстовый файл Release. Например, откройте в браузере репозиторий для Ubuntu: http://ru.archive.ubuntu.com/ubuntu/. Дальше откройте ветку (dists) для jammy. И здесь вы можете скачать и посмотреть файл Release.
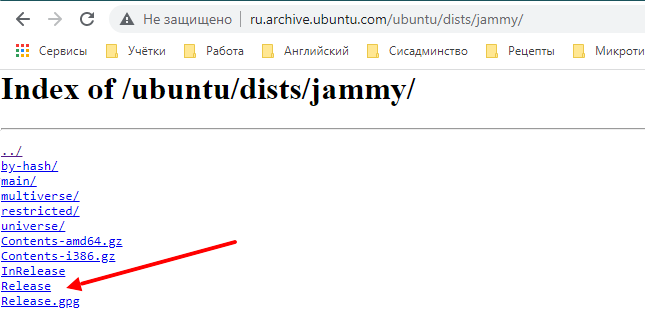
Он содержит информацию о данной ветке репозитория, например для Ubuntu Jammy файл содержит следующее:
Origin: Ubuntu
Label: Ubuntu
Suite: jammy
Version: 22.04
Codename: jammy
Date: Thu, 21 Apr 2022 17:16:08 UTC
Architectures: amd64 arm64 armhf i386 ppc64el riscv64 s390x
Components: main restricted universe multiverse
Description: Ubuntu Jammy 22.04
MD5Sum:
 *** а здесь контрольные суммы для каждого пакета из репозитория ***
Файл Release – один из самых важных файлов для работы репозитория. Когда пакетный менеджер обновляет список пакетов, то он открывает адрес репозитория и читает этот файл. Если этого файла нет, то репозиторий будет помечен как неисправный и не будет использоваться.
Архитектура пакетов
Если вы ещё раз посмотрите на файл Release в репозитории, то можете заметить там строчку:
Architectures: amd64 arm64 armhf i386 ppc64el riscv64 s390x
Здесь прописаны архитектуры пакетов, которые хранятся в репозитории. Прописывая источник репозитория, например в конфиге /etc/apt/sources.list вы можете указать определённую архитектуру, чтобы предотвратить скачивание и установку пакетов для других архитектур.
Это делается таким способом:
### Пример для Debian ###
deb [arch=amd64] http://deb.debian.org/debian/ bullseye main
Вариант использования официальных репозиториев
Для того чтобы уменьшить вероятность поломки вашей системы из-за непроверенных обновлений, можно немного сократить количество репозиториев в системах Debian и в Ubuntu.
Вообще в Debian дан список самых безопасных репозиториев по умолчанию. Можем лишь закомментировать репозитории с исходниками, так как скорее всего вам они пока не понадобятся. Напомню, что такие строки начинаются со слова deb-src. А если понадобятся вы их просто раскомментируете. После правки у нас осталось 3 источника пакетов:
alex@deb:~$ egrep -v '^#|^$' /etc/apt/sources.list | cat -n
     1  deb http://deb.debian.org/debian/ bullseye main
     2  deb http://security.debian.org/debian-security bullseye-security main
     3  deb http://deb.debian.org/debian/ bullseye-updates main
Ubuntu при установке прописала намного больше своих репозиториев. Но их тоже можно свести к трем. Например, я считаю нужным отключить universe, multiverse и jammy-backports репозитории на сервере. После правки список репозиториев также состоит из 3-ёх строк:
alex@ubu:~$ egrep -v '^#|^$' /etc/apt/sources.list | cat -n
     1  deb http://ru.archive.ubuntu.com/ubuntu jammy main restricted
     2  deb http://ru.archive.ubuntu.com/ubuntu jammy-updates main restricted
     3  deb http://ru.archive.ubuntu.com/ubuntu jammy-security main restricted
Чтобы применить изменения, выполните на обоих системах команду:
$ sudo apt update
Эта команда подключится к каждому репозиторию, посмотрит какие пакеты можно обновить и из каких источников. И сохранит локальных кэш. После выполнения этой команды система будет знать какие пакеты из каких репозиториев можно получить, а также версии этих пакетов. Но если в репозиторий добавят более новую версию какого-нибудь пакета, то система об этом узнает лишь после следующего выполнения этой команды.
А если хотите обновить систему, то выполните команду:
$ sudo apt upgrade
Эта команда уже скачивает все обновления и устанавливает их.
Кстати утилита apt – это и есть менеджер пакетов. Рассмотрим её и другие менеджеры пакетов в следующих статьях.
Добавление сторонних репозиториев
Источник репозитория
Некоторые разработчики создают свои собственные репозитории. Например у веб сервера Nginx есть свой репозиторий для разных систем, в том числе для Debian и Ubuntu. Вот его адрес: https://nginx.org/packages/mainline/.
Добавлять репозитории можно в основной конфиг: /etc/apt/sources.list или создавать отдельные конфиги в каталоге /etc/apt/sources.list.d/. Сам я считаю что правильнее для каждого стороннего репозитория создавать отдельные конфиги.
Например, чтобы подключить репозиторий nginx создайте следующий конфиг. Для Debian:
alex@deb:~$ sudo nano /etc/apt/sources.list.d/nginx.list
deb http://nginx.org/packages/debian bullseye nginx
Или для Ubutnu:
alex@ubu:~$ sudo nano /etc/apt/sources.list.d/nginx.list
deb http://nginx.org/packages/ubuntu jammy nginx
Приоритет репозитория
Допустим, мы прописали дополнительный репозиторий для nginx, но как системе понять из какого репозитория брать пакет для установки? Ведь пакеты для nginx есть и в системном репозитории и в репозитории от самого nginx. Чтобы ответить на этот вопрос придумали приоритеты репозиториев.
Чтобы задать приоритет репозитория нужно создать файл /etc/apt/preferences.d/XX<имя_репозитория>, где XX это номер файла, чем он выше, тем обработается позднее, то есть будет иметь приоритет над другими настройками.
По нашему примеру для nginx нужно создать следующий файл:
$ sudo nano /etc/apt/preferences.d/99nginx
Package: *
Pin: origin nginx.org
Pin: release o=nginx
Pin-Priority: 900
Разберём написанное:
- Package: имя пакета. Можно поставить знак * чтобы применить приоритет для всех пакетов из этого репозитория. Также можно указать несколько имён через пробел;
- Pin: опции прикрепления. Существует много опций, я разберу лишь некоторые:
- origin “имя автора или поставщика”;
- release o=nginx – означает что в файле Release репозитория есть поставщик (Origin = o) с именем nginx;
- release l=Debian – означает что в файле Release репозитория есть Label (l) с именем Debian;
- Pin-Priority: приоритет.
То-есть Package и Pin это условия для назначения приоритета, а Pin-Priority это действие (назначение приоритета). В нашем примере получается следующее: если имя пакета любое, но владелец репозитория nginx.org и в файле Release прописано “Origin: nginx“, то для таких пакетов ставим приоритет 900.
Приоритет может быть в следующих диапазонах:
- P >= 1000 – пакет будет установлен из этого репозитория, даже если это приведет к понижению версии уже установленного пакета;
- 990 <= P < 1000 – пакет будет установлен из этого репозитория, если не установлена более новая версия;
- 500 <= P < 990 – пакет будет установлен, если нет пакета принадлежащего к целевому выпуску или не установлена более новая версия;
- 100 <= P < 500 – пакет будет установлен, если нет кандидатов из других репозиториев или установленного пакета более новой версии;
- 0 < P < 100 – пакет будет установлен, только если он ещё не установлен (любой версии) и если нет кандидатов из других репозиториев;
- P < 0 – пакет не будет установлен ни при каких условиях;
- P = 0 – не используется.
Целевой выпуск
Приоритеты с 500 по 990 и с 990 по 1000 очень похожи. Чтобы их отличить нужно понять что такое целевой выпуск. Для Ubuntu или Debian это название версии дистрибутива. Например для Ubuntu – jammy, а для Debian – bullseye. Но это имя ещё нужно задать таким способом:
alex@deb:~$ sudo nano /etc/apt/apt.conf.d/default
APT::Default-Release "bullseye";

alex@ubu:~$ sudo nano /etc/apt/apt.conf.d/default
APT::Default-Release "jammy";
Открытый ключ репозитория
И так, репозиторий мы добавили, приоритет настроили. Давайте попробуем применить изменения:
alex@deb:~$ sudo apt update
Пол:1 http://nginx.org/packages/debian bullseye InRelease [2 860 B]
Ошб:1 http://nginx.org/packages/debian bullseye InRelease
  Следующие подписи не могут быть проверены, так как недоступен открытый ключ: NO_PUBKEY ABF5BD827BD9BF62
Пол:2 http://security.debian.org/debian-security bullseye-security InRelease [44,1 kB]
Сущ:3 http://deb.debian.org/debian bullseye InRelease
Пол:4 http://deb.debian.org/debian bullseye-updates InRelease [39,4 kB]
Чтение списков пакетов… Готово
W: Ошибка GPG: http://nginx.org/packages/debian bullseye InRelease: Следующие подписи не могут быть проверены, так как недоступен открытый ключ: NO_PUBKEY ABF5BD827BD9BF62
E: Репозиторий «http://nginx.org/packages/debian bullseye InRelease» не подписан.
N: Обновление из этого репозитория нельзя выполнить безопасным способом, поэтому по умолчанию он отключён.
N: Информацию о создании репозитория и настройках пользователя смотрите в справочной странице apt-secure(8).
И тут мы видим ошибку, что нам не хватает открытого ключа. Я привёл пример для Debian, но в Ubuntu будет подобная ситуация. Дело в том что современные репозитории шифруются с помощью закрытого ключа и чтобы его использовать, нам нужно установить в систему открытый ключ.
Чтобы это сделать, вначале установим необходимые инструменты:
### Для Debian ###
alex@deb:~$ sudo apt install curl gnupg2 ca-certificates lsb-release debian-archive-keyring

### Для Ubuntu ###
alex@ubu:~$ sudo apt install curl gnupg2 ca-certificates lsb-release ubuntu-keyring
Внимание! Утилита gnupg2 для Ubuntu доступна только в репозитории universe, если вы закомментировали эти источники, то разкомментируете их. Это строчки:
deb http://ru.archive.ubuntu.com/ubuntu jammy universe
deb http://ru.archive.ubuntu.com/ubuntu jammy-updates universe
И не забудьте применить изменения, выполнив:
$ sudo apt update
А дальше скачаем открытый ключ (с помощью wget):
$ wget https://nginx.org/keys/nginx_signing.key
Дальше выполняется конвейер команд, это когда вывод одной команды идет на вход другой команде. Такие конвейеры мы будем проходить позже. Но всё равно постараюсь объяснить следующую команду. С помощью cat мы читаем файл ключа, и прочитанное передаём утилите gpg. Утилита gpg переводит прочитанное в необходимый формат и передаёт вывод уже следующей команде tee. Утилита tee (под sudo) сохраняет полученный текст в файл. В конце добавляем >/dev/null, чтобы не было никакого вывода на терминал. Вот сама команда:
$ cat nginx_signing.key | gpg --dearmor | sudo tee /usr/share/keyrings/nginx-archive-keyring.gpg >/dev/null
Вот так мы получили открытый ключ, который теперь хранится в файле /usr/share/keyrings/nginx-archive-keyring.gpg.
Или можно сразу в одной команде скачать файл (с помощью wget или curl) и сохранить ключ в формате gpg:
### Пример для wget ###
$ wget -O- https://nginx.org/keys/nginx_signing.key | gpg --dearmor | sudo tee /usr/share/keyrings/nginx-archive-keyring.gpg >/dev/null

### Пример для curl ###
$ curl https://nginx.org/keys/nginx_signing.key | gpg --dearmor | sudo tee /usr/share/keyrings/nginx-archive-keyring.gpg >/dev/null
После этого необходимо указать в конфиге репозитория, что нужно использовать этот ключ. Для этого в конфиге репозитория между deb и адресом репозитория вставляем [signed-by=/путь/к/ключу]:
alex@deb:~$ sudo nano /etc/apt/sources.list.d/nginx.list
deb [signed-by=/usr/share/keyrings/nginx-archive-keyring.gpg] http://nginx.org/packages/debian bullseye nginx
И пробуем ещё раз применить изменения:
alex@deb:~$ sudo apt update
Сущ:1 http://security.debian.org/debian-security bullseye-security InRelease
Сущ:2 http://deb.debian.org/debian bullseye InRelease
Сущ:3 http://deb.debian.org/debian bullseye-updates InRelease
Пол:4 http://nginx.org/packages/debian bullseye InRelease [2 860 B]
Пол:5 http://nginx.org/packages/debian bullseye/nginx amd64 Packages [7 633 B]
Получено 7 633 B за 1с (9 420 B/s)
Чтение списков пакетов… Готово
Построение дерева зависимостей… Готово
Чтение информации о состоянии… Готово
Все пакеты имеют последние версии.
На этот раз всё прошло успешно.
Кстати, если вы хотите в источнике пакетов прописать архитектуру и открытый ключ, то это делается через пробел:
### Пример ###
deb [arch=amd64 signed-by=/usr/share/keyrings/nginx-archive-keyring.gpg] http://nginx.org/packages/debian bullseye nginx
Проверка добавленного репозитория
Ну и чтобы понять из какого репозитория будет установлен пакет, выполните команду:
alex@deb:~$ apt-cache policy nginx
nginx:
  Установлен: (отсутствует)
  Кандидат:   1.20.2-1~bullseye
  Таблица версий:
     1.20.2-1~bullseye 990
        990 http://nginx.org/packages/debian bullseye/nginx amd64 Packages
     1.20.1-1~bullseye 990
        990 http://nginx.org/packages/debian bullseye/nginx amd64 Packages
     1.18.0-6.1 990
        990 http://deb.debian.org/debian bullseye/main amd64 Packages
Из вывода становится ясно что пакет nginx ещё не установлен в систему, а кандидатом на установку является пакет с версией 1.20.2 из репозитория http://nginx.org/packages/debian. Приоритет у всех пакетов, кстати стал равным = 990. Это произошло после того, как мы установили целевой выпуск = bullseye. Так как все репозитории относятся к этому выпуску, то на назначенный мною приоритет система перестала смотреть, а назначила репозиториям для bullseye такой приоритет.
Итог
Мы узнали что такое репозитории. Узнали что есть официальные репозитории для системы и они прописываются в конфиг /etc/apt/sources.list. А также есть сторонние репозитории и для них лучше создавать свои конфиги в каталоге /etc/apt/sources.list.d/.
Научились добавлять сторонний репозиторий на примере nginx. Узнали про приоритеты репозиториев и открытые ключи. А также узнали что такое целевой выпуск.
Полезные источники:
- Очень хорошо про приоритеты и повышение или понижение версий пакетов написано здесь.
- Инструкция для подключения nginx репозитория в различные системы.
- Существует Репозиторий от Yandex – он хранит ветки для большинства систем Linux.
- Репозиторий Ubuntu
- Репозиторий Debian
Сводка

Имя статьи
Репозитории Linux
Описание
Из этой статьи вы узнаете что такое репозитории в Linux. Мы научимся их настраивать на примере Debian 11 и Ubuntu 22.04
If you’ve installed Debian stable, then you might have come across situations where you weren’t able to install an application you wanted. That is because Debian stable, by its very nature, is older than its testing and unstable counterparts. In such a case, knowing how to add a specific Debian repository and backports will come in handy.
By providing a higher level of stability and security due to its extensive testing, Debian Buster unfortunately also provides an OS that is outdated when compared to other releases. Unfortunately, that also means that many applications will require the use of backports to install the newer version of their program on Debian stable.
Alternatively, such software programs might require the addition of a repository to your system before you can install them. Indeed, significant app updates often involve newer technology. As such, the newly updated program will become unsupported or unavailable through the regular Debian stable ports and repos.
Fortunately, it is not because a program isn’t readily available on your version of Debian that you will have to change your OS. By knowing how to add a specific Debian repository or backports to your source files, you can install your app as if you were using the testing (Bullseye) or unstable (Bookworm) release.
What are Debian backports? And what is a Debian repository?
In brief, backports allow cross-version package compatibility through the use of non-stable package channels. These, in turn, will enable you to fetch specific applications from other releases and to install them on your own Debian stable system. As for repositories, they will allow you to import the particular packages necessary for your app, regardless of your current Debian release. Sometimes, you will have to add repos even if you are using a newer version such as Debian Bullseye. However, it is common to find out that a Debian repository is only necessary if you are using the older, stable Debian release.
A word of caution: as indicated in the ITgirl.tech’s Debian installation guide, avoid creating a “Frankendebian” (see the avoiding common pitfalls section). If you see that you often add a Debian repository, or use backports to install the majority of your applications, consider upgrading your system to Debian testing or unstable. Note also that the extensive use of backport packages can increase your risk of experiencing bugs or crashes.
Even more so than with Debian repositories, it is best to use backports with parsimony. Indeed, there is no guarantee that you won’t end up with components of your Debian stable being incompatible with the packages fetched through the backports. As such, it is recommended to limit yourself to a few backported packages and not to rely on backports whenever you want to install a new application. The use of a Debian repository doesn’t require such precautions, but it is still a Linux best practice to limit your usage of them whenever possible.
The addition of a repository on your Debian OS is straightforward. The only information you will need is the name of the repo required by the app, which you can find within the software’s instructions. Alternatively, the Debian Wiki will often provide the repos of specific apps.
I’ve seldom had to add particular repos in the past. However, off the top of my head, I remember having had to do this procedure when switching my Ubuntu desktop from GNOME 3 to Cinnamon. That ITgirl.tech article is for a different Linux distribution, but I had hoped to use its procedure in this article. Unfortunately, adding a repository requires different steps on Debian, so be sure to follow the process below. Indeed, even though Ubuntu procedures sometimes work as-is (or with slight changes) on Debian, adding a repo requires Debian-specific instructions.
Let’s say that you want to add Spotify to your Debian Buster operating system. To do so, you will need to fetch the Spotify Debian repository, which you can find here: https://wiki.debian.org/spotify.
Note that in this particular case, Spotify requires a signing key. Be sure to add it before fetching the repo.
Open the Terminal, then type the following:
$ echo deb http://repository.spotify.com stable non-free | sudo tee /etc/apt/sources.list.d/spotify.list
Voilà! Simple as that. Once done, update your system ($ sudo apt update), then follow the instructions provided by the app’s developers.
Adding backports to your sources.list
To add backports, you have to edit what is called the “sources.list” file. Be sure to have a backup copy of your original sources.list file, just in case. There are many ways of changing its content; I like to use the “nano” editor.
From the Terminal, enter:
su
Enter your password, then
nano /etc/apt/sources.list
Now, using the keyboard arrows, create a new line after the last source (generally, after “deb-src http://deb.debian.org/debian/ buster-updates main contrib non-free”).
Enter the following:
deb http://deb.debian.org/debian buster-backports main
Once that is done, exit nano (Ctrl+X). Press the “Y” key to confirm that you want to save the changes. Once done, press Enter. You will automatically exit “nano” and revert to the main Terminal window.
After that, type:
apt-get update
You are now ready to install backported packages!
Installing a package from backports
You can usually find specific backport instructions on the website of the app you want to install. However, a good rule of thumb when in doubt is to type:
apt-get -t buster-backports install [NameOfThePackage]
Where [NameOfThePackage] is the name of the application you wish to install. When in doubt, a quick “apt-search” followed by the common name of the app will ensure that you are indeed using the correct package name.
Contrib non-free repositories and the nonfree firmware packages
If you downloaded the standard Debian ISO file, chances are you might stumble upon some hardware compatibility issues. That is especially the case if you own a new computer and opted for the stable Debian release.
If you see that you are running into problems with hardware detection, one of the first steps is to add the “contrib” and “non-free” repositories to your Debian OS. You will find that the non-free packages are part of the unofficial Debian disk images (and are specified as such). However, they aren’t included in the official stock releases, as their use involves proprietary (ie, non-open-source) drivers.
If you own a computer with recent hardware, some of your machine’s components might require such closed-source packages to function correctly. In such an instance, manually adding the “contrib” and “non-free” repositories to your sources.list is necessary. Indeed, to fetch the “non-free” drivers, you first require access to them through these dedicated repositories.
To add repositories, you have to edit the “sources.list” file, just as with backports. Once again, be sure to have a backup copy of your sources.list file. To change its content from the command line, we will use the “nano” editor.
From the Terminal, enter:
su
Enter your password, then
nano /etc/apt/sources.list
After entering your password, you should see something like this:
Now, using the keyboard arrows, go to the end of each of the following lines and add the “contrib” and “non-free” repositories.
deb http://security.debian.org/debian-security buster/updates main
becomes
deb http://security.debian.org/debian-security buster/updates main contrib non-free
…
deb-src http://security.debian.org/debian-security buster/updates main
becomes
deb-src http://security.debian.org/debian-security buster/updates main contrib non-free
…
deb http://deb.debian.org/debian/ buster-updates main
becomes
deb http://deb.debian.org/debian/ buster-updates main contrib non-free
and
deb-src http://deb.debian.org/debian/ buster-updates main
becomes
deb-src http://deb.debian.org/debian/ buster-updates main contrib non-free
Once that is done, exit nano (Ctrl+X). Press the “Y” key to save the changes. After that, press Enter. You will automatically exit “nano” and revert to the main Terminal window.
Once in the Terminal, type:
apt-get update
You are now ready to install the non-free packages!
To do so, execute the following command:
sudo apt-get install firmware-linux-nonfree
Voilà!
После установки Debian 11 Bullseye в виртуализированной инфраструктуре или на физическом компьютере вы заметите, что репозитории APT настроены неправильно. Эта проблема не относится к облачным образам, в которых репозитории для Debian 11 (Bullseye) настроены правильно. В этом руководстве мы покажем вам, как добавить официальные репозитории Debian 11 Bullseye в sources.list.
Если вы попытаетесь обновить репозиторий APT, вы получите сообщение об ошибке, как показано на снимке экрана.

Решением этой проблемы является правильное обновление файла sources.list с помощью обновлений Debian 11 (Bullseye) по умолчанию и репозиториев безопасности.
Текущее содержимое файла:
$ cat /etc/apt/sources.list
# deb cdrom:[Debian GNU/Linux 11.0.0 _Bullseye_ - Official amd64 DVD Binary-1 20210814-10:04]/ bullseye contrib main

deb cdrom:[Debian GNU/Linux 11.0.0 _Bullseye_ - Official amd64 DVD Binary-1 20210814-10:04]/ bullseye contrib main

deb http://security.debian.org/debian-security bullseye-security main contrib
deb-src http://security.debian.org/debian-security bullseye-security main contrib

# bullseye-updates, to get updates before a point release is made;
# see https://www.debian.org/doc/manuals/debian-reference/ch02.en.html#_updates_and_backports
# A network mirror was not selected during install.  The following entries
# are provided as examples, but you should amend them as appropriate
# for your mirror of choice.
#
# deb http://deb.debian.org/debian/ bullseye-updates main contrib
# deb-src http://deb.debian.org/debian/ bullseye-updates main contrib
Добавьте официальные репозитории Debian 11 Bullseye в sources.list
Запустите приведенные ниже команды, чтобы добавить официальные репозитории Debian 11 Bullseye в sources.list.
sudo tee /etc/apt/sources.list<<EOF
deb http://deb.debian.org/debian bullseye main
deb-src http://deb.debian.org/debian bullseye main

deb http://security.debian.org/debian-security bullseye-security main
deb-src http://security.debian.org/debian-security bullseye-security main

deb http://deb.debian.org/debian bullseye-updates main
deb-src http://deb.debian.org/debian bullseye-updates main

deb http://deb.debian.org/debian bullseye-backports main
deb-src http://deb.debian.org/debian bullseye-backports main
EOF
Когда закончите, обновите свой индекс APT, чтобы убедиться, что репозитории работают правильно:
$ sudo apt update
Get:1 http://deb.debian.org/debian bullseye InRelease [113 kB]
Get:2 http://security.debian.org/debian-security bullseye-security InRelease [44.1 kB]
Get:3 http://deb.debian.org/debian bullseye-updates InRelease [36.8 kB]
Get:4 http://deb.debian.org/debian bullseye-backports InRelease [40.9 kB]
Get:5 http://security.debian.org/debian-security bullseye-security/main Sources [15.8 kB]
Get:6 http://security.debian.org/debian-security bullseye-security/main amd64 Packages [31.1 kB]
Get:7 http://security.debian.org/debian-security bullseye-security/main Translation-en [16.8 kB]
Get:8 http://deb.debian.org/debian bullseye/main Sources [8612 kB]
Get:9 http://deb.debian.org/debian bullseye/main amd64 Packages [8178 kB]
Get:10 http://deb.debian.org/debian bullseye/main Translation-en [6241 kB]
Get:11 http://deb.debian.org/debian bullseye-backports/main Sources [49.8 kB]
Get:12 http://deb.debian.org/debian bullseye-backports/main amd64 Packages [68.7 kB]
Get:13 http://deb.debian.org/debian bullseye-backports/main Translation-en [50.5 kB]
Fetched 23.5 MB in 5s (4978 kB/s)
Reading package lists... Done
Building dependency tree... Done
Reading state information... Done
3 packages can be upgraded. Run 'apt list --upgradable' to see them.
Обновление системы
После добавления официальных репозиториев ОС и подтверждения их работоспособности обновим системные пакеты:
sudo apt upgradeВы также можете попробовать незначительные обновления дистрибутива, если они доступны.
sudo apt dist-upgradeТакже установите общие инструменты администрирования ОС
sudo apt install git curl bash-completion wget curl vim telnet -yТеперь у вас есть правильный файл sources.list в вашей системе Debian 11 (Bullseye)