Speech recognition is a relatively new but important feature in Windows computers. This option allows you to voice type and give commands to use applications in Windows. However, in some cases, the Speech Recognition Setup may not work. If speech recognition doesn’t work on your Windows 11/10 computer, then please read this article for the resolutions.
Voice recognition not working
![Windows Speech Recognition doesn’t work [Fixed]](https://www.thewindowsclub.com/wp-content/uploads/2022/08/Speech-Recognition-Setup-Doesnt-Work.jpg?ezimgfmt=ng%3Awebp%2Fngcb193 "Windows Speech Recognition doesn’t work [Fixed]")
Speech Recognition helps you do various things on your computer. From opening a program to dictate text in any text editor – you can do everything using this functionality. However, if it doesn’t work on your computer, the following suggestions may be handy for you.
The main causes of Speech Recognition not working are hardware related issues, software/system permissions, missing or corrupt system files, issues with drivers, etc. If you encounter this problem on your computer, then please try the following solutions sequentially to fix the same:
- Re-enable Speech Recognition
- Check for hardware related issues
- Check if the correct microphone is connected
- Check for microphone permissions
- Increase the input volume of your microphone
- Check speech language
- Turn on Online Speech Recognition using Registry
- Change Group Policy settings
- Disable hotkey changer software
- Reinstall microphone (if external)
- Run the Recording audio troubleshooter
- Perform SFC scan
- Troubleshoot in Clean Boot State
- Miscellaneous solutions
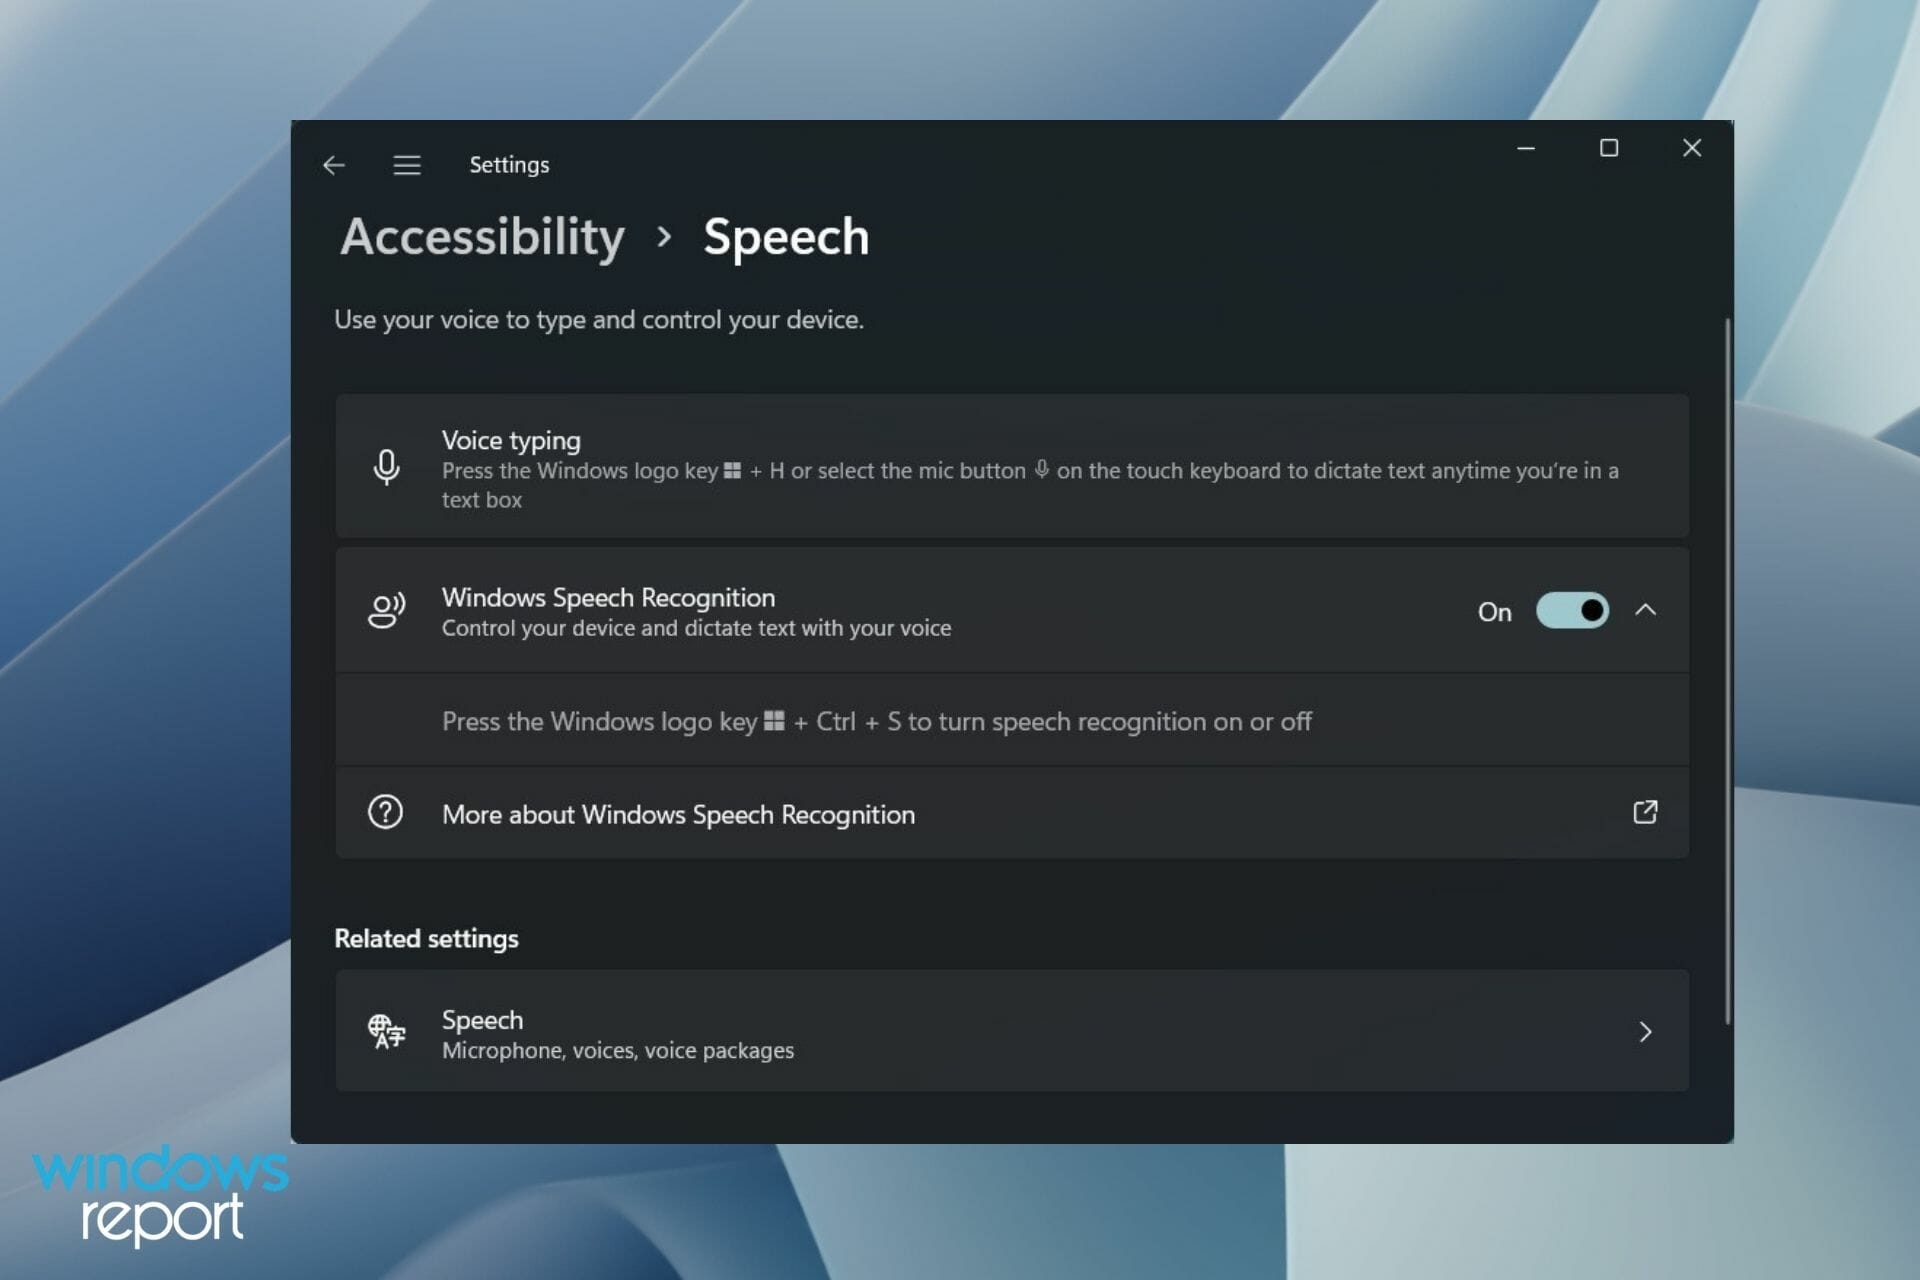
1] Re-enable Speech Recognition
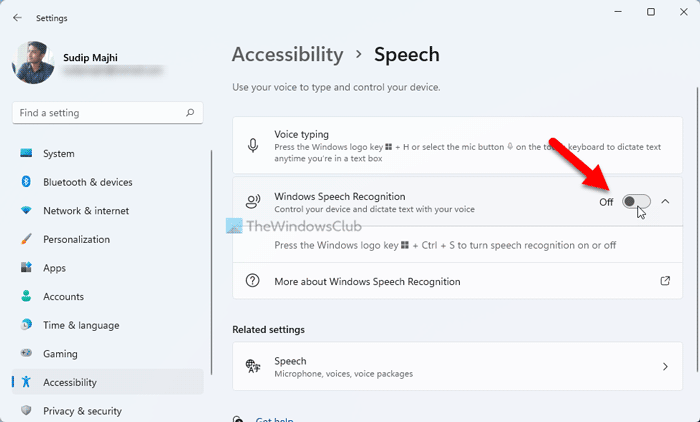
Even if you have turned on the Speech Recognition in Windows Settings, a bug or glitch could disable it automatically. It happens when you use a Beta or Dev Channel build. That is why it is recommended to verify the setting or re-enable it in Windows Settings.
To re-enable Speech Recognition in Windows 11, follow these steps:
- Press Win+I to open Windows Settings.
- Switch to the Accessibility tab.
- Click on the Speech menu.
- Toggle the Windows Speech Recognition button to turn it on.
Then, check if you can use Speech Recognition on your computer or not.
2] Check for hardware related issues
If there are issues with the microphone hardware or the USB connections then no matter what you try on your computer, the speech recognition will not work properly. In this case, we advise you to check your microphone with another computer to isolate the cause with the hardware. If the microphone works fine with another computer, then you can try further solutions.
3] Check if the correct microphone is connected
Ideally, the preferred microphone for any function on the computer is the default microphone of the laptop and if it is not attached then you would have to attach an external one. In the latter case, a Windows computer may or may not detect an external microphone. To confirm this, try the following.
- Right-click on the Start button and select Settings from the menu.
- In the Settings window, go to the System tab on the list on the left-hand side. In the right pane scroll down to Sound and click on it.
- Now scroll down to the Input section and check which microphone is connected and currently in use. It can be judged by checking the radio button.
If your mic is not connected, then click on add device and connect your Input microphone. Make sure that it is the one on which the radio button is checked after connecting.
4] Check for microphone permissions
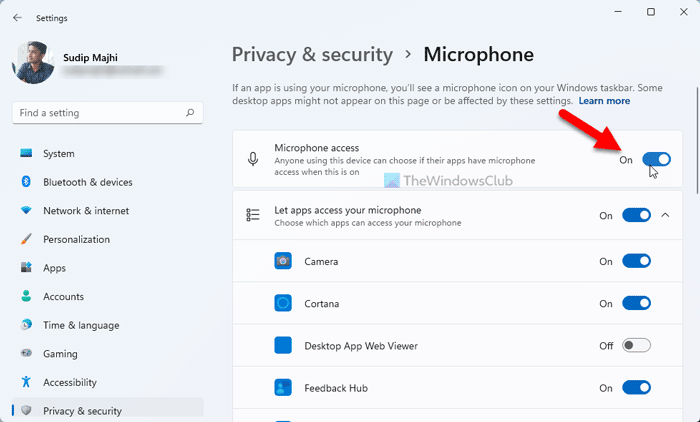
- Right-click on the Start button and select Settings from the menu.
- In the Settings window, go to the Privacy and Security tab on the list on the left-hand side.
- In the right pane, scroll down to App permissions, and click on Microphone.
- Turn the switches on for Microphone access and Let your apps access the microphone.
Also make sure that the switch is turned ON for the application for which you need the speech recognition.
5] Increase the input volume of your microphone
Usually, the volume of the output devices like speaker and headset is visible in the system tray itself. However, you will have to change the microphone volume through the Settings panel. In case the microphone volume is low, the issue in discussion can appear since the computer might not be able to recognize your speech. In this case, you can increase the microphone volume as follows.
- Right-click on the Start button and select Settings from the menu.
- Go to the System tab on the list on the left-hand side and then go to the Sound option on the list on the right-hand side.
- Scroll down to the Input section and you can use the slider to increase the volume.
6] Check speech language
Another reason for your software not recognizing the speech to the microphone could be that you might have selected the wrong language for speech recognition. This can be checked and fixed as follows.
- Right-click on the Start button and select Settings from the menu.
- Go to the Time and Language tab on the list on the left-hand side.
- In the right pane, scroll down and click on Speech.
- Check the speech language and change it if is incorrect.
Although Speech Recognition works with many languages, if you understand English, it is recommended to set English as the primary language. At times, a bug or glitch may block you from using speech recognition when you use any language other than English. That is why it is recommended to follow this guide to change Windows language back to English.
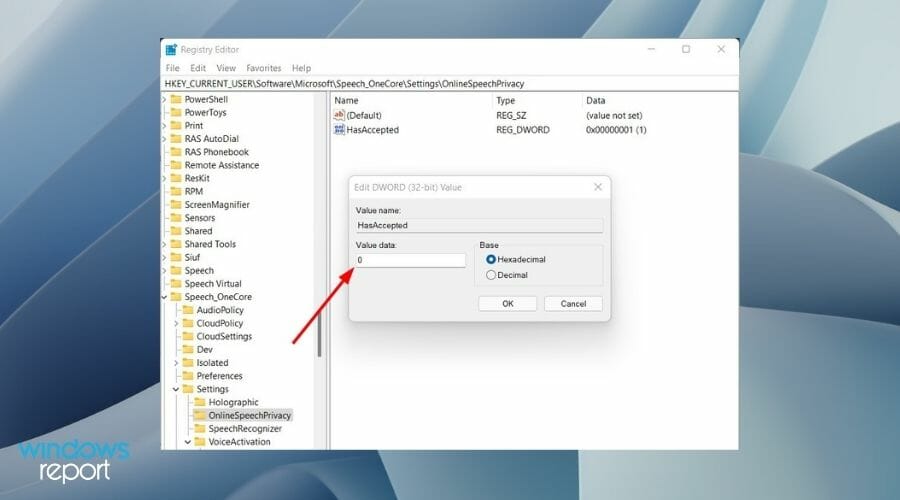
7] Turn on Online Speech Recognition using Registry

If you get this problem with Online Speech Recognition, you must verify the Registry settings. It is possible to enable or disable online Speech Recognition using Windows Registry. If you deactivated this feature in the past, you might encounter the aforementioned problem. That is why follow these steps to turn on Online Speech Recognition using Registry:
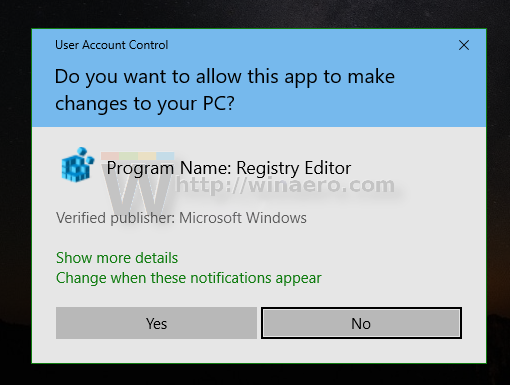
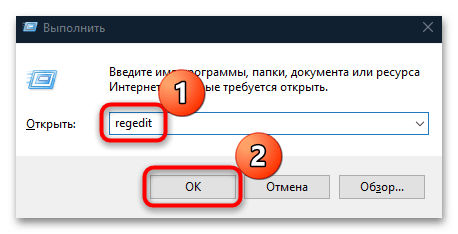
- Press Win+R to open the Run prompt.
- Type regedit > click the OK button.
- Click on the Yes button.
- Navigate to this path: HKEY_CURRENT_USERSoftwareMicrosoftSpeech_OneCoreSettingsOnlineSpeechPrivacy
- Right-click on OnlineSpeechPrivacy > New > DWORD (32-bit) Value.
- Set the name as HasAccepted.
- Double-click on it to set the Value data as 1.
- Click the OK button.
- Close all windows and restart your PC.
After that, you can use online Speech Recognition without any error.
8] Change Group Policy settings
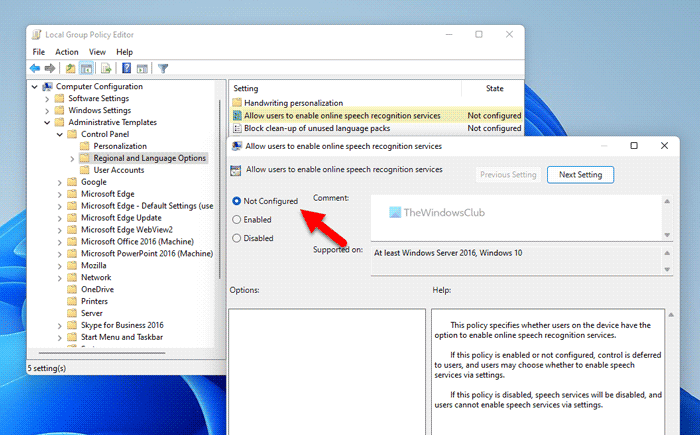
There is a Group Policy setting that helps you prevent or block users from enabling Speech Recognition on Windows 11/10 PC. If you enabled this setting earlier, you could not turn on the same option from Windows Settings. That is why follow the following steps to allow the user to enable online speech recognition:
- Search for gpedit.msc in the Taskbar search box.
- Click on the individual search result.
- Go to Computer Configuration > Administrative Templates > Control Panel > Regional and Language Options.
- Double-click on the Allow users to enable online speech recognition services setting.
- Choose the Enabled or Not Configured option.
- Click the OK button.
After that, you can turn on or off online speech recognition without any problem.
9] Disable hotkey changer software
Windows 11/10 allows users to activate Speech Recognition using a hotkey, Win+Ctrl+S. However, if you have used the same keyboard shortcut to open something else or execute a different command, you won’t be able to use Speech Recognition. That is why it is suggested to check the hotkey changer software or keyboard shortcut changer software minutely.
10] Reinstall microphone (if external)
If you use an external microphone, it is recommended to reinstall it. You can do the following:
- Unplug the microphone from your computer first. Restart your computer and re-plug it in.
- If you haven’t installed the driver, it is suggested to do that. However, if you have already installed the corresponding driver, you can remove it first and reinstall the same.
- Verify if your microphone is in working condition. You can use the same microphone with another computer.
11] Run the Recording audio troubleshooter
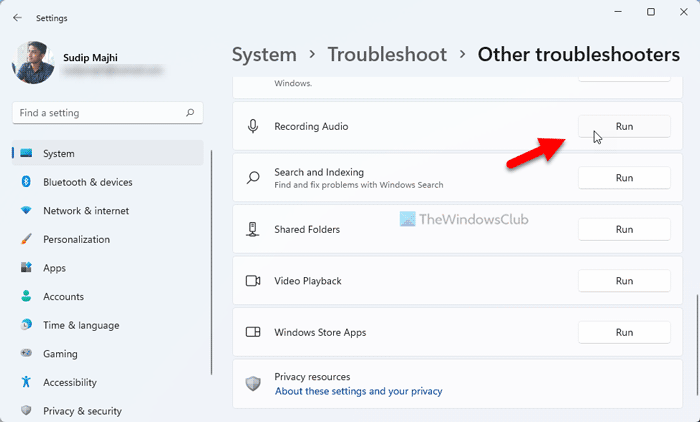
The Recording Audio troubleshooter is an excellent tool to check for problems related to microphone and speech recognition. You can run it as follows.
- Right-click on the Start button and select Settings from the menu.
- In the Settings window, go to the System tab on the list on the left-hand side.
- In the right pane, scroll down and click on Troubleshoot. On the next page, select Other troubleshooters.
- From the list of troubleshooters, select Run corresponding to the Recording Audio troubleshooter.
12] Run SFC scan
If everything else fails, it could be quite possible that the system files are missing or corrupt. In this case, you can consider performing an SFC scan on your computer. The SFC scan will replace the missing and corrupt files and fix the problem of speech recognition not working.
13] Troubleshoot in Clean Boot State
It is quite possible that an external software might be interfering with speech recognition on the intended software. This case can be isolated by troubleshooting the computer in the clean boot state. While in the clean boot state, no other third-party software will launch at the startup itself. In this case, you can identify the problematic software and halt it while using the speech recognition function.
14] Miscellaneous solutions
You can also try solutions like moving to a quieter place, using an external microphone instead of your laptop’s microphone, updating drivers, etc.
Read: How to disable Speech Recognition feature in Windows
How do I turn on my microphone?
First of all, the hardware of the microphone should be plugged and turned on. Some external microphones may have a switch to turn them on but most of them are simply plug and play. If your external microphone requires a separate power supply, make sure that the same is connected. Usually, windows will recognize the hardware and it will be turned on automatically. If that does not happen, you can use the Realtek audio player or Windows Settings to turn it ON manually.
Read: Best Speech Recognition software for Windows 11/10
What is a microphone used for?
A microphone is simply an audio input device for sending an audio input to the computer. The audio input can be used for recording, voice typing, instructing the system, etc. Usually, these days laptops come with inbuilt microphones.
Windows Speech Recognition is not available for the current display language
If you get Windows Speech Recognition is not available for the current display error in Windows 11/10, you need to set English as the default language. If you have used any regional language or anything else as the primary display language, you may encounter the aforementioned error on your computer.
That is why follow these steps to set English as the default Windows display language in Windows 11:
- Press Win+I to open Windows Settings.
- Click on the Time & language tab.
- Select the Language & region menu.
- Expand the Windows display language drop-down menu.
- Select English from the list.
However, you must install the English language first. For that, you can click the Add a language button, select English (United States) and click the Next button to get started with the installation process.
Following that, you can choose it from the drop-down menu.
How do I set up voice recognition on Windows 11?
To set up Voice Recognition or Speech Recognition on Windows 11, you need to open the Windows Settings panel first. Then, go to the Accessibility tab and click on the Speech menu. Following that, toggle the Windows Speech Recognition button to turn it on. Then, you can press Win+Ctrl+S to open the respective panel.
Why is my Windows Speech Recognition not working?
There are many reasons why Speech Recognition might not be working on your computer. For example, if it is turned off in the Windows Settings panel, you cannot use it by pressing the Win+Ctrl+S shortcut. On the other hand, it could be a microphone issue as well. If you use a third-party app, an internal conflict can also cause the same issue.
Does Windows 11 have a talk-to-text feature?
Yes, like Windows 10, Windows 11 also has a talk to text features included. For that, you do not need to install third-party programs or services. You can press Win+H to open the corresponding panel and start talking. Everything will be typed automatically in any text editing or word processing application.
Содержание
- Как решить проблему «speech recognition could not start»
- «Напридумывал, чтобы не работать. » 1977 год, СССР, художник В. А. Травин
- Васю побили?
- О начальстве
- Может, стоит попробовать?
- Ответ на пост «Васю побили?»
- Детский режим Кинопоиска не по-детски
- М+Ж+М=ММ
- Это какой-то позор, православные.
- Два способа отключить Распознавание голоса в Windows 10.
- Чтобы отключить распознавание голоса в Windows 10, выполните следующие действия.
- Отключить распознавание речи в сети с помощью настройки реестра.
- Fix: Speech Recognition could not start Cryptic Error in Windows 10
- Fix: Speech Recognition could not start Cryptic Error in Windows 10
- Add ctfmon.exe to Startup
- Using Speech Recognition Settings
- By Regional Settings
- Train Profile
- Create New Recognition Profile
- Speech recognition error windows 10 как исправить
- Asked by:
- Question
- All replies
- Как скачать Speech Recognition.lnk и устранить сообщения об ошибках
- Обзор файла
- Что такое сообщения об ошибках Speech Recognition.lnk?
- Общие ошибки выполнения Speech Recognition.lnk
- Как исправить ошибки Speech Recognition.lnk — 3-шаговое руководство (время выполнения:
- Шаг 1. Восстановите компьютер до последней точки восстановления, «моментального снимка» или образа резервной копии, которые предшествуют появлению ошибки.
- Шаг 2. Запустите средство проверки системных файлов (System File Checker), чтобы восстановить поврежденный или отсутствующий файл Speech Recognition.lnk.
- Шаг 3. Выполните обновление Windows.
- Если эти шаги не принесут результата: скачайте и замените файл Speech Recognition.lnk (внимание: для опытных пользователей)
Как решить проблему «speech recognition could not start»

друзья, помогите избавиться от ошибки или полностью отключить распознавание речи на винде 10.
в любой непонятной ситуации, хоть винду запустил, хоть любую другую программу, выскакивает эта ошибка, что скрином выше.

в настройках распознавания пишет о не поддерживаем модуле.
пролистывая гугл я выяснил, что можно как то излечить ошибку изменив язык интерфейса на английский

но беда в том, что у меня домашняя версия для одного языка

может кто сталкивался и знает как исправить?
Совет «переустановить винду» нельзя назвать помощью

Кортану видимо отключить


«Напридумывал, чтобы не работать. » 1977 год, СССР, художник В. А. Травин


Васю побили?
Upd: как предыстория https://youtu.be/sy-OhRH81F4 спасибо модератору 1337 что нашел (Вася удалил видео из-за которого произошёл данный инцидент)

О начальстве
Будете смеяться, но была такая ситуация. Начальство забило на топливо и мой экскаватор обсох за 4 часа до конца смены. Полчаса три «Больших Босса» хором уговаривали меня: «Владимирыч, надо доработать смену. Кровь из носу, дерьмо из попы, надо!»
Еще через полчаса я, под изумленные взгляды коллег, торжественно заливал в 600-литровый бак своего Коматсу 5 (пять) литров соляры. Нда.


Может, стоит попробовать?


Ответ на пост «Васю побили?»
Комментарий от Васи
Детский режим Кинопоиска не по-детски


М+Ж+М=ММ


Это какой-то позор, православные.
Давайте вспомним определения:
А что происходит на этом виде?:
Такая форма защиты веры, с применением силы, лично меня, как верующего, оскорбляет.
А теперь давайте заглянем в источники:
«Не делайте себе кумиров, и изваяний, и столбов не ставьте у себя, и камней с изображениями не кладите в земле вашей, чтобы кланяться пред ними, ибо Я Господь, Бог ваш.»
«3. Да не будет у тебя других богов пред лицом Моим.
4. Не делай себе кумира и никакого изображения того, что на небе вверху, и что на земле внизу, и что в воде ниже земли;
5. не поклоняйся им и не служи им, ибо Я Господь, Бог твой, Бог ревнитель, наказывающий детей за вину отцов до третьего и четвертого рода, ненавидящих Меня,
6. и творящий милость до тысячи родов любящим Меня и соблюдающим заповеди Мои.»
Не обманывайтесь: Бог поругаем не бывает. Что посеет человек, то и пожнет: сеющий в плоть свою от плоти пожнет тление, а сеющий в дух от духа пожнет жизнь вечную.
Т.е. то, что делает человек, на совести самого человека. Бога, веру нельзя оскорбить какими-либо действиями.
Так а что мы видим на видео? Кто такие пришли к Васе и действуют, якобы, во имя веры? Во имя какой и чьей веры. Если они про православный крест, так цитаты из православных текстов выше. Сектанты? Гопники? Как по мне, так возможные фигуранты 282 УК РФ.
Может эти люди объявятся? Покажут лицо, назовут свои ФИО. Ну если им нечего стыдиться. Или есть чего?
Источник
Два способа отключить Распознавание голоса в Windows 10.
Публикация: 21 October 2018 Обновлено: 7 August 2019
Windows предоставляет функцию распознавания речи на основе устройств (доступную как с помощью приложения Windows Recech Recognition Desktop), так и с помощью облачной службой распознавания речи на тех рынках и регионах, где доступна Cortana. Microsoft может использовать голосовые данные, взаимодействия с компьютером, чтобы улучшить услуги распознавания речи.
Чтобы использовать распознавание речи, необходимо включить параметр «Знакомство с вами» (параметр конфиденциальности в разделе «Персонализация рукописного ввода и ввода с клавиатуры»), поскольку голосовые службы существуют как в облаке, так и на вашем устройстве. Информация, которую Microsoft собирает с их помощью, позволяет их улучшить. Речевые службы, которые не передаются в облако и присутствуют только на вашем устройстве, такие как «Диктор» и «Распознавание речи Windows», по-прежнему будут работать, если этот параметр отключен, но Microsoft уже не будет собирать данные.
Если для параметра «Диагностика и использование данных» («Параметры» → «Конфиденциальность» → «Диагностика и отзывы») установлено значение «Полные», входящие данные для рукописного ввода и ввода текста отправляются в Microsoft, и компания использует эти данные в совокупности, чтобы улучшить платформу для всех пользователей.
Чтобы отключить распознавание голоса в Windows 10, выполните следующие действия.

Теперь функция отключена.
Кроме того, вы можете применить настройки реестра.
Отключить распознавание речи в сети с помощью настройки реестра.
Чтобы отменить изменение при необходимости, используйте файл On-Online Speech Recognition.reg.
Файлы реестра, выше, изменяют ветвь реестра
Они изменяют параметр DWORD (32 бита) с именем HasAccepted.
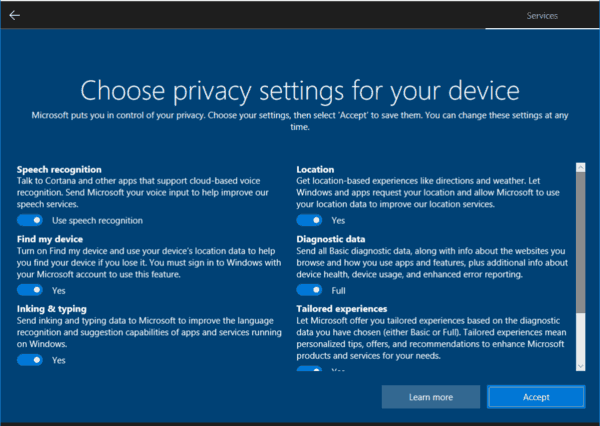
Наконец, вы можете отключить распознавание речи в сети на странице конфиденциальности программы установки Windows во время установки ОС с нуля.
Источник
Fix: Speech Recognition could not start Cryptic Error in Windows 10
Many users are complaining that they are receiving Speech Recognition could not start cryptic error in Windows 10 when they try to start the feature. This problem mostly occurs when ctfmon.exe is not set to automatically start with Windows. However, there are other causes such as a change in the recognizer language that lead to this error.
This issue is not new in Windows as users are experiencing this since Vista edition. Whenever they make an attempt to initiate the Speech Recognition, the following error note shows up on the PC screen. To bypass this problem, there are few solutions like starting ctfmon.exe during Startup, changing Speech settings, adding new recognition profile and so on. Let us move on to the workarounds one by one and see which one fixes your problem.

Fix: Speech Recognition could not start Cryptic Error in Windows 10
Here is how to fix Speech Recognition could not start Cryptic Error in Windows 10 –
Add ctfmon.exe to Startup
Step-1: First of all, press “Windows + R” hotkeys to open Run dialog box. When the box shows up, type regedit and click OK or press Enter to start the process.
Step-2: When the Registry Editor opens, navigate to the below-given path on the left column.
Step-3: Shift to the corresponding pane of Run and make a right-click on an empty space. Hover over New and from the submenu choose String Value.

Step-4: Name it as ctfmon and double-click on it to change its value. On its Value data field, assign its value as ctfmon.exe.

Step-5: Now, you just need to close Registry Editor and restart Windows 10 PC to check how it fixes.
After adding ctfmon.exe to the Startup, if the system still shows Speech Recognition could not start, go ahead with other solutions.
Using Speech Recognition Settings
Open Start Menu, type cp, and press Enter. Choose Speech Recognition applet when Control Panel comes into view.

Click Advanced Speech Options on the left side of the following screen (see snapshot).

When the Speech Properties screen displays, ensure to set the Language in the correct locale. Moving ahead, also uncheck the option namely “Review Documents and mail to improve accuracy”.

Simply click OK and reboot your computer.
It is done, you can check how is the speech recognition feature. If it is still not fixed, you continue to try the solution 3.
By Regional Settings
Press “Win + I” shortcut keys simultaneously in order to open Windows Settings app.
When the main interface of the application comes into view, go to Time & Language category.
Select the Region tab on the left column of the following page. Switch to its right pane and click the drop-down underneath the option Country or region. From the list, choose another location.

Now, reboot the computer and again head towards the Region settings and this time set the correct location of your choice.
Finally, again make an attempt to restart your PC and this time Speech Recognition will work wonder. Doing this will eventually clear out any settings on your system that are may be corrupted by other updates or software that you might have installed.
Train Profile
In case you are still encountering Speech Recognition could not start, give an attempt to Train profile.
First, open Control Panel by using any of your preferred procedures.
Go to Speech Recognition and perform a hit on Advanced speech options on the top left side.
On the Speech Properties dialog, click the button namely Train Profile.

Now, follow the on-screen guidelines of the wizard and complete the training.
Create New Recognition Profile
If the training process and other workarounds fail to bypass Speech Recognition could not start Cryptic Error in Windows 10, you should create a new recognition profile.
Go to Control Panel and get access to Speech Recognition applet.
Make a click on “Advanced speech options“.
In the Speech Properties dialog, click the New button under the ‘Recognition Profiles‘ section as indicated in the below snapshot.

Provide a new name to the profile and when you successfully create it, delete the old one.
Lots of experienced users said that they have tried the above-mentioned methods, and it works effectively. So, you also give a shot to these workarounds and let us know which one helped you out. If you have more tips to solve this trouble, don’t forget to drop them in the comments below.
Источник
Speech recognition error windows 10 как исправить
This forum has migrated to Microsoft Q&A. Visit Microsoft Q&A to post new questions.
Asked by:

Question
Os win10 v. 1803 in Inglese, più italiano lingua secondaria; Date & time su Roma.
Quando provo a eseguire «speech recognize», fallisce per il mismatch della lingua (https://answers.microsoft.com/en-us/windows/forum/all/speech-recognition-windows-10/e31b0c92-01a3-4f85-b34f-2dbdcd1e2331)
Il pacchetto italiano è già installato.
in Settings> Speech è tutto disabilitato.
per policy abbiamo cortana bloccato.
Quali sono gli step per abilitare lo speech recognize? Grazie
Aggiungo: Control PanelAll Control Panel ItemsSpeech Recognition mi manca la voce «avanzate»
ho aggiunto anche la chiave ctfmon.exe, senza risolvere
Thank you for coming TechNet forum.
I noticed you post this thread with Italian, however, this forum just support for English which will be more convenient to share experience between many English customers.
If you prefer a Italian support, please post thread in the following link.
Thank you for your understanding.
Please remember to mark the replies as answers if they help.
If you have feedback for TechNet Subscriber Support, contact tnmff@microsoft.com.
I can’t install any other italian language, because is already installed.
in Control PanelAll Control Panel ItemsSpeech Recognition «advanced option» is missing.
I’ve already trid to add ctfmon.exe in regedit, but still does not work fine.
Could you please help me to run Speech Recognition? Thank you in advance
Thank you for your translation.
As you said advanced option is not exists in your environment, so I think we need to check if any related speech recognition has been disable through Group Policy.
Please run command line «gpresult /h c:gp.html» as administrator and generate a report about applied group policy, then check any thing related with speech recognition. If you have problem about checking it, please upload it to One Drive and paste the link here.
Please remember to mark the replies as answers if they help.
If you have feedback for TechNet Subscriber Support, contact tnmff@microsoft.com.
thanks for your kind reply. I’ve already checked my applied gpo, reading the html report of a standard client. In gpresult there are not any references to «speech» or «recognition».
I add another info: also form a client in workgroup not in domain, editing local policy, I can’t find no reference to speech recognition.
I think it could be an issue about language, but I’m not able to solve: If I configure all just in English, i recieve the same error popup. If I set regional language in Italian with OS in Eglish, i see always the same error:
https://answers.microsoft.com/en-us/windows/forum/windows_10-desktop/speech-recognition-error-language-configuration/ad43d50a-b99f-4519-b53c-000586499afc
So: the error is caused by a language mismatch. Plus: i can’t find «advanced option» in speech recognition control panel. And: cortana is disabled by policy, but on a client outside domain with cortana, i’ve the same error.
Any idea?
Источник
Как скачать Speech Recognition.lnk и устранить сообщения об ошибках
Последнее обновление: 07/01/2022 [Время на прочтение статьи: 5 мин.]
Файлы Windows File Shortcut, такие как Speech Recognition.lnk, используют расширение LNK. Файл считается файлом Ярлык (Windows File Shortcut) и впервые был создан компанией Microsoft для пакета ПО Windows 10.
Файл Speech Recognition.lnk изначально был выпущен с Windows Vista 11/08/2006 для ОС Windows Vista. Датой самого последнего выпуска файла для Windows 10 является 07/29/2015 [версия 10]. Файл Speech Recognition.lnk входит в комплект Windows 10, Windows 8.1 и Windows 8.
Продолжайте читать, чтобы найти загрузку правильной версии файла Speech Recognition.lnk (бесплатно), подробные сведения о файле и порядок устранения неполадок, возникших с файлом LNK.

Рекомендуемая загрузка: исправить ошибки реестра в WinThruster, связанные с Speech Recognition.lnk и (или) Windows.
![]()

Совместимость с Windows 10, 8, 7, Vista, XP и 2000
Средняя оценка пользователей
Обзор файла
| Общие сведения ✻ | |
|---|---|
| Имя файла: | Speech Recognition.lnk |
| Расширение файла: | расширение LNK |
| Тип файла: | Ярлык |
| Описание: | Windows File Shortcut |
| Пользовательский рейтинг популярности: |
| Сведения о разработчике и ПО | |
|---|---|
| Программа: | Windows 10 |
| Разработчик: | Microsoft |
| Программное обеспечение: | Windows |
| Версия ПО: | 10 |
| Сведения о файле | |
|---|---|
| Размер файла (байты): | 1244 |
| Дата первоначального файла: | 11/02/2006 |
| Дата последнего файла: | 03/18/2017 |
✻ Фрагменты данных файлов предоставлены участником Exiftool (Phil Harvey) и распространяются под лицензией Perl Artistic.
Что такое сообщения об ошибках Speech Recognition.lnk?
Общие ошибки выполнения Speech Recognition.lnk
Ошибки файла Speech Recognition.lnk часто возникают на этапе запуска Windows, но также могут возникать во время работы программы. Эти типы ошибок LNK также известны как «ошибки выполнения», поскольку они возникают во время выполнения Windows. К числу наиболее распространенных ошибок выполнения Speech Recognition.lnk относятся:
Программа: C:ProgramDataMicrosoftWindowsStart MenuProgramsAccessibilitySpeech Recognition.lnk
Среда выполнения получила запрос от этого приложения, чтобы прекратить его необычным способом.
Для получения дополнительной информации обратитесь в службу поддержки приложения.
В большинстве случаев причинами ошибок в LNK являются отсутствующие или поврежденные файлы. Файл Speech Recognition.lnk может отсутствовать из-за случайного удаления, быть удаленным другой программой как общий файл (общий с Windows) или быть удаленным в результате заражения вредоносным программным обеспечением. Кроме того, повреждение файла Speech Recognition.lnk может быть вызвано отключением питания при загрузке Windows, сбоем системы при загрузке или сохранении Speech Recognition.lnk, наличием плохих секторов на запоминающем устройстве (обычно это основной жесткий диск) или заражением вредоносным программным обеспечением. Таким образом, крайне важно, чтобы антивирус постоянно поддерживался в актуальном состоянии и регулярно проводил сканирование системы.
Как исправить ошибки Speech Recognition.lnk — 3-шаговое руководство (время выполнения:
Если вы столкнулись с одним из вышеуказанных сообщений об ошибке, выполните следующие действия по устранению неполадок, чтобы решить проблему Speech Recognition.lnk. Эти шаги по устранению неполадок перечислены в рекомендуемом порядке выполнения.
Шаг 1. Восстановите компьютер до последней точки восстановления, «моментального снимка» или образа резервной копии, которые предшествуют появлению ошибки.
Чтобы начать восстановление системы (Windows XP, Vista, 7, 8 и 10):
Если на этапе 1 не удается устранить ошибку Speech Recognition.lnk, перейдите к шагу 2 ниже.

Шаг 2. Запустите средство проверки системных файлов (System File Checker), чтобы восстановить поврежденный или отсутствующий файл Speech Recognition.lnk.
Средство проверки системных файлов (System File Checker) — это утилита, входящая в состав каждой версии Windows, которая позволяет искать и восстанавливать поврежденные системные файлы. Воспользуйтесь средством SFC для исправления отсутствующих или поврежденных файлов Speech Recognition.lnk (Windows XP, Vista, 7, 8 и 10):
Следует понимать, что это сканирование может занять некоторое время, поэтому необходимо терпеливо отнестись к процессу его выполнения.
Если на этапе 2 также не удается устранить ошибку Speech Recognition.lnk, перейдите к шагу 3 ниже.
Шаг 3. Выполните обновление Windows.
Когда первые два шага не устранили проблему, целесообразно запустить Центр обновления Windows. Во многих случаях возникновение сообщений об ошибках Speech Recognition.lnk может быть вызвано устаревшей операционной системой Windows. Чтобы запустить Центр обновления Windows, выполните следующие простые шаги:
Если Центр обновления Windows не смог устранить сообщение об ошибке Speech Recognition.lnk, перейдите к следующему шагу. Обратите внимание, что этот последний шаг рекомендуется только для продвинутых пользователей ПК.

Если эти шаги не принесут результата: скачайте и замените файл Speech Recognition.lnk (внимание: для опытных пользователей)
Если этот последний шаг оказался безрезультативным и ошибка по-прежнему не устранена, единственно возможным вариантом остается выполнение чистой установки Windows 10.
Источник
Содержание
- Как отключить функцию распознавания речи в Windows 10
- Отключить распознавание речи в Windows 10
- Отключить функцию распознавания речи в Интернете
- Не удалось установить компоненту распознавание речи для английского языка
- Два способа отключить Распознавание голоса в Windows 10.
- Чтобы отключить распознавание голоса в Windows 10, выполните следующие действия.
- Отключить распознавание речи в сети с помощью настройки реестра.
- Disable Online Speech Recognition in Windows 10
- Disable Online Speech Recognition with a Registry tweak
- About Sergey Tkachenko
- Disable Speech Recognition feature in Windows 10
- Disable Speech Recognition feature in Windows 10
- Perform a full system scan using Restoro. To do so, follow the instructions below.
Как отключить функцию распознавания речи в Windows 10
В этом посте мы расскажем, как отключить Распознавание речи в Windows 10 v1809 . Распознавание речи – это технология, которая используется для управления компьютерами с помощью голосовых команд. С распознаванием речи вы можете произносить команды, на которые компьютер будет реагировать, и вы также можете диктовать текст на компьютер, что устраняет необходимость набирать слова в любом текстовом редакторе или текстовом редакторе. Функция распознавания речи, позволяет общаться с вашим компьютером. Вы можете улучшить свои компьютеры, чтобы лучше понимать свой собственный голос, чтобы улучшить точность дикции. Однако, чтобы повысить его точность, вы должны «обучить особенности». Если вы не нашли его производительность удовлетворительной, следуйте приведенным ниже инструкциям, чтобы отключить его.
Отключить распознавание речи в Windows 10

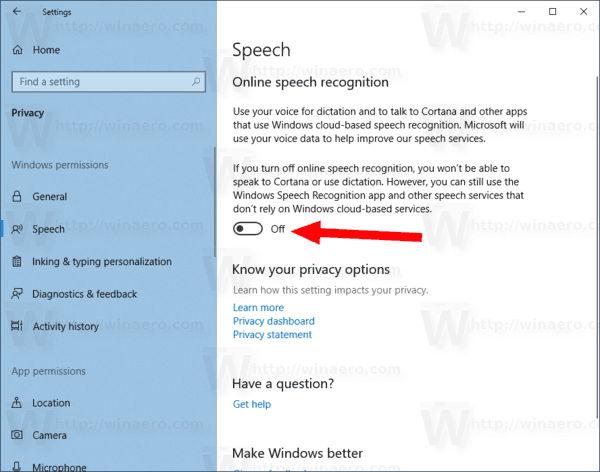
Чтобы отключить распознавание речи в Windows 10, откройте «Настройки»> «Удобство доступа»> «Речь» и включите или выключите Включить распознавание речи , чтобы включить или отключить эту функцию.
Отключить функцию распознавания речи в Интернете
Онлайновое распознавание речи позволяет вам общаться с Cortana и приложениями, которые используют облачное распознавание речи.
1] через настройки
Чтобы отключить распознавание речи в Интернете в Windows 10:
- Нажмите « Пуск » и выберите « Настройки ».
- Перейдите в раздел «Конфиденциальность».
- Переключитесь на « Речь » и на правой панели сдвиньте переключатель, чтобы отключить функцию « Онлайн распознавание речи ».
Речевые сервисы существуют как на вашем устройстве, так и в облаке. Это связано с тем, что Microsoft собирает необходимую информацию с этих служб, чтобы улучшить взаимодействие с пользователем. Поэтому, чтобы остановить это, отключите параметр Знакомство с вами , а также в разделе « Подписание и ввод персонализации ».
2] с помощью редактора реестра
Откройте диалоговое окно Выполнить , нажав комбинацию Windows + R. В пустом поле диалогового окна введите « regedit » и нажмите « Enter ».
Далее перейдите по следующему адресу:
HKEY_CURRENT_USER Software Microsoft Speech_OneCore Settings OnlineSpeechPrivacy
Проверьте значение по умолчанию HasAccepted в правой панели окна.
- HasAccepted = 1 означает, что онлайн-распознавание речи включено.
Чтобы навсегда отключить эту функцию, дважды нажмите клавишу и измените значение слова D с 1 на .
Пожалуйста, имейте в виду, что даже если вы используете 64-битную Windows, как в моем случае, вы все равно должны создать 32-битное значение DWORD.
Перезагрузите компьютер еще раз, чтобы изменения вступили в силу.
В дальнейшем вам не следует включать функцию распознавания речи в Windows 10.
Не удалось установить компоненту распознавание речи для английского языка
Каждый день вылазит сообщение, что не удалось установить. Как это можно установить или отключить
Для решения данного вопроса, пожалуйста, попробуйте в командную строку Администратора поочерёдно ввести следующие команды проверок и исправлений и нажмите Enter :
1. Dism /Online /Cleanup-Image /CheckHealth
2. Dism /Online /Cleanup-Image /RestoreHealth
3. sfc / scannow
Также, Вы можете обновить образ Windows без ущерба для личных файлов.
Восстановить целостность поврежденных системных файлов Windows 10 можно путем обновления системы посредством утилиты Media Creation Tool . Ее можно скачать на официальном сайте Microsoft . Обновление Windows 10 – длительный по времени, в то же время самый надежный способ вернуть операционной системе работоспособность. Процесс обновления Windows 10 по времени проходит примерно столько же, сколько и процесс ее переустановки. В рамках проведения этого процесса все поврежденные системные файлы будут перезаписаны, сохранятся данные пользовательского профиля, установленные программы и внесенные системные настройки, а на выходе получим свежайшую, со всеми установленными обновлениями Windows 10.
Запускаем Media Creation Tool . Принимаем лицензионные условия.
Выбираем Обновить этот компьютер сейчас .
Далее последует загрузка файлов для обновления, будут проведены подготовительные действия. После чего необходимо жать кнопку Установить . И ждать завершения процесса обновления.
Пожалуйста, сообщите результат.
Если данная информация была полезна, пожалуйста, отметьте её как ответ.
Два способа отключить Распознавание голоса в Windows 10.
Публикация: 21 Октябрь 2018 Обновлено: 7 Август 2019
Windows предоставляет функцию распознавания речи на основе устройств (доступную как с помощью приложения Windows Recech Recognition Desktop), так и с помощью облачной службой распознавания речи на тех рынках и регионах, где доступна Cortana. Microsoft может использовать голосовые данные, взаимодействия с компьютером, чтобы улучшить услуги распознавания речи.
Чтобы использовать распознавание речи, необходимо включить параметр «Знакомство с вами» (параметр конфиденциальности в разделе «Персонализация рукописного ввода и ввода с клавиатуры»), поскольку голосовые службы существуют как в облаке, так и на вашем устройстве. Информация, которую Microsoft собирает с их помощью, позволяет их улучшить. Речевые службы, которые не передаются в облако и присутствуют только на вашем устройстве, такие как «Диктор» и «Распознавание речи Windows», по-прежнему будут работать, если этот параметр отключен, но Microsoft уже не будет собирать данные.
Если для параметра «Диагностика и использование данных» («Параметры» → «Конфиденциальность» → «Диагностика и отзывы») установлено значение «Полные», входящие данные для рукописного ввода и ввода текста отправляются в Microsoft, и компания использует эти данные в совокупности, чтобы улучшить платформу для всех пользователей.
Чтобы отключить распознавание голоса в Windows 10, выполните следующие действия.
- Откройте приложение «Параметры».
- Перейдите в раздел «Конфиденциальность» → «Голосовые функции».
- Справа отключите опцию «Распознавания голоса в сети» передвинув ползунок переключателя в положение «Откл.».
Теперь функция отключена.
Кроме того, вы можете применить настройки реестра.
Отключить распознавание речи в сети с помощью настройки реестра.
- Загрузите следующий ZIP-архив: загрузите ZIP-архив.
- Извлеките его содержимое в любую папку. Вы можете разместить файлы непосредственно на рабочем столе.
- Дважды кликните файл Off-Online Recognition.reg, чтобы начать процесс слияния.
Чтобы отменить изменение при необходимости, используйте файл On-Online Speech Recognition.reg.
Все!
Файлы реестра, выше, изменяют ветвь реестра
Они изменяют параметр DWORD (32 бита) с именем HasAccepted.
- HasAccepted = 1 — Включить распознавание речи в сети.
- HasAccepted = 0 — Функция распознавания речи отключена.
Кроме того, начиная с Windows 10 build 17063, ОС имеет ряд новых параметров в разделе «Конфиденциальность». К ним относятся возможность управления разрешениями на использование для ваших библиотек / папок, микрофона , календаря , информации учетной записи пользователя , файловой системы , местоположения , контактов , истории вызовов , электронной почты , обмена сообщениями и т. Д.
Наконец, вы можете отключить распознавание речи в сети на странице конфиденциальности программы установки Windows во время установки ОС с нуля.
Disable Online Speech Recognition in Windows 10
Windows provides both a device-based speech recognition feature (available through the Windows Speech Recognition Desktop app), and a cloud-based speech recognition service in those markets and regions where Cortana is available. Microsoft may use the voice data collected on your computer to help improve their speech services.
When your Diagnostic and usage data setting (Settings > Privacy > Diagnostics & feedback) is set to Full, your inking and typing input data is sent to Microsoft, and the company use this data in the aggregate to improve the inking and typing platform for all users.
To disable Online Speech Recognition in Windows 10, do the following.
- Open the Settings app.

- Go to Privacy -> Speech.
- On the right, turn off the toggle option under Online speech recognition.
- The feature is now disabled.

Alternatively, you can apply a Registry tweak.
Disable Online Speech Recognition with a Registry tweak
- Download the following ZIP archive: Download ZIP archive.
- Extract its contents to any folder. You can place the files directly to the Desktop.
- Unblock the files.
- Double click on the Disable Online Speech Recognition.reg file to merge it.
- To undo the change when needed, use the provided file Enable Online Speech Recognition.reg.
The Registry files above modify the Registry branch
They change the 32-bit DWORD value named HasAccepted.
- HasAccepted = 1 — Online Speech Recognition is enabled.
- HasAccepted = 0 — Online Speech Recognition is disabled.

Note: Even if you are running 64-bit Windows you must still create a 32-bit DWORD value.
Also, Starting with Windows 10 build 17063, the OS has got a number of new options under Privacy. These include the ability to control usage permissions for your Library/data folders, microphone, calendar, user account info, file system, location, contacts, call history, email, messaging, and more. Also, there is a new layout for privacy settings shown above.
Finally, you can disable Online Speech Recognition from the privacy page of the Windows Setup program when installing the OS from scratch.
Articles of interest:
Winaero greatly relies on your support. You can help the site keep bringing you interesting and useful content and software by using these options:
Share this post
About Sergey Tkachenko
Sergey Tkachenko is a software developer from Russia who started Winaero back in 2011. On this blog, Sergey is writing about everything connected to Microsoft, Windows and popular software. Follow him on Telegram, Twitter, and YouTube.
Disable Speech Recognition feature in Windows 10
Disable Speech Recognition feature in Windows 10

Speech Recognition is a technology used to control computers using voice commands. Through this feature, you can say commands that your computer will respond to, and aside from that, you can also dictate text to your computer which eliminates the need to type words in any word processing program or text editor. All in all, the Speech Recognition feature allows you to communicate with your computer and improves your computer’s ability to understand your own voice better as well as improve its diction accuracy. However, before you can improve its accuracy, you need to “train the feature” first. And if so far you are not satisfied with its performance, you actually have the option to disable it. So in this post, you will be guided on how you can disable the Speech Recognition feature in Windows 10 v1809.
To disable Speech Recognition in your computer, follow the steps below.
Step 1: Go to Settings > Ease of Access.
Step 2: From there, go to Speech.
Step 3: Now switch off the toggle button for Speech Recognition to disable this feature.
On the other hand, you can also disable the Online Speech Recognition feature if you really don’t want to have anything to do with it. You have two options to do that – you can either do it using Settings or using the Registry Editor.
Disable Online Speech Recognition feature via Settings:
- Click on the Start button and select Settings.
- Next, go to the Privacy section and click on the Speech option located at the right pane.
- Then switch the toggle button off to turn off the Online Speech Recognition feature.
Note: Speech services exist on your computer and even in the cloud since Microsoft collects essential information from these services in order to enhance user experience and if you want to stop this, you have to turn off the “Getting to know you” option under the “Inking and typing Personalization” section.
Disable Online Speech Recognition feature via Registry Editor:
Before you proceed, you need to create a System Restore Point first.
- Tap the Win + R keys to open the Run dialog box.
- Then type “regedit” in the field and hit Enter to open the Registry Editor.
- Next, navigate to the following registry path:
HKEY_CURRENT_USERSoftwareMicrosoftSpeech_OneCoreSettingsOnlineSpeechPrivacy
- After that, check the default value of the “HasAccepted” key located in the right pane. As you can see its value is set to “1” which means that the Speech Recognition feature is enabled. And so to change it, you have to set “0” as its new value to permanently disable the feature.
- Just double click on the key and change the value from “1” to “0”. Keep in mind that even if you are using a 64-bit Windows 10 computer, you still have to create a 32-bit DWORD value.
- After that, restart your computer to apply the changes made.
That’s about it. You should now be able to enjoy using your computer without the Speech Recognition feature. However, if you are currently experiencing some system issues on your Windows 10 PC, there is a one-click solution you could check out known as Restoro to resolve them. This program is a useful tool that could repair corrupted registries and optimize your PC’s overall performance. Aside from that, it also cleans out your computer for any junk or corrupted files that help you eliminate any unwanted files from your system. This is basically a solution that’s within your grasp with just a click. It’s easy to use as it is user-friendly. For complete set of instructions in downloading and using it, refer to the steps below.
Perform a full system scan using Restoro. To do so, follow the instructions below.
- Turn on your computer. If it’s already on, you have to reboot it.
- After that, the BIOS screen will be displayed, but if Windows pops up instead, reboot your computer and try again. Once you’re on the BIOS screen, repeat pressing F8, by doing so the Advanced Option shows up.

- To navigate the Advanced Option use the arrow keys and select SafeMode with Networking then hit
- Windows will now load the SafeMode with Networking.
- Press and hold both R key and Windows key.

- If done correctly, the Windows Run Box will show up.
- Type in the URL address, https://errortools.com/download/restoro in the Run dialog box and then tap Enter or click OK.
- After that, it will download the program. Wait for the download to finish and then open the launcher to install the program.
- Once the installation process is completed, run Restoro to perform a full system scan.

- After the scan is completed click the “Fix, Clean & Optimize Now” button.
Toggle the option on and off via Settings
by Vladimir Popescu
Being an artist his entire life while also playing handball at a professional level, Vladimir has also developed a passion for all things computer-related. With an innate fascination… read more
Updated on October 12, 2022
Reviewed by
Vlad Turiceanu

Passionate about technology, Windows, and everything that has a power button, he spent most of his time developing new skills and learning more about the tech world. Coming… read more
- Just like Windows 10, Windows 11 also comes with a speech recognition tool to facilitate hands-free usage.
- Although it is disabled by default, if left unattended, some third-party apps could enable it.
- Follow the methods mentioned in this guide to disable speech recognition in Windows 11.
If you have recently installed the latest Windows 11 operating system on your PC and are looking for ways to disable speech recognition in Windows 11, then you are in the right place.
In this guide, we will explain all the necessary steps that you need to follow to disable speech recognition in Windows 11.
Does Windows 11 have Speech Recognition?
Windows 11, the latest operating system from Microsoft, also comes with similar speech recognition options just like the one you have in Windows 10.
Notably, you can use speech recognition offline or use it with an internet connection. Speech recognition lets you control some apps using your voice and also dictate text to a word document.
Microsoft doesn’t offer you a whole host of features with its speech recognition service. Interested users can check out our guide on some of the best speech recognition apps that you can download on your PC to enjoy advanced features.
Do note that you need to train the feature to improve its accuracy, and many would not find its performance satisfactory. So, you may want to disable it for this very reason.
For whatever reason, before you disable speech recognition on your Windows 11 PC, you should understand that this accessibility feature is meant to enhance your user experience.
It is perfectly safe to turn off speech recognition on your device, it cannot harm it in any way.
Follow this guide to understand how you can disable speech recognition in Windows 11.
What are some of the most common voice commands?
Once you have been given access to the microphone, you can go through the below list of some of the common voice commands and use them to facilitate hands-free usage of your PC.
- Open Search: Say Press Windows S
- Select an item: Say Click Computer, Click file name (in place of file name say the exact name of the file)
- Scroll: Say Scroll up, Scroll down, Scroll left, Scroll right
- Show a list of applicable commands: Say What can I Say?
- Insert a new line: Say New line
- Put the cursor before a specific word: Say Go to word (in place of the word say the specific word)
- Don’t insert a space before the next word: Say No space
- Capitalize the first letter of a word: Say Caps word (in place of the word say the specific word)
For a complete list of commands, you can check out the official Microsoft support page.
How can I turn off speech recognition on Windows 11?
1. Disable offline speech recognition
1. Right-click on the Start menu button and select Settings.
2. Select Accessibility from the left-side pane.
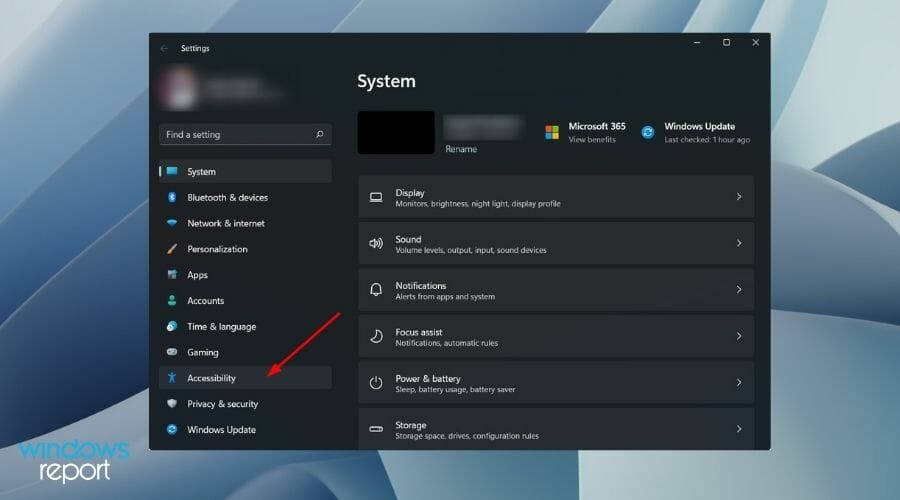
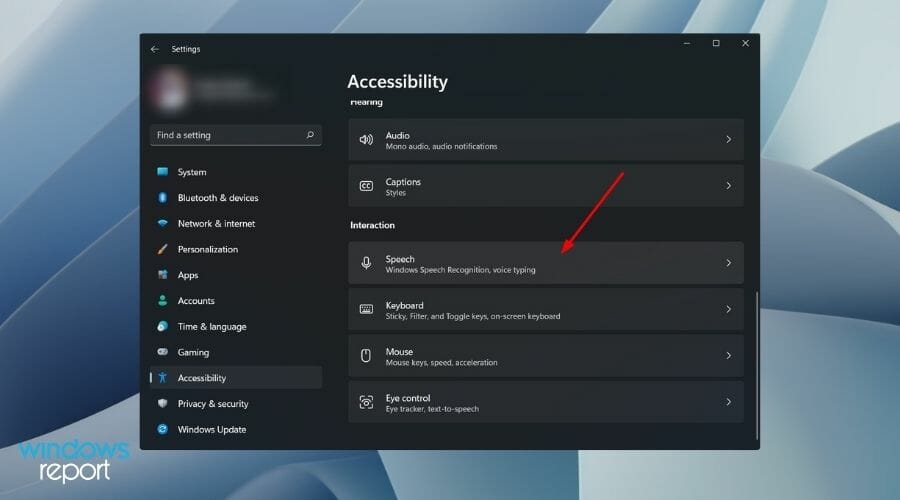
3. Now, from the right side, scroll down and under the Interaction section, click on Speech.
Some PC issues are hard to tackle, especially when it comes to corrupted repositories or missing Windows files. If you are having troubles fixing an error, your system may be partially broken.
We recommend installing Restoro, a tool that will scan your machine and identify what the fault is.
Click here to download and start repairing.
4. Simply turn the toggle off next to the Windows Speech Recognition option.
5. If you ever want to re-enable the feature, simply return to this menu and toggle it back on.
You can easily toggle speech recognition on and off via your Windows 11 PC’s built-in Settings.
All you need to do is navigate to the Accessibility section and configure Windows Speech Recognition settings from there.
2. Use a keyboard shortcut to turn off Windows Speech Recognition
In place of going through the above-mentioned steps, you can also press the Windows + Ctrl + S buttons together to turn the Windows Speech Recognition service on or off.
This keyboard shortcut is sure to get the job done in no time and you can go back to using your PC straight away.
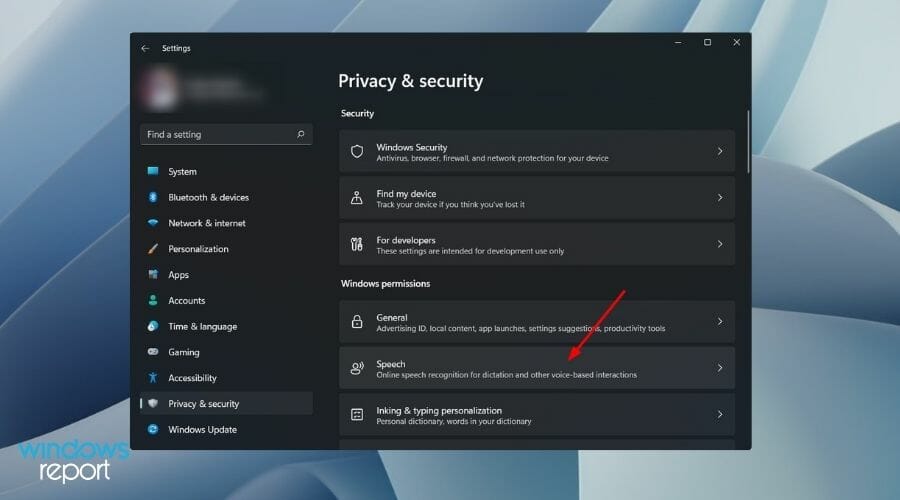
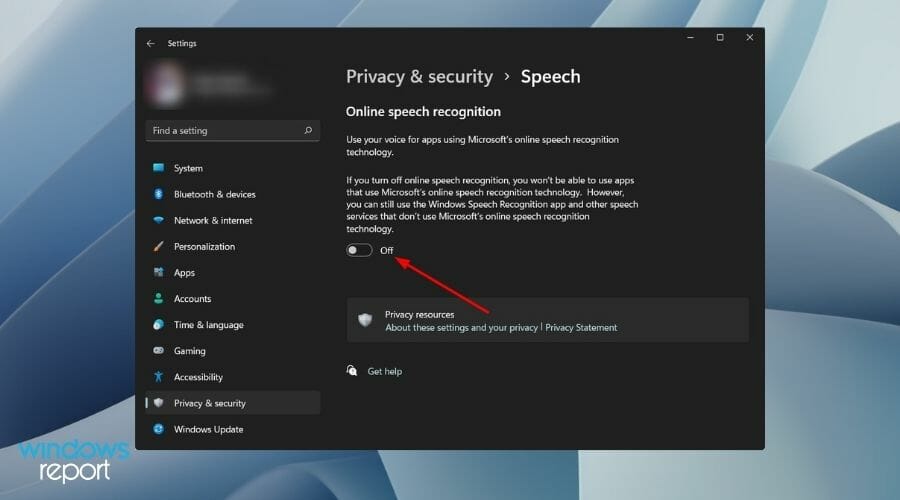
3. Disable online speech recognition
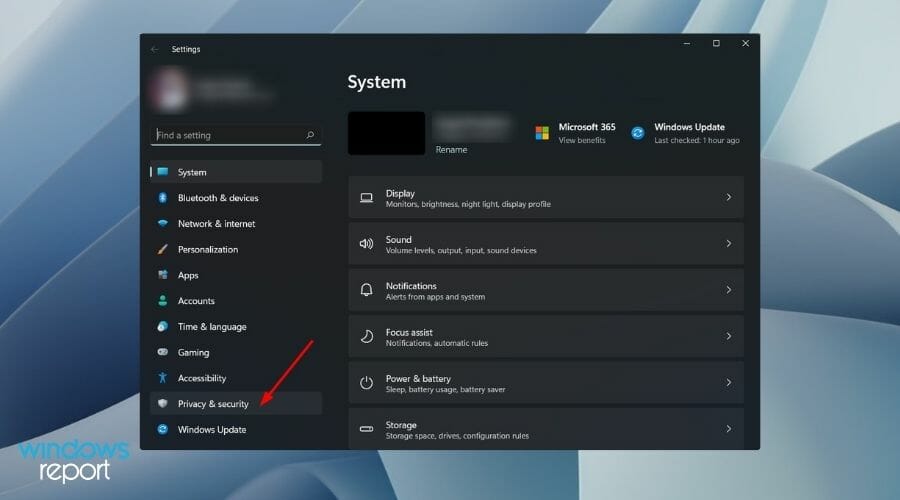
- Right-click on the Start menu button and select Settings.
- You need to select Privacy & security from the left-hand-side pane.

- Under the Windows permissions section, click on Speech.
- Turn off the the toggle for Online speech recognition option.
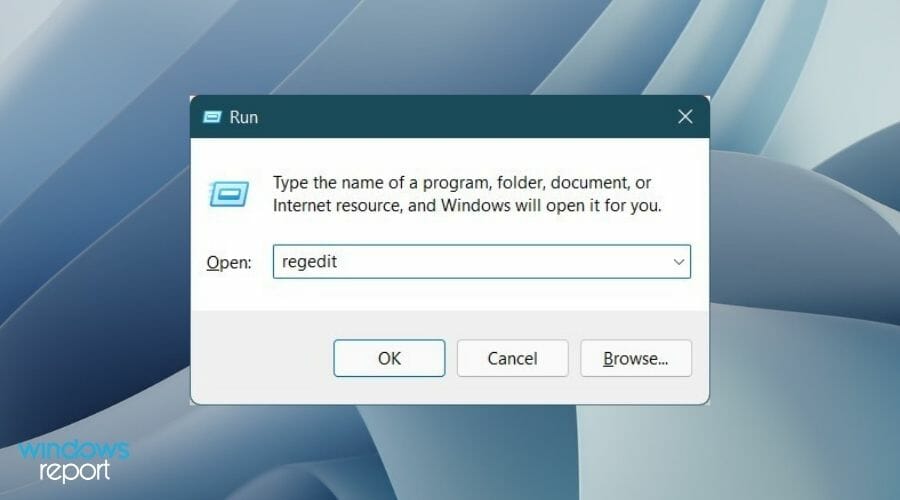
4. Turn off speech recognition with the Registry Editor
Besides, you can take a step further and use the registry settings to permanently disable the online speech recognition services.

NOTE
Do note that tweaking the registry editor, although isn’t dangerous, if done wrong, could stop some crucial services on your PC.
- Open the Run dialog by pressing the Windows + R buttons together.
- Type regedit and press Enter.
- In the address bar of the Registry Editor, paste the below path and press Enter.
HKEY_CURRENT_USERSoftwareMicrosoftSpeech_OneCoreSettingsOnlineSpeechPrivacy - On the right side, double-click on HasAccepted and change the value to 0.
- Press OK and close Registry Editor.
- Restart your PC and the online speech recognition service will now be permanently disabled.
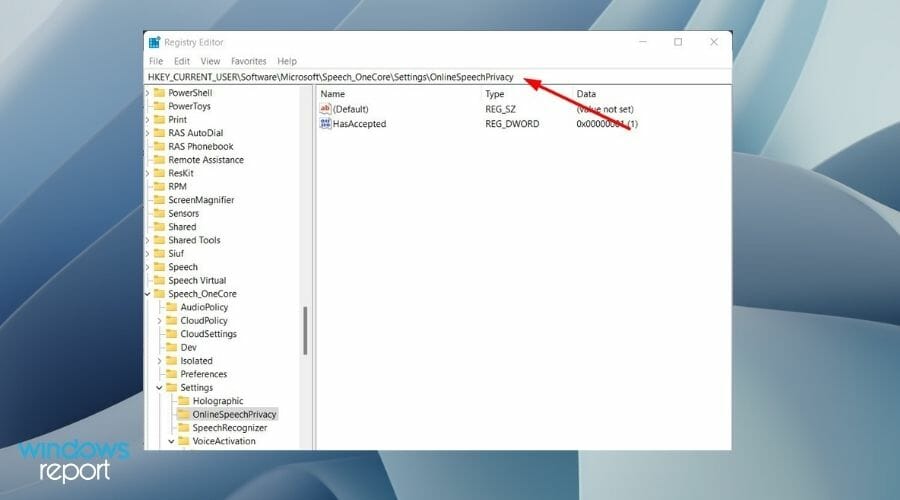
NOTE
To turn Windows Speech Recognition back on, you need to change the HasAccepted value to 1.
- Windows 11 Hidden Icon Menu: How to Turn It On Or Off
- Windows XP Sounds for Windows 11: How to Download & Set Up
- Is your screen stretched on Windows 11? Here’s the solution
- Google Indic Keyboard for Windows 11 [Download & Install]
Why should you disable the Windows Speech Recognition feature?
Thankfully, the Windows Speech Recognition feature isn’t enabled by default in Windows 11. To use this service, you need to enable it manually.
But this also means that users won’t be able to use this feature out of the box. Moreover, to use the speech recognition feature, you need to set it up if you are using it for the first time.
Speech-to-text can be beneficial for users who would like to use their voice to type or perform tasks on their PCs. For such users, we have curated a list of some of the best speech-to-text software for Windows OS.
Just like there are fans of some features, there are people that don’t want to use them. The reason behind this is that some of the third-party apps could enable it.
Disabling it makes sense if you do not wish to use the speech recognition feature on your Windows 11 PC. This will ensure no third-party app can enable it. For that, you can follow the above-mentioned steps.
If you are looking for ways to use the voice typing tool on your PC, then you can check out our dedicated guide on how to use the voice typing tool in Windows 11.
Let us know in the comments below if you have any doubts or queries you would like to share with us.
Still having issues? Fix them with this tool:
SPONSORED
If the advices above haven’t solved your issue, your PC may experience deeper Windows problems. We recommend downloading this PC Repair tool (rated Great on TrustPilot.com) to easily address them. After installation, simply click the Start Scan button and then press on Repair All.
![]()
Newsletter
Содержание
- Способ 1: Системные «Параметры»
- Способ 2: «Редактор реестра»
- Способ 3: Настройка групповых политик
- Вопросы и ответы
Чтобы функция распознавания речи работала корректно, убедитесь, что микрофон активен. Как включить устройство, мы писали ранее в нашем отдельном материале.
Подробнее: Включение микрофона на ноутбуке с Windows 10
Способ 1: Системные «Параметры»
В системных «Параметрах» предусмотрено управление различными функциями Windows 10, включая распознавание речи. Включить ее можно в несколько кликов:
- Нажмите на кнопку «Пуск» на нижней рабочей панели и в появившемся меню кликните по значку в виде шестерни.
- В окне с разделами «Параметров» выберите «Конфиденциальность».
- На панели слева нажмите по вкладке «Голосовые функции» и в центральной части окна, в блоке «Распознавание голоса в сети» переведите тумблер в активное состояние.


После того как функция активирована, можно закрывать окно системных «Параметров».
Способ 2: «Редактор реестра»
Существует и альтернативный метод активации распознавания речи в Windows 10 – через редактирование системного реестра. Разницы между ними никакой нет, поэтому выбирайте удобный для себя.
- Запустите «Редактор реестра»: для этого одновременно зажмите клавиши «Win + R», затем вставьте команду
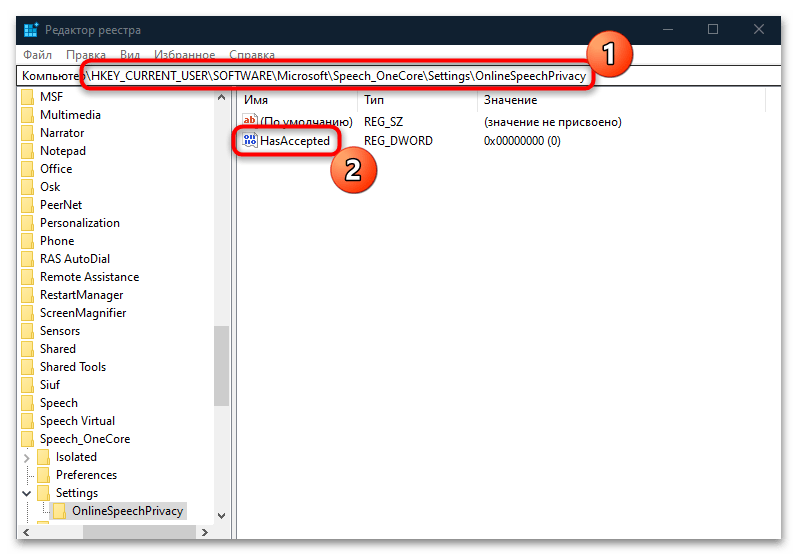
regeditв поле и нажмите на кнопку «ОК». - Раскройте ветку
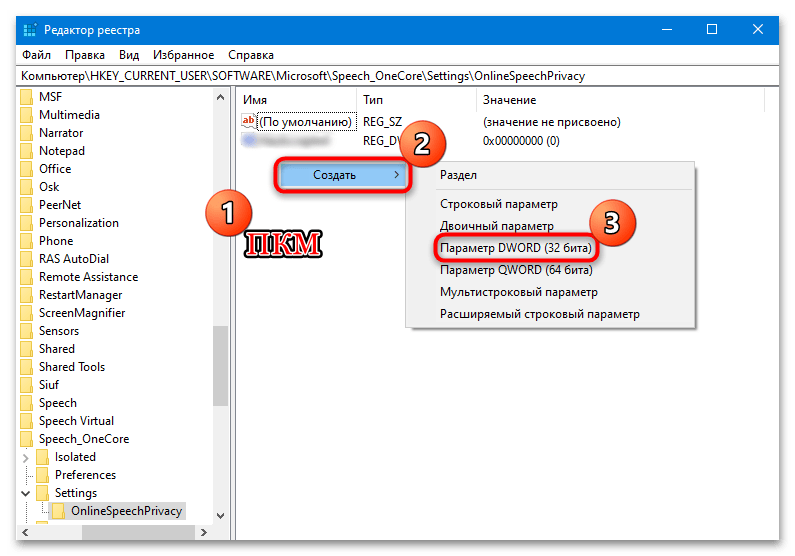
HKEY_CURRENT_USERSOFTWAREMicrosoftSpeech_OneCoreSettingsOnlineSpeechPrivacy, вставив путь в адресную строку вверху и нажав «Enter». Дважды щелкните по параметру «HasAccepted» левой кнопкой мыши. - Если параметра в каталоге нет, то в папке «OnlineSpeechPrivacy» нужно создать его под этим именем. Для этого в основной части окна кликните правой кнопкой мыши по свободной области, наведите курсор на пункт «Создать» и выберите «Параметр DWORD (32 бита)».
- В окне свойств в качестве значения введите «1» и нажмите на кнопку «ОК».

На этом редактирование реестра завершено. Если все сделано правильно, то функция распознавания речи в Windows 10 будет активирована.
Способ 3: Настройка групповых политик
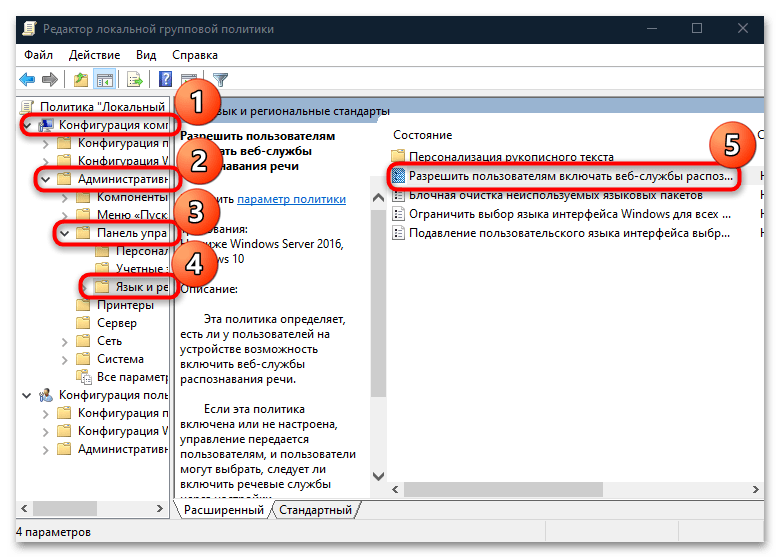
В редакциях Windows 10 Pro и Enterprise есть возможность настраивать различные функции и управлять ими через встроенный «Редактор локальной групповой политики». Если у вас версия Home, этот способ не подойдет, в другом случае можно воспользоваться инструкцией ниже:
- Запустите средство через диалоговое окно «Выполнить» — в строке «Открыть» пропишите
gpedit.mscи нажмите на «ОК». - На панели слева перейдите по следующему пути:
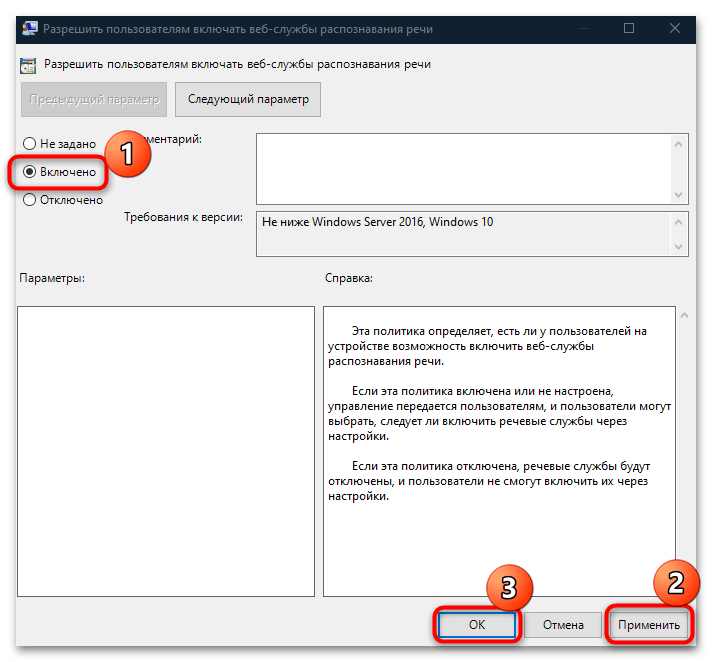
Конфигурация компьютера – Административные шаблоны – Панель управления – Язык и региональные стандарты.Нажмите на последний каталог, после чего по центру появится список компонентов. Отыщите пункт «Разрешить пользователям включать веб-службы распознавания речи» и дважды кликните по нему левой кнопкой мыши. - В новом окне отметьте пункт «Включено», затем примените и сохраните настройки.


Этот способ удобен в том случае, если другие варианты не работают, а также тогда, когда нужно задать общие правила для всех компьютеров в одной локальной сети.
Включить распознавание речи в Windows 10 можно и на этапе установки операционной системы на компьютер. В одном из шагов инсталляции будет предложено выбрать настройки конфиденциальности, где можно активировать функцию.

Читайте также: Руководство по установке Windows 10
Еще статьи по данной теме: