Содержание
- Windows Speech Recognition doesn’t work [Fixed]
- Voice recognition not working
- Windows Speech Recognition doesn’t work
- 1] Re-enable Speech Recognition
- 2] Check for hardware related issues
- 3] Check if the correct microphone is connected
- 4] Check for microphone permissions
- 5] Increase the input volume of your microphone
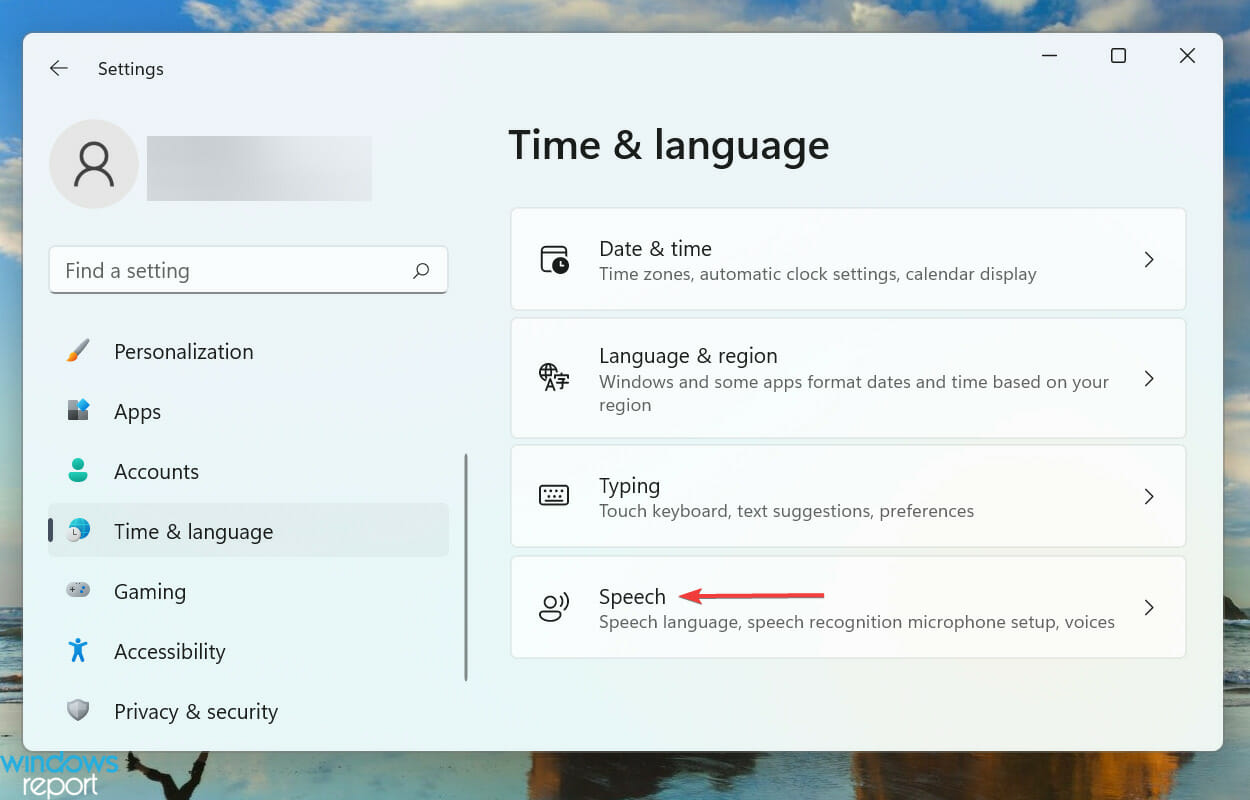
- 6] Check speech language
- 7] Turn on Online Speech Recognition using Registry
- 8] Change Group Policy settings
- 9] Disable hotkey changer software
- 10] Reinstall microphone (if external)
- 11] Run the Recording audio troubleshooter
- 12] Run SFC scan
- 13] Troubleshoot in Clean Boot State
- 14] Miscellaneous solutions
- How do I turn on my microphone?
- What is a microphone used for?
- Windows Speech Recognition is not available for the current display language
- How do I set up voice recognition on Windows 11?
- Why is my Windows Speech Recognition not working?
- Does Windows 11 have a talk-to-text feature?
- Голосовой ввод не работает в Windows
- Перед началом работы
- Сообщения об ошибках
- Текст не появляется после выступления
- Слова ввели неправильно
Windows Speech Recognition doesn’t work [Fixed]
Speech recognition is a relatively new but important feature in Windows computers. This option allows you to voice type and give commands to use applications in Windows. However, in some cases, the Speech Recognition Setup may not work. If speech recognition doesn’t work on your Windows 11/10 computer, then please read this article for the resolutions.
Voice recognition not working
Speech Recognition helps you do various things on your computer. From opening a program to dictate text in any text editor – you can do everything using this functionality. However, if it doesn’t work on your computer, the following suggestions may be handy for you.
Windows Speech Recognition doesn’t work
The main causes of Speech Recognition not working are hardware related issues, software/system permissions, missing or corrupt system files, issues with drivers, etc. If you encounter this problem on your computer, then please try the following solutions sequentially to fix the same:
- Re-enable Speech Recognition
- Check for hardware related issues
- Check if the correct microphone is connected
- Check for microphone permissions
- Increase the input volume of your microphone
- Check speech language
- Turn on Online Speech Recognition using Registry
- Change Group Policy settings
- Disable hotkey changer software
- Reinstall microphone (if external)
- Run the Recording audio troubleshooter
- Perform SFC scan
- Troubleshoot in Clean Boot State
- Miscellaneous solutions
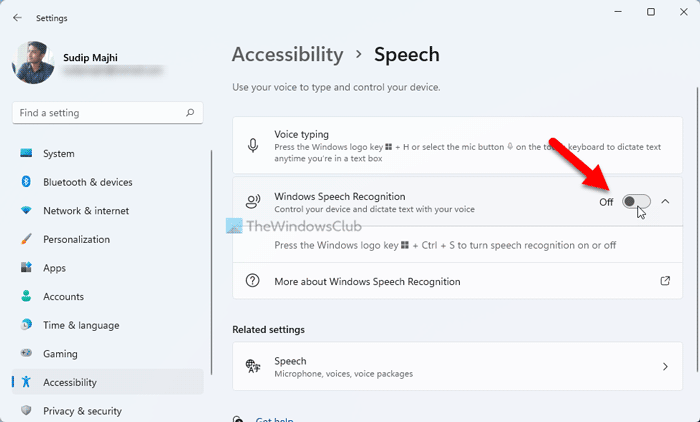
1] Re-enable Speech Recognition
Even if you have turned on the Speech Recognition in Windows Settings, a bug or glitch could disable it automatically. It happens when you use a Beta or Dev Channel build. That is why it is recommended to verify the setting or re-enable it in Windows Settings.
To re-enable Speech Recognition in Windows 11, follow these steps:
- Press Win+I to open Windows Settings.
- Switch to the Accessibility tab.
- Click on the Speech menu.
- Toggle the Windows Speech Recognition button to turn it on.
Then, check if you can use Speech Recognition on your computer or not.
If there are issues with the microphone hardware or the USB connections then no matter what you try on your computer, the speech recognition will not work properly. In this case, we advise you to check your microphone with another computer to isolate the cause with the hardware. If the microphone works fine with another computer, then you can try further solutions.
3] Check if the correct microphone is connected
Ideally, the preferred microphone for any function on the computer is the default microphone of the laptop and if it is not attached then you would have to attach an external one. In the latter case, a Windows computer may or may not detect an external microphone. To confirm this, try the following.
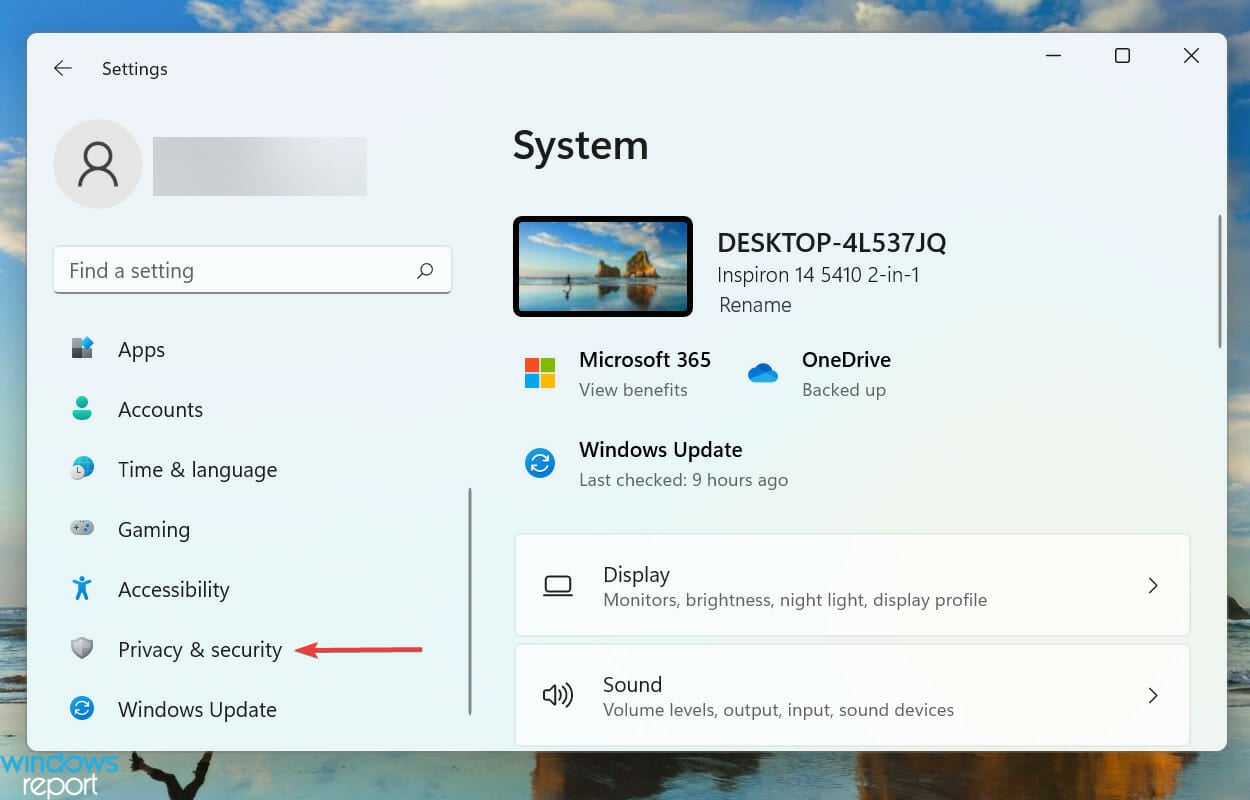
- Right-click on the Start button and select Settings from the menu.
- In the Settings window, go to the System tab on the list on the left-hand side. In the right pane scroll down to Sound and click on it.
- Now scroll down to the Input section and check which microphone is connected and currently in use. It can be judged by checking the radio button.
If your mic is not connected, then click on add device and connect your Input microphone. Make sure that it is the one on which the radio button is checked after connecting.
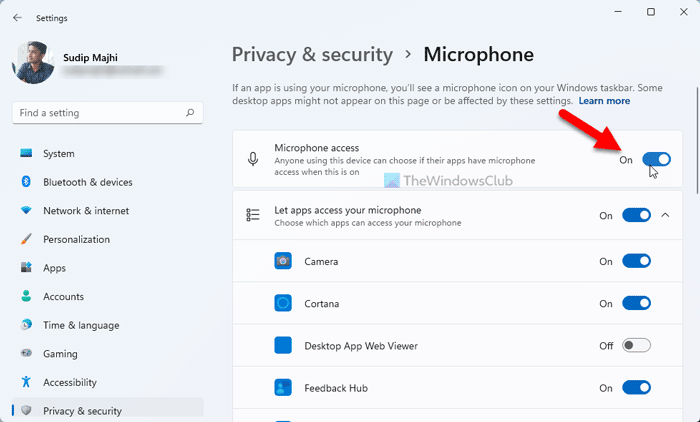
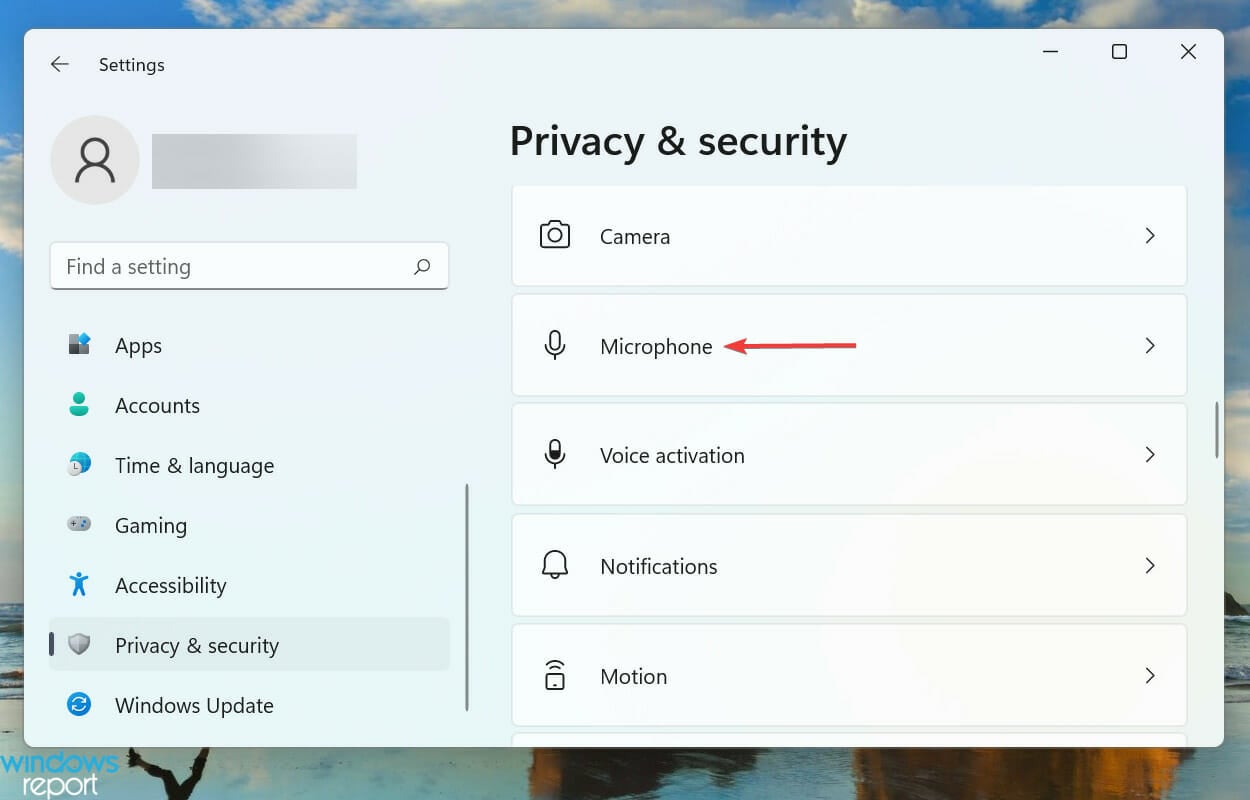
4] Check for microphone permissions
- Right-click on the Start button and select Settings from the menu.
- In the Settings window, go to the Privacy and Security tab on the list on the left-hand side.
- In the right pane, scroll down to App permissions, and click on Microphone.
- Turn the switches on for Microphone access and Let your apps access the microphone.
Also make sure that the switch is turned ON for the application for which you need the speech recognition.
5] Increase the input volume of your microphone
Usually, the volume of the output devices like speaker and headset is visible in the system tray itself. However, you will have to change the microphone volume through the Settings panel. In case the microphone volume is low, the issue in discussion can appear since the computer might not be able to recognize your speech. In this case, you can increase the microphone volume as follows.
- Right-click on the Start button and select Settings from the menu.
- Go to the System tab on the list on the left-hand side and then go to the Sound option on the list on the right-hand side.
- Scroll down to the Input section and you can use the slider to increase the volume.
6] Check speech language
Another reason for your software not recognizing the speech to the microphone could be that you might have selected the wrong language for speech recognition. This can be checked and fixed as follows.
- Right-click on the Start button and select Settings from the menu.
- Go to the Time and Language tab on the list on the left-hand side.
- In the right pane, scroll down and click on Speech.
- Check the speech language and change it if is incorrect.
Although Speech Recognition works with many languages, if you understand English, it is recommended to set English as the primary language. At times, a bug or glitch may block you from using speech recognition when you use any language other than English. That is why it is recommended to follow this guide to change Windows language back to English.
7] Turn on Online Speech Recognition using Registry
If you get this problem with Online Speech Recognition, you must verify the Registry settings. It is possible to enable or disable online Speech Recognition using Windows Registry. If you deactivated this feature in the past, you might encounter the aforementioned problem. That is why follow these steps to turn on Online Speech Recognition using Registry:
- Press Win+R to open the Run prompt.
- Type regedit > click the OK button.
- Click on the Yes button.
- Navigate to this path: HKEY_CURRENT_USERSoftwareMicrosoftSpeech_OneCoreSettingsOnlineSpeechPrivacy
- Right-click on OnlineSpeechPrivacy >New > DWORD (32-bit) Value.
- Set the name as HasAccepted.
- Double-click on it to set the Value data as 1.
- Click the OK button.
- Close all windows and restart your PC.
After that, you can use online Speech Recognition without any error.
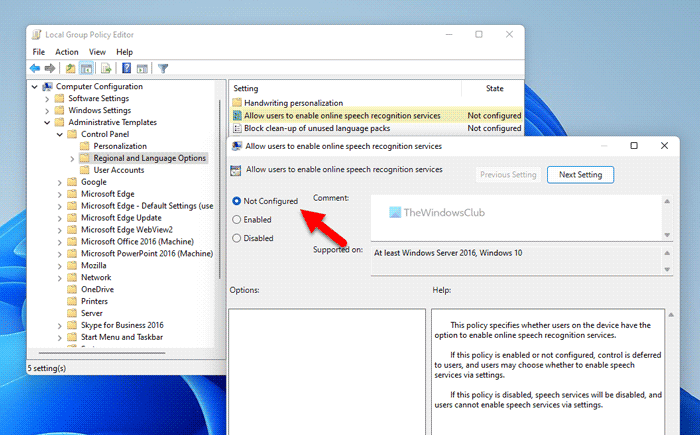
8] Change Group Policy settings
There is a Group Policy setting that helps you prevent or block users from enabling Speech Recognition on Windows 11/10 PC. If you enabled this setting earlier, you could not turn on the same option from Windows Settings. That is why follow the following steps to allow the user to enable online speech recognition:
- Search for gpedit.msc in the Taskbar search box.
- Click on the individual search result.
- Go to Computer Configuration > Administrative Templates > Control Panel > Regional and Language Options.
- Double-click on the Allow users to enable online speech recognition services setting.
- Choose the Enabled or Not Configured option.
- Click the OK button.
After that, you can turn on or off online speech recognition without any problem.
9] Disable hotkey changer software
Windows 11/10 allows users to activate Speech Recognition using a hotkey, Win+Ctrl+S. However, if you have used the same keyboard shortcut to open something else or execute a different command, you won’t be able to use Speech Recognition. That is why it is suggested to check the hotkey changer software or keyboard shortcut changer software minutely.
10] Reinstall microphone (if external)
If you use an external microphone, it is recommended to reinstall it. You can do the following:
- Unplug the microphone from your computer first. Restart your computer and re-plug it in.
- If you haven’t installed the driver, it is suggested to do that. However, if you have already installed the corresponding driver, you can remove it first and reinstall the same.
- Verify if your microphone is in working condition. You can use the same microphone with another computer.
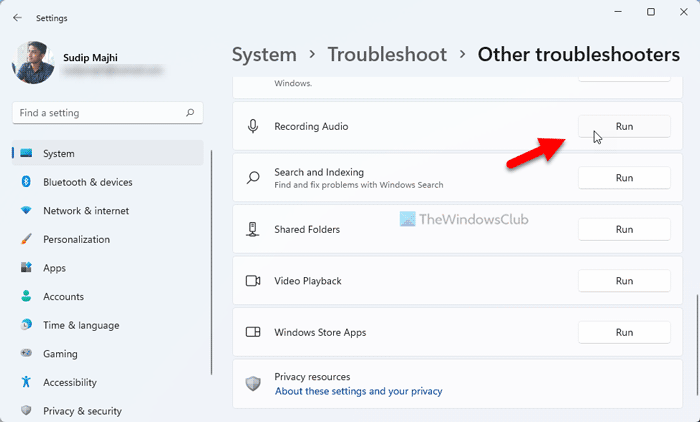
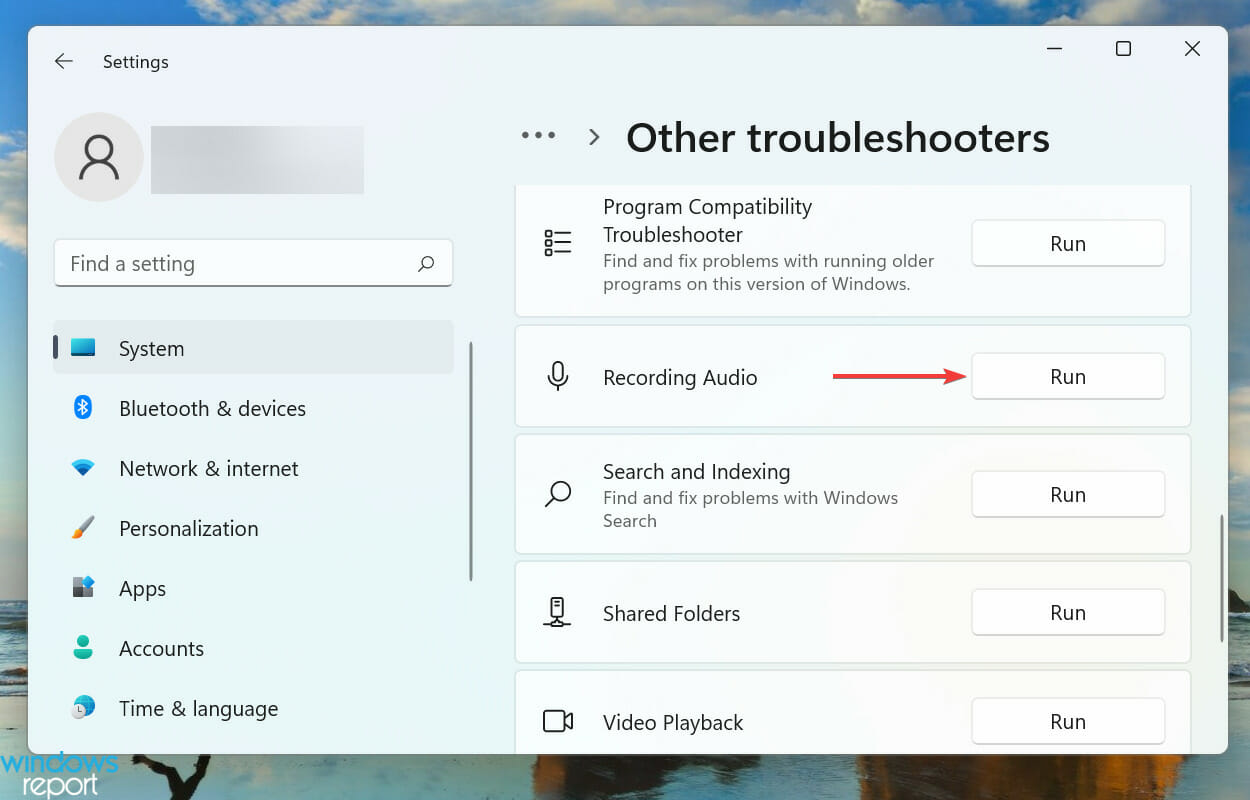
11] Run the Recording audio troubleshooter
The Recording Audio troubleshooter is an excellent tool to check for problems related to microphone and speech recognition. You can run it as follows.
- Right-click on the Start button and select Settings from the menu.
- In the Settings window, go to the System tab on the list on the left-hand side.
- In the right pane, scroll down and click on Troubleshoot. On the next page, select Other troubleshooters.
- From the list of troubleshooters, select Run corresponding to the Recording Audio troubleshooter.
12] Run SFC scan
If everything else fails, it could be quite possible that the system files are missing or corrupt. In this case, you can consider performing an SFC scan on your computer. The SFC scan will replace the missing and corrupt files and fix the problem of speech recognition not working.
13] Troubleshoot in Clean Boot State
It is quite possible that an external software might be interfering with speech recognition on the intended software. This case can be isolated by troubleshooting the computer in the clean boot state. While in the clean boot state, no other third-party software will launch at the startup itself. In this case, you can identify the problematic software and halt it while using the speech recognition function.
14] Miscellaneous solutions
You can also try solutions like moving to a quieter place, using an external microphone instead of your laptop’s microphone, updating drivers, etc.
How do I turn on my microphone?
First of all, the hardware of the microphone should be plugged and turned on. Some external microphones may have a switch to turn them on but most of them are simply plug and play. If your external microphone requires a separate power supply, make sure that the same is connected. Usually, windows will recognize the hardware and it will be turned on automatically. If that does not happen, you can use the Realtek audio player or Windows Settings to turn it ON manually.
What is a microphone used for?
A microphone is simply an audio input device for sending an audio input to the computer. The audio input can be used for recording, voice typing, instructing the system, etc. Usually, these days laptops come with inbuilt microphones.
Windows Speech Recognition is not available for the current display language
If you get Windows Speech Recognition is not available for the current display error in Windows 11/10, you need to set English as the default language. If you have used any regional language or anything else as the primary display language, you may encounter the aforementioned error on your computer.
That is why follow these steps to set English as the default Windows display language in Windows 11:
- Press Win+I to open Windows Settings.
- Click on the Time & language tab.
- Select the Language & region menu.
- Expand the Windows display language drop-down menu.
- Select English from the list.
However, you must install the English language first. For that, you can click the Add a language button, select English (United States) and click the Next button to get started with the installation process.
Following that, you can choose it from the drop-down menu.
How do I set up voice recognition on Windows 11?
To set up Voice Recognition or Speech Recognition on Windows 11, you need to open the Windows Settings panel first. Then, go to the Accessibility tab and click on the Speech menu. Following that, toggle the Windows Speech Recognition button to turn it on. Then, you can press Win+Ctrl+S to open the respective panel.
Why is my Windows Speech Recognition not working?
There are many reasons why Speech Recognition might not be working on your computer. For example, if it is turned off in the Windows Settings panel, you cannot use it by pressing the Win+Ctrl+S shortcut. On the other hand, it could be a microphone issue as well. If you use a third-party app, an internal conflict can also cause the same issue.
Does Windows 11 have a talk-to-text feature?
Yes, like Windows 10, Windows 11 also has a talk to text features included. For that, you do not need to install third-party programs or services. You can press Win+H to open the corresponding panel and start talking. Everything will be typed automatically in any text editing or word processing application.
Источник
Голосовой ввод не работает в Windows
Если голосовой ввод не работает в Windows, попробуйте попробовать на компьютере следующие действия по устранению неполадок:
Перед началом работы
Прежде всего проверьте, не работает ли голосовой ввод:
Убедитесь, что в Параметры выбран нужный Параметры. Чтобы проверить это, выберите Начните> Параметры> Системный> Звук> Вход> Выберите устройство для выступления или записи.
Если вы используете внешний микрофон, убедитесь, что он правильно подключен к компьютеру.
Сообщения об ошибках
При голосовом вводе могут возникнуть другие ошибки.
Сообщение об ошибке
Что можно сделать
Голосовой ввод должен иметь доступ к микрофону. Этот параметр необходимо включить в параметрах, чтобы использовать речь к тексту.
Выберите Пуск > Параметры> конфиденциальности & безопасности> Микрофони убедитесь, что включен доступ к микрофону.
Голосовой ввод не доступен на текущем языке.
Проверьте список поддерживаемых языков и установите нужный. См. список
Текст не появляется после выступления
Если после выступления вы ничего не видите в текстовом ящике, проверьте некоторые из них.
Настройте уровень ввода микрофона. Дополнительные справки см. вэтой Windows.
Если вы используете встроенный микрофон, подумайте о том, чтобы повторить попытку с гарнитурой или внешним микрофоном.
Слова ввели неправильно
Если вы говорите неправильно, проверьте некоторые моменты.
Переход в более тихое место.
Убедитесь, что выбран правильный язык для голосового ввода. Для этого нажмите клавиши Windows клавиша с логотипом + ПРОБЕЛ и выберите один из доступных языков. Дополнительные сведения об установке других языков см. в теме Использование голосового ввода для голосового ввода вместо ввода текста на компьютере.
Если вы используете встроенный микрофон, подумайте о том, чтобы повторить попытку с гарнитурой или внешним микрофоном.
Источник
Speech recognition is a relatively new but important feature in Windows computers. This option allows you to voice type and give commands to use applications in Windows. However, in some cases, the Speech Recognition Setup may not work. If speech recognition doesn’t work on your Windows 11/10 computer, then please read this article for the resolutions.
Voice recognition not working
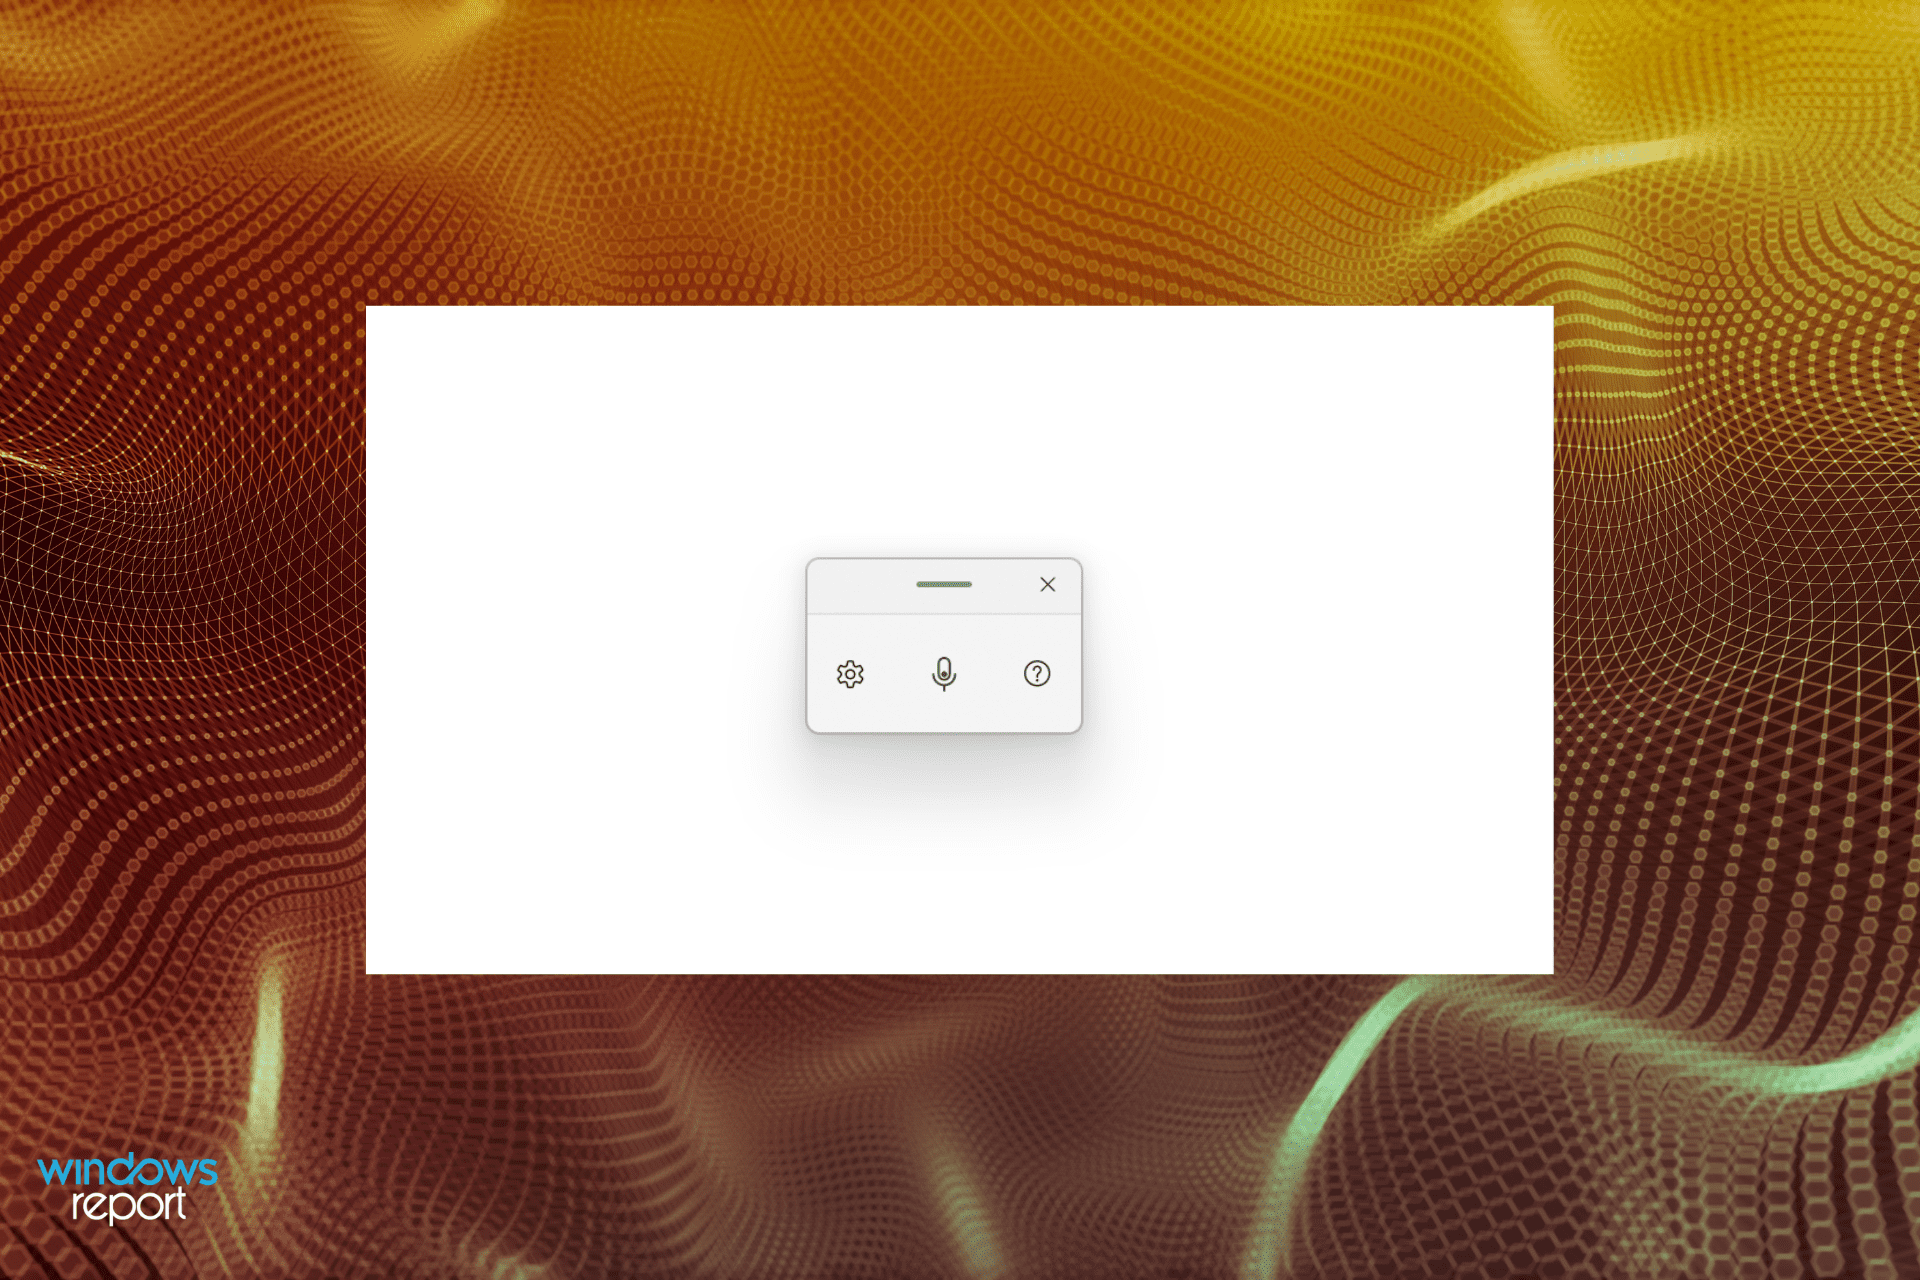
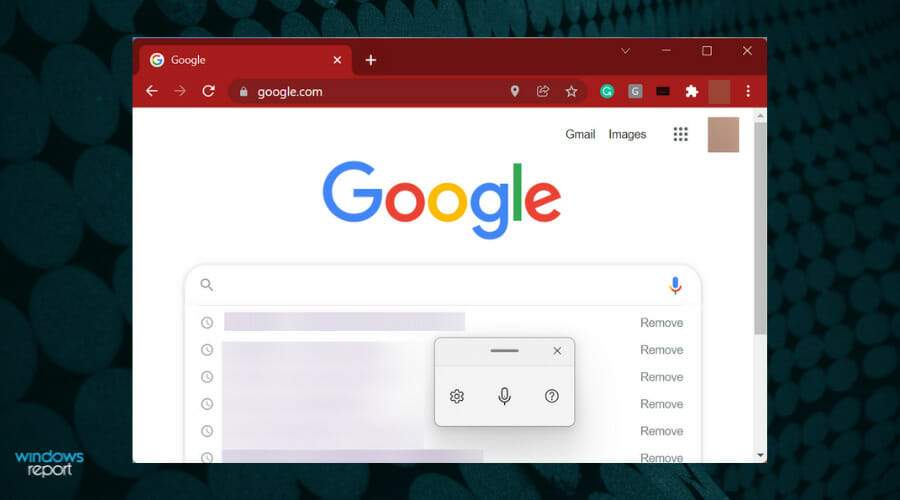
![Windows Speech Recognition doesn’t work [Fixed]](https://www.thewindowsclub.com/wp-content/uploads/2022/08/Speech-Recognition-Setup-Doesnt-Work.jpg?ezimgfmt=ng%3Awebp%2Fngcb193 "Windows Speech Recognition doesn’t work [Fixed]")
Speech Recognition helps you do various things on your computer. From opening a program to dictate text in any text editor – you can do everything using this functionality. However, if it doesn’t work on your computer, the following suggestions may be handy for you.
The main causes of Speech Recognition not working are hardware related issues, software/system permissions, missing or corrupt system files, issues with drivers, etc. If you encounter this problem on your computer, then please try the following solutions sequentially to fix the same:
- Re-enable Speech Recognition
- Check for hardware related issues
- Check if the correct microphone is connected
- Check for microphone permissions
- Increase the input volume of your microphone
- Check speech language
- Turn on Online Speech Recognition using Registry
- Change Group Policy settings
- Disable hotkey changer software
- Reinstall microphone (if external)
- Run the Recording audio troubleshooter
- Perform SFC scan
- Troubleshoot in Clean Boot State
- Miscellaneous solutions
1] Re-enable Speech Recognition
Even if you have turned on the Speech Recognition in Windows Settings, a bug or glitch could disable it automatically. It happens when you use a Beta or Dev Channel build. That is why it is recommended to verify the setting or re-enable it in Windows Settings.
To re-enable Speech Recognition in Windows 11, follow these steps:
- Press Win+I to open Windows Settings.
- Switch to the Accessibility tab.
- Click on the Speech menu.
- Toggle the Windows Speech Recognition button to turn it on.
Then, check if you can use Speech Recognition on your computer or not.
2] Check for hardware related issues
If there are issues with the microphone hardware or the USB connections then no matter what you try on your computer, the speech recognition will not work properly. In this case, we advise you to check your microphone with another computer to isolate the cause with the hardware. If the microphone works fine with another computer, then you can try further solutions.
3] Check if the correct microphone is connected
Ideally, the preferred microphone for any function on the computer is the default microphone of the laptop and if it is not attached then you would have to attach an external one. In the latter case, a Windows computer may or may not detect an external microphone. To confirm this, try the following.
- Right-click on the Start button and select Settings from the menu.
- In the Settings window, go to the System tab on the list on the left-hand side. In the right pane scroll down to Sound and click on it.
- Now scroll down to the Input section and check which microphone is connected and currently in use. It can be judged by checking the radio button.
If your mic is not connected, then click on add device and connect your Input microphone. Make sure that it is the one on which the radio button is checked after connecting.
4] Check for microphone permissions
- Right-click on the Start button and select Settings from the menu.
- In the Settings window, go to the Privacy and Security tab on the list on the left-hand side.
- In the right pane, scroll down to App permissions, and click on Microphone.
- Turn the switches on for Microphone access and Let your apps access the microphone.
Also make sure that the switch is turned ON for the application for which you need the speech recognition.
5] Increase the input volume of your microphone
Usually, the volume of the output devices like speaker and headset is visible in the system tray itself. However, you will have to change the microphone volume through the Settings panel. In case the microphone volume is low, the issue in discussion can appear since the computer might not be able to recognize your speech. In this case, you can increase the microphone volume as follows.
- Right-click on the Start button and select Settings from the menu.
- Go to the System tab on the list on the left-hand side and then go to the Sound option on the list on the right-hand side.
- Scroll down to the Input section and you can use the slider to increase the volume.
6] Check speech language
Another reason for your software not recognizing the speech to the microphone could be that you might have selected the wrong language for speech recognition. This can be checked and fixed as follows.
- Right-click on the Start button and select Settings from the menu.
- Go to the Time and Language tab on the list on the left-hand side.
- In the right pane, scroll down and click on Speech.
- Check the speech language and change it if is incorrect.
Although Speech Recognition works with many languages, if you understand English, it is recommended to set English as the primary language. At times, a bug or glitch may block you from using speech recognition when you use any language other than English. That is why it is recommended to follow this guide to change Windows language back to English.
7] Turn on Online Speech Recognition using Registry

If you get this problem with Online Speech Recognition, you must verify the Registry settings. It is possible to enable or disable online Speech Recognition using Windows Registry. If you deactivated this feature in the past, you might encounter the aforementioned problem. That is why follow these steps to turn on Online Speech Recognition using Registry:
- Press Win+R to open the Run prompt.
- Type regedit > click the OK button.
- Click on the Yes button.
- Navigate to this path: HKEY_CURRENT_USERSoftwareMicrosoftSpeech_OneCoreSettingsOnlineSpeechPrivacy
- Right-click on OnlineSpeechPrivacy > New > DWORD (32-bit) Value.
- Set the name as HasAccepted.
- Double-click on it to set the Value data as 1.
- Click the OK button.
- Close all windows and restart your PC.
After that, you can use online Speech Recognition without any error.
8] Change Group Policy settings
There is a Group Policy setting that helps you prevent or block users from enabling Speech Recognition on Windows 11/10 PC. If you enabled this setting earlier, you could not turn on the same option from Windows Settings. That is why follow the following steps to allow the user to enable online speech recognition:
- Search for gpedit.msc in the Taskbar search box.
- Click on the individual search result.
- Go to Computer Configuration > Administrative Templates > Control Panel > Regional and Language Options.
- Double-click on the Allow users to enable online speech recognition services setting.
- Choose the Enabled or Not Configured option.
- Click the OK button.
After that, you can turn on or off online speech recognition without any problem.
9] Disable hotkey changer software
Windows 11/10 allows users to activate Speech Recognition using a hotkey, Win+Ctrl+S. However, if you have used the same keyboard shortcut to open something else or execute a different command, you won’t be able to use Speech Recognition. That is why it is suggested to check the hotkey changer software or keyboard shortcut changer software minutely.
10] Reinstall microphone (if external)
If you use an external microphone, it is recommended to reinstall it. You can do the following:
- Unplug the microphone from your computer first. Restart your computer and re-plug it in.
- If you haven’t installed the driver, it is suggested to do that. However, if you have already installed the corresponding driver, you can remove it first and reinstall the same.
- Verify if your microphone is in working condition. You can use the same microphone with another computer.
11] Run the Recording audio troubleshooter
The Recording Audio troubleshooter is an excellent tool to check for problems related to microphone and speech recognition. You can run it as follows.
- Right-click on the Start button and select Settings from the menu.
- In the Settings window, go to the System tab on the list on the left-hand side.
- In the right pane, scroll down and click on Troubleshoot. On the next page, select Other troubleshooters.
- From the list of troubleshooters, select Run corresponding to the Recording Audio troubleshooter.
12] Run SFC scan
If everything else fails, it could be quite possible that the system files are missing or corrupt. In this case, you can consider performing an SFC scan on your computer. The SFC scan will replace the missing and corrupt files and fix the problem of speech recognition not working.
13] Troubleshoot in Clean Boot State
It is quite possible that an external software might be interfering with speech recognition on the intended software. This case can be isolated by troubleshooting the computer in the clean boot state. While in the clean boot state, no other third-party software will launch at the startup itself. In this case, you can identify the problematic software and halt it while using the speech recognition function.
14] Miscellaneous solutions
You can also try solutions like moving to a quieter place, using an external microphone instead of your laptop’s microphone, updating drivers, etc.
Read: How to disable Speech Recognition feature in Windows
How do I turn on my microphone?
First of all, the hardware of the microphone should be plugged and turned on. Some external microphones may have a switch to turn them on but most of them are simply plug and play. If your external microphone requires a separate power supply, make sure that the same is connected. Usually, windows will recognize the hardware and it will be turned on automatically. If that does not happen, you can use the Realtek audio player or Windows Settings to turn it ON manually.
Read: Best Speech Recognition software for Windows 11/10
What is a microphone used for?
A microphone is simply an audio input device for sending an audio input to the computer. The audio input can be used for recording, voice typing, instructing the system, etc. Usually, these days laptops come with inbuilt microphones.
Windows Speech Recognition is not available for the current display language

If you get Windows Speech Recognition is not available for the current display error in Windows 11/10, you need to set English as the default language. If you have used any regional language or anything else as the primary display language, you may encounter the aforementioned error on your computer.
That is why follow these steps to set English as the default Windows display language in Windows 11:
- Press Win+I to open Windows Settings.
- Click on the Time & language tab.
- Select the Language & region menu.
- Expand the Windows display language drop-down menu.
- Select English from the list.
However, you must install the English language first. For that, you can click the Add a language button, select English (United States) and click the Next button to get started with the installation process.
Following that, you can choose it from the drop-down menu.
How do I set up voice recognition on Windows 11?
To set up Voice Recognition or Speech Recognition on Windows 11, you need to open the Windows Settings panel first. Then, go to the Accessibility tab and click on the Speech menu. Following that, toggle the Windows Speech Recognition button to turn it on. Then, you can press Win+Ctrl+S to open the respective panel.
Why is my Windows Speech Recognition not working?
There are many reasons why Speech Recognition might not be working on your computer. For example, if it is turned off in the Windows Settings panel, you cannot use it by pressing the Win+Ctrl+S shortcut. On the other hand, it could be a microphone issue as well. If you use a third-party app, an internal conflict can also cause the same issue.
Does Windows 11 have a talk-to-text feature?
Yes, like Windows 10, Windows 11 also has a talk to text features included. For that, you do not need to install third-party programs or services. You can press Win+H to open the corresponding panel and start talking. Everything will be typed automatically in any text editing or word processing application.
by Kazim Ali Alvi
Kazim has always been fond of technology, be it scrolling through the settings on his iPhone, Android device, or Windows. And at times, unscrewing the device to take… read more
Published on February 10, 2022
- Several users have reported that voice typing, a useful feature in Windows 11, is not working. Read this article to find out the solution.
- To fix the problem, try updating the OS, running the built-in troubleshooter, and updating the relevant drivers, amongst other methods listed below.
- Also, check the speech-to-text software that you could use for transcription in Windows 11.
The voice typing feature is one of the most talked about in the latest iteration. Who wouldn’t want to use the voice input text rather than typing the same thing? But several users have reported that Windows 11 voice typing is not working.
The feature is not new, it was there in Windows 10 as well, though with a different name. But on Windows 11, it’s certainly a lot more advanced and offers high accuracy when translating from speech to text.
Apart from that, it will work anywhere on the system, whether you are performing a Google search, drafting a document, and we can use it even while writing this article.
So, read the following sections to find out all about the feature and the most relevant fixes in case Windows 11’s voice typing is not working.
How do I enable and use voice typing in Windows 11?
The process to enable voice typing in Windows 11 is simple, you just have to place the cursor in a text field, and hit Windows + H to launch the tool. But, that isn’t certainly all!
There are a lot of other things about the voice typing tool that a user must know in order to make the most of it. Also, you may need to reconfigure the default settings for the best experience, or set the tool to launch automatically whenever required.
To find it all out, check our dedicated guide that will talk you through using the voice typing tool in Windows 11.
What do I do if voice typing is not working in Windows 11?
1. Check the connections (for external microphones)
If you are using an external microphone, it’s likely that the connections are not in order. To fix that, remove the jack or USB, whichever your microphone uses, clean it and the port, and then reconnect it.
Once that’s done, check if the Windows 11 voice typing not working problem is eliminated.
In case it isn’t, connect the same microphone to another system, and verify if it works there. If it does, the problem lies with your computer, and executing the fixes below should fix it.
While if it doesn’t, you may have to replace the microphone. Check our curated guide that lists the best microphones for Windows 11.
2. Verify that the microphone is enabled
- Press Windows + I to launch the Settings app, and select Privacy & security from the tabs listed in the navigation pane on the left.

- Scroll down and select Microphone under App permissions.
- Make sure the Microphone access toggle is enabled.

If the microphone doesn’t have the required permissions, you will encounter problems with voice typing. Simply making the required changes can get things working.
After providing the permission, check if the voice typing not working problem in Windows 11 is fixed
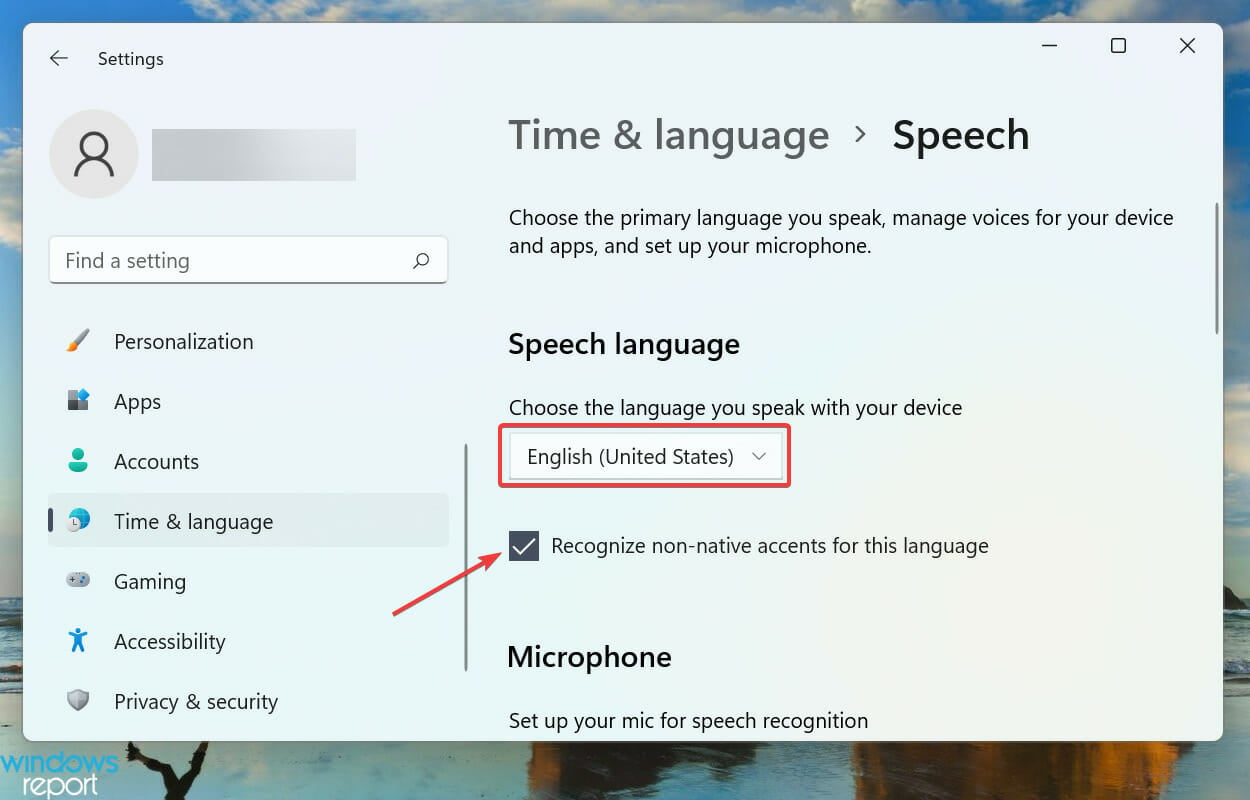
3. Choose the correct language for speech
- Press Windows + I to launch the Settings app, and select Time & language tab from the ones listed in the navigation pane on the left.
- Next, click on Speech on the right.
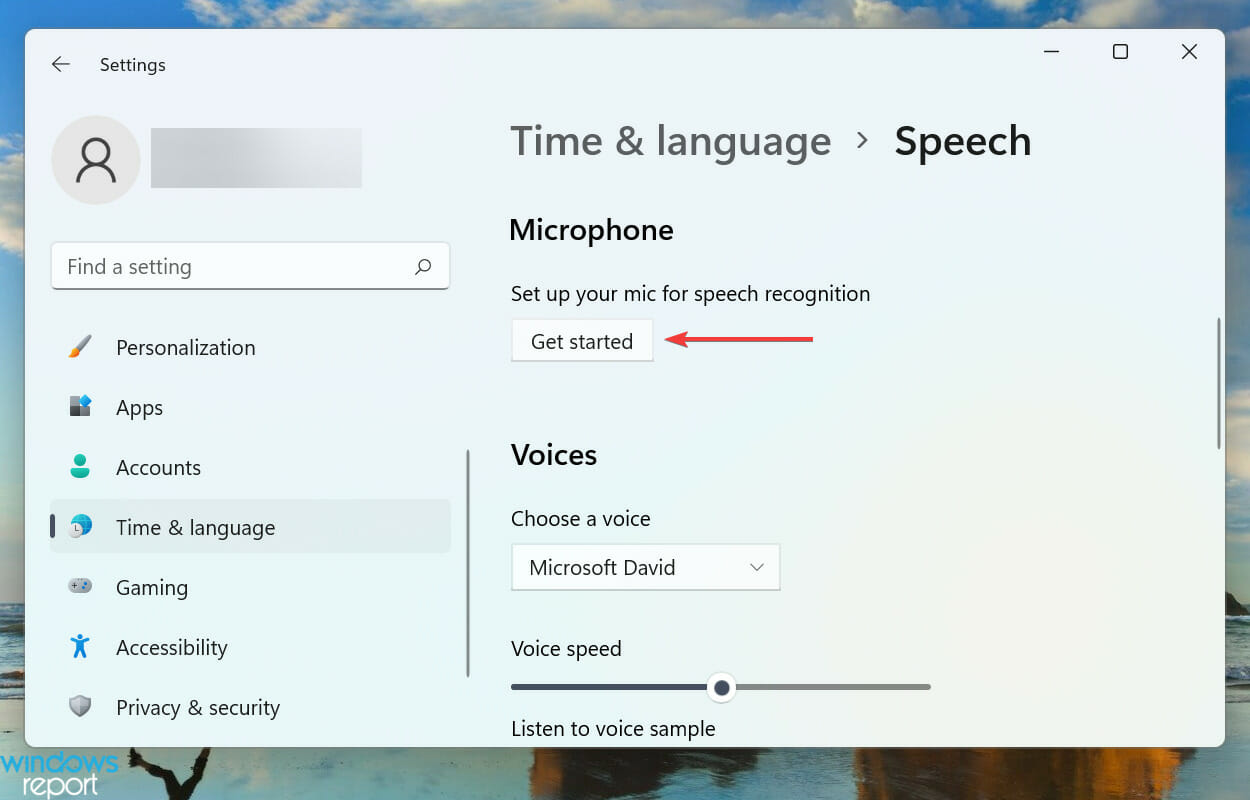
- Now, select the desired option from the Choose the language you speak with your device dropdown menu, and tick the checkbox for Recognize non-native accents for this language option.
- Click on the Get started button under Microphone, and follow the on-screen instructions to fix things.

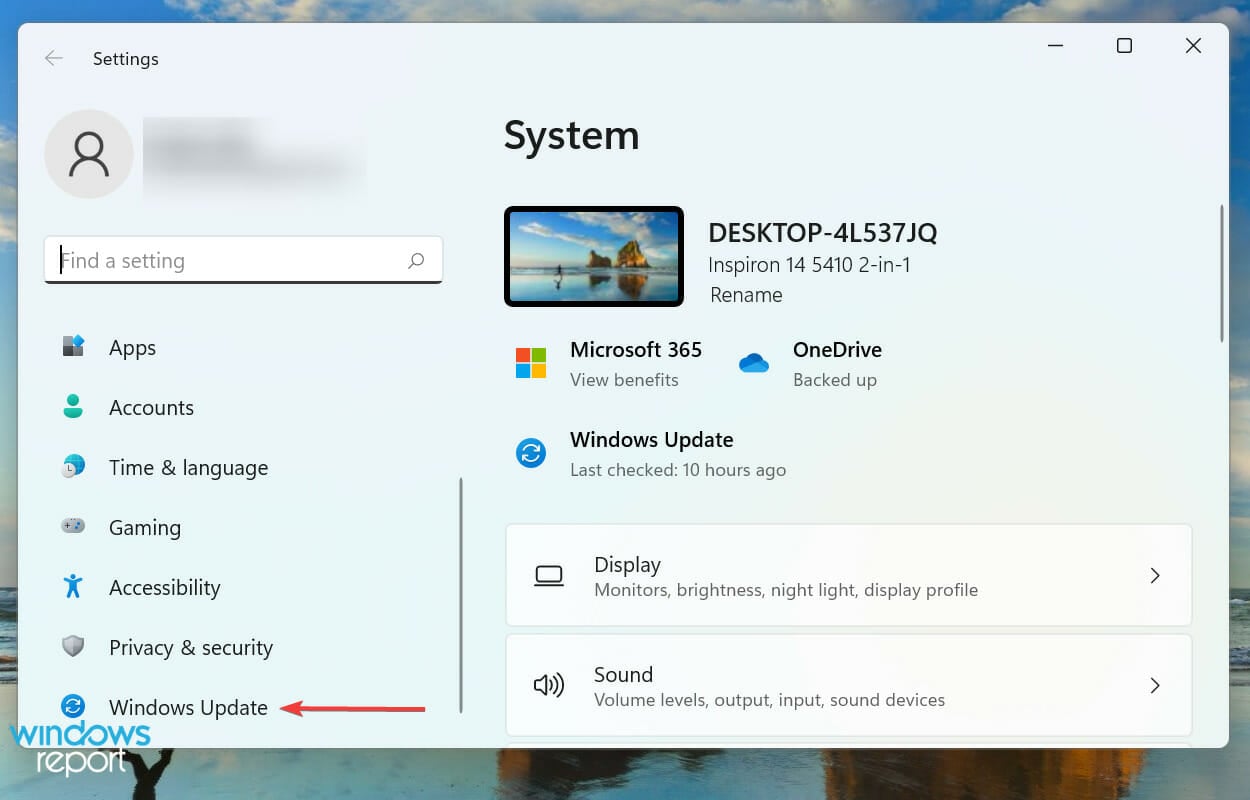
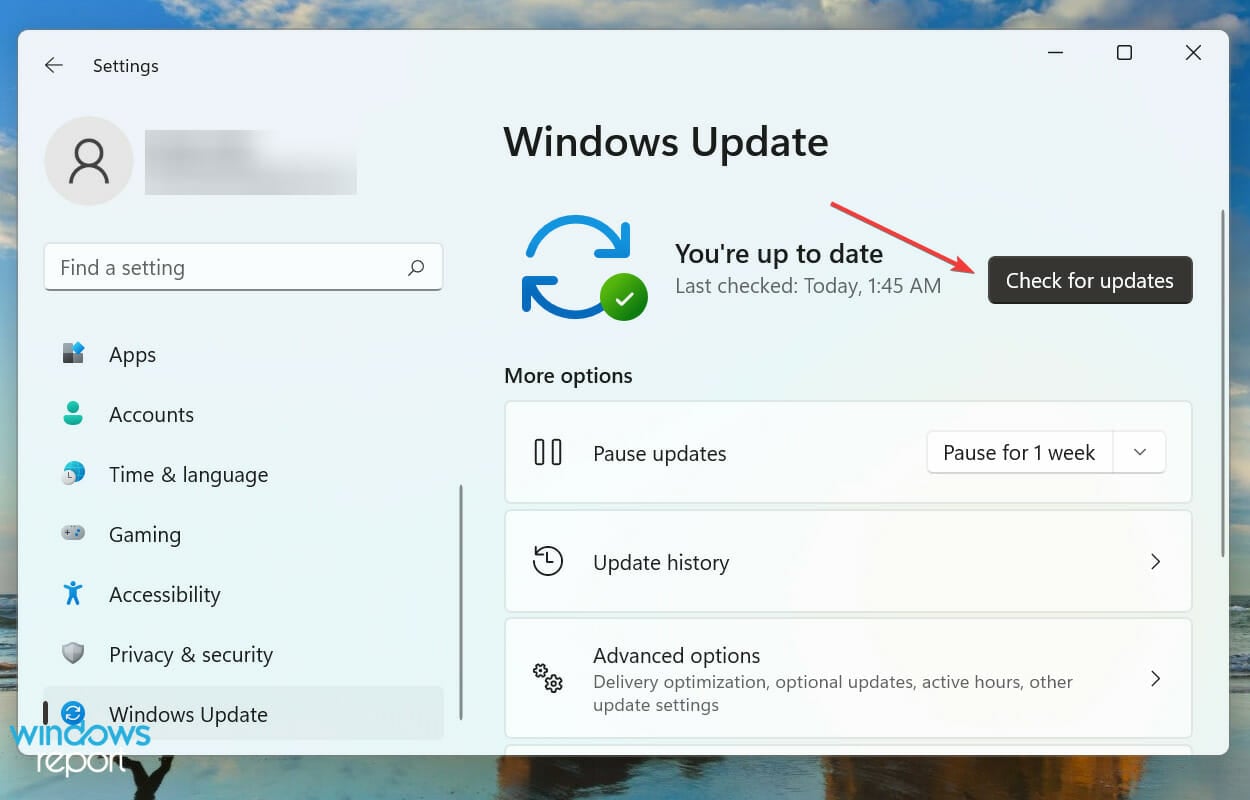
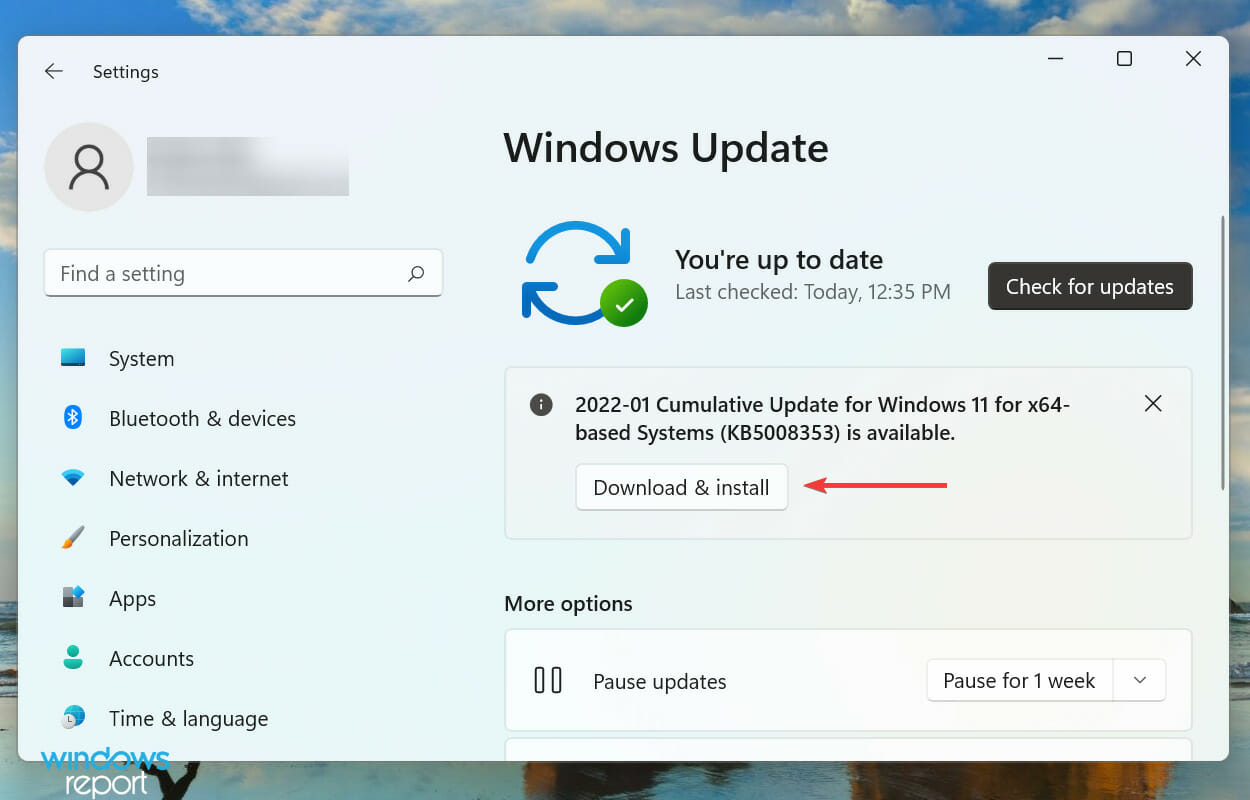
4. Update Windows 11
- Press Windows + I to launch the Settings app, and select the Windows Update tab from the navigation pane.
- Click on the Check for updates button on the right to scan for a newer version of the OS.
- If an update is listed after the scan, click on Download & install.
Some PC issues are hard to tackle, especially when it comes to corrupted repositories or missing Windows files. If you are having troubles fixing an error, your system may be partially broken.
We recommend installing Restoro, a tool that will scan your machine and identify what the fault is.
Click here to download and start repairing.
If you are facing the Windows 11 voice typing not working error due to a bug in the current version of the OS, installing an update would be the best fix. Whenever Microsoft identifies a bug in Windows, a patch for it is released in the subsequent versions.
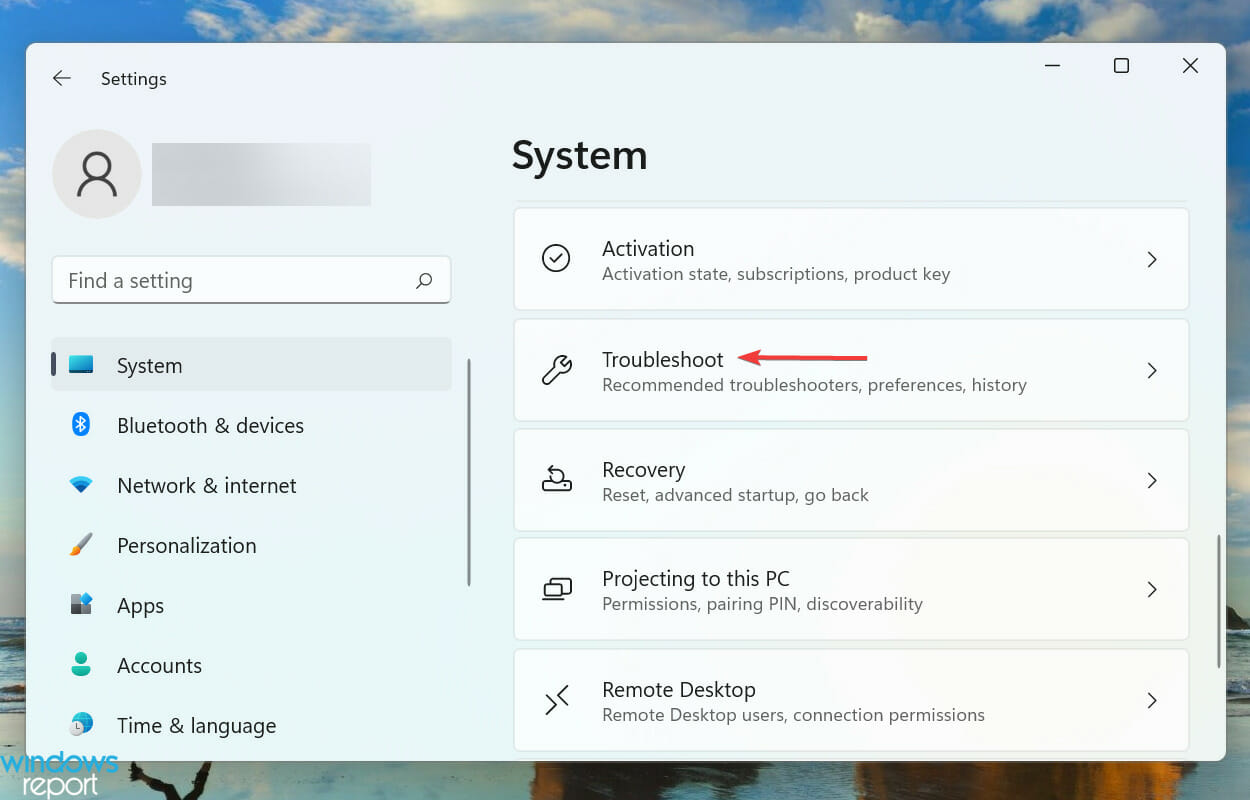
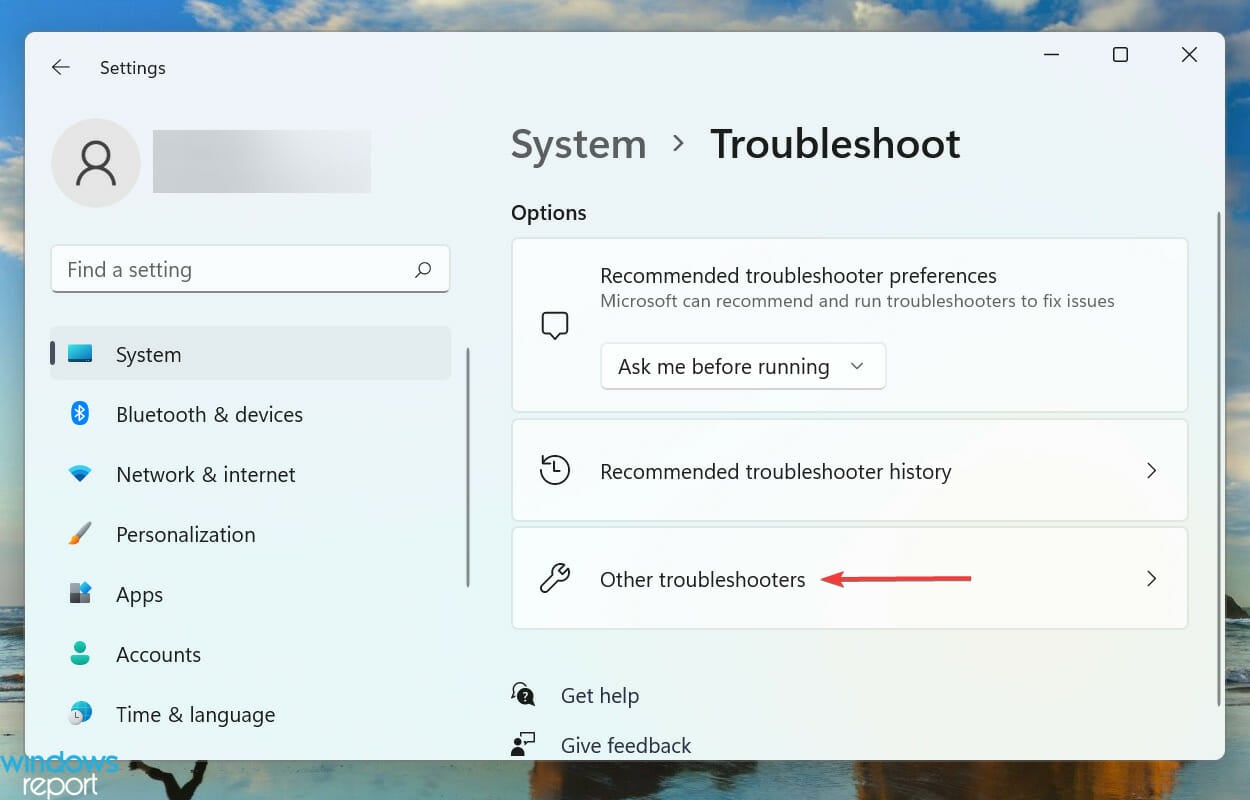
5. Run the troubleshooter
- Press Windows + I to launch the Settings app, and click on Troubleshoot on the right in the System tab.
- Next, click on Other troubleshooters.
- Locate the Recording Audio troubleshooter, and click on the Run button next to it.
- Follow the on-screen instructions and choose the relevant option when prompted.
It’s always recommended to run a dedicated troubleshooter whenever you encounter an issue in Windows. Microsoft offers several of these to automatically diagnose and eliminate problems causing the system or connected devices to malfunction.
Once the troubleshooter is done running, check if the Windows 11 voice typing not working problem is eliminated. In case it persists, head to the next method.
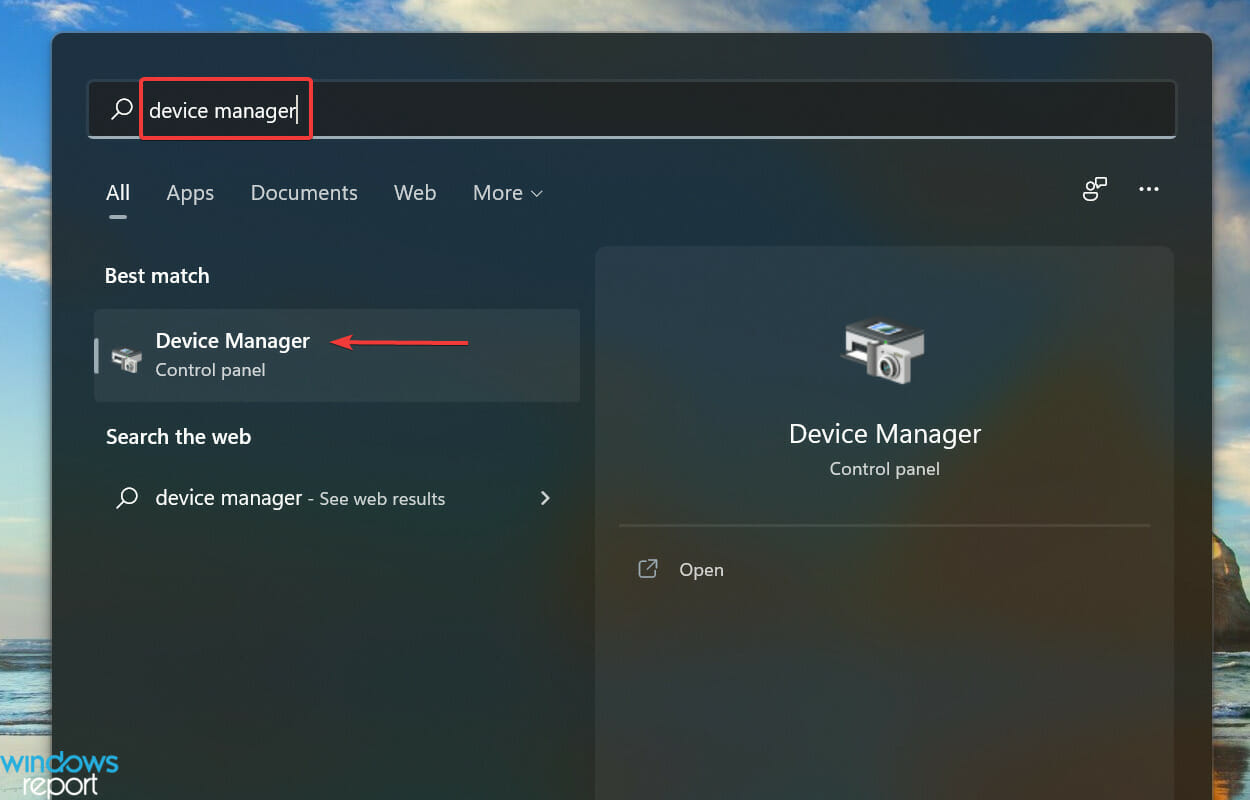
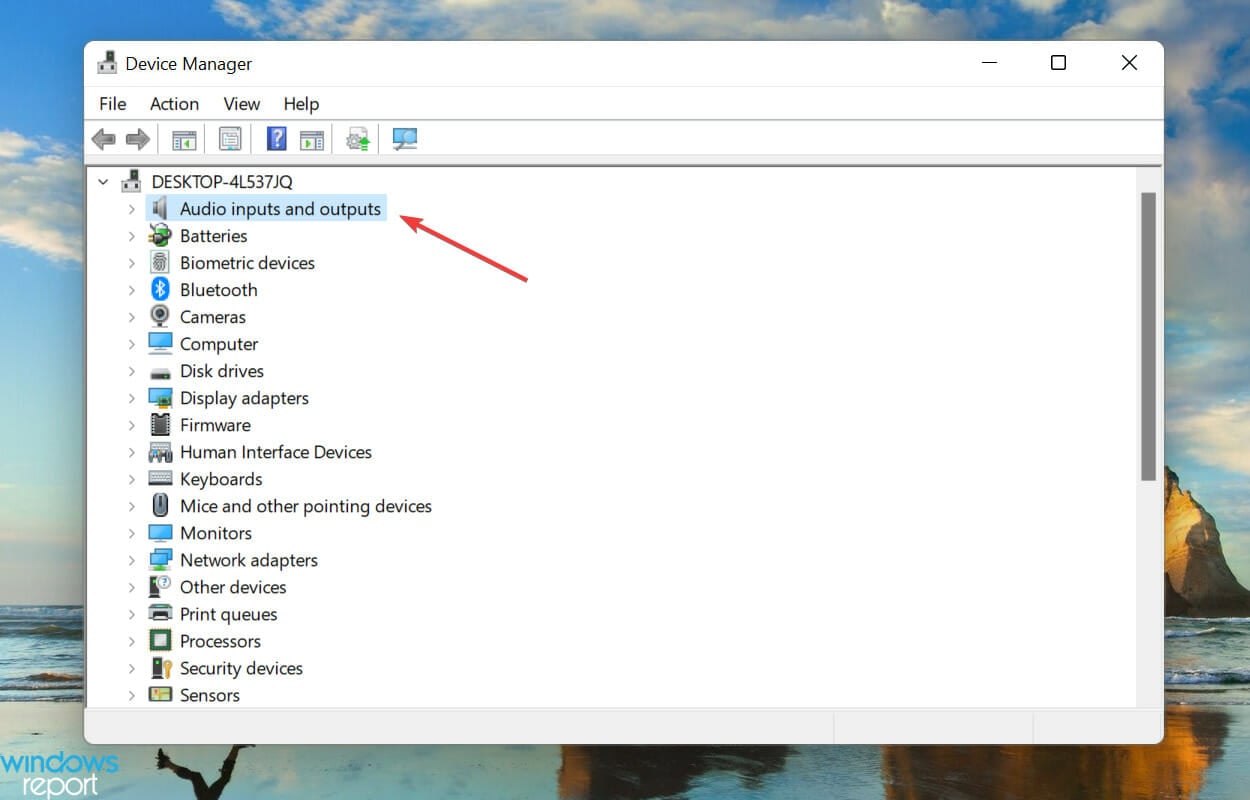
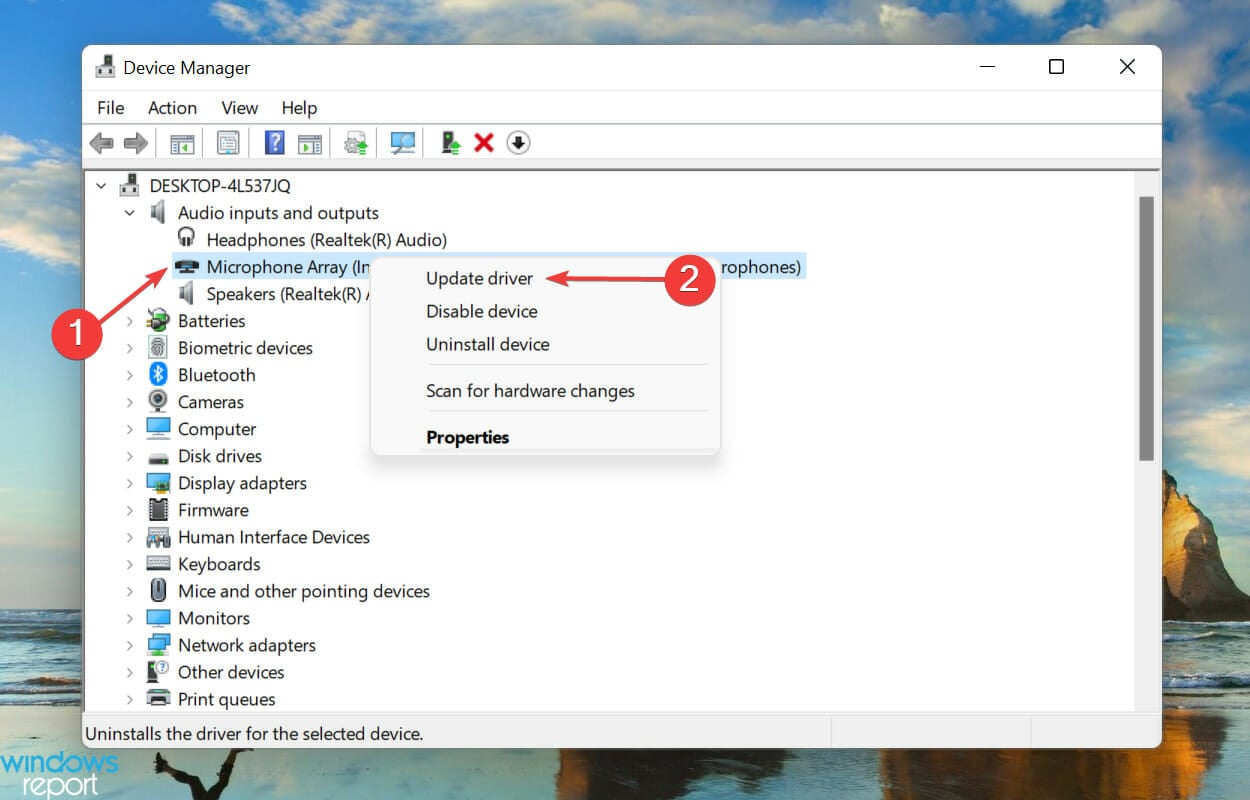
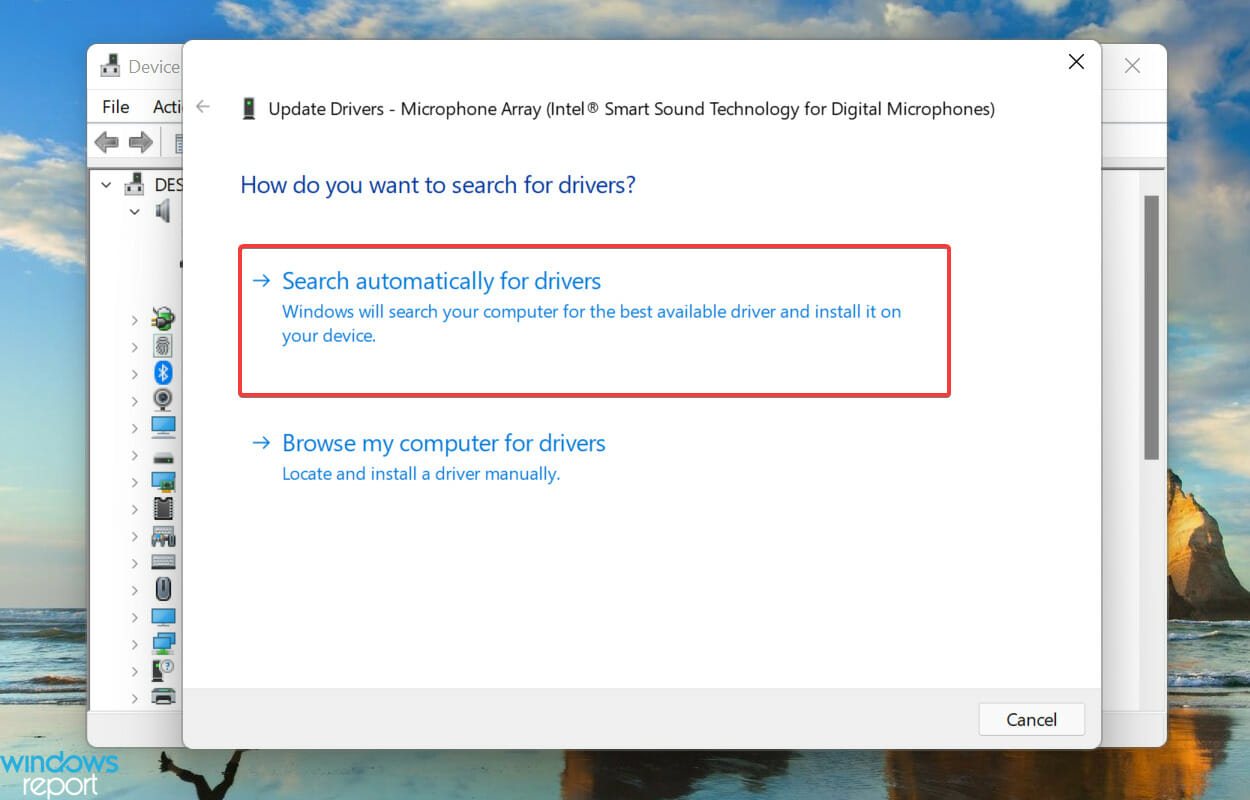
6. Update the microphone driver
- Press Windows + S to launch the Search menu, enter Device Manager in the text field at the top, and click on the relevant search result that appears.
- Now, double-click on the Audio inputs and outputs entry to view the various devices under it.
- Right-click on the malfunctioning microphone, and select Update driver from the context menu.
- Finally, select Search automatically for drivers from the two options listed in the Update Drivers window.
- The system will now scan for the best available drivers and install it for the the microphone.
If none of the fixes listed above have worked, it’s most likely the outdated microphone driver to blame. Outdated drivers are known to cause various problems, and after installing the update, you will notice considerably better performance.
But, the Device Manager method listed above only scans for the updates on the system. So, if you haven’t downloaded the latest version previously, the update wouldn’t go through, and it would tell you that the best available driver is already installed.
In which case, you can check for the latest driver version in Windows Update, or manually download the setup from the manufacturer’s website and install it.
If that sounds like too much trouble, you can always rely on a third-party app. We recommend using DriverFix, a dedicated tool that will scan every source for the latest version, and keep all the installed drivers up-to-date.
What are the best speech to text software tools for Windows 11?
If the voice typing tool in Windows 11 doesn’t meet your requirements, though that’s rarely the case, there are a bunch of similar apps available. Check our curated guide including the best speech to text software for Windows 11 in that regard.
These tools offer a lot more features, and in some cases a higher accuracy and precision as well. When selecting any of the ones listed in our guide or even another, it’s imperative that you verify if the software is effective.
Accuracy is of prime importance here, because you certainly wouldn’t want to keep editing the text over and over again. It should be able to accurately transcribe what’s being spoken with no, or minimum, errors.
By now, you know all about voice typing tools, and the most effective methods to fix it, in case it is not working in Windows 11.
Also, find out how to use Cortana, a quick way to command your computer using voice, in Windows 11, if you are facing issues with it.
Tell us which fix worked and your experience with voice typing in Windows 11, in the comments section below.
![]()
Newsletter
by Kazim Ali Alvi
Kazim has always been fond of technology, be it scrolling through the settings on his iPhone, Android device, or Windows. And at times, unscrewing the device to take… read more
Published on February 10, 2022
- Several users have reported that voice typing, a useful feature in Windows 11, is not working. Read this article to find out the solution.
- To fix the problem, try updating the OS, running the built-in troubleshooter, and updating the relevant drivers, amongst other methods listed below.
- Also, check the speech-to-text software that you could use for transcription in Windows 11.
The voice typing feature is one of the most talked about in the latest iteration. Who wouldn’t want to use the voice input text rather than typing the same thing? But several users have reported that Windows 11 voice typing is not working.
The feature is not new, it was there in Windows 10 as well, though with a different name. But on Windows 11, it’s certainly a lot more advanced and offers high accuracy when translating from speech to text.
Apart from that, it will work anywhere on the system, whether you are performing a Google search, drafting a document, and we can use it even while writing this article.
So, read the following sections to find out all about the feature and the most relevant fixes in case Windows 11’s voice typing is not working.
How do I enable and use voice typing in Windows 11?
The process to enable voice typing in Windows 11 is simple, you just have to place the cursor in a text field, and hit Windows + H to launch the tool. But, that isn’t certainly all!
There are a lot of other things about the voice typing tool that a user must know in order to make the most of it. Also, you may need to reconfigure the default settings for the best experience, or set the tool to launch automatically whenever required.
To find it all out, check our dedicated guide that will talk you through using the voice typing tool in Windows 11.
What do I do if voice typing is not working in Windows 11?
1. Check the connections (for external microphones)
If you are using an external microphone, it’s likely that the connections are not in order. To fix that, remove the jack or USB, whichever your microphone uses, clean it and the port, and then reconnect it.
Once that’s done, check if the Windows 11 voice typing not working problem is eliminated.
In case it isn’t, connect the same microphone to another system, and verify if it works there. If it does, the problem lies with your computer, and executing the fixes below should fix it.
While if it doesn’t, you may have to replace the microphone. Check our curated guide that lists the best microphones for Windows 11.
2. Verify that the microphone is enabled
- Press Windows + I to launch the Settings app, and select Privacy & security from the tabs listed in the navigation pane on the left.
- Scroll down and select Microphone under App permissions.
- Make sure the Microphone access toggle is enabled.
If the microphone doesn’t have the required permissions, you will encounter problems with voice typing. Simply making the required changes can get things working.
After providing the permission, check if the voice typing not working problem in Windows 11 is fixed
3. Choose the correct language for speech
- Press Windows + I to launch the Settings app, and select Time & language tab from the ones listed in the navigation pane on the left.
- Next, click on Speech on the right.
- Now, select the desired option from the Choose the language you speak with your device dropdown menu, and tick the checkbox for Recognize non-native accents for this language option.
- Click on the Get started button under Microphone, and follow the on-screen instructions to fix things.
4. Update Windows 11
- Press Windows + I to launch the Settings app, and select the Windows Update tab from the navigation pane.
- Click on the Check for updates button on the right to scan for a newer version of the OS.
- If an update is listed after the scan, click on Download & install.
Some PC issues are hard to tackle, especially when it comes to corrupted repositories or missing Windows files. If you are having troubles fixing an error, your system may be partially broken.
We recommend installing Restoro, a tool that will scan your machine and identify what the fault is.
Click here to download and start repairing.
If you are facing the Windows 11 voice typing not working error due to a bug in the current version of the OS, installing an update would be the best fix. Whenever Microsoft identifies a bug in Windows, a patch for it is released in the subsequent versions.
5. Run the troubleshooter
- Press Windows + I to launch the Settings app, and click on Troubleshoot on the right in the System tab.
- Next, click on Other troubleshooters.
- Locate the Recording Audio troubleshooter, and click on the Run button next to it.
- Follow the on-screen instructions and choose the relevant option when prompted.
It’s always recommended to run a dedicated troubleshooter whenever you encounter an issue in Windows. Microsoft offers several of these to automatically diagnose and eliminate problems causing the system or connected devices to malfunction.
Once the troubleshooter is done running, check if the Windows 11 voice typing not working problem is eliminated. In case it persists, head to the next method.
6. Update the microphone driver
- Press Windows + S to launch the Search menu, enter Device Manager in the text field at the top, and click on the relevant search result that appears.
- Now, double-click on the Audio inputs and outputs entry to view the various devices under it.
- Right-click on the malfunctioning microphone, and select Update driver from the context menu.
- Finally, select Search automatically for drivers from the two options listed in the Update Drivers window.
- The system will now scan for the best available drivers and install it for the the microphone.
If none of the fixes listed above have worked, it’s most likely the outdated microphone driver to blame. Outdated drivers are known to cause various problems, and after installing the update, you will notice considerably better performance.
But, the Device Manager method listed above only scans for the updates on the system. So, if you haven’t downloaded the latest version previously, the update wouldn’t go through, and it would tell you that the best available driver is already installed.
In which case, you can check for the latest driver version in Windows Update, or manually download the setup from the manufacturer’s website and install it.
If that sounds like too much trouble, you can always rely on a third-party app. We recommend using DriverFix, a dedicated tool that will scan every source for the latest version, and keep all the installed drivers up-to-date.
What are the best speech to text software tools for Windows 11?
If the voice typing tool in Windows 11 doesn’t meet your requirements, though that’s rarely the case, there are a bunch of similar apps available. Check our curated guide including the best speech to text software for Windows 11 in that regard.
These tools offer a lot more features, and in some cases a higher accuracy and precision as well. When selecting any of the ones listed in our guide or even another, it’s imperative that you verify if the software is effective.
Accuracy is of prime importance here, because you certainly wouldn’t want to keep editing the text over and over again. It should be able to accurately transcribe what’s being spoken with no, or minimum, errors.
By now, you know all about voice typing tools, and the most effective methods to fix it, in case it is not working in Windows 11.
Also, find out how to use Cortana, a quick way to command your computer using voice, in Windows 11, if you are facing issues with it.
Tell us which fix worked and your experience with voice typing in Windows 11, in the comments section below.
![]()
Newsletter
Если голосовой ввод не работает в Windows, попробуйте попробовать на компьютере следующие действия по устранению неполадок:
Перед началом работы
Прежде всего проверьте, не работает ли голосовой ввод:
-
Убедитесь, что в Параметры выбран нужный Параметры. Чтобы проверить это, выберите Начните> Параметры> Системный> Звук> Вход> Выберите устройство для выступления или записи.
-
Если вы используете внешний микрофон, убедитесь, что он правильно подключен к компьютеру.
Сообщения об ошибках
При голосовом вводе могут возникнуть другие ошибки.
|
Сообщение об ошибке |
Что можно сделать |
|---|---|
|
Голосовой ввод должен иметь доступ к микрофону. Этот параметр необходимо включить в параметрах, чтобы использовать речь к тексту. |
Выберите Пуск> Параметры> конфиденциальности & безопасности> Микрофони убедитесь, что включен доступ к микрофону. |
|
Голосовой ввод не доступен на текущем языке. |
Проверьте список поддерживаемых языков и установите нужный. См. список |
Текст не появляется после выступления
Если после выступления вы ничего не видите в текстовом ящике, проверьте некоторые из них.
-
Настройте уровень ввода микрофона. Дополнительные справки см. вэтой Windows.
-
Если вы используете встроенный микрофон, подумайте о том, чтобы повторить попытку с гарнитурой или внешним микрофоном.
Слова ввели неправильно
Если вы говорите неправильно, проверьте некоторые моменты.
-
Переход в более тихое место.
-
Убедитесь, что выбран правильный язык для голосового ввода. Для этого нажмите клавиши Windows клавиша с логотипом + ПРОБЕЛ и выберите один из доступных языков. Дополнительные сведения об установке других языков см. в теме Использование голосового ввода для голосового ввода вместо ввода текста на компьютере.
-
Если вы используете встроенный микрофон, подумайте о том, чтобы повторить попытку с гарнитурой или внешним микрофоном.
Статьи по теме
-
Использование голосового ввода для голосового ввода вместо ввода текста на компьютере
Нужна дополнительная помощь?
Содержание
- Как решить проблему «speech recognition could not start»
- «Напридумывал, чтобы не работать. » 1977 год, СССР, художник В. А. Травин
- Васю побили?
- О начальстве
- Может, стоит попробовать?
- Ответ на пост «Васю побили?»
- Детский режим Кинопоиска не по-детски
- М+Ж+М=ММ
- Это какой-то позор, православные.
- Два способа отключить Распознавание голоса в Windows 10.
- Чтобы отключить распознавание голоса в Windows 10, выполните следующие действия.
- Отключить распознавание речи в сети с помощью настройки реестра.
- Fix: Speech Recognition could not start Cryptic Error in Windows 10
- Fix: Speech Recognition could not start Cryptic Error in Windows 10
- Add ctfmon.exe to Startup
- Using Speech Recognition Settings
- By Regional Settings
- Train Profile
- Create New Recognition Profile
- Speech recognition error windows 10 как исправить
- Asked by:
- Question
- All replies
- Как скачать Speech Recognition.lnk и устранить сообщения об ошибках
- Обзор файла
- Что такое сообщения об ошибках Speech Recognition.lnk?
- Общие ошибки выполнения Speech Recognition.lnk
- Как исправить ошибки Speech Recognition.lnk — 3-шаговое руководство (время выполнения:
- Шаг 1. Восстановите компьютер до последней точки восстановления, «моментального снимка» или образа резервной копии, которые предшествуют появлению ошибки.
- Шаг 2. Запустите средство проверки системных файлов (System File Checker), чтобы восстановить поврежденный или отсутствующий файл Speech Recognition.lnk.
- Шаг 3. Выполните обновление Windows.
- Если эти шаги не принесут результата: скачайте и замените файл Speech Recognition.lnk (внимание: для опытных пользователей)
Как решить проблему «speech recognition could not start»

друзья, помогите избавиться от ошибки или полностью отключить распознавание речи на винде 10.
в любой непонятной ситуации, хоть винду запустил, хоть любую другую программу, выскакивает эта ошибка, что скрином выше.

в настройках распознавания пишет о не поддерживаем модуле.
пролистывая гугл я выяснил, что можно как то излечить ошибку изменив язык интерфейса на английский

но беда в том, что у меня домашняя версия для одного языка

может кто сталкивался и знает как исправить?
Совет «переустановить винду» нельзя назвать помощью

Кортану видимо отключить


«Напридумывал, чтобы не работать. » 1977 год, СССР, художник В. А. Травин


Васю побили?
Upd: как предыстория https://youtu.be/sy-OhRH81F4 спасибо модератору 1337 что нашел (Вася удалил видео из-за которого произошёл данный инцидент)

О начальстве
Будете смеяться, но была такая ситуация. Начальство забило на топливо и мой экскаватор обсох за 4 часа до конца смены. Полчаса три «Больших Босса» хором уговаривали меня: «Владимирыч, надо доработать смену. Кровь из носу, дерьмо из попы, надо!»
Еще через полчаса я, под изумленные взгляды коллег, торжественно заливал в 600-литровый бак своего Коматсу 5 (пять) литров соляры. Нда.


Может, стоит попробовать?


Ответ на пост «Васю побили?»
Комментарий от Васи
Детский режим Кинопоиска не по-детски


М+Ж+М=ММ


Это какой-то позор, православные.
Давайте вспомним определения:
А что происходит на этом виде?:
Такая форма защиты веры, с применением силы, лично меня, как верующего, оскорбляет.
А теперь давайте заглянем в источники:
«Не делайте себе кумиров, и изваяний, и столбов не ставьте у себя, и камней с изображениями не кладите в земле вашей, чтобы кланяться пред ними, ибо Я Господь, Бог ваш.»
«3. Да не будет у тебя других богов пред лицом Моим.
4. Не делай себе кумира и никакого изображения того, что на небе вверху, и что на земле внизу, и что в воде ниже земли;
5. не поклоняйся им и не служи им, ибо Я Господь, Бог твой, Бог ревнитель, наказывающий детей за вину отцов до третьего и четвертого рода, ненавидящих Меня,
6. и творящий милость до тысячи родов любящим Меня и соблюдающим заповеди Мои.»
Не обманывайтесь: Бог поругаем не бывает. Что посеет человек, то и пожнет: сеющий в плоть свою от плоти пожнет тление, а сеющий в дух от духа пожнет жизнь вечную.
Т.е. то, что делает человек, на совести самого человека. Бога, веру нельзя оскорбить какими-либо действиями.
Так а что мы видим на видео? Кто такие пришли к Васе и действуют, якобы, во имя веры? Во имя какой и чьей веры. Если они про православный крест, так цитаты из православных текстов выше. Сектанты? Гопники? Как по мне, так возможные фигуранты 282 УК РФ.
Может эти люди объявятся? Покажут лицо, назовут свои ФИО. Ну если им нечего стыдиться. Или есть чего?
Источник
Два способа отключить Распознавание голоса в Windows 10.
Публикация: 21 October 2018 Обновлено: 7 August 2019
Windows предоставляет функцию распознавания речи на основе устройств (доступную как с помощью приложения Windows Recech Recognition Desktop), так и с помощью облачной службой распознавания речи на тех рынках и регионах, где доступна Cortana. Microsoft может использовать голосовые данные, взаимодействия с компьютером, чтобы улучшить услуги распознавания речи.
Чтобы использовать распознавание речи, необходимо включить параметр «Знакомство с вами» (параметр конфиденциальности в разделе «Персонализация рукописного ввода и ввода с клавиатуры»), поскольку голосовые службы существуют как в облаке, так и на вашем устройстве. Информация, которую Microsoft собирает с их помощью, позволяет их улучшить. Речевые службы, которые не передаются в облако и присутствуют только на вашем устройстве, такие как «Диктор» и «Распознавание речи Windows», по-прежнему будут работать, если этот параметр отключен, но Microsoft уже не будет собирать данные.
Если для параметра «Диагностика и использование данных» («Параметры» → «Конфиденциальность» → «Диагностика и отзывы») установлено значение «Полные», входящие данные для рукописного ввода и ввода текста отправляются в Microsoft, и компания использует эти данные в совокупности, чтобы улучшить платформу для всех пользователей.
Чтобы отключить распознавание голоса в Windows 10, выполните следующие действия.

Теперь функция отключена.
Кроме того, вы можете применить настройки реестра.
Отключить распознавание речи в сети с помощью настройки реестра.
Чтобы отменить изменение при необходимости, используйте файл On-Online Speech Recognition.reg.
Файлы реестра, выше, изменяют ветвь реестра
Они изменяют параметр DWORD (32 бита) с именем HasAccepted.
Наконец, вы можете отключить распознавание речи в сети на странице конфиденциальности программы установки Windows во время установки ОС с нуля.
Источник
Fix: Speech Recognition could not start Cryptic Error in Windows 10
Many users are complaining that they are receiving Speech Recognition could not start cryptic error in Windows 10 when they try to start the feature. This problem mostly occurs when ctfmon.exe is not set to automatically start with Windows. However, there are other causes such as a change in the recognizer language that lead to this error.
This issue is not new in Windows as users are experiencing this since Vista edition. Whenever they make an attempt to initiate the Speech Recognition, the following error note shows up on the PC screen. To bypass this problem, there are few solutions like starting ctfmon.exe during Startup, changing Speech settings, adding new recognition profile and so on. Let us move on to the workarounds one by one and see which one fixes your problem.

Fix: Speech Recognition could not start Cryptic Error in Windows 10
Here is how to fix Speech Recognition could not start Cryptic Error in Windows 10 –
Add ctfmon.exe to Startup
Step-1: First of all, press “Windows + R” hotkeys to open Run dialog box. When the box shows up, type regedit and click OK or press Enter to start the process.
Step-2: When the Registry Editor opens, navigate to the below-given path on the left column.
Step-3: Shift to the corresponding pane of Run and make a right-click on an empty space. Hover over New and from the submenu choose String Value.

Step-4: Name it as ctfmon and double-click on it to change its value. On its Value data field, assign its value as ctfmon.exe.

Step-5: Now, you just need to close Registry Editor and restart Windows 10 PC to check how it fixes.
After adding ctfmon.exe to the Startup, if the system still shows Speech Recognition could not start, go ahead with other solutions.
Using Speech Recognition Settings
Open Start Menu, type cp, and press Enter. Choose Speech Recognition applet when Control Panel comes into view.

Click Advanced Speech Options on the left side of the following screen (see snapshot).

When the Speech Properties screen displays, ensure to set the Language in the correct locale. Moving ahead, also uncheck the option namely “Review Documents and mail to improve accuracy”.

Simply click OK and reboot your computer.
It is done, you can check how is the speech recognition feature. If it is still not fixed, you continue to try the solution 3.
By Regional Settings
Press “Win + I” shortcut keys simultaneously in order to open Windows Settings app.
When the main interface of the application comes into view, go to Time & Language category.
Select the Region tab on the left column of the following page. Switch to its right pane and click the drop-down underneath the option Country or region. From the list, choose another location.

Now, reboot the computer and again head towards the Region settings and this time set the correct location of your choice.
Finally, again make an attempt to restart your PC and this time Speech Recognition will work wonder. Doing this will eventually clear out any settings on your system that are may be corrupted by other updates or software that you might have installed.
Train Profile
In case you are still encountering Speech Recognition could not start, give an attempt to Train profile.
First, open Control Panel by using any of your preferred procedures.
Go to Speech Recognition and perform a hit on Advanced speech options on the top left side.
On the Speech Properties dialog, click the button namely Train Profile.

Now, follow the on-screen guidelines of the wizard and complete the training.
Create New Recognition Profile
If the training process and other workarounds fail to bypass Speech Recognition could not start Cryptic Error in Windows 10, you should create a new recognition profile.
Go to Control Panel and get access to Speech Recognition applet.
Make a click on “Advanced speech options“.
In the Speech Properties dialog, click the New button under the ‘Recognition Profiles‘ section as indicated in the below snapshot.

Provide a new name to the profile and when you successfully create it, delete the old one.
Lots of experienced users said that they have tried the above-mentioned methods, and it works effectively. So, you also give a shot to these workarounds and let us know which one helped you out. If you have more tips to solve this trouble, don’t forget to drop them in the comments below.
Источник
Speech recognition error windows 10 как исправить
This forum has migrated to Microsoft Q&A. Visit Microsoft Q&A to post new questions.
Asked by:

Question
Os win10 v. 1803 in Inglese, più italiano lingua secondaria; Date & time su Roma.
Quando provo a eseguire «speech recognize», fallisce per il mismatch della lingua (https://answers.microsoft.com/en-us/windows/forum/all/speech-recognition-windows-10/e31b0c92-01a3-4f85-b34f-2dbdcd1e2331)
Il pacchetto italiano è già installato.
in Settings> Speech è tutto disabilitato.
per policy abbiamo cortana bloccato.
Quali sono gli step per abilitare lo speech recognize? Grazie
Aggiungo: Control PanelAll Control Panel ItemsSpeech Recognition mi manca la voce «avanzate»
ho aggiunto anche la chiave ctfmon.exe, senza risolvere
Thank you for coming TechNet forum.
I noticed you post this thread with Italian, however, this forum just support for English which will be more convenient to share experience between many English customers.
If you prefer a Italian support, please post thread in the following link.
Thank you for your understanding.
Please remember to mark the replies as answers if they help.
If you have feedback for TechNet Subscriber Support, contact tnmff@microsoft.com.
I can’t install any other italian language, because is already installed.
in Control PanelAll Control Panel ItemsSpeech Recognition «advanced option» is missing.
I’ve already trid to add ctfmon.exe in regedit, but still does not work fine.
Could you please help me to run Speech Recognition? Thank you in advance
Thank you for your translation.
As you said advanced option is not exists in your environment, so I think we need to check if any related speech recognition has been disable through Group Policy.
Please run command line «gpresult /h c:gp.html» as administrator and generate a report about applied group policy, then check any thing related with speech recognition. If you have problem about checking it, please upload it to One Drive and paste the link here.
Please remember to mark the replies as answers if they help.
If you have feedback for TechNet Subscriber Support, contact tnmff@microsoft.com.
thanks for your kind reply. I’ve already checked my applied gpo, reading the html report of a standard client. In gpresult there are not any references to «speech» or «recognition».
I add another info: also form a client in workgroup not in domain, editing local policy, I can’t find no reference to speech recognition.
I think it could be an issue about language, but I’m not able to solve: If I configure all just in English, i recieve the same error popup. If I set regional language in Italian with OS in Eglish, i see always the same error:
https://answers.microsoft.com/en-us/windows/forum/windows_10-desktop/speech-recognition-error-language-configuration/ad43d50a-b99f-4519-b53c-000586499afc
So: the error is caused by a language mismatch. Plus: i can’t find «advanced option» in speech recognition control panel. And: cortana is disabled by policy, but on a client outside domain with cortana, i’ve the same error.
Any idea?
Источник
Как скачать Speech Recognition.lnk и устранить сообщения об ошибках
Последнее обновление: 07/01/2022 [Время на прочтение статьи: 5 мин.]
Файлы Windows File Shortcut, такие как Speech Recognition.lnk, используют расширение LNK. Файл считается файлом Ярлык (Windows File Shortcut) и впервые был создан компанией Microsoft для пакета ПО Windows 10.
Файл Speech Recognition.lnk изначально был выпущен с Windows Vista 11/08/2006 для ОС Windows Vista. Датой самого последнего выпуска файла для Windows 10 является 07/29/2015 [версия 10]. Файл Speech Recognition.lnk входит в комплект Windows 10, Windows 8.1 и Windows 8.
Продолжайте читать, чтобы найти загрузку правильной версии файла Speech Recognition.lnk (бесплатно), подробные сведения о файле и порядок устранения неполадок, возникших с файлом LNK.

Рекомендуемая загрузка: исправить ошибки реестра в WinThruster, связанные с Speech Recognition.lnk и (или) Windows.
![]()

Совместимость с Windows 10, 8, 7, Vista, XP и 2000
Средняя оценка пользователей
Обзор файла
| Общие сведения ✻ | |
|---|---|
| Имя файла: | Speech Recognition.lnk |
| Расширение файла: | расширение LNK |
| Тип файла: | Ярлык |
| Описание: | Windows File Shortcut |
| Пользовательский рейтинг популярности: |
| Сведения о разработчике и ПО | |
|---|---|
| Программа: | Windows 10 |
| Разработчик: | Microsoft |
| Программное обеспечение: | Windows |
| Версия ПО: | 10 |
| Сведения о файле | |
|---|---|
| Размер файла (байты): | 1244 |
| Дата первоначального файла: | 11/02/2006 |
| Дата последнего файла: | 03/18/2017 |
✻ Фрагменты данных файлов предоставлены участником Exiftool (Phil Harvey) и распространяются под лицензией Perl Artistic.
Что такое сообщения об ошибках Speech Recognition.lnk?
Общие ошибки выполнения Speech Recognition.lnk
Ошибки файла Speech Recognition.lnk часто возникают на этапе запуска Windows, но также могут возникать во время работы программы. Эти типы ошибок LNK также известны как «ошибки выполнения», поскольку они возникают во время выполнения Windows. К числу наиболее распространенных ошибок выполнения Speech Recognition.lnk относятся:
Программа: C:ProgramDataMicrosoftWindowsStart MenuProgramsAccessibilitySpeech Recognition.lnk
Среда выполнения получила запрос от этого приложения, чтобы прекратить его необычным способом.
Для получения дополнительной информации обратитесь в службу поддержки приложения.
В большинстве случаев причинами ошибок в LNK являются отсутствующие или поврежденные файлы. Файл Speech Recognition.lnk может отсутствовать из-за случайного удаления, быть удаленным другой программой как общий файл (общий с Windows) или быть удаленным в результате заражения вредоносным программным обеспечением. Кроме того, повреждение файла Speech Recognition.lnk может быть вызвано отключением питания при загрузке Windows, сбоем системы при загрузке или сохранении Speech Recognition.lnk, наличием плохих секторов на запоминающем устройстве (обычно это основной жесткий диск) или заражением вредоносным программным обеспечением. Таким образом, крайне важно, чтобы антивирус постоянно поддерживался в актуальном состоянии и регулярно проводил сканирование системы.
Как исправить ошибки Speech Recognition.lnk — 3-шаговое руководство (время выполнения:
Если вы столкнулись с одним из вышеуказанных сообщений об ошибке, выполните следующие действия по устранению неполадок, чтобы решить проблему Speech Recognition.lnk. Эти шаги по устранению неполадок перечислены в рекомендуемом порядке выполнения.
Шаг 1. Восстановите компьютер до последней точки восстановления, «моментального снимка» или образа резервной копии, которые предшествуют появлению ошибки.
Чтобы начать восстановление системы (Windows XP, Vista, 7, 8 и 10):
Если на этапе 1 не удается устранить ошибку Speech Recognition.lnk, перейдите к шагу 2 ниже.

Шаг 2. Запустите средство проверки системных файлов (System File Checker), чтобы восстановить поврежденный или отсутствующий файл Speech Recognition.lnk.
Средство проверки системных файлов (System File Checker) — это утилита, входящая в состав каждой версии Windows, которая позволяет искать и восстанавливать поврежденные системные файлы. Воспользуйтесь средством SFC для исправления отсутствующих или поврежденных файлов Speech Recognition.lnk (Windows XP, Vista, 7, 8 и 10):
Следует понимать, что это сканирование может занять некоторое время, поэтому необходимо терпеливо отнестись к процессу его выполнения.
Если на этапе 2 также не удается устранить ошибку Speech Recognition.lnk, перейдите к шагу 3 ниже.
Шаг 3. Выполните обновление Windows.
Когда первые два шага не устранили проблему, целесообразно запустить Центр обновления Windows. Во многих случаях возникновение сообщений об ошибках Speech Recognition.lnk может быть вызвано устаревшей операционной системой Windows. Чтобы запустить Центр обновления Windows, выполните следующие простые шаги:
Если Центр обновления Windows не смог устранить сообщение об ошибке Speech Recognition.lnk, перейдите к следующему шагу. Обратите внимание, что этот последний шаг рекомендуется только для продвинутых пользователей ПК.

Если эти шаги не принесут результата: скачайте и замените файл Speech Recognition.lnk (внимание: для опытных пользователей)
Если этот последний шаг оказался безрезультативным и ошибка по-прежнему не устранена, единственно возможным вариантом остается выполнение чистой установки Windows 10.
Источник
Голосовой ввод — невероятно полезная функция в Windows 11, которая позволяет диктовать предложения, а не печатать их. Он использует онлайн-распознавание речи для быстрого преобразования вашей речи в текст. Однако, если вы не можете воспользоваться преимуществами голосового набора, потому что эта функция не работает, мы здесь, чтобы помочь.

У этой проблемы может быть несколько причин, в том числе отсутствие соответствующего разрешения и неисправные драйверы микрофона. Если вы не можете понять, в чем причина проблемы, вам помогут приведенные ниже советы по устранению неполадок. Итак, начнем.
1. Проверьте физическое соединение
Если вы используете внешний микрофон на своем ПК, начните с проверки его физического подключения. Пока вы это делаете, очистите аудиопорт или USB-порт, который вы используете. Вы также можете протестировать свой микрофон на другом компьютере, чтобы исключить любые проблемы, связанные с оборудованием.
2. Проверьте устройство ввода звука по умолчанию.
Если к вашему ПК подключено несколько аудиоустройств, Windows может выбрать неправильный микрофон. Убедитесь, что Windows 11 использует предпочитаемый вами микрофон в качестве устройства ввода звука по умолчанию. Вот как это сделать.
Шаг 1: Щелкните значок поиска на панели задач, чтобы открыть меню поиска. Введите настройки звука и выберите результат в разделе Лучшее совпадение.

Шаг 2. В разделе «Выберите устройство для разговора или записи» выберите предпочитаемое аудиоустройство. Также убедитесь, что громкость не слишком низкая.

После этого используйте сочетание клавиш Windows + H, чтобы получить доступ к голосовому набору в Windows и посмотреть, работает ли он.
3. Включите доступ к микрофону
Если в Windows 11 нет необходимых разрешений для доступа к вашему микрофону, функция голосового ввода не будет работать. Выполните следующие действия, чтобы включить доступ к микрофону в Windows 11.
Шаг 1: Щелкните правой кнопкой мыши значок «Пуск» и выберите «Настройки» из списка.

Шаг 2. Перейдите на вкладку «Конфиденциальность и безопасность». Затем прокрутите вниз до «Разрешения приложения» и выберите «Микрофон».

Шаг 3. Включите переключатели рядом с доступом к микрофону и «Разрешить приложениям доступ к вашему микрофону».

Попробуйте снова использовать голосовой ввод, чтобы убедиться, что он работает правильно.
4. Проверьте язык речи
Windows 11 поддерживает различные языки для голосового ввода. Вы можете загрузить и установить предпочитаемый язык голосового ввода в настройках языка речи. Проблемы также могут возникнуть, если вы говорите на языке, отличном от указанного языка речи. Вот что вы можете сделать, чтобы это исправить.
Шаг 1: Откройте меню «Пуск» и щелкните значок в виде шестеренки, чтобы запустить приложение «Настройки».

Шаг 2: На вкладке «Время и язык» нажмите «Речь».

Шаг 3. Используйте раскрывающееся меню в разделе «Язык речи», чтобы выбрать предпочтительный язык для голосового ввода. При желании вы можете включить «Распознавать неродные акценты для этого языка», если это не ваш родной язык.

5. Переместитесь в более тихое место
Если Windows не может обработать ваш голос и правильно набрать слова, подумайте о том, чтобы перейти в более тихое место в вашем доме. Это устранит любые помехи, вызванные фоновым шумом. Кроме того, переключение на проводную гарнитуру или внешний микрофон должно помочь повысить точность, если вы используете встроенный микрофон на своем ноутбуке с Windows для голосового набора.
6. Запустите средство устранения неполадок с записью звука.
Windows 11 предлагает средство устранения неполадок практически для всех проблем, связанных с оборудованием и программным обеспечением. Запуск средства устранения неполадок с записью звука может обнаруживать и автоматически устранять проблемы, если таковые имеются. Даже если он не может, он, по крайней мере, поделится более подробной информацией о проблеме.
Шаг 1: Нажмите клавишу Windows + I, чтобы запустить приложение «Настройки». На вкладке «Система» нажмите «Устранение неполадок».

Шаг 2. Перейдите к разделу Другие средства устранения неполадок.

Шаг 3: Запустите средство устранения неполадок с записью звука.

Следуйте инструкциям на экране, чтобы завершить процесс устранения неполадок. После этого проверьте, нормально ли работает голосовой ввод.
Драйверы на вашем ПК помогают Windows обмениваться данными с вашими аппаратными устройствами. Если драйвер микрофона на вашем ПК неисправен, голосовой ввод может не работать. Чтобы исправить это, вы должны обновить драйвер микрофона на своем ПК, выполнив следующие действия.
Шаг 1: Нажмите клавишу Windows + X и выберите «Диспетчер устройств» в открывшемся меню.

Шаг 2: Дважды щелкните «Аудиовходы и выходы», чтобы развернуть его. Щелкните правой кнопкой мыши микрофон и выберите «Обновить драйвер».

Оттуда следуйте инструкциям на экране, чтобы обновить драйвер. После этого голосовой ввод должен снова начать работать.
Поговорите с типом
Голосовой ввод может быть удобен, если вы тратите большую часть дня на написание длинных документов или делаете заметки. И инструмент довольно точен и прост в использовании. Иногда инструмент голосового набора может не работать должным образом, но вы не можете исправить это самостоятельно.
Post Views: 349