Во время работы вашего приложения часто будут возникать исключительные ситуации. Когда у вас простое консольное приложение, то все просто – ошибка выводится в консоль. Но как быть с веб-приложением?
Допустим у пользователя отсутсвует доступ, или он передал некорректные данные. Лучшим вариантом будет в ответ на такие ситуации, отправлять пользователю сообщения с описанием ошибки. Это позволит клиенту вашего API скорректировать свой запрос.
В данной статье разберём основные возможности, которые предоставляет SpringBoot для решения этой задачи и на простых примерах посмотрим как всё работает.
@ExceptionHandler
@ExceptionHandler позволяет обрабатывать исключения на уровне отдельного контроллера. Для этого достаточно объявить метод в контроллере, в котором будет содержаться вся логика обработки нужного исключения, и пометить его аннотацией.
Для примера у нас будет сущность Person, бизнес сервис к ней и контроллер. Контроллер имеет один эндпойнт, который возвращает пользователя по логину. Рассмотрим классы нашего приложения:
Сущность Person:
package dev.struchkov.general.sort;
import java.text.MessageFormat;
public class Person {
private String lastName;
private String firstName;
private Integer age;
//getters and setters
}Контроллер PersonController:
package dev.struchkov.example.controlleradvice.controller;

import dev.struchkov.example.controlleradvice.domain.Person;
import dev.struchkov.example.controlleradvice.service.PersonService;
import lombok.RequiredArgsConstructor;
import lombok.extern.slf4j.Slf4j;
import org.springframework.http.ResponseEntity;
import org.springframework.web.bind.annotation.GetMapping;
import org.springframework.web.bind.annotation.PathVariable;
import org.springframework.web.bind.annotation.RequestMapping;
import org.springframework.web.bind.annotation.RequestParam;
import org.springframework.web.bind.annotation.RestController;

import java.util.UUID;

@Slf4j
@RestController
@RequestMapping("api/person")
@RequiredArgsConstructor
public class PersonController {

    private final PersonService personService;

    @GetMapping
    public ResponseEntity<Person> getByLogin(@RequestParam("login") String login) {
        return ResponseEntity.ok(personService.getByLoginOrThrown(login));
    }

    @GetMapping("{id}")
    public ResponseEntity<Person> getById(@PathVariable("id") UUID id) {
        return ResponseEntity.ok(personService.getById(id).orElseThrow());
    }

}
И наконец PersonService, который будет возвращать исключение NotFoundException, если пользователя не будет в мапе persons.
package dev.struchkov.example.controlleradvice.service;

import dev.struchkov.example.controlleradvice.domain.Person;
import dev.struchkov.example.controlleradvice.exception.NotFoundException;
import lombok.NonNull;
import org.springframework.stereotype.Service;

import java.util.HashMap;
import java.util.Map;
import java.util.Optional;
import java.util.UUID;

@Service
public class PersonService {

    private final Map<UUID, Person> people = new HashMap<>();

    public PersonService() {
        final UUID komarId = UUID.randomUUID();
        people.put(komarId, new Person(komarId, "komar", "Алексей", "ertyuiop"));
    }

    public Person getByLoginOrThrown(@NonNull String login) {
        return people.values().stream()
                .filter(person -> person.getLogin().equals(login))
                .findFirst()
                .orElseThrow(() -> new NotFoundException("Пользователь не найден"));
    }

    public Optional<Person> getById(@NonNull UUID id) {
        return Optional.ofNullable(people.get(id));
    }

}
Перед тем, как проверить работу исключения, давайте посмотрим на успешную работу эндпойнта.

Все отлично. Нам в ответ пришел код 200, а в теле ответа пришел JSON нашей сущности. А теперь мы отправим запрос с логином пользователя, которого у нас нет. Посмотрим, что сделает Spring по умолчанию.

Обратите внимание, ошибка 500 – это стандартный ответ Spring на возникновение любого неизвестного исключения. Также исключение было выведено в консоль.

Как я уже говорил, отличным решением будет сообщить пользователю, что он делает не так. Для этого добавляем метод с аннотацией @ExceptionHandler, который будет перехватывать исключение и отправлять понятный ответ пользователю.
@RequestMapping("api/person")
@RequiredArgsConstructor
public class PersonController {

    private final PersonService personService;

    @GetMapping
    public ResponseEntity<Person> getByLogin(@RequestParam("login") String login) {
        return ResponseEntity.ok(personService.getByLoginOrThrown(login));
    }

    @ExceptionHandler(NotFoundException.class)
    public ResponseEntity<ErrorMessage> handleException(NotFoundException exception) {
        return ResponseEntity
                .status(HttpStatus.NOT_FOUND)
                .body(new ErrorMessage(exception.getMessage()));
    }

}
Вызываем повторно наш метод и видим, что мы стали получать понятное описание ошибки.

Но теперь вернулся 200 http код, куда корректнее вернуть 404 код.
Однако некоторые разработчики предпочитают возвращать объект, вместо ResponseEntity<T>. Тогда вам необходимо воспользоваться аннотацией @ResponseStatus.
    import org.springframework.web.bind.annotation.ResponseStatus;

    @ResponseStatus(HttpStatus.NOT_FOUND)
    @ExceptionHandler(NotFoundException.class)
    public ErrorMessage handleException(NotFoundException exception) {
        return new ErrorMessage(exception.getMessage());
    }
Если попробовать совместить ResponseEntity<T> и @ResponseStatus, http-код будет взят из ResponseEntity<T>.
Главный недостаток @ExceptionHandler в том, что он определяется для каждого контроллера отдельно. Обычно намного проще обрабатывать все исключения в одном месте.
Хотя это ограничение можно обойти если @ExceptionHandler будет определен в базовом классе, от которого будут наследоваться все контроллеры в приложении, но такой подход не всегда возможен, особенно если перед нами старое приложение с большим количеством легаси.
HandlerExceptionResolver
Как мы знаем в программировании магии нет, какой механизм задействуется, чтобы перехватывать исключения?
Интерфейс HandlerExceptionResolver является общим для обработчиков исключений в Spring. Все исключений выброшенные в приложении будут обработаны одним из подклассов HandlerExceptionResolver. Можно сделать как свою собственную реализацию данного интерфейса, так и использовать существующие реализации, которые предоставляет нам Spring из коробки.
Давайте разберем стандартные для начала:
ExceptionHandlerExceptionResolver — этот резолвер является частью механизма обработки исключений помеченных аннотацией @ExceptionHandler, которую мы рассмотрели выше.
DefaultHandlerExceptionResolver — используется для обработки стандартных исключений Spring и устанавливает соответствующий код ответа, в зависимости от типа исключения:
| Exception | HTTP Status Code |
|---|---|
| BindException | 400 (Bad Request) |
| ConversionNotSupportedException | 500 (Internal Server Error) |
| HttpMediaTypeNotAcceptableException | 406 (Not Acceptable) |
| HttpMediaTypeNotSupportedException | 415 (Unsupported Media Type) |
| HttpMessageNotReadableException | 400 (Bad Request) |
| HttpMessageNotWritableException | 500 (Internal Server Error) |
| HttpRequestMethodNotSupportedException | 405 (Method Not Allowed) |
| MethodArgumentNotValidException | 400 (Bad Request) |
| MissingServletRequestParameterException | 400 (Bad Request) |
| MissingServletRequestPartException | 400 (Bad Request) |
| NoSuchRequestHandlingMethodException | 404 (Not Found) |
| TypeMismatchException | 400 (Bad Request) |
Мы можем создать собственный HandlerExceptionResolver. Назовем его CustomExceptionResolver и вот как он будет выглядеть:
package dev.struchkov.example.controlleradvice.service;

import dev.struchkov.example.controlleradvice.exception.NotFoundException;
import org.springframework.http.HttpStatus;
import org.springframework.stereotype.Component;
import org.springframework.web.servlet.ModelAndView;
import org.springframework.web.servlet.handler.AbstractHandlerExceptionResolver;
import org.springframework.web.servlet.view.json.MappingJackson2JsonView;

import javax.servlet.http.HttpServletRequest;
import javax.servlet.http.HttpServletResponse;

@Component
public class CustomExceptionResolver extends AbstractHandlerExceptionResolver {

    @Override
    protected ModelAndView doResolveException(HttpServletRequest request, HttpServletResponse response, Object handler, Exception e) {
        final ModelAndView modelAndView = new ModelAndView(new MappingJackson2JsonView());
        if (e instanceof NotFoundException) {
            modelAndView.setStatus(HttpStatus.NOT_FOUND);
            modelAndView.addObject("message", "Пользователь не найден");
            return modelAndView;
        }
        modelAndView.setStatus(HttpStatus.INTERNAL_SERVER_ERROR);
        modelAndView.addObject("message", "При выполнении запроса произошла ошибка");
        return modelAndView;
    }

}
Мы создаем объект представления – ModelAndView, который будет отправлен пользователю, и заполняем его. Для этого проверяем тип исключения, после чего добавляем в представление сообщение о конкретной ошибке и возвращаем представление из метода. Если ошибка имеет какой-то другой тип, который мы не предусмотрели в этом обработчике, то мы отправляем сообщение об ошибке при выполнении запроса.
Так как мы пометили этот класс аннотацией @Component, Spring сам найдет и внедрит наш резолвер куда нужно. Посмотрим, как Spring хранит эти резолверы в классе DispatcherServlet.

Все резолверы хранятся в обычном ArrayList и в случае исключнеия вызываются по порядку, при этом наш резолвер оказался последним. Таким образом, если непосредственно в контроллере окажется @ExceptionHandler обработчик, то наш кастомный резолвер не будет вызван, так как обработка будет выполнена в ExceptionHandlerExceptionResolver.
Важное замечание. У меня не получилось перехватить здесь ни одно Spring исключение, например MethodArgumentTypeMismatchException, которое возникает если передавать неверный тип для аргументов @RequestParam.
Этот способ был показан больше для образовательных целей, чтобы показать в общих чертах, как работает этот механизм. Не стоит использовать этот способ, так как есть вариант намного удобнее.
@RestControllerAdvice
Исключения возникают в разных сервисах приложения, но удобнее всего обрабатывать все исключения в каком-то одном месте. Именно для этого в SpringBoot предназначены аннотации @ControllerAdvice и @RestControllerAdvice. В статье мы рассмотрим @RestControllerAdvice, так как у нас REST API.
На самом деле все довольно просто. Мы берем методы помеченные аннотацией @ExceptionHandler, которые у нас были в контроллерах и переносим в отдельный класс аннотированный @RestControllerAdvice.
package dev.struchkov.example.controlleradvice.controller;

import dev.struchkov.example.controlleradvice.domain.ErrorMessage;
import dev.struchkov.example.controlleradvice.exception.NotFoundException;
import org.springframework.http.HttpStatus;
import org.springframework.http.ResponseEntity;
import org.springframework.web.bind.annotation.ExceptionHandler;
import org.springframework.web.bind.annotation.RestControllerAdvice;
import org.springframework.web.method.annotation.MethodArgumentTypeMismatchException;

@RestControllerAdvice
public class ExceptionApiHandler {

    @ExceptionHandler(NotFoundException.class)
    public ResponseEntity<ErrorMessage> notFoundException(NotFoundException exception) {
        return ResponseEntity
                .status(HttpStatus.NOT_FOUND)
                .body(new ErrorMessage(exception.getMessage()));
    }

    @ExceptionHandler(MethodArgumentTypeMismatchException.class)
    public ResponseEntity<ErrorMessage> mismatchException(MethodArgumentTypeMismatchException exception) {
        return ResponseEntity
                .status(HttpStatus.NOT_FOUND)
                .body(new ErrorMessage(exception.getMessage()));
    }

}
За обработку этих методов класса точно также отвечает класс ExceptionHandlerExceptionResolver. При этом мы можем здесь перехватывать даже стандартные исключения Spring, такие как MethodArgumentTypeMismatchException.
На мой взгляд, это самый удобный и простой способ обработки возвращаемых пользователю исключений.
Еще про обработку
Все написанное дальше относится к любому способу обработки исключений.
Запись в лог
Важно отметить, что исключения больше не записываются в лог. Если помимо ответа пользователю, вам все же необходимо записать это событие в лог, то необходимо добавить строчку записи в методе обработчике, например вот так:
@ExceptionHandler(NotFoundException.class)
public ResponseEntity<ErrorMessage> handleException(NotFoundException exception) {
    log.error(exception.getMessage(), exception);
    return ResponseEntity
            .status(HttpStatus.NOT_FOUND)
            .body(new ErrorMessage(exception.getMessage()));
}
Перекрытие исключений
Вы можете использовать иерархию исключений с наследованием и обработчики исключений для всей своей иерархии. В таком случае обработка исключения будет попадать в самый специализированный обработчик.
Допустим мы бросаем NotFoundException, как в примере выше, который наследуется от RuntimeException. И у вас будет два обработчика исключений для NotFoundException и RuntimeException. Исключение попадет в обработчик для NotFoundException. Если этот обработчик убрать, то попадет в обработчик для RuntimeException.
Резюмирую
Обработка исключений это важная часть REST API. Она позволяет возвращать клиентам информационные сообщения, которые помогут им скорректировать свой запрос.
Мы можем по разному реализовать обработку в зависимости от нашей архитектуры. Предпочитаемым способом считаю вариант с @RestControllerAdvice. Этот вариант самый чистый и понятный.
TL/DR: Let’s take a look at everything required to build custom error handling logic in both Spring Boot Web and Spring Boot Security
REST applications developed in Spring Boot automatically take advantage of its default error handling logic. Specifically, whenever an error occurs, a default response containing some information is returned. The problem is that this information may be poor or insufficient for the API callers to deal with the error properly. This is why implementing custom error handling logic is such a common and desirable task. Achieving it requires more effort than you might think, and you need to delve into a few essential Spring Boot notions. Let’s see everything required to get started with custom error handling in Spring Boot and Java.
Prerequisites
This is the list of all the prerequisites for following the article:
- Java >= 1.8 (Java >= 13 recommended)
- Spring Boot >= 2.5
- Spring Boot Starter Web >= 2.5
- Spring Security >= 5.5
- Project Lombok >= 1.18
- Gradle >= 4.x or Maven 3.6.x
Default Error Handling in Spring Boot
By default, Spring Boot offers a fallback error-handling page, as well as an error-handling response in case of REST requests. Particularly, Spring Boot looks for a mapping for the /error endpoint during the start-up. This mapping depends on what is set on a ViewResolver class. When no valid mappings can be found, Spring Boot automatically configures a default fallback error page. This so-called Whitelabel Error Page is nothing more than a white HTML page containing the HTTP status code and a vague error message. This is what such a page looks like:
<html>
   <head></head>
   <body data-new-gr-c-s-check-loaded="14.1026.0" data-gr-ext-installed="">
      <h1>Whitelabel Error Page</h1>
      <p>This application has no explicit mapping for /error, so you are seeing this as a fallback.</p>
      <div id="created">Sun Aug 15 14:32:17 UTC 2021</div>
      <div>There was an unexpected error (type=Internal Server Error, status=500).</div>
      <div></div>
   </body>
</html>
This is what the Whitelabel HTML page looks like in your browser:

The Spring Boot Whitelabel HTML Error Page
Similarly, when dealing with REST requests, Spring Boot automatically returns a default JSON response in case of errors. This contains the same information as the aforementioned Whitelabel HTML error page and looks as follows:
{
  "timestamp": "2021-15-08T14:32:17.947+0000",
  "status": 500,
  "error": "Internal Server Error",
  "path": "/test"
}
As you can see, the default Spring Boot error handling responses for REST does not provide much information. This can quickly become a problem, especially when trying to debug. It is also problematic for front-end developers, who need detailed information coming from API error response messages to be able to explain to the end users what happened properly.
Let’s see how to replace this default response with custom-defined messages. While this may appear like an easy task, this is actually a tricky one. To achieve it, you first need to know a few Spring Boot fundamentals. Let’s learn more about them.
Custom Error Handling in Spring Boot
You are about to see two different approaches to custom error handling in Spring Boot REST applications. Both are based on a @ControllerAdvice annotated class handling all exceptions that may occur. So, let’s first see what a @ControllerAdvice annotated class is, why to use it, how, and when. Then, you will learn how to implement the two different approaches in detail. Finally, the pros and cons of each method will be explained.
Handling Exceptions with @ControllerAdvice
The @ControllerAdvice annotation was introduced in Spring 3.2 to make exception handling logic easier and entirely definable in one place. In fact, @ControllerAdvice allows you to address exception handling across the whole application. In other words, a single @ControllerAdvice annotated class can handle exceptions thrown from any place in your application. Thus, classes annotated with @ControllerAdvice are powerful and flexible tools. Not only do they allow you to centralize exception-handling logic into a global component, but also give you control over the body response, as well as the HTTP status code. This is especially important when trying to achieve custom error handling. Let’s see @ControllerAdvice in action.
Now, you are about to see everything required to implement two custom error handling approaches based on @ControllerAdvice. First, you should clone the GitHub repository supporting this article. By analyzing the codebase, going through this article will become easier. Also, you will be able to immediately see the two approaches in action.
So, clone the repository with the following command:
git clone https://github.com/Tonel/spring-boot-custom-error-handlingThen, run the DemoApplication main class by following this guide from the Spring Boot official documentation, and reach one of the following 4 endpoints to see the custom error handling responses:
http://localhost:8080/test-custom-data-not-found-exceptionhttp://localhost:8080/test-custom-parameter-constraint-exception?value=12http://localhost:8080/test-custom-error-exceptionhttp://localhost:8080/test-generic-exception
The first two APIs apply the first approach to error handling you are about to see, while the third API uses the second approach. The fourth and last API shows the fallback error handling logic presented above in action. Now, let’s delve into implementing these two approaches to custom error handling in Spring Boot.
Both of them rely on an ErrorMessage class representing the custom error body placed in an error package, containing everything needed to deal with custom error handling logic. This can be implemented as follows:
// src/main/java/com/customerrorhandling/demo/errors/ErrorResponse.java

package com.customerrorhandling.demo.errors;

import com.fasterxml.jackson.annotation.JsonFormat;
import lombok.Getter;
import lombok.Setter;
import org.springframework.http.HttpStatus;
import java.util.Date;

@Getter
@Setter
public class ErrorResponse {
    // customizing timestamp serialization format
    @JsonFormat(shape = JsonFormat.Shape.STRING, pattern = "dd-MM-yyyy hh:mm:ss")
    private Date timestamp;

    private int code;

    private String status;

    private String message;

    private String stackTrace;

    private Object data;

    public ErrorResponse() {
        timestamp = new Date();
    }

    public ErrorResponse(
            HttpStatus httpStatus,
            String message
    ) {
        this();

        this.code = httpStatus.value();
        this.status = httpStatus.name();
        this.message = message;
    }

    public ErrorResponse(
            HttpStatus httpStatus,
            String message,
            String stackTrace
    ) {
        this(
                httpStatus,
                message
        );

        this.stackTrace = stackTrace;
    }

    public ErrorResponse(
            HttpStatus httpStatus,
            String message,
        String stackTrace,
            Object data
    ) {
        this(
                httpStatus,
                message,
        stackTrace
        );

        this.data = data;
    }
}
The @Getter and @Setter annotations used in the code examples above are part of the Project Lombok. They are used to automatically generate getters and setters. This is not mandatory and is just an additional way to avoid boilerplate code. Read this article to find out more about Lombok.
ErrorResponse carries information such as an HTTP status code and name, a timestamp indicating when the error occurred, an optional error message, an optional exception stacktrace, and an optional object containing any kind of data. You should try to provide values to the first three fields, while the latter should be used only when required. In particular, the stackTrace field should be valorized only in staging or development environments, as explained here. Similarly, the data field should be used only when additional data is required. Specifically, to explain in detail what happened or let the front-end better handle the error.
This class can be used to achieve a custom response when handling exceptions with @ControllerAdvice as below:
// src/main/java/com/customerrorhandling/demo/errors/CustomControllerAdvice.java

package com.customerrorhandling.demo.errors;

import exceptions.CustomDataNotFoundException;
import exceptions.CustomErrorException;
import exceptions.CustomParameterConstraintException;
import org.springframework.http.HttpStatus;
import org.springframework.http.ResponseEntity;
import org.springframework.web.bind.annotation.ControllerAdvice;
import org.springframework.web.bind.annotation.ExceptionHandler;
import java.io.PrintWriter;
import java.io.StringWriter;

@ControllerAdvice
class CustomControllerAdvice {
    @ExceptionHandler(NullPointerException.class) // exception handled
    public ResponseEntity<ErrorResponse> handleNullPointerExceptions(
        Exception e
    ) {
        // ... potential custom logic

        HttpStatus status = HttpStatus.NOT_FOUND; // 404

        return new ResponseEntity<>(
            new ErrorResponse(
              status,
              e.getMessage()
            ),
            status
        );
    }

    // fallback method
    @ExceptionHandler(Exception.class) // exception handled
    public ResponseEntity<ErrorResponse> handleExceptions(
        Exception e
    ) {
        // ... potential custom logic

        HttpStatus status = HttpStatus.INTERNAL_SERVER_ERROR; // 500

    // converting the stack trace to String
    StringWriter stringWriter = new StringWriter();
    PrintWriter printWriter = new PrintWriter(stringWriter);
    e.printStackTrace(printWriter);
    String stackTrace = stringWriter.toString();

        return new ResponseEntity<>(
            new ErrorResponse(
              status,
              e.getMessage(),
              stackTrace // specifying the stack trace in case of 500s
            ),
            status
        );
    }
}
As you can see, @ControllerAdvice works by employing the @ExceptionHandler method-level annotation. This annotation allows you to define which method should be called in case of an error. Specifically, the exception thrown is compared to the exceptions passed as parameters to @ExceptionHandler based on type. The first method where there is a match is called. If none matched, then the exception’s parent class is tested, and so on. This is also why you should implement a fallback method to cover all remaining cases. You can achieve this by passing the Exception class to the @ExceptionHandler annotation, just like in the handleExceptions method. In fact, any exception in Java must have Exception as one of its ancestors in their inheritance chain. So, they all extend directly — or as subclasses — the Exception superclass.
Then, each method handles the error and might even implement custom logic, such as logging. In this example, each exception is handled by returning a ResponseEntity having the desired HttpStatus. This will be used as an HTTP status code associated with the error response. Similarly, the ErrorResponse instance passed to the ResponseEntity constructor will be automatically serialized in JSON and used as the message body. This way, custom error handling has just been achieved.
Now, you will dive into how to use @ConfrollerAdvice to implement two different approaches to custom error handling for REST in Spring Boot Web. The first one involves boilerplate code, but it is clean and best-practice based. In contrast, the second represents a good solution in terms of convenience, although it is a bit dirty.
Defining Many Custom Exceptions
This approach involves having as many methods in your @ControllerAdvice as many HTTP error status codes you want to handle. These methods will be related to one or more exceptions and return an error message with a particular HTTP status code. Implementing such an approach required three steps. First, you have to think about all the HTTP error status codes you want your application to return. Then, you have to define a method for each of them in your @ControllerAdvice annotated class. Lastly, you have to associate these methods with their exceptions with the @ExceptionHandler annotation.
This means that all exceptions of a particular type will be traced back to their relative method in the @ControllerAdvice annotated class. This may represent a problem, especially considering some exceptions are more common than others, such as NullPointerException. Since these exceptions can be thrown in many parts of your logic, they might have different meanings. Thus, they represent various errors and, therefore, other HTTP status codes.
The solution is to introduce new custom exceptions wrapping these frequent exceptions. For example, a NullPointerException can become a CustomParameterConstraintException exception at the controller layer, and a CustomDataNotFoundException at the DAO (Data Access Object) layer. In this case, the first one can be associated with a 400 Bad Request, and the second with a 404 Not Found HTTP status. The idea behind these exceptions is to give the error that occurred a more specific meaning. This better characterizes the error and makes it more handleable in the @ControllerAdvice annotated class accordingly. So, you should define a custom exception for each particular error you want to handle. Also, using custom exception classes represents undoubtedly a clean code principle. Thus, by adopting it, you are going to have more than one benefit.
So, let’s see this approach in action through an example. Firstly, you have to define custom exceptions, as shown here:
// src/main/java/exceptions/CustomParameterConstraintException.java

package exceptions;

public class CustomParameterConstraintException extends RuntimeException {
    public CustomParameterConstraintException() {
        super();
    }

    public CustomParameterConstraintException(String message) {
        super(message);
    }
}
// src/main/java/exceptions/CustomDataNotFoundException.java
package exceptions;
public class CustomDataNotFoundException extends RuntimeException {
public CustomDataNotFoundException() {
super();
}
public CustomDataNotFoundException(String message) {
super(message);
}
}Then, use them to wrap frequent exceptions, or to throw them in case of particular circumstances representing errors in your business logic. Let’s see how with two examples:
// DAO-level method
public Foo retrieveFooById(
    int id
) {
    try {
        // data retrieving logic
    } catch (NullPointerException e) {
        throw new CustomDataNotFoundException(e.getMessage());
    }
}
As shown above, a generic NullPointerException is turned into a more meaningful CustomDataNotFoundException.
// controller-level method method
public ResponseEntity<Void> performOperation(
    int numberOfAttempts
) {
    if (numberOfAttempts <= 0 || numberOfAttempts >= 5)
        throw new CustomParameterConstraintException("numberOfAttempts must be >= 0 and <= 5!");

    // business logic
}
Here, a particular behavior that should not happen is intercepted. Then, the custom CustomParameterConstraintException exception describing it is thrown.
Finally, all you have to do is add two particular methods to your @ControllerAdvice annotated class, one for each specific error.
// src/main/java/com/customerrorhandling/demo/errors/CustomControllerAdvice.java

package com.customerrorhandling.demo.errors;

import exceptions.CustomDataNotFoundException;
import exceptions.CustomErrorException;
import exceptions.CustomParameterConstraintException;
import org.springframework.http.HttpStatus;
import org.springframework.http.ResponseEntity;
import org.springframework.web.bind.annotation.ControllerAdvice;
import org.springframework.web.bind.annotation.ExceptionHandler;
import java.io.PrintWriter;
import java.io.StringWriter;

@ControllerAdvice
class CustomControllerAdvice {
    // ...

    @ExceptionHandler(CustomDataNotFoundException.class)
    public ResponseEntity<ErrorResponse> handleCustomDataNotFoundExceptions(
        Exception e
    ) {
        HttpStatus status = HttpStatus.NOT_FOUND; // 404

    // converting the stack trace to String
    StringWriter stringWriter = new StringWriter();
    PrintWriter printWriter = new PrintWriter(stringWriter);
    e.printStackTrace(printWriter);
    String stackTrace = stringWriter.toString();

        return new ResponseEntity<>(
            new ErrorResponse(
              status,
              e.getMessage(),
          stackTrace, // assuming to be in staging environment, otherwise stackTrace should not be valorized
            ),
            status
        );
    }

    @ExceptionHandler(CustomParameterConstraintException.class)
    public ResponseEntity<ErrorResponse> handleCustomParameterConstraintExceptions(
        Exception e
    ) {
        HttpStatus status = HttpStatus.BAD_REQUEST; // 400

        return new ResponseEntity<>(
            new ErrorResponse(
              status,
              e.getMessage()
            ),
            status
        );
    }

    // ...
}
Et voilà! Both errors originally related to the same exception were first characterized and then handled accordingly.
Now, let’s see the difference. This is what the default error response would look like on a 404 error:
{
  "timestamp": "2021-15-08T14:32:17.947+0000",
  "status": 404,
  "error": "Not Found",
  "path": "/test404"
}
And this is what the custom error response just implemented looks like:
{
  "timestamp": "2021-15-08 14:32:17",
  "code": 404,
  "status": "NOT_FOUND",
  "message": "Resource not found",
  "stackTrace": "Exception in thread "main" com.example.demo.exceptions.CustomDataNotFoundException
        at com.example.demo.AuthorController.getAuthor(AuthorController.java:16)
        at com.example.demo.AuthorService.getAuthor(AuthorService.java:37)
        at com.example.demo.AuthorDao.getById(AuthorDao.java:24)"
}
Defining a Single Custom Exception Carrying All Data
This approach involves defining a custom exception carrying the HTTP status to use, and all the data required to describe the error that occurred. The idea is to turn every exception you want to handle, or you would like to throw under special circumstances, into an instance of this particular exception. This way, you are spreading the error characterization logic into all your code. So, you will only have to add a new method in your @ControllerAdvice annotated class to handle this custom exception accordingly.
First, you have to define a custom error handling exception. This can be achieved as follows:
// src/main/java/exceptions/CustomErrorException.java

package exceptions;

import lombok.Getter;
import lombok.Setter;
import org.springframework.http.HttpStatus;

@Getter
@Setter
public class CustomErrorException extends RuntimeException {
    private HttpStatus status = null;

    private Object data = null;

    public CustomErrorException() {
      super();
    }

   public CustomErrorException(
      String message
   ) {
      super(message);
   }

    public CustomErrorException(
        HttpStatus status,
        String message
    ) {
        this(message);
        this.status = status;
    }

    public CustomErrorException(
        HttpStatus status,
        String message,
        Object data
    ) {
        this(
          status,
      message
        );
        this.data = data;
    }
}
Again, the @Getter and @Setter annotations were used to avoid boilerplate code and are not mandatory. As you can see, the CustomErrorException class carries the same data used in the ErrorResponse class to better describe what happened and present the errors to the end-users.
So, you can use this exception to wrap other exceptions, or you can throw it in case of particular circumstances constituting errors in your business logic. Now, let’s see how with two examples:
// DAO-level method
public Foo retrieveFooById(
    int id
) {
    try {
        // data retrieving logic
    } catch (NullPointerException e) {
        throw new CustomErrorException(
          HttpStatus.NOT_FOUND,
          e.getMessage(),
          (Integer) id
        );
    }
}
Here, an insufficiently significant NullPointerException is turned into a more detailed CustomErrorException containing all the data to describe why the error occurred.
// controller-level method method
public ResponseEntity<Void> performOperation(
    int numberOfAttempts
) {
    if (numberOfAttempts <= 0 || numberOfAttempts >= 5) {
        throw new CustomErrorException(
          HttpStatus.BAD_REQUEST,
          "numberOfAttempts must be >= 0 and <= 5!",
          (Integer) numberOfAttempts
        );
    }

    // business logic
}
Similarly, a particular behavior that is not supposed to happen is intercepted. Consequently, a CustomErrorException exception containing all the useful data to represent the error is thrown.
Lastly, add one method to handle CustomErrorException exception instances to your @ControllerAdvice annotated class, as below:
// src/main/java/com/customerrorhandling/demo/errors/CustomControllerAdvice.java

package com.customerrorhandling.demo.errors;

import exceptions.CustomDataNotFoundException;
import exceptions.CustomErrorException;
import exceptions.CustomParameterConstraintException;
import org.springframework.http.HttpStatus;
import org.springframework.http.ResponseEntity;
import org.springframework.web.bind.annotation.ControllerAdvice;
import org.springframework.web.bind.annotation.ExceptionHandler;
import java.io.PrintWriter;
import java.io.StringWriter;

@ControllerAdvice
class CustomControllerAdvice {
    // ...

    @ExceptionHandler(CustomErrorException.class)
    public ResponseEntity<ErrorResponse> handleCustomErrorExceptions(
            Exception e
    ) {
        // casting the generic Exception e to CustomErrorException
        CustomErrorException customErrorException = (CustomErrorException) e;

        HttpStatus status = customErrorException.getStatus();

        // converting the stack trace to String
        StringWriter stringWriter = new StringWriter();
        PrintWriter printWriter = new PrintWriter(stringWriter);
        customErrorException.printStackTrace(printWriter);
        String stackTrace = stringWriter.toString();

        return new ResponseEntity<>(
                new ErrorResponse(
                        status,
                        customErrorException.getMessage(),
                        stackTrace,
                        customErrorException.getData()
                ),
                status
        );
    }

    // ...
}
Note that @ExceptionHandler can accept more than one exception type. This means that the parameter of the method representing the exception must be downcasted. Otherwise, a ClassCastException will be throw. So, upcast the exception e to CustomErrorException inside the method. Then, you will be able to access its particular fields and define a valid ErrorResponse instance.
Done! This way each error that occurs is encapsulated into an exception containing everything required to describe it.
Now, let’s see the difference. This is what the default error response on a 404 error would look like:
{
  "timestamp": "2021-15-08T14:32:17.947+0000",
  "status": 404,
  "error": "Not Found",
  "message": "",
  "path": "/test404"
}
And this is what the custom error response just implemented looks like:
{
  "timestamp": "2021-15-08 14:32:17",
  "code": 404,
  "status": "NOT_FOUND",
  "message": "Resource not found",
  "stackTrace": "Exception in thread "main" com.example.demo.exceptions.CustomErrorException
        at com.example.demo.AuthorController.getAuthor(AuthorController.java:16)
        at com.example.demo.AuthorService.getAuthor(AuthorService.java:37)
        at com.example.demo.AuthorDao.getById(AuthorDao.java:24)"
}
Pros and Cons of Each Approach
The first approach should be used when you do not want to spread error handling logic all over your codebase. In fact, the HTTP status code is only associated with errors in your @ControllerAdvice annotated class. This means that no layer knows how the error will be handled and presented to users. Although this should be the desired behavior because it respects the principle of least privilege, it does involve boilerplate code. In fact, you may easily end up with dozens of custom exceptions, and define them is a tedious and not-scalable approach.
So, you may want a less restricting approach, and this is why the second approach was presented. Unfortunately, this one is definitely dirtier. In fact, it requires you to spread detail about error handling logic in many different points of your code. In contrast, it is scalable and quicker to be implemented. So, despite not being the cleanest approach, it allows you to achieve the desired result with little effort. Plus, it is more maintainable than the first approach because it involves only a custom exception.
Custom Error Handling in Spring Security
Spring Security is a powerful and highly customizable framework that provides both authentication and authorization. It is one of the most widely used Spring dependencies and represents the de-facto standard for securing a Spring Boot application.
In case of authentication and authorization failures, AuthenticationException and AccessDeniedException are thrown respectively. Then, Spring Security takes care of encapsulating them in default error handling responses. If you want to customize them, the two approaches presented above are of no use. This is because @ControllerAdvice can handle only exceptions thrown by controllers, but AuthenticationException and AccessDeniedException are thrown by the Spring Security AbstractSecurityInterceptor component — which is not a controller. In other words, a @ControllerAdvice annotated class cannot catch them. Achieving this requires custom logic.
Implementing Custom Error Handling Logic in Spring Security
Let’s take a look at how to implement custom error handling in Spring Security. Luckily, this is not too complex since you can easily provide Spring Security with two components to handle authentication and authorization errors, respectively. What you need to do is to provide the AuthenticationFailureHandler interface with implementation, as follows:
// src/main/java/com/auth0/hotsauces/security/CustomAuthenticationFailureHandler.java

package com.auth0.hotsauces.security;

import com.fasterxml.jackson.annotation.JsonFormat;
import com.fasterxml.jackson.databind.ObjectMapper;
import org.springframework.http.HttpStatus;
import org.springframework.security.core.AuthenticationException;
import org.springframework.security.web.authentication.AuthenticationFailureHandler;
import java.util.*;
import javax.servlet.http.HttpServletRequest;
import javax.servlet.http.HttpServletResponse;
import java.util.HashMap;

public class CustomAuthenticationFailureHandler implements AuthenticationFailureHandler {
    // Jackson JSON serializer instance
    private ObjectMapper objectMapper = new ObjectMapper();

    @Override
    public void onAuthenticationFailure(
      HttpServletRequest request,
      HttpServletResponse response,
      AuthenticationException exception
    ) throws IOException, ServletException {
        HttpStatus httpStatus = HttpStatus.UNAUTHORIZED; // 401

        Map<String, Object> data = new HashMap<>();
        data.put(
          "timestamp",
          new Date()
        );
        data.put(
          "code",
          httpStatus.value();
        );
        data.put(
          "status",
          httpStatus.name();
        );
        data.put(
          "message",
          exception.getMessage()
        );

        // setting the response HTTP status code
        response.setStatus(httpStatus.value());

        // serializing the response body in JSON
        response
          .getOutputStream()
          .println(
              objectMapper.writeValueAsString(data)
          );
    }
}
This will be used to handle AuthenticationExceptions.
Similarly, you can provide the AccessDeniedHandler interface with implementation to handle AccessDeniedExceptions.
// src/main/java/com/auth0/hotsauces/security/CustomAccessDeniedHandler.java

package com.auth0.hotsauces.security;

import com.fasterxml.jackson.annotation.JsonFormat;
import com.fasterxml.jackson.databind.ObjectMapper;
import org.springframework.http.HttpStatus;
import org.springframework.security.core.AuthenticationException;
import org.springframework.security.web.authentication.AuthenticationFailureHandler;
import java.util.*;
import javax.servlet.http.HttpServletRequest;
import javax.servlet.http.HttpServletResponse;
import java.util.HashMap;

public class CustomAccessDeniedHandler implements AccessDeniedHandler {
    // Jackson JSON serializer instance
    private ObjectMapper objectMapper = new ObjectMapper();

    @Override
    public void handle(
      HttpServletRequest request,
      HttpServletResponse response,
      AccessDeniedException exception
    ) throws IOException, ServletException {
        HttpStatus httpStatus = HttpStatus.FORBIDDEN; // 403

        Map<String, Object> data = new HashMap<>();
        data.put(
          "timestamp",
          new Date()
        );
        data.put(
          "code",
          httpStatus.value();
        );
        data.put(
          "status",
          httpStatus.name();
        );
        data.put(
          "message",
          exception.getMessage()
        );

        // setting the response HTTP status code
        response.setStatus(httpStatus.value());

        // serializing the response body in JSON
        response
          .getOutputStream()
          .println(
              objectMapper.writeValueAsString(data)
          );
    }
}
Now, you just need to register these two custom implementations as authentication and authorization error handlers. You can do this as below:
// src/main/java/com/auth0/hotsauces/security/SecurityConfig.java

package com.auth0.hotsauces.security;

import org.springframework.beans.factory.annotation.Value;
import org.springframework.context.annotation.Bean;
import org.springframework.security.config.annotation.web.builders.HttpSecurity;
import org.springframework.security.config.annotation.web.configuration.EnableWebSecurity;
import org.springframework.security.config.annotation.web.configuration.WebSecurityConfigurerAdapter;
import org.springframework.security.oauth2.core.DelegatingOAuth2TokenValidator;
import org.springframework.security.oauth2.core.OAuth2TokenValidator;
import org.springframework.security.oauth2.jwt.*;
import org.springframework.security.oauth2.server.resource.web.BearerTokenAuthenticationFilter;
import org.springframework.security.web.access.AccessDeniedHandler;
import org.springframework.security.web.authentication.AuthenticationFailureHandler;

@EnableWebSecurity
public class SecurityConfig extends WebSecurityConfigurerAdapter {
    // ...

    @Override
    protected void configure(HttpSecurity http)
      throws Exception {
        http
          .authorizeRequests()
          .anyRequest()
          .authenticated()
          .and()
          .formLogin()
          .failureHandler(authenticationFailureHandler())
          .and()
          .exceptionHandling()
          .accessDeniedHandler(accessDeniedHandler());
    }

    @Bean
    public AuthenticationFailureHandler authenticationFailureHandler() {
        return new CustomAuthenticationFailureHandler();
    }

    @Bean
    public AccessDeniedHandler accessDeniedHandler() {
        return new CustomAccessDeniedHandler();
    }
}
Et voilà! Custom error handling in Spring Boot has just been achieved thanks to the failureHandler and accessDeniedHandler methods, which allows you to register a custom authentication error handler and a custom authorization error handler.
Spring Security Custom Error Handling in Action
Now, let’s see how to implement it in a real-world example. First, read this article on how to protect APIs with Spring Security and Auth0. In the demo application produced in that article, no custom error handling is implemented. So, by making a request to a protected API including a wrong access token, the default Spring Boot error handling logic is applied. Let’s test it out.
If you are a macOS or Linux user, enter this command into the terminal:
curl -i --request GET
     --url http://localhost:8080/api/hotsauces/
     -H "Content-Type: application/json"
     -H "authorization: Bearer wrong-token"
Otherwise, if you are a Windows user, enter this command into PowerShell:
$accessToken = "wrong-token"
$headers = @{
    Authorization = "Bearer $accessToken"
}
$response = Invoke-RestMethod "http://localhost:8080/api/hotsauces/" `
    -Headers $headers
$response | ConvertTo-Json
Then, the following response will be returned:
Invoke-WebRequest: The remote server returned an error: (401) Unauthorized.
At line:1 char:1
+ Invoke-WebRequest "http://localhost:8080/api/hotsauces/"
+ ~~~~~~~~~~~~~~~~~~~~~~~~~~~~~~~~~~~~~~~~~~~~~~~~~~~~~~~~
+ CategoryInfo          : InvalidOperation: (System.Net.HttpWebRequest:HttpWebRequest) [Invoke-WebRequest], WebExc
   eption
+ FullyQualifiedErrorId : WebCmdletWebResponseException,Microsoft.PowerShell.Commands.InvokeWebRequestCommand
As you can see, a 401 error status code is returned, but with no details on what happened.
Now, let’s test the demo application extended with custom error handling logic. You can find it in this GitHub repository. The application is exactly the same as the previous one, except for the error handling logic. In particular, the aforementioned presented logic was implemented.
In this case, by launching the commands above, this message will be returned:
Invoke-RestMethod : {"code":401,"message":"An error occurred while attempting to decode the Jwt: Invalid JWT serialization: Missing dot delimiter(s)","timestamp":1629880611013,"status":"UNAUTHORIZED"}
At line:1 char:1
+ $response = Invoke-RestMethod "http://localhost:8080/api/hotsauces/"  ...
+ ~~~~~~~~~~~~~~~~~~~~~~~~~~~~~~~~~~~~~~~~~~~~~~~~~~~~~~~~
+ CategoryInfo          : InvalidOperation: (System.Net.HttpWebRequest:HttpWebRequest) [Invoke-WebRequest], WebExc
   eption
+ FullyQualifiedErrorId : WebCmdletWebResponseException,Microsoft.PowerShell.Commands.InvokeWebRequestCommand
As you can see, a JSON message representing the custom error handling logic was returned as expected. This contains the status code, the exception message, a timestamp, and the HTTP status code name, as follows:
{
  "code": 401,
  "message": "An error occurred while attempting to decode the Jwt: Invalid JWT serialization: Missing dot delimiter(s)",
  "timestamp": 1629880611013,
  "status": "UNAUTHORIZED"
}
Conclusion
In this article, we looked at how to implement custom error handling logic when dealing with REST applications in Spring Boot. This is not as easy a task as it may seem, and it requires knowing a few Spring Boot fundamentals. First, we delved into default error handling in Spring Boot and saw how poor the responses are. Then, we looked at @ControllerAdvice and learn everything required to implement custom error handling logic. In particular, two different approaches were shown. Both allow you to define custom error handling responses but have specific pros and cons. Finally, we learned how to achieve the same result when dealing with Spring Boot Security errors, which requires specific logic. As shown, achieving custom error handling in Spring Boot is not easy but definitely possible, and explaining when, why, and how to do it was what this article was aimed at.
Thanks for reading! I hope that you found this article helpful. Feel free to reach out to me with any questions, comments, or suggestions.
Spring Boot is built on the top of the spring and contains all the features of spring. And is becoming a favorite of developers these days because of its rapid production-ready environment which enables the developers to directly focus on the logic instead of struggling with the configuration and setup. Spring Boot is a microservice-based framework and making a production-ready application in it takes very little time. Exception Handling in Spring Boot helps to deal with errors and exceptions present in APIs so as to deliver a robust enterprise application. This article covers various ways in which exceptions can be handled in a Spring Boot Project. Let’s do the initial setup to explore each approach in more depth.
Initial Setup
In order to create a simple spring boot project using Spring Initializer, please refer to this article. Now let’s develop a Spring Boot Restful Webservice that performs CRUD operations on Customer Entity. We will be using MYSQL database for storing all necessary data.
Step 1: Creating a JPA Entity class Customer with three fields id, name, and address.
Java
package com.customer.model;
import javax.persistence.Entity;
import javax.persistence.GeneratedValue;
import javax.persistence.GenerationType;
import javax.persistence.Id;
import lombok.AllArgsConstructor;
import lombok.Data;
import lombok.NoArgsConstructor;
@Entity
@Data
@AllArgsConstructor
@NoArgsConstructor
public class Customer {
@Id
@GeneratedValue(strategy = GenerationType.IDENTITY)
private Long id;
private String name;
private String address;
}
The Customer class is annotated with @Entity annotation and defines getters, setters, and constructors for the fields.
Step 2: Creating a CustomerRepository Interface
Java
package com.customer.repository;
import com.customer.model.Customer;
import org.springframework.data.jpa.repository.JpaRepository;
import org.springframework.stereotype.Repository;
@Repository
public interface CustomerRepository
extends JpaRepository<Customer, Long> {
}
The CustomerRepository interface is annotated with @Repository annotation and extends the JpaRepository of Spring Data JPA.
Step 3: Creating Custom made Exceptions that can be thrown during necessary scenarios while performing CRUD.
CustomerAlreadyExistsException: This exception can be thrown when the user tries to add a customer that already exists in the database.
Java
package com.customer.exception;
public class CustomerAlreadyExistsException
extends RuntimeException {
private String message;
public CustomerAlreadyExistsException() {}
public CustomerAlreadyExistsException(String msg)
{
super(msg);
this.message = msg;
}
}
NoSuchCustomerExistsException: This exception can be thrown when the user tries to delete or update a customer record that doesn’t exist in the database.
Java
package com.customer.exception;
public class NoSuchCustomerExistsException
extends RuntimeException {
private String message;
public NoSuchCustomerExistsException() {}
public NoSuchCustomerExistsException(String msg)
{
super(msg);
this.message = msg;
}
}
Note: Both Custom Exception classes extend RuntimeException.
Step 4: Creating interface CustomerService and implementing class CustomerServiceImpl of service layer.
The CustomerService interface defines three different methods:
- Customer getCustomer(Long id): To get a customer record by its id. This method throws a NoSuchElementException exception when it doesn’t find a customer record with the given id.
- String addCustomer(Customer customer): To add details of a new Customer to the database. This method throws a CustomerAlreadyExistsException exception when the user tries to add a customer that already exists.
- String updateCustomer(Customer customer): To update details of Already existing Customers. This method throws a NoSuchCustomerExistsException exception when the user tries to update details of a customer that doesn’t exist in the database.
The Interface and service implementation class is as follows:
Java
package com.customer.service;
import com.customer.model.Customer;
public interface CustomerService {
Customer getCustomer(Long id);
String addCustomer(Customer customer);
String updateCustomer(Customer customer);
}
Java
package com.customer.service;
import com.customer.exception.CustomerAlreadyExistsException;
import com.customer.exception.NoSuchCustomerExistsException;
import com.customer.model.Customer;
import com.customer.repository.CustomerRepository;
import java.util.NoSuchElementException;
import org.springframework.beans.factory.annotation.Autowired;
import org.springframework.stereotype.Service;
@Service
public class CustomerServiceImpl
implements CustomerService {
@Autowired
private CustomerRepository customerRespository;
public Customer getCustomer(Long id)
{
return customerRespository.findById(id).orElseThrow(
()
-> new NoSuchElementException(
"NO CUSTOMER PRESENT WITH ID = " + id));
}
public String addCustomer(Customer customer)
{
Customer existingCustomer
= customerRespository.findById(customer.getId())
.orElse(null);
if (existingCustomer == null) {
customerRespository.save(customer);
return "Customer added successfully";
}
else
throw new CustomerAlreadyExistsException(
"Customer already exists!!");
}
public String updateCustomer(Customer customer)
{
Customer existingCustomer
= customerRespository.findById(customer.getId())
.orElse(null);
if (existingCustomer == null)
throw new NoSuchCustomerExistsException(
"No Such Customer exists!!");
else {
existingCustomer.setName(customer.getName());
existingCustomer.setAddress(
customer.getAddress());
customerRespository.save(existingCustomer);
return "Record updated Successfully";
}
}
}
Step 5: Creating Rest Controller CustomerController which defines various APIs.
Java
package com.customer.controller;
import com.customer.exception.CustomerAlreadyExistsException;
import com.customer.exception.ErrorResponse;
import com.customer.model.Customer;
import com.customer.service.CustomerService;
import org.springframework.beans.factory.annotation.Autowired;
import org.springframework.http.HttpStatus;
import org.springframework.web.bind.annotation.ExceptionHandler;
import org.springframework.web.bind.annotation.GetMapping;
import org.springframework.web.bind.annotation.PathVariable;
import org.springframework.web.bind.annotation.PostMapping;
import org.springframework.web.bind.annotation.PutMapping;
import org.springframework.web.bind.annotation.RequestBody;
import org.springframework.web.bind.annotation.RequestMapping;
import org.springframework.web.bind.annotation.ResponseStatus;
import org.springframework.web.bind.annotation.RestController;
@RestController
public class CustomerController {
@Autowired private CustomerService customerService;
@GetMapping("/getCustomer/{id}")
public Customer getCustomer(@PathVariable("id") Long id)
{
return customerService.getCustomer(id);
}
@PostMapping("/addCustomer")
public String
addcustomer(@RequestBody Customer customer)
{
return customerService.addCustomer(customer);
}
@PutMapping("/updateCustomer")
public String
updateCustomer(@RequestBody Customer customer)
{
return customerService.updateCustomer(customer);
}
}
Now let’s go through the various ways in which we can handle the Exceptions thrown in this project.
Default Exception Handling by Spring Boot:
The getCustomer() method defined by CustomerController is used to get a customer with a given Id. It throws a NoSuchElementException when it doesn’t find a Customer record with the given id. On Running the Spring Boot Application and hitting the /getCustomer API with an Invalid Customer Id, we get a NoSuchElementException completely handled by Spring Boot as follows:
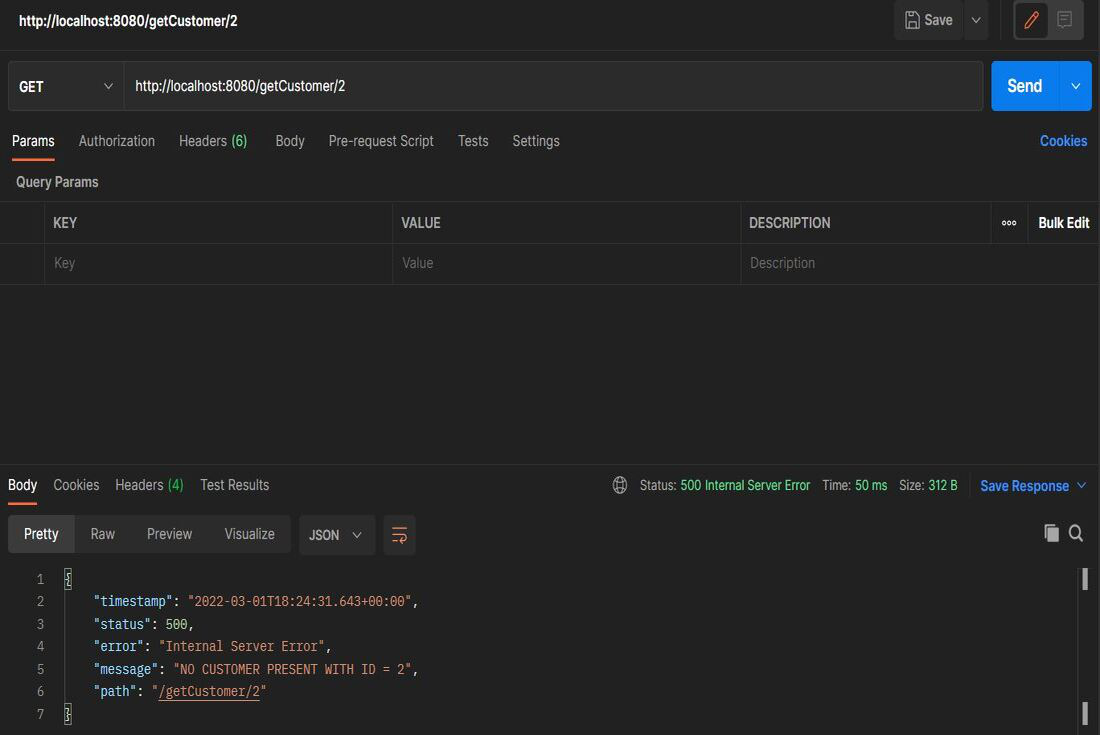
Spring Boot provides a systematic error response to the user with information such as timestamp, HTTP status code, error, message, and the path.
Using Spring Boot @ExceptionHandler Annotation:
@ExceptionHandler annotation provided by Spring Boot can be used to handle exceptions in particular Handler classes or Handler methods. Any method annotated with this is automatically recognized by Spring Configuration as an Exception Handler Method. An Exception Handler method handles all exceptions and their subclasses passed in the argument. It can also be configured to return a specific error response to the user. So let’s create a custom ErrorResponse class so that the exception is conveyed to the user in a clear and concise way as follows:
Java
package com.customer.exception;
import lombok.AllArgsConstructor;
import lombok.Data;
import lombok.NoArgsConstructor;
@Data
@AllArgsConstructor
@NoArgsConstructor
public class ErrorResponse {
private int statusCode;
private String message;
public ErrorResponse(String message)
{
super();
this.message = message;
}
}
The addCustomer() method defined by CustomerController throws a CustomerAlreadyExistsException when the user tries to add a Customer that already exists in the database else it saves the customer details.
To handle this exception let’s define a handler method handleCustomerAlreadyExistsException() in the CustomerController.So now when addCustomer() throws a CustomerAlreadyExistsException, the handler method gets invoked which returns a proper ErrorResponse to the user.
Java
@ExceptionHandler(value
= CustomerAlreadyExistsException.class)
@ResponseStatus(HttpStatus.CONFLICT)
public ErrorResponse
handleCustomerAlreadyExistsException(
CustomerAlreadyExistsException ex)
{
return new ErrorResponse(HttpStatus.CONFLICT.value(),
ex.getMessage());
}
Note: Spring Boot allows to annotate a method with @ResponseStatus to return the required Http Status Code.
On Running the Spring Boot Application and hitting the /addCustomer API with an existing Customer, CustomerAlreadyExistsException gets completely handled by handler method as follows:

Using @ControllerAdvice for Global Exception Handler:
In the previous approach, we can see that the @ExceptionHandler annotated method can only handle the exceptions thrown by that particular class. However, if we want to handle any exception thrown throughout the application we can define a global exception handler class and annotate it with @ControllerAdvice.This annotation helps to integrate multiple exception handlers into a single global unit.
The updateCustomer() method defined in CustomerController throws a NoSuchCustomerExistsException exception if the user tries to update details of a customer that doesn’t already exist in the database else it successfully saves the updated details for that particular customer.
To handle this exception, let’s define a GlobalExceptionHandler class annotated with @ControllerAdvice. This class defines the ExceptionHandler method for NoSuchCustomerExistsException exception as follows.
Java
package com.customer.exception;
import org.springframework.http.HttpStatus;
import org.springframework.web.bind.annotation.ControllerAdvice;
import org.springframework.web.bind.annotation.ExceptionHandler;
import org.springframework.web.bind.annotation.ResponseBody;
import org.springframework.web.bind.annotation.ResponseStatus;
@ControllerAdvice
public class GlobalExceptionHandler {
@ExceptionHandler(value
= NoSuchCustomerExistsException.class)
@ResponseStatus(HttpStatus.BAD_REQUEST)
public @ResponseBody ErrorResponse
handleException(NoSuchCustomerExistsException ex)
{
return new ErrorResponse(
HttpStatus.NOT_FOUND.value(), ex.getMessage());
}
}
On Running the Spring Boot Application and hitting the /updateCustomer API with invalid Customer details, NoSuchCustomerExistsException gets thrown which is completely handled by the handler method defined in GlobalExceptionHandler class as follows:

New answer (2016-04-20)
Using Spring Boot 1.3.1.RELEASE
New Step 1 — It is easy and less intrusive to add the following properties to the application.properties:
spring.mvc.throw-exception-if-no-handler-found=true
spring.resources.add-mappings=false
Much easier than modifying the existing DispatcherServlet instance (as below)! — JO’
If working with a full RESTful Application, it is very important to disable the automatic mapping of static resources since if you are using Spring Boot’s default configuration for handling static resources then the resource handler will be handling the request (it’s ordered last and mapped to /** which means that it picks up any requests that haven’t been handled by any other handler in the application) so the dispatcher servlet doesn’t get a chance to throw an exception.
New Answer (2015-12-04)
Using Spring Boot 1.2.7.RELEASE
New Step 1 — I found a much less intrusive way of setting the «throExceptionIfNoHandlerFound» flag. Replace the DispatcherServlet replacement code below (Step 1) with this in your application initialization class:
@ComponentScan()
@EnableAutoConfiguration
public class MyApplication extends SpringBootServletInitializer {
    private static Logger LOG = LoggerFactory.getLogger(MyApplication.class);
    public static void main(String[] args) {
        ApplicationContext ctx = SpringApplication.run(MyApplication.class, args);
        DispatcherServlet dispatcherServlet = (DispatcherServlet)ctx.getBean("dispatcherServlet");
        dispatcherServlet.setThrowExceptionIfNoHandlerFound(true);
    }
In this case, we’re setting the flag on the existing DispatcherServlet, which preserves any auto-configuration by the Spring Boot framework.
One more thing I’ve found — the @EnableWebMvc annotation is deadly to Spring Boot. Yes, that annotation enables things like being able to catch all the controller exceptions as described below, but it also kills a LOT of the helpful auto-configuration that Spring Boot would normally provide. Use that annotation with extreme caution when you use Spring Boot.
Original Answer:
After a lot more research and following up on the solutions posted here (thanks for the help!) and no small amount of runtime tracing into the Spring code, I finally found a configuration that will handle all Exceptions (not Errors, but read on) including 404s.
Step 1 — tell SpringBoot to stop using MVC for «handler not found» situations. We want Spring to throw an exception instead of returning to the client a view redirect to «/error». To do this, you need to have an entry in one of your configuration classes:
// NEW CODE ABOVE REPLACES THIS! (2015-12-04)
@Configuration
public class MyAppConfig {
    @Bean  // Magic entry
    public DispatcherServlet dispatcherServlet() {
        DispatcherServlet ds = new DispatcherServlet();
        ds.setThrowExceptionIfNoHandlerFound(true);
        return ds;
    }
}
The downside of this is that it replaces the default dispatcher servlet. This hasn’t been a problem for us yet, with no side effects or execution problems showing up. If you’re going to do anything else with the dispatcher servlet for other reasons, this is the place to do them.
Step 2 — Now that spring boot will throw an exception when no handler is found, that exception can be handled with any others in a unified exception handler:
@EnableWebMvc
@ControllerAdvice
public class ServiceExceptionHandler extends ResponseEntityExceptionHandler {

    @ExceptionHandler(Throwable.class)
    @ResponseBody
    ResponseEntity<Object> handleControllerException(HttpServletRequest req, Throwable ex) {
        ErrorResponse errorResponse = new ErrorResponse(ex);
        if(ex instanceof ServiceException) {
            errorResponse.setDetails(((ServiceException)ex).getDetails());
        }
        if(ex instanceof ServiceHttpException) {
            return new ResponseEntity<Object>(errorResponse,((ServiceHttpException)ex).getStatus());
        } else {
            return new ResponseEntity<Object>(errorResponse,HttpStatus.INTERNAL_SERVER_ERROR);
        }
    }

    @Override
    protected ResponseEntity<Object> handleNoHandlerFoundException(NoHandlerFoundException ex, HttpHeaders headers, HttpStatus status, WebRequest request) {
        Map<String,String> responseBody = new HashMap<>();
        responseBody.put("path",request.getContextPath());
        responseBody.put("message","The URL you have reached is not in service at this time (404).");
        return new ResponseEntity<Object>(responseBody,HttpStatus.NOT_FOUND);
    }
    ...
}
Keep in mind that I think the «@EnableWebMvc» annotation is significant here. It seems that none of this works without it. And that’s it — your Spring boot app will now catch all exceptions, including 404s, in the above handler class and you may do with them as you please.
One last point — there doesn’t seem to be a way to get this to catch thrown Errors. I have a wacky idea of using aspects to catch errors and turn them into Exceptions that the above code can then deal with, but I have not yet had time to actually try implementing that.
Any comments/corrections/enhancements will be appreciated.